:max_bytes(150000):strip_icc():format(webp)/duet-c82ee94b39e24788bcfd51d1eea24288.jpg)
10 Best Audio Visualizers Windows, Mac, Android, iPhone & Online

10 Best Audio Visualizers [Windows, Mac, Android, iPhone & Online]
Best Audio Visualizer and Video Editor
Make your music video come alive with Filmora Audio Visualizer. The effect will intelligently match the sound in your video while also adding dynamic effects.
Free Download Free Download Free Download Learn More >

Music is one of the most popular video categories on YouTube, with millions of users using the site to find and discover new music. Unfortunately, making music videos that stand out in a sea of similar content is difficult. Still, suppose you are not a professional filmmaker and want to make a movie quickly. In that case, you may use a music visualizer to create music videos that you can share on social media. Most online music visualizers allow you to choose an audio spectrum template, style the visualization and even add logos or links to your social media profiles. Below are the top ten best video visualizers that can be used to edit music on Mac, Windows, iOs, Android, and online. Let’s dive into details:
- Motionbox Music Visualizer
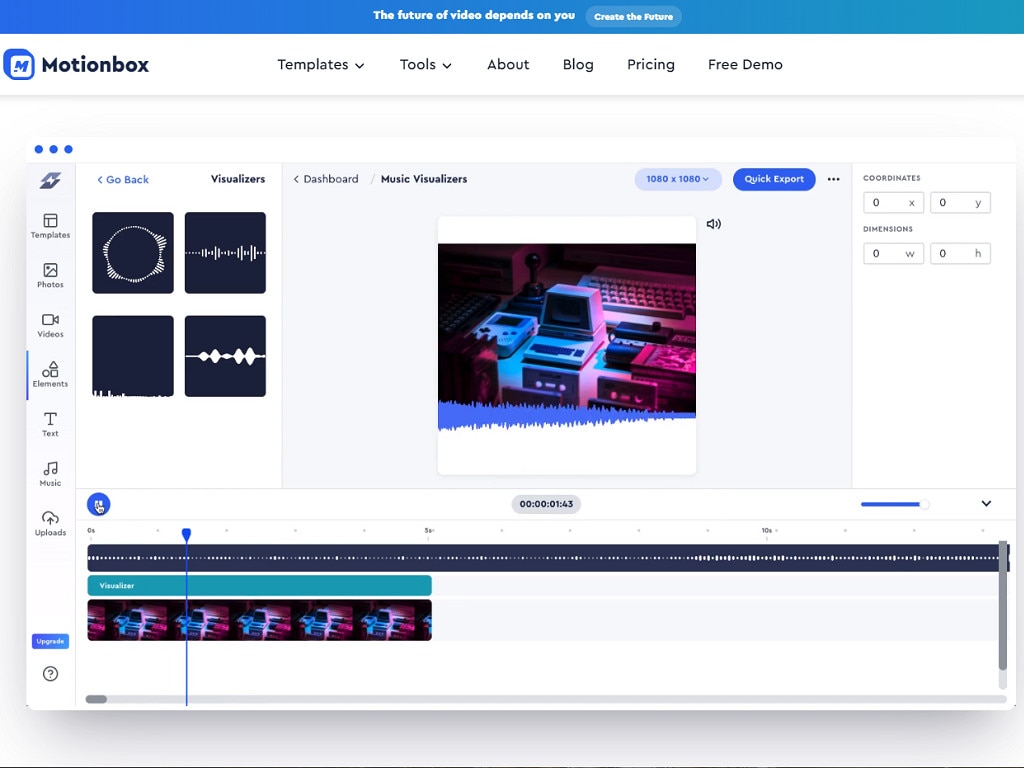
Supported system: Online Introduction: Motionbox’s Music Visualizer allows you to turn your music into an entertaining multimedia piece. Visualizers, which are essentially tangible waveform representations of your audio, are the main feature of this program. These visualizers are available in various forms and may be easily placed on top of a picture or video. The technology makes it simple to create audio material that is very engaging. You start by uploading your video to a drag-and-drop editor, where you can reduce your music as needed for the presentation and overlay the relevant visualizer on a photo or video. You can also include a call to action and other features to spice your multimedia masterpiece. Features:
- Customize subtitles of the music to make visualization better
- Overlay videos to create a mix of music and overlapping music
- Collaborative video editing tools
Price: Free, but you can upgrade the application with in-app purchases. Cons:
- It might run slow in some browsers.
- Plane9
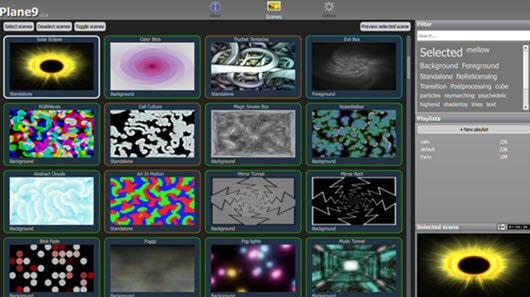
Supported system: Windows Introduction: Plane9 is a scene-based 3D music visualizer that works well in VR, on the Oculus Rift, and as a screensaver. With over 250 effect scenes to choose from, you’ll never have to stick to one view for the duration of a song. Instead, plane9 lets you blend scenes with flawless transitions, giving you a continuous musical experience. Apart from responding to a voice taken through a microphone, it dances to any music you’re listening to, whether Spotify, iTunes, or whatever. A music visualizer can also be added to OBS for hackers. Features:
- A real-time audio stream is supported, and sound from up to 18 speakers can be analyzed.
- Multi-monitor display support
Price: Free, but you can upgrade the application with in-app purchases. Cons:
- Unprocessed digital audio, such as DTS, cannot be used.
- There is a learning curve in setting everything up.
- Videobolt Music Visualizer
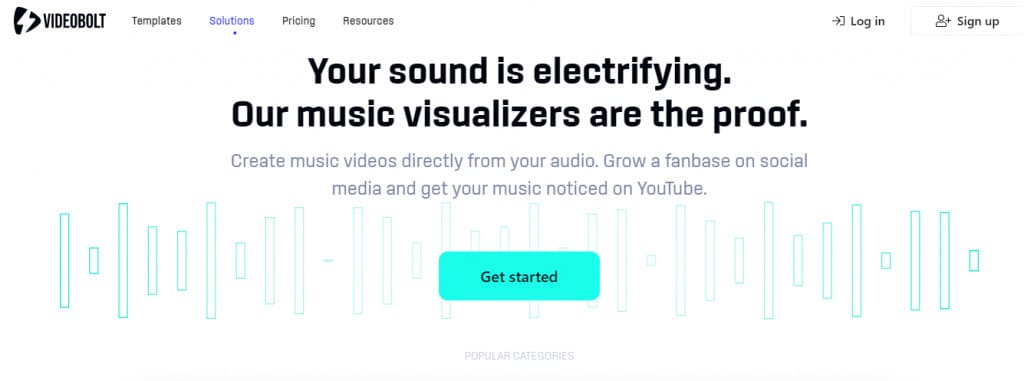
Supported system: Online Introduction: Videobolt is a stock-template-based internet music visualizer. Trap, pop, chill, hip-hop, synthwave, and EDM music are among the visualizer themes available. Each template is fully customizable, allowing you to create stunning images that flow with your music. You can include the name and logo of the artist, which is helpful for YouTubers that have a dedicated music channel. Videobolt allows you to enhance the audio in addition to modifying waveform settings. Beat frequency and spectrum frequency can be adjusted to a specific Hertz range. Features:
- Automatically save incomplete projects online, so you may continue working on music videos later.
- Music visualization templates with a current design that is ready to use
Price: $7.99/month, but a free trial is available. Cons:
- Videobolt will require access to the related YouTube account if you sign in using a Google account.
- Trapp

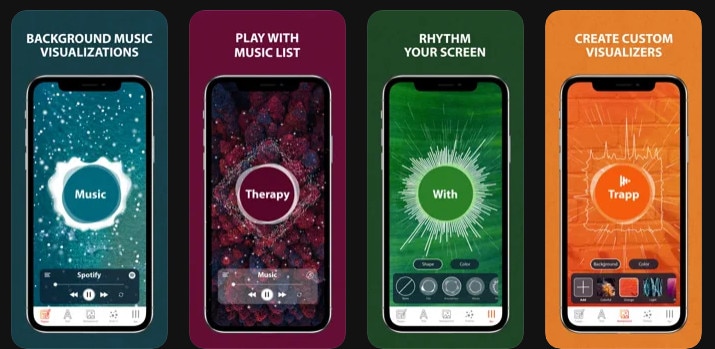
Supported system: iOS Introduction: Trapp - Music Visualizer is an excellent choice for iPhone users who desire complete control over the visualization process. Change the background and color scheme, make bespoke particles by modifying their form, size, and color, and experiment with the Bass Effect to create spectacular audio visualizations. The coolest part is that the Trapp app allows users to listen to their works while using the built-in Music app on their iPhones. However, the worst part is that the free edition of this audio visualizer has minimal capabilities. Features:
- You can visualize without any difficulty.
- You can modify the circle and background.
- You can use your iPhone or iPad to access it.
Price: Free to use, but premium account costs as low as $3.99/month. Cons:
- The premium account does not allow music export.
- Requires in-app purchase to make a new creation.
- VSXu Audio Visualizer
Supported system: Windows Introduction: VSXu is a 3D OpenGL-based audio visualizer for Windows. It’s open-source and free, and it has a lot of graphic effects for your music. This standalone application responds to the record channel on the soundcard and works with any media player. VSXu is a platform for running presets; it does not generate visualization on its own. Anyone can make their graphics and share them with those who are interested. VSXu thrives with unlimited possibilities because of its capacity to modify. VSXu isn’t your typical graphic modeling application, even if it doesn’t require you to write code. To generate images for the sound, you’ll need to put in some time and work. Features:
- Compatible with YouTube, Spotify, Tidal, and other streaming services.
- The ability to alter the speed and intensity of each visual
- Perfect for parties: connect your PC to your television and use this music visualizer.
Price: $0 Cons:
- To create the graphics, you’ll need basic programming skills.
- Using VSXu in a theatrical show is difficult.
- SongRender

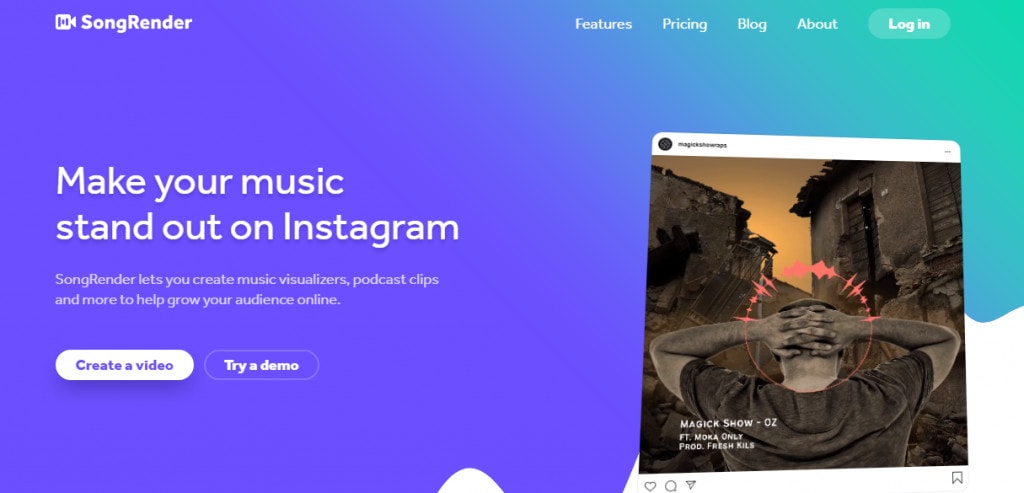
Supported system: Online Introduction: SongRender is a music visualizer for artists and multimedia makers on the go. SongRender is the program to use if you want to rapidly create a music video with a static background and basic animated waveforms that dance with the song. You can select the output video size by clicking the social media icon. After uploading the backdrop image and audio file, you can add the waveform, which can be customized in terms of shape, color, thickness, and other factors. However, because there are no color templates, you’ll have to look up color schemes to match the color of the shapes to the background. Features:
- Simple to use with no learning curve
- Size profiles for YouTube, Instagram, Facebook, and Twitter videos that are ready to use
- High-quality 1080p HD music video export
Price: With $15 per month and $30 per month plans, you can try the free version for seven days. Cons:
- Only MP3 and WMV files can be added.
- Other than the bar and circle pattern, there are no other shapes.
- Video outputs with a watermark
- Sonic Visualizer
Supported system: Windows/Mac Introduction: Sonic Visualiser is a free and open-source audio visualizer that may be used to view and analyze music and audio files. This is not a music visualizer for enjoyment; instead, it is designed for folks who want to know what’s inside an audio file. As a result, you’ll need some basic knowledge of phonetics and phonology to figure out what the depicted images mean. The solid third-party plug-ins it supports, such as pitch estimation and onset detection, are a significant element of this audio visualizer. The official lessons on utilizing it for musicological reasons may be found here. Features:
- Open source and free, with a plethora of plug-ins
- For musicologists, archivists, and other researchers, the best audio visualizer.
Price: $0 Cons:
- Requires you to install plug-ins.
- After Effects

Supported system: Windows/Mac Introduction: Adobe requires no introduction in the photo, audio, and video editing. So it’s no surprise that it’s one of the most reliable music visualization tools available. The Adobe Audio Spectrum Effect is simple to utilize if you have some prior Adobe experience. Even though it is a premium-based music visualizer, there are numerous music visualization capabilities to try out. You must first create a new composition and then add the sound file to it to utilize the tool. Then, finally, you set the audio duration and leave the rest to the visualizer. Features:
- The camera raw image file can be edited or imported.
- When you connect to a USB, this audio visualizer instantly updates the audio device.
- Copying media to a shared location is simple.
- This software allows you to work together on shared projects.
Price: $20.99/month as a single app and $52.99/month as a subscription model for all apps. Cons:
- Tricky to understand and use.
- Requires high device configuration for the software to run.
- Rendersoft Music Visualizer
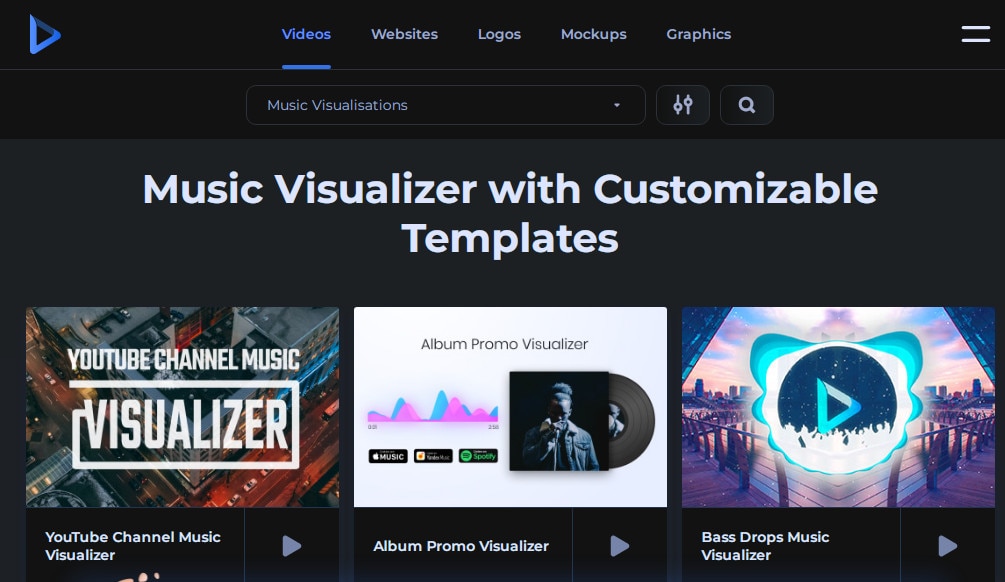
Supported system: Online Introduction: Renderforest is one of the most versatile music visualization programs available, offering freemium and subscription-based plans. But that’s not all; the software also allows users to visualize their music online and even create a website. Users must create an account to utilize the app because it is online-based. Once you’ve created an account, you’ll have access to Renderforest’s massive visualization templates, which you can customize with the song title, artist name, and background photo or video. Then you pick your favorite visualization style and color. Then you finish up by uploading the song you want to use in your video. Click the “Preview” icon to have Renderforest email the music visualization video to you when you’re done. Features:
- Each template is tagged with a rating and exported to make it easier for you to compare and choose.
- You can use free stock photographs as a background or submit your photos. It is also possible to add text.
- You can share your music visualizer on YouTube, Facebook, and other social media platforms.
Price: $9.99/month, but a free version is also available. Cons:
- It is necessary to register and log in. The output will be limited to 2 minutes in 360p with a watermark if you merely wish to utilize this online music visualizer for free.
- Error - In addition to the slow processing and unexpected crashes, there is no OK or Back button after applying a filter during image editing.
- ProjectM Music Visualizer
Supported system: Android and iOS Introduction: ProjectM Music Visualizer is compatible with Android and iOS devices, demonstrating its versatility. While both the Android and iPhone versions can be used to create powerful audiovisuals for your music, the iOS version is preferred. It has a built-in media player that lets you listen to your recordings to get a sense of how the final product will seem. Both versions, however, feature hundreds of music visualization effects and multi-touch interactive visualizations. ProjectM also supports Chromecast, which is a remarkable feature. Features:
- It supports Chromecast and offers hundreds of graphic effects.
- Additional modes are available, such as the Immersive Option for KitKat smartphones.
- Search and browse visual effects
- Detects sound from microphones and music players automatically.
Price: Free to use but can be upgraded to a premium account for $2.99/month. Cons:
- It does not offer any presets in the library.
Nothing rivals the thrill of watching your songs play with gorgeous, real-time animated graphics, whether you’re a professional music mixer or just a sound freak. The apps we’ve evaluated will assist you in choosing and adding graphics to your music.

Music is one of the most popular video categories on YouTube, with millions of users using the site to find and discover new music. Unfortunately, making music videos that stand out in a sea of similar content is difficult. Still, suppose you are not a professional filmmaker and want to make a movie quickly. In that case, you may use a music visualizer to create music videos that you can share on social media. Most online music visualizers allow you to choose an audio spectrum template, style the visualization and even add logos or links to your social media profiles. Below are the top ten best video visualizers that can be used to edit music on Mac, Windows, iOs, Android, and online. Let’s dive into details:
- Motionbox Music Visualizer

Supported system: Online Introduction: Motionbox’s Music Visualizer allows you to turn your music into an entertaining multimedia piece. Visualizers, which are essentially tangible waveform representations of your audio, are the main feature of this program. These visualizers are available in various forms and may be easily placed on top of a picture or video. The technology makes it simple to create audio material that is very engaging. You start by uploading your video to a drag-and-drop editor, where you can reduce your music as needed for the presentation and overlay the relevant visualizer on a photo or video. You can also include a call to action and other features to spice your multimedia masterpiece. Features:
- Customize subtitles of the music to make visualization better
- Overlay videos to create a mix of music and overlapping music
- Collaborative video editing tools
Price: Free, but you can upgrade the application with in-app purchases. Cons:
- It might run slow in some browsers.
- Plane9

Supported system: Windows Introduction: Plane9 is a scene-based 3D music visualizer that works well in VR, on the Oculus Rift, and as a screensaver. With over 250 effect scenes to choose from, you’ll never have to stick to one view for the duration of a song. Instead, plane9 lets you blend scenes with flawless transitions, giving you a continuous musical experience. Apart from responding to a voice taken through a microphone, it dances to any music you’re listening to, whether Spotify, iTunes, or whatever. A music visualizer can also be added to OBS for hackers. Features:
- A real-time audio stream is supported, and sound from up to 18 speakers can be analyzed.
- Multi-monitor display support
Price: Free, but you can upgrade the application with in-app purchases. Cons:
- Unprocessed digital audio, such as DTS, cannot be used.
- There is a learning curve in setting everything up.
- Videobolt Music Visualizer

Supported system: Online Introduction: Videobolt is a stock-template-based internet music visualizer. Trap, pop, chill, hip-hop, synthwave, and EDM music are among the visualizer themes available. Each template is fully customizable, allowing you to create stunning images that flow with your music. You can include the name and logo of the artist, which is helpful for YouTubers that have a dedicated music channel. Videobolt allows you to enhance the audio in addition to modifying waveform settings. Beat frequency and spectrum frequency can be adjusted to a specific Hertz range. Features:
- Automatically save incomplete projects online, so you may continue working on music videos later.
- Music visualization templates with a current design that is ready to use
Price: $7.99/month, but a free trial is available. Cons:
- Videobolt will require access to the related YouTube account if you sign in using a Google account.
- Trapp

Supported system: iOS Introduction: Trapp - Music Visualizer is an excellent choice for iPhone users who desire complete control over the visualization process. Change the background and color scheme, make bespoke particles by modifying their form, size, and color, and experiment with the Bass Effect to create spectacular audio visualizations. The coolest part is that the Trapp app allows users to listen to their works while using the built-in Music app on their iPhones. However, the worst part is that the free edition of this audio visualizer has minimal capabilities. Features:
- You can visualize without any difficulty.
- You can modify the circle and background.
- You can use your iPhone or iPad to access it.
Price: Free to use, but premium account costs as low as $3.99/month. Cons:
- The premium account does not allow music export.
- Requires in-app purchase to make a new creation.
- VSXu Audio Visualizer

Supported system: Windows Introduction: VSXu is a 3D OpenGL-based audio visualizer for Windows. It’s open-source and free, and it has a lot of graphic effects for your music. This standalone application responds to the record channel on the soundcard and works with any media player. VSXu is a platform for running presets; it does not generate visualization on its own. Anyone can make their graphics and share them with those who are interested. VSXu thrives with unlimited possibilities because of its capacity to modify. VSXu isn’t your typical graphic modeling application, even if it doesn’t require you to write code. To generate images for the sound, you’ll need to put in some time and work. Features:
- Compatible with YouTube, Spotify, Tidal, and other streaming services.
- The ability to alter the speed and intensity of each visual
- Perfect for parties: connect your PC to your television and use this music visualizer.
Price: $0 Cons:
- To create the graphics, you’ll need basic programming skills.
- Using VSXu in a theatrical show is difficult.
- SongRender

Supported system: Online Introduction: SongRender is a music visualizer for artists and multimedia makers on the go. SongRender is the program to use if you want to rapidly create a music video with a static background and basic animated waveforms that dance with the song. You can select the output video size by clicking the social media icon. After uploading the backdrop image and audio file, you can add the waveform, which can be customized in terms of shape, color, thickness, and other factors. However, because there are no color templates, you’ll have to look up color schemes to match the color of the shapes to the background. Features:
- Simple to use with no learning curve
- Size profiles for YouTube, Instagram, Facebook, and Twitter videos that are ready to use
- High-quality 1080p HD music video export
Price: With $15 per month and $30 per month plans, you can try the free version for seven days. Cons:
- Only MP3 and WMV files can be added.
- Other than the bar and circle pattern, there are no other shapes.
- Video outputs with a watermark
- Sonic Visualizer

Supported system: Windows/Mac Introduction: Sonic Visualiser is a free and open-source audio visualizer that may be used to view and analyze music and audio files. This is not a music visualizer for enjoyment; instead, it is designed for folks who want to know what’s inside an audio file. As a result, you’ll need some basic knowledge of phonetics and phonology to figure out what the depicted images mean. The solid third-party plug-ins it supports, such as pitch estimation and onset detection, are a significant element of this audio visualizer. The official lessons on utilizing it for musicological reasons may be found here. Features:
- Open source and free, with a plethora of plug-ins
- For musicologists, archivists, and other researchers, the best audio visualizer.
Price: $0 Cons:
- Requires you to install plug-ins.
- After Effects

Supported system: Windows/Mac Introduction: Adobe requires no introduction in the photo, audio, and video editing. So it’s no surprise that it’s one of the most reliable music visualization tools available. The Adobe Audio Spectrum Effect is simple to utilize if you have some prior Adobe experience. Even though it is a premium-based music visualizer, there are numerous music visualization capabilities to try out. You must first create a new composition and then add the sound file to it to utilize the tool. Then, finally, you set the audio duration and leave the rest to the visualizer. Features:
- The camera raw image file can be edited or imported.
- When you connect to a USB, this audio visualizer instantly updates the audio device.
- Copying media to a shared location is simple.
- This software allows you to work together on shared projects.
Price: $20.99/month as a single app and $52.99/month as a subscription model for all apps. Cons:
- Tricky to understand and use.
- Requires high device configuration for the software to run.
- Rendersoft Music Visualizer

Supported system: Online Introduction: Renderforest is one of the most versatile music visualization programs available, offering freemium and subscription-based plans. But that’s not all; the software also allows users to visualize their music online and even create a website. Users must create an account to utilize the app because it is online-based. Once you’ve created an account, you’ll have access to Renderforest’s massive visualization templates, which you can customize with the song title, artist name, and background photo or video. Then you pick your favorite visualization style and color. Then you finish up by uploading the song you want to use in your video. Click the “Preview” icon to have Renderforest email the music visualization video to you when you’re done. Features:
- Each template is tagged with a rating and exported to make it easier for you to compare and choose.
- You can use free stock photographs as a background or submit your photos. It is also possible to add text.
- You can share your music visualizer on YouTube, Facebook, and other social media platforms.
Price: $9.99/month, but a free version is also available. Cons:
- It is necessary to register and log in. The output will be limited to 2 minutes in 360p with a watermark if you merely wish to utilize this online music visualizer for free.
- Error - In addition to the slow processing and unexpected crashes, there is no OK or Back button after applying a filter during image editing.
- ProjectM Music Visualizer

Supported system: Android and iOS Introduction: ProjectM Music Visualizer is compatible with Android and iOS devices, demonstrating its versatility. While both the Android and iPhone versions can be used to create powerful audiovisuals for your music, the iOS version is preferred. It has a built-in media player that lets you listen to your recordings to get a sense of how the final product will seem. Both versions, however, feature hundreds of music visualization effects and multi-touch interactive visualizations. ProjectM also supports Chromecast, which is a remarkable feature. Features:
- It supports Chromecast and offers hundreds of graphic effects.
- Additional modes are available, such as the Immersive Option for KitKat smartphones.
- Search and browse visual effects
- Detects sound from microphones and music players automatically.
Price: Free to use but can be upgraded to a premium account for $2.99/month. Cons:
- It does not offer any presets in the library.
Nothing rivals the thrill of watching your songs play with gorgeous, real-time animated graphics, whether you’re a professional music mixer or just a sound freak. The apps we’ve evaluated will assist you in choosing and adding graphics to your music.

Music is one of the most popular video categories on YouTube, with millions of users using the site to find and discover new music. Unfortunately, making music videos that stand out in a sea of similar content is difficult. Still, suppose you are not a professional filmmaker and want to make a movie quickly. In that case, you may use a music visualizer to create music videos that you can share on social media. Most online music visualizers allow you to choose an audio spectrum template, style the visualization and even add logos or links to your social media profiles. Below are the top ten best video visualizers that can be used to edit music on Mac, Windows, iOs, Android, and online. Let’s dive into details:
- Motionbox Music Visualizer

Supported system: Online Introduction: Motionbox’s Music Visualizer allows you to turn your music into an entertaining multimedia piece. Visualizers, which are essentially tangible waveform representations of your audio, are the main feature of this program. These visualizers are available in various forms and may be easily placed on top of a picture or video. The technology makes it simple to create audio material that is very engaging. You start by uploading your video to a drag-and-drop editor, where you can reduce your music as needed for the presentation and overlay the relevant visualizer on a photo or video. You can also include a call to action and other features to spice your multimedia masterpiece. Features:
- Customize subtitles of the music to make visualization better
- Overlay videos to create a mix of music and overlapping music
- Collaborative video editing tools
Price: Free, but you can upgrade the application with in-app purchases. Cons:
- It might run slow in some browsers.
- Plane9

Supported system: Windows Introduction: Plane9 is a scene-based 3D music visualizer that works well in VR, on the Oculus Rift, and as a screensaver. With over 250 effect scenes to choose from, you’ll never have to stick to one view for the duration of a song. Instead, plane9 lets you blend scenes with flawless transitions, giving you a continuous musical experience. Apart from responding to a voice taken through a microphone, it dances to any music you’re listening to, whether Spotify, iTunes, or whatever. A music visualizer can also be added to OBS for hackers. Features:
- A real-time audio stream is supported, and sound from up to 18 speakers can be analyzed.
- Multi-monitor display support
Price: Free, but you can upgrade the application with in-app purchases. Cons:
- Unprocessed digital audio, such as DTS, cannot be used.
- There is a learning curve in setting everything up.
- Videobolt Music Visualizer

Supported system: Online Introduction: Videobolt is a stock-template-based internet music visualizer. Trap, pop, chill, hip-hop, synthwave, and EDM music are among the visualizer themes available. Each template is fully customizable, allowing you to create stunning images that flow with your music. You can include the name and logo of the artist, which is helpful for YouTubers that have a dedicated music channel. Videobolt allows you to enhance the audio in addition to modifying waveform settings. Beat frequency and spectrum frequency can be adjusted to a specific Hertz range. Features:
- Automatically save incomplete projects online, so you may continue working on music videos later.
- Music visualization templates with a current design that is ready to use
Price: $7.99/month, but a free trial is available. Cons:
- Videobolt will require access to the related YouTube account if you sign in using a Google account.
- Trapp

Supported system: iOS Introduction: Trapp - Music Visualizer is an excellent choice for iPhone users who desire complete control over the visualization process. Change the background and color scheme, make bespoke particles by modifying their form, size, and color, and experiment with the Bass Effect to create spectacular audio visualizations. The coolest part is that the Trapp app allows users to listen to their works while using the built-in Music app on their iPhones. However, the worst part is that the free edition of this audio visualizer has minimal capabilities. Features:
- You can visualize without any difficulty.
- You can modify the circle and background.
- You can use your iPhone or iPad to access it.
Price: Free to use, but premium account costs as low as $3.99/month. Cons:
- The premium account does not allow music export.
- Requires in-app purchase to make a new creation.
- VSXu Audio Visualizer

Supported system: Windows Introduction: VSXu is a 3D OpenGL-based audio visualizer for Windows. It’s open-source and free, and it has a lot of graphic effects for your music. This standalone application responds to the record channel on the soundcard and works with any media player. VSXu is a platform for running presets; it does not generate visualization on its own. Anyone can make their graphics and share them with those who are interested. VSXu thrives with unlimited possibilities because of its capacity to modify. VSXu isn’t your typical graphic modeling application, even if it doesn’t require you to write code. To generate images for the sound, you’ll need to put in some time and work. Features:
- Compatible with YouTube, Spotify, Tidal, and other streaming services.
- The ability to alter the speed and intensity of each visual
- Perfect for parties: connect your PC to your television and use this music visualizer.
Price: $0 Cons:
- To create the graphics, you’ll need basic programming skills.
- Using VSXu in a theatrical show is difficult.
- SongRender

Supported system: Online Introduction: SongRender is a music visualizer for artists and multimedia makers on the go. SongRender is the program to use if you want to rapidly create a music video with a static background and basic animated waveforms that dance with the song. You can select the output video size by clicking the social media icon. After uploading the backdrop image and audio file, you can add the waveform, which can be customized in terms of shape, color, thickness, and other factors. However, because there are no color templates, you’ll have to look up color schemes to match the color of the shapes to the background. Features:
- Simple to use with no learning curve
- Size profiles for YouTube, Instagram, Facebook, and Twitter videos that are ready to use
- High-quality 1080p HD music video export
Price: With $15 per month and $30 per month plans, you can try the free version for seven days. Cons:
- Only MP3 and WMV files can be added.
- Other than the bar and circle pattern, there are no other shapes.
- Video outputs with a watermark
- Sonic Visualizer

Supported system: Windows/Mac Introduction: Sonic Visualiser is a free and open-source audio visualizer that may be used to view and analyze music and audio files. This is not a music visualizer for enjoyment; instead, it is designed for folks who want to know what’s inside an audio file. As a result, you’ll need some basic knowledge of phonetics and phonology to figure out what the depicted images mean. The solid third-party plug-ins it supports, such as pitch estimation and onset detection, are a significant element of this audio visualizer. The official lessons on utilizing it for musicological reasons may be found here. Features:
- Open source and free, with a plethora of plug-ins
- For musicologists, archivists, and other researchers, the best audio visualizer.
Price: $0 Cons:
- Requires you to install plug-ins.
- After Effects

Supported system: Windows/Mac Introduction: Adobe requires no introduction in the photo, audio, and video editing. So it’s no surprise that it’s one of the most reliable music visualization tools available. The Adobe Audio Spectrum Effect is simple to utilize if you have some prior Adobe experience. Even though it is a premium-based music visualizer, there are numerous music visualization capabilities to try out. You must first create a new composition and then add the sound file to it to utilize the tool. Then, finally, you set the audio duration and leave the rest to the visualizer. Features:
- The camera raw image file can be edited or imported.
- When you connect to a USB, this audio visualizer instantly updates the audio device.
- Copying media to a shared location is simple.
- This software allows you to work together on shared projects.
Price: $20.99/month as a single app and $52.99/month as a subscription model for all apps. Cons:
- Tricky to understand and use.
- Requires high device configuration for the software to run.
- Rendersoft Music Visualizer

Supported system: Online Introduction: Renderforest is one of the most versatile music visualization programs available, offering freemium and subscription-based plans. But that’s not all; the software also allows users to visualize their music online and even create a website. Users must create an account to utilize the app because it is online-based. Once you’ve created an account, you’ll have access to Renderforest’s massive visualization templates, which you can customize with the song title, artist name, and background photo or video. Then you pick your favorite visualization style and color. Then you finish up by uploading the song you want to use in your video. Click the “Preview” icon to have Renderforest email the music visualization video to you when you’re done. Features:
- Each template is tagged with a rating and exported to make it easier for you to compare and choose.
- You can use free stock photographs as a background or submit your photos. It is also possible to add text.
- You can share your music visualizer on YouTube, Facebook, and other social media platforms.
Price: $9.99/month, but a free version is also available. Cons:
- It is necessary to register and log in. The output will be limited to 2 minutes in 360p with a watermark if you merely wish to utilize this online music visualizer for free.
- Error - In addition to the slow processing and unexpected crashes, there is no OK or Back button after applying a filter during image editing.
- ProjectM Music Visualizer

Supported system: Android and iOS Introduction: ProjectM Music Visualizer is compatible with Android and iOS devices, demonstrating its versatility. While both the Android and iPhone versions can be used to create powerful audiovisuals for your music, the iOS version is preferred. It has a built-in media player that lets you listen to your recordings to get a sense of how the final product will seem. Both versions, however, feature hundreds of music visualization effects and multi-touch interactive visualizations. ProjectM also supports Chromecast, which is a remarkable feature. Features:
- It supports Chromecast and offers hundreds of graphic effects.
- Additional modes are available, such as the Immersive Option for KitKat smartphones.
- Search and browse visual effects
- Detects sound from microphones and music players automatically.
Price: Free to use but can be upgraded to a premium account for $2.99/month. Cons:
- It does not offer any presets in the library.
Nothing rivals the thrill of watching your songs play with gorgeous, real-time animated graphics, whether you’re a professional music mixer or just a sound freak. The apps we’ve evaluated will assist you in choosing and adding graphics to your music.

Music is one of the most popular video categories on YouTube, with millions of users using the site to find and discover new music. Unfortunately, making music videos that stand out in a sea of similar content is difficult. Still, suppose you are not a professional filmmaker and want to make a movie quickly. In that case, you may use a music visualizer to create music videos that you can share on social media. Most online music visualizers allow you to choose an audio spectrum template, style the visualization and even add logos or links to your social media profiles. Below are the top ten best video visualizers that can be used to edit music on Mac, Windows, iOs, Android, and online. Let’s dive into details:
- Motionbox Music Visualizer

Supported system: Online Introduction: Motionbox’s Music Visualizer allows you to turn your music into an entertaining multimedia piece. Visualizers, which are essentially tangible waveform representations of your audio, are the main feature of this program. These visualizers are available in various forms and may be easily placed on top of a picture or video. The technology makes it simple to create audio material that is very engaging. You start by uploading your video to a drag-and-drop editor, where you can reduce your music as needed for the presentation and overlay the relevant visualizer on a photo or video. You can also include a call to action and other features to spice your multimedia masterpiece. Features:
- Customize subtitles of the music to make visualization better
- Overlay videos to create a mix of music and overlapping music
- Collaborative video editing tools
Price: Free, but you can upgrade the application with in-app purchases. Cons:
- It might run slow in some browsers.
- Plane9

Supported system: Windows Introduction: Plane9 is a scene-based 3D music visualizer that works well in VR, on the Oculus Rift, and as a screensaver. With over 250 effect scenes to choose from, you’ll never have to stick to one view for the duration of a song. Instead, plane9 lets you blend scenes with flawless transitions, giving you a continuous musical experience. Apart from responding to a voice taken through a microphone, it dances to any music you’re listening to, whether Spotify, iTunes, or whatever. A music visualizer can also be added to OBS for hackers. Features:
- A real-time audio stream is supported, and sound from up to 18 speakers can be analyzed.
- Multi-monitor display support
Price: Free, but you can upgrade the application with in-app purchases. Cons:
- Unprocessed digital audio, such as DTS, cannot be used.
- There is a learning curve in setting everything up.
- Videobolt Music Visualizer

Supported system: Online Introduction: Videobolt is a stock-template-based internet music visualizer. Trap, pop, chill, hip-hop, synthwave, and EDM music are among the visualizer themes available. Each template is fully customizable, allowing you to create stunning images that flow with your music. You can include the name and logo of the artist, which is helpful for YouTubers that have a dedicated music channel. Videobolt allows you to enhance the audio in addition to modifying waveform settings. Beat frequency and spectrum frequency can be adjusted to a specific Hertz range. Features:
- Automatically save incomplete projects online, so you may continue working on music videos later.
- Music visualization templates with a current design that is ready to use
Price: $7.99/month, but a free trial is available. Cons:
- Videobolt will require access to the related YouTube account if you sign in using a Google account.
- Trapp

Supported system: iOS Introduction: Trapp - Music Visualizer is an excellent choice for iPhone users who desire complete control over the visualization process. Change the background and color scheme, make bespoke particles by modifying their form, size, and color, and experiment with the Bass Effect to create spectacular audio visualizations. The coolest part is that the Trapp app allows users to listen to their works while using the built-in Music app on their iPhones. However, the worst part is that the free edition of this audio visualizer has minimal capabilities. Features:
- You can visualize without any difficulty.
- You can modify the circle and background.
- You can use your iPhone or iPad to access it.
Price: Free to use, but premium account costs as low as $3.99/month. Cons:
- The premium account does not allow music export.
- Requires in-app purchase to make a new creation.
- VSXu Audio Visualizer

Supported system: Windows Introduction: VSXu is a 3D OpenGL-based audio visualizer for Windows. It’s open-source and free, and it has a lot of graphic effects for your music. This standalone application responds to the record channel on the soundcard and works with any media player. VSXu is a platform for running presets; it does not generate visualization on its own. Anyone can make their graphics and share them with those who are interested. VSXu thrives with unlimited possibilities because of its capacity to modify. VSXu isn’t your typical graphic modeling application, even if it doesn’t require you to write code. To generate images for the sound, you’ll need to put in some time and work. Features:
- Compatible with YouTube, Spotify, Tidal, and other streaming services.
- The ability to alter the speed and intensity of each visual
- Perfect for parties: connect your PC to your television and use this music visualizer.
Price: $0 Cons:
- To create the graphics, you’ll need basic programming skills.
- Using VSXu in a theatrical show is difficult.
- SongRender

Supported system: Online Introduction: SongRender is a music visualizer for artists and multimedia makers on the go. SongRender is the program to use if you want to rapidly create a music video with a static background and basic animated waveforms that dance with the song. You can select the output video size by clicking the social media icon. After uploading the backdrop image and audio file, you can add the waveform, which can be customized in terms of shape, color, thickness, and other factors. However, because there are no color templates, you’ll have to look up color schemes to match the color of the shapes to the background. Features:
- Simple to use with no learning curve
- Size profiles for YouTube, Instagram, Facebook, and Twitter videos that are ready to use
- High-quality 1080p HD music video export
Price: With $15 per month and $30 per month plans, you can try the free version for seven days. Cons:
- Only MP3 and WMV files can be added.
- Other than the bar and circle pattern, there are no other shapes.
- Video outputs with a watermark
- Sonic Visualizer

Supported system: Windows/Mac Introduction: Sonic Visualiser is a free and open-source audio visualizer that may be used to view and analyze music and audio files. This is not a music visualizer for enjoyment; instead, it is designed for folks who want to know what’s inside an audio file. As a result, you’ll need some basic knowledge of phonetics and phonology to figure out what the depicted images mean. The solid third-party plug-ins it supports, such as pitch estimation and onset detection, are a significant element of this audio visualizer. The official lessons on utilizing it for musicological reasons may be found here. Features:
- Open source and free, with a plethora of plug-ins
- For musicologists, archivists, and other researchers, the best audio visualizer.
Price: $0 Cons:
- Requires you to install plug-ins.
- After Effects

Supported system: Windows/Mac Introduction: Adobe requires no introduction in the photo, audio, and video editing. So it’s no surprise that it’s one of the most reliable music visualization tools available. The Adobe Audio Spectrum Effect is simple to utilize if you have some prior Adobe experience. Even though it is a premium-based music visualizer, there are numerous music visualization capabilities to try out. You must first create a new composition and then add the sound file to it to utilize the tool. Then, finally, you set the audio duration and leave the rest to the visualizer. Features:
- The camera raw image file can be edited or imported.
- When you connect to a USB, this audio visualizer instantly updates the audio device.
- Copying media to a shared location is simple.
- This software allows you to work together on shared projects.
Price: $20.99/month as a single app and $52.99/month as a subscription model for all apps. Cons:
- Tricky to understand and use.
- Requires high device configuration for the software to run.
- Rendersoft Music Visualizer

Supported system: Online Introduction: Renderforest is one of the most versatile music visualization programs available, offering freemium and subscription-based plans. But that’s not all; the software also allows users to visualize their music online and even create a website. Users must create an account to utilize the app because it is online-based. Once you’ve created an account, you’ll have access to Renderforest’s massive visualization templates, which you can customize with the song title, artist name, and background photo or video. Then you pick your favorite visualization style and color. Then you finish up by uploading the song you want to use in your video. Click the “Preview” icon to have Renderforest email the music visualization video to you when you’re done. Features:
- Each template is tagged with a rating and exported to make it easier for you to compare and choose.
- You can use free stock photographs as a background or submit your photos. It is also possible to add text.
- You can share your music visualizer on YouTube, Facebook, and other social media platforms.
Price: $9.99/month, but a free version is also available. Cons:
- It is necessary to register and log in. The output will be limited to 2 minutes in 360p with a watermark if you merely wish to utilize this online music visualizer for free.
- Error - In addition to the slow processing and unexpected crashes, there is no OK or Back button after applying a filter during image editing.
- ProjectM Music Visualizer

Supported system: Android and iOS Introduction: ProjectM Music Visualizer is compatible with Android and iOS devices, demonstrating its versatility. While both the Android and iPhone versions can be used to create powerful audiovisuals for your music, the iOS version is preferred. It has a built-in media player that lets you listen to your recordings to get a sense of how the final product will seem. Both versions, however, feature hundreds of music visualization effects and multi-touch interactive visualizations. ProjectM also supports Chromecast, which is a remarkable feature. Features:
- It supports Chromecast and offers hundreds of graphic effects.
- Additional modes are available, such as the Immersive Option for KitKat smartphones.
- Search and browse visual effects
- Detects sound from microphones and music players automatically.
Price: Free to use but can be upgraded to a premium account for $2.99/month. Cons:
- It does not offer any presets in the library.
Nothing rivals the thrill of watching your songs play with gorgeous, real-time animated graphics, whether you’re a professional music mixer or just a sound freak. The apps we’ve evaluated will assist you in choosing and adding graphics to your music.
How to Upload Videos to Twitch? Here’s a Guide for Beginner
Recently, Twitch announced that its users can now upload video to Twitch, and there is no need to broadcast or live stream on Twitch anymore. Uploading videos to Twitch can be an excellent way to share your videos with your audience.

Besides this, you don’t need to upload videos on other video-sharing sites. But if you are using this platform for the first time, then you must be wondering how to upload video to Twitch. Don’t worry, as we have got your back. Keep reading to explore the process, and it is quite easy.
Part 1: How to Upload Videos to Twitch?
- First of all, you need to open Twitch in any browser. Just type twitch.tv in the browser’s address bar and click on Enter. Then you need to log into your account.
- Once done, you can see your account with your profile picture in the screen’s top-right corner. You can find it next to the Get Bits option. Click on it to access the drop-down menu.
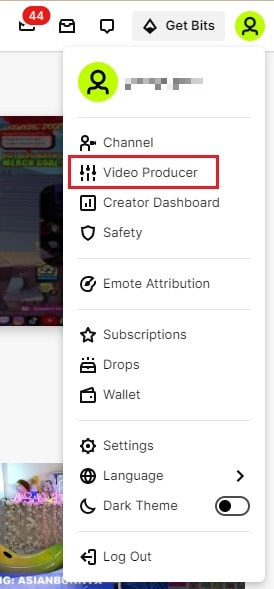
- Then you need to choose the Video Producer option available in the drop-down menu. A new page will open, and you can see the Creator Dashboard from where you can begin uploading your video or hosting a channel on twitch. If this option is unavailable, then you can’t upload your videos.
- Now, you need to click on the upload option. If you have not uploaded any video, you will find this area blank. You can just drag and drop your desired video to upload video to twitch.

- Choose the video that you want to upload and click on the Open option.
- Now, the upload process will begin. Wait for a few seconds to finish the process. Once done, click on the video, and the details window will come up.
- Here you need to edit your video’s metadata information. You can set a title, the category and a description for your video. Besides you can also edit the language and thumbnail here.
- After that, you can click on the Save Changes option that you can find in the upper right corner.
- Now you need to click on the Publish button to post your video on your channel. You can follow the process while hosting a channel on twitch to upload the videos.
Part 2: Why can’t you upload videos to twitch?
Well, it may be noted that not all Twitch users can upload video to twitch. For now, this feature is only available for Twitch partners and affiliates. So, first, you need to become an affiliate or partner, and then you can easily upload your videos. Besides, you should also keep the video upload guidelines in mind to avoid any issues.
- You can only upload video formats like 1080P videos, videos with up to 190mbps bit rate. The platform supports FLV, MOV, AVI and MP4 file formats.
- Besides, using one account, you can upload only 5 videos simultaneously. And within 24 hours, you can do a maximum of 100 uploads.
Now you know that only Twitch partners or affiliates can upload video to twitch, it is crucial for you to know how to become a Twitch affiliate or partner. Have a look at the below-given section for your answer.
Part 3: How to be a twitch affiliate or partner?
In general, streamers on Twitch can’t earn money from their content, and they can only make money from donations. However, if you have more followers, consistent viewers and hosting a channel on twitch regularly, then you can try to become a Twitch affiliate or partner. Some benefits that you can enjoy with this are:
- You will be able to sell your games
- You can get subscriptions.
- You will enjoy chargeback protection.
- It will be easier for you to get Twitch Bits.
- You can now earn revenue through advertisements.
To become an affiliate on Twitch, first of all, you need to monetize your content, i.e., stream. Now, let’s have a look at some requirements to become an affiliate.
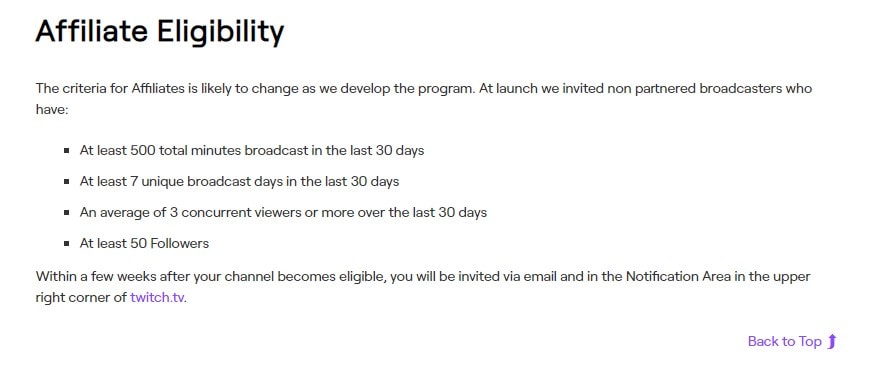
- You must have at least 50 followers.
- Make sure you have completed a minimum of 500 total minutes broadcast within one month or in the last 30 days.
- In the last 30 days, you should have at least seven unique broadcast days.
- At least 3 viewers per stream in the last 30 days.
Steps to Become an Affiliate
- Visit the Twitch website and log into your account.
- Find the Notifications icon and click on it.
- There you can see the Get Started option. Click on it.
- Sign the affiliate agreement and then give your tax information.
- Then choose your payment location to complete the procedure.
Requirements For Becoming a Partner
Once you receive your affiliate status, you can become a partner. But there are some requirements that you need to keep in your mind.
- You must have 75 average unique viewers per day in the last 30 days.
- Have streamed or hosting a channel on twitch for 12 days in the last 30 days.
- You need to stream for 25 hours in 30 days.
Steps to Follow
- Visit Twitch and log into your account.
- Now click on your Profile icon and then click on the Creator Dashboard option.
- Click on the arrow mark located near Insights and then click on Achievements.
- Click on the Apply option located under the Patch to Partner tab.
Once applied, Twitch will reply to your application within 7 business days. Well, if you face rejection, then you need to build a stronger audience and apply for it again later.
What Do You Mean Stay Active?
Chat is an important part of Twitch, and it lets you interact with your fellow members of the community as well as streamers. By keeping your chat active, you can let others know that you are ready to interact with them. This, in turn, can help you to increase your followers.
Part 4: What’s The Alternative to Twitch for Creators?
1. YouTube Gaming
Well, even though YouTube Gaming lacks in-game overlays, it offers other features. The platform offers live gaming broadcasts, channels, chat rooms and more. Here the viewers don’t need to subscribe to watch the content.
2. Smashcast
If you are a gaming fan, you must have heard about Hitbox and Azubu. They came together to form Smashcast. This provides the users with perfect JavaScript and HTML integration. If you are a gaming partner, esports team, viewer, organizer or streamer, then this platform will be an excellent option for you. Compared to Twitch, Smashcast offers better quality esports streams.
3. Facebook Gaming

Facebook also has introduced its own gaming and streaming platform. Facebook Gaming comes with an easy-to-navigate interface. It has a chat room and also allows you to watch videos from different social media platforms, like Twitter, Instagram, and YouTube. Besides, it offers some amazing features, such as different monetization options, interactive live-streaming, simple streaming setup, stream analytics and more.
4. DLive
While YouTube and Twitch have some high bars for monetization, they don’t offer sufficient profit to the creators. DLive is here to solve that issue. This platform rewards content creators as well as viewers. It charges a flat fee and takes around 20 percent of total revenue. On the other hand, viewers also get rewards for their engagement.
5. Ustream
This platform offers more than just gaming video streams, such as sports news, live streams, talk shows, podcasts and more. Some reviews say Ustream provides users with a better and faster streaming service. Besides, it is available for different platforms, such as PS4, Mac, Windows, iOS, and Android.
6. Vimeo

Vimeo has all the features, such as a live chat system and other features that a streaming platform must have. You can easily access its analytic dashboard to know your audience in a better way. It also has many integrations such as Figma, Meta, WordPress, Shopify and more. So, uploading videos directly from your website to Vimeo will not be a challenging task.
FAQs
How Long Do My Videos Stay on Twitch?
The answer is that it depends. If you are a Twitch Prime user, Turbo user or a Twitch partner, then once you upload video to twitch, it will stay for 60 days. For regular broadcasters, their videos will remain active for 14 days. Just follow the above-mentioned steps to successfully upload your videos.
Can I Upload Videos to Twitch?
You can upload your video to twitch if you become a Twitch affiliate or Partner. Regular streamers don’t have this feature for now. Just meet the criteria required for this and apply for an affiliate. This can be a great way to promote your brand as you can leverage this amazing form of influenced marketing.
Free Download For Win 7 or later(64-bit)
Free Download For macOS 10.14 or later
Free Download For macOS 10.14 or later
Steps to Rotate Videos Using Handbrake
Handbrake is a video editing tool that allows you to rotate videos. It is a free and open source software that is available on Windows, Mac, and Linux. It is used to convert video files from one format to another. You can use it to compress videos, add subtitles, or create chapters. It also allows you to rotate videos in different directions. You can use it to fix videos that are not aligned properly or that have been filmed upside down. A handbrake is a popular tool because it is easy to use and it has a variety of features.
Step-by-step on how to rotate videos using Handbrake
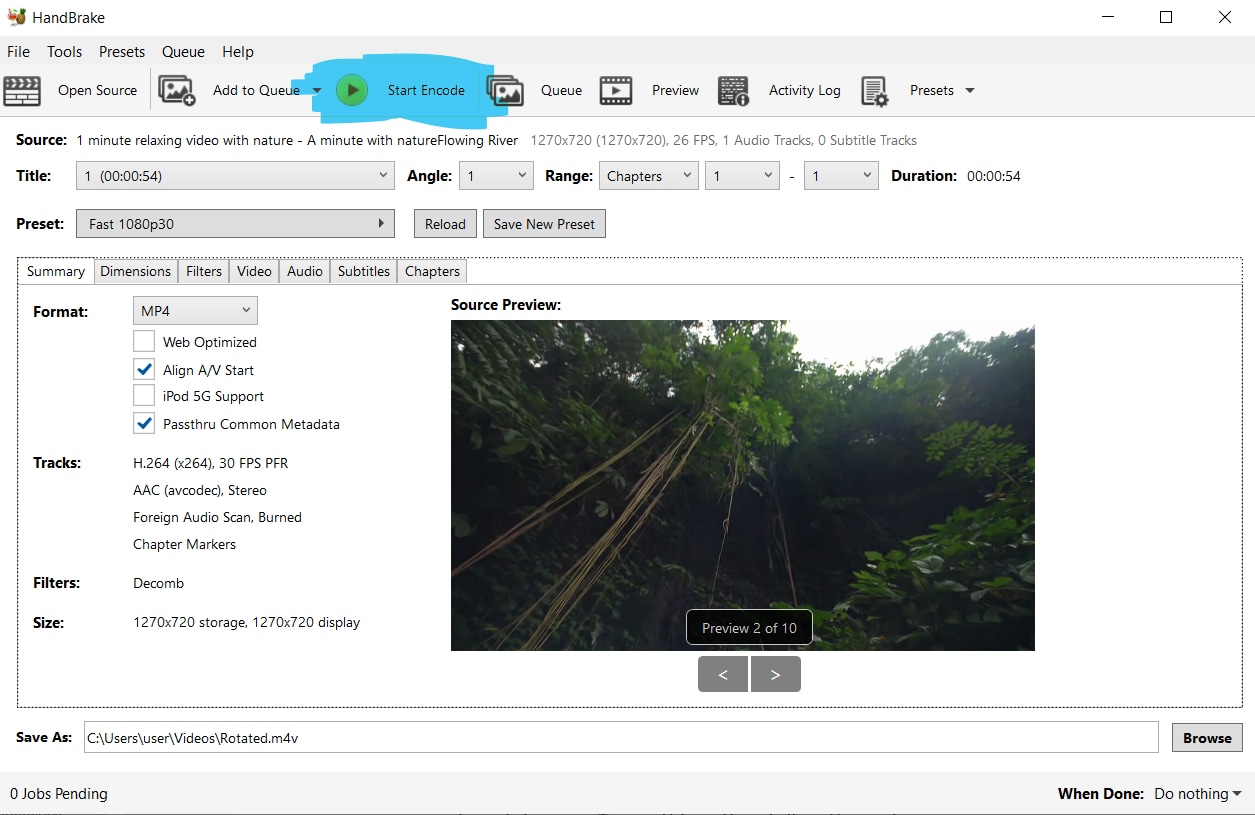
When you import a video into the Handbrake software, it will by default be in a “landscape” orientation, with the long edge of the video oriented horizontally. If you want to rotate the video 90 degrees counterclockwise so that it appears “vertical,” or if you want to rotate it 180 degrees so that it is upside down, you can do so by following these two steps:
Step 1: Open the Handbrake software and import your video.
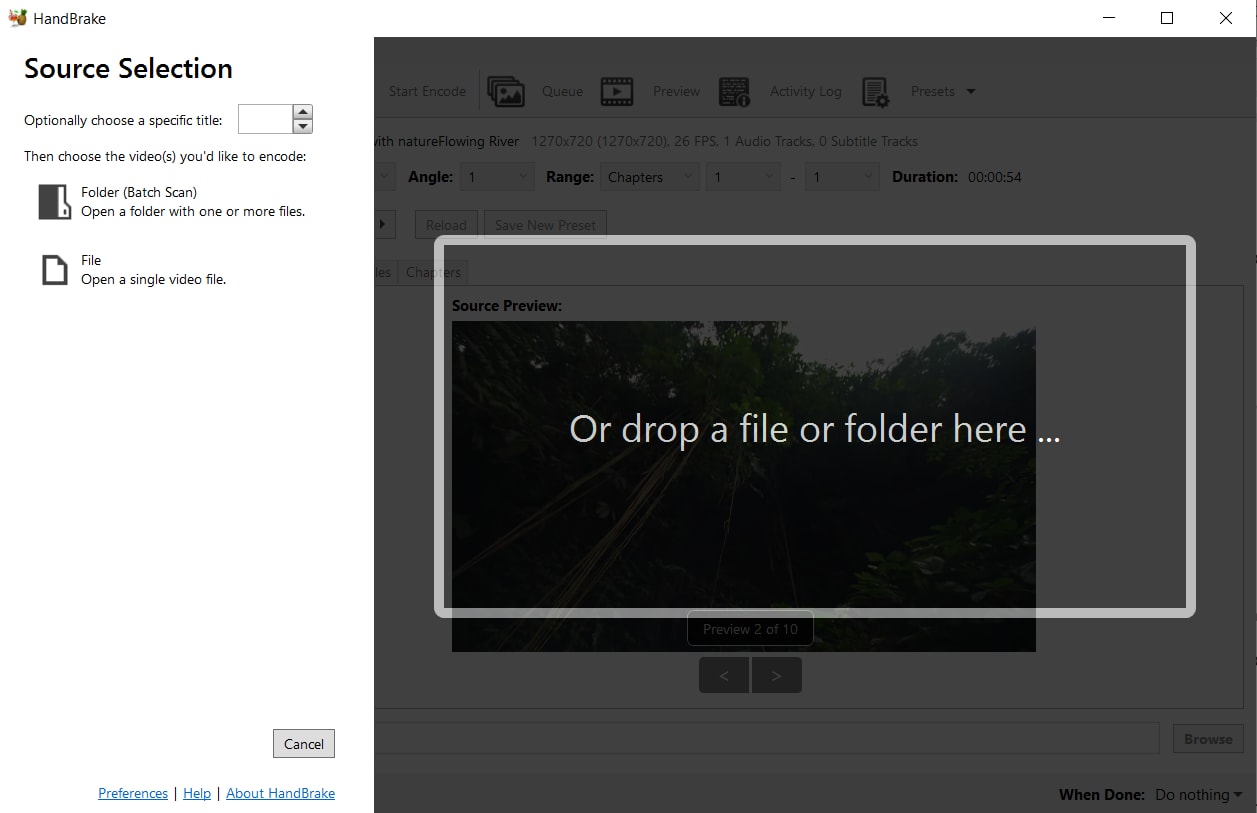
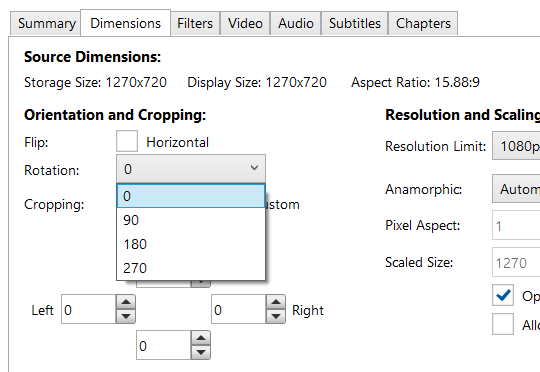
Step 2: Click on the “Dimensions” tab at the top of the Handbrake window.

Step 3: Under the “Orientation and Cropping” section, click on one of the options in the “Rotate” menu.
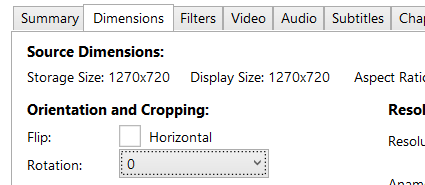
Step 4: If you want to rotate a video 90 degrees counterclockwise, select “90 Degrees CW (Counter-Clockwise).” If you want to rotate the video 180 degrees so that it is upside down, select “180 Degrees.”
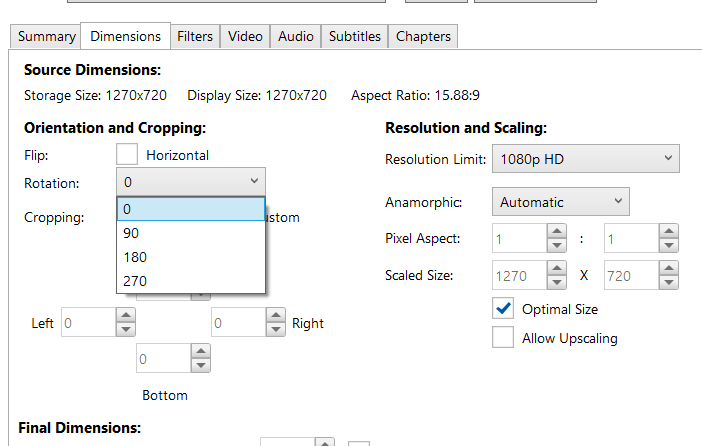
Step 5: Click on the “Preview” button at the bottom of the Handbrake window to see a preview of how your rotated video will look. When you are satisfied with the rotation, click on the “Start Encode” button to begin the encoding process.
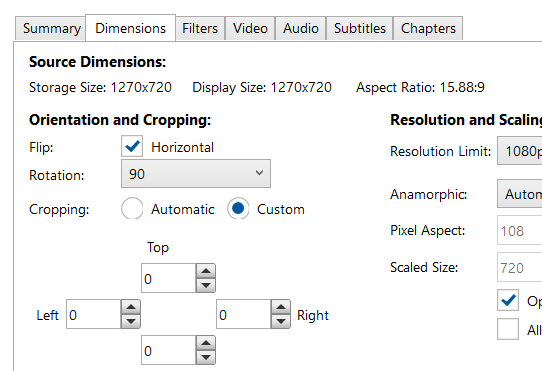
The Handbrake software also offers a “Flip” option which you can do after rotating it, which allows you to slip the video after rotating it. To use this option, follow these steps:
Under the “Orientation and Cropping” section, Go to Rotation and choose the degrees that best is best for your rotation requirements.
Click on “Flip” to flip your video horizontally.
Click on the “Preview” button at the bottom of the Handbrake window to see a preview of how your rotated video will look. When you are satisfied with the rotation, click on the “Start Encode” button to begin the encoding process.
Both of these methods for rotating videos are easy to use and produce good results. Experiment with them to see which method works best for you.
An Easy Way to Rotate Videos Using Filmora
Moreover, instead of using Handbrake, you can use Filmora Video Editor instead. Filmora is a video editor that is very easy to use. It has a variety of features, including the ability to rotate videos. You can download Filmora from the Filmora website. The website has links to the download page for each of the supported platforms.
For Win 7 or later (64-bit)
For macOS 10.14 or later
Step-by-Step on how to rotate videos in Filmora
In order for you to rotate videos in Filmora, follow these simple steps:
Step 1: Import the video that you want to rotate into Filmora.
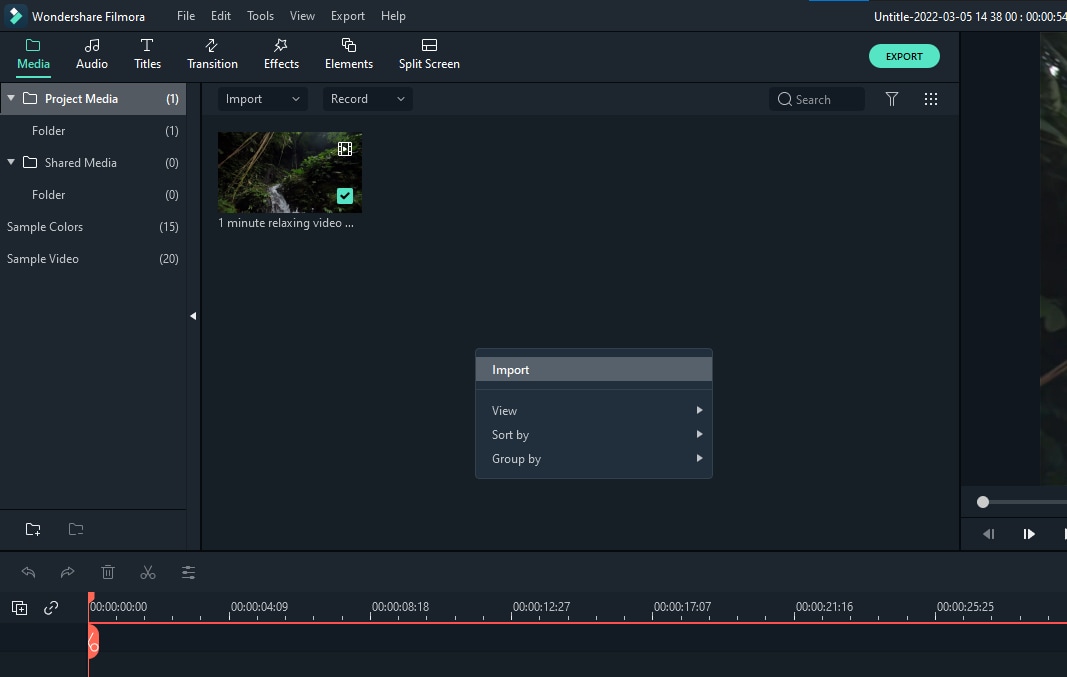
Step 2: Click on the “Edit” tab at the top of the video timeline.
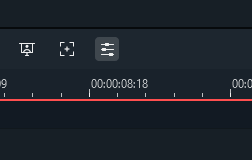
Step 3: Click on the “Rotate” button in the “Transform” section of the toolbar.
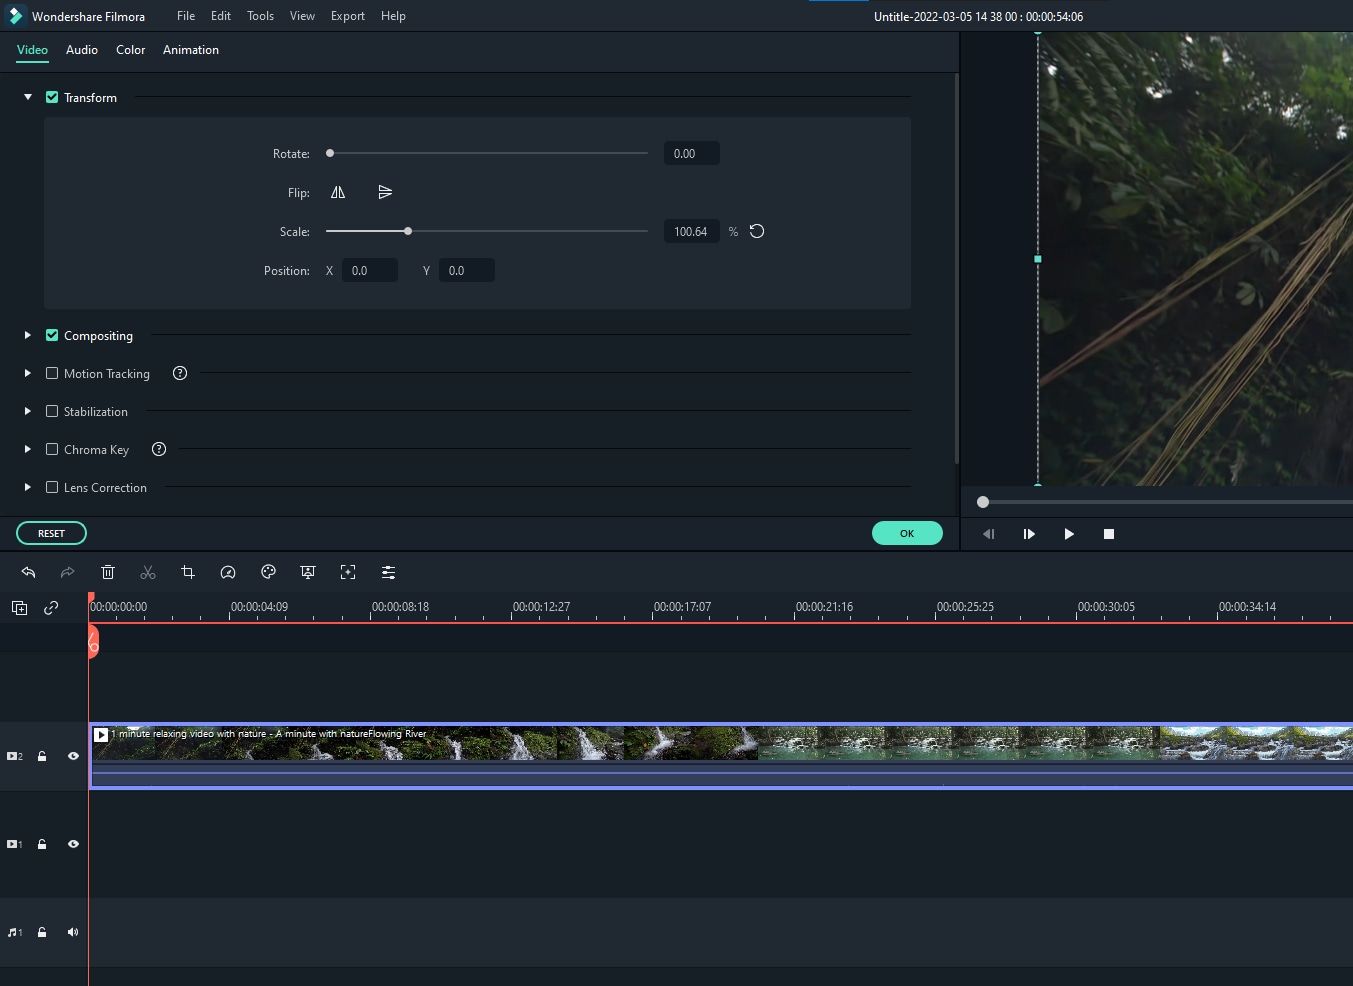
Step 4: Select the rotation angle that you want to rotate the video in the “Rotate” menu.

Step 5: Click on the “Preview” button at the bottom of the Filmora window to see a preview of how your rotated video will look. When you are satisfied with the rotation, click on the “OK” button to apply the rotation.
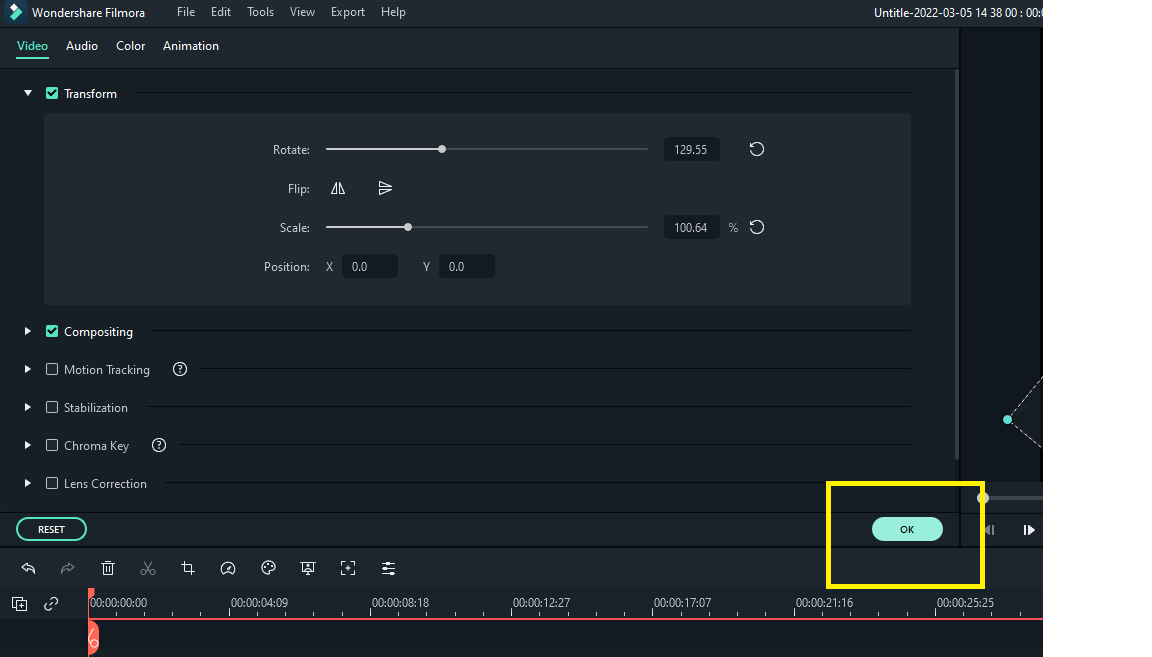
As you can see, rotating videos is a very easy process in both Handbrake and Filmora. Both Handbrake and Filmora offer simple methods for rotating videos. In Handbrake, you can rotate the video 90 degrees counterclockwise or 180 degrees.
In Filmora, you can rotate the video by any number of degrees in either direction. Experiment with these methods to see which one works best for you. Additionally, Filmora offers a number of other features, such as the ability to add text and transitions, that you may find useful.
Step 2: Click on the “Dimensions” tab at the top of the Handbrake window.

Step 3: Under the “Orientation and Cropping” section, click on one of the options in the “Rotate” menu.

Step 4: If you want to rotate a video 90 degrees counterclockwise, select “90 Degrees CW (Counter-Clockwise).” If you want to rotate the video 180 degrees so that it is upside down, select “180 Degrees.”

Step 5: Click on the “Preview” button at the bottom of the Handbrake window to see a preview of how your rotated video will look. When you are satisfied with the rotation, click on the “Start Encode” button to begin the encoding process.

The Handbrake software also offers a “Flip” option which you can do after rotating it, which allows you to slip the video after rotating it. To use this option, follow these steps:
Under the “Orientation and Cropping” section, Go to Rotation and choose the degrees that best is best for your rotation requirements.

Click on “Flip” to flip your video horizontally.

Click on the “Preview” button at the bottom of the Handbrake window to see a preview of how your rotated video will look. When you are satisfied with the rotation, click on the “Start Encode” button to begin the encoding process.
Both of these methods for rotating videos are easy to use and produce good results. Experiment with them to see which method works best for you.
An Easy Way to Rotate Videos Using Filmora
Moreover, instead of using Handbrake, you can use Filmora Video Editor instead. Filmora is a video editor that is very easy to use. It has a variety of features, including the ability to rotate videos. You can download Filmora from the Filmora website. The website has links to the download page for each of the supported platforms.
For Win 7 or later (64-bit)
For macOS 10.14 or later
Step-by-Step on how to rotate videos in Filmora
In order for you to rotate videos in Filmora, follow these simple steps:
Step 1: Import the video that you want to rotate into Filmora.

Step 2: Click on the “Edit” tab at the top of the video timeline.

Step 3: Click on the “Rotate” button in the “Transform” section of the toolbar.

Step 4: Select the rotation angle that you want to rotate the video in the “Rotate” menu.

Step 5: Click on the “Preview” button at the bottom of the Filmora window to see a preview of how your rotated video will look. When you are satisfied with the rotation, click on the “OK” button to apply the rotation.

As you can see, rotating videos is a very easy process in both Handbrake and Filmora. Both Handbrake and Filmora offer simple methods for rotating videos. In Handbrake, you can rotate the video 90 degrees counterclockwise or 180 degrees.
In Filmora, you can rotate the video by any number of degrees in either direction. Experiment with these methods to see which one works best for you. Additionally, Filmora offers a number of other features, such as the ability to add text and transitions, that you may find useful.
Step 2: Click on the “Dimensions” tab at the top of the Handbrake window.

Step 3: Under the “Orientation and Cropping” section, click on one of the options in the “Rotate” menu.

Step 4: If you want to rotate a video 90 degrees counterclockwise, select “90 Degrees CW (Counter-Clockwise).” If you want to rotate the video 180 degrees so that it is upside down, select “180 Degrees.”

Step 5: Click on the “Preview” button at the bottom of the Handbrake window to see a preview of how your rotated video will look. When you are satisfied with the rotation, click on the “Start Encode” button to begin the encoding process.

The Handbrake software also offers a “Flip” option which you can do after rotating it, which allows you to slip the video after rotating it. To use this option, follow these steps:
Under the “Orientation and Cropping” section, Go to Rotation and choose the degrees that best is best for your rotation requirements.

Click on “Flip” to flip your video horizontally.

Click on the “Preview” button at the bottom of the Handbrake window to see a preview of how your rotated video will look. When you are satisfied with the rotation, click on the “Start Encode” button to begin the encoding process.
Both of these methods for rotating videos are easy to use and produce good results. Experiment with them to see which method works best for you.
An Easy Way to Rotate Videos Using Filmora
Moreover, instead of using Handbrake, you can use Filmora Video Editor instead. Filmora is a video editor that is very easy to use. It has a variety of features, including the ability to rotate videos. You can download Filmora from the Filmora website. The website has links to the download page for each of the supported platforms.
For Win 7 or later (64-bit)
For macOS 10.14 or later
Step-by-Step on how to rotate videos in Filmora
In order for you to rotate videos in Filmora, follow these simple steps:
Step 1: Import the video that you want to rotate into Filmora.

Step 2: Click on the “Edit” tab at the top of the video timeline.

Step 3: Click on the “Rotate” button in the “Transform” section of the toolbar.

Step 4: Select the rotation angle that you want to rotate the video in the “Rotate” menu.

Step 5: Click on the “Preview” button at the bottom of the Filmora window to see a preview of how your rotated video will look. When you are satisfied with the rotation, click on the “OK” button to apply the rotation.

As you can see, rotating videos is a very easy process in both Handbrake and Filmora. Both Handbrake and Filmora offer simple methods for rotating videos. In Handbrake, you can rotate the video 90 degrees counterclockwise or 180 degrees.
In Filmora, you can rotate the video by any number of degrees in either direction. Experiment with these methods to see which one works best for you. Additionally, Filmora offers a number of other features, such as the ability to add text and transitions, that you may find useful.
Step 2: Click on the “Dimensions” tab at the top of the Handbrake window.

Step 3: Under the “Orientation and Cropping” section, click on one of the options in the “Rotate” menu.

Step 4: If you want to rotate a video 90 degrees counterclockwise, select “90 Degrees CW (Counter-Clockwise).” If you want to rotate the video 180 degrees so that it is upside down, select “180 Degrees.”

Step 5: Click on the “Preview” button at the bottom of the Handbrake window to see a preview of how your rotated video will look. When you are satisfied with the rotation, click on the “Start Encode” button to begin the encoding process.

The Handbrake software also offers a “Flip” option which you can do after rotating it, which allows you to slip the video after rotating it. To use this option, follow these steps:
Under the “Orientation and Cropping” section, Go to Rotation and choose the degrees that best is best for your rotation requirements.

Click on “Flip” to flip your video horizontally.

Click on the “Preview” button at the bottom of the Handbrake window to see a preview of how your rotated video will look. When you are satisfied with the rotation, click on the “Start Encode” button to begin the encoding process.
Both of these methods for rotating videos are easy to use and produce good results. Experiment with them to see which method works best for you.
An Easy Way to Rotate Videos Using Filmora
Moreover, instead of using Handbrake, you can use Filmora Video Editor instead. Filmora is a video editor that is very easy to use. It has a variety of features, including the ability to rotate videos. You can download Filmora from the Filmora website. The website has links to the download page for each of the supported platforms.
For Win 7 or later (64-bit)
For macOS 10.14 or later
Step-by-Step on how to rotate videos in Filmora
In order for you to rotate videos in Filmora, follow these simple steps:
Step 1: Import the video that you want to rotate into Filmora.

Step 2: Click on the “Edit” tab at the top of the video timeline.

Step 3: Click on the “Rotate” button in the “Transform” section of the toolbar.

Step 4: Select the rotation angle that you want to rotate the video in the “Rotate” menu.

Step 5: Click on the “Preview” button at the bottom of the Filmora window to see a preview of how your rotated video will look. When you are satisfied with the rotation, click on the “OK” button to apply the rotation.

As you can see, rotating videos is a very easy process in both Handbrake and Filmora. Both Handbrake and Filmora offer simple methods for rotating videos. In Handbrake, you can rotate the video 90 degrees counterclockwise or 180 degrees.
In Filmora, you can rotate the video by any number of degrees in either direction. Experiment with these methods to see which one works best for you. Additionally, Filmora offers a number of other features, such as the ability to add text and transitions, that you may find useful.
Step-by-Step Guide | Control Playback Speed in Premiere Pro
Versatile Video Editor - Wondershare Filmora
An easy and powerful editor
Numerous effects to choose from
Detailed tutorials are provided by the official channel
According to the business, Adobe Premiere Pro is one of the most widely used video editing products on the market today. The option to speed up or slow down individual clips is one of the most important capabilities of Premiere Pro.

In terms of video editing, Adobe Premiere Pro is one of the most powerful applications on the market, and it’s well-known for its versatility. Speeding up movies is one of the program’s many features required for the insertion of special effects and transitions. A lot of ways are there for you to pick from while using premiere pro to speed up the film as desired.

You can’t overwrite or replace your media files by doing anything in Premiere Pro, which means that nothing you do will have an effect on your media files. The point remains: a copy of your project and all its media assets should always be kept on hand just in case.
Adobe Premiere Pro is an excellent editing tool in terms of its functionality and capabilities. Still, it has a steep hill to climb that makes it difficult for newbies and users without previous editing experience. To get the most out of Adobe Premiere Pro, one must thoroughly understand the product.
No need to worry, folks; as in this article, we will be looking at how we can alter premiere pro speed.
Fast Forward or Speed up Playback Speed in Premiere Pro
On analog editing systems, the speed of film could permanently be altered; but, because of the limitations of the technology, if you slowed anything down too much, the frame rate at which it was taken may become evident, and the image quality would begin to suffer as a consequence.
Adobe Premiere Pro is a feature-rich and professional video editor designed for the Macintosh platform. It has a variety of editing features built-in. Adobe Premiere Pro lets you change and control the speed at which movies are played back.
Premiere provides three choices for adjusting the tempo of a movie or speeding it up. We’ll go over them one by one as we scroll down the page.

Method 1
- Download and Install Adobe Premiere Pro. Launch the application on your system.
- Once you’ve set up a new project in Adobe Premiere Pro, import the video you want to edit.
- In order to place the video where you want it, drag the necessary video clips into the timeline. In the end, you’ll have a new series to call your own.
- Using the right-click menu, you may choose the whole movie or only a portion of it that you wish to edit.
- The popup dialog box will display if you choose Speed/Duration from the context menu list.
- Choose Clip> Speed Duration instead from the program’s drop-down menu.
- The Speed field should be raised, and then the OK button should be pressed to accept the change.
Method 2: Rate Stretch Tool
Adobe Premiere Pro has a Rate Stretch feature that lets you manually alter the movie’s tempo by sliding the trim bar along the timeline. To utilize the Rate Stretch tool to speed up a video clip, you must first divide the movie into pieces.
Here’s a quick method for altering the video speed so that it fits under the time limit:
- Launch the application on your respective systems.
- Drag and drop the selected video onto the timeline in Premiere Pro.
- Then, choose the Ripple Edit Tool from the toolbar, followed by the Rate Stretch Tool by clicking and holding the Ripple Edit Tool. Click the Rate Stretch button on the timeline’s left side to begin a timer.
- You may also use the R key on your keyboard to activate the Rate Stretch Tool, which is a shortcut key.
- Drag the video’s start and endpoints to their respective ends on the right and left sides to prolong or reduce the duration. As a consequence, the video speed will be improved. The bigger the period of time the video is dragged inwards, the faster it rises.
Method 3: Time Remapping Tool
In Adobe Premiere Pro, the time remapping tool is where you go to speed up a selected video section. With a video clip, this function may be utilized to create the illusion of speed and slowness.
- It’s time to fire up Adobe Premiere Pro and start fiddling with your footage.
- Simply right-click on it to bring up the context menu, and then choose Show Clip Keyframes from the display list. Afterward, choose Time Remapping from the context menu that opens.
- Click on it to make it go faster. The video will be colored blue, and a horizontal rubber band line will be drawn down its center if this option is selected. One of the video’s frame rate lines may be found here.
- A white speed-control track may be seen just below the title bar in the upper part of the video. If you can’t see it well when zooming in, you may try again. The rubber band may be dragged higher in Premiere Pro to speed up the video.
The tooltip will show how long it has been since the change happened compared to the original speed. As the movie progresses, so does the speed at which it is shown, and the duration of the video fluctuates as well. The audio remains unaltered and tied to the video when using Time Remapping.
How to Slow Down A Video in Premiere Pro?
Now, let’s discuss how to slow down a video in premiere pro
Time stretch
A one-second video clip at 60 frames per second is an example of this situation. When the game is being played at a reasonable speed on any given platform or software, 60 frames will be shown. Because of this, each frame will take twice as long to play at a 0.5X slower pace.
To put it another way, you’d see 30 frames in a second that weren’t repeated. A second has been added to the video’s duration, which will now be 2 seconds instead of 1. There will be no deterioration in quality in this situation.
- Create a new project in Premiere Pro on your PC.
- To import a video file, choose Import from the File menu at the top of the screen. After that, drag the video into either the timeline or the project panel, whichever you like.
- Right-clicking and choosing the Duration/Speed option causes the video to begin playing.
- This stage necessitates a decrease in speed from 100% to a lower percentage.
Using Keyframes
When you attempt to slow down a video by adjusting the frame rate, you are essentially eliminating frames from the video stream. This procedure will allow you to slow down a movie to your desired speed without sacrificing quality.
- After downloading and installing Adobe Premiere Pro, the first step is to launch the program. Later, you’ll need to choose a specific video that you’d want to have slowed down.
- After you’ve chosen it, you may upload it to Premiere Pro. After importing the video, you must drag and drop it into the timeline in Premiere.
- By right-clicking the mouse, choose Modify > Interpret from the drop-down menu.
- You’ll need to make some changes to the frame information now. Hit the Assume this frame rate button and input a value that is lower than the original video frame rate.
Utlizing Time Remapping
The remapping tool is a very common tool for creating slow-motion videos. It may be found in many video editing programs. It gives you the option of selecting a particular section of a video clip and then slowing down the video clip.
- Launching Adobe Premiere Pro is the initial step once it has been downloaded and installed on your computer. A particular video that you’d want slow-motioned will need to be selected later on in the process.
- After dragging the video to the timeline, you’ll need to choose the area of the movie that you want to slow down.
- Now you must choose the Key Frames and Speed from your video by clicking on the video’s right-click menu.
- Only the “Pen Tool” must be used to lock the specific region you wish to slow down in order to push the Speed Line through the Selection tool to slow down the video during this phase.
Why Is Premiere Pro Playback Fast?
If this issue arises in your program, you’ll notice choppy playback, a character that speaks too rapidly, and audio that skips frames in the narration.
The multimedia editor Premiere Pro is one of the best currently available on the market. In addition to creating YouTube videos, feature films, music videos, and other sorts of content, many professionals turn to it.
It is said that Adobe Premiere Pro suffers from a playback issue. It has the ability to make the video creation process more complicated and demanding than it should be. Let me show you how to fix this easy error in just two simple steps.
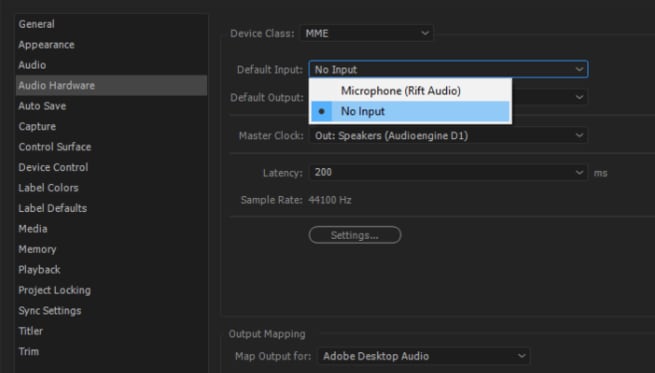
Start the program on your computer’s operating system.
Select Edit from the drop-down menu.
Look towards preference
Afterward, choose audio hardware.
No input should be used as the default input, regardless of what it is currently set to.
When you click on Playback your film, you will notice that the issue has been rectified.
How can we Alter the speed of Videos in WonderShare Filmora?
Before understanding the process of speed altering in WonderShare Filmora, let’s have an overview of “what WonderShare Filmora is”.
What is Wondershare Filmora?
Wondershare Filmora is the best video editor for content creators who are just getting started and those who want to produce Hollywood-quality visuals and content without having to invest years in training and certification. WonderShare Filmora streamlines the video editing process through the use of intelligent, intuitive features that can automate repetitive tasks and save time.
Individuals can subscribe to WonderShare Filmora for a one-year fee of $68.98 per year. Filmora is well-known as a straightforward video editor designed for novice users and social media influencers who want to devote more time to their creative endeavors. A few new features have been added, and we can now create professional-looking videos without having to go through a lengthy learning curve.
Features that Stand Out
For both new and experienced film creators, WonderShare Filmora has been designed to offer a scalable environment. Even if you’ve never edited a movie before, you can start doing so right now.
Millions of Free Media to Choose From:
Over 10 million media files are available in the stock media library of WonderShare Filmora, making it easy for filmmakers to bring their visions to life. Speed ramping and auto beat sync are also included.
Toolbar Quick Access:
After the application is installed on your computer, the toolbar allows rapid access to all the program’s capabilities. These features include media and audio files, titles, effects, split-screen formatting, components, transitions, and other elements.
Quick Editing Feature:
For content producers who don’t want to spend hours on video editing and instead want to concentrate on other areas of their work, WonderShare Filmora is the appropriate solution.
Use Animated Transitions to Bring Life into Your Videos:
Your video may get tedious if you repeatedly use the same frame. Animated transitions may be added to video and photo collages using the Split Screen feature. Using this feature, you may divide your screen into as many as six individual displays.
Improved Speed Ramping Function:
WonderShare Filmora’s new speed ramping functionality is one of the most intriguing new additions. The speed of a video clip may be gradually increased or decreased with this tool, and the transition between the various speed levels is smooth.
Capture Every Scene with Ease:
Using a slew of cameras, skilled videographers may capture the same topic from a variety of vantage points. A single camera may be used in certain circumstances to record the whole scene and a close-up, while others may be used to capture a variety of views and expressions.
Automation at its Best:
With WonderShare Filmora, you don’t have to manually synchronize the audio and video from many cameras, saving you time and effort.
Enhance Your Creativity with Masking:
Masking” is a new feature that is included in this version. Using a mask to combine different clips helps you to expand your creative horizons. You could get something fantastic, particularly if you use effects that are used in commercial ads.”
Hundred’s of Themes to Choose from:
WonderShare Filmora has 115 video themes, including business, travel, vlogging, slideshows, and many more. It’s possible to make a whole movie using Filmora AI by letting it figure out the best way to edit your video.
In short, the most popular features that it offers are:
- Motion Tracking
- Split Screen
- Audio Ducking
- Speed Ramping
- Green screen
- Color Grading
- Third-Party Stock media
- Auto Synchronization
- Masking
- Color Match
How to speed up Playback in Filmora?
In Filmora, you can also modify the length of the video clip, which allows you to change the video speed.
For a “close up in time,” the slow-motion effect may be the best choice, while the fast-forward effect may be used to make dramatic or humorous videos, depending on your tastes.
Filmora’s user-friendly interface and simple editing capabilities have made it a popular choice for professionals throughout the globe. As a result, many people prefer it over alternative editing software.
Steps
- Download and Install The latest version of Filmora.
- Launch the application on your respective system
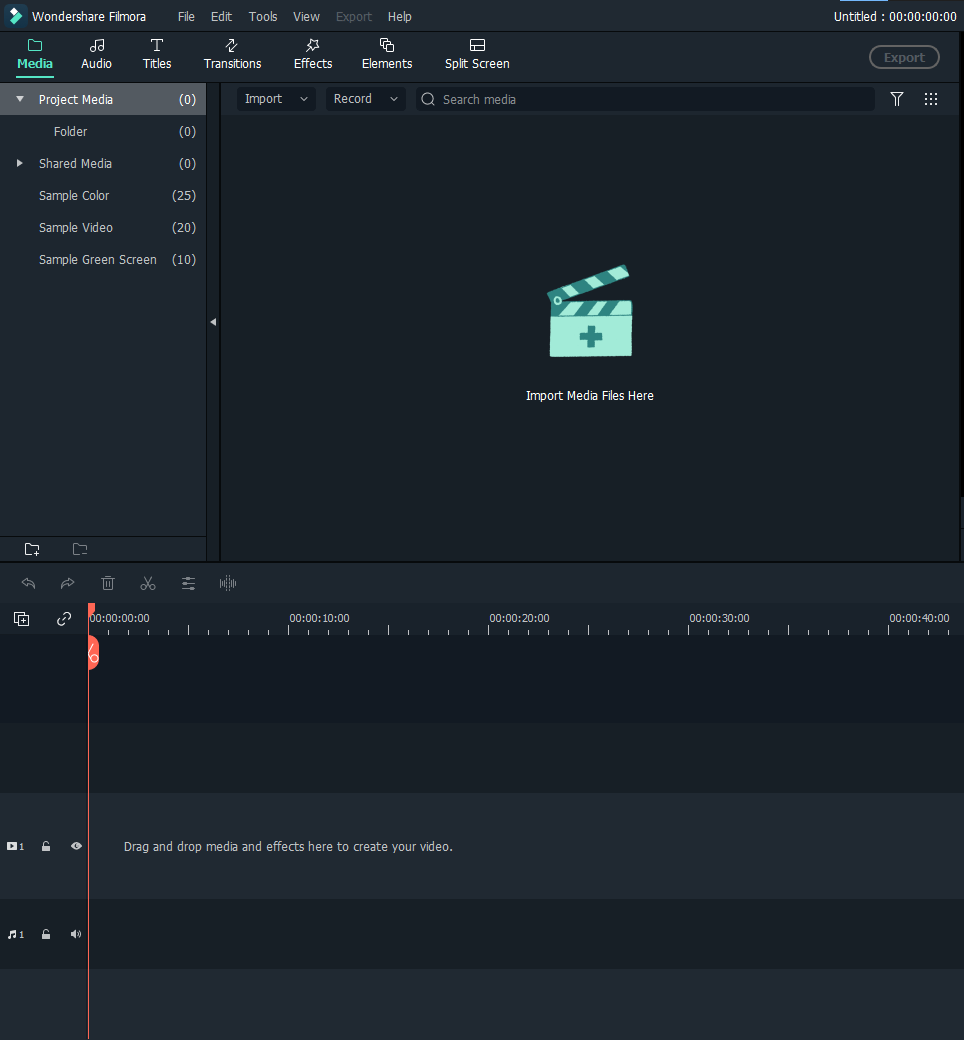
Among the many formats that Wondershare Filmora can handle are MP4 and AVI, WMV and MOV, and even FLV and M4V. Go to your computer’s media library and choose Import from the Import menu to begin the process of bringing in videos from your computer.
Alternatively, you may just drag & drop the file you want.
Drag movies from your User’s Album onto a video track on the Timeline to access the Speed and Duration settings for that track’s duration.
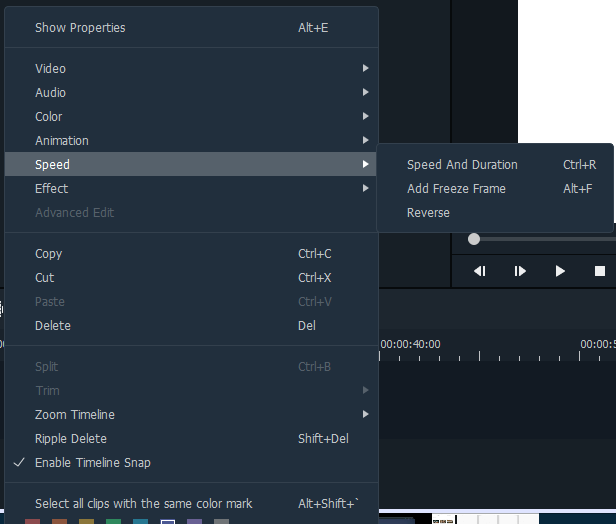
- A pop-up window will appear. In order to determine the speed at which a motion effect is moving, you may use the speed numbers provided. After then, it’s up to you how fast or slow you want to go. To see how sped-up or slowed-down videos will seem, just click on the preview box. It’s a good balance if you think the present speed is too high: 0.5 speed.
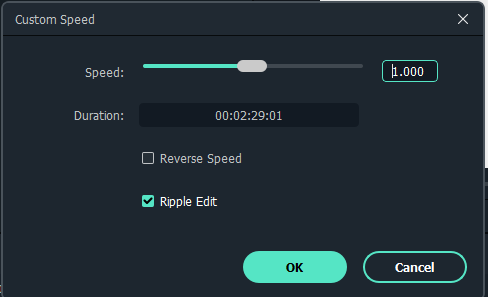
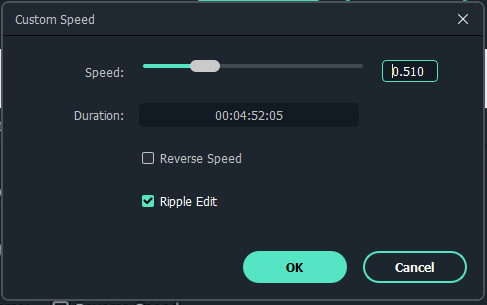
- The speed at which video is played back affects the speed at which audio is played back in a similar manner. Remove the video’s audio if you want the video’s audio to play at the same speed as it did before.
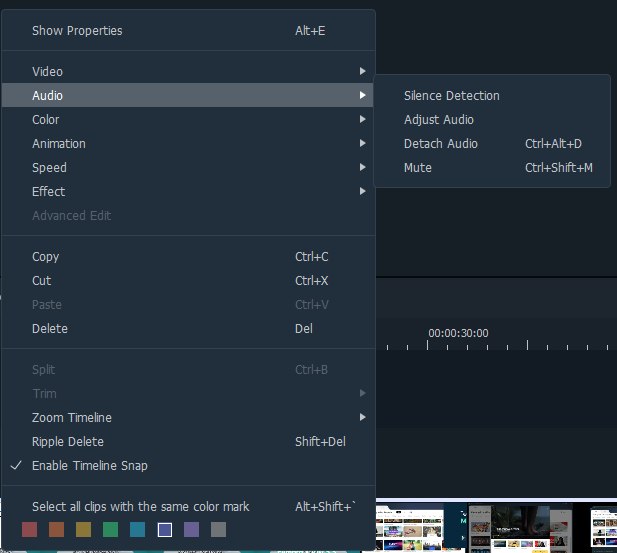
- You must first double-click an audio clip in the audio editing window to begin making changes to it. Fade in and out effects, as well as reducing background noise may all be added or removed. ‘
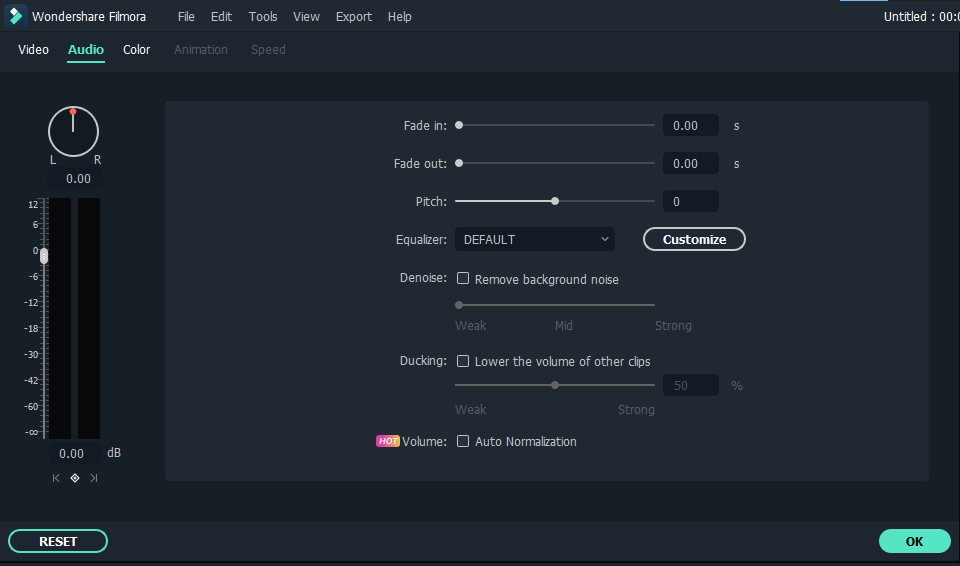
- Once you’ve finished adjusting the speed of your movie, click “Export.” When editing a movie, choose Format from the File menu to save it in a standard format.

- It can also post your videos to sites like YouTube and Vimeo, as well as create a DVD if you so like.

- Using the drop-down menu, choose the proper symbol for your iPod, iPhone, or iPad to view your new video output (if you have one of these devices).
Conclusion
This tutorial looked at how to slow down a video in Premiere Pro using the Video Speed Controller plugin for Windows. It also emphasizes how Filmora may assist you in achieving your goal in a more efficient manner.
Aside from video effects like as rapid motion and slow motion, Filmora also allows you to do some simple and complex editing tasks such as rotating, reversing, chroma-keying, etc.
WonderShare Filmora is a substantial improvement and redesign of the previous Filmora Video Editor, released in 2008. One of the most endearing aspects of Filmora has always been that, although having a robust set of functions, the developers stayed committed to making the program essential in the design and straightforward to learn and use.
A large number of new features have been included in WonderShare Filmora to meet customer demand, and it has been necessary to incorporate access to those functions into the user interface as well.
According to the business, Adobe Premiere Pro is one of the most widely used video editing products on the market today. The option to speed up or slow down individual clips is one of the most important capabilities of Premiere Pro.

In terms of video editing, Adobe Premiere Pro is one of the most powerful applications on the market, and it’s well-known for its versatility. Speeding up movies is one of the program’s many features required for the insertion of special effects and transitions. A lot of ways are there for you to pick from while using premiere pro to speed up the film as desired.

You can’t overwrite or replace your media files by doing anything in Premiere Pro, which means that nothing you do will have an effect on your media files. The point remains: a copy of your project and all its media assets should always be kept on hand just in case.
Adobe Premiere Pro is an excellent editing tool in terms of its functionality and capabilities. Still, it has a steep hill to climb that makes it difficult for newbies and users without previous editing experience. To get the most out of Adobe Premiere Pro, one must thoroughly understand the product.

No need to worry, folks; as in this article, we will be looking at how we can alter premiere pro speed.
Fast Forward or Speed up Playback Speed in Premiere Pro
On analog editing systems, the speed of film could permanently be altered; but, because of the limitations of the technology, if you slowed anything down too much, the frame rate at which it was taken may become evident, and the image quality would begin to suffer as a consequence.
Adobe Premiere Pro is a feature-rich and professional video editor designed for the Macintosh platform. It has a variety of editing features built-in. Adobe Premiere Pro lets you change and control the speed at which movies are played back.
Premiere provides three choices for adjusting the tempo of a movie or speeding it up. We’ll go over them one by one as we scroll down the page.

Method 1
- Download and Install Adobe Premiere Pro. Launch the application on your system.
- Once you’ve set up a new project in Adobe Premiere Pro, import the video you want to edit.
- In order to place the video where you want it, drag the necessary video clips into the timeline. In the end, you’ll have a new series to call your own.
- Using the right-click menu, you may choose the whole movie or only a portion of it that you wish to edit.
- The popup dialog box will display if you choose Speed/Duration from the context menu list.
- Choose Clip> Speed Duration instead from the program’s drop-down menu.
- The Speed field should be raised, and then the OK button should be pressed to accept the change.
Method 2: Rate Stretch Tool
Adobe Premiere Pro has a Rate Stretch feature that lets you manually alter the movie’s tempo by sliding the trim bar along the timeline. To utilize the Rate Stretch tool to speed up a video clip, you must first divide the movie into pieces.
Here’s a quick method for altering the video speed so that it fits under the time limit:
- Launch the application on your respective systems.
- Drag and drop the selected video onto the timeline in Premiere Pro.
- Then, choose the Ripple Edit Tool from the toolbar, followed by the Rate Stretch Tool by clicking and holding the Ripple Edit Tool. Click the Rate Stretch button on the timeline’s left side to begin a timer.
- You may also use the R key on your keyboard to activate the Rate Stretch Tool, which is a shortcut key.
- Drag the video’s start and endpoints to their respective ends on the right and left sides to prolong or reduce the duration. As a consequence, the video speed will be improved. The bigger the period of time the video is dragged inwards, the faster it rises.
Method 3: Time Remapping Tool
In Adobe Premiere Pro, the time remapping tool is where you go to speed up a selected video section. With a video clip, this function may be utilized to create the illusion of speed and slowness.
- It’s time to fire up Adobe Premiere Pro and start fiddling with your footage.
- Simply right-click on it to bring up the context menu, and then choose Show Clip Keyframes from the display list. Afterward, choose Time Remapping from the context menu that opens.
- Click on it to make it go faster. The video will be colored blue, and a horizontal rubber band line will be drawn down its center if this option is selected. One of the video’s frame rate lines may be found here.
- A white speed-control track may be seen just below the title bar in the upper part of the video. If you can’t see it well when zooming in, you may try again. The rubber band may be dragged higher in Premiere Pro to speed up the video.
The tooltip will show how long it has been since the change happened compared to the original speed. As the movie progresses, so does the speed at which it is shown, and the duration of the video fluctuates as well. The audio remains unaltered and tied to the video when using Time Remapping.
How to Slow Down A Video in Premiere Pro?
Now, let’s discuss how to slow down a video in premiere pro
Time stretch
A one-second video clip at 60 frames per second is an example of this situation. When the game is being played at a reasonable speed on any given platform or software, 60 frames will be shown. Because of this, each frame will take twice as long to play at a 0.5X slower pace.
To put it another way, you’d see 30 frames in a second that weren’t repeated. A second has been added to the video’s duration, which will now be 2 seconds instead of 1. There will be no deterioration in quality in this situation.
- Create a new project in Premiere Pro on your PC.
- To import a video file, choose Import from the File menu at the top of the screen. After that, drag the video into either the timeline or the project panel, whichever you like.
- Right-clicking and choosing the Duration/Speed option causes the video to begin playing.
- This stage necessitates a decrease in speed from 100% to a lower percentage.
Using Keyframes
When you attempt to slow down a video by adjusting the frame rate, you are essentially eliminating frames from the video stream. This procedure will allow you to slow down a movie to your desired speed without sacrificing quality.
- After downloading and installing Adobe Premiere Pro, the first step is to launch the program. Later, you’ll need to choose a specific video that you’d want to have slowed down.
- After you’ve chosen it, you may upload it to Premiere Pro. After importing the video, you must drag and drop it into the timeline in Premiere.
- By right-clicking the mouse, choose Modify > Interpret from the drop-down menu.
- You’ll need to make some changes to the frame information now. Hit the Assume this frame rate button and input a value that is lower than the original video frame rate.
Utlizing Time Remapping
The remapping tool is a very common tool for creating slow-motion videos. It may be found in many video editing programs. It gives you the option of selecting a particular section of a video clip and then slowing down the video clip.
- Launching Adobe Premiere Pro is the initial step once it has been downloaded and installed on your computer. A particular video that you’d want slow-motioned will need to be selected later on in the process.
- After dragging the video to the timeline, you’ll need to choose the area of the movie that you want to slow down.
- Now you must choose the Key Frames and Speed from your video by clicking on the video’s right-click menu.
- Only the “Pen Tool” must be used to lock the specific region you wish to slow down in order to push the Speed Line through the Selection tool to slow down the video during this phase.
Why Is Premiere Pro Playback Fast?
If this issue arises in your program, you’ll notice choppy playback, a character that speaks too rapidly, and audio that skips frames in the narration.
The multimedia editor Premiere Pro is one of the best currently available on the market. In addition to creating YouTube videos, feature films, music videos, and other sorts of content, many professionals turn to it.
It is said that Adobe Premiere Pro suffers from a playback issue. It has the ability to make the video creation process more complicated and demanding than it should be. Let me show you how to fix this easy error in just two simple steps.
Start the program on your computer’s operating system.
Select Edit from the drop-down menu.
Look towards preference
Afterward, choose audio hardware.
No input should be used as the default input, regardless of what it is currently set to.
When you click on Playback your film, you will notice that the issue has been rectified.

How can we Alter the speed of Videos in WonderShare Filmora?
Before understanding the process of speed altering in WonderShare Filmora, let’s have an overview of “what WonderShare Filmora is”.
What is Wondershare Filmora?

Wondershare Filmora is the best video editor for content creators who are just getting started and those who want to produce Hollywood-quality visuals and content without having to invest years in training and certification. WonderShare Filmora streamlines the video editing process through the use of intelligent, intuitive features that can automate repetitive tasks and save time.
Individuals can subscribe to WonderShare Filmora for a one-year fee of $68.98 per year. Filmora is well-known as a straightforward video editor designed for novice users and social media influencers who want to devote more time to their creative endeavors. A few new features have been added, and we can now create professional-looking videos without having to go through a lengthy learning curve.
Features that Stand Out
For both new and experienced film creators, WonderShare Filmora has been designed to offer a scalable environment. Even if you’ve never edited a movie before, you can start doing so right now.
Millions of Free Media to Choose From:
Over 10 million media files are available in the stock media library of WonderShare Filmora, making it easy for filmmakers to bring their visions to life. Speed ramping and auto beat sync are also included.
Toolbar Quick Access:
After the application is installed on your computer, the toolbar allows rapid access to all the program’s capabilities. These features include media and audio files, titles, effects, split-screen formatting, components, transitions, and other elements.
Quick Editing Feature:
For content producers who don’t want to spend hours on video editing and instead want to concentrate on other areas of their work, WonderShare Filmora is the appropriate solution.
Use Animated Transitions to Bring Life into Your Videos:
Your video may get tedious if you repeatedly use the same frame. Animated transitions may be added to video and photo collages using the Split Screen feature. Using this feature, you may divide your screen into as many as six individual displays.
Improved Speed Ramping Function:
WonderShare Filmora’s new speed ramping functionality is one of the most intriguing new additions. The speed of a video clip may be gradually increased or decreased with this tool, and the transition between the various speed levels is smooth.
Capture Every Scene with Ease:
Using a slew of cameras, skilled videographers may capture the same topic from a variety of vantage points. A single camera may be used in certain circumstances to record the whole scene and a close-up, while others may be used to capture a variety of views and expressions.
Automation at its Best:
With WonderShare Filmora, you don’t have to manually synchronize the audio and video from many cameras, saving you time and effort.
Enhance Your Creativity with Masking:
Masking” is a new feature that is included in this version. Using a mask to combine different clips helps you to expand your creative horizons. You could get something fantastic, particularly if you use effects that are used in commercial ads.”
Hundred’s of Themes to Choose from:
WonderShare Filmora has 115 video themes, including business, travel, vlogging, slideshows, and many more. It’s possible to make a whole movie using Filmora AI by letting it figure out the best way to edit your video.
In short, the most popular features that it offers are:
- Motion Tracking
- Split Screen
- Audio Ducking
- Speed Ramping
- Green screen
- Color Grading
- Third-Party Stock media
- Auto Synchronization
- Masking
- Color Match
How to speed up Playback in Filmora?
In Filmora, you can also modify the length of the video clip, which allows you to change the video speed.
For a “close up in time,” the slow-motion effect may be the best choice, while the fast-forward effect may be used to make dramatic or humorous videos, depending on your tastes.
Filmora’s user-friendly interface and simple editing capabilities have made it a popular choice for professionals throughout the globe. As a result, many people prefer it over alternative editing software.
Steps
- Download and Install The latest version of Filmora.
- Launch the application on your respective system

Among the many formats that Wondershare Filmora can handle are MP4 and AVI, WMV and MOV, and even FLV and M4V. Go to your computer’s media library and choose Import from the Import menu to begin the process of bringing in videos from your computer.
Alternatively, you may just drag & drop the file you want.
Drag movies from your User’s Album onto a video track on the Timeline to access the Speed and Duration settings for that track’s duration.

- A pop-up window will appear. In order to determine the speed at which a motion effect is moving, you may use the speed numbers provided. After then, it’s up to you how fast or slow you want to go. To see how sped-up or slowed-down videos will seem, just click on the preview box. It’s a good balance if you think the present speed is too high: 0.5 speed.


- The speed at which video is played back affects the speed at which audio is played back in a similar manner. Remove the video’s audio if you want the video’s audio to play at the same speed as it did before.

- You must first double-click an audio clip in the audio editing window to begin making changes to it. Fade in and out effects, as well as reducing background noise may all be added or removed. ‘

- Once you’ve finished adjusting the speed of your movie, click “Export.” When editing a movie, choose Format from the File menu to save it in a standard format.

- It can also post your videos to sites like YouTube and Vimeo, as well as create a DVD if you so like.

- Using the drop-down menu, choose the proper symbol for your iPod, iPhone, or iPad to view your new video output (if you have one of these devices).
Conclusion
This tutorial looked at how to slow down a video in Premiere Pro using the Video Speed Controller plugin for Windows. It also emphasizes how Filmora may assist you in achieving your goal in a more efficient manner.
Aside from video effects like as rapid motion and slow motion, Filmora also allows you to do some simple and complex editing tasks such as rotating, reversing, chroma-keying, etc.
WonderShare Filmora is a substantial improvement and redesign of the previous Filmora Video Editor, released in 2008. One of the most endearing aspects of Filmora has always been that, although having a robust set of functions, the developers stayed committed to making the program essential in the design and straightforward to learn and use.
A large number of new features have been included in WonderShare Filmora to meet customer demand, and it has been necessary to incorporate access to those functions into the user interface as well.
According to the business, Adobe Premiere Pro is one of the most widely used video editing products on the market today. The option to speed up or slow down individual clips is one of the most important capabilities of Premiere Pro.

In terms of video editing, Adobe Premiere Pro is one of the most powerful applications on the market, and it’s well-known for its versatility. Speeding up movies is one of the program’s many features required for the insertion of special effects and transitions. A lot of ways are there for you to pick from while using premiere pro to speed up the film as desired.

You can’t overwrite or replace your media files by doing anything in Premiere Pro, which means that nothing you do will have an effect on your media files. The point remains: a copy of your project and all its media assets should always be kept on hand just in case.
Adobe Premiere Pro is an excellent editing tool in terms of its functionality and capabilities. Still, it has a steep hill to climb that makes it difficult for newbies and users without previous editing experience. To get the most out of Adobe Premiere Pro, one must thoroughly understand the product.

No need to worry, folks; as in this article, we will be looking at how we can alter premiere pro speed.
Fast Forward or Speed up Playback Speed in Premiere Pro
On analog editing systems, the speed of film could permanently be altered; but, because of the limitations of the technology, if you slowed anything down too much, the frame rate at which it was taken may become evident, and the image quality would begin to suffer as a consequence.
Adobe Premiere Pro is a feature-rich and professional video editor designed for the Macintosh platform. It has a variety of editing features built-in. Adobe Premiere Pro lets you change and control the speed at which movies are played back.
Premiere provides three choices for adjusting the tempo of a movie or speeding it up. We’ll go over them one by one as we scroll down the page.

Method 1
- Download and Install Adobe Premiere Pro. Launch the application on your system.
- Once you’ve set up a new project in Adobe Premiere Pro, import the video you want to edit.
- In order to place the video where you want it, drag the necessary video clips into the timeline. In the end, you’ll have a new series to call your own.
- Using the right-click menu, you may choose the whole movie or only a portion of it that you wish to edit.
- The popup dialog box will display if you choose Speed/Duration from the context menu list.
- Choose Clip> Speed Duration instead from the program’s drop-down menu.
- The Speed field should be raised, and then the OK button should be pressed to accept the change.
Method 2: Rate Stretch Tool
Adobe Premiere Pro has a Rate Stretch feature that lets you manually alter the movie’s tempo by sliding the trim bar along the timeline. To utilize the Rate Stretch tool to speed up a video clip, you must first divide the movie into pieces.
Here’s a quick method for altering the video speed so that it fits under the time limit:
- Launch the application on your respective systems.
- Drag and drop the selected video onto the timeline in Premiere Pro.
- Then, choose the Ripple Edit Tool from the toolbar, followed by the Rate Stretch Tool by clicking and holding the Ripple Edit Tool. Click the Rate Stretch button on the timeline’s left side to begin a timer.
- You may also use the R key on your keyboard to activate the Rate Stretch Tool, which is a shortcut key.
- Drag the video’s start and endpoints to their respective ends on the right and left sides to prolong or reduce the duration. As a consequence, the video speed will be improved. The bigger the period of time the video is dragged inwards, the faster it rises.
Method 3: Time Remapping Tool
In Adobe Premiere Pro, the time remapping tool is where you go to speed up a selected video section. With a video clip, this function may be utilized to create the illusion of speed and slowness.
- It’s time to fire up Adobe Premiere Pro and start fiddling with your footage.
- Simply right-click on it to bring up the context menu, and then choose Show Clip Keyframes from the display list. Afterward, choose Time Remapping from the context menu that opens.
- Click on it to make it go faster. The video will be colored blue, and a horizontal rubber band line will be drawn down its center if this option is selected. One of the video’s frame rate lines may be found here.
- A white speed-control track may be seen just below the title bar in the upper part of the video. If you can’t see it well when zooming in, you may try again. The rubber band may be dragged higher in Premiere Pro to speed up the video.
The tooltip will show how long it has been since the change happened compared to the original speed. As the movie progresses, so does the speed at which it is shown, and the duration of the video fluctuates as well. The audio remains unaltered and tied to the video when using Time Remapping.
How to Slow Down A Video in Premiere Pro?
Now, let’s discuss how to slow down a video in premiere pro
Time stretch
A one-second video clip at 60 frames per second is an example of this situation. When the game is being played at a reasonable speed on any given platform or software, 60 frames will be shown. Because of this, each frame will take twice as long to play at a 0.5X slower pace.
To put it another way, you’d see 30 frames in a second that weren’t repeated. A second has been added to the video’s duration, which will now be 2 seconds instead of 1. There will be no deterioration in quality in this situation.
- Create a new project in Premiere Pro on your PC.
- To import a video file, choose Import from the File menu at the top of the screen. After that, drag the video into either the timeline or the project panel, whichever you like.
- Right-clicking and choosing the Duration/Speed option causes the video to begin playing.
- This stage necessitates a decrease in speed from 100% to a lower percentage.
Using Keyframes
When you attempt to slow down a video by adjusting the frame rate, you are essentially eliminating frames from the video stream. This procedure will allow you to slow down a movie to your desired speed without sacrificing quality.
- After downloading and installing Adobe Premiere Pro, the first step is to launch the program. Later, you’ll need to choose a specific video that you’d want to have slowed down.
- After you’ve chosen it, you may upload it to Premiere Pro. After importing the video, you must drag and drop it into the timeline in Premiere.
- By right-clicking the mouse, choose Modify > Interpret from the drop-down menu.
- You’ll need to make some changes to the frame information now. Hit the Assume this frame rate button and input a value that is lower than the original video frame rate.
Utlizing Time Remapping
The remapping tool is a very common tool for creating slow-motion videos. It may be found in many video editing programs. It gives you the option of selecting a particular section of a video clip and then slowing down the video clip.
- Launching Adobe Premiere Pro is the initial step once it has been downloaded and installed on your computer. A particular video that you’d want slow-motioned will need to be selected later on in the process.
- After dragging the video to the timeline, you’ll need to choose the area of the movie that you want to slow down.
- Now you must choose the Key Frames and Speed from your video by clicking on the video’s right-click menu.
- Only the “Pen Tool” must be used to lock the specific region you wish to slow down in order to push the Speed Line through the Selection tool to slow down the video during this phase.
Why Is Premiere Pro Playback Fast?
If this issue arises in your program, you’ll notice choppy playback, a character that speaks too rapidly, and audio that skips frames in the narration.
The multimedia editor Premiere Pro is one of the best currently available on the market. In addition to creating YouTube videos, feature films, music videos, and other sorts of content, many professionals turn to it.
It is said that Adobe Premiere Pro suffers from a playback issue. It has the ability to make the video creation process more complicated and demanding than it should be. Let me show you how to fix this easy error in just two simple steps.
Start the program on your computer’s operating system.
Select Edit from the drop-down menu.
Look towards preference
Afterward, choose audio hardware.
No input should be used as the default input, regardless of what it is currently set to.
When you click on Playback your film, you will notice that the issue has been rectified.

How can we Alter the speed of Videos in WonderShare Filmora?
Before understanding the process of speed altering in WonderShare Filmora, let’s have an overview of “what WonderShare Filmora is”.
What is Wondershare Filmora?

Wondershare Filmora is the best video editor for content creators who are just getting started and those who want to produce Hollywood-quality visuals and content without having to invest years in training and certification. WonderShare Filmora streamlines the video editing process through the use of intelligent, intuitive features that can automate repetitive tasks and save time.
Individuals can subscribe to WonderShare Filmora for a one-year fee of $68.98 per year. Filmora is well-known as a straightforward video editor designed for novice users and social media influencers who want to devote more time to their creative endeavors. A few new features have been added, and we can now create professional-looking videos without having to go through a lengthy learning curve.
Features that Stand Out
For both new and experienced film creators, WonderShare Filmora has been designed to offer a scalable environment. Even if you’ve never edited a movie before, you can start doing so right now.
Millions of Free Media to Choose From:
Over 10 million media files are available in the stock media library of WonderShare Filmora, making it easy for filmmakers to bring their visions to life. Speed ramping and auto beat sync are also included.
Toolbar Quick Access:
After the application is installed on your computer, the toolbar allows rapid access to all the program’s capabilities. These features include media and audio files, titles, effects, split-screen formatting, components, transitions, and other elements.
Quick Editing Feature:
For content producers who don’t want to spend hours on video editing and instead want to concentrate on other areas of their work, WonderShare Filmora is the appropriate solution.
Use Animated Transitions to Bring Life into Your Videos:
Your video may get tedious if you repeatedly use the same frame. Animated transitions may be added to video and photo collages using the Split Screen feature. Using this feature, you may divide your screen into as many as six individual displays.
Improved Speed Ramping Function:
WonderShare Filmora’s new speed ramping functionality is one of the most intriguing new additions. The speed of a video clip may be gradually increased or decreased with this tool, and the transition between the various speed levels is smooth.
Capture Every Scene with Ease:
Using a slew of cameras, skilled videographers may capture the same topic from a variety of vantage points. A single camera may be used in certain circumstances to record the whole scene and a close-up, while others may be used to capture a variety of views and expressions.
Automation at its Best:
With WonderShare Filmora, you don’t have to manually synchronize the audio and video from many cameras, saving you time and effort.
Enhance Your Creativity with Masking:
Masking” is a new feature that is included in this version. Using a mask to combine different clips helps you to expand your creative horizons. You could get something fantastic, particularly if you use effects that are used in commercial ads.”
Hundred’s of Themes to Choose from:
WonderShare Filmora has 115 video themes, including business, travel, vlogging, slideshows, and many more. It’s possible to make a whole movie using Filmora AI by letting it figure out the best way to edit your video.
In short, the most popular features that it offers are:
- Motion Tracking
- Split Screen
- Audio Ducking
- Speed Ramping
- Green screen
- Color Grading
- Third-Party Stock media
- Auto Synchronization
- Masking
- Color Match
How to speed up Playback in Filmora?
In Filmora, you can also modify the length of the video clip, which allows you to change the video speed.
For a “close up in time,” the slow-motion effect may be the best choice, while the fast-forward effect may be used to make dramatic or humorous videos, depending on your tastes.
Filmora’s user-friendly interface and simple editing capabilities have made it a popular choice for professionals throughout the globe. As a result, many people prefer it over alternative editing software.
Steps
- Download and Install The latest version of Filmora.
- Launch the application on your respective system

Among the many formats that Wondershare Filmora can handle are MP4 and AVI, WMV and MOV, and even FLV and M4V. Go to your computer’s media library and choose Import from the Import menu to begin the process of bringing in videos from your computer.
Alternatively, you may just drag & drop the file you want.
Drag movies from your User’s Album onto a video track on the Timeline to access the Speed and Duration settings for that track’s duration.

- A pop-up window will appear. In order to determine the speed at which a motion effect is moving, you may use the speed numbers provided. After then, it’s up to you how fast or slow you want to go. To see how sped-up or slowed-down videos will seem, just click on the preview box. It’s a good balance if you think the present speed is too high: 0.5 speed.


- The speed at which video is played back affects the speed at which audio is played back in a similar manner. Remove the video’s audio if you want the video’s audio to play at the same speed as it did before.

- You must first double-click an audio clip in the audio editing window to begin making changes to it. Fade in and out effects, as well as reducing background noise may all be added or removed. ‘

- Once you’ve finished adjusting the speed of your movie, click “Export.” When editing a movie, choose Format from the File menu to save it in a standard format.

- It can also post your videos to sites like YouTube and Vimeo, as well as create a DVD if you so like.

- Using the drop-down menu, choose the proper symbol for your iPod, iPhone, or iPad to view your new video output (if you have one of these devices).
Conclusion
This tutorial looked at how to slow down a video in Premiere Pro using the Video Speed Controller plugin for Windows. It also emphasizes how Filmora may assist you in achieving your goal in a more efficient manner.
Aside from video effects like as rapid motion and slow motion, Filmora also allows you to do some simple and complex editing tasks such as rotating, reversing, chroma-keying, etc.
WonderShare Filmora is a substantial improvement and redesign of the previous Filmora Video Editor, released in 2008. One of the most endearing aspects of Filmora has always been that, although having a robust set of functions, the developers stayed committed to making the program essential in the design and straightforward to learn and use.
A large number of new features have been included in WonderShare Filmora to meet customer demand, and it has been necessary to incorporate access to those functions into the user interface as well.
According to the business, Adobe Premiere Pro is one of the most widely used video editing products on the market today. The option to speed up or slow down individual clips is one of the most important capabilities of Premiere Pro.

In terms of video editing, Adobe Premiere Pro is one of the most powerful applications on the market, and it’s well-known for its versatility. Speeding up movies is one of the program’s many features required for the insertion of special effects and transitions. A lot of ways are there for you to pick from while using premiere pro to speed up the film as desired.

You can’t overwrite or replace your media files by doing anything in Premiere Pro, which means that nothing you do will have an effect on your media files. The point remains: a copy of your project and all its media assets should always be kept on hand just in case.
Adobe Premiere Pro is an excellent editing tool in terms of its functionality and capabilities. Still, it has a steep hill to climb that makes it difficult for newbies and users without previous editing experience. To get the most out of Adobe Premiere Pro, one must thoroughly understand the product.

No need to worry, folks; as in this article, we will be looking at how we can alter premiere pro speed.
Fast Forward or Speed up Playback Speed in Premiere Pro
On analog editing systems, the speed of film could permanently be altered; but, because of the limitations of the technology, if you slowed anything down too much, the frame rate at which it was taken may become evident, and the image quality would begin to suffer as a consequence.
Adobe Premiere Pro is a feature-rich and professional video editor designed for the Macintosh platform. It has a variety of editing features built-in. Adobe Premiere Pro lets you change and control the speed at which movies are played back.
Premiere provides three choices for adjusting the tempo of a movie or speeding it up. We’ll go over them one by one as we scroll down the page.

Method 1
- Download and Install Adobe Premiere Pro. Launch the application on your system.
- Once you’ve set up a new project in Adobe Premiere Pro, import the video you want to edit.
- In order to place the video where you want it, drag the necessary video clips into the timeline. In the end, you’ll have a new series to call your own.
- Using the right-click menu, you may choose the whole movie or only a portion of it that you wish to edit.
- The popup dialog box will display if you choose Speed/Duration from the context menu list.
- Choose Clip> Speed Duration instead from the program’s drop-down menu.
- The Speed field should be raised, and then the OK button should be pressed to accept the change.
Method 2: Rate Stretch Tool
Adobe Premiere Pro has a Rate Stretch feature that lets you manually alter the movie’s tempo by sliding the trim bar along the timeline. To utilize the Rate Stretch tool to speed up a video clip, you must first divide the movie into pieces.
Here’s a quick method for altering the video speed so that it fits under the time limit:
- Launch the application on your respective systems.
- Drag and drop the selected video onto the timeline in Premiere Pro.
- Then, choose the Ripple Edit Tool from the toolbar, followed by the Rate Stretch Tool by clicking and holding the Ripple Edit Tool. Click the Rate Stretch button on the timeline’s left side to begin a timer.
- You may also use the R key on your keyboard to activate the Rate Stretch Tool, which is a shortcut key.
- Drag the video’s start and endpoints to their respective ends on the right and left sides to prolong or reduce the duration. As a consequence, the video speed will be improved. The bigger the period of time the video is dragged inwards, the faster it rises.
Method 3: Time Remapping Tool
In Adobe Premiere Pro, the time remapping tool is where you go to speed up a selected video section. With a video clip, this function may be utilized to create the illusion of speed and slowness.
- It’s time to fire up Adobe Premiere Pro and start fiddling with your footage.
- Simply right-click on it to bring up the context menu, and then choose Show Clip Keyframes from the display list. Afterward, choose Time Remapping from the context menu that opens.
- Click on it to make it go faster. The video will be colored blue, and a horizontal rubber band line will be drawn down its center if this option is selected. One of the video’s frame rate lines may be found here.
- A white speed-control track may be seen just below the title bar in the upper part of the video. If you can’t see it well when zooming in, you may try again. The rubber band may be dragged higher in Premiere Pro to speed up the video.
The tooltip will show how long it has been since the change happened compared to the original speed. As the movie progresses, so does the speed at which it is shown, and the duration of the video fluctuates as well. The audio remains unaltered and tied to the video when using Time Remapping.
How to Slow Down A Video in Premiere Pro?
Now, let’s discuss how to slow down a video in premiere pro
Time stretch
A one-second video clip at 60 frames per second is an example of this situation. When the game is being played at a reasonable speed on any given platform or software, 60 frames will be shown. Because of this, each frame will take twice as long to play at a 0.5X slower pace.
To put it another way, you’d see 30 frames in a second that weren’t repeated. A second has been added to the video’s duration, which will now be 2 seconds instead of 1. There will be no deterioration in quality in this situation.
- Create a new project in Premiere Pro on your PC.
- To import a video file, choose Import from the File menu at the top of the screen. After that, drag the video into either the timeline or the project panel, whichever you like.
- Right-clicking and choosing the Duration/Speed option causes the video to begin playing.
- This stage necessitates a decrease in speed from 100% to a lower percentage.
Using Keyframes
When you attempt to slow down a video by adjusting the frame rate, you are essentially eliminating frames from the video stream. This procedure will allow you to slow down a movie to your desired speed without sacrificing quality.
- After downloading and installing Adobe Premiere Pro, the first step is to launch the program. Later, you’ll need to choose a specific video that you’d want to have slowed down.
- After you’ve chosen it, you may upload it to Premiere Pro. After importing the video, you must drag and drop it into the timeline in Premiere.
- By right-clicking the mouse, choose Modify > Interpret from the drop-down menu.
- You’ll need to make some changes to the frame information now. Hit the Assume this frame rate button and input a value that is lower than the original video frame rate.
Utlizing Time Remapping
The remapping tool is a very common tool for creating slow-motion videos. It may be found in many video editing programs. It gives you the option of selecting a particular section of a video clip and then slowing down the video clip.
- Launching Adobe Premiere Pro is the initial step once it has been downloaded and installed on your computer. A particular video that you’d want slow-motioned will need to be selected later on in the process.
- After dragging the video to the timeline, you’ll need to choose the area of the movie that you want to slow down.
- Now you must choose the Key Frames and Speed from your video by clicking on the video’s right-click menu.
- Only the “Pen Tool” must be used to lock the specific region you wish to slow down in order to push the Speed Line through the Selection tool to slow down the video during this phase.
Why Is Premiere Pro Playback Fast?
If this issue arises in your program, you’ll notice choppy playback, a character that speaks too rapidly, and audio that skips frames in the narration.
The multimedia editor Premiere Pro is one of the best currently available on the market. In addition to creating YouTube videos, feature films, music videos, and other sorts of content, many professionals turn to it.
It is said that Adobe Premiere Pro suffers from a playback issue. It has the ability to make the video creation process more complicated and demanding than it should be. Let me show you how to fix this easy error in just two simple steps.
Start the program on your computer’s operating system.
Select Edit from the drop-down menu.
Look towards preference
Afterward, choose audio hardware.
No input should be used as the default input, regardless of what it is currently set to.
When you click on Playback your film, you will notice that the issue has been rectified.

How can we Alter the speed of Videos in WonderShare Filmora?
Before understanding the process of speed altering in WonderShare Filmora, let’s have an overview of “what WonderShare Filmora is”.
What is Wondershare Filmora?

Wondershare Filmora is the best video editor for content creators who are just getting started and those who want to produce Hollywood-quality visuals and content without having to invest years in training and certification. WonderShare Filmora streamlines the video editing process through the use of intelligent, intuitive features that can automate repetitive tasks and save time.
Individuals can subscribe to WonderShare Filmora for a one-year fee of $68.98 per year. Filmora is well-known as a straightforward video editor designed for novice users and social media influencers who want to devote more time to their creative endeavors. A few new features have been added, and we can now create professional-looking videos without having to go through a lengthy learning curve.
Features that Stand Out
For both new and experienced film creators, WonderShare Filmora has been designed to offer a scalable environment. Even if you’ve never edited a movie before, you can start doing so right now.
Millions of Free Media to Choose From:
Over 10 million media files are available in the stock media library of WonderShare Filmora, making it easy for filmmakers to bring their visions to life. Speed ramping and auto beat sync are also included.
Toolbar Quick Access:
After the application is installed on your computer, the toolbar allows rapid access to all the program’s capabilities. These features include media and audio files, titles, effects, split-screen formatting, components, transitions, and other elements.
Quick Editing Feature:
For content producers who don’t want to spend hours on video editing and instead want to concentrate on other areas of their work, WonderShare Filmora is the appropriate solution.
Use Animated Transitions to Bring Life into Your Videos:
Your video may get tedious if you repeatedly use the same frame. Animated transitions may be added to video and photo collages using the Split Screen feature. Using this feature, you may divide your screen into as many as six individual displays.
Improved Speed Ramping Function:
WonderShare Filmora’s new speed ramping functionality is one of the most intriguing new additions. The speed of a video clip may be gradually increased or decreased with this tool, and the transition between the various speed levels is smooth.
Capture Every Scene with Ease:
Using a slew of cameras, skilled videographers may capture the same topic from a variety of vantage points. A single camera may be used in certain circumstances to record the whole scene and a close-up, while others may be used to capture a variety of views and expressions.
Automation at its Best:
With WonderShare Filmora, you don’t have to manually synchronize the audio and video from many cameras, saving you time and effort.
Enhance Your Creativity with Masking:
Masking” is a new feature that is included in this version. Using a mask to combine different clips helps you to expand your creative horizons. You could get something fantastic, particularly if you use effects that are used in commercial ads.”
Hundred’s of Themes to Choose from:
WonderShare Filmora has 115 video themes, including business, travel, vlogging, slideshows, and many more. It’s possible to make a whole movie using Filmora AI by letting it figure out the best way to edit your video.
In short, the most popular features that it offers are:
- Motion Tracking
- Split Screen
- Audio Ducking
- Speed Ramping
- Green screen
- Color Grading
- Third-Party Stock media
- Auto Synchronization
- Masking
- Color Match
How to speed up Playback in Filmora?
In Filmora, you can also modify the length of the video clip, which allows you to change the video speed.
For a “close up in time,” the slow-motion effect may be the best choice, while the fast-forward effect may be used to make dramatic or humorous videos, depending on your tastes.
Filmora’s user-friendly interface and simple editing capabilities have made it a popular choice for professionals throughout the globe. As a result, many people prefer it over alternative editing software.
Steps
- Download and Install The latest version of Filmora.
- Launch the application on your respective system

Among the many formats that Wondershare Filmora can handle are MP4 and AVI, WMV and MOV, and even FLV and M4V. Go to your computer’s media library and choose Import from the Import menu to begin the process of bringing in videos from your computer.
Alternatively, you may just drag & drop the file you want.
Drag movies from your User’s Album onto a video track on the Timeline to access the Speed and Duration settings for that track’s duration.

- A pop-up window will appear. In order to determine the speed at which a motion effect is moving, you may use the speed numbers provided. After then, it’s up to you how fast or slow you want to go. To see how sped-up or slowed-down videos will seem, just click on the preview box. It’s a good balance if you think the present speed is too high: 0.5 speed.


- The speed at which video is played back affects the speed at which audio is played back in a similar manner. Remove the video’s audio if you want the video’s audio to play at the same speed as it did before.

- You must first double-click an audio clip in the audio editing window to begin making changes to it. Fade in and out effects, as well as reducing background noise may all be added or removed. ‘

- Once you’ve finished adjusting the speed of your movie, click “Export.” When editing a movie, choose Format from the File menu to save it in a standard format.

- It can also post your videos to sites like YouTube and Vimeo, as well as create a DVD if you so like.

- Using the drop-down menu, choose the proper symbol for your iPod, iPhone, or iPad to view your new video output (if you have one of these devices).
Conclusion
This tutorial looked at how to slow down a video in Premiere Pro using the Video Speed Controller plugin for Windows. It also emphasizes how Filmora may assist you in achieving your goal in a more efficient manner.
Aside from video effects like as rapid motion and slow motion, Filmora also allows you to do some simple and complex editing tasks such as rotating, reversing, chroma-keying, etc.
WonderShare Filmora is a substantial improvement and redesign of the previous Filmora Video Editor, released in 2008. One of the most endearing aspects of Filmora has always been that, although having a robust set of functions, the developers stayed committed to making the program essential in the design and straightforward to learn and use.
A large number of new features have been included in WonderShare Filmora to meet customer demand, and it has been necessary to incorporate access to those functions into the user interface as well.
Also read:
- Updated 3 Best Effects to Appear on Camera for 2024
- New In 2024, Google Meet Green Screen Is the Latest Addition to the Virtual Meeting App. It Is a Crucial Feature as It Allows Users to Maintain a Semblance of Privacy Through Virtual Backgrounds
- In 2024, Create Glitch Text Effect
- Updated Best 8 Free Video Editing Software Reddit for 2024
- New 2024 Approved How to Edit Facebook eCommerce Video Ads
- New 2024 Approved When Struggling to Find a Suitable Game Recorder for Your PC, You Might Come Across Many Options. Explore the Best Game Recorders for Sharing Game Highlights
- New How To Change Sky Background With Adobe Photoshop Best Ways for 2024
- SRT File Translation Could Be a Tedious Task if You Dont Know the Right Steps. Lets Discuss Few Effective Ways to Do It Like a Pro for 2024
- New Adobe Premiere Pro Guide to Slow-Down Video
- Updated How Can You Import and Adjust the Video Clips on Wondershare Filmora for 2024
- New Overview About Supported iPhone Video Formats and Best iPhone Video Editor & Converter
- In 2024, Splice Video Editor Online - Get Your Videos Splice Easily
- Updated Best iPhone LUTs App to Use
- Updated 2024 Approved Top 6 Drones for Videography
- 15 Stunning GIF Splitter Examples You Need to Bookmark for 2024
- In 2024, Perfecting the Art of Slowing Down Video on Instagram
- In 2024, Two Ways to Track My Boyfriends Realme C51 without Him Knowing | Dr.fone
- Full Guide to Hard Reset Your OnePlus Ace 3 | Dr.fone
- How To Bypass iCloud By Checkra1n Even From Apple iPhone 11 Pro Max If Youve Tried Everything
- Forgot Pattern Lock? Heres How You Can Unlock Samsung Galaxy S24 Ultra Pattern Lock Screen
- 10 Fake GPS Location Apps on Android Of your Itel S23+ | Dr.fone
- How to get the dragon scale and evolution-enabled pokemon On Apple iPhone SE (2022)? | Dr.fone
- How to unlock Oppo A79 5G
- In 2024, How To Erase an Apple iPhone 14 Without Apple ID Password?
- New Best 10 Free Video Translators to Mitigate Translation Risks for 2024
- How To Remove or Bypass Knox Enrollment Service On Infinix GT 10 Pro
- How to Downgrade Apple iPhone 11 Pro Max without Losing Any Content? | Dr.fone
- In 2024, Can I Bypass a Forgotten Phone Password Of Realme C67 4G?
- How to Change Netflix Location to Get More Country Version On Realme Narzo 60x 5G | Dr.fone
- In 2024, Full Guide to Fix iToolab AnyGO Not Working On Apple iPhone XR | Dr.fone
- In 2024, Network Locked SIM Card Inserted On Your Vivo Y100i Power 5G Phone? Unlock It Now
- Title: 10 Best Audio Visualizers Windows, Mac, Android, iPhone & Online
- Author: Morgan
- Created at : 2024-05-19 05:11:33
- Updated at : 2024-05-20 05:11:33
- Link: https://ai-video-editing.techidaily.com/10-best-audio-visualizers-windows-mac-android-iphone-and-online/
- License: This work is licensed under CC BY-NC-SA 4.0.

