:max_bytes(150000):strip_icc():format(webp)/patch-tuesday-2625783-d6bcf232b3c64fc5958037ad31299bd9.png)
10 Best Slow-Motion Cameras to Try for 2024

10 Best Slow-Motion Cameras to Try
Camera technology is evolving at an increased pace with improved features. Each brand competes in the media industry to release cameras with diverse functionalities. When you keep updated on the latest models, you will get to know different varieties and options. It will also help you stay current with evolving technology for slow-motion videos. Choosing the best slow-motion camera involves considering specific needs like filmmaking or creating slow-motion videos.
In this article, we’ll mention the top 10 best slow mo cameras for filming slow-motion videos. The slow-motion camera is specifically built to capture the moments in perfect frame rates. Furthermore, this article will highlight an innovative way to slow down videos without any camera.
Slow Motion Video Maker Slow your video’s speed with better control of your keyframes to create unique cinematic effects!
Make A Slow Motion Video Make A Slow Motion Video More Features

Part 1: How Do Slow-Motion Cameras Help in Recording Perfect Slow-Mo Videos?
Slow-motion cameras record videos at much faster speeds than regular cameras. This feature helps create slow-motion videos by slowing down the recorded action when played at normal speed. These slow-motion cameras are popular in filmmaking, sports analysis, science, and content creation. That’s because they capture detailed moments and highlight fast-moving things.
- Higher Frame Rate: Regular videos usually record 24, 30, or 60 frames per second (fps). But slow-motion cameras can capture hundreds or thousands of frames per second. More frames mean more details and smoother slow-motion videos when played back.
- Smooth Playback: Slow-motion videos look smooth and purposeful when played at regular speeds. More frames are recorded initially to achieve this effect. Ultimately, it will preserve all details when the video is played in slow motion.
- High-Resolution Sensors: Lots of slow-motion cameras have high-quality sensors. These sensors ensure that even with more frames captured, the picture stays sharp and detailed in slow-motion videos. This helps capture fine details without losing clarity.
- Creative Control: Slow-motion cameras let filmmakers and videographers control how fast or slow some parts of a scene look. This helps tell stories better, focus on details, and make videos more interesting and attractive to watch.
- Reduced Motion Blur: More frames per second make pictures clearer and sharper. This feature works especially for fast-moving things. This is important when you need to see tiny details or when the lighting isn’t great.
- Temporal Resolution: Slow-motion cameras can record lots of details in quick movements. They’re handy in sports, science, and creative videos where catching fast and detailed actions matter a lot.
Part 2: Finding The Top Slow-Motion Cameras to Use in 2024
If you want a good slow-motion camera, start by checking out the ones with higher frame rates. Also, think about what you’ll be recording and where you’ll share your videos. Buying a new camera can be confusing and perplexing. We hope you’ll find the best slow-motion camera in the list below. We have arranged the top slow-motion cameras to use in 2024 below:
- PowerShot G7 X Mark III Black
- Sony ZV-1 Camera
- GoPro HERO11 Black
- GoPro HERO10 Black
- Panasonic Lumix GH6
- Sony α7R IV
- Fujifilm X-S20
- Canon EOS-1D X Mark III DSLR Camera
- Nikon D6 FX-Format Digital SLR Camera
- Canon DSLR Camera [EOS 90D]
1. PowerShot G7 X Mark III Black
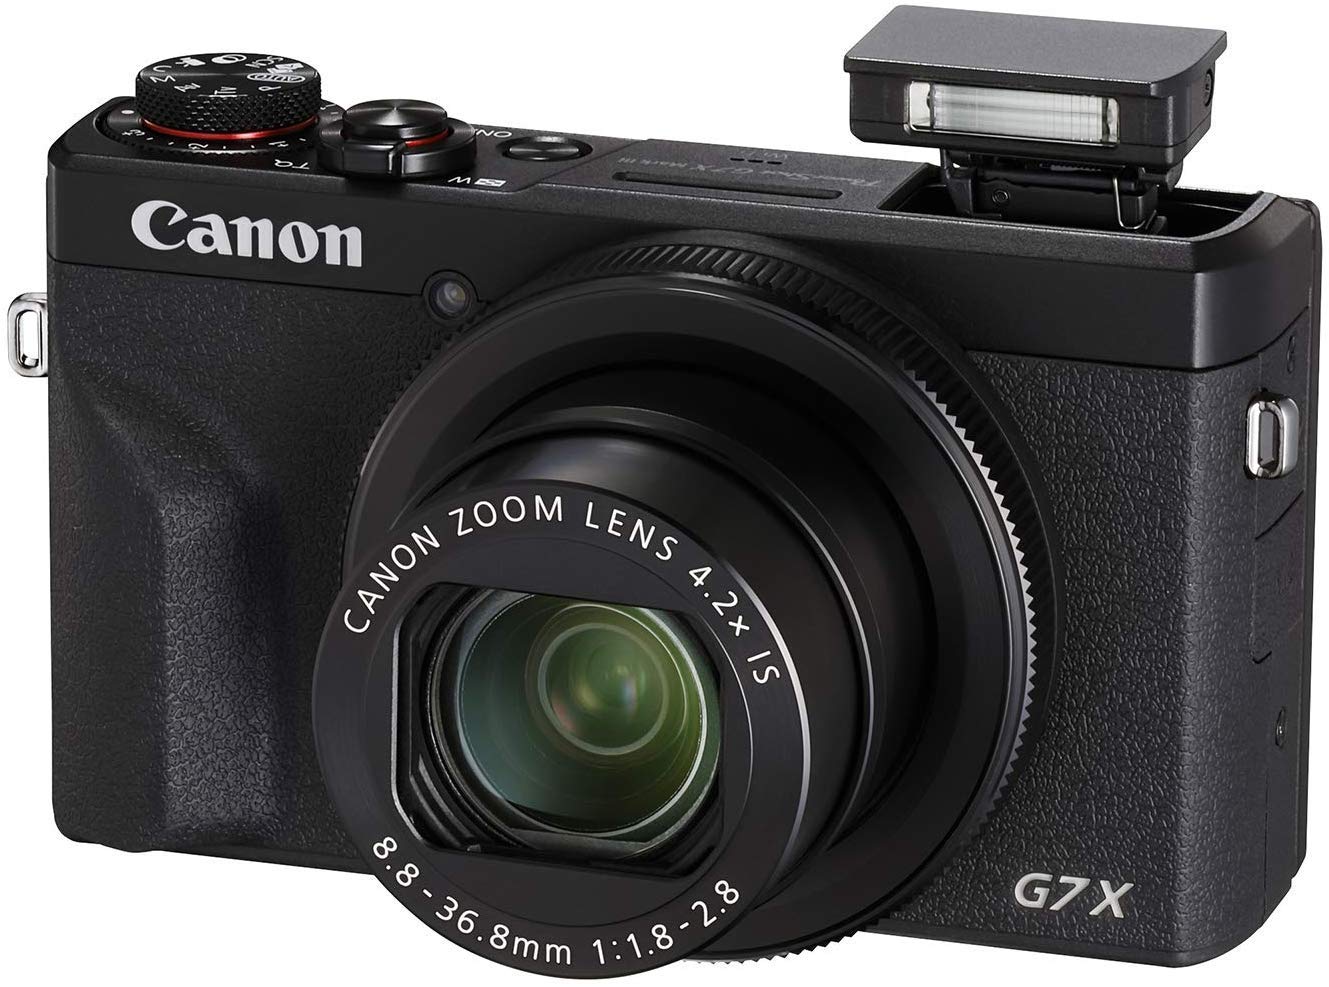
The PowerShot G7 X Mark III Black is a small but powerful camera for taking high-quality slow-motion videos. It has a 20.1 Megapixel camera and a DIGIC 8 Image Processor, which means it shows exceptional clarity even in different lighting. The 4.2x Optical Zoom Kens with Optical Image Stabilizer helps get close-up shots without making them blurry. For videos, it can record in 4K (at 30 frames per second) and Full HD (at 120 frames per second) for super smooth slow-motion shots.
2. Sony ZV-1 Camera
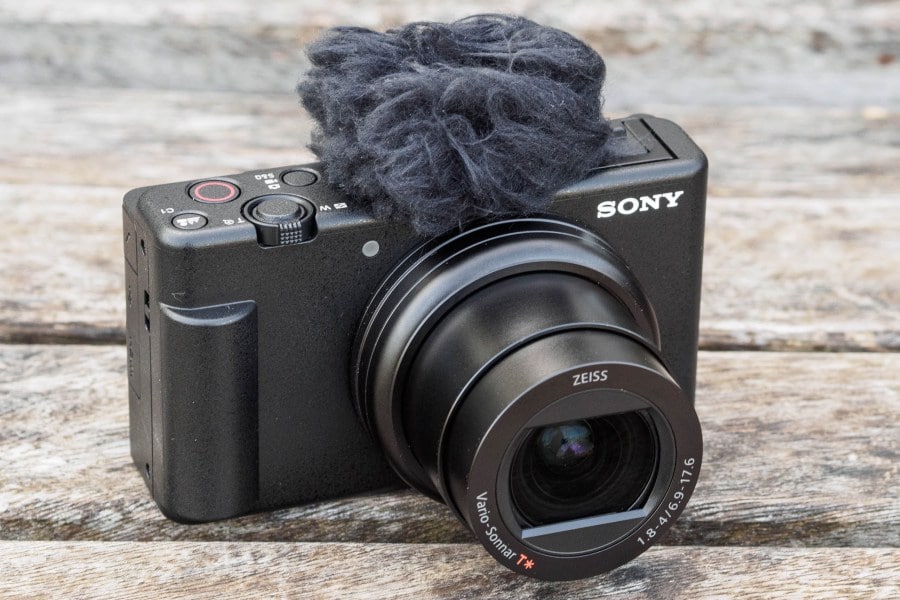
The Sony ZV-1 Camera is made specifically for content creators and vloggers. Although it has a compact design, it is packed with powerful features. This slow-motion video camera has a 1-inch sensor and digital and optical image stabilization. This means your pictures and videos will be clear and steady even if things are moving fast.
The camera’s results are sharp and colorful thanks to its 20.1 MP resolution and BIONZ X Image Processor. Also, it has a Fast Hybrid AF System that quickly focuses accurately, perfect for both photos and videos.
3. GoPro HERO11 Black
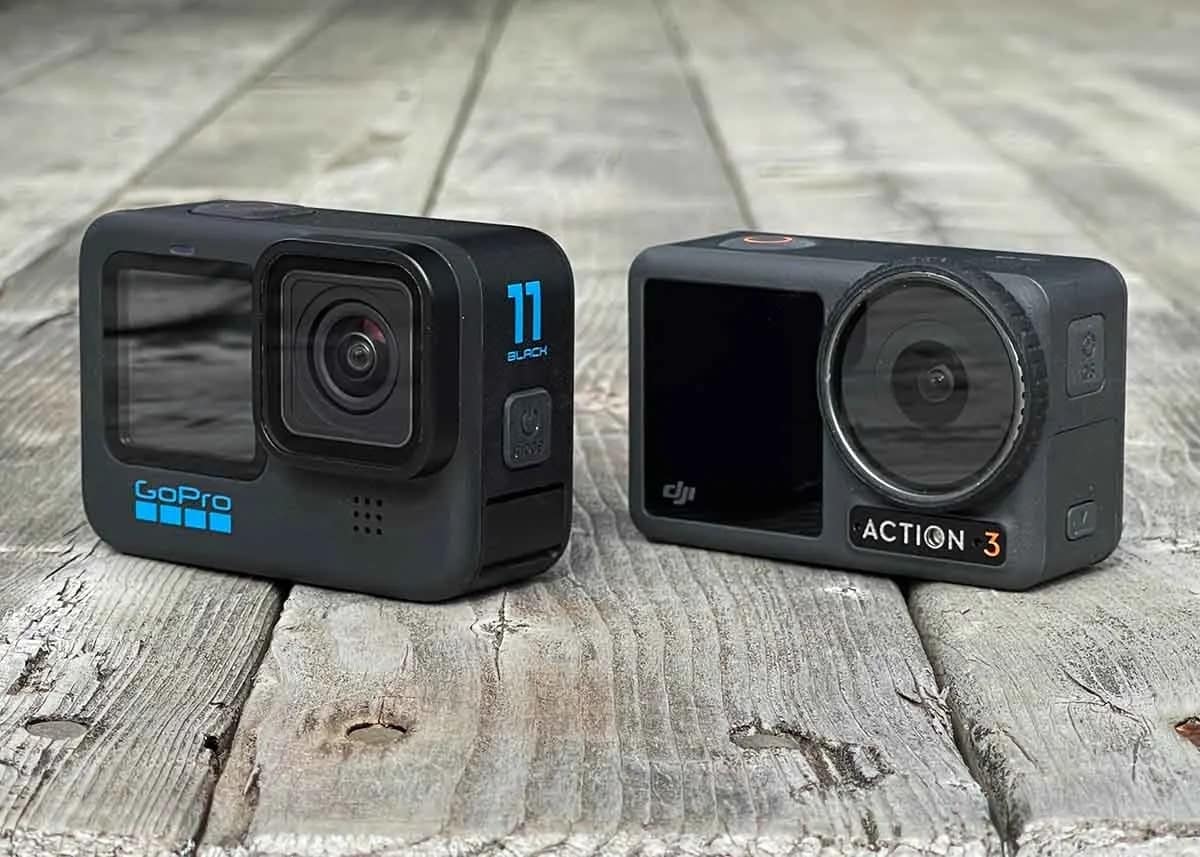
The GoPro HERO11 Black is an awesome slow-motion camera perfect for all kinds of adventures. It takes clear videos up to 5.3K resolution and sharp 27MP photos. The camera has great stabilization, so your videos always look smooth. You can change how wide your shots are and switch lenses digitally while keeping things clear.
GoPro HERO11 Black has cool effects for nighttime shots, making them look artistic. The camera is tough, waterproof up to 33 feet, and has a long-lasting battery that works well even in cold weather.
4. GoPro HERO10 Black
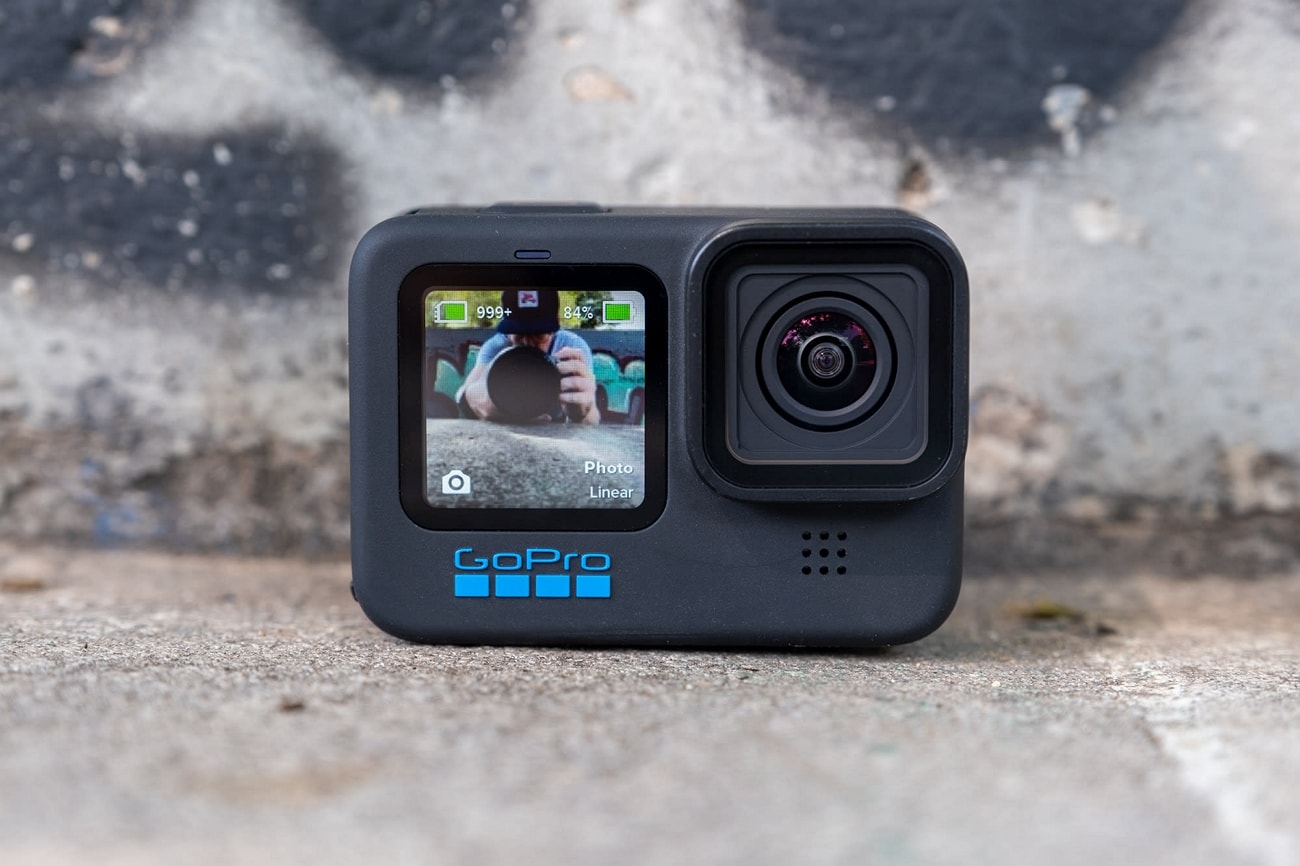
The GoPro HERO10 Black has a faster processor for smoother use and better touch controls. It can record super clear videos at higher speeds: 5.3K at 60fps and 4K at 120fps. You can also shoot camera slow-motion videos at 240fps in 2.7K resolution. The camera’s sensor is better, too, making photos sharper and allowing you to grab 15.8MP pictures from videos. It keeps footage perfectly steady with its excellent stabilization.
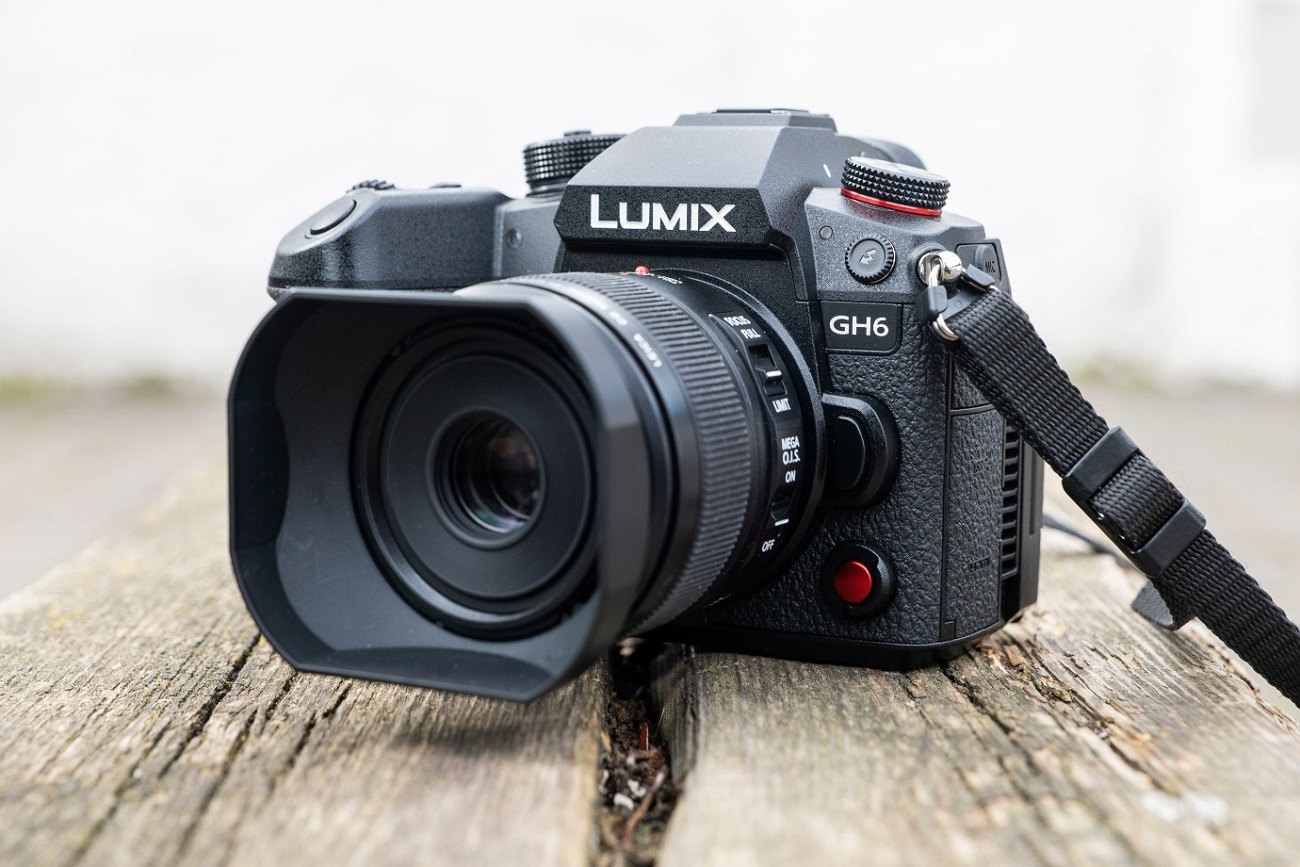
5. Panasonic LUMIX GH6
The LUMIX GH6 is an inspiring innovation in the LUMIX camera series, packed with amazing upgrades. It records high-quality videos internally in ProRes 422 HQ and ProRes 422, making them look great and easier to work with on computers later. This slow-mo video camera is faster due to a new engine, making pictures look better with less noise and better colors.
It’s great for professional video making, offering top-notch recording options. It also has image stabilization, a flexible rear monitor, and slots for different memory cards.
6. Sony α7R IV
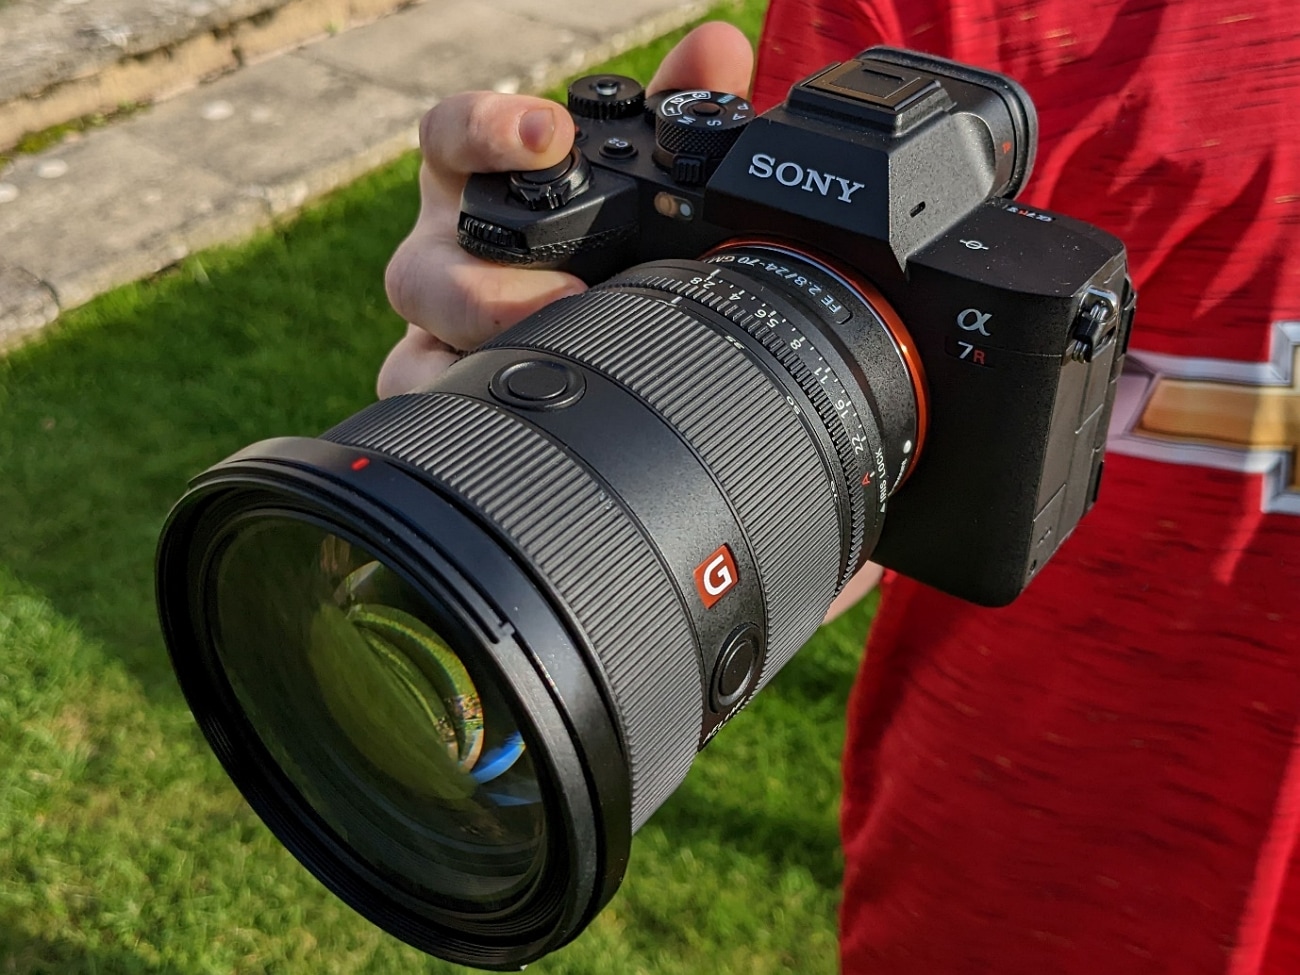
The Sony A7R IV is a top-notch mirrorless camera appreciated by videography experts. It takes super clear pictures with its 20MP full-frame sensor. Also, it has a feature that prevents shaky photos and helps videos stay steady. You can control how long the shutter stays open, which helps in different lighting.
This slow-motion video camera lets you choose different ways to measure light for better pictures. Small and adaptable, it is high-tech and has great performance in digital photography.
7. Fujifilm X-S20
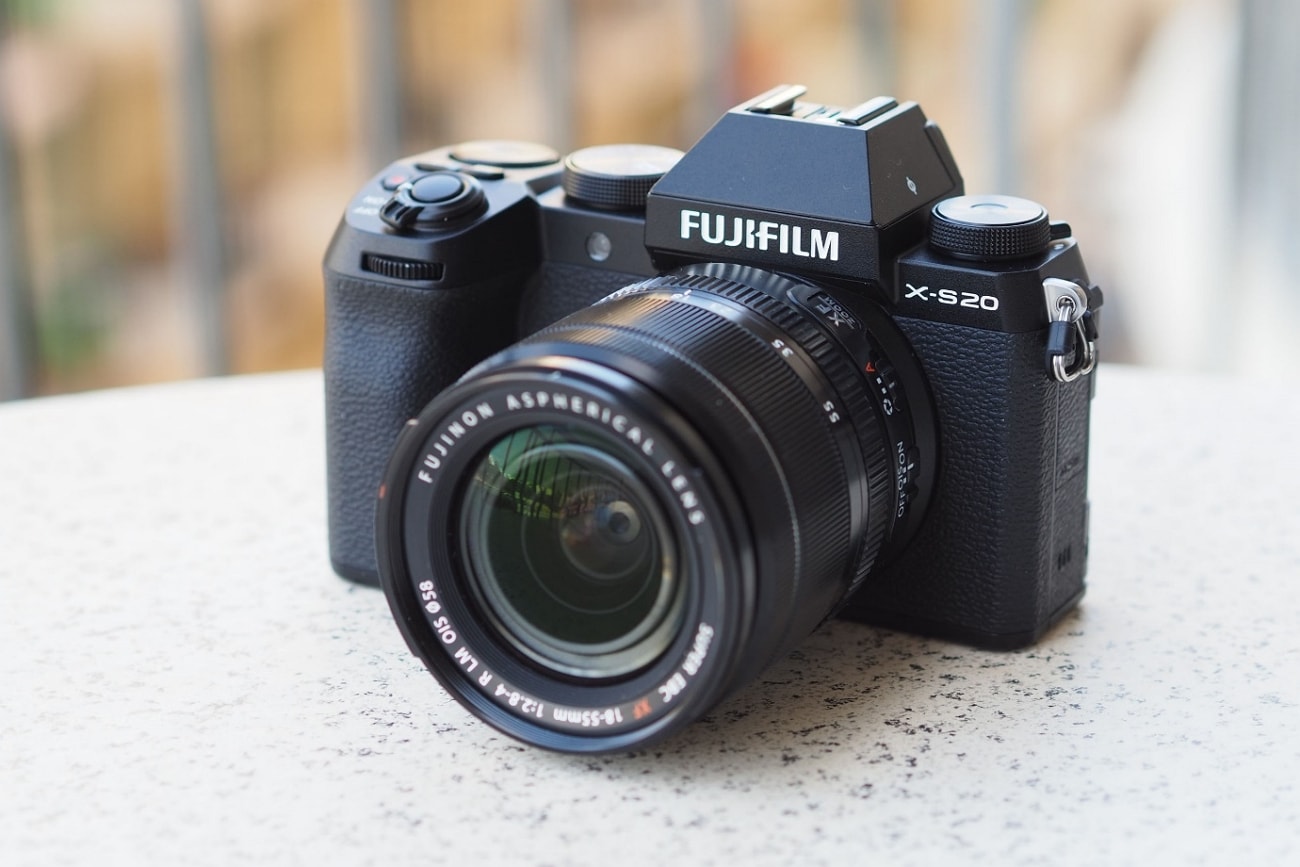
The Fujifilm X-S20 is a versatile camera that is equipped with advanced features and is easy to carry. This slow-motion camera has a 26.1MP sensor for really clear pictures. The screen is a vary-angle touchscreen of 3.0 inches and 1.84m-dot. You can connect it to Wi-Fi and Bluetooth to share and control the camera from a distance.
It’s perfect for videos, too, recording in high-quality up to 6.2K resolution. The camera is small and compact at 127.7 x 85.1 x 65.4mm and weighs only 491g.
8. Canon EOS-1D X Mark III DSLR Camera
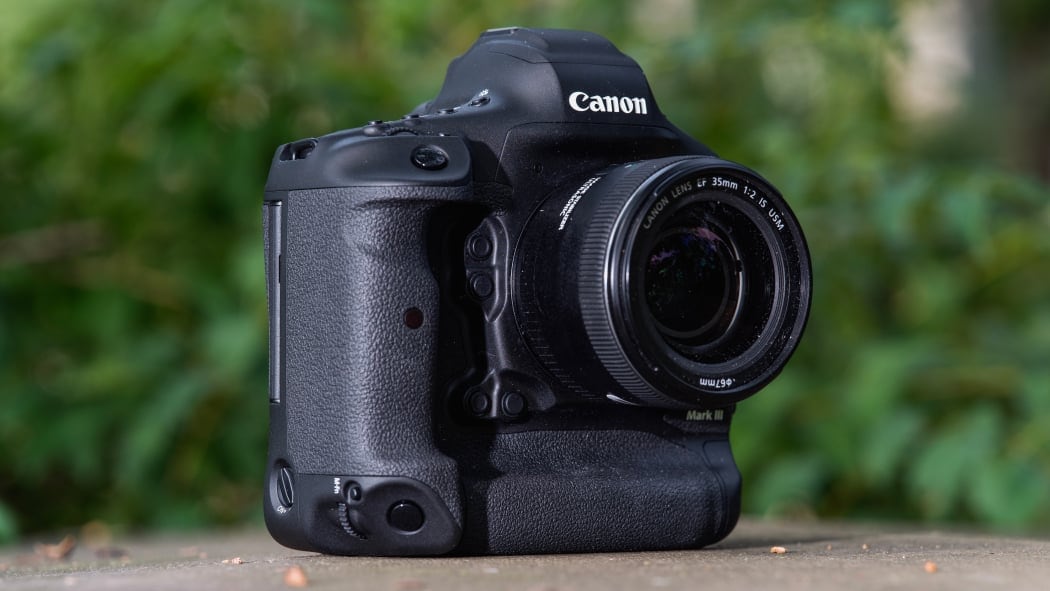
The Canon EOS-1D X Mark III is a top choice for professionals in photography and videography. It has a powerful 20.1 Megapixel Full-frame CMOS sensor that ensures high-quality images. The DIGIC X Image Processor handles low-light situations exceptionally well. Adding on, it offers a wide ISO range for great performance.
Its advanced autofocus system with deep learning technology tracks subjects accurately. This slow-mo camera supports impressive 4K UHD 2160p video recording.
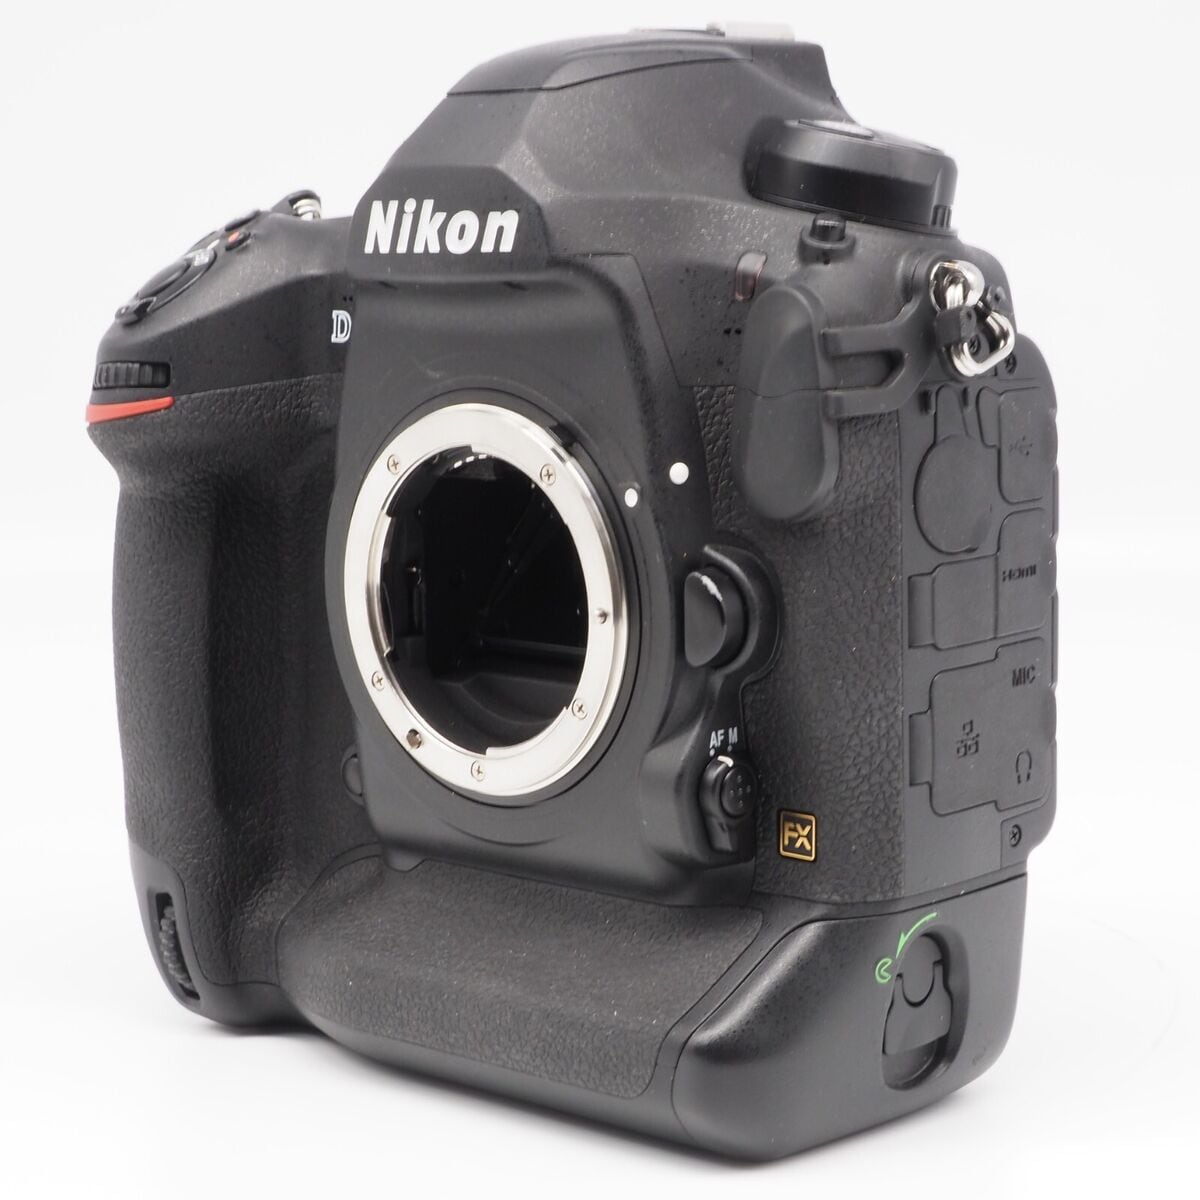
9. Nikon D6 FX-Format Digital SLR Camera
The Nikon D6 FX-Format Digital SLR Camera Body is made for professionals who promise top-notch performance. It has a powerful 20.8 Megapixel Full-frame CMOS sensor for high-quality photos. Also, it can work as a webcam with a maximum resolution of 16 MP and performs well in different situations.
Using digital image stabilization, the slow-motion video camera helps prevent blur. Moreover, it has a quick shutter speed of 1/8000 seconds for precise control over exposure.
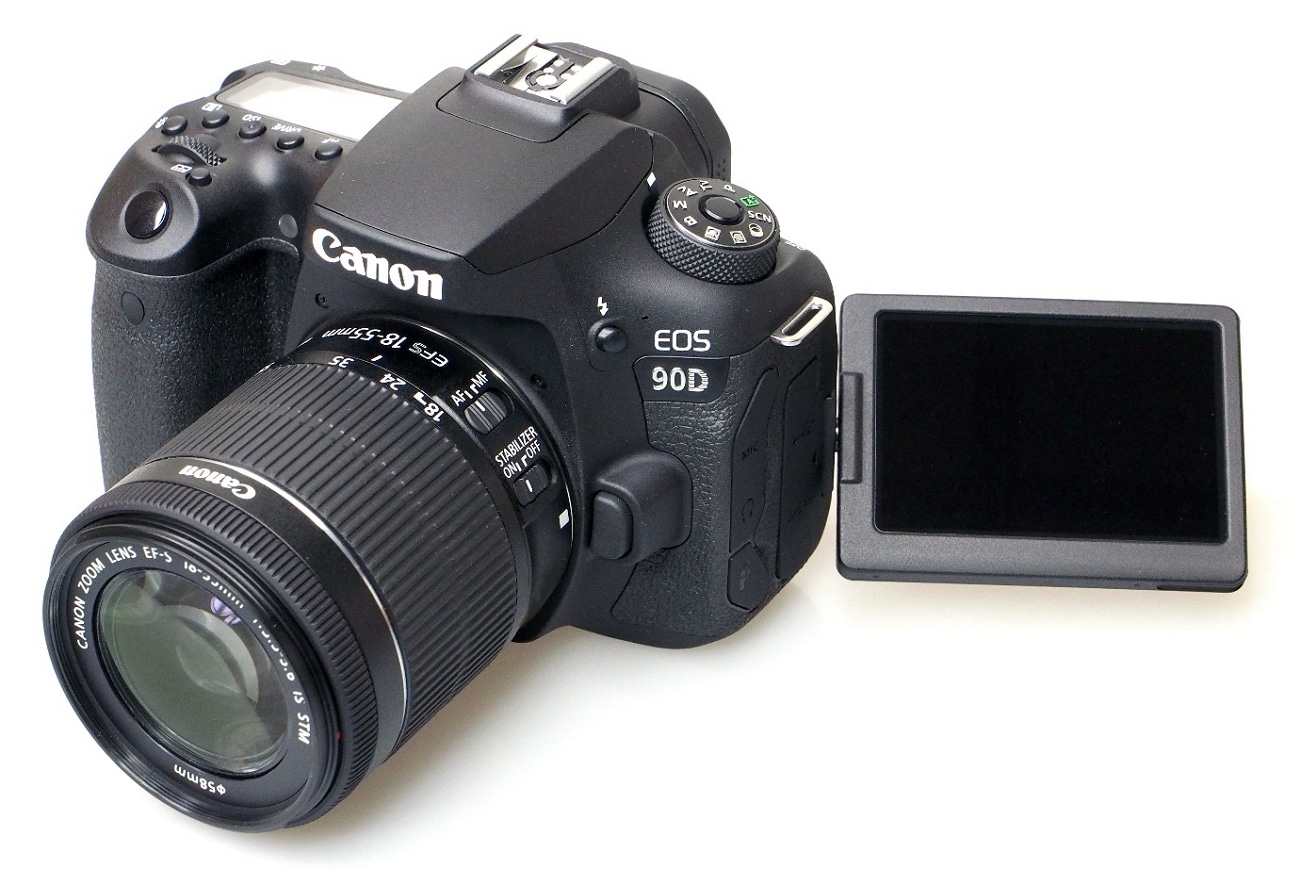
10. Canon DSLR Camera [EOS 90D]
The Canon 90D Body is a slow-mo camera for both filmmakers and videographers. It has a 32.5-megapixel CMOS APS-C sensor for clear and detailed images. Furthermore, it supports recording videos in 4K UHD 30P and Full HD 120P, which helps in delivering excellent video quality. With a 45-Point All Cross-type AF System, the 90D provides precise autofocus across the entire frame.
Part 3: What To Do If You Do Not Have a Camera? Use Filmora for Slow-Mo Video Making
Sometimes, getting an affordable slow-motion camera for shooting videos can be tricky. But don’t worry! You can still create slow-motion videos without having a specific camera. Wondershare Filmora is an excellent solution to make fantastic slow-motion videos, even if you don’t own a special slow-motion camera.
You can adjust the speed of your videos easily to make certain moments slower, making your clips look cool. Filmora isn’t just about changing the speed of your videos. It’s a powerful editing software that lets you do lots of things to make your videos better.
Free Download For Win 7 or later(64-bit)
Free Download For macOS 10.14 or later
Steps Required to Slow Down Video Professionally with Speed Ramping
Filmora Speed Ramping feature allows you to control your clip’s speed. It gives the flexibility to either slow down the entire video or specific segments. Here’s a guide on executing slow-motion in the Filmora video editing interface.
Step 1Set Up Project and Import Footage
Start by launching Wondershare Filmora and creating a new project. Then, import your video by clicking the “+” icon. After that, select “Match to Media” to ensure your project settings align with your clip’s resolution.

Step 2Apply Slow-Motion Effect to Slow Down Video
In the next step, add the imported video to the timeline and access the “Speed” icon. Choose a preset, such as 0.5x from the “Slow” menu, to apply a slow-motion effect to the entire clip. Alternatively, right-click on the video, go to “Speed,” followed by “Uniform Speed,” and adjust the slider leftwards for slow motion.

Step 3Customize Speed for Specific Segments
To create slow-motion effects for specific parts or frames within your video, navigate to the “Speed Ramping” window. Then, choose “Customize” and modify the speed by dragging the points along the line.

Step 4Add Freeze Frame at Required Position
For freezing a frame, position the play head at the desired spot. Select “Add Freeze Frame,” then set the freeze duration in the “Freeze Time Field” and adjust its placement as required. Save changes by clicking “OK.”

Top Features Offered by Filmora
Wondershare Filmora offers its users a variety of advanced features to perform an edit conveniently. It enhances creativity and productivity with the help of AI-equipped in it. Described below are some of these features to know about Filmora:
1. AI Smart Masking
AI Smart Masking simplifies the process of adding high-quality transitions and effects. By contrast, it can be complex with manual editing. By activating this feature, it automatically handles the masking task. Once AI masking is enabled and the desired area is specified, it swiftly completes the process. This allows you to apply transitions and effects to the unmasked area afterward.
2. AI Copywriting
Filmora AI Copywriting is a new tool that incorporates ChatGPT API. It uses AI to create scripts, providing tons of ideas for creators to improve their video storytelling. This tool seamlessly integrates AI-generated text and narration into the editing process. With Filmora AI Copywriting, creators can quickly develop catchy YouTube titles and descriptions.
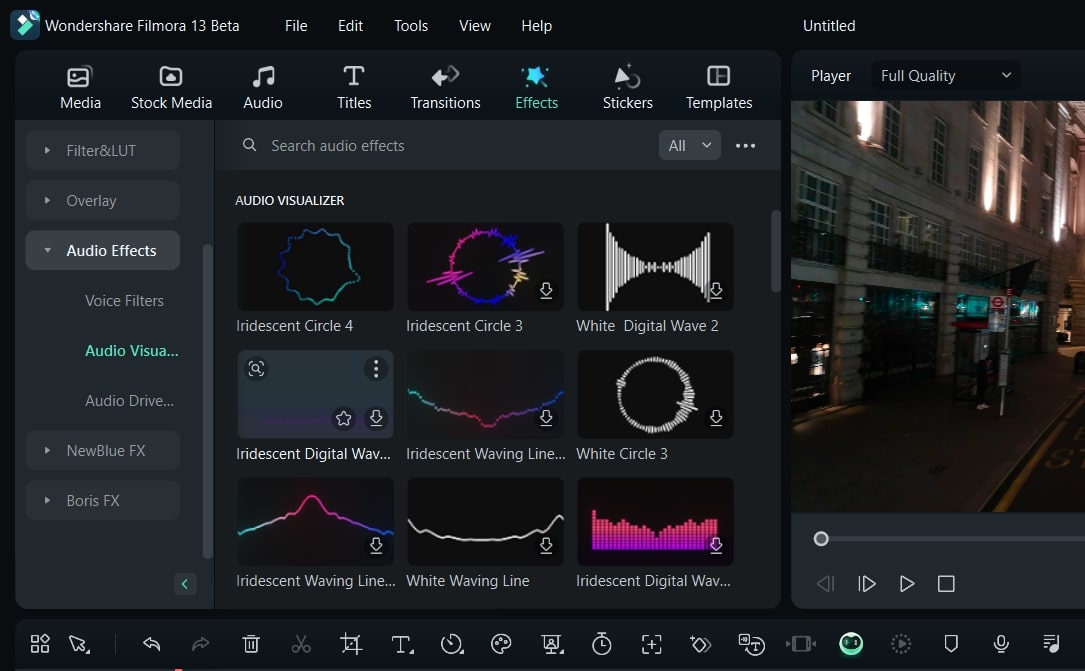
3. Audio Visualizer
Filmora Audio Visualizer is an innovative tool for music videos on how you experience sound and visuals together. It works by matching the visuals to the sound in your video. The Audio Visualizer analyzes the audio and syncs with the music’s beats and rhythm. This creates an amazing display that makes watching and listening more enjoyable.
4. Speech-To-Text
The Filmora Speech-To-Text (STT) feature is a huge help for video editors who want to work more efficiently. With just one click, this tool changes spoken words in videos into written text. It saves a lot of time by avoiding the manual work of typing subtitles. This feature not only saves time but also ensures that subtitles match what’s being said in the video accurately.
Conclusion
In summary, slow-motion videography is an amazing way to tell stories visually. Mixing technology and your ideas helps create videos that capture people’s attention. For that reason, we have provided 10 slow-motion video cameras to help you capture slow-motion videos. Additionally, we also highlighted the perfect solution if you don’t have a camera: Wondershare Filmora. You can easily generate a slow-motion video using our simple guide with this tool.
Make A Slow Motion Video Make A Slow Motion Video More Features

Part 1: How Do Slow-Motion Cameras Help in Recording Perfect Slow-Mo Videos?
Slow-motion cameras record videos at much faster speeds than regular cameras. This feature helps create slow-motion videos by slowing down the recorded action when played at normal speed. These slow-motion cameras are popular in filmmaking, sports analysis, science, and content creation. That’s because they capture detailed moments and highlight fast-moving things.
- Higher Frame Rate: Regular videos usually record 24, 30, or 60 frames per second (fps). But slow-motion cameras can capture hundreds or thousands of frames per second. More frames mean more details and smoother slow-motion videos when played back.
- Smooth Playback: Slow-motion videos look smooth and purposeful when played at regular speeds. More frames are recorded initially to achieve this effect. Ultimately, it will preserve all details when the video is played in slow motion.
- High-Resolution Sensors: Lots of slow-motion cameras have high-quality sensors. These sensors ensure that even with more frames captured, the picture stays sharp and detailed in slow-motion videos. This helps capture fine details without losing clarity.
- Creative Control: Slow-motion cameras let filmmakers and videographers control how fast or slow some parts of a scene look. This helps tell stories better, focus on details, and make videos more interesting and attractive to watch.
- Reduced Motion Blur: More frames per second make pictures clearer and sharper. This feature works especially for fast-moving things. This is important when you need to see tiny details or when the lighting isn’t great.
- Temporal Resolution: Slow-motion cameras can record lots of details in quick movements. They’re handy in sports, science, and creative videos where catching fast and detailed actions matter a lot.
Part 2: Finding The Top Slow-Motion Cameras to Use in 2024
If you want a good slow-motion camera, start by checking out the ones with higher frame rates. Also, think about what you’ll be recording and where you’ll share your videos. Buying a new camera can be confusing and perplexing. We hope you’ll find the best slow-motion camera in the list below. We have arranged the top slow-motion cameras to use in 2024 below:
- PowerShot G7 X Mark III Black
- Sony ZV-1 Camera
- GoPro HERO11 Black
- GoPro HERO10 Black
- Panasonic Lumix GH6
- Sony α7R IV
- Fujifilm X-S20
- Canon EOS-1D X Mark III DSLR Camera
- Nikon D6 FX-Format Digital SLR Camera
- Canon DSLR Camera [EOS 90D]
1. PowerShot G7 X Mark III Black
The PowerShot G7 X Mark III Black is a small but powerful camera for taking high-quality slow-motion videos. It has a 20.1 Megapixel camera and a DIGIC 8 Image Processor, which means it shows exceptional clarity even in different lighting. The 4.2x Optical Zoom Kens with Optical Image Stabilizer helps get close-up shots without making them blurry. For videos, it can record in 4K (at 30 frames per second) and Full HD (at 120 frames per second) for super smooth slow-motion shots.

2. Sony ZV-1 Camera
The Sony ZV-1 Camera is made specifically for content creators and vloggers. Although it has a compact design, it is packed with powerful features. This slow-motion video camera has a 1-inch sensor and digital and optical image stabilization. This means your pictures and videos will be clear and steady even if things are moving fast.
The camera’s results are sharp and colorful thanks to its 20.1 MP resolution and BIONZ X Image Processor. Also, it has a Fast Hybrid AF System that quickly focuses accurately, perfect for both photos and videos.

3. GoPro HERO11 Black
The GoPro HERO11 Black is an awesome slow-motion camera perfect for all kinds of adventures. It takes clear videos up to 5.3K resolution and sharp 27MP photos. The camera has great stabilization, so your videos always look smooth. You can change how wide your shots are and switch lenses digitally while keeping things clear.
GoPro HERO11 Black has cool effects for nighttime shots, making them look artistic. The camera is tough, waterproof up to 33 feet, and has a long-lasting battery that works well even in cold weather.

4. GoPro HERO10 Black
The GoPro HERO10 Black has a faster processor for smoother use and better touch controls. It can record super clear videos at higher speeds: 5.3K at 60fps and 4K at 120fps. You can also shoot camera slow-motion videos at 240fps in 2.7K resolution. The camera’s sensor is better, too, making photos sharper and allowing you to grab 15.8MP pictures from videos. It keeps footage perfectly steady with its excellent stabilization.

5. Panasonic LUMIX GH6
The LUMIX GH6 is an inspiring innovation in the LUMIX camera series, packed with amazing upgrades. It records high-quality videos internally in ProRes 422 HQ and ProRes 422, making them look great and easier to work with on computers later. This slow-mo video camera is faster due to a new engine, making pictures look better with less noise and better colors.
It’s great for professional video making, offering top-notch recording options. It also has image stabilization, a flexible rear monitor, and slots for different memory cards.

6. Sony α7R IV
The Sony A7R IV is a top-notch mirrorless camera appreciated by videography experts. It takes super clear pictures with its 20MP full-frame sensor. Also, it has a feature that prevents shaky photos and helps videos stay steady. You can control how long the shutter stays open, which helps in different lighting.
This slow-motion video camera lets you choose different ways to measure light for better pictures. Small and adaptable, it is high-tech and has great performance in digital photography.

7. Fujifilm X-S20
The Fujifilm X-S20 is a versatile camera that is equipped with advanced features and is easy to carry. This slow-motion camera has a 26.1MP sensor for really clear pictures. The screen is a vary-angle touchscreen of 3.0 inches and 1.84m-dot. You can connect it to Wi-Fi and Bluetooth to share and control the camera from a distance.
It’s perfect for videos, too, recording in high-quality up to 6.2K resolution. The camera is small and compact at 127.7 x 85.1 x 65.4mm and weighs only 491g.

8. Canon EOS-1D X Mark III DSLR Camera
The Canon EOS-1D X Mark III is a top choice for professionals in photography and videography. It has a powerful 20.1 Megapixel Full-frame CMOS sensor that ensures high-quality images. The DIGIC X Image Processor handles low-light situations exceptionally well. Adding on, it offers a wide ISO range for great performance.
Its advanced autofocus system with deep learning technology tracks subjects accurately. This slow-mo camera supports impressive 4K UHD 2160p video recording.

9. Nikon D6 FX-Format Digital SLR Camera
The Nikon D6 FX-Format Digital SLR Camera Body is made for professionals who promise top-notch performance. It has a powerful 20.8 Megapixel Full-frame CMOS sensor for high-quality photos. Also, it can work as a webcam with a maximum resolution of 16 MP and performs well in different situations.
Using digital image stabilization, the slow-motion video camera helps prevent blur. Moreover, it has a quick shutter speed of 1/8000 seconds for precise control over exposure.

10. Canon DSLR Camera [EOS 90D]
The Canon 90D Body is a slow-mo camera for both filmmakers and videographers. It has a 32.5-megapixel CMOS APS-C sensor for clear and detailed images. Furthermore, it supports recording videos in 4K UHD 30P and Full HD 120P, which helps in delivering excellent video quality. With a 45-Point All Cross-type AF System, the 90D provides precise autofocus across the entire frame.

Part 3: What To Do If You Do Not Have a Camera? Use Filmora for Slow-Mo Video Making
Sometimes, getting an affordable slow-motion camera for shooting videos can be tricky. But don’t worry! You can still create slow-motion videos without having a specific camera. Wondershare Filmora is an excellent solution to make fantastic slow-motion videos, even if you don’t own a special slow-motion camera.
You can adjust the speed of your videos easily to make certain moments slower, making your clips look cool. Filmora isn’t just about changing the speed of your videos. It’s a powerful editing software that lets you do lots of things to make your videos better.
Free Download For Win 7 or later(64-bit)
Free Download For macOS 10.14 or later
Steps Required to Slow Down Video Professionally with Speed Ramping
Filmora Speed Ramping feature allows you to control your clip’s speed. It gives the flexibility to either slow down the entire video or specific segments. Here’s a guide on executing slow-motion in the Filmora video editing interface.
Step 1Set Up Project and Import Footage
Start by launching Wondershare Filmora and creating a new project. Then, import your video by clicking the “+” icon. After that, select “Match to Media” to ensure your project settings align with your clip’s resolution.

Step 2Apply Slow-Motion Effect to Slow Down Video
In the next step, add the imported video to the timeline and access the “Speed” icon. Choose a preset, such as 0.5x from the “Slow” menu, to apply a slow-motion effect to the entire clip. Alternatively, right-click on the video, go to “Speed,” followed by “Uniform Speed,” and adjust the slider leftwards for slow motion.

Step 3Customize Speed for Specific Segments
To create slow-motion effects for specific parts or frames within your video, navigate to the “Speed Ramping” window. Then, choose “Customize” and modify the speed by dragging the points along the line.

Step 4Add Freeze Frame at Required Position
For freezing a frame, position the play head at the desired spot. Select “Add Freeze Frame,” then set the freeze duration in the “Freeze Time Field” and adjust its placement as required. Save changes by clicking “OK.”

Top Features Offered by Filmora
Wondershare Filmora offers its users a variety of advanced features to perform an edit conveniently. It enhances creativity and productivity with the help of AI-equipped in it. Described below are some of these features to know about Filmora:
1. AI Smart Masking
AI Smart Masking simplifies the process of adding high-quality transitions and effects. By contrast, it can be complex with manual editing. By activating this feature, it automatically handles the masking task. Once AI masking is enabled and the desired area is specified, it swiftly completes the process. This allows you to apply transitions and effects to the unmasked area afterward.
2. AI Copywriting
Filmora AI Copywriting is a new tool that incorporates ChatGPT API. It uses AI to create scripts, providing tons of ideas for creators to improve their video storytelling. This tool seamlessly integrates AI-generated text and narration into the editing process. With Filmora AI Copywriting, creators can quickly develop catchy YouTube titles and descriptions.
3. Audio Visualizer
Filmora Audio Visualizer is an innovative tool for music videos on how you experience sound and visuals together. It works by matching the visuals to the sound in your video. The Audio Visualizer analyzes the audio and syncs with the music’s beats and rhythm. This creates an amazing display that makes watching and listening more enjoyable.

4. Speech-To-Text
The Filmora Speech-To-Text (STT) feature is a huge help for video editors who want to work more efficiently. With just one click, this tool changes spoken words in videos into written text. It saves a lot of time by avoiding the manual work of typing subtitles. This feature not only saves time but also ensures that subtitles match what’s being said in the video accurately.
Conclusion
In summary, slow-motion videography is an amazing way to tell stories visually. Mixing technology and your ideas helps create videos that capture people’s attention. For that reason, we have provided 10 slow-motion video cameras to help you capture slow-motion videos. Additionally, we also highlighted the perfect solution if you don’t have a camera: Wondershare Filmora. You can easily generate a slow-motion video using our simple guide with this tool.
Detailed Tutorial to Merge Videos in VLC Media Player
Sometimes, when working on a project, we really need to combine several videos - this way some content needs to be conveyed, there are shots that, when neatly sorted and merged together, really create visual and content value which we aspire to make; The process becomes more enjoyable if we work on the videos produced by ourselves, or if the work is to be done for our side project. People always take special care of their own work, and the same can be emphasized freely about the editing as well - about the packaging with which we have to deliver our videos to the audience. Even in the absence of an audience, maybe we want to make a kind of video collage for ourselves, our children, or in general, for the family to make delightful memories?
Of course, not everyone who has taken a camera or a mobile phone to take videos at least one time, even so, for family and friends, has the experience of editing and making various manipulations. However, the function of merging videos in various editing programs or on online platforms is so simple that it can be learned in just a few minutes, without the help of other people, and with a kind of small, though very useful result at the same time.
One of the programs where videos can be uploaded is VLC Media Player, which is a free-to-use, robust, and feature-packed software that plays a wide range of audio, image, and video files. It can play multimedia files directly from extractable devices or the PC. The program is unique, as it can stream from popular websites like Disney +, Hulu, Gaia, and Netflix. VLC Multimedia Player also accepts live video from PlayStation Live, Xbox Live, Facebook, Twitter, and YouTube. While most competing programs display advertisements, VLC Player does not, as it receives support from a non-profit organization.

Interestingly, we can, as though with the help of a magic wand, turn this particular video player into video editing software. When one computer program delivers too many functions, it might make us think of the situation where one person claims to serve ten professions at the same time - there is a mood that they will not be good in any of them. It’s not true with VLC Player, which, from experience, seems to be both a good “player” as well as a fairly user-friendly editing software with many interesting features and functions.
Before we move on to video streaming, let’s look at two features that we can use in VLC player:
In the player, right when our video clip starts to play, we may find that the footage is taken vertically instead of horizontally! This is not a nightmare just for video enthusiasts. If you don’t know how to rotate the video, then you have to rotate your head 90 degrees, and at this time you can not even get pleasure from watching, not to mention that it can even cause your neck to lock up. VLC Player took care of that - in the top panel, just click on Tools, then select Effects & Filters. In the opened window, we find Video Effects, select Geometry and check the Rotate option - so, the whole 360 degrees are at our disposal!
Sometimes it happens that we watch the video, we are crazy about one part of it, and the other part of it seems to spoil everything! Even if we are ready to publish the raw material on social media or just save it for ourselves, we just don’t want some parts of the video to be there. So, it can be said - we are not satisfied with the full version and we wish to cut our clip and/or reduce its timeframe. VLC Player solves this problem “without any problem” - we find the View in the top panel, then we demand the cursor to aim for Advanced Controls button. As a result, a sort of video editor will appear, with its red record button on which we will click and the video will play until we reach the point where we want to split the footage. The cut video will be automatically saved in My Computer’s My Video folder.
How to Merge Multiple Videos in VLC Media Player
Here we are, now the main topic of interest of this article - how to put together several videos so that they become one? This case, unlike other possibilities we discussed above, is more complicated, so we will study this feature step by step .
Technique one:
- Step one:
Open VLC media player.

Probably, you have already decided exactly which files you want to merge, so choose Open Multiple Files…

In the opened window, click on Add in the File tab.

Select the desired clips from the newly opened window (selecting order matters, because it dictates which clips will come first and which ones will be next in the finished version), then click Open.

- Step two:
The selected videos are shown in the File Selection list. At the bottom of the window, click the Arrow button next to the Play button, where you need to select Convert.

In the Profile, it is desirable to specify the following format: Video - + MP3 (MP4), and below you can choose the Destination file - the location where you want to save the merged video. Also, to find the edited video easily, check the following: Append ‘-converted’ to file name. Click on Start. Wait until it is done - then you can play the video.

Technique two:
- Create a New Folder and move the videos that you would like to merge Rename the videos (e.g. to 1, 2 etc.).

- Create a new text file. Copy and paste this line below:
vlc_location video1.mp4 video2.mp4 –sout “#gather:std{access=file,dst=final_file_name.mp4}” –sout-keep

- Type VLC in the taskbar search and right-click on the app. Choose Open File location.

Right-click on the app and choose Properties. A new window will be opened, where you need to go to Target. Select and copy the line.

Go to the text document file. Remove vlc_location and paste the copied text instead. Change the names of the video to match the names in the folder.

- Open the folder with videos. Click on the address line. Type cmd and press Enter.

sA new window will open. Cope the line from the text file and paste it into cmd window; then, click on Enter.

- VLC player will open and will play the merged video file.

An Easier Way to Merge Videos in A Few Clicks
It’s true that merging videos in VLC Media Player takes quite a few steps, so to speak. But is this the only editing program in which a similar operation can be performed? Of course not. Therefore, in our article, we decided to offer you an alternative, where you can also easily merge the videos. This is the famous Filmora Video Editor , a software that is one of the easiest and most convenient to work with, especially for those who want to edit videos without having much experience in “complicated” software before. So again, step by step guideline on how to put together our video clips in Wondershare Filmora.
For Win 7 or later (64-bit)
For macOS 10.14 or later
- Open the program.
- Choose Import Media Files Here.

- Choose your

- We can click and drag, essentially, “insert” a video in a sequence below. The Linear Timeline allows us to understand exactly when a video clip ends and when a new one starts.

- Accordingly, we can make one video “sit” next to another. If we want or need it, we will add the third video clip, fourth, and so on.

- We can view the entire video and save the video afterwards.
- Start to save video - we make sure the result is exactly what we wanted, find the Export button above the timeline and click on it.

- In the opened window, on the left side, to be precise, if we observe well, we can already choose in which format we want to save our clip. On the right we can indicate what name we want to give to our video; The location where we want to store it; Also, we see the resolution (which we can modify freely after clicking on Settings); Size; Duration.

- In Settings, we can decide how much quality the video should have, how many kbps will be the Bit Rate, how many fps the Frame Rate should be, etc., but most likely, beginners will not need to change all this.

- After selecting everything, right-click on the Export button in the lower right corner of the window and the program will start saving the material.


Filmora 9, though, works a little differently.
- In the Import dropdown menu, select Import with instant cutting tool…

This will open the Filmora Instant Cutter window with two options - Trim and Merge. Since we need Merge in this case, this is what we choose.

- Then Open File, which will allow you to select multiple clips. Select the desired video clips and to Import, click Open.

- The window will show the files we selected and the entire video, and to save it, we click on Export.

- Specify File name, Save to (location), When done - the latter is what the program should do after the material is exported, e.g. open the containing folder. The export window also shows the approximate size of the footage.

- After hitting on Ok, the project will be saved, which will happen very quickly, since the program does not decode and encode the material.


That’s it! In this article, we have tried to teach you how to use VLC Media Player as a video editor software, what features we can use and, most importantly, how to merge multiple videos in this dual program; We also learned an alternative way of how we can combine different video clips with the help of Wondershare Filmora. The choice is yours, the main thing is to know all the alternatives and find the most time and energy saving, preferable option for you personally!
Interestingly, we can, as though with the help of a magic wand, turn this particular video player into video editing software. When one computer program delivers too many functions, it might make us think of the situation where one person claims to serve ten professions at the same time - there is a mood that they will not be good in any of them. It’s not true with VLC Player, which, from experience, seems to be both a good “player” as well as a fairly user-friendly editing software with many interesting features and functions.
Before we move on to video streaming, let’s look at two features that we can use in VLC player:
In the player, right when our video clip starts to play, we may find that the footage is taken vertically instead of horizontally! This is not a nightmare just for video enthusiasts. If you don’t know how to rotate the video, then you have to rotate your head 90 degrees, and at this time you can not even get pleasure from watching, not to mention that it can even cause your neck to lock up. VLC Player took care of that - in the top panel, just click on Tools, then select Effects & Filters. In the opened window, we find Video Effects, select Geometry and check the Rotate option - so, the whole 360 degrees are at our disposal!
Sometimes it happens that we watch the video, we are crazy about one part of it, and the other part of it seems to spoil everything! Even if we are ready to publish the raw material on social media or just save it for ourselves, we just don’t want some parts of the video to be there. So, it can be said - we are not satisfied with the full version and we wish to cut our clip and/or reduce its timeframe. VLC Player solves this problem “without any problem” - we find the View in the top panel, then we demand the cursor to aim for Advanced Controls button. As a result, a sort of video editor will appear, with its red record button on which we will click and the video will play until we reach the point where we want to split the footage. The cut video will be automatically saved in My Computer’s My Video folder.
How to Merge Multiple Videos in VLC Media Player
Here we are, now the main topic of interest of this article - how to put together several videos so that they become one? This case, unlike other possibilities we discussed above, is more complicated, so we will study this feature step by step .
Technique one:
- Step one:
Open VLC media player.

Probably, you have already decided exactly which files you want to merge, so choose Open Multiple Files…

In the opened window, click on Add in the File tab.

Select the desired clips from the newly opened window (selecting order matters, because it dictates which clips will come first and which ones will be next in the finished version), then click Open.

- Step two:
The selected videos are shown in the File Selection list. At the bottom of the window, click the Arrow button next to the Play button, where you need to select Convert.

In the Profile, it is desirable to specify the following format: Video - + MP3 (MP4), and below you can choose the Destination file - the location where you want to save the merged video. Also, to find the edited video easily, check the following: Append ‘-converted’ to file name. Click on Start. Wait until it is done - then you can play the video.

Technique two:
- Create a New Folder and move the videos that you would like to merge Rename the videos (e.g. to 1, 2 etc.).

- Create a new text file. Copy and paste this line below:
vlc_location video1.mp4 video2.mp4 –sout “#gather:std{access=file,dst=final_file_name.mp4}” –sout-keep

- Type VLC in the taskbar search and right-click on the app. Choose Open File location.

Right-click on the app and choose Properties. A new window will be opened, where you need to go to Target. Select and copy the line.

Go to the text document file. Remove vlc_location and paste the copied text instead. Change the names of the video to match the names in the folder.

- Open the folder with videos. Click on the address line. Type cmd and press Enter.

sA new window will open. Cope the line from the text file and paste it into cmd window; then, click on Enter.

- VLC player will open and will play the merged video file.

An Easier Way to Merge Videos in A Few Clicks
It’s true that merging videos in VLC Media Player takes quite a few steps, so to speak. But is this the only editing program in which a similar operation can be performed? Of course not. Therefore, in our article, we decided to offer you an alternative, where you can also easily merge the videos. This is the famous Filmora Video Editor , a software that is one of the easiest and most convenient to work with, especially for those who want to edit videos without having much experience in “complicated” software before. So again, step by step guideline on how to put together our video clips in Wondershare Filmora.
For Win 7 or later (64-bit)
For macOS 10.14 or later
- Open the program.
- Choose Import Media Files Here.

- Choose your

- We can click and drag, essentially, “insert” a video in a sequence below. The Linear Timeline allows us to understand exactly when a video clip ends and when a new one starts.

- Accordingly, we can make one video “sit” next to another. If we want or need it, we will add the third video clip, fourth, and so on.

- We can view the entire video and save the video afterwards.
- Start to save video - we make sure the result is exactly what we wanted, find the Export button above the timeline and click on it.

- In the opened window, on the left side, to be precise, if we observe well, we can already choose in which format we want to save our clip. On the right we can indicate what name we want to give to our video; The location where we want to store it; Also, we see the resolution (which we can modify freely after clicking on Settings); Size; Duration.

- In Settings, we can decide how much quality the video should have, how many kbps will be the Bit Rate, how many fps the Frame Rate should be, etc., but most likely, beginners will not need to change all this.

- After selecting everything, right-click on the Export button in the lower right corner of the window and the program will start saving the material.


Filmora 9, though, works a little differently.
- In the Import dropdown menu, select Import with instant cutting tool…

This will open the Filmora Instant Cutter window with two options - Trim and Merge. Since we need Merge in this case, this is what we choose.

- Then Open File, which will allow you to select multiple clips. Select the desired video clips and to Import, click Open.

- The window will show the files we selected and the entire video, and to save it, we click on Export.

- Specify File name, Save to (location), When done - the latter is what the program should do after the material is exported, e.g. open the containing folder. The export window also shows the approximate size of the footage.

- After hitting on Ok, the project will be saved, which will happen very quickly, since the program does not decode and encode the material.


That’s it! In this article, we have tried to teach you how to use VLC Media Player as a video editor software, what features we can use and, most importantly, how to merge multiple videos in this dual program; We also learned an alternative way of how we can combine different video clips with the help of Wondershare Filmora. The choice is yours, the main thing is to know all the alternatives and find the most time and energy saving, preferable option for you personally!
Interestingly, we can, as though with the help of a magic wand, turn this particular video player into video editing software. When one computer program delivers too many functions, it might make us think of the situation where one person claims to serve ten professions at the same time - there is a mood that they will not be good in any of them. It’s not true with VLC Player, which, from experience, seems to be both a good “player” as well as a fairly user-friendly editing software with many interesting features and functions.
Before we move on to video streaming, let’s look at two features that we can use in VLC player:
In the player, right when our video clip starts to play, we may find that the footage is taken vertically instead of horizontally! This is not a nightmare just for video enthusiasts. If you don’t know how to rotate the video, then you have to rotate your head 90 degrees, and at this time you can not even get pleasure from watching, not to mention that it can even cause your neck to lock up. VLC Player took care of that - in the top panel, just click on Tools, then select Effects & Filters. In the opened window, we find Video Effects, select Geometry and check the Rotate option - so, the whole 360 degrees are at our disposal!
Sometimes it happens that we watch the video, we are crazy about one part of it, and the other part of it seems to spoil everything! Even if we are ready to publish the raw material on social media or just save it for ourselves, we just don’t want some parts of the video to be there. So, it can be said - we are not satisfied with the full version and we wish to cut our clip and/or reduce its timeframe. VLC Player solves this problem “without any problem” - we find the View in the top panel, then we demand the cursor to aim for Advanced Controls button. As a result, a sort of video editor will appear, with its red record button on which we will click and the video will play until we reach the point where we want to split the footage. The cut video will be automatically saved in My Computer’s My Video folder.
How to Merge Multiple Videos in VLC Media Player
Here we are, now the main topic of interest of this article - how to put together several videos so that they become one? This case, unlike other possibilities we discussed above, is more complicated, so we will study this feature step by step .
Technique one:
- Step one:
Open VLC media player.

Probably, you have already decided exactly which files you want to merge, so choose Open Multiple Files…

In the opened window, click on Add in the File tab.

Select the desired clips from the newly opened window (selecting order matters, because it dictates which clips will come first and which ones will be next in the finished version), then click Open.

- Step two:
The selected videos are shown in the File Selection list. At the bottom of the window, click the Arrow button next to the Play button, where you need to select Convert.

In the Profile, it is desirable to specify the following format: Video - + MP3 (MP4), and below you can choose the Destination file - the location where you want to save the merged video. Also, to find the edited video easily, check the following: Append ‘-converted’ to file name. Click on Start. Wait until it is done - then you can play the video.

Technique two:
- Create a New Folder and move the videos that you would like to merge Rename the videos (e.g. to 1, 2 etc.).

- Create a new text file. Copy and paste this line below:
vlc_location video1.mp4 video2.mp4 –sout “#gather:std{access=file,dst=final_file_name.mp4}” –sout-keep

- Type VLC in the taskbar search and right-click on the app. Choose Open File location.

Right-click on the app and choose Properties. A new window will be opened, where you need to go to Target. Select and copy the line.

Go to the text document file. Remove vlc_location and paste the copied text instead. Change the names of the video to match the names in the folder.

- Open the folder with videos. Click on the address line. Type cmd and press Enter.

sA new window will open. Cope the line from the text file and paste it into cmd window; then, click on Enter.

- VLC player will open and will play the merged video file.

An Easier Way to Merge Videos in A Few Clicks
It’s true that merging videos in VLC Media Player takes quite a few steps, so to speak. But is this the only editing program in which a similar operation can be performed? Of course not. Therefore, in our article, we decided to offer you an alternative, where you can also easily merge the videos. This is the famous Filmora Video Editor , a software that is one of the easiest and most convenient to work with, especially for those who want to edit videos without having much experience in “complicated” software before. So again, step by step guideline on how to put together our video clips in Wondershare Filmora.
For Win 7 or later (64-bit)
For macOS 10.14 or later
- Open the program.
- Choose Import Media Files Here.

- Choose your

- We can click and drag, essentially, “insert” a video in a sequence below. The Linear Timeline allows us to understand exactly when a video clip ends and when a new one starts.

- Accordingly, we can make one video “sit” next to another. If we want or need it, we will add the third video clip, fourth, and so on.

- We can view the entire video and save the video afterwards.
- Start to save video - we make sure the result is exactly what we wanted, find the Export button above the timeline and click on it.

- In the opened window, on the left side, to be precise, if we observe well, we can already choose in which format we want to save our clip. On the right we can indicate what name we want to give to our video; The location where we want to store it; Also, we see the resolution (which we can modify freely after clicking on Settings); Size; Duration.

- In Settings, we can decide how much quality the video should have, how many kbps will be the Bit Rate, how many fps the Frame Rate should be, etc., but most likely, beginners will not need to change all this.

- After selecting everything, right-click on the Export button in the lower right corner of the window and the program will start saving the material.


Filmora 9, though, works a little differently.
- In the Import dropdown menu, select Import with instant cutting tool…

This will open the Filmora Instant Cutter window with two options - Trim and Merge. Since we need Merge in this case, this is what we choose.

- Then Open File, which will allow you to select multiple clips. Select the desired video clips and to Import, click Open.

- The window will show the files we selected and the entire video, and to save it, we click on Export.

- Specify File name, Save to (location), When done - the latter is what the program should do after the material is exported, e.g. open the containing folder. The export window also shows the approximate size of the footage.

- After hitting on Ok, the project will be saved, which will happen very quickly, since the program does not decode and encode the material.


That’s it! In this article, we have tried to teach you how to use VLC Media Player as a video editor software, what features we can use and, most importantly, how to merge multiple videos in this dual program; We also learned an alternative way of how we can combine different video clips with the help of Wondershare Filmora. The choice is yours, the main thing is to know all the alternatives and find the most time and energy saving, preferable option for you personally!
Interestingly, we can, as though with the help of a magic wand, turn this particular video player into video editing software. When one computer program delivers too many functions, it might make us think of the situation where one person claims to serve ten professions at the same time - there is a mood that they will not be good in any of them. It’s not true with VLC Player, which, from experience, seems to be both a good “player” as well as a fairly user-friendly editing software with many interesting features and functions.
Before we move on to video streaming, let’s look at two features that we can use in VLC player:
In the player, right when our video clip starts to play, we may find that the footage is taken vertically instead of horizontally! This is not a nightmare just for video enthusiasts. If you don’t know how to rotate the video, then you have to rotate your head 90 degrees, and at this time you can not even get pleasure from watching, not to mention that it can even cause your neck to lock up. VLC Player took care of that - in the top panel, just click on Tools, then select Effects & Filters. In the opened window, we find Video Effects, select Geometry and check the Rotate option - so, the whole 360 degrees are at our disposal!
Sometimes it happens that we watch the video, we are crazy about one part of it, and the other part of it seems to spoil everything! Even if we are ready to publish the raw material on social media or just save it for ourselves, we just don’t want some parts of the video to be there. So, it can be said - we are not satisfied with the full version and we wish to cut our clip and/or reduce its timeframe. VLC Player solves this problem “without any problem” - we find the View in the top panel, then we demand the cursor to aim for Advanced Controls button. As a result, a sort of video editor will appear, with its red record button on which we will click and the video will play until we reach the point where we want to split the footage. The cut video will be automatically saved in My Computer’s My Video folder.
How to Merge Multiple Videos in VLC Media Player
Here we are, now the main topic of interest of this article - how to put together several videos so that they become one? This case, unlike other possibilities we discussed above, is more complicated, so we will study this feature step by step .
Technique one:
- Step one:
Open VLC media player.

Probably, you have already decided exactly which files you want to merge, so choose Open Multiple Files…

In the opened window, click on Add in the File tab.

Select the desired clips from the newly opened window (selecting order matters, because it dictates which clips will come first and which ones will be next in the finished version), then click Open.

- Step two:
The selected videos are shown in the File Selection list. At the bottom of the window, click the Arrow button next to the Play button, where you need to select Convert.

In the Profile, it is desirable to specify the following format: Video - + MP3 (MP4), and below you can choose the Destination file - the location where you want to save the merged video. Also, to find the edited video easily, check the following: Append ‘-converted’ to file name. Click on Start. Wait until it is done - then you can play the video.

Technique two:
- Create a New Folder and move the videos that you would like to merge Rename the videos (e.g. to 1, 2 etc.).

- Create a new text file. Copy and paste this line below:
vlc_location video1.mp4 video2.mp4 –sout “#gather:std{access=file,dst=final_file_name.mp4}” –sout-keep

- Type VLC in the taskbar search and right-click on the app. Choose Open File location.

Right-click on the app and choose Properties. A new window will be opened, where you need to go to Target. Select and copy the line.

Go to the text document file. Remove vlc_location and paste the copied text instead. Change the names of the video to match the names in the folder.

- Open the folder with videos. Click on the address line. Type cmd and press Enter.

sA new window will open. Cope the line from the text file and paste it into cmd window; then, click on Enter.

- VLC player will open and will play the merged video file.

An Easier Way to Merge Videos in A Few Clicks
It’s true that merging videos in VLC Media Player takes quite a few steps, so to speak. But is this the only editing program in which a similar operation can be performed? Of course not. Therefore, in our article, we decided to offer you an alternative, where you can also easily merge the videos. This is the famous Filmora Video Editor , a software that is one of the easiest and most convenient to work with, especially for those who want to edit videos without having much experience in “complicated” software before. So again, step by step guideline on how to put together our video clips in Wondershare Filmora.
For Win 7 or later (64-bit)
For macOS 10.14 or later
- Open the program.
- Choose Import Media Files Here.

- Choose your

- We can click and drag, essentially, “insert” a video in a sequence below. The Linear Timeline allows us to understand exactly when a video clip ends and when a new one starts.

- Accordingly, we can make one video “sit” next to another. If we want or need it, we will add the third video clip, fourth, and so on.

- We can view the entire video and save the video afterwards.
- Start to save video - we make sure the result is exactly what we wanted, find the Export button above the timeline and click on it.

- In the opened window, on the left side, to be precise, if we observe well, we can already choose in which format we want to save our clip. On the right we can indicate what name we want to give to our video; The location where we want to store it; Also, we see the resolution (which we can modify freely after clicking on Settings); Size; Duration.

- In Settings, we can decide how much quality the video should have, how many kbps will be the Bit Rate, how many fps the Frame Rate should be, etc., but most likely, beginners will not need to change all this.

- After selecting everything, right-click on the Export button in the lower right corner of the window and the program will start saving the material.


Filmora 9, though, works a little differently.
- In the Import dropdown menu, select Import with instant cutting tool…

This will open the Filmora Instant Cutter window with two options - Trim and Merge. Since we need Merge in this case, this is what we choose.

- Then Open File, which will allow you to select multiple clips. Select the desired video clips and to Import, click Open.

- The window will show the files we selected and the entire video, and to save it, we click on Export.

- Specify File name, Save to (location), When done - the latter is what the program should do after the material is exported, e.g. open the containing folder. The export window also shows the approximate size of the footage.

- After hitting on Ok, the project will be saved, which will happen very quickly, since the program does not decode and encode the material.


That’s it! In this article, we have tried to teach you how to use VLC Media Player as a video editor software, what features we can use and, most importantly, how to merge multiple videos in this dual program; We also learned an alternative way of how we can combine different video clips with the help of Wondershare Filmora. The choice is yours, the main thing is to know all the alternatives and find the most time and energy saving, preferable option for you personally!
Backup and Organize Your Footage in Minutes
Backing up your data is deemed significantly necessary among video editing communities. Files get corrupted easily. Having a backup drive can save your day and countless hours. You can back up your data any way you deem fit. However, it will do you right if you follow the advice of professionals.
The article is written explicitly after due consideration and suggestions from the professional video editor. You can follow the steps in it to make backup files. Let us start with very straightforward steps to help you understand the professional way of backing up and organizing your footage.
Part 1. Back Up Your Files
Backing up your files gives you peace of mind. If one file is lost, the whole project becomes vulnerable to failure. Therefore, every effort must be made to ensure the protection of files. The best way to protect the files from any misfortune is to back them up.
Remember, there is no specific way to back up your files. Depending on the project’s requirements, you can do that differently. The following steps will light up how you can back up your files.
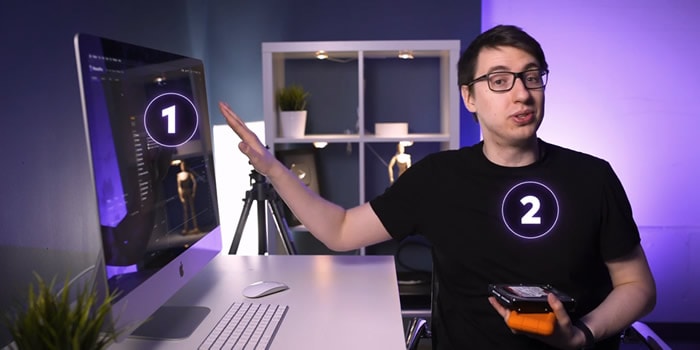
Step1Back up your files in two different places
It is crucial to do that. If one backup drive corrupts, you have the second option. It gives you an opportunity to back up files.
- You can make two different external backup hard drives.
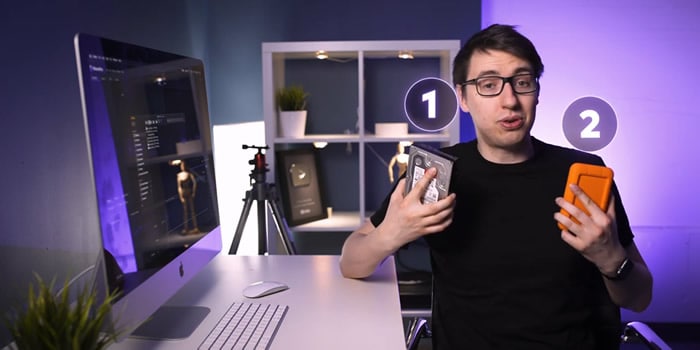
- You can also use your internal and external devices as two backup options.
Step2Make specific folders for each purpose of the video
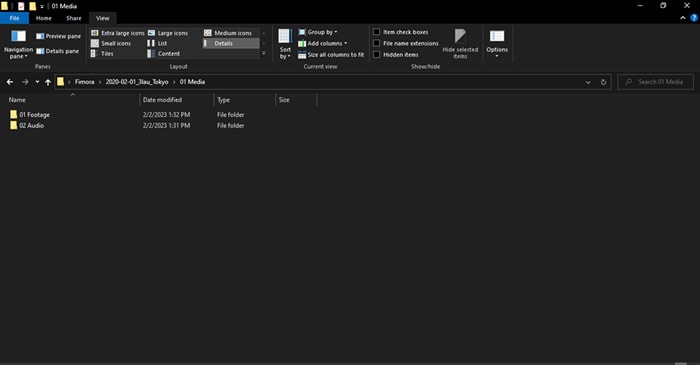
The next step is how you back up your files properly and safely. Make separate folders for the different formats you are importing in your drive. Always use the primary source to make a copy of your files.
Follow the steps below to understand how to back up your files in two drives.
- Create a folder in your drive.
- Name it. You can name it according to the given format. The choice is yours.

- Your backup folder is created.
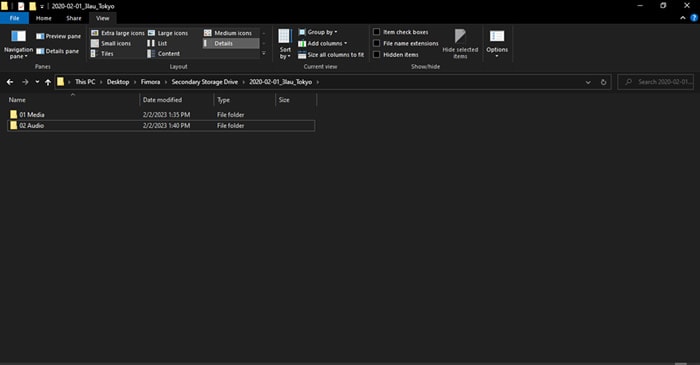
- Make new folders based on the files that are imported into the file. We are making two folders for the project, 01 Footage, and 02 Audio.
- 01 Footage is for the original footage.
- 02 Audio is for audio files provided by the music artist.
Step3Repeat the same process in your second backup drive
- Make the same folders and sub-folders in your secondary backup drive.
Step4Transfer files to your primary and secondary folders
- Transfer files to folders and sub-folders in your first backup drive.
- Transfer files to folders and sub-folders in your secondary backup drive.
![]()
Note: Most people make the mistake of making a backup drive and then using the same drive to make the second backup. The approach needs to be corrected.
We are done with backing up our files. It is time to organize the files in your drive.
Part 2. Organize Your Files in Filmora
Organizing your files is vital for any operation in video and editing. It makes everything streamlined. The risk of losing your data become negligible. Let us enlighten you on how you can organize your files.
Free Download For Win 7 or later(64-bit)
Free Download For macOS 10.14 or later
Step1Create new folders to lay the foundation for your video editing project
You can imitate the format we have chosen. However, you can choose any way you deem fit.
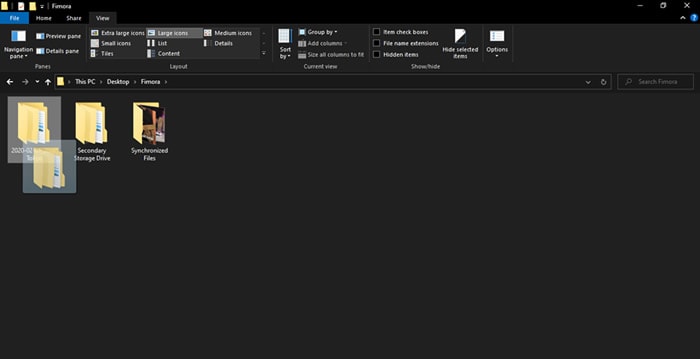
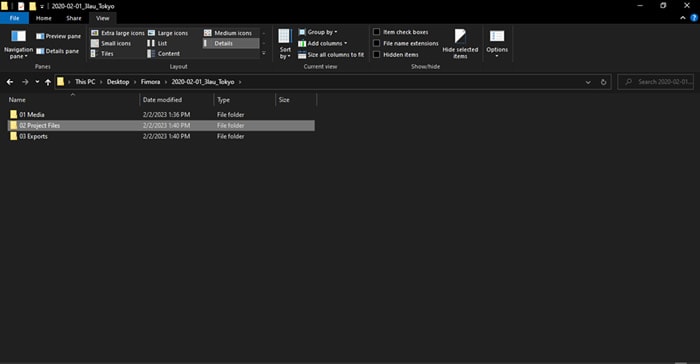
- Create 02 Project Files and 03 Exports.
- 02 Project contains the files that we will edit in Filmora .
- 03 Exports will have files that will be exported out of Filmora.
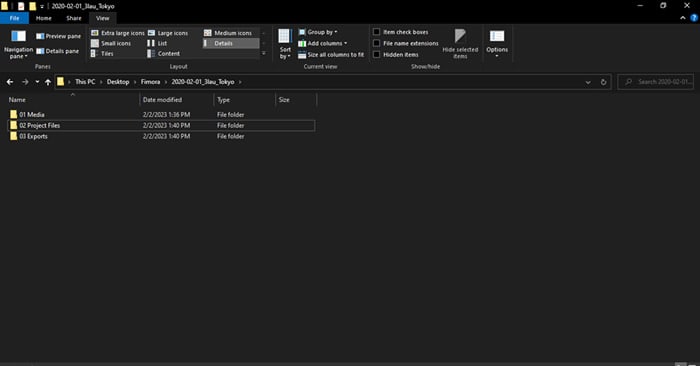
- In the 01 Media folder, create a new folder, 03 Graphics. It will contain graphics the artist will provide, such as a logo. You can also add your graphics to the folder if you want.
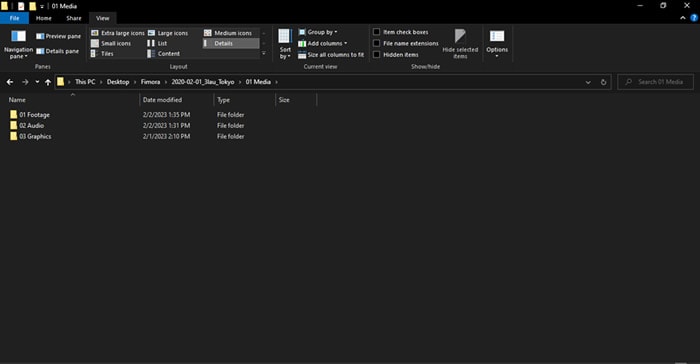
The format will help you if you move files from one device to the next case. In that case, you will only have to move one folder with the artist’s name.
Step2Create a new project
In this step, we will organize our files in Filmora. It will help us to keep discipline and order in file organization. It makes work easy and fun.
- Create a new project when you open Filmora on your PC or Mac.
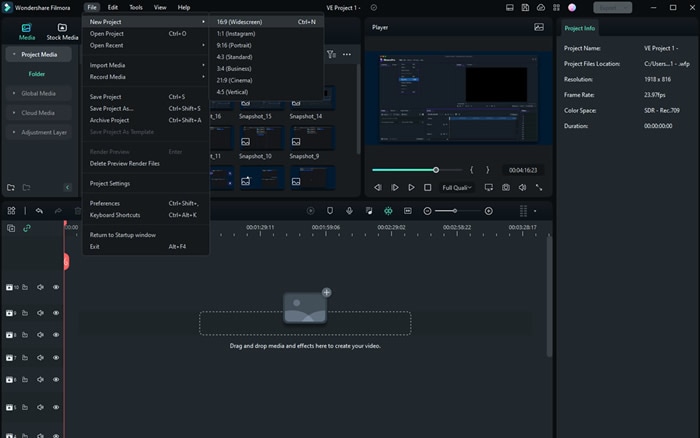
- Save the project in any name you want. We have saved the project in the format explained above.
- Save the file in 02 Project Files.
Step3Edit your workspace if you want
Users can edit the workspace in Filmora. You can customize it to your liking. Also, it is entirely optional.
- Go to layout mode. Change the layout if you want.
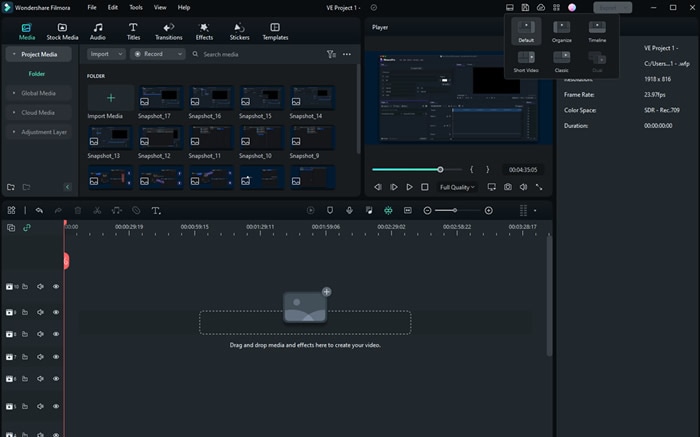
- You can manually change the panels by simply dragging them across the screen.
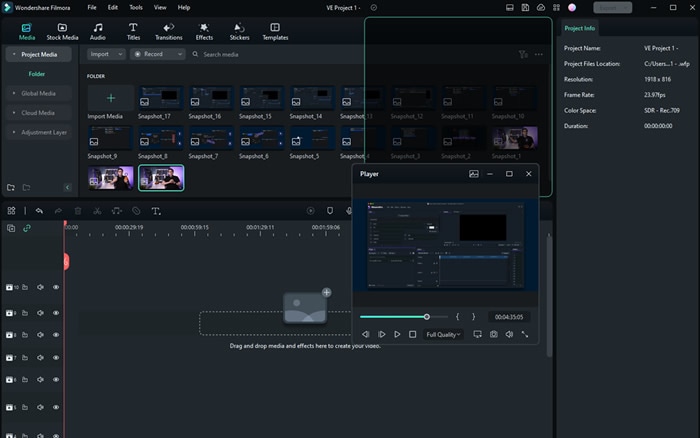
The workspace settings will be saved automatically. The next time you start Filmora, you will not need to readjust the panels.
- Save the file
Step4Recreate the file structure in your 02 project files
Now, you create folders in your project. For that, you can follow our structure, or you can follow your instincts.
- Create the folders in Filmora, as you have created them in your drive. The folders will be created in your 02 Project Files.
These new folders are the exact copies of your media files that you have got from the producer and music artist.
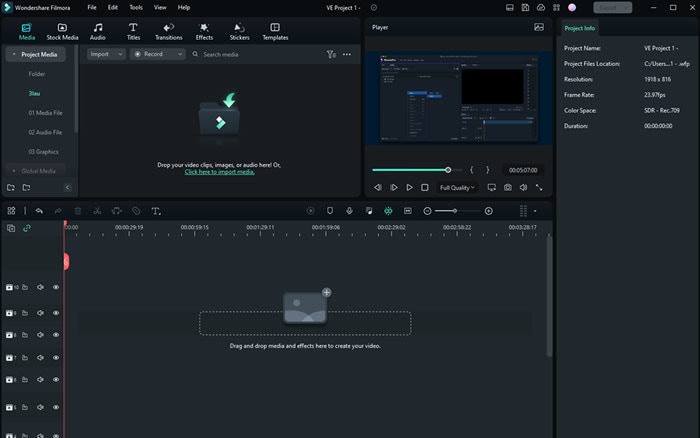
- Import the files into respective folders. Footage should include all the original videos given to your producers.
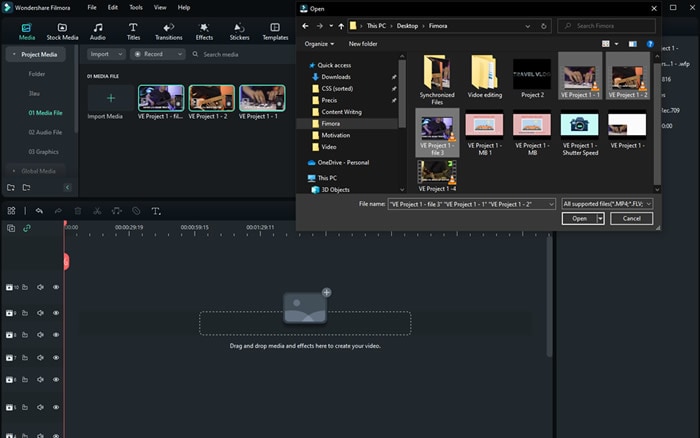
Step5Save the project
You can save the file using the button on Filmora, as shown below.
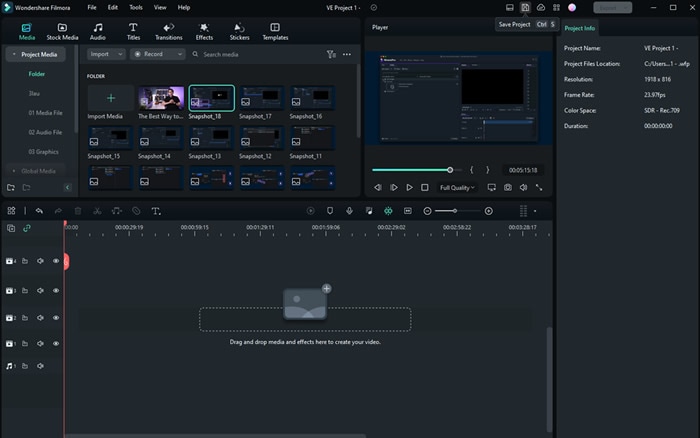
- You can save the files using short keys.

Conclusion
Making a backup file for your project is crucial. For a video editor, it is quite painful to learn that the final product has a missing file. Therefore, one must ensure that all the files are backed up before beginning the editing phase.
Apart from that, one must also keep updating the files in Filmora . You performed some editing. Make sure to save the file then and there. Any minor mistake can cause great worry for the professional editor. Thus, it is better to take proactive actions.
Free Download For Win 7 or later(64-bit)
Free Download For macOS 10.14 or later
We are done with backing up our files. It is time to organize the files in your drive.
Part 2. Organize Your Files in Filmora
Organizing your files is vital for any operation in video and editing. It makes everything streamlined. The risk of losing your data become negligible. Let us enlighten you on how you can organize your files.
Free Download For Win 7 or later(64-bit)
Free Download For macOS 10.14 or later
Step1Create new folders to lay the foundation for your video editing project
You can imitate the format we have chosen. However, you can choose any way you deem fit.
- Create 02 Project Files and 03 Exports.
- 02 Project contains the files that we will edit in Filmora .
- 03 Exports will have files that will be exported out of Filmora.

- In the 01 Media folder, create a new folder, 03 Graphics. It will contain graphics the artist will provide, such as a logo. You can also add your graphics to the folder if you want.

The format will help you if you move files from one device to the next case. In that case, you will only have to move one folder with the artist’s name.

Step2Create a new project
In this step, we will organize our files in Filmora. It will help us to keep discipline and order in file organization. It makes work easy and fun.
- Create a new project when you open Filmora on your PC or Mac.

- Save the project in any name you want. We have saved the project in the format explained above.
- Save the file in 02 Project Files.

Step3Edit your workspace if you want
Users can edit the workspace in Filmora. You can customize it to your liking. Also, it is entirely optional.
- Go to layout mode. Change the layout if you want.

- You can manually change the panels by simply dragging them across the screen.

The workspace settings will be saved automatically. The next time you start Filmora, you will not need to readjust the panels.
- Save the file
Step4Recreate the file structure in your 02 project files
Now, you create folders in your project. For that, you can follow our structure, or you can follow your instincts.
- Create the folders in Filmora, as you have created them in your drive. The folders will be created in your 02 Project Files.
These new folders are the exact copies of your media files that you have got from the producer and music artist.

- Import the files into respective folders. Footage should include all the original videos given to your producers.

Step5Save the project
You can save the file using the button on Filmora, as shown below.

- You can save the files using short keys.

Conclusion
Making a backup file for your project is crucial. For a video editor, it is quite painful to learn that the final product has a missing file. Therefore, one must ensure that all the files are backed up before beginning the editing phase.
Apart from that, one must also keep updating the files in Filmora . You performed some editing. Make sure to save the file then and there. Any minor mistake can cause great worry for the professional editor. Thus, it is better to take proactive actions.
Free Download For Win 7 or later(64-bit)
Free Download For macOS 10.14 or later
Perfectly Use the Audio Mixer in Filmora
Have you seen those classic and outstanding videos of professional YouTubers? Yeah, they feel different from the videos we usually make. The reason mainly lies within the outclass audio quality of those videos.
And now, you might think it’s impossible to mess with the audio control without the support of a professional. But believe me; it’s much simpler than you think. In this brief guide, we’ll show you how to use the audio mixer of Filmora to fine-tune all of your videos skillfully.
But let’s first see what an audio mixer is.
Part 1: What is an audio mixer?
An audio mixer is a tool that gives you control over the audio quality of your videos. Using the audio mixer, you can easily give your video a cinematic feel by controlling different modes and levels.
And that’s not where it ends!!! This mixing console also allows you to mix, combine and balance audio from different sources. So control your audio and give your video that extra bit of depth.
To your surprise, you can access this excellent tool without cost using the world’s leading video editor, Filmora . Let’s see a brief intro of Wondershare Filmora, and then we’ll show you how to use the audio mixer of Filmora in a stepwise manner.
Free Download For Win 7 or later(64-bit)
Free Download For macOS 10.14 or later
Part 2: An easy-to-use audio mixer - Wondershare Filmora

Wondershare Filmora is one of the world’s leading video-editor and is no less than a blessing for all creators. Its stunning editing features like split screen, motion tracking, speed ramping, and many others allow you to take your video to the next level. Moreover, the massive arsenal of video effects and AI portraits gives you various choices.
What’s more, you can tweak the audio using auto synchronization, audio duckling, an audio visualizer, and even an audio mixer. Isn’t it fantastic? Now let’s move forward and see how we can sharpen our video with the audio mixer of Filmora in detail steps.
Part 3: Steps to effectively use the audio mixer in Filmora
Here are the steps you need to follow to use the audio mixer of Filmora effectively.
Step1Download & install
First, you must have a suitable version of Filmora installed on your device. Here are the steps to install the free version.
- Go to the official website of Filmora and hit the “Free Download” button. Filmora is available for Windows 11 and all the previous versions, as well as for macOS 10.14 to macOS 13
Free Download For Win 7 or later(64-bit)
Free Download For macOS 10.14 or later
- When the download finishes, follow the guidelines of the installation wizard to install Filmora on your computer.
Now let’s see how to prepare our video.
Step2Prepare your video
After you have installed the latest version of Filmora, you need to prepare your video for editing.
For this,
- Launch the Filmora on your computer and click the “New Project” button from the starting interface.

- Now let’s import our video. Click on the “Import Media” section or drag and drop your video/audio file here to import it.

- Once the media file has been imported, add it to the editing panel below with the drag-and-drop method. This is important to create a workspace for your video.
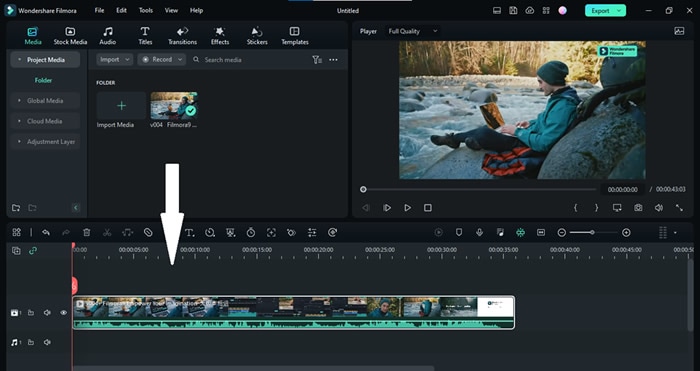
- Now it’s time to edit the video. Make all the editing you want with graphics and visuals to finalize your video before using the audio mixer. And once it’s done, we can move to the first-class audio mixer of Filmora.
Bonus Tip: Before using the audio mixer, ensure you have a headphone to see the changes you are making instead of relying on your desktop speaker.
Step3Start the audio mixer
To open up the audio mixer, click on the “audio mixer” icon on the toolbar below the preview window.
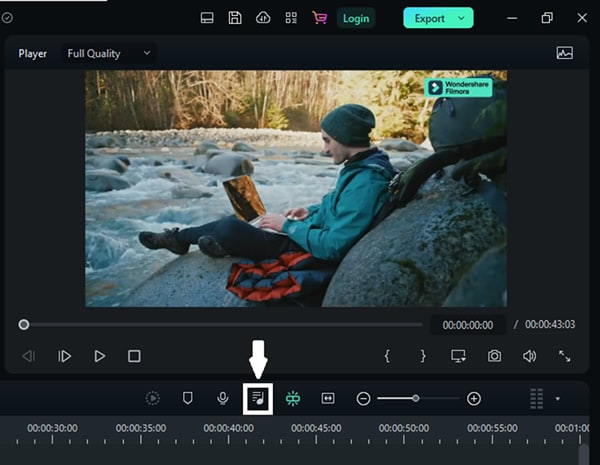
This is what your audio mixer will look like at the start.
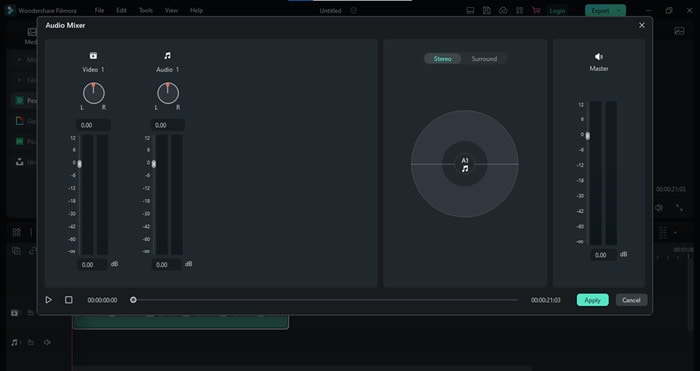
Now we can start adjusting the audio settings. Let’s go with the audio levels first.
Step4Adjust the audio levels
To adjust the audio levels, look at the left side of the audio mixer. Here you’ll see two vertical bars, which are;
- The audio levels for the video clip.
- The audio levels for the sound and music in the music track.
You can adjust the icon up or down to make these channels louder or softer.
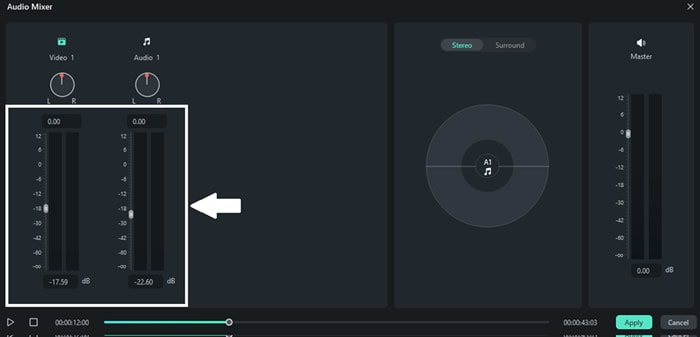
After the audio levels, let’s see how we can change the audio channels.
Free Download For Win 7 or later(64-bit)
Free Download For macOS 10.14 or later
Step5Adjust the audio channels
See those circles above the audio levels? These are for adjusting the audio channels.
- Rotate the knob-like icon in these circles to adjust the Audio channels’ pan/bounce control. This switches the sound between the left and right channels.
- On top of that, you can see these changes on the channel control panel.
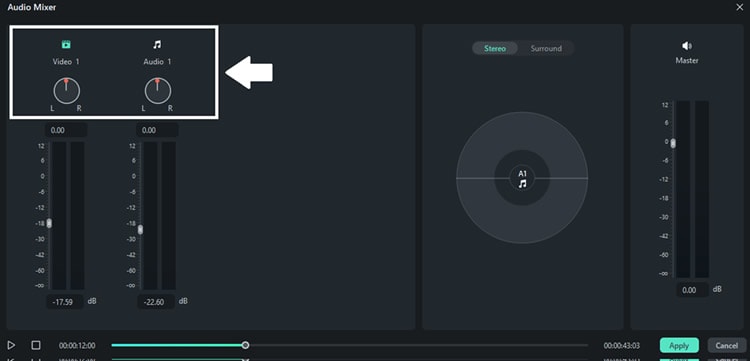
To check the effect, let’s rotate the knob to the left. And to see the result hit the “Play” button on the bottom left corner of the audio mixer interface. Here’s how it looks.
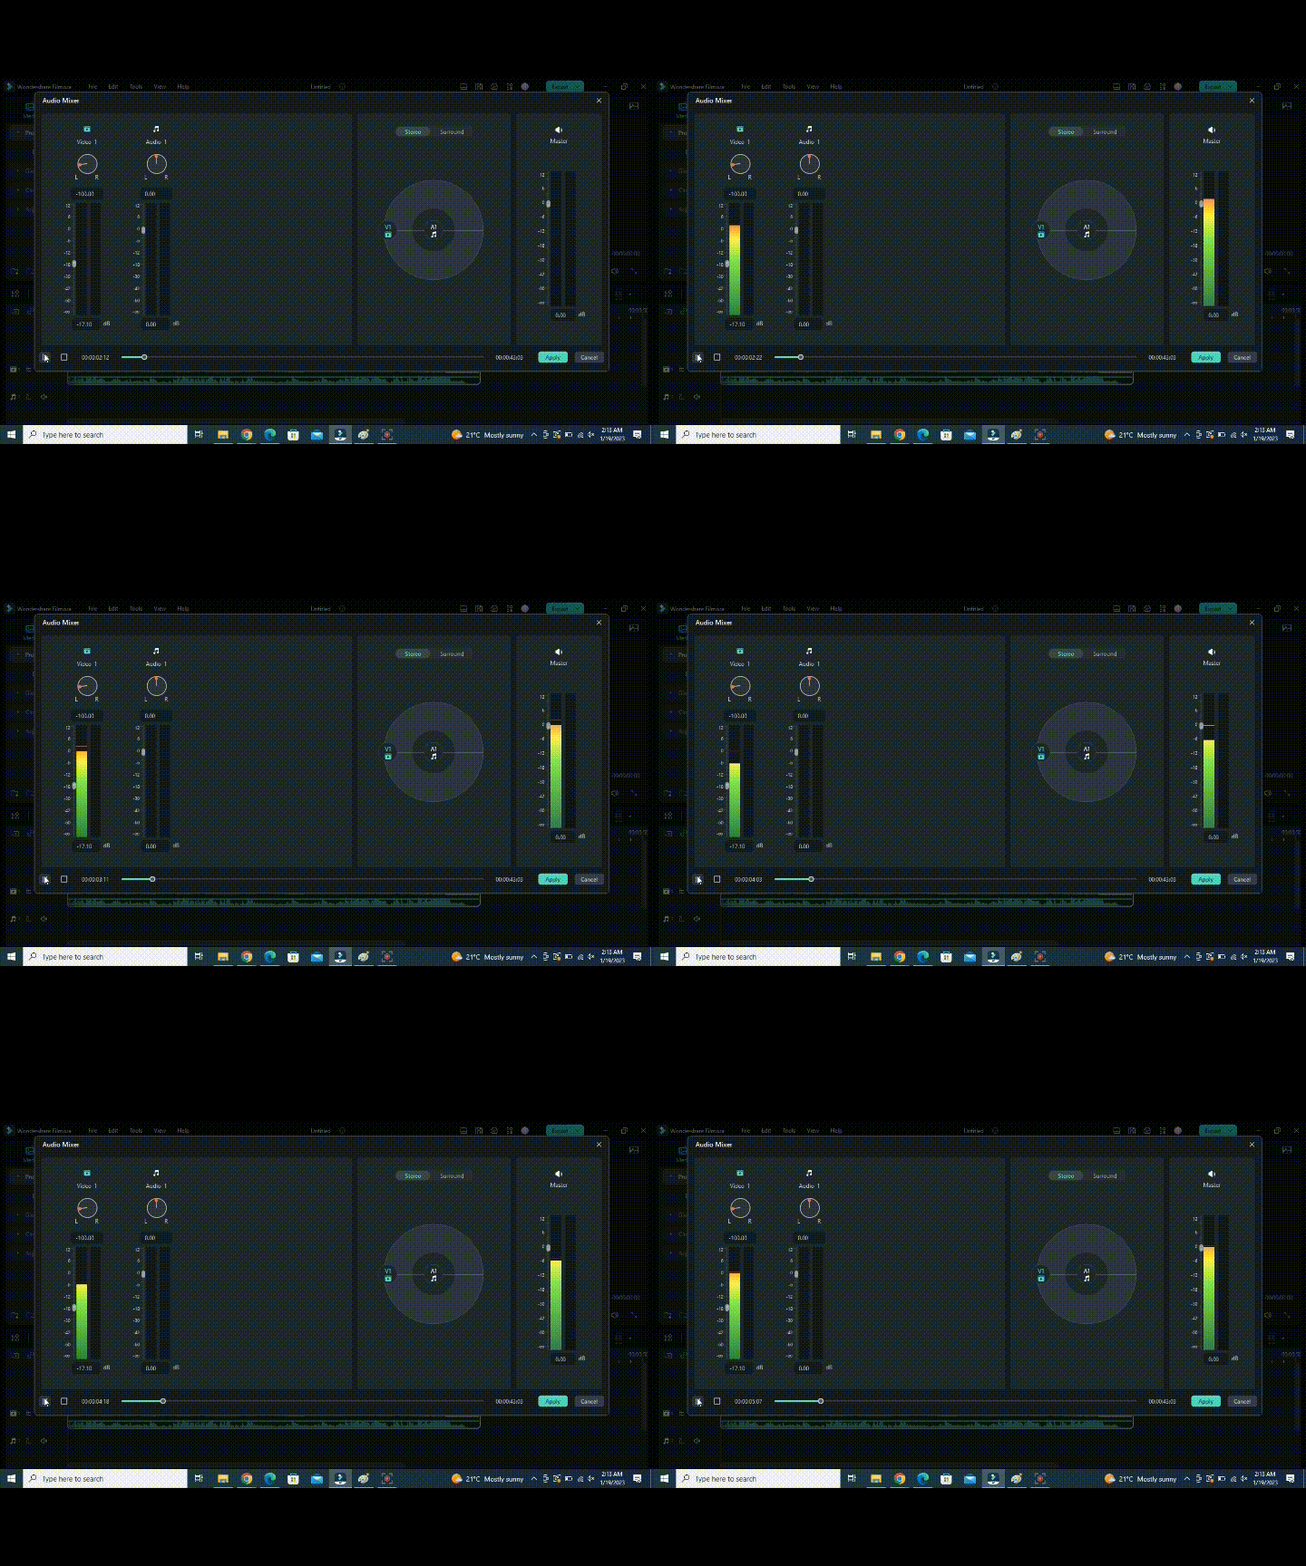
Now it’s time to select the audio mode.
Step6Select the audio mode
The audio mixer of Filmora provides you with two audio mode options. These are;
● Stereo Mode
In the Stereo mode, you can pan from left to right and control your audio just like the knob of the audio channel.
● Surround Mode
You can pan from left to right and front to back in this mode by rotating the video or music icons. This provides you with complete control over the audio positions. But remember that this mode works best if your video is played with the surround sound system.
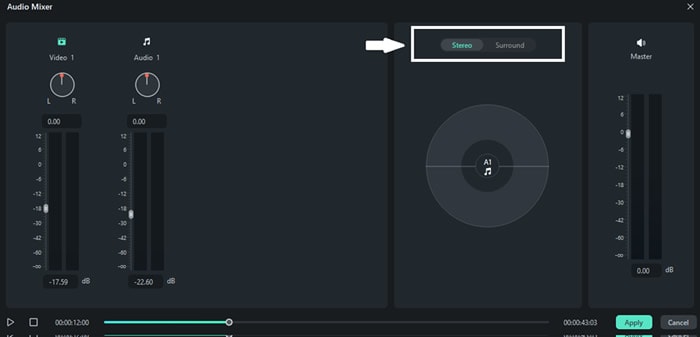
Once you have changed the audio mode, let’s look at the master levels.
Step7Adjust the master levels
On the very left of the window, you’ll find the Master levels.
This is where you can adjust the master section or all your audio files on your timeline.
- Just drag the master level slider upward and downwards, and you’ll notice the changes right away.
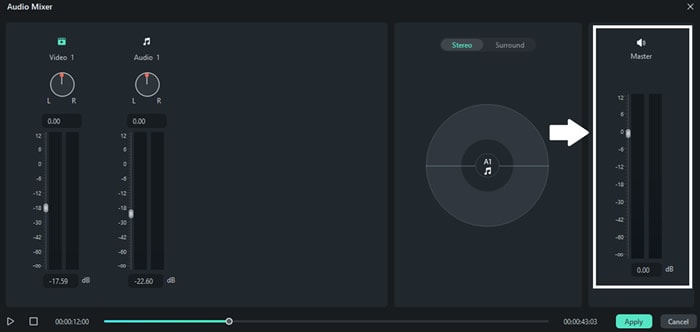
So done with the changes? Let’s preview them.
Free Download For Win 7 or later(64-bit)
Free Download For macOS 10.14 or later
Step8Preview your changes
After carefully making all the changes to your audio, preview it for the last time before going with them. The “Play” button is still there in the bottom left corner.
Perfect!!! No? Make the changes again until you are satisfied and then hit the “Apply” button on the bottom right corner to adjust these changes.
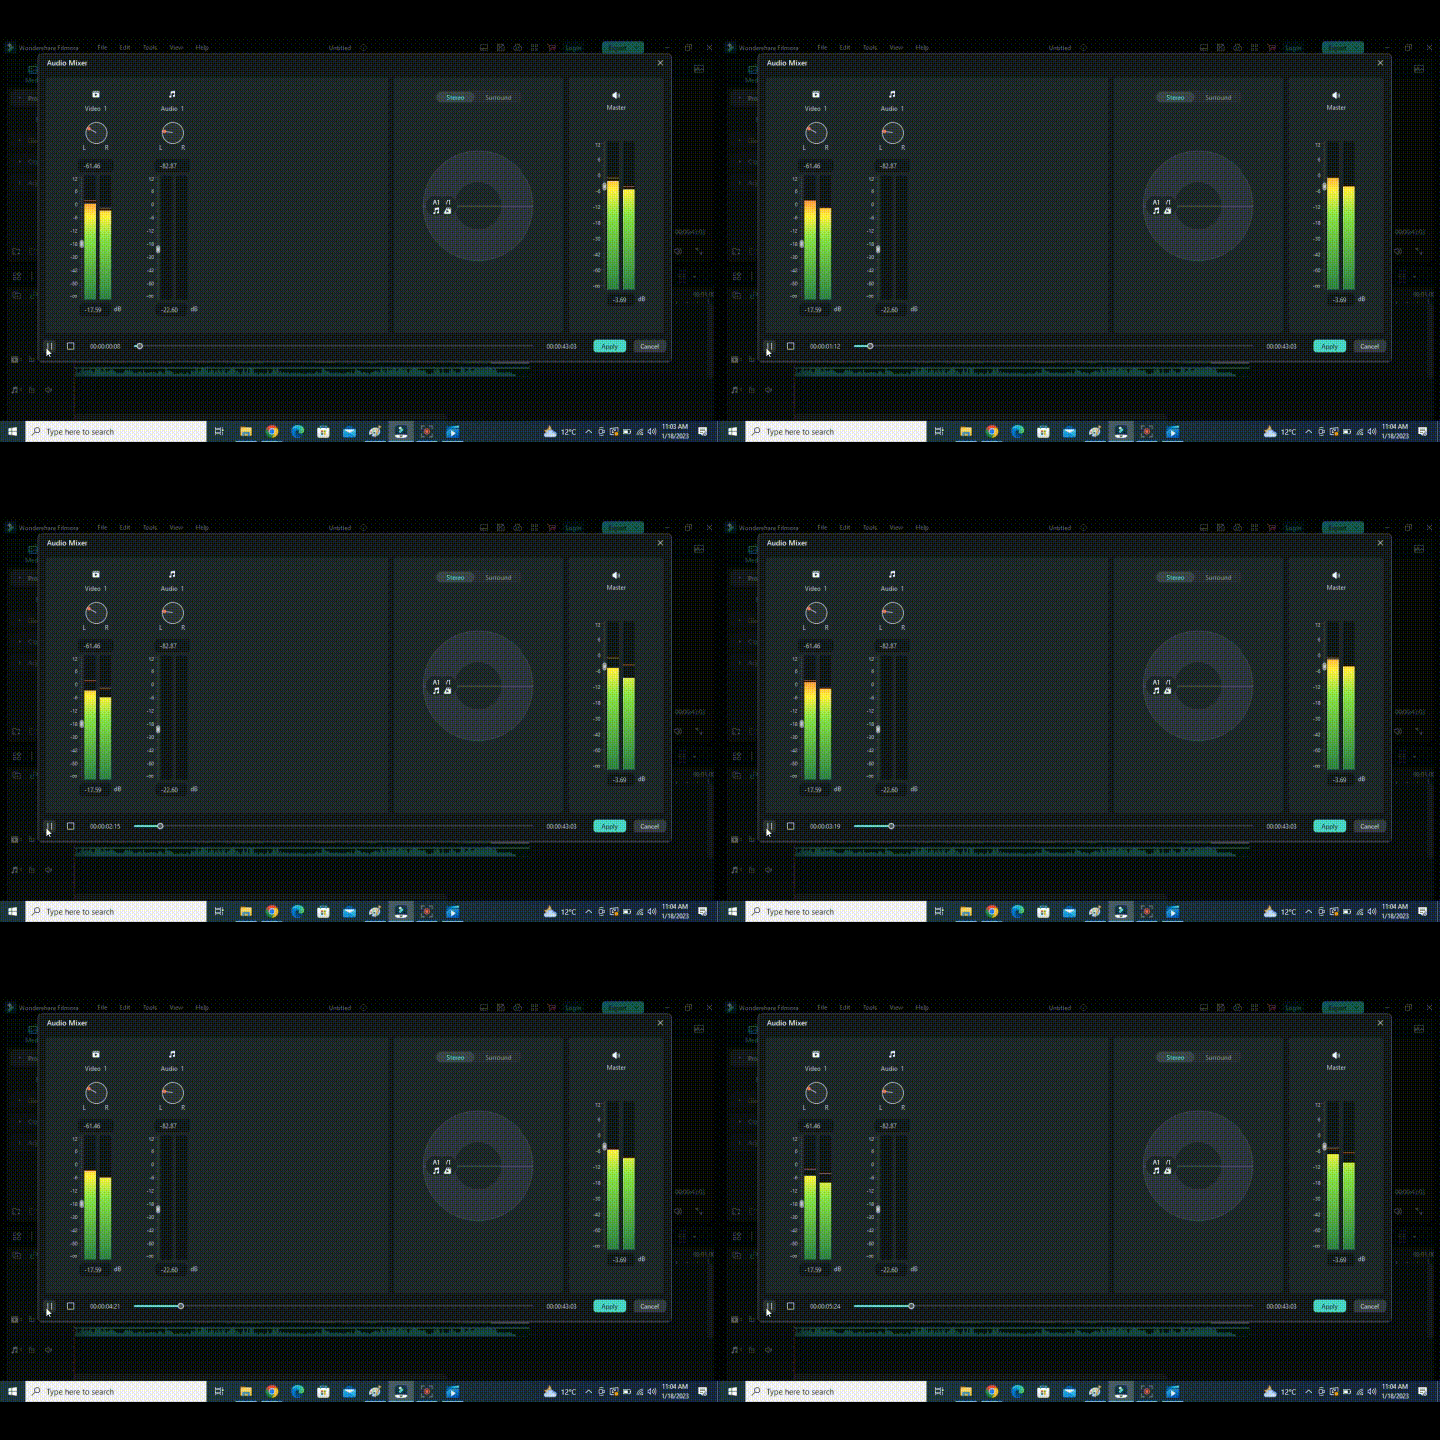
And here we are, done!!! Now you can easily surprise your friends with your master-like audio handling. Before we wind up our guide, we’ll answer some of the frequently asked questions about the audio mixer of Filmora. So let’s dive right into it.
Part 4: Hot FAQs about the audio mixer of Filmora
1.How important is an audio mixer in video editing?
An audio mixer is necessary if you want to create impressive videos. This master volume control allows you to deepen the audio effect and merge two audio sources to get the maximum out of them. This is why most content creators give grave importance to audio mixers during video editing.
2.Where can we find the audio mixer in Filmora?
Like other highly advanced editing tools, you can also find the audio mixer in Filmora. After you’ve placed your media file on the editing panel, the “audio mixer” icon appears on the toolbar under the preview channel.
3.Is the audio mixer of Filmora available for free?
Yes, you can freely use the audio mixer of Filmora as much as you want without any cost. And unlike many other free sound control tools, you get all the latest and advanced features like the preview tool with the audio mixer of Filmora.
Conclusion
Every top-ranked video contains the best-suited audio tracks with it. And the audio mixer of Filmora comes in handy whenever you want to tweak the audio settings of a video.
In this article, we’ve covered everything you need to know about using the audio mixer in Filmora.
Free Download For Win 7 or later(64-bit)
Free Download For macOS 10.14 or later
Free Download For macOS 10.14 or later
Part 2: An easy-to-use audio mixer - Wondershare Filmora

Wondershare Filmora is one of the world’s leading video-editor and is no less than a blessing for all creators. Its stunning editing features like split screen, motion tracking, speed ramping, and many others allow you to take your video to the next level. Moreover, the massive arsenal of video effects and AI portraits gives you various choices.
What’s more, you can tweak the audio using auto synchronization, audio duckling, an audio visualizer, and even an audio mixer. Isn’t it fantastic? Now let’s move forward and see how we can sharpen our video with the audio mixer of Filmora in detail steps.
Part 3: Steps to effectively use the audio mixer in Filmora
Here are the steps you need to follow to use the audio mixer of Filmora effectively.
Step1Download & install
First, you must have a suitable version of Filmora installed on your device. Here are the steps to install the free version.
- Go to the official website of Filmora and hit the “Free Download” button. Filmora is available for Windows 11 and all the previous versions, as well as for macOS 10.14 to macOS 13
Free Download For Win 7 or later(64-bit)
Free Download For macOS 10.14 or later
- When the download finishes, follow the guidelines of the installation wizard to install Filmora on your computer.
Now let’s see how to prepare our video.
Step2Prepare your video
After you have installed the latest version of Filmora, you need to prepare your video for editing.
For this,
- Launch the Filmora on your computer and click the “New Project” button from the starting interface.

- Now let’s import our video. Click on the “Import Media” section or drag and drop your video/audio file here to import it.

- Once the media file has been imported, add it to the editing panel below with the drag-and-drop method. This is important to create a workspace for your video.

- Now it’s time to edit the video. Make all the editing you want with graphics and visuals to finalize your video before using the audio mixer. And once it’s done, we can move to the first-class audio mixer of Filmora.
Bonus Tip: Before using the audio mixer, ensure you have a headphone to see the changes you are making instead of relying on your desktop speaker.
Step3Start the audio mixer
To open up the audio mixer, click on the “audio mixer” icon on the toolbar below the preview window.

This is what your audio mixer will look like at the start.

Now we can start adjusting the audio settings. Let’s go with the audio levels first.
Step4Adjust the audio levels
To adjust the audio levels, look at the left side of the audio mixer. Here you’ll see two vertical bars, which are;
- The audio levels for the video clip.
- The audio levels for the sound and music in the music track.
You can adjust the icon up or down to make these channels louder or softer.

After the audio levels, let’s see how we can change the audio channels.
Free Download For Win 7 or later(64-bit)
Free Download For macOS 10.14 or later
Step5Adjust the audio channels
See those circles above the audio levels? These are for adjusting the audio channels.
- Rotate the knob-like icon in these circles to adjust the Audio channels’ pan/bounce control. This switches the sound between the left and right channels.
- On top of that, you can see these changes on the channel control panel.

To check the effect, let’s rotate the knob to the left. And to see the result hit the “Play” button on the bottom left corner of the audio mixer interface. Here’s how it looks.

Now it’s time to select the audio mode.
Step6Select the audio mode
The audio mixer of Filmora provides you with two audio mode options. These are;
● Stereo Mode
In the Stereo mode, you can pan from left to right and control your audio just like the knob of the audio channel.
● Surround Mode
You can pan from left to right and front to back in this mode by rotating the video or music icons. This provides you with complete control over the audio positions. But remember that this mode works best if your video is played with the surround sound system.

Once you have changed the audio mode, let’s look at the master levels.
Step7Adjust the master levels
On the very left of the window, you’ll find the Master levels.
This is where you can adjust the master section or all your audio files on your timeline.
- Just drag the master level slider upward and downwards, and you’ll notice the changes right away.

So done with the changes? Let’s preview them.
Free Download For Win 7 or later(64-bit)
Free Download For macOS 10.14 or later
Step8Preview your changes
After carefully making all the changes to your audio, preview it for the last time before going with them. The “Play” button is still there in the bottom left corner.
Perfect!!! No? Make the changes again until you are satisfied and then hit the “Apply” button on the bottom right corner to adjust these changes.

And here we are, done!!! Now you can easily surprise your friends with your master-like audio handling. Before we wind up our guide, we’ll answer some of the frequently asked questions about the audio mixer of Filmora. So let’s dive right into it.
Part 4: Hot FAQs about the audio mixer of Filmora
1.How important is an audio mixer in video editing?
An audio mixer is necessary if you want to create impressive videos. This master volume control allows you to deepen the audio effect and merge two audio sources to get the maximum out of them. This is why most content creators give grave importance to audio mixers during video editing.
2.Where can we find the audio mixer in Filmora?
Like other highly advanced editing tools, you can also find the audio mixer in Filmora. After you’ve placed your media file on the editing panel, the “audio mixer” icon appears on the toolbar under the preview channel.
3.Is the audio mixer of Filmora available for free?
Yes, you can freely use the audio mixer of Filmora as much as you want without any cost. And unlike many other free sound control tools, you get all the latest and advanced features like the preview tool with the audio mixer of Filmora.
Conclusion
Every top-ranked video contains the best-suited audio tracks with it. And the audio mixer of Filmora comes in handy whenever you want to tweak the audio settings of a video.
In this article, we’ve covered everything you need to know about using the audio mixer in Filmora.
Free Download For Win 7 or later(64-bit)
Free Download For macOS 10.14 or later
Also read:
- Updated In 2024, How Windows Movie Maker Save MP4 File
- New This Article Has a Detailed Description of How You Can Split the Videos in Lightworks Including the the Discussion of Splitting the Wondershare Filmora as an Alternative. It Is Also a Suitable Choice for 2024
- 10 Amazing Anime Character Designs to Inspire You
- New Efficient Ways to Change Slow Motion Video to Normal on iPhone for 2024
- Updated In 2024, Ultimate Guide on How To Plan and Storyboard a Music Video
- Updated How to Make Falling Text Effect in Filmora for 2024
- New 2024 Approved How To Slow Down GIF Building an Understanding
- In 2024, Deleting White Background in Photoshop Is Hard? No
- Updated In 2024, Techniques You Never Heard of for Learning YouTube AI Marketing
- New How to Use a Stabilization Tool in Filmora for 2024
- New How to Perfect Quick and Efficient Video Editing | Keyboard Shortcuts in Filmora for 2024
- Updated 2024 Approved MP3 Cutter Download for Computer and Mobile
- Updated In 2024, Zoom In and Zoom Out on YouTube
- In 2024, Do You Know You Can Add LUTs for Cinematic Color Grading on Your Smartphones? With VN Editor You Can, You Can Add LUTs. Choose the Option VN LUTs Free Download
- 2024 Approved Do You Want to Add Subtitles to Your MKV Files Easily? This Article Will Introduce 7 Simple Ways Through Which You Can Add Subtitles to MKV on Different Devices
- New In 2024, Lets Introduce the Top 5 Applications to Add a Song to a Video for Free with some Amazing Sound and Visual Effects
- Updated 2024 Approved Wondering How to Stand Out with Your Adobe Slideshow Presentation? Follow the Given Discussion to Learn All About the Easiest Ways of Making a Slideshow at Adobe
- Updated In 2024, 2 Solutions to Cut Video in VLC on Windows
- New 5 Best Video Denoisers for 2024
- New 2024 Approved Stunning Glitch Effect and Its Creation Steps for Premiere Pro
- Updated 2024 Approved Best 6 Online MP4 Croppers
- Updated Adobe Premiere Pro Download and Use Guide In Depth for 2024
- New Top 10 Sony LUT for Different Purposes for 2024
- In 2024, Tips and Tricks for Setting Up your Samsung Galaxy S23 Phone Pattern Lock
- How To Transfer Data From iPhone 12 mini To Others devices? | Dr.fone
- In 2024, 4 Ways to Mirror Apple iPhone X to Laptop via USB or Wi-Fi | Dr.fone
- In 2024, How to Track Vivo V30 Lite 5G Location without Installing Software? | Dr.fone
- How To Transfer Data From Apple iPhone SE To Other iPhone 15 Pro Max devices? | Dr.fone
- In 2024, 3 Things You Must Know about Fake Snapchat Location On Tecno Spark 10C | Dr.fone
- New In 2024, Best GIF Croppers How to Crop an Animated GIF
- How to Track Apple iPhone SE (2020) Location by Number | Dr.fone
- In 2024, 3 Ways for Android Pokemon Go Spoofing On Vivo Y100t | Dr.fone
- How Can Realme GT 3Mirror Share to PC? | Dr.fone
- In 2024, How Do You Remove Restricted Mode on Apple iPhone 14 Plus
- In 2024, Unlocking an iCloud Locked iPad and Apple iPhone SE
- Title: 10 Best Slow-Motion Cameras to Try for 2024
- Author: Morgan
- Created at : 2024-04-24 01:12:17
- Updated at : 2024-04-25 01:12:17
- Link: https://ai-video-editing.techidaily.com/10-best-slow-motion-cameras-to-try-for-2024/
- License: This work is licensed under CC BY-NC-SA 4.0.

