
:max_bytes(150000):strip_icc():format(webp)/cq5dam.web.1280.1280-3-5c2a5dc746e0fb0001d115f0.jpeg)
New Camtasia vs Final Cut Pro
Camtasia vs Final Cut Pro
With many available video editing solutions in the market today, it is a bit hard to choose the best video editing software for your unique needs. Remember, it’s all about investing money. In every purchase, you need to be sure about purchasing no matter the amount. In the case of video editing software, the concern is just significant as you should find software that perfectly suits your requirements. A video editing software may be having excellent features, but become complex when working with. On the other hand, the software may be quite user-friendly, but its range of tools is not as large.
Implementing tools such as Camtasia or Final Cut Pro requires a great deal of contemplating and comparison of crucial factors. You may be wondering, when you compare Camtasia vs Final cut pro, which is the best to use. To make a clear comparison between these two video editing programs, one has to judge all the crucial elements. Though the two programs share some degree of similarity, this article will help you understand if Final Cut Pro is better than Camtasia. We are going to compare Final Cut Pro X vs Techsmith Camtasia using their features, pros, and Cons, market prices, functionality, and customer support to help you fully understand them.
Overall Comparison
This table will help you compare Camtasia vs Final cut pro.
674 reviews341 reviews$ 249.99 for a user license$139.99 upgrade$299.99 per licenseRelatively easy to use A bit complicated for beginners</6h>
| | Camtasia | Final Cut Pro | |
| ——————— | ————————————————————————————————————————- | ————————————————————————————————————————— |
| Overall rating | 674 reviews | 341 reviews |
| Entry-level Price | $ 249.99 for a user license $139.99 upgrade | $299.99 per license |
| Ease of use | Relatively easy to use | A bit complicated for beginners |
| Market share | Small-Business (50.5% of reviews) Mid-Market (26.0% of reviews) Enterprise (23.4% of reviews) | Small-Business (71.0% of reviews) Mid-Market (17.05 reviews) Enterprise (11.9% of reviews) |
| Value of money | 2/10 – low cost | 4/10 – average cost |
| Customer support | Provide Email Languages supported; English, French, Germany, Japanese. | Email Languages supported; English |
| Functionality | Speed is a bit slow Various exporting settings. Enough editing capability. Does not support live recording from a camera. | Speed is higher than its comparison Exporting settings are limited Not as efficient as its comparison Has DV camera support |
| Support system | Desktop, Cloud | Desktop, Cloud, Mobile |
As you can see in the table above there is no great deference seen when comparing Final cut pro X vs Techsmith Camtasia, but it can tell you if is Final cut pro better than Camtasia or reverse is the case.
Final Cut Pro
Final Cut Pro is the perfect macOS video editing software that can help you achieve a professional-looking video. This software is built with the latest and most powerful tools that make it an effortless tool for video editing. It has impressive filters, graphics, and a range of other cool video editing features. Its coolest part is its ability to enable 360-degree video editing for VR and VR headset playback. This program uses multi-core multi-thread machines quickly to allow you to import the videos in different formats faster than others.

Like any other software, Final Cut Pro possesses some pros and cons as listed below;
Pros:
- It is a stable program that can be very useful in small businesses.
- It has a powerful architecture for your complex and heavy projects.
- Its fast rendering speed can allow you to conduct Multicam editing.
- It has classic GPU utilization and powerful media organization to allow you to organize assets such as audio and video carefully.
- Its easy audio modification capabilities can allow you to create impeccable VR videos.
- It has a customizable and streamlined share interface that makes high-quality file delivery easy and fast.
- It can edit videos offline.
- It is tailored with real-time graphics and cool effects like text and blurs that are easy to apply.
Cons:
- It is complex and thus difficult for beginners.
- It has limited export options.
- It only works on Mac computers.
Editing video with Final Cut Pro is not a complicated process. Here are the steps to help a beginner get started.
Step1: Create a new project & import media
When you Launch the Final Cut Pro interface, Libraries and Events are automatically created. You only need to create a new project.
At the top menu bar, click File > New > Project to create a new project. Here you will have to type in a new name of the project and then select ‘Use Automatic Settings’.
At the top menu bar again, click File > Import > Media to enable the program to bring up the Media Import window where you can select the video and audio files you want to import into your new project.
After selecting all the media you want to include in your project press ‘Import Selected’ and then close the media window.
Step 2: Add your trimmed clips to the timeline.
The thumbnails of all the media you have imported will be appearing in the browser. For you to create a new video you need to arrange and trim that media in the timeline.
In your browser, you can set the ‘In and Out’ points for each video clip by holding ‘_Option_’. To do this you will have to click the thumbnail and drag it. The yellow timeline that appears on the clip represents the range that will be added to your video timeline.
After arranging them in the order that you want them to play, trim your clips by moving the mouse cursor to the edge of its thumbnail. This is done by using the ‘Trim tool’. Drag forward or backward to adjust the clip’s endings.
If you are arranging the clips in your sequence, you need to drag and drop any of the clips from the timeline into a different position. Final Cut Pro has a tool known as Magnetic timeline that will automatically insert and arrange the clips for you. You just need to ensure that your clips do not overlap or lay on top of each other.
To preview your video in the viewer, press the space bar on your keyboard or the Play icon in your software interface.
Step 3: Add Title, Texts, Transitions, and Effects
Title and Texts: Final Cut Pro has many Titles located in the browser where you imported your media. You can add them by dragging them into your video’s timeline. To access those titles you can press the ‘Title and Generators’ icon in the sidebar to open it.
Transitions: When adding Transitions, there is nothing wrong with a “hard cut_” between 2 clips. Use the transitions only where they make sense so as not to ruin your video. To add these transitions, you need to open the ‘_Transition browser’ by clicking on its indicated icon.
The transition’s length can be adjusted by dragging inwards or outwards. To customize your transition you can open the inspector by pressing ‘Command + 4’ and make the adjustments.
Effects: With Final Cut Pro inbuilt Effects, you can add some more value to your video after you are done with basic arrangements in the timeline. To add the effects click on the ‘Effects browser’ icon to open it.
Next to the effects browser icon, choose your preferred effect and add it between any 2 clips. By doing this you will have added animation effect between them.
Step 4: Add Audio, Music, and Color.
Audio & Music: At this point, you can import and add your music. Photos and Audio sidebar icon is located above the browser and you can click to open, and then select Sound Effects.
To see all the songs available in Final Cut Pro, you can type the word ‘Jingle‘ and you can preview them by pressing the small play button.
Color correction: By highlighting all the video clips in your video timeline, you can see a yellow outline around them.
Then open the drop-down menu by clicking the ‘_Enhancement_’ icon situated below the Viewer.
To improve the color and contrast, select Balance Color or ‘Option + Cmd + B’.
Now that you are done editing your video, you can save and share as you prefer.
Camtasia
Camtasia is a perfect all-in-one video editing and screen recording program. If you compare Camtasia vs Final cut pro, Camtasia is quite easy to use even for beginners. It can work in both Windows and macOS and provides the user with a demonstration and education video platform. It contains cool features to help you capture and edit your videos and audios appropriately.

Here are some pros and cons of Camtasia.
Pros:
- It is easy to learn.
- It has a good capture feature.
- Impressive cursor effects.
- It has Interactivity features.
- It has a good asset library
- Availability of mobile version.
- It offers great customer service.
- Available at a low cost.
Cons:
- Constant crashes and bugs.
- Limited customization
- No key tracking.
Here are key steps to follow when editing a video with Camtasia.
Step 1: Break up steps of a process with lower thirds.
Break any long multi-step video to help lower the viewer’s cognitive load.
Step 2: Reinforce texts with video.
Remove any mistakes and extra content such as unnecessary footage from the ends of your recording. If you trim too much drag the clip back to restore. This process is known as trimming.
You can zoom in on the most important section to focus your viewer’s attention there.
Step 3: Add narrative to video
Alternative Way to Edit Videos
Getting an appropriate video editing software is quite challenging as the makers of these software sometimes get confused about if the programs needed are for home videos or professional-quality work such as Hollywood movies. This is why you will find that some programs are complex to use while others lack essential features to make your work efficient.
Filmora video editor is one of the most efficient for video editing. This software is powerful and easy to use and it is built with many features to make your vision come true. It is fit for small scale, medium scale and large businesses.
For Win 7 or later (64-bit)
For macOS 10.12 or later
These steps will help you to know how to edit video with Filmora software;
Step 1: Start a new project.

After making sure that you have Filmora video editor installed on your computer, start a new project. Open the app then choose a dropdown option from the Select Project Aspect Ratio.
Step 2: Import your media

The footage, photos, and audios you use in your video are the key basic aspects of your video. Organizing all the files you are going to use in a single file. You can do this by browsing the file menu. Click the ‘File > Import Media Folder’ menu in Filmora and select the folder that contains your video files.
After importing your video files the thumbnails for each file will appear in one half of the application. Double-click on the thumbnails for a preview.
These thumbnails prove that all your captured video clips are already in the application and ready to be edited. Click on the Filmora video editing guide to get to help you know what to do.
Step 3: Add clips to the timeline, trim, adjust appropriately and sequence them.

Now that you have reviewed your video library and seen that they are there, you need to add them to the video editing timeline at the bottom of your app. This is quite easy as you can view all your video clips and determine which is to be added first.
Drag and drop each video or photo in the timeline to add it to your project.
After adding the clips, you can trim and adjust them appropriately. Click on the right or left edges of the clip you want to shorten in the timeline and drag it to shorten.
If you want to split a clip in the timeline, pick the scissors by clicking on the ‘_Scissors_’ icon.
When working on your video footage, click the spacebar of your computer keyboard to preview. By doing this, you will be able to see how your clips are joined together.
Trim appropriately and perfect the runtime of every single clip and re-order your clips where there is a need to do so. This can be done by clicking on the targeted clip and dragging it to where you want it to be.
Step 4: Add video Effects, Transmissions between the clips, and Text overlays

Click on the Effect icon at the top of the app and a deep visual library of effects will be visible. If you want to add a certain effect to your active clip, just double-click it.
Add transitions in your video timeline to cut the scene-to-scene. They are quite necessary as they help establish your audience’s attention.
The next thing after adding the transmissions will be adding the overlays and exporting your video by clicking on the ‘Export‘ button.
Step 5: Export your finished video.

You can click the ‘Export’ button and switch to the platform you want your video to be exported.
Conclusion
Choosing an appropriate video editing tool is equally as important as the video itself. And with the availability of so many of these video editing tools, choosing among them is quite hard. You can easily get confused especially if you are a beginner in the video editing industry. To avoid the complications you need to know what editing software is the best for your project.
As you can see in the table above there is no great deference seen when comparing Final cut pro X vs Techsmith Camtasia, but it can tell you if is Final cut pro better than Camtasia or reverse is the case.
Final Cut Pro
Final Cut Pro is the perfect macOS video editing software that can help you achieve a professional-looking video. This software is built with the latest and most powerful tools that make it an effortless tool for video editing. It has impressive filters, graphics, and a range of other cool video editing features. Its coolest part is its ability to enable 360-degree video editing for VR and VR headset playback. This program uses multi-core multi-thread machines quickly to allow you to import the videos in different formats faster than others.
Like any other software, Final Cut Pro possesses some pros and cons as listed below;
Pros:
- It is a stable program that can be very useful in small businesses.
- It has a powerful architecture for your complex and heavy projects.
- Its fast rendering speed can allow you to conduct Multicam editing.
- It has classic GPU utilization and powerful media organization to allow you to organize assets such as audio and video carefully.
- Its easy audio modification capabilities can allow you to create impeccable VR videos.
- It has a customizable and streamlined share interface that makes high-quality file delivery easy and fast.
- It can edit videos offline.
- It is tailored with real-time graphics and cool effects like text and blurs that are easy to apply.
Cons:
- It is complex and thus difficult for beginners.
- It has limited export options.
- It only works on Mac computers.
Editing video with Final Cut Pro is not a complicated process. Here are the steps to help a beginner get started.
Step1: Create a new project & import media
When you Launch the Final Cut Pro interface, Libraries and Events are automatically created. You only need to create a new project.
At the top menu bar, click File > New > Project to create a new project. Here you will have to type in a new name of the project and then select ‘Use Automatic Settings’.
At the top menu bar again, click File > Import > Media to enable the program to bring up the Media Import window where you can select the video and audio files you want to import into your new project.
After selecting all the media you want to include in your project press ‘Import Selected’ and then close the media window.
Step 2: Add your trimmed clips to the timeline.
The thumbnails of all the media you have imported will be appearing in the browser. For you to create a new video you need to arrange and trim that media in the timeline.
In your browser, you can set the ‘In and Out’ points for each video clip by holding ‘_Option_’. To do this you will have to click the thumbnail and drag it. The yellow timeline that appears on the clip represents the range that will be added to your video timeline.
After arranging them in the order that you want them to play, trim your clips by moving the mouse cursor to the edge of its thumbnail. This is done by using the ‘Trim tool’. Drag forward or backward to adjust the clip’s endings.
If you are arranging the clips in your sequence, you need to drag and drop any of the clips from the timeline into a different position. Final Cut Pro has a tool known as Magnetic timeline that will automatically insert and arrange the clips for you. You just need to ensure that your clips do not overlap or lay on top of each other.
To preview your video in the viewer, press the space bar on your keyboard or the Play icon in your software interface.
Step 3: Add Title, Texts, Transitions, and Effects
Title and Texts: Final Cut Pro has many Titles located in the browser where you imported your media. You can add them by dragging them into your video’s timeline. To access those titles you can press the ‘Title and Generators’ icon in the sidebar to open it.
Transitions: When adding Transitions, there is nothing wrong with a “hard cut_” between 2 clips. Use the transitions only where they make sense so as not to ruin your video. To add these transitions, you need to open the ‘_Transition browser’ by clicking on its indicated icon.
The transition’s length can be adjusted by dragging inwards or outwards. To customize your transition you can open the inspector by pressing ‘Command + 4’ and make the adjustments.
Effects: With Final Cut Pro inbuilt Effects, you can add some more value to your video after you are done with basic arrangements in the timeline. To add the effects click on the ‘Effects browser’ icon to open it.
Next to the effects browser icon, choose your preferred effect and add it between any 2 clips. By doing this you will have added animation effect between them.
Step 4: Add Audio, Music, and Color.
Audio & Music: At this point, you can import and add your music. Photos and Audio sidebar icon is located above the browser and you can click to open, and then select Sound Effects.
To see all the songs available in Final Cut Pro, you can type the word ‘Jingle‘ and you can preview them by pressing the small play button.
Color correction: By highlighting all the video clips in your video timeline, you can see a yellow outline around them.
Then open the drop-down menu by clicking the ‘_Enhancement_’ icon situated below the Viewer.
To improve the color and contrast, select Balance Color or ‘Option + Cmd + B’.
Now that you are done editing your video, you can save and share as you prefer.
Camtasia
Camtasia is a perfect all-in-one video editing and screen recording program. If you compare Camtasia vs Final cut pro, Camtasia is quite easy to use even for beginners. It can work in both Windows and macOS and provides the user with a demonstration and education video platform. It contains cool features to help you capture and edit your videos and audios appropriately.
Here are some pros and cons of Camtasia.
Pros:
- It is easy to learn.
- It has a good capture feature.
- Impressive cursor effects.
- It has Interactivity features.
- It has a good asset library
- Availability of mobile version.
- It offers great customer service.
- Available at a low cost.
Cons:
- Constant crashes and bugs.
- Limited customization
- No key tracking.
Here are key steps to follow when editing a video with Camtasia.
Step 1: Break up steps of a process with lower thirds.
Break any long multi-step video to help lower the viewer’s cognitive load.
Step 2: Reinforce texts with video.
Remove any mistakes and extra content such as unnecessary footage from the ends of your recording. If you trim too much drag the clip back to restore. This process is known as trimming.
You can zoom in on the most important section to focus your viewer’s attention there.
Step 3: Add narrative to video
Alternative Way to Edit Videos
Getting an appropriate video editing software is quite challenging as the makers of these software sometimes get confused about if the programs needed are for home videos or professional-quality work such as Hollywood movies. This is why you will find that some programs are complex to use while others lack essential features to make your work efficient.
Filmora video editor is one of the most efficient for video editing. This software is powerful and easy to use and it is built with many features to make your vision come true. It is fit for small scale, medium scale and large businesses.
For Win 7 or later (64-bit)
For macOS 10.12 or later
These steps will help you to know how to edit video with Filmora software;
Step 1: Start a new project.
After making sure that you have Filmora video editor installed on your computer, start a new project. Open the app then choose a dropdown option from the Select Project Aspect Ratio.
Step 2: Import your media
The footage, photos, and audios you use in your video are the key basic aspects of your video. Organizing all the files you are going to use in a single file. You can do this by browsing the file menu. Click the ‘File > Import Media Folder’ menu in Filmora and select the folder that contains your video files.
After importing your video files the thumbnails for each file will appear in one half of the application. Double-click on the thumbnails for a preview.
These thumbnails prove that all your captured video clips are already in the application and ready to be edited. Click on the Filmora video editing guide to get to help you know what to do.
Step 3: Add clips to the timeline, trim, adjust appropriately and sequence them.
Now that you have reviewed your video library and seen that they are there, you need to add them to the video editing timeline at the bottom of your app. This is quite easy as you can view all your video clips and determine which is to be added first.
Drag and drop each video or photo in the timeline to add it to your project.
After adding the clips, you can trim and adjust them appropriately. Click on the right or left edges of the clip you want to shorten in the timeline and drag it to shorten.
If you want to split a clip in the timeline, pick the scissors by clicking on the ‘_Scissors_’ icon.
When working on your video footage, click the spacebar of your computer keyboard to preview. By doing this, you will be able to see how your clips are joined together.
Trim appropriately and perfect the runtime of every single clip and re-order your clips where there is a need to do so. This can be done by clicking on the targeted clip and dragging it to where you want it to be.
Step 4: Add video Effects, Transmissions between the clips, and Text overlays
Click on the Effect icon at the top of the app and a deep visual library of effects will be visible. If you want to add a certain effect to your active clip, just double-click it.
Add transitions in your video timeline to cut the scene-to-scene. They are quite necessary as they help establish your audience’s attention.
The next thing after adding the transmissions will be adding the overlays and exporting your video by clicking on the ‘Export‘ button.
Step 5: Export your finished video.
You can click the ‘Export’ button and switch to the platform you want your video to be exported.
Conclusion
Choosing an appropriate video editing tool is equally as important as the video itself. And with the availability of so many of these video editing tools, choosing among them is quite hard. You can easily get confused especially if you are a beginner in the video editing industry. To avoid the complications you need to know what editing software is the best for your project.
The Right Ways to Slow Down a Video on iPhone
Slow-motion videos are widely used for various purposes in videography or filmmaking. They not only underline the significance of a shot but also elevate creativity. The frame rate is remarkably higher in slow-motion videos than in normal videos. There are two methods included in the process of how to slow down a video on an iPhone.
The first method involves increasing the frame rate; meanwhile, the other is playback speed adjustment. This article will enfold apps to teach how to slow a video down on iPhone. All these applications will be available in the iPhone’s official App Store. However, check the compatibility of these apps with the iOS version you’re using. Ultimately, we’ll share a desktop alternative on how to slow down a video iPhone.
Slow Motion Video Maker Slow your video’s speed with better control of your keyframes to create unique cinematic effects!
Make A Slow Motion Video Make A Slow Motion Video More Features

Part 1: Pre-Recorded A Video? Adjust Slow Motion Parameters Right Away
One of the major reasons Gen Z and Gen Alpha opt for iPhones is their high-quality camera. It is ideal for capturing and editing videos in high resolution is ideal. In 2013, iPhones were integrated with the Slow-mo feature for creative purposes. Where first users needed third-party applications, they could use the built-in feature. Here is how do you slow down a video on iPhone officially:
Step 1
Locate the “Photos” application on your iPhone and launch it by simply clicking. Upon accessing the app, go to the bottom and click on “Albums.” Afterward, click the “Slo-mo” option from the expanding menu. Formerly, select a video from your device media library import.

Step 2
Once the video has been selected, navigate to the top right corner and select “Edit.”

Step 3
When the editing panel appears, navigate towards the bottom of the timeline bar. Drag the slider’s position to adjust the speed to create a slow motion. As the slow-motion effect has been created, click the “Done” button. Commencing this action will finalize your slow-motion video.

Part 2: Some Top-Notch Solutions to Slow Down Any Video on iPhone
The iPhone does offer a built-in feature to help you curate a perfect slow-mo. Nonetheless, a third-party application can offer additional and upgraded features. They offer specialized effects and filters, multiplatform support, and more. This section discusses 4 applications and how to make video slow motion iPhone using them. Find the brief introduction, capabilities, and guides of these apps below:
- SpeedPro Slow Speed Video Edit
- Slow Fast Slow – Control the Speed of Your Videos
- Slo Mo – Speed Up Video Editor
- Video Speed Editor Slow & Fast
1. SpeedPro Slow Speed Video Edit
This is an exclusive application to answer your question about how to put a video in slow motion on an iPhone. This application offers a -2x to -6x playback speed option for a slow-mo. Its intuitive feature enables speed alteration from a specific video section. This option is ideal for creatively editing your Instagram reels. Along with slowing down the speed, you can also enhance it for fast motion generation.

Key Features
- The application offers a timeline editing interface that enhances precision and accuracy.
- It possesses the ability to incorporate music in your videos using its Music feature.
- The application collaborates with social platforms like Instagram and Facebook for
Steps to Add Slow Motion in Video Using SpeedPro Slow Speed Video Edit
When you embark on a new experience, using something for the first time can be tricky. The unfamiliarity makes it harder, and one doubts its abilities. Hence, consider us your partner in guiding you on how to edit slow motion on your iPhone. We have curated a step-by-step guide to help you in creating a slow-mo:
Step 1: After downloading and accessing the application’s main menu, click the “Speed Pro” option. Then, select a video clip from your device that you desire to apply this effect to.

Step 2: Once the video clip has been selected, click the “Done” button to import.

Step 3: Afterward, you’ll be redirected to its editing interface for speed change. Navigate toward the speed slider at the bottom of the video display. Drag the slider towards the left to select a suitable playback speed option. You can also apply the slow-mo to a specific area by dragging the timeline slider.

2. Slow Fast Slow - Control the Speed of Your Videos
Use this application to record a slow-motion video or add the effect in post-production editing. This application offers a high frame rate of 240 fps for a high-grade slow-mo effect. This means you can now slow a video up to 1/16th of its original speed. It wins at creating slow motion with the iPhone’s built-in speed manipulation feature.

Key Features
- Provides audio pitch maintenance feature during speed alteration.
- Gives the option to adjust the screen ratio before editing, like square or more.
- The application is compatible with all your iOS 10.0 devices and higher versions.
Steps to Add Slow Motion in Video Using Slow Fast Slow
The encounter with an advanced tool or application is often stressful as you are unfamiliar with it. You do not want to mess up the video, so you must master an app. Following is how to slow down a video on an iPhone using the Slow Fast Slow app:
Step 1: After launching the application, give it access to your files for editing. Then, click on the “Other Videos” option to select a video from a device for slow-mo.

Step 2: Once the video has been imported, you will reach the editing interface. You’ll notice a slider with different points. These points indicate the time frames of your video. The slider is positioned downward to add a slow-mo effect at specific durations.

Step 3: Once you are done with the editing, click the play button to preview. Next, navigate towards the right-side bottom of the preview screen and hit “Export.” Select any particular resolution to save the slowed-down video on your device.

3. Slo Mo – Speed Up Video Editor
Are you looking for a versatile application about how to make a normal video slow-motion iPhone 13? Fashioned to modify a video’s speed, this app can help you. It allows users to adjust the video speed up to 12x for slow and fast motion. In addition, you can alter the video frame rate up to 240 fps at precise frames.

Key Feature
- With an additional freeze frame feature, infuse an innovative touch to videos.
- Experience a more productive workflow with its quick processing feature.
- Keeping up an accessible to all approach, the user interface is straightforward and minimal.
Steps to Add Slow Motion in Video Using Slo Mo – Speed Up Video Editor
Those initial stages of operating a new app and getting your hands on its UI are difficult. However, this article prioritizes your ease more than anything. Find our guide on how to make a video in slow motion on iPhone here:
Step 1: Upon launching the application, it will ask you for storage access. After that, you’ll have to import a video to add slow motion. Just select any normal video on your device and click on the “Next” option.

Step 2: Navigate toward the bar at the bottom of the timeline panel and select “Adjust.”

Step 3: This will feature the speed control options on your screen; go to “Advance.” Further, change the speed change slider towards the left to manipulate it. Afterward, preview the video and click on the “tick” icon.

Step 4: Further, select the “Export” icon appearing in the expanded menu.

4. Video Speed Editor Slow & Fast
How do you slow down a video on an iPhone after recording in a minimalistic way? This iPhone application is designed for such contexts to create slow-motion videos. Users can slow down a clip’s playback speed up to 8x at specific durations. Simply trim the video parts to apply the speed setting at specific sections and merge them later.

Key Features
- After slow motion, you have the option to keep the original sound or insert music offered by it.
- The timeline editing method helps you to trim the video at the right time.
- The application is compatible with iOS 12.0, iPadOS 12.0, macOS 11.0, and newer versions.
Steps to Add Slow Motion in Video Using Video Speed Editor Slow & Fast
This application has an innovative user interface with a simple operational menu. To add a slow-motion effect to a video, buy its Pro subscription first. To assist you further, here is how to slow down an iPhone video in it:
Step 1: Create a new project after launching the application and giving access to storage. Do this by clicking on the screen saying, “Tap to create a new project.”

Step 2: From the Videos section of your media, select a video and hit “Choose.”

Step 3: In the editing interface, simply select a speed option from -2x to -8x for slowing. Once the video is slowed down according to your preferences, export it.

Part 3: Failed to Slow Down Video Properly? Try Wondershare Filmora as a Remedy
Have you tried all the given solutions on how to slow-mo a video on an iPhone and are still clueless? Not getting the desired results can be frustrating, but we have brought the best answer. Wondershare Filmora helps you achieve slow motion on a computer or laptop. The software is compatible with all Windows and macOS devices. You can just connect your iPhone with the source using a cable and import media.
Being a versatile software, Filmora introduces you to two advanced methods. Uniform speed emerges as a simple method of creating a slow-motion effect. On the other hand, Speed Ramping allows you to edit speed for professional purposes. Amongst speed alteration, users can also use the frame interpolation technique. It increases video frames to ensure a smooth playback during slow-mo.
Step-by-Step Guide to Creating Slow-Motion in Filmora
If you are using Filmora for the first time, the user interface might initially seem confusing. However, in comparison to other post-production software, it possesses a minimal interface. In this section, learn about how to slo-mo a video iPhone using Filmora:
Free Download For Win 7 or later(64-bit)
Free Download For macOS 10.14 or later
Step 1Connect iPhone and Import Clip
Once you have created a new project on Filmora, import media. First, to import media from your iPhone, connect it to your computer or related device. Then, go to “Import” > “Import from a Camera or Phone” option. Further, select the device name and import data.

Step 2Access Speed Ramping Option
Use your cursor to bring the edited media to the timeline and select it. From the appearing settings panel, access the “Speed” > “Speed Ramping” tabs. Here, either choose any of the predesigned templates or customize one.

Step 3Enable Optical Flow for Additional Touch
If the slow motion seems rough or abrupt, Filmora has a solution to that as well. Go to the “AI Frame Interpolation” section and expand it. From the expanding menu, click the “Optical Flow” option for a high-quality slow-mo.

Step 4Rendering for Final Preview
To observe the overall results, navigate towards the top toolbar. Select the “File” tab and “Render Preview” from the dropdown menu. After reviewing the final video, use your cursor to click the “Export” button.

Key Features of Wondershare Filmora
Wondershare Filmora provides a wide range of features for a full-fledged editing experience. Some of these features are for video, some are for audio, and others are for visuals. Here is a list of some of Filmora’s key features that you must give a try to:
1. Instant Mode
Once you have recorded a video, the post-production process cannot be neglected. However, when you start editing a video, the process might be confusing at first. With Filmora’s Instant Mode, use AI’s assistance to edit any video without effort. There are 115 built-in templates to integrate according to context and highlights it.
2. Green Screen
Integrate attractive backgrounds in your videos, like mountains, beaches, or more. With Filmora’s Green Screen feature, remove the video backgrounds with accuracy. After removing the background, you can insert multiple backgrounds, like solid colors. If there are backgrounds that you have previously saved, import them to the timeline. They will automatically show in the video, and you can customize them further.
3. Color Correction
Filmora offers an extensive range of color correction elements to enhance visibility. There are 40+ free presets in Filmora that you can download and apply within the app. In addition, you can do custom color settings and save them as custom presets. You can also use the 3D LUT feature to set preferences for specific factors.
4. Text-to-Speech
Another important feature that helps with interactive video creation is text-to-speech. It allows users to transform text into speech with voice selection options. The software has been trained on NLP and integrates realistic voices in videos. Being closer to the human voice helps with better audience interaction and understanding.
Conclusion
The main theme of this article was how to slow down a video on iPhone and the tools to do it. We mentioned 4 applications that are compatible with higher versions of the iPhone. In addition, the article provided detailed guides on all these applications.
Among them, Wondershare Filmora has been integrated with an advanced slow-mo feature. It allows a seamless and professional user interface to import, edit, and customize. The AI Optical Flow in it adds a remarkable fine touch to your slow-mo video.
Make A Slow Motion Video Make A Slow Motion Video More Features
Part 1: Pre-Recorded A Video? Adjust Slow Motion Parameters Right Away
One of the major reasons Gen Z and Gen Alpha opt for iPhones is their high-quality camera. It is ideal for capturing and editing videos in high resolution is ideal. In 2013, iPhones were integrated with the Slow-mo feature for creative purposes. Where first users needed third-party applications, they could use the built-in feature. Here is how do you slow down a video on iPhone officially:
Step 1
Locate the “Photos” application on your iPhone and launch it by simply clicking. Upon accessing the app, go to the bottom and click on “Albums.” Afterward, click the “Slo-mo” option from the expanding menu. Formerly, select a video from your device media library import.
Step 2
Once the video has been selected, navigate to the top right corner and select “Edit.”
Step 3
When the editing panel appears, navigate towards the bottom of the timeline bar. Drag the slider’s position to adjust the speed to create a slow motion. As the slow-motion effect has been created, click the “Done” button. Commencing this action will finalize your slow-motion video.
Part 2: Some Top-Notch Solutions to Slow Down Any Video on iPhone
The iPhone does offer a built-in feature to help you curate a perfect slow-mo. Nonetheless, a third-party application can offer additional and upgraded features. They offer specialized effects and filters, multiplatform support, and more. This section discusses 4 applications and how to make video slow motion iPhone using them. Find the brief introduction, capabilities, and guides of these apps below:
- SpeedPro Slow Speed Video Edit
- Slow Fast Slow – Control the Speed of Your Videos
- Slo Mo – Speed Up Video Editor
- Video Speed Editor Slow & Fast
1. SpeedPro Slow Speed Video Edit
This is an exclusive application to answer your question about how to put a video in slow motion on an iPhone. This application offers a -2x to -6x playback speed option for a slow-mo. Its intuitive feature enables speed alteration from a specific video section. This option is ideal for creatively editing your Instagram reels. Along with slowing down the speed, you can also enhance it for fast motion generation.
Key Features
- The application offers a timeline editing interface that enhances precision and accuracy.
- It possesses the ability to incorporate music in your videos using its Music feature.
- The application collaborates with social platforms like Instagram and Facebook for
Steps to Add Slow Motion in Video Using SpeedPro Slow Speed Video Edit
When you embark on a new experience, using something for the first time can be tricky. The unfamiliarity makes it harder, and one doubts its abilities. Hence, consider us your partner in guiding you on how to edit slow motion on your iPhone. We have curated a step-by-step guide to help you in creating a slow-mo:
Step 1: After downloading and accessing the application’s main menu, click the “Speed Pro” option. Then, select a video clip from your device that you desire to apply this effect to.
Step 2: Once the video clip has been selected, click the “Done” button to import.
Step 3: Afterward, you’ll be redirected to its editing interface for speed change. Navigate toward the speed slider at the bottom of the video display. Drag the slider towards the left to select a suitable playback speed option. You can also apply the slow-mo to a specific area by dragging the timeline slider.
2. Slow Fast Slow - Control the Speed of Your Videos
Use this application to record a slow-motion video or add the effect in post-production editing. This application offers a high frame rate of 240 fps for a high-grade slow-mo effect. This means you can now slow a video up to 1/16th of its original speed. It wins at creating slow motion with the iPhone’s built-in speed manipulation feature.
Key Features
- Provides audio pitch maintenance feature during speed alteration.
- Gives the option to adjust the screen ratio before editing, like square or more.
- The application is compatible with all your iOS 10.0 devices and higher versions.
Steps to Add Slow Motion in Video Using Slow Fast Slow
The encounter with an advanced tool or application is often stressful as you are unfamiliar with it. You do not want to mess up the video, so you must master an app. Following is how to slow down a video on an iPhone using the Slow Fast Slow app:
Step 1: After launching the application, give it access to your files for editing. Then, click on the “Other Videos” option to select a video from a device for slow-mo.
Step 2: Once the video has been imported, you will reach the editing interface. You’ll notice a slider with different points. These points indicate the time frames of your video. The slider is positioned downward to add a slow-mo effect at specific durations.
Step 3: Once you are done with the editing, click the play button to preview. Next, navigate towards the right-side bottom of the preview screen and hit “Export.” Select any particular resolution to save the slowed-down video on your device.
3. Slo Mo – Speed Up Video Editor
Are you looking for a versatile application about how to make a normal video slow-motion iPhone 13? Fashioned to modify a video’s speed, this app can help you. It allows users to adjust the video speed up to 12x for slow and fast motion. In addition, you can alter the video frame rate up to 240 fps at precise frames.
Key Feature
- With an additional freeze frame feature, infuse an innovative touch to videos.
- Experience a more productive workflow with its quick processing feature.
- Keeping up an accessible to all approach, the user interface is straightforward and minimal.
Steps to Add Slow Motion in Video Using Slo Mo – Speed Up Video Editor
Those initial stages of operating a new app and getting your hands on its UI are difficult. However, this article prioritizes your ease more than anything. Find our guide on how to make a video in slow motion on iPhone here:
Step 1: Upon launching the application, it will ask you for storage access. After that, you’ll have to import a video to add slow motion. Just select any normal video on your device and click on the “Next” option.
Step 2: Navigate toward the bar at the bottom of the timeline panel and select “Adjust.”
Step 3: This will feature the speed control options on your screen; go to “Advance.” Further, change the speed change slider towards the left to manipulate it. Afterward, preview the video and click on the “tick” icon.
Step 4: Further, select the “Export” icon appearing in the expanded menu.
4. Video Speed Editor Slow & Fast
How do you slow down a video on an iPhone after recording in a minimalistic way? This iPhone application is designed for such contexts to create slow-motion videos. Users can slow down a clip’s playback speed up to 8x at specific durations. Simply trim the video parts to apply the speed setting at specific sections and merge them later.
Key Features
- After slow motion, you have the option to keep the original sound or insert music offered by it.
- The timeline editing method helps you to trim the video at the right time.
- The application is compatible with iOS 12.0, iPadOS 12.0, macOS 11.0, and newer versions.
Steps to Add Slow Motion in Video Using Video Speed Editor Slow & Fast
This application has an innovative user interface with a simple operational menu. To add a slow-motion effect to a video, buy its Pro subscription first. To assist you further, here is how to slow down an iPhone video in it:
Step 1: Create a new project after launching the application and giving access to storage. Do this by clicking on the screen saying, “Tap to create a new project.”
Step 2: From the Videos section of your media, select a video and hit “Choose.”
Step 3: In the editing interface, simply select a speed option from -2x to -8x for slowing. Once the video is slowed down according to your preferences, export it.
Part 3: Failed to Slow Down Video Properly? Try Wondershare Filmora as a Remedy
Have you tried all the given solutions on how to slow-mo a video on an iPhone and are still clueless? Not getting the desired results can be frustrating, but we have brought the best answer. Wondershare Filmora helps you achieve slow motion on a computer or laptop. The software is compatible with all Windows and macOS devices. You can just connect your iPhone with the source using a cable and import media.
Being a versatile software, Filmora introduces you to two advanced methods. Uniform speed emerges as a simple method of creating a slow-motion effect. On the other hand, Speed Ramping allows you to edit speed for professional purposes. Amongst speed alteration, users can also use the frame interpolation technique. It increases video frames to ensure a smooth playback during slow-mo.
Step-by-Step Guide to Creating Slow-Motion in Filmora
If you are using Filmora for the first time, the user interface might initially seem confusing. However, in comparison to other post-production software, it possesses a minimal interface. In this section, learn about how to slo-mo a video iPhone using Filmora:
Free Download For Win 7 or later(64-bit)
Free Download For macOS 10.14 or later
Step 1Connect iPhone and Import Clip
Once you have created a new project on Filmora, import media. First, to import media from your iPhone, connect it to your computer or related device. Then, go to “Import” > “Import from a Camera or Phone” option. Further, select the device name and import data.
Step 2Access Speed Ramping Option
Use your cursor to bring the edited media to the timeline and select it. From the appearing settings panel, access the “Speed” > “Speed Ramping” tabs. Here, either choose any of the predesigned templates or customize one.
Step 3Enable Optical Flow for Additional Touch
If the slow motion seems rough or abrupt, Filmora has a solution to that as well. Go to the “AI Frame Interpolation” section and expand it. From the expanding menu, click the “Optical Flow” option for a high-quality slow-mo.
Step 4Rendering for Final Preview
To observe the overall results, navigate towards the top toolbar. Select the “File” tab and “Render Preview” from the dropdown menu. After reviewing the final video, use your cursor to click the “Export” button.
Key Features of Wondershare Filmora
Wondershare Filmora provides a wide range of features for a full-fledged editing experience. Some of these features are for video, some are for audio, and others are for visuals. Here is a list of some of Filmora’s key features that you must give a try to:
1. Instant Mode
Once you have recorded a video, the post-production process cannot be neglected. However, when you start editing a video, the process might be confusing at first. With Filmora’s Instant Mode, use AI’s assistance to edit any video without effort. There are 115 built-in templates to integrate according to context and highlights it.
2. Green Screen
Integrate attractive backgrounds in your videos, like mountains, beaches, or more. With Filmora’s Green Screen feature, remove the video backgrounds with accuracy. After removing the background, you can insert multiple backgrounds, like solid colors. If there are backgrounds that you have previously saved, import them to the timeline. They will automatically show in the video, and you can customize them further.
3. Color Correction
Filmora offers an extensive range of color correction elements to enhance visibility. There are 40+ free presets in Filmora that you can download and apply within the app. In addition, you can do custom color settings and save them as custom presets. You can also use the 3D LUT feature to set preferences for specific factors.
4. Text-to-Speech
Another important feature that helps with interactive video creation is text-to-speech. It allows users to transform text into speech with voice selection options. The software has been trained on NLP and integrates realistic voices in videos. Being closer to the human voice helps with better audience interaction and understanding.
Conclusion
The main theme of this article was how to slow down a video on iPhone and the tools to do it. We mentioned 4 applications that are compatible with higher versions of the iPhone. In addition, the article provided detailed guides on all these applications.
Among them, Wondershare Filmora has been integrated with an advanced slow-mo feature. It allows a seamless and professional user interface to import, edit, and customize. The AI Optical Flow in it adds a remarkable fine touch to your slow-mo video.
Guide to Create a Timelapse Video in After Effects
Time-Lapse movies are great for a variety of projects; you can use them as establishing shots in sitcoms, corporate marketing videos, and they can make lovely backgrounds for animated slideshows. A time-lapse video is essentially a series of photographs taken at regular intervals to depict how the environment changes gradually over a shorter period of time. In this article, we’ll demonstrate how you may quickly and easily build an After Effects time-lapse effect.
With that said, let’s start!
Step 1. Create a new composition
Calculating your composition length to accommodate the frame rate and number of images is the first step in generating a time-lapse video.
- Verify the number of images you have for your Sequence.
- New Composition Creation. Selecting a frame rate: A time lapse film produced at 30 frames per second will flow smoothly, but you can select any frame rate you like.
- To determine the duration of your composition, divide the number of photographs you have by the frame rate you’ve chosen. For instance, if you use 600 photos at 30 frames per second, your composition will last 20 seconds.
Step 2. Import your images
You are prepared to make a time-lapse sequence if all of your photographs are saved to the same folder and are in the same order. If you are working directly from your Camera, you will likely have Camera Raw files, although this procedure works with PNG and JPEG sequences.
- Press Command/Control I on your keyboard or select File > Import. Find the folder holding your image sequence.
- To begin, select the first picture in the sequence. If all of your images have accurate names, After Effects will be able to identify a sequence of images.
- Make sure the Force Alphabetical Order and Camera Raw Sequence checkboxes are selected. Your Time-Lapse Sequence will display in the Project Browser Panel after you click Import.
- Once you’ve watched how it plays, you can adjust the Frame Rate by right-clicking the Sequence in the Project Browser and selecting Interpret Footage > Main.
- To update your time-lapse, modify the Frame Rate setting and click OK.

Step 3. Create movements
- After Effects’ Time-Lapse Sequence can be used just like any other standalone clip. This implies that you may give your time-lapse clip movement by adding Keyframes and Effects.
- Place your Playhead at the beginning of the clip after choosing the Image Sequence. Make a keyframe for the scale or position.
- To generate a second Keyframe for the value of your choice, move to the end of the clip. Make any necessary Clip modifications.
- Right-click on the timeline, choose New > Adjustment Layer, then add your effects to the Adjustment Layer to add effects like noise and grain.
Step 4. Create slow motion from a video
You can import your video after you’ve shot it to prepare it for editing. The same steps, including naming your photos in order, must be taken for the Time Lapse sequence. It may be advantageous to entirely rename both your Image Sequence and Performer clip.
- Drag the finished Time Lapse sequence to your Timeline after completing it as previously explained.
- Over the Time Lapse, add the Performer Clip to the Timeline.
- Choose Time>Time Stretch by performing a right-click on the performer clip.
- You can alter the Stretch Factor or Duration in the dialogue box. When you alter one parameter, the other will reflect the new Stretch Factor or Duration for you.
Step 5. Make an overlay
You can alter the Stretch Factor or Duration in the dialogue box. When you alter one parameter, the other will reflect the new Stretch Factor or Duration for you.
- Find Luma Key in the Effect Control Panel and drag it to your clip.
- Change the Key Type setting in the Effect Control Panel to Key Out Brighter.
- The Threshold, Tolerance, and Edge settings should be adjusted until only the silhouette is visible.
- Use the Pen or Mask Tool to create a circle around the parts you want to delete if you discover any corners of your clip that are still visible.
- Add any Effects, such as Light Leaks, to your Adjustment Layer by choosing “Right-click > New > Adjustment layer.”

After Effects CC must be opened, a new project must be created, the Import File menu option must be selected, and the appropriate folder containing the altered still images must be located and selected before the time-lapse photos can be turned into a film. You need to make sure that the JPEG Series box is checked, as well as the Force Alphabetical Order box.
Once you have clicked on the first image in the sequence. The time-lapse video that you uploaded appears in the project library. After performing a right-click on the filename, select “New Comp from Selection” from the context menu.
Step 6. Exporting your video
After getting our sequence to perform some kind of slow, understated animation so that it appears as though the camera is moving dramatically, we will need to export a video file. Go to File > Export > Add to Render Queue, then open the Render Queue dialog box by going to Window > Render Queue. From there, you can choose the Output Module and change the settings in the options dialog box. Finally, choose the Output To option and select the location on your computer where you would like to save the video clip that we are currently rendering and exporting.

Conclusion
No matter how you make your time lapse videos, After Effects has a ton of features you can use to modify and enhance the way they look. Now that you are familiar with the fundamentals, you can play with the Frame Rates and Composition options. Check out this helpful manual for more information on Time Stretching and Remapping in After Effects.
Free Download For Win 7 or later(64-bit)
Free Download For macOS 10.14 or later
Free Download For macOS 10.14 or later
How to Use Kahoot! On Zoom
In the educational game Kahoot! participants respond to multiple-choice questions based on trivia. Each participant uses their own controller to answer questions in the online game. There are several question kinds to pick from, allowing for complete customization of the test. Each player needs their own controller for Kahoot! The game questions will be shown in the Zoom/Google Meet window, but the answers must be entered using the controller. With the Kahoot!! app for Zoom, presenters may use play and friendly rivalry to increase participant engagement. Users may organize knowledge- and feedback-gathering pulse checks with staff members, encourage original thought with word clouds, and empower participants’ voices with surveys, open-ended questions, and other tools. Utilizing the brainstorm tool, organizations may crowdsource ideas and advance teamwork.
Engagement has emerged as a crucial component of successful learning, collaboration, and connection as the globe has increased the use of video communications in social and professional situations. Users may access, host, and play Kahoot!! games and educational information with other meeting participants using the Kahoot!! app for Zoom without ever leaving the Zoom Meeting or requiring a second device. Corporate executives may motivate their staff via speeches, meetings, and online activities. Meeting hosts will have immediate access to data and statistics from their Kahoot!! experience, allowing them to respond in real time to audience engagement with the material. Additionally, hosts may email the Kahoot!! games to all participants so they can practice and improve their scores, which will increase participant engagement and learning retention. Hosts can also distribute the Kahoot!! games as self-paced challenges with individuals who couldn’t attend in person.
Part 1: Key Features of Kahoot
What more is there to discuss, Kahoot!? Every pupil adores it. Many instructors and educators use it all around the world to make learning simple, enjoyable, and interesting. Everyone may use it since it is free and extremely simple to use. These are some of its attributes:
- Quizzes may be made in a matter of minutes.
- Develop games based on the abilities of the kids. Playing at home or in the Zoom is simple for them.
- Various templates are offered. You can choose one of them with confidence.
- Kahoot! has the ability to be organized into many folders according to topics or subjects.
- Additionally, multiple choice questions may be included by quiz makers.
- Teachers using Kahoot! may combine different questions into one format, such as quizzes, polls, riddles, and slides.
- Use Apple Schoolwork, Google Zooms, and Microsoft Teams to share student-centered tasks.
Part 2: How to Host a Kahoot! Session within a Zoom Meeting
With the Zoom app, Kahoot! may be viewed, hosted, and used. It’s amazing that Kahoot!!, one of the most well-known brands in quiz-based learning, still provides a free-to-use platform, making it very accessible to both instructors and students. It’s also a useful resource for a hybrid class that combines online and classroom instruction. Most devices will be able to use the cloud-based service using a web browser. This implies that students using computers, tablets, and cellphones in class or at home may access this. Participants in Zoom Meetings may play games and learn without having to leave the Zoom meeting or bring a second device.
Step1Sign up for Zoom ahead of time and get ready. On the other hand, launch the Kahoot! test in your web browser, then be ready to share your screen in Zoom.
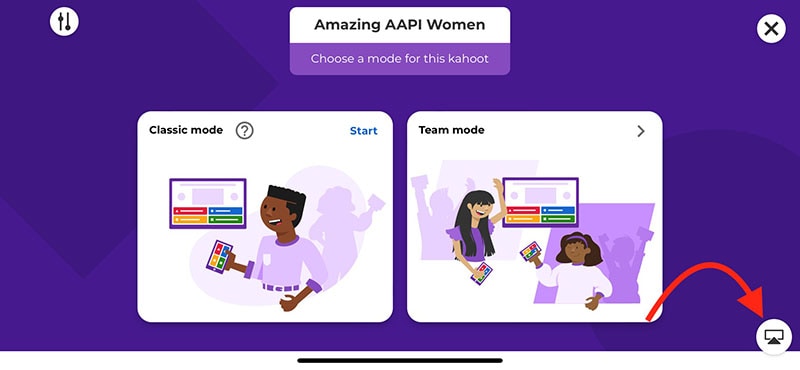
Step2As the participants come, allow them in and check to see whether you and they can both hear each other. To access the Kahoot! quiz, make sure they have a device or another browser tab open.
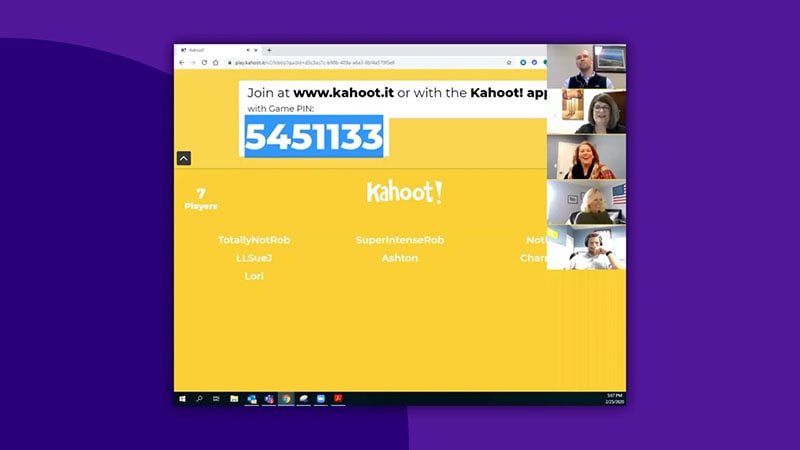
Step3Open the Kahoot! test and share it using Zoom’s “Share Screen” feature. While your screen is shared, continue to host the Kahoot! as normal. To view participants next to your shared screen, we advise selecting Side-by-Side Mode.
Part 3: How to Participate in Kahoot! Sessions within a Zoom Meeting
With more than 40 million ready-made games available on Kahoot!!, getting started is fast and simple. When time and resources are limited, hybrid or distant learning is ideal. After linking the Kahoot! to your Zoom account, you may utilize it. Use this app and start a meeting. Go to Apps on the toolbar and choose the program you wish to use. Select Who is Hosting to locate their host or to join a Kahoot! session being hosted by a friend or another player. Players may post a question to a shared screen on the Kahoot! platform. Kahoot!! just needs an account to be made in order to use it since it is free. Most devices may be used by students to access Kahoot!! from wherever there is an internet connection. This is how:
Step1Take the time to check that Zoom, Skype, Cisco Webex, or Google Hangout are operating and that your camera, microphone, and speaker are all operational.
Step2In the right-side panel, add the Kahoot!! app to your list of apps and click Join.

Step3The lobby will reveal your game PIN when you click the Play button, allowing the computer to show you a Kahoot! You may enter the game PIN and press Enter to join the Kahoot! session once the host shows their screen with you. To participate in a Kahoot! session, you don’t need a Kahoot! account.
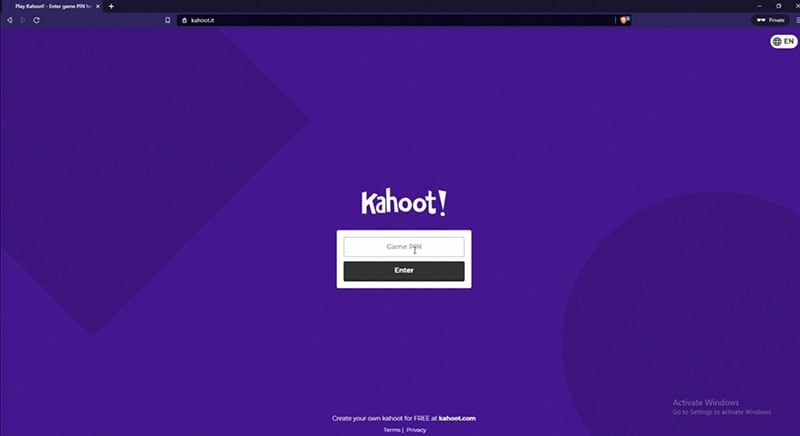
Part 4: How to Record Zoom Meetings
Zoom is a conference tool that enables real-time, high-quality, low-latency communication. Filmora is an excellent video recorder for that reason, enabling users to capture on-screen activity such Zoom audio tracks and video conversations. Wondershare One of the most versatile and portable Zoom voice recorders is the Filmora. Even novices may easily utilize it due to its user-friendly UI. All you have to do is click the record button after choosing the proper audio source in the settings. The all-in-one video editing program Filmora allows you to record your screen with audio, a facecam, and a green screen effect. You can record the entire screen or just a portion of it, and you can perform a number of quick edits on your video using tools like trimming, cropping, changing the audio track’s volume, and so on.
How to Use Filmora to Record Zoom Lectures
Having said that, Filmora is a great Zoom recorder that can capture games, audio, and video conversations. This video recorder may be used to make video clip lessons in addition to recording movies, video games, and webcam footage. In addition to Zoom, it can also capture internet streaming audio. Here is information on how to record Zoom meetings using this software:
Step1Download and Install Filmora on your PC
To use this program for a number of tasks, including screen recording and recording editing, you must first download and install it on your computer. To achieve this, download the recording program by clicking the link below. Launch the program as soon as the download is finished to start the installation process, and then adhere to the on-screen directions to install and make this software available for usage.
Step2Choose the Record’s Ideal Position in the Zoom
Use it on your PC at this point. As soon as you start the program, a window interface with two choices for screen recording, editing already recorded videos, and generating videos will display. Choose the Recording option from the menu. When you click the record button, the program will direct you to the recording interface, where you can easily adjust the settings for your camera and audio. To add the microphone or Zoom sound in that particular field, use the necessary buttons as described below:
Step3Press the Record Button
It goes without saying that you must test your recording tools to ensure they are functional and capturing the highest quality audio. But once you’re ready, click the record button, which will allow you 3-5 seconds before starting to record the personalized screen of your PC as seen below:
Step4Export and Save Your Zoom Recording
You may now save the Zoom video for sharing on social media after making and modifying it. The following file types may be used to save the document: MP4, WMV, AVI, MOV, GIF, and MP3. The finest feature of Wondershare Filmora is the direct export and sharing of Zoom video recordings to YouTube; the only need is that you must be signed in to your YouTube account inside the application:
Because the MOV format is only available for online movies, you may also export your Zoom recordings to MP4 if you want to publish them to your YouTube channel. You are free to choose the format that best suits your needs. You may choose the encoder from a drop-down menu in the export options.
Conclusion
With the aid of several interesting tools and programs made accessible in this virtual environment, learning has now become enjoyable. Of them is Kahoot! In Zoom. It is an application that acts as a learning tool by providing fun games, tests, and a variety of other chances. In only a few minutes, quizzes may be made and distributed. Games and quizzes may be planned using this platform quite easily. The Kahoot! with Zoom will make it simpler than ever for corporate leaders to engage and encourage their team members with Kahoot!! engaging game-based learning experiences at a time when many organizations are staying virtual or planning for a hybrid model. Head towards recording Kahoot with Filmora to experience a smooth Kahoot! usage on Zoom. Plus, you can also share the gameplay afterwards.
In the educational game Kahoot! participants respond to multiple-choice questions based on trivia. Each participant uses their own controller to answer questions in the online game. There are several question kinds to pick from, allowing for complete customization of the test. Each player needs their own controller for Kahoot! The game questions will be shown in the Zoom/Google Meet window, but the answers must be entered using the controller. With the Kahoot!! app for Zoom, presenters may use play and friendly rivalry to increase participant engagement. Users may organize knowledge- and feedback-gathering pulse checks with staff members, encourage original thought with word clouds, and empower participants’ voices with surveys, open-ended questions, and other tools. Utilizing the brainstorm tool, organizations may crowdsource ideas and advance teamwork.
Engagement has emerged as a crucial component of successful learning, collaboration, and connection as the globe has increased the use of video communications in social and professional situations. Users may access, host, and play Kahoot!! games and educational information with other meeting participants using the Kahoot!! app for Zoom without ever leaving the Zoom Meeting or requiring a second device. Corporate executives may motivate their staff via speeches, meetings, and online activities. Meeting hosts will have immediate access to data and statistics from their Kahoot!! experience, allowing them to respond in real time to audience engagement with the material. Additionally, hosts may email the Kahoot!! games to all participants so they can practice and improve their scores, which will increase participant engagement and learning retention. Hosts can also distribute the Kahoot!! games as self-paced challenges with individuals who couldn’t attend in person.
Part 1: Key Features of Kahoot
What more is there to discuss, Kahoot!? Every pupil adores it. Many instructors and educators use it all around the world to make learning simple, enjoyable, and interesting. Everyone may use it since it is free and extremely simple to use. These are some of its attributes:
- Quizzes may be made in a matter of minutes.
- Develop games based on the abilities of the kids. Playing at home or in the Zoom is simple for them.
- Various templates are offered. You can choose one of them with confidence.
- Kahoot! has the ability to be organized into many folders according to topics or subjects.
- Additionally, multiple choice questions may be included by quiz makers.
- Teachers using Kahoot! may combine different questions into one format, such as quizzes, polls, riddles, and slides.
- Use Apple Schoolwork, Google Zooms, and Microsoft Teams to share student-centered tasks.
Part 2: How to Host a Kahoot! Session within a Zoom Meeting
With the Zoom app, Kahoot! may be viewed, hosted, and used. It’s amazing that Kahoot!!, one of the most well-known brands in quiz-based learning, still provides a free-to-use platform, making it very accessible to both instructors and students. It’s also a useful resource for a hybrid class that combines online and classroom instruction. Most devices will be able to use the cloud-based service using a web browser. This implies that students using computers, tablets, and cellphones in class or at home may access this. Participants in Zoom Meetings may play games and learn without having to leave the Zoom meeting or bring a second device.
Step1Sign up for Zoom ahead of time and get ready. On the other hand, launch the Kahoot! test in your web browser, then be ready to share your screen in Zoom.
Step2As the participants come, allow them in and check to see whether you and they can both hear each other. To access the Kahoot! quiz, make sure they have a device or another browser tab open.
Step3Open the Kahoot! test and share it using Zoom’s “Share Screen” feature. While your screen is shared, continue to host the Kahoot! as normal. To view participants next to your shared screen, we advise selecting Side-by-Side Mode.
Part 3: How to Participate in Kahoot! Sessions within a Zoom Meeting
With more than 40 million ready-made games available on Kahoot!!, getting started is fast and simple. When time and resources are limited, hybrid or distant learning is ideal. After linking the Kahoot! to your Zoom account, you may utilize it. Use this app and start a meeting. Go to Apps on the toolbar and choose the program you wish to use. Select Who is Hosting to locate their host or to join a Kahoot! session being hosted by a friend or another player. Players may post a question to a shared screen on the Kahoot! platform. Kahoot!! just needs an account to be made in order to use it since it is free. Most devices may be used by students to access Kahoot!! from wherever there is an internet connection. This is how:
Step1Take the time to check that Zoom, Skype, Cisco Webex, or Google Hangout are operating and that your camera, microphone, and speaker are all operational.
Step2In the right-side panel, add the Kahoot!! app to your list of apps and click Join.
Step3The lobby will reveal your game PIN when you click the Play button, allowing the computer to show you a Kahoot! You may enter the game PIN and press Enter to join the Kahoot! session once the host shows their screen with you. To participate in a Kahoot! session, you don’t need a Kahoot! account.
Part 4: How to Record Zoom Meetings
Zoom is a conference tool that enables real-time, high-quality, low-latency communication. Filmora is an excellent video recorder for that reason, enabling users to capture on-screen activity such Zoom audio tracks and video conversations. Wondershare One of the most versatile and portable Zoom voice recorders is the Filmora. Even novices may easily utilize it due to its user-friendly UI. All you have to do is click the record button after choosing the proper audio source in the settings. The all-in-one video editing program Filmora allows you to record your screen with audio, a facecam, and a green screen effect. You can record the entire screen or just a portion of it, and you can perform a number of quick edits on your video using tools like trimming, cropping, changing the audio track’s volume, and so on.
How to Use Filmora to Record Zoom Lectures
Having said that, Filmora is a great Zoom recorder that can capture games, audio, and video conversations. This video recorder may be used to make video clip lessons in addition to recording movies, video games, and webcam footage. In addition to Zoom, it can also capture internet streaming audio. Here is information on how to record Zoom meetings using this software:
Step1Download and Install Filmora on your PC
To use this program for a number of tasks, including screen recording and recording editing, you must first download and install it on your computer. To achieve this, download the recording program by clicking the link below. Launch the program as soon as the download is finished to start the installation process, and then adhere to the on-screen directions to install and make this software available for usage.
Step2Choose the Record’s Ideal Position in the Zoom
Use it on your PC at this point. As soon as you start the program, a window interface with two choices for screen recording, editing already recorded videos, and generating videos will display. Choose the Recording option from the menu. When you click the record button, the program will direct you to the recording interface, where you can easily adjust the settings for your camera and audio. To add the microphone or Zoom sound in that particular field, use the necessary buttons as described below:
Step3Press the Record Button
It goes without saying that you must test your recording tools to ensure they are functional and capturing the highest quality audio. But once you’re ready, click the record button, which will allow you 3-5 seconds before starting to record the personalized screen of your PC as seen below:
Step4Export and Save Your Zoom Recording
You may now save the Zoom video for sharing on social media after making and modifying it. The following file types may be used to save the document: MP4, WMV, AVI, MOV, GIF, and MP3. The finest feature of Wondershare Filmora is the direct export and sharing of Zoom video recordings to YouTube; the only need is that you must be signed in to your YouTube account inside the application:
Because the MOV format is only available for online movies, you may also export your Zoom recordings to MP4 if you want to publish them to your YouTube channel. You are free to choose the format that best suits your needs. You may choose the encoder from a drop-down menu in the export options.
Conclusion
With the aid of several interesting tools and programs made accessible in this virtual environment, learning has now become enjoyable. Of them is Kahoot! In Zoom. It is an application that acts as a learning tool by providing fun games, tests, and a variety of other chances. In only a few minutes, quizzes may be made and distributed. Games and quizzes may be planned using this platform quite easily. The Kahoot! with Zoom will make it simpler than ever for corporate leaders to engage and encourage their team members with Kahoot!! engaging game-based learning experiences at a time when many organizations are staying virtual or planning for a hybrid model. Head towards recording Kahoot with Filmora to experience a smooth Kahoot! usage on Zoom. Plus, you can also share the gameplay afterwards.
Also read:
- New Best Audio Waveform Generator for 2024
- Top 10 3D Slideshow Software Review
- Updated 2024 Approved Create Your Slow Zoom TikTok in Minutes
- Updated In 2024, Whatre the Best Alternatives to Pexels?
- Updated 2024 Approved Do You Want to Add Voiceovers to Your Video Project? Wondershare Filmora Is an Amazing Tool that Lets You Add Audio Files, Including Voiceovers
- Updated 2024 Approved 3 Best Effects to Appear on Camera
- New Hitfilm Express Video Editor Review
- Updated 2024 Approved Want to Make a Fun and Cinematic Video with an Introductory Text Title? Learn the Stages of Editing with Filmora for This Effect Here
- New A Guide to Understanding Efectum App and Some Top Alternatives for 2024
- New In 2024, 15 Best Free Cinematic LUTs for Your Film
- If Youre Not Using Video yet, Now Is the Time to Start. In This Post, Well Discuss the Benefits of Using Video for Social Media Marketing and Provide Tips for Getting Started. Keep Reading to Learn More for 2024
- In 2024, How To Make Ninja Jump Effect
- New 2024 Approved Stunning Glitch Effect and Its Creation Steps for Premiere Pro
- Updated 2024 Approved Learn How to Use Face Tracking in After Effects to Quickly Mask Out Faces, Animate Objects on Faces, and More
- New 100 Working Methods to Learn How to Rotate TikTok Video
- New In 2024, Good Ways to Make Sure Your Video Editing Course Is Worthing to Watch
- Updated In 2024, Learn How to Add Dynamic Shake Effects to Your Videos Using Alight Motion. Our Step-by-Step Guide Makes It Easy to Create Cinematic Footage
- 2024 Approved Best Ideas on Using Filmora Green Screen
- 2024 Approved How I Got Free After Effects Templates Slideshow with Simple Trick
- Updated 2024 Approved Good Slideshow Makers Sometimes Cost High and Free Slideshow Makers Provide Slideshows with the Watermark. How to Cope with This Problem? This Article Gives Solutions
- Updated How to Choose A Nice GoPro for Vlogging?
- Updated Before & After Editing Trick - Filmora
- How to Perform Mask Tracking Discovering the Best Methods for 2024
- Updated 2024 Approved Convert MP4 to 60 FPS GIF A Step-by-Step Guide
- New Want to Apply a Filter on Your Video Using Your iPhone or Mac? Here Are the Simple Steps to Put Add Filters on iMovie. Find Out a Better iMovie Alternative with More Filters for 2024
- New Get Creative with These 10 Video Editing App With Templates for 2024
- New In 2024, Are You Convincingly Fascinated by the Whole Idea of Augmented Reality and Want to Level up Your Marketing Skills with an AR Integration? Rest Assured, Youve Found the Right Place
- Updated What Is a Memoji and How to Make a Memoji? You Can Learn Top 8 Memoji Makers for PC, Android, or iOS, and the Steps to Make a Memoji for 2024
- Updated Want to Make Your Slideshows More Fun and Exciting? Follow the Given Discussion to Know How to Make a Slideshow Gif, Thereby Making Your Slideshow More Enjoyable than Ever for 2024
- New How to Do Motion Graphics in Filmora
- The Best GIF Editors Weve Tested Heres What We Learned
- New Best GIF to MOV Converters for 2024
- Updated How to Add Subtitles in VLC Media Play
- In 2024, General Information That You Need To Know About MKV Format
- Updated Speed Up/Down Videos in VLC
- New How to Make Your CSGO Montage Impressive for 2024
- 2024 Approved How To Quickly Create A Screen Print Effect In Photoshop Detailed Guide
- In 2024, DVD Slideshow Builder Review and Tutorial
- New 2024 Approved This Article Aim to Teach You How to Make a Night to Day Effect Video with Filmora. Follow the Steps to Figure It Out
- New Looking for the Best Quiz-Making Tools? Read Our Full Review to Find Out the 10 Best Video Quiz Makers Available
- Updated In 2024, Interested in Adding a Cinematic Strobe Light Effect to Your Movie or Video Title? Follow the Steps Explained in Detail Here
- New In 2024, Add Selective Color Effect to Your Videos Using Filmora
- Updated 2024 Approved A Roster of 8 Best Color Match Generators
- Updated 2024 Approved The Best Way to Remove Audio From Your Videos
- Updated In 2024, Tiktok Aspect Ratio Is a Crucial Element to Succeeding in the Tiktok Algorithm. Here Are some Suggestions to Improve Video Quality and Land on the for You Page
- New 2024 Approved Now, You Can Also Apply the Stranger Things Upside Down Effect to Your Video! This Effect Combines Camera Tricks and Video Editing Within Filmora to Transition From the Normal World Into the Upside Down
- New 12 Impressive AI Video Ideas for Making Engaging Video Content
- Learn How to Create a Kinetic Typography Text Effect in Filmora, One of the Best Video Editors for All Skill Levels. Check Out This Simple Step-by-Step Guide for 2024
- Updated Find Out the Best Animated Text Video Tools and Learn How to Animate Text in a Video in Simple Steps. Discover the Best Fonts to Animate Text Along with the Text Animation Templates for 2024
- In 2024, How to Spy on Text Messages from Computer & Apple iPhone 12 Pro | Dr.fone
- In 2024, Top 4 Ways to Trace Meizu 21 Location | Dr.fone
- How to Transfer Data from Infinix Hot 40 to Any iOS Devices | Dr.fone
- How to Recover Deleted Photos from Android Gallery App on Itel
- Best 3 Sony Xperia 10 V Emulator for Mac to Run Your Wanted Android Apps | Dr.fone
- How To Fake GPS On OnePlus Ace 2 Pro For Mobile Legends? | Dr.fone
- Wondering the Best Alternative to Hola On OnePlus Nord N30 5G? Here Is the Answer | Dr.fone
- In 2024, Latest way to get Shiny Meltan Box in Pokémon Go Mystery Box On Motorola Moto E13 | Dr.fone
- 10 Great MP4 to GIF Converters to Get Perfect-Made GIF for 2024
- 4 Feasible Ways to Fake Location on Facebook For your Xiaomi Redmi 13C | Dr.fone
- Looking For A Location Changer On Oppo Find N3? Look No Further | Dr.fone
- In 2024, How to Make the Most of Your iPhone 14 Pro Max Lock Screen with Notifications?
- Unlock android phone if you forget the Vivo Y27 4G password or pattern lock
- Updated 2024 Approved 5 Must Try Ways to Add and Send GIF in Text Message on Android
- How To Unlock Xiaomi Redmi 13C Phone Without Password?
- 7 Ways to Unlock a Locked Tecno Phantom V Fold Phone
- 9 Mind-Blowing Tricks to Hatch Eggs in Pokemon Go Without Walking On HTC U23 Pro | Dr.fone
- Life360 Learn How Everything Works On Samsung Galaxy A15 5G | Dr.fone
- Top 10 Fixes for Phone Keep Disconnecting from Wi-Fi On Huawei P60 | Dr.fone
- How Do You Get Sun Stone Evolutions in Pokémon For Realme C55? | Dr.fone
- How to retrieve erased music from Google Pixel 8 Pro
- Title: New Camtasia vs Final Cut Pro
- Author: Morgan
- Created at : 2024-05-19 05:11:52
- Updated at : 2024-05-20 05:11:52
- Link: https://ai-video-editing.techidaily.com/1713942699801-new-camtasia-vs-final-cut-pro/
- License: This work is licensed under CC BY-NC-SA 4.0.
