
:max_bytes(150000):strip_icc():format(webp)/GettyImages-1088144728-3a9f1bd54e994bfaa4cabea82414202e.jpg)
In 2024, How to Add a Lower Third to Your Video
How to Add a Lower Third to Your Video
Want to bump up the quality and level of your videos? Adding a lower third is one of the easiest ways to impress your audience and improve the quality of your videos. It makes it look like you spent a ton of money on video editing, but in reality, it’s really easy to do.
When you first start video editing, it may seem like a daunting task with so much to learn. The good news is you can cut that learning curve down significantly by using intuitive editing software like Wondershare’s Filmora. Clear and streamlined, Filmora is the choice of many filmmakers.
Until recently, you needed expensive enterprise level software like Sony Vegas or Final Cut Pro to create lower thirds, especially lower thirds with movement. But Filmora makes it easier than ever.
- Use Readable Font
- Don’t Make It Too Long
- Use Branding
- Use Templates
- Keep It Simple
- Emphasize With Your Lower Third
- Step By Step To Explain Filmora
1. What is a Lower Third?

What is a Lower Third
A lower third is text and/or a graphical element put on top of your video for the purpose of sharing information with your audience.
A lower third provides important information but is done without distracting from the actual video content.
Take a look at the shot below. The lower third is used to convey the speaker’s name and profession. This is a type of lower third often used in documentary films and newscasts.
2. Why Add A Lower Third
So the next question a new filmmaker might ask is, “Why add a lower third?”
Funnily enough, despite its name, a lower third does not have to be in the lower third of the video but can be found in other areas of the screen.
In the shot below, the viewer automatically knows he is looking at the rooftops of Alfama, a neighborhood in Lisbon, without someone having to say it - no distractions from the video content.

Why Add A Lower Third
Lower thirds can also create movement. Many lower thirds come gliding onto the screen and add visual interest to a plain shot.
As simple as it may sound, seeing an overlay on a screen or a moving lower third adds professionalism to even the simplest videos. It gives the audience a sense of polish and high perceived value.
![]()
Tips: A lower third lasts approximately 3-6 seconds and is placed in the “title safe area” of your video. A quick explanation of the “title safe area” is that if the video is cropped to fit certain resolutions, your lower third will still appear without the fear of it being cropped out and losing pertinent information for the audience.
3. 6 Quick Tips to Add A Lower Third
As simple as putting in a lower third sounds, here are 6 quick tips to ensure a lower third is effective and conveys the right message.
Wondershare Filmora Video Editor comes equipped with pre-built video-based lower thirds in a ton of unique styles and colors. The cool thing is that you can customize the text easily and quickly, including changing the text color and font style – so you can match your style perfectly.
Tip #1
Use Readable Font
Part of communicating information without distraction is to make sure the font used in the lower third is readable. A lower third only graces the screen for 3-6 seconds, so you want it to be short and easy to read at a glance.
Tip #2
Don’t Make It Too Long
There is a limited amount of space to use. If you need to communicate more information, consider using a title slide instead which will give you more space to communicate your ideas. Less is more when it comes to lower thirds.
Tip #3
Use Branding
A lower third is another way to have people remember and recognize your brand. If you have your own branding colors and logo, use it in your lower third.
Tip #4
Use Templates
Pick one style and stick with it. Consistency in video editing helps communicate trust to your audience. It’s fun to use different styles sometimes, but it can be disjointed. With Filmora you can add elements like lower thirds and title to your favorites – so they are easy to use on your different video projects.
Tip #5
Keep It Simple
Remember the purpose of your lower third - to convey information without being distracting. Don’t use a lot of text. Brevity is the key. Usually, lower thirds are used to detail a name, profession or a location. The most you want is 2 lines of text. Sometimes you may want to use just one line.
Tip #6
Emphasize With Your Lower Third
Often, I might use a lower third to emphasize a certain point, or to use different wording (than I used in my video) if I think it makes the point clearer. This can be helpful if you make a small mistake in your original video and it makes more sense than adding b-roll over the video.
4. Step By Step To Explain Filmora
Using Wondershare Filmora Video Editor it is extremely easy to create a lower third for your video.
Free Download For Win 7 or later(64-bit)
Free Download For macOS 10.14 or later
The following step-by-step tutorial already assumes that you are familiar with some of the workings of Filmora like how to start a project and how to place your media onto the empty timeline.
So here’s how simple it is to add a lower third.
Step 1: Import The Media
In this step, you will create a new project and then import the media and place it on your timeline.

Import The Media
Step 2: Find Title Option
Once you have placed your media onto the project, you will go to the top navigation and click on titles.
It will then open up and you will see a number of choices for titles, including “lower thirds.”

Find Title Option
For lower thirds you want to choose the template that will best compliment your video.
Things to consider are your branding colors and the information you want to convey.
Currently, there are many options to choose from with 43 lower third templates to choose from in Filmora.
Step 3: Choose a Lower Third Template
Choose a lower third template and drag it on top of your media in the timeline. The next step is to edit the template.
Double click on the template and it will allow you to edit the text.

Choose a Lower Third Template

Choose a Lower Third Template2
Also, when deciding how often you need to use a lower third, you only need to use the lower third once - if the speaker appears on the screen again, it only needs to be shown that one time.
You did it. With this new skill you’ve now mastered the quickest way to impress your audience and increase the quality of your videos.
The key is to practice and you’ll get better quickly.
5. Start Using Lower Thirds Today
Lower thirds are a simple but powerful way to enhance your videos.
Using the tips above, start adding lower thirds to your video.
Wrap Up
Whether you are a new filmmaker/editor or a seasoned pro, Wondershare’s Filmora can help take your video editing to the next level. It’s packed with pro-level features that are easy and intuitive to use.
If you’re not using Filmora, download it today and discover how to make your videos look better as you build your audience.
Step By Step To Explain Filmora
1. What is a Lower Third?
What is a Lower Third
A lower third is text and/or a graphical element put on top of your video for the purpose of sharing information with your audience.
A lower third provides important information but is done without distracting from the actual video content.
Take a look at the shot below. The lower third is used to convey the speaker’s name and profession. This is a type of lower third often used in documentary films and newscasts.
2. Why Add A Lower Third
So the next question a new filmmaker might ask is, “Why add a lower third?”
Funnily enough, despite its name, a lower third does not have to be in the lower third of the video but can be found in other areas of the screen.
In the shot below, the viewer automatically knows he is looking at the rooftops of Alfama, a neighborhood in Lisbon, without someone having to say it - no distractions from the video content.
Why Add A Lower Third
Lower thirds can also create movement. Many lower thirds come gliding onto the screen and add visual interest to a plain shot.
As simple as it may sound, seeing an overlay on a screen or a moving lower third adds professionalism to even the simplest videos. It gives the audience a sense of polish and high perceived value.
![]()
Tips: A lower third lasts approximately 3-6 seconds and is placed in the “title safe area” of your video. A quick explanation of the “title safe area” is that if the video is cropped to fit certain resolutions, your lower third will still appear without the fear of it being cropped out and losing pertinent information for the audience.
3. 6 Quick Tips to Add A Lower Third
As simple as putting in a lower third sounds, here are 6 quick tips to ensure a lower third is effective and conveys the right message.
Wondershare Filmora Video Editor comes equipped with pre-built video-based lower thirds in a ton of unique styles and colors. The cool thing is that you can customize the text easily and quickly, including changing the text color and font style – so you can match your style perfectly.
Tip #1
Use Readable Font
Part of communicating information without distraction is to make sure the font used in the lower third is readable. A lower third only graces the screen for 3-6 seconds, so you want it to be short and easy to read at a glance.
Tip #2
Don’t Make It Too Long
There is a limited amount of space to use. If you need to communicate more information, consider using a title slide instead which will give you more space to communicate your ideas. Less is more when it comes to lower thirds.
Tip #3
Use Branding
A lower third is another way to have people remember and recognize your brand. If you have your own branding colors and logo, use it in your lower third.
Tip #4
Use Templates
Pick one style and stick with it. Consistency in video editing helps communicate trust to your audience. It’s fun to use different styles sometimes, but it can be disjointed. With Filmora you can add elements like lower thirds and title to your favorites – so they are easy to use on your different video projects.
Tip #5
Keep It Simple
Remember the purpose of your lower third - to convey information without being distracting. Don’t use a lot of text. Brevity is the key. Usually, lower thirds are used to detail a name, profession or a location. The most you want is 2 lines of text. Sometimes you may want to use just one line.
Tip #6
Emphasize With Your Lower Third
Often, I might use a lower third to emphasize a certain point, or to use different wording (than I used in my video) if I think it makes the point clearer. This can be helpful if you make a small mistake in your original video and it makes more sense than adding b-roll over the video.
4. Step By Step To Explain Filmora
Using Wondershare Filmora Video Editor it is extremely easy to create a lower third for your video.
Free Download For Win 7 or later(64-bit)
Free Download For macOS 10.14 or later
The following step-by-step tutorial already assumes that you are familiar with some of the workings of Filmora like how to start a project and how to place your media onto the empty timeline.
So here’s how simple it is to add a lower third.
Step 1: Import The Media
In this step, you will create a new project and then import the media and place it on your timeline.
Import The Media
Step 2: Find Title Option
Once you have placed your media onto the project, you will go to the top navigation and click on titles.
It will then open up and you will see a number of choices for titles, including “lower thirds.”
Find Title Option
For lower thirds you want to choose the template that will best compliment your video.
Things to consider are your branding colors and the information you want to convey.
Currently, there are many options to choose from with 43 lower third templates to choose from in Filmora.
Step 3: Choose a Lower Third Template
Choose a lower third template and drag it on top of your media in the timeline. The next step is to edit the template.
Double click on the template and it will allow you to edit the text.
Choose a Lower Third Template
Choose a Lower Third Template2
Also, when deciding how often you need to use a lower third, you only need to use the lower third once - if the speaker appears on the screen again, it only needs to be shown that one time.
You did it. With this new skill you’ve now mastered the quickest way to impress your audience and increase the quality of your videos.
The key is to practice and you’ll get better quickly.
5. Start Using Lower Thirds Today
Lower thirds are a simple but powerful way to enhance your videos.
Using the tips above, start adding lower thirds to your video.
Wrap Up
- Whether you are a new filmmaker/editor or a seasoned pro, Wondershare’s Filmora can help take your video editing to the next level. It’s packed with pro-level features that are easy and intuitive to use.
- If you’re not using Filmora, download it today and discover how to make your videos look better as you build your audience.
4 Ways to Rotate Videos on Windows PC
There are times where you may need to rotate a video into landscape if the video is shot in portrait. This is because watching a video in portrait orientation on a computer is horrible as the video screen size is compressed and the two sides have black screen. Instead, you can rotate video Windows into landscape, you can watch the same video comfortably. Besides, there are times when the entire video is shot at a certain angle as the video device was not properly aligned.
If you are a Windows user, rotating a video in Windows through Windows Media Player is not possible. However, Windows 10 comes with Photos app that contains a video editor to rotate a video and save it permanently. If you use VLC Media Player, you can rotate any video temporarily as well permanently at any desired angle. You can also rotate a video online without installing any software. In this article, we will illustrate how to rotate a video in Windows.
Way 1. Use Photos App
If you are a Windows 10, you can use the pre-installed Photos app to rotate a video and save it permanently. Photos app comes with an inbuilt video editor where rotating a video in Windows 10 is so easy. If you are using an older version of Windows, you can relate Photos app with Windows Movie Maker. Anyway, here are the steps to rotate any video on Photos app.
Step 1: From Start menu, search for “Photos” and open Photos app.

Step 2: Select Video Editor option which is available at the top of the screen. Once, Video Editor opens, click on New Video Project button.

Step 3: Put a name for the project and click on Ok. Thereafter, click on Add button and select the video file from your hard drive that you want to rotate.

Step 4: Drag and drop the video file into Timeline. Thereafter, Click on Rotate icon to turn the video by 90 degrees. You can click again to rotate the video further by 90 degrees again.

Step 5: Once done, click on Finish Video option and save the video file in the destination folder.
Way 2. Use Filmora
The best software on how to rotate a video in Windows 10 to Windows 7 is Wondershare Filmora . It is a professional video editor and there are loads of features to edit the video including rotation. You can make a video more attractive and crisp to publish on professional platforms like YouTube. Here are the steps to rotate a video on Filmora.
Step 1: Download and install Filmora. Open the software and import the video file that you want to rotate. Then drag and drop it on Timeline.
For Win 7 or later (64-bit)
For macOS 10.12 or later
Step 2: From Video Editing panel, expand Transform option and use the slider on Rotate option to rotate the video at any angle. Once done, click on OK button.

Step 3: Go to Export option and click on Export button. The new video files with its new rotation will be saved in the destination folder.

Way 3. Use VLC Media Player
Most Windows users generally install VLC Media Player to watch movies. This is because Windows Media Player supports only limited file formats. Most movie files that you download online are supported by VLC but not on Windows Media Player. Here are the steps on how to rotate a video in Windows temporarily using VLC Media Player.
Step 1: Open VLC Media Player. Go to Media menu and click on Open File option. Select the video file from your hard drive that you want to rotate.
Step 2: Once the video opens, go to Tools menu and click on Effects and Filters option.

Step 3: On Adjustments and Effects window, click on Video Effects tab.
Step 4: Under Video Effects tab, click on Geometry tab.
Step 5: Turn of Transform checkbox and click on drop-down menu to select the required option. You can rotate the video by 90 degrees, 180 degrees and 270 degrees.

Step 6: To rotate the video at any desired angle, turn on Rotate checkbox and select the desired angle.

Step 7: Finally, click on Save and then Close button.

Please note that when you rotate a video temporarily, it is for a one-time watch only. When you open the video again in any other media player, it will have the original orientation.
Way 4. Use EZGIF Online Tool
If you have short video files and you want to upload them on social media platforms, you can convert them into GIF files. You can convert any video file to EZGIF. Therefore, instead of video files, if you want to rotate GIF files, EZGIF is highly useful as an online tool. In fact, you can also convert GIF files into MP4 files. Here are the steps to follow to rotate short video files using EZGIF online tool.
Step 1: Open your web browser and open Ezgif.com.
Step 2: Click on Video to GIF option.
Step 3: Click on Choose File button and select the short video file from your hard drive.

Step 4: Click on Upload Video button and wait for the conversion. Thereafter, download the GIF file.
Step 5: To rotate the GIF file, go to Rotate option. Click on Choose File button.

Step 6: Select the GIF file and click on Upload.
Step 7: You can select from provided rotation options or mention rotation angle explicitly and click on Apply Rotation button.

Wait for the rotation effect and download the file on your hard drive.
FAQs about Rotate Video in Windows 10
1. How do I rotate a video in Windows 10?
To rotate a video in Windows 10, you can use the built-in Photos app. Open the app and select the video you want to rotate. Click on the Edit & Create button at the top of the screen and select Rotate left or Rotate right to adjust the video orientation.
2. Can I rotate a video in Windows Media Player?
No, you can’t rotate a video in Windows Media Player. This feature is only available in the Photos app. However, you can use a third-party video editing software to rotate your videos.
3. How do I save the rotated video?
After rotating the video in the Photos app, click on the Save a copy button at the top of the screen. You can then choose the destination folder and file name for the newly rotated video.
4. What should I do if the video is upside down after rotating it?
If the video is upside down after rotating it, you may have rotated it in the wrong direction. Try rotating it in the opposite direction and see if that fixes the issue. If not, you may need to use a third-party video editing software to rotate the video.
5. Can I rotate a video without losing quality?
Rotating a video can sometimes result in a loss of quality, especially if the video is compressed or low-resolution. However, using a good video editing software can help minimize the loss of quality. Make sure to save the rotated video in the same format and resolution as the original file to avoid further loss of quality.
Conclusion
We have provided you all the possible ways to rotate video Windows. If you want to rotate with pre-installed software, you have Photos app. If you have VLC Media Player installed, you can do the rotation temporarily and permanently. You can also use Ezgif online tool to rotate animated files without installing any
For macOS 10.12 or later
Step 2: From Video Editing panel, expand Transform option and use the slider on Rotate option to rotate the video at any angle. Once done, click on OK button.
Step 3: Go to Export option and click on Export button. The new video files with its new rotation will be saved in the destination folder.
Way 3. Use VLC Media Player
Most Windows users generally install VLC Media Player to watch movies. This is because Windows Media Player supports only limited file formats. Most movie files that you download online are supported by VLC but not on Windows Media Player. Here are the steps on how to rotate a video in Windows temporarily using VLC Media Player.
Step 1: Open VLC Media Player. Go to Media menu and click on Open File option. Select the video file from your hard drive that you want to rotate.
Step 2: Once the video opens, go to Tools menu and click on Effects and Filters option.
Step 3: On Adjustments and Effects window, click on Video Effects tab.
Step 4: Under Video Effects tab, click on Geometry tab.
Step 5: Turn of Transform checkbox and click on drop-down menu to select the required option. You can rotate the video by 90 degrees, 180 degrees and 270 degrees.
Step 6: To rotate the video at any desired angle, turn on Rotate checkbox and select the desired angle.
Step 7: Finally, click on Save and then Close button.
Please note that when you rotate a video temporarily, it is for a one-time watch only. When you open the video again in any other media player, it will have the original orientation.
Way 4. Use EZGIF Online Tool
If you have short video files and you want to upload them on social media platforms, you can convert them into GIF files. You can convert any video file to EZGIF. Therefore, instead of video files, if you want to rotate GIF files, EZGIF is highly useful as an online tool. In fact, you can also convert GIF files into MP4 files. Here are the steps to follow to rotate short video files using EZGIF online tool.
Step 1: Open your web browser and open Ezgif.com.
Step 2: Click on Video to GIF option.
Step 3: Click on Choose File button and select the short video file from your hard drive.
Step 4: Click on Upload Video button and wait for the conversion. Thereafter, download the GIF file.
Step 5: To rotate the GIF file, go to Rotate option. Click on Choose File button.
Step 6: Select the GIF file and click on Upload.
Step 7: You can select from provided rotation options or mention rotation angle explicitly and click on Apply Rotation button.
Wait for the rotation effect and download the file on your hard drive.
FAQs about Rotate Video in Windows 10
1. How do I rotate a video in Windows 10?
To rotate a video in Windows 10, you can use the built-in Photos app. Open the app and select the video you want to rotate. Click on the Edit & Create button at the top of the screen and select Rotate left or Rotate right to adjust the video orientation.
2. Can I rotate a video in Windows Media Player?
No, you can’t rotate a video in Windows Media Player. This feature is only available in the Photos app. However, you can use a third-party video editing software to rotate your videos.
3. How do I save the rotated video?
After rotating the video in the Photos app, click on the Save a copy button at the top of the screen. You can then choose the destination folder and file name for the newly rotated video.
4. What should I do if the video is upside down after rotating it?
If the video is upside down after rotating it, you may have rotated it in the wrong direction. Try rotating it in the opposite direction and see if that fixes the issue. If not, you may need to use a third-party video editing software to rotate the video.
5. Can I rotate a video without losing quality?
Rotating a video can sometimes result in a loss of quality, especially if the video is compressed or low-resolution. However, using a good video editing software can help minimize the loss of quality. Make sure to save the rotated video in the same format and resolution as the original file to avoid further loss of quality.
Conclusion
We have provided you all the possible ways to rotate video Windows. If you want to rotate with pre-installed software, you have Photos app. If you have VLC Media Player installed, you can do the rotation temporarily and permanently. You can also use Ezgif online tool to rotate animated files without installing any
Why Did Filmora AI Portrait Attract People?
Quick Answer: Why Did Filmora AI Portrait Attract People?
An easy yet powerful editor
Numerous effects to choose from
Detailed tutorials provided by the official channel
In the recent few years, video editing has become one of the most-sought after professions, all thanks to the popularity of various video sharing platforms like YouTube. Today, creators don’t need big budgets to share their stories with the world. They can simply grab the camera, shoot the video, and use editing software to compile their brainchild into a dedicated movie. And, once the movie is ready, these creators can simply upload it to YouTube and gain the desired viewership. However, it’s worth noting that YouTube isn’t the only element that has helped content creators excel in their careers and follow their passion.
Editing software like Wondershare Filmora also play an equal role in the success of a creator in today’s digital world. These editing tools are equipped with a plethora of features that allow creators to unleash their creativity and compile high-quality videos for their viewers. What’s more interesting is that these tools keep receiving new updates that further streamlines the entire video editing process to help creators edit videos more conveniently.
Today, we are here to talk about one such feature - known as Filmora AI portrait - that recently got introduced to Wondershare Filmora and became an all-time favorite of many creators. We’ll be going in detail about Filmora AI portrait and how you can use it in your videos to uplift the production quality of your videos. We’ll also share some of the alternatives of this cool feature so that you can bring variety to your videos and keep the viewers engaged throughout the video.
In this article
01 [Why Did AI Portrait Become More and More Popular](#Part 1)
02 [What Scenes Apply to AI Portrait?](#Part 2)
03 [What Scenes Do Not Apply to AI Portrait?](#Part 3)
04 [Why Filmora AI Portrait Deserves to Try?](#Part 4)
05 [A Comparison to Other AI Portrait Software](#Part 5)
Part 1 Why Did AI Portrait Become More and More Popular
Let’s start with the basics first! What is Filmora AI portrait and why it has gained an immense popularity in the editing community. It’s basically an add-on effect in Wondershare Filmora X that was introduced with the latest Filmora X version 10.5.
By integrating this add-on into their video, editors can remove/change the background without losing any details of the main subject. So, let’s say if you don’t have green screen footage and still want to remove the background without affecting the foreground (a single subject), Filmora AI portrait will help you get the job done without any hassle.
Being an AI-powered feature, Filmora AI portrait automatically detects the shape and structure of the main subject and separates it from the background. This way even if you don’t have used a green screen or don’t know how to apply the Chroma key in your videos, you’ll be able to remove the background from the RAW footage and replace it with a custom background. This will allow you to make your videos more appealing and add a funny element for better engagement. For example, you can add a moving background to uplift the entire storyline to your videos.
Filmora AI portrait is a great feature for different types of creators such as gaming streamers, YouTube content creators, and daily vloggers. Regardless of your editing style, by integrating the Filmora AI portrait add-on, you’ll have the liberty to remove unwanted backgrounds from various shots and keep the production quality high.
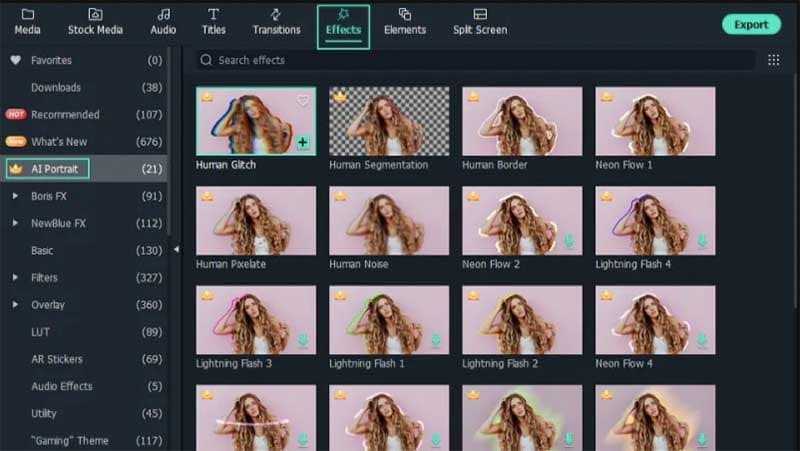
In addition to removing the background, Filmora AI portrait is also a great tool to design thumbnails for your videos. Also, you can use this feature to apply borders, glitch effects, pixelated, noise, or segmentation video effects to your videos. All these elements will allow you to eliminate dull and low quality things from your videos and make the main characters pop-out in every frame.
Here are a few situations where one can implement the Filmora AI portrait and make the most out of its functions.
● If you livestream videos on YouTube, but don’t have a green screen yet, you can use the AI portrait feature in Filmora to remove the background and make your streaming setup look more elegant and professional.
● With the Filmora AI portrait feature, you can also design high-quality and captivating thumbnails for your videos and draw the maximum attention within YouTube’s rabbithole. Any new viewer is more likely to click on your videos when the thumbnail is engaging.
● You can also use Filmora AI portrait effect to remove background from interviews. Usually, when someone shoots an interview, they usually place a green screen behind the person. But, in case you don’t have green screen footage, you can easily make your interviews look more professional with the Filmora AI portrait effect.
● Finally, you can also use the Filmora AI portrait feature in regular YouTube vlogs. This would be applicable when there are unnecessary elements in the background of a clip that are ruining the entire frame. In this case by simply erasing the background and replacing it with a custom one, you’ll be able to keep the production quality high and keep the viewers engaged throughout the vlog.
Part 2 What Scenes Apply to AI Portrait?
While the AI portrait effect can work for all frames, there are a few situations when it delivers the best results. The designers at Wondershare Filmora claim that AI Portrait works like a charm when the frame has a single subject talking directly to the camera.
When there’s a single individual or subject in front of the camera, it’s relatively easier for the AI-algorithm to detect the edges and separate the background with high precision. Moreover, when the main subject is static, you are most likely to witness the best output in terms of background removal. Why? The reason being when there’s a single static subject, an AI-powered algorithm can precisely mark its edges and achieve relatively better results.
Let’s understand this with the help of a few examples.
One-Person Interview
Going back to the interview example - let’s say you are interviewing a person who’s sitting in a chair and talking directly to the camera in front of him. Now, since there isn’t too much movement on his side, the AI-algorithm will be able to detect his edges and remove the background accordingly. In fact, in such ideal cases, the tool will even be able to detect the hair of the subject with high precision.
Shot of a Monologue
Monologues are no longer limited to high-budget Hollywood movies only. They have become a regular part of conventional videos such as daily YouTube vlogs. Monologues boast better authenticity as the entire clip is shot in one go.
Since there are no random cuts, the presenter can easily convey his views to the viewers. But, for a monologue to work, it’s extremely crucial that it has a high-quality background otherwise it’ll fail to grab the viewer’s attention. In case you are also stuck with a monologue that has a bad background, you can use Filmora AI portrait to remove it and make the primary character of the video pop-up more effectively.
YouTube Vlogs
Again, YouTube vlogs are another great example where editors could really benefit from Filmora’s AI portrait effect. For daily vloggers, getting the perfect shot is always a challenge. And, more often than you think, they end up taking shots that have bad backgrounds. But, thanks to Filmora’s AI portrait effect, one could easily remove background from such shots and use them to convey the storyline more effectively. This won’t waste your efforts and you’ll be able to use the shot that would have otherwise gone to Trash.
So, these are a few situations where the AI portrait effect in Filmora can do wonders for your video editing process.
Part 3 What Scenes Do Not Apply to AI Portrait?

Now, as we mentioned in the previous part, the Filmora AI portrait effect works better in scenarios where there’s only a single subject in the frame. This means the effect isn’t applicable in all the situations.
If there is a lot of movement in the frame, the AI-algorithm may fail to detect the edges of the subject(s) and not deliver the expected results. For example if you are working on a vlog where you are moving the camera really fast, the AI effect will struggle to separate the background from the foreground and fail to achieve the desired precision while removing background.
Some of the other situations where you won’t be able to make the most out of the AI portrait effect include:
Shots With Multiple Moving Subjects
If you have a shot of a crowded place where too many people are moving in the frame, it’ll be challenging to detect the background properly. The movement of multiple subjects will interfere with the overall functionality of the algorithm, restricting users from achieving a background-free shot. In such a situation, you’ll either have to use the shot without removing the background or dump into the Trash folder.
Videos With Special Effects and Filters
Here’s the deal; special effects and filters have become an inevitable part of today’s social media-influenced world. People apply filters and visual effects to make their videos more appealing and grab more likes and comments on Instagram, Facebook, and Snapchat.
But, these filters are often a nightmare for video editors as it’s pretty challenging to process them in any video editing software. If you have a clip with filters or video effects, you’ll struggle to implement the Filmora AI portrait effect properly. In fact, the effect will not work as expected and you’ll be stuck with a shot that would be pretty useless for the entire storyline. So, do not apply unnecessary filters to your videos if you are planning to apply the AI portrait effect in the long run.
Videos With Backlights
The lighting setup of any video has a huge influence on how it will look at the end. Just like a human being, even the AI algorithm struggles to detect the background in a video that has poor lighting conditions or bad backlight. In such videos, it’s challenging for the algorithm to detect the main subject and then identify its edges.
To avoid such scenarios, it would be better to plan your shots in advance and shoot them when there are proper lighting conditions. In case you are going to shoot indoors, you can use a dedicated lighting setup. If anything, this will make it much easier to apply the Filmora AI portrait effect and achieve the best results in terms of background removal.
Paintings
Paintings aren’t like traditional videos. The color scheme is entirely different and it’s much challenging to identify the background and the foreground. So, if there are any images of paintings that you want to use as a thumbnail, it might get a bit challenging to remove the background. In such a scenario, it would be much better to either choose a different image for the thumbnail and use the painting without removing its background.
So, these are a few scenarios where using the Filmora AI portrait won’t be an effective solution for you. We would recommend to plan your shots in advance so that you don’t end up with random shots where it’s challenging to apply the AI portrait effect.
Part 4 Why Filmora AI Portrait Deserves to Try?
If you’ve come this far, you are most likely to be serious about video editing. So, now that we have clarified all the situations where using ****Wondershare Filmora Video Editor AI portrait** will be effective, let’s understand how you can use it in your videos.
01Are the Subscription Periods for Wondershare Filmora and the AI Portrait Add-on the Same?
So, first things first, will you get direct access to the AI portrait add-on along with your Filmora license? The answer is No! THe AI portrait add-on is available as a separate item and you’ll have to pay additional charges to use it on your videos. The default Filmora license will not give you access to the AI portrait mode whatsoever. In terms of pricing, the Filmora AI portrait is available at a pocket-friendly price.
For Win 7 or later (64-bit)
For macOS 10.12 or later
You can get this add-on by paying a minimal fee of $5.99 per month. One of the best things about choosing this add-on is that you can discontinue it whenever you want. So, let’s say you no longer need to remove backgrounds from your videos - in this situation, you can directly discontinue your subscription without affecting your regular Filmora subscription.
02How to Add AI Portrait Effects?
Now, coming to the real reason why you’ve come this far - the process to use the AI portrait effect in Filmora. To be honest, it’s a relatively easier process to add the AI portrait effect in Filmora. Even if you are not a Filmora user, you’ll be able to get the job done without any hassle. Let me quickly walk you through the step-by-step procedure of adding the AI portrait effect in Wondershare Filmora.
Step 1 - If you are not an existing user of Filmora, start by purchasing its license and install the software on your system to get started. On the other hand, if you’ve been using Filmora for a while, directly move to the next step to proceed further.
Step 2 - Now, launch the software and create a new project. You’ll be prompted to Filmora’s editing panel. At this point, you’ll have to drag the video clip (that you want to edit) to the timeline.
Step 3 - Once the video is successfully imported, switch to the “Effects” tab and search for “AI Portrait”. You’ll see a “premium” icon next to its name. Double-click on the effect and follow the on-screen instructions to complete the payment procedure.
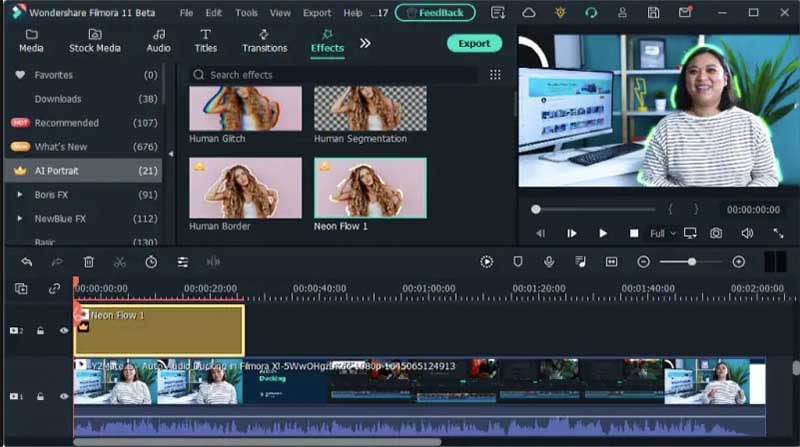
Step 4 - After you have bought the effect, just drag it to the timeline and place it above your video.

Step 5 - Based on how long you want to keep this effect, you can elongate or shorten its duration by simply stretching its duration.
That’s it; the AI portrait effect will automatically detect and remove the background without requiring you to even lift a finger. After the background is removed, you can tap the “Export” button and choose the desired output format to save the file on your system.
03How to Adjust AI Portrait Effects?
Apart from its core ability to remove the background from a video/image, the another advantage of choosing Filmora AI portrait add-on is its fully customization support. Based on your requirements, you can adjust different parameters such as percentage, edge thickness, edge feather, etc. to achieve the desired results in the output.
Let’s have a closer look at all these parameters to understand their overall functionality more precisely.
● Percentage: By adjusting the percentage, you can decide how effective you want the AI portrait effect to appear in your videos. If you drag the slider all the way to the end, the background will be removed completely and you might not even recognize the main subject properly. On the other hand, if you keep it at a lower percentage, there will be a little bit of transparency in the background.
● Alpha: The alpha slider will decide the transparency of the portrait effect itself. You can drag this slider left or right until you have the perfect frame in front of you.
● Edge Thickness: As the name implies, edge thickness decides how thick the edges of the subject would appear in the video. A smaller percentage would mean thinner edges whereas a higher percentage would mean larger edges.
● Edge Feather: With Edge feather, you can define the blurriness of the edges themselves. The higher the value of the edge feather, the blurier the edges would appear in your videos.
Now, to access all these features, all you have to do is double-tap on the AI portrait effect within FIlmora’s timeline. This will automatically prompt you to the editing panel for this particular effect where you’ll be able to manipulate all these parameters and achieve the desired portrait results accordingly.
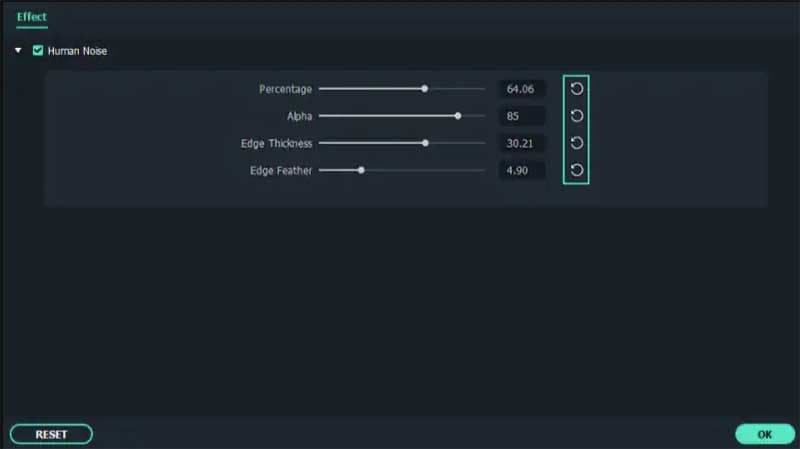
In case you are not happy with your customization, you can also tap the “Restore” button next to each parameter to restore the default value. Once you are happy with the results, just tap the “Ok” button to implement your changes.
04Why Did Filmora AI Portrait Attract People?
Apart from attracting editors, what makes Filmora AI portrait one of the best video effects that you can apply to your videos to engage viewers. Well, the answer is pretty simple; AI portrait effect makes the background of a video transparent.
It means the editors have the liberty to replace the dull boring background with a custom one and keep the engagement level high. This becomes really useful when you are trying to compile a long documentary and have a few shots with bad backgrounds. Since using such shots directly might affect the production quality of your videos, it would be better to first replace the background using the AI portrait effect.
So, regardless of your editing setup, production goals, or the type of video you want to compile at the end, you can use the AI portrait effect in Wondershare Filmora in different situations and protect the end results from becoming a failure. This will help you maximize the reach of your videos and attract more viewers more effectively. So, install Filmora today and sign up for its AI portrait effect to uplift the overall video quality of your projects.
Part 5 A Comparison to Other AI Portrait Software
Now, before saying goodbye, we also believe that it would be unfair if we only talk about a single tool and a single effect in this guide. Of course, Filmora’s AI portrait effect works like a charm in different situations, there are other tools in the market that you can try to achieve similar results. As a video editor, it’s always great to keep trying new things as it will add variation to your portfolio and make it much easier to attract new clients.
So, here’s a list of top 5 video editing software that you can use to get similar functionality like the AI portrait effect in Wondershare Filmora.
01Adobe Premiere Pro
Adobe Premiere Pro is undoubtedly one of the most popular video editing software with a strong fan base. Many industry leaders including Sam Kolder and Rory Kramer use Premier Pro to compile high-quality Hollywood-style videos for musicians as well as other clients.
Premiere Pro is more of an advanced video editing tool, which means even though it can help you remove background from portraits, you’ll have to do all the work manually. There’s no predefined add-on or effect that you can apply to the video to erase the background. Instead, you’ll have to manually mark the edges of the subject, erase the background and then, replace it with a different one to achieve the desired results.
In general, Premiere Pro is a great option for skilled editors who want to take things in their own hands to achieve the best results. If you are a beginner, you would be better off with a more user-friendly tool such as Wondershare Filmora.
Key Features:
● Extreme precision while erasing the background
● Achieve the desired results without compromising the quality of the main subject in the portrait
● An industry-preferred software
Pros:
● Existing Premiere Pro users will find it much easier to replicate the AI portrait effect
● Complete flexibility over your project
Cons:
● It can take several hours to precisely remove the background
● The entire process will be manual
02Final Cut Pro
Like Premiere Pro, Final Cut Pro is another famous video editing software that can help you replicate the results of the Filmora AI portrait effect and remove the background from different videos, images, and motion graphics. Keep in mind that Final Cut Pro is only available for macOS, which means if you own a Windows system, you won’t be able to use the software whatsoever.
Again, the only downside of using Final Cut Pro is the amount of manual effort you’ll have to put in to achieve the expected results. Being a full-scale video editing tool, there aren’t too many add-ons or predefined video effects.
Instead, you’ll have to rely on conventional methods such as keyframing to remove the background frame by frame and make your videos look professional. On the major side, Final Cut Pro will work in all situations. Even if you have a clip with too many moving objects, you’ll be able to mark the edges frame-by-frame and remove the background without losing any details from the foreground.
Key Features:
● Timeline-based interface for rapid video editing
● Exclusive macOS compatibility ensures high performance
● Ideal for experienced editors and designers
Pros:
● Final Cut Pro has an easy-to-use interface
● It’s easier to process each frame individually
Cons:
● Unlike Wondershare Filmora, there aren’t any ready-to-use add-ons
● While working on complex shots, it can take several hours to remove the background
03Unscreen Online
Unscreen is an online video background remover that’s specifically designed to remove background from videos with a single click. Being an online application, Unscreen is an ideal choice for short videos (up to 20 seconds) because longer-duration videos will likely take forever to upload. If you want to edit a video for Instagram Reels or YouTube shorts, Unscreen Online would be worth the consideration.
It’ll allow you to remove the background with one click and you won’t even need high-performance software to get the job done. The only drawback of Unscreen online is its lack of video format compatibility. Since it’s an online application, not all video formats are compatible with Unscreen Online.
Moreover, you can only use the tool to process shorter videos. In general, this is an ideal choice for an average Joe who doesn’t want to go through the hassle of installing and using a dedicated video editing software. So, if you are a professional, it would be far beneficial to stick to other premium tools like Filmora, Premiere Pro, and Final Cut Pro.
Key Features:
● You can access Unscreen Online on any device you want
● The edge detection is quite precise for videos with a single subject
● As compared to other premium options, Unscreen Online is relatively cheaper
Pros:
● Cross-platform compatibility
● Perfect for Instagram content creators
● Affordable pricing
Cons:
● Doesn’t achieve the expected results for more complex videos having too many subjects
● Can’t process videos having longer durations
04MOVAVI Video Editor
MOVAVI is another desktop-based video editing software that offers all the basic functionality one looks for in a video editing tool. The software is compatible with Windows and is an ideal choice for beginners who are just getting started on their video editing journey. You’ll find all the basic features along with a few advanced functions such as background removal. Like Filmora, MOVAVI also has a built-in add-on to remove the background from your clips. However, you might not be able to achieve the same precision, especially when we are talking about more complex frames.
Key Features:
● An ideal choice for beginners
● Compatible with Windows
● Can remove background from videos with a single subject
Pros:
● The user interface is pretty straightforward
● It’s easier to edit the videos, thanks to a timeline-based interface
Cons:
● For a beginner editing tool, the price is on the higher side
● You won’t be able to remove background from complex shots with multiple subjects in the foreground
05Kinemaster
Kinemaster is a video editing tool that’s only available on mobile devices, Android to be more specific. It boasts a plethora of features that make it one of the most sought-after editing tools among mobile users. Apart from the basic editing features, Kinemaster also has Chroma key and green screen functionality that allow users to remove background from the videos. Though it’s not as same as a professional-level video editing tool like Filmora Pro, you can still use Kinemaster to erase the background from your green screen footage to achieve the desired portrait look.
Features:
● Kinemaster is beginner-friendly
● Compatible with all Android devices
Pros:
● Green screen compatibility
● Offers advanced features such as chroma key
● Idea choice for novice video editors
Cons:
● It’s quite challenging to edit longer videos on a phone, making Kinemaster less reliable for large documentary-type videos
● Ending Thoughts →
● Wondershare Filmora has introduced a new AI Portrait feature that allows users to remove background from different video clips to shift the entire focus on the main subject.
● Filmora AI Portrait is applicable in different situations and can help editors maximize the production quality of their videos
● Apart from Filmora AI Portrait, there are several video editing tools that editors can give a try to replicate the AI portrait effect. Though, the results of such tools may differ as well.
In the recent few years, video editing has become one of the most-sought after professions, all thanks to the popularity of various video sharing platforms like YouTube. Today, creators don’t need big budgets to share their stories with the world. They can simply grab the camera, shoot the video, and use editing software to compile their brainchild into a dedicated movie. And, once the movie is ready, these creators can simply upload it to YouTube and gain the desired viewership. However, it’s worth noting that YouTube isn’t the only element that has helped content creators excel in their careers and follow their passion.
Editing software like Wondershare Filmora also play an equal role in the success of a creator in today’s digital world. These editing tools are equipped with a plethora of features that allow creators to unleash their creativity and compile high-quality videos for their viewers. What’s more interesting is that these tools keep receiving new updates that further streamlines the entire video editing process to help creators edit videos more conveniently.
Today, we are here to talk about one such feature - known as Filmora AI portrait - that recently got introduced to Wondershare Filmora and became an all-time favorite of many creators. We’ll be going in detail about Filmora AI portrait and how you can use it in your videos to uplift the production quality of your videos. We’ll also share some of the alternatives of this cool feature so that you can bring variety to your videos and keep the viewers engaged throughout the video.
In this article
01 [Why Did AI Portrait Become More and More Popular](#Part 1)
02 [What Scenes Apply to AI Portrait?](#Part 2)
03 [What Scenes Do Not Apply to AI Portrait?](#Part 3)
04 [Why Filmora AI Portrait Deserves to Try?](#Part 4)
05 [A Comparison to Other AI Portrait Software](#Part 5)
Part 1 Why Did AI Portrait Become More and More Popular
Let’s start with the basics first! What is Filmora AI portrait and why it has gained an immense popularity in the editing community. It’s basically an add-on effect in Wondershare Filmora X that was introduced with the latest Filmora X version 10.5.
By integrating this add-on into their video, editors can remove/change the background without losing any details of the main subject. So, let’s say if you don’t have green screen footage and still want to remove the background without affecting the foreground (a single subject), Filmora AI portrait will help you get the job done without any hassle.
Being an AI-powered feature, Filmora AI portrait automatically detects the shape and structure of the main subject and separates it from the background. This way even if you don’t have used a green screen or don’t know how to apply the Chroma key in your videos, you’ll be able to remove the background from the RAW footage and replace it with a custom background. This will allow you to make your videos more appealing and add a funny element for better engagement. For example, you can add a moving background to uplift the entire storyline to your videos.
Filmora AI portrait is a great feature for different types of creators such as gaming streamers, YouTube content creators, and daily vloggers. Regardless of your editing style, by integrating the Filmora AI portrait add-on, you’ll have the liberty to remove unwanted backgrounds from various shots and keep the production quality high.
In addition to removing the background, Filmora AI portrait is also a great tool to design thumbnails for your videos. Also, you can use this feature to apply borders, glitch effects, pixelated, noise, or segmentation video effects to your videos. All these elements will allow you to eliminate dull and low quality things from your videos and make the main characters pop-out in every frame.
Here are a few situations where one can implement the Filmora AI portrait and make the most out of its functions.
● If you livestream videos on YouTube, but don’t have a green screen yet, you can use the AI portrait feature in Filmora to remove the background and make your streaming setup look more elegant and professional.
● With the Filmora AI portrait feature, you can also design high-quality and captivating thumbnails for your videos and draw the maximum attention within YouTube’s rabbithole. Any new viewer is more likely to click on your videos when the thumbnail is engaging.
● You can also use Filmora AI portrait effect to remove background from interviews. Usually, when someone shoots an interview, they usually place a green screen behind the person. But, in case you don’t have green screen footage, you can easily make your interviews look more professional with the Filmora AI portrait effect.
● Finally, you can also use the Filmora AI portrait feature in regular YouTube vlogs. This would be applicable when there are unnecessary elements in the background of a clip that are ruining the entire frame. In this case by simply erasing the background and replacing it with a custom one, you’ll be able to keep the production quality high and keep the viewers engaged throughout the vlog.
Part 2 What Scenes Apply to AI Portrait?
While the AI portrait effect can work for all frames, there are a few situations when it delivers the best results. The designers at Wondershare Filmora claim that AI Portrait works like a charm when the frame has a single subject talking directly to the camera.
When there’s a single individual or subject in front of the camera, it’s relatively easier for the AI-algorithm to detect the edges and separate the background with high precision. Moreover, when the main subject is static, you are most likely to witness the best output in terms of background removal. Why? The reason being when there’s a single static subject, an AI-powered algorithm can precisely mark its edges and achieve relatively better results.
Let’s understand this with the help of a few examples.
One-Person Interview
Going back to the interview example - let’s say you are interviewing a person who’s sitting in a chair and talking directly to the camera in front of him. Now, since there isn’t too much movement on his side, the AI-algorithm will be able to detect his edges and remove the background accordingly. In fact, in such ideal cases, the tool will even be able to detect the hair of the subject with high precision.
Shot of a Monologue
Monologues are no longer limited to high-budget Hollywood movies only. They have become a regular part of conventional videos such as daily YouTube vlogs. Monologues boast better authenticity as the entire clip is shot in one go.
Since there are no random cuts, the presenter can easily convey his views to the viewers. But, for a monologue to work, it’s extremely crucial that it has a high-quality background otherwise it’ll fail to grab the viewer’s attention. In case you are also stuck with a monologue that has a bad background, you can use Filmora AI portrait to remove it and make the primary character of the video pop-up more effectively.
YouTube Vlogs
Again, YouTube vlogs are another great example where editors could really benefit from Filmora’s AI portrait effect. For daily vloggers, getting the perfect shot is always a challenge. And, more often than you think, they end up taking shots that have bad backgrounds. But, thanks to Filmora’s AI portrait effect, one could easily remove background from such shots and use them to convey the storyline more effectively. This won’t waste your efforts and you’ll be able to use the shot that would have otherwise gone to Trash.
So, these are a few situations where the AI portrait effect in Filmora can do wonders for your video editing process.
Part 3 What Scenes Do Not Apply to AI Portrait?
Now, as we mentioned in the previous part, the Filmora AI portrait effect works better in scenarios where there’s only a single subject in the frame. This means the effect isn’t applicable in all the situations.
If there is a lot of movement in the frame, the AI-algorithm may fail to detect the edges of the subject(s) and not deliver the expected results. For example if you are working on a vlog where you are moving the camera really fast, the AI effect will struggle to separate the background from the foreground and fail to achieve the desired precision while removing background.
Some of the other situations where you won’t be able to make the most out of the AI portrait effect include:
Shots With Multiple Moving Subjects
If you have a shot of a crowded place where too many people are moving in the frame, it’ll be challenging to detect the background properly. The movement of multiple subjects will interfere with the overall functionality of the algorithm, restricting users from achieving a background-free shot. In such a situation, you’ll either have to use the shot without removing the background or dump into the Trash folder.
Videos With Special Effects and Filters
Here’s the deal; special effects and filters have become an inevitable part of today’s social media-influenced world. People apply filters and visual effects to make their videos more appealing and grab more likes and comments on Instagram, Facebook, and Snapchat.
But, these filters are often a nightmare for video editors as it’s pretty challenging to process them in any video editing software. If you have a clip with filters or video effects, you’ll struggle to implement the Filmora AI portrait effect properly. In fact, the effect will not work as expected and you’ll be stuck with a shot that would be pretty useless for the entire storyline. So, do not apply unnecessary filters to your videos if you are planning to apply the AI portrait effect in the long run.
Videos With Backlights
The lighting setup of any video has a huge influence on how it will look at the end. Just like a human being, even the AI algorithm struggles to detect the background in a video that has poor lighting conditions or bad backlight. In such videos, it’s challenging for the algorithm to detect the main subject and then identify its edges.
To avoid such scenarios, it would be better to plan your shots in advance and shoot them when there are proper lighting conditions. In case you are going to shoot indoors, you can use a dedicated lighting setup. If anything, this will make it much easier to apply the Filmora AI portrait effect and achieve the best results in terms of background removal.
Paintings
Paintings aren’t like traditional videos. The color scheme is entirely different and it’s much challenging to identify the background and the foreground. So, if there are any images of paintings that you want to use as a thumbnail, it might get a bit challenging to remove the background. In such a scenario, it would be much better to either choose a different image for the thumbnail and use the painting without removing its background.
So, these are a few scenarios where using the Filmora AI portrait won’t be an effective solution for you. We would recommend to plan your shots in advance so that you don’t end up with random shots where it’s challenging to apply the AI portrait effect.
Part 4 Why Filmora AI Portrait Deserves to Try?
If you’ve come this far, you are most likely to be serious about video editing. So, now that we have clarified all the situations where using ****Wondershare Filmora Video Editor AI portrait** will be effective, let’s understand how you can use it in your videos.
01Are the Subscription Periods for Wondershare Filmora and the AI Portrait Add-on the Same?
So, first things first, will you get direct access to the AI portrait add-on along with your Filmora license? The answer is No! THe AI portrait add-on is available as a separate item and you’ll have to pay additional charges to use it on your videos. The default Filmora license will not give you access to the AI portrait mode whatsoever. In terms of pricing, the Filmora AI portrait is available at a pocket-friendly price.
For Win 7 or later (64-bit)
For macOS 10.12 or later
You can get this add-on by paying a minimal fee of $5.99 per month. One of the best things about choosing this add-on is that you can discontinue it whenever you want. So, let’s say you no longer need to remove backgrounds from your videos - in this situation, you can directly discontinue your subscription without affecting your regular Filmora subscription.
02How to Add AI Portrait Effects?
Now, coming to the real reason why you’ve come this far - the process to use the AI portrait effect in Filmora. To be honest, it’s a relatively easier process to add the AI portrait effect in Filmora. Even if you are not a Filmora user, you’ll be able to get the job done without any hassle. Let me quickly walk you through the step-by-step procedure of adding the AI portrait effect in Wondershare Filmora.
Step 1 - If you are not an existing user of Filmora, start by purchasing its license and install the software on your system to get started. On the other hand, if you’ve been using Filmora for a while, directly move to the next step to proceed further.
Step 2 - Now, launch the software and create a new project. You’ll be prompted to Filmora’s editing panel. At this point, you’ll have to drag the video clip (that you want to edit) to the timeline.
Step 3 - Once the video is successfully imported, switch to the “Effects” tab and search for “AI Portrait”. You’ll see a “premium” icon next to its name. Double-click on the effect and follow the on-screen instructions to complete the payment procedure.
Step 4 - After you have bought the effect, just drag it to the timeline and place it above your video.
Step 5 - Based on how long you want to keep this effect, you can elongate or shorten its duration by simply stretching its duration.
That’s it; the AI portrait effect will automatically detect and remove the background without requiring you to even lift a finger. After the background is removed, you can tap the “Export” button and choose the desired output format to save the file on your system.
03How to Adjust AI Portrait Effects?
Apart from its core ability to remove the background from a video/image, the another advantage of choosing Filmora AI portrait add-on is its fully customization support. Based on your requirements, you can adjust different parameters such as percentage, edge thickness, edge feather, etc. to achieve the desired results in the output.
Let’s have a closer look at all these parameters to understand their overall functionality more precisely.
● Percentage: By adjusting the percentage, you can decide how effective you want the AI portrait effect to appear in your videos. If you drag the slider all the way to the end, the background will be removed completely and you might not even recognize the main subject properly. On the other hand, if you keep it at a lower percentage, there will be a little bit of transparency in the background.
● Alpha: The alpha slider will decide the transparency of the portrait effect itself. You can drag this slider left or right until you have the perfect frame in front of you.
● Edge Thickness: As the name implies, edge thickness decides how thick the edges of the subject would appear in the video. A smaller percentage would mean thinner edges whereas a higher percentage would mean larger edges.
● Edge Feather: With Edge feather, you can define the blurriness of the edges themselves. The higher the value of the edge feather, the blurier the edges would appear in your videos.
Now, to access all these features, all you have to do is double-tap on the AI portrait effect within FIlmora’s timeline. This will automatically prompt you to the editing panel for this particular effect where you’ll be able to manipulate all these parameters and achieve the desired portrait results accordingly.
In case you are not happy with your customization, you can also tap the “Restore” button next to each parameter to restore the default value. Once you are happy with the results, just tap the “Ok” button to implement your changes.
04Why Did Filmora AI Portrait Attract People?
Apart from attracting editors, what makes Filmora AI portrait one of the best video effects that you can apply to your videos to engage viewers. Well, the answer is pretty simple; AI portrait effect makes the background of a video transparent.
It means the editors have the liberty to replace the dull boring background with a custom one and keep the engagement level high. This becomes really useful when you are trying to compile a long documentary and have a few shots with bad backgrounds. Since using such shots directly might affect the production quality of your videos, it would be better to first replace the background using the AI portrait effect.
So, regardless of your editing setup, production goals, or the type of video you want to compile at the end, you can use the AI portrait effect in Wondershare Filmora in different situations and protect the end results from becoming a failure. This will help you maximize the reach of your videos and attract more viewers more effectively. So, install Filmora today and sign up for its AI portrait effect to uplift the overall video quality of your projects.
Part 5 A Comparison to Other AI Portrait Software
Now, before saying goodbye, we also believe that it would be unfair if we only talk about a single tool and a single effect in this guide. Of course, Filmora’s AI portrait effect works like a charm in different situations, there are other tools in the market that you can try to achieve similar results. As a video editor, it’s always great to keep trying new things as it will add variation to your portfolio and make it much easier to attract new clients.
So, here’s a list of top 5 video editing software that you can use to get similar functionality like the AI portrait effect in Wondershare Filmora.
01Adobe Premiere Pro
Adobe Premiere Pro is undoubtedly one of the most popular video editing software with a strong fan base. Many industry leaders including Sam Kolder and Rory Kramer use Premier Pro to compile high-quality Hollywood-style videos for musicians as well as other clients.
Premiere Pro is more of an advanced video editing tool, which means even though it can help you remove background from portraits, you’ll have to do all the work manually. There’s no predefined add-on or effect that you can apply to the video to erase the background. Instead, you’ll have to manually mark the edges of the subject, erase the background and then, replace it with a different one to achieve the desired results.
In general, Premiere Pro is a great option for skilled editors who want to take things in their own hands to achieve the best results. If you are a beginner, you would be better off with a more user-friendly tool such as Wondershare Filmora.
Key Features:
● Extreme precision while erasing the background
● Achieve the desired results without compromising the quality of the main subject in the portrait
● An industry-preferred software
Pros:
● Existing Premiere Pro users will find it much easier to replicate the AI portrait effect
● Complete flexibility over your project
Cons:
● It can take several hours to precisely remove the background
● The entire process will be manual
02Final Cut Pro
Like Premiere Pro, Final Cut Pro is another famous video editing software that can help you replicate the results of the Filmora AI portrait effect and remove the background from different videos, images, and motion graphics. Keep in mind that Final Cut Pro is only available for macOS, which means if you own a Windows system, you won’t be able to use the software whatsoever.
Again, the only downside of using Final Cut Pro is the amount of manual effort you’ll have to put in to achieve the expected results. Being a full-scale video editing tool, there aren’t too many add-ons or predefined video effects.
Instead, you’ll have to rely on conventional methods such as keyframing to remove the background frame by frame and make your videos look professional. On the major side, Final Cut Pro will work in all situations. Even if you have a clip with too many moving objects, you’ll be able to mark the edges frame-by-frame and remove the background without losing any details from the foreground.
Key Features:
● Timeline-based interface for rapid video editing
● Exclusive macOS compatibility ensures high performance
● Ideal for experienced editors and designers
Pros:
● Final Cut Pro has an easy-to-use interface
● It’s easier to process each frame individually
Cons:
● Unlike Wondershare Filmora, there aren’t any ready-to-use add-ons
● While working on complex shots, it can take several hours to remove the background
03Unscreen Online
Unscreen is an online video background remover that’s specifically designed to remove background from videos with a single click. Being an online application, Unscreen is an ideal choice for short videos (up to 20 seconds) because longer-duration videos will likely take forever to upload. If you want to edit a video for Instagram Reels or YouTube shorts, Unscreen Online would be worth the consideration.
It’ll allow you to remove the background with one click and you won’t even need high-performance software to get the job done. The only drawback of Unscreen online is its lack of video format compatibility. Since it’s an online application, not all video formats are compatible with Unscreen Online.
Moreover, you can only use the tool to process shorter videos. In general, this is an ideal choice for an average Joe who doesn’t want to go through the hassle of installing and using a dedicated video editing software. So, if you are a professional, it would be far beneficial to stick to other premium tools like Filmora, Premiere Pro, and Final Cut Pro.
Key Features:
● You can access Unscreen Online on any device you want
● The edge detection is quite precise for videos with a single subject
● As compared to other premium options, Unscreen Online is relatively cheaper
Pros:
● Cross-platform compatibility
● Perfect for Instagram content creators
● Affordable pricing
Cons:
● Doesn’t achieve the expected results for more complex videos having too many subjects
● Can’t process videos having longer durations
04MOVAVI Video Editor
MOVAVI is another desktop-based video editing software that offers all the basic functionality one looks for in a video editing tool. The software is compatible with Windows and is an ideal choice for beginners who are just getting started on their video editing journey. You’ll find all the basic features along with a few advanced functions such as background removal. Like Filmora, MOVAVI also has a built-in add-on to remove the background from your clips. However, you might not be able to achieve the same precision, especially when we are talking about more complex frames.
Key Features:
● An ideal choice for beginners
● Compatible with Windows
● Can remove background from videos with a single subject
Pros:
● The user interface is pretty straightforward
● It’s easier to edit the videos, thanks to a timeline-based interface
Cons:
● For a beginner editing tool, the price is on the higher side
● You won’t be able to remove background from complex shots with multiple subjects in the foreground
05Kinemaster
Kinemaster is a video editing tool that’s only available on mobile devices, Android to be more specific. It boasts a plethora of features that make it one of the most sought-after editing tools among mobile users. Apart from the basic editing features, Kinemaster also has Chroma key and green screen functionality that allow users to remove background from the videos. Though it’s not as same as a professional-level video editing tool like Filmora Pro, you can still use Kinemaster to erase the background from your green screen footage to achieve the desired portrait look.
Features:
● Kinemaster is beginner-friendly
● Compatible with all Android devices
Pros:
● Green screen compatibility
● Offers advanced features such as chroma key
● Idea choice for novice video editors
Cons:
● It’s quite challenging to edit longer videos on a phone, making Kinemaster less reliable for large documentary-type videos
● Ending Thoughts →
● Wondershare Filmora has introduced a new AI Portrait feature that allows users to remove background from different video clips to shift the entire focus on the main subject.
● Filmora AI Portrait is applicable in different situations and can help editors maximize the production quality of their videos
● Apart from Filmora AI Portrait, there are several video editing tools that editors can give a try to replicate the AI portrait effect. Though, the results of such tools may differ as well.
Online Video Makers to Use
Are you into video editing and looking into installing a video editing software or looking into subscribing to an online platform for the same? Both have the potential for creating perfect, and professional quality videos, but the choice of an online video editor will give you some good experience. Online video editors are easy to access. There are several online video editors on the internet which are user-friendly like InVideo. There are made with armature users in mind thus very easy to navigate even for those who have never edited a video before. The software come with several effects and tools that simplify the editing process.
While using a free online video editor, you can access several add-ons that will enhance your user experience. The add-ons are made in a way that they add new tools to enhance a user’s experience and the overall use of the software. These add-ons are provided by the software’s developer or they are mods by some of the users. They are freely updated are simple and free to download.
Filmora Audio Recorder
Record computer system audio
Capture microphone audio
Customize recording volume
Record screen and webcam as well
Veed.io online video editor
It is a simple online video editing software, it is meant to create perfect and professional-looking videos without the user having to train to be a professional video editor. Veed.io is a unique software since it enables users to easily edit videos and this is one of the aspects that sets it apart from other competitors.

Shooting videos has been simplified with the advancement of digital phones enabling just anyone to take a video through their phone camera. On the other hand, it is quite challenging, expensive, and hard to make these recorded videos look nice and professional. You will have to seek assistance at a fee to have the videos edited for you.
Steps to follow while using veed.io
**Choose a File
Choose a video that you want to work on from your archives and upload it to the application
**Making Edits to your videos Online
Here you can add text, audio, subtitles, rotate, crop, add effects, and subtitles among several others.
**Download
After you have done your editing to satisfaction, proceed to download the finished video for sharing or other uses.
FlexClip Online Video Editor
It is a multipurpose online video editing tool that allows you to make videos, movies, and slideshows within the shortest time possible. It enables the user to cut a clip from a video and quickly make it more dynamic by adding voice recordings and texts. The app allows you to completely control a video’s appearance background appearance and much more.

Key features of flexClip are an easy to use and a clean storyboard, videos and music, a large stock of images, and editing features like trim, text, animation, split, watermark, and photos. FlexClip will fulfill all your needs when it comes to editing a video like a professional, you can use the application to create videos for occasions like weddings and much more. It is very easy to use.
Steps on How to Use FlexClip
**Add Media
You will select to add videos and photos from your computer’s storage or library to the app’s storyboard.
**Customize
Here, you will add text, music, a voice-over, or a watermark to personalize or customize the video.
**Export
You can download your edited video in your chosen ratio or definition for your use.
Canva Online Video Maker
A choice to edit your videos using a free online video editing software like Canva is advantageous because of the easy-to-use interface and the basic editing features. Canva video editing software will give you basic editing features like splitting, cutting, and trimming as timeline editing features. It enables you to add as many layers and elements as you want to the storyboard.

Canva online video maker gives you a variety of video sizes free to customize depending on the type of video you want to edit. It also gives you a choice to resize, crop, rotate, flip and adjust a clip or image. For the addition of a voice-over, a webcam video, or a screen recording you can use the in-app recorder available. Canva allows usage without having to sign in and is also available for use on mobile devices on the go. It is also a collaborative app that allows the usage of others all at the same time while editing.
Steps on How to Use Canva Online Video Maker
Step 1:
Start by selecting the project type you want to work on. It is because videos for different platforms do have different dimensions. If you already know the dimensions of the video type that you want, proceed to click Create a design Custom size and input the correct details. If not sure, select the video title after what video you want to make.
Step 2:
Chose a Template or Make one. After choosing a project type, the app will open for you a blank window whose bottom will display your timeline which allows you to add frames and choose the length of the video.
Step 3:
On the screen’s left side, you will find tabs for stored videos, photos, elements, audio files, and texts. You can pick elements to create something more structured. Choose elements and scroll to frames. These will enable you to create shapes if you drag and drops items in them.
To add your prerecorded video, audio and photos, use the Upload tab. For cropping, use double-click a video or image on the screen.
Step 4:
For editing, the software offers several choices. You can add, edit, transition between frames, drag and drop animate pictures, and add elements to make them fade, and tumble among others.
Step 5:
Download and publish. After you are done doing all the necessary edits, you can preview your work before downloading using the play button on the top-right of the screen. In an event that you want someone’s opinion on the editing, you can share the video as well as editing privileges.
Conclusion
Online video editors come with several features that you need to awesome videos without having to possess prior knowledge of video editing . The applications support editing of all types of videos in the browser without having to unnecessarily upload. Some of the online editing tools offer social media ad makers that you can use before resolving to edit to create your own.
Transform Long Videos into Short Ones Instantly
Turn long videos into viral clips. Effortlessly transform lengthy videos into engaging, shareable clips.

Veed.io online video editor
It is a simple online video editing software, it is meant to create perfect and professional-looking videos without the user having to train to be a professional video editor. Veed.io is a unique software since it enables users to easily edit videos and this is one of the aspects that sets it apart from other competitors.
Shooting videos has been simplified with the advancement of digital phones enabling just anyone to take a video through their phone camera. On the other hand, it is quite challenging, expensive, and hard to make these recorded videos look nice and professional. You will have to seek assistance at a fee to have the videos edited for you.
Steps to follow while using veed.io
**Choose a File
Choose a video that you want to work on from your archives and upload it to the application
**Making Edits to your videos Online
Here you can add text, audio, subtitles, rotate, crop, add effects, and subtitles among several others.
**Download
After you have done your editing to satisfaction, proceed to download the finished video for sharing or other uses.
FlexClip Online Video Editor
It is a multipurpose online video editing tool that allows you to make videos, movies, and slideshows within the shortest time possible. It enables the user to cut a clip from a video and quickly make it more dynamic by adding voice recordings and texts. The app allows you to completely control a video’s appearance background appearance and much more.
Key features of flexClip are an easy to use and a clean storyboard, videos and music, a large stock of images, and editing features like trim, text, animation, split, watermark, and photos. FlexClip will fulfill all your needs when it comes to editing a video like a professional, you can use the application to create videos for occasions like weddings and much more. It is very easy to use.
Steps on How to Use FlexClip
**Add Media
You will select to add videos and photos from your computer’s storage or library to the app’s storyboard.
**Customize
Here, you will add text, music, a voice-over, or a watermark to personalize or customize the video.
**Export
You can download your edited video in your chosen ratio or definition for your use.
Canva Online Video Maker
A choice to edit your videos using a free online video editing software like Canva is advantageous because of the easy-to-use interface and the basic editing features. Canva video editing software will give you basic editing features like splitting, cutting, and trimming as timeline editing features. It enables you to add as many layers and elements as you want to the storyboard.
Canva online video maker gives you a variety of video sizes free to customize depending on the type of video you want to edit. It also gives you a choice to resize, crop, rotate, flip and adjust a clip or image. For the addition of a voice-over, a webcam video, or a screen recording you can use the in-app recorder available. Canva allows usage without having to sign in and is also available for use on mobile devices on the go. It is also a collaborative app that allows the usage of others all at the same time while editing.
Steps on How to Use Canva Online Video Maker
Step 1:
Start by selecting the project type you want to work on. It is because videos for different platforms do have different dimensions. If you already know the dimensions of the video type that you want, proceed to click Create a design Custom size and input the correct details. If not sure, select the video title after what video you want to make.
Step 2:
Chose a Template or Make one. After choosing a project type, the app will open for you a blank window whose bottom will display your timeline which allows you to add frames and choose the length of the video.
Step 3:
On the screen’s left side, you will find tabs for stored videos, photos, elements, audio files, and texts. You can pick elements to create something more structured. Choose elements and scroll to frames. These will enable you to create shapes if you drag and drops items in them.
To add your prerecorded video, audio and photos, use the Upload tab. For cropping, use double-click a video or image on the screen.
Step 4:
For editing, the software offers several choices. You can add, edit, transition between frames, drag and drop animate pictures, and add elements to make them fade, and tumble among others.
Step 5:
Download and publish. After you are done doing all the necessary edits, you can preview your work before downloading using the play button on the top-right of the screen. In an event that you want someone’s opinion on the editing, you can share the video as well as editing privileges.
Conclusion
Online video editors come with several features that you need to awesome videos without having to possess prior knowledge of video editing . The applications support editing of all types of videos in the browser without having to unnecessarily upload. Some of the online editing tools offer social media ad makers that you can use before resolving to edit to create your own.
Transform Long Videos into Short Ones Instantly
Turn long videos into viral clips. Effortlessly transform lengthy videos into engaging, shareable clips.
Also read:
- In 2024, 8 Best Free Photo Collage with Music Video Maker
- 2024 Approved This Article Will Focus on Understanding the Secret Tips in Wondershare Filmora that You Can Use to Edit Videos Faster and More Efficiently
- In 2024, How to Create a Custom Sequence Preset in Premiere Pro
- New 10+ Top Unlimited FCPX Slideshow Templates
- Some Facts About GIF Background You Didnt Know
- Deep Learning of AI Video Recognition for 2024
- In 2024, Easy Way to Create an Alternate Reality Effect
- New In 2024, Master Premiere Pro Custom Sequence Presets
- In 2024, For Artists Who Are Making Videos for Show Their Knowledge or Projects, Add some Effects for the Video Can Always Provoke Interests and Attention. This Article Will Show You How to Do that Easily
- New Secret Tips & Tricks to Use in Filmora for 2024
- How to Make After Effects Gifs
- Updated In 2024, Do You Know How to Zoom on Facebook Livestream Videos? Through This Article, You Will Find Multiple Ways and Detailed Steps to Zoom in on the Facebook Livestream Videos
- Updated Consider a LUT to Be a Color Preset that a Filmmaker Can Use to Start Working on a Project Quickly. Sony Engineers Have Developed LUTs to Help Filmmakers Perform Specific Tasks. All of These Are Available for Free
- Updated How to to Mimic Professional Filming Gears
- You Can Easily Cut or Crop a Part of Your Video by Using Its Editing Tools Such as Crop (To Remove Unwanted Black Borders), Trim (To Remove the Unwanted Front and End Parts of Your Video Clip) for 2024
- Updated 2024 Approved Blender Is an Open-Source Cross-Platform 3D Graphics Program, but This Doesnt Mean Its a Low-Rent Option
- 2024 Approved Want to Make an Epic CSGO Montage? You Are in the Right Place. This In-Depth Guide Will Explain How You Can Make an Attention-Grabbing Gaming Montage
- New Introduction to The Best Cinematic LUTs in The Market
- Updated In 2024, The Article Is a Guide About the Split of the Videos in VLC. There Is Also a Particular Description of Its Alternative Wondershare Filmora. It Is Suitable as Well as Reasonable
- New In 2024, 7 Best MP4 Video Editors on Mac Edit MP4 Videos Easily
- How to Make a Time-Lapse Video Online for 2024
- Top 8 Augmented Reality Video Games
- Updated 2024 Approved Learn How to Create Your Own Unique Video in Cinematic Text Intro in Filmora. Its a Simple Process that Will Offer Professional-Level Intros of Your Own
- Updated Do You Want to Be Aware of VHSs Meaning? There Is Nothing to Be Worried About because We Will Guide You in This Article for 2024
- 10 Best Audio Visualizers Windows, Mac, Android, iPhone & Online
- Updated In 2024, How To Change Speed of Video in Final Cut Pro?
- New 2024 Approved Wondering How to Rotate a Video in Windows at Any Desired Angle and Save It Permanently? Find Out All the Different Ways to Rotate Videos Temporarily as Well as Permanently
- Updated Deep Learning of AI Video Recognition - Guide
- Updated Instagram Doesnt Offer Native Support for GIF Files. So, in This Post, Well Learn How to Convert a GIF to a Video for Instagram Using Multiple Methods.
- New How to Use Visual Effect for Zoom for 2024
- New 2024 Approved How to Do Perfect Match Paint 100 the Easy Way
- New 2024 Approved How to Make Canva Collages
- New In 2024, What You Should Know About Speech-to-Text Technology
- Updated 2024 Approved This Article Will Show You How to Make a Tattoo Disappear on Your Body Magically
- New 2024 Approved Do You Want to Use LUTs in Final Cut Pro? There Are Many Free LUTs for FCPX Available that You Can Use. Using LUTs, You Can Create Professional-Looking Content
- Camtasia Vs Captivate Which Is Better for 2024
- Updated Review Video Is a Common Type Video and the First Impression Review Is Also Included. This Article Will Show You What Is First Impression Review Video and How to Create One by Yourself
- Make Super Easy Coin Magic With Filmora for 2024
- New In 2024, How to Blur a Still or Moving Part of Video
- Want to Feather Shapes in After Effects? Read This
- Updated 3 Ways To Stream And Record At The Same Time
- New 2024 Approved What Is the Selective Color Effect, and How Can You Add This Effect to Your Videos Using Wondershare Filmora? A Complete Guide for Beginners
- Top 5 Free Online Video Filter Editors
- New 3 Best Motion Blur Plugins for Adobe After Effects for 2024
- 2024 Approved How to Zoom In and Out on Mac
- How to Use Phone Clone to Migrate Your Tecno Phantom V Fold Data? | Dr.fone
- In 2024, Process of Screen Sharing Honor Play 8T to PC- Detailed Steps | Dr.fone
- In 2024, 7 Ways to Lock Apps on iPhone 15 and iPad Securely | Dr.fone
- Full Tutorial to Bypass Your Vivo Y77t Face Lock?
- Fixing Foneazy MockGo Not Working On Infinix Note 30 VIP | Dr.fone
- How to Flash Dead Google Pixel 8 Safely | Dr.fone
- In 2024, How To Bypass Activation Lock On Apple Watch Or iPhone 12 Pro Max?
- How to Share/Fake Location on WhatsApp for Samsung Galaxy A14 4G | Dr.fone
- Strategies for Apps That Wont Download From Play Store On Samsung Galaxy S23 Ultra | Dr.fone
- Top 10 OnePlus Nord N30 5G Android SIM Unlock APK
- How Can We Unlock Our Realme 10T 5G Phone Screen?
- How to Find iSpoofer Pro Activation Key On Motorola Edge 40 Pro? | Dr.fone
- Remove the Lock Screen Fingerprint Of Your Samsung Galaxy S23 Tactical Edition
- In 2024, The Ultimate Guide to Nokia C12 Pattern Lock Screen Everything You Need to Know
- In 2024, List of Pokémon Go Joysticks On Oppo A56s 5G | Dr.fone
- In 2024, Solutions to Spy on Vivo V27e with and without jailbreak | Dr.fone
- In 2024, How Can We Bypass Itel P55+ FRP?
- In 2024, Ultimate Guide to Catch the Regional-Located Pokemon For Samsung Galaxy F14 5G | Dr.fone
- In 2024, 5 Quick Methods to Bypass Samsung Galaxy M54 5G FRP
- Unlocking the Power of Smart Lock A Beginners Guide for Vivo X100 Pro Users
- How To Fix Unresponsive Touch Screen on Realme Note 50 | Dr.fone
- How to Change your Motorola Razr 40 Location on Twitter | Dr.fone
- In 2024, How Can I Catch the Regional Pokémon without Traveling On Honor 90 Pro | Dr.fone
- 4 Solutions to Fix Unfortunately Your App Has Stopped Error on Samsung Galaxy M34 5G | Dr.fone
- In 2024, Fake Android Location without Rooting For Your Tecno Pop 8 | Dr.fone
- In 2024, The Best Methods to Unlock the iPhone Locked to Owner for Apple iPhone 12 mini
- How To Transfer WhatsApp From Apple iPhone 11 Pro to other iPhone 11 Pro devices? | Dr.fone
- Video File Repair - How to Fix Corrupted video files of Motorola Moto G04 on Windows?
- In 2024, How to Remove an AirTag from Your Apple ID Account On Apple iPhone 14 Pro Max?
- In 2024, Catch or Beat Sleeping Snorlax on Pokemon Go For Vivo Y36 | Dr.fone
- In 2024, How To Do Motorola Moto G24 Screen Sharing | Dr.fone
- In 2024, How to Transfer Everything from Apple iPhone 11 to iPhone | Dr.fone
- How to Fix iPhone 13 mini Storage Not Loading/Showing | Stellar
- Recover Deleted iPhone 15 Plus WhatsApp Attachments on Mac and Windows | Stellar
- How to Mirror PC to Apple iPhone 13 Pro Max? | Dr.fone
- In 2024, Is pgsharp legal when you are playing pokemon On Infinix Hot 40? | Dr.fone
- Recommended Best Applications for Mirroring Your Infinix Smart 8 Pro Screen | Dr.fone
- 8 Quick Fixes Unfortunately, Snapchat has Stopped on Vivo V27e | Dr.fone
- How To Transfer WhatsApp From Apple iPhone SE (2022) to other iPhone 13 Pro Max devices? | Dr.fone
- Title: In 2024, How to Add a Lower Third to Your Video
- Author: Morgan
- Created at : 2024-04-24 01:12:41
- Updated at : 2024-04-25 01:12:41
- Link: https://ai-video-editing.techidaily.com/1713942877796-in-2024-how-to-add-a-lower-third-to-your-video/
- License: This work is licensed under CC BY-NC-SA 4.0.
