
:max_bytes(150000):strip_icc():format(webp)/frenchopen-4d320297828b413f84f9940d5bd258f9.jpg)
New Video Inspiration for Birthday Slideshow
Video Inspiration for Birthday Slideshow
Video Inspiration for Birthday Slideshow
An easy yet powerful editor
Numerous effects to choose from
Detailed tutorials provided by the official channel
Birthdays come only once a year, and at this time of the year, we want to make our loved ones feel special and loved by praying for them, wishing them well, getting them presents, throwing parties, and other stuff people do to celebrate birthdays. You can also make the best of this celebration by doing something special. A birthday slideshow showing all of the celebrant’s fondest moments sounds like a perfect gift to me. A birthday photo slideshow has all the celebrant’s favorite memories, vacation photos, favorite pets, and interests. It combines several images put together using a free or paid birthday slide photo creator. It can be displayed on a computer or Tv screen depending on the creator’s choice.
In this article
01 [What you should put in a birthday slideshow](#Part 1)
02 [Top 5 video templates for happy birthday slideshow](#Part 2)
03 [How to make a birthday slideshow](#Part 3)
Part 1 What You Should Put in A Birthday Slideshow
A birthday slideshow combines several images in a chosen software program. But it is not the only thing that makes a fantastic birthday photo slideshow. This amazing slideshow doesn’t have to be just photos, and you can also create a birthday wishes slideshow. For a lasting impression on the celebrant, consider adding these when you create a birthday slideshow. A birthday slideshow should have the following:
● Background music
Lighten up your video with some background music. A slideshow just displaying photos without music isn’t a good idea.
● Meaningful Quotes and greetings
You can spice up the birthday video by adding greetings, quotes, and well wishes to let the celebrant know you want to them feel fantastic.
● Make the video personal
Add a personal touch to the clip by adding things that matter to the celebrant, whether pictures of them taken while performing a hobby or a favorite place. You can also use photos of their achievements from the time of their last birthday to the present one.
● Keep it short and simple
You don’t want to drag your audience with too many photos. I think the video would have the most impact when it is short, to the point, and keeps the viewers longing for more.
Part 2 Top 5 Video Templates for Happy Birthday Slideshow
Sometimes starting to create a slideshow from scratch can be very hectic and confusing as you might run out of designs to work with. There are other ways to create an impressive and mind-blowing slideshow without starting from scratch. There’s no need to worry cause we have a list of birthday slideshow templates to cover you. Also, tons of mobile apps, websites, and software possess tools to help you with your design.
If you’re still confused about how to go about it, we’ve compiled the top 5 video templates for a birthday photo slideshow to make your work easier.
01birthday cake template.
Developed for, After Effects, this 3D birthday cake is a top-notch birthday video template for free download. With easy customization, it’s among the first choice to consider! A birthday party can never be without cake, so using this template gives the slideshow a little bit of everything. There are photos, cakes, and music.

02Happy Birthday Slideshow Template
This Happy Birthday slideshow template from Renderforest has a customer rating of 4.5, which is a pretty high rating. This is why it is no two on our list. It gathers all your choice memories in the form of an album and is easy and fast to create. You cannot go wrong with this fantastic template. It is sure to impress the celebrant, friends, and relatives.

03Happy Birthday, Mom!
As its name implies, this particular video template is to celebrate your mom’s birthday. Let your mom know how much you care and value her by using this birthday video template. It is available on Canva but not on the free plan and is downloadable by Pro users of Canva. You can customize it to suit your choice by adding your mom’s favorite photos, pet photos, birthday music, and even animation.

04Kid’s Birthday Slideshow Template.
This birthday template is best suited for kids’ birthday parties. Its bold and lively background, wrapped gifts, ribbons, streams of confetti, and bordered slides makes it a perfect choice for your child’s birthdays videos slideshow. The above birthday video template is offered by filmii. Kids love colorful things, so add a little more to their birthday photo slideshow by using this template.

05Awesome Birthday Template
“You get more awesome as the year goes by.”This excellent video template provided by Vimeo is perfect for wishing the celebrant a fantastic birthday. It comes with an aspect ratio that is easily customizable, a transitioning background, and a lively background combination. Consider using this for your birthday video.

Part 3 How To Make A Birthday Slideshow
Creating a free birthday video has never been easier with various birthday video templates to choose from and numerous software and mobile apps to work it. With these tools available, we can create our birthday slideshow. I’ll show you how in these steps below.
Step1: Create Video
To get started, click the Create a Video or View Templates buttons.
Self

Step 2: Upload media files
Go to the Media section and upload all of the video clips and photographs you’ll need to construct a birthday slideshow. Then apply them straight to the storyboard or use them to replace the resources in templates.

Step 3: Create Slideshow
Add text, music, a filter, change the speed, tweak the settings, split the slideshow, and make your birthday slideshow more professional.

You’ve now completed a fantastic free birthday slideshow. So, save it to your PC or share it directly on YouTube.
Wondershare Filmora Video Editor template Mode is the first best birthday slideshow creator for newbies and professionals, among numerous others. It has a comprehensive and customizable set of birthday slideshow templates.
For Win 7 or later (64-bit)
For macOS 10.12 or later
Filmora’s advanced video editing tools, simple and elegant image frames, modern fonts, eye-catching color combinations, and addons make it an excellent tool for a perfect birthday video. Adding, removing, and adjusting clips using effects is made more accessible and less stressful. Next time you wish to surprise your family with a birthday wishes slideshow or a birthday photo slideshow, use the Filmora software for an effortless experience and impressive slideshow turnout.
● Ending Thoughts →
● So, we’ve looked at the best birthday video inspiration templates for the birthday slideshow. I’m sure that after reading this blog, you will be able to know what to do when next you want to create a birthday slideshow.
● Hence, pick the template of your choice, upload images, edit the video, preview, and then export. Go ahead with any of the mentioned templates and a free birthday slideshow creator like Fimora to create magic**.**
Birthdays come only once a year, and at this time of the year, we want to make our loved ones feel special and loved by praying for them, wishing them well, getting them presents, throwing parties, and other stuff people do to celebrate birthdays. You can also make the best of this celebration by doing something special. A birthday slideshow showing all of the celebrant’s fondest moments sounds like a perfect gift to me. A birthday photo slideshow has all the celebrant’s favorite memories, vacation photos, favorite pets, and interests. It combines several images put together using a free or paid birthday slide photo creator. It can be displayed on a computer or Tv screen depending on the creator’s choice.
In this article
01 [What you should put in a birthday slideshow](#Part 1)
02 [Top 5 video templates for happy birthday slideshow](#Part 2)
03 [How to make a birthday slideshow](#Part 3)
Part 1 What You Should Put in A Birthday Slideshow
A birthday slideshow combines several images in a chosen software program. But it is not the only thing that makes a fantastic birthday photo slideshow. This amazing slideshow doesn’t have to be just photos, and you can also create a birthday wishes slideshow. For a lasting impression on the celebrant, consider adding these when you create a birthday slideshow. A birthday slideshow should have the following:
● Background music
Lighten up your video with some background music. A slideshow just displaying photos without music isn’t a good idea.
● Meaningful Quotes and greetings
You can spice up the birthday video by adding greetings, quotes, and well wishes to let the celebrant know you want to them feel fantastic.
● Make the video personal
Add a personal touch to the clip by adding things that matter to the celebrant, whether pictures of them taken while performing a hobby or a favorite place. You can also use photos of their achievements from the time of their last birthday to the present one.
● Keep it short and simple
You don’t want to drag your audience with too many photos. I think the video would have the most impact when it is short, to the point, and keeps the viewers longing for more.
Part 2 Top 5 Video Templates for Happy Birthday Slideshow
Sometimes starting to create a slideshow from scratch can be very hectic and confusing as you might run out of designs to work with. There are other ways to create an impressive and mind-blowing slideshow without starting from scratch. There’s no need to worry cause we have a list of birthday slideshow templates to cover you. Also, tons of mobile apps, websites, and software possess tools to help you with your design.
If you’re still confused about how to go about it, we’ve compiled the top 5 video templates for a birthday photo slideshow to make your work easier.
01birthday cake template.
Developed for, After Effects, this 3D birthday cake is a top-notch birthday video template for free download. With easy customization, it’s among the first choice to consider! A birthday party can never be without cake, so using this template gives the slideshow a little bit of everything. There are photos, cakes, and music.
02Happy Birthday Slideshow Template
This Happy Birthday slideshow template from Renderforest has a customer rating of 4.5, which is a pretty high rating. This is why it is no two on our list. It gathers all your choice memories in the form of an album and is easy and fast to create. You cannot go wrong with this fantastic template. It is sure to impress the celebrant, friends, and relatives.
03Happy Birthday, Mom!
As its name implies, this particular video template is to celebrate your mom’s birthday. Let your mom know how much you care and value her by using this birthday video template. It is available on Canva but not on the free plan and is downloadable by Pro users of Canva. You can customize it to suit your choice by adding your mom’s favorite photos, pet photos, birthday music, and even animation.
04Kid’s Birthday Slideshow Template.
This birthday template is best suited for kids’ birthday parties. Its bold and lively background, wrapped gifts, ribbons, streams of confetti, and bordered slides makes it a perfect choice for your child’s birthdays videos slideshow. The above birthday video template is offered by filmii. Kids love colorful things, so add a little more to their birthday photo slideshow by using this template.
05Awesome Birthday Template
“You get more awesome as the year goes by.”This excellent video template provided by Vimeo is perfect for wishing the celebrant a fantastic birthday. It comes with an aspect ratio that is easily customizable, a transitioning background, and a lively background combination. Consider using this for your birthday video.
Part 3 How To Make A Birthday Slideshow
Creating a free birthday video has never been easier with various birthday video templates to choose from and numerous software and mobile apps to work it. With these tools available, we can create our birthday slideshow. I’ll show you how in these steps below.
Step1: Create Video
To get started, click the Create a Video or View Templates buttons.
Self
Step 2: Upload media files
Go to the Media section and upload all of the video clips and photographs you’ll need to construct a birthday slideshow. Then apply them straight to the storyboard or use them to replace the resources in templates.
Step 3: Create Slideshow
Add text, music, a filter, change the speed, tweak the settings, split the slideshow, and make your birthday slideshow more professional.
You’ve now completed a fantastic free birthday slideshow. So, save it to your PC or share it directly on YouTube.
Wondershare Filmora Video Editor template Mode is the first best birthday slideshow creator for newbies and professionals, among numerous others. It has a comprehensive and customizable set of birthday slideshow templates.
For Win 7 or later (64-bit)
For macOS 10.12 or later
Filmora’s advanced video editing tools, simple and elegant image frames, modern fonts, eye-catching color combinations, and addons make it an excellent tool for a perfect birthday video. Adding, removing, and adjusting clips using effects is made more accessible and less stressful. Next time you wish to surprise your family with a birthday wishes slideshow or a birthday photo slideshow, use the Filmora software for an effortless experience and impressive slideshow turnout.
● Ending Thoughts →
● So, we’ve looked at the best birthday video inspiration templates for the birthday slideshow. I’m sure that after reading this blog, you will be able to know what to do when next you want to create a birthday slideshow.
● Hence, pick the template of your choice, upload images, edit the video, preview, and then export. Go ahead with any of the mentioned templates and a free birthday slideshow creator like Fimora to create magic**.**
Step by Step to Resize Video in Davinci Resolve
While editing videos, you may change the aspect ratio of the video to change the size of the video to upload on different platforms like YouTube, Facebook, Pinterest, and Instagram. Videos come in different sizes and shapes. Some videos are portraits while the others are landscapes. Similarly, videos are captured in different places with different devices. So, we need to set a certain size of the video.
Definitely, a very large video can make delays in the work, similarly, a small size video can result in low resolution and bad quality. Resizing a video saves a lot of time and money whether you have a business, a YouTube channel, a short film, or a feature film. Today, we shall discuss how to resize the videos?
The two free ways to resize the video…
Here are a number of tools used in the market to resize the videos. We are going to teach How to resize the video in Davinci resolve and Fimora wondershare. Once you have mastered How to resize a video, it would be as simple as the ‘click’.
Now the good news is, you can dramatically export the videos in the same resolution in a very short time.
Let’s dive in !
Part 1. How to resize video in Davinci Resolve
Davinci Resolve is a very powerful tool to edit videos. Let’s suppose, you have some videos shots and all the videos have different sizes, some of the videos fit in the timeline and some are out of the timeline. No matter, you are going to make a video on the same scale with the same size.
Resize the video can be done in three ways:
- Zoom in zoom out
- Cropping
- Retime and scaling
1. Zoom in and Zoom out
First of all, select the videos in your timeline. You should stay in the middle of the frame to set it because it’s too wide. The timeline moves forward and backward. Let your video be 4k, go to the bottom-right corner and click on timeline format. Select timeline resolution, select ultra HD, or whatever you want from the drop-down list.

Go to the inspector from the up-right corner and select Transform under the video section. Here you can resize your image. Place the mouse over zoom x (Horizontal) and zoom y (vertical) values to drag left or right for zoom in or zoom out. The video can be resized accordingly.
Here you can also change its rotation.

2. Cropping
Go to the inspector from the up-right corner and select Transform. Now choose Cropping. Here are four options Crop left, crop right, crop Bottom, and crop Top. You can drag the scale from left to right to adjust the crop settings according to the desired result.

3. Retime and scaling
Go to the inspector from the up-right corner and select retime and scaling. You can choose stretch, Fit, Fill, or crop for cropping the video from the drop-down list.
- The Crop function is used to remove the unnecessary or uneven part of the video.
- The Fit function is to have the video auto-center and the selected clips are formatted according to the screen dimensions.
- Stretch Function allows changing the length of the certain clip at a certain duration.

After transforming, cropping, and resizing the videos, you can copy the same settings without repeating the above steps for each video.
Part 2. An alternative way to resize videos with Wondershare
Filmora Video Editor is another great video editing software. It is very easy to use. It offers many different features to resize the videos. Moreover, it allows zooming in the video to highlight the best part of your video. It allows the edited video to export on other devices or YouTube channels.
For Win 7 or later (64-bit)
For macOS 10.14 or later
You can resize your video in three ways:
- Resize video by cropping
- Scale in Scale-out
- Resize by changing Aspect Ratio
1. Resize video by cropping
- Import the videos from your storage by using the import button.
- Drag the videos in the timeline.
- Right-click on the desired video, crop and zoom option will appear in the menu.
- Select crop tab.

- Grab the corner of the crop inwards, and move to adjust as desired.
- Press the OK tab and your video is cropped.

2. Scale-in and scale-out
- Select the video in the timeline.
- Select the settings
- Click on the Transform tab under image section**.**

- Move the pointer from left to right on the Scale to zoom in and zoom out the video. You can remove the unwanted portion of the video.
- Press OK tab.

3. Resize video by changing aspect ratio
Some videos are 4k, 6k, and 8k but exporting them in the same resolution and waiting for a long time is really difficult. You need to resize the video to change its width and height. As different social media platforms require a different sizes for videos. We can say, resizing the video in terms of Giga bites and mega bites. You can do it by changing the Project Aspect Ratio. It is a very powerful technique to resize the videos in the timeline.
You can change the Project Aspect ratio like 16:9(wide-screen), 1:1(Instagram), 9:16(Portrait), 4:3(standard), 21:9(Cinema), or custom.

- Select the Aspect Ratio
- Change the ratio 16:9, 1:1, 9:16, 4:3, 21:9, or custom as desired.
- Select OK.

Conclusion
At this time, every business is using marketing to boost the economy, but video marketing is at its climax. Therefore, it is essential to take advantage of video editing tools to increase productivity and efficiency of work.
The Davinci Resolve and Filmora Wonder Share are the best video editing tools to resize the videos. You can easily use these tools on your laptop, tablets, or smartphones in a very short time. Along with this, you can share your compressed videos on different social media platforms like Facebook, Twitter, YouTube, Instagram, and LinkedIn. Moreover, you can enjoy the magical effects of these free tools at the ease of your smartphone. It is beneficial at both small and large businesses for the following
- Time saver
- Economical
- Good video quality
- Presentable
- Increase engagement
Hope the content would be useful for you. If you like the article please leave a comment.
Go to the inspector from the up-right corner and select Transform under the video section. Here you can resize your image. Place the mouse over zoom x (Horizontal) and zoom y (vertical) values to drag left or right for zoom in or zoom out. The video can be resized accordingly.
Here you can also change its rotation.
2. Cropping
Go to the inspector from the up-right corner and select Transform. Now choose Cropping. Here are four options Crop left, crop right, crop Bottom, and crop Top. You can drag the scale from left to right to adjust the crop settings according to the desired result.
3. Retime and scaling
Go to the inspector from the up-right corner and select retime and scaling. You can choose stretch, Fit, Fill, or crop for cropping the video from the drop-down list.
- The Crop function is used to remove the unnecessary or uneven part of the video.
- The Fit function is to have the video auto-center and the selected clips are formatted according to the screen dimensions.
- Stretch Function allows changing the length of the certain clip at a certain duration.
After transforming, cropping, and resizing the videos, you can copy the same settings without repeating the above steps for each video.
Part 2. An alternative way to resize videos with Wondershare
Filmora Video Editor is another great video editing software. It is very easy to use. It offers many different features to resize the videos. Moreover, it allows zooming in the video to highlight the best part of your video. It allows the edited video to export on other devices or YouTube channels.
For Win 7 or later (64-bit)
For macOS 10.14 or later
You can resize your video in three ways:
- Resize video by cropping
- Scale in Scale-out
- Resize by changing Aspect Ratio
1. Resize video by cropping
- Import the videos from your storage by using the import button.
- Drag the videos in the timeline.
- Right-click on the desired video, crop and zoom option will appear in the menu.
- Select crop tab.
- Grab the corner of the crop inwards, and move to adjust as desired.
- Press the OK tab and your video is cropped.
2. Scale-in and scale-out
- Select the video in the timeline.
- Select the settings
- Click on the Transform tab under image section**.**
- Move the pointer from left to right on the Scale to zoom in and zoom out the video. You can remove the unwanted portion of the video.
- Press OK tab.
3. Resize video by changing aspect ratio
Some videos are 4k, 6k, and 8k but exporting them in the same resolution and waiting for a long time is really difficult. You need to resize the video to change its width and height. As different social media platforms require a different sizes for videos. We can say, resizing the video in terms of Giga bites and mega bites. You can do it by changing the Project Aspect Ratio. It is a very powerful technique to resize the videos in the timeline.
You can change the Project Aspect ratio like 16:9(wide-screen), 1:1(Instagram), 9:16(Portrait), 4:3(standard), 21:9(Cinema), or custom.
- Select the Aspect Ratio
- Change the ratio 16:9, 1:1, 9:16, 4:3, 21:9, or custom as desired.
- Select OK.
Conclusion
At this time, every business is using marketing to boost the economy, but video marketing is at its climax. Therefore, it is essential to take advantage of video editing tools to increase productivity and efficiency of work.
The Davinci Resolve and Filmora Wonder Share are the best video editing tools to resize the videos. You can easily use these tools on your laptop, tablets, or smartphones in a very short time. Along with this, you can share your compressed videos on different social media platforms like Facebook, Twitter, YouTube, Instagram, and LinkedIn. Moreover, you can enjoy the magical effects of these free tools at the ease of your smartphone. It is beneficial at both small and large businesses for the following
- Time saver
- Economical
- Good video quality
- Presentable
- Increase engagement
Hope the content would be useful for you. If you like the article please leave a comment.
A Guide To Adopting Lumetri Color Presets in Effective Color Grading
Color grading plays a crucial role in a video’s post-production. It can impact a video’s appearance and atmosphere. The Lumetri Color panel in Adobe Premiere Pro provides an efficient and powerful set of tools for color grading. However, knowing where to start or how to achieve the desired look can be challenging. One approach is to use Lumetri Color presets, which are pre-configured color grading settings.
You can apply these to your footage with a few clicks. This article will provide a guide on how to adopt Lumetri Color presets. We’ll cover the basics of color grading and their importance. We will also learn how to access and use Lumetri presets. By the end of this guide, you’ll have the knowledge and tools to take your color grading skills to the next level.
Part 1: What are Lumetri Color Presets?
Lumetri Color Presets are pre-made color grading settings that you can use for videos. These are used in Adobe’s Lumetri Color panel in Premiere Pro or After Effects. The Lumetri Color panel allows editors and colorists to adjust the colors and tones of a video clip. It improves your video’s visual appeal and storytelling impact.
The Lumetri Color panel is a powerful tool that provides a range of controls for color grading. It allows you to adjust these image attributes and see the changes in real time. Lumetri Looks provides a simple way to apply a pre-designed look or style to your footage. These presets can range from subtle adjustments to drastic color grading effects. Moreover, you can customize them further to fit your needs.
Empower your videos with a new mood using different LUTs. Filmora now offers 100+ top-quality 3D LUTs cover a broad range of scenarios. Transform your videos with Filmora’s powerful 3D LUTs.
Apply LUT on Videos Apply LUT on Videos Learn More


Part 2: Why Are Lumetri Color Presets Important?
There are many benefits attached to the use of a Lumetri preset. These benefits range from saving your time and effort to enhancing your video to new heights. Given below are some factors which emphasize the importance of Lumetri color presets:
Saves Time
Lumetri color can save a lot of time for video content creators. People adjust the colors and tones in a video to achieve a specific look. Instead, a Lumetri color preset can be applied in a few clicks. It is especially useful when working on larger projects or when deadlines are tight.
Enhanced Look
Color grading is an essential part of video production. Here, Lumetri color can help improve the look of a video. By applying a preset, you can achieve a specific mood or tone that would otherwise be hectic to create. It results in more visually appealing and professional-looking content.
Further Adjustments
You can use Lumetri color presets as a base for further color grading adjustments. After applying a preset, you can still make manual adjustments to fine-tune the colors. It helps achieve a more personalized look while still saving a lot of time and effort.
Maintains Consistency
Using Lumetri color can help maintain consistency across different video projects. It is especially important for branding purposes. Furthermore, it can help establish a recognizable visual style. Besides, using similar presets across different videos gives a cohesive look.
Part 3: How To Install Free Lumetri Color Presets on Device?
There is no doubt that Lumetri Color Presets are an essential tool for video editors. These presets help enhance the quality of their videos. Moreover, they also offer various color grading options. If you are looking for free Lumetri Color Presets, we have good news. Given below are the simple steps for free Lumetri Color download and installation:
Step 1Download Special Presets and Access Adobe Premiere Pro Folder
Start by downloading the “PremiumBeat Hollywood Lumetri Looks” folder from the official website. Now unzip the folder to view its contents. Next, you need to open the Adobe Premiere Pro folder.
To open the Premiere Pro folder, you need to open “Finder” and navigate to “Application.” Here open the “Adobe Premiere Pro CC” folder. Windows users can access the “Adobe Premiere Pro CC” through the “Program Files” of their “C:/” drive.

Step 2Lead Into Its Lumetri Folder
Here, you need to access the “Lumetri” folder. To do that, you need to hold “Command,” click “Adobe Premiere CC,” and choose “Show Package Contents.” Now go to the “Lumetri” folder in “Contents.” Windows users can access the “Lumetri” folder through the “Adobe Premiere Pro CC” folder.

Step 3Unzip The Presets To Lumetri Folder
Now, you need to access the “Cine” folder within the “Lumetri” folder. Afterward, move all “.look” files from the unzipped “PremiumBeat Hollywood Lumetri Looks” folder. Mac users can do that using the drag-and-drop method, while Windows users can do copy/paste.

Part 4: How To Use Lumetri LUT Presets in Premiere Pro?
Now that you have installed free Lumetri presets, the next part is how to use them. These presets can become a powerful feature in your Premiere Pro. It will allow you to apply a pre-defined color grading effect to your footage. In this guide, we will walk you through the steps to use Lumetri LUT presets in Adobe Premiere Pro:
Step 1Open the Color Workspace
After downloading free Lumetri presets, you need to restart your Adobe Premier Pro. Now open your project and access the “Lumetri Color” panel through “Color” from the top bar.

Step 2Lead Into Lumetri Color Section
Scroll down in the “Lumetri Color” panel to find the “Creative” section. Here click the “Look” dropdown menu, and you will find all the installed presets here.

Step 3Apply the Required Presets
Choose a preset and apply it to your project. You can preview the file to see the effect of a preset on your footage.

Bonus Part: Using Lumetri Color Preset LUTs in Wondershare Filmora
Using Lumetri Color Presets or LUTs is essential during the post-production of your footage. However, using Adobe Premier Pro can be tough, especially for beginners. It has a steep learning curve and is also expensive. As a replacement, you can use Wondershare Filmora . It is a video editor known for its extensive features and affordable cost. This tool started its journey with more than 100 LUTs to use in your video.
Add LUTs on Video For Win 7 or later(64-bit)
Add LUTs on Video For macOS 10.14 or later
Furthermore, the video editing innovation has introduced 100+ new LUTs, taking the total number to well past 200. You can use this wide range of LUTs to enhance your video or footage to new heights. Moreover, it allows you to preview each LUT file as you hover over it. When using LUTs in Filmora, you can also set their intensity to your liking.

Main Features of Wondershare Filmora
- Filmora comes with various built-in effects, including transitions, filters, overlays, etc.
- Its Green Screen feature lets you replace the background of your videos with custom images or videos.
- The LUTs section of Filmora include scenarios like travel vlogger, event record, landscape film, and more.
- Using its motion-tracking feature, you can add text or graphics on a moving object or person in your video.
Conclusion
To sum it up, adopting Lumetri Presets is an effective way to enhance your video content. You can get professional-level color grading results by using the provided instructions. While Premiere Pro is a good choice for color grading, it has a steep learning curve. That’s why Wondershare Filmora stands out as the best choice due to its clean interface and affordable price.
Moreover, it offers an extensive library of built-in LUTs. You can take your video content to the next level using Filmora and the knowledge gained from this guide.
Apply LUT on Videos Apply LUT on Videos Learn More
Part 2: Why Are Lumetri Color Presets Important?
There are many benefits attached to the use of a Lumetri preset. These benefits range from saving your time and effort to enhancing your video to new heights. Given below are some factors which emphasize the importance of Lumetri color presets:
Saves Time
Lumetri color can save a lot of time for video content creators. People adjust the colors and tones in a video to achieve a specific look. Instead, a Lumetri color preset can be applied in a few clicks. It is especially useful when working on larger projects or when deadlines are tight.
Enhanced Look
Color grading is an essential part of video production. Here, Lumetri color can help improve the look of a video. By applying a preset, you can achieve a specific mood or tone that would otherwise be hectic to create. It results in more visually appealing and professional-looking content.
Further Adjustments
You can use Lumetri color presets as a base for further color grading adjustments. After applying a preset, you can still make manual adjustments to fine-tune the colors. It helps achieve a more personalized look while still saving a lot of time and effort.
Maintains Consistency
Using Lumetri color can help maintain consistency across different video projects. It is especially important for branding purposes. Furthermore, it can help establish a recognizable visual style. Besides, using similar presets across different videos gives a cohesive look.
Part 3: How To Install Free Lumetri Color Presets on Device?
There is no doubt that Lumetri Color Presets are an essential tool for video editors. These presets help enhance the quality of their videos. Moreover, they also offer various color grading options. If you are looking for free Lumetri Color Presets, we have good news. Given below are the simple steps for free Lumetri Color download and installation:
Step 1Download Special Presets and Access Adobe Premiere Pro Folder
Start by downloading the “PremiumBeat Hollywood Lumetri Looks” folder from the official website. Now unzip the folder to view its contents. Next, you need to open the Adobe Premiere Pro folder.
To open the Premiere Pro folder, you need to open “Finder” and navigate to “Application.” Here open the “Adobe Premiere Pro CC” folder. Windows users can access the “Adobe Premiere Pro CC” through the “Program Files” of their “C:/” drive.
Step 2Lead Into Its Lumetri Folder
Here, you need to access the “Lumetri” folder. To do that, you need to hold “Command,” click “Adobe Premiere CC,” and choose “Show Package Contents.” Now go to the “Lumetri” folder in “Contents.” Windows users can access the “Lumetri” folder through the “Adobe Premiere Pro CC” folder.
Step 3Unzip The Presets To Lumetri Folder
Now, you need to access the “Cine” folder within the “Lumetri” folder. Afterward, move all “.look” files from the unzipped “PremiumBeat Hollywood Lumetri Looks” folder. Mac users can do that using the drag-and-drop method, while Windows users can do copy/paste.
Part 4: How To Use Lumetri LUT Presets in Premiere Pro?
Now that you have installed free Lumetri presets, the next part is how to use them. These presets can become a powerful feature in your Premiere Pro. It will allow you to apply a pre-defined color grading effect to your footage. In this guide, we will walk you through the steps to use Lumetri LUT presets in Adobe Premiere Pro:
Step 1Open the Color Workspace
After downloading free Lumetri presets, you need to restart your Adobe Premier Pro. Now open your project and access the “Lumetri Color” panel through “Color” from the top bar.
Step 2Lead Into Lumetri Color Section
Scroll down in the “Lumetri Color” panel to find the “Creative” section. Here click the “Look” dropdown menu, and you will find all the installed presets here.
Step 3Apply the Required Presets
Choose a preset and apply it to your project. You can preview the file to see the effect of a preset on your footage.
Bonus Part: Using Lumetri Color Preset LUTs in Wondershare Filmora
Using Lumetri Color Presets or LUTs is essential during the post-production of your footage. However, using Adobe Premier Pro can be tough, especially for beginners. It has a steep learning curve and is also expensive. As a replacement, you can use Wondershare Filmora . It is a video editor known for its extensive features and affordable cost. This tool started its journey with more than 100 LUTs to use in your video.
Add LUTs on Video For Win 7 or later(64-bit)
Add LUTs on Video For macOS 10.14 or later
Furthermore, the video editing innovation has introduced 100+ new LUTs, taking the total number to well past 200. You can use this wide range of LUTs to enhance your video or footage to new heights. Moreover, it allows you to preview each LUT file as you hover over it. When using LUTs in Filmora, you can also set their intensity to your liking.
Main Features of Wondershare Filmora
- Filmora comes with various built-in effects, including transitions, filters, overlays, etc.
- Its Green Screen feature lets you replace the background of your videos with custom images or videos.
- The LUTs section of Filmora include scenarios like travel vlogger, event record, landscape film, and more.
- Using its motion-tracking feature, you can add text or graphics on a moving object or person in your video.
Conclusion
To sum it up, adopting Lumetri Presets is an effective way to enhance your video content. You can get professional-level color grading results by using the provided instructions. While Premiere Pro is a good choice for color grading, it has a steep learning curve. That’s why Wondershare Filmora stands out as the best choice due to its clean interface and affordable price.
Moreover, it offers an extensive library of built-in LUTs. You can take your video content to the next level using Filmora and the knowledge gained from this guide.
Add Text Animation to A Video Online
Do you want to make a creative video? Do you want your presentation or video to be easy to follow and entertaining? You can take the video to another level with the help of text animation. This article will discuss how to add text animation to online videos. You can use a good video editor from where you can select fresh styles and make the best video from there. One of the simplest ways to elevate your movie from good to excellent is with understandable text animation.
Text animation and short captions can broaden the audience for your content as more consumers view videos without sound these days. It matters what fonts you use in the videos, and they establish the mood and facilitate interaction with most viewers who rely on video captions. Add text, alter the font, add transitions, and use text effects to draw the user’s attention as they scroll. Please continue reading to discover how simple it is to make interactive video titles, words, and supers.
1. Use Kapwing animation text editor
(https://www.kapwing.com/animated-text-video-maker )
You can use the potent online editor Kapwing to add animated text to videos online, utilizing music, videos, GIFs, and images. There are no downloads required because everything is already present inside the browser. Kapwing is a capable tool for content production that is simple enough for everyone to use. The majority of video formats, GIF and image, including avi, png, jpg, gif, MOV, mp4, and more, are supported by Kapwing.
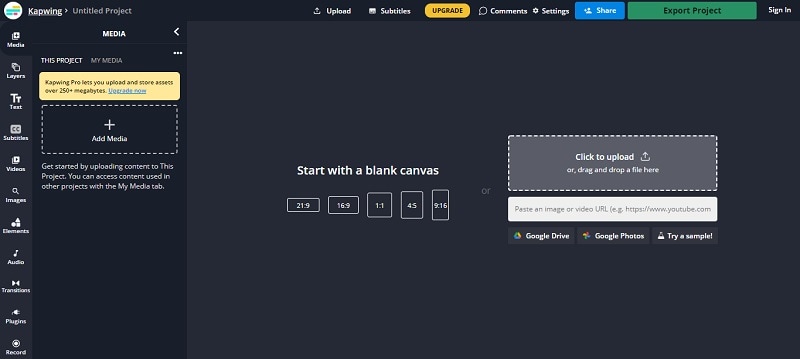
Step1 Upload the Video to Kapwing
You can open Kapwing with the device and tap on “Start Editing” to open up Kapwimg studio. After that, one can use the drag and drop option to upload the video in the studio. You can click on upload or use the link to upload.
If you have a more than 250 MB video, then you will require the Pro version.
Step2 Add the Text
When the video gets uploaded, now you can add your text. You must click the “Text” option on the left and type the text. After that, you can pick your favorite color, background, and color to add style.
You will always want that your text to get animated, but it doesn’t mean that you will have to use explosive fonts or funky or bright, which are very funky. The animation will make your text look attractive, and you can experiment with the colors and fonts to find the best combination.
Step3 Animate the Text
Now the fun part starts; choose the text box present on the right side and click on the “Animate” tab. It will allow the user to select animations like fade, flicker, hue rotates, and many more. Choose the speed according to your requirement, and if you want to change the background and color, you can do it too.
Use “Apply To” for applying this animation in the outro, intro, or both. It will help you to make the text fade out, fade in, or transition out and in with animation. Now the animation library has nine options:
- Drop: It appears on top of the text box
- Flicker: This one is like a candle’s flicker, and text flashes disappear and appear before staying.
- Fade: Opacity can be changed from 0% to 100%.
- Pop:- This grows the text more extensive than the text box and shrinks back to the place.
- Reveal:- Rolls from the left side to the right side
- Wipe:- Rolls from the left side to the right side with a colored background.
- Vibrate: The text box shakes in every direction.
- Hue rotates:- Colour of text cycles through the hue values..
You can use a timeline to adjust the animation’s termination when you set text animation. You can even drag that layer after the start time or use it on end/start time sliders to decrease or increase the time of your video. Text animation can get started when the cursor reaches the start time.
Step4 Export
The video with animated text is now ready to boom. You can click on “Export Video” present at the top and wait for the process. After that, you can download that video and use the links to share it on your social media platform.
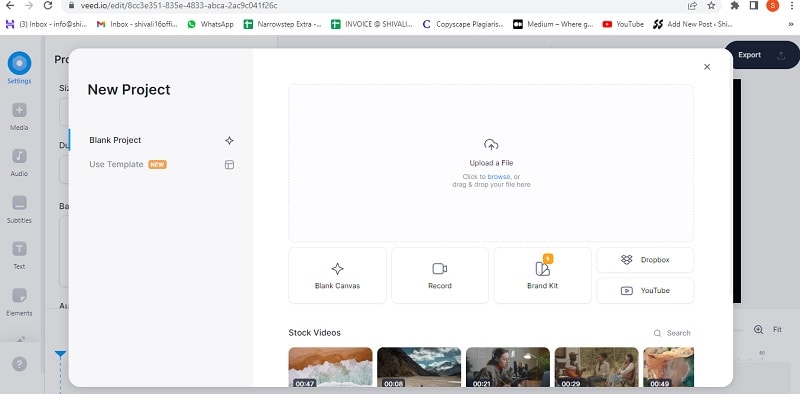
2. Use veed.io text video editor
(https://www.veed.io/create/text-video-maker )
Veed is one of the best video editor text effects online, which allows you to add text to online videos. You can easily add style, color, text, and font in a few clicks. You can upload the video and tap the text to get started. Add title and text or select handwriting font. One can select it from templates. Change transparency, alignment, and font size of the text.
This online software is perfect for creating attractive videos on social media. This is free, which omits the usage of expensive software. It is much easier to avoid many complex video editor apps. With the help of VEED, you can create an excellent video without any experience and do it with a few clicks. Let’s see how to add animated text to photos online.
Step1 Upload the video
Tap on “Choose Video” and choose the file you want to upload on VEED. One can even use the drag and drop option from the folder to the editor.
Step2 Add text
After that, you can add the text by tapping on the “Text” option on the left menu. You can select the text style and start typing.
Step3 Export
Save the video with the text you placed by tapping on “Export.” The video gets saved in an MP4 file.
3. Use Animaker text maker
(https://www.animaker.com/text-animation-maker )
The Animaker is one of the best-animated video makers. This app offers the best collection of charts, BGs, and animated characters. With the help of Animaker, you can make the text disappear or appear off-screen in the best way. After you finish your video, you can download the format in MP4.
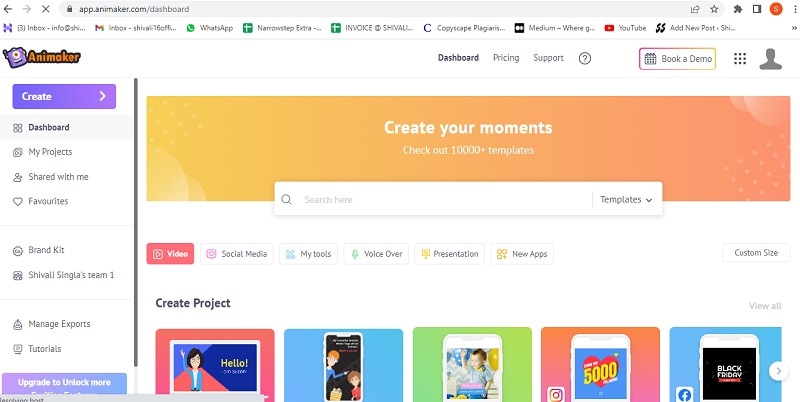
Step1 Upload the video clip
First, you can upload your video clip present on top that you wish to add text animation.
- Tap on the “Upload section” on the bottom left. You can upload your video where you wish to add the animated text.
- The video will get uploaded to “My Files.”
- Click on the uploaded video in the library to load it on the workspace.
Step2 Add text to the video
- You can add text in their text section
- In the next section, one can find two different text types. At the top, you will discover plain text options, and at the bottom, you can find pre-designed boxes seasoned at Animaker.
Let’s see how you can use pre-built text boxes.
- Tap on pre-built designs for your text animation. One can see the text appearing in the center of the workspace, and you can click it and type new text if you want to customize it.
- You can notice widespread options appearing with your text. It is known as the item menu. It will allow the user to modify their text. One can change font size, color, style, etc. Your text will come with pre-defined effects, which will help you to animate text instantly.
- You must have noticed that the purple color bar appears on the timeline, representing the duration of the text visible in the video. For example, if you want that text to get visible between 4rth to 8th seconds, then you will have to drag the edges of that purple bar to the same duration.
To see the scene, you must click on the play button on top of the timeline.
Let’s check the other ways of adding animated text to the video. In the previous one, you have seen how you can add text animation using pre-built boxes. Now you will get to know about doing it by using blank boxes.
- Start tapping the “text section”. Select the bank textbox.
- Click on them and then opt to add new text.
- Opt for clicking the cog icon that is there in the item menu.
- You will notice the settings tab that is on the screen’s right side.
- You can easily opt for the customization of the text in the way you wish. You can start by modifying the style of the font. One can change the size and color of the font as well.
- Use these options and opt for the application of enter and/or exit effects to text. Now, opt to click on the effect option to get more than 50 options. You can select the effect from there.
- Once the animation effect is applied to your timeline, you can notice the pink part in the bar i.e. purple. This completes creating text animation by using Animaker.
Step3 Download the Video
- You can visit the publish option in the right window to download the video.
- Tap on the “download video” option for downloading.
Conclusion
Now, you are aware of how to add text animation to video online and the three best video editors that will help you add animated text to your videos. At this point, you can choose the best one according to your needs and usage. These steps will help you create a unique and good video that will be easy to understand and entertaining.
Free Download For Win 7 or later(64-bit)
Free Download For macOS 10.14 or later
Free Download For macOS 10.14 or later
Also read:
- In 2024, How To Fix Slow Playback Issues in DaVinci Resolve Finding the Best Solutions
- New Top Best Free LUTs For Premiere Pro
- Top 6 Drones for Videography for 2024
- 2024 Approved Are You Seeking Free Lumetri Presets to Enhance Your Videos? Find Out All About Lumetri Color Presets and How to Use Them in Presenting Proper Color Grading
- In 2024, How To Combine Videos On TikTok
- 2024 Approved How Have Game Recording Software Improved Their Stature in the Market? An Overview
- New 2024 Approved A Roster of 8 Best Color Match Generators
- New How to Build A Video Editing Career
- Updated Finding the Best Voice Changers for WhatsApp Free and Paid
- New How to Make a Slow Motion Video in Wondershare Filmora for 2024
- New Want to Feather Shapes in After Effects? Read This for 2024
- Finest Approach to Slow Down a Video CapCut All-in-One Video Editor for 2024
- 2024 Approved Freeze Frame Clone Effect Is a Creative Effect to Use for Many Video Creators. This Article Will Show You How to Use Filmora to Make a Frozen Frame Clone Video Effect
- How to Make Video Slow Motion for 2024
- In 2024, Top List 20 Best LUTs for Music Videos
- In 2024, Are You Looking for Funny Discord Emojis to Massively Improve Your Discord Experience? Using some Fun Bots for Discord Is an Excellent Way of Doing That! Thus, We Compiled a List of 10 Fun Discord Bots You Need
- List of Pokémon Go Joysticks On Lava Blaze 2 Pro | Dr.fone
- How to Reset your Vivo X90S Lock Screen Password
- A Detailed VPNa Fake GPS Location Free Review On Realme GT 5 | Dr.fone
- 3 Effective Methods to Fake GPS location on Android For your Oppo A1x 5G | Dr.fone
- In 2024, Sim Unlock Oppo A59 5G Phones without Code 2 Ways to Remove Android Sim Lock
- How Samsung Galaxy A23 5G Mirror Screen to PC? | Dr.fone
- 3 Things You Must Know about Fake Snapchat Location On OnePlus Ace 2 | Dr.fone
- Spotify Keeps Crashing A Complete List of Fixes You Can Use on Poco C55 | Dr.fone
- 5 Ways to Track Poco M6 5G without App | Dr.fone
- How To Create an Apple Developer Account On Apple iPhone 8
- Forgot iPhone 14 Plus Backup Password? Heres What to Do
- Is GSM Flasher ADB Legit? Full Review To Bypass Your Itel P55 Phone FRP Lock
- How To Remove or Bypass Knox Enrollment Service On Poco C65
- In 2024, Apple ID Locked or Disabled On Apple iPhone 15? 7 Mehtods You Cant-Miss
- Title: New Video Inspiration for Birthday Slideshow
- Author: Morgan
- Created at : 2024-05-19 05:12:09
- Updated at : 2024-05-20 05:12:09
- Link: https://ai-video-editing.techidaily.com/1713945300510-new-video-inspiration-for-birthday-slideshow/
- License: This work is licensed under CC BY-NC-SA 4.0.
