
:max_bytes(150000):strip_icc():format(webp)/the_room-56cc7f225f9b5879cc590941.png)
2024 Approved Phone Aspect Ratio Vertical Definition, Types & Tips
Phone Aspect Ratio Vertical Definition, Types & Tips
Versatile Video Editor - Wondershare Filmora
If you are a professional video or image creator, you know what aspect ratio is and why aspect ratio is important. Even people passionate about their cameras and visual art enthusiasts know it. If you are a newbie, Let us make it easy for you. This article will talk about the vertical phone aspect ratio ratio, its definition, types, iPhone vertical video dimensions, etc. We’ll also provide you solid tips on mobile vertical video size and how to create phone vertical videos easily. Let’s jump into the topic and see what you can learn.
In this article
01 [What is Phone Aspect Ratio Vertical?](#Part 1)
02 [Types of Phone Aspect Ratio Vertical](#Part 2)
03 [Tips to Create Phone Vertical Videos](#Part 3)
Part 1 What is Phone Aspect Ratio Vertical?
The vertical phone aspect ratio is the “proportional” relationship between the screen’s width and height. For example, if your image or video has an aspect ratio of 4:5, it simply means the width of the screen (photo or video) is four times the height of the image.
The vertical phone aspect ratio is the “proportional” relationship between the screen’s width and height. For example, if your image or video has an aspect ratio of 4:5, it simply means the width of the screen (photo or video) is four times the height of the image.
Back in the television days, you might have seen certain old pictures with black padding on either side of the screen. It was just that they were shot in different aspect ratios and your television screen had different aspect ratios.
Aspect Ratio Vs Resolution
Remember that aspect ratio does not refer to the physical size of an image or its dimensions in pixels (resolution). So aspect ratio 3:1 does not refer to the actual width and height of the image or video; it just describes their relationship.
You are wrong if you think aspect ratio is just another fancy name for resolution. Think again. Check out how it is calculated.
“
| | Aspect Ratio | Resolution | |
| ————— | ————————————————————– | ———————————————————————————- |
| Definition | The Ratio of the width of an image to the height of the image. | Total number of pixels displayed on your screen (computer, cell phone, television) |
| Commonly Used | ● 1:1 ● 3:1 ● 3:2 ● 4:3 ● 5:4 ● 9:1 ● 16:9 | ● 640x480 ● 800x600 ● 1024x768 |
Aspect Ratio Calculator
To get the resolution, you need to multiply width times the height. To get aspect ratio, the formula is: Divide the width by the height or simply divide the long side by the short side.
There are multiple online aspect ratio calculators available. Check out the value for both the images and the videos generated through the photo ratio calculator for your ease.
| Common Aspect Ratio | AR Width | AR Height | Image Width | Image Height |
|---|---|---|---|---|
| 1:1(square) | 1 | 1 | 1920 | 1920 |
| 5:4 (large and medium format cameras) | 5 | 4 | 1920 | 1536 |
| 4:3 Standard | 4 | 3 | 1920 | 1440 |
| 3:2 (35mm camera) | 3 | 2 | 1920 | 1280 |
| 16:9 | 16 | 9 | 1920 | 1080 |
| 3:1 Panoramic | 3 | 1 | 1920 | 640 |
| 9:16 | 9 | 16 | 1080 | 1920 |
For example, the aspect ratio of 3:1 may be an image of 3m wide and 1m high. At the same time it can be 3 feet wide and 1 foot high. For further simplification, consider dimensions in pixels: a 6000×4000 image has 3:2 aspect ratios.
Always remember this small but crucial point. The aspect ratio refers to the image or video you captured or recorded and the display (or screen) in which your video or image would be displayed.
Why is the aspect ratio important?
In the age of web content, asking why aspect ratio is important? Some may consider it naïve. Images need to be uploaded at different aspect ratios for different uses (desktop vs. mobile or blog vs. social media). Incorrect aspect ratio affects your final image and end-user experience.
Choice of the wrong aspect ratio can eliminate the potential for editing (cropping and resizing). In addition, using the correct aspect ratios saves you from facing the trouble of distortion or clipping.
Part 2 Types of Phone Aspect Ratio Vertical
Image Aspect Ratios
The aspect ratio decides and changes the entire composition and how the audience perceives the image. First, let us see some common image aspect ratios.

● 1:1 Ratio

If you have seen a square-shaped image, it had probably a 1:1 aspect ratio. It simply means both sides (width and height of the image) are equal. It was initially the aspect ratio of square television sets. However, this is commonly used for print photos, mobile screens, and social platforms.
● 3:2 Ratio

Initially used for classic 35 mm film and still photography, aspect ratio 3:5 is still used on some laptops, tablets, and handheld game consoles. The famous example of this aspect ratio Images framed at 1080×720 pixels or 6″x4″.
● 5:4 Ratio

It was commonly used for photography and art prints. For Images having dimensions, 8″x10″ and 16x20 have the 5:4 aspect ratios.
Video Aspect Ratios

Like the image aspect ratios, video aspect ratios would also profoundly affect its composition and thus how your directed viewers perceive it. Some common mobile vertical video size or video aspect ratios are given below.
● 16:9 Ratio

If you have seen presentation slides, computer monitors, or widescreee seen this slimmer and more elongated rectangular-shaped 16:9 Ratio. This is the standardized widescreen aspect ratio that you see everywhere on the web. In terms of pixel common dimension for 16:9 is 1920×1080 pixels and 1280×720 pixels.
● 9:16 Ratio (Vertical)

When smartphones started coming with video capabilities, this Ratio became popular. Likewise, today this Ratio is trendy for social media platforms with video story capabilities.
The Instagram story typically consists of 1080x1920 pixels, which in terms of aspect ratio is 9:16. Most phones, such as iPhone, have a feature that allows you to record footage in both (16:9 as well as 9:16).
Phone aspect ratio vertical
Back in the day, taking aspect ratio vertical (portrait mode) footage was considered unprofessional and a sign of an amateur. But the digital revolution has changed that. Now from unforgivable sin, the vewayal mode has practically become a mainstream media sensation. Vertical style has now become the dominant format.

Phone aspect ratio vertical simply means taller screen than wider. The most common type is 9:16 (1080x1920 pixels), a typical vertical videos aspect ratio. Although this phone aspect ratio vertical comes in a few more shapes and sizes such as 4:5, 2:3.
Part 3 Tips to Create Phone Vertical Videos
Creating vertical videos is crucial for getting engagements and growing your brand. It is easy with a phone because most smartphones, by default, record in 9:16, which is the standard vertical aspect ratio. But with a camera, you have to manually edit to the correct aspect ratio before you shoot it.
You can also shoot horizontally and then change it to vertical, but it needs professional videographer expertise.
Who wants to rotate their phones watching videos? Well, as far as the trend, Let us see some tiny but handy tips for creating vertical phone videos.
1. Choose the correct aspect ratio
Video taller than the 1:1 aspect ratio is commonly considered Vertical video. Types of these vertical aspects ratio include 4:5 (social), 2:3 and 9:16. They are all taller than they are wide, thus vertical.
Choosing the correct aspect ratio for your vertical video, always think about why and where you intend to use the video. The second important thing you should consider is your plans for editing that video.
Cropping horizontal can be irritating and sometimes disappointing at the same time. Producing a 9:16 vertical frame at HD resolution from a horizontal HD frame may result in very pixelated and low-quality footage.
If, for some reason, you still want first to shoot it horizontal and then change it back to mobile vertical video size. You may need to shoot in 4K horizontally to get extra pixels to work with. It can later be cropped in the sides to 9:16 (Vertical phone aspect ratio). Plus, you won’t need to scale it anymore.
2. Direct your viewer’s eyes
For hooking social media viewers, you need to put your most interesting visual upfront. These include GIFs, colourful stop-motion or looping animation. Always try to match your first couple of shots with your overall brand personality.
3. Screen splitting into two or more

A tall vertical screen can be styled with multiple horizontal clips on top of each other. These clips must relate to your relevant content and overall look. Natural lines or patterns can help display them in the most creative ways.
4. Be close to your subject
For producing an intimate experience with the vertical frame, you should get closer to the subject. Most of the action will be positioned to the centre as your viewers scroll. Do not let cut off or cover up your main subject by any text and make sure you leave enough room for text, emojis and stickers.
5. Filling the vertical space
First, make sure that your subject is vertical-friendly. Then get closer and fill the space within the vertical frame. The vertical frame can be filled through the following:
● Up-close shot (if the subject is personal).
● Raising the camera high and tilting it down (to film things like a long, empty road).
● Bird’s-eye view from above.
5. Rule of Third

This photography rule says not to place the main subject directly in the center of the frame. Create more dynamic composition by creating imaginary (Horizontal & Vertical) lines that divide your frame into thirds.
You have to place your subject either on the lines or where the lines meet up. And guess what? You don’t need to draw imaginary nowadays. Most cameras and smartphones provide you with this option.
6. Avoid Shaking
You do not want to distract your viewers with shaky camera moments. Normal pan and 360-degree rotation are acceptable or maybe even essential. But moving side to side too quickly will make it difficult for the camera to process that information. You better use a selfie stick or gimbal.
Now, check out the best vertical video ratios for various social platforms.
Best video aspect ratios for Facebook

● 1:1 or 4:5 (Feed)
● 9:16 (Stories) Full portrait/Vertical
● 1:1 (Video Carousel)
● 16:9 (In streams, ads) -> Full landscape
● 9:16 (Audience Network)
● 2:3 (Vertical)
Best video aspect ratios for Instagram
● 1:1 (Feed)
● 4:5 (Feed ads)
● 9:16 (Stories)
● 9:16 (Reels)
● 9:16 (ICTV)
Best video aspect ratios for Twitter

● 1:1 (Promoted Videos)
● 1:1 or 9:16 (Sponsorship)
● 16:9 (Live Videos)
● 1:11 or 16:9 (Video Posts)
Best video aspect ratios for TikTok
● 9:16, 1:1, or 16:9 (For ads)
● 9:16 (For organic videos)
Wondershare Filmora
Being a newbie and producing perfect and professional vertical video content can be challenging, especially for the social platform. And then perfection requires delicate skills. If you want to change the aspect ratio after capturing an image or shooting a video, you need post-processing software.
There are tons of post-processing software available that have aspect ratio tools. As a tech geek, I even want essential tools that can serve all my needs and are also simple to use. Wondershare Filmora (iOS and Android) and Wondershare Filmora (Windows) is just that platform where you simply record, edit and share right away. It is loaded with easy-to-use editing features, special effects, social media integration options, and your desired music.
The best thing about Filmora Go is that it is for every skill level, unlike the other video editing software. Moreover, it lets you build unique custom build animation without breaking a sweat. So if you have a horizontal video, Filmora Go makes it easy to edit it into a Vertical one.
Features:
● Allows users to make videos anywhere using your iOS or Android device.
● The powerful editing tools of Filmora and Filmora help you create excellent iPhone vertical video dimensions.
● A dynamic music library helps users to add great background music in the videos.
● Both Filmora and Filmora (Desktop) have a user-friendly and intuitive user interface.
● The new Video Beautification feature helps you modify the shape of your face, lips, or nose in the picture.
Wondershare Filmora
Get started easily with Filmora’s powerful performance, intuitive interface, and countless effects!
Try It Free Try It Free Try It Free Learn More >

Conclusion
The vertical phone aspect ratio may seem avoidable, but you need a near-perfect influence on your desired audience to engage and grow. Thus, the Aspect ratio is not something to avoid if you want to compete in the business. Smartphone digital evolution has shifted the balance towards the phone aspect ratio vertical. In this article, we also talked about iPhone video dimensions vertical, hope it will help you. Platforms like Filmora provides comprehensive and easy editing solutions to edit aspect ratio as desired.
If you are a professional video or image creator, you know what aspect ratio is and why aspect ratio is important. Even people passionate about their cameras and visual art enthusiasts know it. If you are a newbie, Let us make it easy for you. This article will talk about the vertical phone aspect ratio ratio, its definition, types, iPhone vertical video dimensions, etc. We’ll also provide you solid tips on mobile vertical video size and how to create phone vertical videos easily. Let’s jump into the topic and see what you can learn.
In this article
01 [What is Phone Aspect Ratio Vertical?](#Part 1)
02 [Types of Phone Aspect Ratio Vertical](#Part 2)
03 [Tips to Create Phone Vertical Videos](#Part 3)
Part 1 What is Phone Aspect Ratio Vertical?
The vertical phone aspect ratio is the “proportional” relationship between the screen’s width and height. For example, if your image or video has an aspect ratio of 4:5, it simply means the width of the screen (photo or video) is four times the height of the image.
The vertical phone aspect ratio is the “proportional” relationship between the screen’s width and height. For example, if your image or video has an aspect ratio of 4:5, it simply means the width of the screen (photo or video) is four times the height of the image.
Back in the television days, you might have seen certain old pictures with black padding on either side of the screen. It was just that they were shot in different aspect ratios and your television screen had different aspect ratios.
Aspect Ratio Vs Resolution
Remember that aspect ratio does not refer to the physical size of an image or its dimensions in pixels (resolution). So aspect ratio 3:1 does not refer to the actual width and height of the image or video; it just describes their relationship.
You are wrong if you think aspect ratio is just another fancy name for resolution. Think again. Check out how it is calculated.
“
| | Aspect Ratio | Resolution | |
| ————— | ————————————————————– | ———————————————————————————- |
| Definition | The Ratio of the width of an image to the height of the image. | Total number of pixels displayed on your screen (computer, cell phone, television) |
| Commonly Used | ● 1:1 ● 3:1 ● 3:2 ● 4:3 ● 5:4 ● 9:1 ● 16:9 | ● 640x480 ● 800x600 ● 1024x768 |
Aspect Ratio Calculator
To get the resolution, you need to multiply width times the height. To get aspect ratio, the formula is: Divide the width by the height or simply divide the long side by the short side.
There are multiple online aspect ratio calculators available. Check out the value for both the images and the videos generated through the photo ratio calculator for your ease.
| Common Aspect Ratio | AR Width | AR Height | Image Width | Image Height |
|---|---|---|---|---|
| 1:1(square) | 1 | 1 | 1920 | 1920 |
| 5:4 (large and medium format cameras) | 5 | 4 | 1920 | 1536 |
| 4:3 Standard | 4 | 3 | 1920 | 1440 |
| 3:2 (35mm camera) | 3 | 2 | 1920 | 1280 |
| 16:9 | 16 | 9 | 1920 | 1080 |
| 3:1 Panoramic | 3 | 1 | 1920 | 640 |
| 9:16 | 9 | 16 | 1080 | 1920 |
For example, the aspect ratio of 3:1 may be an image of 3m wide and 1m high. At the same time it can be 3 feet wide and 1 foot high. For further simplification, consider dimensions in pixels: a 6000×4000 image has 3:2 aspect ratios.
Always remember this small but crucial point. The aspect ratio refers to the image or video you captured or recorded and the display (or screen) in which your video or image would be displayed.
Why is the aspect ratio important?
In the age of web content, asking why aspect ratio is important? Some may consider it naïve. Images need to be uploaded at different aspect ratios for different uses (desktop vs. mobile or blog vs. social media). Incorrect aspect ratio affects your final image and end-user experience.
Choice of the wrong aspect ratio can eliminate the potential for editing (cropping and resizing). In addition, using the correct aspect ratios saves you from facing the trouble of distortion or clipping.
Part 2 Types of Phone Aspect Ratio Vertical
Image Aspect Ratios
The aspect ratio decides and changes the entire composition and how the audience perceives the image. First, let us see some common image aspect ratios.
● 1:1 Ratio
If you have seen a square-shaped image, it had probably a 1:1 aspect ratio. It simply means both sides (width and height of the image) are equal. It was initially the aspect ratio of square television sets. However, this is commonly used for print photos, mobile screens, and social platforms.
● 3:2 Ratio
Initially used for classic 35 mm film and still photography, aspect ratio 3:5 is still used on some laptops, tablets, and handheld game consoles. The famous example of this aspect ratio Images framed at 1080×720 pixels or 6″x4″.
● 5:4 Ratio
It was commonly used for photography and art prints. For Images having dimensions, 8″x10″ and 16x20 have the 5:4 aspect ratios.
Video Aspect Ratios
Like the image aspect ratios, video aspect ratios would also profoundly affect its composition and thus how your directed viewers perceive it. Some common mobile vertical video size or video aspect ratios are given below.
● 16:9 Ratio
If you have seen presentation slides, computer monitors, or widescreee seen this slimmer and more elongated rectangular-shaped 16:9 Ratio. This is the standardized widescreen aspect ratio that you see everywhere on the web. In terms of pixel common dimension for 16:9 is 1920×1080 pixels and 1280×720 pixels.
● 9:16 Ratio (Vertical)
When smartphones started coming with video capabilities, this Ratio became popular. Likewise, today this Ratio is trendy for social media platforms with video story capabilities.
The Instagram story typically consists of 1080x1920 pixels, which in terms of aspect ratio is 9:16. Most phones, such as iPhone, have a feature that allows you to record footage in both (16:9 as well as 9:16).
Phone aspect ratio vertical
Back in the day, taking aspect ratio vertical (portrait mode) footage was considered unprofessional and a sign of an amateur. But the digital revolution has changed that. Now from unforgivable sin, the vewayal mode has practically become a mainstream media sensation. Vertical style has now become the dominant format.
Phone aspect ratio vertical simply means taller screen than wider. The most common type is 9:16 (1080x1920 pixels), a typical vertical videos aspect ratio. Although this phone aspect ratio vertical comes in a few more shapes and sizes such as 4:5, 2:3.
Part 3 Tips to Create Phone Vertical Videos
Creating vertical videos is crucial for getting engagements and growing your brand. It is easy with a phone because most smartphones, by default, record in 9:16, which is the standard vertical aspect ratio. But with a camera, you have to manually edit to the correct aspect ratio before you shoot it.
You can also shoot horizontally and then change it to vertical, but it needs professional videographer expertise.
Who wants to rotate their phones watching videos? Well, as far as the trend, Let us see some tiny but handy tips for creating vertical phone videos.
1. Choose the correct aspect ratio
Video taller than the 1:1 aspect ratio is commonly considered Vertical video. Types of these vertical aspects ratio include 4:5 (social), 2:3 and 9:16. They are all taller than they are wide, thus vertical.
Choosing the correct aspect ratio for your vertical video, always think about why and where you intend to use the video. The second important thing you should consider is your plans for editing that video.
Cropping horizontal can be irritating and sometimes disappointing at the same time. Producing a 9:16 vertical frame at HD resolution from a horizontal HD frame may result in very pixelated and low-quality footage.
If, for some reason, you still want first to shoot it horizontal and then change it back to mobile vertical video size. You may need to shoot in 4K horizontally to get extra pixels to work with. It can later be cropped in the sides to 9:16 (Vertical phone aspect ratio). Plus, you won’t need to scale it anymore.
2. Direct your viewer’s eyes
For hooking social media viewers, you need to put your most interesting visual upfront. These include GIFs, colourful stop-motion or looping animation. Always try to match your first couple of shots with your overall brand personality.
3. Screen splitting into two or more
A tall vertical screen can be styled with multiple horizontal clips on top of each other. These clips must relate to your relevant content and overall look. Natural lines or patterns can help display them in the most creative ways.
4. Be close to your subject
For producing an intimate experience with the vertical frame, you should get closer to the subject. Most of the action will be positioned to the centre as your viewers scroll. Do not let cut off or cover up your main subject by any text and make sure you leave enough room for text, emojis and stickers.
5. Filling the vertical space
First, make sure that your subject is vertical-friendly. Then get closer and fill the space within the vertical frame. The vertical frame can be filled through the following:
● Up-close shot (if the subject is personal).
● Raising the camera high and tilting it down (to film things like a long, empty road).
● Bird’s-eye view from above.
5. Rule of Third
This photography rule says not to place the main subject directly in the center of the frame. Create more dynamic composition by creating imaginary (Horizontal & Vertical) lines that divide your frame into thirds.
You have to place your subject either on the lines or where the lines meet up. And guess what? You don’t need to draw imaginary nowadays. Most cameras and smartphones provide you with this option.
6. Avoid Shaking
You do not want to distract your viewers with shaky camera moments. Normal pan and 360-degree rotation are acceptable or maybe even essential. But moving side to side too quickly will make it difficult for the camera to process that information. You better use a selfie stick or gimbal.
Now, check out the best vertical video ratios for various social platforms.
Best video aspect ratios for Facebook
● 1:1 or 4:5 (Feed)
● 9:16 (Stories) Full portrait/Vertical
● 1:1 (Video Carousel)
● 16:9 (In streams, ads) -> Full landscape
● 9:16 (Audience Network)
● 2:3 (Vertical)
Best video aspect ratios for Instagram
● 1:1 (Feed)
● 4:5 (Feed ads)
● 9:16 (Stories)
● 9:16 (Reels)
● 9:16 (ICTV)
Best video aspect ratios for Twitter
● 1:1 (Promoted Videos)
● 1:1 or 9:16 (Sponsorship)
● 16:9 (Live Videos)
● 1:11 or 16:9 (Video Posts)
Best video aspect ratios for TikTok
● 9:16, 1:1, or 16:9 (For ads)
● 9:16 (For organic videos)
Wondershare Filmora
Being a newbie and producing perfect and professional vertical video content can be challenging, especially for the social platform. And then perfection requires delicate skills. If you want to change the aspect ratio after capturing an image or shooting a video, you need post-processing software.
There are tons of post-processing software available that have aspect ratio tools. As a tech geek, I even want essential tools that can serve all my needs and are also simple to use. Wondershare Filmora (iOS and Android) and Wondershare Filmora (Windows) is just that platform where you simply record, edit and share right away. It is loaded with easy-to-use editing features, special effects, social media integration options, and your desired music.
The best thing about Filmora Go is that it is for every skill level, unlike the other video editing software. Moreover, it lets you build unique custom build animation without breaking a sweat. So if you have a horizontal video, Filmora Go makes it easy to edit it into a Vertical one.
Features:
● Allows users to make videos anywhere using your iOS or Android device.
● The powerful editing tools of Filmora and Filmora help you create excellent iPhone vertical video dimensions.
● A dynamic music library helps users to add great background music in the videos.
● Both Filmora and Filmora (Desktop) have a user-friendly and intuitive user interface.
● The new Video Beautification feature helps you modify the shape of your face, lips, or nose in the picture.
Wondershare Filmora
Get started easily with Filmora’s powerful performance, intuitive interface, and countless effects!
Try It Free Try It Free Try It Free Learn More >
Conclusion
The vertical phone aspect ratio may seem avoidable, but you need a near-perfect influence on your desired audience to engage and grow. Thus, the Aspect ratio is not something to avoid if you want to compete in the business. Smartphone digital evolution has shifted the balance towards the phone aspect ratio vertical. In this article, we also talked about iPhone video dimensions vertical, hope it will help you. Platforms like Filmora provides comprehensive and easy editing solutions to edit aspect ratio as desired.
Let’s Create a New Premiere Pro Project, Import some Video, and Control Video Playback Speed. Also, Find Alternative Software (WonderShare Filmora) to Control Playback Speed in Minutes
Versatile Video Editor - Wondershare Filmora
An easy and powerful editor
Numerous effects to choose from
Detailed tutorials are provided by the official channel
According to the business, Adobe Premiere Pro is one of the most widely used video editing products on the market today. The option to speed up or slow down individual clips is one of the most important capabilities of Premiere Pro.

In terms of video editing, Adobe Premiere Pro is one of the most powerful applications on the market, and it’s well-known for its versatility. Speeding up movies is one of the program’s many features required for the insertion of special effects and transitions. A lot of ways are there for you to pick from while using premiere pro to speed up the film as desired.

You can’t overwrite or replace your media files by doing anything in Premiere Pro, which means that nothing you do will have an effect on your media files. The point remains: a copy of your project and all its media assets should always be kept on hand just in case.
Adobe Premiere Pro is an excellent editing tool in terms of its functionality and capabilities. Still, it has a steep hill to climb that makes it difficult for newbies and users without previous editing experience. To get the most out of Adobe Premiere Pro, one must thoroughly understand the product.

No need to worry, folks; as in this article, we will be looking at how we can alter premiere pro speed.
Fast Forward or Speed up Playback Speed in Premiere Pro
On analog editing systems, the speed of film could permanently be altered; but, because of the limitations of the technology, if you slowed anything down too much, the frame rate at which it was taken may become evident, and the image quality would begin to suffer as a consequence.
Adobe Premiere Pro is a feature-rich and professional video editor designed for the Macintosh platform. It has a variety of editing features built-in. Adobe Premiere Pro lets you change and control the speed at which movies are played back.
Premiere provides three choices for adjusting the tempo of a movie or speeding it up. We’ll go over them one by one as we scroll down the page.

Method 1
- Download and Install Adobe Premiere Pro. Launch the application on your system.
- Once you’ve set up a new project in Adobe Premiere Pro, import the video you want to edit.
- In order to place the video where you want it, drag the necessary video clips into the timeline. In the end, you’ll have a new series to call your own.
- Using the right-click menu, you may choose the whole movie or only a portion of it that you wish to edit.
- The popup dialog box will display if you choose Speed/Duration from the context menu list.
- Choose Clip> Speed Duration instead from the program’s drop-down menu.
- The Speed field should be raised, and then the OK button should be pressed to accept the change.
Method 2: Rate Stretch Tool
Adobe Premiere Pro has a Rate Stretch feature that lets you manually alter the movie’s tempo by sliding the trim bar along the timeline. To utilize the Rate Stretch tool to speed up a video clip, you must first divide the movie into pieces.
Here’s a quick method for altering the video speed so that it fits under the time limit:
- Launch the application on your respective systems.
- Drag and drop the selected video onto the timeline in Premiere Pro.
- Then, choose the Ripple Edit Tool from the toolbar, followed by the Rate Stretch Tool by clicking and holding the Ripple Edit Tool. Click the Rate Stretch button on the timeline’s left side to begin a timer.
- You may also use the R key on your keyboard to activate the Rate Stretch Tool, which is a shortcut key.
- Drag the video’s start and endpoints to their respective ends on the right and left sides to prolong or reduce the duration. As a consequence, the video speed will be improved. The bigger the period of time the video is dragged inwards, the faster it rises.
Method 3: Time Remapping Tool
In Adobe Premiere Pro, the time remapping tool is where you go to speed up a selected video section. With a video clip, this function may be utilized to create the illusion of speed and slowness.
- It’s time to fire up Adobe Premiere Pro and start fiddling with your footage.
- Simply right-click on it to bring up the context menu, and then choose Show Clip Keyframes from the display list. Afterward, choose Time Remapping from the context menu that opens.
- Click on it to make it go faster. The video will be colored blue, and a horizontal rubber band line will be drawn down its center if this option is selected. One of the video’s frame rate lines may be found here.
- A white speed-control track may be seen just below the title bar in the upper part of the video. If you can’t see it well when zooming in, you may try again. The rubber band may be dragged higher in Premiere Pro to speed up the video.
The tooltip will show how long it has been since the change happened compared to the original speed. As the movie progresses, so does the speed at which it is shown, and the duration of the video fluctuates as well. The audio remains unaltered and tied to the video when using Time Remapping.
How to Slow Down A Video in Premiere Pro?
Now, let’s discuss how to slow down a video in premiere pro
Time stretch
A one-second video clip at 60 frames per second is an example of this situation. When the game is being played at a reasonable speed on any given platform or software, 60 frames will be shown. Because of this, each frame will take twice as long to play at a 0.5X slower pace.
To put it another way, you’d see 30 frames in a second that weren’t repeated. A second has been added to the video’s duration, which will now be 2 seconds instead of 1. There will be no deterioration in quality in this situation.
- Create a new project in Premiere Pro on your PC.
- To import a video file, choose Import from the File menu at the top of the screen. After that, drag the video into either the timeline or the project panel, whichever you like.
- Right-clicking and choosing the Duration/Speed option causes the video to begin playing.
- This stage necessitates a decrease in speed from 100% to a lower percentage.
Using Keyframes
When you attempt to slow down a video by adjusting the frame rate, you are essentially eliminating frames from the video stream. This procedure will allow you to slow down a movie to your desired speed without sacrificing quality.
- After downloading and installing Adobe Premiere Pro, the first step is to launch the program. Later, you’ll need to choose a specific video that you’d want to have slowed down.
- After you’ve chosen it, you may upload it to Premiere Pro. After importing the video, you must drag and drop it into the timeline in Premiere.
- By right-clicking the mouse, choose Modify > Interpret from the drop-down menu.
- You’ll need to make some changes to the frame information now. Hit the Assume this frame rate button and input a value that is lower than the original video frame rate.
Utlizing Time Remapping
The remapping tool is a very common tool for creating slow-motion videos. It may be found in many video editing programs. It gives you the option of selecting a particular section of a video clip and then slowing down the video clip.
- Launching Adobe Premiere Pro is the initial step once it has been downloaded and installed on your computer. A particular video that you’d want slow-motioned will need to be selected later on in the process.
- After dragging the video to the timeline, you’ll need to choose the area of the movie that you want to slow down.
- Now you must choose the Key Frames and Speed from your video by clicking on the video’s right-click menu.
- Only the “Pen Tool” must be used to lock the specific region you wish to slow down in order to push the Speed Line through the Selection tool to slow down the video during this phase.
Why Is Premiere Pro Playback Fast?
If this issue arises in your program, you’ll notice choppy playback, a character that speaks too rapidly, and audio that skips frames in the narration.
The multimedia editor Premiere Pro is one of the best currently available on the market. In addition to creating YouTube videos, feature films, music videos, and other sorts of content, many professionals turn to it.
It is said that Adobe Premiere Pro suffers from a playback issue. It has the ability to make the video creation process more complicated and demanding than it should be. Let me show you how to fix this easy error in just two simple steps.
Start the program on your computer’s operating system.
Select Edit from the drop-down menu.
Look towards preference
Afterward, choose audio hardware.
No input should be used as the default input, regardless of what it is currently set to.
When you click on Playback your film, you will notice that the issue has been rectified.

How can we Alter the speed of Videos in WonderShare Filmora?
Before understanding the process of speed altering in WonderShare Filmora, let’s have an overview of “what WonderShare Filmora is”.
What is Wondershare Filmora?

Wondershare Filmora is the best video editor for content creators who are just getting started and those who want to produce Hollywood-quality visuals and content without having to invest years in training and certification. WonderShare Filmora streamlines the video editing process through the use of intelligent, intuitive features that can automate repetitive tasks and save time.
Individuals can subscribe to WonderShare Filmora for a one-year fee of $68.98 per year. Filmora is well-known as a straightforward video editor designed for novice users and social media influencers who want to devote more time to their creative endeavors. A few new features have been added, and we can now create professional-looking videos without having to go through a lengthy learning curve.
Features that Stand Out
For both new and experienced film creators, WonderShare Filmora has been designed to offer a scalable environment. Even if you’ve never edited a movie before, you can start doing so right now.
Millions of Free Media to Choose From:
Over 10 million media files are available in the stock media library of WonderShare Filmora, making it easy for filmmakers to bring their visions to life. Speed ramping and auto beat sync are also included.
Toolbar Quick Access:
After the application is installed on your computer, the toolbar allows rapid access to all the program’s capabilities. These features include media and audio files, titles, effects, split-screen formatting, components, transitions, and other elements.
Quick Editing Feature:
For content producers who don’t want to spend hours on video editing and instead want to concentrate on other areas of their work, WonderShare Filmora is the appropriate solution.
Use Animated Transitions to Bring Life into Your Videos:
Your video may get tedious if you repeatedly use the same frame. Animated transitions may be added to video and photo collages using the Split Screen feature. Using this feature, you may divide your screen into as many as six individual displays.
Improved Speed Ramping Function:
WonderShare Filmora’s new speed ramping functionality is one of the most intriguing new additions. The speed of a video clip may be gradually increased or decreased with this tool, and the transition between the various speed levels is smooth.
Capture Every Scene with Ease:
Using a slew of cameras, skilled videographers may capture the same topic from a variety of vantage points. A single camera may be used in certain circumstances to record the whole scene and a close-up, while others may be used to capture a variety of views and expressions.
Automation at its Best:
With WonderShare Filmora, you don’t have to manually synchronize the audio and video from many cameras, saving you time and effort.
Enhance Your Creativity with Masking:
Masking” is a new feature that is included in this version. Using a mask to combine different clips helps you to expand your creative horizons. You could get something fantastic, particularly if you use effects that are used in commercial ads.”
Hundred’s of Themes to Choose from:
WonderShare Filmora has 115 video themes, including business, travel, vlogging, slideshows, and many more. It’s possible to make a whole movie using Filmora AI by letting it figure out the best way to edit your video.
In short, the most popular features that it offers are:
- Motion Tracking
- Split Screen
- Audio Ducking
- Speed Ramping
- Green screen
- Color Grading
- Third-Party Stock media
- Auto Synchronization
- Masking
- Color Match
How to speed up Playback in Filmora?
In Filmora, you can also modify the length of the video clip, which allows you to change the video speed.
For a “close up in time,” the slow-motion effect may be the best choice, while the fast-forward effect may be used to make dramatic or humorous videos, depending on your tastes.
Filmora’s user-friendly interface and simple editing capabilities have made it a popular choice for professionals throughout the globe. As a result, many people prefer it over alternative editing software.
Steps
- Download and Install The latest version of Filmora.
- Launch the application on your respective system

Among the many formats that Wondershare Filmora can handle are MP4 and AVI, WMV and MOV, and even FLV and M4V. Go to your computer’s media library and choose Import from the Import menu to begin the process of bringing in videos from your computer.
Alternatively, you may just drag & drop the file you want.
Drag movies from your User’s Album onto a video track on the Timeline to access the Speed and Duration settings for that track’s duration.

- A pop-up window will appear. In order to determine the speed at which a motion effect is moving, you may use the speed numbers provided. After then, it’s up to you how fast or slow you want to go. To see how sped-up or slowed-down videos will seem, just click on the preview box. It’s a good balance if you think the present speed is too high: 0.5 speed.


- The speed at which video is played back affects the speed at which audio is played back in a similar manner. Remove the video’s audio if you want the video’s audio to play at the same speed as it did before.

- You must first double-click an audio clip in the audio editing window to begin making changes to it. Fade in and out effects, as well as reducing background noise may all be added or removed. ‘

- Once you’ve finished adjusting the speed of your movie, click “Export.” When editing a movie, choose Format from the File menu to save it in a standard format.

- It can also post your videos to sites like YouTube and Vimeo, as well as create a DVD if you so like.

- Using the drop-down menu, choose the proper symbol for your iPod, iPhone, or iPad to view your new video output (if you have one of these devices).
Conclusion
This tutorial looked at how to slow down a video in Premiere Pro using the Video Speed Controller plugin for Windows. It also emphasizes how Filmora may assist you in achieving your goal in a more efficient manner.
Aside from video effects like as rapid motion and slow motion, Filmora also allows you to do some simple and complex editing tasks such as rotating, reversing, chroma-keying, etc.
WonderShare Filmora is a substantial improvement and redesign of the previous Filmora Video Editor, released in 2008. One of the most endearing aspects of Filmora has always been that, although having a robust set of functions, the developers stayed committed to making the program essential in the design and straightforward to learn and use.
A large number of new features have been included in WonderShare Filmora to meet customer demand, and it has been necessary to incorporate access to those functions into the user interface as well.
According to the business, Adobe Premiere Pro is one of the most widely used video editing products on the market today. The option to speed up or slow down individual clips is one of the most important capabilities of Premiere Pro.
In terms of video editing, Adobe Premiere Pro is one of the most powerful applications on the market, and it’s well-known for its versatility. Speeding up movies is one of the program’s many features required for the insertion of special effects and transitions. A lot of ways are there for you to pick from while using premiere pro to speed up the film as desired.
You can’t overwrite or replace your media files by doing anything in Premiere Pro, which means that nothing you do will have an effect on your media files. The point remains: a copy of your project and all its media assets should always be kept on hand just in case.
Adobe Premiere Pro is an excellent editing tool in terms of its functionality and capabilities. Still, it has a steep hill to climb that makes it difficult for newbies and users without previous editing experience. To get the most out of Adobe Premiere Pro, one must thoroughly understand the product.
No need to worry, folks; as in this article, we will be looking at how we can alter premiere pro speed.
Fast Forward or Speed up Playback Speed in Premiere Pro
On analog editing systems, the speed of film could permanently be altered; but, because of the limitations of the technology, if you slowed anything down too much, the frame rate at which it was taken may become evident, and the image quality would begin to suffer as a consequence.
Adobe Premiere Pro is a feature-rich and professional video editor designed for the Macintosh platform. It has a variety of editing features built-in. Adobe Premiere Pro lets you change and control the speed at which movies are played back.
Premiere provides three choices for adjusting the tempo of a movie or speeding it up. We’ll go over them one by one as we scroll down the page.
Method 1
- Download and Install Adobe Premiere Pro. Launch the application on your system.
- Once you’ve set up a new project in Adobe Premiere Pro, import the video you want to edit.
- In order to place the video where you want it, drag the necessary video clips into the timeline. In the end, you’ll have a new series to call your own.
- Using the right-click menu, you may choose the whole movie or only a portion of it that you wish to edit.
- The popup dialog box will display if you choose Speed/Duration from the context menu list.
- Choose Clip> Speed Duration instead from the program’s drop-down menu.
- The Speed field should be raised, and then the OK button should be pressed to accept the change.
Method 2: Rate Stretch Tool
Adobe Premiere Pro has a Rate Stretch feature that lets you manually alter the movie’s tempo by sliding the trim bar along the timeline. To utilize the Rate Stretch tool to speed up a video clip, you must first divide the movie into pieces.
Here’s a quick method for altering the video speed so that it fits under the time limit:
- Launch the application on your respective systems.
- Drag and drop the selected video onto the timeline in Premiere Pro.
- Then, choose the Ripple Edit Tool from the toolbar, followed by the Rate Stretch Tool by clicking and holding the Ripple Edit Tool. Click the Rate Stretch button on the timeline’s left side to begin a timer.
- You may also use the R key on your keyboard to activate the Rate Stretch Tool, which is a shortcut key.
- Drag the video’s start and endpoints to their respective ends on the right and left sides to prolong or reduce the duration. As a consequence, the video speed will be improved. The bigger the period of time the video is dragged inwards, the faster it rises.
Method 3: Time Remapping Tool
In Adobe Premiere Pro, the time remapping tool is where you go to speed up a selected video section. With a video clip, this function may be utilized to create the illusion of speed and slowness.
- It’s time to fire up Adobe Premiere Pro and start fiddling with your footage.
- Simply right-click on it to bring up the context menu, and then choose Show Clip Keyframes from the display list. Afterward, choose Time Remapping from the context menu that opens.
- Click on it to make it go faster. The video will be colored blue, and a horizontal rubber band line will be drawn down its center if this option is selected. One of the video’s frame rate lines may be found here.
- A white speed-control track may be seen just below the title bar in the upper part of the video. If you can’t see it well when zooming in, you may try again. The rubber band may be dragged higher in Premiere Pro to speed up the video.
The tooltip will show how long it has been since the change happened compared to the original speed. As the movie progresses, so does the speed at which it is shown, and the duration of the video fluctuates as well. The audio remains unaltered and tied to the video when using Time Remapping.
How to Slow Down A Video in Premiere Pro?
Now, let’s discuss how to slow down a video in premiere pro
Time stretch
A one-second video clip at 60 frames per second is an example of this situation. When the game is being played at a reasonable speed on any given platform or software, 60 frames will be shown. Because of this, each frame will take twice as long to play at a 0.5X slower pace.
To put it another way, you’d see 30 frames in a second that weren’t repeated. A second has been added to the video’s duration, which will now be 2 seconds instead of 1. There will be no deterioration in quality in this situation.
- Create a new project in Premiere Pro on your PC.
- To import a video file, choose Import from the File menu at the top of the screen. After that, drag the video into either the timeline or the project panel, whichever you like.
- Right-clicking and choosing the Duration/Speed option causes the video to begin playing.
- This stage necessitates a decrease in speed from 100% to a lower percentage.
Using Keyframes
When you attempt to slow down a video by adjusting the frame rate, you are essentially eliminating frames from the video stream. This procedure will allow you to slow down a movie to your desired speed without sacrificing quality.
- After downloading and installing Adobe Premiere Pro, the first step is to launch the program. Later, you’ll need to choose a specific video that you’d want to have slowed down.
- After you’ve chosen it, you may upload it to Premiere Pro. After importing the video, you must drag and drop it into the timeline in Premiere.
- By right-clicking the mouse, choose Modify > Interpret from the drop-down menu.
- You’ll need to make some changes to the frame information now. Hit the Assume this frame rate button and input a value that is lower than the original video frame rate.
Utlizing Time Remapping
The remapping tool is a very common tool for creating slow-motion videos. It may be found in many video editing programs. It gives you the option of selecting a particular section of a video clip and then slowing down the video clip.
- Launching Adobe Premiere Pro is the initial step once it has been downloaded and installed on your computer. A particular video that you’d want slow-motioned will need to be selected later on in the process.
- After dragging the video to the timeline, you’ll need to choose the area of the movie that you want to slow down.
- Now you must choose the Key Frames and Speed from your video by clicking on the video’s right-click menu.
- Only the “Pen Tool” must be used to lock the specific region you wish to slow down in order to push the Speed Line through the Selection tool to slow down the video during this phase.
Why Is Premiere Pro Playback Fast?
If this issue arises in your program, you’ll notice choppy playback, a character that speaks too rapidly, and audio that skips frames in the narration.
The multimedia editor Premiere Pro is one of the best currently available on the market. In addition to creating YouTube videos, feature films, music videos, and other sorts of content, many professionals turn to it.
It is said that Adobe Premiere Pro suffers from a playback issue. It has the ability to make the video creation process more complicated and demanding than it should be. Let me show you how to fix this easy error in just two simple steps.
Start the program on your computer’s operating system.
Select Edit from the drop-down menu.
Look towards preference
Afterward, choose audio hardware.
No input should be used as the default input, regardless of what it is currently set to.
When you click on Playback your film, you will notice that the issue has been rectified.
How can we Alter the speed of Videos in WonderShare Filmora?
Before understanding the process of speed altering in WonderShare Filmora, let’s have an overview of “what WonderShare Filmora is”.
What is Wondershare Filmora?
Wondershare Filmora is the best video editor for content creators who are just getting started and those who want to produce Hollywood-quality visuals and content without having to invest years in training and certification. WonderShare Filmora streamlines the video editing process through the use of intelligent, intuitive features that can automate repetitive tasks and save time.
Individuals can subscribe to WonderShare Filmora for a one-year fee of $68.98 per year. Filmora is well-known as a straightforward video editor designed for novice users and social media influencers who want to devote more time to their creative endeavors. A few new features have been added, and we can now create professional-looking videos without having to go through a lengthy learning curve.
Features that Stand Out
For both new and experienced film creators, WonderShare Filmora has been designed to offer a scalable environment. Even if you’ve never edited a movie before, you can start doing so right now.
Millions of Free Media to Choose From:
Over 10 million media files are available in the stock media library of WonderShare Filmora, making it easy for filmmakers to bring their visions to life. Speed ramping and auto beat sync are also included.
Toolbar Quick Access:
After the application is installed on your computer, the toolbar allows rapid access to all the program’s capabilities. These features include media and audio files, titles, effects, split-screen formatting, components, transitions, and other elements.
Quick Editing Feature:
For content producers who don’t want to spend hours on video editing and instead want to concentrate on other areas of their work, WonderShare Filmora is the appropriate solution.
Use Animated Transitions to Bring Life into Your Videos:
Your video may get tedious if you repeatedly use the same frame. Animated transitions may be added to video and photo collages using the Split Screen feature. Using this feature, you may divide your screen into as many as six individual displays.
Improved Speed Ramping Function:
WonderShare Filmora’s new speed ramping functionality is one of the most intriguing new additions. The speed of a video clip may be gradually increased or decreased with this tool, and the transition between the various speed levels is smooth.
Capture Every Scene with Ease:
Using a slew of cameras, skilled videographers may capture the same topic from a variety of vantage points. A single camera may be used in certain circumstances to record the whole scene and a close-up, while others may be used to capture a variety of views and expressions.
Automation at its Best:
With WonderShare Filmora, you don’t have to manually synchronize the audio and video from many cameras, saving you time and effort.
Enhance Your Creativity with Masking:
Masking” is a new feature that is included in this version. Using a mask to combine different clips helps you to expand your creative horizons. You could get something fantastic, particularly if you use effects that are used in commercial ads.”
Hundred’s of Themes to Choose from:
WonderShare Filmora has 115 video themes, including business, travel, vlogging, slideshows, and many more. It’s possible to make a whole movie using Filmora AI by letting it figure out the best way to edit your video.
In short, the most popular features that it offers are:
- Motion Tracking
- Split Screen
- Audio Ducking
- Speed Ramping
- Green screen
- Color Grading
- Third-Party Stock media
- Auto Synchronization
- Masking
- Color Match
How to speed up Playback in Filmora?
In Filmora, you can also modify the length of the video clip, which allows you to change the video speed.
For a “close up in time,” the slow-motion effect may be the best choice, while the fast-forward effect may be used to make dramatic or humorous videos, depending on your tastes.
Filmora’s user-friendly interface and simple editing capabilities have made it a popular choice for professionals throughout the globe. As a result, many people prefer it over alternative editing software.
Steps
- Download and Install The latest version of Filmora.
- Launch the application on your respective system
Among the many formats that Wondershare Filmora can handle are MP4 and AVI, WMV and MOV, and even FLV and M4V. Go to your computer’s media library and choose Import from the Import menu to begin the process of bringing in videos from your computer.
Alternatively, you may just drag & drop the file you want.
Drag movies from your User’s Album onto a video track on the Timeline to access the Speed and Duration settings for that track’s duration.
- A pop-up window will appear. In order to determine the speed at which a motion effect is moving, you may use the speed numbers provided. After then, it’s up to you how fast or slow you want to go. To see how sped-up or slowed-down videos will seem, just click on the preview box. It’s a good balance if you think the present speed is too high: 0.5 speed.
- The speed at which video is played back affects the speed at which audio is played back in a similar manner. Remove the video’s audio if you want the video’s audio to play at the same speed as it did before.
- You must first double-click an audio clip in the audio editing window to begin making changes to it. Fade in and out effects, as well as reducing background noise may all be added or removed. ‘
- Once you’ve finished adjusting the speed of your movie, click “Export.” When editing a movie, choose Format from the File menu to save it in a standard format.
- It can also post your videos to sites like YouTube and Vimeo, as well as create a DVD if you so like.
- Using the drop-down menu, choose the proper symbol for your iPod, iPhone, or iPad to view your new video output (if you have one of these devices).
Conclusion
This tutorial looked at how to slow down a video in Premiere Pro using the Video Speed Controller plugin for Windows. It also emphasizes how Filmora may assist you in achieving your goal in a more efficient manner.
Aside from video effects like as rapid motion and slow motion, Filmora also allows you to do some simple and complex editing tasks such as rotating, reversing, chroma-keying, etc.
WonderShare Filmora is a substantial improvement and redesign of the previous Filmora Video Editor, released in 2008. One of the most endearing aspects of Filmora has always been that, although having a robust set of functions, the developers stayed committed to making the program essential in the design and straightforward to learn and use.
A large number of new features have been included in WonderShare Filmora to meet customer demand, and it has been necessary to incorporate access to those functions into the user interface as well.
A Full Guide to Funcall Voice Changer and Its Alternatives
Do you want to prank your friends? Everyone can agree that receiving a prank call is one of the world’s most annoying experiences. Still, you must admit that coming up with a great prank is a flex. If you want to make the next big prank film for TikTok or are just looking for something to do during a sleepover with your friends, you’ll need to have a plan before you pick up the phone. In this article, we will tell you how you can make prank calls easily with Funcall apps:
Try AI Voice Changer For Win 7 or later(64-bit)
Try AI Voice Changer For macOS 10.14 or later
Part 1: What’s Funcall App, and how to use it?
Making successful prank calls is very challenging. The Funcall - Voice Changer makes it incredibly easy to change your voice on a call and prank your family members and friends. You can call them and get their funny reactions.
You must input the target’s phone number and select whether you want the voice to be feminine, helium balloon, frightening, male, or regular sound. Funcall app also allows you to make international calls in over 150 countries on cell phones and landlines.

After installing the app, you will only have 30 seconds to play the prank. You can install other applications, view advertisements, or buy time directly through the app to get additional time. You are free to phone whatever number you like and speak in an artificial voice as long as you have the time. Additionally, you can include humorous sound effects like barking, farts, or gunfire. This voice-changing app is compatible with both Android and iPhone devices.
Follow these easy steps to use the Funcall app:
Step1Download
Go to the official website of Funcall apps and download it on your mobile device. To start the Funcall app, tap on the icon.
Step2Dial the Number
Dial the number of your friend or relative you want to prank and select the country.
Step3Select a Voice
At this point, pick the voice-altering sound you want to use. You can also add a background effect.
Step4Change Voice in Real Time
The call’s recipient will hear your customized voice rather than the original. To make the call more thrilling, you can add sound effects in addition to your altered voice.

Part 2: How to use the app for free?
Funcall is a premium software, and to use it, you must purchase one of its membership plans, which are reasonably priced. The first call on this app is free. You can earn more free minutes for prank calls by completing activities like watching advertising and downloading software.
Another option is to use Funcall MOD APK. It can be your best option if you’re seeking its free version, which allows you to enjoy an infinite number of minutes and an ad-free experience. You can use its hacked version to have free access to all of its paid features.
Part 3: Best alternatives to Funcall Voice Changer
Prank Dial
If you are looking for the best alternative to the Funcall app, you can use Prank Dial. With the help of the Prank Dial app, users can have fun while spending their free time making up to three random prank calls to friends and coworkers each day. You can press a call scenario to hear it and tap the heart to put it in your favourites so you can use it later.

The array of situations is sorted by category in the Prank Dial app, including “celebrities,” “angry,” “love,” “family prank calls,” etc. The history area displays all recent calls, including call date, caller id, scenario name, etc.
Fake Caller ID
If you want to make prank calls, make false caller ID, and have a good time, download this Fake Caller ID software. It has a very straightforward user interface that is free of any complications. You can easily prank or make fun of your friends by changing your voice pitch and caller ID.

This app gives two free calls each day and allows you to adjust your caller ID before you make the call, alter your voice while on the call, and record calls to listen to them later for fun.
MagicCall
For both Android and iOS, MagicCall is a fantastic tool to use as a voice-changing app when on the phone. It is an excellent app for making prank calls to pals and applying various effects. With multiple voice modifications and appended background effects, Magic Call is straightforward to use.

You can choose between Male, Robot, Female, Elderly Male, and Kid voices in the Voices area.
Prank Caller
With the help of the features in the Prank Caller app, you can access a massive library of prank call scripts directly from your smartphone’s screen and entertain your loved ones by using a different voice.

To try a new prank daily, you can browse the top prank call scripts and a list of all the available prank situations ranked by popularity.
FAQs
Can I use the Funcall app to make international calls?
You can use the Funcall app to make international calls in over 150 countries, including Asian, European, African, Middle Eastern regions, etc.
Can I use the Funcalls app while playing games?
No, you can’t use the Funcalls app while playing games. You can only use this app to change your voice during calls.
Can I change my voice during a call?
Yes, you can change your voice during calls. You can use Funcall apps or any alternatives to change your voice. However, we recommend you use the Funcall app because it is compatible with Android and iPhone.
What are the available voices on the Funcall app?
You can use a feminine, male, scary, helium, or a regular voice. This app also allows you to use various background sounds and effects.
Free Download For Win 7 or later(64-bit)
Free Download For macOS 10.14 or later
Try AI Voice Changer For Win 7 or later(64-bit)
Try AI Voice Changer For macOS 10.14 or later
Part 1: What’s Funcall App, and how to use it?
Making successful prank calls is very challenging. The Funcall - Voice Changer makes it incredibly easy to change your voice on a call and prank your family members and friends. You can call them and get their funny reactions.
You must input the target’s phone number and select whether you want the voice to be feminine, helium balloon, frightening, male, or regular sound. Funcall app also allows you to make international calls in over 150 countries on cell phones and landlines.
After installing the app, you will only have 30 seconds to play the prank. You can install other applications, view advertisements, or buy time directly through the app to get additional time. You are free to phone whatever number you like and speak in an artificial voice as long as you have the time. Additionally, you can include humorous sound effects like barking, farts, or gunfire. This voice-changing app is compatible with both Android and iPhone devices.
Follow these easy steps to use the Funcall app:
Step1Download
Go to the official website of Funcall apps and download it on your mobile device. To start the Funcall app, tap on the icon.
Step2Dial the Number
Dial the number of your friend or relative you want to prank and select the country.
Step3Select a Voice
At this point, pick the voice-altering sound you want to use. You can also add a background effect.
Step4Change Voice in Real Time
The call’s recipient will hear your customized voice rather than the original. To make the call more thrilling, you can add sound effects in addition to your altered voice.
Part 2: How to use the app for free?
Funcall is a premium software, and to use it, you must purchase one of its membership plans, which are reasonably priced. The first call on this app is free. You can earn more free minutes for prank calls by completing activities like watching advertising and downloading software.
Another option is to use Funcall MOD APK. It can be your best option if you’re seeking its free version, which allows you to enjoy an infinite number of minutes and an ad-free experience. You can use its hacked version to have free access to all of its paid features.
Part 3: Best alternatives to Funcall Voice Changer
Prank Dial
If you are looking for the best alternative to the Funcall app, you can use Prank Dial. With the help of the Prank Dial app, users can have fun while spending their free time making up to three random prank calls to friends and coworkers each day. You can press a call scenario to hear it and tap the heart to put it in your favourites so you can use it later.
The array of situations is sorted by category in the Prank Dial app, including “celebrities,” “angry,” “love,” “family prank calls,” etc. The history area displays all recent calls, including call date, caller id, scenario name, etc.
Fake Caller ID
If you want to make prank calls, make false caller ID, and have a good time, download this Fake Caller ID software. It has a very straightforward user interface that is free of any complications. You can easily prank or make fun of your friends by changing your voice pitch and caller ID.
This app gives two free calls each day and allows you to adjust your caller ID before you make the call, alter your voice while on the call, and record calls to listen to them later for fun.
MagicCall
For both Android and iOS, MagicCall is a fantastic tool to use as a voice-changing app when on the phone. It is an excellent app for making prank calls to pals and applying various effects. With multiple voice modifications and appended background effects, Magic Call is straightforward to use.
You can choose between Male, Robot, Female, Elderly Male, and Kid voices in the Voices area.
Prank Caller
With the help of the features in the Prank Caller app, you can access a massive library of prank call scripts directly from your smartphone’s screen and entertain your loved ones by using a different voice.
To try a new prank daily, you can browse the top prank call scripts and a list of all the available prank situations ranked by popularity.
FAQs
Can I use the Funcall app to make international calls?
You can use the Funcall app to make international calls in over 150 countries, including Asian, European, African, Middle Eastern regions, etc.
Can I use the Funcalls app while playing games?
No, you can’t use the Funcalls app while playing games. You can only use this app to change your voice during calls.
Can I change my voice during a call?
Yes, you can change your voice during calls. You can use Funcall apps or any alternatives to change your voice. However, we recommend you use the Funcall app because it is compatible with Android and iPhone.
What are the available voices on the Funcall app?
You can use a feminine, male, scary, helium, or a regular voice. This app also allows you to use various background sounds and effects.
Free Download For Win 7 or later(64-bit)
Free Download For macOS 10.14 or later
How to Add Motion Titles
Do you want to make your videos eye-catching instantly? Looking for some cool title animations to make your texts stand out? You should definitely opt for motion title templates that are widely available in popular video editors. Motion title templates come preloaded with animated texts, engaging graphic elements, and even background effects.
You can add them directly to your video and customize them as per you requirements so that your video looks exactly the way you desire. Different video editors have different motion titles, and therefore, you should check them out one by one to find out the templates you are looking for. We will illustrate title motion graphics in all the leading video editors.
Part 1. Add Motion Title with Filmora
The easiest way to add motion title to your video on your computer is through Wondershare Filmora . Filmora is a professional video editor that is available for Windows and Mac users. Filmora has the best collection of motion title templates, and the user interface is super intuitive and anyone can use without any prior experience. Here are the steps to add motion title with Filmora.
Step1Install and launch Wondershare Filmora on your computer. Click on New Project option on the welcome screen or go to File menu and click on New Project option.

Step2Go to File menu and Import Media option to import your video file. Otherwise, you can simply drop the video file into Project Media folder.
Step3Drag the video file from Project Media folder and drop it into the Timeline.

Step4Go to Titles at the top and go to the left panel. You can different categories of motion title templates. Select any desired text effect and drop into the Timeline above the video layer wherever you want.
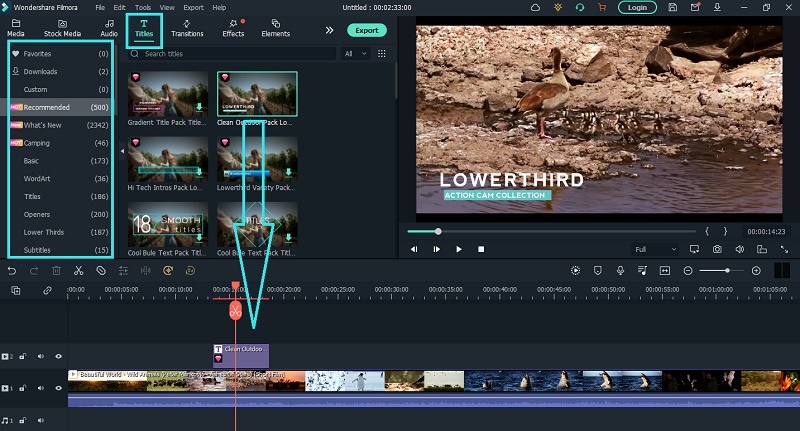
Step5Double clicking on the text layer on Timeline to edit the text and change the styles. Under Preset tab, you can change font, size, and color. Finally, click on OK button to save the edits done.
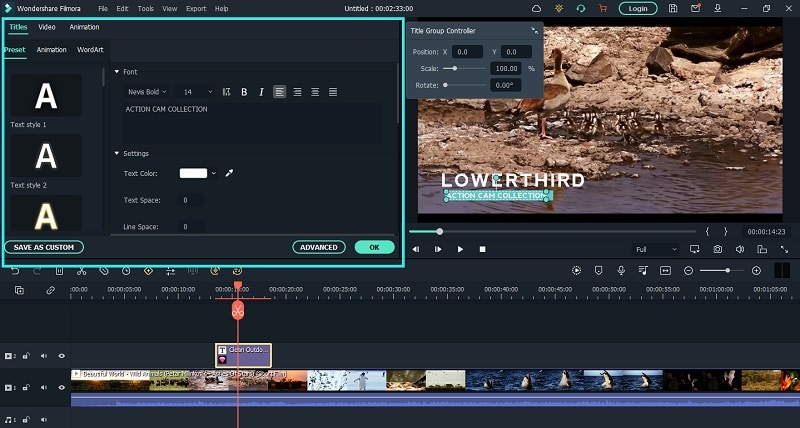
Part 2. Add Motion Title with Premiere Pro
Adobe Premiere Pro is a renowned video editor that is mostly used by professionals to edit videos and add effects and animations. Even though Premiere Pro has a steep learning curve, you can create motion title in simple steps. You can write any text on the video and select from different effects and animations to create motion title graphics. Here are the steps to add title motion graphics Premiere Pro free.
Step1Launch Premiere Pro and go to New> Project option. Import the video file and drop it into Timeline.
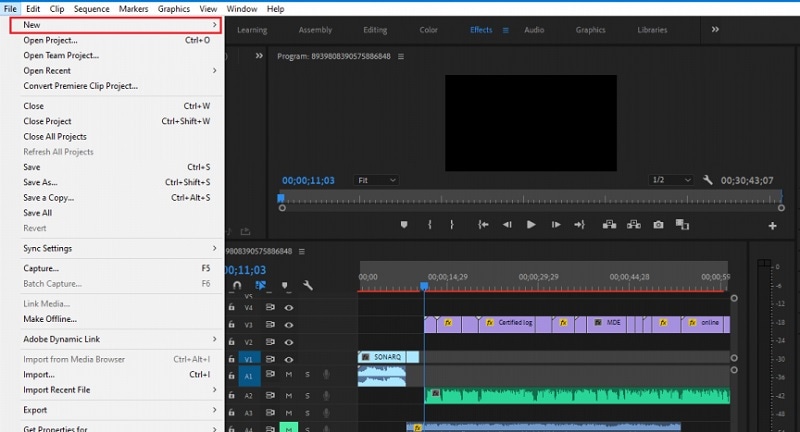
Step2Go to Title> New Title> Default Still option and follow the on-screen instructions.

Step3You will see different types of title styles and designs to choose from as you feel.

Step4Click on Type Tool option and click on the area on the video where you want the text to appear. You can customize them from the right panel from Title Styles, Title Properties, Tools and Title Actions.
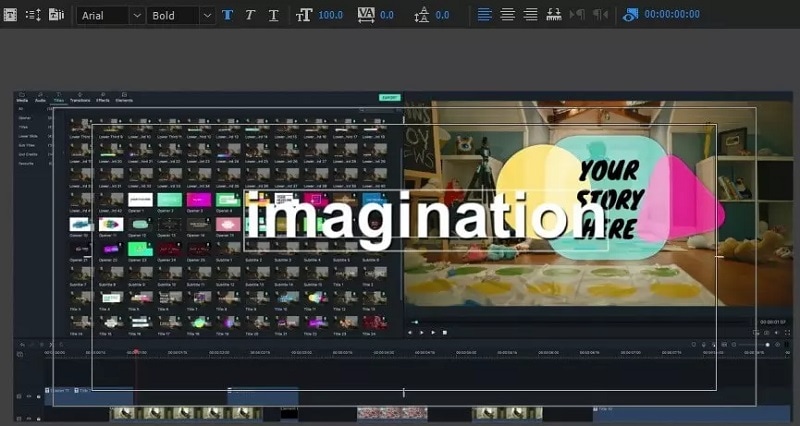
Step5To add motion to the title, click on Effects Control window. Click on any desired animation and turn to Stopwatch icon to apply the effect to the text. There is a dedicated Motion option available.
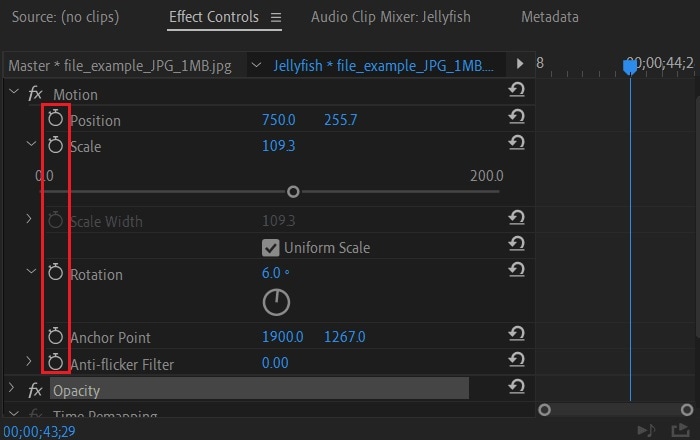
Part 3. Make motion title with Studio
Studio is a popular video editing software where you can not only apply motion title presets but also create motion title presets from scratch. The reason why video editors choose Studio is because it allows users to customize everything and create different templates and animations for personalization. Here are the steps to create title motion graphics in Studio as per your requirements.
Step1Launch Studio. Import your video file, and you can import single frames such as images from a live video for stop motion titles. Once you have imported, go to the header bar above the Timeline. Click on Create Title option to open Title Editor to create title motion.
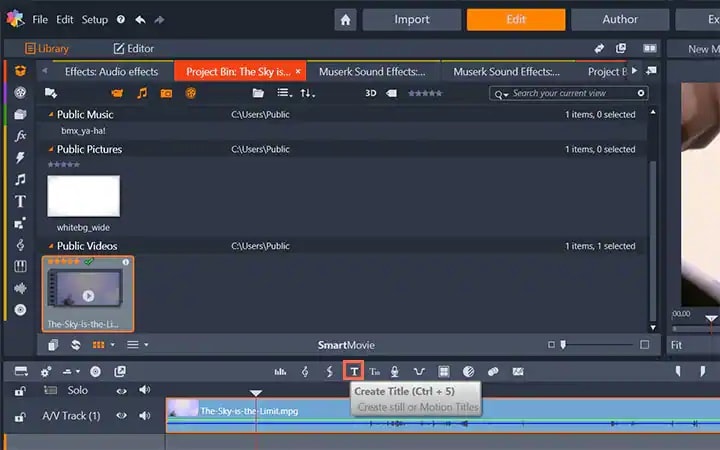
Step2Add your preferred text under Title Editor and adjust font, size, and style as you feel. Go to the right side to make changes to Look, Background, and Stereoscopic Settings to get the perfect text style from the wide range of choices available.
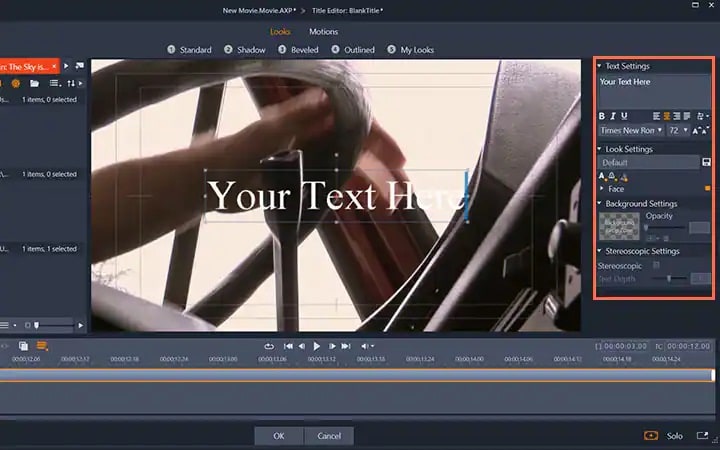
Step3Click on Motion option at the top to add motion to the text. Choose from the different motion title templates as per your preference.
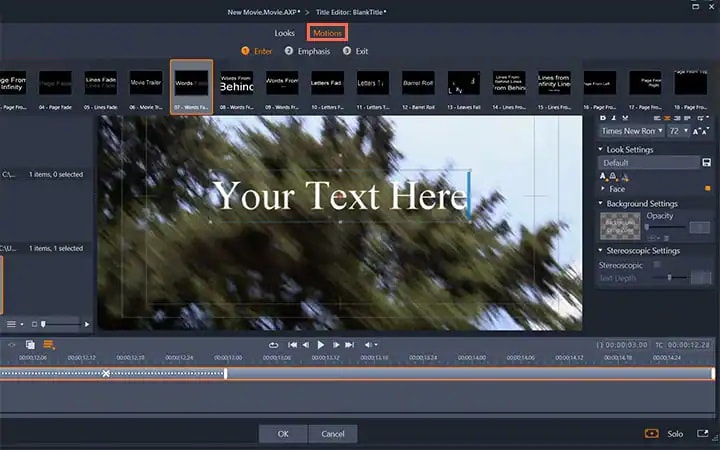
Step4You can adjust the duration of the motion effect from the right panel and click on Ok button.

Part 4. Add Motion Title with WeVideo
WeVideo is a popular online video editor that you can use to add title motion graphics Premiere Pro free. You can find many motion titles on WeVideo for free like you get in Premiere Pro and there are many exclusive motion text templates available. You need to create a free account with WeVideo to get started. You can create your video from scratch by selecting from the available video templates. You can even import your recorded video and add motion texts and animations as per your preference. Here are the steps to add motion title with WeVideo.
Step1Open your web browser and visit “wevideo.com”. Click on Try For Free button. Sign up for free and go to WeVideo video editor.
Step2Click on Create New button and select Video option. Click on Full-featured editor option.
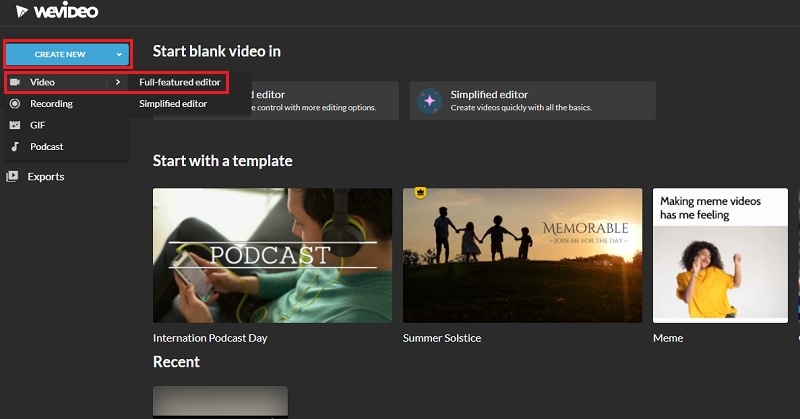
Step3Drag and drop your video file into My Media folder and bring it to Timeline.
Step4Go to Text tab and you will see all the motion animated titles under Titles section. Click on them to check out their previews in Viewer. If you have selected anyone, drag and drop it into Timeline.
Step5Adjust the position where you want the title to appear on the video and stretch the duration as required. Double-click on the title to edit and customize it as per your preference. Finally, click on Save Changes button.
The Bottom Line
Motion titles are extremely important for any video because they bring in a variety to your video. They make the video eye-catching and help in getting the message across by grabbing the attention of the viewers. We have illustrated how to add motion titles Premiere Pro and Studio. You can also use WeVideo online video editor. We recommend Wondershare Filmora for its extensive collection of motion title templates to choose from and apply to your text.
Free Download For Win 7 or later(64-bit)
Free Download For macOS 10.14 or later
Also read:
- New 2024 Approved Recording Slow-Motion Videos Is Not More Difficult Using a Smartphone. Learn Everything From How to Record Slow-Motion Video and Edit a Video to Slow Down It
- In 2024, 4 Ways to Loop a Video on Vimeo
- Updated 22 Free Video Editing Software to Save Your Money and Time for 2024
- How to Merge Audio and Video in VLC Media Player
- Updated How to Get Motion Blur in Roblox?
- Deleting White Background in Photoshop Is Hard, In 2024
- In 2024, Best 10 Tools To Make Quiz Videos
- In 2024, Phone Aspect Ratio Vertical Definition, Types & Tips
- New 2024 Approved How to Perfect Quick and Efficient Video Editing | Keyboard Shortcuts in Filmora
- Updated General Knowledge About MP4 Format and Best MP4 Video Editor
- Updated In 2024, Bandicut Video Editor Download and Review
- 2024 Approved Hey! Are You Looking for Video Reverse Effects in Your Videos? Then, You Are at the Right Place. This Article Will Guide You in Creating a Video Reverse Effect
- 20 Best LUTs for Music Videos for 2024
- New 2024 Approved Unleash the Power of Video Slow Motion with Wondershare Filmora. Find Out How to Create Slow Motion Video with the Effective Speed Ramping Feature on Filmora
- New How to Get Motion Blur in Roblox, In 2024
- Updated Beginners Guide to Green Screen Keying
- Updated How to Turn On/Off Motion Blur in Dying Light 2?
- Updated How to Make Dynamic Video Collages, In 2024
- 2024 Approved Are You an Apple User Interested in Adding a Slow-Mo to Their Videos? This Article Features an Exceptional Procedure for Creating Slow-Mo in iMovie
- New 2024 Approved Experience Time Differently with The Top Slow-Motion Applications
- Updated 2024 Approved How to Create Freeze Frame Clone Effect
- How to Denoise in After Effects – Audio and Video Noise Removal for 2024
- Updated Are You Wondering How to Slow Down Videos or Speed Them up, Here Are Three Ways to Do It. Speed up or Slow Down Your Videos on PC, Online, and Phone for 2024
- Updated 2024 Approved Looking for the Best Way to Create Stunning Video Animations? Here, We Look at some of the Best Animated Video Maker Solutions to Use
- New Want to Make a Single Video From Different Clips? Follow These Ways to Learn About How to Merge Clips in DaVinci Resolve for 2024
- In 2024, Top-Rated Android Apps For Slowing Down Motion
- New In 2024, To Know How to Add Effects in Premiere Pro, You Need to Follow This Guide as It Has All You Need to Know to Add Effects in Premiere Pro. Learn More Here
- In 2024, Looking for the Best Free Video Editing Software Reddit to Make Your Video Perfectly? Check Out Our List of the Best Video Editors for Reddit and You Can Choose Any of Them
- 2024 Approved 30+ Amazing Templates for VN Video Editor
- 2024 Approved General Knowledge About MP4 Format and Best MP4 Video Editor
- Updated 2024 Approved Cropping a Video in Davinci Resolve Step by Step
- Updated Weve Picked up the Best Online as Well as Offline MOV to GIF Converters . These Converters Are Easy to Use and Have No Limitations on Size. Get Your One
- In 2024, Customize PowerPoint Slideshow Icon in Simple Ways
- New Recommended Video Background Online Changers for 2024
- Updated In 2024, Rotate Video in iMovie
- New 2024 Approved Do You Want Your Photo and Video Edits to Look Like Peter McKinnons? Color-Grade Your Media Files with Peter McKinnon LUTs to Make Your Content Stand Out
- In 2024, The Way to Make Dynamic Video Collages?
- Updated In 2024, 4 Methods to Resize a WebM File
- Lets Look at Four Different Ways of Merging Audios and Videos. The Tools Will Help You Craft High-End Videos without Involving Any Complex Steps. You Can Make Your Videos Beautiful by Using the Following Easy to Use Tools
- 2024 Approved How to Record Video Streams With FFmpeg on Windows and Mac?
- In 2024, How to Transfer Apps from ZTE Blade A73 5G to Another | Dr.fone
- How To Transfer WhatsApp From iPhone 7 Plus to other iPhone 13 Pro devices? | Dr.fone
- Catch or Beat Sleeping Snorlax on Pokemon Go For Poco F5 5G | Dr.fone
- In 2024, Top 15 Augmented Reality Games Like Pokémon GO To Play On Vivo Y78t | Dr.fone
- How to Put iPhone 14 Plus or iPad on Recovery mode? (Step by Step Tutorial) | Stellar
- In 2024, 3 Effective Ways to Unlock iCloud Account Without Password On Apple iPhone 15 Pro
- Why does the pokemon go battle league not available On Apple iPhone 15 Pro | Dr.fone
- In 2024, 3 Effective Methods to Fake GPS location on Android For your Motorola G54 5G | Dr.fone
- How to Unlock Realme 12 Pro+ 5G Phone without Google Account?
- How to Transfer Photos from Oppo A58 4G to Laptop Without USB | Dr.fone
- How to convert AVCHD MTS to MP4 for Motorola Moto G24?
- In 2024, Does Life360 Notify When You Log Out On Infinix Smart 8 Plus? | Dr.fone
- In 2024, Process of Screen Sharing Vivo V30 Lite 5G to PC- Detailed Steps | Dr.fone
- What is Fake GPS Location Pro and Is It Good On Apple iPhone XS Max? | Dr.fone
- Fixing Persistent Pandora Crashes on Huawei P60 | Dr.fone
- How to Repair a Damaged video file of Realme using Video Repair Utility on Mac?
- In 2024, How to get the dragon scale and evolution-enabled pokemon On Tecno Spark 20? | Dr.fone
- Top 12 Prominent Xiaomi Mix Fold 3 Fingerprint Not Working Solutions
- In 2024, How to Turn Off Google Location to Stop Tracking You on Motorola Razr 40 Ultra | Dr.fone
- Hacks to do pokemon go trainer battles For Xiaomi Redmi Note 12 Pro+ 5G | Dr.fone
- In 2024, Resolve Your Apple iPhone 11 Pro Max Keeps Asking for Outlook Password | Dr.fone
- 6 Proven Ways to Unlock Oppo A56s 5G Phone When You Forget the Password
- Two Ways to Track My Boyfriends Xiaomi Redmi Note 12 Pro 5G without Him Knowing | Dr.fone
- How To Simulate GPS Movement With Location Spoofer On Lava Storm 5G? | Dr.fone
- Easy Guide to Lenovo FRP Bypass With Best Methods
- Top 4 SIM Location Trackers To Easily Find Your Lost Itel S23 Device
- Recommended Best Applications for Mirroring Your Infinix Zero 5G 2023 Turbo Screen | Dr.fone
- How To Unlock a Motorola Moto G24 Easily?
- 6 Fixes to Unfortunately WhatsApp has stopped Error Popups On Honor Magic 6 | Dr.fone
- In 2024, How to Remove Apple iPhone 6 Plus SIM Lock?
- Remove the lock of Honor 90 GT
- Android Screen Stuck General Xiaomi 14 Partly Screen Unresponsive | Dr.fone
- The Best iSpoofer Alternative to Try On Asus ROG Phone 7 | Dr.fone
- Does Life360 Notify When You Log Out On Motorola Edge+ (2023)? | Dr.fone
- In 2024, How to Change Your OnePlus Ace 2 Pro Location on life360 Without Anyone Knowing? | Dr.fone
- How to Repair Broken video files of Vivo V30 Lite 5G on Windows??
- In 2024, How To Pause Life360 Location Sharing For Oppo Reno 11 5G | Dr.fone
- Title: 2024 Approved Phone Aspect Ratio Vertical Definition, Types & Tips
- Author: Morgan
- Created at : 2024-04-24 01:12:51
- Updated at : 2024-04-25 01:12:51
- Link: https://ai-video-editing.techidaily.com/1713947511075-2024-approved-phone-aspect-ratio-vertical-definition-types-and-tips/
- License: This work is licensed under CC BY-NC-SA 4.0.
