
:max_bytes(150000):strip_icc():format(webp)/how-to-add-tiktok-filters-and-effects-f3c195b2fe1449cb8b2906eea3305b22.jpg)
Create and Share Short Videos with Your Friends. TikTok Is the Best Way to Entertain Your Friends on Your Own Time, Right From Your Pocket. Creating Looping Videos on TikTok Is the Perfect Way to Showcase Your Talent and Creativity to Our Global Community for 2024
Create and Share Short Videos with Your Friends. TikTok Is the Best Way to Entertain Your Friends on Your Own Time, Right From Your Pocket. Creating Looping Videos on TikTok Is the Perfect Way to Showcase Your Talent and Creativity to Our Global Community
Nowadays, many people like to make a lot of videos with their phone and share it on social media. But if you are not familiar with this social media, then you should check out TikTok. You probably know that TikTok videos can be looped. If users were unable to replay videos, they would lose interest quickly. Therefore, more than 1 billion people now use the app daily.
TikTok is an app that allows you to create short videos and share them on social media. The app is available on many platforms, including Android, iOS, and Windows Phone. The videos can be up to 15 seconds long. It’s also possible to loop videos in TikTok. Are you dreaming to make loop TikTok videos? But makes you feel it is not as simple as it looks.
That’s where looping comes in. Looping allows you to sell your videos on TikTok directly from within the app. This means that instead of running ads for other companies all over your Instagram feed or website, you can run them from within TikTok itself and keep all of your followers happy!
Part 1: How to Make a TikTok Loop
One of the best features of TikTok is the loop feature. It allows you to add your favorite song and turn it into a video. But, that’s not all. It also allows you to make a video and loop it. If you are looking for an app that allows you to loop videos, then TikTok is a good app to use.
There are many ways to monetize your content. If you’re already making videos, you know how much time and energy it takes to produce them. And if you’re not already making videos, it’s going to take a lot of time and energy before you get started. But what if there was a way to make money while you were still learning?
Step1 Download the TikTok app and create an account on it
Go to your play-store and type TikTok on its search bar. Install the app on your phone and create an account on it. You can sign up through your phone number, Gmail, or Facebook. After that, they will send you a code to verify your account.

Step2 Make or select a video template
Click on the “+” symbol after that you can record your video or you can also select media from your gallery.

Step3 Select a template and add a transition
After selecting the video you can add a template to your video or can add transitions to your video. Your video must have an authentic starting and ending. You can add a transition in the middle of your video. Keep your looping video clips shorter because it looks more real.

Step4 Create a loop video and save it or publish it
If you want to merge the starting video with the ending video in one take. Now you can have to focus on the beginning video and split the starting and ending clips.

Benefits of loop TikTok videos
TikTok loop includes the use of videos with a similar rhythm to create a special atmosphere that attracts people to participate and share them. The videos are made by those people who know how to make the video attractive to the public. The most used technique of communication is through a video that is shared on social networks like Facebook and Instagram.
One reason why loop TikTok videos are so popular is that they’re really easy to use. You don’t need to be an expert in video editing to create them. All you need is a smartphone. Also, loop TikTok videos are a great way to share a moment with your friends and followers. Plus, they can be posted on the go and shared instantly.
Looping TikTok videos can have several positive impacts on your brand. Looping allows you to build a more consistent look for your content if you want to keep building brand equity. Second, it helps you maintain consistency in your storytelling across platforms. Third, it helps you avoid having to spend time creating new content because it gives viewers what they expect from you.
TikTok is one of the fastest-growing mobile apps in the world. It allows you to make short videos, which can be edited and shared with friends. As a plus, you can add cool music to your videos and customize them the way you want. You can also create short videos of yourself lip-syncing to the music. This article will guide you about the loop TikTok video.
Part 2: How to Edit Time-lapse Video on a Computer
Time-lapse video is a type of video that allows you to see a huge amount of change in a very short time. You can see it on all social media websites such as YouTube, Facebook, and Instagram. It can be used to make all kinds of videos, from simple scenes of nature to complex events. The first time-lapse video was made in France in 1872 by Léon Bouly.
There are a lot of steps to make a time-lapse video on a computer.
Step1 You need to download the free software that comes with the camera. You can find it on the manufacturer’s website or through a search engine.
Step2 You’ll want to plug in your phone’s charging cable and plug it in so that it can stay charged while filming.
Step3 You’ll need to find somewhere quiet where you can set up your camera and tripod. If possible, try to do this outside so that there’s no worry about getting dust or dirt on your lens.
Step4 Set up your phone so that it will record once every hour for an hour straight. This will give you enough time for each frame of video before switching over to the next one after an hour has passed.
Step5 Start recording!
Why we should make a time-lapse video on a computer?
Time lapses are also useful for showing how something changes over time. For example, if you want to show how an environment changes from day to night, or how a plant grows from seedlings into mature plants after being watered and nourished by sunlight, these videos would be perfect for demonstrating this change in real-time.
You can also create time-lapse videos that show the growth of plants or flowers over time. You could use this method to demonstrate how plants grow from seedlings into fully grown trees or bushes. You could even try creating a time-lapse video showing the growth of a weed from the seedling stage into full bloom with its seeds spread out across the ground below it!
You can make your videos more fun and engaging. By recording multiple angles at the same time, you can capture all the exciting moments, like when something unexpected happens. Or when something amazing turns out to be a total disaster in real life. You can easily share with friends and family members who might not be able to come to see you in person.
Why Filmora is the best option to make a time-lapse video?
Filmora is the best option to make time-lapse videos. The reason is simple: it has a lot of features that other editing programs don’t have, and it’s been designed by professional editors who know what they’re doing. In addition to offering full HD resolution, Filmora also allows you to easily customize the length of your time-lapse video.
In Filmora you can use your music while editing your video. This means you won’t need to worry about downloading any additional software or paying for expensive music licenses like you would with other editing programs out there. Filmora has an easy-to-use interface that makes it easy for beginners like yourself to get started right away without having any trouble understanding how everything works together.
Free Download For Win 7 or later(64-bit)
Free Download For macOS 10.14 or later
How to edit video in Filmora
A time-lapse video is a great way to show the passage of time in a short video. By speeding up the video, you can show a long event, such as a day of travel, in a short amount of time. You can use it for other purposes as well. But how do you edit time-lapse videos? That’s easy with Filmora just follow the below steps:
Step1 Select a video clip you want to add
Install Filmora from Google Chrome or any browser you want. After that click on create a new project and select media from your gallery. Select the video you want to make a time-lapse.

Step2 Put the video on the timeline
Place your video on a timeline or just simply drag and drop your video clip on the timeline. Place the video header on the front of your video.

Step3 Add effects and transitions
After putting the video on the timeline add some effects to your video. If you are combining two or more videos then must add a dissolve transition between the videos to show your video more seamlessly.

Step4 Edit the duration of the video then export it
After making all the editing videos, you can also select the duration according to your requirements. You can also edit the duration of your per video.

The Bottom Line
As a result, if you do make a TikTok Loop video, it’s important to get the “looping” right. If your end goal is more likes and followers, keep in mind that a short clip will get you there faster than trying to stretch out a single event over an entire song. It’s an easy, cost-free program to use, and it can provide tons of pleasure.
Covering everything from what a TikTok loop is to how to make one, we’ve compiled a guide for anyone looking for an informative and inspiring resource to take advantage of the app’s many features. If you want to edit your loop video, you must require the Filmora editing tool. Filmora is the best tool to customize your video. This software will give your video a professional look.
Free Download For macOS 10.14 or later
How to edit video in Filmora
A time-lapse video is a great way to show the passage of time in a short video. By speeding up the video, you can show a long event, such as a day of travel, in a short amount of time. You can use it for other purposes as well. But how do you edit time-lapse videos? That’s easy with Filmora just follow the below steps:
Step1 Select a video clip you want to add
Install Filmora from Google Chrome or any browser you want. After that click on create a new project and select media from your gallery. Select the video you want to make a time-lapse.
Step2 Put the video on the timeline
Place your video on a timeline or just simply drag and drop your video clip on the timeline. Place the video header on the front of your video.
Step3 Add effects and transitions
After putting the video on the timeline add some effects to your video. If you are combining two or more videos then must add a dissolve transition between the videos to show your video more seamlessly.
Step4 Edit the duration of the video then export it
After making all the editing videos, you can also select the duration according to your requirements. You can also edit the duration of your per video.
The Bottom Line
As a result, if you do make a TikTok Loop video, it’s important to get the “looping” right. If your end goal is more likes and followers, keep in mind that a short clip will get you there faster than trying to stretch out a single event over an entire song. It’s an easy, cost-free program to use, and it can provide tons of pleasure.
Covering everything from what a TikTok loop is to how to make one, we’ve compiled a guide for anyone looking for an informative and inspiring resource to take advantage of the app’s many features. If you want to edit your loop video, you must require the Filmora editing tool. Filmora is the best tool to customize your video. This software will give your video a professional look.
2 Methods to Cut Video in VLC on Windows
Other than playing videos and music, VLC Media Player can also be used as a video editing tool. While advanced video editing requires unconventional and powerful video editing software, VLC offers a simpler and easy-to-learn process of cutting and/or trimming videos.
You can cut a section of your video and make shorter video clips. This means that you can now get rid of parts of a video that you do not need and preserve those that you like. VLC automatically saves the video clips made, so you do not have to save them again.
In this article, we are going to learn the simplest procedure on how to cut and/or trim videos using VLC Media Player. Each step is carefully explained, with screenshots attached.
To Cut Video Using VLC Media Player
- Download VLC Media Player
You need to have the app before using it. To download it, visit Google Play Store or any other suitable app, search and download. There are a variety of versions that is, 32-bit, 64-bit and Windows ARM. You may as well narrow down your search to the version of your gadget, be it Android, iOS, Linux or Windows.
- Install and Open VLC Media Player
The installation process is simple. You click on the icon indicating ‘install’ then open. On opening, you will come across a page that looks like the one attached below.

This is the dashboard of the VLC Media Player.
- Select the file you would like to cut
On the top of the screen is the menu with ‘Media’ being the first on the far left. On clicking the ‘Media’ button, a drop-down menu will appear. Select the first option, ‘Open File’ to access your files. From the dialogue box that appears, locate your video (the one you would like to cut), select it then click to open. The video will start playing.

- Click on Advanced Controls (View > Advanced Controls)
Some videos will play automatically while others will wait for an action. In case your video plays automatically, it is advisable that you pause it.
On the menu is a tab labelled ‘View’. Choose the tab, click open it and on the drop-down menu, select ‘Advanced Options’.

On selecting ‘Advanced Options’, a red button will appear at the bottom-left corner of the VLC. This is the record button.

Its purpose is to indicate the recording of the section of the video that you would like to cut.
- Click to Cut or Trim
If you had paused your video, you can play it at this stage. If you do not want to cut/trim your video from the start, scroll to the point from which you would like to cut it. Click on the red button for the recording to start. If the video does not play automatically, click to play.
After the video has played till the point where you would like to end, click on the red button again to stop the recording. The cut section will be automatically saved on the videos’ folder on C:\Users\Username\Videos.
An easier way to cut videos with Wondershare Filmora
Wondershare Filmora Video Editor is an alternative video editor. Unlike VLC Media Player, Filmora gives you more options. It allows you to split, trim, edit, combine, and crop a video, among others. It also gives you room to add footnotes, a variety of transitions, lower thirds, among other features. You can as well resize your video and enhance its quality.
For Win 7 or later (64-bit)
For macOS 10.14 or later
To Cut/Trim Videos with Wondershare Filmora:
- Drag and Drop the Video
Assuming that you have already downloaded and installed Wondershare Filmora app, click to open. There are two ways through which you can locate your video.
One, you can opt to drag and drop the video from its location to the app’s timeline. Secondly, you can right click on the space at the top left then select the video to be edited from the dialogue box that will appear.

- Trimming the video
After dropping the video on the timeline, it is likely to take up a lot of space, especially if it is long.
To trim the video from the beginning, place your cursor at the starting point and wait for the pointer to appear. Then move the point forward. To trim from the end, place the cursor at that point, hold and move the pointer forward till the required point.


Trimming the video does not mean that you lose the parts. It is more like shortening it to fit in place.
- Cutting the video
Unlike trimming, cutting involves getting rid of a section of the video completely. To do so, you need to first of all isolate that section.
With the video on the timeline, move and point your cursor at the starting point of the video and click on the scissors icon at the top. Then move it to the end of the video section and click on the scissors icon again. By so doing, you will have selected that section.
Once the section has been selected, right click on the video, select and click to delete. You can then drag the remaining parts to make them one.

After cutting or trimming, you can choose to add several effects to the video. Transitions, watermarks, cropping, resizing, ripple effects among others are some of the changes you could make. All these appear on the menu at the top.
- Save and/or Import your video
The final step is saving or importing your file to prevent its loss. By clicking on the ‘Import’ button, you save the file to the Media Library. By selecting ‘save as’, you select the location where you want to store your file.

Conclusion
There are so many video editors, each with different features. Some are simple to use while others will require advanced software to operate. Whether you use VLC Media Player or Wondershare Filmora, the results will be the same. The difference comes in where you have the knowledge and skills to use one app better than the other one.
The above steps on how to use both VLC Media Player and Wondershare Filmora will guide you through the whole process. It is said that, ‘practice makes perfect’. So yes, keep practicing and putting these skills into use. Sooner or later you will be an expert!
This is the dashboard of the VLC Media Player.
- Select the file you would like to cut
On the top of the screen is the menu with ‘Media’ being the first on the far left. On clicking the ‘Media’ button, a drop-down menu will appear. Select the first option, ‘Open File’ to access your files. From the dialogue box that appears, locate your video (the one you would like to cut), select it then click to open. The video will start playing.
- Click on Advanced Controls (View > Advanced Controls)
Some videos will play automatically while others will wait for an action. In case your video plays automatically, it is advisable that you pause it.
On the menu is a tab labelled ‘View’. Choose the tab, click open it and on the drop-down menu, select ‘Advanced Options’.
On selecting ‘Advanced Options’, a red button will appear at the bottom-left corner of the VLC. This is the record button.
Its purpose is to indicate the recording of the section of the video that you would like to cut.
- Click to Cut or Trim
If you had paused your video, you can play it at this stage. If you do not want to cut/trim your video from the start, scroll to the point from which you would like to cut it. Click on the red button for the recording to start. If the video does not play automatically, click to play.
After the video has played till the point where you would like to end, click on the red button again to stop the recording. The cut section will be automatically saved on the videos’ folder on C:\Users\Username\Videos.
An easier way to cut videos with Wondershare Filmora
Wondershare Filmora Video Editor is an alternative video editor. Unlike VLC Media Player, Filmora gives you more options. It allows you to split, trim, edit, combine, and crop a video, among others. It also gives you room to add footnotes, a variety of transitions, lower thirds, among other features. You can as well resize your video and enhance its quality.
For Win 7 or later (64-bit)
For macOS 10.14 or later
To Cut/Trim Videos with Wondershare Filmora:
- Drag and Drop the Video
Assuming that you have already downloaded and installed Wondershare Filmora app, click to open. There are two ways through which you can locate your video.
One, you can opt to drag and drop the video from its location to the app’s timeline. Secondly, you can right click on the space at the top left then select the video to be edited from the dialogue box that will appear.
- Trimming the video
After dropping the video on the timeline, it is likely to take up a lot of space, especially if it is long.
To trim the video from the beginning, place your cursor at the starting point and wait for the pointer to appear. Then move the point forward. To trim from the end, place the cursor at that point, hold and move the pointer forward till the required point.
Trimming the video does not mean that you lose the parts. It is more like shortening it to fit in place.
- Cutting the video
Unlike trimming, cutting involves getting rid of a section of the video completely. To do so, you need to first of all isolate that section.
With the video on the timeline, move and point your cursor at the starting point of the video and click on the scissors icon at the top. Then move it to the end of the video section and click on the scissors icon again. By so doing, you will have selected that section.
Once the section has been selected, right click on the video, select and click to delete. You can then drag the remaining parts to make them one.
After cutting or trimming, you can choose to add several effects to the video. Transitions, watermarks, cropping, resizing, ripple effects among others are some of the changes you could make. All these appear on the menu at the top.
- Save and/or Import your video
The final step is saving or importing your file to prevent its loss. By clicking on the ‘Import’ button, you save the file to the Media Library. By selecting ‘save as’, you select the location where you want to store your file.
Conclusion
There are so many video editors, each with different features. Some are simple to use while others will require advanced software to operate. Whether you use VLC Media Player or Wondershare Filmora, the results will be the same. The difference comes in where you have the knowledge and skills to use one app better than the other one.
The above steps on how to use both VLC Media Player and Wondershare Filmora will guide you through the whole process. It is said that, ‘practice makes perfect’. So yes, keep practicing and putting these skills into use. Sooner or later you will be an expert!
Funny Content Ideas for YouTube Videos and Funny Music Background
When it comes to entertainment, YouTube always makes it to the top of the list. You can find any type of video on YouTube. Talking about entertainment, funny videos are among the most-watched. There are various types of funny videos.
Sometimes the compilation of pranks makes us laugh. Sometimes it’s the comedy that makes us laugh. In any case, we love watching funny videos. If you are in a bad mood, these videos help lighten your mood. Many YouTube channels create funny content. They are the reason you laugh and enjoy spending time on YouTube. PewDiePie, Liza Koshy is among the famous channels.
The article below will discuss more funny videos. You will also learn about funny background music from this article.
In this article
01 5 Funny Content Ideas for YouTube Videos
02 2 Tutorial to Help You Create Funny Videos for YouTube
03 Recommendation about Funny Background Music
Part 1. 5 Funny Content Ideas for YouTube Videos
Is there any constant video type that you watch daily? Any video that ever bores you? Funny videos are the answer to all these questions. Not every kind of video is watched daily except funny videos. We entertain ourselves with these fun videos.

If you ever plan to create funny videos, what are you going to do? What type of content will you make? The following section of this article will bring 5 ideas to you. With these ideas, you can create funny videos for YouTube.
1. Prank Videos
Who doesn’t enjoy pranking others? Well, we all love to play safe pranks on our loved ones. Surprisingly, people love to watch these pranks. This is the perfect idea for funny videos. You can set a hiding camera, prank someone and record it. By sharing the prank, you can make someone laugh. Pranks are not always planned. Sometimes candid things can also do the job.
2. Baby and Kids Videos
Who doesn’t like babies? One idea for funny videos is sharing your baby’s or kid’s activities. Babies and kids are very cute, adorable, and innocent. They always do cute little disasters, which are fun to watch. You can share their funny and cute moments with everyone. Kids and babies can easily make everyone laugh. Their cuteness will attract the audience.
3. Challenge Videos
Challenge videos are another type of video which are fun to watch. Simple challenges which do not harm anyone in any way are encouraged. Challenge videos automatically become funny. Things get funny when someone can’t complete the challenge and is desperate to get it done. Completing the challenge and struggling to get things done seems funny.
4. Plan a Skit
Skits are very successful. The factors that help in making unique skits are the idea and the humor. If both things are amazing and well presented, your skit will shine. The fact because skits are short comedy films, they effortlessly attract the audience. So, creating skits is another fantastic idea for funny YouTube content.
5. Blooper Videos
Blooper videos are naturally funny. You don’t have to put extra effort to make them funny. Bloopers are the funny things that take place while you try to record something. Bloopers never make it to the final video, but they are always fun to watch. So instead of watching and enjoying them alone, you can share them on YouTube so that everyone can enjoy the fun behind the scenes.
Part 2. 2 Tutorial to Help You Create Funny Videos for YouTube
Sharing ideas for funny videos is not enough. There might be people out there who don’t have a clue about creating and editing videos. For any such person, Wondershare Filmora is the best tool they will ever come across. It doesn’t matter if you are a beginner or a professional. You can easily use Filmora because of its simple process.
The following section of this article will teach you how you can create funny videos. Take help from the 2 shared tutorials below and make your own stunning funny YouTube video.
Create a Cute and Funny Pet Intro
Suppose you are a YouTuber and you want to introduce your pet on the channel. What could be the best way? Sharing a basic introduction is too mainstream. Have you ever tried to introduce someone with the coolest editing? If not, learn from us about introducing your pet in the cutest way.
For Win 7 or later (64-bit)
For macOS 10.12 or later
Step 1: To create cute pet intros, first of all, open Filmora. Then head to the ‘Titles’ tab. You can search for any pet-related title template. Select a template that you like and drag it onto the timeline. You can double-click on the template to edit and customize it as you want.

Step 2: After that, it’s time to add the media file. For that, you need to import the media file. After importing it, drag it to the timeline so that it can be edited. The media file can also be edited. You have to double-click on it to open the editing settings.

Step 3: As we are teaching to edit a cute yet funny introduction so what is editing without elements? To add cute little elements to your video, head over to the ‘Elements’ tab. Select an element and drag it to the timeline. You can also edit the element by double-clicking on it.

Step 4: Lastly, you can add background music to your video. You can either import the background music or also use the music from Filmora’s library.

Create a Funny Baby Laser Meme Video
Are you not a meme fan? It’s strange if you don’t like memes. This is because memes are entertaining and funny. The next tutorial that we are going to discuss is related to memes. We will tell you about creating a baby laser meme funny video.
For Win 7 or later (64-bit)
For macOS 10.12 or later
Step 1: To edit a funny meme video, first of all, import a baby video to Filmora. Then, you need to drag it to the timeline to start the editing.

Step 2: Now, let the fun begin. Start by double-clicking on the video part that you want to edit and animate. Then enable the ‘Motion Tracking’ option and adjust the tracker on the screen where you want the scene.

Step 3: Let us make the editing enjoyable. For that, head to the ‘Elements’ tab. Search for laser-related elements. Then, drag your selected element to the timeline. You can adjust the element in the preview window by double-clicking on it.

Step 4: Finish off by adding a cool transition to your funny meme video. This could be done from the ‘Transition’ section. You can add as many Elements and Transitions as you want.

Part 3. Recommendation about Funny Background Music
Is something left to share about funny videos? Now that you have ideas for funny videos and know how to edit them, what is left? The only missing part is suitable funny background music. Let us help you with this. In this section, we will share the best funny video background music for your videos.
| Song Name | Artist Name | Year of Publication |
|---|---|---|
| Subway System | Jimothy Lacoste | 2018 |
| Gangnam Style | PSY | 2012 |
| Amazing Horse | Jonti Picking | 2010 |
| I’m on a Boat | The Lonely Island | 2009 |
| The Duck Song | Bryant Oden | 2009 |
Bottom Line
This article holds so much information regarding funny YouTube videos. You can take help from this article to create stunning funny videos. We have also shared tutorials for making cute and funny videos. Not just this, but the best funny background music has also been discussed.
Wondershare Filmora
Get started easily with Filmora’s powerful performance, intuitive interface, and countless effects!
Try It Free Try It Free Try It Free Learn More >

02 2 Tutorial to Help You Create Funny Videos for YouTube
03 Recommendation about Funny Background Music
Part 1. 5 Funny Content Ideas for YouTube Videos
Is there any constant video type that you watch daily? Any video that ever bores you? Funny videos are the answer to all these questions. Not every kind of video is watched daily except funny videos. We entertain ourselves with these fun videos.
If you ever plan to create funny videos, what are you going to do? What type of content will you make? The following section of this article will bring 5 ideas to you. With these ideas, you can create funny videos for YouTube.
1. Prank Videos
Who doesn’t enjoy pranking others? Well, we all love to play safe pranks on our loved ones. Surprisingly, people love to watch these pranks. This is the perfect idea for funny videos. You can set a hiding camera, prank someone and record it. By sharing the prank, you can make someone laugh. Pranks are not always planned. Sometimes candid things can also do the job.
2. Baby and Kids Videos
Who doesn’t like babies? One idea for funny videos is sharing your baby’s or kid’s activities. Babies and kids are very cute, adorable, and innocent. They always do cute little disasters, which are fun to watch. You can share their funny and cute moments with everyone. Kids and babies can easily make everyone laugh. Their cuteness will attract the audience.
3. Challenge Videos
Challenge videos are another type of video which are fun to watch. Simple challenges which do not harm anyone in any way are encouraged. Challenge videos automatically become funny. Things get funny when someone can’t complete the challenge and is desperate to get it done. Completing the challenge and struggling to get things done seems funny.
4. Plan a Skit
Skits are very successful. The factors that help in making unique skits are the idea and the humor. If both things are amazing and well presented, your skit will shine. The fact because skits are short comedy films, they effortlessly attract the audience. So, creating skits is another fantastic idea for funny YouTube content.
5. Blooper Videos
Blooper videos are naturally funny. You don’t have to put extra effort to make them funny. Bloopers are the funny things that take place while you try to record something. Bloopers never make it to the final video, but they are always fun to watch. So instead of watching and enjoying them alone, you can share them on YouTube so that everyone can enjoy the fun behind the scenes.
Part 2. 2 Tutorial to Help You Create Funny Videos for YouTube
Sharing ideas for funny videos is not enough. There might be people out there who don’t have a clue about creating and editing videos. For any such person, Wondershare Filmora is the best tool they will ever come across. It doesn’t matter if you are a beginner or a professional. You can easily use Filmora because of its simple process.
The following section of this article will teach you how you can create funny videos. Take help from the 2 shared tutorials below and make your own stunning funny YouTube video.
Create a Cute and Funny Pet Intro
Suppose you are a YouTuber and you want to introduce your pet on the channel. What could be the best way? Sharing a basic introduction is too mainstream. Have you ever tried to introduce someone with the coolest editing? If not, learn from us about introducing your pet in the cutest way.
For Win 7 or later (64-bit)
For macOS 10.12 or later
Step 1: To create cute pet intros, first of all, open Filmora. Then head to the ‘Titles’ tab. You can search for any pet-related title template. Select a template that you like and drag it onto the timeline. You can double-click on the template to edit and customize it as you want.
Step 2: After that, it’s time to add the media file. For that, you need to import the media file. After importing it, drag it to the timeline so that it can be edited. The media file can also be edited. You have to double-click on it to open the editing settings.
Step 3: As we are teaching to edit a cute yet funny introduction so what is editing without elements? To add cute little elements to your video, head over to the ‘Elements’ tab. Select an element and drag it to the timeline. You can also edit the element by double-clicking on it.
Step 4: Lastly, you can add background music to your video. You can either import the background music or also use the music from Filmora’s library.
Create a Funny Baby Laser Meme Video
Are you not a meme fan? It’s strange if you don’t like memes. This is because memes are entertaining and funny. The next tutorial that we are going to discuss is related to memes. We will tell you about creating a baby laser meme funny video.
For Win 7 or later (64-bit)
For macOS 10.12 or later
Step 1: To edit a funny meme video, first of all, import a baby video to Filmora. Then, you need to drag it to the timeline to start the editing.
Step 2: Now, let the fun begin. Start by double-clicking on the video part that you want to edit and animate. Then enable the ‘Motion Tracking’ option and adjust the tracker on the screen where you want the scene.
Step 3: Let us make the editing enjoyable. For that, head to the ‘Elements’ tab. Search for laser-related elements. Then, drag your selected element to the timeline. You can adjust the element in the preview window by double-clicking on it.
Step 4: Finish off by adding a cool transition to your funny meme video. This could be done from the ‘Transition’ section. You can add as many Elements and Transitions as you want.
Part 3. Recommendation about Funny Background Music
Is something left to share about funny videos? Now that you have ideas for funny videos and know how to edit them, what is left? The only missing part is suitable funny background music. Let us help you with this. In this section, we will share the best funny video background music for your videos.
| Song Name | Artist Name | Year of Publication |
|---|---|---|
| Subway System | Jimothy Lacoste | 2018 |
| Gangnam Style | PSY | 2012 |
| Amazing Horse | Jonti Picking | 2010 |
| I’m on a Boat | The Lonely Island | 2009 |
| The Duck Song | Bryant Oden | 2009 |
Bottom Line
This article holds so much information regarding funny YouTube videos. You can take help from this article to create stunning funny videos. We have also shared tutorials for making cute and funny videos. Not just this, but the best funny background music has also been discussed.
Wondershare Filmora
Get started easily with Filmora’s powerful performance, intuitive interface, and countless effects!
Try It Free Try It Free Try It Free Learn More >
10 Best Cartoon Video Makers (Online and Desktop Solution)
Abundant Video Effects - Wondershare Filmora
Provide abundant video effects - A creative video editor
Powerful color correction and grading
Detailed tutorials are provided by the official channel
Introduction
There are some issues common to the video production process. However, animated or cartoon videos have helped to combat such issues. You do not need to scout for locations, go through a seemingly endless casting process, or rent the pricey equipment. A cartoon is simply a type of animation or an illustration that usually appears in a semi-realistic or an unreal style. In addition, it uses simple, satirical, and humorous drawing language to tell the story.
Although there are restrictions, there are a lot of possibilities cartoon video makers still offer to their users. Therefore, this article will share the top 10 best cartoon video makers online and on PC that you can use before diving into an animated video world.
So, here is what we shall learn about cartoon makers today:
In this article
01 Best 5 Online Cartoon Makers
02 Cartoon Video Maker for Desktop (Win and Mac)
03 How Can I Create My Own Cartoon Using Wondershare Anireel
Part 1: Best 5 Online Cartoon Makers
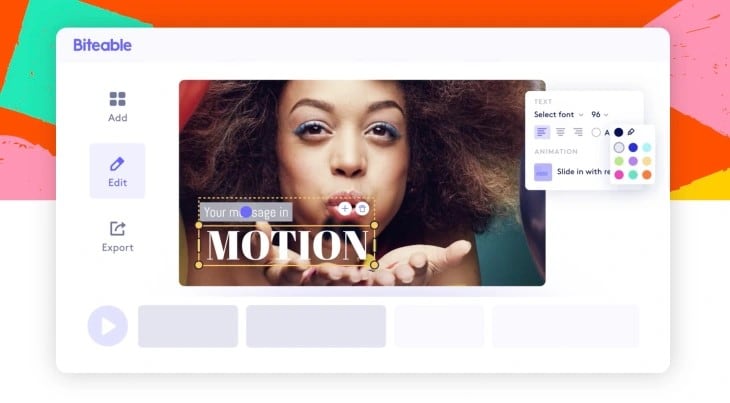
1. Biteable
Biteable provides a seemingly endless list of template categories to cater to your online media marketing needs. Aside from offering entertaining cartoon-making templates, the platform also allows users to create motion graphics or content, and Facebook covers for their social media channels.
Price: Free, $23 per month, billed annually.
Features:
- Offering library with lots of templates to choose from
- Free to use, except you are looking for additional features
- Five simple steps to an incredible cartoon video
- It has an easily customizable template
Pros
- It is a perfect option for social media managers
- Quickly create entertaining cartoons
- Used by biggies like Amazon, Microsoft, Google, Disney, BBC, Shopify, Samsung, and salesforce.
- Over 9 million users
Cons
- There is a mandatory registration
- There are no audio editing options
- The file-sharing capabilities are limited to YouTube and Facebook
- The download option is disabled in the free version
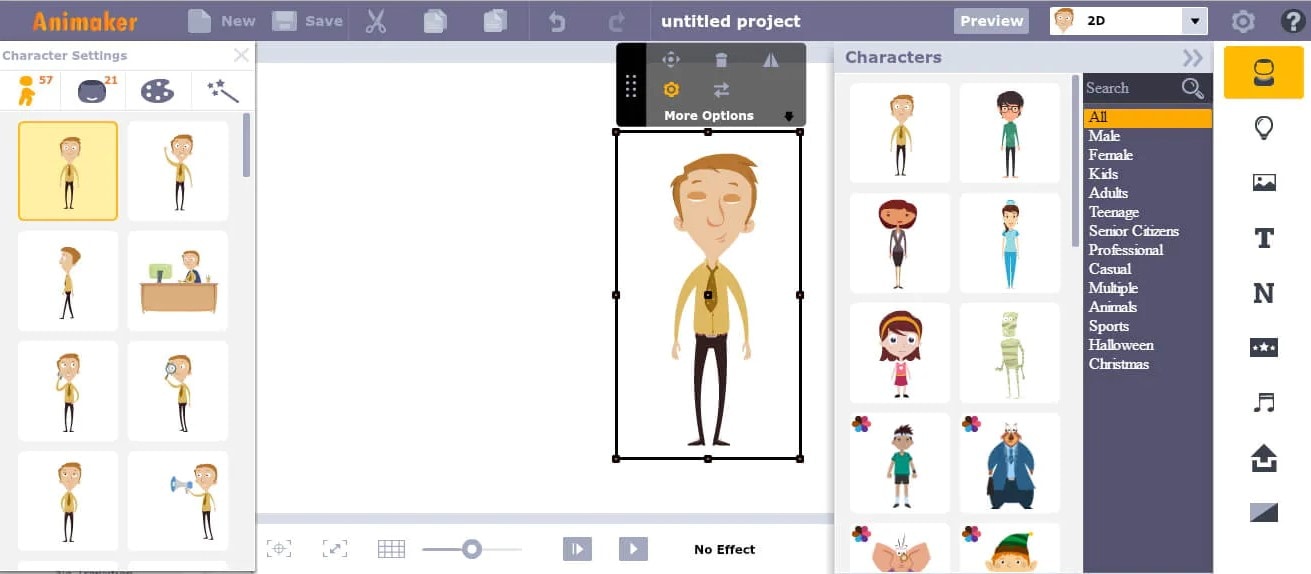
2. Animaker
With this animated maker, you get access to hundreds of animated characters, maps, and backgrounds. There are six (6) video styles available in this cartoon maker: Typography, Infographic, or 2D for different types of projects.
Price: Free version available. Subscription plans start at $12 per month/billed annually.
Features
- Different video styles, marketing, explainer, or 2D animation.
- Posts itself as the number 1 cartoon maker
- No need for a credit card to start.
- Four-step process; select template, customize it, add music, and download or share.
- 200+ voices, 25+ languages, and loads of customizable options.
- It offers auto-lip sync with advanced animation effects.
- There is a rich selection of 1000+ templates
Pros:
- Superb audio editing options
- Excellent and quick animation tools.
- Over 10 million users so far and still counting.
- Currently used by Amazon, Bosch, HP, Nokia, and Philips.
Cons:
- The monthly fee is pricey
- Account creation is mandatory for a free version
- The free version contains a watermark
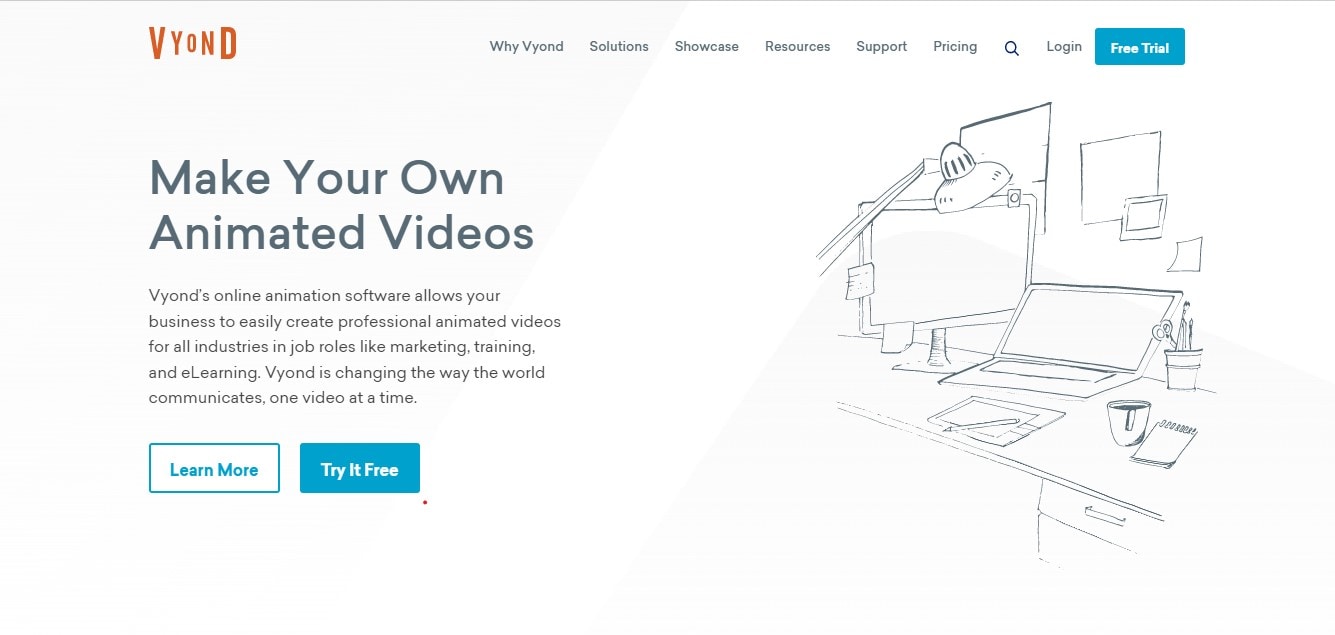
3. Vyond
Vyond, the cartoon creator launched in 2007, is probably one of the oldest online cartoon video makers. Additionally, it is still one of the most popular online destinations meant for anyone who wants to create an animated video quickly.
Price: Subscription plans start from $39 per month, billed annually.
Features:
- Perfect for animated video creation
- There is automatic character lip-syncing
- Try it for free before purchasing
- Make videos for training, e-learning, marketing, human resources, etc.
- The maximum duration of the video is 120 minutes
Pros:
- It has a fully customizable template
- There are high-end object and character animated features
- Certified by GDPR, TrustArc, BSI, and CCPA
- A wholesome cartoon makerfor enterprise and individual
- Data security and privacy assurance by BSI, CCPA, and GPDR.
Cons:
- It is quite expensive
- Vyond is not the best option for inexperienced animators
- The features depend on the subscription model
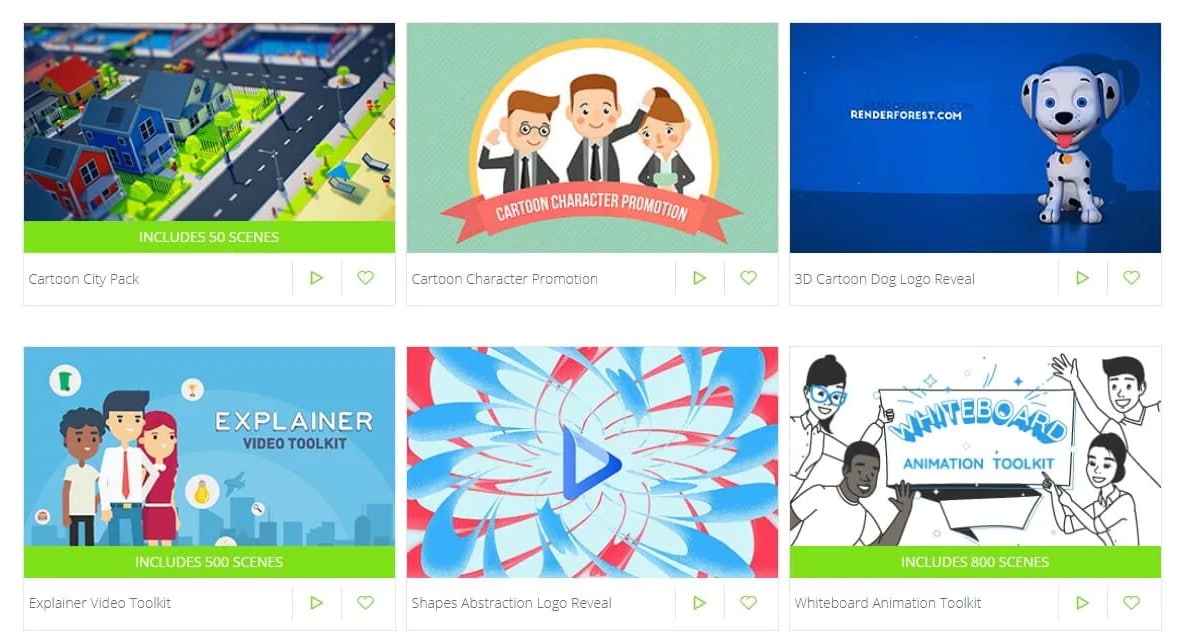
4. Renderforest
This is a famous online cartoon video maker for many purposes. Among the numerous options, the platform offers to its user. They include; 3D explainer videos, logo animations, or professional presentations.
Price: Free version available. Subscription plans start at $16 per month, billed annually.
Features:
- There is an extensive library of templates with numerous options
- Has a large online storage
- Was among the top 100 software companies in 2019.
- Top ranked solution holder for 2020
- Up to 250GB of online storage space
- Use the in-built template to make a story, customize the video, and then export it to share with your friends.
- Amadeus, Bose, BBC, Vodafone, Sony Music, and many others use Renderforest.
Pros:
- Produce videos like a pro
- Comes with an ultimate animation pack.
- Trusted by millions and one of the oldest cartoon makers.
Cons:
- A limited amount of commercial music tracks
- There are modest export options
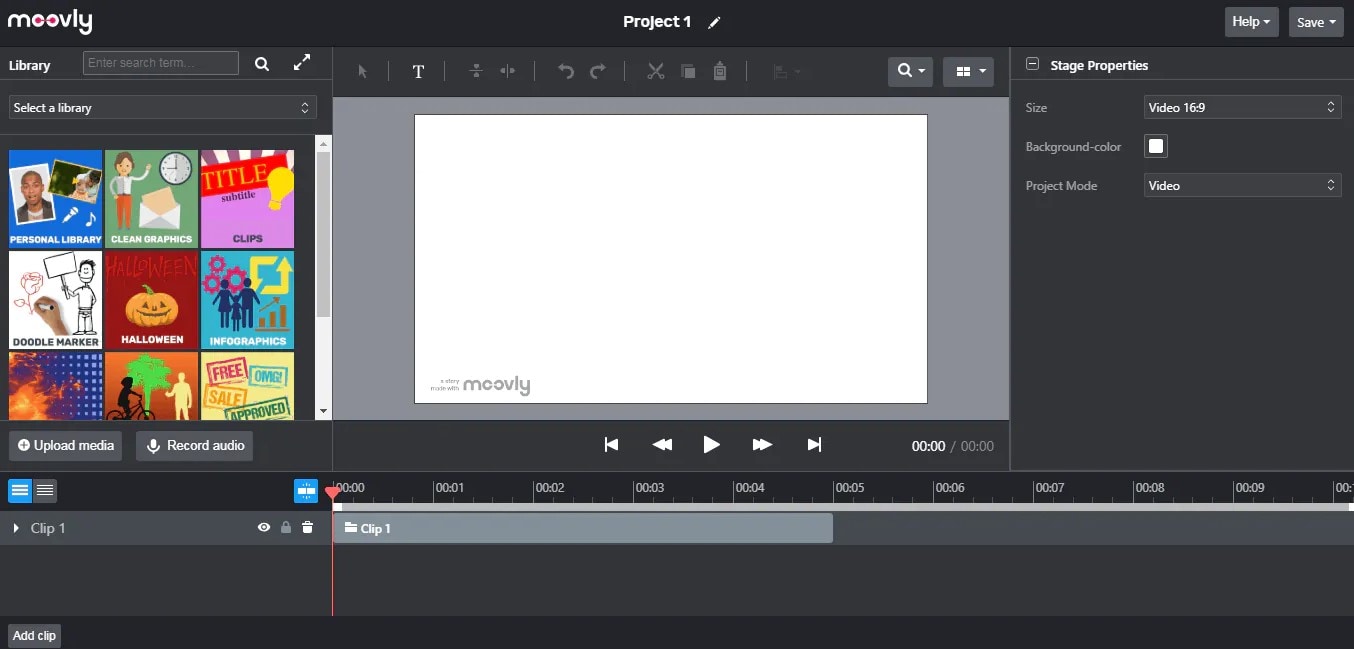
5. Moovly
With this cartoon maker, users must first log in. However, there is no need to create a new account as you can use your LinkedIn or Google account to sign in quickly.
Price: Free 30-day trial, $24.92 per month billed annually.
Features:
- Moovly is the perfect cartoon video maker for sales&marketing, human resources, internal communication, learning&development, agencies, and education.
- Apply expert features in one click with Moovly.
- Create videos and edit with browser-based or drag and drop features without installing software.
- Moovly has over 1.3 million free media, like images, sounds, music, and royalty-free stock videos at no extra charge.
- Besides, it offers 100 million extra media you can try and then purchase.
- You can add your images, music, and videos to create unique clips in style.
- Add text, remove color, add subtitles or generate them, auto-translate your text and subtitles, import PPT files, structure your content, record yourself or your computer screen, edit, mix, etc.
Pros:
- Even if users need to log in, they don’t need to create an account
- Allows users to import content from online sources like Storyblock, Shutterstock, etc.
- It is the number 1 customizable and straightforward solution to making cartoons.
- Use by Colgate-Palmolive, NHS, Teradata, Amadeus, Cisco, Continental, and Logitech.
- The interface is intuitive and user-friendly.
Cons:
- Watermarked videos during the free trial
- To export videos in HD 1080p quality, one needs to purchase one of the available plans.
Renderforest is the best cartoon maker online of the listed five in this article due to the vast library template and large online bandwidth.
Part 2: Cartoon Video Maker for Desktop (Win and Mac)
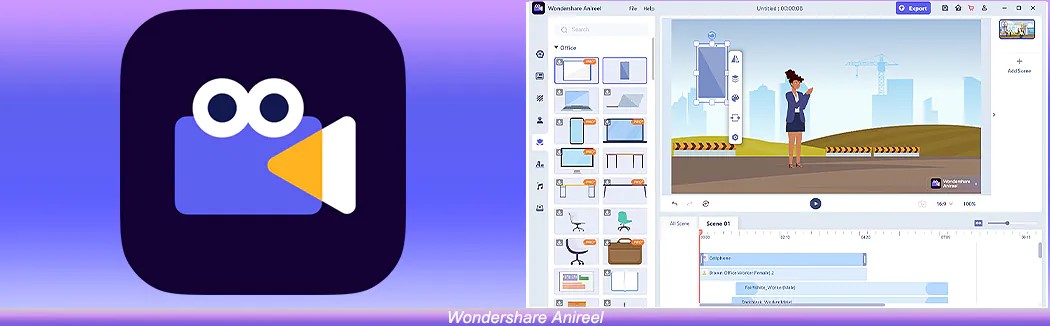
1. Wondershare Anireel
Anireel is one of the top animation software on the internet that allows users to bring their imaginations to life with a huge range of customizable elements and features.
Price: $9.99 per month billed annually and $19.99 monthly
Features:
- 40+ customizable templates
- Top animation software
- Compatible with Windows 11/10/8.1 (64 bit OS)
- Only three steps to an excellent animated video.
- Import images, videos, and sound in almost all formats.
- Create unique avatar, logo images, and more specific to your brand.
- The Deep Learning tech offers quick text-to-speech conversion.
- Animate camera movements, entry and exit effects, motion path, etc.
- Use the one-click option and change scripts to clips.
- Anireel cartoon video makercan lip-sync your characters with perfection.
- Quick and easy drag and drop editing.
Pros:
- It is convenient and simple to use
- Anireel has an intuitive interface
- The cartoon makeroffers a practical and seamless animated video editing
- It comes at an affordable and competitive price
Cons:
- It has a limited amount of assets
- Not suitable for too professional people to use.
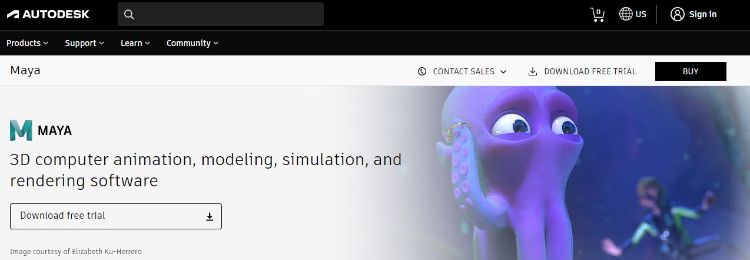
2. Autodesk Maya
Autodesk Maya is one of the best animation tools used to create animation pictures, video games, and add 3D effects in motion pictures. Plus, this cartoon maker is the best if you require a high-quality visual impact.
Price: Free trial, $225 billed monthly.
Features:
- It offers AutoDesk financing for new buyers.
- Maya is the go-to shop for architects, engineers, designers, media, and entertainment.
- Shape 3D objects and add realistic effects with Maya cartoon maker’s NURBS modeling.
- The Integrated Arnold rendering technology lets you view scene changes in real-time.
- Maya has been part of the top movie makers, including the MCU.
- This cartoon video maker offers geometry-based polygon modeling and helps create accurate simulations for visual programming.
- Maya can load and change vast data sets at a faster pace.
Pros:
- It makes complex hand-made animation tasks extremely easy
- Efficient color management
- Allows the creation of realistic effects like cloth simulations and explosions
- 30-day free trial and 30-day money-back guarantee
- Meet deadlines, add fine details to develop even the most complex shots or characters.
- Excellent tool for professionals
Cons:
- The pro is quite expensive
3. Adobe Animate
This is one of the most powerful animation software products on the internet that has been available for decades. It can animate images used for games, film, or online and produce HTML 5, WebGL, or Flash content.
Price: This cartoon creator offers three pricing plans starting at US$24.14/month
Features:
- Excellent for complex animation
- The capability of freehand drawing
- Animate, illustrate, and make 3D typography.
- Import and add vector drawings for further editing.
- Export your work as HTML5 Canvas, WebGL, Flash/Adobe AIR, GIF, or QuickTime movie.
- With the Bone tool, make your cartoon characters fluid and natural.
- Synchronize sounds and music for your project.
- Choose parts of the clip to be animated.
Pros:
- It has Puppeting features
- It is an excellent choice for complex animations
- It includes freehand drawing capability
Cons:
- It is not suitable for beginners
- Other Adobe software may be required while working on a project
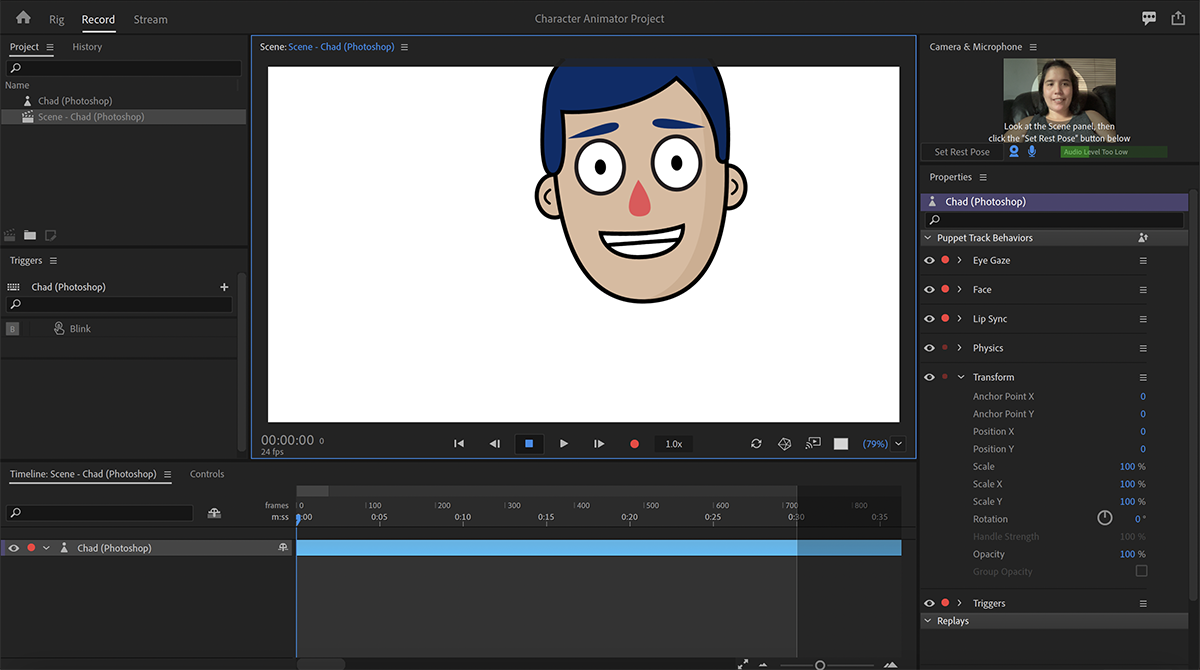
4. Adobe Character Animator
Adobe Character Animator is another type of Adobe’s animation software stack that allows users to use motion to capture and create live animations of their 2D characters.
Price: Adobe Character Animator has two pricing plans starting at US$34,49/month for the first year
Features:
- This product requires other Adobe products to function
- Lots of options to export and import.
- Make your real-life cartoon using the Motion Capture feature in five steps.
- The Avatar will walk, talk, and copy your expressions in real-time.
- Integrate and add assets from other Adobe Creative Cloud apps.
- Auto lip-syncing and real-time facial movement capture.
- Works on iOS and Android.
Pros:
- Easy to replicate real-life movements and expressions with facial tracking.
- There are various import and export options.
Cons:
- It is not a standalone product.
- Users need to have a webcam and microphone to use the motion capture feature.
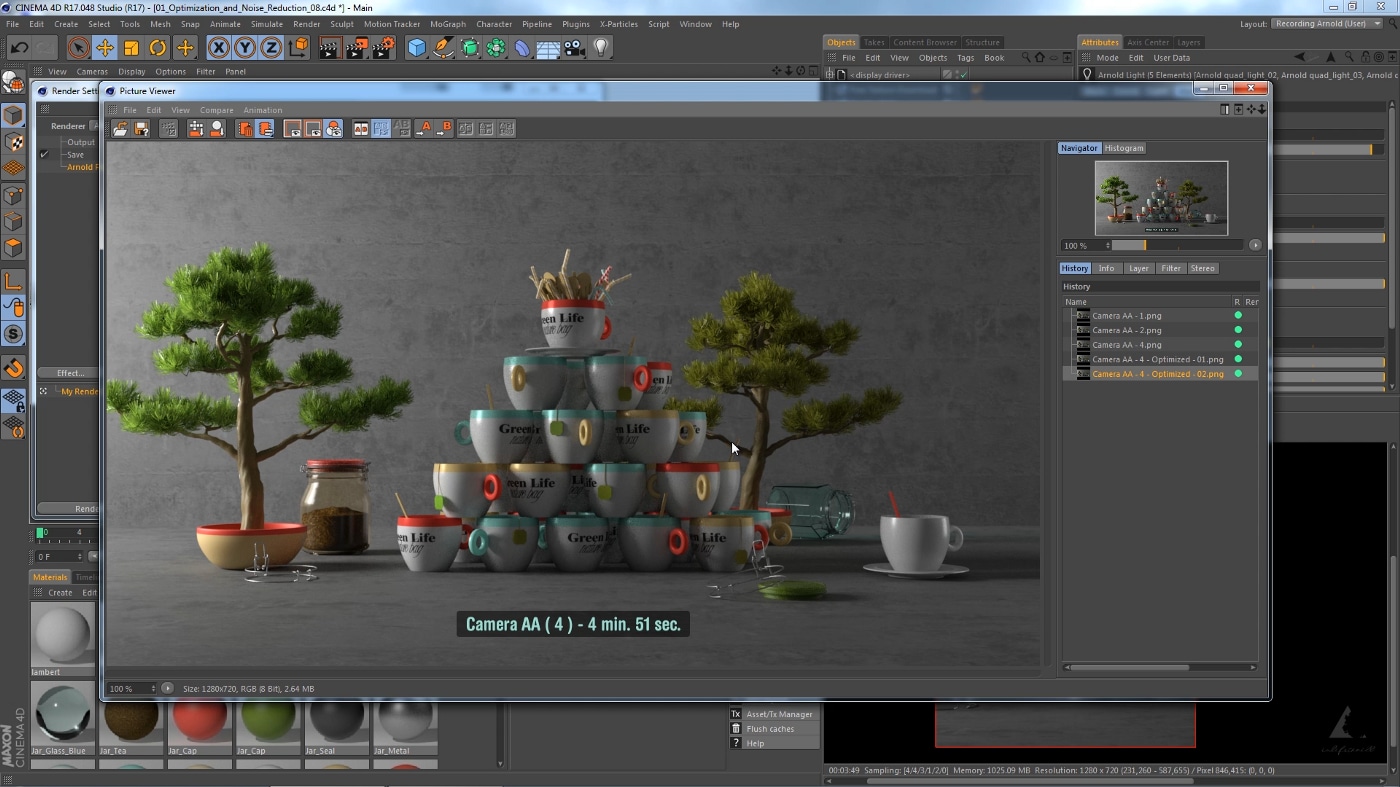
5. Cinema 4D
This cartoon maker has a 3D application interface that offers a keyframe animation, life-like characters, simulation building, object tracking, flexible rig building, cartoon styling, and animation basics.
Price: 4 pricing plans, starting at $99.91/month and $1199.00 billed annually.
Features:
- Keyframing animation effect
- It has a 3d interface
- The ZRemesher for retopology and new tools for modeling add to the new features.
- The Cloth Simulation features help make your cartoon more real.
- It supports CPU rendering with Redshift, which helps you preview, import, and export in high quality.
Pros:
- It is pretty easy to use.
- Lots of exciting design templates are available
- Many editing features are available
Cons
- It is pretty expensive compared to other software
- Not good for beginners
Wondershare Anireel is the best cartoon maker of the five listed in this article. It has lots of advanced features and templates to choose from.
Part 3: How Can I Create My Own Cartoon Using Wondershare Anireel
As stated, Wondershare Anireel has become our top cartoon creator pick due to its affordable pricing, secure server, and ease of use.
So, let us view the simple steps to create your cartoon using the Anireel software.
Step 1: Download, install and Create Character
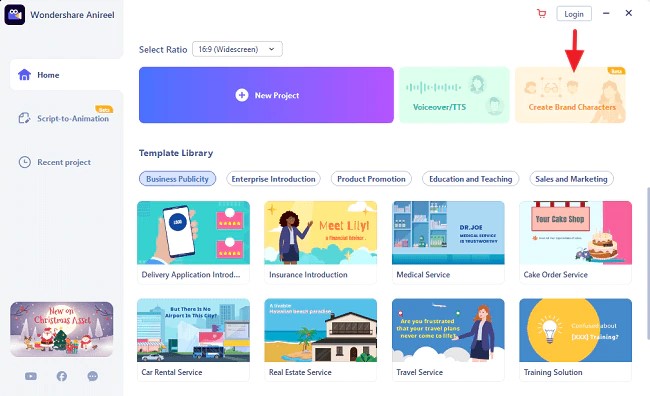
Run Anireel on your device, visit Characters Tab and then click on Create a Character option, or you may click on the Create Brand Characters tab on the home screen.
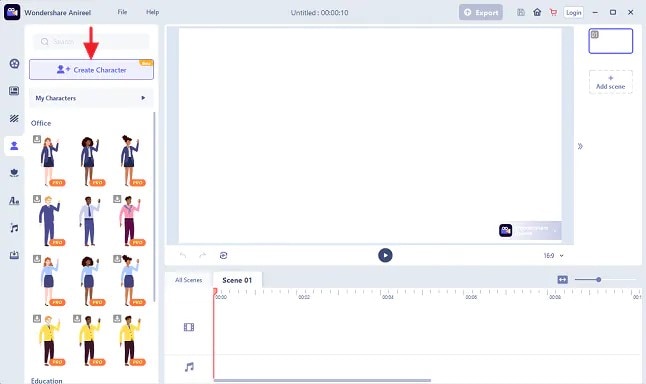
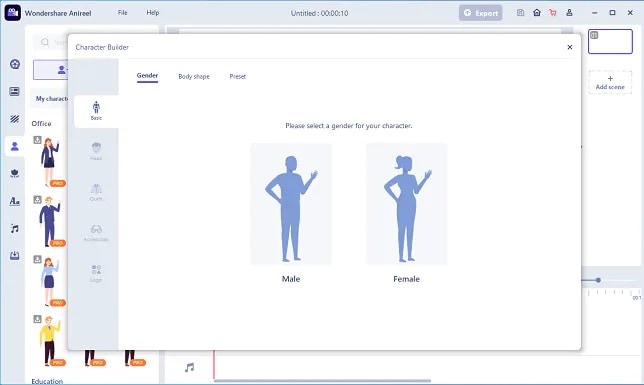
Step 2: Start Creating your Cartoon Character
Choose your gender and body shape, and apply some preset suits.
Now, you can start building facial features using the Head tab to customize the shape of the face, eyes, hairstyle, nose, mouth, ears, and eyebrows.
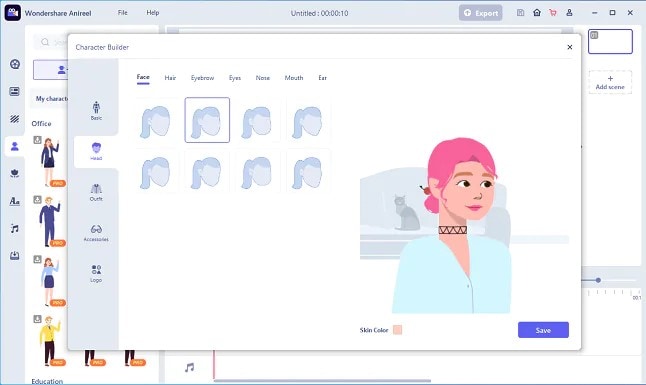
You can also choose to change the skin tone to match yours.
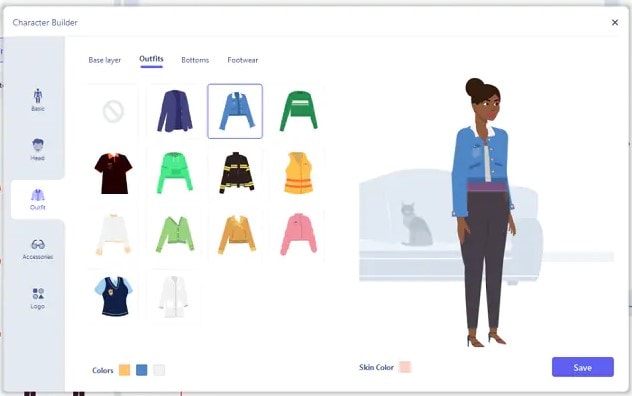
Step 3: Add an Outfit and Accessories
Choose the Outfit tab in Character Builder to select the base layer, outfit, bottom wear, and footwear. Pick what you want to use on your cartoon and keep adding.
Next, reach the Accessories tab to add glasses, necklaces, and more to your cartoon character.
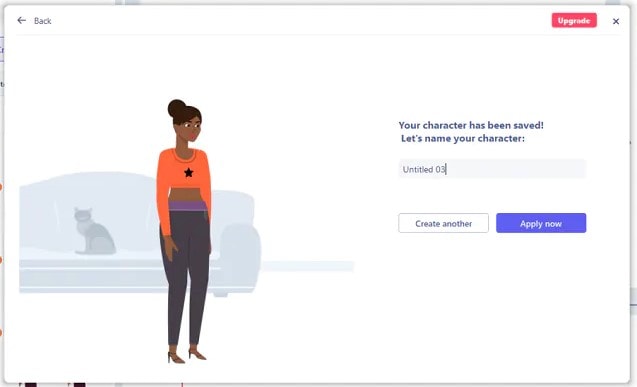
Step 4: Name your Cartoon and Apply
Click on Save and add a name to your cartoon when all done. Finally, click Apply Now to add your cartoon character to your Anireel cartoon maker canvas or My Characters tab.
Part 4: People Also Want to Know
Below are some answers to a few queries about cartoon creators. Let us look at them one by one.
1. What is the best free cartoon maker?
Wondershare Anireel is the best cartoon maker for Android as it is free to use with lots of advanced features and templates to choose from.
2. What is the best app to make a cartoon?
Wondershare Anireel’s Microsoft app is also one of the best cartoon applications that are very flexible and easy to use on the go.
Conclusion
In this article, we explained the best cartoon creators in the industry. Also, we gave the best cartoon video maker from the list. Thus, as you saw, in this report, we have summarized a few essential points regarding cartoon video makers. You learned:
- The cartoon video maker for free that you should know of.
- The ten best cartoon video makers.
- Why are Wondershare Anireel and Renderforest excellent online cartoon video makers?
- How does Anireel, cartoon creator, work?
- Finally, a few FAQs for users to better understand the cartoon maker
Introduction
There are some issues common to the video production process. However, animated or cartoon videos have helped to combat such issues. You do not need to scout for locations, go through a seemingly endless casting process, or rent the pricey equipment. A cartoon is simply a type of animation or an illustration that usually appears in a semi-realistic or an unreal style. In addition, it uses simple, satirical, and humorous drawing language to tell the story.
Although there are restrictions, there are a lot of possibilities cartoon video makers still offer to their users. Therefore, this article will share the top 10 best cartoon video makers online and on PC that you can use before diving into an animated video world.
So, here is what we shall learn about cartoon makers today:
In this article
01 Best 5 Online Cartoon Makers
02 Cartoon Video Maker for Desktop (Win and Mac)
03 How Can I Create My Own Cartoon Using Wondershare Anireel
Part 1: Best 5 Online Cartoon Makers
1. Biteable
Biteable provides a seemingly endless list of template categories to cater to your online media marketing needs. Aside from offering entertaining cartoon-making templates, the platform also allows users to create motion graphics or content, and Facebook covers for their social media channels.
Price: Free, $23 per month, billed annually.
Features:
- Offering library with lots of templates to choose from
- Free to use, except you are looking for additional features
- Five simple steps to an incredible cartoon video
- It has an easily customizable template
Pros
- It is a perfect option for social media managers
- Quickly create entertaining cartoons
- Used by biggies like Amazon, Microsoft, Google, Disney, BBC, Shopify, Samsung, and salesforce.
- Over 9 million users
Cons
- There is a mandatory registration
- There are no audio editing options
- The file-sharing capabilities are limited to YouTube and Facebook
- The download option is disabled in the free version
2. Animaker
With this animated maker, you get access to hundreds of animated characters, maps, and backgrounds. There are six (6) video styles available in this cartoon maker: Typography, Infographic, or 2D for different types of projects.
Price: Free version available. Subscription plans start at $12 per month/billed annually.
Features
- Different video styles, marketing, explainer, or 2D animation.
- Posts itself as the number 1 cartoon maker
- No need for a credit card to start.
- Four-step process; select template, customize it, add music, and download or share.
- 200+ voices, 25+ languages, and loads of customizable options.
- It offers auto-lip sync with advanced animation effects.
- There is a rich selection of 1000+ templates
Pros:
- Superb audio editing options
- Excellent and quick animation tools.
- Over 10 million users so far and still counting.
- Currently used by Amazon, Bosch, HP, Nokia, and Philips.
Cons:
- The monthly fee is pricey
- Account creation is mandatory for a free version
- The free version contains a watermark
3. Vyond
Vyond, the cartoon creator launched in 2007, is probably one of the oldest online cartoon video makers. Additionally, it is still one of the most popular online destinations meant for anyone who wants to create an animated video quickly.
Price: Subscription plans start from $39 per month, billed annually.
Features:
- Perfect for animated video creation
- There is automatic character lip-syncing
- Try it for free before purchasing
- Make videos for training, e-learning, marketing, human resources, etc.
- The maximum duration of the video is 120 minutes
Pros:
- It has a fully customizable template
- There are high-end object and character animated features
- Certified by GDPR, TrustArc, BSI, and CCPA
- A wholesome cartoon makerfor enterprise and individual
- Data security and privacy assurance by BSI, CCPA, and GPDR.
Cons:
- It is quite expensive
- Vyond is not the best option for inexperienced animators
- The features depend on the subscription model
4. Renderforest
This is a famous online cartoon video maker for many purposes. Among the numerous options, the platform offers to its user. They include; 3D explainer videos, logo animations, or professional presentations.
Price: Free version available. Subscription plans start at $16 per month, billed annually.
Features:
- There is an extensive library of templates with numerous options
- Has a large online storage
- Was among the top 100 software companies in 2019.
- Top ranked solution holder for 2020
- Up to 250GB of online storage space
- Use the in-built template to make a story, customize the video, and then export it to share with your friends.
- Amadeus, Bose, BBC, Vodafone, Sony Music, and many others use Renderforest.
Pros:
- Produce videos like a pro
- Comes with an ultimate animation pack.
- Trusted by millions and one of the oldest cartoon makers.
Cons:
- A limited amount of commercial music tracks
- There are modest export options
5. Moovly
With this cartoon maker, users must first log in. However, there is no need to create a new account as you can use your LinkedIn or Google account to sign in quickly.
Price: Free 30-day trial, $24.92 per month billed annually.
Features:
- Moovly is the perfect cartoon video maker for sales&marketing, human resources, internal communication, learning&development, agencies, and education.
- Apply expert features in one click with Moovly.
- Create videos and edit with browser-based or drag and drop features without installing software.
- Moovly has over 1.3 million free media, like images, sounds, music, and royalty-free stock videos at no extra charge.
- Besides, it offers 100 million extra media you can try and then purchase.
- You can add your images, music, and videos to create unique clips in style.
- Add text, remove color, add subtitles or generate them, auto-translate your text and subtitles, import PPT files, structure your content, record yourself or your computer screen, edit, mix, etc.
Pros:
- Even if users need to log in, they don’t need to create an account
- Allows users to import content from online sources like Storyblock, Shutterstock, etc.
- It is the number 1 customizable and straightforward solution to making cartoons.
- Use by Colgate-Palmolive, NHS, Teradata, Amadeus, Cisco, Continental, and Logitech.
- The interface is intuitive and user-friendly.
Cons:
- Watermarked videos during the free trial
- To export videos in HD 1080p quality, one needs to purchase one of the available plans.
Renderforest is the best cartoon maker online of the listed five in this article due to the vast library template and large online bandwidth.
Part 2: Cartoon Video Maker for Desktop (Win and Mac)
1. Wondershare Anireel
Anireel is one of the top animation software on the internet that allows users to bring their imaginations to life with a huge range of customizable elements and features.
Price: $9.99 per month billed annually and $19.99 monthly
Features:
- 40+ customizable templates
- Top animation software
- Compatible with Windows 11/10/8.1 (64 bit OS)
- Only three steps to an excellent animated video.
- Import images, videos, and sound in almost all formats.
- Create unique avatar, logo images, and more specific to your brand.
- The Deep Learning tech offers quick text-to-speech conversion.
- Animate camera movements, entry and exit effects, motion path, etc.
- Use the one-click option and change scripts to clips.
- Anireel cartoon video makercan lip-sync your characters with perfection.
- Quick and easy drag and drop editing.
Pros:
- It is convenient and simple to use
- Anireel has an intuitive interface
- The cartoon makeroffers a practical and seamless animated video editing
- It comes at an affordable and competitive price
Cons:
- It has a limited amount of assets
- Not suitable for too professional people to use.
2. Autodesk Maya
Autodesk Maya is one of the best animation tools used to create animation pictures, video games, and add 3D effects in motion pictures. Plus, this cartoon maker is the best if you require a high-quality visual impact.
Price: Free trial, $225 billed monthly.
Features:
- It offers AutoDesk financing for new buyers.
- Maya is the go-to shop for architects, engineers, designers, media, and entertainment.
- Shape 3D objects and add realistic effects with Maya cartoon maker’s NURBS modeling.
- The Integrated Arnold rendering technology lets you view scene changes in real-time.
- Maya has been part of the top movie makers, including the MCU.
- This cartoon video maker offers geometry-based polygon modeling and helps create accurate simulations for visual programming.
- Maya can load and change vast data sets at a faster pace.
Pros:
- It makes complex hand-made animation tasks extremely easy
- Efficient color management
- Allows the creation of realistic effects like cloth simulations and explosions
- 30-day free trial and 30-day money-back guarantee
- Meet deadlines, add fine details to develop even the most complex shots or characters.
- Excellent tool for professionals
Cons:
- The pro is quite expensive
3. Adobe Animate
This is one of the most powerful animation software products on the internet that has been available for decades. It can animate images used for games, film, or online and produce HTML 5, WebGL, or Flash content.
Price: This cartoon creator offers three pricing plans starting at US$24.14/month
Features:
- Excellent for complex animation
- The capability of freehand drawing
- Animate, illustrate, and make 3D typography.
- Import and add vector drawings for further editing.
- Export your work as HTML5 Canvas, WebGL, Flash/Adobe AIR, GIF, or QuickTime movie.
- With the Bone tool, make your cartoon characters fluid and natural.
- Synchronize sounds and music for your project.
- Choose parts of the clip to be animated.
Pros:
- It has Puppeting features
- It is an excellent choice for complex animations
- It includes freehand drawing capability
Cons:
- It is not suitable for beginners
- Other Adobe software may be required while working on a project
4. Adobe Character Animator
Adobe Character Animator is another type of Adobe’s animation software stack that allows users to use motion to capture and create live animations of their 2D characters.
Price: Adobe Character Animator has two pricing plans starting at US$34,49/month for the first year
Features:
- This product requires other Adobe products to function
- Lots of options to export and import.
- Make your real-life cartoon using the Motion Capture feature in five steps.
- The Avatar will walk, talk, and copy your expressions in real-time.
- Integrate and add assets from other Adobe Creative Cloud apps.
- Auto lip-syncing and real-time facial movement capture.
- Works on iOS and Android.
Pros:
- Easy to replicate real-life movements and expressions with facial tracking.
- There are various import and export options.
Cons:
- It is not a standalone product.
- Users need to have a webcam and microphone to use the motion capture feature.
5. Cinema 4D
This cartoon maker has a 3D application interface that offers a keyframe animation, life-like characters, simulation building, object tracking, flexible rig building, cartoon styling, and animation basics.
Price: 4 pricing plans, starting at $99.91/month and $1199.00 billed annually.
Features:
- Keyframing animation effect
- It has a 3d interface
- The ZRemesher for retopology and new tools for modeling add to the new features.
- The Cloth Simulation features help make your cartoon more real.
- It supports CPU rendering with Redshift, which helps you preview, import, and export in high quality.
Pros:
- It is pretty easy to use.
- Lots of exciting design templates are available
- Many editing features are available
Cons
- It is pretty expensive compared to other software
- Not good for beginners
Wondershare Anireel is the best cartoon maker of the five listed in this article. It has lots of advanced features and templates to choose from.
Part 3: How Can I Create My Own Cartoon Using Wondershare Anireel
As stated, Wondershare Anireel has become our top cartoon creator pick due to its affordable pricing, secure server, and ease of use.
So, let us view the simple steps to create your cartoon using the Anireel software.
Step 1: Download, install and Create Character
Run Anireel on your device, visit Characters Tab and then click on Create a Character option, or you may click on the Create Brand Characters tab on the home screen.
Step 2: Start Creating your Cartoon Character
Choose your gender and body shape, and apply some preset suits.
Now, you can start building facial features using the Head tab to customize the shape of the face, eyes, hairstyle, nose, mouth, ears, and eyebrows.
You can also choose to change the skin tone to match yours.
Step 3: Add an Outfit and Accessories
Choose the Outfit tab in Character Builder to select the base layer, outfit, bottom wear, and footwear. Pick what you want to use on your cartoon and keep adding.
Next, reach the Accessories tab to add glasses, necklaces, and more to your cartoon character.
Step 4: Name your Cartoon and Apply
Click on Save and add a name to your cartoon when all done. Finally, click Apply Now to add your cartoon character to your Anireel cartoon maker canvas or My Characters tab.
Part 4: People Also Want to Know
Below are some answers to a few queries about cartoon creators. Let us look at them one by one.
1. What is the best free cartoon maker?
Wondershare Anireel is the best cartoon maker for Android as it is free to use with lots of advanced features and templates to choose from.
2. What is the best app to make a cartoon?
Wondershare Anireel’s Microsoft app is also one of the best cartoon applications that are very flexible and easy to use on the go.
Conclusion
In this article, we explained the best cartoon creators in the industry. Also, we gave the best cartoon video maker from the list. Thus, as you saw, in this report, we have summarized a few essential points regarding cartoon video makers. You learned:
- The cartoon video maker for free that you should know of.
- The ten best cartoon video makers.
- Why are Wondershare Anireel and Renderforest excellent online cartoon video makers?
- How does Anireel, cartoon creator, work?
- Finally, a few FAQs for users to better understand the cartoon maker
Also read:
- Updated In 2024, This Article Will Focus on Understanding the Secret Tips in Wondershare Filmora that You Can Use to Edit Videos Faster and More Efficiently
- New 2024 Approved Frame Rates, Speed, and Wondershare Filmora
- 2024 Approved How to Use Canva Color Match
- Updated In 2024, Top-Rated Android Apps For Slowing Down Motion
- New Zoom In and Out on Snapchat for 2024
- New In 2024, Best Cinematic LUTs For Premiere Pro Recommendation
- New Fun & Easy Masking Tricks in Filmora
- New In 2024, How to Create Cooking Video Intro and End Screen for YouTube Channel?
- Updated 2024 Approved You May Want to Create Your Video Tutorial and Share Your Knowledge with Others. Fortunately, You Can Easily Create a Professionally Edited Tutorial Video with Filmora. Keep Reading This Article Since We Will Show You How to Do It
- Updated In 2024, How to Make A Jaw-Dropping Time Lapse Video? Full Guide
- In 2024, Whats an AV1 Format and How Does It Impact Your Life?
- In 2024, Do You Want to Experiment with Various Sky Backgrounds for Your Footage? Learn About Sky Replacement After Effects in This Article with a Step-by-Step Guide
- 5 Ways to Make a Fake Facetime Call Video for 2024
- How to Create the Stranger Things Upside Down Effect
- 2024 Approved Splitting the Clips in Adobe After Effects Step by Step
- New 2024 Approved 8 Apps to Custom Your GIF Stickers
- Updated In 2024, Simple Step by Step Tutorial on Creating a Lightroom Collage
- In 2024, Find The Best Free Canon LUTs
- New Learning The Details Of How To Replace Sky in Lightroom
- 2024 Approved Review Video Is a Common Type Video and the First Impression Review Is Also Included. This Article Will Show You What Is First Impression Review Video and How to Create One by Yourself
- Updated 2024 Approved Add Effects to Video Online
- New 2024 Approved 2 Solutions to Crop a Video Using After Effects
- New In 2024, This Article Presents the Guide to Using Magic Effects for Creating Competent Films with Step-by-Step Instructions and Filmoras Grow and Win Program Contest
- Updated IMovie Review – Is It The Best Video Editor for Mac Users?
- New Techniques You Never Heard of for Learning YouTube AI Marketing
- In 2024, Top 12 Best Freeze Frame Video Editing Examples
- In 2024, Have You Ever Played Roblox Games? Read This Article to Find Out How to Get Motion Blur in Roblox Using Simple and Efficient Ways
- Updated 2024 Approved Logo Intro Videos Are the Hottest Trend in Town and Are Gaining Popularity Quickly. Keep Reading This Article to Learn Their Importance and How to Design One
- Top 6 End Screen Makers for 2024
- New In 2024, Top Fixes to Resolve Issues with Premiere Pro Slow Playback
- New 10 Best Slow-Motion Cameras to Try
- New In 2024, Steps to Denoise in Final Cut Pro – Reduce Video and Audio Noise
- New In 2024, Useful Tips for Tiktok Video Aspect Ratio Included
- Updated Templates Increase the Editing Possibilities for Beginners and Professionals. Read This Article to Learn About some Customizable Slow-Motion CapCut Templates for 2024
- New In 2024, Unlock Your Video Editing Potential With Filmora From Wondershare
- New Detailed Tutorial to Resize Your Video in VLC for 2024
- New What Does It Mean to Color Grade Your Images, and Why Is It so Important? Does It Mean the Same Thing as a Color Correction? Read on to Gather All the Information You Need on Color Grading Photography
- New 2024 Approved How to Use LUTs in Adobe Premiere Pro
- The Complete Guide to Slideshow Maker with Music for 2024
- In 2024, 10 Best Text to Robot Voice Generators Windows, Mac, Android, iPhone & Online
- 2024 Approved Being an After Effects Editor, You Often Find Yourself the Need to Add Motion Blur After Effects. This Guide Has Got You Covered. Follow to Find Out How to Add Motion Blur in After Effects
- Updated In 2024, With This Article, We Will Be Looking at Steps to Rotate a Video in Cyberlink PowerDirector to Help You when Required. We Have Also Mentioned the Steps You Will Need to Follow in Wondershare Filmora
- New 2024 Approved How to Edit Text in Premiere Pro
- New Discover the Top Slow Motion Camera App to Use
- Perfect Moody LUTs for VN Editor An Overview
- Recording Video in Slow Motion Some Considerable Points for 2024
- Updated In 2024, 4 Solutions to Add White Border to Video on Mobile and Desktop
- In 2024, Top 10 3D Slideshow Software Review
- Everything To Know About Apple ID Password Requirements For Apple iPhone 12 mini
- Simple and Effective Ways to Change Your Country on YouTube App Of your Samsung Galaxy Z Fold 5 | Dr.fone
- In 2024, 3 Ways to Change Location on Facebook Marketplace for Vivo Y78 5G | Dr.fone
- How To Unlock Apple iPhone 6s Plus Without Passcode? 4 Easy Methods
- A Working Guide For Pachirisu Pokemon Go Map On Honor 100 Pro | Dr.fone
- In 2024, How to Transfer Contacts from Vivo S17 to iPhone XS/11 | Dr.fone
- In 2024, Best Pokemons for PVP Matches in Pokemon Go For Realme Narzo N55 | Dr.fone
- Top 4 Ways to Trace Samsung Galaxy A25 5G Location | Dr.fone
- How to retrieve erased videos from Nova Y91
- In 2024, How to Unlock Verizon Apple iPhone 12 Pro
- How To Restore Missing Messages Files from Honor X50i
- What Pokémon Evolve with A Dawn Stone For Realme Note 50? | Dr.fone
- Pattern Locks Are Unsafe Secure Your Samsung Galaxy XCover 6 Pro Tactical Edition Phone Now with These Tips
- Will iSpoofer update On Samsung Galaxy M14 5G | Dr.fone
- Does find my friends work on Poco X5 Pro | Dr.fone
- Top 6 Apps/Services to Trace Any Apple iPhone 13 mini Location By Mobile Number | Dr.fone
- How to Quickly Fix Bluetooth Not Working on Motorola Moto G13 | Dr.fone
- How to Mirror PC Screen to Honor X50 Phones? | Dr.fone
- In 2024, 3 Effective Methods to Fake GPS location on Android For your OnePlus Nord 3 5G | Dr.fone
- Hassle-Free Ways to Remove FRP Lock from Samsung Galaxy Z Fold 5 Phones with/without a PC
- Which Pokémon can Evolve with a Moon Stone For Oppo A58 4G? | Dr.fone
- In 2024, Top 10 AirPlay Apps in Vivo Y100i for Streaming | Dr.fone
- How to Track Asus ROG Phone 7 Ultimate Location without Installing Software? | Dr.fone
- How to Change Lock Screen Wallpaper on Samsung Galaxy XCover 6 Pro Tactical Edition
- In 2024, What Legendaries Are In Pokemon Platinum On Honor X7b? | Dr.fone
- Network Locked SIM Card Inserted On Your Lava Blaze 2 Pro Phone? Unlock It Now
- Does G54 5G support MOV videos ?
- In 2024, How to Mirror OnePlus Nord N30 5G to Mac? | Dr.fone
- Updated 2024 Approved 10 Free Online Sticker Makers to Make Your Own Stickers
- In 2024, How to Change Location On Facebook Dating for your Honor Magic 6 Pro | Dr.fone
- 2024 Approved Authors Recommended The Best Text Voice Generators for All Platforms
- All About Factory Reset, What Is It and What It Does to Your Infinix Note 30i? | Dr.fone
- 4 Solutions to Fix Unfortunately Your App Has Stopped Error on Xiaomi Redmi Note 13 Pro 5G | Dr.fone
- 4 Methods to Turn off Life 360 On Samsung Galaxy A14 4G without Anyone Knowing | Dr.fone
- How to Reset your Nubia Red Magic 9 Pro Lock Screen Password
- Full guide to iPhone 15 iCloud Bypass
- In 2024, How To Unlock The iPhone 13 mini SIM Lock 4 Easy Methods
- Top 5 Tracking Apps to Track Apple iPhone 13 without Them Knowing | Dr.fone
- Fake Android Location without Rooting For Your Poco F5 5G | Dr.fone
- A Guide Realme V30 Wireless and Wired Screen Mirroring | Dr.fone
- In 2024, What You Want To Know About Two-Factor Authentication for iCloud From your Apple iPhone 11 Pro Max
- How to Change Netflix Location to Get More Country Version On Samsung Galaxy XCover 7 | Dr.fone
- How to Screen Mirroring Nokia C300 to PC? | Dr.fone
- What to Do if Google Play Services Keeps Stopping on Realme C67 5G | Dr.fone
- How does the stardust trade cost In pokemon go On Vivo Y100i? | Dr.fone
- A Guide Sony Xperia 10 V Wireless and Wired Screen Mirroring | Dr.fone
- Title: Create and Share Short Videos with Your Friends. TikTok Is the Best Way to Entertain Your Friends on Your Own Time, Right From Your Pocket. Creating Looping Videos on TikTok Is the Perfect Way to Showcase Your Talent and Creativity to Our Global Community for 2024
- Author: Morgan
- Created at : 2024-04-24 01:12:59
- Updated at : 2024-04-25 01:12:59
- Link: https://ai-video-editing.techidaily.com/1713949006015-create-and-share-short-videos-with-your-friends-tiktok-is-the-best-way-to-entertain-your-friends-on-your-own-time-right-from-your-pocket-creating-looping-vi/
- License: This work is licensed under CC BY-NC-SA 4.0.
