
:max_bytes(150000):strip_icc():format(webp)/how-to-use-remote-access-on-your-samsung-smart-tv-4688935-01-29c7de5dc77e4747a8070d12f0c3d84c.jpg)
Discover the Best Game Recording Software for Your PC in This Developing Industry. Record Your Gameplay in Real Time and Enjoy the Benefits that Come with It for 2024
Discover the Best Game Recording Software for Your PC in This Developing Industry. Record Your Gameplay in Real Time and Enjoy the Benefits that Come with It
Recording gameplay on PC has been an essential part of operations for many streamers. This has led to developing several recording software dedicated to this specific purpose. With the market flooding with these tools, it is important to look at the quality instead of the quantity.
Let’s dive into the world of top game recorders for PC featuring services for the finest content creation. Take a look at their benefits, along with a simple and cost-effective alternative to make screen recording much easier on your PC.
Screen Recording Now For Win 7 or later(64-bit)
Screen Recording Now For macOS 10.14 or later
Part 1. Finding a Good Gameplay Recorder on PC? Get One Instantly
Now that you are aware of some top benefits that game recorders provide, it is time to learn how to reap these benefits. There are currently several apps to help you capture gameplay on PC. The following list provides an insight into the top 10 apps to record gameplay on your computer:
Top Gameplay Recorder Tools on PC:
1.Bandicam
2. OBS Studio
3.Xbox Game Bar
4.Action! – Game Recorder
5.XSplit Broadcaster
6.FBX
7.D3DGear
8.Geceta by Movavi
9.Radeon ReLive
10.ScreenPal
1.Bandicam
Bandicam stands amongst the top gameplay recorders available for PC today. It is an easy-to-use and free screen recording software that can capture anything you want on your screen.
Bandicam offers several useful features when it comes to screen recording. You can record audio, choose webcam overlay, draw real-time on the screen, and more. Bandicam also offers long-term screen recording, stretching as long as 24 hours. Besides recording gameplay, it is also suitable for recording lectures, webinars, video calls, and more.

2.OBS Studio
OBS Studio offers open-source software for recording and live-streaming videos. The game recorder for PC is available for download on Windows, Mac, and Linux. OBS allows real-time audio and video capturing abilities without compromising on performance. You can capture multiple sources simultaneously, including windows, text, images, webcams, and more.
The tool allows users to set unlimited scenes and seamlessly switch between them. You can easily choose custom transitions, duplicate screens, and tweak other aspects.

3.Xbox Game Bar
Your Windows PC will likely have an in-built Game Bar offered by Xbox. It is a customizable gaming overlay that makes gaming easier. Among other useful features, the Game Bar allows for real-time recording of any gameplay on the PC.
The Xbox Game Bar offers easy keyboard shortcuts that can be customized for various functions. The start and end of the recording are also narrated by the tool, so you can hear when changes are made. Game Bar can also help find new teammates with LFG (Looking For Group) and chat with other Xbox users.

4.Action! – Game Recorder
Action! – Game Recorder is one of the best software currently available for recording gameplay on PC. With smooth recordings and high-quality streaming, it is a reliable option for novice and expert gamers.
It can record HD gameplay at up to 120fps with low CPU usage. Users can easily get around its easy-to-use interface. You can export your videos directly to Facebook and YouTube. Action! also supports live streaming to Twitch, YouTube, and Upstream. You can even control the video recording on your PC via your smartphone.

5.XSplit Broadcaster
Another remarkable tool that offers simple yet powerful gameplay recording is XSplit. You can use tools to create content for popular platforms like Twitch, YouTube, and TikTok. XSplit Broadcaster comes as a feature-packed production studio for content creation.
XSplit offers unlimited customization options when it comes to recording gameplay. It offers flawless video and audio quality without putting additional load on the system. XSplit ensures lag-free gameplay, so your efficiency is not affected while recording.

6.FBX
If you want high-performance HD recordings without interruptions in your gameplay, FBX is a reliable option. It is a dedicated game recorder offering many useful features to users. FBX can save highlights of the best parts of your gameplay. You can customize hotkeys that instantly save short videos of your best action.
It can also capture high-quality screenshots for easy sharing. FBX also allows live streaming options with rapid setups. The tool can automatically adjust to your bandwidth to help eliminate jerky streams.

7.D3DGear
For fast and efficient recordings, you can opt for D3DGear. It is a high-quality game screen recorder for PC containing all the essentials for smooth recordings. The tool is available on Windows computers as a plugin and add-on software.
D3DGear can record gameplay smoothly without causing the game to drop much in the frame rate. It also allows users to live stream their gameplay to Twitch. D3DGear can also record Oculus Rift VR gameplay with HD SBS stereoscopic videos. Furthermore, it can produce Constant Frame Rate (CFR) movies, often required with Adobe software.

8.Gecata by Movavi
Movavi offers its state-of-the-art game recorder for PC in the form of Gecata. The tool is a lightweight and solid program for recording and streaming gameplay. You can use it to grab the best moments of your gaming experience and share them with your peers across the globe.
Gecata enables users to record and stream their games at the same time without any lag. You can also record webcam and microphone, in-game sound effects, music, and dialogues all in one click. Gecata provides full control, allowing you to customize overlays to monitor frame rate, bit count, and other metrics.

9.Radeon ReLive
Radeon ReLive by AMD certainly deserves a spot on this list of game recorder software for PCs. It is a user-friendly game recorder that helps users capture and share gameplay videos and screenshots. Radeon ReLive is configuring-friendly and has a minimal impact on the FPS rate.
The tool works on systems with AMD graphics cards. It allows users to tweak their game and display settings, allowing for seamless gameplay. Radeon also contains a switch for saving power and preventing the system from overheating.

10.ScreenPal
Formerly known as Screencast-o-Matic, ScreenPal is a user-friendly tool designed to capture and share screen recordings. You can record and edit your content on the same platform using this versatile tool. ScreenPal is available on Windows, Mac, iOS, Android, and Chromebook devices.
Besides recording gameplay on a PC, you can also use it for education, work, and other personal purposes. ScreenPal comes with a built-in editor that helps you tweak your videos after recording them. You can also host and share content on its easily accessible cloud.

[Cost-Effective] Screen Recording in Wondershare Filmora
The tools mentioned above are great for recording gameplay on PC. However, you might have noticed that many of these tools offer pricing plans that can prove heavy on the wallet. If you are looking for a cost-effective solution for recording gameplay, Wondershare Filmora is a stellar choice.
Filmora by Wondershare is an all-in-one solution when it comes to content creation. While other game recorders for PC often offer specific tools, Filmora offers a 360-degree approach. Besides recording the screen, Filmora also allows users to compile and edit their recorded gameplay without ever exiting the platform.
Anyone Can Create a Tutorial With These Easy Steps
Free Download For Win 7 or later(64-bit)
Free Download For macOS 10.14 or later
How to Record Gameplay Using Wondershare Filmora
The Screen Record feature on Filmora is a simple yet powerful function that can help you capture your computer’s screen and webcam. You can record audio using the microphone and the system at the same time.
Filmora also lets users customize the area of the screen they wish to capture. This makes it arguably the best game screen recorder for PC. To capture gameplay on PC using Filmora, follow the steps below:
Step1Open Screen Recorder on Filmora
Install and launch Wondershare Filmora on your PC. You can select the “Screen Recorder” feature from the startup window on Filmora.

Alternatively, you can also go to the “File” tab and select “Record Media” from the dropdown list, then choose to record the webcam, PC screen, or voiceover.

Step2Adjust Screen Recording Settings
Once the Screen Recorder panel opens, you can choose the recording ratio from the menu under the “Square” icon. The available options are to record the full screen, a target window, or any custom size. You can then toggle the switches next to the “Microphone,” “System Audio,” and “Camera” options to turn them on or off. Filmora also lets users adjust the frame rate, quality, and other parameters.

Step3 Adjust Screen Recording Settings
Once the Screen Recorder panel opens, you can choose the recording ratio from the menu under the “Square” icon. The available options are to record the full screen, a target window, or any custom size. You can then toggle the switches next to the “Microphone,” “System Audio,” and “Camera” options to turn them on or off. Filmora also lets users adjust the frame rate, quality, and other parameters.
Step4Record Through Filmora and Conclude
After specifying the settings, tap the “Record” button to start recording your gameplay. Filmora will ensure your gameplay is not affected by the recording. Hit the “Stop” button once you are done and edit the file in Filmora. Finally, export the recorded gameplay to a location of your choice.

Conclusion
Many dedicated software are available to help you capture gameplay on PC. The top game recording software for PC and their pricing plans are mentioned above for your convenience. However, our advice is to switch to Wondershare Filmora. Not only does Filmora offer a cost-effective solution, but it is also much easier to use and provides high-quality recordings without lag.
Screen Recording Now For Win 7 or later(64-bit)
Screen Recording Now For macOS 10.14 or later
Part 1. Finding a Good Gameplay Recorder on PC? Get One Instantly
Now that you are aware of some top benefits that game recorders provide, it is time to learn how to reap these benefits. There are currently several apps to help you capture gameplay on PC. The following list provides an insight into the top 10 apps to record gameplay on your computer:
Top Gameplay Recorder Tools on PC:
1.Bandicam
2. OBS Studio
3.Xbox Game Bar
4.Action! – Game Recorder
5.XSplit Broadcaster
6.FBX
7.D3DGear
8.Geceta by Movavi
9.Radeon ReLive
10.ScreenPal
1.Bandicam
Bandicam stands amongst the top gameplay recorders available for PC today. It is an easy-to-use and free screen recording software that can capture anything you want on your screen.
Bandicam offers several useful features when it comes to screen recording. You can record audio, choose webcam overlay, draw real-time on the screen, and more. Bandicam also offers long-term screen recording, stretching as long as 24 hours. Besides recording gameplay, it is also suitable for recording lectures, webinars, video calls, and more.
2.OBS Studio
OBS Studio offers open-source software for recording and live-streaming videos. The game recorder for PC is available for download on Windows, Mac, and Linux. OBS allows real-time audio and video capturing abilities without compromising on performance. You can capture multiple sources simultaneously, including windows, text, images, webcams, and more.
The tool allows users to set unlimited scenes and seamlessly switch between them. You can easily choose custom transitions, duplicate screens, and tweak other aspects.
3.Xbox Game Bar
Your Windows PC will likely have an in-built Game Bar offered by Xbox. It is a customizable gaming overlay that makes gaming easier. Among other useful features, the Game Bar allows for real-time recording of any gameplay on the PC.
The Xbox Game Bar offers easy keyboard shortcuts that can be customized for various functions. The start and end of the recording are also narrated by the tool, so you can hear when changes are made. Game Bar can also help find new teammates with LFG (Looking For Group) and chat with other Xbox users.
4.Action! – Game Recorder
Action! – Game Recorder is one of the best software currently available for recording gameplay on PC. With smooth recordings and high-quality streaming, it is a reliable option for novice and expert gamers.
It can record HD gameplay at up to 120fps with low CPU usage. Users can easily get around its easy-to-use interface. You can export your videos directly to Facebook and YouTube. Action! also supports live streaming to Twitch, YouTube, and Upstream. You can even control the video recording on your PC via your smartphone.
5.XSplit Broadcaster
Another remarkable tool that offers simple yet powerful gameplay recording is XSplit. You can use tools to create content for popular platforms like Twitch, YouTube, and TikTok. XSplit Broadcaster comes as a feature-packed production studio for content creation.
XSplit offers unlimited customization options when it comes to recording gameplay. It offers flawless video and audio quality without putting additional load on the system. XSplit ensures lag-free gameplay, so your efficiency is not affected while recording.
6.FBX
If you want high-performance HD recordings without interruptions in your gameplay, FBX is a reliable option. It is a dedicated game recorder offering many useful features to users. FBX can save highlights of the best parts of your gameplay. You can customize hotkeys that instantly save short videos of your best action.
It can also capture high-quality screenshots for easy sharing. FBX also allows live streaming options with rapid setups. The tool can automatically adjust to your bandwidth to help eliminate jerky streams.
7.D3DGear
For fast and efficient recordings, you can opt for D3DGear. It is a high-quality game screen recorder for PC containing all the essentials for smooth recordings. The tool is available on Windows computers as a plugin and add-on software.
D3DGear can record gameplay smoothly without causing the game to drop much in the frame rate. It also allows users to live stream their gameplay to Twitch. D3DGear can also record Oculus Rift VR gameplay with HD SBS stereoscopic videos. Furthermore, it can produce Constant Frame Rate (CFR) movies, often required with Adobe software.
8.Gecata by Movavi
Movavi offers its state-of-the-art game recorder for PC in the form of Gecata. The tool is a lightweight and solid program for recording and streaming gameplay. You can use it to grab the best moments of your gaming experience and share them with your peers across the globe.
Gecata enables users to record and stream their games at the same time without any lag. You can also record webcam and microphone, in-game sound effects, music, and dialogues all in one click. Gecata provides full control, allowing you to customize overlays to monitor frame rate, bit count, and other metrics.
9.Radeon ReLive
Radeon ReLive by AMD certainly deserves a spot on this list of game recorder software for PCs. It is a user-friendly game recorder that helps users capture and share gameplay videos and screenshots. Radeon ReLive is configuring-friendly and has a minimal impact on the FPS rate.
The tool works on systems with AMD graphics cards. It allows users to tweak their game and display settings, allowing for seamless gameplay. Radeon also contains a switch for saving power and preventing the system from overheating.
10.ScreenPal
Formerly known as Screencast-o-Matic, ScreenPal is a user-friendly tool designed to capture and share screen recordings. You can record and edit your content on the same platform using this versatile tool. ScreenPal is available on Windows, Mac, iOS, Android, and Chromebook devices.
Besides recording gameplay on a PC, you can also use it for education, work, and other personal purposes. ScreenPal comes with a built-in editor that helps you tweak your videos after recording them. You can also host and share content on its easily accessible cloud.
[Cost-Effective] Screen Recording in Wondershare Filmora
The tools mentioned above are great for recording gameplay on PC. However, you might have noticed that many of these tools offer pricing plans that can prove heavy on the wallet. If you are looking for a cost-effective solution for recording gameplay, Wondershare Filmora is a stellar choice.
Filmora by Wondershare is an all-in-one solution when it comes to content creation. While other game recorders for PC often offer specific tools, Filmora offers a 360-degree approach. Besides recording the screen, Filmora also allows users to compile and edit their recorded gameplay without ever exiting the platform.
Anyone Can Create a Tutorial With These Easy Steps
Free Download For Win 7 or later(64-bit)
Free Download For macOS 10.14 or later
How to Record Gameplay Using Wondershare Filmora
The Screen Record feature on Filmora is a simple yet powerful function that can help you capture your computer’s screen and webcam. You can record audio using the microphone and the system at the same time.
Filmora also lets users customize the area of the screen they wish to capture. This makes it arguably the best game screen recorder for PC. To capture gameplay on PC using Filmora, follow the steps below:
Step1Open Screen Recorder on Filmora
Install and launch Wondershare Filmora on your PC. You can select the “Screen Recorder” feature from the startup window on Filmora.
Alternatively, you can also go to the “File” tab and select “Record Media” from the dropdown list, then choose to record the webcam, PC screen, or voiceover.
Step2Adjust Screen Recording Settings
Once the Screen Recorder panel opens, you can choose the recording ratio from the menu under the “Square” icon. The available options are to record the full screen, a target window, or any custom size. You can then toggle the switches next to the “Microphone,” “System Audio,” and “Camera” options to turn them on or off. Filmora also lets users adjust the frame rate, quality, and other parameters.
Step3 Adjust Screen Recording Settings
Once the Screen Recorder panel opens, you can choose the recording ratio from the menu under the “Square” icon. The available options are to record the full screen, a target window, or any custom size. You can then toggle the switches next to the “Microphone,” “System Audio,” and “Camera” options to turn them on or off. Filmora also lets users adjust the frame rate, quality, and other parameters.
Step4Record Through Filmora and Conclude
After specifying the settings, tap the “Record” button to start recording your gameplay. Filmora will ensure your gameplay is not affected by the recording. Hit the “Stop” button once you are done and edit the file in Filmora. Finally, export the recorded gameplay to a location of your choice.
Conclusion
Many dedicated software are available to help you capture gameplay on PC. The top game recording software for PC and their pricing plans are mentioned above for your convenience. However, our advice is to switch to Wondershare Filmora. Not only does Filmora offer a cost-effective solution, but it is also much easier to use and provides high-quality recordings without lag.
15 Camera Shake Preset for Premiere Pro
Create High-Quality Video - Wondershare Filmora
An easy and powerful video editor
Numerous video and audio effects to choose from
Detailed tutorials are provided by the official channel
Do you know how professional video footage is made? Most of the time, it’s through small movements on a camera, called Camera Shake. It is used to create realistic and dramatic shots in movies. In contrast, you can accidentally capture some shake on film; most of the time, it has to be created by a team of people. Camera operators will perform different movements with the camera in order to create this effect that we see in many movies, TV shows, and documentaries all around the world.
Putting a shake on footage can add visual interest to your scene. It adds kinetic energy to the shot and can be useful for transitions as well. Are you looking for realistic camera shake effects for your footage? Do you think these effects will help your video stand out from the rest on video sharing sites such as Youtube, Vimeo, or other sites? Look no more. In this article, we will look at 15 camera shake presets for unlimited possibilities! Mix and match to get your favorite camera shake effect. Save your time and costs!
15 Camera Shake Preset for Adobe Premiere Pro
1. Camera Shake Presets By Jorkiy
This preset collection contains 15 camera shake presets for Premiere Pro. The presets produce a live camera effect. Three groups of presets are available. A smooth preset, a quick preset, and a jerky preset. Choose one and apply it to your footage. Surprise your audience with dynamic videos courtesy of this pack.

2. Shake The Camera Or Text By 27
Create a dynamic and realistic camera shake with this awesome preset collection. The length of the presets is 1 minute, and the version for long videos is also included - 10 minutes. The project is perfect for shaking other objects, such as text or particles. Easy to use. Create dynamics in your video using this preset.

3. Real Action Ca1mera Shakes By PlaygroundStudio
12 Action Shakes effects are included in “Real Action Camera Shakes.”. You can use these effects directly in your clips or on adjustment layers. The visuals can be used in presentations, slideshows, TV shows, commercials, promotions, events, and on Facebook and YouTube. This professionally designed and energetically animated Premiere Preset will impress your audience.

4. Camera Shake By Insine
You can add a camera shake to your footage to give it a realistic look. You can also use it to shake other objects like text or particles. Animate your projects with realistic camera movements!
5. Shaking Presets Transitions By Jorkiy
This set of dynamic transitions for Premiere Pro is called Shaking Presets Transitions. There are different kinds of shakes in these transitions. This video pack works with any resolution (4k, full HD, vertical videos, etc.). Impress your audience with breathtaking videos by using this pack.

6. 35 Hit Presets By Animark
Your video will be shaken with these presets. There are 35 presets divided into seven categories. These presets would be ideal for any action, dynamic presentation, trailer, etc. You can choose from FullHD, 4K, Square, Instagram, etc.
7. 30 Shake Transitions By Animark
A stylish shake transition will be added to your video with these presets. Approximately 30 transitions are included in the project. You can create a multitude of different transitions by combining presets. You can use these presets for any action, dynamic social media presentation, trailer, etc.
8. 3D Spin Transitions By PlaygroundStudio
3D With Spin Transitions for Premiere Pro, you get 24 stylish and creative transitioning effects. This feature will look and feel better when presenting slideshows, films, movies, trailers, teasers, promotions, and events videos. PP presets that are action-packed and energetically crafted to impress your audience.
9. Stretched Bounce Transitions By LeftHand
This collection of 12 dynamic transitions presets is called Stretched Bounce Transitions. With these transitions, your videos will look more modern, clean, and cinematic. This transition works with videos and photos with resolutions up to 4K. With presets, you can combine seamless camera movement with an elastic shake. Each of the four directions is included, and there is also a category perfect for music videos with a liquid, psychedelic overlay. You can modify the speed of each preset easily.
10. Shake Transitions By JuliaDesign
Are you capable of creating dynamic videos? Check out these shake transitions to improve them. The pack is small but has a lot of cool effects. Six presets are included, so you can easily pick your favorite. You can customize each transition by adjusting the layer length.

11. Shake Transitions Presets By Jorkiy
The Shake Transitions Presets for Premiere Pro is available for free. Create sharp shaky camera effects by using this set of presets. You can apply a preset to an adjustment layer placed over your frames. The pack is compatible with any resolution (4K, full HD, vertical video, etc.). Surprise your viewers with dynamic videos created with this pack.
12. Camera Shake Flicker Effects By Vesna
14 shake presets are included in this pack, including shake effects and blinking effects. An instructional video is included. Presets last approximately 30 seconds each. It can be used as a camera shake effect, a text shake effect, or a transition effect. The possibilities are endless when you combine them.
13. Smooth Camera Shake By Enduro
Ten smooth camera shake effects are included in this project. Easily applied to the clip or layer above your edit, these are easy to use. You can use presets for effects such as camera shake, text shake, and even transitions. You can combine them to get any unique result you desire.
14. Real Camera Shakes By PlaygroundStudio
You can apply them to a clip or an adjustment layer, and they’re so easy to use. Presentations, slide shows, TV shows, commercials, promotions, events, Facebook, and YouTube videos can all benefit from using them. This energetic and beautifully designed Premiere Preset will impress your audience.
15. Spin Shake Transitions By VSDream
You’re sure to love the 24 dynamic, impactful directional spin shake transitions in the Spin Shake Transitions Premiere Pro template. Sport, travel, action movies, special events, TV shows, sports films, commercials, and trailers are perfect for this project. Anything that requires an extra dose of excitement.
How to import & use Camera Shake Preset in Premiere Pro
The following steps will show you how to use these presets in Premiere Pro.
Firstly, these aren’t just drag-and-drop effects. You must install Adobe Premiere Pro on your computer.
Step1: The first step is to install the presets in your After Effects presets folder. After downloading and unzipping the free presets, copy and paste them.
Step2: As soon as you have copied the presets to the AE presets folder, you can open a PP project and replace the effects in your videos by choosing: Replace with After Effects Composition.
Step3: Verify the composition settings in Premiere Pro, and see if 4K or FHD are selected.
Step4: If you want to start adding presets to NULL objects, you can do so by creating them. To add Motion Blur, you will need footage and the overall composition. Next, you can adjust keyframes and use Motion Tiles.
Conclusion
●If you are tired of the linear style and want to change your videos into cool videos, you can use these 15 Presets for Adobe Premiere Pro. You can even tweak the effects to suit your preferences. These presets have a wide range of uses and can be used easily. It is a completely customizable filter that you can use on any video or audio footage in Adobe Premiere Pro, no matter its format (avi, MPEG, mp4, etc.). You can also control the intensity of these effects, making it suitable for footage.
Do you know how professional video footage is made? Most of the time, it’s through small movements on a camera, called Camera Shake. It is used to create realistic and dramatic shots in movies. In contrast, you can accidentally capture some shake on film; most of the time, it has to be created by a team of people. Camera operators will perform different movements with the camera in order to create this effect that we see in many movies, TV shows, and documentaries all around the world.
Putting a shake on footage can add visual interest to your scene. It adds kinetic energy to the shot and can be useful for transitions as well. Are you looking for realistic camera shake effects for your footage? Do you think these effects will help your video stand out from the rest on video sharing sites such as Youtube, Vimeo, or other sites? Look no more. In this article, we will look at 15 camera shake presets for unlimited possibilities! Mix and match to get your favorite camera shake effect. Save your time and costs!
15 Camera Shake Preset for Adobe Premiere Pro
1. Camera Shake Presets By Jorkiy
This preset collection contains 15 camera shake presets for Premiere Pro. The presets produce a live camera effect. Three groups of presets are available. A smooth preset, a quick preset, and a jerky preset. Choose one and apply it to your footage. Surprise your audience with dynamic videos courtesy of this pack.
2. Shake The Camera Or Text By 27
Create a dynamic and realistic camera shake with this awesome preset collection. The length of the presets is 1 minute, and the version for long videos is also included - 10 minutes. The project is perfect for shaking other objects, such as text or particles. Easy to use. Create dynamics in your video using this preset.
3. Real Action Ca1mera Shakes By PlaygroundStudio
12 Action Shakes effects are included in “Real Action Camera Shakes.”. You can use these effects directly in your clips or on adjustment layers. The visuals can be used in presentations, slideshows, TV shows, commercials, promotions, events, and on Facebook and YouTube. This professionally designed and energetically animated Premiere Preset will impress your audience.
4. Camera Shake By Insine
You can add a camera shake to your footage to give it a realistic look. You can also use it to shake other objects like text or particles. Animate your projects with realistic camera movements!
5. Shaking Presets Transitions By Jorkiy
This set of dynamic transitions for Premiere Pro is called Shaking Presets Transitions. There are different kinds of shakes in these transitions. This video pack works with any resolution (4k, full HD, vertical videos, etc.). Impress your audience with breathtaking videos by using this pack.
6. 35 Hit Presets By Animark
Your video will be shaken with these presets. There are 35 presets divided into seven categories. These presets would be ideal for any action, dynamic presentation, trailer, etc. You can choose from FullHD, 4K, Square, Instagram, etc.
7. 30 Shake Transitions By Animark
A stylish shake transition will be added to your video with these presets. Approximately 30 transitions are included in the project. You can create a multitude of different transitions by combining presets. You can use these presets for any action, dynamic social media presentation, trailer, etc.
8. 3D Spin Transitions By PlaygroundStudio
3D With Spin Transitions for Premiere Pro, you get 24 stylish and creative transitioning effects. This feature will look and feel better when presenting slideshows, films, movies, trailers, teasers, promotions, and events videos. PP presets that are action-packed and energetically crafted to impress your audience.
9. Stretched Bounce Transitions By LeftHand
This collection of 12 dynamic transitions presets is called Stretched Bounce Transitions. With these transitions, your videos will look more modern, clean, and cinematic. This transition works with videos and photos with resolutions up to 4K. With presets, you can combine seamless camera movement with an elastic shake. Each of the four directions is included, and there is also a category perfect for music videos with a liquid, psychedelic overlay. You can modify the speed of each preset easily.
10. Shake Transitions By JuliaDesign
Are you capable of creating dynamic videos? Check out these shake transitions to improve them. The pack is small but has a lot of cool effects. Six presets are included, so you can easily pick your favorite. You can customize each transition by adjusting the layer length.
11. Shake Transitions Presets By Jorkiy
The Shake Transitions Presets for Premiere Pro is available for free. Create sharp shaky camera effects by using this set of presets. You can apply a preset to an adjustment layer placed over your frames. The pack is compatible with any resolution (4K, full HD, vertical video, etc.). Surprise your viewers with dynamic videos created with this pack.
12. Camera Shake Flicker Effects By Vesna
14 shake presets are included in this pack, including shake effects and blinking effects. An instructional video is included. Presets last approximately 30 seconds each. It can be used as a camera shake effect, a text shake effect, or a transition effect. The possibilities are endless when you combine them.
13. Smooth Camera Shake By Enduro
Ten smooth camera shake effects are included in this project. Easily applied to the clip or layer above your edit, these are easy to use. You can use presets for effects such as camera shake, text shake, and even transitions. You can combine them to get any unique result you desire.
14. Real Camera Shakes By PlaygroundStudio
You can apply them to a clip or an adjustment layer, and they’re so easy to use. Presentations, slide shows, TV shows, commercials, promotions, events, Facebook, and YouTube videos can all benefit from using them. This energetic and beautifully designed Premiere Preset will impress your audience.
15. Spin Shake Transitions By VSDream
You’re sure to love the 24 dynamic, impactful directional spin shake transitions in the Spin Shake Transitions Premiere Pro template. Sport, travel, action movies, special events, TV shows, sports films, commercials, and trailers are perfect for this project. Anything that requires an extra dose of excitement.
How to import & use Camera Shake Preset in Premiere Pro
The following steps will show you how to use these presets in Premiere Pro.
Firstly, these aren’t just drag-and-drop effects. You must install Adobe Premiere Pro on your computer.
Step1: The first step is to install the presets in your After Effects presets folder. After downloading and unzipping the free presets, copy and paste them.
Step2: As soon as you have copied the presets to the AE presets folder, you can open a PP project and replace the effects in your videos by choosing: Replace with After Effects Composition.
Step3: Verify the composition settings in Premiere Pro, and see if 4K or FHD are selected.
Step4: If you want to start adding presets to NULL objects, you can do so by creating them. To add Motion Blur, you will need footage and the overall composition. Next, you can adjust keyframes and use Motion Tiles.
Conclusion
●If you are tired of the linear style and want to change your videos into cool videos, you can use these 15 Presets for Adobe Premiere Pro. You can even tweak the effects to suit your preferences. These presets have a wide range of uses and can be used easily. It is a completely customizable filter that you can use on any video or audio footage in Adobe Premiere Pro, no matter its format (avi, MPEG, mp4, etc.). You can also control the intensity of these effects, making it suitable for footage.
How to Use Visual Effect for Zoom
Zoom, a video calling software, has been quite popular over the last several months and is still one of the most used videos calling applications by millions of people worldwide. The site is a favorite among working professionals, but it is also utilized by individuals to connect with their friends and loved ones. Additionally, despite the app’s abundance of practical built-in tools and functions, it lacks the fun filters and special effects that the majority of users are used to when using a camera. Zoom has ingrained itself in our vocabulary during the last year. It seemed almost inevitable given that everything, from meetings to parties, has moved online.
You don’t need to seek farther than Zoom visual effects to inject a little jazz into the routine Zoom meetings during these hard times. By making adjustments to your Video configuration either before or during a video call, you may add visual effects in Zoom. Zoom meetings may be tedious to conduct over extended periods of time. Additionally, it would be helpful if you recorded the condition of your room before any Zoom meetings. You wouldn’t want to reveal your disorganized space while in a meeting. In these situations, adding visual effects will keep your private area private while also making your Zoom meetings entertaining and exciting. It will also prevent others from seeing your filthy room. This tutorial will walk you through the process of adding visual effects to Zoom step-by-step. In addition, you will get acquainted with the numerous camera functions and visual effects that you may employ during a Zoom video conversation.
- 1. What apps can add visual effect on Zoom?
- 2. How do I add visual effects to Zoom in Mobile?
- 3. How do you download Zoom effects?
Part 1: Popular Visual Effects you can add to Zoom
You may apply one of four main graphic effects to your Zoom meetings. The visual effects that you may use in your next Zoom video chat are briefly summarized below.
1. Visual Backgrounds
Virtual backdrops may transform any plain wall into an artistic setting. Zoom provides you the choice to add photographs to your backdrop in addition to offering you a few pre-made backdrops. Zoom lets you add a movie to your backdrop in addition to simply photographs. With the help of this imaginative feature, gather your pals and enjoy your favorite meme or video. A presentation’s collection of photos, a video, or a single image may all serve as virtual backdrops. A green screen would often be used as your real backdrop and consistent lighting would be required.
To avoid having to reveal your real surroundings while in a conference, you may add any picture or video as a virtual backdrop in Zoom. You have the option of adding own photos and movies or selecting from the pre-existing backdrop films and images. The file type for video backgrounds should be MP4 or MOV, and the resolution should range from 360p to a maximum of 1080p. Ensure that the mirroring of your video is deselected in the Zoom’s Video settings if your backdrop picture has text that may be read. By using virtual backdrops, you may alter the background of your video as it appears to the audience member with whom you are speaking. During the video conference you’re in, the other participants will be able to view your face and body overlaid on the backdrop of your choice.
2. Filters
With these filters, you can have fun in all of your Zoom meetings! Filters are a fun way to spend time with loved ones who are far away, particularly at a period when maintaining social distance is crucial. Filters are the modifications you make to yourself during Zoom meetings (such as a mustache, beard, etc.). They enliven the proceedings and contribute to the fun and memorability of your Zoom meetings.
Your films’ colors may be changed, and video filters can also add new aspects. By selecting a filter appropriate for each event, like team meetings or game nights, you may create the right atmosphere. You may embellish your face in the video with flowers or animal traits by using Zoom’s various filters. Alternately, you might just convert your video’s color to black and white. The video filters from a different program, however, allow you to apply more vibrant filters and place a greater emphasis on special effects.
3. Lighting and Touch-ups
The Lighting function enhances lighting effects and makes adjustments for low light situations to make you seem more professional during a Zoom conference. Similar to this, Touch-up enhances your facial characteristics by making your skin shine, erasing wrinkles, and giving your face a radiant appearance.
On your Zoom videos, changing your lighting and applying touch-ups may improve how you seem. By adjusting your lighting, you can make even dim illumination look bright. By doing touch-ups, you may get a smoother skin texture and get rid of any obvious imperfections.
4. Studio Effects
Zoom has been developing on a new feature called Studio Effects that would give customers the option of using virtual cosmetics in their movies. They are still checking it out before formally releasing it since it is still in beta. However, it is still available to users under the Backgrounds & Filters area. You may adjust the opacity as you like. You have the option to choose a new color or one of the predefined colors. Additionally, you may decide to employ the face effects in all of your next meetings, albeit doing so might be problematic if you use Zoom for business. Don’t worry if you’re running late. Zoom can give your face a natural-looking cosmetic makeover in only one minute!
This function is intended for less formal settings, such as gatherings of friends or family. Anyone who wants to seem more professional during meetings has access to Studio Effects, which offers the choice of various eyebrow colors, beards, and lipsticks. These are a few recently added features. You may add mustaches, beards, and brows in a variety of designs, hues, and intensities. Additionally, you have the option of coloring your lips.
Part 2: How to Add Visual Effects to Zoom
Along with facilitating online meetings, the Zoom program also lets you play with its visual effects. You just need to make a few adjustments to the video settings or utilize another third-party program to be ready to go.
Step1Start a Zoom meeting
You can download Zoom, install it on your computer, and log into your account if you don’t already have it if you don’t already have it.
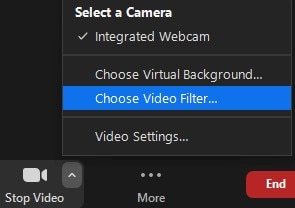
Step2Tap Background and Filters
After logging in to Zoom, use these settings. - Options > Camera > Video

Step3Faucet Filters
Here, you may play with a variety of visual effects and customize them to suit your tastes. Pick one of the numerous filters that are offered. To activate the filter, tap it.
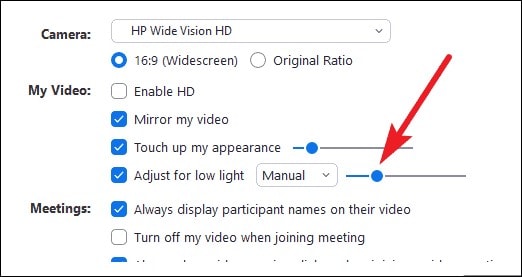
Step4Set Lighting Effects to on
Select “Adjust for low light” in the video options. For your lighting, you may choose between Auto and Manual effects. Zoom will automatically detect and adapt for the lighting in your room if you choose Auto.
Use Zoom’s noise reduction option to keep your conversation focused during your video conference in addition to adding visual elements. To do this, go to “Audio Settings” and choose “High” under “Suppress background noise.” Once you start speaking during the video conference, this essentially cancels out any background noise.
Part 3: Related FAQs
1. What apps can add visual effect on Zoom?
Following is the list of top three apps that you can use to utilize visual effects Zoom application:
Snap Camera is regarded as the most user-friendly. It is a software that you can download for Windows or Mac that works with live broadcasts and video chats. Because it was created by the people who founded Snapchat, it shares a broad variety of filters with that platform.
Link: Snap Camera
The Mac is the only platform on which CamTwist may be used. You may also use it to give your movies additional filters and unique effects. This program lets you pick from a variety of pre-made effects while also allowing you to create your own.
Link: CamTwist
Another desktop application that lets you change and even blur your backdrop is ManyCam. It enables you to apply digital effects, filters, and 3-D masks to your face. Using this tool, you can also build layers and presets.
Link: ManyCam
2. How do I add visual effects to Zoom in Mobile?
Zoom includes a function that might be useful if you don’t want to tidy up or want to add some entertainment to your calls. You may utilize Zoom virtual backdrops to alter your surroundings and take you to a more pleasant location on both the desktop and mobile apps. After joining one on a mobile device, pick Virtual backdrop by tapping the More icon in the bottom right corner. Choose a photo from the list of choices, or click the plus sign (+) to add a photo or video from your gallery.
3. How do you download Zoom effects?
Pressing the Studio Effects button after installing Zoom for the first time will prompt a pop-up asking you to download the Studio Effects package. Several filters, suited for both business meetings and conversations with friends, let you customize the video and audio during your video calls. To start downloading the Effects bundle, click the Download button. The “Studio Effects” window will appear on the right-hand side of the Background & Filter page after the download is finished. All the face components and choices are available in this Studio Effects window.
Conclusion
The most popular video meeting tool worldwide is Zoom. Family, friends, coworkers, and any two people who want to video chat utilize it. Zoom visual effects are the ideal tool for injecting some humor into otherwise dull Zoom sessions and meetings. A few simple steps will get you a striking backdrop, a humorous filter, and some interesting effects. Since the majority of formal work is now completed from home, Zoom has taken over as the standard video conferencing program. Try out as many of the effects as you like, and use this page as a companion and a map to help you along the way.
- 1. What apps can add visual effect on Zoom?
- 2. How do I add visual effects to Zoom in Mobile?
- 3. How do you download Zoom effects?
Part 1: Popular Visual Effects you can add to Zoom
You may apply one of four main graphic effects to your Zoom meetings. The visual effects that you may use in your next Zoom video chat are briefly summarized below.
1. Visual Backgrounds
Virtual backdrops may transform any plain wall into an artistic setting. Zoom provides you the choice to add photographs to your backdrop in addition to offering you a few pre-made backdrops. Zoom lets you add a movie to your backdrop in addition to simply photographs. With the help of this imaginative feature, gather your pals and enjoy your favorite meme or video. A presentation’s collection of photos, a video, or a single image may all serve as virtual backdrops. A green screen would often be used as your real backdrop and consistent lighting would be required.
To avoid having to reveal your real surroundings while in a conference, you may add any picture or video as a virtual backdrop in Zoom. You have the option of adding own photos and movies or selecting from the pre-existing backdrop films and images. The file type for video backgrounds should be MP4 or MOV, and the resolution should range from 360p to a maximum of 1080p. Ensure that the mirroring of your video is deselected in the Zoom’s Video settings if your backdrop picture has text that may be read. By using virtual backdrops, you may alter the background of your video as it appears to the audience member with whom you are speaking. During the video conference you’re in, the other participants will be able to view your face and body overlaid on the backdrop of your choice.
2. Filters
With these filters, you can have fun in all of your Zoom meetings! Filters are a fun way to spend time with loved ones who are far away, particularly at a period when maintaining social distance is crucial. Filters are the modifications you make to yourself during Zoom meetings (such as a mustache, beard, etc.). They enliven the proceedings and contribute to the fun and memorability of your Zoom meetings.
Your films’ colors may be changed, and video filters can also add new aspects. By selecting a filter appropriate for each event, like team meetings or game nights, you may create the right atmosphere. You may embellish your face in the video with flowers or animal traits by using Zoom’s various filters. Alternately, you might just convert your video’s color to black and white. The video filters from a different program, however, allow you to apply more vibrant filters and place a greater emphasis on special effects.
3. Lighting and Touch-ups
The Lighting function enhances lighting effects and makes adjustments for low light situations to make you seem more professional during a Zoom conference. Similar to this, Touch-up enhances your facial characteristics by making your skin shine, erasing wrinkles, and giving your face a radiant appearance.
On your Zoom videos, changing your lighting and applying touch-ups may improve how you seem. By adjusting your lighting, you can make even dim illumination look bright. By doing touch-ups, you may get a smoother skin texture and get rid of any obvious imperfections.
4. Studio Effects
Zoom has been developing on a new feature called Studio Effects that would give customers the option of using virtual cosmetics in their movies. They are still checking it out before formally releasing it since it is still in beta. However, it is still available to users under the Backgrounds & Filters area. You may adjust the opacity as you like. You have the option to choose a new color or one of the predefined colors. Additionally, you may decide to employ the face effects in all of your next meetings, albeit doing so might be problematic if you use Zoom for business. Don’t worry if you’re running late. Zoom can give your face a natural-looking cosmetic makeover in only one minute!
This function is intended for less formal settings, such as gatherings of friends or family. Anyone who wants to seem more professional during meetings has access to Studio Effects, which offers the choice of various eyebrow colors, beards, and lipsticks. These are a few recently added features. You may add mustaches, beards, and brows in a variety of designs, hues, and intensities. Additionally, you have the option of coloring your lips.
Part 2: How to Add Visual Effects to Zoom
Along with facilitating online meetings, the Zoom program also lets you play with its visual effects. You just need to make a few adjustments to the video settings or utilize another third-party program to be ready to go.
Step1Start a Zoom meeting
You can download Zoom, install it on your computer, and log into your account if you don’t already have it if you don’t already have it.
Step2Tap Background and Filters
After logging in to Zoom, use these settings. - Options > Camera > Video
Step3Faucet Filters
Here, you may play with a variety of visual effects and customize them to suit your tastes. Pick one of the numerous filters that are offered. To activate the filter, tap it.
Step4Set Lighting Effects to on
Select “Adjust for low light” in the video options. For your lighting, you may choose between Auto and Manual effects. Zoom will automatically detect and adapt for the lighting in your room if you choose Auto.
Use Zoom’s noise reduction option to keep your conversation focused during your video conference in addition to adding visual elements. To do this, go to “Audio Settings” and choose “High” under “Suppress background noise.” Once you start speaking during the video conference, this essentially cancels out any background noise.
Part 3: Related FAQs
1. What apps can add visual effect on Zoom?
Following is the list of top three apps that you can use to utilize visual effects Zoom application:
Snap Camera is regarded as the most user-friendly. It is a software that you can download for Windows or Mac that works with live broadcasts and video chats. Because it was created by the people who founded Snapchat, it shares a broad variety of filters with that platform.
Link: Snap Camera
The Mac is the only platform on which CamTwist may be used. You may also use it to give your movies additional filters and unique effects. This program lets you pick from a variety of pre-made effects while also allowing you to create your own.
Link: CamTwist
Another desktop application that lets you change and even blur your backdrop is ManyCam. It enables you to apply digital effects, filters, and 3-D masks to your face. Using this tool, you can also build layers and presets.
Link: ManyCam
2. How do I add visual effects to Zoom in Mobile?
Zoom includes a function that might be useful if you don’t want to tidy up or want to add some entertainment to your calls. You may utilize Zoom virtual backdrops to alter your surroundings and take you to a more pleasant location on both the desktop and mobile apps. After joining one on a mobile device, pick Virtual backdrop by tapping the More icon in the bottom right corner. Choose a photo from the list of choices, or click the plus sign (+) to add a photo or video from your gallery.
3. How do you download Zoom effects?
Pressing the Studio Effects button after installing Zoom for the first time will prompt a pop-up asking you to download the Studio Effects package. Several filters, suited for both business meetings and conversations with friends, let you customize the video and audio during your video calls. To start downloading the Effects bundle, click the Download button. The “Studio Effects” window will appear on the right-hand side of the Background & Filter page after the download is finished. All the face components and choices are available in this Studio Effects window.
Conclusion
The most popular video meeting tool worldwide is Zoom. Family, friends, coworkers, and any two people who want to video chat utilize it. Zoom visual effects are the ideal tool for injecting some humor into otherwise dull Zoom sessions and meetings. A few simple steps will get you a striking backdrop, a humorous filter, and some interesting effects. Since the majority of formal work is now completed from home, Zoom has taken over as the standard video conferencing program. Try out as many of the effects as you like, and use this page as a companion and a map to help you along the way.
How To Create a Polaroid Collage?
How To Create a Polaroid Collage?
An easy yet powerful editor
Numerous effects to choose from
Detailed tutorials provided by the official channel
As it is said that “Old is gold”, the same holds true when it comes to collages. No matter how advanced the technology has become or the design has evolved with collages the old-fashioned polaroid collages are never out of fashion. Polaroid images are small pocket-sized images having a white border developed using polaroid cameras. When it comes to collages, you can develop these images using your special camera and then lay them out in the desired pattern.
With everything taking the digital route, collage creation is no exception and now you can quickly create customized polarised collages using all your favorite pictures. Learn more about polaroid collages, the best tools for their creation, and more in the following parts.
In this article
01 [How to Create an Impressive Polaroid Collage](#Part 1)
02 [How to Create a Polaroid Photo Collage in Photoshop](#Part 2)
03 [Best Place to Get Stock Images for Your Polaroid Collage](#Part 3)
04 [How to Make a Photo Collage Online](#Part 4)
Part 1 How to Create an Impressive Polaroid Collage
Like any other collage, a polaroid collage is one where several polaroid styles images are placed together in the desired pattern. To create an eye-catchy polaroid collage, some of the basic requirements are as follows.

01Use the right tool
First of all, select the right tool that can help you create the desired collage. There are several online as well as desktop programs available for this. Choose a tool that comes with multiple polaroid collage template and offers different editing options.
02Select a layout/design/template
Next, select the desired layout or the polaroid frame collage template from the available options that match your requirements.
03Add high-quality images
Now it’s time to add the images to the template. To make an impressive collage make sure to add high-quality images. You can either use the images captured by you or can also use the stock images available at different online sites.
04Personalize and customize the collage
Next, it’s time to customize the collage. After the images are added, you can further add elements like text, filters, effects, and others to make your collage look more appealing.
05Save, print, or share the collage
Finally, it’s time to save the collage, print it, or share it over online sites, social media platforms, or with your near and dear ones.
Part 2 How to Create a Polaroid Photo Collage in Photoshop
To create an interesting polaroid collage Photoshop works as a good tool. Both Photoshop CS6 and Photoshop Creative Cloud can be used for creating the desired collage with slight changes in the functioning of both versions.
01Steps to create polaroid collage using Photoshop polaroid collage maker
Step 1. Launch the Photoshop tool and add the first image. Choose the Rectangle Tool using its icon which is present in the lower half of the Tools panel.

Step 2. Next, at the left corner of the interface set the Shape option as Tool Mode for drawing the vector shapes.

Step 3. Next, choose the color of the rectangle shape, and to fill this select black at the Fill color swatch in the Options bar. A dialog box will appear to choose the type of fill and here you need to select the Solid Color option.
Click on the Enter button to close the dialog box.

Step 4. Also, ensure that there are no strokes around the edges, and for this tap on the Stroke swatch box on the right side of the Options bar. A Stroke Type dialog box will open where you need to select the None icon. Click on Enter to close the pop-up window.
Step 5. When all the above settings are done, press and hold the Shift key and then you need to click and drag the shape to move into the square box.

Step 6. A newly added shape layer will now appear at the Layers panel. Now you need to make a copy of this shape and then resize it for creating the outer frame of the polaroid.
The duplicate shape layer will be created and will appear on the Layers panel. Rename these shapes as desired.
Step 7. Now after selecting the border layer in the layers panel click again on the Fill color swatch and choose the White color (to make it look like a polaroid image).
Step 8. Next, move to the Edit menu and select Free Transform Path which will create the transform handles around the shape which can also be used for resizing.
Step 9. A shadow to the border can also be added by clicking on the icon of Layer Styles and then choosing the Drop Shadow option from the list.
Step 10. Choose the image area from the Layers panel.
Step 11. Next, use the Knockout function from the Blending Options.
Step 12. Now select both shape layers and group the layers by clicking on New Group from Layers in the menu. Give a desired name to the group.
Step 13. Next, click on the Background layer and choose New Fill or Adjustment Layer.
Step 14. Tap on the Polaroid layer group from the Layers panel and select it.
Step 15. Go to the Edit menu and select the Free Transform option.
Step 16. Now when all the major work is done, it’s time to create a duplicate layer group to create a new polaroid.

When multiple layer groups are added your polaroid photo collage will be ready.
Part 3 How to Make a Photo Collage Online
Creating a polaroid collage using Photoshop is quite complicated and a lengthy process. So, if you are looking for a simpler and quicker way to create the desired collage, we suggest using an online tool. Fotor is one such decent tool that works from your browser and comes with several pre-designed collage templates including polaroid.
The interface of this polaroid collage app is simple where you just need to select the polaroid-based template from the available options, add images, customize the collage by adding a text, filter, or any other element, and then download the created collage.
The interface is simple and user-friendly and the process of creating the collage is fast.

Part 4 Best Place To Get Stock Images For Your Polaroid Collage
To create an eye-catchy collage, the images added also need to be interesting. Besides your local pictures, you can even get stock images available at several sites. One such tool for stock images that we recommend is Wondershare Filmora Video Editor . Though this is an advanced video editing tool supporting a wide range of functions, it also comes with a library of images and other media files that can be used.
You can search from a vast collection of images in different categories and genres to be used for your collage. Additionally, the software also supports a split-screen feature where multiple videos can be played that appears like a video collage.
For Win 7 or later (64-bit)
For macOS 10.12 or later
● Ending Thoughts →
● Polaroid picture collage is one of the most interesting ways of making a collage.
● Photoshop is a great tool for creating a polaroid collage like a pro.
● Online tools like Fotor and others are simple and user-friendly and come with pre-designed templates for creating a polaroid collage.
● Wondershare Filmora is an excellent software to search for stock images and other files, editing videos, and also create a video collage.
As it is said that “Old is gold”, the same holds true when it comes to collages. No matter how advanced the technology has become or the design has evolved with collages the old-fashioned polaroid collages are never out of fashion. Polaroid images are small pocket-sized images having a white border developed using polaroid cameras. When it comes to collages, you can develop these images using your special camera and then lay them out in the desired pattern.
With everything taking the digital route, collage creation is no exception and now you can quickly create customized polarised collages using all your favorite pictures. Learn more about polaroid collages, the best tools for their creation, and more in the following parts.
In this article
01 [How to Create an Impressive Polaroid Collage](#Part 1)
02 [How to Create a Polaroid Photo Collage in Photoshop](#Part 2)
03 [Best Place to Get Stock Images for Your Polaroid Collage](#Part 3)
04 [How to Make a Photo Collage Online](#Part 4)
Part 1 How to Create an Impressive Polaroid Collage
Like any other collage, a polaroid collage is one where several polaroid styles images are placed together in the desired pattern. To create an eye-catchy polaroid collage, some of the basic requirements are as follows.
01Use the right tool
First of all, select the right tool that can help you create the desired collage. There are several online as well as desktop programs available for this. Choose a tool that comes with multiple polaroid collage template and offers different editing options.
02Select a layout/design/template
Next, select the desired layout or the polaroid frame collage template from the available options that match your requirements.
03Add high-quality images
Now it’s time to add the images to the template. To make an impressive collage make sure to add high-quality images. You can either use the images captured by you or can also use the stock images available at different online sites.
04Personalize and customize the collage
Next, it’s time to customize the collage. After the images are added, you can further add elements like text, filters, effects, and others to make your collage look more appealing.
05Save, print, or share the collage
Finally, it’s time to save the collage, print it, or share it over online sites, social media platforms, or with your near and dear ones.
Part 2 How to Create a Polaroid Photo Collage in Photoshop
To create an interesting polaroid collage Photoshop works as a good tool. Both Photoshop CS6 and Photoshop Creative Cloud can be used for creating the desired collage with slight changes in the functioning of both versions.
01Steps to create polaroid collage using Photoshop polaroid collage maker
Step 1. Launch the Photoshop tool and add the first image. Choose the Rectangle Tool using its icon which is present in the lower half of the Tools panel.
Step 2. Next, at the left corner of the interface set the Shape option as Tool Mode for drawing the vector shapes.
Step 3. Next, choose the color of the rectangle shape, and to fill this select black at the Fill color swatch in the Options bar. A dialog box will appear to choose the type of fill and here you need to select the Solid Color option.
Click on the Enter button to close the dialog box.
Step 4. Also, ensure that there are no strokes around the edges, and for this tap on the Stroke swatch box on the right side of the Options bar. A Stroke Type dialog box will open where you need to select the None icon. Click on Enter to close the pop-up window.
Step 5. When all the above settings are done, press and hold the Shift key and then you need to click and drag the shape to move into the square box.
Step 6. A newly added shape layer will now appear at the Layers panel. Now you need to make a copy of this shape and then resize it for creating the outer frame of the polaroid.
The duplicate shape layer will be created and will appear on the Layers panel. Rename these shapes as desired.
Step 7. Now after selecting the border layer in the layers panel click again on the Fill color swatch and choose the White color (to make it look like a polaroid image).
Step 8. Next, move to the Edit menu and select Free Transform Path which will create the transform handles around the shape which can also be used for resizing.
Step 9. A shadow to the border can also be added by clicking on the icon of Layer Styles and then choosing the Drop Shadow option from the list.
Step 10. Choose the image area from the Layers panel.
Step 11. Next, use the Knockout function from the Blending Options.
Step 12. Now select both shape layers and group the layers by clicking on New Group from Layers in the menu. Give a desired name to the group.
Step 13. Next, click on the Background layer and choose New Fill or Adjustment Layer.
Step 14. Tap on the Polaroid layer group from the Layers panel and select it.
Step 15. Go to the Edit menu and select the Free Transform option.
Step 16. Now when all the major work is done, it’s time to create a duplicate layer group to create a new polaroid.
When multiple layer groups are added your polaroid photo collage will be ready.
Part 3 How to Make a Photo Collage Online
Creating a polaroid collage using Photoshop is quite complicated and a lengthy process. So, if you are looking for a simpler and quicker way to create the desired collage, we suggest using an online tool. Fotor is one such decent tool that works from your browser and comes with several pre-designed collage templates including polaroid.
The interface of this polaroid collage app is simple where you just need to select the polaroid-based template from the available options, add images, customize the collage by adding a text, filter, or any other element, and then download the created collage.
The interface is simple and user-friendly and the process of creating the collage is fast.
Part 4 Best Place To Get Stock Images For Your Polaroid Collage
To create an eye-catchy collage, the images added also need to be interesting. Besides your local pictures, you can even get stock images available at several sites. One such tool for stock images that we recommend is Wondershare Filmora Video Editor . Though this is an advanced video editing tool supporting a wide range of functions, it also comes with a library of images and other media files that can be used.
You can search from a vast collection of images in different categories and genres to be used for your collage. Additionally, the software also supports a split-screen feature where multiple videos can be played that appears like a video collage.
For Win 7 or later (64-bit)
For macOS 10.12 or later
● Ending Thoughts →
● Polaroid picture collage is one of the most interesting ways of making a collage.
● Photoshop is a great tool for creating a polaroid collage like a pro.
● Online tools like Fotor and others are simple and user-friendly and come with pre-designed templates for creating a polaroid collage.
● Wondershare Filmora is an excellent software to search for stock images and other files, editing videos, and also create a video collage.
Also read:
- In 2024, 8 Best Sites to Get Glitch Transition for Premiere Pro
- New In 2024, This Article Will Address Your Questions About the Easiest Way to Turn a Blog Into a Podcast. Lets Begin with the Reasons Why You Should Do a Podcast
- 2024 Approved Learn About Open Broadcaster Software and How to Perform Obs Color Correction. Also, Explore the Various Aspects of Color Correction Like Contrast, Brightness, Saturation, Among Others
- 2024 Approved How to Animate Your Designs With Canva GIF
- New Premiere Pro Best Slow Motion Effects To Use
- 7 Solutions Cut Video For Instagram On Mac for 2024
- New 2024 Approved Srt File Creator
- In 2024, How to Shoot Cinematic Footage From a Smartphone
- New Best GIF to Video Converters
- How To Export Video in Filmora
- Updated How to Convert Time-Lapse to Normal Video for 2024
- New 2024 Approved Spooky Halloween with the Best 15+ Halloween Countdown Video Clips
- New How to Rotate Videos With Media Player Classic for 2024
- New How-To Tutorials of Kapwing Collage Maker
- In 2024, Guide To Creating The Perfect VHS Effect Look in Premiere Pro
- New Are You Looking to Vlog Across Your Next Stop at the Café? Get Aware of the Significant Elements that Make up the Café Vlog
- Updated 15 Camera Shake Preset for Premiere Pro
- New How to Create Emoji on Mac That Take Less Than 10 Mins
- How to Resize FLV Videos Efficiently Windows, Mac,Android, iPhone & Online for 2024
- In 2024, How to Add Background to Video With/Without a Green Screen
- New There Are Several Video Players that You Can Use to Watch Videos on Your PC. To Have a Better Experience Viewing Videos and Enhancing Them Across a Similar Platform, You Can Try Out VLC Media Player for PC for 2024
- New Mastering the Art of Video Framing for 2024
- Updated Before & After Editing Trick - Filmora
- Updated 2024 Approved An Intro Video Describing You and Your Content Is the First and the Foremost Thing Which a Viewer Sees. Thinking of How to Make an Interesting Intro Video, This Blog Is Surely a Supportive Guide for You. Learn More Here
- New 2024 Approved Add Background to Video With/Without a Green Screen
- Updated In 2024, Create Intro Video with Flixpress
- New The Best Jump Cut Editing Tricks Make Your Videos Snappy! For 2024
- New Motion Tracking Is the Process of Tracking the Movements of a Project in a Video. This Article Will Show You How to Apply Motion Tracking Effect Into Videos
- Updated How to Put a Filter on a Video in iMovie for 2024
- Want to Immediately Know Something About Discord GIF for 2024
- Updated Have You Ever Heard Bokeh Effects for Videos? Do You Know that You Can Make Your Own Bokeh Video Easily with some Software. This Article Will Introduce You How to Make a Bokeh Effect Video with Steps for 2024
- Which Pokémon can Evolve with a Moon Stone For Apple iPhone 12 mini? | Dr.fone
- Forgotten The Voicemail Password Of Samsung Galaxy F54 5G? Try These Fixes
- In 2024, How To Unlock A Found Apple iPhone SE (2020)?
- Reliable User Guide to Fix Xiaomi Redmi 12 Running Slow and Freezing | Dr.fone
- 4 Ways to Fix Android Blue Screen of Death On Tecno Camon 20 Pro 5G | Dr.fone
- In 2024, Ultimate Guide, How to Transfer Music From Apple iPhone SE to iPhone | Dr.fone
- In 2024, Ultimate Guide on Tecno Spark 20 FRP Bypass
- Fix the Error of Unfortunately the Process.com.android.phone Has Stopped on Vivo S17 Pro | Dr.fone
- In 2024, Easy Tutorial for Activating iCloud from Apple iPhone SE (2022) Safe and Legal
- How to Fix It Oppo Reno 10 Pro+ 5G Wont Turn On | Dr.fone
- Top 15 Apps To Hack WiFi Password On Samsung Galaxy S23 Ultra
- How to Intercept Text Messages on Samsung Galaxy F04 | Dr.fone
- Change Location on Yik Yak For your Xiaomi Mix Fold 3 to Enjoy More Fun | Dr.fone
- In 2024, How Do You Get Sun Stone Evolutions in Pokémon For Samsung Galaxy F54 5G? | Dr.fone
- In 2024, How to Unlock T-Mobile iPhone 6s Plus online without SIM Card?
- In 2024, How to Copy Contacts from Apple iPhone SE (2022) to SIM? | Dr.fone
- Additional Tips About Sinnoh Stone For OnePlus Ace 3 | Dr.fone
- In 2024, Fake Android Location without Rooting For Your Xiaomi Civi 3 | Dr.fone
- In 2024, 5 Most Effective Methods to Unlock Apple iPhone 15 Plus in Lost Mode
- 4 Effective Methods Fake GPS Location on Apple iPhone 11/iPad | Dr.fone
- In 2024, 3 Ways to Track Vivo S17e without Them Knowing | Dr.fone
- Tips and Tricks for Apple ID Locked Issue From iPhone 15 Plus
- Fix Excel 2010 formula not showing result | Stellar
- The Ultimate Guide to Get the Rare Candy on Pokemon Go Fire Red On Tecno Phantom V Fold | Dr.fone
- 5 Ways to Track Tecno Pova 5 without App | Dr.fone
- Best Android Data Recovery - Undelete Lost Music from Honor Magic 6
- How To Enable USB Debugging on a Locked Infinix Note 30i Phone
- Title: Discover the Best Game Recording Software for Your PC in This Developing Industry. Record Your Gameplay in Real Time and Enjoy the Benefits that Come with It for 2024
- Author: Morgan
- Created at : 2024-05-19 05:12:31
- Updated at : 2024-05-20 05:12:31
- Link: https://ai-video-editing.techidaily.com/1713949105266-discover-the-best-game-recording-software-for-your-pc-in-this-developing-industry-record-your-gameplay-in-real-time-and-enjoy-the-benefits-that-come-with-it/
- License: This work is licensed under CC BY-NC-SA 4.0.
