
:max_bytes(150000):strip_icc():format(webp)/how-to-change-your-tiktok-username-and-profile-picture-048cd3c3b4854846ab46f920e862332f.jpg)
Do You Have an Idea on How to Zoom in on Snapchat? Using This Article, You Will Find the Easiest Way to Zoom in and Out on Snapchat Videos for Different Purposes for 2024
Do You Have an Idea on How to Zoom in on Snapchat? Using This Article, You Will Find the Easiest Way to Zoom in and Out on Snapchat Videos for Different Purposes
Abundant Video Effects - Wondershare Filmora
Provide abundant video effects - A creative video editor
Powerful color correction and grading
Detailed tutorials are provided by the official channel
People make Snapchat videos for various purposes, such as capturing beautiful natural scenery or a funny video of a friend. To capture the details or to focus on a specific part, the zoom in and out feature is commonly used. By doing so, you can manually focus on a particular area clearly with your fingers.
The following article will focus on how to zoom in on Snapchat by offering detailed and easy steps. Moreover, we will suggest a powerful tool that can help you in zooming in and out on Snapchat flawlessly, along with additional distinct features.
In this article
Part 1: How to Zoom In and Out a Video on Snapchat While Recording?
Part 2: How to Zoom In and Out a Pre-Recorded Video on Snapchat?
Part 3: How to Zoom In and Zoom Out Videos using Wondershare Filmora?
Part 1: How to Zoom In and Out a Video on Snapchat While Recording?
In this section, we will provide you with two methods of how to zoom in and out on Snapchat videos instantly:
Method 1: Without Locking Snapchat Recorder
Step 1: Start by opening your Snapchat from on your mobile device to access the camera screen for recording a video. Now, start capturing the video by holding the center red button from the middle of your screen.

Step 2: While holding the center recording button, use your finger and slide it in the upward direction to zoom in.

Step 3: To zoom out, use the same finger by sliding it to the bottom direction. Once done, leave the recording button by removing your finger to finish the recording. Now you can save the recorded video on Snapchat.

Method 2: By Using the Snapchat Lock Feature
Step 1: Begin with opening your Snapchat account and stay on your camera screen to record the video. Now start the recording by holding the center red button from your displayed screen.

Step 2: To “Lock” the recording, move your finger towards the left side, after which you can see the padlock icon on your screen.

Step 3: After recording the video is locked, use your two fingers simultaneously and move them apart to zoom in on the specific part. Conversely, for zooming out, use your two fingers and move them in an inward direction.

Step 4: To finalize the recording, simply tap on the recording icon, and the recording will stop. You can now edit your snap and send it to your friends or post it on your Snapchat.

Part 2: How to Zoom In and Out a Pre-Recorded Video on Snapchat?
In this section, we will offer detailed steps on how to zoom in and out on Snapchat with pre-recorded videos:
Step 1: Open your Snapchat from your smartphone and then tap on the icon showing on the left side depicting “Two Mobiles Overlapping Each Other.” From this icon, navigate to your “Camera Roll.”

Step 2: From your camera roll, choose the video you want to edit. Then click on the “Pencil” icon by going to the bottom left corner to zoom in and out on your video.

Step 3: On the next screen, you will see various editing options on the right side. Select the second last option, which is for cropping and can be used to zoom in on the videos.

Step 4: By using this selected option, you can zoom in and out on the video according to your preference. Just use your two fingers and place them on the screen. To zoom in, stretch the fingers and move them apart and control the zoom value manually.

Step 5: For zooming out, move the fingers in an inward direction. Once done with all the changes, tap on the “Tick” button. Afterward, click on the “Done” option and save the changes by tapping on “Save Changes.”

Part 3: How to Zoom In and Zoom Out Videos using Wondershare Filmora?
If you are finding it difficult how to zoom in on Snapchat effortlessly, we will recommend Wondershare Filmora as a complete toolbox for editing videos. Through this tool, you can not only flawlessly zoom in on the multiple Snapchat videos but can also perform various editing functions. The user interface is specially designed in a way to assist beginners in executing the editing process.
You can take advantage of tons of advanced features in Filmora like auto reframing, video effects, transitions, and instant mode. The user interface is so simple that within seconds you can zoom in and out on any video perfectly.
Collectively, this tool functions as a complete professional toolbox for video editing and does not require technical experience or additional tools. Steps to Zoom In and Out through Wondershare Filmora:
Step 1: Select New Project
Begin with launching Wondershare Filmora on your computer and click to open its user interface. Afterward, tap on the option “New Project” to continue with the process.

Step 2: Import your Snapchat Video
On the new window, click on the icon of the “Arrowhead” to import the video on this tool. Once done with uploading the video, drag the video to the timeline of this tool.

Step 3: Go to Transitions Tab
From the tabs displayed on the left side, navigate to the “Transitions” tab by clicking on them. On its search box, type “Zoom In Out,” and the tool will automatically fetch transitions related to it.

Step 4: Choose Transitions
From the displayed transitions, select any transition of your choice. Apply the transition to your video by dragging it to the video available on the timeline.

Step 5: Preview the video
If you find the results satisfactory in the preview window, tap on the “Export” button displayed on top and save the video on your computer.

Conclusion
Snapchat videos are highly popular due to their high-quality results and features. However, if you are struggling to focus on certain parts while recording a video through Snapchat, this article has offered a well-structured guide on how to zoom in and out on Snapchat quickly. If you are finding manual methods confusing, you can rely on the top-notch tool called Wondershare Filmora for Snapchat zoomed in.
People make Snapchat videos for various purposes, such as capturing beautiful natural scenery or a funny video of a friend. To capture the details or to focus on a specific part, the zoom in and out feature is commonly used. By doing so, you can manually focus on a particular area clearly with your fingers.
The following article will focus on how to zoom in on Snapchat by offering detailed and easy steps. Moreover, we will suggest a powerful tool that can help you in zooming in and out on Snapchat flawlessly, along with additional distinct features.
In this article
Part 1: How to Zoom In and Out a Video on Snapchat While Recording?
Part 2: How to Zoom In and Out a Pre-Recorded Video on Snapchat?
Part 3: How to Zoom In and Zoom Out Videos using Wondershare Filmora?
Part 1: How to Zoom In and Out a Video on Snapchat While Recording?
In this section, we will provide you with two methods of how to zoom in and out on Snapchat videos instantly:
Method 1: Without Locking Snapchat Recorder
Step 1: Start by opening your Snapchat from on your mobile device to access the camera screen for recording a video. Now, start capturing the video by holding the center red button from the middle of your screen.
Step 2: While holding the center recording button, use your finger and slide it in the upward direction to zoom in.
Step 3: To zoom out, use the same finger by sliding it to the bottom direction. Once done, leave the recording button by removing your finger to finish the recording. Now you can save the recorded video on Snapchat.
Method 2: By Using the Snapchat Lock Feature
Step 1: Begin with opening your Snapchat account and stay on your camera screen to record the video. Now start the recording by holding the center red button from your displayed screen.
Step 2: To “Lock” the recording, move your finger towards the left side, after which you can see the padlock icon on your screen.
Step 3: After recording the video is locked, use your two fingers simultaneously and move them apart to zoom in on the specific part. Conversely, for zooming out, use your two fingers and move them in an inward direction.
Step 4: To finalize the recording, simply tap on the recording icon, and the recording will stop. You can now edit your snap and send it to your friends or post it on your Snapchat.
Part 2: How to Zoom In and Out a Pre-Recorded Video on Snapchat?
In this section, we will offer detailed steps on how to zoom in and out on Snapchat with pre-recorded videos:
Step 1: Open your Snapchat from your smartphone and then tap on the icon showing on the left side depicting “Two Mobiles Overlapping Each Other.” From this icon, navigate to your “Camera Roll.”
Step 2: From your camera roll, choose the video you want to edit. Then click on the “Pencil” icon by going to the bottom left corner to zoom in and out on your video.
Step 3: On the next screen, you will see various editing options on the right side. Select the second last option, which is for cropping and can be used to zoom in on the videos.
Step 4: By using this selected option, you can zoom in and out on the video according to your preference. Just use your two fingers and place them on the screen. To zoom in, stretch the fingers and move them apart and control the zoom value manually.
Step 5: For zooming out, move the fingers in an inward direction. Once done with all the changes, tap on the “Tick” button. Afterward, click on the “Done” option and save the changes by tapping on “Save Changes.”
Part 3: How to Zoom In and Zoom Out Videos using Wondershare Filmora?
If you are finding it difficult how to zoom in on Snapchat effortlessly, we will recommend Wondershare Filmora as a complete toolbox for editing videos. Through this tool, you can not only flawlessly zoom in on the multiple Snapchat videos but can also perform various editing functions. The user interface is specially designed in a way to assist beginners in executing the editing process.
You can take advantage of tons of advanced features in Filmora like auto reframing, video effects, transitions, and instant mode. The user interface is so simple that within seconds you can zoom in and out on any video perfectly.
Collectively, this tool functions as a complete professional toolbox for video editing and does not require technical experience or additional tools. Steps to Zoom In and Out through Wondershare Filmora:
Step 1: Select New Project
Begin with launching Wondershare Filmora on your computer and click to open its user interface. Afterward, tap on the option “New Project” to continue with the process.
Step 2: Import your Snapchat Video
On the new window, click on the icon of the “Arrowhead” to import the video on this tool. Once done with uploading the video, drag the video to the timeline of this tool.
Step 3: Go to Transitions Tab
From the tabs displayed on the left side, navigate to the “Transitions” tab by clicking on them. On its search box, type “Zoom In Out,” and the tool will automatically fetch transitions related to it.
Step 4: Choose Transitions
From the displayed transitions, select any transition of your choice. Apply the transition to your video by dragging it to the video available on the timeline.
Step 5: Preview the video
If you find the results satisfactory in the preview window, tap on the “Export” button displayed on top and save the video on your computer.
Conclusion
Snapchat videos are highly popular due to their high-quality results and features. However, if you are struggling to focus on certain parts while recording a video through Snapchat, this article has offered a well-structured guide on how to zoom in and out on Snapchat quickly. If you are finding manual methods confusing, you can rely on the top-notch tool called Wondershare Filmora for Snapchat zoomed in.
Learn How Video Montages Were Used over Film History with Examples and the Types of Videos for Shorter Montages. Plus, Learn About the Best Software for It
Video montages are one of the best types of video formats people enjoy, and they are useful for different occasions. Whether you want to create a montage of your memories as an anniversary gift or create a montage of product photos for promotions, uses are multiple here. This prompts the need for users to learn how to make a montage, and that is what we will cover in this post.
These videos, with a series of shots and information edited together cohesively in sequence, are useful for showcasing storyline progress. Here, you will learn about use cases of the process, like a birthday video montage, more ideas, and the process of making them. Read on if any of that interests you.

Part 1. Classic Montage Ideas in Art and Film
Video montages play a major role in films, art productions, and gaming, like the call of duty montage.
In terms of the first example, when you watch movies, you might notice this technique used in many movies, utilized more prominently since the 1920s when Sergei Eisenstein coined the term first. These scenes appear as stitched-together shots of the characters showing time passage, enjoying activities or memories.
Different techniques are common, like rhythmic, metric, intellectual, or tonal. For example, the 2000 movie “Requiem for a Dream” showcased an intellectual/metric style of video montage to show the disorientating effect of the character under drug influence. A relatively recent example would be Benedict Cumberbatch’s 2016 movie “Doctor Strange”, where the montage shows the titular character’s interaction with the villain (no spoilers).
3 Top Montages in Film for All Times
If the above two examples did not fully express what is a montage video, seeing more examples should help. For this, here are three of the top montage examples available in Film History, each version representing a separate video montage style.
1. Rocky (1976)
One of the most notable montages is available in the 1976 action movie, the Sylvester Stallone-starrer “Rocky”. The type of video montage that is visible in this movie is rhythmic in nature, showcasing the training the character undergoes. This is edited with a musical background score, summarising some shots’ full training progression process.
To add an emotive tone to the video, music is added to the video clip that engages audiences to feel the character’s passion. A rhythmic style of video montage technique is used to cut the shorts as per the content. The lengths of each clip are not similar and differ as per the action going on in the scene.
2. Mulan (1998)
Video montages are also visible in animated movies, as seen in the 1998 version of Disney’s “Mulan”. The scene in question is where the song “I’ll Make a Man Out of You” plays while Mulan undergoes strict training for the military from the male lead. A sequence of shots showing her progress is shown.
Here, the video montage is shown with the background music that perfectly aligns with what is occurring in the video. The visuals and the audio in the background cohesively show the main character’s struggle, which creates an emotional response in the audience. Therefore, the style of video montage here falls under tonal or overtonal categories.
Watch this video to get an idea of how music and visuals can partner for tonal video montages.
3. Creed (2015)
Like in the Rocky movie, its 2015 sequel, “Creed”, also has a video montage. Here, the clips in the sequence are also used to depict the intense training progress. However, where it differs from the rhythmic formula is that the sequence highlights the emotional journey or determination of Adonis Creed to succeed.
Plus, this video montage is a homage to the original version; the tonal effect is further noticeable in the scene of Rocky’s health deterioration against Creed’s training. Thus, it juxtaposes the two scenes, creating an emotional impact on viewers to root for the main character.
Watch this video to understand what is a montage video of the tonal type.
Part 2. Creative Montage Ideas for Social Media
Of course, movies and TV shows are the only types of media where video montage techniques are useful. Many non-professionals use options like a fortnite montage editor to create and edit montage videos for other projects they can share across platforms. Some even create video montages to create videos for social media.
These include vlog-like videos that people record and then edit together into a montage which different techniques. Plus, some users create montages of different things that interest them, like gameplay. Then, they share those videos across social media for views, like on TikTok or YouTube.
· Gaming Montages
Different creators focus on developing gaming montages to create projects for the games they operate. These can include videos showcasing the skills or gameplays of the creation, all explaining a specific theme in some cases.
There are different games that the users focus on for showcasing their gaming prowess in action. Common examples include Fortnite, Call of Duty, CSGO, or PUBG montage videos.
Watch this video to get an idea.
· Wedding Montages
Many users turn to edit video montages for specific occasions, adding clips of different moments instead of one long-running documentary. They incorporate stylish effects like slow motion and transitions, incorporate a moving background score, and more.
Many top influencers and celebrities have used this technique for their wedding videos on social media. Additionally, regular people also adopt the style.
Watch this video as an example.
· Birthday Montages
Like wedding videos, users can try out the video montage technique to create videos for birthdays. These can include scenes of the main creator throughout their preparation phase for the party. Alternately, some users create video montages of their experience leading up to the video celebration, through a longer period or the same day.
Watch this video to understand how these videos may look.
Part 3. How Can I Create Easily a Montage Video?
After understanding the types of video montage techniques and ideas, the next point of concern is learning how to make a montage.
One of the best editing software to use for this process is Wondershare Filmora . With this editor, you can create different video montages as per the theme, customized or instantly. Filmora includes premium-quality effects and transitions, including free stock media that you can also add. Plus, the software allows the ability to record voiceover and adjust background scores in the video.
You can also choose the aspect ratio for the video, depending on the platform you post it on. For example, if you are creating a full professional-level scene montage, use the widescreen (16:9) aspect ratio, like in YouTube videos. Or, use the portrait (9:16) for mobile-based videos for TikTok videos or a 1:1 aspect ratio for Instagram videos.
Watch this video to know how it works.
Free Download For Win 7 or later(64-bit)
Free Download For macOS 10.14 or later
Features of Filmora for Video Montage Making
There are multiple top-quality features available in the Filmora software that is useful for creating and editing video montages. Use them and create dynamic videos.
1. Screen Recorder
The Screen Recorder feature is accessible through the home page of the Filmora software after launching. Since the first stage of making a montage involves getting the video clips for it, you can use this to record the video. For example, if you have a movie saved on your desktop, use the screen recorder and tap the Play button to record the screen.

You can adjust further settings, like which headphone or speaker to use for the audio recording.
2. Preset Templates
Next comes the editing process. After completing the recording process for the montage video, you can use preset templates on Filmora via Instant Mode. This is useful for users who do not have enough time to fully edit a long montage video or have the technical skills for it.
You can click on the Instant Mode tab on the home page. Then, choose the specific theme of the video montage you will create, like Birthday, Wedding, Business, etc. After selecting the theme, you can insert multiple video clips into the editor. Adjust the clips in sequence and press the “Auto-Create” button.

3. Abundant Video Effects and Music Resources
If you want to customize the video montage video manually, you can use the various effects and advanced features in the main editor timeline. For example, click on the Effects tab to find your options.

After importing the file(s) into the editor and dragging it to the timeline, you can use the Crop icon to cut clips. Then, rearrange them and merge them. Plus, further editing features are available for premium-level edits, like the Chroma Key. Click on it and add a green screen in the background.

The AI Portrait feature is also available, automatically detecting the main character and accurately removing the background.
You can adjust the speed of transitions in the video with the Speed Ramping function. Many high-quality effects are available under the Effects tab, and you can add audio to the video through the Media tab.

Conclusion
Video montages are one of the tried-and-tested methods used in film-making, gaming videos, and social media videos. You can use Filmora to create such video montages based on the type of video montage technique that fits it. Then, share it directly to YouTube or save it for transferring across different platforms.
Free Download For Win 7 or later(64-bit)
Free Download For macOS 10.14 or later
Part 1. Classic Montage Ideas in Art and Film
Video montages play a major role in films, art productions, and gaming, like the call of duty montage.
In terms of the first example, when you watch movies, you might notice this technique used in many movies, utilized more prominently since the 1920s when Sergei Eisenstein coined the term first. These scenes appear as stitched-together shots of the characters showing time passage, enjoying activities or memories.
Different techniques are common, like rhythmic, metric, intellectual, or tonal. For example, the 2000 movie “Requiem for a Dream” showcased an intellectual/metric style of video montage to show the disorientating effect of the character under drug influence. A relatively recent example would be Benedict Cumberbatch’s 2016 movie “Doctor Strange”, where the montage shows the titular character’s interaction with the villain (no spoilers).
3 Top Montages in Film for All Times
If the above two examples did not fully express what is a montage video, seeing more examples should help. For this, here are three of the top montage examples available in Film History, each version representing a separate video montage style.
1. Rocky (1976)
One of the most notable montages is available in the 1976 action movie, the Sylvester Stallone-starrer “Rocky”. The type of video montage that is visible in this movie is rhythmic in nature, showcasing the training the character undergoes. This is edited with a musical background score, summarising some shots’ full training progression process.
To add an emotive tone to the video, music is added to the video clip that engages audiences to feel the character’s passion. A rhythmic style of video montage technique is used to cut the shorts as per the content. The lengths of each clip are not similar and differ as per the action going on in the scene.
2. Mulan (1998)
Video montages are also visible in animated movies, as seen in the 1998 version of Disney’s “Mulan”. The scene in question is where the song “I’ll Make a Man Out of You” plays while Mulan undergoes strict training for the military from the male lead. A sequence of shots showing her progress is shown.
Here, the video montage is shown with the background music that perfectly aligns with what is occurring in the video. The visuals and the audio in the background cohesively show the main character’s struggle, which creates an emotional response in the audience. Therefore, the style of video montage here falls under tonal or overtonal categories.
Watch this video to get an idea of how music and visuals can partner for tonal video montages.
3. Creed (2015)
Like in the Rocky movie, its 2015 sequel, “Creed”, also has a video montage. Here, the clips in the sequence are also used to depict the intense training progress. However, where it differs from the rhythmic formula is that the sequence highlights the emotional journey or determination of Adonis Creed to succeed.
Plus, this video montage is a homage to the original version; the tonal effect is further noticeable in the scene of Rocky’s health deterioration against Creed’s training. Thus, it juxtaposes the two scenes, creating an emotional impact on viewers to root for the main character.
Watch this video to understand what is a montage video of the tonal type.
Part 2. Creative Montage Ideas for Social Media
Of course, movies and TV shows are the only types of media where video montage techniques are useful. Many non-professionals use options like a fortnite montage editor to create and edit montage videos for other projects they can share across platforms. Some even create video montages to create videos for social media.
These include vlog-like videos that people record and then edit together into a montage which different techniques. Plus, some users create montages of different things that interest them, like gameplay. Then, they share those videos across social media for views, like on TikTok or YouTube.
· Gaming Montages
Different creators focus on developing gaming montages to create projects for the games they operate. These can include videos showcasing the skills or gameplays of the creation, all explaining a specific theme in some cases.
There are different games that the users focus on for showcasing their gaming prowess in action. Common examples include Fortnite, Call of Duty, CSGO, or PUBG montage videos.
Watch this video to get an idea.
· Wedding Montages
Many users turn to edit video montages for specific occasions, adding clips of different moments instead of one long-running documentary. They incorporate stylish effects like slow motion and transitions, incorporate a moving background score, and more.
Many top influencers and celebrities have used this technique for their wedding videos on social media. Additionally, regular people also adopt the style.
Watch this video as an example.
· Birthday Montages
Like wedding videos, users can try out the video montage technique to create videos for birthdays. These can include scenes of the main creator throughout their preparation phase for the party. Alternately, some users create video montages of their experience leading up to the video celebration, through a longer period or the same day.
Watch this video to understand how these videos may look.
Part 3. How Can I Create Easily a Montage Video?
After understanding the types of video montage techniques and ideas, the next point of concern is learning how to make a montage.
One of the best editing software to use for this process is Wondershare Filmora . With this editor, you can create different video montages as per the theme, customized or instantly. Filmora includes premium-quality effects and transitions, including free stock media that you can also add. Plus, the software allows the ability to record voiceover and adjust background scores in the video.
You can also choose the aspect ratio for the video, depending on the platform you post it on. For example, if you are creating a full professional-level scene montage, use the widescreen (16:9) aspect ratio, like in YouTube videos. Or, use the portrait (9:16) for mobile-based videos for TikTok videos or a 1:1 aspect ratio for Instagram videos.
Watch this video to know how it works.
Free Download For Win 7 or later(64-bit)
Free Download For macOS 10.14 or later
Features of Filmora for Video Montage Making
There are multiple top-quality features available in the Filmora software that is useful for creating and editing video montages. Use them and create dynamic videos.
1. Screen Recorder
The Screen Recorder feature is accessible through the home page of the Filmora software after launching. Since the first stage of making a montage involves getting the video clips for it, you can use this to record the video. For example, if you have a movie saved on your desktop, use the screen recorder and tap the Play button to record the screen.
You can adjust further settings, like which headphone or speaker to use for the audio recording.
2. Preset Templates
Next comes the editing process. After completing the recording process for the montage video, you can use preset templates on Filmora via Instant Mode. This is useful for users who do not have enough time to fully edit a long montage video or have the technical skills for it.
You can click on the Instant Mode tab on the home page. Then, choose the specific theme of the video montage you will create, like Birthday, Wedding, Business, etc. After selecting the theme, you can insert multiple video clips into the editor. Adjust the clips in sequence and press the “Auto-Create” button.
3. Abundant Video Effects and Music Resources
If you want to customize the video montage video manually, you can use the various effects and advanced features in the main editor timeline. For example, click on the Effects tab to find your options.
After importing the file(s) into the editor and dragging it to the timeline, you can use the Crop icon to cut clips. Then, rearrange them and merge them. Plus, further editing features are available for premium-level edits, like the Chroma Key. Click on it and add a green screen in the background.
The AI Portrait feature is also available, automatically detecting the main character and accurately removing the background.
You can adjust the speed of transitions in the video with the Speed Ramping function. Many high-quality effects are available under the Effects tab, and you can add audio to the video through the Media tab.
Conclusion
Video montages are one of the tried-and-tested methods used in film-making, gaming videos, and social media videos. You can use Filmora to create such video montages based on the type of video montage technique that fits it. Then, share it directly to YouTube or save it for transferring across different platforms.
Free Download For Win 7 or later(64-bit)
Free Download For macOS 10.14 or later
List of Whatsapp Video Format That You May Need to Know
Among the different communication platforms, WhatsApp is very famous. The application lets you communicate with your loved ones living far away via messages, audio, and video calls. Unlike other platforms, WhatsApp has a lot of happy users.
With WhatsApp, you can not only communicate but also offers media file sharing. You can share your favorite meme, funny videos, and other things through WhatsApp. If you want to share a video but can’t, the WhatsApp video format is not supported. To learn about WhatsApp-supported video formats, keep reading the article.
In this article
01 Introduction About WhatsApp Supported Video Formats
02 Tips About How to Convert Video for WhatsApp
03 Tricks About How to Edit Video for WhatsApp
Part 1. Introduction About WhatsApp Supported Video Formats
Are you facing trouble with WhatsApp videos and sharing them? It might be because of the video format WhatsApp as WhatsApp supports certain video formats. You should have the video in the supported format for using videos on WhatsApp and sharing them.

WhatsApp supports a maximum file size of 16MB is approximately a video of 90 seconds to 3 minutes. Whereas if we talk about WhatsApp status, it allows 30 seconds duration for the video. WhatsApp supports and MPEG-4 codec for videos and audio, and AC3.
Moving on, the WhatsApp-supported video formats include MP4, MKV, AVI, MOV, and also 3GP. Do you want to know more about these formats? Let’s help you.
MP4
This is the most commonly used format for both video and audio files. Other than this, MP4 also stores data like subtitles, still images, etc. Interesting, it also allows streaming.
MKV
MKV is an open container, free format. The format can hold videos, pictures, audio, and also an unlimited number of subtitles. Additionally, the format is universally used to store multimedia content like your favorite TV show or movies.
AVI
Audio Video Interleave is another video format supported by WhatsApp. Do you know that the AVI format supports synchronous audio-with-video playback? The file format stores both video and audio data in a file container.
MOV
Apple developed a MOV file format that can hold a wide range of media content like your audio, video, and even text. It stores data in the same file but on different tracks. The file format is commonly used in video editing software.
3GP
3GP is Third Generation Partnership Project (3GPP), a multimedia container for multimedia services. The format works great on 3G mobile phones, but it can also be used on 2G and 4G phones. 3GP is also a video format supported by WhatsApp.
Part 2. Tips About How to Convert Video for WhatsApp
Now that you know about video formats supported by WhatsApp, shall we introduce tips to convert the file format? In case you have a video that is not supported by WhatsApp, the following section of this article will assist as we are about to introduce Wondershare UniConverter . The video converter software is GPU accelerated, and it promises to maintain the original video quality.
UniConverter offers 90x faster conversion speed. You can convert video from and to different formats and also for different devices. Moreover, with UniConverter, you can convert multiple media files at once. Do you know what else UniConverter has to offer? The software is not just a video converter; it’s much more than that; you can use its Background Remover, Subtitle Editor, Smart Trimmer, etc.
Apart from converting your videos to WhatsApp video format, with UniConverter, you can also convert them into various popular web formats like Facebook, Instagram, Vimeo, YouTube, Amazon, and also eBay. Do you know an exciting thing about UniConverter? Well, it also supports various 4K and 3D files. If you are impressed with UniConverter, let’s move on and share the steps to use the software:
Step 1: To start, launch Wondershare UniConverter on your device and make sure that you have selected the ‘Converter’ option from the left menu. After this, from the right window, import the video files that you plan to work with.

Step 2: Now, head to the bottom of the main screen and look for the ‘Output Format’ option. Open it and go to the ‘Video’ section. There, from the list of various file formats, select the supported video format for WhatsApp from the left and the right, select a resolution.

Step 3: UniConverter is famous for its speedy conversion; for this, hit on the ‘High-Speed Conversion’ from the top right corner. Next, select your desired location to save the file from the bottom by using the ‘File Location’ field. Once done, hit the ‘Convert’ button to get the video format converted.

Part 3. Tricks About How to Edit Video for WhatsApp
Do you plan to edit your WhatsApp videos? If you do, then we have a little treat for you; let us introduce Wondershare Filmora Video Editor . The software can change your editing game with its phenomenal features and amazing editing elements.
Do you want to know what features and elements we are talking about? Let’s tell you. Wondershare Filmora offers high-quality effects and transitions that can transform your video. Along with this, you get a wide variety of titles and other editing elements that could be used.
Filmora has a clean and straight interface; users can understand the software very quickly and work with it. Moreover, the video editor lets you select your preferred output format and then export the file. You get various cool features like green screen background, split-screen, join video, and a lot more.
For Win 7 or later (64-bit)
For macOS 10.12 or later
Interestingly, the software offers elements according to the latest trends and events around, like Christmas, Valentine’s, birthday, etc. Do you want to use Filmora to edit your WhatsApp video? For guidance, follow the steps shared below:
Step 1: For editing, launch Wondershare Filmora on your device and import the video file by heading to the ‘File’ tab. After that, hover on to the ‘Import Media’ option and select the ‘Import Media Files’ option.

Step 2: After locating your desired file, import it. Once successfully imported, then drag the file from the ‘Project Media’ section to the ‘Timeline’ so that you can start the editing.

Step 3: Let the fun begins! You can edit and transform your video file by adding various sound effects to it that Filmora offers you. Users can access the effects from the ‘Audio’ tab.

Step 4: Are you worried about titles? Don’t worry because Filmora offers a wide range of title templates that you can select from and customize too. Just head to the ‘Titles’ tab from the top menu bar and enjoy.

Step 5: What is editing without cool transitions and effects? Filmora comes with unique and distinct video effects and transitions that you can use by accessing the ‘Effects’ and ‘Transitions’ tabs.

Step 6: Once you are satisfied with all the editing, it’s time to export the video file. Hit on the ‘Export’ button and select WhatsApp-supported video format to save the file.

Wrapping Up
If you have been struggling with WhatsApp videos, this article is for you. We have discussed in detail WhatsApp-supported video formats. Not just this, we also talked about a video converter that could be used to convert video formats. Moreover, we shared a video editor to edit your WhatsApp videos. Are you ready for a bit of surprise?
Let’s talk about Wondershare Filmora Video Editor, the editing king to drastically change your videos and make them shine. The software is not an ordinary editor; it lets you trim, cut, join, split your video along with other editing options.
Do you know any good software for motion tracking? Wondershare Filmora offers many brilliant features like Key Framing, Silence Detection, Green Screen, Color Match, and whatnot. If you want to create exciting videos with exciting effects and features, then Filmora is a must-try.
Wondershare Filmora
Get started easily with Filmora’s powerful performance, intuitive interface, and countless effects!
Try It Free Try It Free Try It Free Learn More >

02 Tips About How to Convert Video for WhatsApp
03 Tricks About How to Edit Video for WhatsApp
Part 1. Introduction About WhatsApp Supported Video Formats
Are you facing trouble with WhatsApp videos and sharing them? It might be because of the video format WhatsApp as WhatsApp supports certain video formats. You should have the video in the supported format for using videos on WhatsApp and sharing them.
WhatsApp supports a maximum file size of 16MB is approximately a video of 90 seconds to 3 minutes. Whereas if we talk about WhatsApp status, it allows 30 seconds duration for the video. WhatsApp supports and MPEG-4 codec for videos and audio, and AC3.
Moving on, the WhatsApp-supported video formats include MP4, MKV, AVI, MOV, and also 3GP. Do you want to know more about these formats? Let’s help you.
MP4
This is the most commonly used format for both video and audio files. Other than this, MP4 also stores data like subtitles, still images, etc. Interesting, it also allows streaming.
MKV
MKV is an open container, free format. The format can hold videos, pictures, audio, and also an unlimited number of subtitles. Additionally, the format is universally used to store multimedia content like your favorite TV show or movies.
AVI
Audio Video Interleave is another video format supported by WhatsApp. Do you know that the AVI format supports synchronous audio-with-video playback? The file format stores both video and audio data in a file container.
MOV
Apple developed a MOV file format that can hold a wide range of media content like your audio, video, and even text. It stores data in the same file but on different tracks. The file format is commonly used in video editing software.
3GP
3GP is Third Generation Partnership Project (3GPP), a multimedia container for multimedia services. The format works great on 3G mobile phones, but it can also be used on 2G and 4G phones. 3GP is also a video format supported by WhatsApp.
Part 2. Tips About How to Convert Video for WhatsApp
Now that you know about video formats supported by WhatsApp, shall we introduce tips to convert the file format? In case you have a video that is not supported by WhatsApp, the following section of this article will assist as we are about to introduce Wondershare UniConverter . The video converter software is GPU accelerated, and it promises to maintain the original video quality.
UniConverter offers 90x faster conversion speed. You can convert video from and to different formats and also for different devices. Moreover, with UniConverter, you can convert multiple media files at once. Do you know what else UniConverter has to offer? The software is not just a video converter; it’s much more than that; you can use its Background Remover, Subtitle Editor, Smart Trimmer, etc.
Apart from converting your videos to WhatsApp video format, with UniConverter, you can also convert them into various popular web formats like Facebook, Instagram, Vimeo, YouTube, Amazon, and also eBay. Do you know an exciting thing about UniConverter? Well, it also supports various 4K and 3D files. If you are impressed with UniConverter, let’s move on and share the steps to use the software:
Step 1: To start, launch Wondershare UniConverter on your device and make sure that you have selected the ‘Converter’ option from the left menu. After this, from the right window, import the video files that you plan to work with.
Step 2: Now, head to the bottom of the main screen and look for the ‘Output Format’ option. Open it and go to the ‘Video’ section. There, from the list of various file formats, select the supported video format for WhatsApp from the left and the right, select a resolution.
Step 3: UniConverter is famous for its speedy conversion; for this, hit on the ‘High-Speed Conversion’ from the top right corner. Next, select your desired location to save the file from the bottom by using the ‘File Location’ field. Once done, hit the ‘Convert’ button to get the video format converted.
Part 3. Tricks About How to Edit Video for WhatsApp
Do you plan to edit your WhatsApp videos? If you do, then we have a little treat for you; let us introduce Wondershare Filmora Video Editor . The software can change your editing game with its phenomenal features and amazing editing elements.
Do you want to know what features and elements we are talking about? Let’s tell you. Wondershare Filmora offers high-quality effects and transitions that can transform your video. Along with this, you get a wide variety of titles and other editing elements that could be used.
Filmora has a clean and straight interface; users can understand the software very quickly and work with it. Moreover, the video editor lets you select your preferred output format and then export the file. You get various cool features like green screen background, split-screen, join video, and a lot more.
For Win 7 or later (64-bit)
For macOS 10.12 or later
Interestingly, the software offers elements according to the latest trends and events around, like Christmas, Valentine’s, birthday, etc. Do you want to use Filmora to edit your WhatsApp video? For guidance, follow the steps shared below:
Step 1: For editing, launch Wondershare Filmora on your device and import the video file by heading to the ‘File’ tab. After that, hover on to the ‘Import Media’ option and select the ‘Import Media Files’ option.
Step 2: After locating your desired file, import it. Once successfully imported, then drag the file from the ‘Project Media’ section to the ‘Timeline’ so that you can start the editing.
Step 3: Let the fun begins! You can edit and transform your video file by adding various sound effects to it that Filmora offers you. Users can access the effects from the ‘Audio’ tab.
Step 4: Are you worried about titles? Don’t worry because Filmora offers a wide range of title templates that you can select from and customize too. Just head to the ‘Titles’ tab from the top menu bar and enjoy.
Step 5: What is editing without cool transitions and effects? Filmora comes with unique and distinct video effects and transitions that you can use by accessing the ‘Effects’ and ‘Transitions’ tabs.
Step 6: Once you are satisfied with all the editing, it’s time to export the video file. Hit on the ‘Export’ button and select WhatsApp-supported video format to save the file.
Wrapping Up
If you have been struggling with WhatsApp videos, this article is for you. We have discussed in detail WhatsApp-supported video formats. Not just this, we also talked about a video converter that could be used to convert video formats. Moreover, we shared a video editor to edit your WhatsApp videos. Are you ready for a bit of surprise?
Let’s talk about Wondershare Filmora Video Editor, the editing king to drastically change your videos and make them shine. The software is not an ordinary editor; it lets you trim, cut, join, split your video along with other editing options.
Do you know any good software for motion tracking? Wondershare Filmora offers many brilliant features like Key Framing, Silence Detection, Green Screen, Color Match, and whatnot. If you want to create exciting videos with exciting effects and features, then Filmora is a must-try.
Wondershare Filmora
Get started easily with Filmora’s powerful performance, intuitive interface, and countless effects!
Try It Free Try It Free Try It Free Learn More >
How To Add Text In After Effects
In almost every video you come across, you will see text added to the video in different parts. There are various reasons why adding text to videos becomes a necessity. First of all, you can highlight the underlying message or key points in your video. Along with audio and video, the viewers will have another cue point in the form of text that they can retain in their memory for longer. You add animated texts to video to make the video interesting to watch and break the monotony of visual cues only.
Besides, you may have to want credits and add intro as well as outro to your video where adding text is almost a necessity. Text can help your viewer get the context of your video and make sense of the content. After Effects is a popular video editor thanks to its visual effects, text animation animations, and instant video enhancement tools. We will illustrate the different ways of adding text in After Effects in simple steps.
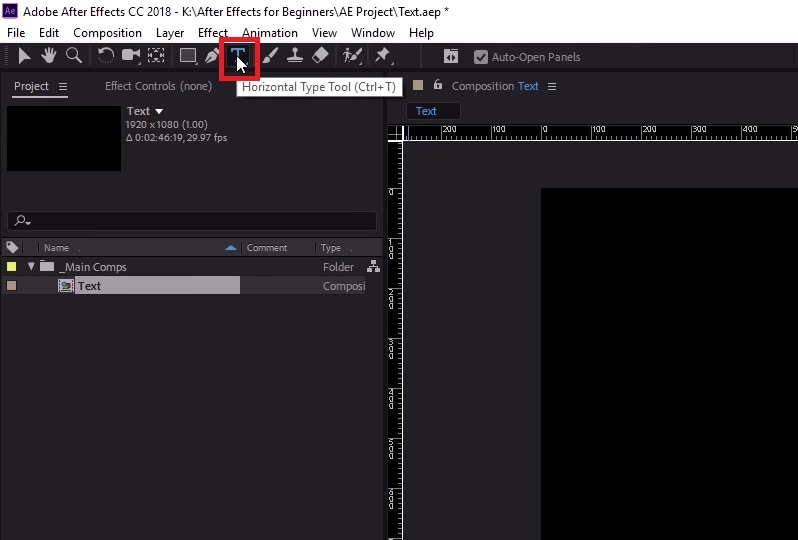
Part 1. Add Text in After Effects with Horizontal Type Tool
Once you have imported your video clip into the Timeline, there are several ways you can add text to your video. First of all, you can right-click on the Timeline and select New> Text to create an empty text layer and add any text you want. Similarly, you can go to Layer> New> Text option to do the same. But the easiest way of adding text in After Effects is by using Horizontal Type Tool. Here are the steps on how you can add text in AE with the type tool.
Step1Once you have imported your video into the Timeline, click on Horizontal Type Tool located in the top bar to add any text. You can press Ctrl+T(Windows) or Command+H(Mac) to get it instantly.
Step2Click on the video where you want to place the text and type your desired text there. After you are done adding your text, press Enter key in Num pad to exit out of the text field in the video.
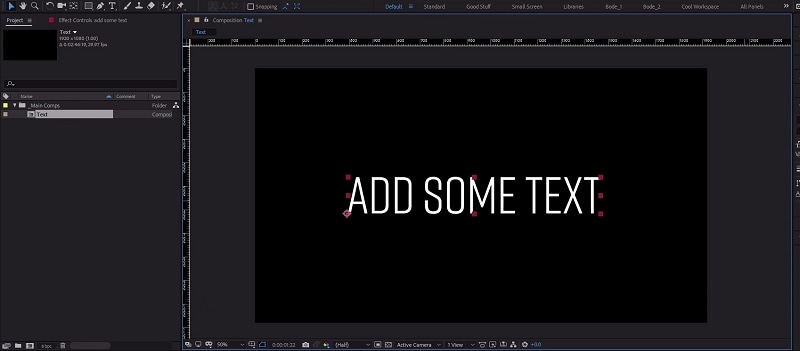
Step3This will automatically create a text layer on Timeline. You can now move the text and place it anywhere you want. You can also modify the text style and add animation which we will illustrate in the next section.
Part 2. Use the Character Panel to Edit Text in AE
When you select Type tool and add your desired text, you get a default style for the text. It is most likely that you have to modify the text style such as changing color, font, and size to fit in your video seamlessly. That is when you have to visit the Character Panel. Character Panel is where you get to edit the font of the text you have typed, increase or decrease the font size, change the font color, and much more. Apart from that, you can increase the spacing between lines when your text is a paragraph instead of a few words. Here are the steps to use Character Panel to edit text in AE.
Step1Once you have typed your text using Horizontal Type tool on the video, click on the text.
Step2Go to Character panel located in the right side of the screen. If it is minimized, click on the panel to expand it.
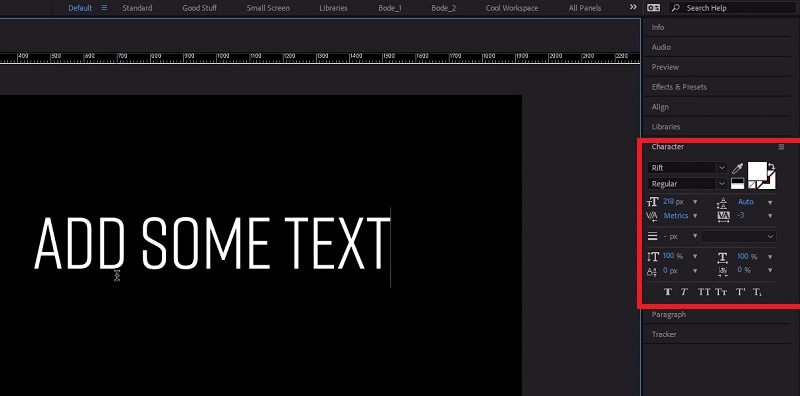
Step3The first option in the panel is the font of the text. By the side of the font is the text color. You can use the color picker tool to choose any color as per your preference.
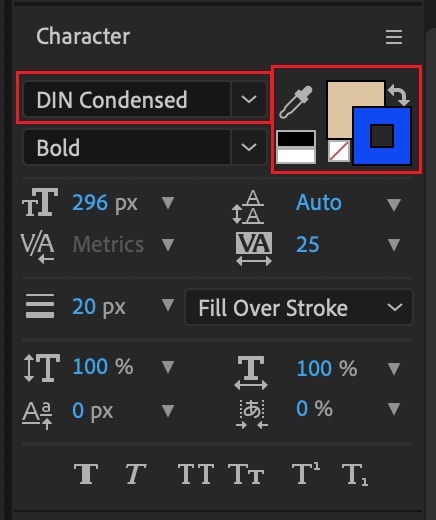
Step4Below the font, you can select the font style such as regular, bold, italics, and likewise. The subsequent part is to change the font size and adjust vertical spacing between lines and horizontal spacing between characters.
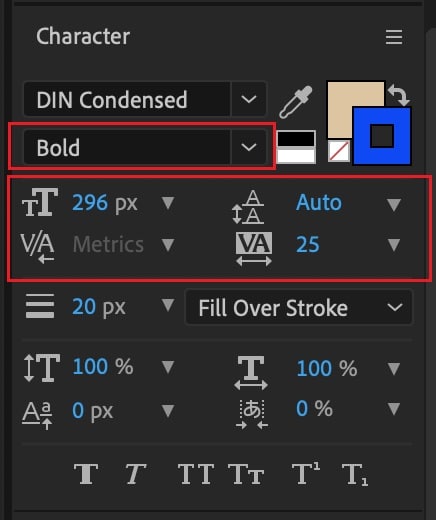
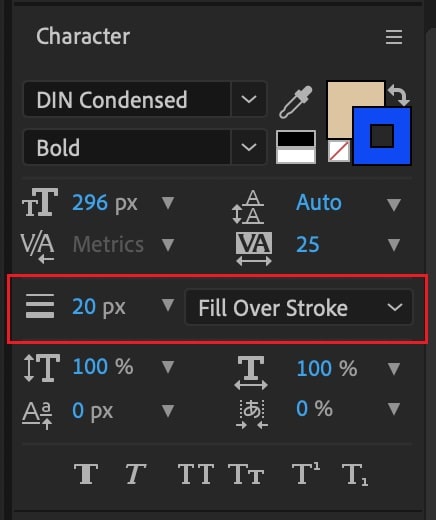
Step5The next section deals with Stroke option as well as fill the text option. You can fill the background of the text with any desired color.
Part 3. Add Animated Text to Video with Animation Presets
Now that you have added a static text and set the text format as per your preference, it is time to animate the text. A static text in a video does not look appealing, and animated texts make the video eye-catching instantly. You can use text animation presets in After Effects to add animated text to video. Here are the steps to add animated text to video with animation presets and effects.
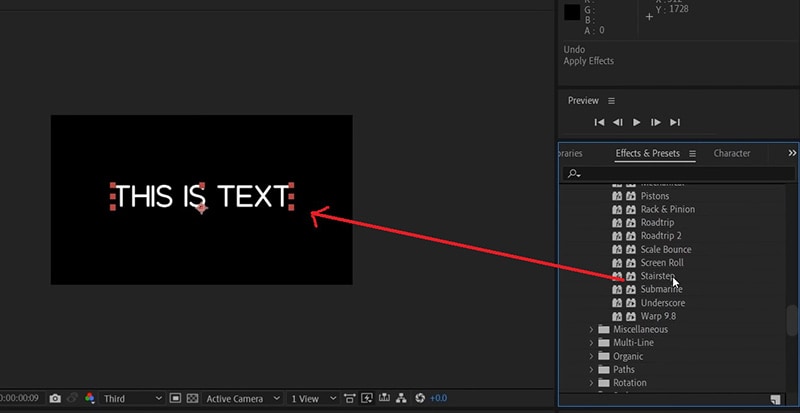
Step1Click on the text on your video that you want to animate. Go to Effects and Presets panel located on the right side.
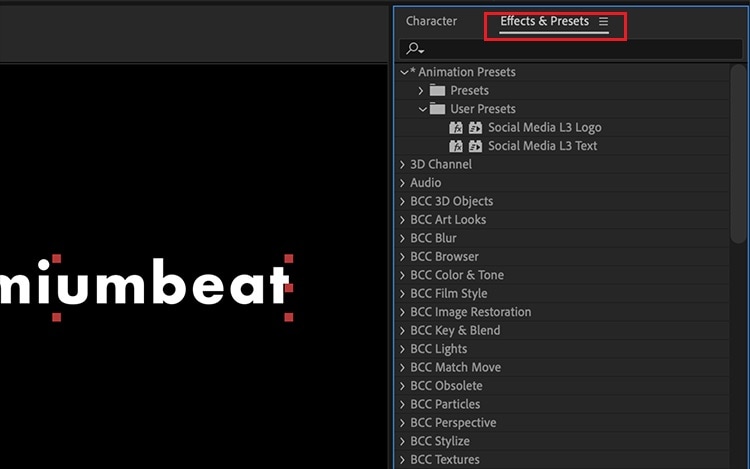
Step2Under Effects and Presets panel, Click on Text option. This will open all the different categories of animation presets available that you can apply to the text on your video.
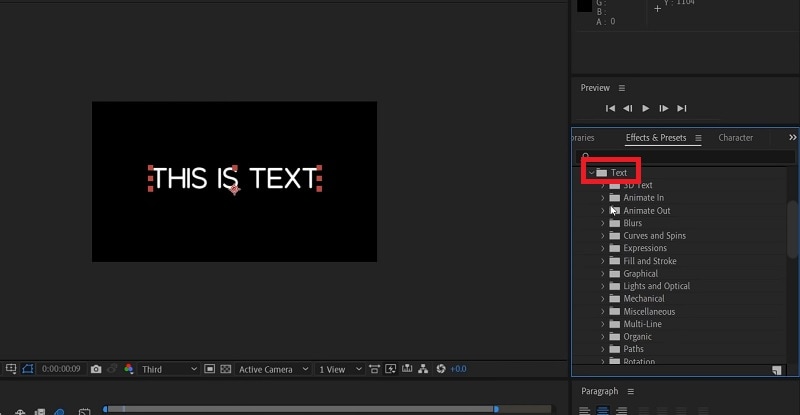
Step3Select any desired animation that you want to apply to the text and drag and drop the animation on the text in the composition window. Play the video and watch the applied animation on the text.
Part 4. Alternative Way to Add Text to Videos
If you are not comfortable with After Effects as a video editor, we recommend Wondershare as the best AE alternative. This is because the user interface of Filmora is super simple and there are loads of text effects and animations available to enhance your video content. Filmora is a professional video editor that is extremely popular among amateur and professional video editors. The application is available for both Windows and Mac users. Here are the steps for adding animated text to video using Filmora.
Step1Install Wondershare Filmora on your computer and launch the application. Click on New Project option on the welcome screen. Otherwise, you can go to File> New Project option.

Step2Go to File> Import Media> Import Media Files to import your video file. You can also drop the video file directly into Project Media folder.

Step3Drag and drop the video file from Project Media folder into the Timeline. If you have multiple video clips, you need to arrange them sequentially on the Timeline.
Step4To add text to your video, go to Titles located at the top bar. Check the left panel where you can see different categories of text effects. Select any desired text effect and drop into the Timeline. Make sure that the text layer is above the video layer on Timeline. You can shift the text layer on Timeline to place it where you want it to appear. You can also stretch the duration of the text effect as per your requirements.
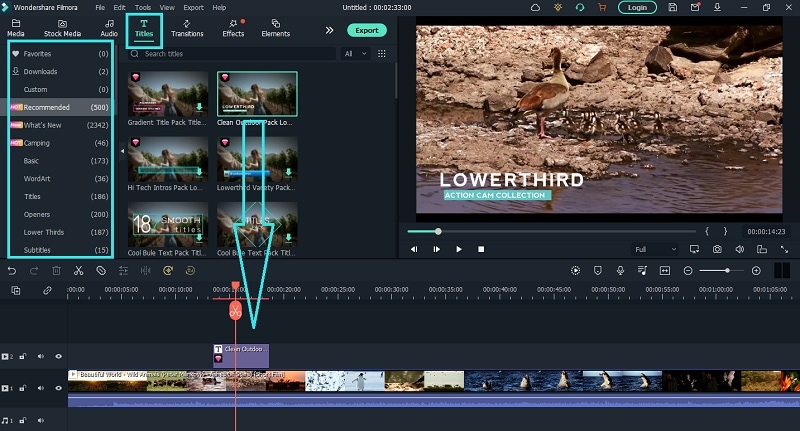
Step5You can edit the text effect by double clicking on the text layer on Timeline. Under Preset tab, you can change the text, font type and size, text color and much more. For further customization, you can click on Advanced button. At last, click on OK button to save the edits done.
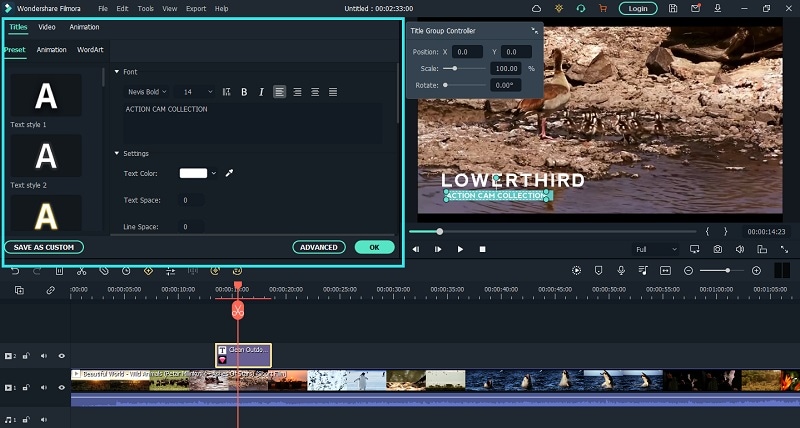
The Bottom Line
If you want to add animated text to photo and video, After Effects is a great editor you can use. We have illustrated how you can add text and customize the text and finally, animate it as per your preference. However, if you are looking for AE alternative, we recommend Wondershare Filmora where you can add text to video instantly and choose from a wide range of text effects and animations.
Free Download For Win 7 or later(64-bit)
Free Download For macOS 10.14 or later
Also read:
- Separating Audio From Video in DaVinci Resolve Step by Step for 2024
- How to Make a Super Easy Rotating Video Effect
- Updated Best 8 Srt File Creators for 2024
- New 2024 Approved Create a Transparent Image in Minimal Steps with Right Tools. Try Out Best Transparent Maker and Know How to Use Them. In No Time, the Desired Image Will Be Right There with You
- In 2024, Little Tricks to Make Canva Slideshow No One Is Telling You
- New 2024 Approved How to Create Sports Intro and Outro for YouTube Video?
- In 2024, How to Create an Aesthetic Slideshow Presentation
- Updated This Article Will Show You How to Clone Yourslef in Videos with Filmora for 2024
- Do You Want to Slow Down Your TikTok Video and Zoom on a Specific Part? This Is No Longer a Difficult Task as This Video Comes up with the Right Set of Methods that Can Be Used to Implement the Slow Zoom Effect TikTok for 2024
- Updated 7 Best MP4 Video Editors on Mac Edit MP4 Videos Easily for 2024
- 2024 Approved How to Remove Audio From Videos with FFmpeg?
- In 2024, How to Create a Custom Slide Show in PowerPoint
- VSCO Slow Motion for 2024
- Do You Want to Create Adjustment Layers in Final Cut Pro? This Article Will Discuss a Simple yet Efficient Method to Generate Adjustment Layers in Final Cut Pro
- Updated 2024 Approved The Best Way to Remove Audio From Your Videos
- New TikTok Slow Zoom | Create Your Slow Zoom TikTok in Minutes
- New How To Make Flying Objects in Wondershare Filmora
- Updated Do You Know Adding Subtitles Can Benefit Video Content? Meanwhile, for Adding Subtitles to a Video, Wondershare Filmora Can Help You
- In 2024, Convert Your Videos to 60 FPS Using These Excellent Tools
- 2024 Approved Making a Countdown Timer Video Like a Pro Isnt a Problem Anymore. Follow the Steps Mentioned in This Guide and Create an Impressive Countdown Timer for Your Videos
- Browse the List of the Best 8 Scanners or Converters for Converting the Slides to Digital Images. Also, Know the Other Important Information of Slides to Digital Conversion for 2024
- Updated Have You Ever Wanted to Speed up or Slow Down a Video? Maybe It Was Too Long, or You Wanted to Draw Out an Exciting Part of the Video without Having to Watch the Boring Parts for 2024
- How to Add Adjustment Layer in Premiere Pro
- New The Best 10 AI Video Analytics Companies at a Glance for 2024
- In 2024, How to Remove Audio From Video Without Watermark?
- WebM to GIF Converters (Online and Offline Solutions) for 2024
- New Guide of 8 Photo Collage Apps for PC
- New Best 5 PDF to GIF Converters You Should Know for 2024
- Updated 2024 Approved To Know How to Add Effects in Premiere Pro, You Need to Follow This Guide as It Has All You Need to Know to Add Effects in Premiere Pro. Learn More Here
- Updated 2024 Approved How to Concatenate Videos Using FFmpeg
- Updated In 2024, 20 Best LUTs for Music Videos
- Updated 2024 Approved Looking Forward to Try Hands at Using the Icecream Slideshow Maker Program to Create High End Slideshow Presentations? Stay Here for a Complete Insight Into the Process
- In 2024, If You Are Looking for an Open-Source, Cross-Platform Video Editor, Shotcut Is a Great Choice? But Is It Truly the Best Video Editor or Is There a Better Alternative Available?
- How to Change the Speed of Video in DaVinci Resolve for 2024
- In 2024, What Do You Prefer More, MKV File Format or MOV? Increase Your Knowledge and Learn More About MKV Format by Ready the Detailed Article Below
- Updated In 2024, 12 Best GIF Editors to Use
- Quick Solved How to Add Subtitles to a Video on iPhones
- 2024 Approved How to Animate Your Designs With Canva GIF
- Updated Top LUTs for Sony HLG for 2024
- How Can Filmora Create an Audio Visualizer Project for a Song? All Steps, From Launching the App to Editing the Text, Are Detailed Here
- New Learn How to Extract Sound From Video Using the Different Online and Software Tools. Details About Their Features, Pros/Cons, and More Are Given
- Additional Tips About Sinnoh Stone For Apple iPhone 12 mini | Dr.fone
- How to Transfer Text Messages from Vivo T2 Pro 5G to New Phone | Dr.fone
- Can I Bypass a Forgotten Phone Password Of Realme C33 2023?
- In 2024, How To Activate and Use Life360 Ghost Mode On Vivo X100 | Dr.fone
- How to Unlock a Network Locked Infinix Hot 30i Phone?
- Everything You Need to Know about Lock Screen Settings on your Oppo A1x 5G
- In 2024, How to Spy on Text Messages from Computer & Huawei P60 | Dr.fone
- Can you watch MOV movies on Samsung Galaxy S24+ ?
- Android Call History Recovery - recover deleted call logs from Realme C33 2023
- How Can We Bypass Nokia G22 FRP?
- How to Hard Reset Tecno Camon 20 Pro 5G Without Password | Dr.fone
- How to bypass Nubia Z50 Ultra’s lock screen pattern, PIN or password
- Title: Do You Have an Idea on How to Zoom in on Snapchat? Using This Article, You Will Find the Easiest Way to Zoom in and Out on Snapchat Videos for Different Purposes for 2024
- Author: Morgan
- Created at : 2024-04-24 01:13:00
- Updated at : 2024-04-25 01:13:00
- Link: https://ai-video-editing.techidaily.com/1713949171913-do-you-have-an-idea-on-how-to-zoom-in-on-snapchat-using-this-article-you-will-find-the-easiest-way-to-zoom-in-and-out-on-snapchat-videos-for-different-purpo/
- License: This work is licensed under CC BY-NC-SA 4.0.
