
Do You Want to Add an Adjustment Layer to Your Video for Easier Editing? Read This Article to Find Out How to Efficiently Add an Adjustment Layer in After Effects for 2024

Do You Want to Add an Adjustment Layer to Your Video for Easier Editing? Read This Article to Find Out How to Efficiently Add an Adjustment Layer in After Effects
Have you ever used After Effects for professional video editing? Adobe After Effects is a significant video editing software that is used to add animating effects, transitions, intros, outros, and visual effects. You can launch this software on Windows and Mac effectively. Using this high-end software allows you to work on team projects as it consists of auto-saving features.
Moreover, you can add adjustment layers on After Effects to make your video editing more efficient. If you don’t know what the adjustment layer in After Effects is, this article will help you. By reading this article, you can easily learn how to create adjustment layers in your video clips using After Effects.
Part 1: What is the Adjustment Layer in After Effects?
The adjustment layer can save you time and energy from adding effects to multiple clips individually. It does not alter the composition of your video clip until you start applying the effects. Once you add the effect in the adjustment layer, it will replace the effect on all the layers under it.
You can add the adjustment layers in your timeline for creating visual effects such as film grain or color grading. Using the adjustment layer, you can produce transition effects by adding effects to shorter compositions. However, if you want to use the adjustment layer properly, you should select its position carefully in the layer’s stack.
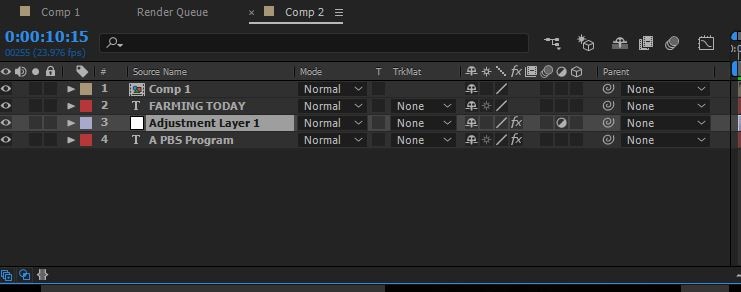
Moreover, always keep in mind that anything placed under the adjustment layer will have a direct effect. In contrast, anything above the adjustment layer won’t get affected. Hence, you can use adjustment layers in After Effects for your convenience to apply all kinds of effects from color to distortion.
Part 2: How to Add Adjustment Layers in After Effects?
Do you want to learn how to add an adjustment layer in After Effects? In this section, we will shed light on two ways through which you can add an adjustment layer to your video clips in After Effects:
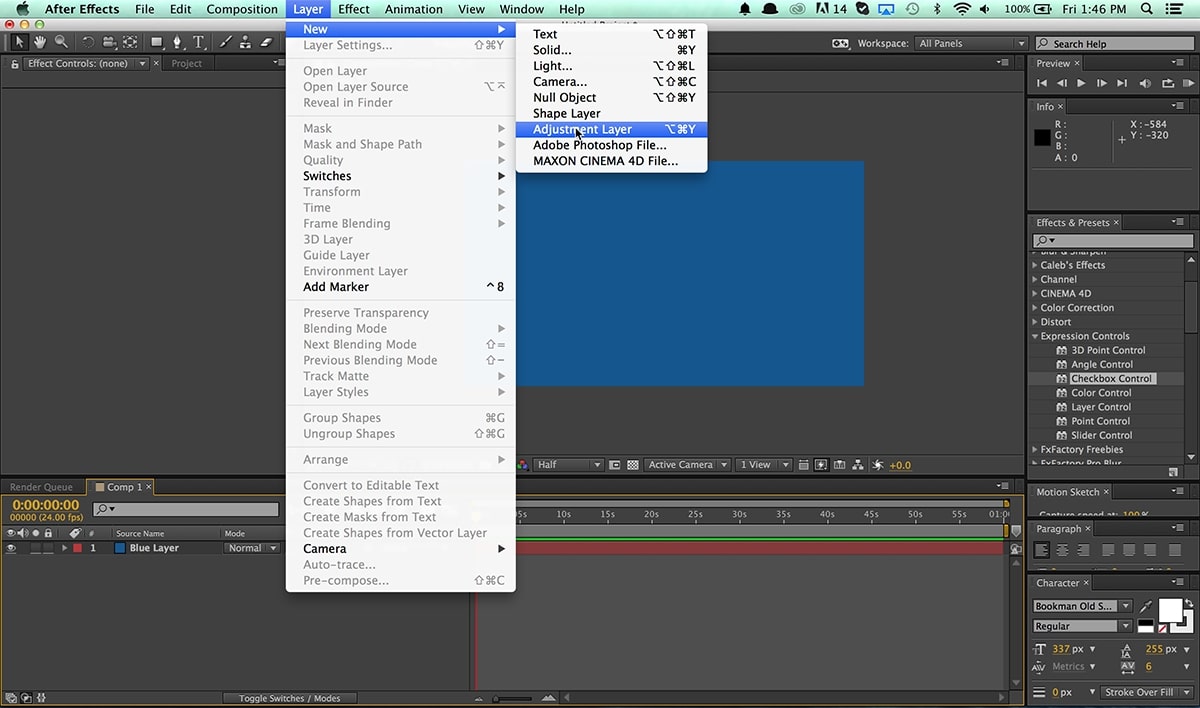
Way 1: After opening After Effects and uploading your project, go to the “Layers” tab. Tap on the “New” button and choose “Adjustment Layer.”
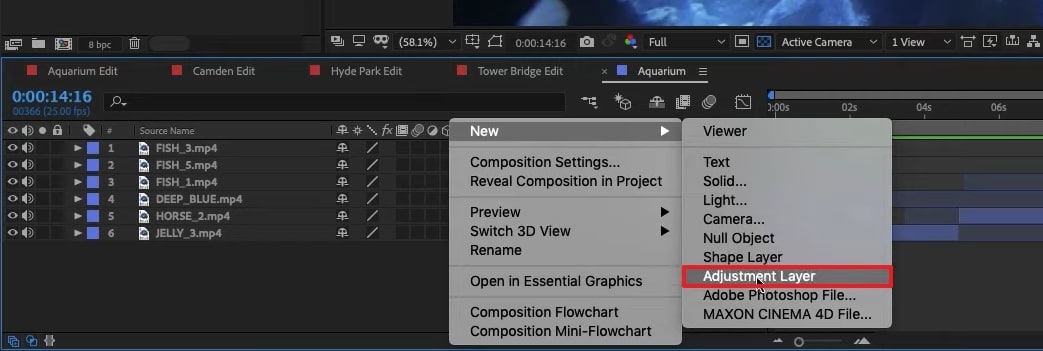
Way 2: Once done with uploading the project on After Effects, go to the blank space in the timeline section on the left side. Right-click using your mouse and select the option “New.” Afterward, click on “Adjustment Layer” to proceed. This will add the adjustment layer on the top of your layers stack.
Tips – Keyboard Shortcuts of Adjustment Layers in After Effects
Do you want to save time while creating an adjustment layer in After Effects? Through the following table, you can learn the shortcuts that you can utilize to generate adjustment layers quickly.
| For Windows | For MacBook |
|---|---|
| Ctrl+Alt+Y | Command+Option+Y |
Part 3: Popular Effects You Can Try With Adjustment Layers in After Effects
In this section, you can find out different effects that you can try with the adjustment layer in After Effects. By applying these effects with an adjustment layer, you can transform your video drastically.
1. Animated Ink Text
Do you want to give a unique sense of style to your added text in the video? This particular effect can add animation to your text to produce engaging and distinctive visuals for your text. To make animated ink text illustrations efficiently, you can check the following steps:
Step1 Once you have uploaded the project on After Effects, you can begin with the process. First, open the composition settings and modify the width, height, frame rate, resolution, and background color according to your choice.
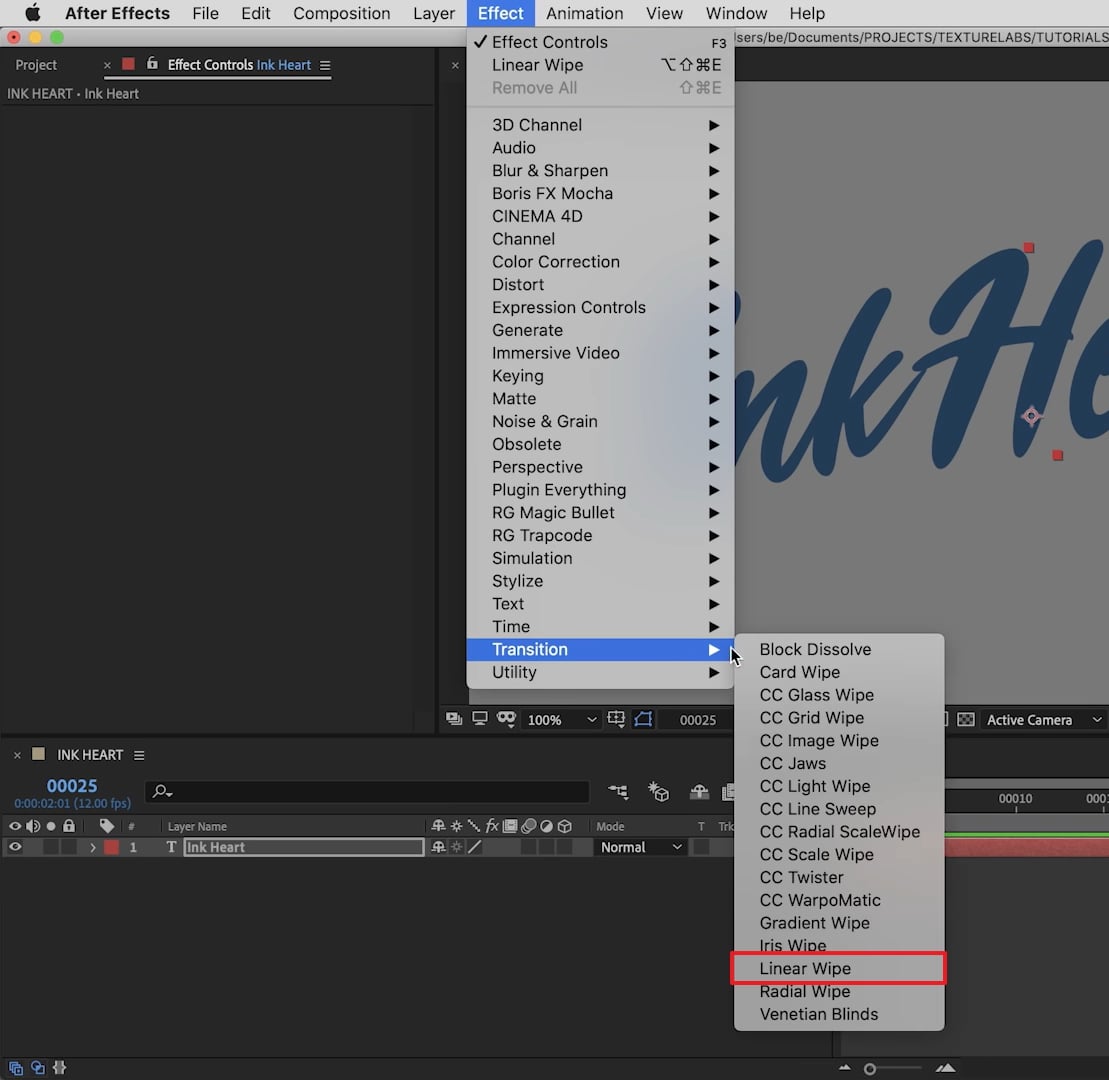
Step2 Make sure to select a suitable text font and color to craft a vibrant output. Afterward, head to the “Effect” tab and select tap on “Transition.” From there, select “Linear Wipe.” Now adjust the settings of the “Linear Wipe” effect from the left panel.
Step3 Now add an adjustment layer to your timeline and select “Distort” from the “Effect” tab. From the “Distort” drop-down menu, choose “Turbulent Displace.” After making its settings, such as adjusting the evolution time, head back to the “Effects” tab and select “Blur and Sharpen.” From there, click on “Fast Box Blur.”
Step4 Manage the threshold value properly and then add a new effect called “Stylize.” From its drop-down menu, click on “Roughen Edges.” Afterward, you can add some elements, such as ink droplets, to create a more vibrant look. To ensure a flawless illustration, make sure to match the color of ink droplets with your text color.
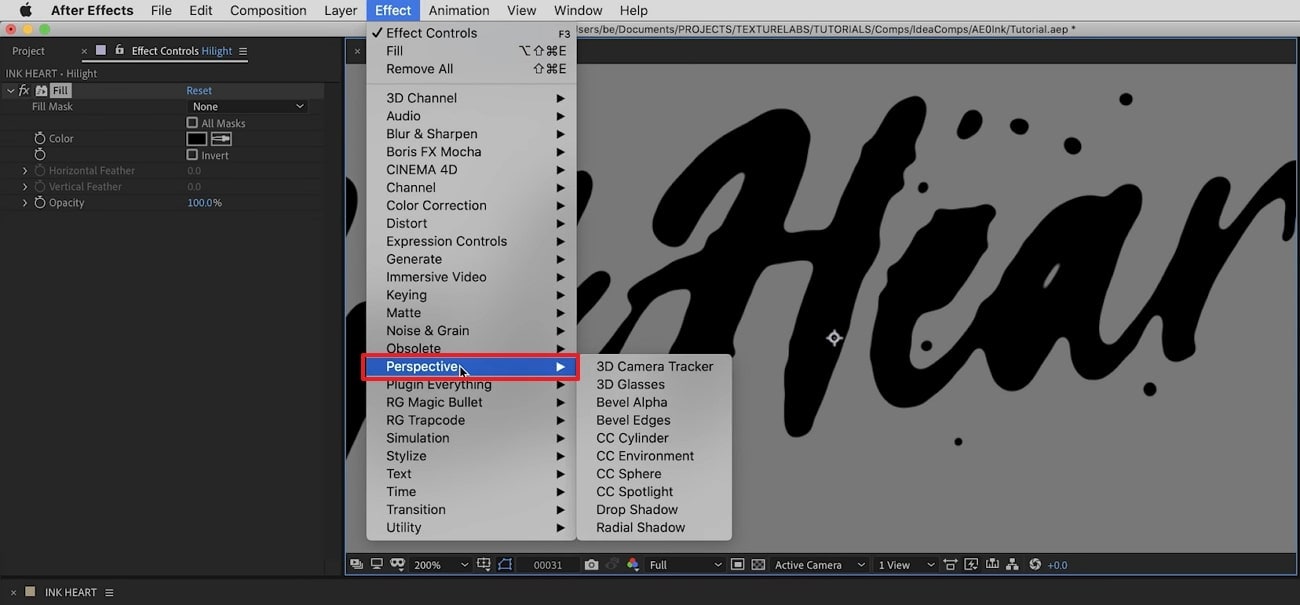
Step5 If you want to give a highlight effect to your animated text, you can add 2nd adjustment layer. Afterward, you can select a bold color for your text, such as black, and add a “Perspective” effect. You can adjust the light color and intensity to create compelling results.
Moreover, you can also add blur and matte effects for more modifications. You can use the blending mode to adjust all the colors. Also, you can apply noise and grain effects to eliminate all the harsh edges from the text.
2. Add Blur Effect
There are various blur effects, such as Gaussian blur, motion blur, radial blur, etc. You can add any of the blur effects in your video clip to craft a smoother look. In After Effects, you can find a variety of blur effects that can help you change your video’s perspective. To use an adjustment layer for adding the blur effect, here are the accurate steps:
Step1 Once you have imported the video clip to the timeline of After Effects, add an adjustment layer. Afterward, go to the “Effects” tab and locate any of your preferred effects, such as Gaussian blur. After locating this effect, apply it to the adjustment layer.
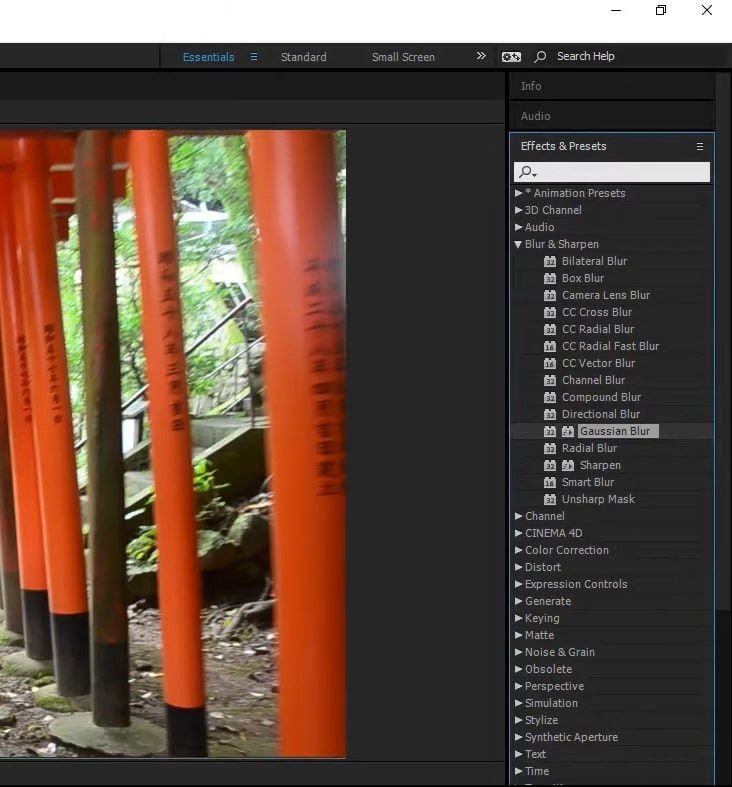
Step2 After applying the effect to the adjustment layer, you can change its settings from the left side. From the left panel, you can change the blurriness value and blur dimensions according to your choice.
3. Color Correction
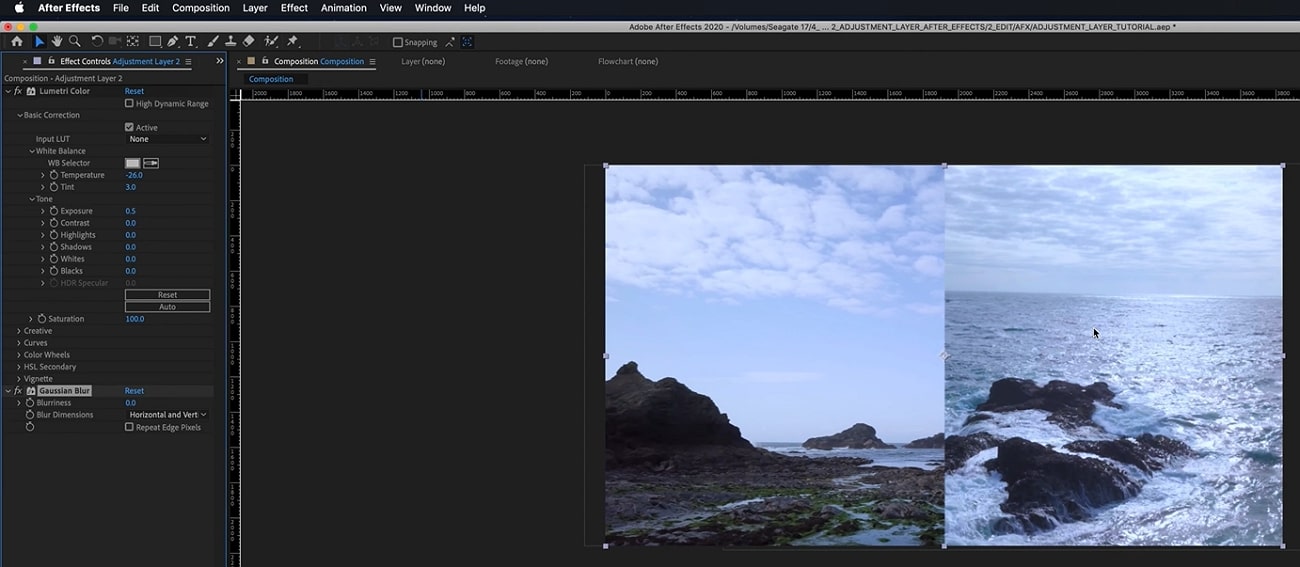
Color correction effects can add and manage the colors in your videos effortlessly. You can change the basic corrections of your video by adjusting the brightness, contrast, hue, exposure, highlight, and other elements. Here are the simple steps to use the adjustment layer for color correction:
Step1 After uploading the video on After Effects, go to the “Layer” tab and add an adjustment layer from there. Once done, you can search for the color correction effect on this tool.
Step2 Once you have found the suitable color correction effect, apply it to the adjustment layer. You can always change the settings of the applied effect from the left panel.
Conclusion
Many beginners are unaware of the term called adjustment layer in video editing. By reading this article, you can find out brief and authentic details about the adjustment layer. Moreover, we have also addressed how to add an adjustment layer in After Effects in simple and easy steps. You can also check about the common effects that people use in Adobe After Effects, using adjustment layers to enhance their videos.
Part 3: Popular Effects You Can Try With Adjustment Layers in After Effects
In this section, you can find out different effects that you can try with the adjustment layer in After Effects. By applying these effects with an adjustment layer, you can transform your video drastically.
1. Animated Ink Text
Do you want to give a unique sense of style to your added text in the video? This particular effect can add animation to your text to produce engaging and distinctive visuals for your text. To make animated ink text illustrations efficiently, you can check the following steps:
Step1 Once you have uploaded the project on After Effects, you can begin with the process. First, open the composition settings and modify the width, height, frame rate, resolution, and background color according to your choice.
Step2 Make sure to select a suitable text font and color to craft a vibrant output. Afterward, head to the “Effect” tab and select tap on “Transition.” From there, select “Linear Wipe.” Now adjust the settings of the “Linear Wipe” effect from the left panel.

Step3 Now add an adjustment layer to your timeline and select “Distort” from the “Effect” tab. From the “Distort” drop-down menu, choose “Turbulent Displace.” After making its settings, such as adjusting the evolution time, head back to the “Effects” tab and select “Blur and Sharpen.” From there, click on “Fast Box Blur.”
Step4 Manage the threshold value properly and then add a new effect called “Stylize.” From its drop-down menu, click on “Roughen Edges.” Afterward, you can add some elements, such as ink droplets, to create a more vibrant look. To ensure a flawless illustration, make sure to match the color of ink droplets with your text color.
Step5 If you want to give a highlight effect to your animated text, you can add 2nd adjustment layer. Afterward, you can select a bold color for your text, such as black, and add a “Perspective” effect. You can adjust the light color and intensity to create compelling results.
Moreover, you can also add blur and matte effects for more modifications. You can use the blending mode to adjust all the colors. Also, you can apply noise and grain effects to eliminate all the harsh edges from the text.

2. Add Blur Effect
There are various blur effects, such as Gaussian blur, motion blur, radial blur, etc. You can add any of the blur effects in your video clip to craft a smoother look. In After Effects, you can find a variety of blur effects that can help you change your video’s perspective. To use an adjustment layer for adding the blur effect, here are the accurate steps:
Step1 Once you have imported the video clip to the timeline of After Effects, add an adjustment layer. Afterward, go to the “Effects” tab and locate any of your preferred effects, such as Gaussian blur. After locating this effect, apply it to the adjustment layer.

Step2 After applying the effect to the adjustment layer, you can change its settings from the left side. From the left panel, you can change the blurriness value and blur dimensions according to your choice.
3. Color Correction
Color correction effects can add and manage the colors in your videos effortlessly. You can change the basic corrections of your video by adjusting the brightness, contrast, hue, exposure, highlight, and other elements. Here are the simple steps to use the adjustment layer for color correction:
Step1 After uploading the video on After Effects, go to the “Layer” tab and add an adjustment layer from there. Once done, you can search for the color correction effect on this tool.
Step2 Once you have found the suitable color correction effect, apply it to the adjustment layer. You can always change the settings of the applied effect from the left panel.

Conclusion
Many beginners are unaware of the term called adjustment layer in video editing. By reading this article, you can find out brief and authentic details about the adjustment layer. Moreover, we have also addressed how to add an adjustment layer in After Effects in simple and easy steps. You can also check about the common effects that people use in Adobe After Effects, using adjustment layers to enhance their videos.
Tips for Choosing Location and Scheduling Music Video
Making viral music videos is everyone’s dream; what if you get exact tips to follow before shooting your music video to make it high-ranked? Obviously, it’ll be a treat for you!
Planning and preparing before the shoot is the key to making a music video successful. You can only achieve this after location scouting and emerging with the best one. And scheduling for big projects before the day is more important. Let’s directly move towards the things to consider before shooting!
Location scouting
The pleasant and eye-catchy location always makes your music video trending or flopping. You should first go with your budget and then come up with location ideas. In the upcoming tip, we will use 3lau’s song “Tokyo” as an example.
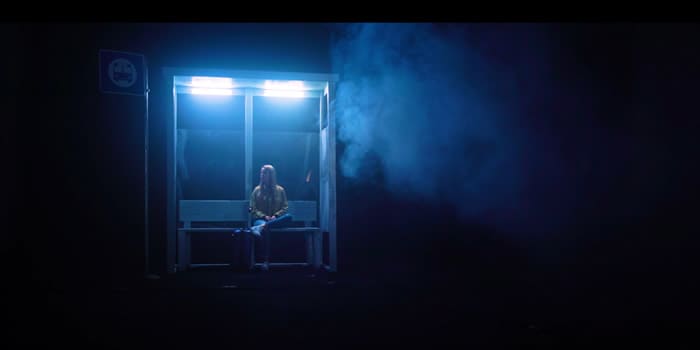
If you are going with large projects, you need to consider the following requirements!
1. Availability of electricity
You need rig lights and a large lighting setup to make your video more glow and give them aesthetic vibes. For this, make sure you choose a location where light is readily available.
2. Separate room
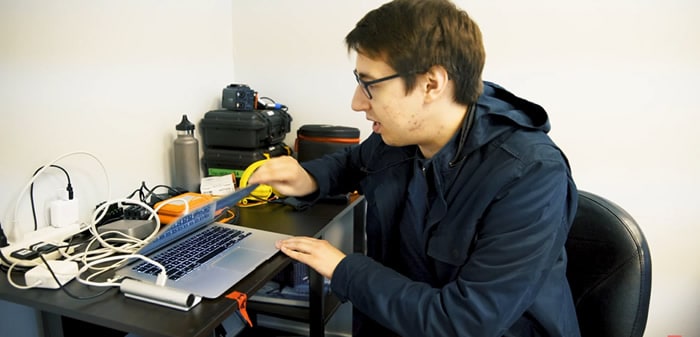
During shooting for big projects, you need room to store all gear and sensitive equipment in one place for many days.
3. Check the size
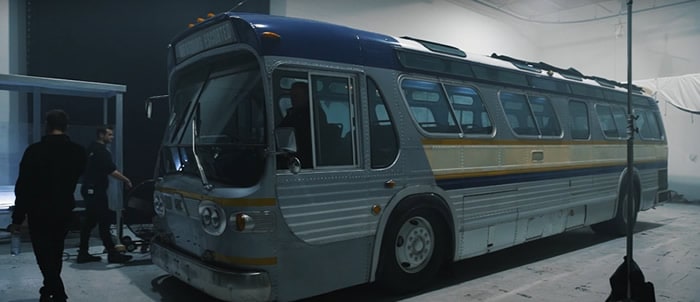
The foremost thing in choosing the location is to check the Height and Width of the studio. They should be enough to rig the lights in the studio easily and place every required thing in a decided space.
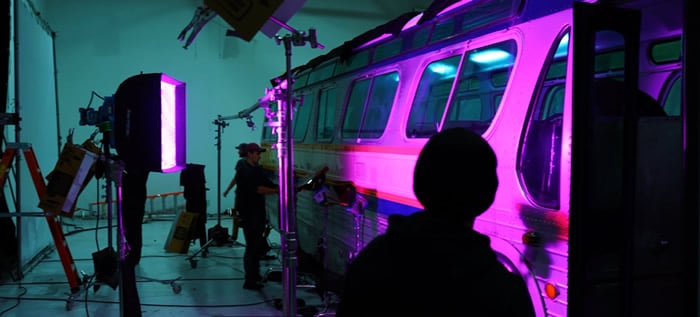
For Example, while shooting a 3lau song, there is a need for a bus to come into the studio easily, but there is an issue in entering the bus due to height issues of the door. Due to this, the director changed the location at the spot to sort out this issue.
A cross-platform for making videos anywhere for all creators

Why your video editing isn’t good enough? How about some creative inspo?
- 100 Million+ Users
- 150+ Countries and Regions
- 4 Million+ Social Media Followers
- 5 Million+ Stock Media for Use
* Secure Download

Alternate Ways of Location Scouting
If you don’t have enough budget to get a studio space, then you can easily shoot by selecting spaces that are in your use or available. These are the following locations you should regard!
Location 1. Your Home
You should go with the space available at your home to shoot, such as: on couches or in the bedroom, to give a good impression to your music video.
Location 2. Office Space
You can also make scenes of your music video in office space to better describe the work in the video.

Location 3. Outdoor Locations
For better daylight and illustrations in the music video, you can go with the outdoor location, which is free of cost.

Location 4. Public Places
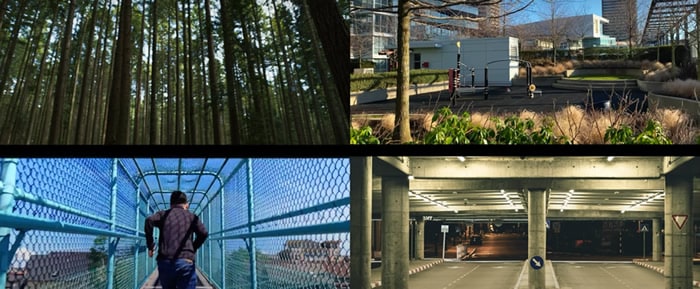
Public places are easily available and have many options, such as public parks, playgrounds, bridges, and public parking.
![]()
Note: During public shooting, ensure that the space is empty, and there should be no interruption of the public in filming the shots.
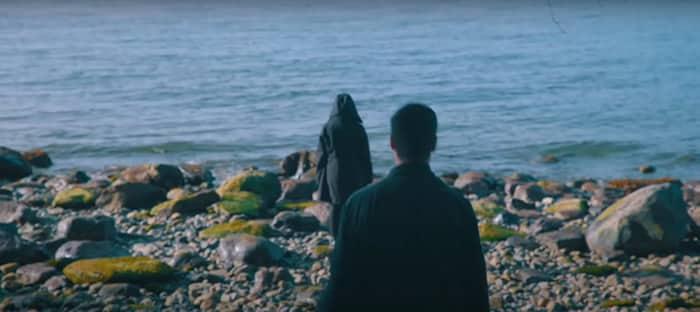
The weather is also a major factor when shooting a video, which you must check before the shoot days. After selecting and scouting the location, now it’s time to make a schedule which you’ll get in hand in the below lines!
Scheduling for the Music Video
If you have a big project and more scenes to shoot, it’s better to make a whole plan about each and everything. You have to make a schedule of using even a single light at a specific time and space. The following are the main considerations you should take care of!
1. Pre-Rig Day
You need to come to the setup before the filming day to check the main things like electricity, measure exact spaces, check the lightning setup, loaded everything such as the bus, crew, and gears.
2. A Call Sheet
A call sheet is a daily shot list given to the cast and crew to follow the timelines, and it contains the phone number of everyone, their location, and the time to arrive on set. It also includes the nearest hospital, sunset, and sun-rising timing.
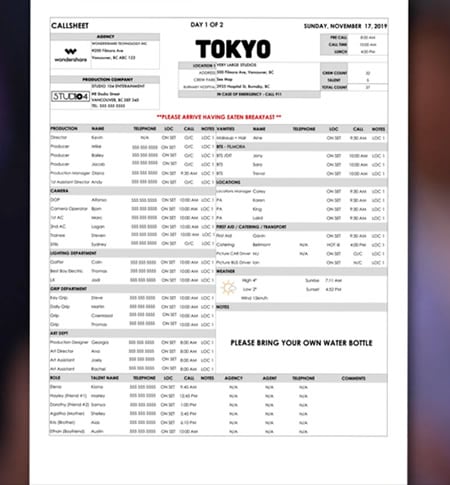
It consists of one to two pages according to shoot days and has a plan of everything that happens after the Pre-Rig day.
![]()
Note: When you wrap up for day 1, you have another call sheet for day 2, day 3, and so on!
3. Do Planning
You need to work efficiently and smartly to maintain everything according to the plan. You can cut the filming into halves to have a better lighting setup and character availability. On the shot day, you must change the lighting and rigging setup as little as possible.
Examples
On day 1 of the Tokyo song, the filming is done in two halves; the first half day goes towards filming everything in the bus, and the other half day, there is a shoot of everything outside the bus.
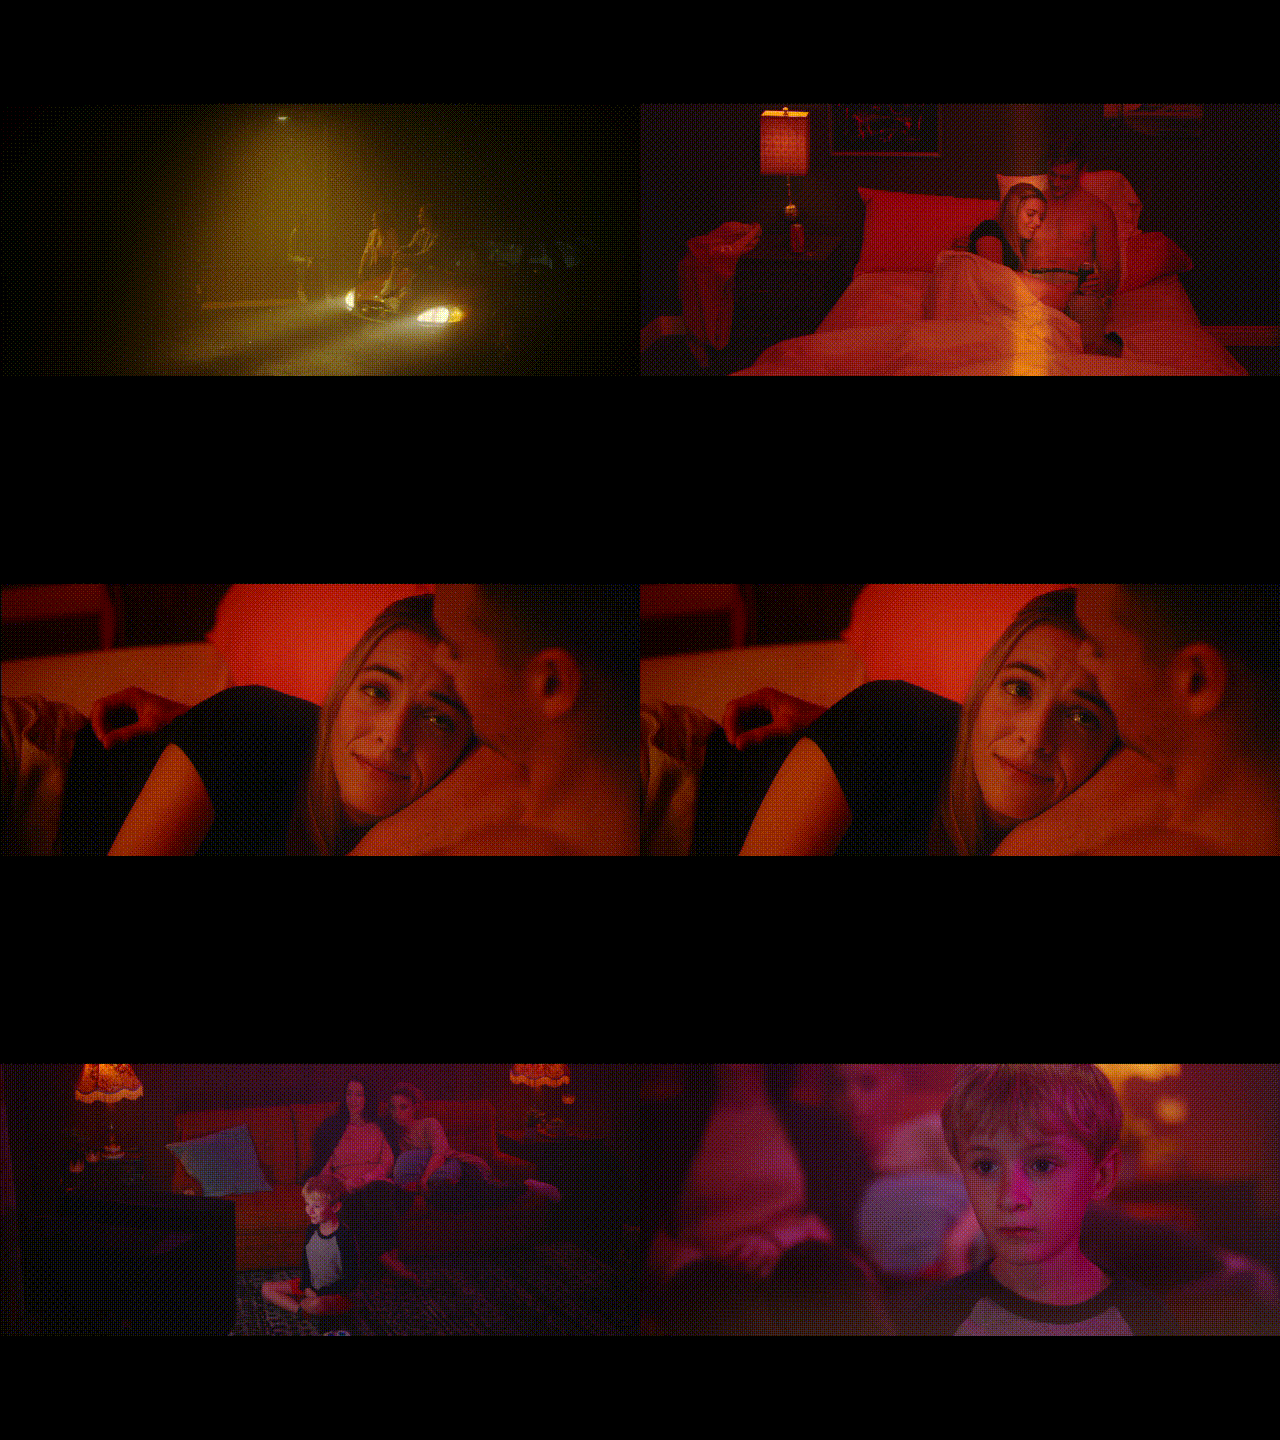
While in day 2, there is a filming of every memory. For this, there are setups of rooms and homes for making perfect shots according to the requirements of a music video.
4. Take No Stress
You should not blow up and take stress during shoot day because it’ll obviously cause chaos in every little scene and give a bad impression to the music video. You just should work hard and get all done.
Conclusion
After checking and following the above tips for location scouting and scheduling, you’ll obviously come up with an amazing filming setup and music video. There is no need to worry, just get the whole planning and then do all scenes one after the other patiently.
Filming with people is not always bulky and flopping, but if you have a cooperative team and follow all the timelines of shooting. Then you’ll rock the music video!
A cross-platform for making videos anywhere for all creators! 
Why your video editing isn’t good enough? How about some creative inspo?
- 100 Million+ Users
- 150+ Countries and Regions
- 4 Million+ Social Media Followers
- 5 Million+ Stock Media for Use
* Secure Download

Alternate Ways of Location Scouting
If you don’t have enough budget to get a studio space, then you can easily shoot by selecting spaces that are in your use or available. These are the following locations you should regard!
Location 1. Your Home
You should go with the space available at your home to shoot, such as: on couches or in the bedroom, to give a good impression to your music video.
Location 2. Office Space
You can also make scenes of your music video in office space to better describe the work in the video.

Location 3. Outdoor Locations
For better daylight and illustrations in the music video, you can go with the outdoor location, which is free of cost.

Location 4. Public Places
Public places are easily available and have many options, such as public parks, playgrounds, bridges, and public parking.

![]()
Note: During public shooting, ensure that the space is empty, and there should be no interruption of the public in filming the shots.

The weather is also a major factor when shooting a video, which you must check before the shoot days. After selecting and scouting the location, now it’s time to make a schedule which you’ll get in hand in the below lines!
Scheduling for the Music Video
If you have a big project and more scenes to shoot, it’s better to make a whole plan about each and everything. You have to make a schedule of using even a single light at a specific time and space. The following are the main considerations you should take care of!
1. Pre-Rig Day
You need to come to the setup before the filming day to check the main things like electricity, measure exact spaces, check the lightning setup, loaded everything such as the bus, crew, and gears.

2. A Call Sheet
A call sheet is a daily shot list given to the cast and crew to follow the timelines, and it contains the phone number of everyone, their location, and the time to arrive on set. It also includes the nearest hospital, sunset, and sun-rising timing.

It consists of one to two pages according to shoot days and has a plan of everything that happens after the Pre-Rig day.
![]()
Note: When you wrap up for day 1, you have another call sheet for day 2, day 3, and so on!
3. Do Planning
You need to work efficiently and smartly to maintain everything according to the plan. You can cut the filming into halves to have a better lighting setup and character availability. On the shot day, you must change the lighting and rigging setup as little as possible.
Examples
On day 1 of the Tokyo song, the filming is done in two halves; the first half day goes towards filming everything in the bus, and the other half day, there is a shoot of everything outside the bus.
While in day 2, there is a filming of every memory. For this, there are setups of rooms and homes for making perfect shots according to the requirements of a music video.

4. Take No Stress
You should not blow up and take stress during shoot day because it’ll obviously cause chaos in every little scene and give a bad impression to the music video. You just should work hard and get all done.
Conclusion
After checking and following the above tips for location scouting and scheduling, you’ll obviously come up with an amazing filming setup and music video. There is no need to worry, just get the whole planning and then do all scenes one after the other patiently.
Filming with people is not always bulky and flopping, but if you have a cooperative team and follow all the timelines of shooting. Then you’ll rock the music video!
How to Make a Countdown Video
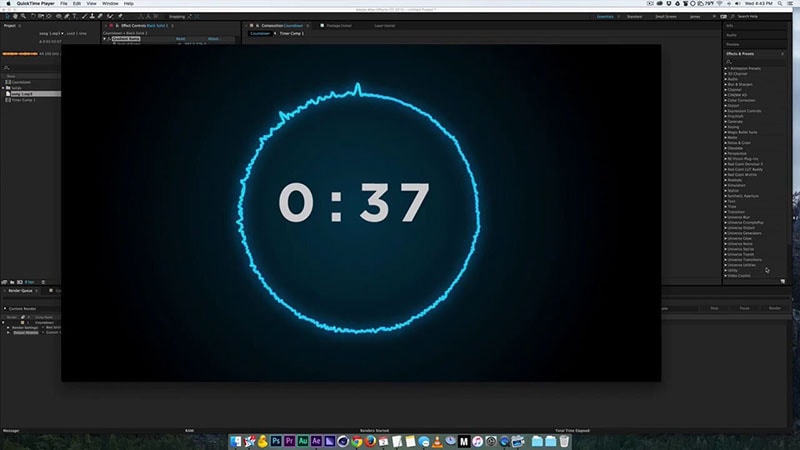
Have you ever wanted to use Adobe After Effects to recreate a countdown timer for a rocket launch or simply create a suspenseful moment in a video by displaying how the time runs out? This tutorial will show you how. It is imperative that you become familiar with the process of creating a countdown in After Effects.
In this article, we will demonstrate how to use Adobe After Effects to put together a countdown video. This procedure is a straightforward one, and it will handle expressions as well as plugins. Stay here and read on to find out more about the various methods in which we might accomplish this goal!
Let’s begin!
Part 1. Create a new composition
It’s possible that you only want to show the minutes and seconds. Make a mask around the entire area you intend to use in order to quickly remove undesired information.
1. Create a new Text Layer.
2. Alt + Click (on a PC) or Option + Click (on a Mac) on the stopwatch in the Source Text to display text options.
3. Place the expression “timeToCurrentFormat” within the expression box (). You must set your composition frame rate to 60 frames per second in order to make it appear to be a real digital countdown timer.
4. Everything should be pre-composed, and the composition’s tempo should be reversed to make it count down. Right-click the composition and choose Time > Time Reverse Layer to change its pace.
Part 2. Using the timecode plugin
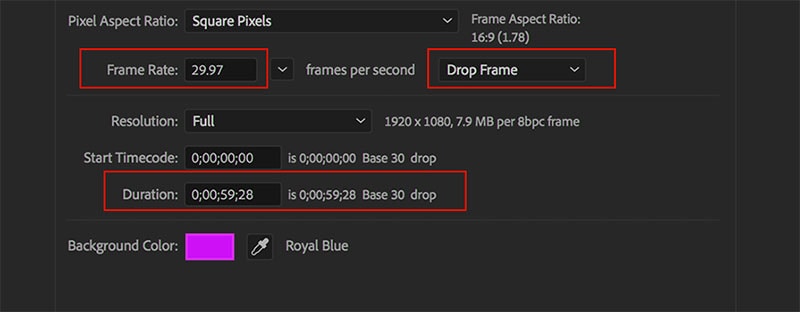
To make a countdown timer, you can use the Timecode plugin rather than the “timeToCurrentFormat()” statement. The timer layout will be immediately created when the plugin is added to a New Solid; use the same steps as before to convert it to a countdown timer.
Here is a quick video that demonstrates how simple it is to set up a countdown timer in this manner:
Step1 Ctrl-click (Windows) or Command-click (Mac OS) the time display to cycle through Timecode Base or Frames/Feet + Frames (depending on whether the “Use Feet + Frames” option is checked in the Project Settings). The Timeline panel’s upper-left corner, as well as the bottoms of the Layer, Composition, and Footage panels, all indicate the current time. Timeline panel (See.)
Step2 A smaller text version of the option that is not selected in the project settings will be seen underneath. Do the following to limit the display to the Timecode or Frames option that was chosen in the Project Settings:
Step3 Choose After Effects > Preferences > Display (Mac OS) or Edit > Preferences > Display to access the display preferences window (Windows). Remove the check mark next to “Show Timecode and Frames in Timeline Panel” (this option is selected by default).
Step4 Change the time display units by selecting File > Project Settings and then selecting a different choice from the list in the Time Display Style section.
Timecode:
Displays the current time as timecode in the time rulers of the Timeline, Layer, and Footage panels. You have the option of utilizing the timecode from the source media (Use Media Source) or beginning at 00:00:00:00. To use timecode rather than frames, select the Timecode option from the menu. It is important to take note that there are no options available for changing the frame rate or whether or not to delete frames, as the source timecode is recognized and used instead.
Part 3. Source timecode
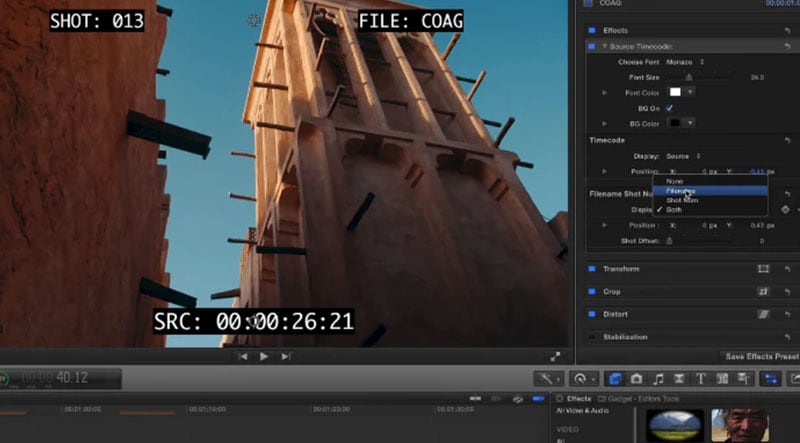
Support for various file formats for the source timecode QuickTime, DV, AVI, P2, MPEG-2, MPEG-4, H.264, AVCHD, RED, XDCAM EX, XDCAM HD, and WAV image sequence importers are just some of the formats that After Effects is able to read and apply timecode for.
Project panel
The Project panel includes several columns that display the source timecode. These columns are titled as follows: Media Start, Media End, Media Duration, and Tape Name. These are the beginning, ending, and overall length of time for the source. There are columns labeled “In,” “Out,” and “Duration,” which reflect the In and Out points that the user has set in the Footage panel for the footage item or the work area for the composition, respectively. These columns also show the duration of the clip.
Context of the Project
The source timecode feature set can be found in the dialog box that is used to configure the Project. Check out the Options for Time Display Units page for more information.
Box for Configuring Composition Settings
The source timecode feature set is located in the dialog box that is called Composition Settings.
Box for Specifying Preferences
The Import section of the Preferences dialog box is capable of handling source timecode functions.
That’s it! You are now familiar with the process of creating a straightforward countdown and a countdown timer in After Effects, and you have three options to choose from. Make use of this information to give your videos an interesting spin and to round out the experience for the audience.
Free Download For Win 7 or later(64-bit)
Free Download For macOS 10.14 or later
Free Download For macOS 10.14 or later
It Is Easy to Separate the Audio From the Video in DaVinci Resolve. But, to Avail of This Feature, You Need to Follow Proper Steps, and This Article Is All About It
The DaVinci Resolve is an excellent software for editing videos; that’s why it attracts users. They also enjoy using it due to its simplicity and availability of features. One of them is separating the audio from the video that most people are looking for. It is easy to extract from this software. But, to avail of this feature, you need to follow proper steps, and this article is all about it. There are also details regarding the Wondershare Filmora as the most appropriate alternative and simpler solution provider.
How can you separate audio from the video clips in DaVinci resolve?
The DaVinci resolve is the complete package to solve your different issues. It is a solution provider regarding the editing of the videos, extraction of audio from videos, matching, correction of the colours and many more. It also includes modification of the lens that helps analyse and correct the distortion. Even the lens analysis is also available to deliver high-quality results.
Step 1: Launch the DaVinci Resolve in your system after its installation. Import the media file from the library in your timeline from which you have to separate the audio.

Step 2: Select the Edit tab in the timeline of your project if it isn’t selected by default. You need to choose the video clip by pointing the cursor or dragging the mouse towards it.

Step 3: After its selection, untick all the clips, and this step is for separating the audio from the video just from one file. Click the video file for deselection.

Step 4: Now it is easy to select the video and click on it. Select the audio and video clips separately. Simply edit, delete or move your audio whenever you want it to.
An easier way to separate the audio from the video
However, the DaVinci Resolve is the software of advanced level and the best choice for professionals. But its pricing that is $299, is quite disturbing for most of the users. So, they are always searching for a suitable approach and reasonable as well. And that is the first and foremost Filmora Video Editor . You can split the audio and listen to your favourite track on any media player.
All the tools are readily available, and they are used without facing any issue. After editing and applying all the effects, it is easy to upload on social network platforms. it is very simple to create fast or slow-motion videos with speed controls. This software is highly supportive of editing videos of any kind. There is no need to look for the reasons to choose Wondershare Filmora; instead, it is not to choose it for editing tasks.
For Win 7 or later (64-bit)
For macOS 10.14 or later
Features:
- Extracting the audio from videos
- Controls available for videos and audios
- Number of ways to split the clips and screens
- All the functions are performed by just drag and drop
- Sharing of the videos unlimitedly on Vimeo, YouTube and others
- mixing the audio and removing the noise
To extract the audio from the video clip in Wondershare Filmora, go through the following easy steps and get your task done.
Step 1: After completing the installation of Wondershare Filmora, selection of the ratio is required whether it is 4:3 or 16:9. It is your choice and dependent on the requirements of your project. Import the video from the folder of your computer when you will click “Import”. As the default, all the files are all together in one place with no gap.

Step 2: This step separates the audio from the video in a single click. You need to right-click on the video from which you have to split the audio and select “Detach Audio”. Instantly, an audio file will appear on the screen on the audio track. Yes, you have received the original audio final from the source file.
Successfully the audio is separate from the video. Wondershare Filmora also offers to replace the audio file you want to add to the video. It can provide a few instructions, some narrations or personal, funny tunes for sharing with family and friends.
Step 3: After step2, it is simple to delete the audio clips or video that isn’t needed anymore and add your own choice. Click on “Export” to save the audio file into the new MP3 file and select “iPod” presenting to play. Even, you can save it as your project file on your system. After the completion of exporting the audio track, load the project file again with the video frame and export it as the new file of your video.

Wondershare Filmora is the most user-friendly editing software for all. Whether you want to make complex or straightforward videos, all is done in just a few steps. The best part of this software is that all the features are easily accessible to all types of users. It is very simple to start and show your creative skills and share easily if you are unfamiliar with video editing.
There is a massive range of tools in Wondershare Filmora that you are looking for in any video editor. 800+ video effects are built-in, such as effects for the text, transitions, filters, stickers, motion graphics, and overlays.
In Wondershare Filmora, there are templates for the spilt screens as well. It is best for you to handle your YouTube channels or your Instagram account. It doesn’t record screen only but as well voice-over. Even capturing the videos from frame to frame is also possible. So, what are you waiting for? Download Wondershare Filmora today and start your editing done in just a few clicks.
Step 2: Select the Edit tab in the timeline of your project if it isn’t selected by default. You need to choose the video clip by pointing the cursor or dragging the mouse towards it.

Step 3: After its selection, untick all the clips, and this step is for separating the audio from the video just from one file. Click the video file for deselection.

Step 4: Now it is easy to select the video and click on it. Select the audio and video clips separately. Simply edit, delete or move your audio whenever you want it to.
An easier way to separate the audio from the video
However, the DaVinci Resolve is the software of advanced level and the best choice for professionals. But its pricing that is $299, is quite disturbing for most of the users. So, they are always searching for a suitable approach and reasonable as well. And that is the first and foremost Filmora Video Editor . You can split the audio and listen to your favourite track on any media player.
All the tools are readily available, and they are used without facing any issue. After editing and applying all the effects, it is easy to upload on social network platforms. it is very simple to create fast or slow-motion videos with speed controls. This software is highly supportive of editing videos of any kind. There is no need to look for the reasons to choose Wondershare Filmora; instead, it is not to choose it for editing tasks.
For Win 7 or later (64-bit)
For macOS 10.14 or later
Features:
- Extracting the audio from videos
- Controls available for videos and audios
- Number of ways to split the clips and screens
- All the functions are performed by just drag and drop
- Sharing of the videos unlimitedly on Vimeo, YouTube and others
- mixing the audio and removing the noise
To extract the audio from the video clip in Wondershare Filmora, go through the following easy steps and get your task done.
Step 1: After completing the installation of Wondershare Filmora, selection of the ratio is required whether it is 4:3 or 16:9. It is your choice and dependent on the requirements of your project. Import the video from the folder of your computer when you will click “Import”. As the default, all the files are all together in one place with no gap.

Step 2: This step separates the audio from the video in a single click. You need to right-click on the video from which you have to split the audio and select “Detach Audio”. Instantly, an audio file will appear on the screen on the audio track. Yes, you have received the original audio final from the source file.
Successfully the audio is separate from the video. Wondershare Filmora also offers to replace the audio file you want to add to the video. It can provide a few instructions, some narrations or personal, funny tunes for sharing with family and friends.
Step 3: After step2, it is simple to delete the audio clips or video that isn’t needed anymore and add your own choice. Click on “Export” to save the audio file into the new MP3 file and select “iPod” presenting to play. Even, you can save it as your project file on your system. After the completion of exporting the audio track, load the project file again with the video frame and export it as the new file of your video.

Wondershare Filmora is the most user-friendly editing software for all. Whether you want to make complex or straightforward videos, all is done in just a few steps. The best part of this software is that all the features are easily accessible to all types of users. It is very simple to start and show your creative skills and share easily if you are unfamiliar with video editing.
There is a massive range of tools in Wondershare Filmora that you are looking for in any video editor. 800+ video effects are built-in, such as effects for the text, transitions, filters, stickers, motion graphics, and overlays.
In Wondershare Filmora, there are templates for the spilt screens as well. It is best for you to handle your YouTube channels or your Instagram account. It doesn’t record screen only but as well voice-over. Even capturing the videos from frame to frame is also possible. So, what are you waiting for? Download Wondershare Filmora today and start your editing done in just a few clicks.
Step 2: Select the Edit tab in the timeline of your project if it isn’t selected by default. You need to choose the video clip by pointing the cursor or dragging the mouse towards it.

Step 3: After its selection, untick all the clips, and this step is for separating the audio from the video just from one file. Click the video file for deselection.

Step 4: Now it is easy to select the video and click on it. Select the audio and video clips separately. Simply edit, delete or move your audio whenever you want it to.
An easier way to separate the audio from the video
However, the DaVinci Resolve is the software of advanced level and the best choice for professionals. But its pricing that is $299, is quite disturbing for most of the users. So, they are always searching for a suitable approach and reasonable as well. And that is the first and foremost Filmora Video Editor . You can split the audio and listen to your favourite track on any media player.
All the tools are readily available, and they are used without facing any issue. After editing and applying all the effects, it is easy to upload on social network platforms. it is very simple to create fast or slow-motion videos with speed controls. This software is highly supportive of editing videos of any kind. There is no need to look for the reasons to choose Wondershare Filmora; instead, it is not to choose it for editing tasks.
For Win 7 or later (64-bit)
For macOS 10.14 or later
Features:
- Extracting the audio from videos
- Controls available for videos and audios
- Number of ways to split the clips and screens
- All the functions are performed by just drag and drop
- Sharing of the videos unlimitedly on Vimeo, YouTube and others
- mixing the audio and removing the noise
To extract the audio from the video clip in Wondershare Filmora, go through the following easy steps and get your task done.
Step 1: After completing the installation of Wondershare Filmora, selection of the ratio is required whether it is 4:3 or 16:9. It is your choice and dependent on the requirements of your project. Import the video from the folder of your computer when you will click “Import”. As the default, all the files are all together in one place with no gap.

Step 2: This step separates the audio from the video in a single click. You need to right-click on the video from which you have to split the audio and select “Detach Audio”. Instantly, an audio file will appear on the screen on the audio track. Yes, you have received the original audio final from the source file.
Successfully the audio is separate from the video. Wondershare Filmora also offers to replace the audio file you want to add to the video. It can provide a few instructions, some narrations or personal, funny tunes for sharing with family and friends.
Step 3: After step2, it is simple to delete the audio clips or video that isn’t needed anymore and add your own choice. Click on “Export” to save the audio file into the new MP3 file and select “iPod” presenting to play. Even, you can save it as your project file on your system. After the completion of exporting the audio track, load the project file again with the video frame and export it as the new file of your video.

Wondershare Filmora is the most user-friendly editing software for all. Whether you want to make complex or straightforward videos, all is done in just a few steps. The best part of this software is that all the features are easily accessible to all types of users. It is very simple to start and show your creative skills and share easily if you are unfamiliar with video editing.
There is a massive range of tools in Wondershare Filmora that you are looking for in any video editor. 800+ video effects are built-in, such as effects for the text, transitions, filters, stickers, motion graphics, and overlays.
In Wondershare Filmora, there are templates for the spilt screens as well. It is best for you to handle your YouTube channels or your Instagram account. It doesn’t record screen only but as well voice-over. Even capturing the videos from frame to frame is also possible. So, what are you waiting for? Download Wondershare Filmora today and start your editing done in just a few clicks.
Step 2: Select the Edit tab in the timeline of your project if it isn’t selected by default. You need to choose the video clip by pointing the cursor or dragging the mouse towards it.

Step 3: After its selection, untick all the clips, and this step is for separating the audio from the video just from one file. Click the video file for deselection.

Step 4: Now it is easy to select the video and click on it. Select the audio and video clips separately. Simply edit, delete or move your audio whenever you want it to.
An easier way to separate the audio from the video
However, the DaVinci Resolve is the software of advanced level and the best choice for professionals. But its pricing that is $299, is quite disturbing for most of the users. So, they are always searching for a suitable approach and reasonable as well. And that is the first and foremost Filmora Video Editor . You can split the audio and listen to your favourite track on any media player.
All the tools are readily available, and they are used without facing any issue. After editing and applying all the effects, it is easy to upload on social network platforms. it is very simple to create fast or slow-motion videos with speed controls. This software is highly supportive of editing videos of any kind. There is no need to look for the reasons to choose Wondershare Filmora; instead, it is not to choose it for editing tasks.
For Win 7 or later (64-bit)
For macOS 10.14 or later
Features:
- Extracting the audio from videos
- Controls available for videos and audios
- Number of ways to split the clips and screens
- All the functions are performed by just drag and drop
- Sharing of the videos unlimitedly on Vimeo, YouTube and others
- mixing the audio and removing the noise
To extract the audio from the video clip in Wondershare Filmora, go through the following easy steps and get your task done.
Step 1: After completing the installation of Wondershare Filmora, selection of the ratio is required whether it is 4:3 or 16:9. It is your choice and dependent on the requirements of your project. Import the video from the folder of your computer when you will click “Import”. As the default, all the files are all together in one place with no gap.

Step 2: This step separates the audio from the video in a single click. You need to right-click on the video from which you have to split the audio and select “Detach Audio”. Instantly, an audio file will appear on the screen on the audio track. Yes, you have received the original audio final from the source file.
Successfully the audio is separate from the video. Wondershare Filmora also offers to replace the audio file you want to add to the video. It can provide a few instructions, some narrations or personal, funny tunes for sharing with family and friends.
Step 3: After step2, it is simple to delete the audio clips or video that isn’t needed anymore and add your own choice. Click on “Export” to save the audio file into the new MP3 file and select “iPod” presenting to play. Even, you can save it as your project file on your system. After the completion of exporting the audio track, load the project file again with the video frame and export it as the new file of your video.

Wondershare Filmora is the most user-friendly editing software for all. Whether you want to make complex or straightforward videos, all is done in just a few steps. The best part of this software is that all the features are easily accessible to all types of users. It is very simple to start and show your creative skills and share easily if you are unfamiliar with video editing.
There is a massive range of tools in Wondershare Filmora that you are looking for in any video editor. 800+ video effects are built-in, such as effects for the text, transitions, filters, stickers, motion graphics, and overlays.
In Wondershare Filmora, there are templates for the spilt screens as well. It is best for you to handle your YouTube channels or your Instagram account. It doesn’t record screen only but as well voice-over. Even capturing the videos from frame to frame is also possible. So, what are you waiting for? Download Wondershare Filmora today and start your editing done in just a few clicks.
Also read:
- [New] 2024 Approved Flip the Script Unique Approaches to Retracing YT Content
- [New] Leveraging Time Stamps for Enhanced Video Clarity on YouTube
- [New] Mastering the Science of Quantum HDR
- [Updated] Enhancing Social Media Presence with Professional Slideshow Making for 2024
- Convert Your WebM Videos Into Animated GIFs for Free with Movavi's Online Tool!
- In 2024, 5 Quick Hacks to Sharpen Your Indie Filmmaking Skills
- New 2024 Approved How To Split Videos in Premier Pro
- New Explore a Variety of Inexpensive Camera Models Suitable for Making Slow-Motion Footage without Compromising Quality for 2024
- New In 2024, If You Want an App to Make Videos with Pictures and Music for Social Media Posts, We Are with the Best Apps to Make Videos with Music and Pictures
- New In 2024, Read and Learn How to Convert a Slow-Motion Video to Normal in This Guide. Besides, Find the Best Desktop Solution to Adjust Video Speed Quickly and Easily
- New In 2024, Templates Increase the Editing Possibilities for Beginners and Professionals. Read This Article to Learn About some Customizable Slow-Motion CapCut Templates
- Unseen Pathways to Friend Finder Excellence
- Updated 2024 Approved Do You Know You Dont Need a PC or Mac to Apply LUTs on Your Media? You Can Use Many Smartphone Apps to Apply LUTs, Such as 3DLUT Mobile App
- Updated 2024 Approved Follow the Trend of Making Slow-Motion Videos with a Camera Lenta CapCut Template. Learn Everything About CapCut and Find Its Alternatives in This Article
- VersaMix Suite - Mac & PC
- ZMI PowerPack 20000 Review: Harnessing Limitless Energy in a Portable Package
- Title: Do You Want to Add an Adjustment Layer to Your Video for Easier Editing? Read This Article to Find Out How to Efficiently Add an Adjustment Layer in After Effects for 2024
- Author: Morgan
- Created at : 2024-09-23 22:12:09
- Updated at : 2024-09-30 16:31:07
- Link: https://ai-video-editing.techidaily.com/1713949342922-do-you-want-to-add-an-adjustment-layer-to-your-video-for-easier-editing-read-this-article-to-find-out-how-to-efficiently-add-an-adjustment-layer-in-after-ef/
- License: This work is licensed under CC BY-NC-SA 4.0.
