:max_bytes(150000):strip_icc():format(webp)/HotelTransylvaniaTransformania-71f0792728254936864ad509c847c73c.jpg)
Do You Want to Make Your Background Disappear and Replace with an Attractive Background? Here Is How to Add a Green Screen to Zoom App and Add Any Virtual Background of Your Choice for 2024

Do You Want to Make Your Background Disappear and Replace with an Attractive Background? Here Is How to Add a Green Screen to Zoom App and Add Any Virtual Background of Your Choice
If you are a regular user of Zoom app because you have to attend meetings and video conferences every now and then, you should know how to create a green screen for Zoom calls. There are going to be times when you would not want to show what is in your background because it might look distracting. Besides, changing the background from time to time breaks the monotony of your Zoom calls.
Zoom app allows you to change your background and set any available virtual background. However, the effect of virtual background may not be accurate and smooth unless you have a uniform background color. If you use green screen background for Zoom, you can replace it with any virtual background that will look very realistic to your audiences. We will illustrate how to create a green screen background for Zoom.
Part 1. How to add green screen to Zoom on computer?
Regular Zoom users prefer arranging and attending video conferences from their computers. Zoom desktop app makes it more convenient to attend Zoom conference with a wider screen and better visibility. Make sure you have a uniform green screen in your background before attending Zoom call so that you can replace it with any available virtual background on Zoom. Here are the steps on how to create a green screen for Zoom app on your computer.
Step1Open Zoom app and make sure you are logged into your account. Adjust the webcam so that only you and your green screen should be visible in the frame.
Step2Click on Settings (gear icon) located in the top-right corner.

Step3Once Settings window opens, click on Virtual background option on the left panel.
Step4Turn on the option “I have a green screen” located at the bottom. Thereafter, choose a virtual background with which you want to replace the green screen in your video.
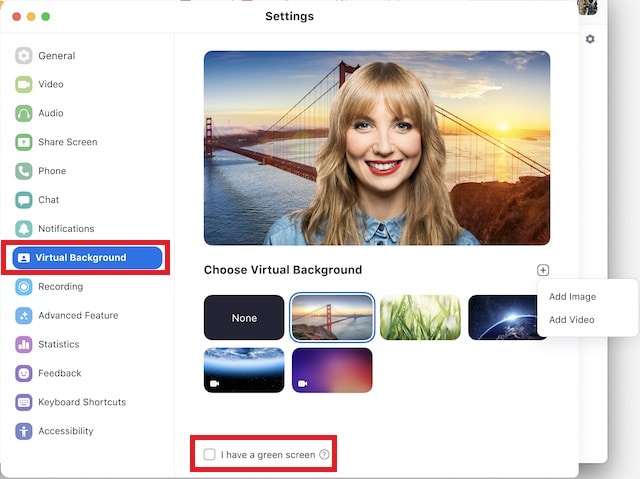
Step5Apart from the present virtual background, you can add photo or video to replace green screen background.
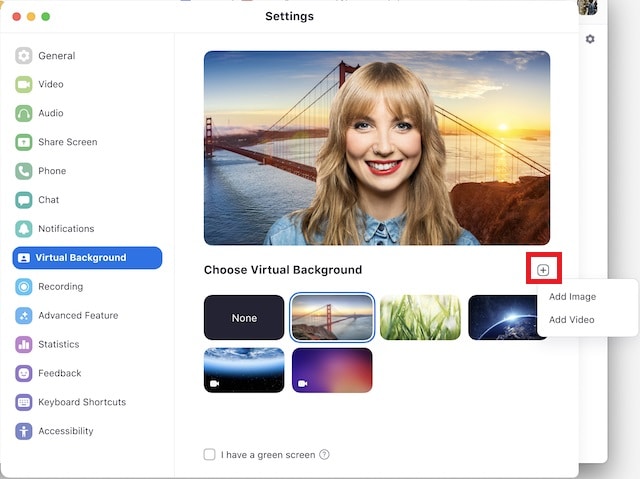
Step6Close Settings window and you will see that your green screen is replaced by your selected virtual background.
Part 2. How to add green screen to Zoom on mobile?
If you are an occasional Zoom user, you are more likely to use your smartphone to attend Zoom conferences. If you want green screen effect on your Zoom call, make sure you have a sizeable green screen in your background. This is because even if you happen to move your phone during the meeting, green screen background should come in the video frame all the time.
It is recommended to use a tripod to keep your smartphone fixed in one spot for better and consistent green screen effect. Here are the steps to answer your question how do you add a green screen to Zoom app on your mobile phone. The steps are the same for Android and iOS users.
Step1Open Zoom app on your smartphone and make sure you are signed into your account.
Step2Start a Zoom meeting and tap on More option located in the bottom-right corner.

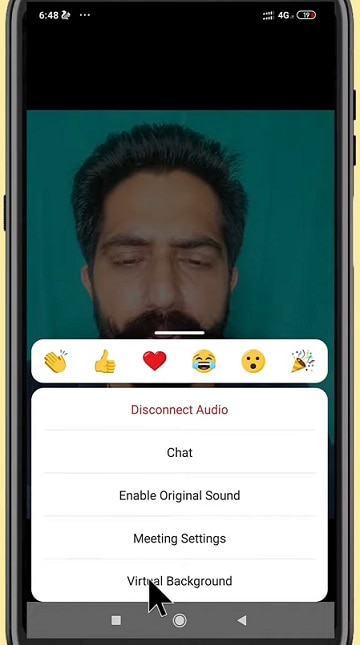
Step3Tap on Virtual background and you can select any preset virtual background.
Step4If you want to replace green screen with a customized background, tap on “+” icon and select any photo or video from your phone.
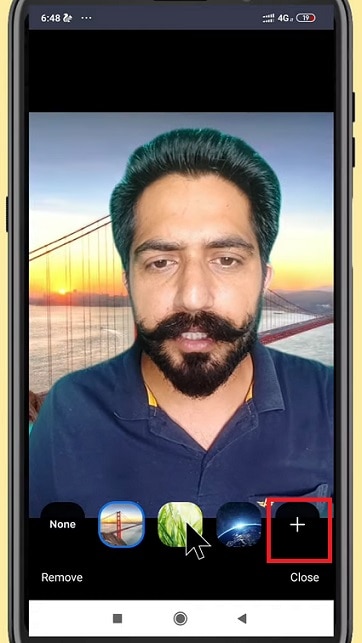
Step5Tap on Close option and the selected virtual background will be applied to your Zoom video.
Part 3. Tips to use green screen on Zoom video
Here are some important tips to use green screen on Zoom video for a better outcome.
Buy Large Green Screen - Since you are going to invest in buying green screen, you should buy a large green screen instead of buying two. Firstly, when you have one large green screen, you can set it up without any wrinkles or overlaps.
Secondly, a large green screen means greater surface area, and even when you slightly change the angle of your camera, your background will still have green screen instead of the exterior wall showing up and ruining virtual background effect.
Buy Green Screen Stand - Along with green screen, you should buy a sizeable green screen stand. A regular green screen stand contains two vertical supports at both ends and one horizontal support where you hand the green screen.
You can buy it according to the size of green screen you have bought. And you need to buy stand because you cannot fix the green screen on the wall properly. If you use any other means, there are going to be wrinkles and uneven virtual background effect.
Green Screen Quality - You can purchase any shade of green screen, but we recommend you opt for vibrant green color for a better outcome. Most importantly, the color should be even across the surface, and there should not be light and dark patches to dampen the virtual background effect and make it look unrealistic. That is why you should not compromise with quality.
Avoid Green Objects - You should not wear anything green. If your green screen has a lighter shade, you can wear deep color dresses and vice versa. Most importantly, you should not keep anything that is green while attending Zoom attending as it will disturb the green screen effect and it will look embarrassing. If you need to keep any green objects in your Zoom meetings, you should have blue screen instead of green screen.
Focus On Lighting - Lighting is extremely important when you want to use green screen. You should place the light so that it spreads evenly across the green screen. Otherwise, there are going to be light and dark patches, and the effect can get disturbed. Make sure you do not cast any shadow on the green screen by positioning the green screen accordingly.
Select A Proper Background - Last but not least, when you change your green screen to any virtual background photo or video, make sure you keep your audiences in mind. If you are attending a meeting, you should keep a professional-looking background. The background should not be distracting and match the theme of your meeting.
Conclusion
We have answered your question, “How do you add a green screen to zoom?” You can use green screen on your Zoom desktop app as well as smartphone app. This will help you to make your usual background cover up with green screen and replace green screen with any virtual background. Keep in mind all the tips we have provided you so that the green screen effect is perfect.
Free Download For Win 7 or later(64-bit)
Free Download For macOS 10.14 or later
How To Make A Video Longer
These days when you head on to social media, you can easily find 4-5 seconds video clips on the internet. However, many social media platforms like YouTube, Instagram, and other videos sharing platforms require you to make your video longer to meet the site’s minimum length requirements. So, for example, although Instagram’s minimum length is 3 seconds, you might want to find ways to engage your audience longer.
This article will describe the best ways to make a video longer. We’ll also offer a bonus tip on how you can edit your video to make it look better and attract more audience. On that note, let’s take a look.
6 Best Methods to Make a Video Longer
There are many methods out there to make your video longer. This section will touch on the six best methods to make a video longer.
Loop the Video
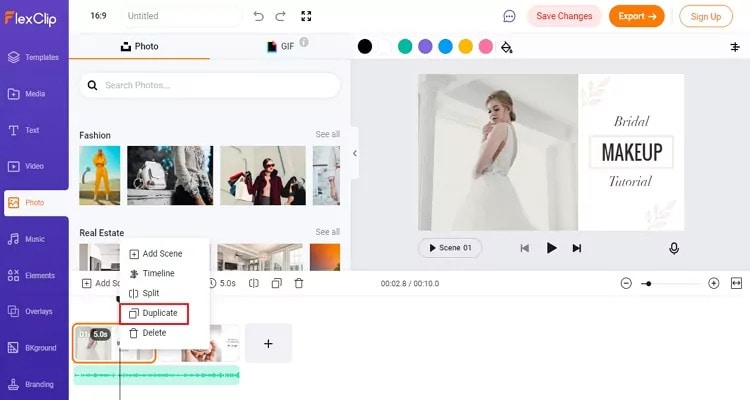
One of the best ways to make your video longer for most social media platforms is to loop the video. When you replay the video several times in a single row, it helps to multiply its length. An example is taking a 2-second video and looping it 4x. This automatically makes it into an 8-second video clip. With looping, you can simply replay the action of the clip rather than altering it in any way.
Many video editing software today allows you to loop your video for free. You have to upload the video and choose how many times you would like to loop it, and the software will get to work.
Slow Down the Video Speed

We would all agree that slow-motion makes everything seem longer automatically. You can utilize the same technique when you want to make a video longer. When you slow down a video clip, every second lasts longer. Using the slow-motion effect on a 3-second video will make the video 6 or even 9 seconds longer.
Add an Intro and Outro

Intro and outro are scenes you add before and after the video; these scenes are popular in YouTube videos. More generally, an intro is like a trailer. It shows the audience what the video is about, and the outro scene is usually used to show more information about the video maker. Adding an intro and outro to your video can add 2-4 seconds to your video clips.
It’s quite easy to add an intro and outro to any video. You can create them separately and then merge them with your video. The intro must be something relevant to the video clip; an example is adding a fast photo slideshow to the beginning of your video or a black frame. Relevant intro and outro scenes will make your video longer and maybe more engaging.
Add Images to the Video
This is another trick that most bloggers use to make their videos longer. It is an old trick in the book and makes your video significantly longer, depending on the number of videos you’re adding. A single picture can add a second or two to your video. You can simply use a video editor to merge the video clip and pictures into one seamless file.
Boomerang Your Video
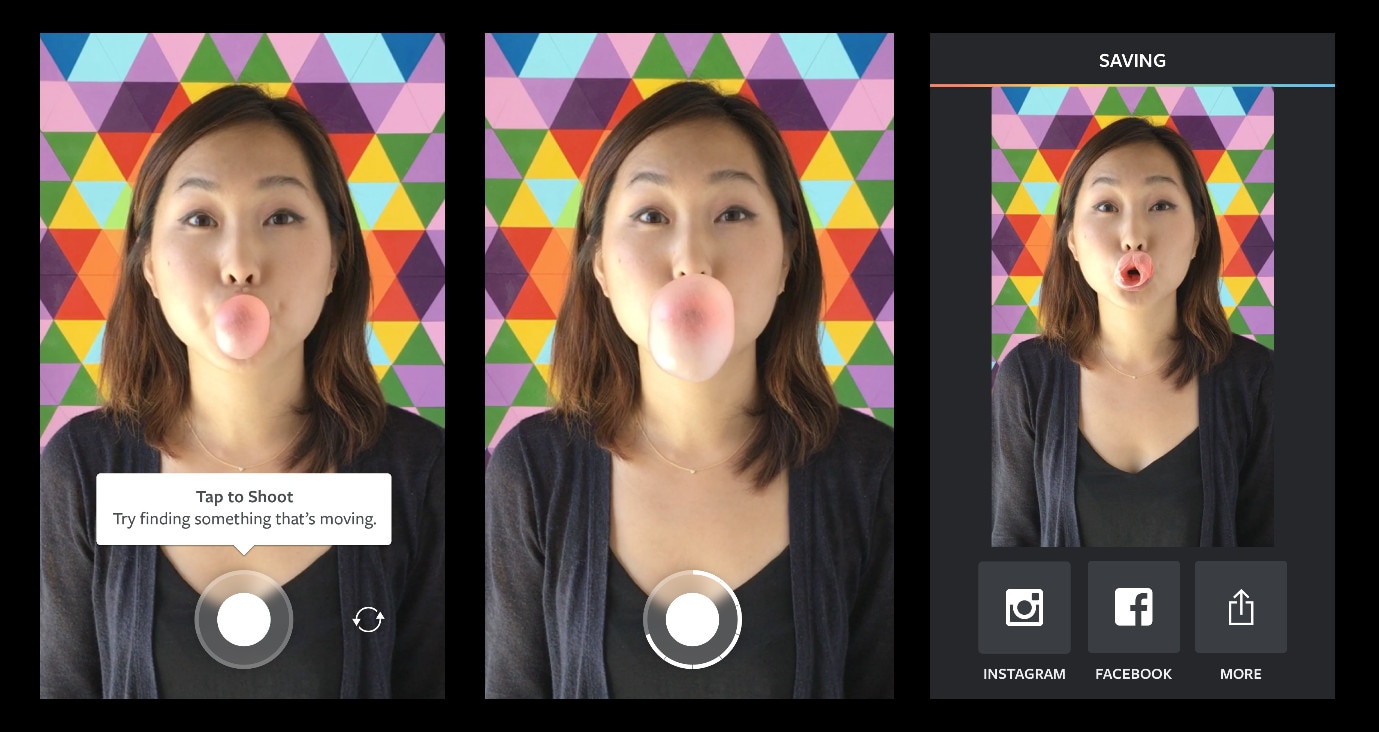
If you have plans to upload your media to Instagram, then a top feature you can use to make your video longer is the boomerang feature. Instagram introduced the Boomerang feature to play short video clips forward and then repeat their reverse. So by using the Boomerang feature, you don’t only add a memory effect to your video, but you also make your video longer.
Alternatively, you can manually append your video clip to a reversed version; this option allows you to make a boomerang from an existing clip. Apart from Instagram, you can utilize many other editing tools to create a boomerang from an existing video.
Add More Content to Your Video Clip

Another step you can take is to add more materials to your video. This doesn’t necessarily mean you have to get your camera out and start shooting more scenes to add to your video. Instead, you can simply access online media libraries and get amazing materials from there that are relevant to your video clip.
Today, most professional video editors offer you access to royalty-free photos and music material. You can simply browse through their collections and pick materials relevant to your video. For example, you could add a soundtrack and videos or GIFs that make your videos engaging. Adding extra content to your video clip can make it longer by 10 seconds.
Bonus Tips: How to Edit Video Easily on a Computer
Social media platforms offer you basic video editing features that you can use to optimize your video. However, these features are limited in what they can provide you with. If you want to have more control over the editing of your video clip and make it look even more professional, you should try Wondershare Filmora. This video editing tool is powerful and provides you with more editing features to ensure you get the result you want.
Filmora offers users over 300 effects like motion elements, overlays, titles, music sounds, and many more features to make your video more engaging and attractive. Using this app is relatively easy as well, and it offers users the option of changing the file format of their video if the social media platform does not support the original format.
If you would like to edit your video to give it a more engaging and professional look, follow the simple steps below.
Step 1: Import Video to Wondershare Filmora
First, you need to download the app on your device. After that, you can download it from the official website. Luckily, Wondershare Filmora supports Windows and Mac OS. Once you download the file, install and launch the app to get started.
On the menu, click on create a new project to begin. Next, click on the import button, and from the dropdown menu, choose ‘import media file.’ Alternatively, you can simply drag the video directly to the media library of this video editor. In addition, Filmora allows you to preview your video as you add different features to optimize the video.

If your video is shaky, you can use the stabilization feature to make it more stable. Simply right-click on the video in the preview window and select the option. Once you are sure, the video is ok, drag and drop it into the timeline to start editing your video.
Step 2: Cut, Slip, Rotate, or Color-Tune Your Video
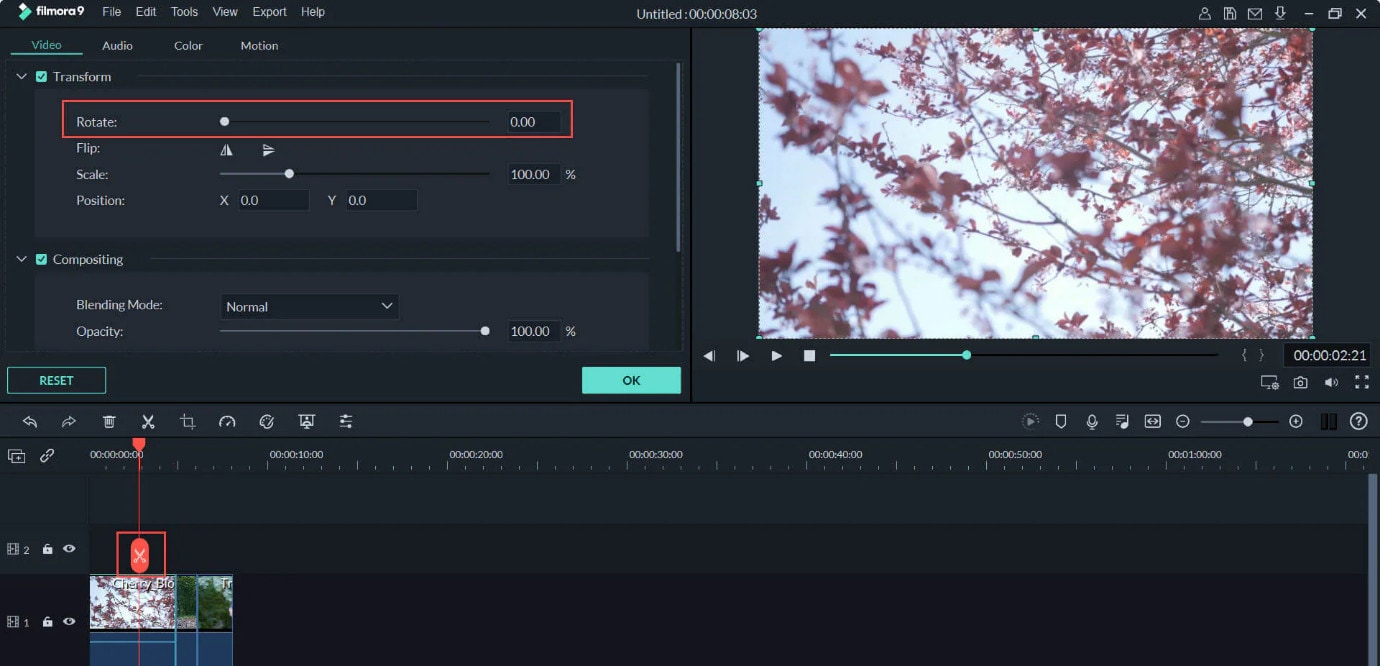
You can use many features to shape your video quickly on Wondershare Filmora. For example, you can use the scissors tool to cut or split your video. You can also use the transform tool to rotate and flip your video if you would prefer. In addition, Filmora allows you to add some advanced color tuning to your video with the color feature. This automatically makes your video even more beautiful.
Step 3: Add Filters and Effects to Your Video
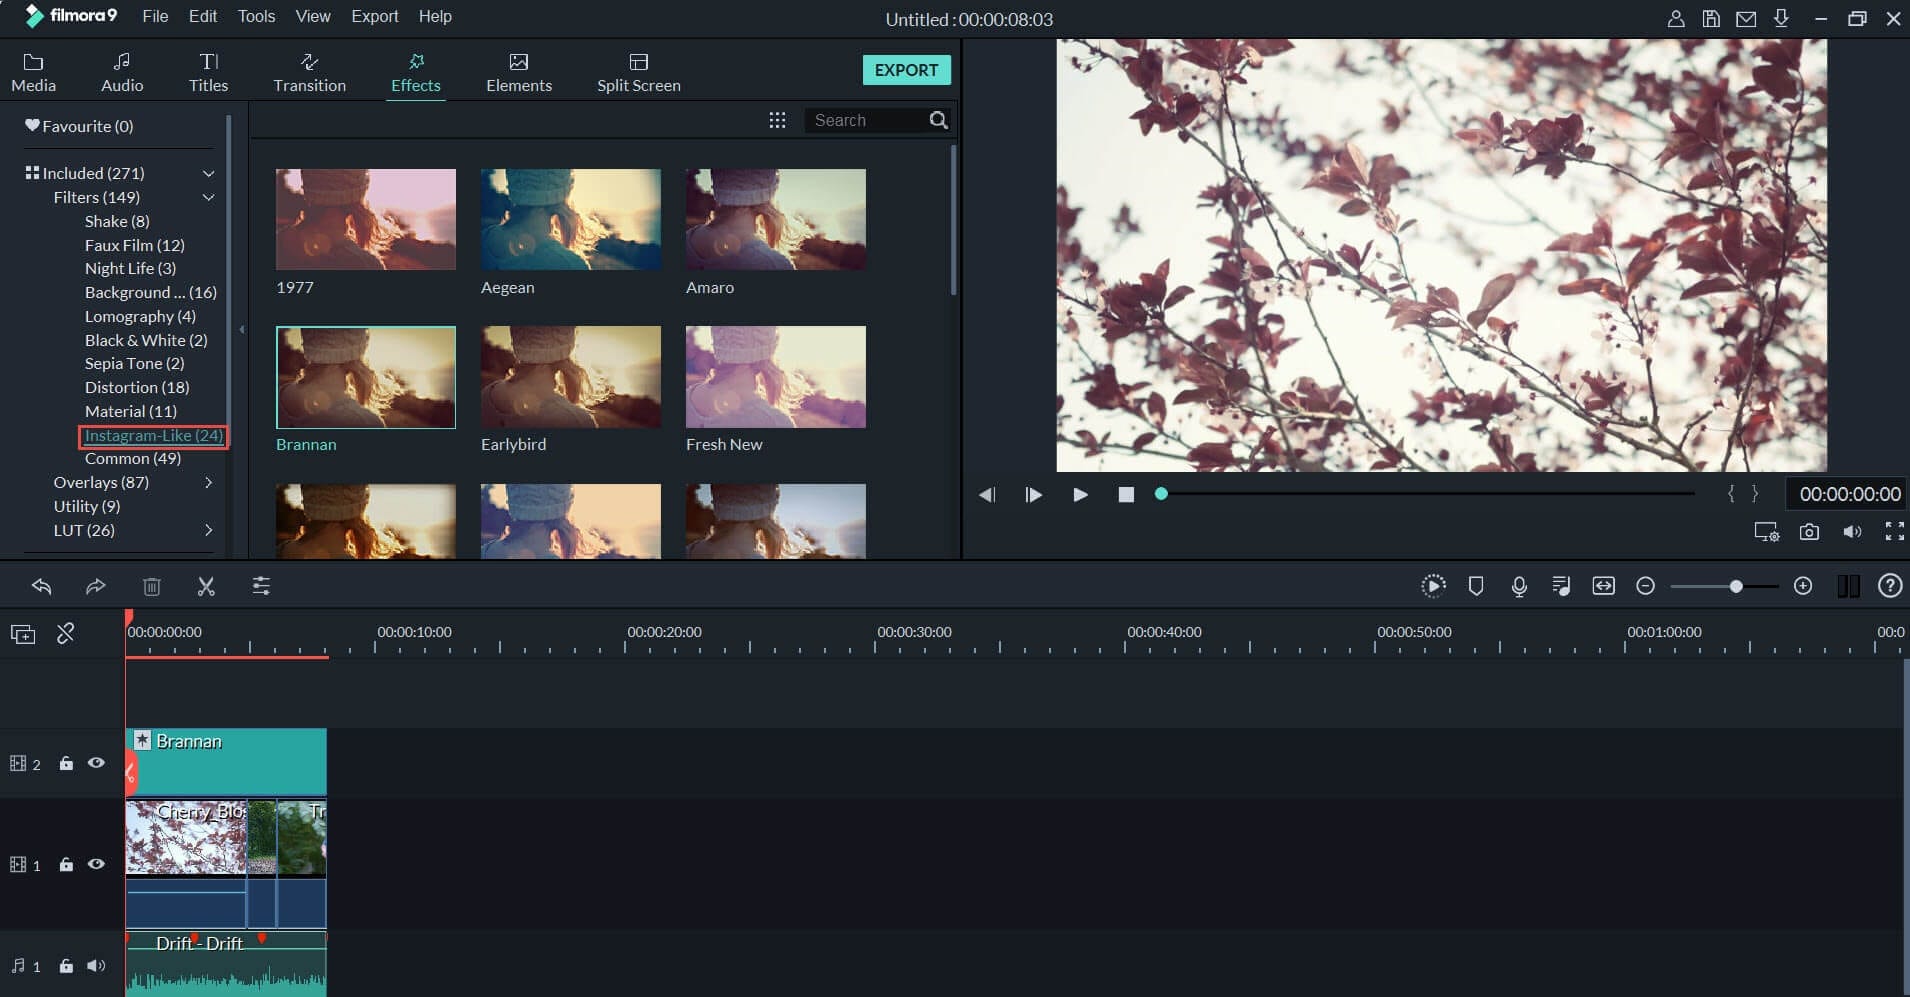
Additionally, Wondershare Filmora allows you to choose different transitions, graphics, tiles, texts, sound effects, titles, filters, overlays, and elements for your videos. With this video editing tool, you can get the exact look and sound you’re looking to achieve. In addition, there are different effect tabs above the timeline that directs you to the right feature you would like to include in your video.
You can just drag these effects and drop them on the timeline to apply to your video. Filmora has over 100 in-built filters and royalty-free music you can implement on your video. If you’re not sure which feature you’re looking for. Simply experiment and undo the effect till you find exactly what you’re looking for.
Step 4: Save and Share Edited Video

Once you’re satisfied with your video clip, you can now proceed to save it. You can choose to save the video to your local folder or a storage device you’d prefer. Wondershare Filmora allows you to save in the original format or change the format to your preferred option. Filmora also allows you to change your video’s resolution and bit rate to your preference. Alternatively, you can upload your video to video-sharing platforms like Instagram, Vimeo, YouTube, etc. You can also burn the video into a DVD collection if that’s what you’re looking for.
Final Thoughts
Social media platforms are great for gaining recognition and promoting your brand. However, there are times when you don’t meet the right video length, and you would like to make your video longer. With the six methods explained above, you can make your video as long as you want and also make your video more engaging. Additionally, you can use Wondershare Filmora to make your video more professional-looking. It offers you hundreds of effects and filters you can use to optimize your video.
Meta Description: If your video is short and you need to make it longer, this article gives you six methods to make a video longer and optimize them.
One of the best ways to make your video longer for most social media platforms is to loop the video. When you replay the video several times in a single row, it helps to multiply its length. An example is taking a 2-second video and looping it 4x. This automatically makes it into an 8-second video clip. With looping, you can simply replay the action of the clip rather than altering it in any way.
Many video editing software today allows you to loop your video for free. You have to upload the video and choose how many times you would like to loop it, and the software will get to work.
Slow Down the Video Speed

We would all agree that slow-motion makes everything seem longer automatically. You can utilize the same technique when you want to make a video longer. When you slow down a video clip, every second lasts longer. Using the slow-motion effect on a 3-second video will make the video 6 or even 9 seconds longer.
Add an Intro and Outro

Intro and outro are scenes you add before and after the video; these scenes are popular in YouTube videos. More generally, an intro is like a trailer. It shows the audience what the video is about, and the outro scene is usually used to show more information about the video maker. Adding an intro and outro to your video can add 2-4 seconds to your video clips.
It’s quite easy to add an intro and outro to any video. You can create them separately and then merge them with your video. The intro must be something relevant to the video clip; an example is adding a fast photo slideshow to the beginning of your video or a black frame. Relevant intro and outro scenes will make your video longer and maybe more engaging.
Add Images to the Video
This is another trick that most bloggers use to make their videos longer. It is an old trick in the book and makes your video significantly longer, depending on the number of videos you’re adding. A single picture can add a second or two to your video. You can simply use a video editor to merge the video clip and pictures into one seamless file.
Boomerang Your Video

If you have plans to upload your media to Instagram, then a top feature you can use to make your video longer is the boomerang feature. Instagram introduced the Boomerang feature to play short video clips forward and then repeat their reverse. So by using the Boomerang feature, you don’t only add a memory effect to your video, but you also make your video longer.
Alternatively, you can manually append your video clip to a reversed version; this option allows you to make a boomerang from an existing clip. Apart from Instagram, you can utilize many other editing tools to create a boomerang from an existing video.
Add More Content to Your Video Clip

Another step you can take is to add more materials to your video. This doesn’t necessarily mean you have to get your camera out and start shooting more scenes to add to your video. Instead, you can simply access online media libraries and get amazing materials from there that are relevant to your video clip.
Today, most professional video editors offer you access to royalty-free photos and music material. You can simply browse through their collections and pick materials relevant to your video. For example, you could add a soundtrack and videos or GIFs that make your videos engaging. Adding extra content to your video clip can make it longer by 10 seconds.
Bonus Tips: How to Edit Video Easily on a Computer
Social media platforms offer you basic video editing features that you can use to optimize your video. However, these features are limited in what they can provide you with. If you want to have more control over the editing of your video clip and make it look even more professional, you should try Wondershare Filmora. This video editing tool is powerful and provides you with more editing features to ensure you get the result you want.
Filmora offers users over 300 effects like motion elements, overlays, titles, music sounds, and many more features to make your video more engaging and attractive. Using this app is relatively easy as well, and it offers users the option of changing the file format of their video if the social media platform does not support the original format.
If you would like to edit your video to give it a more engaging and professional look, follow the simple steps below.
Step 1: Import Video to Wondershare Filmora
First, you need to download the app on your device. After that, you can download it from the official website. Luckily, Wondershare Filmora supports Windows and Mac OS. Once you download the file, install and launch the app to get started.
On the menu, click on create a new project to begin. Next, click on the import button, and from the dropdown menu, choose ‘import media file.’ Alternatively, you can simply drag the video directly to the media library of this video editor. In addition, Filmora allows you to preview your video as you add different features to optimize the video.

If your video is shaky, you can use the stabilization feature to make it more stable. Simply right-click on the video in the preview window and select the option. Once you are sure, the video is ok, drag and drop it into the timeline to start editing your video.
Step 2: Cut, Slip, Rotate, or Color-Tune Your Video

You can use many features to shape your video quickly on Wondershare Filmora. For example, you can use the scissors tool to cut or split your video. You can also use the transform tool to rotate and flip your video if you would prefer. In addition, Filmora allows you to add some advanced color tuning to your video with the color feature. This automatically makes your video even more beautiful.
Step 3: Add Filters and Effects to Your Video

Additionally, Wondershare Filmora allows you to choose different transitions, graphics, tiles, texts, sound effects, titles, filters, overlays, and elements for your videos. With this video editing tool, you can get the exact look and sound you’re looking to achieve. In addition, there are different effect tabs above the timeline that directs you to the right feature you would like to include in your video.
You can just drag these effects and drop them on the timeline to apply to your video. Filmora has over 100 in-built filters and royalty-free music you can implement on your video. If you’re not sure which feature you’re looking for. Simply experiment and undo the effect till you find exactly what you’re looking for.
Step 4: Save and Share Edited Video

Once you’re satisfied with your video clip, you can now proceed to save it. You can choose to save the video to your local folder or a storage device you’d prefer. Wondershare Filmora allows you to save in the original format or change the format to your preferred option. Filmora also allows you to change your video’s resolution and bit rate to your preference. Alternatively, you can upload your video to video-sharing platforms like Instagram, Vimeo, YouTube, etc. You can also burn the video into a DVD collection if that’s what you’re looking for.
Final Thoughts
Social media platforms are great for gaining recognition and promoting your brand. However, there are times when you don’t meet the right video length, and you would like to make your video longer. With the six methods explained above, you can make your video as long as you want and also make your video more engaging. Additionally, you can use Wondershare Filmora to make your video more professional-looking. It offers you hundreds of effects and filters you can use to optimize your video.
Meta Description: If your video is short and you need to make it longer, this article gives you six methods to make a video longer and optimize them.
One of the best ways to make your video longer for most social media platforms is to loop the video. When you replay the video several times in a single row, it helps to multiply its length. An example is taking a 2-second video and looping it 4x. This automatically makes it into an 8-second video clip. With looping, you can simply replay the action of the clip rather than altering it in any way.
Many video editing software today allows you to loop your video for free. You have to upload the video and choose how many times you would like to loop it, and the software will get to work.
Slow Down the Video Speed

We would all agree that slow-motion makes everything seem longer automatically. You can utilize the same technique when you want to make a video longer. When you slow down a video clip, every second lasts longer. Using the slow-motion effect on a 3-second video will make the video 6 or even 9 seconds longer.
Add an Intro and Outro

Intro and outro are scenes you add before and after the video; these scenes are popular in YouTube videos. More generally, an intro is like a trailer. It shows the audience what the video is about, and the outro scene is usually used to show more information about the video maker. Adding an intro and outro to your video can add 2-4 seconds to your video clips.
It’s quite easy to add an intro and outro to any video. You can create them separately and then merge them with your video. The intro must be something relevant to the video clip; an example is adding a fast photo slideshow to the beginning of your video or a black frame. Relevant intro and outro scenes will make your video longer and maybe more engaging.
Add Images to the Video
This is another trick that most bloggers use to make their videos longer. It is an old trick in the book and makes your video significantly longer, depending on the number of videos you’re adding. A single picture can add a second or two to your video. You can simply use a video editor to merge the video clip and pictures into one seamless file.
Boomerang Your Video

If you have plans to upload your media to Instagram, then a top feature you can use to make your video longer is the boomerang feature. Instagram introduced the Boomerang feature to play short video clips forward and then repeat their reverse. So by using the Boomerang feature, you don’t only add a memory effect to your video, but you also make your video longer.
Alternatively, you can manually append your video clip to a reversed version; this option allows you to make a boomerang from an existing clip. Apart from Instagram, you can utilize many other editing tools to create a boomerang from an existing video.
Add More Content to Your Video Clip

Another step you can take is to add more materials to your video. This doesn’t necessarily mean you have to get your camera out and start shooting more scenes to add to your video. Instead, you can simply access online media libraries and get amazing materials from there that are relevant to your video clip.
Today, most professional video editors offer you access to royalty-free photos and music material. You can simply browse through their collections and pick materials relevant to your video. For example, you could add a soundtrack and videos or GIFs that make your videos engaging. Adding extra content to your video clip can make it longer by 10 seconds.
Bonus Tips: How to Edit Video Easily on a Computer
Social media platforms offer you basic video editing features that you can use to optimize your video. However, these features are limited in what they can provide you with. If you want to have more control over the editing of your video clip and make it look even more professional, you should try Wondershare Filmora. This video editing tool is powerful and provides you with more editing features to ensure you get the result you want.
Filmora offers users over 300 effects like motion elements, overlays, titles, music sounds, and many more features to make your video more engaging and attractive. Using this app is relatively easy as well, and it offers users the option of changing the file format of their video if the social media platform does not support the original format.
If you would like to edit your video to give it a more engaging and professional look, follow the simple steps below.
Step 1: Import Video to Wondershare Filmora
First, you need to download the app on your device. After that, you can download it from the official website. Luckily, Wondershare Filmora supports Windows and Mac OS. Once you download the file, install and launch the app to get started.
On the menu, click on create a new project to begin. Next, click on the import button, and from the dropdown menu, choose ‘import media file.’ Alternatively, you can simply drag the video directly to the media library of this video editor. In addition, Filmora allows you to preview your video as you add different features to optimize the video.

If your video is shaky, you can use the stabilization feature to make it more stable. Simply right-click on the video in the preview window and select the option. Once you are sure, the video is ok, drag and drop it into the timeline to start editing your video.
Step 2: Cut, Slip, Rotate, or Color-Tune Your Video

You can use many features to shape your video quickly on Wondershare Filmora. For example, you can use the scissors tool to cut or split your video. You can also use the transform tool to rotate and flip your video if you would prefer. In addition, Filmora allows you to add some advanced color tuning to your video with the color feature. This automatically makes your video even more beautiful.
Step 3: Add Filters and Effects to Your Video

Additionally, Wondershare Filmora allows you to choose different transitions, graphics, tiles, texts, sound effects, titles, filters, overlays, and elements for your videos. With this video editing tool, you can get the exact look and sound you’re looking to achieve. In addition, there are different effect tabs above the timeline that directs you to the right feature you would like to include in your video.
You can just drag these effects and drop them on the timeline to apply to your video. Filmora has over 100 in-built filters and royalty-free music you can implement on your video. If you’re not sure which feature you’re looking for. Simply experiment and undo the effect till you find exactly what you’re looking for.
Step 4: Save and Share Edited Video

Once you’re satisfied with your video clip, you can now proceed to save it. You can choose to save the video to your local folder or a storage device you’d prefer. Wondershare Filmora allows you to save in the original format or change the format to your preferred option. Filmora also allows you to change your video’s resolution and bit rate to your preference. Alternatively, you can upload your video to video-sharing platforms like Instagram, Vimeo, YouTube, etc. You can also burn the video into a DVD collection if that’s what you’re looking for.
Final Thoughts
Social media platforms are great for gaining recognition and promoting your brand. However, there are times when you don’t meet the right video length, and you would like to make your video longer. With the six methods explained above, you can make your video as long as you want and also make your video more engaging. Additionally, you can use Wondershare Filmora to make your video more professional-looking. It offers you hundreds of effects and filters you can use to optimize your video.
Meta Description: If your video is short and you need to make it longer, this article gives you six methods to make a video longer and optimize them.
One of the best ways to make your video longer for most social media platforms is to loop the video. When you replay the video several times in a single row, it helps to multiply its length. An example is taking a 2-second video and looping it 4x. This automatically makes it into an 8-second video clip. With looping, you can simply replay the action of the clip rather than altering it in any way.
Many video editing software today allows you to loop your video for free. You have to upload the video and choose how many times you would like to loop it, and the software will get to work.
Slow Down the Video Speed

We would all agree that slow-motion makes everything seem longer automatically. You can utilize the same technique when you want to make a video longer. When you slow down a video clip, every second lasts longer. Using the slow-motion effect on a 3-second video will make the video 6 or even 9 seconds longer.
Add an Intro and Outro

Intro and outro are scenes you add before and after the video; these scenes are popular in YouTube videos. More generally, an intro is like a trailer. It shows the audience what the video is about, and the outro scene is usually used to show more information about the video maker. Adding an intro and outro to your video can add 2-4 seconds to your video clips.
It’s quite easy to add an intro and outro to any video. You can create them separately and then merge them with your video. The intro must be something relevant to the video clip; an example is adding a fast photo slideshow to the beginning of your video or a black frame. Relevant intro and outro scenes will make your video longer and maybe more engaging.
Add Images to the Video
This is another trick that most bloggers use to make their videos longer. It is an old trick in the book and makes your video significantly longer, depending on the number of videos you’re adding. A single picture can add a second or two to your video. You can simply use a video editor to merge the video clip and pictures into one seamless file.
Boomerang Your Video

If you have plans to upload your media to Instagram, then a top feature you can use to make your video longer is the boomerang feature. Instagram introduced the Boomerang feature to play short video clips forward and then repeat their reverse. So by using the Boomerang feature, you don’t only add a memory effect to your video, but you also make your video longer.
Alternatively, you can manually append your video clip to a reversed version; this option allows you to make a boomerang from an existing clip. Apart from Instagram, you can utilize many other editing tools to create a boomerang from an existing video.
Add More Content to Your Video Clip

Another step you can take is to add more materials to your video. This doesn’t necessarily mean you have to get your camera out and start shooting more scenes to add to your video. Instead, you can simply access online media libraries and get amazing materials from there that are relevant to your video clip.
Today, most professional video editors offer you access to royalty-free photos and music material. You can simply browse through their collections and pick materials relevant to your video. For example, you could add a soundtrack and videos or GIFs that make your videos engaging. Adding extra content to your video clip can make it longer by 10 seconds.
Bonus Tips: How to Edit Video Easily on a Computer
Social media platforms offer you basic video editing features that you can use to optimize your video. However, these features are limited in what they can provide you with. If you want to have more control over the editing of your video clip and make it look even more professional, you should try Wondershare Filmora. This video editing tool is powerful and provides you with more editing features to ensure you get the result you want.
Filmora offers users over 300 effects like motion elements, overlays, titles, music sounds, and many more features to make your video more engaging and attractive. Using this app is relatively easy as well, and it offers users the option of changing the file format of their video if the social media platform does not support the original format.
If you would like to edit your video to give it a more engaging and professional look, follow the simple steps below.
Step 1: Import Video to Wondershare Filmora
First, you need to download the app on your device. After that, you can download it from the official website. Luckily, Wondershare Filmora supports Windows and Mac OS. Once you download the file, install and launch the app to get started.
On the menu, click on create a new project to begin. Next, click on the import button, and from the dropdown menu, choose ‘import media file.’ Alternatively, you can simply drag the video directly to the media library of this video editor. In addition, Filmora allows you to preview your video as you add different features to optimize the video.

If your video is shaky, you can use the stabilization feature to make it more stable. Simply right-click on the video in the preview window and select the option. Once you are sure, the video is ok, drag and drop it into the timeline to start editing your video.
Step 2: Cut, Slip, Rotate, or Color-Tune Your Video

You can use many features to shape your video quickly on Wondershare Filmora. For example, you can use the scissors tool to cut or split your video. You can also use the transform tool to rotate and flip your video if you would prefer. In addition, Filmora allows you to add some advanced color tuning to your video with the color feature. This automatically makes your video even more beautiful.
Step 3: Add Filters and Effects to Your Video

Additionally, Wondershare Filmora allows you to choose different transitions, graphics, tiles, texts, sound effects, titles, filters, overlays, and elements for your videos. With this video editing tool, you can get the exact look and sound you’re looking to achieve. In addition, there are different effect tabs above the timeline that directs you to the right feature you would like to include in your video.
You can just drag these effects and drop them on the timeline to apply to your video. Filmora has over 100 in-built filters and royalty-free music you can implement on your video. If you’re not sure which feature you’re looking for. Simply experiment and undo the effect till you find exactly what you’re looking for.
Step 4: Save and Share Edited Video

Once you’re satisfied with your video clip, you can now proceed to save it. You can choose to save the video to your local folder or a storage device you’d prefer. Wondershare Filmora allows you to save in the original format or change the format to your preferred option. Filmora also allows you to change your video’s resolution and bit rate to your preference. Alternatively, you can upload your video to video-sharing platforms like Instagram, Vimeo, YouTube, etc. You can also burn the video into a DVD collection if that’s what you’re looking for.
Final Thoughts
Social media platforms are great for gaining recognition and promoting your brand. However, there are times when you don’t meet the right video length, and you would like to make your video longer. With the six methods explained above, you can make your video as long as you want and also make your video more engaging. Additionally, you can use Wondershare Filmora to make your video more professional-looking. It offers you hundreds of effects and filters you can use to optimize your video.
Meta Description: If your video is short and you need to make it longer, this article gives you six methods to make a video longer and optimize them.
3 Effective Methods to Correct Color Distortion in Videos
Create High-Quality Video - Wondershare Filmora
An easy and powerful YouTube video editor
Numerous video and audio effects to choose from
Detailed tutorials are provided by the official channel
Nothing is more satisfying than seeing the final cut of a video and realizing that everything we filmed is crystal clear, with vibrant colors and balanced light. Unfortunately, whether you are editing on your own or collaborating with a team, this can be difficult to achieve because color problems often occur. Unlike photo editors, where one photo can easily be fixed without affecting the rest of an album, video editing requires adjusting to fix one problem. We’ll look at three different methods to correct color distortion in videos.
In this article
02 How will Color Distortion Affect Your Videos?
03 Different Methods to Correct Color Distortion in Videos
What Is Color Distortion
Color distortion, also called chromatic aberration (CA), happens when the camera’s lens cannot resolve the wavelengths of light that it is recording. It occurs due to dispersion, which is when the lens elements’ refractive index varies with the light wavelength.
The refractive index of transparent materials often reduces with increasing wavelength. Because a lens’ focal length depends on the index of refraction, this variation in refraction index affects focusing.
There are two types of CA: transverse (lateral) and axial (longitudinal). Axial aberration happens when different wavelengths of light focus at different distances from a lens (focus shift). Essentially, longitudinal aberration is often at long focal lengths.
On the other hand, transverse aberration happens when different wavelengths focus at different places in the focal plane due to the magnification or distortion of the lens varying with wavelength. Ideally, transverse aberration is often at short focal lengths.
The two types of CA have different characteristics, and they may occur together. Axial chromatic aberration occurs throughout an image, and you can reduce it by stopping down, hence increasing the depth of the field so that although the different wavelengths are focusing at different distances, they’re still in acceptable focus.
When it comes to transverse chromatic aberration, it doesn’t occur in the middle of the image, and it increases towards the edge. What’s more? Stopping down does not affect it.
How will Color Distortion Affect Your Videos?
Colour distortion displays itself as “fringes” of color on the boundaries separating bright and dark parts of the image in a video. Color distortion can also occur when adding effects to a video, such as the use of a green screen. By using the green screen to replace the real thing, the colors in the video can appear a little off.
Different Methods to Correct Color Distortion in Videos
There are several methods to correct color distortion in your video. They include.
Method 1: Correct Color Distortion in Videos Using Filmora
Filmora is user-friendly software with powerful tools that allow users to tweak the color settings and correct color distortion. Follow the steps below to learn how to correct color distortion in videos using Filmora.
Step 1. Download and Install Filmora
Head to https://filmora.wondershare.net/ and download Filmora. Once you have finished downloading the software, install Filmora on your device and launch it.
Step 2. Import Your videos to Filmora
Select the New Project option to create a new project file. Click on the Import Media Files Here to find and load your videos to the Filmora’s media library. Alternatively, you can drag and drop your video file to the media library, and then put it on the timeline.

Step 3. Correct Color Distortions with Your Preferences
Navigate to the timeline and double-click your video. You’ll see the video editing window. Select the Color panel; you’ll see several parameters that you can tweak.
- Contrast allows you to control the difference in brightness and color in different areas of your video image. The Brightness setting lets you customize the overall darkness or lightness of the video image.
- With the Saturation setting, you can make the colors in your video image appear more inconspicuous or saturated.
- If the color in your video image is set too high, it will look oversaturated. The colors will be washed out and muted if it’s set to low. The Tint control in Filmora allows you to adjust the balance between these two chroma channels.
- Additionally, you can employ Hollywood film-looking color sets for videos from Sparta 300, Walking Dead, Game of Thrones, Star Wars, and much more.
- Preview and Save Your Edited Video

Once you have finished correcting the color distortion in your video, you can hit the Play symbol to view the changes in the previewing window. Click the Export button if you are content with the results. You can click on Settings to change the settings if you want.
Filmora allows you to save your videos in different formats. To do this, navigate to the Format tab. The software has the option of uploading videos directly to Vimeo or YouTube. Alternatively, you can burn it to DVD or export it to a portable device.

For Win 7 or later (64-bit)
For macOS 10.12 or later
Method 2: Correct Color Distortion in Videos Using Premiere Pro
Premiere Pro provides color correction tools that allow users to edit footage directly on their timeline. To learn how to correct color distortion in video using Premiere Pro, follow these steps:
Step 1. Import Your Video Files
Use the Import command to bring video files on your device into your project; this will make the video files available to the Premiere Pro project. This timeline-based video editing software application allows you to import an entire folder, multiple files, or a single file. You can import video files using the Import command or the Media Browser.
Step 2. Head to Color Correction Effect
Once you have imported your video, place it on the timeline. Apply color correction effects to the video you placed in the Timeline. You can also select your video and drag and drop the effect you want to the Video Effects selection under the Effects Control Panel. Here are some of the color correction effects you can apply:
Brightness and Contrast Effect: With this effect, you can adjust the contrast and brightness of your video. Using this effect allows you to make adjustments to all pixel values in your video image at once — mid-tones, shadows, and highlights.
Color Balance Effect: This effect changes the amount of blue, green, and red in the shadow, highlights of an image, and mid-tones. Preserve Luminosity preserves the average brightness of your video image and changes the color. It maintains the tonal balance in your video image.

Method 3: Correct Color Distortion in Videos Using Final Cut Pro
Developed by Macromedia and later Apple, Final Cut Pro is a non-linear video editing software that allows you to log and transfer videos onto a hard drive, where you can edit them, process them, and output the videos to various formats.
The software provides non-destructive and non-linear editing of QuickTime-compatible video formats. These include 8K, 5K, 4K, 2K, XDCAM (via plug-in), P2 MXF (DVCProHD), HDV, and DV film formats. Final Cut Pro can also import projects from iMovie for iPadOS and iOS. It also comes with multiple color correction tools, such as color wheels, video scopes, and sliders and curves.
With that in mind, let’s look at how to correct color distortion in videos using Final Cut Pro.
Step 1. Open Your Video in Final Cut Pro
Click on the ‘Window’ tab at the top of your screen and select the video you’d like to edit from the drop-down menu.
Step 2. Switch to Color Effects Work Space

Go to the Window panel and select the Workspaces option. Then, choose the Color & Effects option. Here, you can adjust a range of scopes, including the Luma Waveform, Vectorscope, and RGB Overlay.

Step 3. Correct the Color
Head to the color panel and click the drop-down menu next to No Corrections. Select Color Wheels, where you’ll be able to control various parts of your video clips individually.

The Shadows wheel allows you to control the darker shades of your footage, Highlights controls the bright shades of your footage, and the Midtones wheel allows you to adjust the Luma channels in the middle of your video clip. The Master wheel allows you to adjust hue, saturation, and Luma channel (exposure).

In addition to the color wheels, you’ll find more controls below that help you adjust the white balance.
Step 4. Save Your New Video File
After you’ve made these adjustments to your video, it’s time to save and export the file. Click on the ‘File’ tab at the top of your screen and choose ‘Export. Once you click ‘Export,’ you’ll be saving the file to your hard drive. Once it’s done, click ‘Save.’ The file will automatically be saved on your desktop.
Conclusion
● If you are experiencing color distortion, you can use any of the three methods above to correct it. Filmora is one of the most popular video edit tools that people use to correct color distortion videos.
Nothing is more satisfying than seeing the final cut of a video and realizing that everything we filmed is crystal clear, with vibrant colors and balanced light. Unfortunately, whether you are editing on your own or collaborating with a team, this can be difficult to achieve because color problems often occur. Unlike photo editors, where one photo can easily be fixed without affecting the rest of an album, video editing requires adjusting to fix one problem. We’ll look at three different methods to correct color distortion in videos.
In this article
02 How will Color Distortion Affect Your Videos?
03 Different Methods to Correct Color Distortion in Videos
What Is Color Distortion
Color distortion, also called chromatic aberration (CA), happens when the camera’s lens cannot resolve the wavelengths of light that it is recording. It occurs due to dispersion, which is when the lens elements’ refractive index varies with the light wavelength.
The refractive index of transparent materials often reduces with increasing wavelength. Because a lens’ focal length depends on the index of refraction, this variation in refraction index affects focusing.
There are two types of CA: transverse (lateral) and axial (longitudinal). Axial aberration happens when different wavelengths of light focus at different distances from a lens (focus shift). Essentially, longitudinal aberration is often at long focal lengths.
On the other hand, transverse aberration happens when different wavelengths focus at different places in the focal plane due to the magnification or distortion of the lens varying with wavelength. Ideally, transverse aberration is often at short focal lengths.
The two types of CA have different characteristics, and they may occur together. Axial chromatic aberration occurs throughout an image, and you can reduce it by stopping down, hence increasing the depth of the field so that although the different wavelengths are focusing at different distances, they’re still in acceptable focus.
When it comes to transverse chromatic aberration, it doesn’t occur in the middle of the image, and it increases towards the edge. What’s more? Stopping down does not affect it.
How will Color Distortion Affect Your Videos?
Colour distortion displays itself as “fringes” of color on the boundaries separating bright and dark parts of the image in a video. Color distortion can also occur when adding effects to a video, such as the use of a green screen. By using the green screen to replace the real thing, the colors in the video can appear a little off.
Different Methods to Correct Color Distortion in Videos
There are several methods to correct color distortion in your video. They include.
Method 1: Correct Color Distortion in Videos Using Filmora
Filmora is user-friendly software with powerful tools that allow users to tweak the color settings and correct color distortion. Follow the steps below to learn how to correct color distortion in videos using Filmora.
Step 1. Download and Install Filmora
Head to https://filmora.wondershare.net/ and download Filmora. Once you have finished downloading the software, install Filmora on your device and launch it.
Step 2. Import Your videos to Filmora
Select the New Project option to create a new project file. Click on the Import Media Files Here to find and load your videos to the Filmora’s media library. Alternatively, you can drag and drop your video file to the media library, and then put it on the timeline.

Step 3. Correct Color Distortions with Your Preferences
Navigate to the timeline and double-click your video. You’ll see the video editing window. Select the Color panel; you’ll see several parameters that you can tweak.
- Contrast allows you to control the difference in brightness and color in different areas of your video image. The Brightness setting lets you customize the overall darkness or lightness of the video image.
- With the Saturation setting, you can make the colors in your video image appear more inconspicuous or saturated.
- If the color in your video image is set too high, it will look oversaturated. The colors will be washed out and muted if it’s set to low. The Tint control in Filmora allows you to adjust the balance between these two chroma channels.
- Additionally, you can employ Hollywood film-looking color sets for videos from Sparta 300, Walking Dead, Game of Thrones, Star Wars, and much more.
- Preview and Save Your Edited Video

Once you have finished correcting the color distortion in your video, you can hit the Play symbol to view the changes in the previewing window. Click the Export button if you are content with the results. You can click on Settings to change the settings if you want.
Filmora allows you to save your videos in different formats. To do this, navigate to the Format tab. The software has the option of uploading videos directly to Vimeo or YouTube. Alternatively, you can burn it to DVD or export it to a portable device.

For Win 7 or later (64-bit)
For macOS 10.12 or later
Method 2: Correct Color Distortion in Videos Using Premiere Pro
Premiere Pro provides color correction tools that allow users to edit footage directly on their timeline. To learn how to correct color distortion in video using Premiere Pro, follow these steps:
Step 1. Import Your Video Files
Use the Import command to bring video files on your device into your project; this will make the video files available to the Premiere Pro project. This timeline-based video editing software application allows you to import an entire folder, multiple files, or a single file. You can import video files using the Import command or the Media Browser.
Step 2. Head to Color Correction Effect
Once you have imported your video, place it on the timeline. Apply color correction effects to the video you placed in the Timeline. You can also select your video and drag and drop the effect you want to the Video Effects selection under the Effects Control Panel. Here are some of the color correction effects you can apply:
Brightness and Contrast Effect: With this effect, you can adjust the contrast and brightness of your video. Using this effect allows you to make adjustments to all pixel values in your video image at once — mid-tones, shadows, and highlights.
Color Balance Effect: This effect changes the amount of blue, green, and red in the shadow, highlights of an image, and mid-tones. Preserve Luminosity preserves the average brightness of your video image and changes the color. It maintains the tonal balance in your video image.

Method 3: Correct Color Distortion in Videos Using Final Cut Pro
Developed by Macromedia and later Apple, Final Cut Pro is a non-linear video editing software that allows you to log and transfer videos onto a hard drive, where you can edit them, process them, and output the videos to various formats.
The software provides non-destructive and non-linear editing of QuickTime-compatible video formats. These include 8K, 5K, 4K, 2K, XDCAM (via plug-in), P2 MXF (DVCProHD), HDV, and DV film formats. Final Cut Pro can also import projects from iMovie for iPadOS and iOS. It also comes with multiple color correction tools, such as color wheels, video scopes, and sliders and curves.
With that in mind, let’s look at how to correct color distortion in videos using Final Cut Pro.
Step 1. Open Your Video in Final Cut Pro
Click on the ‘Window’ tab at the top of your screen and select the video you’d like to edit from the drop-down menu.
Step 2. Switch to Color Effects Work Space

Go to the Window panel and select the Workspaces option. Then, choose the Color & Effects option. Here, you can adjust a range of scopes, including the Luma Waveform, Vectorscope, and RGB Overlay.

Step 3. Correct the Color
Head to the color panel and click the drop-down menu next to No Corrections. Select Color Wheels, where you’ll be able to control various parts of your video clips individually.

The Shadows wheel allows you to control the darker shades of your footage, Highlights controls the bright shades of your footage, and the Midtones wheel allows you to adjust the Luma channels in the middle of your video clip. The Master wheel allows you to adjust hue, saturation, and Luma channel (exposure).

In addition to the color wheels, you’ll find more controls below that help you adjust the white balance.
Step 4. Save Your New Video File
After you’ve made these adjustments to your video, it’s time to save and export the file. Click on the ‘File’ tab at the top of your screen and choose ‘Export. Once you click ‘Export,’ you’ll be saving the file to your hard drive. Once it’s done, click ‘Save.’ The file will automatically be saved on your desktop.
Conclusion
● If you are experiencing color distortion, you can use any of the three methods above to correct it. Filmora is one of the most popular video edit tools that people use to correct color distortion videos.
Nothing is more satisfying than seeing the final cut of a video and realizing that everything we filmed is crystal clear, with vibrant colors and balanced light. Unfortunately, whether you are editing on your own or collaborating with a team, this can be difficult to achieve because color problems often occur. Unlike photo editors, where one photo can easily be fixed without affecting the rest of an album, video editing requires adjusting to fix one problem. We’ll look at three different methods to correct color distortion in videos.
In this article
02 How will Color Distortion Affect Your Videos?
03 Different Methods to Correct Color Distortion in Videos
What Is Color Distortion
Color distortion, also called chromatic aberration (CA), happens when the camera’s lens cannot resolve the wavelengths of light that it is recording. It occurs due to dispersion, which is when the lens elements’ refractive index varies with the light wavelength.
The refractive index of transparent materials often reduces with increasing wavelength. Because a lens’ focal length depends on the index of refraction, this variation in refraction index affects focusing.
There are two types of CA: transverse (lateral) and axial (longitudinal). Axial aberration happens when different wavelengths of light focus at different distances from a lens (focus shift). Essentially, longitudinal aberration is often at long focal lengths.
On the other hand, transverse aberration happens when different wavelengths focus at different places in the focal plane due to the magnification or distortion of the lens varying with wavelength. Ideally, transverse aberration is often at short focal lengths.
The two types of CA have different characteristics, and they may occur together. Axial chromatic aberration occurs throughout an image, and you can reduce it by stopping down, hence increasing the depth of the field so that although the different wavelengths are focusing at different distances, they’re still in acceptable focus.
When it comes to transverse chromatic aberration, it doesn’t occur in the middle of the image, and it increases towards the edge. What’s more? Stopping down does not affect it.
How will Color Distortion Affect Your Videos?
Colour distortion displays itself as “fringes” of color on the boundaries separating bright and dark parts of the image in a video. Color distortion can also occur when adding effects to a video, such as the use of a green screen. By using the green screen to replace the real thing, the colors in the video can appear a little off.
Different Methods to Correct Color Distortion in Videos
There are several methods to correct color distortion in your video. They include.
Method 1: Correct Color Distortion in Videos Using Filmora
Filmora is user-friendly software with powerful tools that allow users to tweak the color settings and correct color distortion. Follow the steps below to learn how to correct color distortion in videos using Filmora.
Step 1. Download and Install Filmora
Head to https://filmora.wondershare.net/ and download Filmora. Once you have finished downloading the software, install Filmora on your device and launch it.
Step 2. Import Your videos to Filmora
Select the New Project option to create a new project file. Click on the Import Media Files Here to find and load your videos to the Filmora’s media library. Alternatively, you can drag and drop your video file to the media library, and then put it on the timeline.

Step 3. Correct Color Distortions with Your Preferences
Navigate to the timeline and double-click your video. You’ll see the video editing window. Select the Color panel; you’ll see several parameters that you can tweak.
- Contrast allows you to control the difference in brightness and color in different areas of your video image. The Brightness setting lets you customize the overall darkness or lightness of the video image.
- With the Saturation setting, you can make the colors in your video image appear more inconspicuous or saturated.
- If the color in your video image is set too high, it will look oversaturated. The colors will be washed out and muted if it’s set to low. The Tint control in Filmora allows you to adjust the balance between these two chroma channels.
- Additionally, you can employ Hollywood film-looking color sets for videos from Sparta 300, Walking Dead, Game of Thrones, Star Wars, and much more.
- Preview and Save Your Edited Video

Once you have finished correcting the color distortion in your video, you can hit the Play symbol to view the changes in the previewing window. Click the Export button if you are content with the results. You can click on Settings to change the settings if you want.
Filmora allows you to save your videos in different formats. To do this, navigate to the Format tab. The software has the option of uploading videos directly to Vimeo or YouTube. Alternatively, you can burn it to DVD or export it to a portable device.

For Win 7 or later (64-bit)
For macOS 10.12 or later
Method 2: Correct Color Distortion in Videos Using Premiere Pro
Premiere Pro provides color correction tools that allow users to edit footage directly on their timeline. To learn how to correct color distortion in video using Premiere Pro, follow these steps:
Step 1. Import Your Video Files
Use the Import command to bring video files on your device into your project; this will make the video files available to the Premiere Pro project. This timeline-based video editing software application allows you to import an entire folder, multiple files, or a single file. You can import video files using the Import command or the Media Browser.
Step 2. Head to Color Correction Effect
Once you have imported your video, place it on the timeline. Apply color correction effects to the video you placed in the Timeline. You can also select your video and drag and drop the effect you want to the Video Effects selection under the Effects Control Panel. Here are some of the color correction effects you can apply:
Brightness and Contrast Effect: With this effect, you can adjust the contrast and brightness of your video. Using this effect allows you to make adjustments to all pixel values in your video image at once — mid-tones, shadows, and highlights.
Color Balance Effect: This effect changes the amount of blue, green, and red in the shadow, highlights of an image, and mid-tones. Preserve Luminosity preserves the average brightness of your video image and changes the color. It maintains the tonal balance in your video image.

Method 3: Correct Color Distortion in Videos Using Final Cut Pro
Developed by Macromedia and later Apple, Final Cut Pro is a non-linear video editing software that allows you to log and transfer videos onto a hard drive, where you can edit them, process them, and output the videos to various formats.
The software provides non-destructive and non-linear editing of QuickTime-compatible video formats. These include 8K, 5K, 4K, 2K, XDCAM (via plug-in), P2 MXF (DVCProHD), HDV, and DV film formats. Final Cut Pro can also import projects from iMovie for iPadOS and iOS. It also comes with multiple color correction tools, such as color wheels, video scopes, and sliders and curves.
With that in mind, let’s look at how to correct color distortion in videos using Final Cut Pro.
Step 1. Open Your Video in Final Cut Pro
Click on the ‘Window’ tab at the top of your screen and select the video you’d like to edit from the drop-down menu.
Step 2. Switch to Color Effects Work Space

Go to the Window panel and select the Workspaces option. Then, choose the Color & Effects option. Here, you can adjust a range of scopes, including the Luma Waveform, Vectorscope, and RGB Overlay.

Step 3. Correct the Color
Head to the color panel and click the drop-down menu next to No Corrections. Select Color Wheels, where you’ll be able to control various parts of your video clips individually.

The Shadows wheel allows you to control the darker shades of your footage, Highlights controls the bright shades of your footage, and the Midtones wheel allows you to adjust the Luma channels in the middle of your video clip. The Master wheel allows you to adjust hue, saturation, and Luma channel (exposure).

In addition to the color wheels, you’ll find more controls below that help you adjust the white balance.
Step 4. Save Your New Video File
After you’ve made these adjustments to your video, it’s time to save and export the file. Click on the ‘File’ tab at the top of your screen and choose ‘Export. Once you click ‘Export,’ you’ll be saving the file to your hard drive. Once it’s done, click ‘Save.’ The file will automatically be saved on your desktop.
Conclusion
● If you are experiencing color distortion, you can use any of the three methods above to correct it. Filmora is one of the most popular video edit tools that people use to correct color distortion videos.
Nothing is more satisfying than seeing the final cut of a video and realizing that everything we filmed is crystal clear, with vibrant colors and balanced light. Unfortunately, whether you are editing on your own or collaborating with a team, this can be difficult to achieve because color problems often occur. Unlike photo editors, where one photo can easily be fixed without affecting the rest of an album, video editing requires adjusting to fix one problem. We’ll look at three different methods to correct color distortion in videos.
In this article
02 How will Color Distortion Affect Your Videos?
03 Different Methods to Correct Color Distortion in Videos
What Is Color Distortion
Color distortion, also called chromatic aberration (CA), happens when the camera’s lens cannot resolve the wavelengths of light that it is recording. It occurs due to dispersion, which is when the lens elements’ refractive index varies with the light wavelength.
The refractive index of transparent materials often reduces with increasing wavelength. Because a lens’ focal length depends on the index of refraction, this variation in refraction index affects focusing.
There are two types of CA: transverse (lateral) and axial (longitudinal). Axial aberration happens when different wavelengths of light focus at different distances from a lens (focus shift). Essentially, longitudinal aberration is often at long focal lengths.
On the other hand, transverse aberration happens when different wavelengths focus at different places in the focal plane due to the magnification or distortion of the lens varying with wavelength. Ideally, transverse aberration is often at short focal lengths.
The two types of CA have different characteristics, and they may occur together. Axial chromatic aberration occurs throughout an image, and you can reduce it by stopping down, hence increasing the depth of the field so that although the different wavelengths are focusing at different distances, they’re still in acceptable focus.
When it comes to transverse chromatic aberration, it doesn’t occur in the middle of the image, and it increases towards the edge. What’s more? Stopping down does not affect it.
How will Color Distortion Affect Your Videos?
Colour distortion displays itself as “fringes” of color on the boundaries separating bright and dark parts of the image in a video. Color distortion can also occur when adding effects to a video, such as the use of a green screen. By using the green screen to replace the real thing, the colors in the video can appear a little off.
Different Methods to Correct Color Distortion in Videos
There are several methods to correct color distortion in your video. They include.
Method 1: Correct Color Distortion in Videos Using Filmora
Filmora is user-friendly software with powerful tools that allow users to tweak the color settings and correct color distortion. Follow the steps below to learn how to correct color distortion in videos using Filmora.
Step 1. Download and Install Filmora
Head to https://filmora.wondershare.net/ and download Filmora. Once you have finished downloading the software, install Filmora on your device and launch it.
Step 2. Import Your videos to Filmora
Select the New Project option to create a new project file. Click on the Import Media Files Here to find and load your videos to the Filmora’s media library. Alternatively, you can drag and drop your video file to the media library, and then put it on the timeline.

Step 3. Correct Color Distortions with Your Preferences
Navigate to the timeline and double-click your video. You’ll see the video editing window. Select the Color panel; you’ll see several parameters that you can tweak.
- Contrast allows you to control the difference in brightness and color in different areas of your video image. The Brightness setting lets you customize the overall darkness or lightness of the video image.
- With the Saturation setting, you can make the colors in your video image appear more inconspicuous or saturated.
- If the color in your video image is set too high, it will look oversaturated. The colors will be washed out and muted if it’s set to low. The Tint control in Filmora allows you to adjust the balance between these two chroma channels.
- Additionally, you can employ Hollywood film-looking color sets for videos from Sparta 300, Walking Dead, Game of Thrones, Star Wars, and much more.
- Preview and Save Your Edited Video

Once you have finished correcting the color distortion in your video, you can hit the Play symbol to view the changes in the previewing window. Click the Export button if you are content with the results. You can click on Settings to change the settings if you want.
Filmora allows you to save your videos in different formats. To do this, navigate to the Format tab. The software has the option of uploading videos directly to Vimeo or YouTube. Alternatively, you can burn it to DVD or export it to a portable device.

For Win 7 or later (64-bit)
For macOS 10.12 or later
Method 2: Correct Color Distortion in Videos Using Premiere Pro
Premiere Pro provides color correction tools that allow users to edit footage directly on their timeline. To learn how to correct color distortion in video using Premiere Pro, follow these steps:
Step 1. Import Your Video Files
Use the Import command to bring video files on your device into your project; this will make the video files available to the Premiere Pro project. This timeline-based video editing software application allows you to import an entire folder, multiple files, or a single file. You can import video files using the Import command or the Media Browser.
Step 2. Head to Color Correction Effect
Once you have imported your video, place it on the timeline. Apply color correction effects to the video you placed in the Timeline. You can also select your video and drag and drop the effect you want to the Video Effects selection under the Effects Control Panel. Here are some of the color correction effects you can apply:
Brightness and Contrast Effect: With this effect, you can adjust the contrast and brightness of your video. Using this effect allows you to make adjustments to all pixel values in your video image at once — mid-tones, shadows, and highlights.
Color Balance Effect: This effect changes the amount of blue, green, and red in the shadow, highlights of an image, and mid-tones. Preserve Luminosity preserves the average brightness of your video image and changes the color. It maintains the tonal balance in your video image.

Method 3: Correct Color Distortion in Videos Using Final Cut Pro
Developed by Macromedia and later Apple, Final Cut Pro is a non-linear video editing software that allows you to log and transfer videos onto a hard drive, where you can edit them, process them, and output the videos to various formats.
The software provides non-destructive and non-linear editing of QuickTime-compatible video formats. These include 8K, 5K, 4K, 2K, XDCAM (via plug-in), P2 MXF (DVCProHD), HDV, and DV film formats. Final Cut Pro can also import projects from iMovie for iPadOS and iOS. It also comes with multiple color correction tools, such as color wheels, video scopes, and sliders and curves.
With that in mind, let’s look at how to correct color distortion in videos using Final Cut Pro.
Step 1. Open Your Video in Final Cut Pro
Click on the ‘Window’ tab at the top of your screen and select the video you’d like to edit from the drop-down menu.
Step 2. Switch to Color Effects Work Space

Go to the Window panel and select the Workspaces option. Then, choose the Color & Effects option. Here, you can adjust a range of scopes, including the Luma Waveform, Vectorscope, and RGB Overlay.

Step 3. Correct the Color
Head to the color panel and click the drop-down menu next to No Corrections. Select Color Wheels, where you’ll be able to control various parts of your video clips individually.

The Shadows wheel allows you to control the darker shades of your footage, Highlights controls the bright shades of your footage, and the Midtones wheel allows you to adjust the Luma channels in the middle of your video clip. The Master wheel allows you to adjust hue, saturation, and Luma channel (exposure).

In addition to the color wheels, you’ll find more controls below that help you adjust the white balance.
Step 4. Save Your New Video File
After you’ve made these adjustments to your video, it’s time to save and export the file. Click on the ‘File’ tab at the top of your screen and choose ‘Export. Once you click ‘Export,’ you’ll be saving the file to your hard drive. Once it’s done, click ‘Save.’ The file will automatically be saved on your desktop.
Conclusion
● If you are experiencing color distortion, you can use any of the three methods above to correct it. Filmora is one of the most popular video edit tools that people use to correct color distortion videos.
How to Make an Aesthetic Slideshow
How to Make an Aesthetic Slideshow Presentation
An easy yet powerful editor
Numerous effects to choose from
Detailed tutorials provided by the official channel
The slideshow must be engaging and attractive. And the recent trend is all about making things around your aesthetic, that is, visually pleasant. You might want to know how you, too, can make such aesthetic slideshows? Well, in the following discussion, we will discuss all of it, along with the best tool for making the best aesthetic slideshows.
In this article
01 The Best 8 Premium Aesthetic Slideshow Template Designs
02 [How to Make an Aesthetic Slideshow Presentation](#Part 2)
03 [FAQ of Making Aesthetic Slideshow](#Part 3)
Part 1 The Best 8 Premium Aesthetic Slideshow Template Designs
One of the best ways of making marvellous aesthetic slideshows is by using an aesthetic slideshow template. The templates have readymade elements that emit aesthetic and minimalistic vibes to your slideshow.
You will find numerous templates that have an aesthetic and minimalistic theme. You can choose any among the countless for your slideshows. There are many designs of templates available for making aesthetic slideshows.
We will discuss eight premium aesthetic slideshow template designs that you can readily use in your slideshows to make your work a lot easier. These template designs will be some of the best ones and can serve and suit every possible purpose for creating a slideshow.
So, here are the best and the most useful eight aesthetic slideshow template designs that you can use for making fantastic aesthetic slideshows.
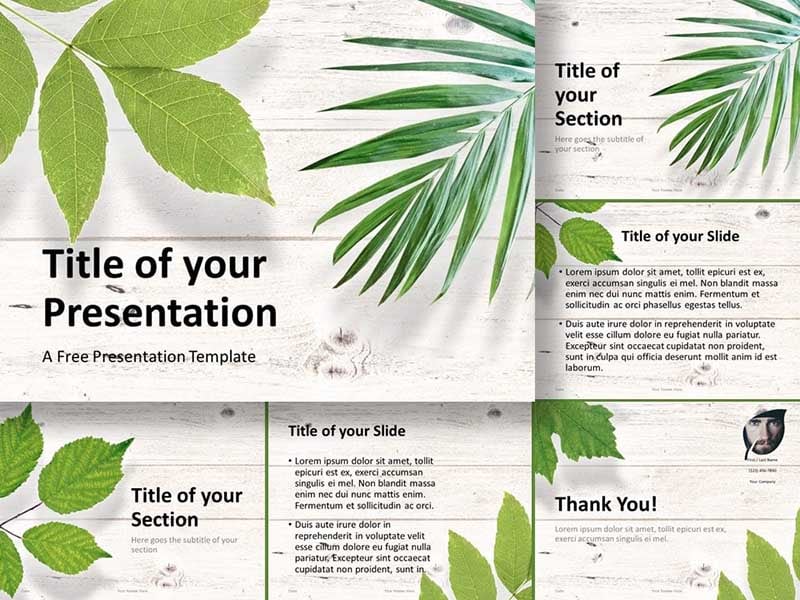
01Leafy Template Design
The Leafy template design is best suitable for making the best aesthetic slideshows with a classy presentation theme. It is available in Google Slides, and it consists of as many as 120 unique designed slides and two variations of colours.
You can readily make changes and edits and customize the tinplated design according to your imagination, reference and skills. It is best for making classy presentations because the designs are simple, yet they reflect the quality of elegance that helps you create the best aesthetic sideshows.
02Cinematic Reel Template
The Cinematic Reel template is a premiere pro template design by Videomaker. It consists of 22 media layers and 12 editable tact layers, and it has a very stylish design and includes simple yet impactful text animations.

Any trailers, demos, reel videos, short movie trails and the like can be ideally and perfectly created with this template design. Using this template design is absolutely effortless, and you can make any content-related slideshows effortlessly and ideally with this slideshow template design by Videomaker.
03B-Clinique
B-Clinique is the template design for making a minimalist aesthetic slideshow avowable on Google Slides. This template design is best suited for creating trendy aesthetic slideshows. It includes designs of line arts, subtle pleasant shares and all the other components that solely and perfectly reflect an aesthetic aura.
It was primarily designed for making slides for cosmetology purposes. It has 30 different slide designs and is ideal for creating slides for the industry by integrating a few edits. It ideally reflects a calming aura as it uses the earthy brown tone and shade for the design of the template.
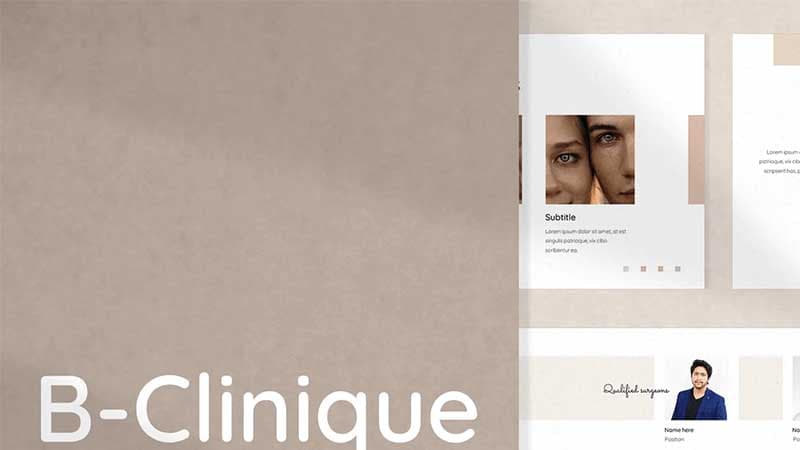
04YouTube Pack Template
We all know that various social media platforms have become the most influential factor in our lives. And YouTube is the most renowned among all the other social media platforms, and now, it has even become a mode of earning a livelihood.
And for making slideshows that are to be put up on one or more social media platforms, especially on YouTube, they need to be presented in a particular manner. And you can readily make aesthetic slideshows ideal for social media platforms, especially YouTube, with the YouTube Pack Templated designs, which is Mirs.
This template includes all the necessary elements, such as the “Subscribe” panel, other buttons, side frames, and the like. One can readily use it to make incredible aesthetic slides for their social media channels.

05Sunlike Template
The Sunlike Templates by the Google Slides. It is a beautiful and professional aesthetic slideshow template with design slides that can create a clean and highly professional. It is a modern-creative type of template that consists of 39 distinctive design slides. You can readily edit and thus, customise the slides according to your overreference, needs and skills.
It helps you create a lively and aesthetic presentation at the same time. It includes a lot of vibrant colours that make your presentation look exuberant and engaging.
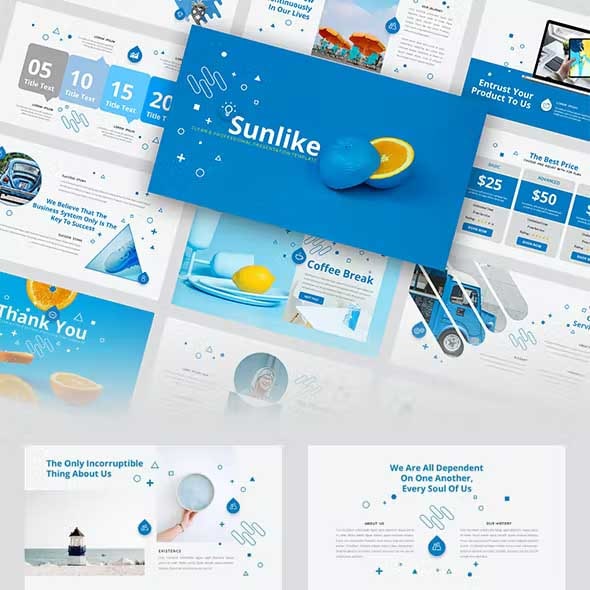
06Fast Glitch Transitions Template
The Fast Glitch Transitions template is by Red Feathers. Transitions have been the recent trend, and in every other video, we see different and unique transitions. And when you integrate transitions in your slideshows, they become more eye-catching.
And the glitch transitions can create a unique yet pleasing effect for your slideshows when you use the many among the uncountable options available.

07Solv Template
The Solv template is by Google Slides. It is best suitable for creating your start-up business slideshow presentation when you are a big fan of aesthetic presentations. 36 slides are present with attractive pop colours, which, although they look vibrant, are gladly aesthetic too.

08Text Messages Template
The Text Messages template by Blinque can be the trendiest and the most aesthetic template design one can find. It helps you create slideshow videos in the form of text messages. So, if you want to narrate anything and do it uniquely, this template can be the best fit for you.

Part 2 How to Make an Aesthetic Slideshow Presentation
Making a slideshow presentation is quite simple and an aspect that is well-known to many. But, how can you make your slideshows look aesthetic? If you include them in your slideshows, there are a few factors that can readily turn them aesthetic.
So, let us look into the different aspects that can help you turn your slides aesthetic when you integrate them into it.
● Minimalistic Text Designs
Minimalism and aesthetic aura go simultaneously. So, the more your efforts to keep your texts and writings in your slide minimalistic, the more aesthetic your slide would look. Several such finds or text designs are available, and you can readily choose among them and integrate them into your slides.
● Use soft and pastel colours for your theme of the template
Every aesthetic object’s most common and signature feature is its subtle, pastel shade. So, stick to using a soft pastel shade for the theme of your template. The colours, such as lavender, sift purple, millennial pink, powder blue or tones of silver, can ideally fit under the collection of aesthetic shades for the youth template of the slideshows.
● Minimalistic Pictures
The images you use in your slideshow will play a considerable role in deeming how aesthetic your slides look. So, choose them after enough analysis. See whether the photos have an aesthetic or minimalistic feature. By that, we are referring to the copper tone of the picture, its content and its size. It is best to include small images to reflect the slide’s minimalistic character.
Part 3 FAQ of Making Aesthetic Slideshow
Here are some of the FAQs about making aesthetic slideshows.
01How can I make an aesthetic slideshow in PowerPoint?
One can effortlessly do so with the templates available. Also, it is best to use small images, subtle pastel shades for the theme and minimalistic text designs or fonts in the slides.
02Which is the best tool for creating aesthetic slideshows?
Filmore is one of the most effective and ideal tools for making the most aesthetically pleasing slideshows. It has over 700 filters, innumerable templates and uncountable beneficial features to make your slides look minimalistic and aesthetic.
03How can I use Filmora for making aesthetic slideshows?
Filmora has several templates that reflect minimalistic designs. You can readily use them for your slideshow video. You can also use several filters to give a subtle pastel tone to your slideshow. Lastly, the different motion control features and fonts available can help you make the most aesthetically pleasing slideshows with Filmora.
04Is Filmora suitable for slideshows?
Wondershare Filmora Video Editor is one of the best and renowned tools for video editing. And for making slideshow videos, it Is equally competent and helps make the best and the most aesthetic slideshows with its incredible features.
For Win 7 or later (64-bit)
For macOS 10.12 or later
Filmora is the best video editing tool that one can come across. It has the best and the most advanced features for editing and is ideal for professionals. But, the beginners, too, can use it to enhance their editing skills, as Filmora is not difficult to use.
Also, it is ideal for creating aesthetic slideshow videos. It is because-
● There are more than 800 templates, and among them, there are numerous aesthetic design templates that you can use
● The filters can help add an aesthetic and minimalistic tone to your slideshow video
● You can integrate different aesthetic fonts from the many available.
● Ending Thoughts →
● Now that you know all about creating the best minimalist aesthetic slideshow, bring out all your creative skills and make the most wholesome and engaging slideshow!
● Choose the best templates, and for the ideal results, pick from the templates mentioned above.
● Follow the above steps to create the most aesthetic slideshows that would perfectly mirror your imagination.
● Lastly, use the best video editing tool, Filmora, that will help you make such aesthetic slideshows that will definitely be incomparable and inimitable!
The slideshow must be engaging and attractive. And the recent trend is all about making things around your aesthetic, that is, visually pleasant. You might want to know how you, too, can make such aesthetic slideshows? Well, in the following discussion, we will discuss all of it, along with the best tool for making the best aesthetic slideshows.
In this article
01 The Best 8 Premium Aesthetic Slideshow Template Designs
02 [How to Make an Aesthetic Slideshow Presentation](#Part 2)
03 [FAQ of Making Aesthetic Slideshow](#Part 3)
Part 1 The Best 8 Premium Aesthetic Slideshow Template Designs
One of the best ways of making marvellous aesthetic slideshows is by using an aesthetic slideshow template. The templates have readymade elements that emit aesthetic and minimalistic vibes to your slideshow.
You will find numerous templates that have an aesthetic and minimalistic theme. You can choose any among the countless for your slideshows. There are many designs of templates available for making aesthetic slideshows.
We will discuss eight premium aesthetic slideshow template designs that you can readily use in your slideshows to make your work a lot easier. These template designs will be some of the best ones and can serve and suit every possible purpose for creating a slideshow.
So, here are the best and the most useful eight aesthetic slideshow template designs that you can use for making fantastic aesthetic slideshows.
01Leafy Template Design
The Leafy template design is best suitable for making the best aesthetic slideshows with a classy presentation theme. It is available in Google Slides, and it consists of as many as 120 unique designed slides and two variations of colours.
You can readily make changes and edits and customize the tinplated design according to your imagination, reference and skills. It is best for making classy presentations because the designs are simple, yet they reflect the quality of elegance that helps you create the best aesthetic sideshows.

02Cinematic Reel Template
The Cinematic Reel template is a premiere pro template design by Videomaker. It consists of 22 media layers and 12 editable tact layers, and it has a very stylish design and includes simple yet impactful text animations.

Any trailers, demos, reel videos, short movie trails and the like can be ideally and perfectly created with this template design. Using this template design is absolutely effortless, and you can make any content-related slideshows effortlessly and ideally with this slideshow template design by Videomaker.
03B-Clinique
B-Clinique is the template design for making a minimalist aesthetic slideshow avowable on Google Slides. This template design is best suited for creating trendy aesthetic slideshows. It includes designs of line arts, subtle pleasant shares and all the other components that solely and perfectly reflect an aesthetic aura.
It was primarily designed for making slides for cosmetology purposes. It has 30 different slide designs and is ideal for creating slides for the industry by integrating a few edits. It ideally reflects a calming aura as it uses the earthy brown tone and shade for the design of the template.

04YouTube Pack Template
We all know that various social media platforms have become the most influential factor in our lives. And YouTube is the most renowned among all the other social media platforms, and now, it has even become a mode of earning a livelihood.
And for making slideshows that are to be put up on one or more social media platforms, especially on YouTube, they need to be presented in a particular manner. And you can readily make aesthetic slideshows ideal for social media platforms, especially YouTube, with the YouTube Pack Templated designs, which is Mirs.
This template includes all the necessary elements, such as the “Subscribe” panel, other buttons, side frames, and the like. One can readily use it to make incredible aesthetic slides for their social media channels.

05Sunlike Template
The Sunlike Templates by the Google Slides. It is a beautiful and professional aesthetic slideshow template with design slides that can create a clean and highly professional. It is a modern-creative type of template that consists of 39 distinctive design slides. You can readily edit and thus, customise the slides according to your overreference, needs and skills.
It helps you create a lively and aesthetic presentation at the same time. It includes a lot of vibrant colours that make your presentation look exuberant and engaging.

06Fast Glitch Transitions Template
The Fast Glitch Transitions template is by Red Feathers. Transitions have been the recent trend, and in every other video, we see different and unique transitions. And when you integrate transitions in your slideshows, they become more eye-catching.
And the glitch transitions can create a unique yet pleasing effect for your slideshows when you use the many among the uncountable options available.

07Solv Template
The Solv template is by Google Slides. It is best suitable for creating your start-up business slideshow presentation when you are a big fan of aesthetic presentations. 36 slides are present with attractive pop colours, which, although they look vibrant, are gladly aesthetic too.

08Text Messages Template
The Text Messages template by Blinque can be the trendiest and the most aesthetic template design one can find. It helps you create slideshow videos in the form of text messages. So, if you want to narrate anything and do it uniquely, this template can be the best fit for you.

Part 2 How to Make an Aesthetic Slideshow Presentation
Making a slideshow presentation is quite simple and an aspect that is well-known to many. But, how can you make your slideshows look aesthetic? If you include them in your slideshows, there are a few factors that can readily turn them aesthetic.
So, let us look into the different aspects that can help you turn your slides aesthetic when you integrate them into it.
● Minimalistic Text Designs
Minimalism and aesthetic aura go simultaneously. So, the more your efforts to keep your texts and writings in your slide minimalistic, the more aesthetic your slide would look. Several such finds or text designs are available, and you can readily choose among them and integrate them into your slides.
● Use soft and pastel colours for your theme of the template
Every aesthetic object’s most common and signature feature is its subtle, pastel shade. So, stick to using a soft pastel shade for the theme of your template. The colours, such as lavender, sift purple, millennial pink, powder blue or tones of silver, can ideally fit under the collection of aesthetic shades for the youth template of the slideshows.
● Minimalistic Pictures
The images you use in your slideshow will play a considerable role in deeming how aesthetic your slides look. So, choose them after enough analysis. See whether the photos have an aesthetic or minimalistic feature. By that, we are referring to the copper tone of the picture, its content and its size. It is best to include small images to reflect the slide’s minimalistic character.
Part 3 FAQ of Making Aesthetic Slideshow
Here are some of the FAQs about making aesthetic slideshows.
01How can I make an aesthetic slideshow in PowerPoint?
One can effortlessly do so with the templates available. Also, it is best to use small images, subtle pastel shades for the theme and minimalistic text designs or fonts in the slides.
02Which is the best tool for creating aesthetic slideshows?
Filmore is one of the most effective and ideal tools for making the most aesthetically pleasing slideshows. It has over 700 filters, innumerable templates and uncountable beneficial features to make your slides look minimalistic and aesthetic.
03How can I use Filmora for making aesthetic slideshows?
Filmora has several templates that reflect minimalistic designs. You can readily use them for your slideshow video. You can also use several filters to give a subtle pastel tone to your slideshow. Lastly, the different motion control features and fonts available can help you make the most aesthetically pleasing slideshows with Filmora.
04Is Filmora suitable for slideshows?
Wondershare Filmora Video Editor is one of the best and renowned tools for video editing. And for making slideshow videos, it Is equally competent and helps make the best and the most aesthetic slideshows with its incredible features.
For Win 7 or later (64-bit)
For macOS 10.12 or later
Filmora is the best video editing tool that one can come across. It has the best and the most advanced features for editing and is ideal for professionals. But, the beginners, too, can use it to enhance their editing skills, as Filmora is not difficult to use.
Also, it is ideal for creating aesthetic slideshow videos. It is because-
● There are more than 800 templates, and among them, there are numerous aesthetic design templates that you can use
● The filters can help add an aesthetic and minimalistic tone to your slideshow video
● You can integrate different aesthetic fonts from the many available.
● Ending Thoughts →
● Now that you know all about creating the best minimalist aesthetic slideshow, bring out all your creative skills and make the most wholesome and engaging slideshow!
● Choose the best templates, and for the ideal results, pick from the templates mentioned above.
● Follow the above steps to create the most aesthetic slideshows that would perfectly mirror your imagination.
● Lastly, use the best video editing tool, Filmora, that will help you make such aesthetic slideshows that will definitely be incomparable and inimitable!
The slideshow must be engaging and attractive. And the recent trend is all about making things around your aesthetic, that is, visually pleasant. You might want to know how you, too, can make such aesthetic slideshows? Well, in the following discussion, we will discuss all of it, along with the best tool for making the best aesthetic slideshows.
In this article
01 The Best 8 Premium Aesthetic Slideshow Template Designs
02 [How to Make an Aesthetic Slideshow Presentation](#Part 2)
03 [FAQ of Making Aesthetic Slideshow](#Part 3)
Part 1 The Best 8 Premium Aesthetic Slideshow Template Designs
One of the best ways of making marvellous aesthetic slideshows is by using an aesthetic slideshow template. The templates have readymade elements that emit aesthetic and minimalistic vibes to your slideshow.
You will find numerous templates that have an aesthetic and minimalistic theme. You can choose any among the countless for your slideshows. There are many designs of templates available for making aesthetic slideshows.
We will discuss eight premium aesthetic slideshow template designs that you can readily use in your slideshows to make your work a lot easier. These template designs will be some of the best ones and can serve and suit every possible purpose for creating a slideshow.
So, here are the best and the most useful eight aesthetic slideshow template designs that you can use for making fantastic aesthetic slideshows.
01Leafy Template Design
The Leafy template design is best suitable for making the best aesthetic slideshows with a classy presentation theme. It is available in Google Slides, and it consists of as many as 120 unique designed slides and two variations of colours.
You can readily make changes and edits and customize the tinplated design according to your imagination, reference and skills. It is best for making classy presentations because the designs are simple, yet they reflect the quality of elegance that helps you create the best aesthetic sideshows.

02Cinematic Reel Template
The Cinematic Reel template is a premiere pro template design by Videomaker. It consists of 22 media layers and 12 editable tact layers, and it has a very stylish design and includes simple yet impactful text animations.

Any trailers, demos, reel videos, short movie trails and the like can be ideally and perfectly created with this template design. Using this template design is absolutely effortless, and you can make any content-related slideshows effortlessly and ideally with this slideshow template design by Videomaker.
03B-Clinique
B-Clinique is the template design for making a minimalist aesthetic slideshow avowable on Google Slides. This template design is best suited for creating trendy aesthetic slideshows. It includes designs of line arts, subtle pleasant shares and all the other components that solely and perfectly reflect an aesthetic aura.
It was primarily designed for making slides for cosmetology purposes. It has 30 different slide designs and is ideal for creating slides for the industry by integrating a few edits. It ideally reflects a calming aura as it uses the earthy brown tone and shade for the design of the template.

04YouTube Pack Template
We all know that various social media platforms have become the most influential factor in our lives. And YouTube is the most renowned among all the other social media platforms, and now, it has even become a mode of earning a livelihood.
And for making slideshows that are to be put up on one or more social media platforms, especially on YouTube, they need to be presented in a particular manner. And you can readily make aesthetic slideshows ideal for social media platforms, especially YouTube, with the YouTube Pack Templated designs, which is Mirs.
This template includes all the necessary elements, such as the “Subscribe” panel, other buttons, side frames, and the like. One can readily use it to make incredible aesthetic slides for their social media channels.

05Sunlike Template
The Sunlike Templates by the Google Slides. It is a beautiful and professional aesthetic slideshow template with design slides that can create a clean and highly professional. It is a modern-creative type of template that consists of 39 distinctive design slides. You can readily edit and thus, customise the slides according to your overreference, needs and skills.
It helps you create a lively and aesthetic presentation at the same time. It includes a lot of vibrant colours that make your presentation look exuberant and engaging.

06Fast Glitch Transitions Template
The Fast Glitch Transitions template is by Red Feathers. Transitions have been the recent trend, and in every other video, we see different and unique transitions. And when you integrate transitions in your slideshows, they become more eye-catching.
And the glitch transitions can create a unique yet pleasing effect for your slideshows when you use the many among the uncountable options available.

07Solv Template
The Solv template is by Google Slides. It is best suitable for creating your start-up business slideshow presentation when you are a big fan of aesthetic presentations. 36 slides are present with attractive pop colours, which, although they look vibrant, are gladly aesthetic too.

08Text Messages Template
The Text Messages template by Blinque can be the trendiest and the most aesthetic template design one can find. It helps you create slideshow videos in the form of text messages. So, if you want to narrate anything and do it uniquely, this template can be the best fit for you.

Part 2 How to Make an Aesthetic Slideshow Presentation
Making a slideshow presentation is quite simple and an aspect that is well-known to many. But, how can you make your slideshows look aesthetic? If you include them in your slideshows, there are a few factors that can readily turn them aesthetic.
So, let us look into the different aspects that can help you turn your slides aesthetic when you integrate them into it.
● Minimalistic Text Designs
Minimalism and aesthetic aura go simultaneously. So, the more your efforts to keep your texts and writings in your slide minimalistic, the more aesthetic your slide would look. Several such finds or text designs are available, and you can readily choose among them and integrate them into your slides.
● Use soft and pastel colours for your theme of the template
Every aesthetic object’s most common and signature feature is its subtle, pastel shade. So, stick to using a soft pastel shade for the theme of your template. The colours, such as lavender, sift purple, millennial pink, powder blue or tones of silver, can ideally fit under the collection of aesthetic shades for the youth template of the slideshows.
● Minimalistic Pictures
The images you use in your slideshow will play a considerable role in deeming how aesthetic your slides look. So, choose them after enough analysis. See whether the photos have an aesthetic or minimalistic feature. By that, we are referring to the copper tone of the picture, its content and its size. It is best to include small images to reflect the slide’s minimalistic character.
Part 3 FAQ of Making Aesthetic Slideshow
Here are some of the FAQs about making aesthetic slideshows.
01How can I make an aesthetic slideshow in PowerPoint?
One can effortlessly do so with the templates available. Also, it is best to use small images, subtle pastel shades for the theme and minimalistic text designs or fonts in the slides.
02Which is the best tool for creating aesthetic slideshows?
Filmore is one of the most effective and ideal tools for making the most aesthetically pleasing slideshows. It has over 700 filters, innumerable templates and uncountable beneficial features to make your slides look minimalistic and aesthetic.
03How can I use Filmora for making aesthetic slideshows?
Filmora has several templates that reflect minimalistic designs. You can readily use them for your slideshow video. You can also use several filters to give a subtle pastel tone to your slideshow. Lastly, the different motion control features and fonts available can help you make the most aesthetically pleasing slideshows with Filmora.
04Is Filmora suitable for slideshows?
Wondershare Filmora Video Editor is one of the best and renowned tools for video editing. And for making slideshow videos, it Is equally competent and helps make the best and the most aesthetic slideshows with its incredible features.
For Win 7 or later (64-bit)
For macOS 10.12 or later
Filmora is the best video editing tool that one can come across. It has the best and the most advanced features for editing and is ideal for professionals. But, the beginners, too, can use it to enhance their editing skills, as Filmora is not difficult to use.
Also, it is ideal for creating aesthetic slideshow videos. It is because-
● There are more than 800 templates, and among them, there are numerous aesthetic design templates that you can use
● The filters can help add an aesthetic and minimalistic tone to your slideshow video
● You can integrate different aesthetic fonts from the many available.
● Ending Thoughts →
● Now that you know all about creating the best minimalist aesthetic slideshow, bring out all your creative skills and make the most wholesome and engaging slideshow!
● Choose the best templates, and for the ideal results, pick from the templates mentioned above.
● Follow the above steps to create the most aesthetic slideshows that would perfectly mirror your imagination.
● Lastly, use the best video editing tool, Filmora, that will help you make such aesthetic slideshows that will definitely be incomparable and inimitable!
The slideshow must be engaging and attractive. And the recent trend is all about making things around your aesthetic, that is, visually pleasant. You might want to know how you, too, can make such aesthetic slideshows? Well, in the following discussion, we will discuss all of it, along with the best tool for making the best aesthetic slideshows.
In this article
01 The Best 8 Premium Aesthetic Slideshow Template Designs
02 [How to Make an Aesthetic Slideshow Presentation](#Part 2)
03 [FAQ of Making Aesthetic Slideshow](#Part 3)
Part 1 The Best 8 Premium Aesthetic Slideshow Template Designs
One of the best ways of making marvellous aesthetic slideshows is by using an aesthetic slideshow template. The templates have readymade elements that emit aesthetic and minimalistic vibes to your slideshow.
You will find numerous templates that have an aesthetic and minimalistic theme. You can choose any among the countless for your slideshows. There are many designs of templates available for making aesthetic slideshows.
We will discuss eight premium aesthetic slideshow template designs that you can readily use in your slideshows to make your work a lot easier. These template designs will be some of the best ones and can serve and suit every possible purpose for creating a slideshow.
So, here are the best and the most useful eight aesthetic slideshow template designs that you can use for making fantastic aesthetic slideshows.
01Leafy Template Design
The Leafy template design is best suitable for making the best aesthetic slideshows with a classy presentation theme. It is available in Google Slides, and it consists of as many as 120 unique designed slides and two variations of colours.
You can readily make changes and edits and customize the tinplated design according to your imagination, reference and skills. It is best for making classy presentations because the designs are simple, yet they reflect the quality of elegance that helps you create the best aesthetic sideshows.

02Cinematic Reel Template
The Cinematic Reel template is a premiere pro template design by Videomaker. It consists of 22 media layers and 12 editable tact layers, and it has a very stylish design and includes simple yet impactful text animations.

Any trailers, demos, reel videos, short movie trails and the like can be ideally and perfectly created with this template design. Using this template design is absolutely effortless, and you can make any content-related slideshows effortlessly and ideally with this slideshow template design by Videomaker.
03B-Clinique
B-Clinique is the template design for making a minimalist aesthetic slideshow avowable on Google Slides. This template design is best suited for creating trendy aesthetic slideshows. It includes designs of line arts, subtle pleasant shares and all the other components that solely and perfectly reflect an aesthetic aura.
It was primarily designed for making slides for cosmetology purposes. It has 30 different slide designs and is ideal for creating slides for the industry by integrating a few edits. It ideally reflects a calming aura as it uses the earthy brown tone and shade for the design of the template.

04YouTube Pack Template
We all know that various social media platforms have become the most influential factor in our lives. And YouTube is the most renowned among all the other social media platforms, and now, it has even become a mode of earning a livelihood.
And for making slideshows that are to be put up on one or more social media platforms, especially on YouTube, they need to be presented in a particular manner. And you can readily make aesthetic slideshows ideal for social media platforms, especially YouTube, with the YouTube Pack Templated designs, which is Mirs.
This template includes all the necessary elements, such as the “Subscribe” panel, other buttons, side frames, and the like. One can readily use it to make incredible aesthetic slides for their social media channels.

05Sunlike Template
The Sunlike Templates by the Google Slides. It is a beautiful and professional aesthetic slideshow template with design slides that can create a clean and highly professional. It is a modern-creative type of template that consists of 39 distinctive design slides. You can readily edit and thus, customise the slides according to your overreference, needs and skills.
It helps you create a lively and aesthetic presentation at the same time. It includes a lot of vibrant colours that make your presentation look exuberant and engaging.

06Fast Glitch Transitions Template
The Fast Glitch Transitions template is by Red Feathers. Transitions have been the recent trend, and in every other video, we see different and unique transitions. And when you integrate transitions in your slideshows, they become more eye-catching.
And the glitch transitions can create a unique yet pleasing effect for your slideshows when you use the many among the uncountable options available.

07Solv Template
The Solv template is by Google Slides. It is best suitable for creating your start-up business slideshow presentation when you are a big fan of aesthetic presentations. 36 slides are present with attractive pop colours, which, although they look vibrant, are gladly aesthetic too.

08Text Messages Template
The Text Messages template by Blinque can be the trendiest and the most aesthetic template design one can find. It helps you create slideshow videos in the form of text messages. So, if you want to narrate anything and do it uniquely, this template can be the best fit for you.

Part 2 How to Make an Aesthetic Slideshow Presentation
Making a slideshow presentation is quite simple and an aspect that is well-known to many. But, how can you make your slideshows look aesthetic? If you include them in your slideshows, there are a few factors that can readily turn them aesthetic.
So, let us look into the different aspects that can help you turn your slides aesthetic when you integrate them into it.
● Minimalistic Text Designs
Minimalism and aesthetic aura go simultaneously. So, the more your efforts to keep your texts and writings in your slide minimalistic, the more aesthetic your slide would look. Several such finds or text designs are available, and you can readily choose among them and integrate them into your slides.
● Use soft and pastel colours for your theme of the template
Every aesthetic object’s most common and signature feature is its subtle, pastel shade. So, stick to using a soft pastel shade for the theme of your template. The colours, such as lavender, sift purple, millennial pink, powder blue or tones of silver, can ideally fit under the collection of aesthetic shades for the youth template of the slideshows.
● Minimalistic Pictures
The images you use in your slideshow will play a considerable role in deeming how aesthetic your slides look. So, choose them after enough analysis. See whether the photos have an aesthetic or minimalistic feature. By that, we are referring to the copper tone of the picture, its content and its size. It is best to include small images to reflect the slide’s minimalistic character.
Part 3 FAQ of Making Aesthetic Slideshow
Here are some of the FAQs about making aesthetic slideshows.
01How can I make an aesthetic slideshow in PowerPoint?
One can effortlessly do so with the templates available. Also, it is best to use small images, subtle pastel shades for the theme and minimalistic text designs or fonts in the slides.
02Which is the best tool for creating aesthetic slideshows?
Filmore is one of the most effective and ideal tools for making the most aesthetically pleasing slideshows. It has over 700 filters, innumerable templates and uncountable beneficial features to make your slides look minimalistic and aesthetic.
03How can I use Filmora for making aesthetic slideshows?
Filmora has several templates that reflect minimalistic designs. You can readily use them for your slideshow video. You can also use several filters to give a subtle pastel tone to your slideshow. Lastly, the different motion control features and fonts available can help you make the most aesthetically pleasing slideshows with Filmora.
04Is Filmora suitable for slideshows?
Wondershare Filmora Video Editor is one of the best and renowned tools for video editing. And for making slideshow videos, it Is equally competent and helps make the best and the most aesthetic slideshows with its incredible features.
For Win 7 or later (64-bit)
For macOS 10.12 or later
Filmora is the best video editing tool that one can come across. It has the best and the most advanced features for editing and is ideal for professionals. But, the beginners, too, can use it to enhance their editing skills, as Filmora is not difficult to use.
Also, it is ideal for creating aesthetic slideshow videos. It is because-
● There are more than 800 templates, and among them, there are numerous aesthetic design templates that you can use
● The filters can help add an aesthetic and minimalistic tone to your slideshow video
● You can integrate different aesthetic fonts from the many available.
● Ending Thoughts →
● Now that you know all about creating the best minimalist aesthetic slideshow, bring out all your creative skills and make the most wholesome and engaging slideshow!
● Choose the best templates, and for the ideal results, pick from the templates mentioned above.
● Follow the above steps to create the most aesthetic slideshows that would perfectly mirror your imagination.
● Lastly, use the best video editing tool, Filmora, that will help you make such aesthetic slideshows that will definitely be incomparable and inimitable!
Also read:
- New In 2024, Time Lapse Video Is Very Interesting and Creative, Which Usually Attracts More Attention. This Article Will Show You How to Make a Time Lapse Video with Adobe After Effects
- Updated Want to Immediately Know Something About Discord GIF, In 2024
- Updated Fascinated About Exploring Your Graphic Creativity by Experimenting with Designing Slideshow Presentations on a Variety of Software Programs? Stay Here to Get the Know-How of Using Clideo for 2024
- In 2024, Track Mattes The Ultimate Guide For After Effects
- New In 2024, Want to Add the Radial Blur Image Effect to Your Photos to Make Them Stand Out? Read on to Find the 11 Best Tools for Creating Stunning Image Editing Projects
- Updated How to Start a Video Editing Career
- New 2024 Approved In This Article, We Shall Take a Look at the Various Steps of Making a Photo Collage in Microsoft Word, and Also at Other Details of the Process, Which Might Be Relevant
- Updated Do You Have Any Idea About Changing the Video Speed Using the Editors? Had You Worked with the VLC Playback Speed? This Article Enlightens You with the Best Video Edits Using the Perfect Tool in the Digital Space for 2024
- New Why Your Transparent GIF Is Hard to Remove for 2024
- New 2024 Approved An Ultimate Guide to Flexclip Online Trimmer
- New In 2024, Learn How to Make a Gaming Montage - Guide & Tips
- Updated 10 Catchy Pixel Art Wallpapers and How to Custom Your Own for 2024
- In 2024, A Guide to Find a High-Quality Video Marketing Agency
- New 2024 Approved Best 10 Tools To Make Quiz Videos
- New 8 Apps to Custom GIF Stickers for 2024
- Unravel the Creative Potential of Adobe After Effects for Precise Motion Synchronization. Learn How to Use Track Matte and Tracking with a Simple Alternative for 2024
- Updated Want to Know the Full Process of Adding the Falling Text Effect as a Video Introduction? Detailed Guidelines on All the Steps Are Mentioned Here for Filmora Users
- Updated How to Create a Light Sweep (Shine) Effect
- New What Is the Best MP4 Cutters for YouTubers on Mac?
- Updated Want to Make a Funny Vlog on TikTok? Trying to Find the Right Topic for It? This Article Presents some Impressive Options for Making a Funny Vlog for TikTok
- New 2024 Approved Do You Want to Add a Motion Blur Effect in Valorant? Read This Guide to Find Out How to Create a Motion Blur Effect in Valorant without Any Hassle
- Updated 2024 Approved Expolring Top 6 Best Alternatives to Clownfish Voice Changer
- New In 2024, Final Cut Pro for iPad
- In 2024, How Can You Transfer Files From Realme Narzo 60x 5G To iPhone 15/14/13? | Dr.fone
- In 2024, Here are Some of the Best Pokemon Discord Servers to Join On Apple iPhone XS Max | Dr.fone
- How to retrieve erased messages from Xiaomi 13 Ultra
- How to Perform Hard Reset on Itel A70? | Dr.fone
- In 2024, AddROM Bypass An Android Tool to Unlock FRP Lock Screen For your Vivo V30
- What To Do When Xiaomi Civi 3 Disney 100th Anniversary Edition Has Black Screen of Death? | Dr.fone
- How to Transfer Data from Nokia G22 to Any iOS Devices | Dr.fone
- Pokémon Go Cooldown Chart On OnePlus Nord N30 SE | Dr.fone
- How To Factory Unlock Your Telstra Apple iPhone 8
- Full Solutions to Fix Error Code 920 In Google Play on Vivo Y78t | Dr.fone
- How to Change GPS Location on Oppo F23 5G Easily & Safely | Dr.fone
- In 2024, 3 Ways to Track Apple iPhone 15 without Them Knowing | Dr.fone
- Fixes for Apps Keep Crashing on Nokia C12 Pro | Dr.fone
- 3 Ways for Android Pokemon Go Spoofing On Nubia Red Magic 8S Pro+ | Dr.fone
- In 2024, Bypass iCloud Activation Lock with IMEI Code On your iPhone 11 Pro Max
- What You Need To Know To Improve Your OnePlus 11 5G Hard Reset | Dr.fone
- Fix Unfortunately Settings Has Stopped on Vivo Y100i Power 5G Quickly | Dr.fone
- Best Android Data Recovery - Retrieve Lost Photos from X50i+.
- Life360 Circle Everything You Need to Know On Samsung Galaxy A05s | Dr.fone
- In 2024, How to Intercept Text Messages on Realme Narzo 60 5G | Dr.fone
- Title: Do You Want to Make Your Background Disappear and Replace with an Attractive Background? Here Is How to Add a Green Screen to Zoom App and Add Any Virtual Background of Your Choice for 2024
- Author: Morgan
- Created at : 2024-04-24 01:13:03
- Updated at : 2024-04-25 01:13:03
- Link: https://ai-video-editing.techidaily.com/1713949538031-do-you-want-to-make-your-background-disappear-and-replace-with-an-attractive-background-here-is-how-to-add-a-green-screen-to-zoom-app-and-add-any-virtual-ba/
- License: This work is licensed under CC BY-NC-SA 4.0.

