
If You Are a Marketer Who Want to Create Facebook Ads to Boost Your Business, You Are Coming to the Right Place. Well Share You some Useful Tips to Start Your First FB Ads Campaign for 2024
If You Are a Marketer Who Want to Create Facebook Ads to Boost Your Business, You Are Coming to the Right Place. We’ll Share You some Useful Tips to Start Your First FB Ads Campaign
Facebook ads can be an effective channel for reaching the right customers, but only if you have a strong strategy in place. If you are new to Facebook ads, don’t rush into creating your first campaign without fully understanding the risks and rewards of advertising on Facebook.

Before you launch your first Facebook ad campaign, here are six tips to keep in mind:
Part1. Define the purpose of your ad
This can be a long-form or short-form question. If a user is browsing Facebook and sees your ad, you want them to know why they should click on it. Is it an offer? If so, what are they getting in return? Is the ad simply a call to action? You may want to include a “Learn more” button that links back to your website so that users can learn more about whatever they need to know before taking the next steps.
There are 11 Facebook Ads campaign objectives to choose from, and you should choose the one that best aligns with your goals.

Awareness:
- Brand awareness - Show your advertisements to individuals who are most likely to recall them.
- Reach - Show your ad to as many people as possible
Consideration:
- Traffic - Send people to your website or app
- Engagement - Increase the number of times people see and interact with your ad.
- App installs - Advertise to individuals who are more likely than others to download and use your app.
- Video views - Increase the number of times people see and interact with your video
- Lead generation - Use forms, calls, or chats to obtain information from people eager in your business.
- Messages - Get more people to message you on Facebook Messenger
Conversion:
- Conversions - Advertise to people who have a higher likelihood of taking action, such as buying something or calling you from your website.
- Catalog sales -Show your potential customers ads for items in your catalog that match their interests, so they are more likely to buy from you.
- Store traffic - This allows you to use your Facebook page as a marketing platform. If you want to run store traffic ads on Facebook, include your shop information there.
Whatever the case, make sure you have a clear goal from start to finish to understand what exactly it is you are trying to accomplish for any given campaign.
Part2. Know your target audience
Before you create any ads, it’s important to define who will see them. You’ll want to think carefully about the type of person who would be interested in what you’re offering and how they would respond when they see the ad. If you can’t answer these questions, it’s time to start considering different audiences.

But how do we begin defining a target audience? To start, let’s look at the different terms used by advertisers:
Customer: The person who has already bought from your company. For example, if you sell coffee makers on Amazon and have an existing customer base from those sales (customers), then this would be the most relevant term for you when deciding who should see specific ads for new products or services that may interest them based on past purchases or interests shown through other online activity such as browsing history or social media engagement with similar content/products/services.
Prospect: A lead that has expressed interest in buying something, but has not yet purchased anything from your company. A prospect does not necessarily mean someone has signed up for an email list or asked for more info; keeping leads fresh is just as important as nurturing prospects into customers later down the road so don’t forget that part!
Now that you know who you are targeting, it’s time to create an avatar for your target customer. An avatar is a fictional character that represents your target customer. This will help you to better understand their needs and wants, and it will also make it easier to create targeted ads.
![]()
There are a few different ways to create an avatar:
1.) Customer profile: This is a simple way to gather information about your target customer. Start by creating a list of demographic information such as age, location, gender, education level, and income level. You can also include interests and behaviors, such as what they like to do for fun, what type of music they listen to, and what type of products they buy.
2.) Persona: A persona is very similar to a customer profile, but it takes things a step further by giving each target customer a name and backstory. This can be helpful if you are targeting a specific niche audience.
3.) Mind-map: If you want to get creative, you can create a mind-map of your target customer. This will allow you to brainstorm everything that you know about them and come up with new ideas.
Once you have created your avatar, make sure that you keep it in mind when creating your Facebook ad campaign. This will help to ensure that your ads are relevant and interesting to your target customer.
Part3. Prepare a decent image for your audience to click on
Images are the most important part of any ad. A good image will help your customers understand what it is that they’re clicking on, and they may even want to share it with their friends. However, if your image is poor quality or irrelevant then, it won’t do as well as it could have done.
You should start by picking a relevant image that shows off your product in the best light possible. If possible, try and get some type of testimonial from customers using your product so that other people can see how great your product really is!

If you don’t have good images available yet, don’t worry! You can always hire a professional photographer who knows what kind of shots work best for advertising purposes but even if this isn’t something that suits every business, there are still plenty of free resources out there too like Unsplash which offers high-quality stock photography under Creative Commons licenses under various conditions such as attribution when used commercially, so make sure whatever method you choose fits within these guidelines!
Part4. Practice Your copywriting skills
You can have the best-developed ad in the world, but if it doesn’t have strong copywriting, your ads won’t work as well. It’s important to know what you’re getting into before spending time and money on Facebook ads.

The following are just some of the ways you can improve your copywriting skills:
- Read other people’s ads and see how they write their copy
- Read books about writing persuasive copy.
Try writing your own copy. Then have someone read it and give feedback on what they like and what they don’t like about it. Try to learn from their suggestions.
There are also many different ways to write copy for a Facebook ad. Some people like to use specific formulas for their ads, such as: AIDA (attention, interest, desire, action). This formula was developed by an American businessman named Claude C. Hopkins in 1898 and is still widely used today. If you’re not sure which method is best for you, it might be worth trying a few different ones. Have someone read your ad and give their opinion on which method was the most effective at convincing them that they should click on your ad.
You can also hire a copywriter to help you with your ad. However, if you don’t have the budget for it at this point in time or just want to try writing your own first before hiring someone else, there are many different apps and websites that will help you to create an ad copy.
Part5. Decide what type of ad format will you use
It is a carousel ad, or single image/video ad, or a combination of both?

If you are going to use a carousel ad, you need at least three images. If you’re using a single image or video ads, then you only need one image or video.
As always, if your budget allows it, try to increase the number of ad sets that are running at once so as not to cannibalize each other’s reach—it’s better to have multiple ads winning than just one.
If you’re running a single video ad for example and your budget is $100 per day, it’s best practice to have to create multiple versions of this single video ad so that they don’t cannibalize each other.
Part6. Plan your ad budget
You need to determine how much you’re willing to spend on your Facebook ads. This will help you to create a budget and also to decide how often you want your ad to be shown.

The average Facebook ad spends between $5 and $10 per day. However, this can vary depending on the type of product or service that you’re promoting, as well as the size of your target audience.
If you have a large target audience, it might be worth increasing your ad budget so that your ad is seen by more people. On the other hand, if you have a smaller target audience, you might want to decrease your ad budget so that you don’t spend too much money on ads that aren’t being seen by as many people.
It’s also important to consider how often you want your ad to be shown. If you want your ad to be seen by as many people as possible, it’s best to have it shown more than once. However, if you only want your ad to be shown to a select group of people, it’s best to have it shown less often.
Both of these factors will help you to determine your Facebook ad spend.
The Bottom Line
If you’re ready to get started with Facebook ads, we encourage you to put these tips into practice. I believe that they will help you make the most of your budget and achieve your goals, whether they be brand awareness, lead generation or sales.
Free Download For Win 7 or later(64-bit)
Free Download For macOS 10.14 or later
Free Download For macOS 10.14 or later

Best Guide for Setting TikTok Countdown Timer
Introduced in 2016, TikTok is an application like YouTube that is widely used to create and post short videos. On this application, billions of users watch and post videos of what they like. Therefore, to create videos without complications, TikTok introduced several features like editing and countdown. One of the most commonly used features, which is specifically designed to create fault-free videos, is a countdown.
However, many people don’t know how to set the TikTok countdown timer. If you are one of them, don’t panic because this article is truly dedicated to countdown videos. You will not only learn to set the timer on TikTok but will also learn about Wondershare Filmora, which can help you add the countdown effect.

Part 1: What are the Benefits of Using Countdown Timer on TikTok
The countdown feature of TikTok is quite an assistive one. With the help of this feature, you can eliminate the risk of mistakes in several ways. If you are new to TikTok and want to know about the benefits of countdown in TikTok, the below-given points will greatly help you:
1. Improved Engagement on Videos
You can make the best videos with a countdown timer because you will know when to initiate actions. Besides this, it also helps escalate the sense of engagement and urgency. Thus, it is a perfect option for maximizing the engagement ratio on your TikTok videos.
2. Escalate Excitement
If you set timers before starting the video, it arises a euphoric sensation in your audience. They will wait excitingly to know what is coming next to this timer. It is highly preferred in revealing and launching videos. So, now with the help of this feature, you can get your audience excited without any issues.
3. Build Suspenseful Environment
When you set the TikTok countdown timer in a video, it interacts with the users effortlessly. They became curious about your video, which led to a suspenseful environment. It helps create such videos, which will make suspense lovers return to your TikTok account repeatedly.
4. Maximize Interaction Ratio
It is widely preferred to create a sense of engagement with the videos. Moreover, you will be attentive to the timing perspective of a TikTok video. Interacting with more viewers is now easier than ever because of this highly intuitive feature of TikTok.
5. Improved Goals
By using countdowns, you can create particular goals. In addition to this, it also helps to target and track performance and goals. Now you can create videos along with focusing on your goals.
Part 2: How to Use Countdown Timer on TikTok
Now that you know the higher functionality of countdowns, you must be looking for ways to set TikTok countdown timers. By following the understated steps, you can do this without any problem:
Step 1: Download and Launch TikTok
To initiate the process, install the TikTok application on your device and launch it. From TikTok’s main interface, click on the “+” icon.

Step 2: Set the Countdown Timer for TikTok
From the recording interface, select the “Timer” icon from the upper right of the screen. By this, you will see two timer options, including 3s and 10s. From here, you can select an option of your choice. Following this, drag the slide across the timer bar to customize the length of the video.

Step 3: Shoot, Edit, and Post Video
Once done with selecting the timer, tap on “Start Countdown.” You can also stop and pause the video while recording. After recording a video, you can personalize it with options like editing, stickers, audio editing, enhance, and more. Then, hit “Next” and add hashtags and captions. Afterward, tap “Post” and get likes and views on your new TikTok video.

Bonus: How to Make an Impressive Countdown Timer Video?
No doubt that TikTok is a feature-rich application by which you can create videos and set a TikTok countdown timer. However, you know that there is a notable restriction on timer options. Thus, if you want to work with an expanded timer option, consider using an excellent third-party video editor named Wondershare Filmora .
Filmora is a video editor which can be used on both desktop and mobile, so you can use it as per your choice. Moreover, it also helps you add customized timers according to your liking. Not only in the countdown, but you can also use Filmora for several purposes, like editing, adding sound, and more.
download filmora app for ios ](https://app.adjust.com/b0k9hf2%5F4bsu85t ) download filmora app for android ](https://app.adjust.com/b0k9hf2%5F4bsu85t )
Now that you know the higher functionality of this tool, you must be eager to learn more about it. Click here to learn more about this impressive video editor and how to add a countdown timer effect.

Conclusion
On a final note, TikTok videos are the best way to share your talents and likeness with other people. You can create videos more exceptionally by using its countdown feature. Some people think that the part of setting the TikTok countdown timer will take lots of effort, but it’s not true.
By using the steps listed above, you can do this without any hassle. However, a third-party tool named Wondershare Filmora can help you with adding the countdown timer effect. Moreover, this tool can lead to better results and easy timers than TikTok itself.
Now that you know the higher functionality of this tool, you must be eager to learn more about it. Click here to learn more about this impressive video editor and how to add a countdown timer effect.
Conclusion
On a final note, TikTok videos are the best way to share your talents and likeness with other people. You can create videos more exceptionally by using its countdown feature. Some people think that the part of setting the TikTok countdown timer will take lots of effort, but it’s not true.
By using the steps listed above, you can do this without any hassle. However, a third-party tool named Wondershare Filmora can help you with adding the countdown timer effect. Moreover, this tool can lead to better results and easy timers than TikTok itself.
How to Add Text Animation Online
Before you can publish your recorded video to your viewers, you need to polish the video so that you can get everyone’s appreciation. This is where the magic of video editing comes into the scene. Editing your video is not just about trimming unnecessary parts and adding transitions and effects. The titles and texts you display on your video play a major role in your video content. In fact, you can create a video based on texts and titles only.
Instead of showing static texts, you should create animated texts and place them in the video wherever appropriate. You do not need to download a video editor on your computer or smartphone to add animated text to your video. You can make text animation online using an online text animation maker. We will illustrate the steps to create animated text with three different online editors.
Part 1. Use Biteable Animated Text
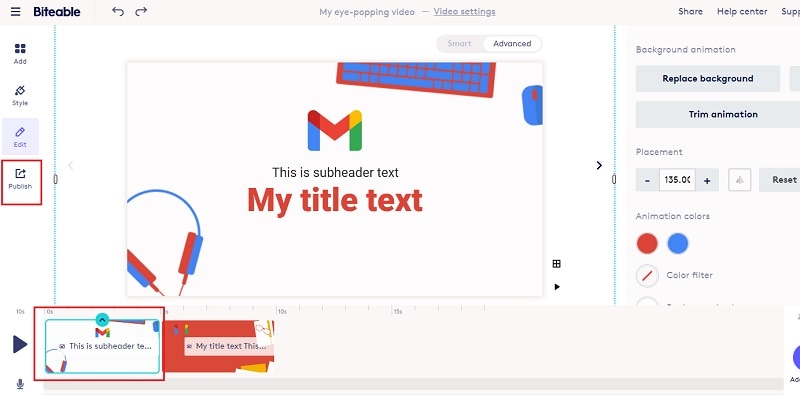
Biteable is a popular online platform where you can create amazing animated text video using Biteable text video maker. You can add animated text to your videos as well as photos. The user interface of Biteable is extremely easy for all users. You have to first create an account for free to get started. There are various templates available to create your animated text video from scratch. Here are the steps to use Biteable online text animation maker to create a video based on animated texts.
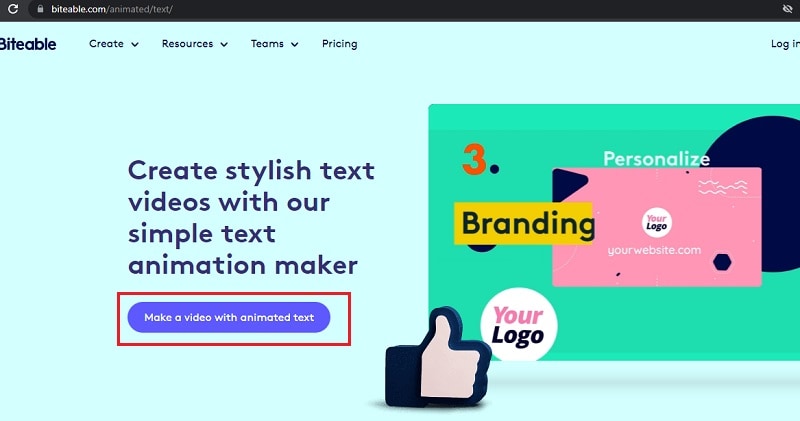
Step1Open your web browser and visit “biteable.com/animated/text”. Click on “Make a video with animated text” button.
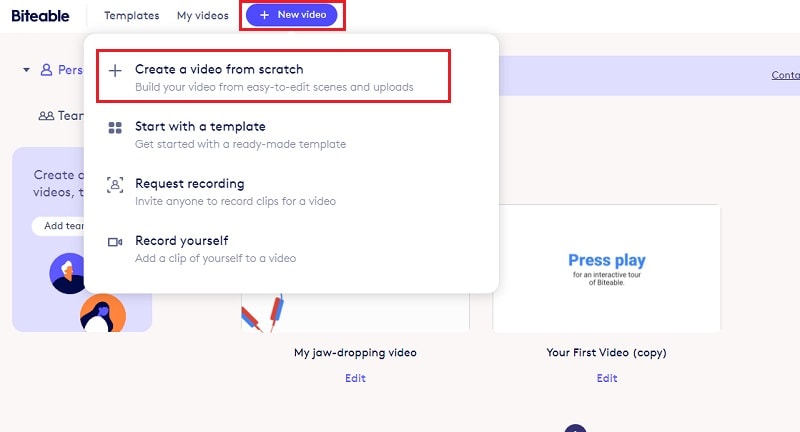
Step2Create an account by following the on-screen instructions. Click on New Video button and select “Create a video from scratch”.
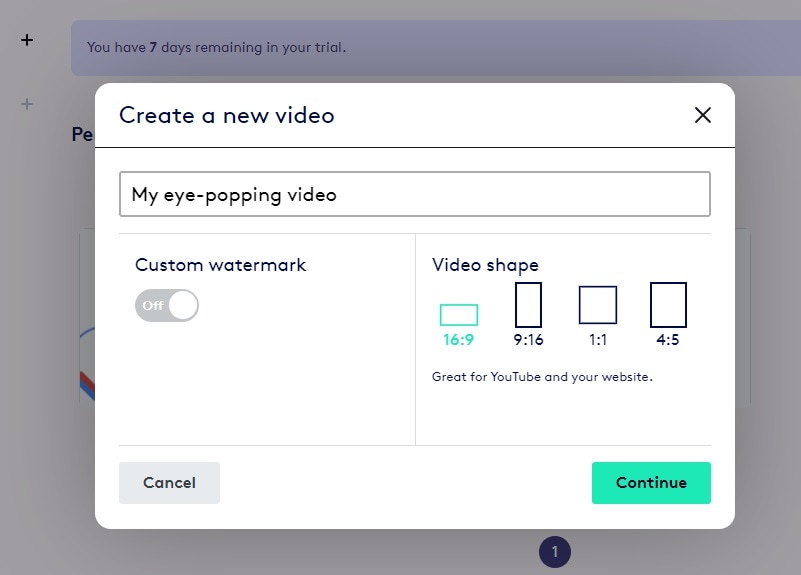
Step3Enter a name for the video and select a video shape as per your preference. Click on Continue button.
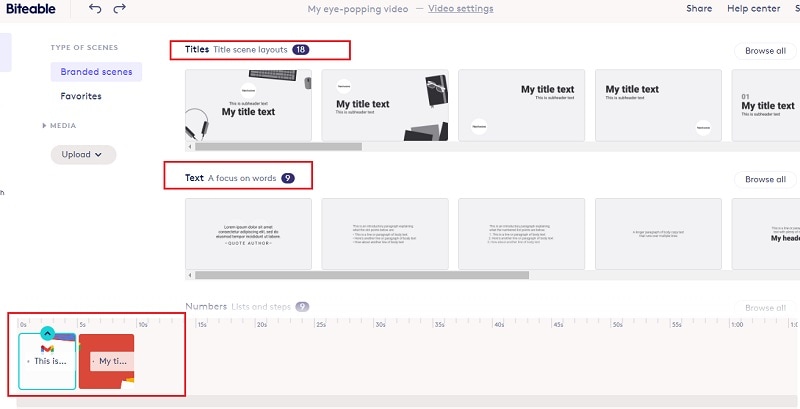
Step4Under Titles, select any template and it will be added to the Timeline. Similarly, you can add multiple titles templates, text templates, number templates and likewise. You will see them in the Timeline placed side by side. You can stretch their durations as per your requirements.
Step5Double-click on each template to edit the text in them and select the text animations as per your preference. Play the video and if you are satisfied, click on Publish button to save the video.
Part 2. Use Motionden Video Maker
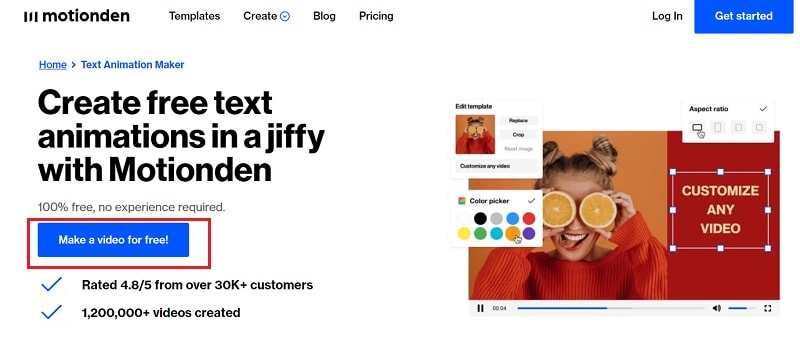
Motionden is yet another powerful text animation maker where you can create free text animations instantly. There are over 1500 templates available to choose from in order to create text videos from scratch. You can choose video templates from any category as per the video theme you want. Besides, you can upload your video or photo and add texts and music as per your preference. Here are the steps to create animated text online using Motionden Video Maker.
Step1Open your web browser and visit “motionden.com/video-maker/text-animation”. Click on “Make a video for free” button.
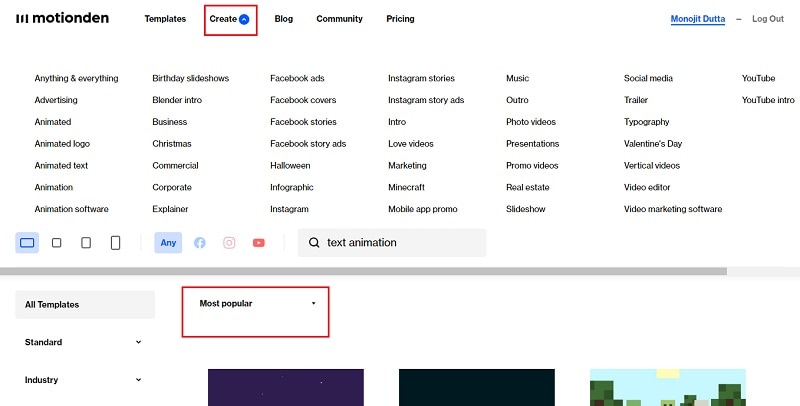
Step2Go to Create menu option and select any category of video templates. You can also check out the popular video templates and select anyone as per your preference.
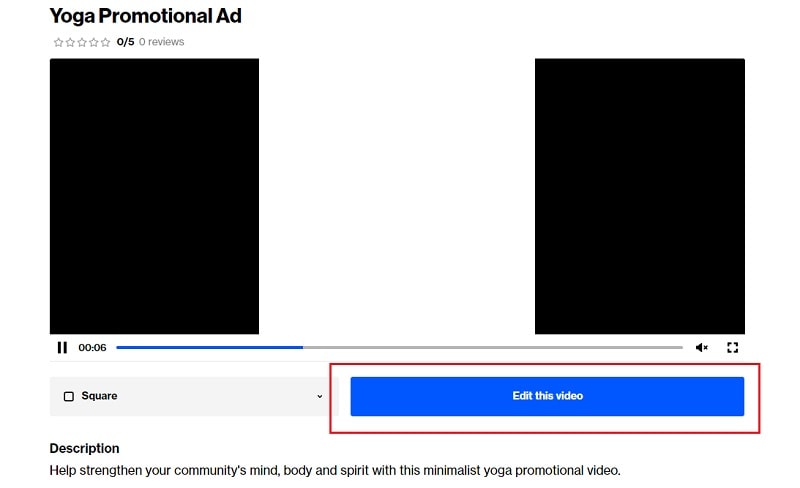
Step3For the selected category, you need to select the desired video template. Click on Edit Video and you can make changes to the template on the video editor as per your requirements. You need to sign up for free in order to continue and edit the template.
Step4Click on individual scenes and click on texts to customize them. Once the editing is done for each scene, click on Make Video button to build and save the text video.

Part 3. Use Flexclip Text Animation Tool
You can use Flexclip Text Animation Tool to create text video from scratch as well as add text to your recorded video. You should use Biteable and Motionden to create video with text effects only directly using video template while you should use Flexclip to edit your video and add text. You can add text effects to photos and videos and here are the steps to follow.
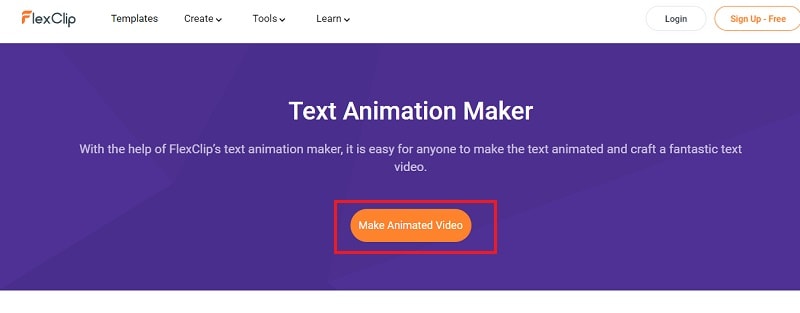
Step1Open web browser and visit “flexclip.com/features/text-animation.html”. Click on Make Animated Video button.
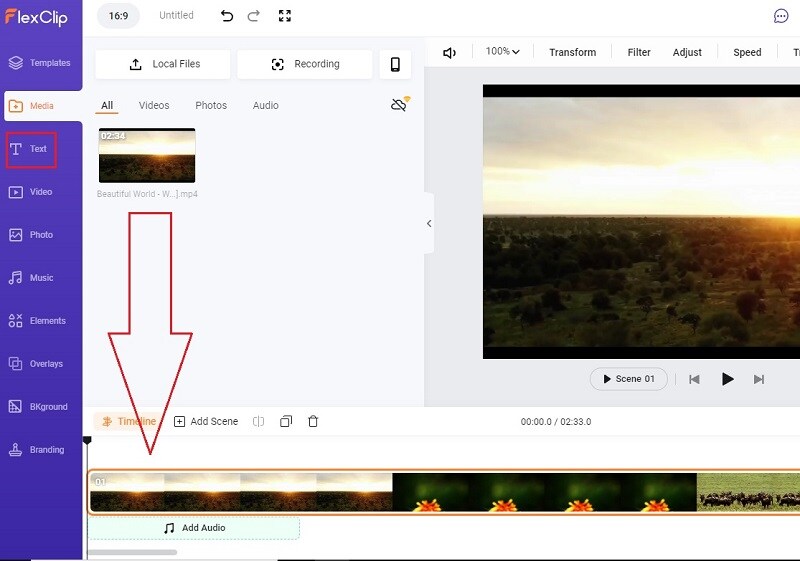
Step2You can choose from the available templates to create video with text from scratch. If you want to add text to your recorded video, go to Media tab. Click on Local Files button and upload your recorded video.

Step3Drag and drop the uploaded video into the Timeline. Thereafter, go to Text tab.
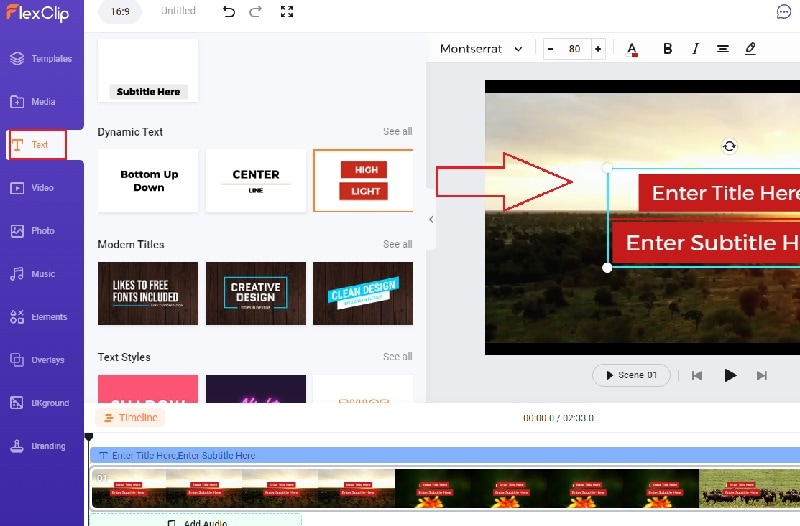
Step4You will see all the different text effects and animations. Place your mouse pointer to preview the animation. Drag and drop the select text template to the video on the Viewer. You can check the Timeline and stretch or compress the text layer as per your requirements.
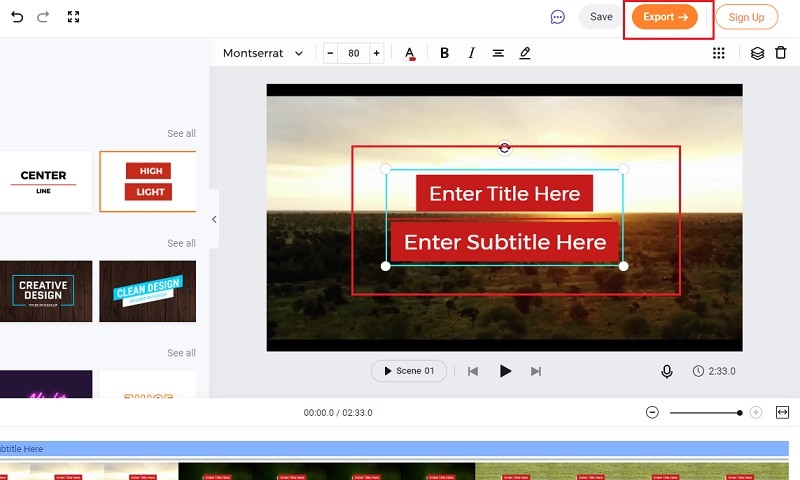
Step5Double-click on the text on Viewer window and customize the text as per your preference. Finally, click on Export button to save the edited video.
Conclusion
You can make video with animated text to make your presentation video eye-catching and attention-grabbing. We have mentioned three different online text animation makers that you can use to create animated text video from scratch by choosing different video templates. You can also edit your recorded video and add animated text wherever you want using Flexclip Text Animation Tool.
Free Download For Win 7 or later(64-bit)
Free Download For macOS 10.14 or later
What Is HDRI? Everything You Need to Know About HDRI
Photography is like art itself. Photographers must carefully select the setting and use the right camera to capture images with lossless quality. However, you’ll realize that some photos appear darker or brighter than in actual life.
In that case, use free HDRI software to change that straightway. But HDRI being a relatively new technique, beginners might struggle to edit the photos, let alone find the perfect HDRI software.
So, in this simple guidepost, we’ll learn how to create an HDRI 3D picture using HDRI for Blender. But first, let’s understand what an HDRI file is and the difference between HDRI and HDR.
Part 1: What is HDRI?
HDRI (High Dynamic Range Image) is simply an image created using multiple image overlays of the same background but with varying exposures. The exposures can range from the brightest highlights to the darkest shadows. So, in short, HDRI expands an image’s dynamic range to brighten or darken it and make it look more natural.
Having said that, HDRI is a raster image created using color pixels. HDRI photos are generally significant in size, so they won’t quickly lose quality like other raster photos such as PNG and JPG. Many formats can store HDRI images, although the most common are OpenEXR (.exr) and Radiance RGBE (.hdr).
Pros
- You can easily create one using HDRI for Blender, Photoshop, EasyHDRI, etc.
- HDRI photos are compatible with many image editing programs.
- Produces crisp images with excellent detail and lighting control.
Cons
- 32-bit HDRI files have significant sizes.
- HDRI can quickly be poorly done without prior experience.
Part 2: What’s the difference between HDR and HDRI
According to Wikipedia, HDR and HDRI are the same things. But is it true? For starters, HDRI is basically a photo with High Dynamic Range qualities. So, yes, HDR and HDRI can mean the same thing in digital image editing.
However, some photo editors argue that there is a difference between these two regarding basic workflow. First, HDR technology increases brightness to show more image details. On the other hand, HDRI performs unique optimization of content and lighting to deliver crisp images. In other words, HDRI brightens the dark shadows without necessarily overexposing the bright image areas.
Some photographers can also consider HDR as images with pixel values higher than 1 or 255. That means that the pixels can be much higher than pure white. But technically speaking, HDR and HDRI can be used interchangeably.
Part 3: When to use HDRI
Now that you have all the information about HDRI, let’s learn about some industries where HDRI is applicable.
1. HDRI for 3D visualization and 3D animation
HDRI 3D is commonplace these days. 3D animation creators can use programs like HDRI Blender to add HDR environments and make the content look detailed and more realistic in high lighting reflections. To put it simply, HDRI makes 3D scenes look lighter, less cartoonish, and more professional. This technology can also be used in interior visualizations in animations.
2. HDRI for architect rendering
Creating HDRI environments is a common practice in 3D architectural designs. For example, designers can create panoramic house designs with varying light tones and interior moods. HDRI helps them give a natural 3D lighting effect on scenes and objects.
3. HDRI monitors and TVs
You’ve probably heard of HDRI 4K when shopping for a smart TV or computer monitor. These TVs offer a lot more than just a wide color gamut, high brightness, and advanced contrast ratio. In addition, HDR TVs and monitors can recognize HDR signals, allowing viewers to watch the content with all studio quality. In short, viewers can see more color details in shadowy and lighter scenes, making them perfect for avid gamers.
Part 4: How do you open an HDRI?
Because HDRIs use low dynamic range rendering, a standard display panel won’t open HDR images. So, to open an HDRI file on a non-HDR display, you’ll need to convert it to a different low dynamic range format using tone mapping technology. For example, you convert HDRI to JPEG or PNG and enjoy regular bitmaps while maintaining the HDRI properties. You can also open and edit HDRI using desktop programs like EasyHDR, Photoshop, and Blender.
Part 5: How to set up an HDR environment background?
Before wrapping up this blog post, let’s discuss how to use HDRI for Blender to apply HDR effects to an image’s background. Blender is a 100% free program for creating jaw-dropping 3D rendering and animations on Mac and Windows computers. With Blender, you’ll get an advanced modeling toolset like retopology, curves, sculpting, and more. But in this post, we’ll learn how to create an HDR environment or add lighting to your image project. Let’s get started!
Step1Install and run Blender and then tap the World Properties tab. Then, click the Color icon and add Environment Texture.

Step2Next, split the window into two and launch the Shader Editor tool. Then, open the Object drop-down menu at the top-left corner and choose World. You’ll see the Environment Texture hooked into the background.

Step3On the Environment Texture, tap Open Image before opening the 3.2 folder inside the Blender Foundation folder. Then, click Data files > Studiolights > Word. Now open a .exr file. For example, open the Interior.exr image.

Step4Click the Viewport Shading icon and tap the drop-down button to choose Interior. You’ll see all the lighting reflections inside the room and customize it as you wish. That’s it!

Conclusion
Using the environment maps is the simplest and most effective way to lighten up your 3D scenes in Blender. This program lets you achieve realistic 3D scenes, mimicking natural world lighting. But note that Blender can be a little confusing for beginners. So, play around with this HDRI tool, and you’ll be a pro in no time.
Free Download For Win 7 or later(64-bit)
Free Download For macOS 10.14 or later
Part 2: What’s the difference between HDR and HDRI
According to Wikipedia, HDR and HDRI are the same things. But is it true? For starters, HDRI is basically a photo with High Dynamic Range qualities. So, yes, HDR and HDRI can mean the same thing in digital image editing.
However, some photo editors argue that there is a difference between these two regarding basic workflow. First, HDR technology increases brightness to show more image details. On the other hand, HDRI performs unique optimization of content and lighting to deliver crisp images. In other words, HDRI brightens the dark shadows without necessarily overexposing the bright image areas.
Some photographers can also consider HDR as images with pixel values higher than 1 or 255. That means that the pixels can be much higher than pure white. But technically speaking, HDR and HDRI can be used interchangeably.
Part 3: When to use HDRI
Now that you have all the information about HDRI, let’s learn about some industries where HDRI is applicable.
1. HDRI for 3D visualization and 3D animation
HDRI 3D is commonplace these days. 3D animation creators can use programs like HDRI Blender to add HDR environments and make the content look detailed and more realistic in high lighting reflections. To put it simply, HDRI makes 3D scenes look lighter, less cartoonish, and more professional. This technology can also be used in interior visualizations in animations.
2. HDRI for architect rendering
Creating HDRI environments is a common practice in 3D architectural designs. For example, designers can create panoramic house designs with varying light tones and interior moods. HDRI helps them give a natural 3D lighting effect on scenes and objects.
3. HDRI monitors and TVs
You’ve probably heard of HDRI 4K when shopping for a smart TV or computer monitor. These TVs offer a lot more than just a wide color gamut, high brightness, and advanced contrast ratio. In addition, HDR TVs and monitors can recognize HDR signals, allowing viewers to watch the content with all studio quality. In short, viewers can see more color details in shadowy and lighter scenes, making them perfect for avid gamers.
Part 4: How do you open an HDRI?
Because HDRIs use low dynamic range rendering, a standard display panel won’t open HDR images. So, to open an HDRI file on a non-HDR display, you’ll need to convert it to a different low dynamic range format using tone mapping technology. For example, you convert HDRI to JPEG or PNG and enjoy regular bitmaps while maintaining the HDRI properties. You can also open and edit HDRI using desktop programs like EasyHDR, Photoshop, and Blender.
Part 5: How to set up an HDR environment background?
Before wrapping up this blog post, let’s discuss how to use HDRI for Blender to apply HDR effects to an image’s background. Blender is a 100% free program for creating jaw-dropping 3D rendering and animations on Mac and Windows computers. With Blender, you’ll get an advanced modeling toolset like retopology, curves, sculpting, and more. But in this post, we’ll learn how to create an HDR environment or add lighting to your image project. Let’s get started!
Step1Install and run Blender and then tap the World Properties tab. Then, click the Color icon and add Environment Texture.
Step2Next, split the window into two and launch the Shader Editor tool. Then, open the Object drop-down menu at the top-left corner and choose World. You’ll see the Environment Texture hooked into the background.
Step3On the Environment Texture, tap Open Image before opening the 3.2 folder inside the Blender Foundation folder. Then, click Data files > Studiolights > Word. Now open a .exr file. For example, open the Interior.exr image.
Step4Click the Viewport Shading icon and tap the drop-down button to choose Interior. You’ll see all the lighting reflections inside the room and customize it as you wish. That’s it!
Conclusion
Using the environment maps is the simplest and most effective way to lighten up your 3D scenes in Blender. This program lets you achieve realistic 3D scenes, mimicking natural world lighting. But note that Blender can be a little confusing for beginners. So, play around with this HDRI tool, and you’ll be a pro in no time.
Free Download For Win 7 or later(64-bit)
Free Download For macOS 10.14 or later
Also read:
- [New] Breakdown FB Video Aspect Ratios
- [New] Viral Ventures From Likes to Lore in the Facebook Landscape
- [Updated] In 2024, Expert Tips for Memorable YouTube Names
- 2024 Approved Pilot to Perfection Complete Review of DJI Phantom 4
- 8 Quick Fixes Unfortunately, Snapchat has Stopped on Vivo Y28 5G | Dr.fone
- Guide to Instant Upgrades: Freshest Epson Drivers for Your Window OS
- Insight on 'The Ascent' Postponement: Diving Deep Into the Causes
- New 2024 Approved Do You Wish to Design the Perfect Slow-Motion Video on Your Smartphone? Learn some Top-Rated Free Slow-Mo Apps for Android and iOS Users in This Article
- New 2024 Approved End Your Struggles with Choppy Playback on DaVinci Resolve. Read This Guide to Find Effective Fixes and Reliable DaVinci Resolve Slow Playback Alternatives
- New 2024 Approved If You Want to Replace or Delete the Sky Pictures or Background Media, Then Give a Quick Read to This Article for Effective Solutions
- New In 2024, What Is MOV Format and How To Edit MOV Video Creatively?
- New Stop Worrying if Your Adobe Premiere Playback Slows Down. This Guide Will Show You the Best Solutions to Resolve This Issue and a Perfect Alternative for 2024
- Solved: Resolving the Black Screen Error When Playing Call of Duty WWII on Windows
- Updated Would You Like to Know How to Change the Ratio of the Video or Which Is the Correct Aspect Ratio for Uploading to the Online Platform? Then, Go Through the Article to Get Complete Details About the Video Aspect Ratio for 2024
- Title: If You Are a Marketer Who Want to Create Facebook Ads to Boost Your Business, You Are Coming to the Right Place. Well Share You some Useful Tips to Start Your First FB Ads Campaign for 2024
- Author: Morgan
- Created at : 2024-09-26 21:21:50
- Updated at : 2024-09-30 17:38:43
- Link: https://ai-video-editing.techidaily.com/1713950242747-if-you-are-a-marketer-who-want-to-create-facebook-ads-to-boost-your-business-you-are-coming-to-the-right-place-well-share-you-some-useful-tips-to-start-your/
- License: This work is licensed under CC BY-NC-SA 4.0.