

Looking for Simple Steps to Apply Fade in Effect to Your Text in Premiere Pro? Here Are Two Different Methods Along with an Alternative Way to Fade Text in Videos for 2024
Looking for Simple Steps to Apply Fade in Effect to Your Text in Premiere Pro? Here Are Two Different Methods Along with an Alternative Way to Fade Text in Videos
Every video is unappealing until you edit the video properly. Editing videos not only means trimming out unnecessary parts but also adding effects and animations. There are certain effects and transitions that are commonly used in most videos. Fade in effect is widely used in texts, objects, as well as clips. Fade in effect is very eye-soothing that does not distract the audience from the overall video content.
Fade in effect is available in all video editors. Among video editors, Adobe Premiere Pro is one of the best professional video editors. However, the learning curve of Premiere Pro is steep and hence, you have to know the exact steps to add fade in text Premiere Pro. We will illustrate how to apply fade in text effect Pro as well as add fade in and fade out transition effects in Premiere Pro. We will also state an alternative way to fade in texts in your videos.
Part 1. Fade in text in Premiere Pro with Opacity option
If you have added any text or any graphical object in your video on Premiere Pro, you can apply fade in effect to your text and object easily. When you add fade in effect to your text or object, they slowly appear on the screen which is very soothing to watch instead of sudden and abrupt appearance. Here are the steps on how to fade text in Premiere Pro.
Step1 You must have your video clip as well as text clip on the Timeline of Premiere Pro. Make sure that you add text from Essential Graphics panel. Select the text clip from the Timeline to proceed.

Step2 Go to Effect Controls and click on Text option to expand it. Click on Opacity option from the dropdown menu.

Step3 Put the timeline cursor at the beginning of the selected text clip. Thereafter, make the Opacity value to zero. Click on Stopwatch icon beside Opacity to add a keyframe.

Step4 Put the timeline cursor at that point in the clip where you want the text to appear completely. Now make the Opacity value to 100. Click on Stopwatch to add a keyframe here.

Step5 Play the video to watch the fade in effect on your selected text. You can move the keyframes to speed up or slow down fade in effect.
Part 2. Make fade in or out with transition effects
If you have multiple video clips or scenes, you should add fade in and fade out transition effects so that the transition from one clip to another or one scene to another is smooth. The fade in or fade out effect for video clips look similar to fade text Premiere Pro. In fact, you can use the steps of how to fade in text in Premiere Pro to get the job done. But there is an easier way available with Video Transitions option. Here are the steps on how to apply fade in or out effect on your video clips in Premiere Pro.
Step1 You should have multiple video clips added to Timeline. Select the video clip to which you want to apply Fade in effect.
Step2 Go to Effects panel and click on Video Transitions option.

Step3 Click on Dissolve and from the dropdown list, drag and drop Film Dissolve to the beginning of the selected video clip for fade in effect.

Step4 Click on the added effect on Timeline to adjust speed, duration, and alignment of the effect.

Step5 Play the video to ensure that the effect looks perfect. Therefore, go to File> Share> Export File to save the video.
You can place the transition at the end of the video for fading out effect. Instead of Film Dissolve, you can use Crossfade or Dip to Black effect for fade in and fade out effect on video clips.
Part 3. Alternative way to fade in text in videos
If you do not have Adobe Premiere Pro or you find the steps difficult to fade in text in videos using Premiere Pro, we recommend Wondershare Filmora . Filmora is a professional video editor that is available for Windows as well as Mac users. There is a wide range of video effects available in Filmora in comparison to Premiere Pro. Most importantly, Filmora is super easy and intuitive to use, and even amateur users can use it comfortably. Here are the steps to fade in text in videos using Filmora.
Free Download For Win 7 or later(64-bit)
Free Download For macOS 10.14 or later
Step1 Download and install Filmora . Launch Filmora and click on New Project option.

Step2 Import the video clip under Project Media folder. Drag and drop the video clip to Timeline.

Step3 Go to Titles located at the top and drag and drop any title style on Timeline. Double-click on the Title clip on Timeline and type in your required text in the Viewer. You can stretch the Title clip to extend its duration as per your requirement.

Step4 Double-click on Title clip again on the Timeline and go to Text> Animation tab located at the top-left corner. Scroll down to go to Fade1 option and double-click Fade1 to apply it to your text.
Step5 You can go to settings by clicking on Advanced button and adjust parameters such as speed and duration of the fade effect for better visibility.
Step6 Once you are done, play the video and thereafter, click on Export to save the video on your hard drive.
Conclusion
We have stated the steps on how to fade text in Premiere Pro. You can use the same steps to apply the effect to graphical objects. We have also illustrated how to apply fade in and fade out effects between video clips and scenes using transition effects. If you are looking for an alternative and easier way to fade in texts in your videos, we recommend Wondershare Filmora .
Free Download For macOS 10.14 or later
Step1 Download and install Filmora . Launch Filmora and click on New Project option.
Step2 Import the video clip under Project Media folder. Drag and drop the video clip to Timeline.
Step3 Go to Titles located at the top and drag and drop any title style on Timeline. Double-click on the Title clip on Timeline and type in your required text in the Viewer. You can stretch the Title clip to extend its duration as per your requirement.
Step4 Double-click on Title clip again on the Timeline and go to Text> Animation tab located at the top-left corner. Scroll down to go to Fade1 option and double-click Fade1 to apply it to your text.
Step5 You can go to settings by clicking on Advanced button and adjust parameters such as speed and duration of the fade effect for better visibility.
Step6 Once you are done, play the video and thereafter, click on Export to save the video on your hard drive.
Conclusion
We have stated the steps on how to fade text in Premiere Pro. You can use the same steps to apply the effect to graphical objects. We have also illustrated how to apply fade in and fade out effects between video clips and scenes using transition effects. If you are looking for an alternative and easier way to fade in texts in your videos, we recommend Wondershare Filmora .
Step by Step Guide on Make Gimp Transparent Background PNG
Step by Step Guide on Make Gimp Transparent Background PNG
An easy yet powerful editor
Numerous effects to choose from
Detailed tutorials provided by the official channel
Removing background of images and making them transparent is a really very tough task for the newbies. Sometimes you may need to learn lots of software to get the work done and most of the programs are paid over the internet. There are many reasons why you need to remove the background of images such as you don’t like the background and replace with the new one. Here, in this article we will share the information about the GIMP which is a free and open source programs and can help you to remove background from the images and make the transparent.
In this article
01 [What’s Gimp?](#Part 1)
02 [How to Create a Transparent Background in GIMP](#Part 2)
03 [How to Turn the Complex Image Background Transparent](#Part 3)
04 [How to Turn a One-Color Background Transparent](#Part 4)
Part 1 What’s Gimp?
GIMP is open source software which allows you to do image manipulations. The program is distributed over the internet for free of cost the beginners to learn the photography skills. GIMP software can be used for photo retouching, image authoring and image compositions. GIMP supports all features of photo editing even it can be used for GIMP remove background to transparent. You can also use it as a paint program, online batch processing system, image format converter and as an image renderer.
Part 2 How to Create a Transparent Background in GIMP
With the help of GIMP software you can easily remove background from image and make it transparent. Here, we are going to tell you that how you can remove background with the help of GIMP. Let’s learn it step by step.
Step 1:
Install and launch GIMP program on your system. Now click the “File > Open” or you can also use “File > Open as Layers” option.

Step 2:
Now, you have to use the Fuzzy tool. The Fuzzy tool is mainly designed to select the current layer area and the image on the basis of color. Using this tool you can easily select the background which you want to remove with just one click.

Step 3:
On your image, now you will see a channel dialog when you add a second layer on it. This layer will tell the transparency of the image you have added to remove background. So, click the “Layer > Transparency > Add Alpha Channel option.

Step 4:
On your keyboard now you need to hit the “Delete” button to remove background. You may need to repeat the steps 2 to 4 if the background is not completely removed else there is no problem. We have removed blue background here for example.

Step 5:
Finally, you can click the “File > Export As” and then select the PNG format and save it on your computer in the PNG format. This is the way about GIMP remove background to transparent.

Part 3 How to Turn the Complex Image Background Transparent
The above part was about removing the simple and easy background from the image. Here we will share about GIMP transparent background PNG when you have the complex background. For, GIMP create transparent background in the complex images you need to add a transparent layer on the image.
Step 1:
Open the image in GIMP and then right click on the layer of image. Now, click the “Add Alpha Chanel” option.

Step 2:
After making a layer for background now you have to select the foreground of the image which you want to keep using the select tool of GIMP. To start, first you need to make sure the in the settings you have selected “Draw foreground option” is selected.
After doing all adjustments of the settings you need to draw outline of the object and finally press the enter button on keyboard.

Step 3:
After doing all the settings you have to adjust the stroke width from settings panel of GIMP. Use your mouse now and start dragging and drawing the image just like you are painting with a brush. Once your drawing is finished and you leave your mouse the image will look like the below screenshot.

Step 4:
You can also fine tune your selection now with the help of draw background option in the GIMP. This will help you to adjust the rough outline you created previously. Once you are happy then simply press the enter button.

Step 5:
Still, if you want to refine your results more than you can refine your outlines by using the path nodes option. You can view the path nodes by following the below steps.
● Keep your mouse cursor at paths dialog.
● Now, hit selection.
● To view the path you can click the CTRL+Shift+A button.
● Now, select the paths tool.
● Finally click the “Path”.

Step 6:
Now, it’s a time to adjust the outlines according to the output of your foreground image. You can zoom the image and add or adjust the previous nodes. To adjust node you can click the CTRL button on keyboard and drag the node using your mouse. If you need to remove a node then you can use CTRL+Shift button and then click on the node.

Step 7:
Once the path is refined according to your need hit the “Selection from Path” option at the left side.

Step 8:
You will have to add the layer mask on the image now to which will reveal the transparency. Right click the Current layer > Add Layer Mask > Selection and finally click “Add” button.

Step 9:
Now, if you have followed all the previous steps perfectly then your background will be removed now and you can also add a new background to the image. This is way about GIMP delete background to transparent for the complex images.

Part 4 How to Turn a One-Color Background Transparent
While using the GIMP you can also run the one color images background in the transparent. This method helps you to make the transparent background in case if you have the single color in the background of your image. In this method you just need to select the background by the color and it will be removed in the seconds. For GIMP create transparent background image in the single color background image you can follow the below steps.
Steps to Follow:
● Open the image using “File > Open” in the GIMP program.
● Once image is opened you have to select the image layer at the right side corner of the screen. Now right click and select the Add Alpha Channel option.
● Now, you have to choose the select by color tool.

Step 2:
After selecting the color tool you can select the area of the background image which you need to make transparent by clicking on the image. You can also select it manually by clicking and dragging using your mouse pointer. To increase the selection press Shift button on keyboard and then select the different area which you want to select.

Step 3:
Finally, when you have selected the complete area which you want to make transparent then simply select the delete button. This is the way about GIMP set transparent background for one color background images.

Learn New Ways to Make Transparent Background
GIMP software is a free program for newbie users to expand their skills. With the help of GIMP software you can easily remove background from mostly any kind of images. If you like to go for pro software to make the video from the images you have created then you can try the Wondershare Filmora Video Editor which allows you to make the beautiful videos and edit them quickly.
For Win 7 or later (64-bit)
For macOS 10.12 or later
Wondershare Filmora program is video editor software which also offers you some of the photo editing options as well. It is compatible with the windows as well as the Mac operating system devices. The program comes with a very easy to use interface and allows you to edit the videos and design them from scratch. It comes with the premade templates in it so you can directly use them for your videos to make the process faster. You can do keyframing, speed ramping, splitting screen, motion tracking etc for editing your videos.
Filmora offers you an inbuilt screen recorder which is the best for recording the gaming videos. it also offers you the effects to apply on the videos, color correction, color matching and many more others features which can be used for making the best quality videos.

● Ending Thoughts →
● Well, this is all about making transparent background in the GIMP. GIMP is really a very helpful program that comes with most all features what you need to edit the images and change the background of your images.
● If you need to edit the videos as well or you want to make videos with the images edited using GIMP then you can simply use Wondershare Filmora which the best in the video editing Era.
Removing background of images and making them transparent is a really very tough task for the newbies. Sometimes you may need to learn lots of software to get the work done and most of the programs are paid over the internet. There are many reasons why you need to remove the background of images such as you don’t like the background and replace with the new one. Here, in this article we will share the information about the GIMP which is a free and open source programs and can help you to remove background from the images and make the transparent.
In this article
01 [What’s Gimp?](#Part 1)
02 [How to Create a Transparent Background in GIMP](#Part 2)
03 [How to Turn the Complex Image Background Transparent](#Part 3)
04 [How to Turn a One-Color Background Transparent](#Part 4)
Part 1 What’s Gimp?
GIMP is open source software which allows you to do image manipulations. The program is distributed over the internet for free of cost the beginners to learn the photography skills. GIMP software can be used for photo retouching, image authoring and image compositions. GIMP supports all features of photo editing even it can be used for GIMP remove background to transparent. You can also use it as a paint program, online batch processing system, image format converter and as an image renderer.
Part 2 How to Create a Transparent Background in GIMP
With the help of GIMP software you can easily remove background from image and make it transparent. Here, we are going to tell you that how you can remove background with the help of GIMP. Let’s learn it step by step.
Step 1:
Install and launch GIMP program on your system. Now click the “File > Open” or you can also use “File > Open as Layers” option.
Step 2:
Now, you have to use the Fuzzy tool. The Fuzzy tool is mainly designed to select the current layer area and the image on the basis of color. Using this tool you can easily select the background which you want to remove with just one click.
Step 3:
On your image, now you will see a channel dialog when you add a second layer on it. This layer will tell the transparency of the image you have added to remove background. So, click the “Layer > Transparency > Add Alpha Channel option.
Step 4:
On your keyboard now you need to hit the “Delete” button to remove background. You may need to repeat the steps 2 to 4 if the background is not completely removed else there is no problem. We have removed blue background here for example.
Step 5:
Finally, you can click the “File > Export As” and then select the PNG format and save it on your computer in the PNG format. This is the way about GIMP remove background to transparent.
Part 3 How to Turn the Complex Image Background Transparent
The above part was about removing the simple and easy background from the image. Here we will share about GIMP transparent background PNG when you have the complex background. For, GIMP create transparent background in the complex images you need to add a transparent layer on the image.
Step 1:
Open the image in GIMP and then right click on the layer of image. Now, click the “Add Alpha Chanel” option.
Step 2:
After making a layer for background now you have to select the foreground of the image which you want to keep using the select tool of GIMP. To start, first you need to make sure the in the settings you have selected “Draw foreground option” is selected.
After doing all adjustments of the settings you need to draw outline of the object and finally press the enter button on keyboard.
Step 3:
After doing all the settings you have to adjust the stroke width from settings panel of GIMP. Use your mouse now and start dragging and drawing the image just like you are painting with a brush. Once your drawing is finished and you leave your mouse the image will look like the below screenshot.
Step 4:
You can also fine tune your selection now with the help of draw background option in the GIMP. This will help you to adjust the rough outline you created previously. Once you are happy then simply press the enter button.
Step 5:
Still, if you want to refine your results more than you can refine your outlines by using the path nodes option. You can view the path nodes by following the below steps.
● Keep your mouse cursor at paths dialog.
● Now, hit selection.
● To view the path you can click the CTRL+Shift+A button.
● Now, select the paths tool.
● Finally click the “Path”.
Step 6:
Now, it’s a time to adjust the outlines according to the output of your foreground image. You can zoom the image and add or adjust the previous nodes. To adjust node you can click the CTRL button on keyboard and drag the node using your mouse. If you need to remove a node then you can use CTRL+Shift button and then click on the node.
Step 7:
Once the path is refined according to your need hit the “Selection from Path” option at the left side.
Step 8:
You will have to add the layer mask on the image now to which will reveal the transparency. Right click the Current layer > Add Layer Mask > Selection and finally click “Add” button.
Step 9:
Now, if you have followed all the previous steps perfectly then your background will be removed now and you can also add a new background to the image. This is way about GIMP delete background to transparent for the complex images.
Part 4 How to Turn a One-Color Background Transparent
While using the GIMP you can also run the one color images background in the transparent. This method helps you to make the transparent background in case if you have the single color in the background of your image. In this method you just need to select the background by the color and it will be removed in the seconds. For GIMP create transparent background image in the single color background image you can follow the below steps.
Steps to Follow:
● Open the image using “File > Open” in the GIMP program.
● Once image is opened you have to select the image layer at the right side corner of the screen. Now right click and select the Add Alpha Channel option.
● Now, you have to choose the select by color tool.
Step 2:
After selecting the color tool you can select the area of the background image which you need to make transparent by clicking on the image. You can also select it manually by clicking and dragging using your mouse pointer. To increase the selection press Shift button on keyboard and then select the different area which you want to select.
Step 3:
Finally, when you have selected the complete area which you want to make transparent then simply select the delete button. This is the way about GIMP set transparent background for one color background images.
Learn New Ways to Make Transparent Background
GIMP software is a free program for newbie users to expand their skills. With the help of GIMP software you can easily remove background from mostly any kind of images. If you like to go for pro software to make the video from the images you have created then you can try the Wondershare Filmora Video Editor which allows you to make the beautiful videos and edit them quickly.
For Win 7 or later (64-bit)
For macOS 10.12 or later
Wondershare Filmora program is video editor software which also offers you some of the photo editing options as well. It is compatible with the windows as well as the Mac operating system devices. The program comes with a very easy to use interface and allows you to edit the videos and design them from scratch. It comes with the premade templates in it so you can directly use them for your videos to make the process faster. You can do keyframing, speed ramping, splitting screen, motion tracking etc for editing your videos.
Filmora offers you an inbuilt screen recorder which is the best for recording the gaming videos. it also offers you the effects to apply on the videos, color correction, color matching and many more others features which can be used for making the best quality videos.
● Ending Thoughts →
● Well, this is all about making transparent background in the GIMP. GIMP is really a very helpful program that comes with most all features what you need to edit the images and change the background of your images.
● If you need to edit the videos as well or you want to make videos with the images edited using GIMP then you can simply use Wondershare Filmora which the best in the video editing Era.
How To Synchronize Your Audio And Videos Properly?
Video quality and engagement are prone to impact badly if your audio is not synchronized with the video. This can happen because of technical issues or frame rate mismatches. In case you somehow get unsynchronized audio in the video, you need to use a reliable video editor to cater to this issue. To help you with this issue, this article will provide the best-in-class video editor named Wondershare Filmora.
The key features and the smooth and sleek interface show that you will have optimized audio synchronization with videos. Along with the auto beat sync feature, we will also discuss some online alternatives that will assist you in syncing audio while online.
Part 1: Why Should You Synchronize Your Audio And Videos in Video Editing?
Audio and video synchronization is important for presenting a good quality viewing experience. Here are the main reasons you shouldn’t neglect this in your audio and video.
Lip Sync and Narrative Flow
Synchronizing audio and video is crucial to maintaining the film’s narrative flow. Well-synchronized audio and video offer a very smooth experience to the viewers. If the lips and dialogue flow are not well maintained, it can cause distraction in the storytelling. As a result, the real message won’t be conveyed to the viewers.
Viewer Engagement
Do you wish to ensure that your viewers pay full attention to your video and that your message is well conveyed? Your video quality and sound matter the most for the best experience. When the audio and video are well-synced, the viewers pay attention to the content. They are not distracted due to the bad quality of the video.
Value of Quality Production
A high-quality video with perfect sound quality and proper syncing builds a good perception. If the video quality is bad or does not have proper sync, it can leave a bad impression. Therefore, to enhance the impact of these emotional and dramatic effects, it is imperative to focus on these core things.
Professionalism and Quality
To make your viewer experience outstanding, focus on paying attention to details. A good quality video represents your professionalism and the standards of your production. When it is synchronized, the viewer will always see this as a high-quality creation.
Automatically Synchroize Audio to Video
Simply and efficiently sync audio to video with Filmora Video Editor! Experience the magic of cool to make great video.
Start Video Voice Over Start Video Voice Over Learn More >


Part 2: [Offline Solution] Wondershare Filmora: A Great Video Editor With Audio Editing Qualities
Wondershare Filmora is the video editor through which you can fix audio issues in no time. It integrates the reliable features of Auto Beat Sync , through which you can match the audio with the length of your video. It never compromises the quality of audio or adds distortion to it. With this particular feature, you can sync the music with videos without making manual adjustments.
Edit Audio for Free For Win 7 or later(64-bit)
Edit Audio for Free For macOS 10.14 or later
There are several audio features in Filmora that never fail to amaze users with their higher functionality. One such example is the Silence Detection feature in this video editing platform. It can help you in detecting the unrequired silent intervals and remove them from videos. It also supports Audio Ducking, Text to Speech , Audio Visualizer, and other audio optimization features.
What Is The Procedure for Auto Syncing Audio with Filmora
The procedure of syncing the audio with video is not as tricky as you think. You can follow the below-listed steps to learn how to sync audio and video perfectly using this tool:
Auto Syncing Audio For Win 7 or later(64-bit)
Auto Syncing Audio For macOS 10.14 or later
Step 1Launch Filmora and Import Video
Initially, launch Wondershare Filmora on your device and select the “Auto Beat Sync” tab from the home interface. Next, select the “Import Media” button from the right panel and add the video that needs audio synchronization.

Step 2Auto Synchronize the Video With Audio
As you import the video to the platform, continue to define the “Whole Length” in the available section. Once you are done, look to select the background music that you want to auto-synchronize with the video. Set the “BGM Start Time” in the available section and define the “Beat Cut” and “Video Effects” from the right panel.

Step 3Export the Edited Video to Timeline
Once you are done editing the video, you can use the “Analyze” button to look into how well the process has been executed. Proceed to select the “Export to Timeline” button to import the video to the timeline.

Part 3: Some Online Solutions For Auto-Beat Sync Easily
Although Filmora provides the best services of Auto-Beat Sync to its users, there are other options that users can go by. Online services provide an excellent system for synchronizing the audio with the video. The main reason to go with such services is to resolve the case quickly. For this case, we have highlighted some top online solutions that can be used to match the beat.
1. Veed.io
Veed.io is a great online video editor with a dedicated system for synchronizing audio beats with video. With no need to download the software, the system makes the process easy and effective. By keeping the entire process to a single click, get to know how to fix audio and video out of sync using Veed.io:
Step 1: Open the dedicated service of Veed.io on the browser and click “Sync video to audio” to continue to the next screen.

Step 2: When led to the video editing panel, import your respective video in the provided space. Click the “Upload a File” option or drag and drop the video directly.

Step 3: Once the video is uploaded successfully, you can observe the sound waves in the timeline. This can be done with the “Show sound wave on timeline” button on the right panel. Tap on the video on the timeline, continue to the left panel, and scroll down to find the “Audio” section. You can use the “Clean Audio” and “Remove Silences” button to manage and synchronize the audio.

2. Canva
Canva is another great option with a dedicated service for synchronizing the beats of the video. While the accessibility is simple, Canva provides proper results for its users. You can easily groove to the coolest beats with the help of this online auto-beat sync video editor. To know how to fix the problem of audio synchronization with Canva, look at the steps below:
Step 1: After opening the browser page of Canva, continue to click the “Sync audio and video” button.

Step 2: As this leads you to a new webpage, add in your video having the audio. After you upload it, navigate to the “Beat Sync” button on the top.

Step 3: This opens a new set of options on the left panel, where you have to turn on the “Sync now” toggle. After completing these processes, lead to the “Share” button on the top-right. Select the “Download” option and download the fixed video successfully on your computer.

Conclusion
In a nutshell, this article has discussed Wondershare Filmora, which is one of the most premium standard video editors. While you’ve been explained the importance of synchronization, the Auto Beat Sync was the major highlight. You have been guided into how it can be executed through the right tools in the market. Eventually, you can auto-sync your video to the music beat.
Auto Sync Your Video For Win 7 or later(64-bit)
Auto Sync Your Video For macOS 10.14 or later
Start Video Voice Over Start Video Voice Over Learn More >
Part 2: [Offline Solution] Wondershare Filmora: A Great Video Editor With Audio Editing Qualities
Wondershare Filmora is the video editor through which you can fix audio issues in no time. It integrates the reliable features of Auto Beat Sync , through which you can match the audio with the length of your video. It never compromises the quality of audio or adds distortion to it. With this particular feature, you can sync the music with videos without making manual adjustments.
Edit Audio for Free For Win 7 or later(64-bit)
Edit Audio for Free For macOS 10.14 or later
There are several audio features in Filmora that never fail to amaze users with their higher functionality. One such example is the Silence Detection feature in this video editing platform. It can help you in detecting the unrequired silent intervals and remove them from videos. It also supports Audio Ducking, Text to Speech , Audio Visualizer, and other audio optimization features.
What Is The Procedure for Auto Syncing Audio with Filmora
The procedure of syncing the audio with video is not as tricky as you think. You can follow the below-listed steps to learn how to sync audio and video perfectly using this tool:
Auto Syncing Audio For Win 7 or later(64-bit)
Auto Syncing Audio For macOS 10.14 or later
Step 1Launch Filmora and Import Video
Initially, launch Wondershare Filmora on your device and select the “Auto Beat Sync” tab from the home interface. Next, select the “Import Media” button from the right panel and add the video that needs audio synchronization.
Step 2Auto Synchronize the Video With Audio
As you import the video to the platform, continue to define the “Whole Length” in the available section. Once you are done, look to select the background music that you want to auto-synchronize with the video. Set the “BGM Start Time” in the available section and define the “Beat Cut” and “Video Effects” from the right panel.
Step 3Export the Edited Video to Timeline
Once you are done editing the video, you can use the “Analyze” button to look into how well the process has been executed. Proceed to select the “Export to Timeline” button to import the video to the timeline.
Part 3: Some Online Solutions For Auto-Beat Sync Easily
Although Filmora provides the best services of Auto-Beat Sync to its users, there are other options that users can go by. Online services provide an excellent system for synchronizing the audio with the video. The main reason to go with such services is to resolve the case quickly. For this case, we have highlighted some top online solutions that can be used to match the beat.
1. Veed.io
Veed.io is a great online video editor with a dedicated system for synchronizing audio beats with video. With no need to download the software, the system makes the process easy and effective. By keeping the entire process to a single click, get to know how to fix audio and video out of sync using Veed.io:
Step 1: Open the dedicated service of Veed.io on the browser and click “Sync video to audio” to continue to the next screen.
Step 2: When led to the video editing panel, import your respective video in the provided space. Click the “Upload a File” option or drag and drop the video directly.
Step 3: Once the video is uploaded successfully, you can observe the sound waves in the timeline. This can be done with the “Show sound wave on timeline” button on the right panel. Tap on the video on the timeline, continue to the left panel, and scroll down to find the “Audio” section. You can use the “Clean Audio” and “Remove Silences” button to manage and synchronize the audio.
2. Canva
Canva is another great option with a dedicated service for synchronizing the beats of the video. While the accessibility is simple, Canva provides proper results for its users. You can easily groove to the coolest beats with the help of this online auto-beat sync video editor. To know how to fix the problem of audio synchronization with Canva, look at the steps below:
Step 1: After opening the browser page of Canva, continue to click the “Sync audio and video” button.
Step 2: As this leads you to a new webpage, add in your video having the audio. After you upload it, navigate to the “Beat Sync” button on the top.
Step 3: This opens a new set of options on the left panel, where you have to turn on the “Sync now” toggle. After completing these processes, lead to the “Share” button on the top-right. Select the “Download” option and download the fixed video successfully on your computer.
Conclusion
In a nutshell, this article has discussed Wondershare Filmora, which is one of the most premium standard video editors. While you’ve been explained the importance of synchronization, the Auto Beat Sync was the major highlight. You have been guided into how it can be executed through the right tools in the market. Eventually, you can auto-sync your video to the music beat.
Auto Sync Your Video For Win 7 or later(64-bit)
Auto Sync Your Video For macOS 10.14 or later
How to Use LUTs in VN Editor – Complete Guide and Best LUTs Download
Hello and welcome to another article full of information and excitement. The topic of this article is LUT for the VN editor. So it will be exciting for those who want to use LUTs in their video to make them look nice and well. As we will discuss today that what is VN editor and how you can add LUTs to your videos using it on the devices it is compatible for. Moreover, where you can download some fantastic LUTs like moody LUTs, which help your videos to look nice, and which software you should use for this purpose if you are running a device on which the VN editor is not compatible. So let’s begin!
Part 1. What is VN editor?
VN editor is one of the best choices for video editing on mobiles and Mac. Fast editing, transitions, effects, filters, colors, subtitles, music, and many other features make the VN video editing app a great tool for producing and editing videos. It aims to make editing shorter and more feature-rich, empowering everyone to take control of their own lives. You cannot only produce great videos but good films as well. In the following, we will discuss how you can add LUTs to your videos using it.

Part 2. How to use LUTs in VN editor?
First, we must know that it is compatible with which platforms. So, it is now available for Android, iOS, and Mac OS only. However, you can also use it on Windows with some Android or iOS emulators, but it is not a very continent way in our suggestions. Even after doing this, it does not work well on your Windows. Maybe you will face some glitches or malfunctioning problems. So it is better to use it on only those platforms for which it is primarily available. Please read the instructions below since we will go through how to use LUTs in it later on.
On Mac:
First of all, we will learn how you can do it on Mac:
- Download the VN Editor for Mac and open it.
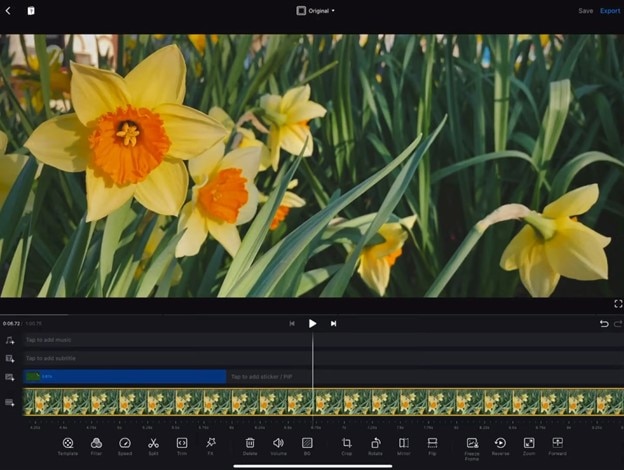
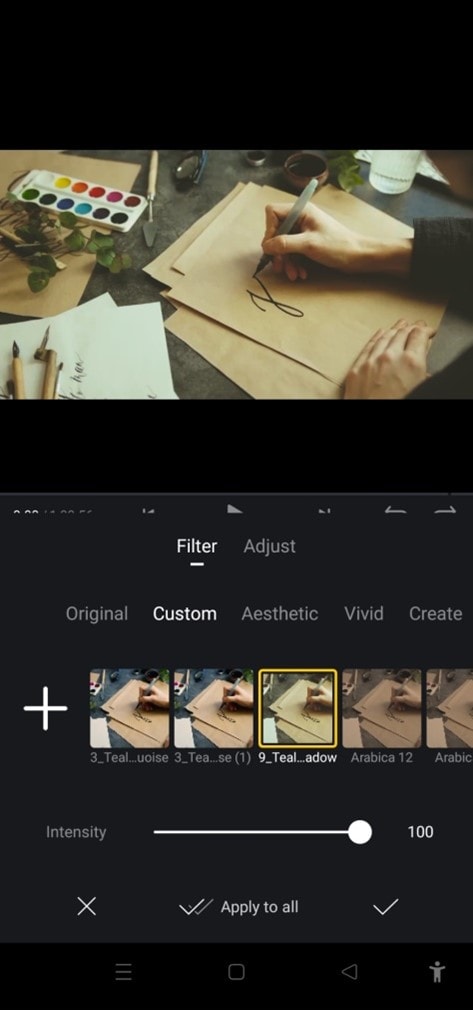
- Add your video and then tap the filters option.
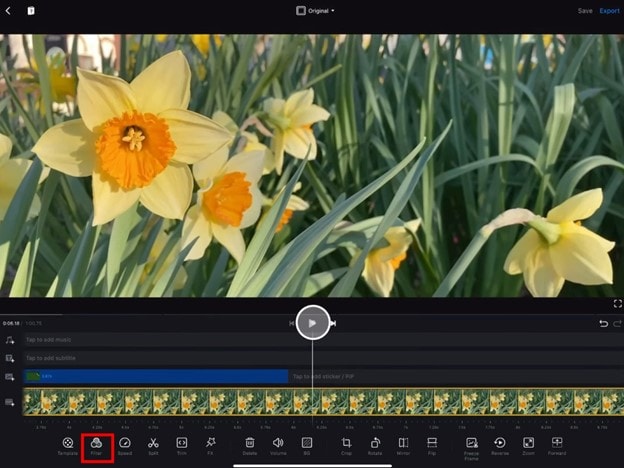
- Now choose custom filters and then select the LUTs pack.

- Select the desired LUT and apply.
On Mobile:
Secondly, we will discuss how we can do this on our mobiles (Android or iOS). The procedure on both devices (Android or iOS) is almost comparable. Therefore, we will discuss the steps from the perspective of both of these here:
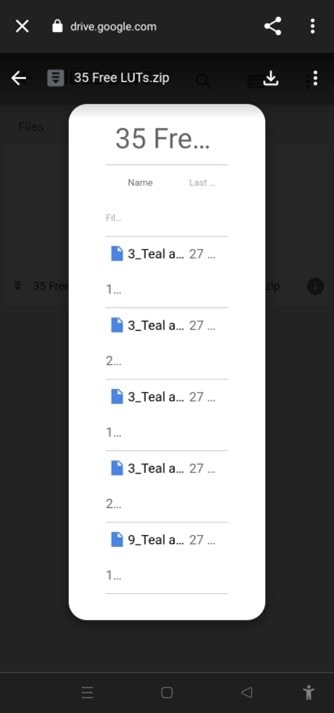
- First, download the VN editor from your mobile app store (Android or iOS) and the LUTs pack you want to use in your video.
- After downloading them on your mobile, open the VN editor application.
- Create a new project and add your video to it.

- Then click on the Filters option and select add external or custom filters option next to the existing filters.
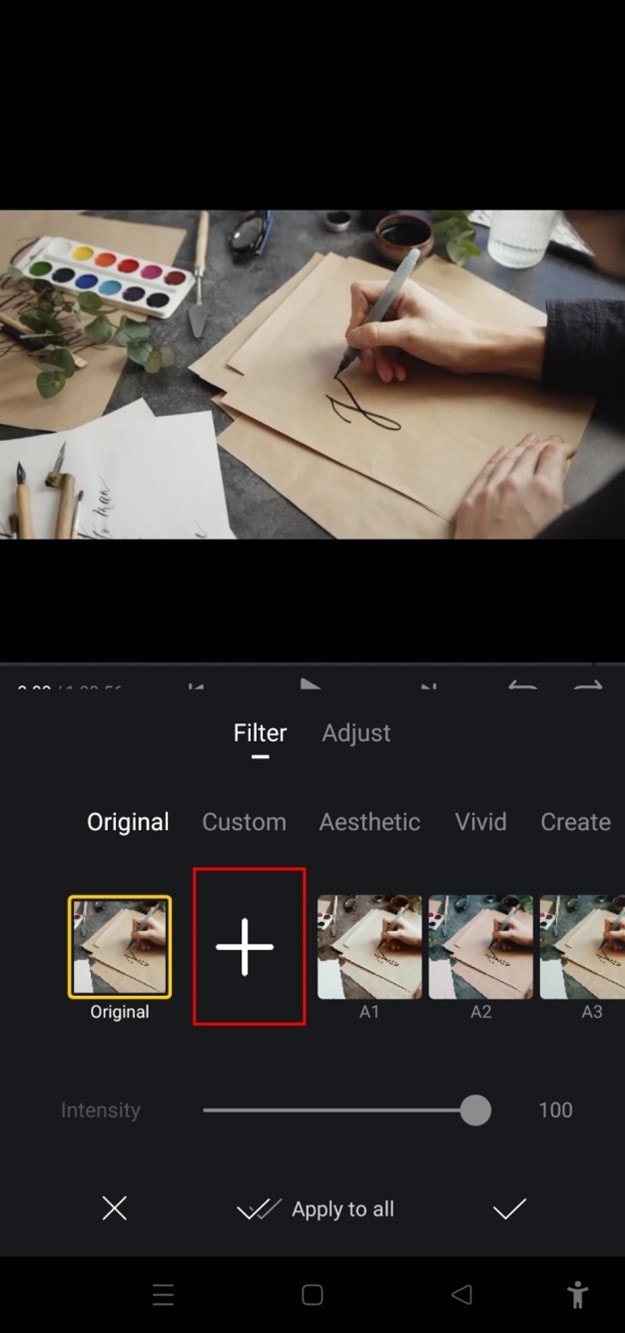
- It will take you to the File manager of your mobile, from which you have to find the folder in which you have stored your LUTs.
- After finding them, you can select those LUTs you want to use in your video and then click on the done or select button.
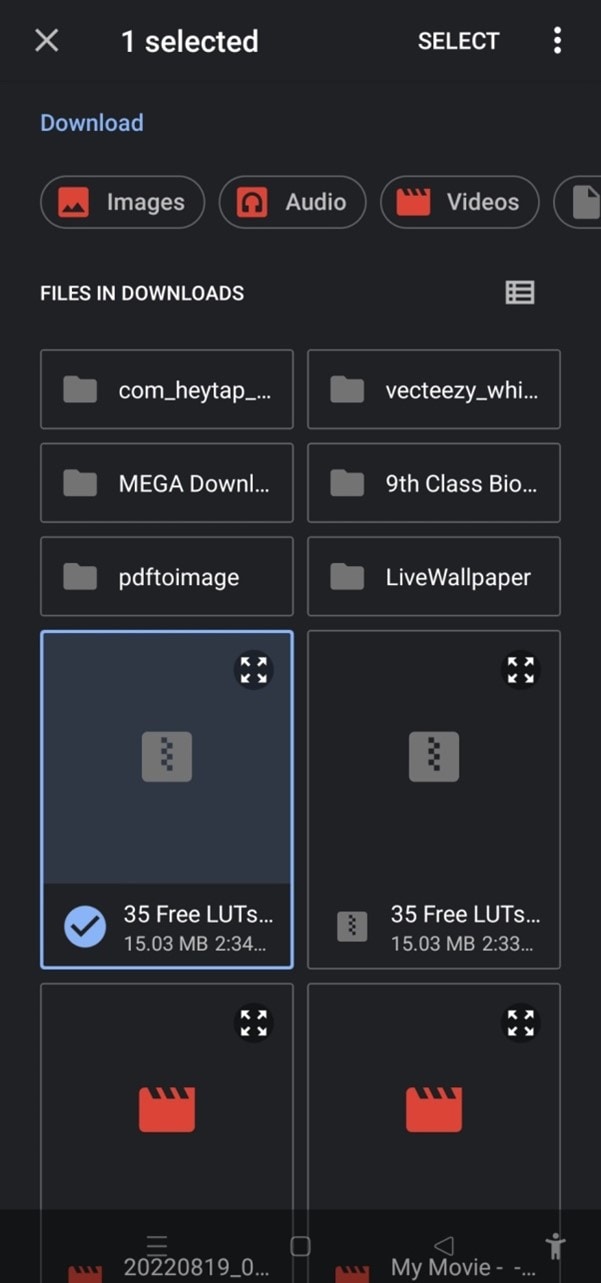
- Your downloaded LUTs start showing in the VN editor, and you can use them in your videos as you want.
Part 3. Best LUTs resource for VN video editor
1. Presets Store
Presets Store is an online platform that helps you with various Filters, LUTs, and other presets. So you can download LUTs for your videos for the VN editor using it. However, it’s not a free service. You have to pay for the LUTs you want to download from here. You can visit their YouTube channel to follow the latest LUTs, Filters and other presets on this platform.
2. Apna Editz
Apna Editz is another online platform you can use for this purpose. It also provides you with a fantastic variety of Presets like LUTs, Filters, and many other similar effects, which you can use in your video using the VN editor. The main Pros of this recommendation are that it’s a free website. So you can download LUTs for your videos from it for free. Keep an eye on their YouTube channel to be updated about the latest LUTs.
3. Lut Preset
Lut Preset is another alternative to all the above ones. You can get almost all your favorite LUTs for VN editor for free here and then use them in your videos as you want. They also share the latest LUTs on their YouTube Channel.
4. Pencil Hub
Pencil Hub is also a good option in this concern. However, it does not have too much variety of VN LUTs, but you can still use it to download some of the best LUTs for VN editors. To get informed of their every new effect and LUTs, their YouTube channel is the primary source.
5. YRP EDITZ
YRP ETIDZ is another good option if you are still looking for some fantastic VN LUTs. They, too not have a large variety of presets and LUTs. However, if you want some most commonly used LUTs for VN Editor, then they are a good option. You’ll notify of their most website updates by checking their YouTube channel.
Part 4. How to add LUTs to the best alternative to the VN editor?
VN Editor is undoubtedly an excellent choice to add LUTs to your videos. However, the VN editor is best suitable for mobile devices. To enhance your LUTs and effects, it would be great if you used some desktop software. Wondershare Filmora offers a great variety of built-in LUTs to choose from. Let’s look at how we can use Filmora to add LUTs:
- Add your video and tap the tools, then click the Color option.
- Now select the Color Correction option and then choose 3D LUT.
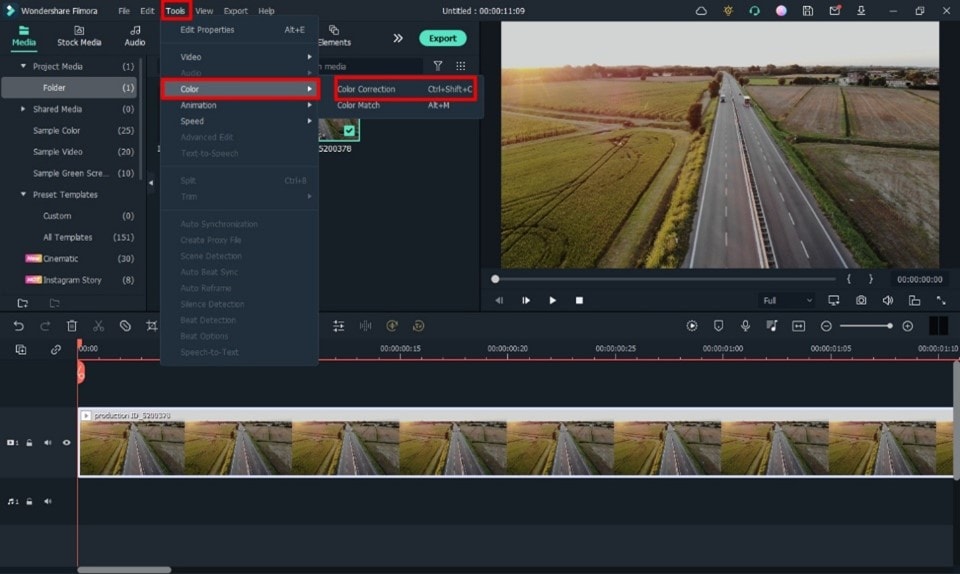
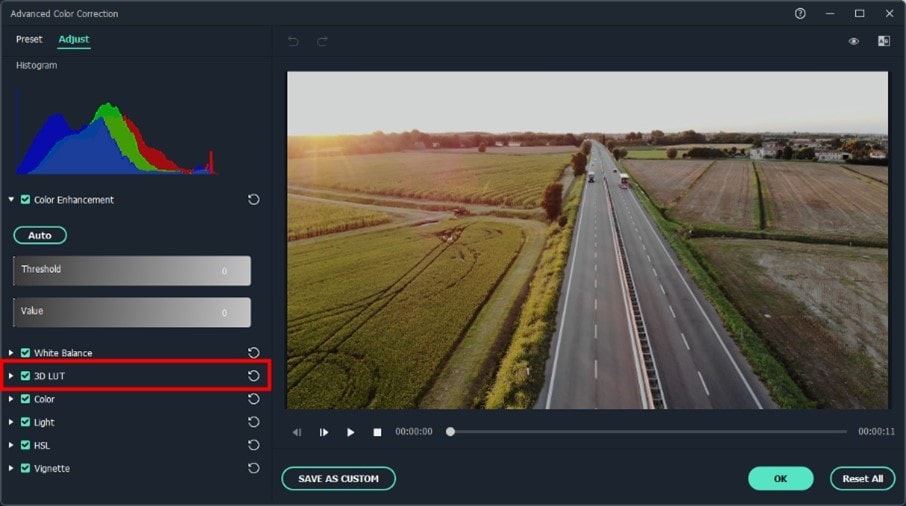
- Click the drop-down menu and select the Load new LUT option. Here you can import other downloaded preset LUTs to use
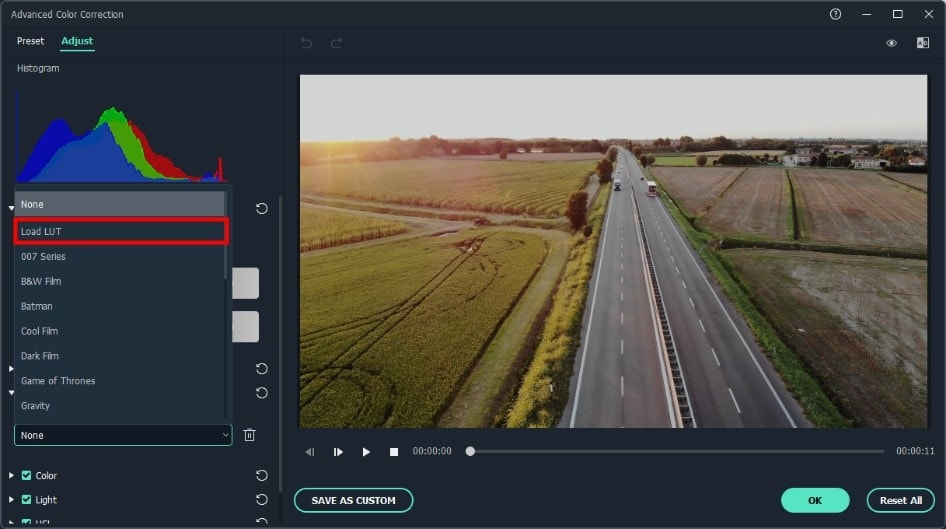
- Choose the LUT and click OK. Your new fantastic video is ready now.

Closing Thoughts
This post recommends several lut resources and demonstrates how to import them if you are a devoted user of VN editor and want to learn how to utilize it for video color grading. The more potent desktop editor Wondershare Filmora, which offers a range of built-in LUT sources and supports color grading settings, is of course recommended if you want to take your videos to the next level. Thanks for reading.
Free Download For Win 7 or later(64-bit)
Free Download For macOS 10.14 or later
2. Apna Editz
Apna Editz is another online platform you can use for this purpose. It also provides you with a fantastic variety of Presets like LUTs, Filters, and many other similar effects, which you can use in your video using the VN editor. The main Pros of this recommendation are that it’s a free website. So you can download LUTs for your videos from it for free. Keep an eye on their YouTube channel to be updated about the latest LUTs.
3. Lut Preset
Lut Preset is another alternative to all the above ones. You can get almost all your favorite LUTs for VN editor for free here and then use them in your videos as you want. They also share the latest LUTs on their YouTube Channel.
4. Pencil Hub
Pencil Hub is also a good option in this concern. However, it does not have too much variety of VN LUTs, but you can still use it to download some of the best LUTs for VN editors. To get informed of their every new effect and LUTs, their YouTube channel is the primary source.
5. YRP EDITZ
YRP ETIDZ is another good option if you are still looking for some fantastic VN LUTs. They, too not have a large variety of presets and LUTs. However, if you want some most commonly used LUTs for VN Editor, then they are a good option. You’ll notify of their most website updates by checking their YouTube channel.
Part 4. How to add LUTs to the best alternative to the VN editor?
VN Editor is undoubtedly an excellent choice to add LUTs to your videos. However, the VN editor is best suitable for mobile devices. To enhance your LUTs and effects, it would be great if you used some desktop software. Wondershare Filmora offers a great variety of built-in LUTs to choose from. Let’s look at how we can use Filmora to add LUTs:
- Add your video and tap the tools, then click the Color option.
- Now select the Color Correction option and then choose 3D LUT.
- Click the drop-down menu and select the Load new LUT option. Here you can import other downloaded preset LUTs to use
- Choose the LUT and click OK. Your new fantastic video is ready now.
Closing Thoughts
This post recommends several lut resources and demonstrates how to import them if you are a devoted user of VN editor and want to learn how to utilize it for video color grading. The more potent desktop editor Wondershare Filmora, which offers a range of built-in LUT sources and supports color grading settings, is of course recommended if you want to take your videos to the next level. Thanks for reading.
Free Download For Win 7 or later(64-bit)
Free Download For macOS 10.14 or later
Also read:
- New In 2024, Do You Want to Know How to Edit a Time Lapse Video on iPhone, Interesting Ideas, and some Tips and Pointers for Shooting a Professional Time Lapse Video? Find Out Everything in This Guide
- 10 Best Meme Text to Speech Tools Windows, Mac, Android, iPhone
- 15 Stunning GIF Splitter Examples You Need to Bookmark for 2024
- New Using AI to Replace Skies Finding the Right Methods for 2024
- In 2024, Have You Ever Watched a Movie Where You Felt the Filmmakers Left You Hanging? Yea, Thats What Freeze Frame Does. Here We Will Enlighten You on What It Is, Freeze Frame Examples Where It Has Been Helpful to Drive Our Point Home
- Updated 2024 Approved How to Add Subtitles to Videos With Kapwing
- Updated 2024 Approved Looking for the Best Alternatives of iPad Compatible Slideshow Applications to Design High End Graphic Presentations? Rest Assured, You Have Landed at the Correct Spot
- New What Is AI Composite Video App and AI Composite Video Guide
- Updated In 2024, 8 Free Photo Collage with Music Video Maker
- Step by Step to Rotate Video in Google Photos for 2024
- Keyframes Interval Everything You Need To Know | Filmora for 2024
- Updated How To Add Motion Blur In Davinci Resolve, In 2024
- Best 8 Online MPEG to GIF Converters
- Updated In 2024, Phone Aspect Ratio Vertical Definition, Types & Tips
- Are You Finding It Difficult to Freeze-Frame in After Effects? Note that Freeze-Frame Takes only a Few Seconds, and, in This Tutorial, We Will Guide You on How to Create and Add Frame Hold in After Effects for 2024
- 2024 Approved Which 10 Best Video Editing Online Makers Is Worth Your Attention?
- Updated In 2024, Methods to Make Sure Your Recording Slideshow in Powerpoint Is Not Wro
- 2024 Approved Want to Add an Exciting Countdown Timer to Your Wedding, Product Launch or Any Other Video Using After Effects or an Alternative Tool? This Article Will Help You Learn All About After Effects Countdown and the Procedure
- Updated 2024 Approved Learn How to Trim/Crop Video in Microsoft PowerPoint
- 2024 Approved Dollar-Store DIY Hacks to Use for Filmmaking on a Budget
- New How to Calculate & Change Video Aspect Ratio Online for 2024
- New Ultimate Guide To Make A Political Video
- New Mask Tracking Is Believed to Be a Helpful Procedure for Marking Proper Areas in Videos. Learn How to Perform Premiere Pro Mask Tracking in This Guide for 2024
- Step by Step to Rotate Video in Google Photos
- New Use This Color Match Paint Technique to Find the Exact Shade of Any Hue You Have in Mind for Your Paint Project. Match the Paint to Your Desired Color Even without Knowing the Paint Name or Brand with Automotive Paint Matching for 2024
- Updated In 2024, Follow a Few Simple Steps and Learn How to Create a Professional Glowing Edge Effect to Your Videos in Filmora
- New 2024 Approved Best 10 Mind-Blowing Video Collage Maker for PC
- In 2024, Camtasia Vs Captivate - Which to Choose?
- In 2024, How to Use OBS Chroma Key With/Without Green Screen Easy Solutions
- Magic Effects Video Making How To for 2024
- New In 2024, Create Your Face Zoom TikTok Now
- Updated 2024 Approved Applying and Creating Gif Background on Your Devices and Presentations Is Not Hard. Read Below to Learn How to Apply a GIF Background on All Devices
- Are You Looking to Remove Echo in Premiere Pro? Please Look at Our Guide for Advice and Suggestions on Getting the Best Possible Outcomes
- In 2024, How to Convert Time-Lapse to Normal Video
- Updated Whats The Best Laptops For Video Editing for 2024
- What To Do When Lava Yuva 3 Has Black Screen of Death? | Dr.fone
- In 2024, Still Using Pattern Locks with Samsung Galaxy A15 4G? Tips, Tricks and Helpful Advice
- Simple Guide to Create New and Exciting Blackboard Animation for 2024
- In 2024, Simple and Effective Ways to Change Your Country on YouTube App Of your Realme V30 | Dr.fone
- In 2024, Unova Stone Pokémon Go Evolution List and How Catch Them For Oppo F25 Pro 5G | Dr.fone
- Ultimate Guide to Free PPTP VPN For Beginners On Lava Yuva 2 | Dr.fone
- Bypassing Google Account With vnROM Bypass For Sony
- In 2024, Tips And Tricks To Tell if Your Apple iPhone 12 mini Is Unlocked
- Will Pokémon Go Ban the Account if You Use PGSharp On Nokia 130 Music | Dr.fone
- In 2024, Bypass Activation Lock On iPhone SE - 4 Easy Ways
- In 2024, How to Mirror Your Samsung Galaxy A54 5G Screen to PC with Chromecast | Dr.fone
- How to Repair corrupt MP4 and AVI files of X90S?
- Best Ways on How to Unlock/Bypass/Swipe/Remove Samsung Galaxy S24 Fingerprint Lock
- How to Downgrade Apple iPhone 12 Pro Max without Losing Data? | Dr.fone
- How to Transfer Data from Honor Magic 5 to Samsung Phone | Dr.fone
- In 2024, How to Change GPS Location on Realme Narzo 60 Pro 5G Easily & Safely | Dr.fone
- A Complete Guide To OEM Unlocking on Vivo S18e
- 3 Ways to Track Realme V30T without Them Knowing | Dr.fone
- In 2024, Two Ways to Track My Boyfriends Oppo K11 5G without Him Knowing | Dr.fone
- How to Transfer Music from Nokia C300 to iPod | Dr.fone
- In 2024, Best 10 Chinese Video to English Translator
- Title: Looking for Simple Steps to Apply Fade in Effect to Your Text in Premiere Pro? Here Are Two Different Methods Along with an Alternative Way to Fade Text in Videos for 2024
- Author: Morgan
- Created at : 2024-06-24 01:30:29
- Updated at : 2024-06-25 01:30:29
- Link: https://ai-video-editing.techidaily.com/1713950828325-looking-for-simple-steps-to-apply-fade-in-effect-to-your-text-in-premiere-pro-here-are-two-different-methods-along-with-an-alternative-way-to-fade-text-in-v/
- License: This work is licensed under CC BY-NC-SA 4.0.
