
New 2024 Approved Whatre the Best Alternatives to Pexels?
What’re the Best Alternatives to Pexels?
Sites like Pexels provide you with royalty-free images to include in your messages to further their impact. Although Pexels is a great resource for royalty-free photos and animations, it is not without its limitations. Here is a list of Pexels alternatives for you to consider when creating content. It includes reasons why the sites are suitable alternatives and brief guides on how to get started on them.
Part1: What are the best alternatives to Pexels?
There are several factors to consider when selecting a suitable image resource for your messaging. For example, you may consider a site favorable to another because of its intuitive user interface, or you may consider another because it has no pesky advertisements. Taking this into consideration, here is a list of the three best Pexels alternatives worth checking out for your next project.
No.1 Unsplash

Unsplash is a stock photo-sharing website run by Getty Images. According to recent reports, the site hosts over 265,000 photographers contributing to a library of over 3.5 million photos. Initially, all photos were under a creative commons license zero, meaning you could distribute the photos without restriction. However, following lobbying from some creators, all photos are now under the Unsplash license.
This means you can still copy, modify, share, and download images for free. However, under the new licensing terms, you cannot use unedited copies of the images for commercial purposes such as T-Shirt printing or branding and using the photos on a similar or competing service.
Most Unsplash users praise it for the following features:
- The library contains tons of high-resolution photos.
- You can access the site through your web browser or the app available on Android and iOS devices.
- There are no download limits to the photos, and everything is free.
- Unsplash is a plugin for various content editing software such as Filmora 11, Adobe XD, and Figma.
Despite all the positives, here are a few improvements to make Unsplash even better.
- The website lacks a free HD video library, which would be a great addition for aspiring content creators.
- In addition, the search algorithm is not as accurate, and you may struggle to find suitable images for your subject matter.
No.2 Shutterstock
Another Pexels alternative to consider is Shutterstock. It is an online resource where individuals and businesses can access high-quality, licensed photos, videos, illustrations, vectors, and music for their content creation.

Unlike Unsplash above, you need to create an account to access Shutterstock services. In addition, the website offers different pricing models for each user, depending on your unique requirements. For example, you can subscribe to an image-only subscription that allows you ten image downloads monthly for $29. Alternatively, you can purchase the Mix and Match subscription that offers you 25 credits monthly to download different media from the site.
Currently, the website boasts a collection of over 200 million royalty-free images and over 10 million video clips. In addition, the company also offers a percentage-based compensation model to contributors, with first-timers earning up to 15% of content sales. Furthermore, the site continues to populate its library through the acquisition of different companies in a similar space. Some of its notable acquisitions include Turbosquid, Bigstock, Rex Features, and BEImages.
No.3 Filmstock [Editor’s Choices]

Filmstock is an online library of different editing resources for filmmakers. Some of the resources you can obtain are effects, elements, titles, and audio. In addition, Filmstock is the most recent version of the formerly known Filmora Effects Store. Regardless of the close association with Filmora Video Editing Software, you can still use these resources in your creations on other programs.
Filmstock currently offers its services in three categories. They are:
- A Free package that allows you unlimited downloads of media effects and resources under a royalty-free license. However, any resource you download from the site comes with a Filmora tag.
- The Standard subscription will cost you $9.99 per month and includes free technical support as an additional feature to those available in the free package.
- Finally, the Premium subscription gives you access to the premium library that contains an exclusive selection of the contributors’ commercial work. The package will cost you $32.99 monthly and also includes all the features in the previous subscription models.
Kindly note that you must register for a Filmstock or Wondershare account to use the service. In addition, you will need to purchase a separate license to use the service with Filmora Video Editing software.
No.4 Getty Images


Getty Images is an online supplier of media resources for media, creative, and corporate clients. It boasts a resource library of over 477 million entries. Access to the site requires you to create a user account. In addition, some of the prints you will find on the site will require you to make a purchase, depending on the size and quality.
No.5 iStock

iStock is an online library of creative resources, including music, videos, illustrations, and images. In addition, the site offers access to its exclusive stock-image library through different subscription models. Some of the platforms appealing features include the following:
- An AI-powered search engine that provides more accurate results than Pexels.
- Preset templates for easier creation of videos and social media posts.
No.6 Flickr

Flickr is another alternative to Pexels worth considering. This is because it offers you free and paid access to one of the internet’s largest creative libraries. In addition, you can select from several licenses, including creative commons and U.S. Government works licenses for your assets, something other similar sites lack in their offering.
No.7 Pixabay

Pixabay gives you access to over 1 million creative assets in different categories, including videos, music, and sound effects. In addition, the site offers its content under the creative commons zero licenses, meaning you can use all stock photos without fear of backlash. Although the site’s search function requires work on its accuracy, the numerous categories make it easier to pinpoint your desired image.
No.8 Adobe Stock

Another site like Pexels is Adobe Stock, where you can access millions of creative assets for your content. Depending on your licensing options, the site offers free and paid access to its services. For example, you can increase your creativity by subscribing to the different Adobe design assets, including Adobe Stock Vector and Adobe Stock Illustrations.
No.9 Vista Create

Vista Create is an online free photo and image website like Pexels that also includes design tools to alter the images to your liking. In addition, you have plenty of templates to suit different platform requirements, including social media sites such as Facebook and Instagram. Furthermore, Vista Creare also boasts a wide collection of vectors, which you can customize in three easy steps.
No.10 LibreStock

Unlike the ones above, LIbreStock is an aggregator site that combines stock photo databases in a single platform. As such, it is arguably the largest provider of royalty-free images on the web. In addition, it automatically filters out poor-quality images, guaranteeing you excellence each time.
Most LibreStock users name the website’s search function as its best feature. This is because it also utilizes search tags when scanning through different databases. As such, you can easily find unique stock photos for your creation, regardless of how outrageous the search tag is. Finally, LibreStock provides its content under the creative commons zero licenses, meaning you can use the assets for personal and commercial work.
No.11 StockSnap

StockSnap operates similarly to Pexels, as it also offers a variety of free stock photos and images. However, a few tweaks to how you receive these creative assets make it slightly better. For example, StockSnap allows you to download ten free images from Shutterstock if what you need is unavailable in their library.
In addition, the platform also displays the most recent additions to their library in the top search results. As such, you are guaranteed to receive unique pictures without significant overuse.
Part2: FAQs
What is better than Pexels?
From the above information, Unsplash ranks as the best alternative to Pexels. This is because of its user-friendly interface, availability across web-based and smartphones, and compatibility with different video editing software such as Adobe XD and Filmora . As such, its versatility allows you to always create on the go.
Can I use Pexels on YouTube?
Yes, you can use Pexels on YouTube, provided you apply the creative assets to your material. In addition, you will need to make alterations to Pexels images and videos before using them to avoid violating your license agreement.
Free Download For Win 7 or later(64-bit)
Free Download For macOS 10.14 or later
Free Download For macOS 10.14 or later
Here Are the Steps to Crop a Video in Sony Vegas Pro: Step 1: Click on ‘Import’ and Import the Video to Be Edited. Click on It and Drag-Drop to Timeline
Sony Vegas Pro is a video editing software package for non-linear editing (NLE) originally published by Sonic Foundry, now owned and run by Magix Software GmbH. Written in the C++ programming language, the software uses the Microsoft Windows operating system and is compatible with 64-bit versions.
It has been used to produce TV shows and feature films. More recently, Sony released a consumer video-editing program known as Movie Studio Platinum 13, which was designed for consumer-level editors. In the previous year by Sonic Foundry, a division of Sony Pictures Digital. The software was re-branded as Sony Vegas following Sonic Foundry’s merger with Sony Pictures Digital in 2007, and after the latter sold off Sonic Foundry in 2008, it became a part of MAGIX.
Other video editing products from Sony include Movie Studio, Sound Forge Pro, and ACID Pro.
The original version was called Sound Forge. The software was upgraded to incorporate features of the newly acquired product Vegas, which had been released as a Windows version of the original DOS-based Non-Linear Editor (NLE) developed by US company, Canopus.
About Sony Vegas Pro
The powerful video editing software makes it easy to create professional-quality videos. It provides the users with some special features like easy trimming, splitting and merging of clips, etc. By using Vegas Pro you can easily crop your short video (a clip) and also resize it.
Sony Vegas Pro is a video editing software produced by Sony Creative Software. It is used for professional video, audio post-production and 3D animation.
Sony Vegas Pro is a video editing software that is used worldwide. It has great features and it can be utilized by individuals who are newbies in the field of creating videos. Sony Vegas Pro 12, 11, 10 have been installed many times on Windows 7, 8, 8.1 operating systems without encountering any problems. But some users face problems with the installation process of Sony Vegas Pro 13, 14 versions. Many individuals have got different difficulties.
Cropping means cutting off a part of the video. Instead of enlarging the video by moving its borders, you have to trim it from both sides. The editing procedure includes removing unwanted parts from short videos, making them shorter and more effective. It can also create suspense or interest for audiences. Here are the steps to crop a video in Sony Vegas Pro:
Step-by-step on how to crop videos using Vegas Pro?
Step 1: Click on ‘Import’ and import the video to be edited. Click on it and drag-drop to timeline. You can see a green indicator in the form of a splitter between two clips in the timeline, which shows where the clip ends and starts playing.

Step 2: Open the video you want to edit, in the timeline of your project. Right-click on the clip and select “Video Event Pan/Crop”.

Step 3: Alternatively, you can also select crop effect by pressing the icon in the clip. Or, select the Crop icon from the toolbar to add it to a track.

Step 4: The crop window will pop up. You can now drag the dotted rectangle to the ‘crop’ part of the video that you want. Press enter once done to apply the crop. You can also use the “Previous Frame” or “Next Frame” button to navigate to another frame of your video and drag the dotted rectangle from there, without changing your current frame.

Step 5: When you have finished adjusting the crop area, go to File > Export > Render Video. In the Render Video window that pops up, select the file format and quality of your render. You can also adjust the size, frame rate, and bitrate options from here. Once ready, press “Render” to begin rendering your video with the cropped area. This will give you a new output video where only the selected portion of the previous video is visible.

Sony Vegas Pro provides advanced options for users to easily crop videos in multiple formats like - HDV, AVCHD, and many more.
And… Voila! You have successfully cropped your video in Sony Vegas Pro.
Alternatively, there is a better way to crop a video and that is using the Wondershare Filmora. It is easier and user-friendly. It also has a lot of features that you can choose from.
An Easier Way to Crop a Video with Filmora
Filmora Video Editor is a free windows movie maker. It is one of the best windows movie makers available in the market. Filmora uses MPEG-4 AVC codec for editing videos and also offers many output formats like MP4, AVI, FLV, etc. In addition to these features, it includes a video stabilization algorithm, picture in picture editor, and many more. It is a free windows movie maker so anyone who has a windows computer can download and use this software.
It includes many interesting and useful features which you will not find in other movie makers like:
Support for multiple videos, audio, image formats: The program offers support for multiple videos, audio, image formats. Video stabilization algorithm: Video stabilization algorithm is used to remove unwanted shakes from your videos. Apart from this it also contains a picture-in-picture editor and many more useful features.
Filmora is an indie filmmaker’s go-to tool to create gorgeous-looking videos. No matter your skill level, it’s easy enough for beginners and powerful enough for professionals.
For Win 7 or later (64-bit)
For macOS 10.14 or later
Step-by-step on how to crop videos using Wondershare Filmora?
So, here are the steps to crop videos using Wondershare Filmora.
Step 1: Open the video you want to edit in Wondershare Filmora. Drag it and drop to timeline.

Step 2: In your timeline, select a portion of the video that needs cropping and click on ‘Crop and Zoom’ tab located at the bottom right corner of your screen. Here you can see the Crop and Zoom window where you can adjust the crop area. Adjust the size, shape of your video with these options.

Step 3: Once done with your adjustment click on ‘OK’ button to apply your crop. You can see that the selected portion of the video is now cropped.

Step 4: Finally, click on “Save” to save your video with cropping. Congratulations, you have successfully cropped your video! So, this was all about how to crop videos using Wondershare Filmora software step by step. Using these easy steps anyone can simple edit their videos and save them in multiple formats without any loss of quality or data.

Step 2: Open the video you want to edit, in the timeline of your project. Right-click on the clip and select “Video Event Pan/Crop”.
Step 3: Alternatively, you can also select crop effect by pressing the icon in the clip. Or, select the Crop icon from the toolbar to add it to a track.
Step 4: The crop window will pop up. You can now drag the dotted rectangle to the ‘crop’ part of the video that you want. Press enter once done to apply the crop. You can also use the “Previous Frame” or “Next Frame” button to navigate to another frame of your video and drag the dotted rectangle from there, without changing your current frame.
Step 5: When you have finished adjusting the crop area, go to File > Export > Render Video. In the Render Video window that pops up, select the file format and quality of your render. You can also adjust the size, frame rate, and bitrate options from here. Once ready, press “Render” to begin rendering your video with the cropped area. This will give you a new output video where only the selected portion of the previous video is visible.
Sony Vegas Pro provides advanced options for users to easily crop videos in multiple formats like - HDV, AVCHD, and many more.
And… Voila! You have successfully cropped your video in Sony Vegas Pro.
Alternatively, there is a better way to crop a video and that is using the Wondershare Filmora. It is easier and user-friendly. It also has a lot of features that you can choose from.
An Easier Way to Crop a Video with Filmora
Filmora Video Editor is a free windows movie maker. It is one of the best windows movie makers available in the market. Filmora uses MPEG-4 AVC codec for editing videos and also offers many output formats like MP4, AVI, FLV, etc. In addition to these features, it includes a video stabilization algorithm, picture in picture editor, and many more. It is a free windows movie maker so anyone who has a windows computer can download and use this software.
It includes many interesting and useful features which you will not find in other movie makers like:
Support for multiple videos, audio, image formats: The program offers support for multiple videos, audio, image formats. Video stabilization algorithm: Video stabilization algorithm is used to remove unwanted shakes from your videos. Apart from this it also contains a picture-in-picture editor and many more useful features.
Filmora is an indie filmmaker’s go-to tool to create gorgeous-looking videos. No matter your skill level, it’s easy enough for beginners and powerful enough for professionals.
For Win 7 or later (64-bit)
For macOS 10.14 or later
Step-by-step on how to crop videos using Wondershare Filmora?
So, here are the steps to crop videos using Wondershare Filmora.
Step 1: Open the video you want to edit in Wondershare Filmora. Drag it and drop to timeline.
Step 2: In your timeline, select a portion of the video that needs cropping and click on ‘Crop and Zoom’ tab located at the bottom right corner of your screen. Here you can see the Crop and Zoom window where you can adjust the crop area. Adjust the size, shape of your video with these options.
Step 3: Once done with your adjustment click on ‘OK’ button to apply your crop. You can see that the selected portion of the video is now cropped.
Step 4: Finally, click on “Save” to save your video with cropping. Congratulations, you have successfully cropped your video! So, this was all about how to crop videos using Wondershare Filmora software step by step. Using these easy steps anyone can simple edit their videos and save them in multiple formats without any loss of quality or data.
How To Split Screen On Tiktok
TikTok is probably the most popular video-sharing app in the world right now. Many TikTokers have become famous for making videos that have a significant impact and encourage creativity and new ideas. One of the most popular TikTok trends is the split-screen effect. You’ve probably seen a lot of TikTok split-screen videos with cool effects that made you wonder how the user split their screen. Becoming skilled in using TikTok effects is not as difficult as it might look. It only requires a significant amount of practice. Read on as we show you how to make a TikTok split-screen video.
Using CapCut To Split Screen
CapCut is the official free TikTok Video Maker and Video Editor with Music for TikTok that is multifunctional. Its interface is quite similar and easy to use.
CapCut includes free advanced capabilities such as keyframe animation, stabilization, and Picture-in-Picture (PIP). These are in addition to its fundamental functions, such as video editing, adding stickers, text, and music.
Steps to Split Screen Video with CapCut On Android and IOS Devices
- To use the app, you need to install it first. iPhone and Android users can download CapCut. Navigate to the appropriate app store of your choice and download CapCut.
- After installation, launch the app.
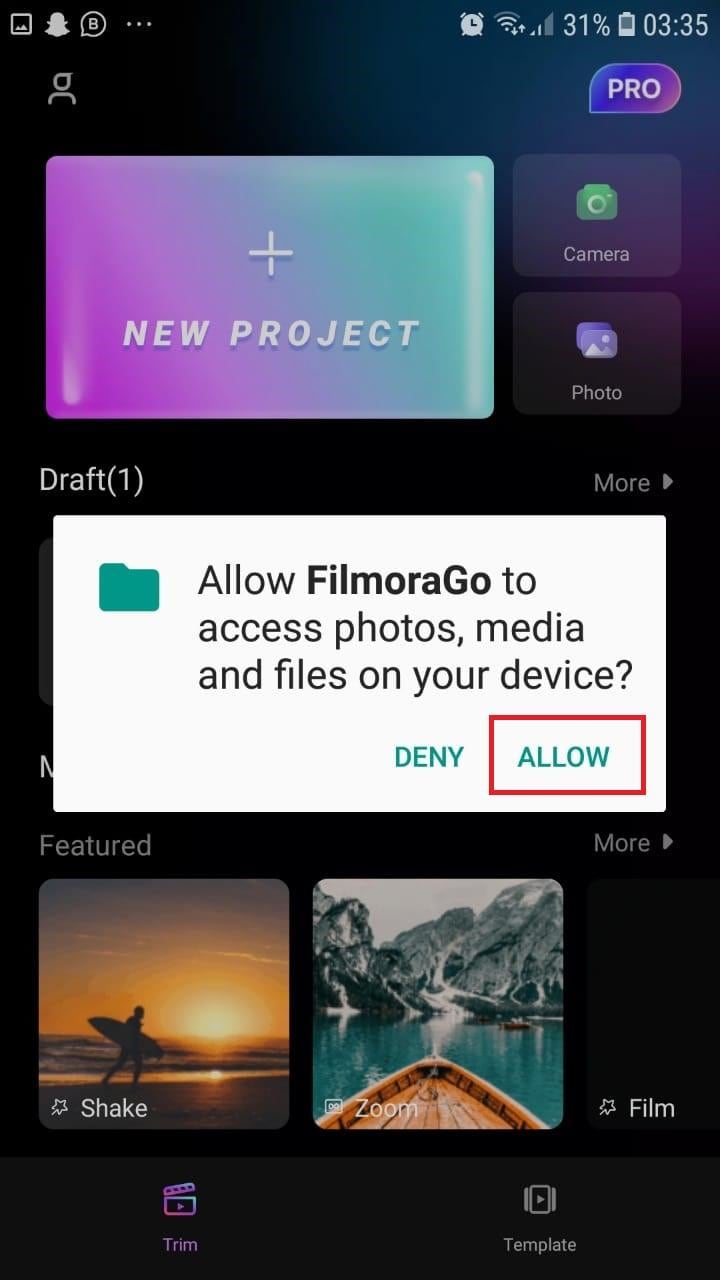
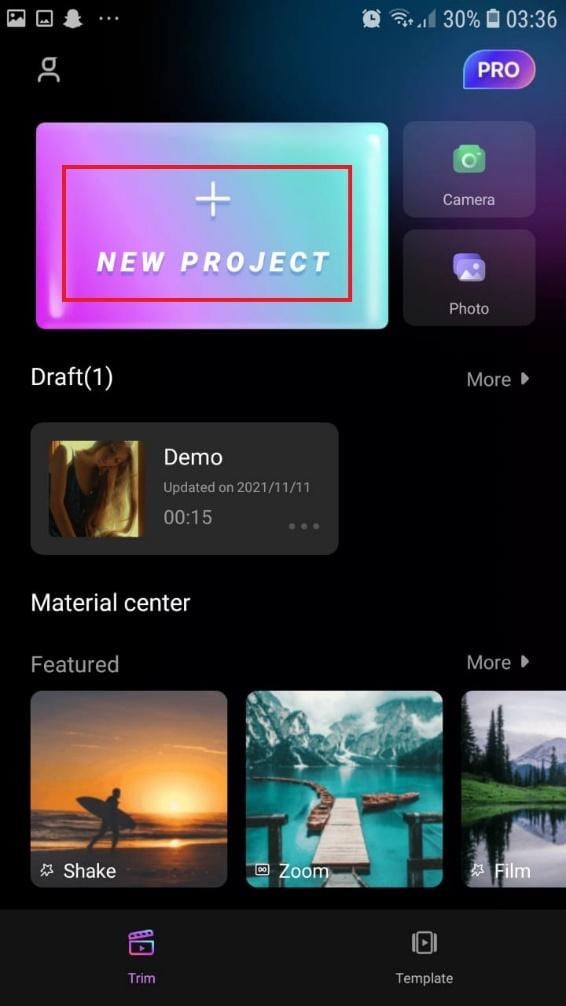
- Then go ahead and grant CapCut permission to view your camera roll. Incorporating video clips into your project has never been easier. Go to the app’s main screen and select “New Project“ from the drop-down menu.
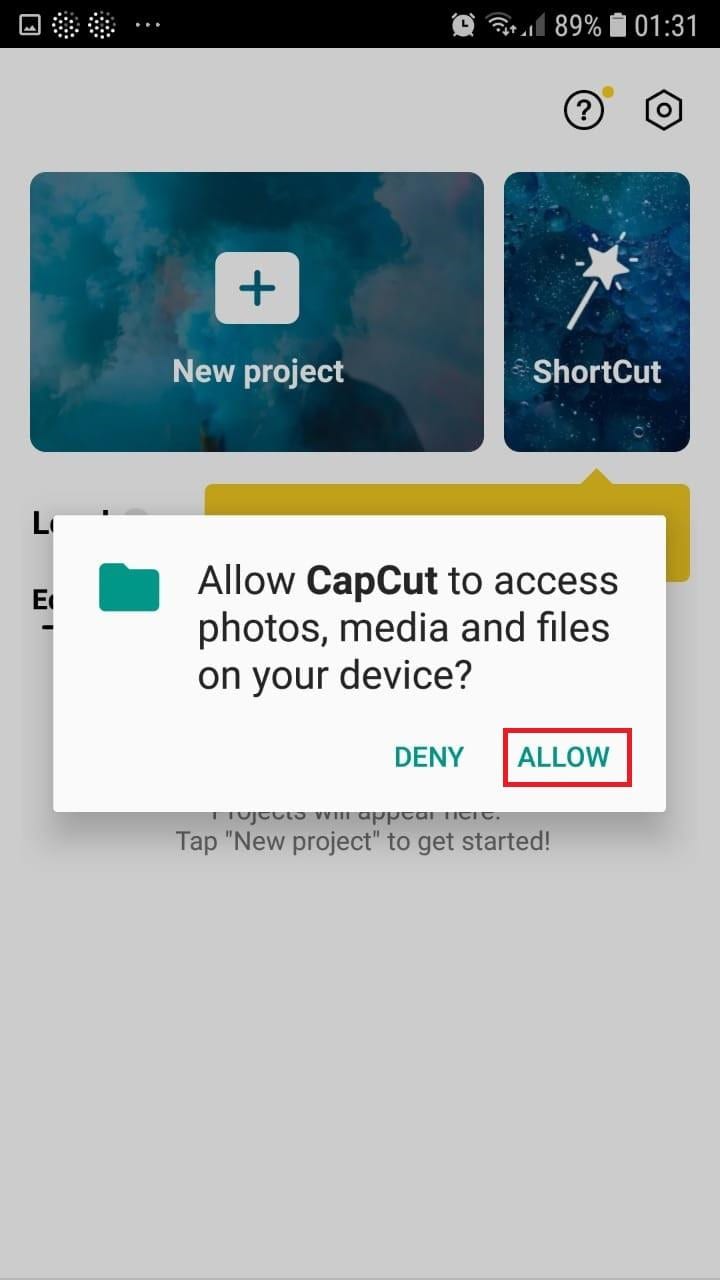
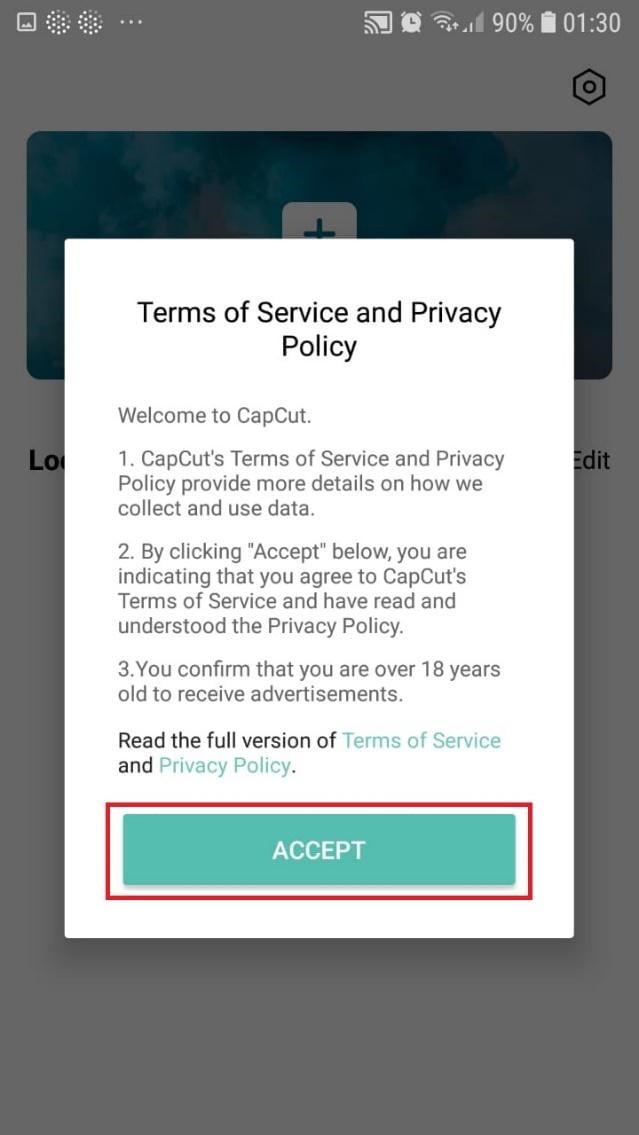
- To confirm your selection, click the green Accept This confirms that CapCut requires access to your photographs to function correctly. Tap on the button on the following pop-up window to gain access to all the photos. This is a one-time process that must be carried out the first time you launch the application.
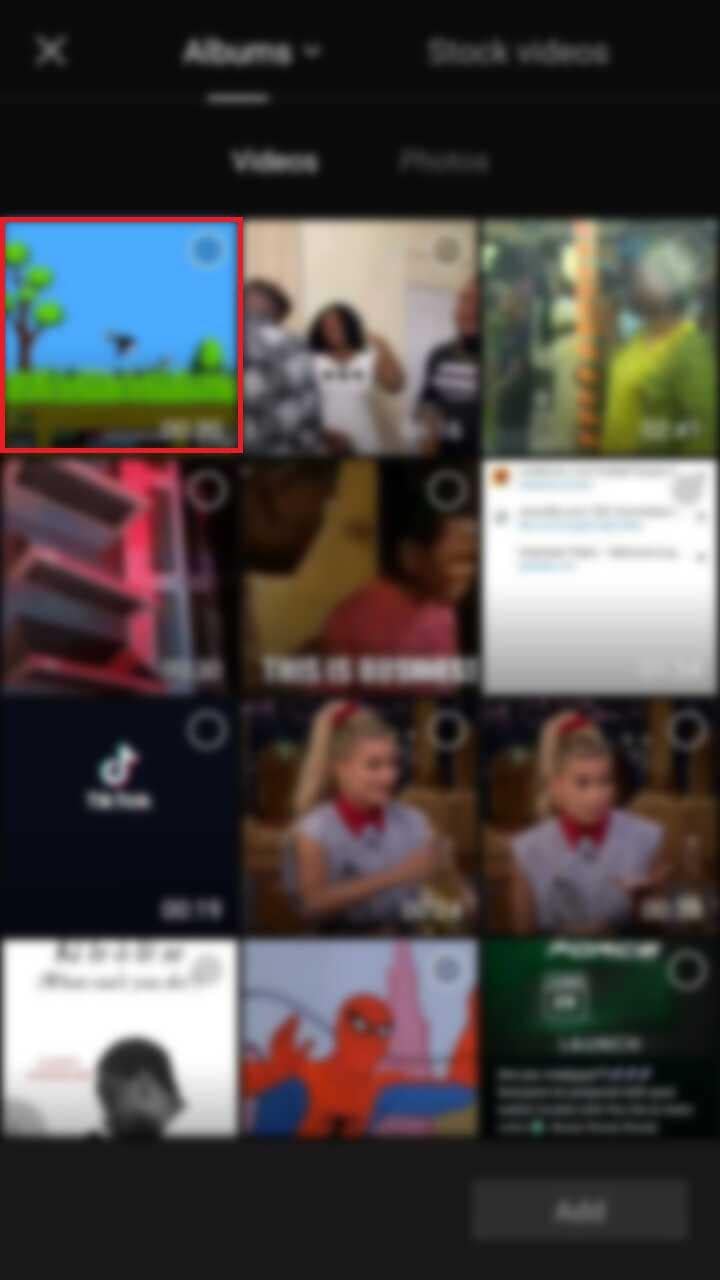
- Begin a New Project. After opening the app, press the “New Project“ icon to bring up a new screen showing your device’s videos.

- Choose a video clip. Locate the desired video clip for your project by scrolling through the pages displaying your camera roll. Tap the video’s thumbnail and then tap the “Add“ icon in the screen’s lower part.
- Get familiar with your workspace. Upon uploading your first clip, CapCut leads you to the primary workspace. This is where you will spend most of your time within the app. The preview panel, the timeline, and the toolbar are in order from top to bottom.
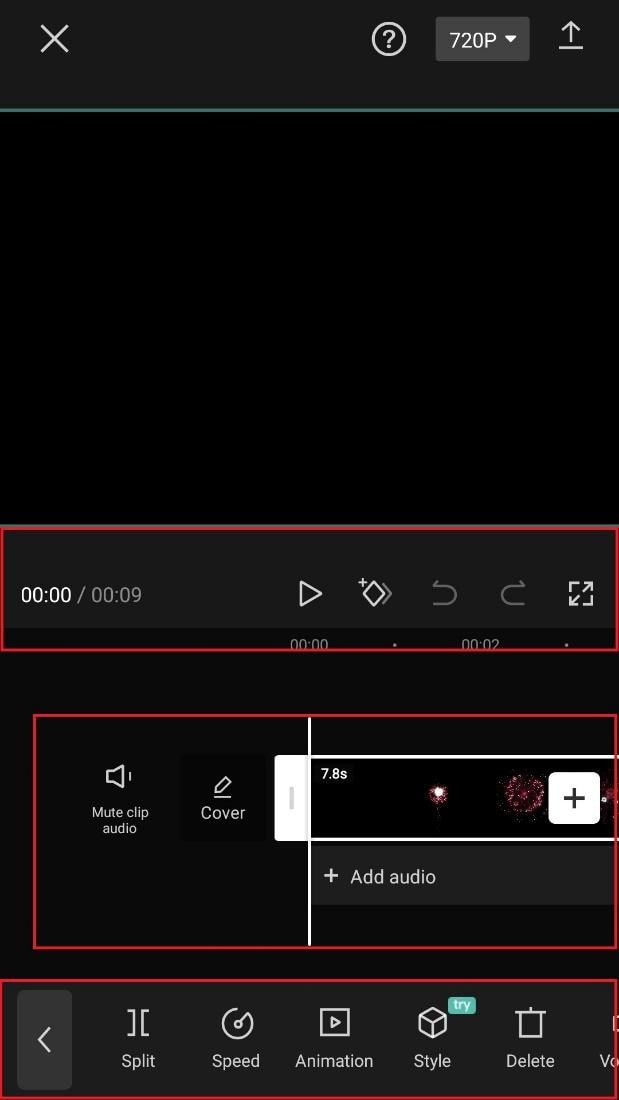
- View the toolbar and timeline. They represent your screen’s bottom half. The timeline, located below the preview panel, is where you’ll make all your adjustments. You can access all your video editing tools, including split, text, audio, effects, stickers, and more, on the toolbar at the bottom of your screen.
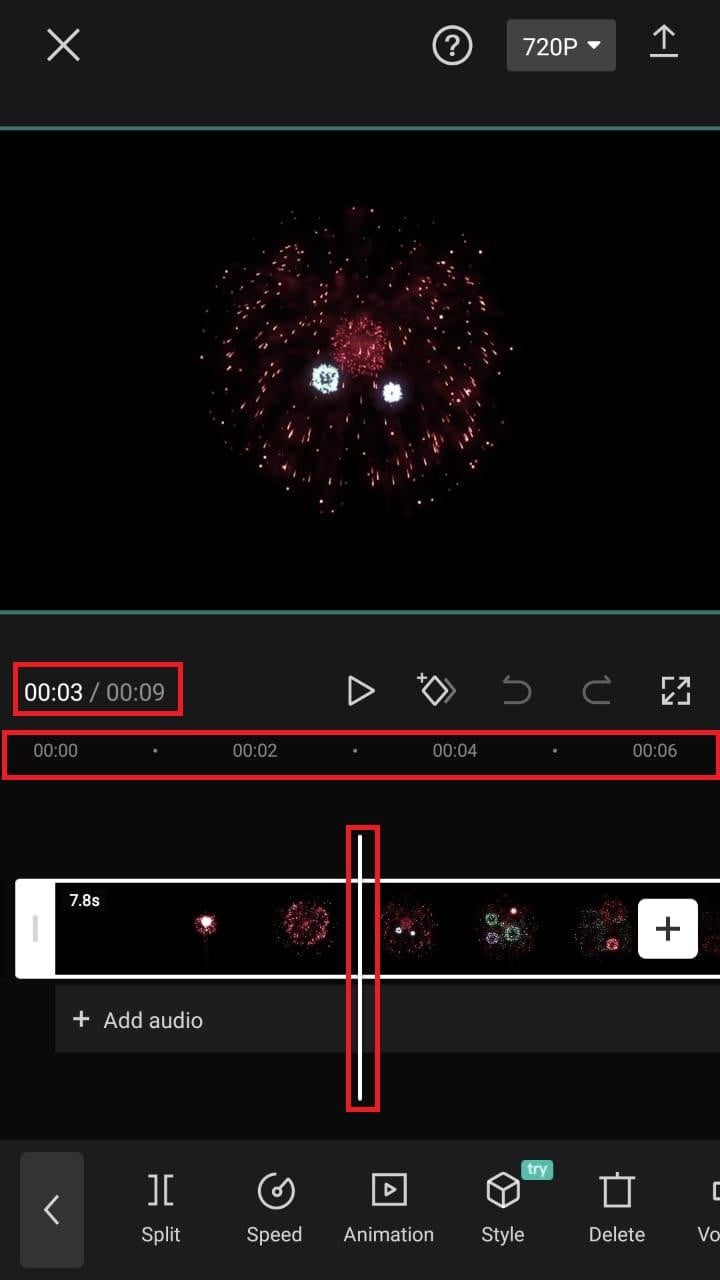
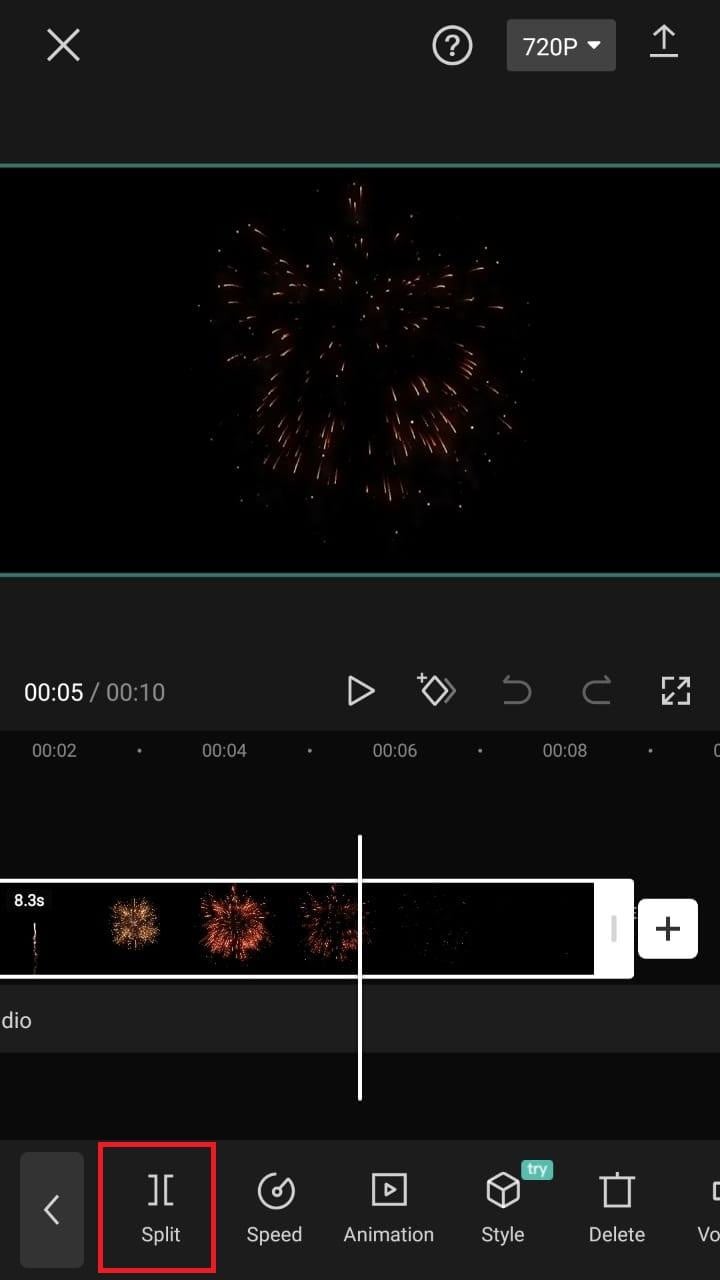
- Split video clips. To split a video clip in half, move the play head to the desired location on the timeline. Tap on your clip, then press the “Split“ toolbar icon. Your result now shows two different clips, not just one.
A Better Split-Screen Effect Video Editor
Filmora is one of the best free HD video makers and video editors with several functionalities, including text, backgrounds, filters, special effects, emoji, audio, and special effects.
Filmora is a feature-packed video editor which has a variety of tools to work with. With this video editor, producing memes, videos with images, pictures, music, stickers, and sound effects and editing videos for YouTube, Twitter, WhatsApp, Facebook, TikTok, and Instagram is simple and entertaining.
Free Download For Win 7 or later(64-bit)
Free Download For macOS 10.14 or later
Steps to Split Screen Video with Filmora
- Download Filmora from the App store
- After installation, launch it.
- Click on “Continue” to continue to use the app.

- Click on Allow to grant Filmora access to your photos and videos.
- You can now tap on “New Project” with the + Symbol.
- Select your desired video and tap on “Next” at the bottom right of your screen
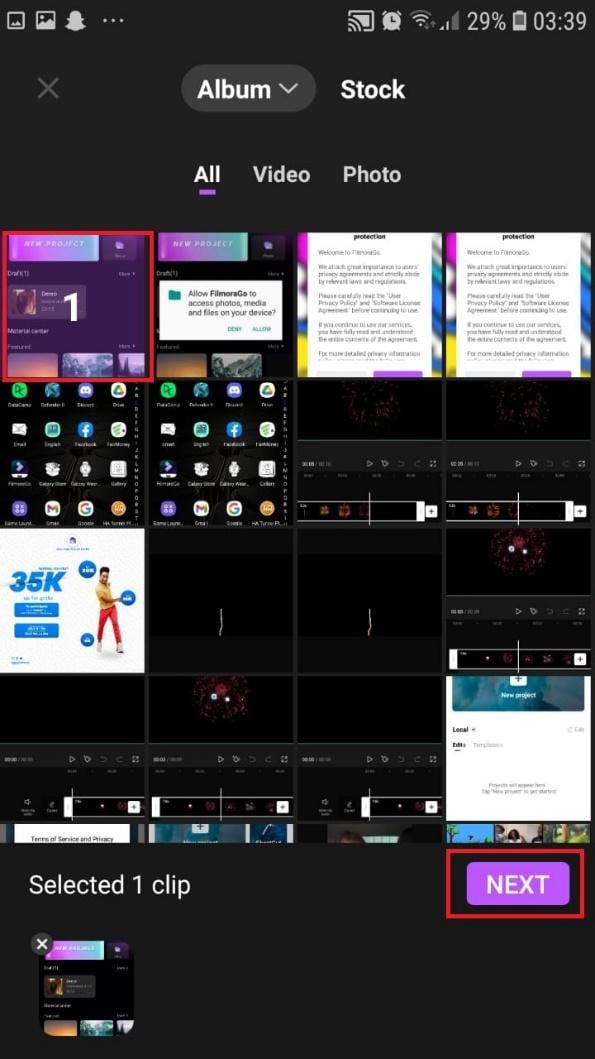
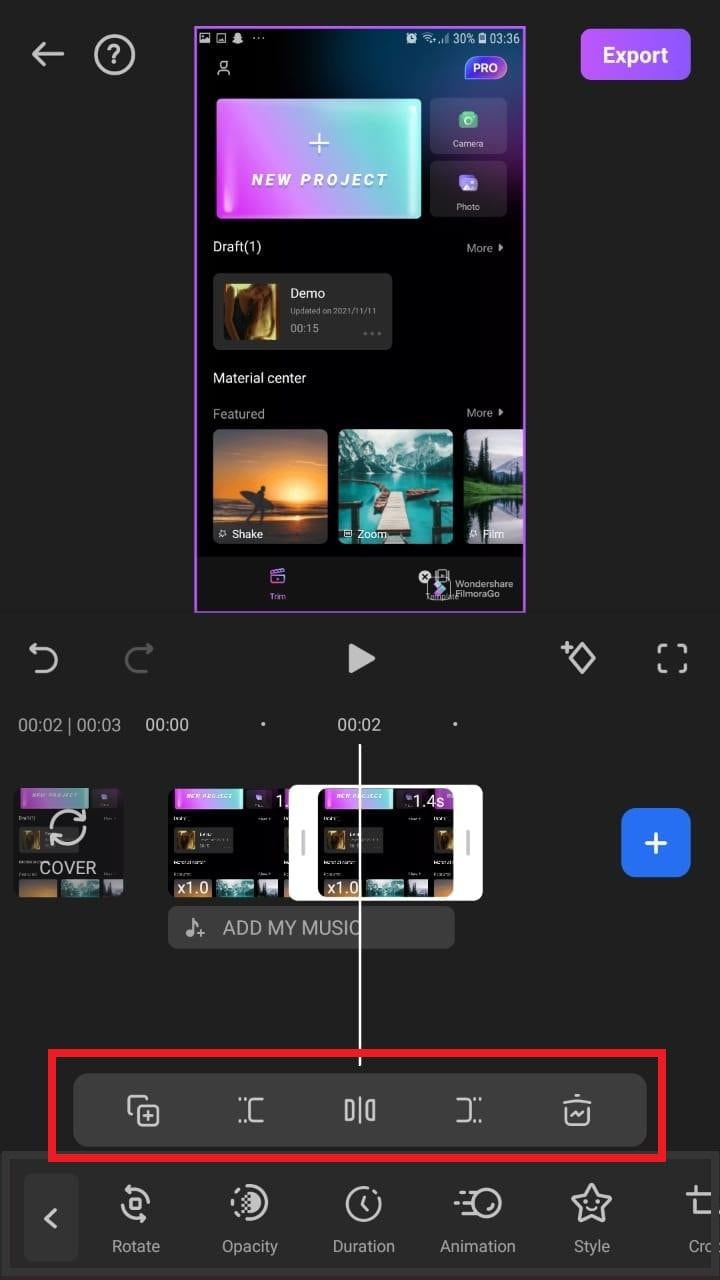
- You can select various options from the bottom of your screen to edit the selected video the way you like.

- Click on trim, and then you will see the different split-screen and collage feature options. Pick any that appeals to you.
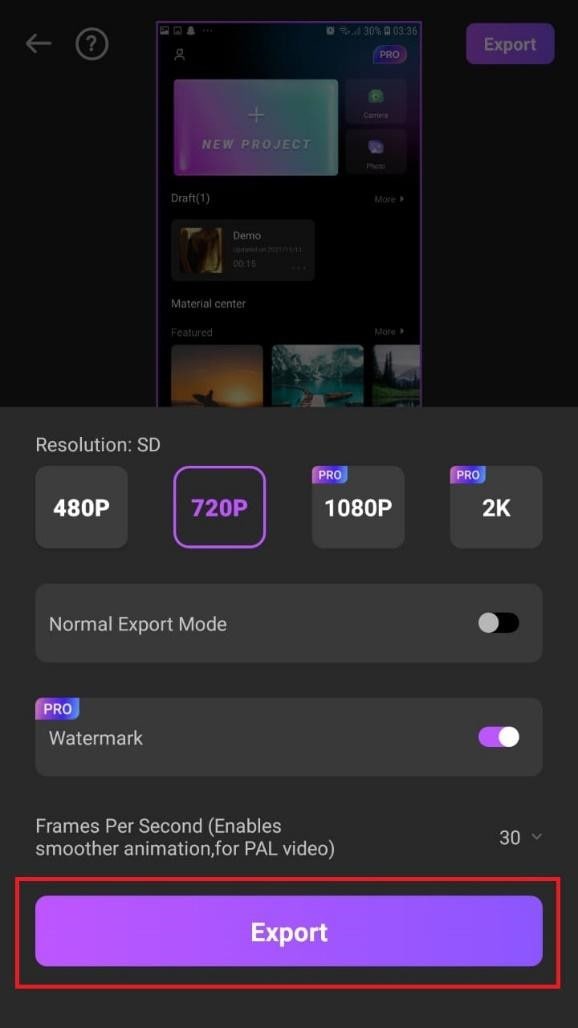
- When you are done with the editing, tap on “Export” at the top right of your screen.

- Go ahead and tap on “Export” on the next screen. Your video will be successfully exported and saved to your camera roll.
Using Filmora is very efficient in splitting your videos and making collage features for TikTok. It is a very simplified app available on both the Google Play Store and Apple Appstore.
Conclusion
TikTok is a platform that users use worldwide to create and share content. It could be pictures, videos, reels, or any other media type. Some people create videos for their audience on TikTok to educate them, while others do it to entertain them.
In any case, the goal is to build a more significant following on TikTok and garner greater attention from its users. You could even make money off the app.
One of the methods to impress your fans and explore multiple possibilities to build unique reels is to use the TikTok split-screen and collage feature effect available on TikTok. Although there are a few different ways to create a Split Screen on TikTok, the steps highlighted in this article are the most straightforward.
Free Download For macOS 10.14 or later
Steps to Split Screen Video with Filmora
- Download Filmora from the App store
- After installation, launch it.
- Click on “Continue” to continue to use the app.
- Click on Allow to grant Filmora access to your photos and videos.
- You can now tap on “New Project” with the + Symbol.
- Select your desired video and tap on “Next” at the bottom right of your screen
- You can select various options from the bottom of your screen to edit the selected video the way you like.
- Click on trim, and then you will see the different split-screen and collage feature options. Pick any that appeals to you.
- When you are done with the editing, tap on “Export” at the top right of your screen.
- Go ahead and tap on “Export” on the next screen. Your video will be successfully exported and saved to your camera roll.
Using Filmora is very efficient in splitting your videos and making collage features for TikTok. It is a very simplified app available on both the Google Play Store and Apple Appstore.
Conclusion
TikTok is a platform that users use worldwide to create and share content. It could be pictures, videos, reels, or any other media type. Some people create videos for their audience on TikTok to educate them, while others do it to entertain them.
In any case, the goal is to build a more significant following on TikTok and garner greater attention from its users. You could even make money off the app.
One of the methods to impress your fans and explore multiple possibilities to build unique reels is to use the TikTok split-screen and collage feature effect available on TikTok. Although there are a few different ways to create a Split Screen on TikTok, the steps highlighted in this article are the most straightforward.
How to Add Subtitles in Canva?
Have you ever used Canva before? It is a famous online tool that is also available on Windows, Mac, Android, and iOS platforms. It contains various basic editing features that you can use to crop, trim, resize, and rotate your video clips and images. Apart from these basic tools, you can also navigate to the built-in library of Canva to explore its vibrant templates.
As more than 100 million individuals use Canva every month, it’s a well-trusted tool. If you are a frequent user of Canva, this article can help you how to add subtitles in Canva. Keep reading this article to find out the quickest way to add subtitles to videos using Canva.

Part 1: What is Canva?
To create and edit videos flawlessly, Canva offers great options. It contains pre-sized video formats for YouTube, Facebook, and other social media platforms. If you are a beginner and struggling with ideas, Canva offers various templates of different categories, such as fitness, education, fashion, and real estate. Apart from using the built-in media library, you have complete freedom to upload your media files to add further modifications.

Furthermore, using Canva, you can also add exciting animations and transitions to your videos to generate a smooth look. You can also add multiple overlays to add more dimensions to your video clips. Also, you can use the Canvas captions feature to generate customized subtitles for your video files. To learn more about Canva, let’s shed light on its key features, advantages, and pricing plans:
Key Features of Canva
- Multiple Export Options: Canva offers various export formats such as MP3, PNG, GIF, MP4, PPTX, etc. You can also check the video quality before exporting it to your device.
- Add Audio Tracks: To make your videos more engaging, you can add audio tracks and sound effects using this professional tool.
- Background Remover: To remove a dull background from your video without a green screen or professional software, you can use the background remover of Canva. Through this advanced feature, you can remove the background from your videos with a single click.
- Magic Resize: It offers a Magic Resize option that enables you to resize videos in different formats for multiple platforms.
- Brand Tools: Canva’s branding tools allow users to create and save branded templates, colors, and fonts. This makes it easy to maintain consistency across all design materials and ensures that all designs align with the brand’s visual identity.
- Collaboration Features: Canva’s collaboration features make it easy for teams to work together on a design project. Users can share designs with team members and assign roles and permissions, allowing for seamless collaboration and feedback.
Advantages of Using Canva
- If you want to share your videos on social media platforms instantly, Canva is the best option. Using this software, you can share your videos on Instagram or other social media platforms with a single tap.
- Canva can also add voice-overs and narrations to your videos in high audio quality.
- This tool provides various elements such as lines, shapes, stickers, and frames that you can add to your videos.
Pricing Plans
If you want to learn more about Canva’s detailed plan, you can visit its official website .
| Plan Name | Price |
|---|---|
| Canva Pro | $54.99/Year for 1 Person |
| Canva for Teams | $84.90/Year for 5 Person |
Part 2: How to Add Captions to Videos in Canva?
Do you want to know how to add subtitles in Canva? Adding subtitles in Canva is extremely simple and quick. In this section, we have jotted down accurate and simple instructions to add subtitles using the Canva tool:
Step1 Begin by visiting the video editor tool page of Canva through any web browser. After accessing the tool page, click on “Edit a Video.” This will open a new window on your screen.

Step2 Now, hit the “Upload Files” button from the left panel and import the video file on this tool. Once done, navigate to the “Text” tab and tap “Add a little bit of body text.” Now adjust the position of the text box according to your desire. You can write your Canva captions by choosing your preferred font, color, size, and style.

Step3 You can also add effects and animation to your added subtitles for more enhancements. Once done with customizations, click on the “Share” button. Here select MP4 as the video file format and save the video on your system.

Part 3: Is There a Good Alternative to Add Subtitles to Videos?
Canva provides a very basic user interface to create subtitles. If you want to enhance your added subtitles with more possibilities, Wondershare Filmora is the best alternative. You can add subtitles through this tool in multiple ways. You can either add subtitles manually or use its “Speech-to-Text” feature. Through this feature, you can transcribe your voice to generate subtitles automatically.
Free Download For Win 7 or later(64-bit)
Free Download For macOS 10.14 or later
Filmora also offers great styles and font options to customize the subtitles. You can easily check the results from the preview window of this efficient video editor. Hence, Filmora acts as a complete and well-trusted platform to generate subtitles in different ways.
Instructions to Create Subtitles Using Filmora
Are you tired of writing subtitles manually in Canva? Read the precise instructions guided below to create the subtitles automatically in more than 16 languages:
Step1 Upload the Video File
Download and launch Filmora on your desktop to initiate the process. On its main interface, tap “Create New Project,” which will open a new window. Afterward, upload your desired video on the Project Media to proceed.

Step2 Select Speech-to-Text Feature
Once done with uploading the file, drag the video file to the timeline. Click on the “Speech-to-Text” icon displayed on the timeline and hit the “OK” button after selecting the required language and file. After some seconds, subtitles would be automatically added to the timeline.

Step3 Add Modifications to Subtitles
On your timeline, double-click on the auto-generated subtitles to open the edit settings. By going to the Presets section, you can select the subtitle styles. To add more modifications, you can head to the Custom tab as displayed on your screen. From here, you can change the font, style, color, and size of the subtitles. To confirm the subtitles edits, press the “OK” button.

Step4 Export the Video File
Once you are done with all the subtitle edits, click on the “Export” button. Filmora provides you with various export resolution options and file formats that you can choose. Moreover, you can also share the video file to your desired social media platform, such as YouTube, Vimeo, or TikTok.

Conclusion
Being a non-technical individual, adding subtitles may sound tricky. To provide you with complete assistance, this article has shed light on how to add subtitles in Canva. But, Canva has some limitations in generating subtitles. Hence, we recommend you try and explore Wondershare Filmora to craft subtitles. This tool comprises a Speech-to-Text feature through which you can produce subtitles automatically without hassle.
Part 2: How to Add Captions to Videos in Canva?
Do you want to know how to add subtitles in Canva? Adding subtitles in Canva is extremely simple and quick. In this section, we have jotted down accurate and simple instructions to add subtitles using the Canva tool:
Step1 Begin by visiting the video editor tool page of Canva through any web browser. After accessing the tool page, click on “Edit a Video.” This will open a new window on your screen.
Step2 Now, hit the “Upload Files” button from the left panel and import the video file on this tool. Once done, navigate to the “Text” tab and tap “Add a little bit of body text.” Now adjust the position of the text box according to your desire. You can write your Canva captions by choosing your preferred font, color, size, and style.
Step3 You can also add effects and animation to your added subtitles for more enhancements. Once done with customizations, click on the “Share” button. Here select MP4 as the video file format and save the video on your system.
Part 3: Is There a Good Alternative to Add Subtitles to Videos?
Canva provides a very basic user interface to create subtitles. If you want to enhance your added subtitles with more possibilities, Wondershare Filmora is the best alternative. You can add subtitles through this tool in multiple ways. You can either add subtitles manually or use its “Speech-to-Text” feature. Through this feature, you can transcribe your voice to generate subtitles automatically.
Free Download For Win 7 or later(64-bit)
Free Download For macOS 10.14 or later
Filmora also offers great styles and font options to customize the subtitles. You can easily check the results from the preview window of this efficient video editor. Hence, Filmora acts as a complete and well-trusted platform to generate subtitles in different ways.
Instructions to Create Subtitles Using Filmora
Are you tired of writing subtitles manually in Canva? Read the precise instructions guided below to create the subtitles automatically in more than 16 languages:
Step1 Upload the Video File
Download and launch Filmora on your desktop to initiate the process. On its main interface, tap “Create New Project,” which will open a new window. Afterward, upload your desired video on the Project Media to proceed.
Step2 Select Speech-to-Text Feature
Once done with uploading the file, drag the video file to the timeline. Click on the “Speech-to-Text” icon displayed on the timeline and hit the “OK” button after selecting the required language and file. After some seconds, subtitles would be automatically added to the timeline.
Step3 Add Modifications to Subtitles
On your timeline, double-click on the auto-generated subtitles to open the edit settings. By going to the Presets section, you can select the subtitle styles. To add more modifications, you can head to the Custom tab as displayed on your screen. From here, you can change the font, style, color, and size of the subtitles. To confirm the subtitles edits, press the “OK” button.
Step4 Export the Video File
Once you are done with all the subtitle edits, click on the “Export” button. Filmora provides you with various export resolution options and file formats that you can choose. Moreover, you can also share the video file to your desired social media platform, such as YouTube, Vimeo, or TikTok.
Conclusion
Being a non-technical individual, adding subtitles may sound tricky. To provide you with complete assistance, this article has shed light on how to add subtitles in Canva. But, Canva has some limitations in generating subtitles. Hence, we recommend you try and explore Wondershare Filmora to craft subtitles. This tool comprises a Speech-to-Text feature through which you can produce subtitles automatically without hassle.
Also read:
- [New] Record Desktop on Windows 3 Simple, Cost-Free Methods
- 2024 Approved Restoring Windows Photo Viewer in Windows 10 Step-by-Step Guide
- Adblocker Adoption Continues to Challenge YouTube's Revenue Stream
- Family Fun with the Holy Stone Remote Control Race Car Series - A Comprehensive Review
- In 2024, Revolutionary 6 Sustainable Minecraft Homes
- New In 2024, Are You Searching for the Best Canon LUT Download? This Article Provides the Best Recommendations for Creating the Best Professional Videos
- New Premiere Pro Best Slow Motion Effects To Use for 2024
- Updated In 2024, Having GoPro Accessories Is Easy, but Editing on GoPro Quik Is Challenging. Read This Guide and, Stepwise, Learn to Use GoPro Slow-Motion for Perfect Shots
- Updated Making Slow Motion Videos in Premiere Pro A Review on The Best Method for 2024
- Title: New 2024 Approved Whatre the Best Alternatives to Pexels?
- Author: Morgan
- Created at : 2024-09-25 21:13:10
- Updated at : 2024-09-30 17:11:14
- Link: https://ai-video-editing.techidaily.com/1713954227686-new-2024-approved-whatre-the-best-alternatives-to-pexels/
- License: This work is licensed under CC BY-NC-SA 4.0.