
:max_bytes(150000):strip_icc():format(webp)/GettyImages-944229088-5bd1f61e46e0fb0026fdf2f0.jpg)
New In 2024, Tips for Choosing Location & Scheduling Music Video
Tips for Choosing Location & Scheduling Music Video
Making viral music videos is everyone’s dream; what if you get exact tips to follow before shooting your music video to make it high-ranked? Obviously, it’ll be a treat for you!
Planning and preparing before the shoot is the key to making a music video successful. You can only achieve this after location scouting and emerging with the best one. And scheduling for big projects before the day is more important. Let’s directly move towards the things to consider before shooting!
Location scouting
The pleasant and eye-catchy location always makes your music video trending or flopping. You should first go with your budget and then come up with location ideas. In the upcoming tip, we will use 3lau’s song “Tokyo” as an example.

If you are going with large projects, you need to consider the following requirements!
1. Availability of electricity
You need rig lights and a large lighting setup to make your video more glow and give them aesthetic vibes. For this, make sure you choose a location where light is readily available.
2. Separate room
During shooting for big projects, you need room to store all gear and sensitive equipment in one place for many days.

3. Check the size
The foremost thing in choosing the location is to check the Height and Width of the studio. They should be enough to rig the lights in the studio easily and place every required thing in a decided space.
For Example, while shooting a 3lau song, there is a need for a bus to come into the studio easily, but there is an issue in entering the bus due to height issues of the door. Due to this, the director changed the location at the spot to sort out this issue.

![]()
A cross-platform for making videos anywhere for all creators

Why your video editing isn’t good enough? How about some creative inspo?
- 100 Million+ Users
- 150+ Countries and Regions
- 4 Million+ Social Media Followers
- 5 Million+ Stock Media for Use
* Secure Download

Alternate Ways of Location Scouting
If you don’t have enough budget to get a studio space, then you can easily shoot by selecting spaces that are in your use or available. These are the following locations you should regard!
Location 1. Your Home
You should go with the space available at your home to shoot, such as: on couches or in the bedroom, to give a good impression to your music video.
Location 2. Office Space
You can also make scenes of your music video in office space to better describe the work in the video.

Location 3. Outdoor Locations
For better daylight and illustrations in the music video, you can go with the outdoor location, which is free of cost.

Location 4. Public Places
Public places are easily available and have many options, such as public parks, playgrounds, bridges, and public parking.

![]()
Note: During public shooting, ensure that the space is empty, and there should be no interruption of the public in filming the shots.

The weather is also a major factor when shooting a video, which you must check before the shoot days. After selecting and scouting the location, now it’s time to make a schedule which you’ll get in hand in the below lines!
Scheduling for the Music Video
If you have a big project and more scenes to shoot, it’s better to make a whole plan about each and everything. You have to make a schedule of using even a single light at a specific time and space. The following are the main considerations you should take care of!
1. Pre-Rig Day
You need to come to the setup before the filming day to check the main things like electricity, measure exact spaces, check the lightning setup, loaded everything such as the bus, crew, and gears.

2. A Call Sheet
A call sheet is a daily shot list given to the cast and crew to follow the timelines, and it contains the phone number of everyone, their location, and the time to arrive on set. It also includes the nearest hospital, sunset, and sun-rising timing.

It consists of one to two pages according to shoot days and has a plan of everything that happens after the Pre-Rig day.
![]()
Note: When you wrap up for day 1, you have another call sheet for day 2, day 3, and so on!
3. Do Planning
You need to work efficiently and smartly to maintain everything according to the plan. You can cut the filming into halves to have a better lighting setup and character availability. On the shot day, you must change the lighting and rigging setup as little as possible.
Examples
On day 1 of the Tokyo song, the filming is done in two halves; the first half day goes towards filming everything in the bus, and the other half day, there is a shoot of everything outside the bus.
While in day 2, there is a filming of every memory. For this, there are setups of rooms and homes for making perfect shots according to the requirements of a music video.

4. Take No Stress
You should not blow up and take stress during shoot day because it’ll obviously cause chaos in every little scene and give a bad impression to the music video. You just should work hard and get all done.
Conclusion
After checking and following the above tips for location scouting and scheduling, you’ll obviously come up with an amazing filming setup and music video. There is no need to worry, just get the whole planning and then do all scenes one after the other patiently.
Filming with people is not always bulky and flopping, but if you have a cooperative team and follow all the timelines of shooting. Then you’ll rock the music video!
A cross-platform for making videos anywhere for all creators!
Why your video editing isn’t good enough? How about some creative inspo?
- 100 Million+ Users
- 150+ Countries and Regions
- 4 Million+ Social Media Followers
- 5 Million+ Stock Media for Use
* Secure Download
Alternate Ways of Location Scouting
If you don’t have enough budget to get a studio space, then you can easily shoot by selecting spaces that are in your use or available. These are the following locations you should regard!
Location 1. Your Home
You should go with the space available at your home to shoot, such as: on couches or in the bedroom, to give a good impression to your music video.
Location 2. Office Space
You can also make scenes of your music video in office space to better describe the work in the video.
Location 3. Outdoor Locations
For better daylight and illustrations in the music video, you can go with the outdoor location, which is free of cost.
Location 4. Public Places
Public places are easily available and have many options, such as public parks, playgrounds, bridges, and public parking.
![]()
Note: During public shooting, ensure that the space is empty, and there should be no interruption of the public in filming the shots.
The weather is also a major factor when shooting a video, which you must check before the shoot days. After selecting and scouting the location, now it’s time to make a schedule which you’ll get in hand in the below lines!
Scheduling for the Music Video
If you have a big project and more scenes to shoot, it’s better to make a whole plan about each and everything. You have to make a schedule of using even a single light at a specific time and space. The following are the main considerations you should take care of!
1. Pre-Rig Day
You need to come to the setup before the filming day to check the main things like electricity, measure exact spaces, check the lightning setup, loaded everything such as the bus, crew, and gears.
2. A Call Sheet
A call sheet is a daily shot list given to the cast and crew to follow the timelines, and it contains the phone number of everyone, their location, and the time to arrive on set. It also includes the nearest hospital, sunset, and sun-rising timing.
It consists of one to two pages according to shoot days and has a plan of everything that happens after the Pre-Rig day.
![]()
Note: When you wrap up for day 1, you have another call sheet for day 2, day 3, and so on!
3. Do Planning
You need to work efficiently and smartly to maintain everything according to the plan. You can cut the filming into halves to have a better lighting setup and character availability. On the shot day, you must change the lighting and rigging setup as little as possible.
Examples
On day 1 of the Tokyo song, the filming is done in two halves; the first half day goes towards filming everything in the bus, and the other half day, there is a shoot of everything outside the bus.
While in day 2, there is a filming of every memory. For this, there are setups of rooms and homes for making perfect shots according to the requirements of a music video.
4. Take No Stress
You should not blow up and take stress during shoot day because it’ll obviously cause chaos in every little scene and give a bad impression to the music video. You just should work hard and get all done.
Conclusion
After checking and following the above tips for location scouting and scheduling, you’ll obviously come up with an amazing filming setup and music video. There is no need to worry, just get the whole planning and then do all scenes one after the other patiently.
Filming with people is not always bulky and flopping, but if you have a cooperative team and follow all the timelines of shooting. Then you’ll rock the music video!
How to Make Video Slow Motion? [Complete Guide]
Slow-motion videos are in trend now, especially when shooting for Instagram Reels , TikTok videos, or YouTube Shorts . While many users record the entire video in slow motion, there are others who need only a particular section of a clip to play at a reduced speed. Nevertheless, slowing down footage is no longer rocket science, thanks to the advancements in technology, and the availability and ease of access to relevant apps.
That said, here you will learn what is needed to record a video in slow motion, and how to get the job done in a simple way. In addition, you will also learn how to reduce the playback speed of an already existing video if it was recorded at a normal pace.
In this article
01 How to Make Slow Motion Videos via Recording?
02 How to Apply the Smooth Slow-Motion Effect in Post-Production?
Part 1: How to Make Slow Motion Videos via Recording?
The fact is, the playback speed of a video is inversely proportional to the frames per second (FPS) it has been recorded in. Usually, to have a video play at normal speed, it is recorded at 24 FPS or 30 FPS. On the other hand, if you increase the frame rate (FPS) to 120 or 240, the playback speed slows down. You can easily check this if you have access to a DSLR camera or an iPhone. These devices allow you to adjust the FPS so the videos can be recorded in slow motion.
For your convenience and learning, the step-by-step procedure on how to record a video in slow motion using an iPhone is explained below:
Step 1: Get to the SLO-MO Mode
Launch the Camera app on your iPhone (iPhone 13 Pro Max is used here for illustrations), and swipe the screen to the left to get to the SLO-MO mode.

Step 2: Adjust Recording Preferences
Tap the number at the top-right corner to switch between 120 FPS and 240 FPS as needed. Tap 1x from the lower-middle section of the screen, and use the rotator to adjust your preferred zoom level.

Step 3: Start and Stop Recording
Tap the Record button from the bottom-center of the screen to begin recording the video in slow motion. Tap Stop when you are done. You can access the recorded video from the Videos container of the Photos app in your iPhone.
If you are using Android phone, you can check this article to find out more details about How to Record Super Slow Motion Videos on Your Phone.
You may also like: Best Slo-mo Camera Apps for Android And iPhone
Part 2: How to Apply the Smooth Slow-Motion Effect in Post-Production?
If you don’t have access to a camera that can record videos in slow motion, or in case you want to capture the footage at normal playback speed and then slow it down later, you need a dedicated tool to get the job done. Even though several post-production applications are available in the market, the one that is most versatile, has an intuitive interface, and is quite easy to use is Filmora video editor from Wondershare .
The latest version of the app, i.e., Wondershare Filmora 11 has a new feature called Speed Ramping that enables you to graphically manage the speed of the clips. While using the feature, you can either slow down the entire video or certain parts of it according to your requirements. For your learning, both the methods are explained below:
Method 1: Add Slow Motion Effect to the Whole Clip
For Win 7 or later (64-bit)
For macOS 10.12 or later
Step 1: Import the Source Video and Add to Timeline
Launch Wondershare Filmora on your Windows or Mac computer (a Windows 11 PC is used here for illustrations), click New Project from the first screen that appears. Make sure that the Media tool is selected from the standard tool bar at the top, click anywhere inside the Media window, and select and import the source clip to the program.

Next, hover the mouse over the thumbnail of the imported video in the Media window, and click the + icon present at its bottom-right corner. When the confirmation box comes up, click the Match to Media or Keep Project Settings button to change the project settings to match the resolution of the video, or change the footage to meet the project settings respectively.

Step 2: Add Slow Motion Effect to the Whole Clip
Once the media is added to the timeline, click on it and then click the Speed icon on the toolbar. Scroll down to the Slow menu and then you will see 0.5x, 0.25x, 0.1x, 0.05x and 0.01x presets. Select one to add slo-mo effects to the whole select clip. and click Speed Ramping from the menu that drops down.

You can also right click the video in the timeline, and hover over to Speed option to select Uniform Speed to adjust the speed of the video to make a slo-mo effect video. Drag the speed slider to the left to slow down the video and you will see how many times it slowed down in the next field.

Method 2: Use Speed Ramping to Add Slow Motion Effect
For Win 7 or later (64-bit)
For macOS 10.12 or later
Speed Ramping enables you to add the slow-motion effect at different parts of a video and even freeze the screen for the duration that you specify. The processes to get these done are given below in detail:
Step 1: Add Source Video to Timeline and Get to the Speed Ramping Window
Use the process given in the previous method to import a source video to Wondershare Filmora 11 and add it to the Timeline. Then use the process given in the second step of the previous method to get to the Speed Ramping window.
Step 2: Add Slow Motion Effect to Different Parts of the Clip
Go to the Speed Ramping tab if it is not already selected, click Custom from the available options, and drag the adjustment points below the center line to reduce the playback speed for that particular section of the clip. Optionally, you can click any of the available presets to automatically add the slow-motion effect to the video.
Note: You can also drag the adjustment points above the line to increase the playback speed.
To add an adjustment point on the frame where it is not already present, place the playhead (skimmer) at the correct position, and click Add Adjust Point from the left of the Speed Ramping window itself. Once added, you can drag it downward to reduce the playback speed of that part of the clip.

Step 3: Freeze the Video
Place the skimmer on the frame where you want to freeze the video for a while, and click Add Freeze Frame from the left of the Speed Ramping window. When the time box appears, in the Freeze Time field, enter the duration in seconds you want to freeze the screen for, and click OK.

After adding a freeze point, optionally, you can drag and reposition it in the Speed Ramping timeline as needed. Finally, click OK from the bottom-right area to save the changes.
Part 3: When to Use Slow Motion?
There could be many instances when you want to add a slow-motion effect to your videos. Some of the most common ones include:
- Add Focus
If there is a particular scene in a clip that you want the audience to focus on, it would be a good idea to add the slow-motion effect right before that action appears on the screen, and bring the speed back to normal when the section is over.
- Skill or Style Demonstration
When a clip is playing at a normal speed, many times, the audience isn’t able to see the skills that you want to display. This is where you may want to add the slow-motion effect so that every detail can be noticed clearly and in detail.
- Replays
Mostly used for tournaments and matches where the actual action is to replayed so the audience, umpires, and other viewers can see the movements in detail before making the right decision.
- Observation
Some natural phenomena such as a deer running in the woods, a balloon full of water bursting, etc. occur quite quickly. If you want to witness such things clearly and in detail, it would be good to record them, and then reduce the playback speed for better viewing.
- Add Suspense
When you add the slow-motion effect to a scene, the impulse of the audience is automatically increased, and they take that particular section more seriously and with a thrill.
Conclusion
The slow-motion effect is inversely proportional to the framerate, i.e., frames per second or FPS. Almost all DSLR cameras that are available nowadays allow you to switch between different FPS values (typically 120 and 240) before recording. Also, if you have access to an iPhone, its Camera app has a built-in SLO-MO mode that can capture the footage in slow motion.
In addition, if you already have a video that has been recorded at a normal speed, you can use an efficient post-production software like Wondershare Filmora 11, and exploit its Speed Ramping feature to add the slow-motion effect at different scenes of a clip.
02 How to Apply the Smooth Slow-Motion Effect in Post-Production?
Part 1: How to Make Slow Motion Videos via Recording?
The fact is, the playback speed of a video is inversely proportional to the frames per second (FPS) it has been recorded in. Usually, to have a video play at normal speed, it is recorded at 24 FPS or 30 FPS. On the other hand, if you increase the frame rate (FPS) to 120 or 240, the playback speed slows down. You can easily check this if you have access to a DSLR camera or an iPhone. These devices allow you to adjust the FPS so the videos can be recorded in slow motion.
For your convenience and learning, the step-by-step procedure on how to record a video in slow motion using an iPhone is explained below:
Step 1: Get to the SLO-MO Mode
Launch the Camera app on your iPhone (iPhone 13 Pro Max is used here for illustrations), and swipe the screen to the left to get to the SLO-MO mode.
Step 2: Adjust Recording Preferences
Tap the number at the top-right corner to switch between 120 FPS and 240 FPS as needed. Tap 1x from the lower-middle section of the screen, and use the rotator to adjust your preferred zoom level.
Step 3: Start and Stop Recording
Tap the Record button from the bottom-center of the screen to begin recording the video in slow motion. Tap Stop when you are done. You can access the recorded video from the Videos container of the Photos app in your iPhone.
If you are using Android phone, you can check this article to find out more details about How to Record Super Slow Motion Videos on Your Phone.
You may also like: Best Slo-mo Camera Apps for Android And iPhone
Part 2: How to Apply the Smooth Slow-Motion Effect in Post-Production?
If you don’t have access to a camera that can record videos in slow motion, or in case you want to capture the footage at normal playback speed and then slow it down later, you need a dedicated tool to get the job done. Even though several post-production applications are available in the market, the one that is most versatile, has an intuitive interface, and is quite easy to use is Filmora video editor from Wondershare .
The latest version of the app, i.e., Wondershare Filmora 11 has a new feature called Speed Ramping that enables you to graphically manage the speed of the clips. While using the feature, you can either slow down the entire video or certain parts of it according to your requirements. For your learning, both the methods are explained below:
Method 1: Add Slow Motion Effect to the Whole Clip
For Win 7 or later (64-bit)
For macOS 10.12 or later
Step 1: Import the Source Video and Add to Timeline
Launch Wondershare Filmora on your Windows or Mac computer (a Windows 11 PC is used here for illustrations), click New Project from the first screen that appears. Make sure that the Media tool is selected from the standard tool bar at the top, click anywhere inside the Media window, and select and import the source clip to the program.
Next, hover the mouse over the thumbnail of the imported video in the Media window, and click the + icon present at its bottom-right corner. When the confirmation box comes up, click the Match to Media or Keep Project Settings button to change the project settings to match the resolution of the video, or change the footage to meet the project settings respectively.
Step 2: Add Slow Motion Effect to the Whole Clip
Once the media is added to the timeline, click on it and then click the Speed icon on the toolbar. Scroll down to the Slow menu and then you will see 0.5x, 0.25x, 0.1x, 0.05x and 0.01x presets. Select one to add slo-mo effects to the whole select clip. and click Speed Ramping from the menu that drops down.
You can also right click the video in the timeline, and hover over to Speed option to select Uniform Speed to adjust the speed of the video to make a slo-mo effect video. Drag the speed slider to the left to slow down the video and you will see how many times it slowed down in the next field.
Method 2: Use Speed Ramping to Add Slow Motion Effect
For Win 7 or later (64-bit)
For macOS 10.12 or later
Speed Ramping enables you to add the slow-motion effect at different parts of a video and even freeze the screen for the duration that you specify. The processes to get these done are given below in detail:
Step 1: Add Source Video to Timeline and Get to the Speed Ramping Window
Use the process given in the previous method to import a source video to Wondershare Filmora 11 and add it to the Timeline. Then use the process given in the second step of the previous method to get to the Speed Ramping window.
Step 2: Add Slow Motion Effect to Different Parts of the Clip
Go to the Speed Ramping tab if it is not already selected, click Custom from the available options, and drag the adjustment points below the center line to reduce the playback speed for that particular section of the clip. Optionally, you can click any of the available presets to automatically add the slow-motion effect to the video.
Note: You can also drag the adjustment points above the line to increase the playback speed.
To add an adjustment point on the frame where it is not already present, place the playhead (skimmer) at the correct position, and click Add Adjust Point from the left of the Speed Ramping window itself. Once added, you can drag it downward to reduce the playback speed of that part of the clip.
Step 3: Freeze the Video
Place the skimmer on the frame where you want to freeze the video for a while, and click Add Freeze Frame from the left of the Speed Ramping window. When the time box appears, in the Freeze Time field, enter the duration in seconds you want to freeze the screen for, and click OK.
After adding a freeze point, optionally, you can drag and reposition it in the Speed Ramping timeline as needed. Finally, click OK from the bottom-right area to save the changes.
Part 3: When to Use Slow Motion?
There could be many instances when you want to add a slow-motion effect to your videos. Some of the most common ones include:
- Add Focus
If there is a particular scene in a clip that you want the audience to focus on, it would be a good idea to add the slow-motion effect right before that action appears on the screen, and bring the speed back to normal when the section is over.
- Skill or Style Demonstration
When a clip is playing at a normal speed, many times, the audience isn’t able to see the skills that you want to display. This is where you may want to add the slow-motion effect so that every detail can be noticed clearly and in detail.
- Replays
Mostly used for tournaments and matches where the actual action is to replayed so the audience, umpires, and other viewers can see the movements in detail before making the right decision.
- Observation
Some natural phenomena such as a deer running in the woods, a balloon full of water bursting, etc. occur quite quickly. If you want to witness such things clearly and in detail, it would be good to record them, and then reduce the playback speed for better viewing.
- Add Suspense
When you add the slow-motion effect to a scene, the impulse of the audience is automatically increased, and they take that particular section more seriously and with a thrill.
Conclusion
The slow-motion effect is inversely proportional to the framerate, i.e., frames per second or FPS. Almost all DSLR cameras that are available nowadays allow you to switch between different FPS values (typically 120 and 240) before recording. Also, if you have access to an iPhone, its Camera app has a built-in SLO-MO mode that can capture the footage in slow motion.
In addition, if you already have a video that has been recorded at a normal speed, you can use an efficient post-production software like Wondershare Filmora 11, and exploit its Speed Ramping feature to add the slow-motion effect at different scenes of a clip.
How To Split Screen On Tiktok
TikTok is probably the most popular video-sharing app in the world right now. Many TikTokers have become famous for making videos that have a significant impact and encourage creativity and new ideas. One of the most popular TikTok trends is the split-screen effect. You’ve probably seen a lot of TikTok split-screen videos with cool effects that made you wonder how the user split their screen. Becoming skilled in using TikTok effects is not as difficult as it might look. It only requires a significant amount of practice. Read on as we show you how to make a TikTok split-screen video.
Using CapCut To Split Screen
CapCut is the official free TikTok Video Maker and Video Editor with Music for TikTok that is multifunctional. Its interface is quite similar and easy to use.
CapCut includes free advanced capabilities such as keyframe animation, stabilization, and Picture-in-Picture (PIP). These are in addition to its fundamental functions, such as video editing, adding stickers, text, and music.
Steps to Split Screen Video with CapCut On Android and IOS Devices
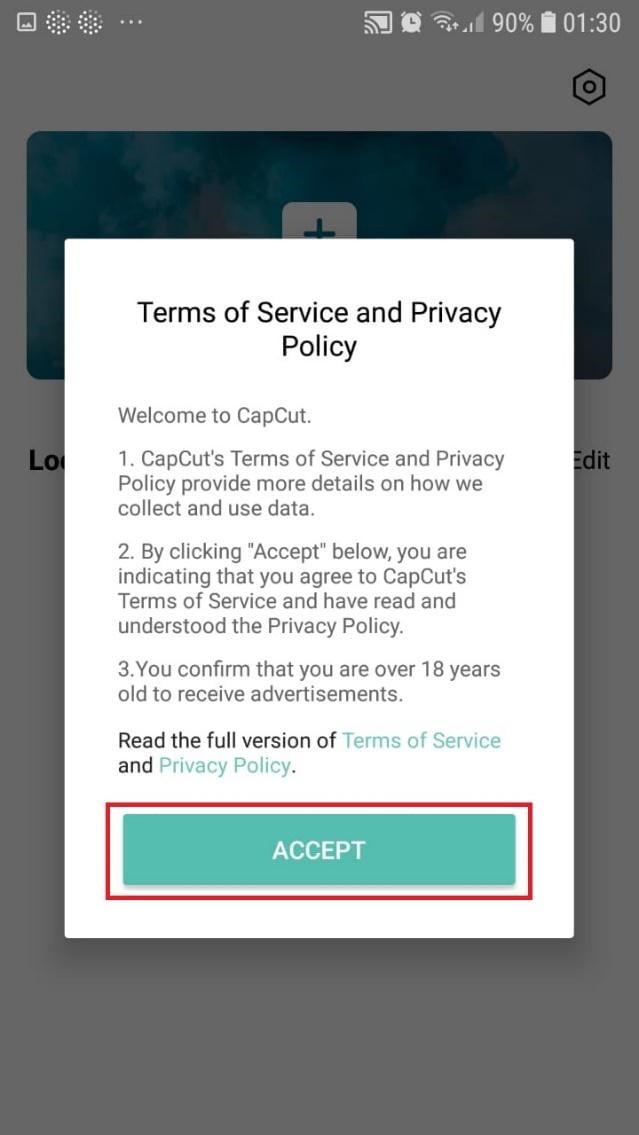
- To use the app, you need to install it first. iPhone and Android users can download CapCut. Navigate to the appropriate app store of your choice and download CapCut.
- After installation, launch the app.
- Then go ahead and grant CapCut permission to view your camera roll. Incorporating video clips into your project has never been easier. Go to the app’s main screen and select “New Project“ from the drop-down menu.
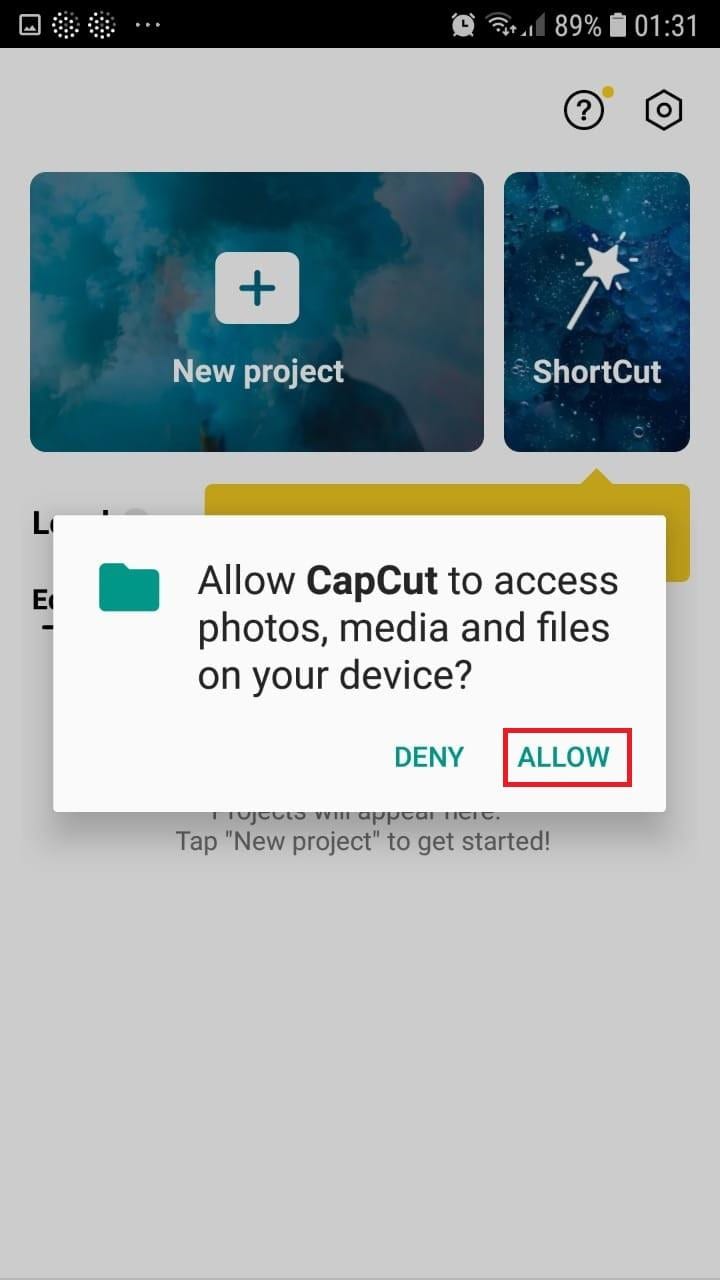
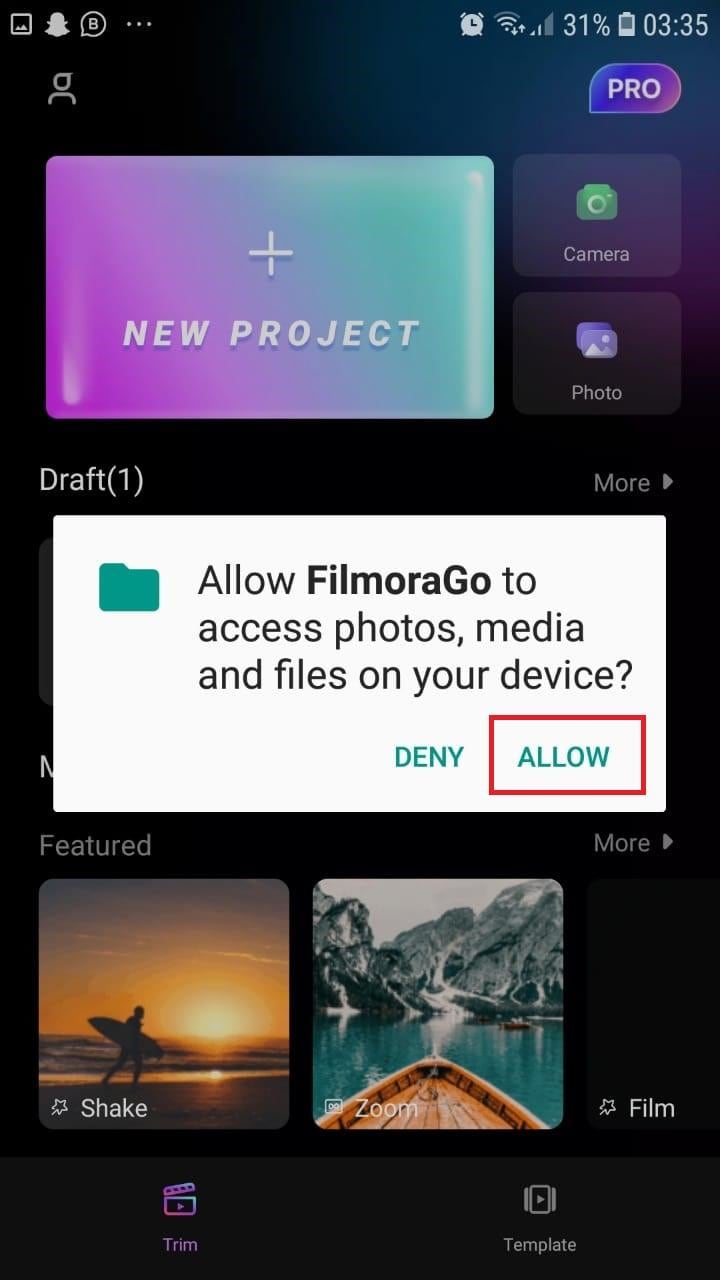
- To confirm your selection, click the green Accept This confirms that CapCut requires access to your photographs to function correctly. Tap on the button on the following pop-up window to gain access to all the photos. This is a one-time process that must be carried out the first time you launch the application.
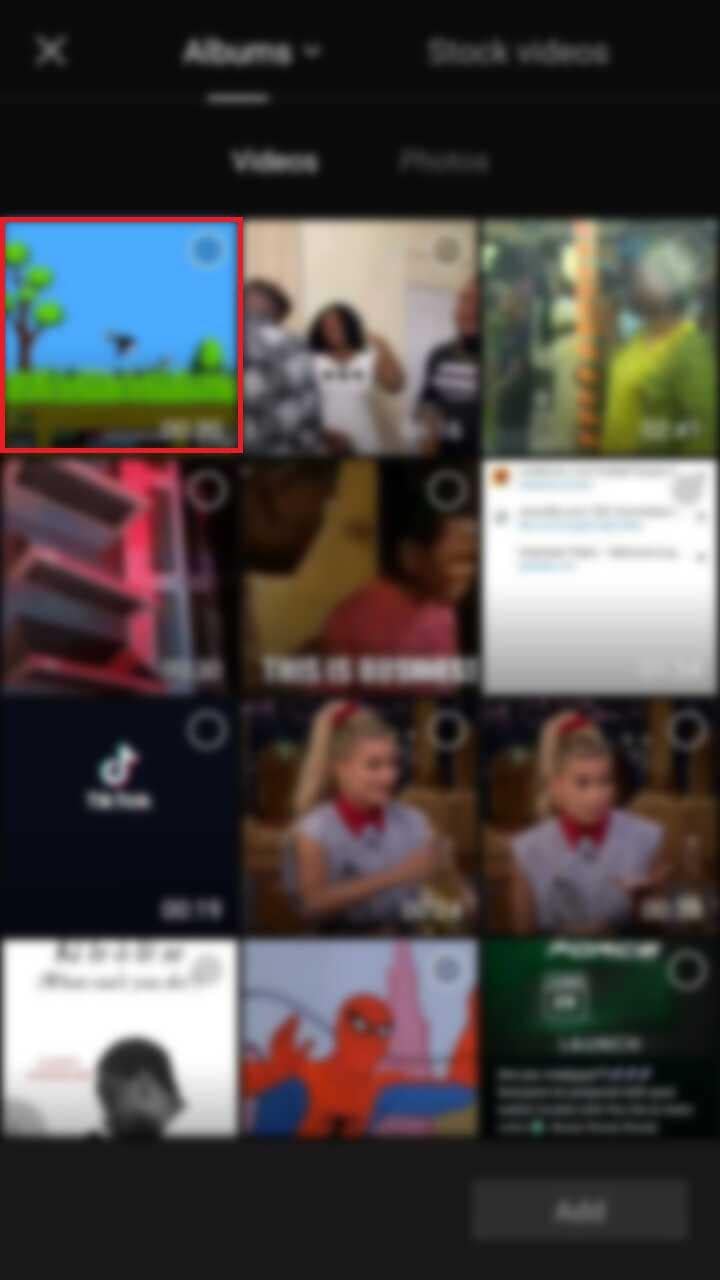
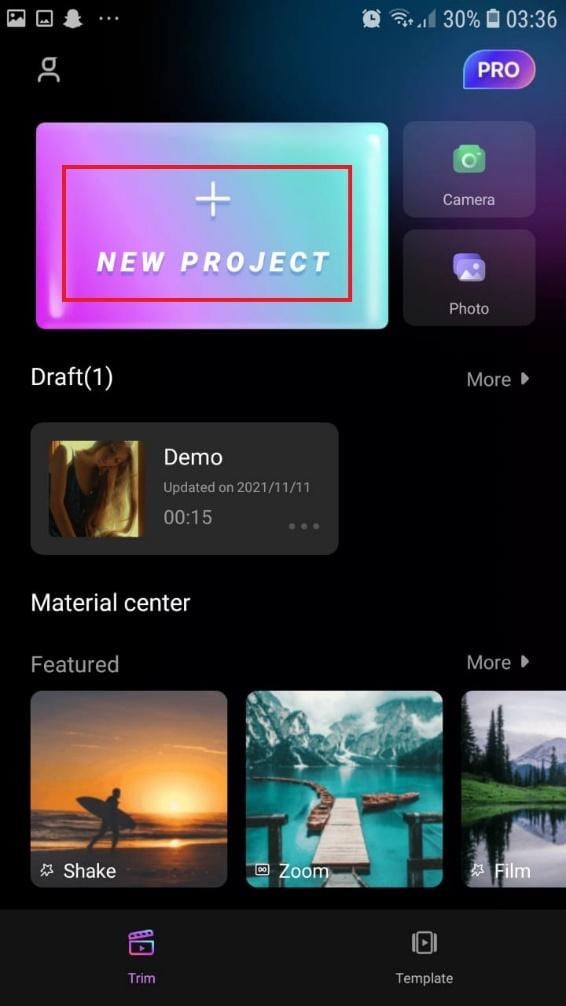
- Begin a New Project. After opening the app, press the “New Project“ icon to bring up a new screen showing your device’s videos.

- Choose a video clip. Locate the desired video clip for your project by scrolling through the pages displaying your camera roll. Tap the video’s thumbnail and then tap the “Add“ icon in the screen’s lower part.
- Get familiar with your workspace. Upon uploading your first clip, CapCut leads you to the primary workspace. This is where you will spend most of your time within the app. The preview panel, the timeline, and the toolbar are in order from top to bottom.
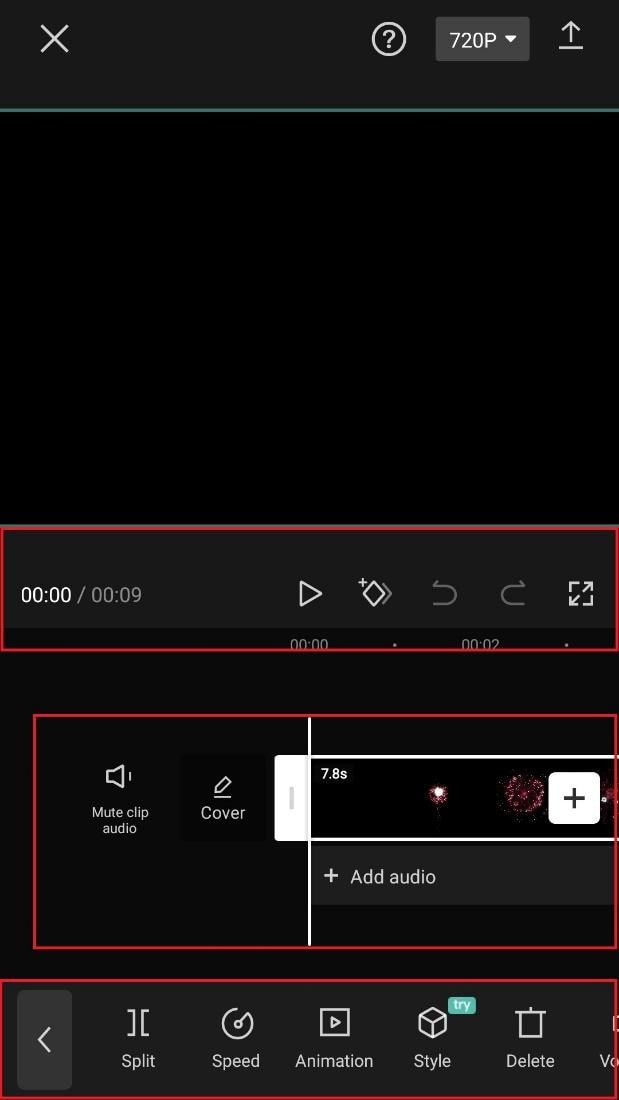
- View the toolbar and timeline. They represent your screen’s bottom half. The timeline, located below the preview panel, is where you’ll make all your adjustments. You can access all your video editing tools, including split, text, audio, effects, stickers, and more, on the toolbar at the bottom of your screen.
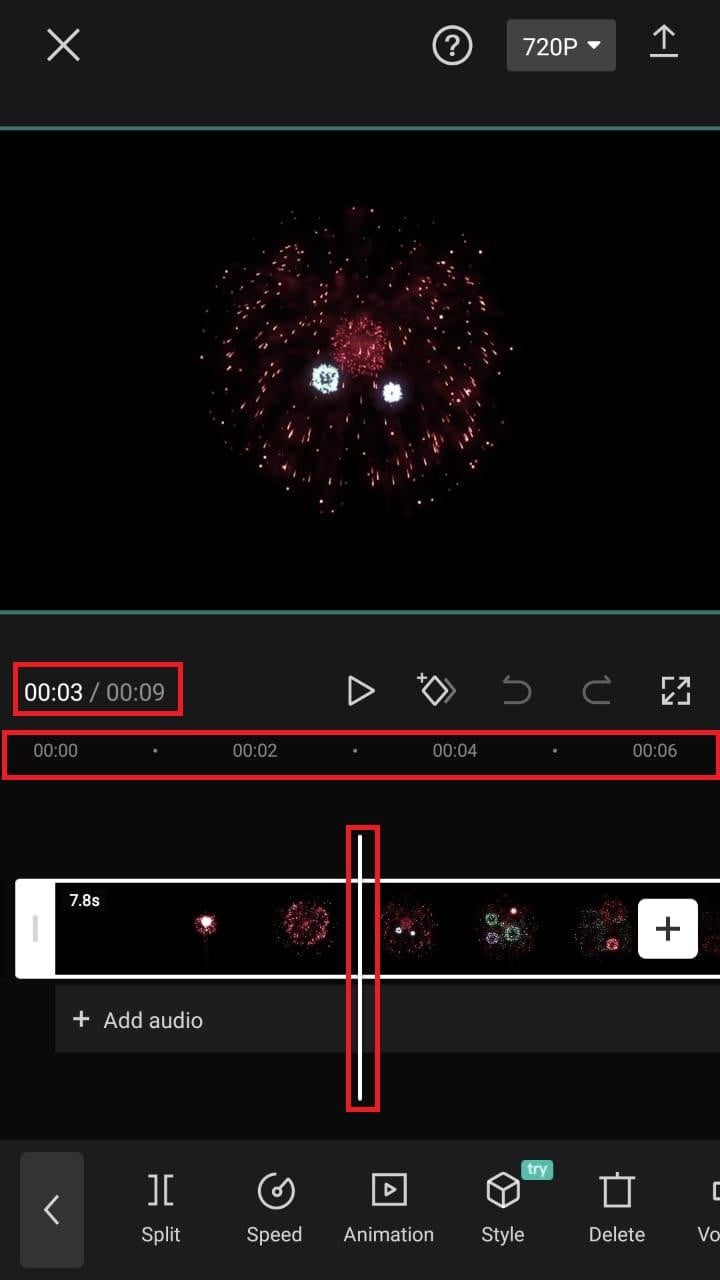
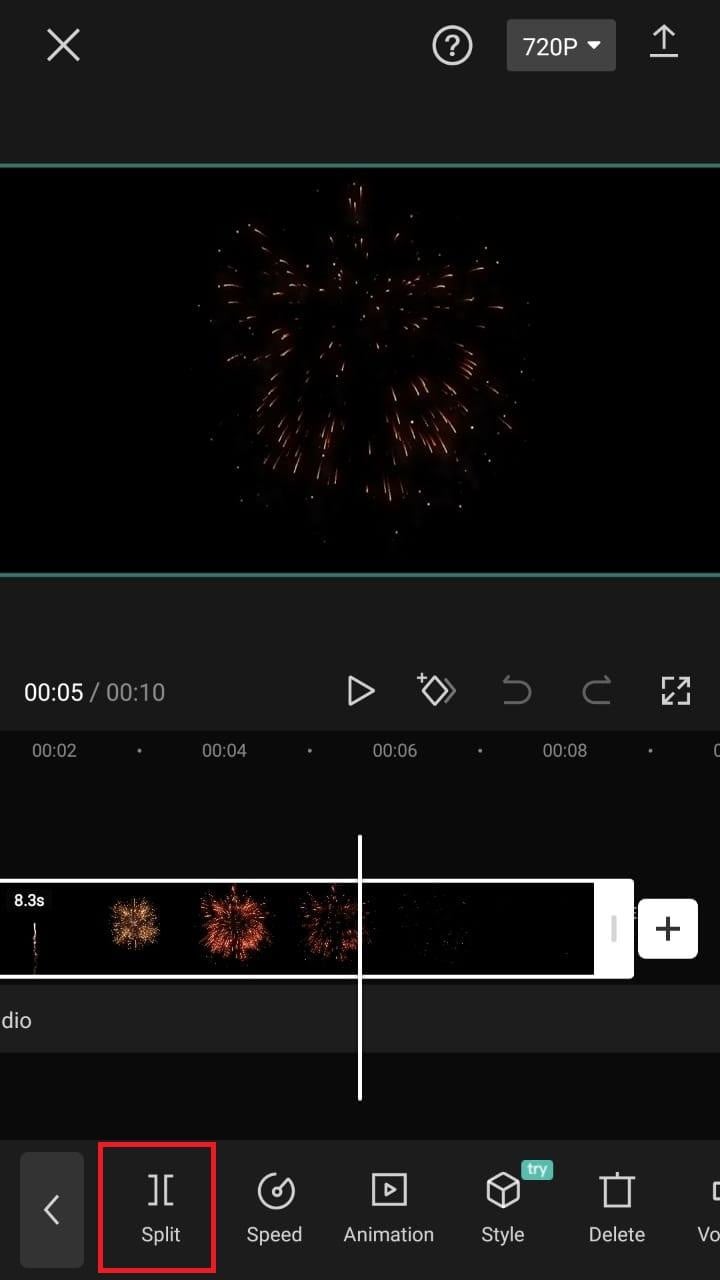
- Split video clips. To split a video clip in half, move the play head to the desired location on the timeline. Tap on your clip, then press the “Split“ toolbar icon. Your result now shows two different clips, not just one.
A Better Split-Screen Effect Video Editor
Filmora is one of the best free HD video makers and video editors with several functionalities, including text, backgrounds, filters, special effects, emoji, audio, and special effects.
Filmora is a feature-packed video editor which has a variety of tools to work with. With this video editor, producing memes, videos with images, pictures, music, stickers, and sound effects and editing videos for YouTube, Twitter, WhatsApp, Facebook, TikTok, and Instagram is simple and entertaining.
Free Download For Win 7 or later(64-bit)
Free Download For macOS 10.14 or later
Steps to Split Screen Video with Filmora
- Download Filmora from the App store
- After installation, launch it.
- Click on “Continue” to continue to use the app.

- Click on Allow to grant Filmora access to your photos and videos.
- You can now tap on “New Project” with the + Symbol.
- Select your desired video and tap on “Next” at the bottom right of your screen
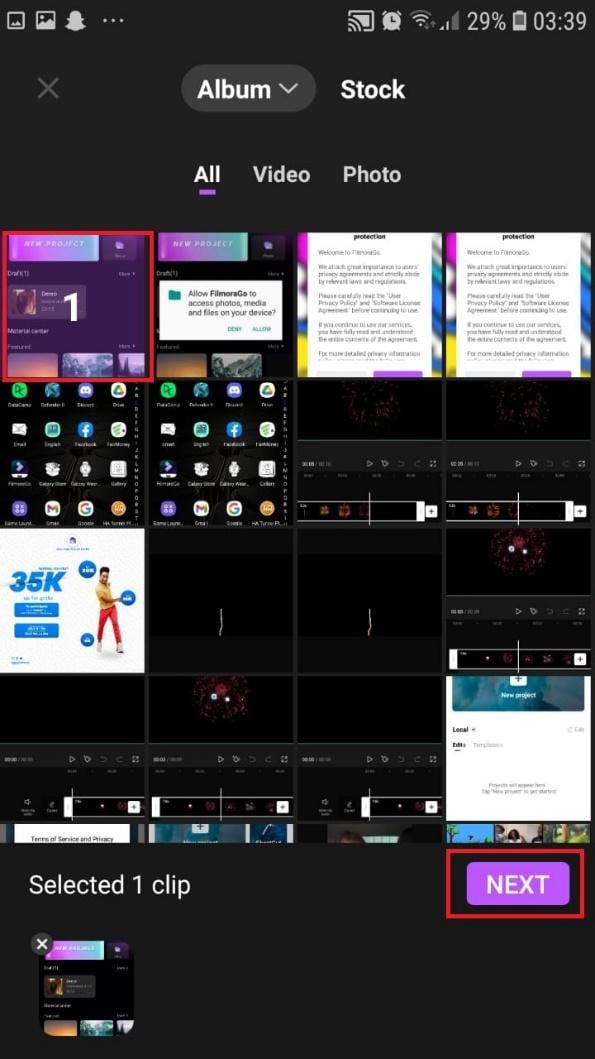
- You can select various options from the bottom of your screen to edit the selected video the way you like.

- Click on trim, and then you will see the different split-screen and collage feature options. Pick any that appeals to you.
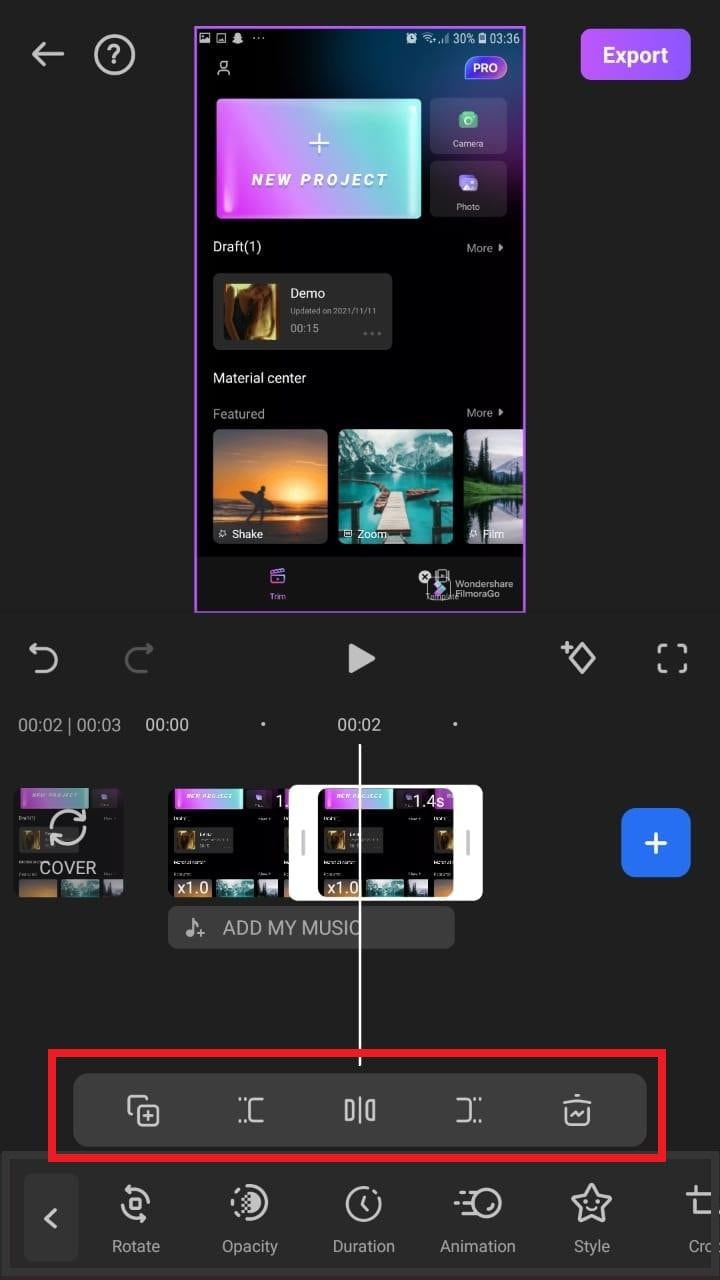
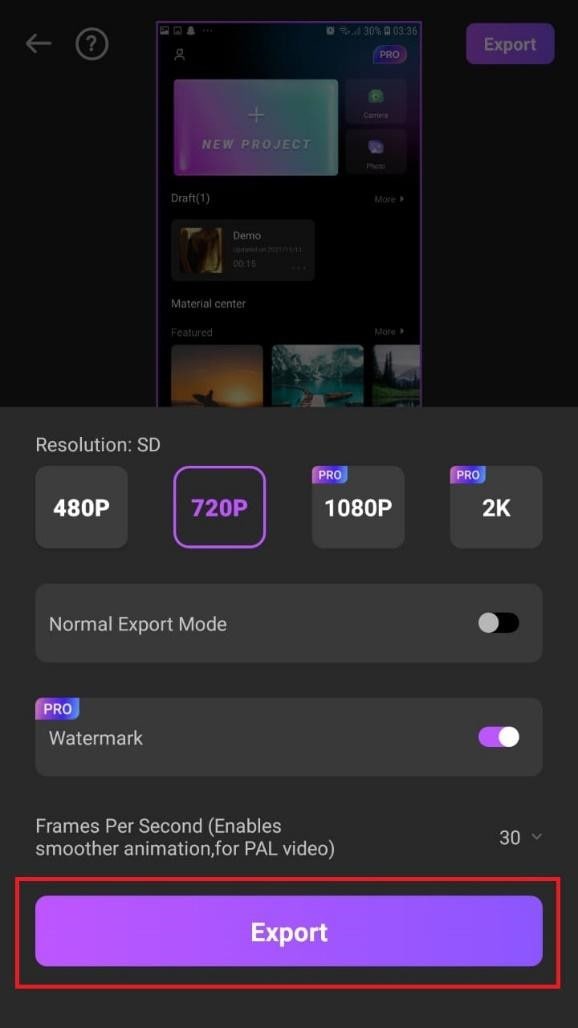
- When you are done with the editing, tap on “Export” at the top right of your screen.

- Go ahead and tap on “Export” on the next screen. Your video will be successfully exported and saved to your camera roll.
Using Filmora is very efficient in splitting your videos and making collage features for TikTok. It is a very simplified app available on both the Google Play Store and Apple Appstore.
Conclusion
TikTok is a platform that users use worldwide to create and share content. It could be pictures, videos, reels, or any other media type. Some people create videos for their audience on TikTok to educate them, while others do it to entertain them.
In any case, the goal is to build a more significant following on TikTok and garner greater attention from its users. You could even make money off the app.
One of the methods to impress your fans and explore multiple possibilities to build unique reels is to use the TikTok split-screen and collage feature effect available on TikTok. Although there are a few different ways to create a Split Screen on TikTok, the steps highlighted in this article are the most straightforward.
Free Download For macOS 10.14 or later
Steps to Split Screen Video with Filmora
- Download Filmora from the App store
- After installation, launch it.
- Click on “Continue” to continue to use the app.
- Click on Allow to grant Filmora access to your photos and videos.
- You can now tap on “New Project” with the + Symbol.
- Select your desired video and tap on “Next” at the bottom right of your screen
- You can select various options from the bottom of your screen to edit the selected video the way you like.
- Click on trim, and then you will see the different split-screen and collage feature options. Pick any that appeals to you.
- When you are done with the editing, tap on “Export” at the top right of your screen.
- Go ahead and tap on “Export” on the next screen. Your video will be successfully exported and saved to your camera roll.
Using Filmora is very efficient in splitting your videos and making collage features for TikTok. It is a very simplified app available on both the Google Play Store and Apple Appstore.
Conclusion
TikTok is a platform that users use worldwide to create and share content. It could be pictures, videos, reels, or any other media type. Some people create videos for their audience on TikTok to educate them, while others do it to entertain them.
In any case, the goal is to build a more significant following on TikTok and garner greater attention from its users. You could even make money off the app.
One of the methods to impress your fans and explore multiple possibilities to build unique reels is to use the TikTok split-screen and collage feature effect available on TikTok. Although there are a few different ways to create a Split Screen on TikTok, the steps highlighted in this article are the most straightforward.
Making Creative and Engaging Youtube Videos Is Now Easy with Several Tools. Now, YouTube Also Offers You It’s Own Built-In Video Editor Through Which You Can Edit and Enhance the Video Quality
How to Edit YouTube Videos in Simple Steps
An easy yet powerful editor
Numerous effects to choose from
Detailed tutorials provided by the official channel
In this article
01 [How to Edit Your YouTube Videos for Beginners?](#Part 1)
02 [How to edit YouTube videos on phone?](#Part 2)
03 [What do Professional YouTubers Use to Edit Videos?](#Part 3)
04 [YouTube Video Editing Q&A](#Part 4)
Part 1 How to Edit Your YouTube Videos for Beginners?
There are a lot of tools for beginners from which they can edit their videos on a budget. Here some of them:
01YouTube Creator Studio
Price: Free
Great For: Quick and basic video edits
YouTube has its own web based video editor which is free of cost. YouTube creator studio is a basic editing tool which allows you to trim the clips from any part of the video. You can also blur the objects and faces if you want. There are several other features that will help you to make your video attractive and engaging.
If you have uploaded a video on YouTube then also, YouTube creator studio allows you to edit the video without losing your video ID and video URL. You can also “Add an End Screen” to your video to give your viewers an option to subscribe your channel.
Pros:
● Create (ability to edit and post your content)
● Activity Insight (you can check your performance metrics)
● Monetization Management
Cons:
There are no cons as such.

02Videorama
Price: Free
Great For: making movies from videos and photos.
If you shoot a video on an iPhone or iPad then Videorama is the best tool to edit your video. You can choose video clips and photos from your gallery and put them together. In this, you can create overlays, add music, filters, add text and can also record a voice – over. Click on the “OK, Share” after you are done with editing, choose the preferred resolution and frame rate. Now your video is ready to post on your YouTube channel.
Pros:
● Easy to use
● Great range of SFX and VFX
● Text Effects and Filters are good
Cons:
● Lack some basic editing features
● IAP’s can get expensive
● More diverse effects would be nice.

● Shotcut
Price: Free
Good For: Used for editing videos and audios for free
Shotcut is a multimedia editing tool and if you are a beginner in video or audio editing this tool is quite the deal for you. You can create or edit the videos by using its various features and can make an engaging or captivating video. It has some tutorials to help you out. For YouTube, it is the best tool to edit your videos.
There are a lot effects and some of that which are used commonly are color grading, color tint etc. When we talk about audio editing features, Shotcut is mostly used to enhance your video with adding music to it.
For editing video you can select from multiple presents or you can set the frame rate and resolution which you want by setting it on ‘Custom’.
Pros:
● Free to use
● Comes with tutorials
● It has a simple interface.
Cons:
● Doesn’t support animation
● Do not have optional plugins.
● Lacks features like multicam editing and motion tracking.

03Movavi Video Editor
Price: $ 59.95
Great For: Quick and fast video editor
Movavi is a video editor tool to edit your video and share it with everyone. You can edit your videos and make them look more alluring to people by using its Key frame animations, special effects and readymade intros.
You can also change the background in your video clips easily by applying Chroma key. It has an easy and refined interface so that you can use it easily and there is nothing to learn in it before using. You can edit your videos and download it for free. There is no need of internet connection when using it. So, it is the best to use it while on the go.
Pros:
● Easy interface
● Amazing feature and special effects
● Fast and quick editor
Cons:
● Free trial isn’t good as it has limited features
● Few templates for text templates and transitions
● You have limited control over color tuning.

04Apple iMovie
Price: Free for Mac users / $14.99 in the Apple Play Store
Great For: Making photos and videos in a beautiful production.
Apple iMovie is a video editor is for those who want to do editing on a professional level. It is for Mac users. It is easy to use and it gives you high quality of video editing with its special effects, high fidelity filters, green screen effects, etc . It allows you to add various clips and shots and arrange them in order, add text, music, effects and your engaging video is ready.
Before starting to edit your video for YouTube or for other sites, always select the standard aspect ratio that is (4:3). If you will choose any theme for your video, iMovie will add transitions effects and add title on its own.
Pros:
● User friendly interface
● It is quick and fast
● Easy sharing
Cons:
● Limited editing features
● Quite expensive
● It requires high level of HDD space

05Videoshop – video editor
Price: Free
Great For: Easy and fast video editor
Videoshop is a third party video editing app from which you can edit your videos on your android or iPhone. Videoshop has amazing features like you can trim, cut, adjust the lightning, rotate your video, add transitions, etc. You can add music and text to make your video more engaging.
There are a lot of filters and features that you can apply to your video to make it look more captivating. Once you have completed editing the video, click on the ‘Share’ icon. It makes your video ready to upload on YouTube or other sites.
Pros:
● Combine clips from various videos
● Fast and easy way to edit videos
● Add special effects, filters and sound
Cons:
● Free for limited time
● Requires subscription to access app’s features like watermark free
● Not fit for editing batch videos
06HitFilm Express
Price: Free
Great For: Gives you professional-grade video editing
HitFilm Express is a free video editing tool which is packed with amazing features to edit your videos for any platform including YouTube. It has a lot of filters and 400+ visual effects that help to give your video a professional touch. You can add voice over to your videos as well by just clicking on a button.
You can create commercials, movies, audio songs while using this as it allows you to add music, text and image etc. you can make quality videos by using HitFilm and share it with the world.
Pros:
● Clean user interface
● Easy to use
● Perfect for YouTube creators
Cons:
● Sometimes crashes and freezes
● Welcome screen is cluttered
● Steep learning curve

Part 2 How to edit YouTube videos on phone?
Editing can enhance the look of your video and making an engaging video can attract the audience to give it a watch. There are various tools to edit your YouTube video. Some of them are listed below:
01YouTube Creator Studio
This is one of the best options to edit a new video or a video that is already uploaded. This built-in editor can easily be accessed on the phone to carry out the necessary editing. You can follow the below discussed guide for the same.
Step 1: Sign in to the YouTube’s studio (channel dashboard).
Step 2: Click on the content option given at the left sidebar.
Step 3: Click on the thumbnail of the video you want to edit from uploads.

Step 4: Click on theEditor given at the left sidebar.
Step 5: You can trim the beginning or the end part of the video. You can trim the video from the Trim option which is right above the timeline.

Step 6: Add end screen to your video
Click on the end screen icon which is given at the middle of the timeline. If you want your viewers to know that you have more related videos or you want to make them subscribe your channel then you can add an end screen to your video.

02iMovie
Editing videos on iphone was never so easy. Using the iMovie app, one can easily edit the YouTube videos for free. The app can easily be downloaded from the app store. Here is a step by step guide that you can follow to edit the video.
Step 1: Import media
Open the app to My Movie section present on main screen. Now, add the video for editing by clicking on ‘Import media’. Now, you need to drag it to the bottom timeline.

Step 2: Trim or split the video
Now, you can trim or split the clip as per your requirement. You can do this by clicking on the spot in video that you want to split or trim. For this, click on modify and then select Split Clip, Trim to Clip Edge or Trim to Playhead.

Step 3: Add music and effects
You can check out the sound and music effects, background, transitions and themed titles at the top toolbar and implement them in the video. Using the icons present just above the clip, you can make color corrections, stabilize the clip, change volume, eliminate background noise, apply speed changes, etc.

Step 4: Share the video
After the editing is complete, click on the Share icon present at the top right corner. Now, click on YouTube & facebook. Now, save the video to your Mac device. When the file is saved, go to YouTube Studio And upload your video.

03Windows Photo app
To use this app, you need to have windows 10 on your system. The Windows Photo app is an effective tool to edit the videos. The editing process is very simple and can be done in a few minutes. Here is a simple guide to help you.
Step 1: Open the app
Launch the app and click on the Video Editor option. To start the editing process, click on new video project. Now, name your project to start the process.

Step 2: Import the video
Click on ‘Add’ and then ‘From this pc’ to add the video. You can then drag the clip to open it in storyboard. There are several options at the storyboard using which you can add text to the title etc. to do this, select Add title card option. You can add text, select style and duration. Finally click on Done.

Step 3: Edit the video
You can find the trim, split and other editing options at the top. Using these options, you can make the desirable changes to the video. After completing the editing work, you can click on Finish video option. Now, choose the video quality (540p, 720p, 1080p) and select Export option to save the video on your computer.

Part 3 What do Professional You Tubers Use to Edit Videos?
Professional YouTubers use the best software for editing their videos and make them engaging and of high quality. One such software that you can also give a try is Wondershare Filmora Video Editor . The easy to use and interactive interface makes this software a top notch choice of the editors. In Filmora, you can edit your videos and audios, record the PC screen, add a voiceover to your video and also add colors in an easy way. The templates are customizable and you can edit them according to you. It has a lot of animated elements, transitions, title designs etc.
For Win 7 or later (64-bit)
For macOS 10.12 or later
Why to choose Filmora for editing YouTube videos:
● Can record the PC screen
● It has Pan and Zoom movements
● Can edit your audios with audio mixers
● Have amazing Filters, Text effects and Overlays.
● Color tuning
● Upload your videos directly to YouTube, Face book or Vimeo.
● Can adjust the speed
● Video stabilization
Part 4 YouTube Video Editing Q&A
What are the tools used for editing YouTube videos?
A. There are various tools available for editing the YouTube’s video. Some of them are listed here:
● YouTube creator studio
● Apple iMovie
● Videorama
● Shotcut
● Movavi video editor
How can you edit a YouTube video on your smart phone?
A. You can easily edit a YouTube video on your smart phone. Here are the steps to follow:
● Step 1: Log in to you YouTube account and click on the three dots at top right corner.
● Step 2: Tap on the three vertical dots at the side of your video which you want to edit.
● Step 3: Edit the video as you wish. You can change its description, add effects etc.
● Step 4: Click on the save button after you are done editing.
How can you add music to your video?
A. Adding music to video is very simple and can be done using Movavi Video Editor. Here is a small guide that you can follow.
● Download the Movavi Video Editor.
● Select the audio and video in Movavi Video Editor.
● Adjust the length and volume of the audio according to your video.
● Save the file.
How can you add Transitions on a video editor?
A. You can add transition to your video in two ways. You can add transitions to one or two different video clips or the other is adding transition to one media file.
What are the steps for editing a video?
A. A simple but highly effective way to edit a video is make a plan, film the video, add the media, arrange the media, edit the video, trim the video, add transitions, add title, add effects, and merge the Audio. Now, give a final touch to your video and the project is ready.
● Ending Thoughts →
● Editing videos on a budget is now easy as there are several software like Movavi Video Editor, Videorama, Apple iMovie, Shotcut tools that help you do it with ease.
● You can also edit your YouTube videos on your smart phones as it is quite simple and also you can use these tools to edit the video professionally.
● Filmora is the best tool from which you can edit your YouTube videos and can upload them directly on YouTube.
In this article
01 [How to Edit Your YouTube Videos for Beginners?](#Part 1)
02 [How to edit YouTube videos on phone?](#Part 2)
03 [What do Professional YouTubers Use to Edit Videos?](#Part 3)
04 [YouTube Video Editing Q&A](#Part 4)
Part 1 How to Edit Your YouTube Videos for Beginners?
There are a lot of tools for beginners from which they can edit their videos on a budget. Here some of them:
01YouTube Creator Studio
Price: Free
Great For: Quick and basic video edits
YouTube has its own web based video editor which is free of cost. YouTube creator studio is a basic editing tool which allows you to trim the clips from any part of the video. You can also blur the objects and faces if you want. There are several other features that will help you to make your video attractive and engaging.
If you have uploaded a video on YouTube then also, YouTube creator studio allows you to edit the video without losing your video ID and video URL. You can also “Add an End Screen” to your video to give your viewers an option to subscribe your channel.
Pros:
● Create (ability to edit and post your content)
● Activity Insight (you can check your performance metrics)
● Monetization Management
Cons:
There are no cons as such.
02Videorama
Price: Free
Great For: making movies from videos and photos.
If you shoot a video on an iPhone or iPad then Videorama is the best tool to edit your video. You can choose video clips and photos from your gallery and put them together. In this, you can create overlays, add music, filters, add text and can also record a voice – over. Click on the “OK, Share” after you are done with editing, choose the preferred resolution and frame rate. Now your video is ready to post on your YouTube channel.
Pros:
● Easy to use
● Great range of SFX and VFX
● Text Effects and Filters are good
Cons:
● Lack some basic editing features
● IAP’s can get expensive
● More diverse effects would be nice.
● Shotcut
Price: Free
Good For: Used for editing videos and audios for free
Shotcut is a multimedia editing tool and if you are a beginner in video or audio editing this tool is quite the deal for you. You can create or edit the videos by using its various features and can make an engaging or captivating video. It has some tutorials to help you out. For YouTube, it is the best tool to edit your videos.
There are a lot effects and some of that which are used commonly are color grading, color tint etc. When we talk about audio editing features, Shotcut is mostly used to enhance your video with adding music to it.
For editing video you can select from multiple presents or you can set the frame rate and resolution which you want by setting it on ‘Custom’.
Pros:
● Free to use
● Comes with tutorials
● It has a simple interface.
Cons:
● Doesn’t support animation
● Do not have optional plugins.
● Lacks features like multicam editing and motion tracking.
03Movavi Video Editor
Price: $ 59.95
Great For: Quick and fast video editor
Movavi is a video editor tool to edit your video and share it with everyone. You can edit your videos and make them look more alluring to people by using its Key frame animations, special effects and readymade intros.
You can also change the background in your video clips easily by applying Chroma key. It has an easy and refined interface so that you can use it easily and there is nothing to learn in it before using. You can edit your videos and download it for free. There is no need of internet connection when using it. So, it is the best to use it while on the go.
Pros:
● Easy interface
● Amazing feature and special effects
● Fast and quick editor
Cons:
● Free trial isn’t good as it has limited features
● Few templates for text templates and transitions
● You have limited control over color tuning.
04Apple iMovie
Price: Free for Mac users / $14.99 in the Apple Play Store
Great For: Making photos and videos in a beautiful production.
Apple iMovie is a video editor is for those who want to do editing on a professional level. It is for Mac users. It is easy to use and it gives you high quality of video editing with its special effects, high fidelity filters, green screen effects, etc . It allows you to add various clips and shots and arrange them in order, add text, music, effects and your engaging video is ready.
Before starting to edit your video for YouTube or for other sites, always select the standard aspect ratio that is (4:3). If you will choose any theme for your video, iMovie will add transitions effects and add title on its own.
Pros:
● User friendly interface
● It is quick and fast
● Easy sharing
Cons:
● Limited editing features
● Quite expensive
● It requires high level of HDD space
05Videoshop – video editor
Price: Free
Great For: Easy and fast video editor
Videoshop is a third party video editing app from which you can edit your videos on your android or iPhone. Videoshop has amazing features like you can trim, cut, adjust the lightning, rotate your video, add transitions, etc. You can add music and text to make your video more engaging.
There are a lot of filters and features that you can apply to your video to make it look more captivating. Once you have completed editing the video, click on the ‘Share’ icon. It makes your video ready to upload on YouTube or other sites.
Pros:
● Combine clips from various videos
● Fast and easy way to edit videos
● Add special effects, filters and sound
Cons:
● Free for limited time
● Requires subscription to access app’s features like watermark free
● Not fit for editing batch videos
06HitFilm Express
Price: Free
Great For: Gives you professional-grade video editing
HitFilm Express is a free video editing tool which is packed with amazing features to edit your videos for any platform including YouTube. It has a lot of filters and 400+ visual effects that help to give your video a professional touch. You can add voice over to your videos as well by just clicking on a button.
You can create commercials, movies, audio songs while using this as it allows you to add music, text and image etc. you can make quality videos by using HitFilm and share it with the world.
Pros:
● Clean user interface
● Easy to use
● Perfect for YouTube creators
Cons:
● Sometimes crashes and freezes
● Welcome screen is cluttered
● Steep learning curve
Part 2 How to edit YouTube videos on phone?
Editing can enhance the look of your video and making an engaging video can attract the audience to give it a watch. There are various tools to edit your YouTube video. Some of them are listed below:
01YouTube Creator Studio
This is one of the best options to edit a new video or a video that is already uploaded. This built-in editor can easily be accessed on the phone to carry out the necessary editing. You can follow the below discussed guide for the same.
Step 1: Sign in to the YouTube’s studio (channel dashboard).
Step 2: Click on the content option given at the left sidebar.
Step 3: Click on the thumbnail of the video you want to edit from uploads.
Step 4: Click on theEditor given at the left sidebar.
Step 5: You can trim the beginning or the end part of the video. You can trim the video from the Trim option which is right above the timeline.
Step 6: Add end screen to your video
Click on the end screen icon which is given at the middle of the timeline. If you want your viewers to know that you have more related videos or you want to make them subscribe your channel then you can add an end screen to your video.
02iMovie
Editing videos on iphone was never so easy. Using the iMovie app, one can easily edit the YouTube videos for free. The app can easily be downloaded from the app store. Here is a step by step guide that you can follow to edit the video.
Step 1: Import media
Open the app to My Movie section present on main screen. Now, add the video for editing by clicking on ‘Import media’. Now, you need to drag it to the bottom timeline.
Step 2: Trim or split the video
Now, you can trim or split the clip as per your requirement. You can do this by clicking on the spot in video that you want to split or trim. For this, click on modify and then select Split Clip, Trim to Clip Edge or Trim to Playhead.
Step 3: Add music and effects
You can check out the sound and music effects, background, transitions and themed titles at the top toolbar and implement them in the video. Using the icons present just above the clip, you can make color corrections, stabilize the clip, change volume, eliminate background noise, apply speed changes, etc.
Step 4: Share the video
After the editing is complete, click on the Share icon present at the top right corner. Now, click on YouTube & facebook. Now, save the video to your Mac device. When the file is saved, go to YouTube Studio And upload your video.
03Windows Photo app
To use this app, you need to have windows 10 on your system. The Windows Photo app is an effective tool to edit the videos. The editing process is very simple and can be done in a few minutes. Here is a simple guide to help you.
Step 1: Open the app
Launch the app and click on the Video Editor option. To start the editing process, click on new video project. Now, name your project to start the process.
Step 2: Import the video
Click on ‘Add’ and then ‘From this pc’ to add the video. You can then drag the clip to open it in storyboard. There are several options at the storyboard using which you can add text to the title etc. to do this, select Add title card option. You can add text, select style and duration. Finally click on Done.
Step 3: Edit the video
You can find the trim, split and other editing options at the top. Using these options, you can make the desirable changes to the video. After completing the editing work, you can click on Finish video option. Now, choose the video quality (540p, 720p, 1080p) and select Export option to save the video on your computer.
Part 3 What do Professional You Tubers Use to Edit Videos?
Professional YouTubers use the best software for editing their videos and make them engaging and of high quality. One such software that you can also give a try is Wondershare Filmora Video Editor . The easy to use and interactive interface makes this software a top notch choice of the editors. In Filmora, you can edit your videos and audios, record the PC screen, add a voiceover to your video and also add colors in an easy way. The templates are customizable and you can edit them according to you. It has a lot of animated elements, transitions, title designs etc.
For Win 7 or later (64-bit)
For macOS 10.12 or later
Why to choose Filmora for editing YouTube videos:
● Can record the PC screen
● It has Pan and Zoom movements
● Can edit your audios with audio mixers
● Have amazing Filters, Text effects and Overlays.
● Color tuning
● Upload your videos directly to YouTube, Face book or Vimeo.
● Can adjust the speed
● Video stabilization
Part 4 YouTube Video Editing Q&A
What are the tools used for editing YouTube videos?
A. There are various tools available for editing the YouTube’s video. Some of them are listed here:
● YouTube creator studio
● Apple iMovie
● Videorama
● Shotcut
● Movavi video editor
How can you edit a YouTube video on your smart phone?
A. You can easily edit a YouTube video on your smart phone. Here are the steps to follow:
● Step 1: Log in to you YouTube account and click on the three dots at top right corner.
● Step 2: Tap on the three vertical dots at the side of your video which you want to edit.
● Step 3: Edit the video as you wish. You can change its description, add effects etc.
● Step 4: Click on the save button after you are done editing.
How can you add music to your video?
A. Adding music to video is very simple and can be done using Movavi Video Editor. Here is a small guide that you can follow.
● Download the Movavi Video Editor.
● Select the audio and video in Movavi Video Editor.
● Adjust the length and volume of the audio according to your video.
● Save the file.
How can you add Transitions on a video editor?
A. You can add transition to your video in two ways. You can add transitions to one or two different video clips or the other is adding transition to one media file.
What are the steps for editing a video?
A. A simple but highly effective way to edit a video is make a plan, film the video, add the media, arrange the media, edit the video, trim the video, add transitions, add title, add effects, and merge the Audio. Now, give a final touch to your video and the project is ready.
● Ending Thoughts →
● Editing videos on a budget is now easy as there are several software like Movavi Video Editor, Videorama, Apple iMovie, Shotcut tools that help you do it with ease.
● You can also edit your YouTube videos on your smart phones as it is quite simple and also you can use these tools to edit the video professionally.
● Filmora is the best tool from which you can edit your YouTube videos and can upload them directly on YouTube.
Also read:
- Change Aspect Ratio of Video for 2024
- Updated Create Realistic Fire Effects by Filmora
- In 2024, Cropping Video in VLC Step by Step
- New How to Brighten a Video in Windows 10 | Step-By-Step Guide for 2024
- Updated Change Background Color in After Effects for 2024
- Updated In 2024, Add Emoji to Linkedin Post – 5 Tips You Need to Know
- New Best Way to Freeze-Frame in Final Cut Pro
- Updated Logo Intro Videos Are the Hottest Trend in Town and Are Gaining Popularity Quickly. Keep Reading This Article to Learn Their Importance and How to Design One
- 2024 Approved Logo Intro Videos Are the Hottest Trend in Town and Are Gaining Popularity Quickly. Keep Reading This Article to Learn Their Importance and How to Design One
- New 5 Tips for Faster Editing in Filmora for 2024
- New 2024 Approved Timeline Template Is a Visual Representation Showing the Passage of Time. It Includes Text, Diagrams, Images and Icons. They Are Perfect for Telling Stories, Events Etc
- New In 2024, How to Make Random Letter Reveal Intro?
- New Quick Answer What Is a Transparent Logo and Why Do You Need It for 2024
- New Top 5 Video Filter Software Improve Your Videos with Filters
- Updated How to Create Cooking Video Intro and End Screen for YouTube Channel?
- 2024 Approved Best 12 Best Freeze Frame Video Editing Examples
- 2024 Approved So, You Are a Gamer and Have Been on the Cool App Discord for a While, and You Keep Hearing People Talk About Game Bots in Discord, Like, Robot Gamers? This Article Will Discuss All Discord Game Bots and Much More
- Updated 2024 Approved The After-Effects Match Colour Feature Bestows Numerous Benefits. Thus, in the Following Discussion, We Will Discuss This Feature and an Equally Proficient Efficient Alternative Tool for Colour Matching
- New 2024 Approved How to to Mimic Professional Filming Gears
- Updated In 2024, A Guide To Motion Tracking Using The Best Video Editors
- Updated 2024 Approved 4 Simple Methods for Making a High-Quality Recap Video
- In 2024, The Best Peter McKinnon LUTs for Perfect Video Editing
- In 2024, How to Trim/Crop Video in Microsoft Powerpoint
- How to Use Frame Blending in Premiere Pro for 2024
- On the Tiktok App, You Can Make a Photo Video Slideshow. You Can Make Photo Video Slideshow with Music, Animated Tiktok Templates, and Can Also Add Text to Slideshow Video
- How to Resize FLV Video EfficientlyWindows, Mac, Android, iPhone &
- In 2024, Learn How to Slow Down Time-Lapse Videos on Your iPhone to Make Detailed Slow-Motion Effects in Your Time-Lapse Captures
- New In 2024, How to Make a Video by Mouse with Filmora
- In 2024, Have You Ever Tried to Remove Motion Blur From Photos? This Article Will Address How to Remove the Motion Blur Effect Using Photoshop and Its Alternatives
- New Finding the Best Game Recorder for PC
- Learn Color Correction in After Effects with These YouTube Videos for 2024
- 2024 Approved The Most Efficient Ways to Manage Your Timeline
- Final Cut Pro for iPad for 2024
- Updated 2024 Approved What Is the Best Voice Changer for WhatsApp? Discover the Seven (7) Best Voice Changers for WhatsApp Here in This Post
- 2024 Approved Know How You Can Get some Cool Discord Animated Icons Through some Simple Steps. Presenting the Latest Tool to Get Animated PFP and Logos Instantly for Discord
- New The Article Introduces Three Recommended Apps to Download Royalty-Free Cinematic Music and Covers an Extensive Procedure to Create a Cinematic Travel Intro for a Travel Vlog for 2024
- Updated 2024 Approved Try These 10 Music Video Templates To Make Your Work Easy
- Updated In 2024, Do You Like Clouds or Sky and Want to Use Them as a Video Background? Explore This Article to Learn About the Sky Change Video in Filmora
- 10 Top Vloggers on YouTube
- New In 2024, How to Use Visual Effect for Zoom
- Updated In This Article Ill Share to You some of the Skin Care Vlog Ideas for You to Start Doing a Skin Care Review on Your YouTube Channel. But Before that Ill Share with You How Important Is Skin Care?
- Updated In 2024, MP3 Cutter Download for Computer and Mobile
- Ideas That Help You Out in Converting AVI to GIF
- New In 2024, Best Love Video Maker with Music
- Updated 2024 Approved Are You Looking for an Ideal Halloween Countdown Video Clip for Your Video? This Article Will Walk You Through the Best Ones You Can Use to Get the Job Done Perfectly
- Updated 15 Best Free Cinematic LUTs for Your Film
- New 2024 Approved Best Options to Replace Sky of Any Photo Online + Offline
- Updated 2024 Approved How to Create a Special Animated Transition in Filmora in Just 2 Minutes. This Simple Step-by-Step Guide Will Show You the Easy Way
- New Progressive Solutions to Adding VHS Effects to Video with Ease
- How Do You Unlock your iPhone XR? Learn All 4 Methods | Dr.fone
- New 2024 Approved Unlocking Camtasias Power Speed Up, Slow Down, and More
- Recommended Best Applications for Mirroring Your Honor 100 Screen | Dr.fone
- How to Use Phone Clone to Migrate Your Nokia G310 Data? | Dr.fone
- A Guide OnePlus 12 Wireless and Wired Screen Mirroring | Dr.fone
- 2024 Approved Unleash Your Creativity 7 Essential Animation Drawing Software
- Full Guide to Fix iToolab AnyGO Not Working On Infinix Note 30 5G | Dr.fone
- How to Mirror PC to Apple iPhone 13 Pro? | Dr.fone
- Remove Lock Screen without Password(A05s)
- How to Reset a Itel P40 Phone that is Locked?
- How to Screen Mirroring Honor 100 Pro? | Dr.fone
- New In 2024, Animation Powerhouses Top 8 Software for Mac and Windows Creators
- Mindful Browsing A Compendium of Online Destinations to Find Tranquility and Relaxation This Year for 2024
- Why Is My Samsung Galaxy F54 5G Offline? Troubleshooting Guide | Dr.fone
- Updated Elevate Your Storytelling Expert-Approved 1080P Video Editing Solutions
- The Insiders Path to High-Quality Unobtrusive Musical Pairings for Media Creation for 2024
- The Ultimate Guide to Choosing a Windows Movie Editor for 2024
- Mastering Audio Removing Vocals From Video Like A Pro for 2024
- Updated Best Voice Generators & Changers with The Most Anime Voices Supported for 2024
- New Vintage Vibes in FCP A Step-by-Step Guide to VHS Effects for 2024
- 2024 Approved Get a Powerful 64-Bit Video Editor (Windows 8 Included)
- In 2024, How to fix iCloud lock on your Apple iPhone 13 Pro Max and iPad
- How to Fix Videos Not Playing on Xiaomi Redmi Note 12 Pro 5G?
- In 2024, 3 Things You Must Know about Fake Snapchat Location On Apple iPhone SE (2022) | Dr.fone
- Methods to Change GPS Location On Infinix Hot 40i | Dr.fone
- New In 2024, Cut, Trim, and Split The Best Free Video Editors
- Updated The Ultimate Guide Selecting the 5 Best MP3 Recorders for Clear Audio Transcription for 2024
- 5 Easy Ways to Change Location on YouTube TV On Oppo Find X6 Pro | Dr.fone
- 2024 Approved FCP Audio Editing Essentials A Step-by-Step Guide
- Perfect Guide To Excel in TikTok Live Shopping for 2024
- New 2024 Approved The Ultimate Guide 8 Premium Rain Impact Noises for Creative Projects
- Does MP4 play on Defy 2?
- New In 2024, Clearer Screen, Cleaner Sound Techniques for Dampening Background Audio in Digital Videos
- WebM Video Shrinking Made Simple Top Online Compressors
- Top 8 iPhone 6 SMS/Message/Text Recovery Software | Stellar
- Updated Critical Lists of Soft Instrumental Sets for Ambient Acoustics for 2024
- Updated In 2024, Audio Sanitization Made Simple A Guide to Voice-Less Video Enhancement
- How to Repair a Damaged video file of Nokia C210 using Video Repair Utility on Mac?
- Title: New In 2024, Tips for Choosing Location & Scheduling Music Video
- Author: Morgan
- Created at : 2024-05-19 05:13:04
- Updated at : 2024-05-20 05:13:04
- Link: https://ai-video-editing.techidaily.com/1713960552501-new-in-2024-tips-for-choosing-location-and-scheduling-music-video/
- License: This work is licensed under CC BY-NC-SA 4.0.
