
:max_bytes(150000):strip_icc():format(webp)/GettyImages-Macys-59e6c3699abed500118af858.jpg)
Updated Are You Finding It Challenging to Upload and Create a Link for Your Video? Well, This Detailed Upload Video to Link Guide Will Help You with This. Check It Out Now for 2024
Are You Finding It Challenging to Upload and Create a Link for Your Video? Well, This Detailed Upload Video to Link Guide Will Help You with This. Check It Out Now
A well-personalized video is an effective way to get your way around the viewers easily. Besides, you can also easily impress them with your products or services by uniquely pressing them.

Now, imagine if you have an easier way to share your videos with audiences on different platforms! Well, this way you will save a lot of time. For this, you need to upload the video to the link, and then you can share the URL link on various platforms. Keep reading to understand the entire process.
Part 1: Method1: Upload videos to a video hosting platform
The method to upload the video to the link will vary based on the video-sharing platform you are using. Let’s understand this with an example. If you are using YouTube, then you need to follow the below-given steps to upload and generate a link for your video.
- First of all, you need to log into your YouTube channel or account.
- Now, you need to click on the video icon. You can find it on the right-hand side of the screen.
- Then, click on the Upload a Video option.
- Click on the Select Files option and choose the video that you want to upload. You can also drag and drop the video to upload it.
- Once done, click on Publish option to complete the process.
Now, to complete your YouTube video upload share, you need to find the link to your video. For this, you need to click on the pause button and then right-click on the video. Now choose the Copy video URL. Now, you can share that video on other platforms just by pasting the video link.
How To Make Video Private and Public?
- Sign in to your YouTube account.
- Choose the Videos option.
- Now choose the video that you want to update.
- Then you need to click on the down arrow located under Visibility and select Private or Public based on your preference and then click on the Save option.

Different Video Hosting Platforms that You can Use
1. Vimeo
One of the best alternatives to YouTube is Vimeo. This platform allows the user to create, manage and enjoy an easy video upload share process. This platform has more than 250 million active users. It offers different subscription plans, and for unlimited upload limits, webinars, live streaming and more, you can go for its premium package. Some of the impressive features of this platform are:
- Custom CTAs- Calls to Actions
- Support video hosting in 8K quality.
- Easy access to different video editing templates
- CRM- Customer Relationship Management integrations
- Supports content analytics
- video upload share option for social media
2. Streamable

Speaking about Streamable, this is a video editing as well as sharing tool that will allow you to stream videos in 4K quality, and you can even embed the videos. You will have the freedom to upload your videos in different formats and can also resize them in vertical, landscape and square formats. Some unique features of Streamable are:
- Content management tool
- Brand overlay
- Easy-to-customize templates
- Content Library
- Audio capture
- Faster data export and import and more
3. Uscreen
This is an excellent all-in-one platform that helps video creators to sell, manage and market their content while expanding their business. Besides, the platform also helps the users to create mobile and TV apps and offers tools to market the videos. Some features for Uscreen to consider are:
- Different membership options.
- Support offline viewing of content, including videos.
- A professional video player
- You will enjoy full ownership of your audience’s data
- Supports different retention and marketing tools.
- Supports more than 150 hours of video storage and more.
4. Dailymotion

This platform is also called “the home for videos that matter”. Dailymotion is used by many well-known clients such as MLB, CNN and more to host video content. If you are a creator, you can easily upload your videos on this platform for free. Creators can utilize different features available on the platform, such as:
- Easily embeddable and shareable videos
- Easy video sharing using your video link on social media platforms
- You can upload videos of up to 4K quality.
- Password-protected videos
Part 2: Upload your videos to a cloud disk and share to others
As per some studies, more than 85 percent of businesses utilize videos for marketing strategy. Video content is entertaining, easy to understand and can offer better ROI as you can reuse it. However, with the huge volume of these files, it has become more challenging to find a good storage option.

This is where cloud storage comes to play. There are different cloud disk or storage platforms where you can upload video to link and share your videos with others. For example, Google storage or Google Drive. So, let’s know the process of uploading a video to Google Drive.
- First, visit your Google Drive Account and then click on the new option.
- Now, you need to click on File Upload and then select the video that you want to upload.
- You can now see the selected video uploading in the screen’s lower left corner. It will take some time.
- Once done, Google Drive will begin processing the video.
- Once your video is available on Google Drive, you can move it to different folders or change the name.
Now, let’s talk about how to generate a link to your video and share that link with others.
- Open your Google Drive account.
- Choose the video that you want to share and right-click on it.
- Now, you need to click on the Get Link option.
- Then, choose the Anyone with the Link option from the viewer option.
- Now, click on the Copy Link option, and you can now share that link with anyone you want.
There are different reasons that make cloud storage options a perfect choice for video creators or other users. For example:
- You don’t have to worry about data loss.
- Cloud storage is highly scalable.
- There will be no space or storage limit
- The users can enjoy real-time video content updates
- One can access and share videos using any device.
However, some of the cloud storage platforms are not free to use. You will get up to 10GB to 20GB for free. For more storage limits, you will have to buy a subscription plan. For example, if you are using Dropbox, then you will have to pay around USD 20 per month to get up to 3TB of storage.
Besides, there are some content restrictions that you will have to consider. You are not allowed to upload videos that support malicious attacks, hate speech, graphic violence, predatory behavior or videos that promote any dangerous behavior. Besides, the platforms support certain types of video formats, such as OGG, WebM files, WMV, MTS, AVI, and WMV. FLV, 3GPP, MPEG 4, MOV and other file formats.
If you are looking for some free cloud storage platforms, then you can give Google Drive, Dropbox, Box, NeXT cloud, pCloud, Amazon Cloud Drive and OneDrive a try.
Part 3: How to Make Videos That Go Viral?
To make your videos go viral, you will have to make stunning videos by adding some unique special effects. And for this, you can use the Filmora tool. This is a creative video editing tool for a video creator. The platform offers some great features to vloggers, gamers and others. For example, it supports 4K editing, noise removal, advanced text editor, GIF support, video stabilization, equalizer and more. Now, let’s talk about how to use this platform to make or edit a video.
- Open Filmora and choose the desired aspect ratio. Now, click on the New Project option and import the video.
- Then you need to choose the frame rate and resolution for the video.
- Once done, you can go on and transition music between your video clips, or you can use different visual effects.
- Once you are done with editing, you can then explore the videos and then share the videos on different platforms directly from Filmora.
Free Download For Win 7 or later(64-bit)
Free Download For macOS 10.14 or later
FAQs
Why Create a Video Link?
The first reason to consider here is when upload video to link, you can easily share the videos in various formats. Besides, you can share it without worrying about the video size. The video can be shared on multiple platforms and social media channels. It is a faster way to share your video content.
How To Locate the URL of Your Video?
To locate your video URL, you can open the video online. The link that you will see in the browser’s address bar will be the URL of your video. You can then copy the URL and paste it or share it on other platforms. It also applies to YouTube and other video-sharing platforms.
How Do I Get My YouTube Channel’s URL?
You need to sign in to your YouTube Studio. Then from the left Menu, choose Customization and then choose the Basic info. Under the Channel URL option, you can see the URL of your YouTube channel. Now you can copy the Channel URL and share it with others.
Let’s Look at Four Different Ways of Merging Audios and Videos. The Tools Will Help You Craft High-End Videos without Involving Any Complex Steps. You Can Make Your Videos Beautiful by Using the Following Easy to Use Tools
The rising trends in audio and visual effects have introduced the media industry to new dimensions of technology. The screens around us are flickering 24/7 with videos on several topics. But, without the perfect background audios, their underlying message remains unheard. Hence, a balance of sound and picture is necessary to entice the audience and break the monotony. You can also create personalized videos by merging various video clips and adding the background sound afterwards. For this purpose, all you need is a tool that can add audio to your videos.
Let’s look at four different ways of merging audios and videos. The tools will help you craft high-end videos without involving any complex steps. You can make your videos beautiful by using the following easy to use tools.
- Filmora Wondershare
- VLC
- Photos App on Windows 10
- Using the Online Converter
Merge MP4 and MP3 Using Filmora Wondershare
Filmora Video Editor is an editing tool that brings your creativity and productivity to a whole new level. It comes with several editing options for both audio and video. All you need is to let your imagination run wild to give a personalized touch to your videos.
If you want to record podcasts, narration or voiceovers with lowered background music under speech, itsaudio ducking feature comes in handy. Filmora’sauto-synchronization feature is the cherry on top. It facilitates matching your audio with your video in a crispy way. Thus, making the whole experience of customizing video more professional.
Adding more to it, the Filmora Montage maker edits your video automatically to make it smooth with the music of your choice. Thisauto-beat sync feature is user friendly and convenient. Hence, you cannot deny that from beginners to intermediate, Filmora is empowering creators over the globe.
Filmora comes with an in-built audio library that serves the purpose of adding different sounds in the background. Its drag and drop feature make its interface more user friendly.It allows you to add audio files (.MP3, or .WMA) to videos (.Avi, .MP4, .MKV).It supports different audio and video formats that help you create awesome videos.
For Win 7 or later (64-bit)
For macOS 10.14 or later
Here is a step-by-step guide for adding sound to your videos.
Step 1: Importing the Media files (Both Audio and Video)
After you finish installing Wondershare Filmora from the official website on your computer, launch it.
You can import the MP4 and MP3 files by going to the File menu and then selecting import media files.

Tip: The software comes with a huge built-in library. You can also use it to add sound to your project.
Step 2: Adding media files to Timeline
- Now, hover the mouse over the media files that you have imported.
- Use the drag and drop feature to add the mp4 and mp3 files to the timeline.

If you want to modify the audio, the audio panel can be seen by double-tapping the audio from the timeline. This panel will appear at the top of the screen.

You can explore different options ranging from ducking to denoising.
Step 3: Exporting the File
Now that the audio has been added to the video, select the ‘Export’ tab so that you can export your video.

The exported file can be saved in different formats. (MP4, WMV, etc)
Tip: You can rename and define the resolution for better output.
Merge MP4 and MP3 Using VLC Media Player
VLC is an open-source media player that works for different platforms (Windows, Mac and Linux). The media player comes with features ranging from compression to conversion. This multimedia framework supports audio formats like AC-3, DV Audio, FLAC, MP3, Speex, Vorbis. It also supports different video formats.
If your video has no background sound, you can add it to your videos by following simple steps. Not only that, but you can also change the original audio track to make your video an exquisite piece of art.
The majority of people consider VLC as only a media player. But, it works as a video editor as well. Therefore, it allows you to add background sound to your videos. This handy tool supports various streaming protocols along with almost all multimedia files.
Here is a demonstration for adding audio to your video.
Step 1: Installation
The first step would be installing the VLC media player on your computer and launching it afterward.
Click on Media and then select Convert/Save.

A pop-up window will appear in which you have to select the Add option. This will help you load the targeted video.

Step 2: Playing both audio and video in a synchronous manner
- After loading the video, at the bottom of the dialogue box, tick the Show more options.
- Select the option named ‘Play another media synchronously.

Click Browse to import your desired audio. It will open another window.

Step 3: Adding audio
Click + Add on the second Open Media window. It will load the audio files for the video.
- Now, you’ll have your video and audio files in the formats of mp4 and mp3 respectively.

- Click on Convert/Save
- A pop-up window will appear asking about the format you wish to have for your video.

- Also, by selecting Browse, select the destination where you want to save your video.

- Click on Start so that the video and audio can be merged.

Merge MP4 and MP3 Using Windows Photo App
Windows Photo App is home to all audio and video files on your PC. You can view, edit and store your audio and video files in it. It also allows you to share those among your family and friends. The tool comes with an AI-powered assistant to manage your media efficiently. Hence, you can find your required media files faster.
With its editing features, you can bring dull moments to life. It lets you integrate photos and videos into third-party apps so that you may transform your mundane videos into extraordinary ones.
The App also comes with a backup feature that makes it a safe home for your life’s memories.
If you want to merge recordings of small video clips in no time, then Windows Photo App will assist you in doing it in a jiff. It is a built-in app for Windows 10 and comes with the easiest ways of adding sound to your videos.
Have a look at the following steps.
You can find the Windows Photo app on your desktop or press the Windows + S to open the Start menu search and type Photos in the search box.

- Click on the video editor tab.
- Select the New Video project to start a blank project.

A dialogue box will appear asking to add the desired project name. Enter the name.

You’ll see an add button on the left side. By selecting it, a drop-down menu will appear. It will show you different options for adding video to your project.

Select the desired option and add the video clips.

Adjust the order of your videos by dragging the videos in the storyboard.

- You can trim, split and rotate your videos here.
- It also allows you to use various filters, texts and 3D effects.
- After completing the editing, select the finish video button on the menu bar.
- Select your preferred video quality.
You can add audio by selecting the Custom Audio option.

You will see a window-pane on the right side with different options for adding the sound. You can add it by the drag and drop feature or by clicking on the add file option.


- Select Done to complete the process.
- You have successfully added mp3 to your video file**.**
- Tap on Finish video in the upper right corner to complete the process.

- You can also select the quality of your video.

Click on Export to save your file to your desired destination.
Merge MP4 and MP3 Using Using Online Converter
Different online resources on the internet will help combine videos. You do not have to go through the hassle of downloading and installing third-party apps. Online Converter supports different formats like MP4, AVI, FLV, MOV, 3GP, MKV, etc. With it, you can combine multiple video files into a single file in no time. The most popular output format is MP4.
The procedure is simple. You have to upload your video clips on Online Converter in the order that you want in the final output.

You’ll navigate to a page with options for adding the media files by clicking on the choose file.

After uploading the media files. You will also see options for the audio in a drop-down menu.

Select the Add option to merge mp3 to mp4.

After the mp3 is merged to the mp4, you can download the converted file or share it via social media as well.

Disadvantages
- If your internet connectivity is poor, the videos may take longer to upload.
- If the response time is slow, you need to cancel the process and re-submit the data.
- Encrypted or protected video files are not supported for the merger of the videos.
Conclusion
Each tool comes with its pros and cons. With the wide range of video editing options, you can explore these different platforms and add life to your moments. Whether you are a beginner or an intermediate, editing multimedia files has been made easy by these different tools.
For macOS 10.14 or later
Here is a step-by-step guide for adding sound to your videos.
Step 1: Importing the Media files (Both Audio and Video)
After you finish installing Wondershare Filmora from the official website on your computer, launch it.
You can import the MP4 and MP3 files by going to the File menu and then selecting import media files.
Tip: The software comes with a huge built-in library. You can also use it to add sound to your project.
Step 2: Adding media files to Timeline
- Now, hover the mouse over the media files that you have imported.
- Use the drag and drop feature to add the mp4 and mp3 files to the timeline.
If you want to modify the audio, the audio panel can be seen by double-tapping the audio from the timeline. This panel will appear at the top of the screen.
You can explore different options ranging from ducking to denoising.
Step 3: Exporting the File
Now that the audio has been added to the video, select the ‘Export’ tab so that you can export your video.
The exported file can be saved in different formats. (MP4, WMV, etc)
Tip: You can rename and define the resolution for better output.
Merge MP4 and MP3 Using VLC Media Player
VLC is an open-source media player that works for different platforms (Windows, Mac and Linux). The media player comes with features ranging from compression to conversion. This multimedia framework supports audio formats like AC-3, DV Audio, FLAC, MP3, Speex, Vorbis. It also supports different video formats.
If your video has no background sound, you can add it to your videos by following simple steps. Not only that, but you can also change the original audio track to make your video an exquisite piece of art.
The majority of people consider VLC as only a media player. But, it works as a video editor as well. Therefore, it allows you to add background sound to your videos. This handy tool supports various streaming protocols along with almost all multimedia files.
Here is a demonstration for adding audio to your video.
Step 1: Installation
The first step would be installing the VLC media player on your computer and launching it afterward.
Click on Media and then select Convert/Save.
A pop-up window will appear in which you have to select the Add option. This will help you load the targeted video.
Step 2: Playing both audio and video in a synchronous manner
- After loading the video, at the bottom of the dialogue box, tick the Show more options.
- Select the option named ‘Play another media synchronously.
Click Browse to import your desired audio. It will open another window.
Step 3: Adding audio
Click + Add on the second Open Media window. It will load the audio files for the video.
- Now, you’ll have your video and audio files in the formats of mp4 and mp3 respectively.
- Click on Convert/Save
- A pop-up window will appear asking about the format you wish to have for your video.
- Also, by selecting Browse, select the destination where you want to save your video.
- Click on Start so that the video and audio can be merged.
Merge MP4 and MP3 Using Windows Photo App
Windows Photo App is home to all audio and video files on your PC. You can view, edit and store your audio and video files in it. It also allows you to share those among your family and friends. The tool comes with an AI-powered assistant to manage your media efficiently. Hence, you can find your required media files faster.
With its editing features, you can bring dull moments to life. It lets you integrate photos and videos into third-party apps so that you may transform your mundane videos into extraordinary ones.
The App also comes with a backup feature that makes it a safe home for your life’s memories.
If you want to merge recordings of small video clips in no time, then Windows Photo App will assist you in doing it in a jiff. It is a built-in app for Windows 10 and comes with the easiest ways of adding sound to your videos.
Have a look at the following steps.
You can find the Windows Photo app on your desktop or press the Windows + S to open the Start menu search and type Photos in the search box.
- Click on the video editor tab.
- Select the New Video project to start a blank project.
A dialogue box will appear asking to add the desired project name. Enter the name.
You’ll see an add button on the left side. By selecting it, a drop-down menu will appear. It will show you different options for adding video to your project.
Select the desired option and add the video clips.
Adjust the order of your videos by dragging the videos in the storyboard.
- You can trim, split and rotate your videos here.
- It also allows you to use various filters, texts and 3D effects.
- After completing the editing, select the finish video button on the menu bar.
- Select your preferred video quality.
You can add audio by selecting the Custom Audio option.
You will see a window-pane on the right side with different options for adding the sound. You can add it by the drag and drop feature or by clicking on the add file option.
- Select Done to complete the process.
- You have successfully added mp3 to your video file**.**
- Tap on Finish video in the upper right corner to complete the process.
- You can also select the quality of your video.
Click on Export to save your file to your desired destination.
Merge MP4 and MP3 Using Using Online Converter
Different online resources on the internet will help combine videos. You do not have to go through the hassle of downloading and installing third-party apps. Online Converter supports different formats like MP4, AVI, FLV, MOV, 3GP, MKV, etc. With it, you can combine multiple video files into a single file in no time. The most popular output format is MP4.
The procedure is simple. You have to upload your video clips on Online Converter in the order that you want in the final output.
You’ll navigate to a page with options for adding the media files by clicking on the choose file.
After uploading the media files. You will also see options for the audio in a drop-down menu.
Select the Add option to merge mp3 to mp4.
After the mp3 is merged to the mp4, you can download the converted file or share it via social media as well.
Disadvantages
- If your internet connectivity is poor, the videos may take longer to upload.
- If the response time is slow, you need to cancel the process and re-submit the data.
- Encrypted or protected video files are not supported for the merger of the videos.
Conclusion
Each tool comes with its pros and cons. With the wide range of video editing options, you can explore these different platforms and add life to your moments. Whether you are a beginner or an intermediate, editing multimedia files has been made easy by these different tools.
Create Glitch Text Effect
Glitch text effect is a trending video effect whereby the texts get distorted for a few seconds. The effect is comparable to the glitch you face when your screen starts to malfunction, and the screen appears to be wavy and disoriented. A glitch text effect is better than a regular animated text effect as it helps to get the attention of the viewers immediately and get the message across clearly.
The glitch effect can be applied to the entire video as well as the text as per your preference. There are several video editors available where the glitch text effect comes pre-loaded. All you need to do is to apply it to the text and get it done in a few steps. We will illustrate how to add glitch text effect Premiere Pro. But we recommend Filmora for the best glitter text effect that you can add to your video instantly.
Part 1. Create Glitch Text in Video with Filmora
We have already stated that Wondershare Filmora is the best video editor for the best glitch text effect download and apply to your video in simple steps. Filmora is a premium video editor that is widely used by amateur and professional video editors. You can get all glitch text effect After Effects and add them to your video conveniently in comparison to After Effects.
As a matter of fact, there are literally unlimited video and text effects available, and you can find different types of glitch text effects to apply to your titles and texts. Filmora is available for both Windows and mac users. Here are the steps to create glitch text in video with Filmora.
Free Download For Win 7 or later(64-bit)
Free Download For macOS 10.14 or later
Step1 Download and install Filmora on your computer. Go to File> New Project from the menu bar to start video editing project.

Step2 Go to File> Import Media > Import Media Files to import the video clips where you want to add glitch text effect. Drop the clip into the Timeline to get started.

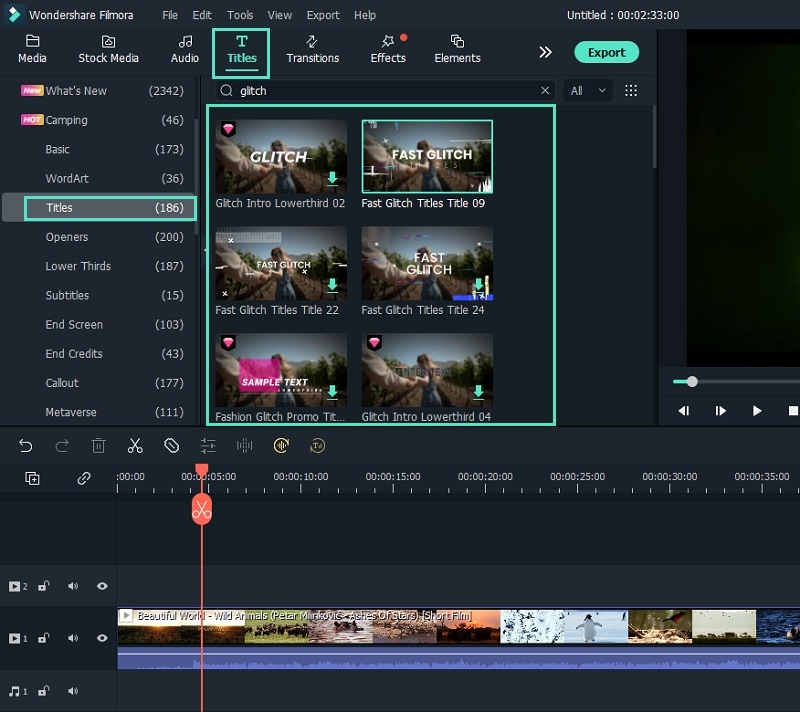
Step3 Go to Titles tab located at the top. From the left panel, click on Titles option. Search “glitch” in the search field and you will see all the glitch text effects that you can apply to the text in your video.
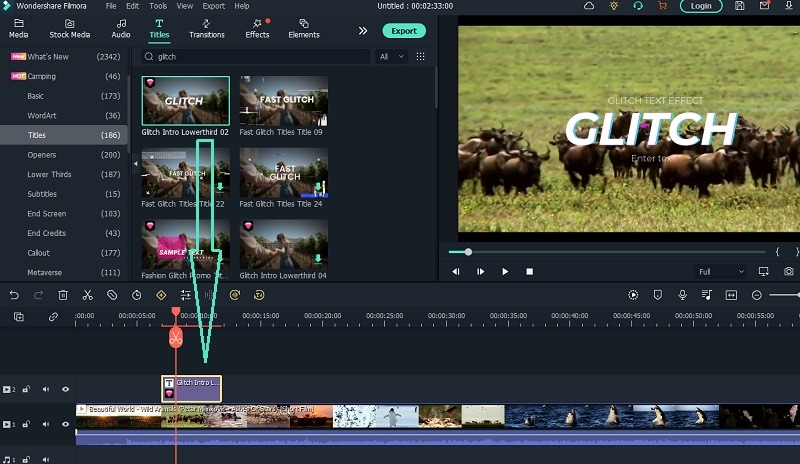
Step4 Select any glitch text effect and drop it into the Timeline above the video clip exactly where you want the text and the effect to appear.
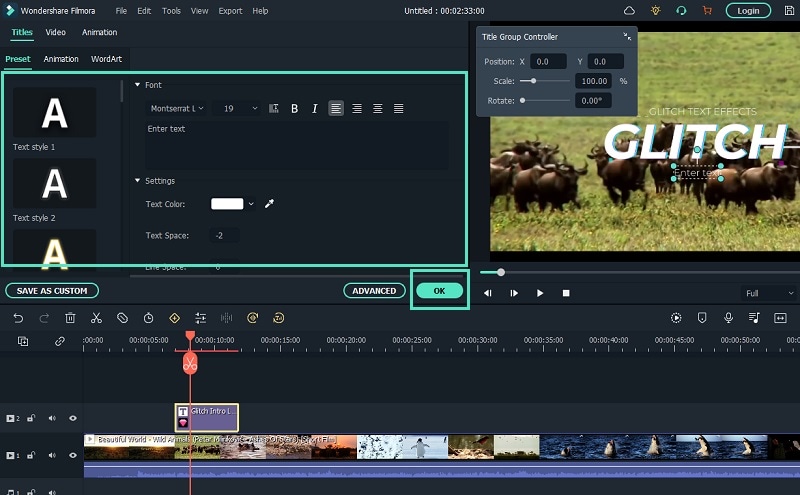
Step5 Double-click on the glitch text effect located on Timeline and edit the text, style, and other parameters as per your preference. Click on Ok and play the video to see your edited video with the glitch text effect.
Part 2. How to Make Glitch Text Effect with Premiere Pro
Adobe Premiere Pro is another renowned video editor where you can add glitch text effect to your video. Premiere Pro is strictly for professional video editors as the user interface is not as intuitive as Filmora . The learning curve is steep, and therefore, you need to go through the steps to add glitch text effect Premiere Pro. There are several glitch text effect presets available that you can apply to any text on your video to make them engaging. Here are the steps to make glitch text effect with Premiere Pro.
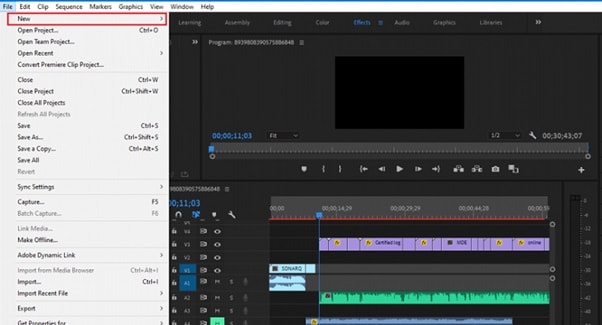
Step1 Launch Adobe Premiere Pro and go to New> Project to get started. Import your video and drop it into Timeline.
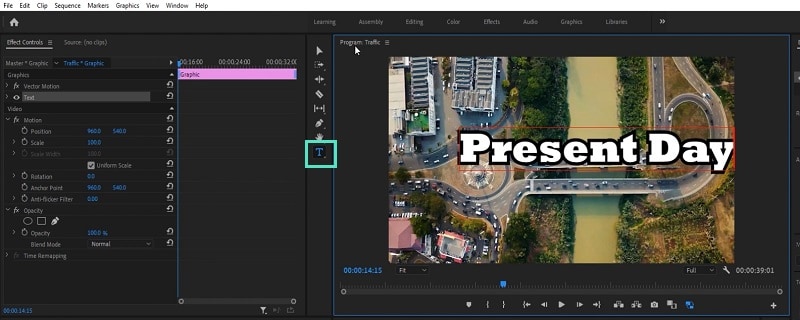
Step2 Use the Type tool to write any text on your video to add glitch text effect. You should have a text layer on Timeline.
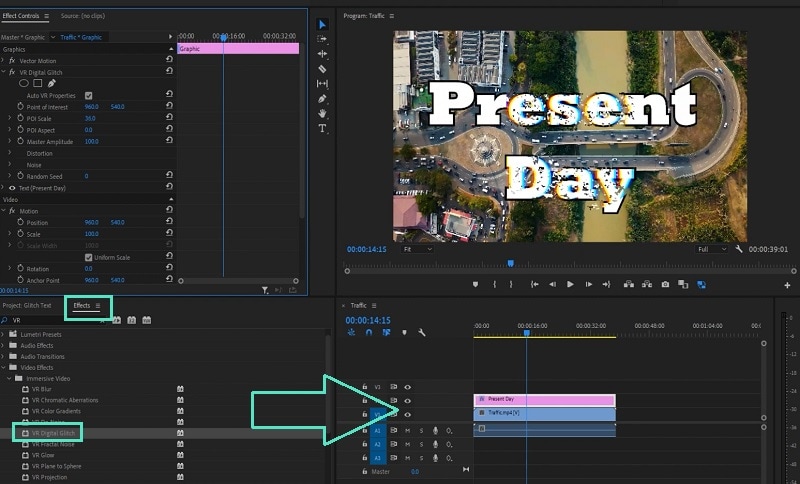
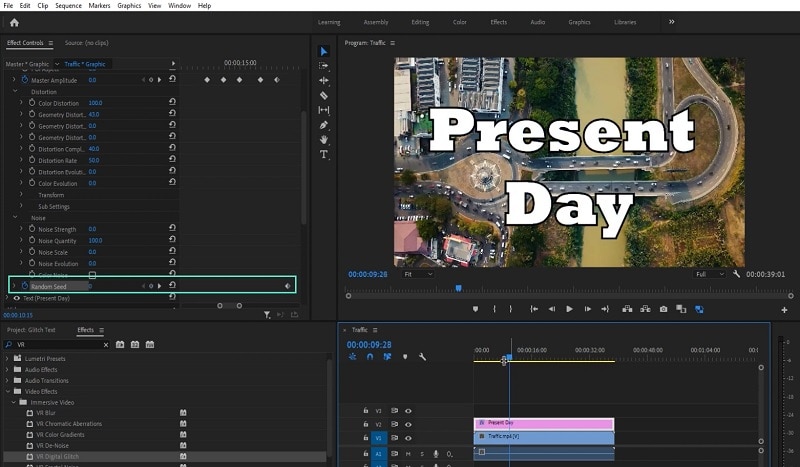
Step3 Go to Effects> Immersive Video> VR Digital Glitch option. Drag and drop the effect to text layer.
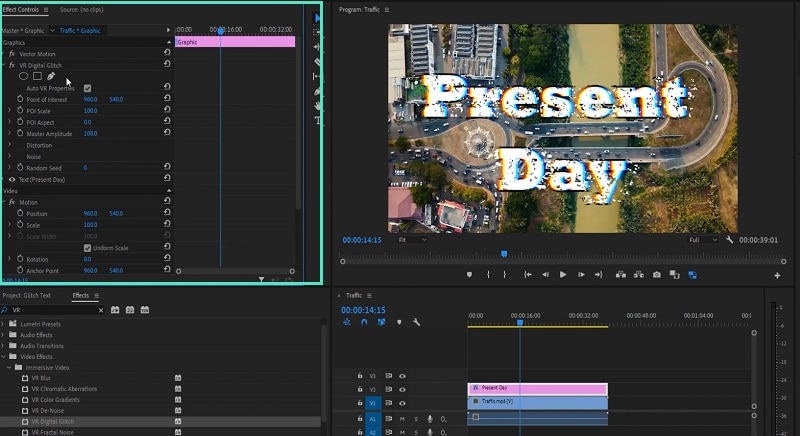
Step4 Under Effect Controls tab, you will find all the different parameters that you can adjust to get the glitch text effect perfectly.
Step5 Turn on Master Amplitude and add multiple keyframes as different points in the Timeline and change the distortion value to make the effect prominent.
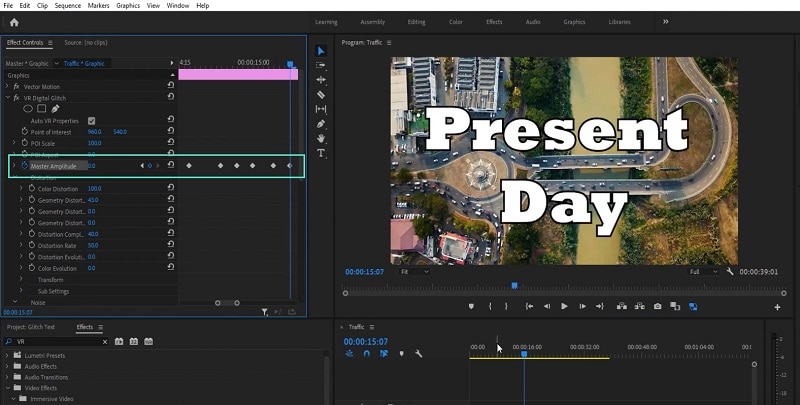
Step6 Go to the first keyframe and turn on Random Seed effect. Go to the last keyframe and turn on Random Seed effect and change the value to 75. Play the video to check the entire video with glitch text effect.
Part 3. Use VSDC Video Editor to Create Glitch Text
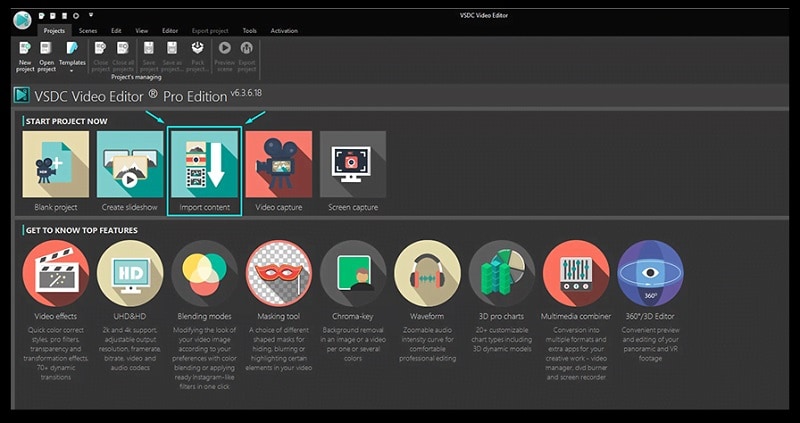
If you do not have any premium video editor on your computer and you do not want to purchase any premium video editor, you can still get glitter text effect free. You need to download and install VSDC free video editor on your computer. But the steps to create glitch text on VSDC video editor are slightly complicated as the user interface is not as intuitive as Filmora . Here are the steps to add free glitch text effect on your video.
Step1 Download and install VSDC video editor. Launch the editor and click on New Project to get started. Import your video to your project where you want to add glitch text effect.
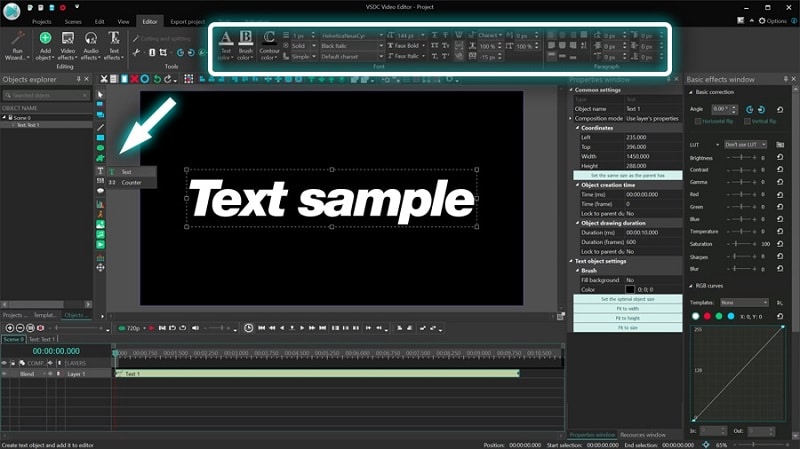
Step2 Use Type tool to write a text on the video. You can press Shift+T shortcut as well. After typing the text, adjust the text style as per your preference.
Step3 Double-click on the text layer on Timeline and go to Video Effects> Special FX and click on Glitch option.
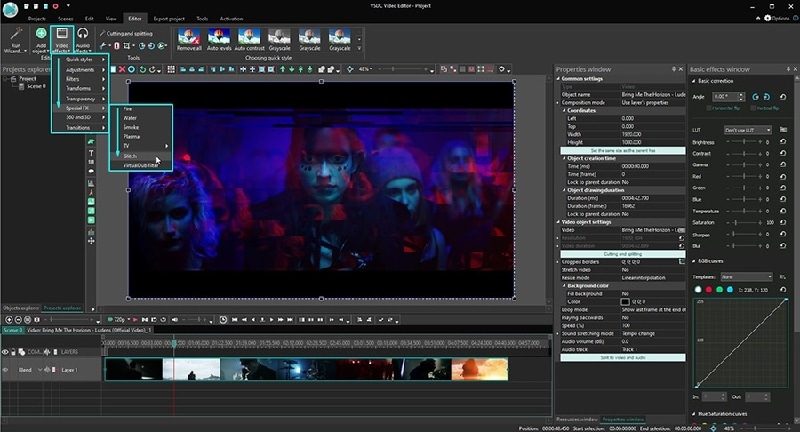
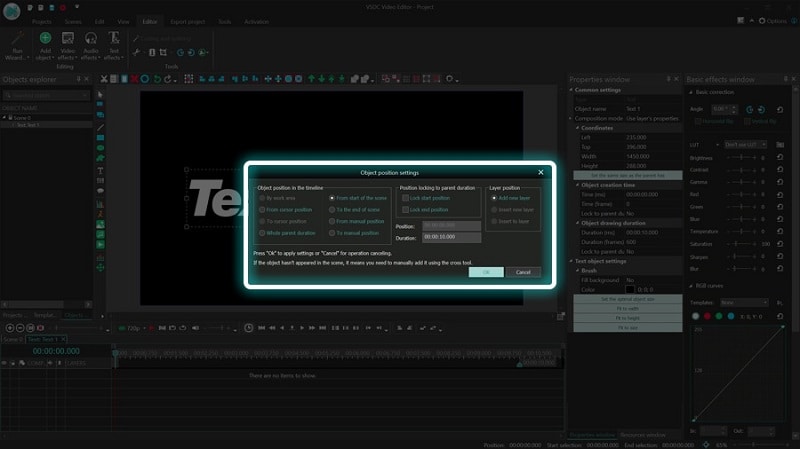
Step4 A window will appear where you can set the starting point, duration, and different parameters. Click on Ok button.
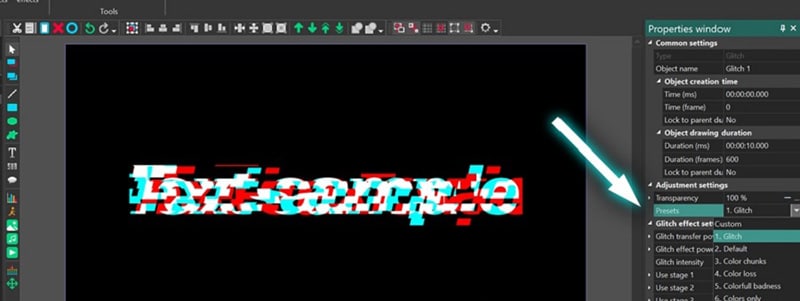
Step5 Go to Properties Windows and click on Presets to select different types of glitch text effects. You can also adjust the intensity of the text effects and other parameters as you feel.
Part 4. Related FAQs about Glitch Text
1. How do you animate glitch text?
If you want to animate glitch text for free, VSDC video editor is ideal as you can customize the effect on any text in simple steps. If you want to use a premium video editor, we recommend Filmora as there are various glitch text effects available to apply to any text on your video instantly.
2. How do you glitch text on video?
First, you have to import your video in your video editor. Type the desired text and set the style. Thereafter, go to glitch text effect presets available on the video editor and apply it to the text instantly. You can customize the glitch text effect as per your preference to make the animation more prominent.
3. How do you glitch text on Android?
You should first install Glitch Video Effect: Glitch FX app from Play Store. Edit your video on the app to add any text, and thereafter, add glitch text effect instantly. In fact, the glitch text effect is available in almost all popular video editor apps on Android due to the effect being trendy and viral.
Free Download For macOS 10.14 or later
Step1 Download and install Filmora on your computer. Go to File> New Project from the menu bar to start video editing project.
Step2 Go to File> Import Media > Import Media Files to import the video clips where you want to add glitch text effect. Drop the clip into the Timeline to get started.
Step3 Go to Titles tab located at the top. From the left panel, click on Titles option. Search “glitch” in the search field and you will see all the glitch text effects that you can apply to the text in your video.
Step4 Select any glitch text effect and drop it into the Timeline above the video clip exactly where you want the text and the effect to appear.
Step5 Double-click on the glitch text effect located on Timeline and edit the text, style, and other parameters as per your preference. Click on Ok and play the video to see your edited video with the glitch text effect.
Part 2. How to Make Glitch Text Effect with Premiere Pro
Adobe Premiere Pro is another renowned video editor where you can add glitch text effect to your video. Premiere Pro is strictly for professional video editors as the user interface is not as intuitive as Filmora . The learning curve is steep, and therefore, you need to go through the steps to add glitch text effect Premiere Pro. There are several glitch text effect presets available that you can apply to any text on your video to make them engaging. Here are the steps to make glitch text effect with Premiere Pro.
Step1 Launch Adobe Premiere Pro and go to New> Project to get started. Import your video and drop it into Timeline.
Step2 Use the Type tool to write any text on your video to add glitch text effect. You should have a text layer on Timeline.
Step3 Go to Effects> Immersive Video> VR Digital Glitch option. Drag and drop the effect to text layer.
Step4 Under Effect Controls tab, you will find all the different parameters that you can adjust to get the glitch text effect perfectly.
Step5 Turn on Master Amplitude and add multiple keyframes as different points in the Timeline and change the distortion value to make the effect prominent.
Step6 Go to the first keyframe and turn on Random Seed effect. Go to the last keyframe and turn on Random Seed effect and change the value to 75. Play the video to check the entire video with glitch text effect.
Part 3. Use VSDC Video Editor to Create Glitch Text
If you do not have any premium video editor on your computer and you do not want to purchase any premium video editor, you can still get glitter text effect free. You need to download and install VSDC free video editor on your computer. But the steps to create glitch text on VSDC video editor are slightly complicated as the user interface is not as intuitive as Filmora . Here are the steps to add free glitch text effect on your video.
Step1 Download and install VSDC video editor. Launch the editor and click on New Project to get started. Import your video to your project where you want to add glitch text effect.
Step2 Use Type tool to write a text on the video. You can press Shift+T shortcut as well. After typing the text, adjust the text style as per your preference.
Step3 Double-click on the text layer on Timeline and go to Video Effects> Special FX and click on Glitch option.
Step4 A window will appear where you can set the starting point, duration, and different parameters. Click on Ok button.
Step5 Go to Properties Windows and click on Presets to select different types of glitch text effects. You can also adjust the intensity of the text effects and other parameters as you feel.
Part 4. Related FAQs about Glitch Text
1. How do you animate glitch text?
If you want to animate glitch text for free, VSDC video editor is ideal as you can customize the effect on any text in simple steps. If you want to use a premium video editor, we recommend Filmora as there are various glitch text effects available to apply to any text on your video instantly.
2. How do you glitch text on video?
First, you have to import your video in your video editor. Type the desired text and set the style. Thereafter, go to glitch text effect presets available on the video editor and apply it to the text instantly. You can customize the glitch text effect as per your preference to make the animation more prominent.
3. How do you glitch text on Android?
You should first install Glitch Video Effect: Glitch FX app from Play Store. Edit your video on the app to add any text, and thereafter, add glitch text effect instantly. In fact, the glitch text effect is available in almost all popular video editor apps on Android due to the effect being trendy and viral.
How Long Does It Take To Edit A Video
If you want to put together the pieces for online videos the number one thing most of the time takes is editing.
Why does editing take so much time and what to do for that?
- Too many choices.
It completely depends upon how many choices you are giving yourself while editing a video. It takes time to make choices. For example, if your friend asks you to buy a card (any card) from the store. You go into the store and start searching cards from more than 50000 cards, it takes time. On the other hand, if your friend asks you to buy a card for his uncle’s pet dog. This time it becomes easier for you to go straight and choose from the pet cards without moving around the birthday and anniversary cards.
- Amount of footage.
It depends upon how much footage you have on your edit and what kind of content you are editing. Some of the content is really complex and takes a lot of time like V-logging but at the same time, you may have content that requires very less edit or zero edit.
The video editing will become a slit and a quick process for you compared to what it was a few years back. But there are a few key things that really speed up the editing process.
I am going to discuss from beginning to end how to edit a video.
- Outline
You should take a paper and write down what you are going to say about your video. It would make your editing easy because you have already structured your content.
- Avoid distractions
While editing you make a flow state in which the editing process becomes easier. But when you got distracted it takes a lot of time to get back to that flow state.
- My kids are my big distraction so, I usually start my editing process after they go to bed. (You can set yours).
- Keep your phone away because it is another distraction that consumes most of your time.
- Don’t keep re-watching your video all the time. Usually, people edit the first clip and before starting to edit the second clip they watch the first clip. After that, they edit the second clip and then re-watch the first and the second clip. It is also wasting a lot of your time. Do it at the end.
How to Edit Video Faster with the Best Video Editor
Filmora 11 is one of the easiest to learn and one of the most beginner-friendly apps. It is available on both Mac and windows. You can download it for free to use its features. Now let’s get started to go deep down into the steps.
- Open the Filmora 11, a window will be opened.
- The Create Project is for a new project.
- You can change the Aspect Ratio coinciding with the social media platforms. Widescreen 16:9 is for TV or YouTube.
- You can use the previously made projects.
- To start with a new project hit the New Project.

In the user interphase, there are 3 basic sections.
- Editing tabs are at the top to change the formatting of the videos.
- Media tab is to Import videos or photos.
- Preview window to watch the editing process.
- Down here is the timeline where all the editing process takes place.

- Select the video from the system storage and drag it and drop it into the timeline.
- The video then be visible in the preview window.

You can split, cut, trim, delete, animate, and add effects and music. There are hundreds of editing features inside the menu bar that provide the edit controls and you can enjoy editing in the palm of your hand.
Here is an important feature you should know.
- Select the video and hit the speed
- You can select slow, fast, normal, and the most interesting one is speed ramping.
- Speed ramping allows you to set automatically made patterns to slow down then fast again slow. It will create a cinematic effect in the video. But this feature is only for paid users.

- Here is another very interesting tool the color correction tool. To get a uniform color in the combination of different clips, you can automatically set the color correction and color match.
- You can match the reference frame with the current to match their colors.

- Hit the File option and select the Save as Project.
- Now hit the Export tab to export the video. You can set the format of the video and the platform like YouTube, Instagram, Facebook, or any of them.

It will give you the fundamental framework for editing any video using Filmora 11.
1. Photos app for Windows 10.
I am going to show you how you can edit videos in Windows 10 using the app that comes with windows 10. Yes! Windows 10 include a free video editor and I am going to tell you step-by-step how to take advantage of it. If you are using windows 7 or windows 8 don’t feel let down, you can also create windows 10 totally free.
Microsoft has added the Photos app to Windows 10 and has added a fully functional video editor. You can do all sorts of things like trimming and splitting clips and re-organizing clips.

The great news is you don’t have to go out and buy a video editor or search for the video editor to download on your system instead if you are Windows 10 you already have some awesome software to edit your videos.
2. CapCut App for Android.
CapCut is the best video editing app, whether you are making videos for youtube, TikTok, Instagram, or Facebook. It is a free and all-in-one video editing app and you can use it without watermarks and annoying ads. The good thing about this app is, that it is very easy to use. Now let’s have a quick overview of the CapCut app.
- After opening your video select the clips you want to edit and here you will get a project timeline.

Here you can add, move or replace clips and can perform even more editing in the timeline.
You can split, trim, and delete

You can also apply some filters and adjustments. Adding text, stickers, and audio and the rest of the editing is just fun doing in CapCut. You can change the animation and style of your video in just a few clicks.

It also provides us with the Effects options.
- The video effects are effects on the entire video.
- The body effects are the effects applied only on the body.

Let’s enjoy its advanced features without paying for monthly subscription.
3. Davinci Resolve for Mac.
The Davinci Resolve is the most professional video editing software on Mac. It is absolutely ridiculous that it is giving access to you for free. Along with this, it is very professional video editing software that people used to create Hollywood movies and that kind of stuff. It provides a very easy and professional interphase that anyone can use without having training.
- The controls and features in the software are amazing and can edit videos frame by frame.

- There is also a dedicated area for audio creation.

- The motion graphics and

- A specific area just for color grading and color correcting.

That’s why the Davinci Resolve has got its name as a finishing application of movies. People come in and color grade their videos. As it is a very powerful software hence if you are working with an old computer and that’s not really a powerful computer, the Davinci Resolve would not be going to work properly for you.
It completely depends upon how many choices you are giving yourself while editing a video. It takes time to make choices. For example, if your friend asks you to buy a card (any card) from the store. You go into the store and start searching cards from more than 50000 cards, it takes time. On the other hand, if your friend asks you to buy a card for his uncle’s pet dog. This time it becomes easier for you to go straight and choose from the pet cards without moving around the birthday and anniversary cards.
- Amount of footage.
It depends upon how much footage you have on your edit and what kind of content you are editing. Some of the content is really complex and takes a lot of time like V-logging but at the same time, you may have content that requires very less edit or zero edit.
The video editing will become a slit and a quick process for you compared to what it was a few years back. But there are a few key things that really speed up the editing process.
I am going to discuss from beginning to end how to edit a video.
- Outline
You should take a paper and write down what you are going to say about your video. It would make your editing easy because you have already structured your content.
- Avoid distractions
While editing you make a flow state in which the editing process becomes easier. But when you got distracted it takes a lot of time to get back to that flow state.
- My kids are my big distraction so, I usually start my editing process after they go to bed. (You can set yours).
- Keep your phone away because it is another distraction that consumes most of your time.
- Don’t keep re-watching your video all the time. Usually, people edit the first clip and before starting to edit the second clip they watch the first clip. After that, they edit the second clip and then re-watch the first and the second clip. It is also wasting a lot of your time. Do it at the end.
How to Edit Video Faster with the Best Video Editor
Filmora 11 is one of the easiest to learn and one of the most beginner-friendly apps. It is available on both Mac and windows. You can download it for free to use its features. Now let’s get started to go deep down into the steps.
- Open the Filmora 11, a window will be opened.
- The Create Project is for a new project.
- You can change the Aspect Ratio coinciding with the social media platforms. Widescreen 16:9 is for TV or YouTube.
- You can use the previously made projects.
- To start with a new project hit the New Project.
In the user interphase, there are 3 basic sections.
- Editing tabs are at the top to change the formatting of the videos.
- Media tab is to Import videos or photos.
- Preview window to watch the editing process.
- Down here is the timeline where all the editing process takes place.
- Select the video from the system storage and drag it and drop it into the timeline.
- The video then be visible in the preview window.
You can split, cut, trim, delete, animate, and add effects and music. There are hundreds of editing features inside the menu bar that provide the edit controls and you can enjoy editing in the palm of your hand.
Here is an important feature you should know.
- Select the video and hit the speed
- You can select slow, fast, normal, and the most interesting one is speed ramping.
- Speed ramping allows you to set automatically made patterns to slow down then fast again slow. It will create a cinematic effect in the video. But this feature is only for paid users.
- Here is another very interesting tool the color correction tool. To get a uniform color in the combination of different clips, you can automatically set the color correction and color match.
- You can match the reference frame with the current to match their colors.
- Hit the File option and select the Save as Project.
- Now hit the Export tab to export the video. You can set the format of the video and the platform like YouTube, Instagram, Facebook, or any of them.
It will give you the fundamental framework for editing any video using Filmora 11.
1. Photos app for Windows 10.
I am going to show you how you can edit videos in Windows 10 using the app that comes with windows 10. Yes! Windows 10 include a free video editor and I am going to tell you step-by-step how to take advantage of it. If you are using windows 7 or windows 8 don’t feel let down, you can also create windows 10 totally free.
Microsoft has added the Photos app to Windows 10 and has added a fully functional video editor. You can do all sorts of things like trimming and splitting clips and re-organizing clips.
The great news is you don’t have to go out and buy a video editor or search for the video editor to download on your system instead if you are Windows 10 you already have some awesome software to edit your videos.
2. CapCut App for Android.
CapCut is the best video editing app, whether you are making videos for youtube, TikTok, Instagram, or Facebook. It is a free and all-in-one video editing app and you can use it without watermarks and annoying ads. The good thing about this app is, that it is very easy to use. Now let’s have a quick overview of the CapCut app.
- After opening your video select the clips you want to edit and here you will get a project timeline.
Here you can add, move or replace clips and can perform even more editing in the timeline.
You can split, trim, and delete
You can also apply some filters and adjustments. Adding text, stickers, and audio and the rest of the editing is just fun doing in CapCut. You can change the animation and style of your video in just a few clicks.
It also provides us with the Effects options.
- The video effects are effects on the entire video.
- The body effects are the effects applied only on the body.
Let’s enjoy its advanced features without paying for monthly subscription.
3. Davinci Resolve for Mac.
The Davinci Resolve is the most professional video editing software on Mac. It is absolutely ridiculous that it is giving access to you for free. Along with this, it is very professional video editing software that people used to create Hollywood movies and that kind of stuff. It provides a very easy and professional interphase that anyone can use without having training.
- The controls and features in the software are amazing and can edit videos frame by frame.
- There is also a dedicated area for audio creation.
- The motion graphics and
- A specific area just for color grading and color correcting.
That’s why the Davinci Resolve has got its name as a finishing application of movies. People come in and color grade their videos. As it is a very powerful software hence if you are working with an old computer and that’s not really a powerful computer, the Davinci Resolve would not be going to work properly for you.
Also read:
- Updated In 2024, 3GP Video Format What Is 3GP Format And How To Open It?
- New How to Split a Video Into Parts on All Platforms for 2024
- New How to Create Emoji on Mac That Take Less Than 10 Mins
- Perfect Guide for Beginners to Make a TikTok with Multiple Clips
- New In 2024, How to Use iMovie Text Effects
- 2024 Approved 2 Solutions to Crop a Video Using After Effects
- New Ever Wondered About the Similarity You Bear with an Anime Character? If You Have Not yet Looked Into This Exciting Aspect of Motion Graphic Design, You Can Very Well Break the Ice Here
- New Secret Tips & Tricks to Use in Filmora for 2024
- New What Is AI Composite Video App and AI Composite Video Guide
- Updated Looking for the Tools that Can Let You Blend Images Perfectly for Creating an Awesome Collage? Shortlisted for You Are the Best Bend Collage Program for an Effortless Task
- 2 Ways to Fade in Text in Premiere Pro
- Quick Solved How to Add Subtitles to a Video on iPhones
- Updated In 2024, TEXT REVEAL Animation | Easy Masking Filmora
- You Can Learn How to Color Grade Your Picture in Lightroom Effectively. By Understanding the Process of Color Grading in Lightroom, You Can Create Unique Works, and Improve Your Abilities for 2024
- You Are Planning to Convert an AVI to GIF Online but You Are Not Sure How? If You Are Looking for an Idea on How to Do It, You Have Come to the Right Place
- 2024 Approved 3D Ray Traced Settings In After Effects A Comprehensive Guide
- New In 2024, WebM to GIF Converters (Online and Offline Solutions)
- How to Share/Fake Location on WhatsApp for Motorola Razr 40 | Dr.fone
- In 2024, How To Leave a Life360 Group On Realme V30T Without Anyone Knowing? | Dr.fone
- In 2024, Full Guide to Bypass Lava Agni 2 5G FRP
- In 2024, 4 Ways to Transfer Messages from Apple iPhone 7 Plus to iPhone Including iPhone 15 | Dr.fone
- In 2024, Full Guide to Fix iToolab AnyGO Not Working On Xiaomi Redmi Note 12 Pro 5G | Dr.fone
- Ways to stop parent tracking your Realme C67 4G | Dr.fone
- In 2024, How to Change/Fake Your Nubia Z50 Ultra Location on Viber | Dr.fone
- How to Remove Apple ID from iPhone SE without Password?
- In 2024, Dose Life360 Notify Me When Someone Checks My Location On Apple iPhone 14 Pro? | Dr.fone
- How To Transfer WhatsApp From Apple iPhone 15 Pro to other iPhone 15 Pro devices? | Dr.fone
- How to Upgrade Apple iPhone 11 without Losing Anything? | Dr.fone
- Honor 90 Pro ADB Format Tool for PC vs. Other Unlocking Tools Which One is the Best?
- How Can I Catch the Regional Pokémon without Traveling On Realme Note 50 | Dr.fone
- Fixing Foneazy MockGo Not Working On Itel P40+ | Dr.fone
- Title: Updated Are You Finding It Challenging to Upload and Create a Link for Your Video? Well, This Detailed Upload Video to Link Guide Will Help You with This. Check It Out Now for 2024
- Author: Morgan
- Created at : 2024-04-24 01:08:21
- Updated at : 2024-04-25 01:08:21
- Link: https://ai-video-editing.techidaily.com/1713961432900-updated-are-you-finding-it-challenging-to-upload-and-create-a-link-for-your-video-well-this-detailed-upload-video-to-link-guide-will-help-you-with-this-chec/
- License: This work is licensed under CC BY-NC-SA 4.0.
