
:max_bytes(150000):strip_icc():format(webp)/GettyImages-1250476440-2ff779100e984029aa752236f9791b11.jpg)
Updated Green Screens Are a Fun Way for Creators to Bring Their Personality to Their Stream, Allowing Them to Dynamically Alter Their Stream Background and Make Their Content Appear Even More Engaging and Polished for 2024
Green Screens Are a Fun Way for Creators to Bring Their Personality to Their Stream, Allowing Them to Dynamically Alter Their Stream Background and Make Their Content Appear Even More Engaging and Polished
Green screens are a fun way for creators to bring their personality to their stream, allowing them to dynamically alter their stream background and make their content appear even more engaging and polished. With Twitch green screen background, you can easily configure Chroma key settings and detect your green screen with a single click.
The twitch green screen attaches directly to the back of your chair. You don’t have to worry about stands, or spacing behind your chair. Just attach it and go. This portable green screen can fit on the back of your chair a feature that makes it easy to assemble and use for start-up twitchers.
How to set up a Green Screen with Twitch Studio
**Set Up Your Camera
First things first, make sure that your camera is being detected on Twitch Studio. If you do not already have a layer with your webcam on your scene, click Edit Scene and add a webcam layer by clicking the + icon on the left next to Layers.
Once your webcam layer has been created, make sure that the desired device is selected, plugged in, and that you have not turned off every webcam (Camera icon on the bottom left of Twitch Studio).
**Set Up Your Green Screen
Once your green screen is set up in your background, select your webcam layers to display your webcam settings.
We recommend using the Auto-Detect Color feature as it will automatically detect the best color code for you and will be a great base to work from. If you prefer, you can manually pick the color code by either providing the color code in the Color to Remove field or clicking on the colored square to display a color spectrum that you can select from.
The Chroma Key section is located at the bottom of the webcam settings, and you will be able to toggle the chroma key on and off by clicking the eye icon.
To adjust the chroma key settings, you can click on Edit Chroma Key. You will be able to change the color code and change similarity, edge transparency and color correction for the perfect fit.
Other free ways to set up green screen for Twitch streams
OBS
OBS Studio is a free and open-source app for screen-casting and live streaming. Written in C/C++ and built with Qt, OBS Studio provides real-time capture, scene composition, recording, encoding, and broadcasting via the Real Time Messaging Protocol(RTMP).It can stream Videos to any RTMP supporting destination including YouTube, Twitch, Instagram and Facebook.
OBS Green Screen Set-up Steps
- Make sure you have the following equipment prepared: a solid green background, webcam or video camera, lighting, and OBS Studio.
- Download the latest stable version of OBS Studio from the official website and install the software. Open OBS and let the Auto-Configuration Wizard optimize the software’s settings based on your hardware.
- Now you can add a video source.
- Right-click on the video source you’ve created and select Filter.
- Click the +button under the Effects Filters section and select Chroma Key.
- Type in a name for this effect layer.
- After you add a chroma key, OBS will automatically create and adjust the baseline settings for the filter. You can experiment with the sliders and settle when you are satisfied with the result.
- Make sure you aren’t wearing any green or reflective material. You can double-checkthe performance on the preview screen.
- If things are working smoothly, you are all set to start streamingwith the green screen on.
Pro tip:
You can follow the instructions above and live stream to multiple platforms at once with Restream. Multistreaming to platforms like YouTube, Facebook, Twitter, Twitch, and LinkedIn allows you to drastically increase the audience reach and grow your followers.
XBOX
It is a video gaming brand created and owned by Microsoft. The brand consists of five video game consoles, as well as applications(games), streaming services, an online service by the name of Xbox network, and the development arm by the name of Xbox Game Studios. The brand was first introduced in the United States in November 2001, with the launch of the original Xbox console.
Steps on Using Xbox Green Screen
Make your Xbox console reflect your personal style by changing its look and feel. Choose a favourite colour, update your background with game art or a customised image, or select a different theme.
Choose your color
The color you choose will appear in tiles and accents on your Xbox. It also follows you to any console you sign in to.
- Press the Xboxbutton on your controller to open the guide, and then select Profile & system > Settings > General > Personalisation > My color & theme > My color.
- Select a color, and then select OK.
**Choose your background
Your background appears where you’d expect it to—in the background of Home. It can be a solid color or an image, such as game art, achievement art, a screenshot, or a customized image. Achievement art follows you to any Xbox, but screenshots and customized images stay on the console that they’re set to.
To choose your background, press the Xbox button on your controller to open the guide, and then select Profile & system > Settings > General > Personalization > My background.
From here, choose from the following options:
**Solid color and game art
Select a background color, and then select OK. To then add game art, choose the game most recently played and the game art will appear as the background.
**Achievement art
- Select Achievement art> Gaming.
- Select a game from your list of games with achievements.
- Select the achievement with the background art you want.
- Select Set as background.
**Custom image
Note Customized images must be smaller than 3 MB, and the best size for backgrounds is 1920 x 1080.
- Copy a JPG or PNG file that you want to use to a USB device, and then plug it into your Xbox.
- On your Xbox, select Customized image. A dialogue box appears that shows the contents of your console and attached USB device.
- Select the USB device, and then choose your image.
**Screenshot
- Select Screenshot, then choose the one you want.
- Select More actions> Set as background.
**Dynamic background
Note Dynamic backgrounds are only available on Xbox Series X|S.
- Select Dynamic background.
- Select the background art you want.
- Select Apply.
Note Some dynamic backgrounds are only available through promotions with special edition hardware (like the 20th Anniversary Special Edition controller). To see one of these special dynamic backgrounds in your list of options, make sure your special edition hardware is turned on and in use with your console when you set your background.
**Remove customized background
If you want to remove your background, select Remove customized background.
**Choose your theme
Themes can be set to dark or light and can also be scheduled. To set a theme:
- Press the Xboxbutton on your controller to open the guide, and then select Profile & system > Settings > General > Personalization.
- Select My color & theme.
- Under System theme, select Darkor Light. Select Scheduled to activate your theme according to specific times, or to start at sunrise and sunset.
Themes stay on the console they’re set to.
Solid Color
Achievement Art
Custom Image
Remove Custom Background
Filmora
Wondershare Filmora is the one of best video editing software with cool features that compares to other competing video editing Softwares. Many video editing programs claim to offer professional results; Filmora is one of a few consumer-level tools that actually delivers.
For Win 7 or later (64-bit)
For macOS 10.12 or later
Key Features
4k editing support
GIF support
Noise removal
Color tuning
Advanced tech editor
Audio mixer
Video stabilization
Scene detection
Conclusion
You probably already have an idea of how to use a green screen, at least in principle. You film something or someone in front of a colored background — the green screen — then you replace everything that’s in the color of the screen with other footage, images, charts, presentations, or whatever visuals you want. However, Chroma keying a live stream works almost the same way. The main difference is that you have to replace the green screen as you’re filming, rather than during editing.
How to Use Kahoot! On Zoom
In the educational game Kahoot! participants respond to multiple-choice questions based on trivia. Each participant uses their own controller to answer questions in the online game. There are several question kinds to pick from, allowing for complete customization of the test. Each player needs their own controller for Kahoot! The game questions will be shown in the Zoom/Google Meet window, but the answers must be entered using the controller. With the Kahoot!! app for Zoom, presenters may use play and friendly rivalry to increase participant engagement. Users may organize knowledge- and feedback-gathering pulse checks with staff members, encourage original thought with word clouds, and empower participants’ voices with surveys, open-ended questions, and other tools. Utilizing the brainstorm tool, organizations may crowdsource ideas and advance teamwork.
Engagement has emerged as a crucial component of successful learning, collaboration, and connection as the globe has increased the use of video communications in social and professional situations. Users may access, host, and play Kahoot!! games and educational information with other meeting participants using the Kahoot!! app for Zoom without ever leaving the Zoom Meeting or requiring a second device. Corporate executives may motivate their staff via speeches, meetings, and online activities. Meeting hosts will have immediate access to data and statistics from their Kahoot!! experience, allowing them to respond in real time to audience engagement with the material. Additionally, hosts may email the Kahoot!! games to all participants so they can practice and improve their scores, which will increase participant engagement and learning retention. Hosts can also distribute the Kahoot!! games as self-paced challenges with individuals who couldn’t attend in person.
Part 1: Key Features of Kahoot
What more is there to discuss, Kahoot!? Every pupil adores it. Many instructors and educators use it all around the world to make learning simple, enjoyable, and interesting. Everyone may use it since it is free and extremely simple to use. These are some of its attributes:
- Quizzes may be made in a matter of minutes.
- Develop games based on the abilities of the kids. Playing at home or in the Zoom is simple for them.
- Various templates are offered. You can choose one of them with confidence.
- Kahoot! has the ability to be organized into many folders according to topics or subjects.
- Additionally, multiple choice questions may be included by quiz makers.
- Teachers using Kahoot! may combine different questions into one format, such as quizzes, polls, riddles, and slides.
- Use Apple Schoolwork, Google Zooms, and Microsoft Teams to share student-centered tasks.
Part 2: How to Host a Kahoot! Session within a Zoom Meeting
With the Zoom app, Kahoot! may be viewed, hosted, and used. It’s amazing that Kahoot!!, one of the most well-known brands in quiz-based learning, still provides a free-to-use platform, making it very accessible to both instructors and students. It’s also a useful resource for a hybrid class that combines online and classroom instruction. Most devices will be able to use the cloud-based service using a web browser. This implies that students using computers, tablets, and cellphones in class or at home may access this. Participants in Zoom Meetings may play games and learn without having to leave the Zoom meeting or bring a second device.
Step1Sign up for Zoom ahead of time and get ready. On the other hand, launch the Kahoot! test in your web browser, then be ready to share your screen in Zoom.
Step2As the participants come, allow them in and check to see whether you and they can both hear each other. To access the Kahoot! quiz, make sure they have a device or another browser tab open.
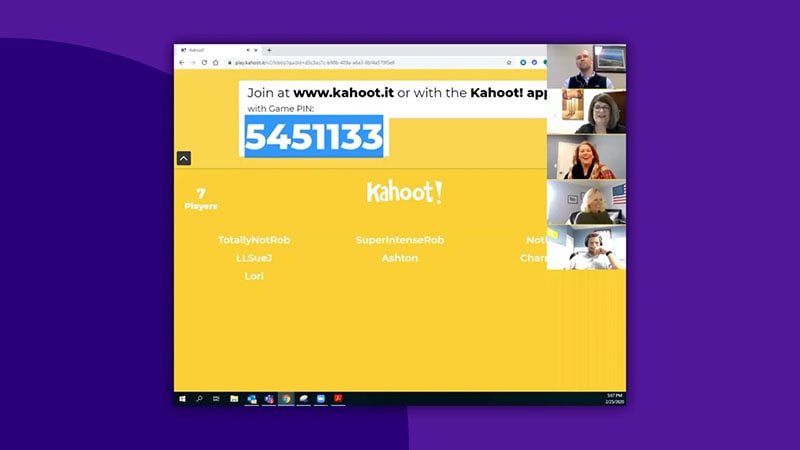
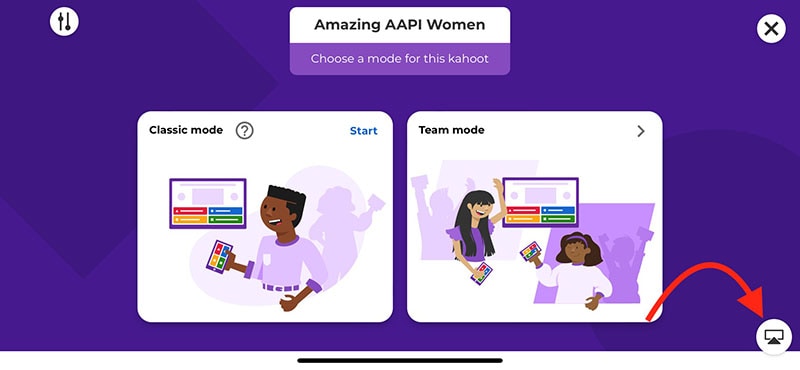
Step3Open the Kahoot! test and share it using Zoom’s “Share Screen” feature. While your screen is shared, continue to host the Kahoot! as normal. To view participants next to your shared screen, we advise selecting Side-by-Side Mode.
Part 3: How to Participate in Kahoot! Sessions within a Zoom Meeting
With more than 40 million ready-made games available on Kahoot!!, getting started is fast and simple. When time and resources are limited, hybrid or distant learning is ideal. After linking the Kahoot! to your Zoom account, you may utilize it. Use this app and start a meeting. Go to Apps on the toolbar and choose the program you wish to use. Select Who is Hosting to locate their host or to join a Kahoot! session being hosted by a friend or another player. Players may post a question to a shared screen on the Kahoot! platform. Kahoot!! just needs an account to be made in order to use it since it is free. Most devices may be used by students to access Kahoot!! from wherever there is an internet connection. This is how:
Step1Take the time to check that Zoom, Skype, Cisco Webex, or Google Hangout are operating and that your camera, microphone, and speaker are all operational.
Step2In the right-side panel, add the Kahoot!! app to your list of apps and click Join.
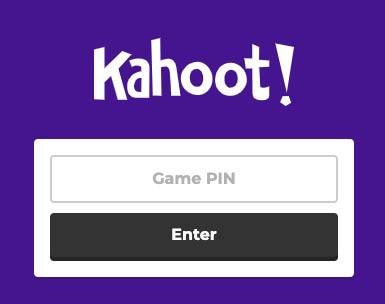
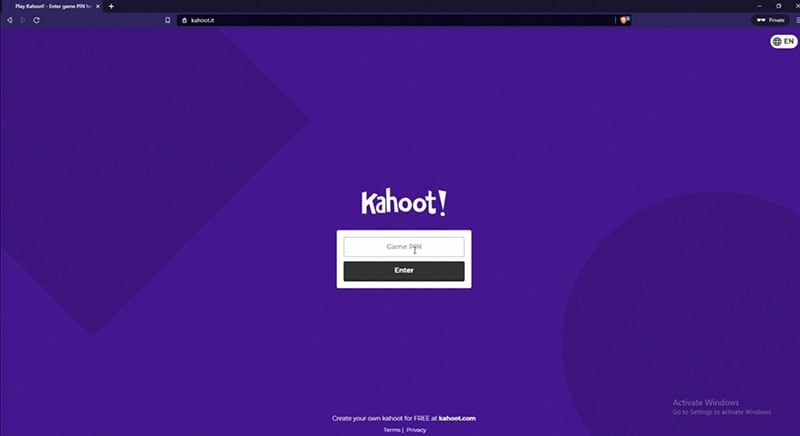
Step3The lobby will reveal your game PIN when you click the Play button, allowing the computer to show you a Kahoot! You may enter the game PIN and press Enter to join the Kahoot! session once the host shows their screen with you. To participate in a Kahoot! session, you don’t need a Kahoot! account.
Part 4: How to Record Zoom Meetings
Zoom is a conference tool that enables real-time, high-quality, low-latency communication. Filmora is an excellent video recorder for that reason, enabling users to capture on-screen activity such Zoom audio tracks and video conversations. Wondershare One of the most versatile and portable Zoom voice recorders is the Filmora. Even novices may easily utilize it due to its user-friendly UI. All you have to do is click the record button after choosing the proper audio source in the settings. The all-in-one video editing program Filmora allows you to record your screen with audio, a facecam, and a green screen effect. You can record the entire screen or just a portion of it, and you can perform a number of quick edits on your video using tools like trimming, cropping, changing the audio track’s volume, and so on.
How to Use Filmora to Record Zoom Lectures
Having said that, Filmora is a great Zoom recorder that can capture games, audio, and video conversations. This video recorder may be used to make video clip lessons in addition to recording movies, video games, and webcam footage. In addition to Zoom, it can also capture internet streaming audio. Here is information on how to record Zoom meetings using this software:
Step1Download and Install Filmora on your PC
To use this program for a number of tasks, including screen recording and recording editing, you must first download and install it on your computer. To achieve this, download the recording program by clicking the link below. Launch the program as soon as the download is finished to start the installation process, and then adhere to the on-screen directions to install and make this software available for usage.
Step2Choose the Record’s Ideal Position in the Zoom
Use it on your PC at this point. As soon as you start the program, a window interface with two choices for screen recording, editing already recorded videos, and generating videos will display. Choose the Recording option from the menu. When you click the record button, the program will direct you to the recording interface, where you can easily adjust the settings for your camera and audio. To add the microphone or Zoom sound in that particular field, use the necessary buttons as described below:
Step3Press the Record Button
It goes without saying that you must test your recording tools to ensure they are functional and capturing the highest quality audio. But once you’re ready, click the record button, which will allow you 3-5 seconds before starting to record the personalized screen of your PC as seen below:
Step4Export and Save Your Zoom Recording
You may now save the Zoom video for sharing on social media after making and modifying it. The following file types may be used to save the document: MP4, WMV, AVI, MOV, GIF, and MP3. The finest feature of Wondershare Filmora is the direct export and sharing of Zoom video recordings to YouTube; the only need is that you must be signed in to your YouTube account inside the application:
Because the MOV format is only available for online movies, you may also export your Zoom recordings to MP4 if you want to publish them to your YouTube channel. You are free to choose the format that best suits your needs. You may choose the encoder from a drop-down menu in the export options.
Conclusion
With the aid of several interesting tools and programs made accessible in this virtual environment, learning has now become enjoyable. Of them is Kahoot! In Zoom. It is an application that acts as a learning tool by providing fun games, tests, and a variety of other chances. In only a few minutes, quizzes may be made and distributed. Games and quizzes may be planned using this platform quite easily. The Kahoot! with Zoom will make it simpler than ever for corporate leaders to engage and encourage their team members with Kahoot!! engaging game-based learning experiences at a time when many organizations are staying virtual or planning for a hybrid model. Head towards recording Kahoot with Filmora to experience a smooth Kahoot! usage on Zoom. Plus, you can also share the gameplay afterwards.
In the educational game Kahoot! participants respond to multiple-choice questions based on trivia. Each participant uses their own controller to answer questions in the online game. There are several question kinds to pick from, allowing for complete customization of the test. Each player needs their own controller for Kahoot! The game questions will be shown in the Zoom/Google Meet window, but the answers must be entered using the controller. With the Kahoot!! app for Zoom, presenters may use play and friendly rivalry to increase participant engagement. Users may organize knowledge- and feedback-gathering pulse checks with staff members, encourage original thought with word clouds, and empower participants’ voices with surveys, open-ended questions, and other tools. Utilizing the brainstorm tool, organizations may crowdsource ideas and advance teamwork.
Engagement has emerged as a crucial component of successful learning, collaboration, and connection as the globe has increased the use of video communications in social and professional situations. Users may access, host, and play Kahoot!! games and educational information with other meeting participants using the Kahoot!! app for Zoom without ever leaving the Zoom Meeting or requiring a second device. Corporate executives may motivate their staff via speeches, meetings, and online activities. Meeting hosts will have immediate access to data and statistics from their Kahoot!! experience, allowing them to respond in real time to audience engagement with the material. Additionally, hosts may email the Kahoot!! games to all participants so they can practice and improve their scores, which will increase participant engagement and learning retention. Hosts can also distribute the Kahoot!! games as self-paced challenges with individuals who couldn’t attend in person.
Part 1: Key Features of Kahoot
What more is there to discuss, Kahoot!? Every pupil adores it. Many instructors and educators use it all around the world to make learning simple, enjoyable, and interesting. Everyone may use it since it is free and extremely simple to use. These are some of its attributes:
- Quizzes may be made in a matter of minutes.
- Develop games based on the abilities of the kids. Playing at home or in the Zoom is simple for them.
- Various templates are offered. You can choose one of them with confidence.
- Kahoot! has the ability to be organized into many folders according to topics or subjects.
- Additionally, multiple choice questions may be included by quiz makers.
- Teachers using Kahoot! may combine different questions into one format, such as quizzes, polls, riddles, and slides.
- Use Apple Schoolwork, Google Zooms, and Microsoft Teams to share student-centered tasks.
Part 2: How to Host a Kahoot! Session within a Zoom Meeting
With the Zoom app, Kahoot! may be viewed, hosted, and used. It’s amazing that Kahoot!!, one of the most well-known brands in quiz-based learning, still provides a free-to-use platform, making it very accessible to both instructors and students. It’s also a useful resource for a hybrid class that combines online and classroom instruction. Most devices will be able to use the cloud-based service using a web browser. This implies that students using computers, tablets, and cellphones in class or at home may access this. Participants in Zoom Meetings may play games and learn without having to leave the Zoom meeting or bring a second device.
Step1Sign up for Zoom ahead of time and get ready. On the other hand, launch the Kahoot! test in your web browser, then be ready to share your screen in Zoom.
Step2As the participants come, allow them in and check to see whether you and they can both hear each other. To access the Kahoot! quiz, make sure they have a device or another browser tab open.
Step3Open the Kahoot! test and share it using Zoom’s “Share Screen” feature. While your screen is shared, continue to host the Kahoot! as normal. To view participants next to your shared screen, we advise selecting Side-by-Side Mode.
Part 3: How to Participate in Kahoot! Sessions within a Zoom Meeting
With more than 40 million ready-made games available on Kahoot!!, getting started is fast and simple. When time and resources are limited, hybrid or distant learning is ideal. After linking the Kahoot! to your Zoom account, you may utilize it. Use this app and start a meeting. Go to Apps on the toolbar and choose the program you wish to use. Select Who is Hosting to locate their host or to join a Kahoot! session being hosted by a friend or another player. Players may post a question to a shared screen on the Kahoot! platform. Kahoot!! just needs an account to be made in order to use it since it is free. Most devices may be used by students to access Kahoot!! from wherever there is an internet connection. This is how:
Step1Take the time to check that Zoom, Skype, Cisco Webex, or Google Hangout are operating and that your camera, microphone, and speaker are all operational.
Step2In the right-side panel, add the Kahoot!! app to your list of apps and click Join.
Step3The lobby will reveal your game PIN when you click the Play button, allowing the computer to show you a Kahoot! You may enter the game PIN and press Enter to join the Kahoot! session once the host shows their screen with you. To participate in a Kahoot! session, you don’t need a Kahoot! account.
Part 4: How to Record Zoom Meetings
Zoom is a conference tool that enables real-time, high-quality, low-latency communication. Filmora is an excellent video recorder for that reason, enabling users to capture on-screen activity such Zoom audio tracks and video conversations. Wondershare One of the most versatile and portable Zoom voice recorders is the Filmora. Even novices may easily utilize it due to its user-friendly UI. All you have to do is click the record button after choosing the proper audio source in the settings. The all-in-one video editing program Filmora allows you to record your screen with audio, a facecam, and a green screen effect. You can record the entire screen or just a portion of it, and you can perform a number of quick edits on your video using tools like trimming, cropping, changing the audio track’s volume, and so on.
How to Use Filmora to Record Zoom Lectures
Having said that, Filmora is a great Zoom recorder that can capture games, audio, and video conversations. This video recorder may be used to make video clip lessons in addition to recording movies, video games, and webcam footage. In addition to Zoom, it can also capture internet streaming audio. Here is information on how to record Zoom meetings using this software:
Step1Download and Install Filmora on your PC
To use this program for a number of tasks, including screen recording and recording editing, you must first download and install it on your computer. To achieve this, download the recording program by clicking the link below. Launch the program as soon as the download is finished to start the installation process, and then adhere to the on-screen directions to install and make this software available for usage.
Step2Choose the Record’s Ideal Position in the Zoom
Use it on your PC at this point. As soon as you start the program, a window interface with two choices for screen recording, editing already recorded videos, and generating videos will display. Choose the Recording option from the menu. When you click the record button, the program will direct you to the recording interface, where you can easily adjust the settings for your camera and audio. To add the microphone or Zoom sound in that particular field, use the necessary buttons as described below:
Step3Press the Record Button
It goes without saying that you must test your recording tools to ensure they are functional and capturing the highest quality audio. But once you’re ready, click the record button, which will allow you 3-5 seconds before starting to record the personalized screen of your PC as seen below:
Step4Export and Save Your Zoom Recording
You may now save the Zoom video for sharing on social media after making and modifying it. The following file types may be used to save the document: MP4, WMV, AVI, MOV, GIF, and MP3. The finest feature of Wondershare Filmora is the direct export and sharing of Zoom video recordings to YouTube; the only need is that you must be signed in to your YouTube account inside the application:
Because the MOV format is only available for online movies, you may also export your Zoom recordings to MP4 if you want to publish them to your YouTube channel. You are free to choose the format that best suits your needs. You may choose the encoder from a drop-down menu in the export options.
Conclusion
With the aid of several interesting tools and programs made accessible in this virtual environment, learning has now become enjoyable. Of them is Kahoot! In Zoom. It is an application that acts as a learning tool by providing fun games, tests, and a variety of other chances. In only a few minutes, quizzes may be made and distributed. Games and quizzes may be planned using this platform quite easily. The Kahoot! with Zoom will make it simpler than ever for corporate leaders to engage and encourage their team members with Kahoot!! engaging game-based learning experiences at a time when many organizations are staying virtual or planning for a hybrid model. Head towards recording Kahoot with Filmora to experience a smooth Kahoot! usage on Zoom. Plus, you can also share the gameplay afterwards.
Read on to Learn About Multi Object Tracking, Its Types, and Requirements. You’ll Also Learn About the Different Approaches Toward Object Tracking
Multi Object Tracking (MOT) in a video is a challenging process with many applications in both the public and private sectors. Surveillance cameras in public places can track potential criminals, while retail stores can use object tracking to monitor customer behavior.
Developed in 1988 by Zenon Pylyshyn, MOT is a technique first designed to study the human visual system’s ability to track multiple moving objects. However, since then, various methods have been introduced for Object Tracking through computer vision.
In this article, we will explore Multi Object Tracking and provide a detailed guide on object tracking and the requirement to track multiple objects.
Part 1. What Is Object Tracking
Object Tracking is an application of computer vision that involves tracking the movement of objects in real-time. It is a useful tool for many different purposes, such as video surveillance, human-computer interaction, and automotive safety.
The Object Tracking algorithm is a deep-learning-based program that works by developing a model for each individual object and creating a set of trajectories to represent their movement. This is done through an indication, such as a square that follows the object and tells the users about its location on the screen in real-time.
Its algorithms are designed to work with various types of inputs, including everything from images and videos to real-time footage. The input you expect to use will impact the category, use cases, and object tracking applications.
![]()
Part 2. Types Of Object Tracking
There are two main types or levels of Object Tracking: SOT and MOT
SOT
Single Object Tracking or Visual Object Tracking is a process in which the bounding box of the target object is assigned to the tracker in the first frame. The tracker then detects the same object in all the other frames.
SOT only detects and tracks a single object and comes under the category of detection-free tracking, which implies that it is manually initialized with a fixed number of objects, even though other objects are present in the frames.
Let’s understand it with an example: A police department is resolving a murder case that involves a car on the highway. They received surveillance camera footage and wanted to track the vehicle to resolve the mystery. However, it might take time to do it manually. Therefore, they will use the Single Object Tracking process and will assign the tracker a bounding box for the target car to check what happens to it.
![]()
MOT
Multiple Object Tracking involves tracking multiple objects in a frame. Since its development in 1988 by Zenon Pylyshyn, several experiments have been conducted to see how human and computer vision systems can detect and track multiple objects in a frame.
As an output, multiple tracking creates several bounding boxes and are identified using certain parameters such as coordinates, width, height, etc. MOT program is not pre-trained regarding the appearance or amount of objects to be tracked.
Moreover, the algorithm assigns a detection ID to each box which helps the model in identifying the objects within a class. For instance, if multiple cars are in a frame, the MOT algorithm will identify each car as a separate object and assign them a unique ID.
![]()
Part 3. What Multi Object Tracking Needs?
Above is the explaination of MOT. In this part, we will focus on its mechanism. Following are some of the most important requirements of Multi Object Tracking:
1. Detection
The best approach to detect objects of your interest depends on what you’re trying to track and if the camera is stationary or moving.
MOT Using Stationary Camera
The vision.ForegroundDetector System object can be used to detect objects in motion against a stationary background by performing background subtraction. This approach is efficient but requires that the camera be stationary.
MOT Using Moving Camera
A sliding-window detection approach is often used with a moving camera to detect objects in motion. However, this approach is slower than the background subtraction method.
Use the following approaches for tracing the given categories of objects.
| Type of the Tracking Object | Camera Position | Approach |
|---|---|---|
| Custom object category | Stationary/Moving | custom sliding window detector using selectStrongestBbox and extractHOGFeatures or trainCascadeObjectDetector function |
| Pedestrians | Stationary/Moving | vision.PeopleDetector System object |
| Moving object | Stationary | vision.ForegroundDetector System object™ |
| Faces, upper body, mouth, nose, eyes, etc. | Stationary/Moving | vision.CascadeObjectDetector System object |
2. Prediction
The second requirement for Multi Object Tracking is “Prediction.” In this, you have to predict the position of the tracking object in the next frame. To do this, you can design the model to use the Kalman filter (vision.KalmanFilter ).
This will help predict the next location of the object in the frames. For this, it will take into account the object’s constant velocity, constant acceleration measurement noise, and process noise. Measurement noise is the detection of an error, while process noise is the variation in the object’s actual motion from that of the motion model.
3. Data Association
Data association is a critical step in Multiple Object Tracking and involves linking the data points together that represent the same thing across different frames.
A “track” is the temporal history of an object consisting of multiple detections and can include the entire history of past locations of the object or simply the object’s last known location and current velocity.
Part 4. Approaches Of Object Tracking
After understanding what MOT needs, let’s learn about the theory of how Object Tracking works.
The following are the most popular approaches for Object Tracking:
1. OpenCV-Based Object Tracking
There are many ways to approach object tracking, but one of the most popular is through the use of built-in algorithms in the OpenCV library.
The library has a tracking API containing Object Tracking algorithms and eight trackers: BOOSTING, MEDIANFLOW, MIL, KCF, CSRT, TLD, GOTURN, and MOSSE. Each tracker has its own advantages and disadvantages and has different goals. For instance, the MOSSE tracker is best for the fastest object tracking.
To have a deeper review of OpenCV Object Tracking and what is OpenCV, please read our article about: OpenCV Tracking: A complete Guide in 2022. (同期交付,可以插这个文章主题的内链)
2. MDNet
MDNet is a breakthrough in the field of tracking because it is the first network to use classification-based models instead of the more traditional approach. This makes MDNet much faster and more accurate than other tracking methods.
Inspired by the R-CNN object detection network, the MDNet algorithm can detect objects in real-time more efficiently and with high speed, making it a state-of-the-art visual tracker.
![]()
3. DeepSort
DeepSort is the most popular Object Tracking algorithm choice. The integration of appearance information or deep appearance distance metrics vastly improves DeepSORT performance.
The addition of the “Deep Appearance” distance metric enables DeepSort to avoid identifying switches by 45% and handle complex scenarios. On the MOT17 dataset, DeepSORT has received 77.2 IDF1 and 75.4 MOTA with 239 ID switches but a lower FPS of 13.
4. ROLO
ROLO - a combination of YOLO and LSTM is a Spatio-temporal convolutional neural network that uses the YOLO module and LTSM network for collecting visual features, location inference priors, and locating the target object’s trajectory.
The LSTM network uses an input feature vector of length 4096 for each frame to predict the target object’s location. This vector is obtained by combining the high-level visual features with the YOLO detection. By working together, the LSTM and YOLO can predict the target object’s location more accurately.
ALT TEXT: rolo for object tracking
![]()
Conclusion
In this ultimate guide, we’ve discussed Multi Object Tracking and its requirements. We also explored different approaches for object tracking to help you determine which one is best for your needs.
Hopefully, you found this guide helpful, and your queries related to Object Tracking and its types have been resolved.
Free Download For Win 7 or later(64-bit)
Free Download For macOS 10.14 or later
7 Solutions Cut Video For Instagram On Mac
More video content is being created than before. Unfortunately, some social media platforms like Instagram require your video to be short. Therefore, many people wonder how to cut a video to make it easier to share. If you’re wondering how to cut video for Instagram on Mac, you’re in luck. This article shares the best tools to use for this purpose.
What You Should Know About Instagram Video

Instagram is a social media site owned by Facebook. However, its main focus is on sharing videos and photos. It also allows users to put up stories that only last 24 hours. Stories allow you to highlight some crucial aspects of your life. These stories could be made up of photos, texts, and videos. However, each story slide can only take up to 15 seconds of video.
Most times, your video would be longer than that. If you upload a video longer than the accepted 15 seconds, Instagram automatically trims it to 15 seconds. However, the resulting video might not be the parts you want to show to your audience. Maybe there’s a particular section you would like your followers to see. That’s why video cutters enter the picture.
A good video splitter to cut video for Instagram on Mac is necessary when you’re creating video content for your Instagram page. In addition, the video editing tool you choose must maintain the quality and the safety of the file. Therefore, we’ve selected the best tools to cut videos for Instagram on Mac. Next, we’ll explore these tools, highlighting their best features, cons, and how you can use them. On that note, let’s dive in.
Best Instagram Video Cutter for Mac - Filmroa Video Editor

Supported System: Windows and Mac
Splitting your Instagram video before sharing them makes it easier to highlight your best parts. If you’re wondering what the best tool to do that is, you’re in luck. Filmora Video Editor is the best video cutter for Mac for many reasons. Apart from cutting videos, it offers several editing tools to enhance your video. It provides video processing features like cropping, splitting, rotating, trimming, speed increase, and color correction. However, it also offers features for professional editing of videos.
Filmora supports all video formats, even the high-definition video formats for your editing. In addition, Wondershare Filmora offers you an intuitive and user-friendly interface compared to other video cutters out there. This makes it a fantastic choice for experts and novices alike. The steps to split your video and use other in-built features are pretty straightforward, and if you need tutorials, Wondershare Filmora makes them available.
For Win 7 or later (64-bit)
For macOS 10.14 or later
Steps to Cut Video for Instagram on Mac
Filmora makes it relatively easy to use its extensive features. You don’t need previous editing experience to use Wondershare Filmora. If you’re wondering how to cut video for Instagram on Mac, below are the steps to follow.
Step 1: Download Wondershare Filmore
First, you have to download the Filmora app on your Mac. You can get it on the App Store or the official website. After installation, launch Filmora to get started.
Step 2: Import Video

Once you install the app, you can import the video you would like to cut for Instagram on the app. Click ‘import media files here’ to choose a video file from your PC storage. Alternatively, you can drag and drop the Instagram video on the software’s timeline.
Step 3: Cut the Video

You can cut your video from any end you prefer. First, move the cursor where you would like to cut the video until the clip changes to the ‘I’ pointer. Then, you can move the cursor within the video length to cut to your preference.
Step 4: Split Instagram Video

You can also split the video into specific portions by dragging the slider to each endpoint and picking the scissors. Additionally, you can carry out more editing like adding transitions, sound effects, and more to beautify your video.
Step 5: Save Instagram Video

Now that the video is to your liking, hit the ‘export’ button and choose the output format you would prefer. Next, click ‘export’ to confirm your choice.
More Free Instagram Video Cutter for Mac to Cut Video For Instagram
Although Wondershare Filmore is the best option when you want to cut video for Instagram on Mac, other options are available. In this section, we’ll explore the free Instagram video cutters for Mac that you can use.
Lightworks

Supported System: Windows and Mac
Lightworks is one of the best video splitting tools you can use if you’re learning how to cut video for Instagram on Mac. It is best for both novices and professionals and allows you seamlessly cut the video to your desired part. With Lightworks software, you can easily get results.
Apart from cutting Instagram videos on Mac, there are several more editing features you can utilize to take your Insta video to the next level. It also allows you to combine several cut clips. Size isn’t an issue with Lightworks as it effortlessly handles large file sizes. It offers users all the features of a high-quality video processing video editor. The best part is that it allows you directly export your cut video to Instagram or any other social media platform you would prefer.
Pros
- It supports different audio, video, and image format
- It allows users to share projects to encourage collaborative workflow
- Easy to use by beginners and professionals
- Allows exporting of video to Instagram directly
Cons
- It doesn’t support 3D video editing
- You have to register before using the application
- No video stabilization feature
Step to Cut Video for Instagram on Mac Using Lightworks
The steps to using this software are pretty easy to follow. Below, we’ve outlined the steps to make it easier to use.
- Step 1: Download the Lightworks software on your Mac from the official software. Once you do this, install the app and launch the software to begin the video-cutting process.
- Step 2: Import the video into the software. You can do this by clicking ‘import video’ or simply dragging the clip into the timeline.

- Step 3: After uploading the clip on your timeline, you can start cutting the video to your preference. Simply slide the cursor to the point you want to cut from and press the ‘c’ key on your keyboard.

- Step 4: After cutting the part you want, erase the rest by using the deleting button.

- Step 5: Click the ‘all’ option and then choose ‘export’ from the menu that appears to save your newly-cut video. You can also export directly to Instagram to save space and time.

Avidemux

Supported System: Windows and Mac
Another free video cutter that you can use when learning how to cut video for Instagram on Mac is Avidemux. This app is simple and offers simple filtering, cutting, and encoding features. As a result, it makes it relatively easy for beginners to split, cut, and trim videos. In addition, Avidemux offers users an intuitive user interface that makes it easy to know the next step to take.
Avidemux supports the most common formats like AVI, MP4, and more. It also offers different filters to spice up your Instagram videos. You can resize your video and also color correct your video. It is not an advanced tool for professionals because it doesn’t offer advanced tools. However, if you simply want to cut video for Instagram for Mac, this free software helps you achieve that.
Pros
- It supports common video formats
- It’s easy to cut videos for Instagram using keyboard shortcuts
- Offers various filters for enhancing video
- It is free to use
- Easy for beginners to use
Cons
- It crashes sometimes
- There are limited features in the editing software
Steps to Cut Video for Instagram on Mac Using Avidemux
Avidemux has a user-friendly interface that makes it easy to cut and save your Instagram video within minutes. Below are the simple steps to cut Instagram videos you should follow.
- Step 1: Download Avidemux on your Mac and install it. After installation, launch Avidemus to begin cutting your Instagram video.
- Step 2: Next, load the file you would like to work with

- Step 3: Next, navigate to the portion of the video you would like to cut and check its ‘frame type.’ At the beginning, where you would like to cut the video from, click the ‘A’ button. It automatically records it as the start of the clip.

- Start 4: Move to where you would like the clip to end and click the ‘B’ button. This will automatically cut the Instagram video to your preference.

- Step 5: Save the video by going to file and choosing ‘save’ from the available options. Next, click ‘save video’ and name the file.

You’re now ready to use your new video on Instagram or any other video-sharing platform you would prefer.
iMovie

Supported System: Mac
Apple first released this software in 1999, but it has continually updated it to offer more features to users. IMovie is available on all iOS devices, including your MacBook. Due to the frequent upgrades, this software makes editing relatively easy for beginners. The user interface is user-friendly, and it is entirely free to use. It is also an excellent choice for cutting your Instagram videos.
One of the reasons Mac users love this app is that there’s no need for installation and downloading. There are different effects available to enhance your video. You can also use ready-made templates on the software that offers popular music and stunning graphics. In addition, you can also add transitions, change speed, and many more with this software.
Pros
- It puts your content in different media libraries to help you stay organized
- It offers access to various video and audio filters
- It provides a stability feature that’s not available with many Instagram video cutting tools
- It allows you to share directly on Instagram
- It is easy for beginners to use
Cons
- It lacks some useful controls
- It doesn’t allow tagging when you share directly to Instagram
- It only supports two video tracks
Steps to Cut Video for Instagram on Mac Using IMovie
If you want to cut your video for Instagram using IMovie, below are the steps you need to follow.
- Step 1: Open iMovie on your Macbook to get started
- Step 2: Now, create a new project and name the project with a name you prefer

- Step 3: Import your video to IMovie by granting the software access to your computer’s video library.

- Step 4: Start cutting out any part you don’t want; you can also trim the video in-between if there are parts within the clip you don’t want.

- Step 5: You can add filters, transitions, or any other effect you would like to enhance your video.

- Step 6: Finally, you can save your file on your Mac or upload it directly to Instagram.
More Paid Instagram Video Cutter for Mac to Cut Video For Instagram
Now that you know the top three free video cutters for Instagram on Mac, this section explores the best paid Instagram video cutter you can use to cut videos for Instagram on Mac. Without further ado, let’s take a look.
Movavi Video Editor

Supported System: Windows and Mac
This video editor is relatively easy to use and powerful. It offers many features that go beyond cutting video for Instagram. You can also utilize this video editing software to enhance your video and make it look professional. Movavi offers transitions, filters, titles, and many more features for your videos. It is easy for both novices and professionals to use this platform.
Movavi Video Editor supports all types of video formats for easy editing. It also allows you to set your video to full HD and 4K resolution so that the images are clean and clear. You can also convert to a new format without compromising the quality of your video. In addition, Movavi offers you a trial period you can use to check out the software to ensure it is the ideal option for you. With Movavi, you can also share directly to Instagram if you’re looking to save space on Mac.
Ros
- It allows you to cut videos and export them quickly
- It offers several other features to enhance your videos
- It supports all video formats
- It enables you to convert video to the new format without compromising the quality
- It is ideal for beginners and experts
Cons
- Subscription fees are pretty high
- Some of the settings can be quite complex for beginners
Steps to Cut Video for Instagram on Mac Using Movavi Video Editor
If you would like to try Movavi video editor but don’t know how to go about it, the steps below make it relatively easy.
- Firstly, Install Movavi Video Editor on your Mac and install the app following the instructions. After installation, launch the app to begin.
- Next, choose the video file you would like to cut by clicking ‘add files’ and selecting your media library.

- It will appear on the ‘media bin,’ and you’ll have to drag it to the timeline.
- Now, you can start cutting the video for Instagram. Click on the video and move the market to the point in the video you would like to cut. Next, click the split button.

- You can easily remove the unwanted segments by clicking delete after selecting it.

- After cutting your video, you can choose the output format you prefer and then click ‘export.’ Choose the folder on your Mac you would like to save to and click ‘start’ to begin the saving process.

Final Cut Pro

Supported System: Mac
Next on our list, we have Final Cut Pro, an excellent video cutter for Mac. It is software developed by Apple for professional video editing. This app is primarily for MacOS users, and it offers several cutting-edge editing features to ensure a smooth and high-resolution video. It supports different video formats and allows you to enhance audio, add effects, trim, and carry out 360-degree video editing if you want to improve your video.
This tool doesn’t offer a monthly subscription. Instead, users can simply make a one-time payment and have lifetime access to this editing tool. It is not an excellent choice for beginners as its advanced features and interface can be pretty complicated. However, if you want to give this video cutter ago, we’ll provide the steps to cut the video for Instagram below.
Pros
- It supports 360-video editing
- Performance is relatively fast and ensures an easy video-cutting process
- It supports different video formats
- It offers various editing tools to enhance your video for Instagram
Cons
- It isn’t ideal for beginners
- One-time payment is relatively high
- The interface can be quite confusing
Steps to Cut Video for Instagram on Mac Using Final Cut Pro
If you want to cut video for Instagram in Final Cut Pro, the blade tool is the best option. However, it can be pretty confusing to use Final Cut Pro if you’ve never used the software before. Follow the steps below to cut Instagram video using Final Cut Pro.
- First, you have to download the app; you can download it on the App Store or the official website.
- Next, install the video cutter on your Mac and launch it to begin cutting Instagram videos.
- Import the video you would like to cut by visiting the ‘file’ type and choosing ‘import.’ Next, choose media and select the video from the media library. Alternatively, you can simply press Command + I on your Mac keyboard to go straight to your PC storage.

- Next, move the imported clip to the timeline to begin the cutting process.
- Select the Tools menu and choose ‘Blade’ from the dropdown menu. You can also press the B key on your keyword to select this tool.

- Now, you’re ready to start cutting the video file. Move the selected blade tool to the frame you would like to cut from the clip and click.

- Next, move to where you would like the cut to the end and click again.

- That’s all you have to do. Once you cut the clip and you’re satisfied with your result, simply save your clip by hitting the ‘export’ button and choosing the location you prefer and your preferred output format.
Adobe Premiere Rush

Supported System: Windows and Mac
Premier Rush was designed for social media videos and to help vloggers make the most of their videos. Although it started as a mobile-only app, it now has a desktop option for Mac and Windows. The idea behind Rush is an editing tool that helps you edit your video and share it to your preferred social media platform fast. This editing tool offers a simple user interface, and the workflow is seamless to ensure speedy performance.
As long as you want a video cutter created for cutting video for Instagram on Mac, this software delivers. It offers different editing features to enhance your video. You can link your Instagram account and upload directly to the platform. It also allows you to save all edited video files on Cloud to save space on your MacBook.
Pros
- It allows you to transfer videos from Adobe Premiere Pro directly for editing
- Allows you to link your social media accounts for direct uploads
- It offers transitions, filters, and more editing tools to enhance your Instagram video
- You can save directly to the Cloud to save space and ensure easy access
- It is an excellent option for beginners
Cons
- You can’t change the output format
- It doesn’t offer ample audio tools
Steps to Cut Video for Instagram on Mac Using Adobe Premiere Rush
This section will cover all the crucial steps to get the most from Adobe Premier Rush. Keep reading to learn how to cut video for Instagram on Mac using Adobe Rush.
- Firstly, download and install the app on your Mac. Launch the software after installation to start editing
- Now, create a new project on the app and import the video you would like to cut for Instagram.

- Afterward, select the video you would like to cut, click ‘create,’ and you’re ready to begin.

- When the video appears on the timeline, select the video and click the ‘scissors’ icon on the left corner. This tool helps to cut your video to your preference.
- To use the scissors tool, simply go to the beginning of the video and drag the handle to where you would like the video to start. You can also do the same to the end by dragging the handle at the end to where you would prefer.

- After cutting your video, you can also utilize other editing features to enhance your video.

- Now, you’re ready to export your video. Simply click ‘share’ located at the top of the editing software and choose from the options whether you want to share directly to Instagram or save on Mac.
Which Should I Choose, Free or Paid Instagram Video Cutter?
Now that you know the best free and paid video cutters to cut Instagram videos, you’re probably wondering what the ideal option is. With so many options, you must make the right decision for your project. You need to consider several factors before you decide if a paid or free Instagram video cutter is the best option for you.
- Budget
When deciding between a paid or free Instagram cutter, one crucial factor is how much you’re willing to pay. If your budget is really low and doesn’t fit into any paid options, you can simply go for a free option. However, if the price isn’t an issue for you, going for a paid option is best because it offers you more editing features to enhance your video.
- Ease of Use
You should also consider how easy it is to use the video cutter. Some paid options are for professionals and can be challenging to understand. However, most free options offer poor performance times. The last thing Instagram users want is to devote hours to figure out where each tool is on the software. However, there are paid options with an intuitive interface that makes it easy to cut your Instagram video.
- Customer Support
You also need to consider whether customer support will be available when you need it. Some free options have no customer support to turn to. Instead, consider a video cutter that will offer helpful and responsive customer support when picking.
- Video Format Support
Before choosing a paid or free option, you need to consider if it would support the video format you prefer. You might be using different video formats, and you want to ensure you’re not limited to select options. You also want a video cutter that offers various output formats.
FAQs about Cut Video For Instagram
- How do you post long videos on Instagram without splitting? Instagram allows users to post long videos on the app, as long as 60 seconds. Alternatively, you can use the IGTV to upload long clips on Instagram without splitting.
- What is multi-capture on Instagram: This tool allows you to create and share multiple photos on your stories.
- How do I split the video into two parts for Instagram on Mac? The paid and free video cutters shared above will help you split a video into two parts for Instagram on Mac. Simply pick the option that fits your preference.
- Why can’t I split a video on iMovie? Maybe your iMovie software is experiencing a glitch; you can simply restart the software. Alternately, move the clip to the center row if you find the option greyed out. Moving the clip should help fix the issue.
Conclusion
Various tools are available to help you cut a video for Instagram on Mac. Therefore, just refer to the paid and free tools listed above whenever you need a video cutter. These video cutters are highly recommended and ensure the quality isn’t affected while cutting the video. When deciding which is the best option for you, free or paid, the factors listed will help you decide. Suppose you’re looking specifically for a video cutter that offers you all the features you need to enhance your video while providing an intuitive user interface. In that case, Wondershare Filmora is the ideal choice.
Instagram is a social media site owned by Facebook. However, its main focus is on sharing videos and photos. It also allows users to put up stories that only last 24 hours. Stories allow you to highlight some crucial aspects of your life. These stories could be made up of photos, texts, and videos. However, each story slide can only take up to 15 seconds of video.
Most times, your video would be longer than that. If you upload a video longer than the accepted 15 seconds, Instagram automatically trims it to 15 seconds. However, the resulting video might not be the parts you want to show to your audience. Maybe there’s a particular section you would like your followers to see. That’s why video cutters enter the picture.
A good video splitter to cut video for Instagram on Mac is necessary when you’re creating video content for your Instagram page. In addition, the video editing tool you choose must maintain the quality and the safety of the file. Therefore, we’ve selected the best tools to cut videos for Instagram on Mac. Next, we’ll explore these tools, highlighting their best features, cons, and how you can use them. On that note, let’s dive in.
Best Instagram Video Cutter for Mac - Filmroa Video Editor
Supported System: Windows and Mac
Splitting your Instagram video before sharing them makes it easier to highlight your best parts. If you’re wondering what the best tool to do that is, you’re in luck. Filmora Video Editor is the best video cutter for Mac for many reasons. Apart from cutting videos, it offers several editing tools to enhance your video. It provides video processing features like cropping, splitting, rotating, trimming, speed increase, and color correction. However, it also offers features for professional editing of videos.
Filmora supports all video formats, even the high-definition video formats for your editing. In addition, Wondershare Filmora offers you an intuitive and user-friendly interface compared to other video cutters out there. This makes it a fantastic choice for experts and novices alike. The steps to split your video and use other in-built features are pretty straightforward, and if you need tutorials, Wondershare Filmora makes them available.
For Win 7 or later (64-bit)
For macOS 10.14 or later
Steps to Cut Video for Instagram on Mac
Filmora makes it relatively easy to use its extensive features. You don’t need previous editing experience to use Wondershare Filmora. If you’re wondering how to cut video for Instagram on Mac, below are the steps to follow.
Step 1: Download Wondershare Filmore
First, you have to download the Filmora app on your Mac. You can get it on the App Store or the official website. After installation, launch Filmora to get started.
Step 2: Import Video
Once you install the app, you can import the video you would like to cut for Instagram on the app. Click ‘import media files here’ to choose a video file from your PC storage. Alternatively, you can drag and drop the Instagram video on the software’s timeline.
Step 3: Cut the Video
You can cut your video from any end you prefer. First, move the cursor where you would like to cut the video until the clip changes to the ‘I’ pointer. Then, you can move the cursor within the video length to cut to your preference.
Step 4: Split Instagram Video
You can also split the video into specific portions by dragging the slider to each endpoint and picking the scissors. Additionally, you can carry out more editing like adding transitions, sound effects, and more to beautify your video.
Step 5: Save Instagram Video
Now that the video is to your liking, hit the ‘export’ button and choose the output format you would prefer. Next, click ‘export’ to confirm your choice.
More Free Instagram Video Cutter for Mac to Cut Video For Instagram
Although Wondershare Filmore is the best option when you want to cut video for Instagram on Mac, other options are available. In this section, we’ll explore the free Instagram video cutters for Mac that you can use.
Lightworks
Supported System: Windows and Mac
Lightworks is one of the best video splitting tools you can use if you’re learning how to cut video for Instagram on Mac. It is best for both novices and professionals and allows you seamlessly cut the video to your desired part. With Lightworks software, you can easily get results.
Apart from cutting Instagram videos on Mac, there are several more editing features you can utilize to take your Insta video to the next level. It also allows you to combine several cut clips. Size isn’t an issue with Lightworks as it effortlessly handles large file sizes. It offers users all the features of a high-quality video processing video editor. The best part is that it allows you directly export your cut video to Instagram or any other social media platform you would prefer.
Pros
- It supports different audio, video, and image format
- It allows users to share projects to encourage collaborative workflow
- Easy to use by beginners and professionals
- Allows exporting of video to Instagram directly
Cons
- It doesn’t support 3D video editing
- You have to register before using the application
- No video stabilization feature
Step to Cut Video for Instagram on Mac Using Lightworks
The steps to using this software are pretty easy to follow. Below, we’ve outlined the steps to make it easier to use.
- Step 1: Download the Lightworks software on your Mac from the official software. Once you do this, install the app and launch the software to begin the video-cutting process.
- Step 2: Import the video into the software. You can do this by clicking ‘import video’ or simply dragging the clip into the timeline.
- Step 3: After uploading the clip on your timeline, you can start cutting the video to your preference. Simply slide the cursor to the point you want to cut from and press the ‘c’ key on your keyboard.
- Step 4: After cutting the part you want, erase the rest by using the deleting button.
- Step 5: Click the ‘all’ option and then choose ‘export’ from the menu that appears to save your newly-cut video. You can also export directly to Instagram to save space and time.
Avidemux
Supported System: Windows and Mac
Another free video cutter that you can use when learning how to cut video for Instagram on Mac is Avidemux. This app is simple and offers simple filtering, cutting, and encoding features. As a result, it makes it relatively easy for beginners to split, cut, and trim videos. In addition, Avidemux offers users an intuitive user interface that makes it easy to know the next step to take.
Avidemux supports the most common formats like AVI, MP4, and more. It also offers different filters to spice up your Instagram videos. You can resize your video and also color correct your video. It is not an advanced tool for professionals because it doesn’t offer advanced tools. However, if you simply want to cut video for Instagram for Mac, this free software helps you achieve that.
Pros
- It supports common video formats
- It’s easy to cut videos for Instagram using keyboard shortcuts
- Offers various filters for enhancing video
- It is free to use
- Easy for beginners to use
Cons
- It crashes sometimes
- There are limited features in the editing software
Steps to Cut Video for Instagram on Mac Using Avidemux
Avidemux has a user-friendly interface that makes it easy to cut and save your Instagram video within minutes. Below are the simple steps to cut Instagram videos you should follow.
- Step 1: Download Avidemux on your Mac and install it. After installation, launch Avidemus to begin cutting your Instagram video.
- Step 2: Next, load the file you would like to work with
- Step 3: Next, navigate to the portion of the video you would like to cut and check its ‘frame type.’ At the beginning, where you would like to cut the video from, click the ‘A’ button. It automatically records it as the start of the clip.
- Start 4: Move to where you would like the clip to end and click the ‘B’ button. This will automatically cut the Instagram video to your preference.
- Step 5: Save the video by going to file and choosing ‘save’ from the available options. Next, click ‘save video’ and name the file.
You’re now ready to use your new video on Instagram or any other video-sharing platform you would prefer.
iMovie
Supported System: Mac
Apple first released this software in 1999, but it has continually updated it to offer more features to users. IMovie is available on all iOS devices, including your MacBook. Due to the frequent upgrades, this software makes editing relatively easy for beginners. The user interface is user-friendly, and it is entirely free to use. It is also an excellent choice for cutting your Instagram videos.
One of the reasons Mac users love this app is that there’s no need for installation and downloading. There are different effects available to enhance your video. You can also use ready-made templates on the software that offers popular music and stunning graphics. In addition, you can also add transitions, change speed, and many more with this software.
Pros
- It puts your content in different media libraries to help you stay organized
- It offers access to various video and audio filters
- It provides a stability feature that’s not available with many Instagram video cutting tools
- It allows you to share directly on Instagram
- It is easy for beginners to use
Cons
- It lacks some useful controls
- It doesn’t allow tagging when you share directly to Instagram
- It only supports two video tracks
Steps to Cut Video for Instagram on Mac Using IMovie
If you want to cut your video for Instagram using IMovie, below are the steps you need to follow.
- Step 1: Open iMovie on your Macbook to get started
- Step 2: Now, create a new project and name the project with a name you prefer
- Step 3: Import your video to IMovie by granting the software access to your computer’s video library.
- Step 4: Start cutting out any part you don’t want; you can also trim the video in-between if there are parts within the clip you don’t want.
- Step 5: You can add filters, transitions, or any other effect you would like to enhance your video.
- Step 6: Finally, you can save your file on your Mac or upload it directly to Instagram.
More Paid Instagram Video Cutter for Mac to Cut Video For Instagram
Now that you know the top three free video cutters for Instagram on Mac, this section explores the best paid Instagram video cutter you can use to cut videos for Instagram on Mac. Without further ado, let’s take a look.
Movavi Video Editor
Supported System: Windows and Mac
This video editor is relatively easy to use and powerful. It offers many features that go beyond cutting video for Instagram. You can also utilize this video editing software to enhance your video and make it look professional. Movavi offers transitions, filters, titles, and many more features for your videos. It is easy for both novices and professionals to use this platform.
Movavi Video Editor supports all types of video formats for easy editing. It also allows you to set your video to full HD and 4K resolution so that the images are clean and clear. You can also convert to a new format without compromising the quality of your video. In addition, Movavi offers you a trial period you can use to check out the software to ensure it is the ideal option for you. With Movavi, you can also share directly to Instagram if you’re looking to save space on Mac.
Ros
- It allows you to cut videos and export them quickly
- It offers several other features to enhance your videos
- It supports all video formats
- It enables you to convert video to the new format without compromising the quality
- It is ideal for beginners and experts
Cons
- Subscription fees are pretty high
- Some of the settings can be quite complex for beginners
Steps to Cut Video for Instagram on Mac Using Movavi Video Editor
If you would like to try Movavi video editor but don’t know how to go about it, the steps below make it relatively easy.
- Firstly, Install Movavi Video Editor on your Mac and install the app following the instructions. After installation, launch the app to begin.
- Next, choose the video file you would like to cut by clicking ‘add files’ and selecting your media library.
- It will appear on the ‘media bin,’ and you’ll have to drag it to the timeline.
- Now, you can start cutting the video for Instagram. Click on the video and move the market to the point in the video you would like to cut. Next, click the split button.
- You can easily remove the unwanted segments by clicking delete after selecting it.
- After cutting your video, you can choose the output format you prefer and then click ‘export.’ Choose the folder on your Mac you would like to save to and click ‘start’ to begin the saving process.
Final Cut Pro
Supported System: Mac
Next on our list, we have Final Cut Pro, an excellent video cutter for Mac. It is software developed by Apple for professional video editing. This app is primarily for MacOS users, and it offers several cutting-edge editing features to ensure a smooth and high-resolution video. It supports different video formats and allows you to enhance audio, add effects, trim, and carry out 360-degree video editing if you want to improve your video.
This tool doesn’t offer a monthly subscription. Instead, users can simply make a one-time payment and have lifetime access to this editing tool. It is not an excellent choice for beginners as its advanced features and interface can be pretty complicated. However, if you want to give this video cutter ago, we’ll provide the steps to cut the video for Instagram below.
Pros
- It supports 360-video editing
- Performance is relatively fast and ensures an easy video-cutting process
- It supports different video formats
- It offers various editing tools to enhance your video for Instagram
Cons
- It isn’t ideal for beginners
- One-time payment is relatively high
- The interface can be quite confusing
Steps to Cut Video for Instagram on Mac Using Final Cut Pro
If you want to cut video for Instagram in Final Cut Pro, the blade tool is the best option. However, it can be pretty confusing to use Final Cut Pro if you’ve never used the software before. Follow the steps below to cut Instagram video using Final Cut Pro.
- First, you have to download the app; you can download it on the App Store or the official website.
- Next, install the video cutter on your Mac and launch it to begin cutting Instagram videos.
- Import the video you would like to cut by visiting the ‘file’ type and choosing ‘import.’ Next, choose media and select the video from the media library. Alternatively, you can simply press Command + I on your Mac keyboard to go straight to your PC storage.
- Next, move the imported clip to the timeline to begin the cutting process.
- Select the Tools menu and choose ‘Blade’ from the dropdown menu. You can also press the B key on your keyword to select this tool.
- Now, you’re ready to start cutting the video file. Move the selected blade tool to the frame you would like to cut from the clip and click.
- Next, move to where you would like the cut to the end and click again.
- That’s all you have to do. Once you cut the clip and you’re satisfied with your result, simply save your clip by hitting the ‘export’ button and choosing the location you prefer and your preferred output format.
Adobe Premiere Rush
Supported System: Windows and Mac
Premier Rush was designed for social media videos and to help vloggers make the most of their videos. Although it started as a mobile-only app, it now has a desktop option for Mac and Windows. The idea behind Rush is an editing tool that helps you edit your video and share it to your preferred social media platform fast. This editing tool offers a simple user interface, and the workflow is seamless to ensure speedy performance.
As long as you want a video cutter created for cutting video for Instagram on Mac, this software delivers. It offers different editing features to enhance your video. You can link your Instagram account and upload directly to the platform. It also allows you to save all edited video files on Cloud to save space on your MacBook.
Pros
- It allows you to transfer videos from Adobe Premiere Pro directly for editing
- Allows you to link your social media accounts for direct uploads
- It offers transitions, filters, and more editing tools to enhance your Instagram video
- You can save directly to the Cloud to save space and ensure easy access
- It is an excellent option for beginners
Cons
- You can’t change the output format
- It doesn’t offer ample audio tools
Steps to Cut Video for Instagram on Mac Using Adobe Premiere Rush
This section will cover all the crucial steps to get the most from Adobe Premier Rush. Keep reading to learn how to cut video for Instagram on Mac using Adobe Rush.
- Firstly, download and install the app on your Mac. Launch the software after installation to start editing
- Now, create a new project on the app and import the video you would like to cut for Instagram.
- Afterward, select the video you would like to cut, click ‘create,’ and you’re ready to begin.
- When the video appears on the timeline, select the video and click the ‘scissors’ icon on the left corner. This tool helps to cut your video to your preference.
- To use the scissors tool, simply go to the beginning of the video and drag the handle to where you would like the video to start. You can also do the same to the end by dragging the handle at the end to where you would prefer.
- After cutting your video, you can also utilize other editing features to enhance your video.
- Now, you’re ready to export your video. Simply click ‘share’ located at the top of the editing software and choose from the options whether you want to share directly to Instagram or save on Mac.
Which Should I Choose, Free or Paid Instagram Video Cutter?
Now that you know the best free and paid video cutters to cut Instagram videos, you’re probably wondering what the ideal option is. With so many options, you must make the right decision for your project. You need to consider several factors before you decide if a paid or free Instagram video cutter is the best option for you.
- Budget
When deciding between a paid or free Instagram cutter, one crucial factor is how much you’re willing to pay. If your budget is really low and doesn’t fit into any paid options, you can simply go for a free option. However, if the price isn’t an issue for you, going for a paid option is best because it offers you more editing features to enhance your video.
- Ease of Use
You should also consider how easy it is to use the video cutter. Some paid options are for professionals and can be challenging to understand. However, most free options offer poor performance times. The last thing Instagram users want is to devote hours to figure out where each tool is on the software. However, there are paid options with an intuitive interface that makes it easy to cut your Instagram video.
- Customer Support
You also need to consider whether customer support will be available when you need it. Some free options have no customer support to turn to. Instead, consider a video cutter that will offer helpful and responsive customer support when picking.
- Video Format Support
Before choosing a paid or free option, you need to consider if it would support the video format you prefer. You might be using different video formats, and you want to ensure you’re not limited to select options. You also want a video cutter that offers various output formats.
FAQs about Cut Video For Instagram
- How do you post long videos on Instagram without splitting? Instagram allows users to post long videos on the app, as long as 60 seconds. Alternatively, you can use the IGTV to upload long clips on Instagram without splitting.
- What is multi-capture on Instagram: This tool allows you to create and share multiple photos on your stories.
- How do I split the video into two parts for Instagram on Mac? The paid and free video cutters shared above will help you split a video into two parts for Instagram on Mac. Simply pick the option that fits your preference.
- Why can’t I split a video on iMovie? Maybe your iMovie software is experiencing a glitch; you can simply restart the software. Alternately, move the clip to the center row if you find the option greyed out. Moving the clip should help fix the issue.
Conclusion
Various tools are available to help you cut a video for Instagram on Mac. Therefore, just refer to the paid and free tools listed above whenever you need a video cutter. These video cutters are highly recommended and ensure the quality isn’t affected while cutting the video. When deciding which is the best option for you, free or paid, the factors listed will help you decide. Suppose you’re looking specifically for a video cutter that offers you all the features you need to enhance your video while providing an intuitive user interface. In that case, Wondershare Filmora is the ideal choice.
Also read:
- 2024 Approved Do You Want to Apply LUTs Using Open Broadcaster Software? You Can Download Free LUTs for OBS and Apply Them to Your Files. There Are Many LUTs Available
- How to Create Sports Intro and Outro for YouTube Video for 2024
- Updated In 2024, Rotate Video in iMovie
- New In 2024, Want to Create an Impressive Video Collage but Clueless About the Best Tools? No Worries as We Are Here and Will Help You to Learn About the Best Video Collage Maker PC Tools
- The Best Way To Color Grading & Color Correction in Filmora for 2024
- Updated 2024 Approved AVI Editor for Windows 11/10/8.1/8/7 Easily Edit AVI Files on PC
- New In 2024, Are You Convincingly Fascinated by the Whole Idea of Augmented Reality and Want to Level up Your Marketing Skills with an AR Integration? Rest Assured, Youve Found the Right Place
- Updated Want to Feather Shapes in After Effects? Read This
- New 10 Best Cartoon Video Makers (Online and Desktop Solution)
- Updated Detailed Steps to Cut a Video in QuickTime for 2024
- This Article Shares Valuable Insight Into the Best Brand Story Videos. Also, It Highlights the Importance of a Video Maker in Your Brand Story Video Ad-Making Process and Why Filmora Should Be Your Go-To Choice
- New 2024 Approved How to Easily Create a Free Eye-Catching Intro Videos with Invideo
- New In 2024, Have You Ever Wondered How Those PowerPoint, Looping Slideshows You See in Conferences and Reception Areas Display and Move to the Next Slide Automatically without Clicking a Mouse? You Dont Have to Be Amazed at This
- New 2024 Approved In This Article Let Me Share with You How to Start a Vlog? Ideas and Any Tips for You to Start Your Own Vlogging Channel
- New In 2024, Enhance Your Video Color Accuracy with Video Scopes
- Updated Do You Want to Know Which Are the Best Wondershare Filmora LUTs to Use? There Are Many LUTs that You Can Download, Each with a Different Tone and Style for 2024
- 2024 Approved Want to Skip the Typing Hustle with a Convenient and Instant Conversion of Your Words Into Text? Stay Here to Learn About some Irresistible Software Solutions to Address the Concern
- Looking for the Simple Steps to Add Transition Effects in Your Video? We Will Illustrate How to Add Transition in Filmora and Mention Tips and Tricks for Video Transition Effects
- New 2024 Approved How to Add Slideshow in PowerPoint
- New How to AI DeNoise for 2024
- In 2024, Get Creative with Audio Best Video Dubbing Apps of the Year
- Updated In 2024, KineMaster on Mac Download, Install, and Start Editing Today
- In 2024, Downloading SamFw FRP Tool 3.0 for Oppo Reno 11F 5G
- New In 2024, Green Screen on a Mac Which Software Reigns Supreme?
- How to Unlock ZTE Axon 40 Lite Phone without Google Account?
- Ways to trade pokemon go from far away On Oppo Find X7 Ultra? | Dr.fone
- New Eliminating Soundtracks in Contemporary MKV Video Files (MKV-2023) for 2024
- Simple Solutions to Fix Android SystemUI Has Stopped Error For Nokia C32 | Dr.fone
- Unova Stone Pokémon Go Evolution List and How Catch Them For Oppo F25 Pro 5G | Dr.fone
- How to Bypass Google FRP Lock on Xiaomi Redmi K70 Pro Devices
- In 2024, How can I get more stardust in pokemon go On Nubia Z50S Pro? | Dr.fone
- In 2024, 2 Ways to Add Custom Subtitles to Netflix
- How To Transfer WhatsApp From Apple iPhone SE (2022) to other iPhone 11 Pro Max devices? | Dr.fone
- New Windows 11/10 Video Editors Alternatives to iMovie Youll Love for 2024
- Updated EchoTech Pro Review Series Unveiling the Specs, Standout Aspects, and Comparable Solutions in Sound Engineering for 2024
- New In 2024, Filmora X Just Got Faster ARM Support Now Available
- Title: Updated Green Screens Are a Fun Way for Creators to Bring Their Personality to Their Stream, Allowing Them to Dynamically Alter Their Stream Background and Make Their Content Appear Even More Engaging and Polished for 2024
- Author: Morgan
- Created at : 2024-05-19 05:14:19
- Updated at : 2024-05-20 05:14:19
- Link: https://ai-video-editing.techidaily.com/1713963135533-updated-green-screens-are-a-fun-way-for-creators-to-bring-their-personality-to-their-stream-allowing-them-to-dynamically-alter-their-stream-background-and-m/
- License: This work is licensed under CC BY-NC-SA 4.0.
