

Updated Have You Tried Creating an Engaging Video? Try Out Impressive AI Video Ideas that Give You a Clue on How to Create an Attention Catching Video. Here Is a Breakdown of What an AI Video Idea Generator Is and How to Utilize It Efficiently for 2024
Have You Tried Creating an Engaging Video? Try Out Impressive AI Video Ideas that Give You a Clue on How to Create an Attention Catching Video. Here Is a Breakdown of What an AI Video Idea Generator Is and How to Utilize It Efficiently
12 Impressive AI Video Ideas for Creating Engaging Video Content
An easy yet powerful editor
Numerous effects to choose from
Detailed tutorials provided by the official channel
In recent times, AI technology has become more useful for content creators to get more effective and engaging AI video ideas. Various AI video idea generator tools like Jasper, WeShare, etc., save con-tent creators time by giving the latest trending video ideas. These tools made content creators work easy as they need not spend much time on video ideas.
Most of us know AI-Artificial Intelligence and its role in achieving better and fast results in different areas. This article will let us know the position of YouTube video idea generator AI in generating engaging video content using Artificial Intelligence. Nowadays, these tools also help add audio/video summary and animations for the videos.
In this article
01 [What’s Video Ideas Generator and How to Use This Tool to Get More Views](#Part 1)
02 [12 Great AI Video Ideas to Bring More Traffic](#Part 2)
Part 1 What’s Video Ideas Generator and How to Use This Tool to Get More Views
It’s not enough to create a YouTube channel and post some video that does not have informative content. Sometimes, even though the video has informative content, the content might not be attractive to the viewers for various reasons, like the content might be routine and does not have more reach, likes, or shares. Along with good content, we also need new and creative ideas to get more viewers. Thus, we have some tools to provide unique and innovative ideas based on the niche you choose.
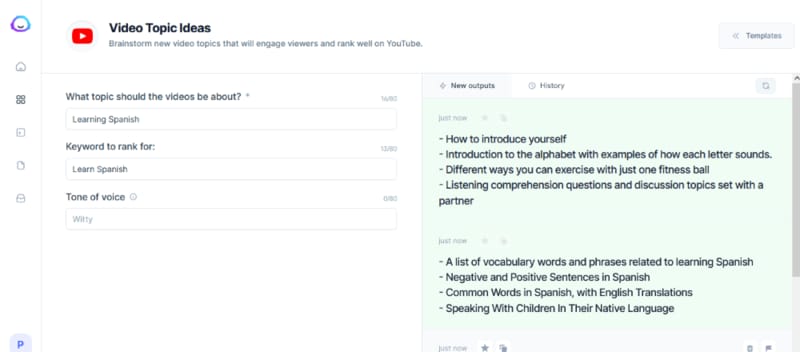
Videos Idea Generator is a tool that gives ideas for YouTube videos, and it works based on AI technology (Neural Networks). This tool will be more beneficial for the content creators to get more AI video ideas. Naturally, you might be out of ideas for your channel, or sometimes it takes more time to get an idea, or it could be a routine idea that does not sound interesting to the viewers. In such cases, an AI video idea generator is more helpful in suggesting new and innovative ideas for the content creators based on their interesting topics.
Some of the advantages of a video idea generator are:
● Time-saving – as one can utilize the time in other work, such as editing the video/ adding subtitles, etc., instead of thinking of an idea.
● Engaging with the audience – can utilize the time in engaging with the audience by answering their questions.
● Promote videos – can utilize time to promote their videos on other social media platforms or collaborate with other content creators for promotions.
● Add animations – animations and other visual effects can be added to the videos using AI. Also, we can add video and audio summaries after each video so that the viewers can get brief detailing of the whole video.
How to use Videos Idea Generator:
There are different AI video idea generator tools, and most of them work similarly. The most common steps are:
Step 1: Provide Topic
Here you need to provide the topic’s name on which we are planning to create the video.
Step 2: Provide Keywords
After providing a topic, give the keywords required for publishing. The video needs to have all the keywords so that the main content of the video can project adequately.
Based on the topic name and keywords, the tool will generate suggestions for the video ideas using the Neural Network concept of Artificial Learning.
Part 2 12 Great AI Video Ideas to Bring More Traffic
Now, let us know 12 AI video ideas that can become viral and get more likes and views :
01Idea 1: Know your Interest
Before starting a YouTube channel or posting a video, know your area of interest first. Once you get clarity on the area of interest, it’s easy to pick a topic from that and create an innovative video. Try to be more specific in the topic you choose. Also, have clarity on the section of audience you want to target.
For example, if your topic is more related to children, add more animations of animals/ cartoons that interest children. If you choose a related topic, do not add more animations that might confuse the audience. Add more reference links so that they can refer to those and be more particular on the specific topic you are trying to explain through the video. Similarly, if you choose a gaming-related topic, do not be more general about gaming.
Be specific towards a particular section of games like mobile gaming/ desktop/ virtual to reach more audience, and it does not seem boring to the audience.
02Idea 2: Interview Questions
As many students graduate every year, the competition for jobs has increased. People are more interested in getting an appointment as soon as possible, and for that, they need to prepare for the interview thoroughly. A video containing the main topics for the discussion that has references for the interview questions would benefit the students. It can engage with people within no time. Also, if the video is more specific to the department-wise interview questions/ job-level interview questions, it would reach more people and be more helpful to them.
03Idea 3: Full Course in Any Technology
Apart from the entertainment-related videos, education-related videos will be more helpful and engaging. Any video related to any technology course can get more views. Using the YouTube video idea generator AI tool, you can generate more unique videos related to education. Instead of giving a brief idea of the technology, it’s better to pick up a few topics and explain them in detail so that it would be helpful for interviews too. You can use AI technology to add a voice-over and a small summary at the end of the video so that the main points get revised once again.
04Idea 4: Cooking Ideas
Cooking is one of the most trending topics on YouTube. Whatever the language might be, cooking-related videos can get more views, create more creativity, and engage with the audience. You can choose a dish from any cuisine and make a video. You can add slow motion/ fast forward actions and small creative animations using AI. Using AI video ideas tools, you can get more creative ideas related to cooking that can increase views, as viewers will be more interested if the videos are innovative.
05Idea 5: Art and Craft ideas
Recently, people have seem more interested in the interior design of the house. For such people, art and craft ideas might be more helpful. Also, nowadays, schools are encouraging students in other circular activities and studies. These videos might be more attractive to the school’s students. Also, in crafts, select a specific area and make videos on that so that the video will be short and crisp, and easily understandable to the viewers. You can also add a voice-over while doing the craftwork to make it more transparent for the viewers.
06Idea 6: Photo and Video Editing Related Videos
People have become more addicted to taking photos and storing them. Any video related to editing the photos/ videos will engage more with viewers as it is not associated with any section of people. Anyone from any place and with any qualification can understand such videos. Consider a few topics related to the editing and give a detailed description/ explanation of those ideas, or consider any photo/ video editing app and explain how the app works in the video so that it might be helpful for the people who are using the app for the first time. Also, please reply to the frequently asked questions related to the app in the form of comments or summary so that it can reach more people, and there is a chance that the viewers might suggest the video to others who are about to use the app.
07Idea 7: Movies Related Videos
In every country, people are more addicted to movies regardless of language. Movies have become a part of daily life for almost all people. Some of the movie-related video ideas can be:
● Video regarding actor interviews.
● Video regarding the movie review/ collections.
● Video regarding highlights/ mistakes in the movie.
● Video related to small clips/ songs in the film.
● Video related to the spoof of the central theme of the film.
Any video related to a movie can be more viral. To create new content, use AI video idea generator tools so that the videos can be more engaging and creative.
08Idea 8: Lifehacks Related Videos
Simple daily life hack idea-related videos will be more helpful to people irrespective of their living. Any statements about keeping the house clean/clothing/makeup/skincare can be beneficial. You can take simple concepts related to our daily life like:
● How to use a few tools in our everyday life.
● Simple cleaning techniques.
● Folding clothes easily saves time.
09Idea 9: Earning Related Ideas
Videos related to earning can get more views and become more viral among people. Any detailed description of any earning app/ small startup ideas can be helpful. The video ideas generator tool can give more suggestions related to such trending topics.
10Idea 10: Sports related ideas
A large population is into sports, like football and cricket. People enjoy watching and playing these sports regularly from young to old age. It will be a good idea if you can try videos on sports. Using the video generator AI, you can generate animation videos playing cricket and add small clips of old generation cricket players as examples. You may also create small teaching videos on other sports for children. Through animation, giving the latest sports updates worldwide will also be a better idea to get more views for videos.
11Idea 11: Current Affairs Related Videos
Current affairs and general knowledge-related videos will be more helpful to people preparing for competitive exams as most people are learning through the internet rather than from books. If you can take a specific subject and give a detailed description of its past and current updates, it can be helpful for many people. And also, while doing such information-related videos, you get a chance to research it, and it will help improve your knowledge of the subject and searching skills.
12Idea 12: Gadget And Product Review Ideas
Reportedly, there has been a tremendous increase in new products related to mobiles, laptops, TV, other hardware tools, skin, hair care products, etc. You can take a specific product and create innovative ideas on how to use the product using animations/ cartoons and give a short review of the product. Through this, you can earn as you promote a company product, and people will know about the product. This is beneficial in both ways. If the product is related to electronic gadgets, make a video explaining the product’s features and how to use them. If it is hair or skincare related, include the ingredients used, advantages of the product, how to use the product, and any disadvantages, etc. Based on the product you choose, the content of the video should change.
Bonus Idea:
Use an innovative and powerful tool like Wondershare Filmora Video Editor to beautify your AI videos in the shortest time frame.
Filmora’s latest version offers various upgraded tools like:
● Instant Mode to create accessible and quick videos.
● A shop of preset templates to power up your videos.
● The Filmora Auto Beat Sync can match your clip with music.
● Adjust the speed of your video and introduce cinematic effects.
● You can even record your screen with Filmora and use that in your AI videos ideas.

Wondershare Filmora - Best Video Editor for Mac/Windows
5,481,435 people have downloaded it.
Build unique custom animations without breaking a sweat.
Focus on creating epic stories and leave the details to Filmora’s auto features.
Start a creative adventure with drag & drop effects and endless possibilities.
Filmora simplifies advanced features to save you time and effort.
Filmora cuts out repetition so you can move on to your next creative breakthrough.
● Ending Thoughts →
● Finally, that you have a fair idea of what a YouTube video idea generator is about and how it helps content creators in daily life get more innovative ideas for YouTube videos.
● Make use of this tool to get more engaging and creative content and more AI video ideas so that the views for the video increase and the audience receives good knowledge through the videos. Try out these ideas, use Filmora to create exceptional animations on your videos, and watch your YouTube channel grow as expected.
In recent times, AI technology has become more useful for content creators to get more effective and engaging AI video ideas. Various AI video idea generator tools like Jasper, WeShare, etc., save con-tent creators time by giving the latest trending video ideas. These tools made content creators work easy as they need not spend much time on video ideas.
Most of us know AI-Artificial Intelligence and its role in achieving better and fast results in different areas. This article will let us know the position of YouTube video idea generator AI in generating engaging video content using Artificial Intelligence. Nowadays, these tools also help add audio/video summary and animations for the videos.
In this article
01 [What’s Video Ideas Generator and How to Use This Tool to Get More Views](#Part 1)
02 [12 Great AI Video Ideas to Bring More Traffic](#Part 2)
Part 1 What’s Video Ideas Generator and How to Use This Tool to Get More Views
It’s not enough to create a YouTube channel and post some video that does not have informative content. Sometimes, even though the video has informative content, the content might not be attractive to the viewers for various reasons, like the content might be routine and does not have more reach, likes, or shares. Along with good content, we also need new and creative ideas to get more viewers. Thus, we have some tools to provide unique and innovative ideas based on the niche you choose.
Videos Idea Generator is a tool that gives ideas for YouTube videos, and it works based on AI technology (Neural Networks). This tool will be more beneficial for the content creators to get more AI video ideas. Naturally, you might be out of ideas for your channel, or sometimes it takes more time to get an idea, or it could be a routine idea that does not sound interesting to the viewers. In such cases, an AI video idea generator is more helpful in suggesting new and innovative ideas for the content creators based on their interesting topics.
Some of the advantages of a video idea generator are:
● Time-saving – as one can utilize the time in other work, such as editing the video/ adding subtitles, etc., instead of thinking of an idea.
● Engaging with the audience – can utilize the time in engaging with the audience by answering their questions.
● Promote videos – can utilize time to promote their videos on other social media platforms or collaborate with other content creators for promotions.
● Add animations – animations and other visual effects can be added to the videos using AI. Also, we can add video and audio summaries after each video so that the viewers can get brief detailing of the whole video.
How to use Videos Idea Generator:
There are different AI video idea generator tools, and most of them work similarly. The most common steps are:
Step 1: Provide Topic
Here you need to provide the topic’s name on which we are planning to create the video.
Step 2: Provide Keywords
After providing a topic, give the keywords required for publishing. The video needs to have all the keywords so that the main content of the video can project adequately.
Based on the topic name and keywords, the tool will generate suggestions for the video ideas using the Neural Network concept of Artificial Learning.
Part 2 12 Great AI Video Ideas to Bring More Traffic
Now, let us know 12 AI video ideas that can become viral and get more likes and views :
01Idea 1: Know your Interest
Before starting a YouTube channel or posting a video, know your area of interest first. Once you get clarity on the area of interest, it’s easy to pick a topic from that and create an innovative video. Try to be more specific in the topic you choose. Also, have clarity on the section of audience you want to target.
For example, if your topic is more related to children, add more animations of animals/ cartoons that interest children. If you choose a related topic, do not add more animations that might confuse the audience. Add more reference links so that they can refer to those and be more particular on the specific topic you are trying to explain through the video. Similarly, if you choose a gaming-related topic, do not be more general about gaming.
Be specific towards a particular section of games like mobile gaming/ desktop/ virtual to reach more audience, and it does not seem boring to the audience.
02Idea 2: Interview Questions
As many students graduate every year, the competition for jobs has increased. People are more interested in getting an appointment as soon as possible, and for that, they need to prepare for the interview thoroughly. A video containing the main topics for the discussion that has references for the interview questions would benefit the students. It can engage with people within no time. Also, if the video is more specific to the department-wise interview questions/ job-level interview questions, it would reach more people and be more helpful to them.
03Idea 3: Full Course in Any Technology
Apart from the entertainment-related videos, education-related videos will be more helpful and engaging. Any video related to any technology course can get more views. Using the YouTube video idea generator AI tool, you can generate more unique videos related to education. Instead of giving a brief idea of the technology, it’s better to pick up a few topics and explain them in detail so that it would be helpful for interviews too. You can use AI technology to add a voice-over and a small summary at the end of the video so that the main points get revised once again.
04Idea 4: Cooking Ideas
Cooking is one of the most trending topics on YouTube. Whatever the language might be, cooking-related videos can get more views, create more creativity, and engage with the audience. You can choose a dish from any cuisine and make a video. You can add slow motion/ fast forward actions and small creative animations using AI. Using AI video ideas tools, you can get more creative ideas related to cooking that can increase views, as viewers will be more interested if the videos are innovative.
05Idea 5: Art and Craft ideas
Recently, people have seem more interested in the interior design of the house. For such people, art and craft ideas might be more helpful. Also, nowadays, schools are encouraging students in other circular activities and studies. These videos might be more attractive to the school’s students. Also, in crafts, select a specific area and make videos on that so that the video will be short and crisp, and easily understandable to the viewers. You can also add a voice-over while doing the craftwork to make it more transparent for the viewers.
06Idea 6: Photo and Video Editing Related Videos
People have become more addicted to taking photos and storing them. Any video related to editing the photos/ videos will engage more with viewers as it is not associated with any section of people. Anyone from any place and with any qualification can understand such videos. Consider a few topics related to the editing and give a detailed description/ explanation of those ideas, or consider any photo/ video editing app and explain how the app works in the video so that it might be helpful for the people who are using the app for the first time. Also, please reply to the frequently asked questions related to the app in the form of comments or summary so that it can reach more people, and there is a chance that the viewers might suggest the video to others who are about to use the app.
07Idea 7: Movies Related Videos
In every country, people are more addicted to movies regardless of language. Movies have become a part of daily life for almost all people. Some of the movie-related video ideas can be:
● Video regarding actor interviews.
● Video regarding the movie review/ collections.
● Video regarding highlights/ mistakes in the movie.
● Video related to small clips/ songs in the film.
● Video related to the spoof of the central theme of the film.
Any video related to a movie can be more viral. To create new content, use AI video idea generator tools so that the videos can be more engaging and creative.
08Idea 8: Lifehacks Related Videos
Simple daily life hack idea-related videos will be more helpful to people irrespective of their living. Any statements about keeping the house clean/clothing/makeup/skincare can be beneficial. You can take simple concepts related to our daily life like:
● How to use a few tools in our everyday life.
● Simple cleaning techniques.
● Folding clothes easily saves time.
09Idea 9: Earning Related Ideas
Videos related to earning can get more views and become more viral among people. Any detailed description of any earning app/ small startup ideas can be helpful. The video ideas generator tool can give more suggestions related to such trending topics.
10Idea 10: Sports related ideas
A large population is into sports, like football and cricket. People enjoy watching and playing these sports regularly from young to old age. It will be a good idea if you can try videos on sports. Using the video generator AI, you can generate animation videos playing cricket and add small clips of old generation cricket players as examples. You may also create small teaching videos on other sports for children. Through animation, giving the latest sports updates worldwide will also be a better idea to get more views for videos.
11Idea 11: Current Affairs Related Videos
Current affairs and general knowledge-related videos will be more helpful to people preparing for competitive exams as most people are learning through the internet rather than from books. If you can take a specific subject and give a detailed description of its past and current updates, it can be helpful for many people. And also, while doing such information-related videos, you get a chance to research it, and it will help improve your knowledge of the subject and searching skills.
12Idea 12: Gadget And Product Review Ideas
Reportedly, there has been a tremendous increase in new products related to mobiles, laptops, TV, other hardware tools, skin, hair care products, etc. You can take a specific product and create innovative ideas on how to use the product using animations/ cartoons and give a short review of the product. Through this, you can earn as you promote a company product, and people will know about the product. This is beneficial in both ways. If the product is related to electronic gadgets, make a video explaining the product’s features and how to use them. If it is hair or skincare related, include the ingredients used, advantages of the product, how to use the product, and any disadvantages, etc. Based on the product you choose, the content of the video should change.
Bonus Idea:
Use an innovative and powerful tool like Wondershare Filmora Video Editor to beautify your AI videos in the shortest time frame.
Filmora’s latest version offers various upgraded tools like:
● Instant Mode to create accessible and quick videos.
● A shop of preset templates to power up your videos.
● The Filmora Auto Beat Sync can match your clip with music.
● Adjust the speed of your video and introduce cinematic effects.
● You can even record your screen with Filmora and use that in your AI videos ideas.
Wondershare Filmora - Best Video Editor for Mac/Windows
5,481,435 people have downloaded it.
Build unique custom animations without breaking a sweat.
Focus on creating epic stories and leave the details to Filmora’s auto features.
Start a creative adventure with drag & drop effects and endless possibilities.
Filmora simplifies advanced features to save you time and effort.
Filmora cuts out repetition so you can move on to your next creative breakthrough.
● Ending Thoughts →
● Finally, that you have a fair idea of what a YouTube video idea generator is about and how it helps content creators in daily life get more innovative ideas for YouTube videos.
● Make use of this tool to get more engaging and creative content and more AI video ideas so that the views for the video increase and the audience receives good knowledge through the videos. Try out these ideas, use Filmora to create exceptional animations on your videos, and watch your YouTube channel grow as expected.
15 Best Free MP4 Video Rotators [Windows,Mac, Android, iPhone & Online
Have you ever encountered a problem where you saved a video in the wrong orientation? So you ask yourself what’s the best tool to rotate. There are tools that help to flip videos recorded so that you don’t get frustrated while you watch them later on your pc or phone. So why don’t you take a look at the best video rotators that are available for Android, iOs, Windows, Mac, and online tools?
Best MP4 Video Rotators to Rotate MP4 Video on Windows and Mac - Filmroa Video Editor
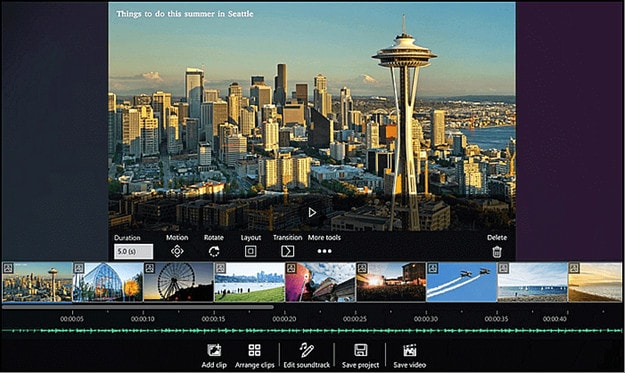
Filmora Video Editor allows you to rotate your video to any angle. You can also zoom in and crop out the parts of the video that you don’t want to see. It also includes predefined aspect ratios such as 16:9, 9:16, 4:5, 1:1, and others to help you quickly discover the ideal aspect ratio for YouTube, Instagram, and other sites. Let’s look at how to modify the orientation of a video in Filmora.
For Win 7 or later (64-bit)
For macOS 10.14 or later
How to change the video orientation in Filmora
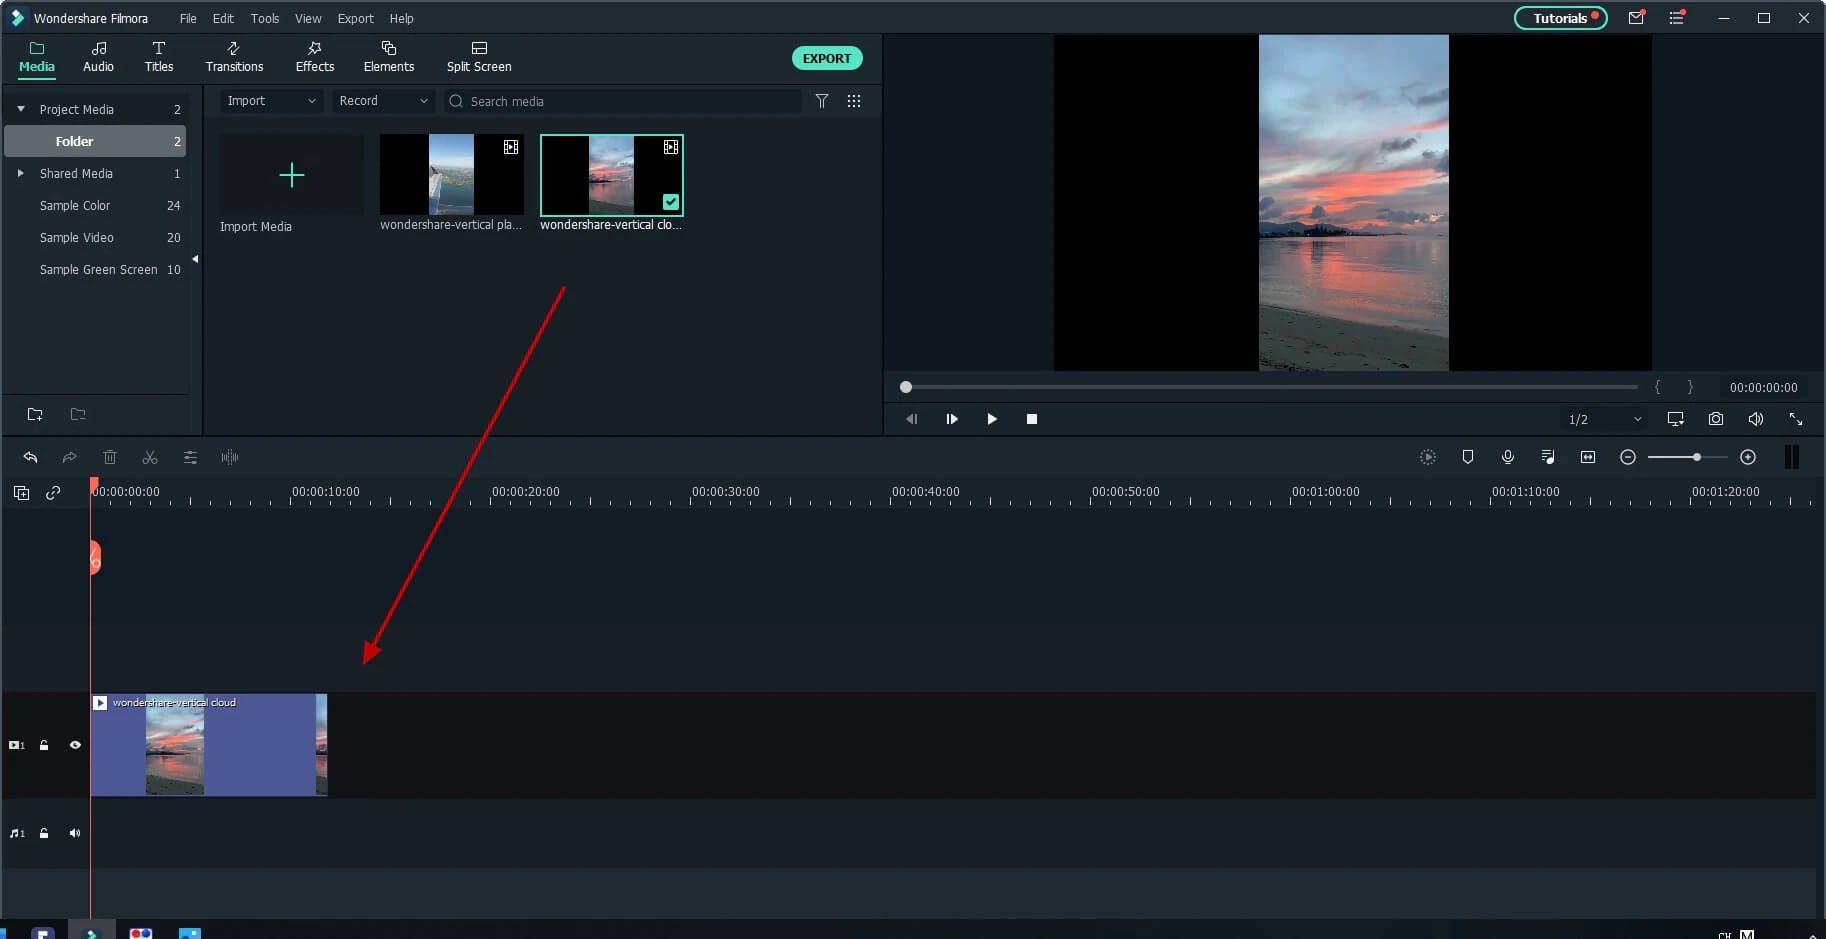
Step 1:Import the video file into Filmora, and then drag it to the timeline.
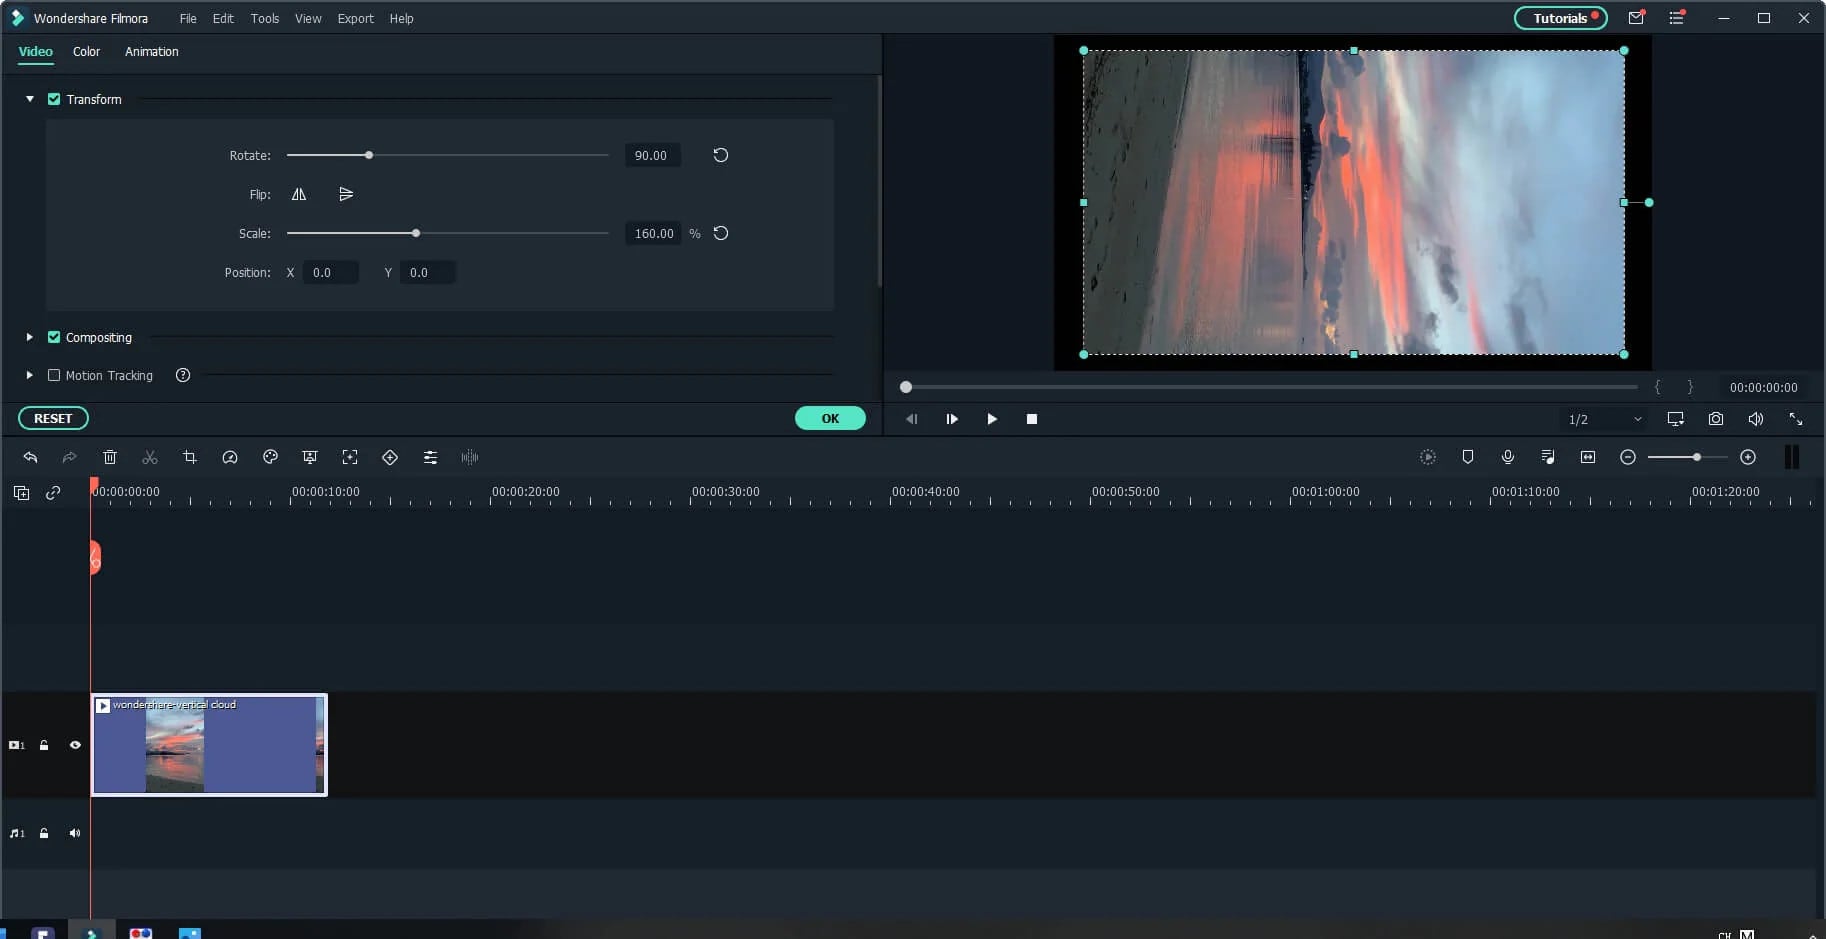
Step 2: To enter the video editing panel, double-click the video clip in the timeline. Locate the “Rotate” option under the “Transform” menu. You can drag the slider or enter a specific number to adjust the rotation value. You can rotate up to 360 degrees. When you enter “90” in the box, the video clip will be rotated 90 degrees.
By dragging the “Scale” slider, you can make the full image screen, or you can directly adjust its position, size, shape, etc., in the Viewer panel.
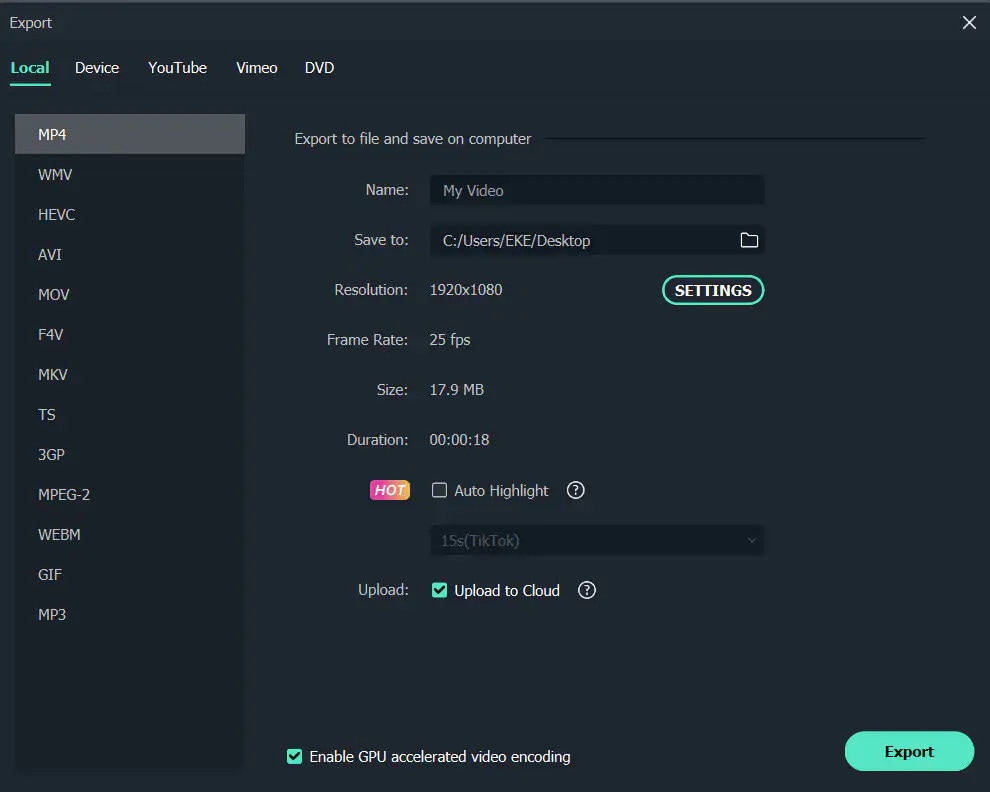
Step 3: After you are satisfied, click the export button. You can change the format here, or you can upload the file to YouTube.
Top 3 Free MP4 Video Rotators on Windows
Looking for the best free video rotator?
If you are looking for a free video rotator for windows, then this article has got you covered. A list of the top 3 free video rotators for windows has been listed.
- VSDC Free Video Editor

It is a highly functional video editing suite with easy controls. It provides anyone who is a beginner to easily access and edit the video easily.
It helps you rotate the videos in increments of 90 degrees, be it clockwise or anticlockwise )
VSDC is a free video editor with non-linear editing capabilities. Users may swiftly convert video and audio files from one format to another with VSDC. A built-in disk burning tool for DVDs is also included in the software. This free program, designed for educational purposes, can be used by businesses or individuals.
VSDC Free Video Editor features
- Built-In DVD Burning Tool
- Colour Blending And Filters
- Specific Multimedia Devices Creation
- Desktop Video Capture
- Export To Social Networking Sites
- Masking
- Non-Linear Video Editing
- Subpixel Accuracy
- Supports Popular Formats
- Video File Converter
Pros
- It’s completely free.
- There is no watermark.
- There are numerous free video editing programs available.
- Support a wide range of file formats
Cons
There isn’t a macOS version available.
Take a severe learning curve into consideration.
There are numerous premium-only features.
The timeline isn’t the same as most NLE editing software.
- Windows Movie Maker
The most well-known video rotator and editor are probably Windows Movie Maker. Most of us who grew up with Microsoft’s various operating systems have had access to it because it comes as a free download with most Microsoft products. It can handle a wide range of files and is generally simple to use. Adding features like sound, music, special effects, or even speeding up the video is simple, and you’ll love the variety of skins available.
For beginners, Windows Video Maker is ideal. It is available for free on Windows PCs and includes basic capabilities and workflow aspects found in professional video editing systems. Its user-friendly interface resembles a simplified version of a video editor timeline and is simple enough for even inexperienced editors to understand.
Features of Windows Movie Maker
- Customization Tool’s title
- Auto Movie Options
- Credit Customization Tool
- Special Effects Options
- Overlays for Transitions
Pros:
- Various video editing functions;
- A variety of output possibilities
Cons:
- Many different versions of the same product;
- No longer included in the Windows operating system.
3.EaseUS Video Editor
EaseUS Video Editor is one of the few most popular video rotators we have today. Its video editing provides tools that can change the video orientation by 90 degrees anticlockwise and clockwise, which can flip vertically and horizontally.
In terms of videos, adding great filters, sound, music, subtitles and other elements to have a great video output can be achieved using the EaseUS. Moreover, it accepts video formats and can convert files to MP4 and other great features.
Features of EaseUS Video Editor
- Can easily trim, cut, split, merge, rotate, and mix video clips.
- Ability to apply stylish video effects
- Can add or remove the watermark and reduce background or wind noise from a video.
Pros:
- User-friendly interface, perfect for beginners
- Easily trim, cut, split, merge, rotate, mix video clips
- A full range of free visual and audio effects
- Change of contrast, exposure, brightness, and other video aspects
- Use the voiceover function to add your comments to the video
Cons:
- The software has no version for macOS
Top 3 Free MP4 Video Rotators on Mac
- iMovie
The iMovie for Mac users is an exceptional video rotator. You can turn any video or movie you may have into an amazing masterpiece with more features due to the special after-effects it has. Simple application to use and navigate easily, although when importing video takes a while at certain times.
Features of the iMovie include
- Full range of options to modify
- Ability to enhance colour settings
- Easily crop and edit video clips ease
- Ability to change the speed of clips.
Pros:
- Nice interface;
- The function is to create fun Movie Trailers.
Cons:
- Supports only a few video formats;
- Pre-processing and import trans-coding can be time-consuming.
- Movavi Video Editor
Movavi has a free version that is easy to use, especially for beginners. It allows you to add titles, filters, transitions, and special effects to your videos and photographs to make attractive movies. You can use the animation to smoothly move things around the screen in your film. On the multi-track timeline, you can add as many tracks as you wish. From the expanded built-in collection, you can get more example video clips, stickers, and audio tracks.
Features of Movavi Video Editor
- You can upload files and photographs in almost any format.
- To make videos automatically, use the Montage Wizard.
- Transition Wizard allows you to quickly put together slideshows.
- Enhance image quality by cutting, cropping, and rotating videos on the timeline.
- Apply artistic filters, and make transitions between portions as smooth as possible.
- Create animated headlines, stickers, callouts, and video overlays:
Pros:
- It’s appropriate for newcomers and casual users alike.
- A number of video formats are supported, including.mov (QuickTime)
- Chroma Key and Slow Motion are examples of special effects.
Cons
- Only the premium version supports the advanced features.
- It uses the basic colour grading tool
- QuickTime Player
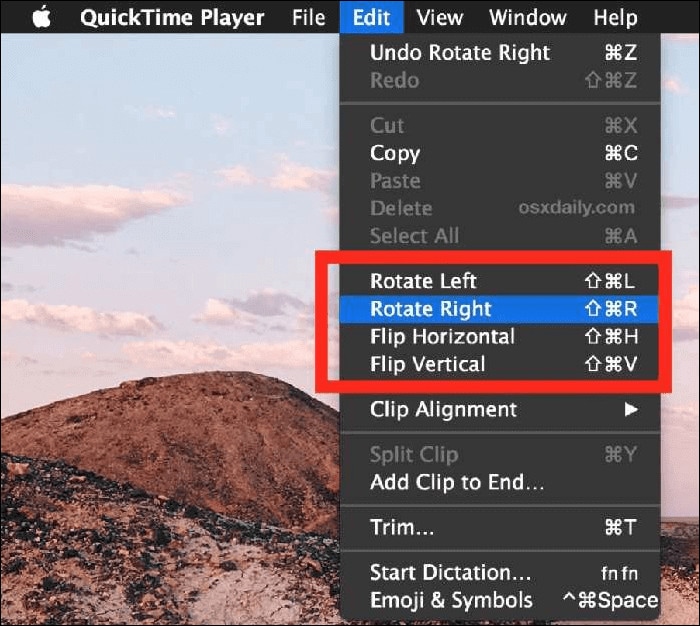
The key advantage of Apple’s QuickTime is that it comes pre-installed on your Mac’s macOS operating system. It’s powerful enough to rotate your clip, yet it’s simple enough for beginners to do. iTunes files can be played and edited with QuickTime. After rotation, it exports a new video file, leaving the old clip on the Mac. The output video will be compressed slightly, resulting in a smaller rotational video file than the original.
Features of QuickTime Player
- Anything can be recorded, including video, audio, and the screen.
- Cropping, audio detachment, combining, and rotation are all simple video editing techniques.
- From 4K to 480p video compression
- Quickly share your video: directly upload videos to YouTube
Pros:
- With macOS, it comes pre-installed.
- Work with iTunes files Streaming video player with no configuration
Cons:
- Only QuickTime Pro 7 unlocks the editing feature.
- There will be no more Windows versions.
- It isn’t compatible with standard subtitle files.
Top 3 Free MP4 Video Rotators on Android
When we use a smartphone to capture a video or download one from a website, we occasionally discover that the video has been inverted. As a result, we’ll require a video rotator app to correct the problem. On the market, there are many different sorts of tools for various platforms. However, you may have discovered that separating the wheat from the chaff can be difficult at times. To save you time, I’ve compiled a list of 3 video rotator applications for Android
- VivaVideo
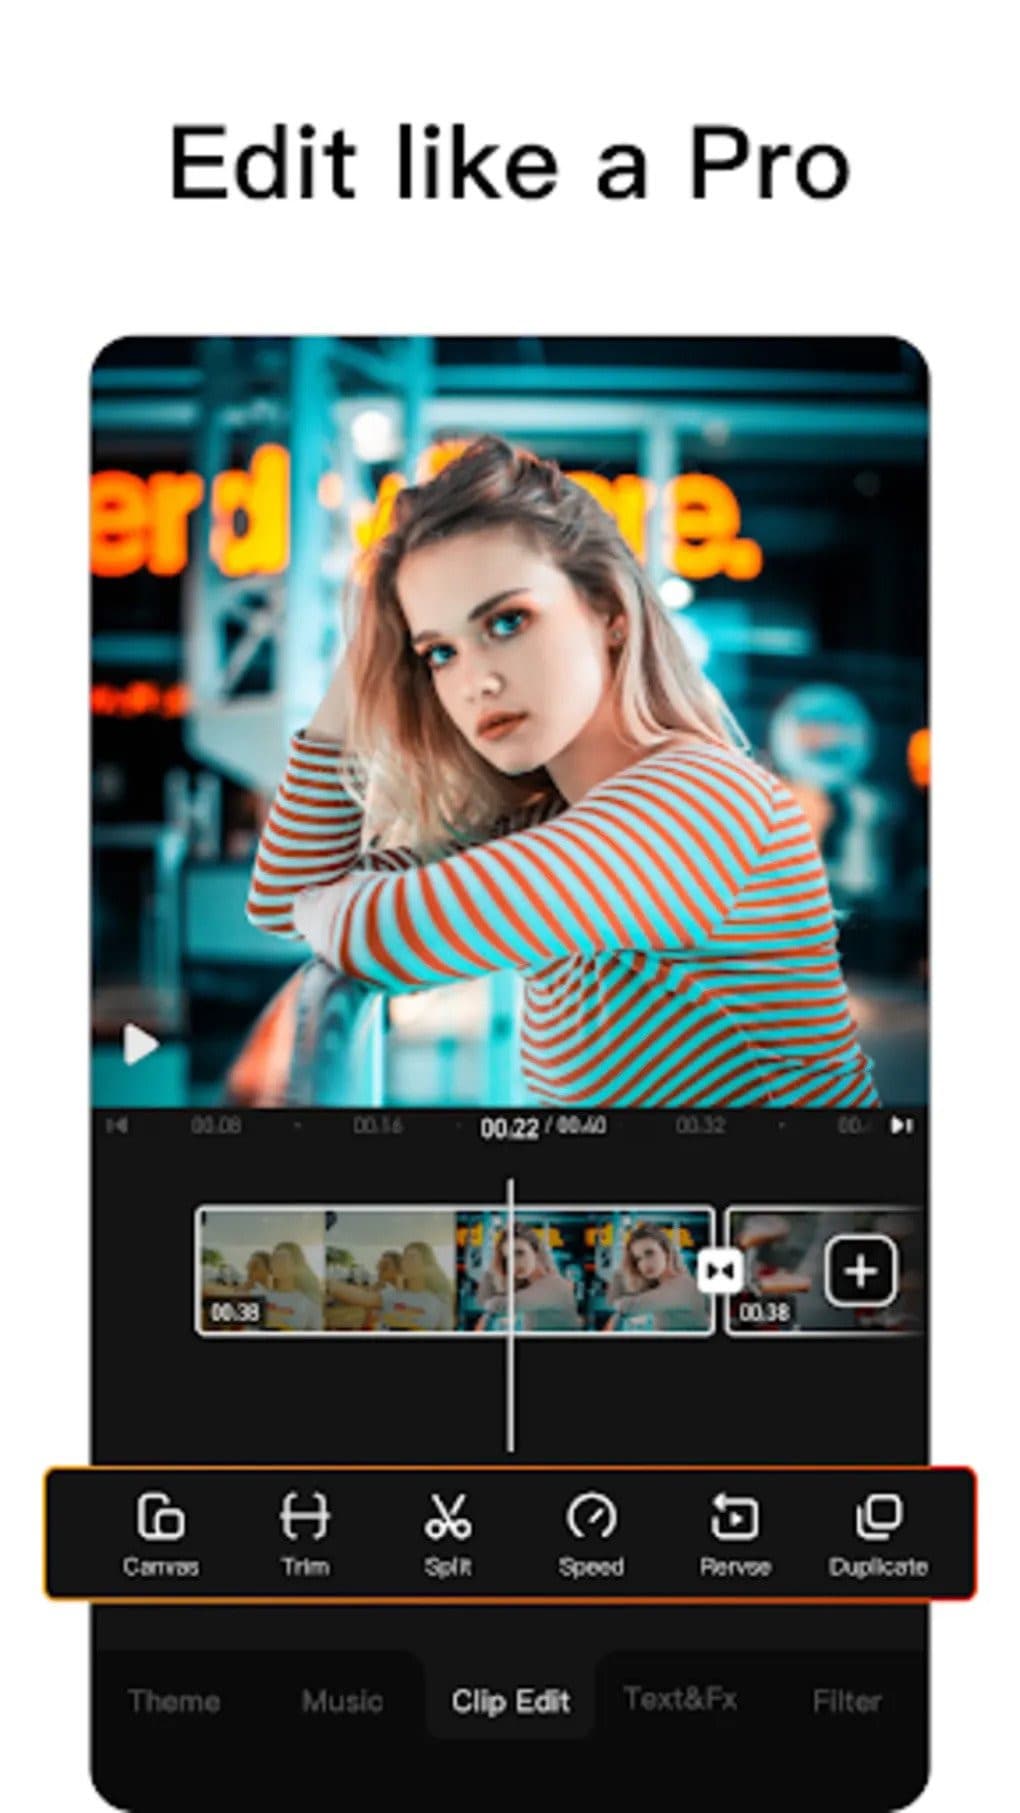
VivaVideo is one of the top movie producers and free video rotators for Android devices as a media editor. This application allows you to alter the orientation of your videos. Aside from rotating videos, this software also includes cropping, combining, cutting, and other editing features. “The best video editor software is VivaVideo - Video Maker App,” an Android expert previously said. This program is a video producer as well as an editor.
Features of VivaVideo
- It allows you to add music to videos.
- Combine videos clips into one video
- Can apply video effects.
- After you’ve finished editing your videos, you may save and share them on YouTube and TikTok! To rotate video, use this program!
Pros
- It has an In-app camera with live effects previews for capturing videos.
- More than 60 effects to choose from with additional downloadable effects.
- Enhance the videos using themes.
- Ability to Merge videos and create montages with storyboarding features
- Edit frames within a video
Cons
- There is no negative review to say about this app
2.Google Photos
This app may already be installed on your smartphone, but you are unaware of its full potential. This program includes a built-in picture and video editor in addition to backing up your photos. This program includes three essential video editing tools that are extremely basic and easy to use.
The first is to stabilize the video; if your video is unsteady, you can use this option in Google Photos to stabilize it. You may also use the timeline below the video to cut the video. If you mistakenly captured the video in the wrong orientation, there is a tool to rotate it.
Features of Google Photos
- You can modify photographs and videos in Google Photos.
- On Google Photos, make a collage or a movie.
- Recover photos or videos that were recently erased.
- Clear off some space on Google Photos…
- Place photos in the Archive.
Pros
Google Images automatically backs up all of your device’s photos and videos.
Despite its many advantages, the reason I choose Google Photos is that it helps me save space on my smartphone.
The original quality of images stored in Google Photos is really high. Photos and videos are saved in the same resolution as when they were taken.
Over time, Google has improved the Google Photos interface, and it now incorporates AI to provide consumers with even better performance.
Cons
There aren’t many effects, and there aren’t any other editing tools.
The lack of a password-protection option in Google Photos is annoying. Some photos are private, and you may not wish to share them with others.
Users of Google Photos will no longer have limitless storage.
3Adobe Rush
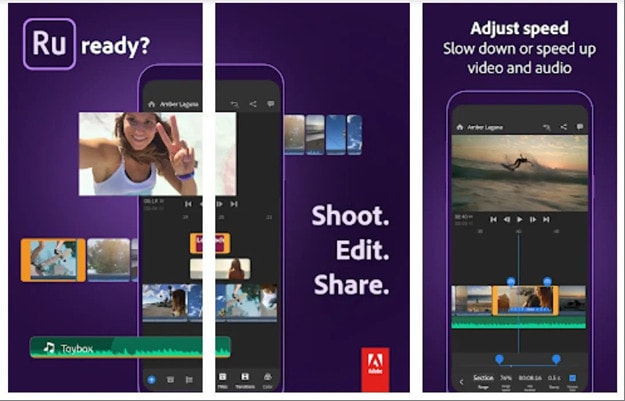
Adobe Rush is a new video editor that Adobe released via a partnership with Samsung’s latest flagship smartphone. This app is a simple yet powerful tool for editing videos on the go, on your smartphone.
This app comes with some powerful tools which you find on some high-end video editing apps. You get a timeline interface to edit your videos perfectly, and you get some music recommendations right into the app.
Features Of Adobe Rush
- In the timeline, you can make changes to your video.
- Audio can be added and refined.
- Change the colour, size, and position of the video.
- Make a title.
- Add transitions, pan and zoom effects, and reframe your clips automatically.
- Change the clip’s attributes.
- Change your video’s aspect ratio.
- Create the illusion of a picture-in-picture effect.
Pros
- It has a user-friendly UI that is responsive and snappy.
- It’s easy to use and provides helpful advice for newcomers.
- It enables Adobe users to quickly and easily produce stunning videos that are customized to their preferences.
- When compared to its competitors, exporting files is a breeze.
- Unlike most of its competitors, it comes with good colour and title tools.
- YouTube, Facebook, Vimeo, Snapchat, Instagram, and Twitter are just a few of the social media channels where the finished files can be simply shared.
- It synchronizes projects between desktop and mobile devices, making them more accessible.
Cons
- When compared to its competitors, it is a little costly.
- It renders projects slowly and only supports three transitions.
- The app does not have storyboard templates and cannot specify the exact structure for output files.
- It only comes with a few video and audio editing capabilities.
- Many standard video effects are missing.
Top 3 Free MP4 Video Rotators on iPhone
1.Splice

Trimming, cropping, effects, titles, speed adjustments, animation, transitions, and music are all available in this well-known video editor, which has a cultish following of dedicated Splicers.
Splice’s music library is one of its strongest assets. It offers a large selection of free music and sound effects to layer over your video, as well as the ability to sync your movie to the beat of your soundtrack.
Features of Splice
Clips should be cropped and trimmed to focus on the highlights.
With an Audio Library and iTunes Integration, you may add music to your videos.
To smooth transitions between clips and images, use transitions.
Enhance videos with effects.
Pros:
- Developed by GoPro, award-winning, highly regarded.
Cons:
- Only available on iOS devices.
2. Clips

It’s easy to miss pre-loaded apps like Apple’s Clips, but this video editing tool has lots of impressive features to enjoy, thanks to the weight of the tech giant’s greatest brains behind it. Take, for example, their live tiles setting. You can use this to generate animated captions and titles that appear as you speak.
To liven things up, you may add animated emojis and backgrounds, and music tracks dynamically sync to the length of your video.
Features of Clips
- Ability to generate animated captions
- Full access to Animated emojis and backgrounds
- Ability to have your music sync to your videos
Pros:
- Simple to use, unique features, and Apple’s support.
Cons:
- It’s only for iOS devices (obviously! ), and it has trouble with a big number of clips.
3. Quik

You may apply transitions and effects to up to 200 photographs and video clips from your photo library or GoPro Plus with this free software. You may not only crop, zoom, and rotate photos and video clips, but you can also customize them with 26 different themes, fonts, effects, and artwork.
You may make HD 1080p or 720p films for social sharing in cinema, square, or portrait formats, and you can store your draft creations for up to seven days.
Features of Quik
- Everything that is available for free.
- There are no limits to the number of mural events.
- Editing is unrestricted.
- There are now a total of 25 more photo and video filters.
Pros:
- Tons of features, including access to 100+ free songs,
- Flashbacks and QuikStories, which make videos based on your most recent footage,
- syncs footage to the beat of your soundtrack, and AI editing help.
Cons:
- Limited control and no trimming option; customers have claimed that it is occasionally glitchy.
Top 3 Free MP4 Video Rotators Online
1.Online Video Cutter
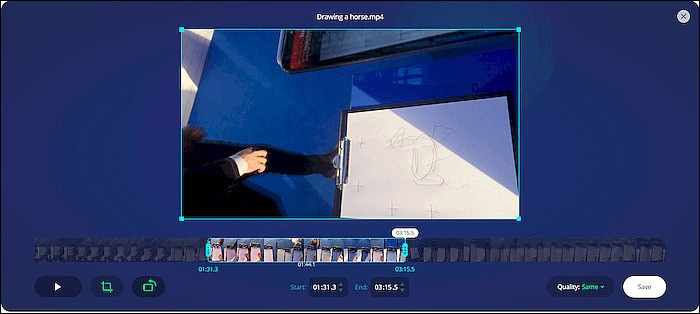
This web tool comes in helpful when you need to rapidly edit a small video file. It is not necessary to install it; you may use it right from your browser. The clip can only be rotated 90, 180, or 270 degrees. It’ll come in handy, especially if you’ve closed the video in portrait mode and want to watch it on a big screen. The service’s provider says that the files will be automatically erased from the servers a few hours after you accomplish your task, resulting in a high level of security.
Features of Online Video cutter.
- It Supports Any Video Format. …
- Completely Online for you to access
- Additional Settings to make more edits to videos
- Easy to use, User-friendly interface.
Pros:
It has a very simple user interface.
You do not need to pay for a license to utilize it.
Almost every video format is supported.
Cons:
Only suitable for little clips
Performing simply the most basic functions, such as rotating and cropping
2.EzGif
This unique internet tool not only creates animated GIFs but can also rotate video. You simply choose the clip from your local folder. However, the file’s maximum size is limited to 100MB. A basic tool for rotating the video through 90, 180, and 270 degrees. You can also vertically and horizontally flip the video before exporting it in a different format and encoding.
Features of EzGif
- A simple user interface to find your way around the website.
- Ability to do resizing and rotating of videos and images.
- Capable of video conversions and editing
Pros:
- Many video formats are supported, including MP4, WebM, AVI, MPEG, FLV, MOV, and 3GP.
- The rotation procedure is quick and simple to utilize.
- After rotating, provide a preview function.
Cons:
- The maximum file size is 100 megabytes.
- There are no filters or transitions, and only basic editing functions are available.
3.Videorotate
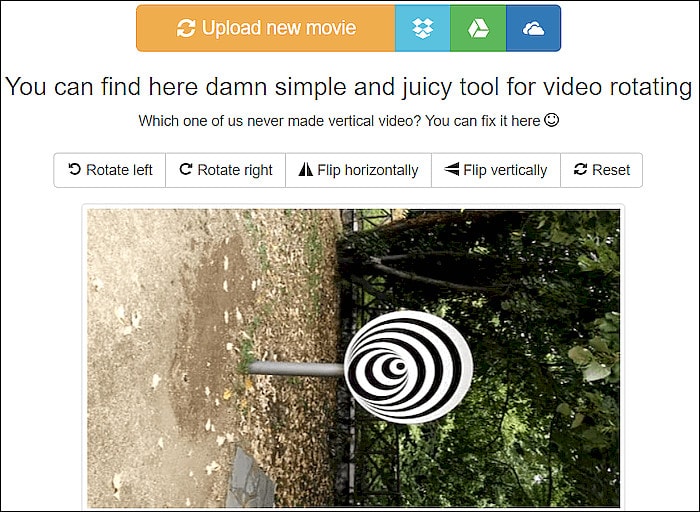
- This is a free online video rotator that is simple and quick to use. You can upload your video from a local folder or import a recorded clip from major cloud services like Dropbox, Google Drive, and One Drive, just like the other online services (there are buttons for each of them). You can flip the clip or rotate it left and right. Other video capabilities available on the site include cropping, stabilizing, and slicing.
Features of Videorotate
- Ability to crop, stabilize and slice videos.
Pros:
- Simple and straightforward to use
- Clips from your Dropbox, Google Drive, and OneDrive accounts can be uploaded.
- A specific “Reset” button is available.
Cons:
- For basic operations, a service for newcomers is available.
- Only a few video file formats are supported.
FAQs about Video Rotator
- What is the best way to rotate a video?
Use an easy-to-use video editing program. It’s easy to rotate a video, even if you’ve never edited one before. You can also use some media players.
- How do I rotate a video permanently?
In this guide, we will show you exactly how to rotate video in Windows with EaseUS Video Editor and save it permanently.
3.How can I rotate a video for free on the internet?
It’s simple to rotate a video online, and there are various services that offer free online video rotators.
- Videorotate
- Ezgif
- Video cutter on the internet
- How do I mirror a video on the internet?
The websites that support video rotation also offer the ability to “flip” the video vertically and horizontally. You’ll have “mirroring” frames in this manner as if you’re filming your pals in the mirror.
For macOS 10.14 or later
How to change the video orientation in Filmora
Step 1:Import the video file into Filmora, and then drag it to the timeline.
Step 2: To enter the video editing panel, double-click the video clip in the timeline. Locate the “Rotate” option under the “Transform” menu. You can drag the slider or enter a specific number to adjust the rotation value. You can rotate up to 360 degrees. When you enter “90” in the box, the video clip will be rotated 90 degrees.
By dragging the “Scale” slider, you can make the full image screen, or you can directly adjust its position, size, shape, etc., in the Viewer panel.
Step 3: After you are satisfied, click the export button. You can change the format here, or you can upload the file to YouTube.
Top 3 Free MP4 Video Rotators on Windows
Looking for the best free video rotator?
If you are looking for a free video rotator for windows, then this article has got you covered. A list of the top 3 free video rotators for windows has been listed.
- VSDC Free Video Editor
It is a highly functional video editing suite with easy controls. It provides anyone who is a beginner to easily access and edit the video easily.
It helps you rotate the videos in increments of 90 degrees, be it clockwise or anticlockwise )
VSDC is a free video editor with non-linear editing capabilities. Users may swiftly convert video and audio files from one format to another with VSDC. A built-in disk burning tool for DVDs is also included in the software. This free program, designed for educational purposes, can be used by businesses or individuals.
VSDC Free Video Editor features
- Built-In DVD Burning Tool
- Colour Blending And Filters
- Specific Multimedia Devices Creation
- Desktop Video Capture
- Export To Social Networking Sites
- Masking
- Non-Linear Video Editing
- Subpixel Accuracy
- Supports Popular Formats
- Video File Converter
Pros
- It’s completely free.
- There is no watermark.
- There are numerous free video editing programs available.
- Support a wide range of file formats
Cons
There isn’t a macOS version available.
Take a severe learning curve into consideration.
There are numerous premium-only features.
The timeline isn’t the same as most NLE editing software.
- Windows Movie Maker
The most well-known video rotator and editor are probably Windows Movie Maker. Most of us who grew up with Microsoft’s various operating systems have had access to it because it comes as a free download with most Microsoft products. It can handle a wide range of files and is generally simple to use. Adding features like sound, music, special effects, or even speeding up the video is simple, and you’ll love the variety of skins available.
For beginners, Windows Video Maker is ideal. It is available for free on Windows PCs and includes basic capabilities and workflow aspects found in professional video editing systems. Its user-friendly interface resembles a simplified version of a video editor timeline and is simple enough for even inexperienced editors to understand.
Features of Windows Movie Maker
- Customization Tool’s title
- Auto Movie Options
- Credit Customization Tool
- Special Effects Options
- Overlays for Transitions
Pros:
- Various video editing functions;
- A variety of output possibilities
Cons:
- Many different versions of the same product;
- No longer included in the Windows operating system.
3.EaseUS Video Editor
EaseUS Video Editor is one of the few most popular video rotators we have today. Its video editing provides tools that can change the video orientation by 90 degrees anticlockwise and clockwise, which can flip vertically and horizontally.
In terms of videos, adding great filters, sound, music, subtitles and other elements to have a great video output can be achieved using the EaseUS. Moreover, it accepts video formats and can convert files to MP4 and other great features.
Features of EaseUS Video Editor
- Can easily trim, cut, split, merge, rotate, and mix video clips.
- Ability to apply stylish video effects
- Can add or remove the watermark and reduce background or wind noise from a video.
Pros:
- User-friendly interface, perfect for beginners
- Easily trim, cut, split, merge, rotate, mix video clips
- A full range of free visual and audio effects
- Change of contrast, exposure, brightness, and other video aspects
- Use the voiceover function to add your comments to the video
Cons:
- The software has no version for macOS
Top 3 Free MP4 Video Rotators on Mac
- iMovie
The iMovie for Mac users is an exceptional video rotator. You can turn any video or movie you may have into an amazing masterpiece with more features due to the special after-effects it has. Simple application to use and navigate easily, although when importing video takes a while at certain times.
Features of the iMovie include
- Full range of options to modify
- Ability to enhance colour settings
- Easily crop and edit video clips ease
- Ability to change the speed of clips.
Pros:
- Nice interface;
- The function is to create fun Movie Trailers.
Cons:
- Supports only a few video formats;
- Pre-processing and import trans-coding can be time-consuming.
- Movavi Video Editor
Movavi has a free version that is easy to use, especially for beginners. It allows you to add titles, filters, transitions, and special effects to your videos and photographs to make attractive movies. You can use the animation to smoothly move things around the screen in your film. On the multi-track timeline, you can add as many tracks as you wish. From the expanded built-in collection, you can get more example video clips, stickers, and audio tracks.
Features of Movavi Video Editor
- You can upload files and photographs in almost any format.
- To make videos automatically, use the Montage Wizard.
- Transition Wizard allows you to quickly put together slideshows.
- Enhance image quality by cutting, cropping, and rotating videos on the timeline.
- Apply artistic filters, and make transitions between portions as smooth as possible.
- Create animated headlines, stickers, callouts, and video overlays:
Pros:
- It’s appropriate for newcomers and casual users alike.
- A number of video formats are supported, including.mov (QuickTime)
- Chroma Key and Slow Motion are examples of special effects.
Cons
- Only the premium version supports the advanced features.
- It uses the basic colour grading tool
- QuickTime Player
The key advantage of Apple’s QuickTime is that it comes pre-installed on your Mac’s macOS operating system. It’s powerful enough to rotate your clip, yet it’s simple enough for beginners to do. iTunes files can be played and edited with QuickTime. After rotation, it exports a new video file, leaving the old clip on the Mac. The output video will be compressed slightly, resulting in a smaller rotational video file than the original.
Features of QuickTime Player
- Anything can be recorded, including video, audio, and the screen.
- Cropping, audio detachment, combining, and rotation are all simple video editing techniques.
- From 4K to 480p video compression
- Quickly share your video: directly upload videos to YouTube
Pros:
- With macOS, it comes pre-installed.
- Work with iTunes files Streaming video player with no configuration
Cons:
- Only QuickTime Pro 7 unlocks the editing feature.
- There will be no more Windows versions.
- It isn’t compatible with standard subtitle files.
Top 3 Free MP4 Video Rotators on Android
When we use a smartphone to capture a video or download one from a website, we occasionally discover that the video has been inverted. As a result, we’ll require a video rotator app to correct the problem. On the market, there are many different sorts of tools for various platforms. However, you may have discovered that separating the wheat from the chaff can be difficult at times. To save you time, I’ve compiled a list of 3 video rotator applications for Android
- VivaVideo
VivaVideo is one of the top movie producers and free video rotators for Android devices as a media editor. This application allows you to alter the orientation of your videos. Aside from rotating videos, this software also includes cropping, combining, cutting, and other editing features. “The best video editor software is VivaVideo - Video Maker App,” an Android expert previously said. This program is a video producer as well as an editor.
Features of VivaVideo
- It allows you to add music to videos.
- Combine videos clips into one video
- Can apply video effects.
- After you’ve finished editing your videos, you may save and share them on YouTube and TikTok! To rotate video, use this program!
Pros
- It has an In-app camera with live effects previews for capturing videos.
- More than 60 effects to choose from with additional downloadable effects.
- Enhance the videos using themes.
- Ability to Merge videos and create montages with storyboarding features
- Edit frames within a video
Cons
- There is no negative review to say about this app
2.Google Photos
This app may already be installed on your smartphone, but you are unaware of its full potential. This program includes a built-in picture and video editor in addition to backing up your photos. This program includes three essential video editing tools that are extremely basic and easy to use.
The first is to stabilize the video; if your video is unsteady, you can use this option in Google Photos to stabilize it. You may also use the timeline below the video to cut the video. If you mistakenly captured the video in the wrong orientation, there is a tool to rotate it.
Features of Google Photos
- You can modify photographs and videos in Google Photos.
- On Google Photos, make a collage or a movie.
- Recover photos or videos that were recently erased.
- Clear off some space on Google Photos…
- Place photos in the Archive.
Pros
Google Images automatically backs up all of your device’s photos and videos.
Despite its many advantages, the reason I choose Google Photos is that it helps me save space on my smartphone.
The original quality of images stored in Google Photos is really high. Photos and videos are saved in the same resolution as when they were taken.
Over time, Google has improved the Google Photos interface, and it now incorporates AI to provide consumers with even better performance.
Cons
There aren’t many effects, and there aren’t any other editing tools.
The lack of a password-protection option in Google Photos is annoying. Some photos are private, and you may not wish to share them with others.
Users of Google Photos will no longer have limitless storage.
3Adobe Rush
Adobe Rush is a new video editor that Adobe released via a partnership with Samsung’s latest flagship smartphone. This app is a simple yet powerful tool for editing videos on the go, on your smartphone.
This app comes with some powerful tools which you find on some high-end video editing apps. You get a timeline interface to edit your videos perfectly, and you get some music recommendations right into the app.
Features Of Adobe Rush
- In the timeline, you can make changes to your video.
- Audio can be added and refined.
- Change the colour, size, and position of the video.
- Make a title.
- Add transitions, pan and zoom effects, and reframe your clips automatically.
- Change the clip’s attributes.
- Change your video’s aspect ratio.
- Create the illusion of a picture-in-picture effect.
Pros
- It has a user-friendly UI that is responsive and snappy.
- It’s easy to use and provides helpful advice for newcomers.
- It enables Adobe users to quickly and easily produce stunning videos that are customized to their preferences.
- When compared to its competitors, exporting files is a breeze.
- Unlike most of its competitors, it comes with good colour and title tools.
- YouTube, Facebook, Vimeo, Snapchat, Instagram, and Twitter are just a few of the social media channels where the finished files can be simply shared.
- It synchronizes projects between desktop and mobile devices, making them more accessible.
Cons
- When compared to its competitors, it is a little costly.
- It renders projects slowly and only supports three transitions.
- The app does not have storyboard templates and cannot specify the exact structure for output files.
- It only comes with a few video and audio editing capabilities.
- Many standard video effects are missing.
Top 3 Free MP4 Video Rotators on iPhone
1.Splice
Trimming, cropping, effects, titles, speed adjustments, animation, transitions, and music are all available in this well-known video editor, which has a cultish following of dedicated Splicers.
Splice’s music library is one of its strongest assets. It offers a large selection of free music and sound effects to layer over your video, as well as the ability to sync your movie to the beat of your soundtrack.
Features of Splice
Clips should be cropped and trimmed to focus on the highlights.
With an Audio Library and iTunes Integration, you may add music to your videos.
To smooth transitions between clips and images, use transitions.
Enhance videos with effects.
Pros:
- Developed by GoPro, award-winning, highly regarded.
Cons:
- Only available on iOS devices.
2. Clips
It’s easy to miss pre-loaded apps like Apple’s Clips, but this video editing tool has lots of impressive features to enjoy, thanks to the weight of the tech giant’s greatest brains behind it. Take, for example, their live tiles setting. You can use this to generate animated captions and titles that appear as you speak.
To liven things up, you may add animated emojis and backgrounds, and music tracks dynamically sync to the length of your video.
Features of Clips
- Ability to generate animated captions
- Full access to Animated emojis and backgrounds
- Ability to have your music sync to your videos
Pros:
- Simple to use, unique features, and Apple’s support.
Cons:
- It’s only for iOS devices (obviously! ), and it has trouble with a big number of clips.
3. Quik
You may apply transitions and effects to up to 200 photographs and video clips from your photo library or GoPro Plus with this free software. You may not only crop, zoom, and rotate photos and video clips, but you can also customize them with 26 different themes, fonts, effects, and artwork.
You may make HD 1080p or 720p films for social sharing in cinema, square, or portrait formats, and you can store your draft creations for up to seven days.
Features of Quik
- Everything that is available for free.
- There are no limits to the number of mural events.
- Editing is unrestricted.
- There are now a total of 25 more photo and video filters.
Pros:
- Tons of features, including access to 100+ free songs,
- Flashbacks and QuikStories, which make videos based on your most recent footage,
- syncs footage to the beat of your soundtrack, and AI editing help.
Cons:
- Limited control and no trimming option; customers have claimed that it is occasionally glitchy.
Top 3 Free MP4 Video Rotators Online
1.Online Video Cutter
This web tool comes in helpful when you need to rapidly edit a small video file. It is not necessary to install it; you may use it right from your browser. The clip can only be rotated 90, 180, or 270 degrees. It’ll come in handy, especially if you’ve closed the video in portrait mode and want to watch it on a big screen. The service’s provider says that the files will be automatically erased from the servers a few hours after you accomplish your task, resulting in a high level of security.
Features of Online Video cutter.
- It Supports Any Video Format. …
- Completely Online for you to access
- Additional Settings to make more edits to videos
- Easy to use, User-friendly interface.
Pros:
It has a very simple user interface.
You do not need to pay for a license to utilize it.
Almost every video format is supported.
Cons:
Only suitable for little clips
Performing simply the most basic functions, such as rotating and cropping
2.EzGif
This unique internet tool not only creates animated GIFs but can also rotate video. You simply choose the clip from your local folder. However, the file’s maximum size is limited to 100MB. A basic tool for rotating the video through 90, 180, and 270 degrees. You can also vertically and horizontally flip the video before exporting it in a different format and encoding.
Features of EzGif
- A simple user interface to find your way around the website.
- Ability to do resizing and rotating of videos and images.
- Capable of video conversions and editing
Pros:
- Many video formats are supported, including MP4, WebM, AVI, MPEG, FLV, MOV, and 3GP.
- The rotation procedure is quick and simple to utilize.
- After rotating, provide a preview function.
Cons:
- The maximum file size is 100 megabytes.
- There are no filters or transitions, and only basic editing functions are available.
3.Videorotate
- This is a free online video rotator that is simple and quick to use. You can upload your video from a local folder or import a recorded clip from major cloud services like Dropbox, Google Drive, and One Drive, just like the other online services (there are buttons for each of them). You can flip the clip or rotate it left and right. Other video capabilities available on the site include cropping, stabilizing, and slicing.
Features of Videorotate
- Ability to crop, stabilize and slice videos.
Pros:
- Simple and straightforward to use
- Clips from your Dropbox, Google Drive, and OneDrive accounts can be uploaded.
- A specific “Reset” button is available.
Cons:
- For basic operations, a service for newcomers is available.
- Only a few video file formats are supported.
FAQs about Video Rotator
- What is the best way to rotate a video?
Use an easy-to-use video editing program. It’s easy to rotate a video, even if you’ve never edited one before. You can also use some media players.
- How do I rotate a video permanently?
In this guide, we will show you exactly how to rotate video in Windows with EaseUS Video Editor and save it permanently.
3.How can I rotate a video for free on the internet?
It’s simple to rotate a video online, and there are various services that offer free online video rotators.
- Videorotate
- Ezgif
- Video cutter on the internet
- How do I mirror a video on the internet?
The websites that support video rotation also offer the ability to “flip” the video vertically and horizontally. You’ll have “mirroring” frames in this manner as if you’re filming your pals in the mirror.
Use Path Blur In Photoshop To Create Motion Effect
There are different kinds of blur effects that redefine the movement and intensity of an image. By applying a suitable blur effect, you can increase the visual appeal of your still photo by emphasizing a certain motion. Path blur is one of the trending motion blur effects that people use to enhance their photos instantly. Through this article, you can learn how to use path blur in Photoshop conveniently.
Part 1: What is Path Blur and How Does It Work?
Path blur is a kind of motion blur that highlights a motion and speed in a certain direction. It helps to create a sense of movement by adjusting the blur intensity and central point. If you want to display a stimulating motion in an image, path blur can assist you in this regard.
Path blur works by adjusting two variables: Speed and Taper. By adjusting the speed slider, you can specify the amount of path blur. In addition to speed, you can adjust the taper value accordingly to determine the blur trail.

This effect can instantly add new dimensions to your captured photo. For instance, if you have captured a photo of a racing car, you can add a path blur effect to give a sense of speed to it. You can easily find this special effect in Adobe Photoshop. By using the selection tools, you can effectively add a path blur effect to your image in the selected area. To know more about path blur in Photoshop, continue reading this article.
Part 2: How to Use Path Blur in Photoshop?
Photoshop is undoubtedly the most commonly used tool to edit pictures with great configuration options. After uploading the image, you can quickly transform it by adding new effects, filters, and layers. You can retouch your photography efficiently through this tool by increasing the quality of pictures. Moreover, the clean user interface of Photoshop allows you to utilize the advanced functions without any interruptions.
Are you ready to use Photoshop path blur? Read this part of the article to find out two interesting ways to create a path blur effect in the images.
Add Dynamic Effect to Your Static Images
Step1 Open Photoshop and import the desired picture. Once done, go to the “Layers” section and copy the background layer. For this, press “Ctrl + J” in Windows and “Command + J” for MacBook.

Step2 Now proceed to the “Filter” section and locate the option “Blur Gallery”. From there, choose the “Path Blur” option. Now you would be able to see an arrow on your screen. Using this arrow, you can specify the path blur motion. Drag and close the arrow where you want to show the speed. Also, set a higher value for the speed given on the right side. Once done, hit the “OK” button.

Create a Long Exposure Picture
Step1 Navigate to the Adobe Photoshop tool and begin by uploading a picture. Afterward, go to the “Filter” tab and select “Convert for Small Filters.”

Step2 Now go to the “Filter” tab again and choose the “Blur Gallery” option. From there, select the “Path Blur” option. Now adjust the displayed arrow in a particular direction to decide the starting and endpoint of the path blur. Moreover, modify the “Speed” slider according to your choice.

Step3 After dragging the arrow in a particular direction, a blue dot will appear at the center. Press the “Delete” button to eliminate that point. Now select the endpoint of the arrow and change its blur shape.

Step4 Utilize the noise section to add a grainy effect in the blurred area. Once done, click on the “OK” button. Now select the masking tool to select the area in your picture. Afterward, choose the “Smart Mask” filter and then navigate to the “Fill” option given in the “Edit” section.

Step5 In the fill menu, choose the color “Black.” Now go to the “Select” section and click “Deselect.” To soften the whole look, you can go to the “Properties” panel and adjust the “Feather” properties.

Step6 Now add the first layer and choose the option “Convert for Smart Filters.” Again, go to the “Filter” section, select “Blur Gallery,” and uncheck the option called “Edit Blur Screen.”

Step7 Now increase the length of the arrow and press “Ctrl + Click” for Windows or “Command + Click” for Mac to reposition the path. You can also add a curve to the arrow. Enhance the speed from the right panel and uncheck the option of “Center Blur.” You can increase the taper value to make the blur gradually trail off. Add a grainy filter for more enhancements.

Bonus Tips – The Alternative to Photoshop to Create Motion Blur Effect
Many users find the interface of Adobe Photoshop intimidating or challenging to operate. If you want an alternative to Photoshop, the best choice you can make is to use Wondershare Filmora . For beginners, this tool adds built-in presets that are professionally made.
Free Download For Win 7 or later(64-bit)
Free Download For macOS 10.14 or later
It offers more than 900 effects that you can use to add new dimensions to your photos and videos. Moreover, it provides fast processing speed for photo and video editing to help you achieve your goals conveniently.
Steps to Produce Motion Blur Effect in Filmora
If you are a beginner and want to create a motion blur effect, then use the steps mentioned below:
Step1 Add the Image to Timeline
After launching Filmora, select “Create New Project” and import the desired picture. After dragging it to the timeline, you have to split it to proceed.

Step2 Choose the Background Blur
To split, choose the starting and ending point in the clip where you want to add the motion blur effect. Once done, go to the “Effects” tab and search for the “Background Blur” effect section. Pick and apply the desired blur filter to the split section of the video.

Step3 Apply the Transition
Once you have added the motion blur effect, you can check the results from the preview window. You can also apply the “Dissolve” transition from the “Transitions” tab to generate a smooth result.

Conclusion
If you want to display a sense of speed and movement in the picture, you can add a path blur effect. It’s one of the types of motion blur effects that many people use in their pictures to add a dynamic element. By reading this article, you have learned how to add path blur in Photoshop through simple means. Moreover, you can also explore the tool Filmora to create a motion blur effect in the photos effortlessly.
Free Download For macOS 10.14 or later
It offers more than 900 effects that you can use to add new dimensions to your photos and videos. Moreover, it provides fast processing speed for photo and video editing to help you achieve your goals conveniently.
Steps to Produce Motion Blur Effect in Filmora
If you are a beginner and want to create a motion blur effect, then use the steps mentioned below:
Step1 Add the Image to Timeline
After launching Filmora, select “Create New Project” and import the desired picture. After dragging it to the timeline, you have to split it to proceed.
Step2 Choose the Background Blur
To split, choose the starting and ending point in the clip where you want to add the motion blur effect. Once done, go to the “Effects” tab and search for the “Background Blur” effect section. Pick and apply the desired blur filter to the split section of the video.
Step3 Apply the Transition
Once you have added the motion blur effect, you can check the results from the preview window. You can also apply the “Dissolve” transition from the “Transitions” tab to generate a smooth result.
Conclusion
If you want to display a sense of speed and movement in the picture, you can add a path blur effect. It’s one of the types of motion blur effects that many people use in their pictures to add a dynamic element. By reading this article, you have learned how to add path blur in Photoshop through simple means. Moreover, you can also explore the tool Filmora to create a motion blur effect in the photos effortlessly.
FLV Editors for Windows 11/10/8.1/8/7: Easily Edit FLV Videos on PC
If you are a streamer or a content creator then you undoubtedly may have come across files having .flv format. FLV stands for “Flash Video”. It is a container file format like .mp4 and .mov. But it isn’t used quite frequently nowadays. They are mainly used for streaming videos. Because it provides compressed video while maintaining the quality and takes less space. It supports codec which is compatible with most of the devices but you may need a flash player to play these files. If you have recently started working with .flv files or need more info about it then read till the end. We have gathered all the necessary information for you in this article.
Being a content creator, you can’t just record videos and publish them directly. Sometimes it requires finishing touches or an entirely new look, for this purpose you need a good editor. And if you are working with .flv files then selecting a good editing software that supports .flv files is important. So, here we have mentioned a list of FLV video editors. You can select one depending on your needs and budget.
Best FLV Editor to Edit FlV Video on Windows and Mac:
- Wondershare – Filmora:
It is available for both Windows and Mac.
Filmora Video Editor is the most common and versatile editing software in this list that almost every content creator may have used or heard about. It has a lot of professional features used by content creators. It is one of the best video editors for .flv format, if u work with .flv files then you must get your hands on filmora.
Its UI is quite similar to premiere pro which makes it quite easy for people who are looking for premiere pro alternatives. It has hundreds of classy transitions/effects and dozens of unique and useful features but many of them are available on paid version only.
The free version also packs a punch but it is almost useless for most users as it leaves a watermark on the final product. It is good for learning video editing and once you master enough to move forward then you can purchase the pro version or you can start directly on the paid version.
For Win 7 or later (64-bit)
For macOS 10.14 or later
Features:
- Support a wide range of formats including .flv.
- Have advanced color grading options.
- Have standard Motion Tracking feature.
- Masking and Chroma key.
- Keyframing and Smooth animation. (Paid version)
- Speed ramping and Auto Synchronization. (Paid Version)
- Support industry-standard plugins (like Boris fx).
- Have a vast stock library.
Cons:
- Leaves a watermark on export. (free version)
- Have playback issues while using 4k videos.
- Lacks some standard editing features.
*Almost every software has some pros and cons. Remember these are inspected from my point of view. And it can differ from your experience.
Steps:
Import: Open filmora, a popup will appear, Select desired aspect ratio then click “New Project” to start editing or click “Open Project” to continue your old project.
On the center of the screen, you will see the import window, click it to import .flv file or any other video you want to edit.

Edit: Drag the clips on the timeline to start editing. Drag the clips from the corner to trim them. Click the top left icon of the timeline (not the whole screen) to add layers. In the toolbar above the timeline, you will find a bunch of tools, like split, crop, speed ramping, animation e.t.c. Click the red scissors icon on the pointer to split the clip at the desired timestamp.

Effects: Click the “edit” icon, then you will see a bunch of icons appear on the top left corner of the screen, These are as follow.
Select the “Video” icon to transform the clip or to do motion tracking, stabilization, chroma-key, Masking, e.t.c. To do Motion tracking, on the playback screen, lock the box on the item you want to track then click “Start Tracking”.
Select the “Audio” icon to apply effects and enhance your audio.
Select the “Color” icon to do fine-tuning and color grading, Select the “3D LUT” option to import a new customized lut. You can find a number of cool luts online.
Select the “Animation” icon to add preset animations or make custom animations by using keyframes.
Select the “Speed” icon to adjust the speed of the clip or to do speed ramping.
Click the “OK” button below to go back to previous tabs.
From there you can add Audio, Titles, Transitions, Effects, Elements, and Stock Media. Simply drag and drop the effects and transition on the clip to apply it. And to use titles and stock media, click and drag them on the timeline to use them.
Export: Click the blue “Export” button. Then choose Desired format and Resolution to export your final product.
More Free FLV Editor for Windows to Edit FLV Videos:
If you are looking for a .flv video editor to perform some editing tasks without spending any money then read till the end because here we have mentioned some free FLV editors for you.
- VSDC video editors :
It is available only on Windows.
Despite being free software, it is packed with lots of features. It is a good choice for non-professionals and it can even run on low-end PCs. It supports a wide range of video/audio formats including .flv file. It has dozens of cool effects and tools that can give your videos a new look. It is a non-linear program that makes using layers much easier means you can add layers at any specific time frame and can add layers into layers for complex editing. It also supports 360 and 3D video which can easily be converted into 2D. It has a number of video and audio effects. It is an old yet powerful software which can even run in 19s Pc. Its features are mentioned below.
Features:
- Free Software with no watermark.
- Can support 4K footages on the latest versions.
- Can import/export a wide range of formats.
- Have built-in video and screen capture feature.
- Has a Non-linear interface that supports multi-layer editing.
- Have professional features like chroma key and masking.
- Can convert layers into a sprite (Grouped Sequence) for handling multiple layers easily.
Cons:
- Being a free software it has some limitations too.
- It’s hard to learn for beginners.
- It still lacks features for a professional creator.
- Doesn’t support Hardware acceleration.
Steps:
Import: Open VSDC video editor, from the “Start Project Now” tab click “Blank Project” to start a new project or click “Import Content” to browse video or image files. Then select “Project settings”.

Edit: You can add more files by clicking the “Add Object” button on the top left corner. Then drag the file from Object explorer to anywhere on the timeline even on layers. On top of the “Editor Tab”, you can find the necessary tools to split, crop, and rotate the video. Click “Spacebar” to play/pause the timeline.

Effects: Click a video on the timeline then select the Effect buttons on top of the “Editor” tab to apply effects to your clip. Then Click the effect on “Object Explorer” to open its properties menu. On the left side of the player, you will find buttons to add text, shapes, e.t.c to the project. On the right side of the screen, you will find the “Basic effects window” where you can do color correction and grading.
Select Multiple Clips then right-click the mouse button and then the “Convert to sprite” button to make a grouped clip (clips within a clip).
Export: Click the “Export Project” button on the top of the screen. Then choose “Media device”, “output video format” and select output destination and quality setup then click “Export Project” to export the video. If you are using the free version of the software, a popup will appear saying “export without premium features”, just click Continue. Now your file is ready to be viewed.

- Shotcut:
It is available on Windows, Mac, and Linux.
It is a free and open-source video editor which is simple and easy to use, which makes it ideal for beginners. It doesn’t have any pro version. It is an ideal software to deal with .flv files as it supports a large number of import/export formats. However, it takes some time to understand its UI. After that, it is quite easy to use. It has cool effects and transitions. It has a clean and simple timeline which is not versatile for professionals although it has some complex options to customize your timeline. It has some refined color grading options. Being a free software it has some 360 effects and 3D text which makes it comparatively good as compared to some other free softwares. It can support 4K videos also but lags or crashes sometimes when using 4K clips. All the effects and tools are combined in one tab “Filter” which is a plus point for some users. It also has some good quality audio effects. Some of its features are mentioned below.
Features:
- It is completely free software with no watermark.
- It has one of the largest file format compatibility.
- It can support 4K video resolution.
- It has 3 wheel grading tool and some other color filters.
- It has standard animation and keyframing features.
- It has some effects to support 360 videos.
Cons:
- It isn’t suitable for professionals as it lacks some useful features.
- Have issues with playback of 4K videos and sometimes crashes.
- Doesn’t have a separate text column and lacks some basic text and title effects.
- Its UI is different from other common video editors and is a bit hard to understand.
Steps:
Import: Click the “Open file” icon on the top left corner of the window to import files.

Edit: Drag and drop clips on an empty timeline panel to add tracks. Right-click on the left side of the timeline to add a video or an audio track. To trim from ends, drag the clip from corners to trim. Click the Scissors icon on the top timeline to split the clip in between.
Click the “Properties” tab above the timeline panel to change the aspect ratio and playback speed of the clip.

Effects: Click the “Filters” tab above the timeline panel to open the filter menu, Click “+” above it to add filters. Double click a filter to add it to the selected clip, then click the filter to change its properties.
Click the “Keyframes” icon on top of the window to open the Keyframes window. Then click the “Timeline” icon to go back to the previous window.
Export: Click the “Export” button on the top of the screen. Select a preset or click the “Advanced” button to change export settings then click “Export File”.

- OpenShot:
It is available on Windows, Mac, and Linux.
OpenShot is another choice for you if you are looking for a free FLV editor. It is simple and easy to use. Its User Interface is clean and beginner-friendly. It has hundreds of transitions and effects. It has an animated titles option also, which is powered by Blender.
Features:
- Is simple and easy to use.
- Its UI is Beginner friendly.
- Can support 4K videos.
- Support a wide range of formats.
- Have smooth keyframe animation.
- Is free and has no watermark.
Cons:
- Video Playback is a bit laggy.
- Animated titles are only supported when you have Blender (3d software) installed on your PC.
- Doesn’t have enough tools for professionals.
Steps:
Import: Start “OpenShot” then drag and drop files in the project files tab from your file system (or press CTRL + F). Drag and drop files to add them to the timeline.
Edit: To trim from ends, drag the clip from corners to trim. There are some basic tools above the tracks in the timeline window. Click “+” to add a new track. Click the scissors icon to split the clip at the desired length. Click the magnet icon to on snapping mode. Click the green marker icon to add markers at desired points during editing.

Effects: Above the timeline window you will see a bar containing 4 buttons: Project Files, Transitions, Effects, and Emojis. Drag these elements to add them to the timeline. Effects appear as a small icon on the clip. Right-click the icon then select “Remove Effect” to remove it.

Right-click the clip to access more features like keyframe animation, playback speed, e.t.c.
Export: Click the red dot button on the top of the screen to export your video (or press CTRL + E). Select the desired Profile, Format, Quality, and Destination folder then click “Export Video” to export your file.

More Paid FLV Editor for Windows to Edit FLV Videos:
If you are looking for a good flv editor and you are ready to spend some cash on it then we have selected some paid softwares worthy of your investment.
- Power director 365 (import only):
It is available on both, Windows and Mac.
If you are looking for software to do more than just trimming and cropping the video then Cyberlink Power Director can be the right choice for you. It is packed with dozens of features that professional content creators look for. It has some professional-level plugins also. It is suitable for both beginners and advanced users.
It allows users to import .flv file and edit it like usual but you can’t export it in the same format as it exports videos in few formats only. FLV file is then converted into any of the other supported formats.
Pricing:
Its annual subscription is 69$ which is available at 30% off at 48.99$/year. This offer is valid till 4th May 2022.
Features:
- Can support 4K videos and can import a wide range of file formats.
- Have Auto Chapter and Subtitle settings.
- Multi-cam editing.
- Have hundreds of transitions, effects, and access to thousands of stock footage.
- Can Group clips for easy editing.
- Can import presets and color LUTS.
Cons:
- It lags sometimes, this issue can be resolved to an extent if you have a powerful PC.
- Some features are complicated to use.
- Export settings have fewer file formats as compared to the import file range.
Steps:
Import: Open Power Director then select the aspect ratio and click “Full Mode” to start the program. Import media files to the media room. Click the “Import Media” icon below the files tab to add more clips.

Edit: Drag and drop files to add them to the timeline. Drop files above or below to add them in layers. Click the icon on the top left corner of the timeline to add a new layer. You can find basic editing tools above the timeline.

Effects: All the effects and overlay elements are situated at the top left corner of the screen in a vertical bar. Here you will find the Project library, titles, effects, transitions, overlays, e.t.c. Simply just drag and drop on the timeline to use them. Here you can also do audio mixing and add subtitles and chapters.
Double click a clip or an overlay element to open the designer window. Here you can customize the clips and overlays to enhance your project.

Export: Click the “Produce” button on top of the screen then select the desired mode and file format and add a destination then click “Start”.
- AVS video editor:
If you are looking for a good .flv video editor and are ready to spend some bucks then the AVS video editor is a good choice for you. It is a low-budget software that is simple and easy to use and has some great features. It was my first video editor which I used about 5-6 years ago when I started making videos. It is simple and easy to use. It has some fine features that can fulfill your basic video editing tasks. Has a unique animation trajectory feature, where you can create paths for overlays.
Pricing:
It has two different plans, the first is an annual one which is at 69$ per year and the second one is a lifetime offer for 199$. In a lifetime plan, you can own the software forever. Right now, the software is at a 70% discount(till 30th April 2022) which decreases the price of the annual subscription to 39$ and the purchase price is 59$ this offer makes the software valuable enough to invest in.
Features:
- Its UI is beginner-friendly and easy to learn.
- Can Support 4K videos.
- Has cool features like video stabilization and a chroma key.
- Has 300+ effects, transitions, and overlays.
- Has a storyboard-type editing style also, which is a great feature for some users.
- Has keyframing and animation trajectory option for overlays.
Cons:
- Lacks some commonly used features.
- It is a decade-old software and needs some new updates to compete with other editing softwares.
- It isn’t suitable for professionals as you can’t do many customizations.
- It has only one layer for every element like text, effects, overlays, e.t.c.
- If hard disk crashes you have to purchase the license again.
Steps:
Import: Click “Import Media Files” to import clips or click “Open Existing Project” to load previously saved projects. Drag and drop files to add them to the timeline.
Edit: To trim from ends, drag the clip from corners to trim. On top of the timeline, you will find a few basic tools like change speed, apply transitions, do color correction, or do video stabilization.

Effects: Click the “Transition” button above the timeline to apply transitions. Drag and drop transitions between two clips to apply it. Right-click on the transition to change its duration.
Click the “Video Effects” button on top of the timeline, then drag and drop the desired effect on the effects layer and trim it according to your need.
Similarly from the “Text” tab Drag and drop the desired text to the text layer in the timeline. Then select “Edit text” to change the text.

Export: Click the “Produce” button on top of the timeline to open the export window. Select the desired file format and quality then click “next” and then click the “Create” button to export your file.

Veed.io: (Online):
If you want to edit FLV videos quickly and don’t want to install any software then Veed.io can be a good choice for you. It is an online FLV video editor that can run on any browser and is compatible with Windows, Mac, Linux, and even mobile phones. It is a quick and simple method to fulfill your basic video editing needs. It has some amazing and uniques features as compared to other basic video editors. It is a great platform to edit videos anywhere. You can start editing video on your PC and can continue it on your phone if you have to leave your workplace. But these features come at a price as its basic plan has the majority of the features but it leaves a watermark on the final video.
Pricing:
It has 3 different plans depending on your needs. The first one is the “Free Plan” which is almost useless for most users as it creates a watermark. The second one is the “Basic Plan” at 18$/month. While third is the “Pro Plan” at 30$/month which has some more features than the basic plan. You can purchase an annual plan to save up to 33%.

Features:
- It is an online platform that makes it easily accessible from any device.
- It is multi user friendly and is a good choice for team projects.
- It has a simple and clean interface which is ideal for beginners.
- It has an Auto subtitle generator + subtitle translator and editor.
- It has audio to text and video to text features that aren’t found in many other editors.
- It is compatible with many video and audio formats.
Cons:
- It is quite slow as compared to other video editing software.
- Downloading 4K videos is only available in Pro Plan.
- It is an online platform, so its data can be breached or leaked, so avoid editing your personal videos on this platform. It can rarely happen but precaution is better than cure.
Steps:
Import: Click choose FLV File on the home screen then a popup will appear, click “Browse” to upload a file or use a template.

Edit: To trim from ends, drag the clip from corners to trim. Click the “Split” button above the timeline to split the clip in between.

Effects: All the effects tabs like Text, Elements, Transitions lie on the left side of the screen (on windows). Click an element and it will be added to the timeline, then adjust the settings according to your will.
Export: Click the “Export” button on the top right side of the screen. Select a preset or change export settings then click “Export Video”. Soon you will get your final product.
Which Should I choose Free or Paid FLV Editor :
Are you confused to choose the FLV editor for you? Then look for the one that suits your other needs. Like if you want an editor only to crop or trim videos then save your money and go for a free video editor. But if you want some extra features to enhance your workflow or have some cash then go for paid software. For professionals, Power Director 365 or Filmora pro can be a good choice to invest your money in.
~ Some FAQs about FLV Videos:
why is .flv format used?
FLV is basically used to publish or distribute videos on the Internet. Many social platforms and web pages (such as youtube, Hulu, e.t.c.) use .flv files as it provide high-quality synchronized audio and video in compact file size. It was mostly used for embedded videos on these platforms. It is compatible with most browsers and devices even with older phones and computers.
How to play .FLV files?
To play .flv files a flash player is required. Which is pre-installed in almost most of the computers and browsers, if that’s not the case. Then you need a good video player which supports .flv format. Therefore VLC media prayer is a good choice. It is quite easy to use and has some useful features like Speed, Adding subtitles, Audio sync, e.t.c.
Is .flv file easy to edit?
FLV is just a format, It can be edited like any other format. Steps may differ from software to software. But don’t worry as I have mentioned the steps of some popular FLV video editors above.
Can the .flv file be converted?
If you don’t want to stick with the .flv format for long enough and want to switch over to a more convenient format then you can try these converters.
VLC Media Player: Yes, apart from being a video player it can convert video formats. It’s quite easy to use.
Simply Open VLC Media Player >> Click Media tab >> Click “Convert/Save” >> On pop up menu Select “Add” to add file (can add multiple files also) >> Click “Convert/Save” >> Add Destination folder and File Format (to convert in) then click “Start”.
Hand Brake: It is another popular video converter that can convert a .flv file into almost any file format.
Open HandBrake-“Drop a file” screen will appear >> Select the specific file you one to convert >> Select Destination filder >> Click “Start encoding”.
Flv vs Mp4 which is better?
FLV format was quite popular back in 2010 as it provides high-quality compressed video for the internet. It takes less space which makes it easy to download and transfer quickly. Nowadays MP4 format is used more as it is versatile and is compatible with almost all devices like Mobile, PC, TV, e.t.c. FLV uses H.263 codec while MP4 uses codec which provides better quality after compression. Still .flv file is a better choice for streaming platforms as one of the most common software used for streaming is OBS studio and it produces .flv files.
It is available for both Windows and Mac.
Filmora Video Editor is the most common and versatile editing software in this list that almost every content creator may have used or heard about. It has a lot of professional features used by content creators. It is one of the best video editors for .flv format, if u work with .flv files then you must get your hands on filmora.
Its UI is quite similar to premiere pro which makes it quite easy for people who are looking for premiere pro alternatives. It has hundreds of classy transitions/effects and dozens of unique and useful features but many of them are available on paid version only.
The free version also packs a punch but it is almost useless for most users as it leaves a watermark on the final product. It is good for learning video editing and once you master enough to move forward then you can purchase the pro version or you can start directly on the paid version.
For Win 7 or later (64-bit)
For macOS 10.14 or later
Features:
- Support a wide range of formats including .flv.
- Have advanced color grading options.
- Have standard Motion Tracking feature.
- Masking and Chroma key.
- Keyframing and Smooth animation. (Paid version)
- Speed ramping and Auto Synchronization. (Paid Version)
- Support industry-standard plugins (like Boris fx).
- Have a vast stock library.
Cons:
- Leaves a watermark on export. (free version)
- Have playback issues while using 4k videos.
- Lacks some standard editing features.
*Almost every software has some pros and cons. Remember these are inspected from my point of view. And it can differ from your experience.
Steps:
Import: Open filmora, a popup will appear, Select desired aspect ratio then click “New Project” to start editing or click “Open Project” to continue your old project.
On the center of the screen, you will see the import window, click it to import .flv file or any other video you want to edit.
Edit: Drag the clips on the timeline to start editing. Drag the clips from the corner to trim them. Click the top left icon of the timeline (not the whole screen) to add layers. In the toolbar above the timeline, you will find a bunch of tools, like split, crop, speed ramping, animation e.t.c. Click the red scissors icon on the pointer to split the clip at the desired timestamp.
Effects: Click the “edit” icon, then you will see a bunch of icons appear on the top left corner of the screen, These are as follow.
Select the “Video” icon to transform the clip or to do motion tracking, stabilization, chroma-key, Masking, e.t.c. To do Motion tracking, on the playback screen, lock the box on the item you want to track then click “Start Tracking”.
Select the “Audio” icon to apply effects and enhance your audio.
Select the “Color” icon to do fine-tuning and color grading, Select the “3D LUT” option to import a new customized lut. You can find a number of cool luts online.
Select the “Animation” icon to add preset animations or make custom animations by using keyframes.
Select the “Speed” icon to adjust the speed of the clip or to do speed ramping.
Click the “OK” button below to go back to previous tabs.
From there you can add Audio, Titles, Transitions, Effects, Elements, and Stock Media. Simply drag and drop the effects and transition on the clip to apply it. And to use titles and stock media, click and drag them on the timeline to use them.
Export: Click the blue “Export” button. Then choose Desired format and Resolution to export your final product.
More Free FLV Editor for Windows to Edit FLV Videos:
If you are looking for a .flv video editor to perform some editing tasks without spending any money then read till the end because here we have mentioned some free FLV editors for you.
- VSDC video editors :
It is available only on Windows.
Despite being free software, it is packed with lots of features. It is a good choice for non-professionals and it can even run on low-end PCs. It supports a wide range of video/audio formats including .flv file. It has dozens of cool effects and tools that can give your videos a new look. It is a non-linear program that makes using layers much easier means you can add layers at any specific time frame and can add layers into layers for complex editing. It also supports 360 and 3D video which can easily be converted into 2D. It has a number of video and audio effects. It is an old yet powerful software which can even run in 19s Pc. Its features are mentioned below.
Features:
- Free Software with no watermark.
- Can support 4K footages on the latest versions.
- Can import/export a wide range of formats.
- Have built-in video and screen capture feature.
- Has a Non-linear interface that supports multi-layer editing.
- Have professional features like chroma key and masking.
- Can convert layers into a sprite (Grouped Sequence) for handling multiple layers easily.
Cons:
- Being a free software it has some limitations too.
- It’s hard to learn for beginners.
- It still lacks features for a professional creator.
- Doesn’t support Hardware acceleration.
Steps:
Import: Open VSDC video editor, from the “Start Project Now” tab click “Blank Project” to start a new project or click “Import Content” to browse video or image files. Then select “Project settings”.
Edit: You can add more files by clicking the “Add Object” button on the top left corner. Then drag the file from Object explorer to anywhere on the timeline even on layers. On top of the “Editor Tab”, you can find the necessary tools to split, crop, and rotate the video. Click “Spacebar” to play/pause the timeline.
Effects: Click a video on the timeline then select the Effect buttons on top of the “Editor” tab to apply effects to your clip. Then Click the effect on “Object Explorer” to open its properties menu. On the left side of the player, you will find buttons to add text, shapes, e.t.c to the project. On the right side of the screen, you will find the “Basic effects window” where you can do color correction and grading.
Select Multiple Clips then right-click the mouse button and then the “Convert to sprite” button to make a grouped clip (clips within a clip).
Export: Click the “Export Project” button on the top of the screen. Then choose “Media device”, “output video format” and select output destination and quality setup then click “Export Project” to export the video. If you are using the free version of the software, a popup will appear saying “export without premium features”, just click Continue. Now your file is ready to be viewed.
- Shotcut:
It is available on Windows, Mac, and Linux.
It is a free and open-source video editor which is simple and easy to use, which makes it ideal for beginners. It doesn’t have any pro version. It is an ideal software to deal with .flv files as it supports a large number of import/export formats. However, it takes some time to understand its UI. After that, it is quite easy to use. It has cool effects and transitions. It has a clean and simple timeline which is not versatile for professionals although it has some complex options to customize your timeline. It has some refined color grading options. Being a free software it has some 360 effects and 3D text which makes it comparatively good as compared to some other free softwares. It can support 4K videos also but lags or crashes sometimes when using 4K clips. All the effects and tools are combined in one tab “Filter” which is a plus point for some users. It also has some good quality audio effects. Some of its features are mentioned below.
Features:
- It is completely free software with no watermark.
- It has one of the largest file format compatibility.
- It can support 4K video resolution.
- It has 3 wheel grading tool and some other color filters.
- It has standard animation and keyframing features.
- It has some effects to support 360 videos.
Cons:
- It isn’t suitable for professionals as it lacks some useful features.
- Have issues with playback of 4K videos and sometimes crashes.
- Doesn’t have a separate text column and lacks some basic text and title effects.
- Its UI is different from other common video editors and is a bit hard to understand.
Steps:
Import: Click the “Open file” icon on the top left corner of the window to import files.
Edit: Drag and drop clips on an empty timeline panel to add tracks. Right-click on the left side of the timeline to add a video or an audio track. To trim from ends, drag the clip from corners to trim. Click the Scissors icon on the top timeline to split the clip in between.
Click the “Properties” tab above the timeline panel to change the aspect ratio and playback speed of the clip.
Effects: Click the “Filters” tab above the timeline panel to open the filter menu, Click “+” above it to add filters. Double click a filter to add it to the selected clip, then click the filter to change its properties.
Click the “Keyframes” icon on top of the window to open the Keyframes window. Then click the “Timeline” icon to go back to the previous window.
Export: Click the “Export” button on the top of the screen. Select a preset or click the “Advanced” button to change export settings then click “Export File”.
- OpenShot:
It is available on Windows, Mac, and Linux.
OpenShot is another choice for you if you are looking for a free FLV editor. It is simple and easy to use. Its User Interface is clean and beginner-friendly. It has hundreds of transitions and effects. It has an animated titles option also, which is powered by Blender.
Features:
- Is simple and easy to use.
- Its UI is Beginner friendly.
- Can support 4K videos.
- Support a wide range of formats.
- Have smooth keyframe animation.
- Is free and has no watermark.
Cons:
- Video Playback is a bit laggy.
- Animated titles are only supported when you have Blender (3d software) installed on your PC.
- Doesn’t have enough tools for professionals.
Steps:
Import: Start “OpenShot” then drag and drop files in the project files tab from your file system (or press CTRL + F). Drag and drop files to add them to the timeline.
Edit: To trim from ends, drag the clip from corners to trim. There are some basic tools above the tracks in the timeline window. Click “+” to add a new track. Click the scissors icon to split the clip at the desired length. Click the magnet icon to on snapping mode. Click the green marker icon to add markers at desired points during editing.
Effects: Above the timeline window you will see a bar containing 4 buttons: Project Files, Transitions, Effects, and Emojis. Drag these elements to add them to the timeline. Effects appear as a small icon on the clip. Right-click the icon then select “Remove Effect” to remove it.
Right-click the clip to access more features like keyframe animation, playback speed, e.t.c.
Export: Click the red dot button on the top of the screen to export your video (or press CTRL + E). Select the desired Profile, Format, Quality, and Destination folder then click “Export Video” to export your file.
More Paid FLV Editor for Windows to Edit FLV Videos:
If you are looking for a good flv editor and you are ready to spend some cash on it then we have selected some paid softwares worthy of your investment.
- Power director 365 (import only):
It is available on both, Windows and Mac.
If you are looking for software to do more than just trimming and cropping the video then Cyberlink Power Director can be the right choice for you. It is packed with dozens of features that professional content creators look for. It has some professional-level plugins also. It is suitable for both beginners and advanced users.
It allows users to import .flv file and edit it like usual but you can’t export it in the same format as it exports videos in few formats only. FLV file is then converted into any of the other supported formats.
Pricing:
Its annual subscription is 69$ which is available at 30% off at 48.99$/year. This offer is valid till 4th May 2022.
Features:
- Can support 4K videos and can import a wide range of file formats.
- Have Auto Chapter and Subtitle settings.
- Multi-cam editing.
- Have hundreds of transitions, effects, and access to thousands of stock footage.
- Can Group clips for easy editing.
- Can import presets and color LUTS.
Cons:
- It lags sometimes, this issue can be resolved to an extent if you have a powerful PC.
- Some features are complicated to use.
- Export settings have fewer file formats as compared to the import file range.
Steps:
Import: Open Power Director then select the aspect ratio and click “Full Mode” to start the program. Import media files to the media room. Click the “Import Media” icon below the files tab to add more clips.
Edit: Drag and drop files to add them to the timeline. Drop files above or below to add them in layers. Click the icon on the top left corner of the timeline to add a new layer. You can find basic editing tools above the timeline.
Effects: All the effects and overlay elements are situated at the top left corner of the screen in a vertical bar. Here you will find the Project library, titles, effects, transitions, overlays, e.t.c. Simply just drag and drop on the timeline to use them. Here you can also do audio mixing and add subtitles and chapters.
Double click a clip or an overlay element to open the designer window. Here you can customize the clips and overlays to enhance your project.
Export: Click the “Produce” button on top of the screen then select the desired mode and file format and add a destination then click “Start”.
- AVS video editor:
If you are looking for a good .flv video editor and are ready to spend some bucks then the AVS video editor is a good choice for you. It is a low-budget software that is simple and easy to use and has some great features. It was my first video editor which I used about 5-6 years ago when I started making videos. It is simple and easy to use. It has some fine features that can fulfill your basic video editing tasks. Has a unique animation trajectory feature, where you can create paths for overlays.
Pricing:
It has two different plans, the first is an annual one which is at 69$ per year and the second one is a lifetime offer for 199$. In a lifetime plan, you can own the software forever. Right now, the software is at a 70% discount(till 30th April 2022) which decreases the price of the annual subscription to 39$ and the purchase price is 59$ this offer makes the software valuable enough to invest in.
Features:
- Its UI is beginner-friendly and easy to learn.
- Can Support 4K videos.
- Has cool features like video stabilization and a chroma key.
- Has 300+ effects, transitions, and overlays.
- Has a storyboard-type editing style also, which is a great feature for some users.
- Has keyframing and animation trajectory option for overlays.
Cons:
- Lacks some commonly used features.
- It is a decade-old software and needs some new updates to compete with other editing softwares.
- It isn’t suitable for professionals as you can’t do many customizations.
- It has only one layer for every element like text, effects, overlays, e.t.c.
- If hard disk crashes you have to purchase the license again.
Steps:
Import: Click “Import Media Files” to import clips or click “Open Existing Project” to load previously saved projects. Drag and drop files to add them to the timeline.
Edit: To trim from ends, drag the clip from corners to trim. On top of the timeline, you will find a few basic tools like change speed, apply transitions, do color correction, or do video stabilization.
Effects: Click the “Transition” button above the timeline to apply transitions. Drag and drop transitions between two clips to apply it. Right-click on the transition to change its duration.
Click the “Video Effects” button on top of the timeline, then drag and drop the desired effect on the effects layer and trim it according to your need.
Similarly from the “Text” tab Drag and drop the desired text to the text layer in the timeline. Then select “Edit text” to change the text.
Export: Click the “Produce” button on top of the timeline to open the export window. Select the desired file format and quality then click “next” and then click the “Create” button to export your file.
Veed.io: (Online):
If you want to edit FLV videos quickly and don’t want to install any software then Veed.io can be a good choice for you. It is an online FLV video editor that can run on any browser and is compatible with Windows, Mac, Linux, and even mobile phones. It is a quick and simple method to fulfill your basic video editing needs. It has some amazing and uniques features as compared to other basic video editors. It is a great platform to edit videos anywhere. You can start editing video on your PC and can continue it on your phone if you have to leave your workplace. But these features come at a price as its basic plan has the majority of the features but it leaves a watermark on the final video.
Pricing:
It has 3 different plans depending on your needs. The first one is the “Free Plan” which is almost useless for most users as it creates a watermark. The second one is the “Basic Plan” at 18$/month. While third is the “Pro Plan” at 30$/month which has some more features than the basic plan. You can purchase an annual plan to save up to 33%.
Features:
- It is an online platform that makes it easily accessible from any device.
- It is multi user friendly and is a good choice for team projects.
- It has a simple and clean interface which is ideal for beginners.
- It has an Auto subtitle generator + subtitle translator and editor.
- It has audio to text and video to text features that aren’t found in many other editors.
- It is compatible with many video and audio formats.
Cons:
- It is quite slow as compared to other video editing software.
- Downloading 4K videos is only available in Pro Plan.
- It is an online platform, so its data can be breached or leaked, so avoid editing your personal videos on this platform. It can rarely happen but precaution is better than cure.
Steps:
Import: Click choose FLV File on the home screen then a popup will appear, click “Browse” to upload a file or use a template.
Edit: To trim from ends, drag the clip from corners to trim. Click the “Split” button above the timeline to split the clip in between.
Effects: All the effects tabs like Text, Elements, Transitions lie on the left side of the screen (on windows). Click an element and it will be added to the timeline, then adjust the settings according to your will.
Export: Click the “Export” button on the top right side of the screen. Select a preset or change export settings then click “Export Video”. Soon you will get your final product.
Which Should I choose Free or Paid FLV Editor :
Are you confused to choose the FLV editor for you? Then look for the one that suits your other needs. Like if you want an editor only to crop or trim videos then save your money and go for a free video editor. But if you want some extra features to enhance your workflow or have some cash then go for paid software. For professionals, Power Director 365 or Filmora pro can be a good choice to invest your money in.
~ Some FAQs about FLV Videos:
why is .flv format used?
FLV is basically used to publish or distribute videos on the Internet. Many social platforms and web pages (such as youtube, Hulu, e.t.c.) use .flv files as it provide high-quality synchronized audio and video in compact file size. It was mostly used for embedded videos on these platforms. It is compatible with most browsers and devices even with older phones and computers.
How to play .FLV files?
To play .flv files a flash player is required. Which is pre-installed in almost most of the computers and browsers, if that’s not the case. Then you need a good video player which supports .flv format. Therefore VLC media prayer is a good choice. It is quite easy to use and has some useful features like Speed, Adding subtitles, Audio sync, e.t.c.
Is .flv file easy to edit?
FLV is just a format, It can be edited like any other format. Steps may differ from software to software. But don’t worry as I have mentioned the steps of some popular FLV video editors above.
Can the .flv file be converted?
If you don’t want to stick with the .flv format for long enough and want to switch over to a more convenient format then you can try these converters.
VLC Media Player: Yes, apart from being a video player it can convert video formats. It’s quite easy to use.
Simply Open VLC Media Player >> Click Media tab >> Click “Convert/Save” >> On pop up menu Select “Add” to add file (can add multiple files also) >> Click “Convert/Save” >> Add Destination folder and File Format (to convert in) then click “Start”.
Hand Brake: It is another popular video converter that can convert a .flv file into almost any file format.
Open HandBrake-“Drop a file” screen will appear >> Select the specific file you one to convert >> Select Destination filder >> Click “Start encoding”.
Flv vs Mp4 which is better?
FLV format was quite popular back in 2010 as it provides high-quality compressed video for the internet. It takes less space which makes it easy to download and transfer quickly. Nowadays MP4 format is used more as it is versatile and is compatible with almost all devices like Mobile, PC, TV, e.t.c. FLV uses H.263 codec while MP4 uses codec which provides better quality after compression. Still .flv file is a better choice for streaming platforms as one of the most common software used for streaming is OBS studio and it produces .flv files.
Also read:
- New Do You Want to Know Which Are the Best Wondershare Filmora LUTs to Use? There Are Many LUTs that You Can Download, Each with a Different Tone and Style
- Updated Some Facts About GIF Background You Didnt Know
- 2024 Approved Little Tricks to Create Canva Slideshow No One Is Telling You
- In 2024, The Availability of the Slow-Motion Feature on the iPhone Is Often Debated. This Article Will Guide You on How to Slow Down a Video on iPhone
- Updated 2024 Approved Do You Want to Show Your Mood in Your Digital Media Content but Dont Know How To? There Are Many Moody LUTs Available that Highlight Your Mood in Your Content
- New 2024 Approved Sometimes It May Happen to You that You Are Watching a Video that Has Very Low Graphics or, in Other Words, Low Visual Quality. You Might Wish to Change, Instead Improve the Video Quality. Here, AI Upscaling Video Comes to Use
- New In 2024, How to Use LUTS to Color Grade on Your iPhone
- Updated 2024 Approved Basic Knowledge About WMV Format and Best WMV Video Editor
- Updated Guide to Make Timelapse Video with iMovie for 2024
- New How to Make a Bokeh Effect for 2024
- Updated 2024 Approved 3 Best Effects to Appear on Camera
- Updated In 2024, Applying the Effect of Camera Shake in Video Creation
- Updated Adding Shake Effects to Your Video With Alight Motion
- In 2024, Want to Learn How to Crop or Trim Video in PowerPoint? We Have Got You Covered; We Have Given a Step-by-Step Guide that Will Allow You to Trim and Crop Videos Using This Presentation Program
- Updated Have You Ever Created a Slow Motion Video on Your Phonr or Camera? This Article Will Show You some Knowledge About Slow Motion Photography for 2024
- New What Does It Mean to Color Grade Your Images, and Why Is It so Important? Does It Mean the Same Thing as a Color Correction? Read on to Gather All the Information You Need on Color Grading Photography
- New In 2024, Best 5 Solutions on How to Add Emojis to iPhone
- Updated In 2024, DVD Slideshow Builder Review and Tutorial
- While Fiddling with Solutions to Complement the Ordinary Text Messages with Graphic Elements, People Also Ask About Ways to Add Emoji to Photo Online. Stay Here to Get the Best Answers for 2024
- Updated Beginners Guide to Green Screen Keying
- How to Make Video Fade to Black in Movie Maker for 2024
- 2024 Approved Whatre the Best Alternatives to Pexels?
- In 2024, Explore Your Skills in Dimensional Graphic Editing and Animation with Blender. The Software Lands Among the Best Platforms for Art Enthusiasts with Its Stunning Transparent Backgrounds
- New In 2024, Step-by-Step Guide to Storyboard
- Kinetic Typography Text Effect 【EASY&FAST】 for 2024
- Updated 2024 Approved Looking for the Best Quiz-Making Tools? Read Our Full Review to Find Out the 10 Best Video Quiz Makers Available
- 2024 Approved Everything That You Need to Know About Video Montages- Ideas, Techniques, and Software
- New In 2024, How To Fade Audio With Movavi Editor
- In 2024, Zoom In and Out on Discord
- Updated Do You Know How to Create a Lol Montage Video? Had You Ever Tried that Video Type Before? Connect with This Article to Study the Tips and Tricks Associated with the Making of Montage Videos for 2024
- Updated In 2024, Top 5 Best Video to PPT Converters
- Updated Have You Ever Wondered How Those PowerPoint, Looping Slideshows You See in Conferences and Reception Areas Display and Move to the Next Slide Automatically without Clicking a Mouse? You Dont Have to Be Amazed at This for 2024
- In 2024, Top 5 AI Music Video Examples and Makers to Make Them
- Updated Best Free Video Editing Software to Boost Your Content Creation for 2024
- Updated How to Create Liquid Water Reveal Intro?
- Brighten a Video in Windows 10 Easily When Video Clips You Recorded on Your Windows 10 Computer or Those Downloaded From YouTube Are Too Dark or Too Bright, You Can Easily Adjust the Color Levels in a Few Clicks for 2024
- Updated 2024 Approved How To Remove Audio From Video
- Searching for the Best Video Editor to Make Your Video More Attractive? This Article Introduce You Everything About Choosing a Video Editing Software for 2024
- Updated 2024 Approved 10 Amazing Anime Character Designs to Inspire You
- Updated 2024 Approved Some Effective Slow Motion Video Editors You Can Try
- Updated Ideas That Help You Out in Making Transparent Image
- In 2024, Looking for Efficient Ways to Create a Slow-Motion Video? Read the Article for Reliable Solutions that Provide Excellent Results
- Enhance Your Video Color Accuracy with Video Scopes
- Make Videos with Pictures and Music-10 Apps
- New In 2024, S Top-Rated Video Editors with Audio Features
- New The Ultimate Guide to GarageBand Tracking Techniques for 2024
- Video File Repair - How to Fix Corrupted video files of ZTE Blade A73 5G on Mac?
- In 2024, Unlocking Apple iPhone 11 Passcode without a Computer
- Updated Leading Platforms for Seamless MP3 Refinement and Cutting
- In 2024, Downloading SamFw FRP Tool 3.0 for Vivo V29
- In 2024, How to Mirror Xiaomi 14 Pro to Mac? | Dr.fone
- Detect Subtle Moan Vocalizations
- Want to Uninstall Google Play Service from Realme 12+ 5G? Here is How | Dr.fone
- New S Best Video Editors for 4K Proxy Footage Expert Recommendations
- Updated Top-Rated Motion Graphics Software for Text Tracking for 2024
- Detailed Review of doctorSIM Unlock Service For Apple iPhone 14 Pro Max | Dr.fone
- New In 2024, Get Your FCPX Plugins Up and Running A Step-by-Step Guide
- How Can We Unlock Our Nokia C12 Plus Phone Screen?
- Updated 2024 Approved The Complete Guide to Video Editors 35 Options for Windows, Mac, and More
- In 2024, Planning to Use a Pokemon Go Joystick on Huawei Nova Y91? | Dr.fone
- How to Unlock SIM Card on Apple iPhone 13 mini online without jailbreak
- In 2024, Disabled iPhone 7 Plus How to Unlock a Disabled iPhone 7 Plus? | Dr.fone
- 2024 Approved Unleash Your Creativity Top Chromebook Video Editor Apps
- Updated 2024 Approved S Leading Text Motion Tracking and Animation Platforms
- 5 Best Route Generator Apps You Should Try On Realme Note 50 | Dr.fone
- Super Easy Ways To Deal with Oppo A58 4G Unresponsive Screen | Dr.fone
- Title: Updated Have You Tried Creating an Engaging Video? Try Out Impressive AI Video Ideas that Give You a Clue on How to Create an Attention Catching Video. Here Is a Breakdown of What an AI Video Idea Generator Is and How to Utilize It Efficiently for 2024
- Author: Morgan
- Created at : 2024-06-15 18:56:38
- Updated at : 2024-06-16 18:56:38
- Link: https://ai-video-editing.techidaily.com/1713963307653-updated-have-you-tried-creating-an-engaging-video-try-out-impressive-ai-video-ideas-that-give-you-a-clue-on-how-to-create-an-attention-catching-video-here-i/
- License: This work is licensed under CC BY-NC-SA 4.0.
