
:max_bytes(150000):strip_icc():format(webp)/homeweatherstation-34f9e9a9aaf64446a8f21ff05991c079.jpg)
2024 Approved 11 Apps To Speed Up A Video On iPhone
11 Apps To Speed Up A Video On iPhone
As a content creator or a video editor, you may deal with many different aspects of editing. It may go from basic editing to VFX and so on. Speed ramping is also an important feature of editing. Creators who make cinematics or B-rolls often may have used this feature.
Changing the speed of the whole video doesn’t look good in most situations therefore speed ramping feature was created. Speed Ramping means gradually changing the speed of a clip over time. It isn’t a complex thing but doing it correctly in the right amount at the right time can change the feel of the whole video. It catches the attention of viewers through different scenes of a clip.
So, here we have mentioned some iPhone video editing softwares that can at least do basic speed changes. but most of them can also do advanced speed ramping. These are as follows:
Filmora Go:
It is available on IOS and Android both.
Want to do speed ramping? use Filmora Go. But are you a content creator and want to do more than just video editing? I would still recommend “Filmora Go”. Because it is such a versatile and easy-to-use software made by Wondershare. Like its PC software, it is also packed with many cool features such as chroma key, mask, keyframing, blending, e.t.c. It also supports multiple layers. It has built-in effects, transitions, and presets to speed up the editing process.
It is a paid video editor but you can try it for free, free trial includes most of the features but it leaves a watermark on export.
~Features:
- Has speed curves for smooth speed ramping.
- Supports multiple images and video layers.
- Have many presets and filters for fast pace editing.
- Have cool features like chroma key, masking, keyframing, e.t.c.
- Supports “Pixabay’s” stock library.
~Cons:
- Its UI doesn’t support editing in landscape orientation.
- It doesn’t support 4k video resolution.


~Steps:
Import: Open Filmora Go, Click “New project” to start a new project, or Choose the previous one from the “Draft” portion. Select videos or images to import to your timeline. Hold and drag the clip to change its arrangement.
Edit: You can add text, effects, stickers, layers, e.t.c. by clicking their icon, present on the bar at the bottom.
Click and Drag a clip from the corner to trim it.
Click the “PiP” icon to add image or video layers, you also can add multiple layers.
Select a clip to edit it. Different editing tools appear on the bottom bar. Here you can change its opacity, its speed, or add animations.
Click the diamond icon above the timeline to add keyframes. Zoom, move, or rotate the clip to add keyframes with the passage of time.
Speed Ramping: To Change the speed of a clip, select it then click the “Speed” icon on the bottom bar of the screen. Move the slider to change the speed of the whole clip. To do speed ramping, click the “curves” option to choose a preset or create your own. Click a preset to apply it, and click again to open its edit menu. drag the beats up and down to change speed or add or delete a beat if you want.
Effects: Click the “Effects” icon to open the effects menu. Select an effect to apply to your clip.
Click the white box between two clips to add transitions.
Export: Click the “Export” button to export your file. Select your desired resolution and frame rate to export your clip.


Some Free Video speeding Softwares for iPhone:
If you are short on budget or don’t want to spend much on video editing softwares then you can try these free softwares. They are free that doesn’t mean that they are useless, they are quite good for beginners or moderate users although some of them are designed for professionals also. If you don’t believe me, go and try it yourself. Apart from just changing the speed, they are good in other editing aspects also.
Adobe Premiere Rush:
It is available on IOS and Android both.
If you are looking for free but good speed ramping software then why go anywhere also when you have an amazing video editor made by a well-known software company “Adobe”. Like premiere pro, they have designed a compact version for phones named “Premiere Rush”.
It is a free video editor that has all the tools needed for video editing, from video effects to color grading and audio editing. Its UI is a bit similar to PC video editors. It is a free video editor with no watermarks. Although it takes some time to understand it. But once mastered, you can do editing quickly.
~Features:
- It is a free video editor with no watermark.
- It supports up to 4K resolution at 60fps.
- You can extract audio and can do voiceover directly from the software.
- It has hundreds of filters, overlays, and title designs.
- It has basic color grading tools.
- It also has a motion tracking feature. (in Paid version)
- It supports multiple audio, video, and text layers.


~Cons:
- It only runs on high-end devices. ( It is not supported in most mid-range phones)
- Not suitable for beginners. Its UI is quite hard to understand.
- Doesn’t have common features like the chroma key, masking, e.t.c.


~Price:
Its Premium version is available for 9.99/month. It includes some premium features. Or you can purchase the “All Apps Bundle” at $54.99/month for the annual plan.
~Steps:
Import: Open “Adobe Premiere Rush”, Click the “+” sign at the bottom to create a new project. in the media location, select the clips, then click the blue “create” button to start editing.
Click the blue “+” button at the bottom-left corner to add clips, audio, or graphics.
Hold and drag the clips upward to add them as a layer.
Edit: Scroll over a clip to select it. Clicking again shows a pop-up above the selected clip. Here you get 4 options: split, duplicate, separate audio, and delete.
A number of edit options appear on the bottom line of the screen:
Graphics: Click the “Graphics” button to add animated titles, transition graphics, and overlays as a layer. Select to customize its design.
Effects: Click the “Effects” button to add transitions or motion effect. Select a clip to apply transition at both ends. or select a corner of the clip to apply on it only. And change the duration of transition if you want.
Color: Here you can color grade your clips, Apply a preset or color grade manually by using sliders. You can also create your presets.
Transform: Here you can resize, rotate, crop, or change the position of the clip.
Audio: Here you can edit the audio, select a clip to edit its audio.
Speed Ramping: Click the “Speed” button to edit its speed. Select the range option to speed ramp a specific part of the clip. Select the ramp option to create a smooth speed curve. Or Set the clip duration to change its speed accordingly.
Export: To Export your clip, click the “Export” icon on top of the screen. Click “Quality Settings” to adjust export settings then click “Export” to save your file.
CapCut:
It is available on IOS and Android both.
If you are looking for a free but good speed ramping software to help you create slo-mo videos easily anywhere, anytime you want, then “CapCut” can be the right choice for you. It is a free mobile video editing software with many interesting features like keyframing, chroma-key, masking e.t.c. It also supports video and image layers. It has one of the best speed ramping features among other mobile video editors. It provides curves to smoothly speed ramp your clips. It can edit landscape, portrait, and even square video formats. It has many amazing effects and filters, it also has some stock clips.


~Features:
- It is completely free and has no watermarks.
- It supports up to 4K video resolution.
- Has curves for speed ramping.
- Has keyframes for animation.
- It has hundreds of effects, overlays, and titles.


~Cons:
- Its UI doesn’t support editing in landscape orientation.
- Lacks some common editing tools.
~Steps:
Import: Open Capcut, then click “New Project” to start a new project. Select files then click “Add” to import them. Click the white box with the “+” sign to add more clips. Hold and drag to rearrange the clips.
Click the “Add overlay” button to add photos or videos as layers.
Edit: On the bottom of the screen, you can find a bunch of tools for editing. From here you can add overlays, effects, filters, titles e.t.c to the timeline.
Select a clip to open the edit menu situated at the bottom of the screen. Here you can do the following tasks:
Split the clip; Change its speed, remove background, edit audio, do color correction, apply filters, stabilize the clip, e.t.c.
We have more edit features for the layers only which include: Spice (Blending), Animation, Masking, Chroma key, freeze frame, change opacity e.t.c.
Click the “Keyframe” icon (Diamond shaped) below the playback screen to apply keyframes to the layer. Pinch and zoom or rotate to transform the clip. Use the “Graphs” button in the edit menu to customize the keyframe animation.
Speed Ramping: To Change the speed of a clip, select it then click the “Speed” icon on the bottom bar of the screen. Move the slider to change the speed of the whole clip. To do speed ramping, click the “curves” option to choose a preset or create your own. Click a preset to apply it, and click again to open its edit menu. drag the beats up and down to change speed or add or delete a beat if you want.
Effects: Click the “+” sign between the two clips to add a transition between them, and drag the slider to change its duration.
Select the effects, filters, or titles icon to add them as a layer.
Export: Click the “Export” button on the top-right side of the screen to export your clip. Or click the button, left to the “Export” button to change its resolution and frame rate.
iMovie:
It is available on IOS and Mac.
If you are an Apple fan and own everything Apple then what’s better than getting your hands on a video editor designed by Apple. It is simple and easy to use. It has all the basic editing tools to enhance your video like crop, trim, transitions, effects, e.t.c. It also has a speed ramping feature which let you change the speed at different points of a clip. It’s AI mode “Magic Movie” lets you select clips and a style and software will make the final product for you.
Its “Storyboards” mode is a creative way of learning production and post-production skills. It lets you choose a theme from many famous Genres available, then it will guide you through the production process like capturing footage, arranging your shots, and creating cinematic titles to enhance your story.


~Features:
- It is free and easy to use.
- Let you do speed ramping by changing the speed of different parts of the clip .
- Supports Raw files.
- It’s AI mode creates videos for you on its own.
- The “Storyboarding” feature helps you through the production process.


~Cons:
- It only works on IOS and Mac.
- Not suitable for professional projects.
~Steps:
Import: Open “iMovie” then click “Start New Project” and select one of the 3 following modes to start editing:
- Magic Movie: Select the clips for editing, then click “Create Magic Movie” to let iMovie create a movie for you, which you can customize according to your liking.
- Storyboard: Click “Storyboard” then select Template and a genre or a style then click “Create” to start the project. iMovie will guide you and let you add the clip or title according to the pattern.
- Movie: In “Movie” mode, select the clips from the media browser then click “Create Movie” to start editing.
Edit: Select a clip to edit it. A bunch of tools will appear at the bottom of the screen.
Click the “scissors” icon to split, duplicate, delete the clip, or to detach the audio.
Click the “volume” icon to change the volume of the clip.
Click the “Title” icon to add a title design. Click the text (on the playback window) to edit it.
Click the “Filters” icon to apply it to the selected clip and move the slider to change its intensity.
Speed Ramping: Click the “Speed” icon to change its speed. Move the yellow slider to change the speed of the whole clip. Or click the “Add” button to add partitions (in yellow color) to the selected clip. Select a partition to change its speed only. And click the “Freeze” button to add a freeze-frame.
Effects: Select the black box between two clips to add a transition. Select a transition to apply it and change its time duration if you want.
Export: Click the “Done” button on the top-left corner of the screen to save the clip, then click the “Export” icon on the bottom of the screen to save your file.
Some Paid Video speeding Softwares for iPhone:
If you do most of your video editing from your phone and want to invest some money in it then you should check the softwares mentioned below. They are quite affordable and are worthy of investment. As they are packed with many cool features. But if you aren’t sure which software to use then don’t worry as most of these softwares have a free version to try on but they have some limited features and they provide a watermark on export. But it is a great option to get your hands on new software and once you are comfortable with it, you can purchase its premium version.
Kinemaster:
It is available on IOS and Android both.
If you want to do more than just trimming and cropping to your videos then you should try Kinemaster. For editors, who want to do some advanced-level video editing on their phone, then you must have Kinemaster on your phone. It is a paid software, which is packed with many useful features. It has many video and audio effects. It also has an amazing audio editor. It also has many title designs and basic color correction tools. It has hundreds of effects and transitions + more can be downloaded from its asset store. Its UI is suitable for beginners and content creators both. It is a paid software, but all its features are completely free to use, but the free version leaves a watermark on export.

~Features:
- It supports up to 4K resolution at 60fps. (depending on mobile configuration)
- Have amazing features like chroma key, keyframing, blend e.t.c
- Has built-in audio and video recorder.
- Supports multiple texts and video layers with different resolutions depending on the capability of the mobile phone.
- Has UI like a PC video editor and supports landscape orientation for editing.
- Have an asset store with 100s of free effects, transitions, and stock material.


~Cons:
- Can’t export 4K videos on most devices.
- Can’t apply keyframes and chroma key to the main video. (can be done on layers only)
~Price:
Its Premium version is available for $4.9/month or $39.9/year. It also includes all the premium assets.

~Steps:
Import: Open Kinemaster, then click “New Project” to start a new project. Select the desired aspect ratio then click “Create” to start editing. Or click the “import” button on top to import an existing file to continue editing.
Media Browser will be opened. Select the clips to add them to the timeline. Click the “X” button on the top-right corner to close the media browser.
Edit: Drag the clip from the corner to trim it. Select a clip to open its editing menu. Here you can change its speed, add filters, do color correction, edit its audio, e.t.c.
On the right side, you will see a bunch of icons. Click the “Layer” button to add a media file, text, or effect as a layer. Click the “Audio” button to add an audio file. Or click the “Rec” button to do a voice-over.
Click the “+” symbol between two clips to add a transition between them, then adjust its time duration if you want.
Speed Ramping: Select the “Speed” option to change its speed. Here you can only do linear speed change. To create a speed ramp effect, split the clip into different parts and then change their speed according to your liking. Apply a crossfade transition of about 0.1 sec to smooth the jump cut between clips.
Effects: Select a clip then click “Clip Graphics” to apply the effect to your clip. Your clip will be highlighted with a yellow box, adjust it to set the time duration of the effect.
Click the “Shop” icon to visit the Asset store. Here you can find many cool Effects, clip graphics, transitions, and sound effects. Download them to use in your project.
Click the Layer clip to edit it. Here you can do chroma key, keyframing, or apply animation.
Export: Click the “Export” icon on the top-right corner of the app to open the export screen. Select the desired resolution and frame rate then click “Save as video” to export it.
Power Director:
It is available on IOS and Android both.
It is a paid but quite advanced video editor available for androids and IOS both. Like its PC version mobile version is also packed with many great features. It is compact and easy to use. It supports multiple video and audio layers. Have many cool filters and transitions. Can also do basic color corrections. To complete post-production work it also has audio editing tools and effects. It also has hundreds of title designs. Its UI is easy to use and supports both portrait and landscape orientation for editing. Most of its features can be used for free with a watermark on export. To remove the watermark you need to purchase the premium version.


~Features:
- It supports up to 4K resolution at 60fps. (compatible on most devices)
- Supports both Portrait and Landscape orientation for editing.
- Supports Key framing and video stabilization also.
- Supports multiple audio and video layers.
- Can edit videos in different aspect ratios.
- Have a vast stock library.


~Cons:
- Can’t export 4K videos on many devices.
- Can apply keyframing and chroma key to layers only.
- Software lags sometimes.
~Price:
Its Premium version is available for $4.9/month or $29.9/year.
~Steps:
Import: Open “Power Director”. Click “New Project” then select Aspect Ratio to start editing. Select clips from the media library Then click the “blue tick” button to add them to the timeline. Click the “+” icon to import more clips. From the bottom bar (in portrait mode), Select the video, image, audio, or effect icon to add them as a layer. In Landscape Mode bar it is situated on the left side of the screen.
Edit: Select and drag the clip from the corner to trim it. Select a clip to open edit tools. From here you can do audio editing, color correction, cropping, stabilization, and speed change.
Here you get more features to edit a layer or an overlay such as chroma key, masking, transform keyframe, e.t.c. To do keyframing, select a layer, then click the “diamond” icon located on the right side above the timeline to add keyframes then rotate, zoom or change the position of the clip with time to add more keyframes. You can also do keyframing for other features like adjustment, mask, blend, and opacity.
Speed Ramping: To Change speed, select a clip or a layer click the “speed” button then move the slider to change its speed. To do speed ramping split the clip into small parts and change their speed respectively. Click the “ease-in” and “ease-out” buttons to smooth the jump between the clips.
Effects: Click the grey box between the clips to add a transition and move the slider to change its duration if you want.
Select a clip, then choose a filter or an effect to apply to the selected clip.
Export: To Export the finished product, click the “export” icon on the top-right side of the screen then click “Produce and Share” to select the video resolution or click the “Settings” icon to change the storage path and frame rate. Then click “Produce”.
LumaFusion:
It is available on IOS and Mac (with an m1 processor).
As a content creator, have you ever wished for creating your own cinematic masterpiece, but the thing holding you back is that you don’t have a powerful workstation or expensive software then don’t worry. You can do professional-level editing on your iPhone with the software named “LumaFusion. It is one of the most powerful and advanced video editors available for your iPhone or iPad.
It is a multi-track video editor with many useful features like the Chroma key, keyframing, color grading, and color LUTs. Have powerful color grading tools and an audio editor. It also has a lock and load stabilizer. You have to purchase the software before using it. It doesn’t have any free version to try.

Credits: Pic by Luma touch website.
~Features:
- It supports up to 4K video resolution at a max of 240 fps.
- Can also edit and export 360 videos.
- Have powerful color correction tools. You can also import your own color LUTs.
- Supports Keyframing on almost all the editing tools within the software.
- You can add some third-party audio plugins.
- Supports up to 6 audio and video layers.
- Have “Storyblock” stock library. (Many of its contents are free to use)
- Supports external monitor for display.

Credits: Pic by Luma touch website.
~Cons:
- Not available for Android devices.
- Being an advanced software, it doesn’t have masking and speed ramping features.
- Doesn’t have a free version to try on.
~Price:
It is available for purchase at $29.99.
~Steps:
Import: Click the “+” button on the bottom of the screen to start a new project. A small tab will appear, change the settings if you want, then click the “+” button on the top-right side of the tab to start your project.
Click the “flower icon” on the top-right side of the screen to open the source menu (Its icon changes depending on the present tab), Click “Photos” to open folders and files. Click and drag files to add them to the timeline. Click and drag the clips on the top of the primary clip to add them as a layer.
Edit: Click and drag the clips from the corner to trim them. On the bar at the bottom of the screen, you will find basic tools. Click the clip, to open editing tools on the same bar.
Click the “+” icon on the bottom bar or select “Titles” on the source menu to open the Titles menu. Drag and drop the titles to use them. Double-click the text to open the edit menu.
Double-click the clip to open the edit menu. Here you can transform the clip, change its speed, Stabilize your clips, do color grading, add an effect and perform audio editing.
Speed Ramping: In the edit mode, click the “speed and reverse” button and move the slider back or forth to change the speed of the whole video. To do speed ramping, split the video into parts and apply different speeds to create a speed ramp effect. This method is not perfect but it gets the job done.
Effects: Select the “Transitions” icon on the source menu to open the transition menu. Drag and drop a transition on a clip to use it.
Double click a clip to open the edit menu. Then in the “Color & Effects” tab select any effects and apply them to your clip.
To do keyframing, on the edit menu, click the “circle” icon on the bottom-right side below the display to start keyframing. then change the settings with time to add further keyframes.
Export: To Export your file, click the “Export” icon on the bottom-right corner of the screen to open the export menu then click the “movie” icon to select the file destination. Select the desired export settings then click the “Export” icon on the top of the menu to export your finished product.
Which One Should I Choose Free or Paid iPhone Video speeding Softwares?
It usually depends on your needs. If you just want a speed editor to make slow-mo or timelapse videos for your social media then you should go for free video editors, as they are easy to use and provide better speed ramping features than some paid video editors mentioned here.
But as a content creator if you want more features alongside speed ramping then you should go for paid softwares mentioned above. As mobile video editors are quite affordable and some of them have features like that of some PC softwares.
FAQs about Speed ramping feature and softwares:
- Q) What is Speed Ramping and where it is used?
Speed Ramping is different from just changing the speed of the whole clip. It means changing the speed of the video gradually, so the clip doesn’t feel jumpy.
It is done to give viewers a smooth experience between different parts of the clip. like the fast-forward clip is used to show the passage of time. and the slow-mo is used to emphasize something or produce tension, while a mix of both is used in ads and action scenes, e.t.c.
- Q) How to do Speed Ramping?
Speed Ramping methods vary from software to software. Either you can do it by adding keyframes and changing speed with time or you can add or adjust curves for speed change. If your software doesn’t support the speed ramping feature, you can split a clip into parts and apply speed change to them differently. For some of the best iPhone softwares, we have mentioned the speed ramping steps above.
- Q) What FPS is best for Slo-mo videos?
Shooting at 60 Fps is ideal as it gives a smooth and crisp video and you can make slow motion easily if required, you can slow it down up to 40% of its speed while maintaining the quality. It is supported in almost most devices nowadays. And if you want to create super slo-mo for your cinematics or product video then 120 or 240 fps is preferable. But higher fps often have disadvantages as it is harder to apply visual effects or masks. So choose the frame rate according to your requirements.
- Q) Does changing the speed of video affect its audio?
Yes, changing the speed of video affects the audio, It affects its pitch (tempo). Increasing its speed increases the pitch of the audio making it sound shrill while decreasing the speed of the video or making slow-mo decreases the pitch making it sound deep.
Although, some softwares provide the feature to maintain the pitch while changing the speed of the clip.
~Cons:
- Its UI doesn’t support editing in landscape orientation.
- It doesn’t support 4k video resolution.
~Steps:
Import: Open Filmora Go, Click “New project” to start a new project, or Choose the previous one from the “Draft” portion. Select videos or images to import to your timeline. Hold and drag the clip to change its arrangement.
Edit: You can add text, effects, stickers, layers, e.t.c. by clicking their icon, present on the bar at the bottom.
Click and Drag a clip from the corner to trim it.
Click the “PiP” icon to add image or video layers, you also can add multiple layers.
Select a clip to edit it. Different editing tools appear on the bottom bar. Here you can change its opacity, its speed, or add animations.
Click the diamond icon above the timeline to add keyframes. Zoom, move, or rotate the clip to add keyframes with the passage of time.
Speed Ramping: To Change the speed of a clip, select it then click the “Speed” icon on the bottom bar of the screen. Move the slider to change the speed of the whole clip. To do speed ramping, click the “curves” option to choose a preset or create your own. Click a preset to apply it, and click again to open its edit menu. drag the beats up and down to change speed or add or delete a beat if you want.
Effects: Click the “Effects” icon to open the effects menu. Select an effect to apply to your clip.
Click the white box between two clips to add transitions.
Export: Click the “Export” button to export your file. Select your desired resolution and frame rate to export your clip.
Some Free Video speeding Softwares for iPhone:
If you are short on budget or don’t want to spend much on video editing softwares then you can try these free softwares. They are free that doesn’t mean that they are useless, they are quite good for beginners or moderate users although some of them are designed for professionals also. If you don’t believe me, go and try it yourself. Apart from just changing the speed, they are good in other editing aspects also.
Adobe Premiere Rush:
It is available on IOS and Android both.
If you are looking for free but good speed ramping software then why go anywhere also when you have an amazing video editor made by a well-known software company “Adobe”. Like premiere pro, they have designed a compact version for phones named “Premiere Rush”.
It is a free video editor that has all the tools needed for video editing, from video effects to color grading and audio editing. Its UI is a bit similar to PC video editors. It is a free video editor with no watermarks. Although it takes some time to understand it. But once mastered, you can do editing quickly.
~Features:
- It is a free video editor with no watermark.
- It supports up to 4K resolution at 60fps.
- You can extract audio and can do voiceover directly from the software.
- It has hundreds of filters, overlays, and title designs.
- It has basic color grading tools.
- It also has a motion tracking feature. (in Paid version)
- It supports multiple audio, video, and text layers.
~Cons:
- It only runs on high-end devices. ( It is not supported in most mid-range phones)
- Not suitable for beginners. Its UI is quite hard to understand.
- Doesn’t have common features like the chroma key, masking, e.t.c.
~Price:
Its Premium version is available for 9.99/month. It includes some premium features. Or you can purchase the “All Apps Bundle” at $54.99/month for the annual plan.
~Steps:
Import: Open “Adobe Premiere Rush”, Click the “+” sign at the bottom to create a new project. in the media location, select the clips, then click the blue “create” button to start editing.
Click the blue “+” button at the bottom-left corner to add clips, audio, or graphics.
Hold and drag the clips upward to add them as a layer.
Edit: Scroll over a clip to select it. Clicking again shows a pop-up above the selected clip. Here you get 4 options: split, duplicate, separate audio, and delete.
A number of edit options appear on the bottom line of the screen:
Graphics: Click the “Graphics” button to add animated titles, transition graphics, and overlays as a layer. Select to customize its design.
Effects: Click the “Effects” button to add transitions or motion effect. Select a clip to apply transition at both ends. or select a corner of the clip to apply on it only. And change the duration of transition if you want.
Color: Here you can color grade your clips, Apply a preset or color grade manually by using sliders. You can also create your presets.
Transform: Here you can resize, rotate, crop, or change the position of the clip.
Audio: Here you can edit the audio, select a clip to edit its audio.
Speed Ramping: Click the “Speed” button to edit its speed. Select the range option to speed ramp a specific part of the clip. Select the ramp option to create a smooth speed curve. Or Set the clip duration to change its speed accordingly.
Export: To Export your clip, click the “Export” icon on top of the screen. Click “Quality Settings” to adjust export settings then click “Export” to save your file.
CapCut:
It is available on IOS and Android both.
If you are looking for a free but good speed ramping software to help you create slo-mo videos easily anywhere, anytime you want, then “CapCut” can be the right choice for you. It is a free mobile video editing software with many interesting features like keyframing, chroma-key, masking e.t.c. It also supports video and image layers. It has one of the best speed ramping features among other mobile video editors. It provides curves to smoothly speed ramp your clips. It can edit landscape, portrait, and even square video formats. It has many amazing effects and filters, it also has some stock clips.
~Features:
- It is completely free and has no watermarks.
- It supports up to 4K video resolution.
- Has curves for speed ramping.
- Has keyframes for animation.
- It has hundreds of effects, overlays, and titles.
~Cons:
- Its UI doesn’t support editing in landscape orientation.
- Lacks some common editing tools.
~Steps:
Import: Open Capcut, then click “New Project” to start a new project. Select files then click “Add” to import them. Click the white box with the “+” sign to add more clips. Hold and drag to rearrange the clips.
Click the “Add overlay” button to add photos or videos as layers.
Edit: On the bottom of the screen, you can find a bunch of tools for editing. From here you can add overlays, effects, filters, titles e.t.c to the timeline.
Select a clip to open the edit menu situated at the bottom of the screen. Here you can do the following tasks:
Split the clip; Change its speed, remove background, edit audio, do color correction, apply filters, stabilize the clip, e.t.c.
We have more edit features for the layers only which include: Spice (Blending), Animation, Masking, Chroma key, freeze frame, change opacity e.t.c.
Click the “Keyframe” icon (Diamond shaped) below the playback screen to apply keyframes to the layer. Pinch and zoom or rotate to transform the clip. Use the “Graphs” button in the edit menu to customize the keyframe animation.
Speed Ramping: To Change the speed of a clip, select it then click the “Speed” icon on the bottom bar of the screen. Move the slider to change the speed of the whole clip. To do speed ramping, click the “curves” option to choose a preset or create your own. Click a preset to apply it, and click again to open its edit menu. drag the beats up and down to change speed or add or delete a beat if you want.
Effects: Click the “+” sign between the two clips to add a transition between them, and drag the slider to change its duration.
Select the effects, filters, or titles icon to add them as a layer.
Export: Click the “Export” button on the top-right side of the screen to export your clip. Or click the button, left to the “Export” button to change its resolution and frame rate.
iMovie:
It is available on IOS and Mac.
If you are an Apple fan and own everything Apple then what’s better than getting your hands on a video editor designed by Apple. It is simple and easy to use. It has all the basic editing tools to enhance your video like crop, trim, transitions, effects, e.t.c. It also has a speed ramping feature which let you change the speed at different points of a clip. It’s AI mode “Magic Movie” lets you select clips and a style and software will make the final product for you.
Its “Storyboards” mode is a creative way of learning production and post-production skills. It lets you choose a theme from many famous Genres available, then it will guide you through the production process like capturing footage, arranging your shots, and creating cinematic titles to enhance your story.
~Features:
- It is free and easy to use.
- Let you do speed ramping by changing the speed of different parts of the clip .
- Supports Raw files.
- It’s AI mode creates videos for you on its own.
- The “Storyboarding” feature helps you through the production process.
~Cons:
- It only works on IOS and Mac.
- Not suitable for professional projects.
~Steps:
Import: Open “iMovie” then click “Start New Project” and select one of the 3 following modes to start editing:
- Magic Movie: Select the clips for editing, then click “Create Magic Movie” to let iMovie create a movie for you, which you can customize according to your liking.
- Storyboard: Click “Storyboard” then select Template and a genre or a style then click “Create” to start the project. iMovie will guide you and let you add the clip or title according to the pattern.
- Movie: In “Movie” mode, select the clips from the media browser then click “Create Movie” to start editing.
Edit: Select a clip to edit it. A bunch of tools will appear at the bottom of the screen.
Click the “scissors” icon to split, duplicate, delete the clip, or to detach the audio.
Click the “volume” icon to change the volume of the clip.
Click the “Title” icon to add a title design. Click the text (on the playback window) to edit it.
Click the “Filters” icon to apply it to the selected clip and move the slider to change its intensity.
Speed Ramping: Click the “Speed” icon to change its speed. Move the yellow slider to change the speed of the whole clip. Or click the “Add” button to add partitions (in yellow color) to the selected clip. Select a partition to change its speed only. And click the “Freeze” button to add a freeze-frame.
Effects: Select the black box between two clips to add a transition. Select a transition to apply it and change its time duration if you want.
Export: Click the “Done” button on the top-left corner of the screen to save the clip, then click the “Export” icon on the bottom of the screen to save your file.
Some Paid Video speeding Softwares for iPhone:
If you do most of your video editing from your phone and want to invest some money in it then you should check the softwares mentioned below. They are quite affordable and are worthy of investment. As they are packed with many cool features. But if you aren’t sure which software to use then don’t worry as most of these softwares have a free version to try on but they have some limited features and they provide a watermark on export. But it is a great option to get your hands on new software and once you are comfortable with it, you can purchase its premium version.
Kinemaster:
It is available on IOS and Android both.
If you want to do more than just trimming and cropping to your videos then you should try Kinemaster. For editors, who want to do some advanced-level video editing on their phone, then you must have Kinemaster on your phone. It is a paid software, which is packed with many useful features. It has many video and audio effects. It also has an amazing audio editor. It also has many title designs and basic color correction tools. It has hundreds of effects and transitions + more can be downloaded from its asset store. Its UI is suitable for beginners and content creators both. It is a paid software, but all its features are completely free to use, but the free version leaves a watermark on export.
~Features:
- It supports up to 4K resolution at 60fps. (depending on mobile configuration)
- Have amazing features like chroma key, keyframing, blend e.t.c
- Has built-in audio and video recorder.
- Supports multiple texts and video layers with different resolutions depending on the capability of the mobile phone.
- Has UI like a PC video editor and supports landscape orientation for editing.
- Have an asset store with 100s of free effects, transitions, and stock material.
~Cons:
- Can’t export 4K videos on most devices.
- Can’t apply keyframes and chroma key to the main video. (can be done on layers only)
~Price:
Its Premium version is available for $4.9/month or $39.9/year. It also includes all the premium assets.
~Steps:
Import: Open Kinemaster, then click “New Project” to start a new project. Select the desired aspect ratio then click “Create” to start editing. Or click the “import” button on top to import an existing file to continue editing.
Media Browser will be opened. Select the clips to add them to the timeline. Click the “X” button on the top-right corner to close the media browser.
Edit: Drag the clip from the corner to trim it. Select a clip to open its editing menu. Here you can change its speed, add filters, do color correction, edit its audio, e.t.c.
On the right side, you will see a bunch of icons. Click the “Layer” button to add a media file, text, or effect as a layer. Click the “Audio” button to add an audio file. Or click the “Rec” button to do a voice-over.
Click the “+” symbol between two clips to add a transition between them, then adjust its time duration if you want.
Speed Ramping: Select the “Speed” option to change its speed. Here you can only do linear speed change. To create a speed ramp effect, split the clip into different parts and then change their speed according to your liking. Apply a crossfade transition of about 0.1 sec to smooth the jump cut between clips.
Effects: Select a clip then click “Clip Graphics” to apply the effect to your clip. Your clip will be highlighted with a yellow box, adjust it to set the time duration of the effect.
Click the “Shop” icon to visit the Asset store. Here you can find many cool Effects, clip graphics, transitions, and sound effects. Download them to use in your project.
Click the Layer clip to edit it. Here you can do chroma key, keyframing, or apply animation.
Export: Click the “Export” icon on the top-right corner of the app to open the export screen. Select the desired resolution and frame rate then click “Save as video” to export it.
Power Director:
It is available on IOS and Android both.
It is a paid but quite advanced video editor available for androids and IOS both. Like its PC version mobile version is also packed with many great features. It is compact and easy to use. It supports multiple video and audio layers. Have many cool filters and transitions. Can also do basic color corrections. To complete post-production work it also has audio editing tools and effects. It also has hundreds of title designs. Its UI is easy to use and supports both portrait and landscape orientation for editing. Most of its features can be used for free with a watermark on export. To remove the watermark you need to purchase the premium version.
~Features:
- It supports up to 4K resolution at 60fps. (compatible on most devices)
- Supports both Portrait and Landscape orientation for editing.
- Supports Key framing and video stabilization also.
- Supports multiple audio and video layers.
- Can edit videos in different aspect ratios.
- Have a vast stock library.
~Cons:
- Can’t export 4K videos on many devices.
- Can apply keyframing and chroma key to layers only.
- Software lags sometimes.
~Price:
Its Premium version is available for $4.9/month or $29.9/year.
~Steps:
Import: Open “Power Director”. Click “New Project” then select Aspect Ratio to start editing. Select clips from the media library Then click the “blue tick” button to add them to the timeline. Click the “+” icon to import more clips. From the bottom bar (in portrait mode), Select the video, image, audio, or effect icon to add them as a layer. In Landscape Mode bar it is situated on the left side of the screen.
Edit: Select and drag the clip from the corner to trim it. Select a clip to open edit tools. From here you can do audio editing, color correction, cropping, stabilization, and speed change.
Here you get more features to edit a layer or an overlay such as chroma key, masking, transform keyframe, e.t.c. To do keyframing, select a layer, then click the “diamond” icon located on the right side above the timeline to add keyframes then rotate, zoom or change the position of the clip with time to add more keyframes. You can also do keyframing for other features like adjustment, mask, blend, and opacity.
Speed Ramping: To Change speed, select a clip or a layer click the “speed” button then move the slider to change its speed. To do speed ramping split the clip into small parts and change their speed respectively. Click the “ease-in” and “ease-out” buttons to smooth the jump between the clips.
Effects: Click the grey box between the clips to add a transition and move the slider to change its duration if you want.
Select a clip, then choose a filter or an effect to apply to the selected clip.
Export: To Export the finished product, click the “export” icon on the top-right side of the screen then click “Produce and Share” to select the video resolution or click the “Settings” icon to change the storage path and frame rate. Then click “Produce”.
LumaFusion:
It is available on IOS and Mac (with an m1 processor).
As a content creator, have you ever wished for creating your own cinematic masterpiece, but the thing holding you back is that you don’t have a powerful workstation or expensive software then don’t worry. You can do professional-level editing on your iPhone with the software named “LumaFusion. It is one of the most powerful and advanced video editors available for your iPhone or iPad.
It is a multi-track video editor with many useful features like the Chroma key, keyframing, color grading, and color LUTs. Have powerful color grading tools and an audio editor. It also has a lock and load stabilizer. You have to purchase the software before using it. It doesn’t have any free version to try.
Credits: Pic by Luma touch website.
~Features:
- It supports up to 4K video resolution at a max of 240 fps.
- Can also edit and export 360 videos.
- Have powerful color correction tools. You can also import your own color LUTs.
- Supports Keyframing on almost all the editing tools within the software.
- You can add some third-party audio plugins.
- Supports up to 6 audio and video layers.
- Have “Storyblock” stock library. (Many of its contents are free to use)
- Supports external monitor for display.
Credits: Pic by Luma touch website.
~Cons:
- Not available for Android devices.
- Being an advanced software, it doesn’t have masking and speed ramping features.
- Doesn’t have a free version to try on.
~Price:
It is available for purchase at $29.99.
~Steps:
Import: Click the “+” button on the bottom of the screen to start a new project. A small tab will appear, change the settings if you want, then click the “+” button on the top-right side of the tab to start your project.
Click the “flower icon” on the top-right side of the screen to open the source menu (Its icon changes depending on the present tab), Click “Photos” to open folders and files. Click and drag files to add them to the timeline. Click and drag the clips on the top of the primary clip to add them as a layer.
Edit: Click and drag the clips from the corner to trim them. On the bar at the bottom of the screen, you will find basic tools. Click the clip, to open editing tools on the same bar.
Click the “+” icon on the bottom bar or select “Titles” on the source menu to open the Titles menu. Drag and drop the titles to use them. Double-click the text to open the edit menu.
Double-click the clip to open the edit menu. Here you can transform the clip, change its speed, Stabilize your clips, do color grading, add an effect and perform audio editing.
Speed Ramping: In the edit mode, click the “speed and reverse” button and move the slider back or forth to change the speed of the whole video. To do speed ramping, split the video into parts and apply different speeds to create a speed ramp effect. This method is not perfect but it gets the job done.
Effects: Select the “Transitions” icon on the source menu to open the transition menu. Drag and drop a transition on a clip to use it.
Double click a clip to open the edit menu. Then in the “Color & Effects” tab select any effects and apply them to your clip.
To do keyframing, on the edit menu, click the “circle” icon on the bottom-right side below the display to start keyframing. then change the settings with time to add further keyframes.
Export: To Export your file, click the “Export” icon on the bottom-right corner of the screen to open the export menu then click the “movie” icon to select the file destination. Select the desired export settings then click the “Export” icon on the top of the menu to export your finished product.
Which One Should I Choose Free or Paid iPhone Video speeding Softwares?
It usually depends on your needs. If you just want a speed editor to make slow-mo or timelapse videos for your social media then you should go for free video editors, as they are easy to use and provide better speed ramping features than some paid video editors mentioned here.
But as a content creator if you want more features alongside speed ramping then you should go for paid softwares mentioned above. As mobile video editors are quite affordable and some of them have features like that of some PC softwares.
FAQs about Speed ramping feature and softwares:
- Q) What is Speed Ramping and where it is used?
Speed Ramping is different from just changing the speed of the whole clip. It means changing the speed of the video gradually, so the clip doesn’t feel jumpy.
It is done to give viewers a smooth experience between different parts of the clip. like the fast-forward clip is used to show the passage of time. and the slow-mo is used to emphasize something or produce tension, while a mix of both is used in ads and action scenes, e.t.c.
- Q) How to do Speed Ramping?
Speed Ramping methods vary from software to software. Either you can do it by adding keyframes and changing speed with time or you can add or adjust curves for speed change. If your software doesn’t support the speed ramping feature, you can split a clip into parts and apply speed change to them differently. For some of the best iPhone softwares, we have mentioned the speed ramping steps above.
- Q) What FPS is best for Slo-mo videos?
Shooting at 60 Fps is ideal as it gives a smooth and crisp video and you can make slow motion easily if required, you can slow it down up to 40% of its speed while maintaining the quality. It is supported in almost most devices nowadays. And if you want to create super slo-mo for your cinematics or product video then 120 or 240 fps is preferable. But higher fps often have disadvantages as it is harder to apply visual effects or masks. So choose the frame rate according to your requirements.
- Q) Does changing the speed of video affect its audio?
Yes, changing the speed of video affects the audio, It affects its pitch (tempo). Increasing its speed increases the pitch of the audio making it sound shrill while decreasing the speed of the video or making slow-mo decreases the pitch making it sound deep.
Although, some softwares provide the feature to maintain the pitch while changing the speed of the clip.
Quick Answer: Why Did Filmora AI Portrait Attract People?
Quick Answer: Why Did Filmora AI Portrait Attract People?
An easy yet powerful editor
Numerous effects to choose from
Detailed tutorials provided by the official channel
In the recent few years, video editing has become one of the most-sought after professions, all thanks to the popularity of various video sharing platforms like YouTube. Today, creators don’t need big budgets to share their stories with the world. They can simply grab the camera, shoot the video, and use editing software to compile their brainchild into a dedicated movie. And, once the movie is ready, these creators can simply upload it to YouTube and gain the desired viewership. However, it’s worth noting that YouTube isn’t the only element that has helped content creators excel in their careers and follow their passion.
Editing software like Wondershare Filmora also play an equal role in the success of a creator in today’s digital world. These editing tools are equipped with a plethora of features that allow creators to unleash their creativity and compile high-quality videos for their viewers. What’s more interesting is that these tools keep receiving new updates that further streamlines the entire video editing process to help creators edit videos more conveniently.
Today, we are here to talk about one such feature - known as Filmora AI portrait - that recently got introduced to Wondershare Filmora and became an all-time favorite of many creators. We’ll be going in detail about Filmora AI portrait and how you can use it in your videos to uplift the production quality of your videos. We’ll also share some of the alternatives of this cool feature so that you can bring variety to your videos and keep the viewers engaged throughout the video.
In this article
01 [Why Did AI Portrait Become More and More Popular](#Part 1)
02 [What Scenes Apply to AI Portrait?](#Part 2)
03 [What Scenes Do Not Apply to AI Portrait?](#Part 3)
04 [Why Filmora AI Portrait Deserves to Try?](#Part 4)
05 [A Comparison to Other AI Portrait Software](#Part 5)
Part 1 Why Did AI Portrait Become More and More Popular
Let’s start with the basics first! What is Filmora AI portrait and why it has gained an immense popularity in the editing community. It’s basically an add-on effect in Wondershare Filmora X that was introduced with the latest Filmora X version 10.5.
By integrating this add-on into their video, editors can remove/change the background without losing any details of the main subject. So, let’s say if you don’t have green screen footage and still want to remove the background without affecting the foreground (a single subject), Filmora AI portrait will help you get the job done without any hassle.
Being an AI-powered feature, Filmora AI portrait automatically detects the shape and structure of the main subject and separates it from the background. This way even if you don’t have used a green screen or don’t know how to apply the Chroma key in your videos, you’ll be able to remove the background from the RAW footage and replace it with a custom background. This will allow you to make your videos more appealing and add a funny element for better engagement. For example, you can add a moving background to uplift the entire storyline to your videos.
Filmora AI portrait is a great feature for different types of creators such as gaming streamers, YouTube content creators, and daily vloggers. Regardless of your editing style, by integrating the Filmora AI portrait add-on, you’ll have the liberty to remove unwanted backgrounds from various shots and keep the production quality high.
In addition to removing the background, Filmora AI portrait is also a great tool to design thumbnails for your videos. Also, you can use this feature to apply borders, glitch effects, pixelated, noise, or segmentation video effects to your videos. All these elements will allow you to eliminate dull and low quality things from your videos and make the main characters pop-out in every frame.
Here are a few situations where one can implement the Filmora AI portrait and make the most out of its functions.
● If you livestream videos on YouTube, but don’t have a green screen yet, you can use the AI portrait feature in Filmora to remove the background and make your streaming setup look more elegant and professional.
● With the Filmora AI portrait feature, you can also design high-quality and captivating thumbnails for your videos and draw the maximum attention within YouTube’s rabbithole. Any new viewer is more likely to click on your videos when the thumbnail is engaging.
● You can also use Filmora AI portrait effect to remove background from interviews. Usually, when someone shoots an interview, they usually place a green screen behind the person. But, in case you don’t have green screen footage, you can easily make your interviews look more professional with the Filmora AI portrait effect.
● Finally, you can also use the Filmora AI portrait feature in regular YouTube vlogs. This would be applicable when there are unnecessary elements in the background of a clip that are ruining the entire frame. In this case by simply erasing the background and replacing it with a custom one, you’ll be able to keep the production quality high and keep the viewers engaged throughout the vlog.
Part 2 What Scenes Apply to AI Portrait?
While the AI portrait effect can work for all frames, there are a few situations when it delivers the best results. The designers at Wondershare Filmora claim that AI Portrait works like a charm when the frame has a single subject talking directly to the camera.
When there’s a single individual or subject in front of the camera, it’s relatively easier for the AI-algorithm to detect the edges and separate the background with high precision. Moreover, when the main subject is static, you are most likely to witness the best output in terms of background removal. Why? The reason being when there’s a single static subject, an AI-powered algorithm can precisely mark its edges and achieve relatively better results.
Let’s understand this with the help of a few examples.
One-Person Interview
Going back to the interview example - let’s say you are interviewing a person who’s sitting in a chair and talking directly to the camera in front of him. Now, since there isn’t too much movement on his side, the AI-algorithm will be able to detect his edges and remove the background accordingly. In fact, in such ideal cases, the tool will even be able to detect the hair of the subject with high precision.
Shot of a Monologue
Monologues are no longer limited to high-budget Hollywood movies only. They have become a regular part of conventional videos such as daily YouTube vlogs. Monologues boast better authenticity as the entire clip is shot in one go.
Since there are no random cuts, the presenter can easily convey his views to the viewers. But, for a monologue to work, it’s extremely crucial that it has a high-quality background otherwise it’ll fail to grab the viewer’s attention. In case you are also stuck with a monologue that has a bad background, you can use Filmora AI portrait to remove it and make the primary character of the video pop-up more effectively.
YouTube Vlogs
Again, YouTube vlogs are another great example where editors could really benefit from Filmora’s AI portrait effect. For daily vloggers, getting the perfect shot is always a challenge. And, more often than you think, they end up taking shots that have bad backgrounds. But, thanks to Filmora’s AI portrait effect, one could easily remove background from such shots and use them to convey the storyline more effectively. This won’t waste your efforts and you’ll be able to use the shot that would have otherwise gone to Trash.
So, these are a few situations where the AI portrait effect in Filmora can do wonders for your video editing process.
Part 3 What Scenes Do Not Apply to AI Portrait?

Now, as we mentioned in the previous part, the Filmora AI portrait effect works better in scenarios where there’s only a single subject in the frame. This means the effect isn’t applicable in all the situations.
If there is a lot of movement in the frame, the AI-algorithm may fail to detect the edges of the subject(s) and not deliver the expected results. For example if you are working on a vlog where you are moving the camera really fast, the AI effect will struggle to separate the background from the foreground and fail to achieve the desired precision while removing background.
Some of the other situations where you won’t be able to make the most out of the AI portrait effect include:
Shots With Multiple Moving Subjects
If you have a shot of a crowded place where too many people are moving in the frame, it’ll be challenging to detect the background properly. The movement of multiple subjects will interfere with the overall functionality of the algorithm, restricting users from achieving a background-free shot. In such a situation, you’ll either have to use the shot without removing the background or dump into the Trash folder.
Videos With Special Effects and Filters
Here’s the deal; special effects and filters have become an inevitable part of today’s social media-influenced world. People apply filters and visual effects to make their videos more appealing and grab more likes and comments on Instagram, Facebook, and Snapchat.
But, these filters are often a nightmare for video editors as it’s pretty challenging to process them in any video editing software. If you have a clip with filters or video effects, you’ll struggle to implement the Filmora AI portrait effect properly. In fact, the effect will not work as expected and you’ll be stuck with a shot that would be pretty useless for the entire storyline. So, do not apply unnecessary filters to your videos if you are planning to apply the AI portrait effect in the long run.
Videos With Backlights
The lighting setup of any video has a huge influence on how it will look at the end. Just like a human being, even the AI algorithm struggles to detect the background in a video that has poor lighting conditions or bad backlight. In such videos, it’s challenging for the algorithm to detect the main subject and then identify its edges.
To avoid such scenarios, it would be better to plan your shots in advance and shoot them when there are proper lighting conditions. In case you are going to shoot indoors, you can use a dedicated lighting setup. If anything, this will make it much easier to apply the Filmora AI portrait effect and achieve the best results in terms of background removal.
Paintings
Paintings aren’t like traditional videos. The color scheme is entirely different and it’s much challenging to identify the background and the foreground. So, if there are any images of paintings that you want to use as a thumbnail, it might get a bit challenging to remove the background. In such a scenario, it would be much better to either choose a different image for the thumbnail and use the painting without removing its background.
So, these are a few scenarios where using the Filmora AI portrait won’t be an effective solution for you. We would recommend to plan your shots in advance so that you don’t end up with random shots where it’s challenging to apply the AI portrait effect.
Part 4 Why Filmora AI Portrait Deserves to Try?
If you’ve come this far, you are most likely to be serious about video editing. So, now that we have clarified all the situations where using ****Wondershare Filmora Video Editor AI portrait** will be effective, let’s understand how you can use it in your videos.
01Are the Subscription Periods for Wondershare Filmora and the AI Portrait Add-on the Same?
So, first things first, will you get direct access to the AI portrait add-on along with your Filmora license? The answer is No! THe AI portrait add-on is available as a separate item and you’ll have to pay additional charges to use it on your videos. The default Filmora license will not give you access to the AI portrait mode whatsoever. In terms of pricing, the Filmora AI portrait is available at a pocket-friendly price.
For Win 7 or later (64-bit)
For macOS 10.12 or later
You can get this add-on by paying a minimal fee of $5.99 per month. One of the best things about choosing this add-on is that you can discontinue it whenever you want. So, let’s say you no longer need to remove backgrounds from your videos - in this situation, you can directly discontinue your subscription without affecting your regular Filmora subscription.
02How to Add AI Portrait Effects?
Now, coming to the real reason why you’ve come this far - the process to use the AI portrait effect in Filmora. To be honest, it’s a relatively easier process to add the AI portrait effect in Filmora. Even if you are not a Filmora user, you’ll be able to get the job done without any hassle. Let me quickly walk you through the step-by-step procedure of adding the AI portrait effect in Wondershare Filmora.
Step 1 - If you are not an existing user of Filmora, start by purchasing its license and install the software on your system to get started. On the other hand, if you’ve been using Filmora for a while, directly move to the next step to proceed further.
Step 2 - Now, launch the software and create a new project. You’ll be prompted to Filmora’s editing panel. At this point, you’ll have to drag the video clip (that you want to edit) to the timeline.
Step 3 - Once the video is successfully imported, switch to the “Effects” tab and search for “AI Portrait”. You’ll see a “premium” icon next to its name. Double-click on the effect and follow the on-screen instructions to complete the payment procedure.
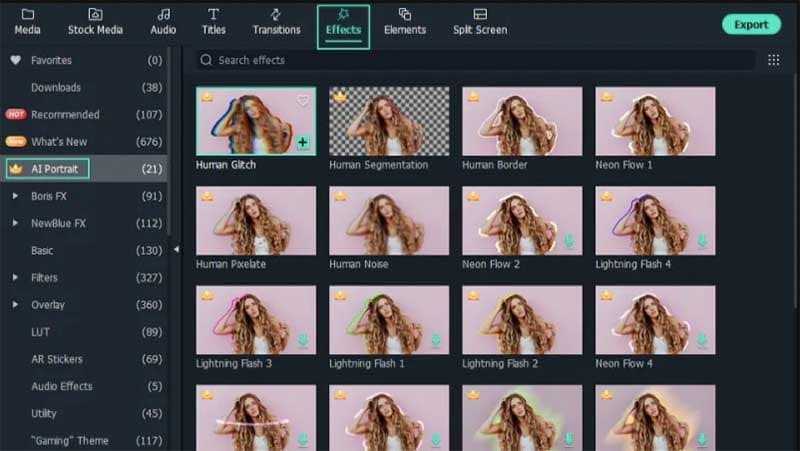
Step 4 - After you have bought the effect, just drag it to the timeline and place it above your video.

Step 5 - Based on how long you want to keep this effect, you can elongate or shorten its duration by simply stretching its duration.
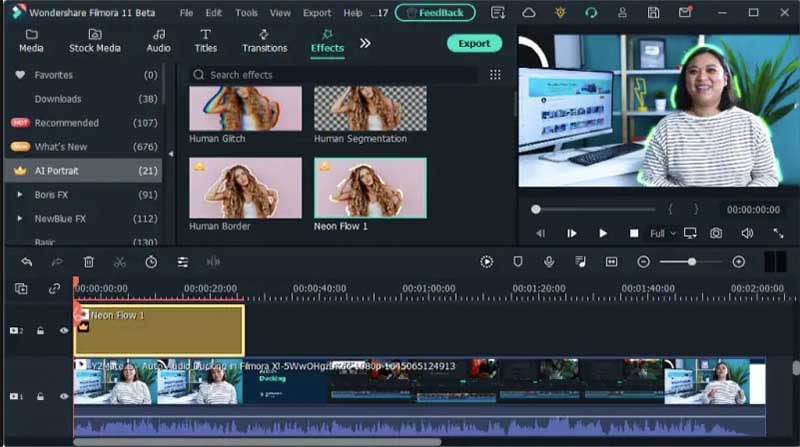
That’s it; the AI portrait effect will automatically detect and remove the background without requiring you to even lift a finger. After the background is removed, you can tap the “Export” button and choose the desired output format to save the file on your system.
03How to Adjust AI Portrait Effects?
Apart from its core ability to remove the background from a video/image, the another advantage of choosing Filmora AI portrait add-on is its fully customization support. Based on your requirements, you can adjust different parameters such as percentage, edge thickness, edge feather, etc. to achieve the desired results in the output.
Let’s have a closer look at all these parameters to understand their overall functionality more precisely.
● Percentage: By adjusting the percentage, you can decide how effective you want the AI portrait effect to appear in your videos. If you drag the slider all the way to the end, the background will be removed completely and you might not even recognize the main subject properly. On the other hand, if you keep it at a lower percentage, there will be a little bit of transparency in the background.
● Alpha: The alpha slider will decide the transparency of the portrait effect itself. You can drag this slider left or right until you have the perfect frame in front of you.
● Edge Thickness: As the name implies, edge thickness decides how thick the edges of the subject would appear in the video. A smaller percentage would mean thinner edges whereas a higher percentage would mean larger edges.
● Edge Feather: With Edge feather, you can define the blurriness of the edges themselves. The higher the value of the edge feather, the blurier the edges would appear in your videos.
Now, to access all these features, all you have to do is double-tap on the AI portrait effect within FIlmora’s timeline. This will automatically prompt you to the editing panel for this particular effect where you’ll be able to manipulate all these parameters and achieve the desired portrait results accordingly.
In case you are not happy with your customization, you can also tap the “Restore” button next to each parameter to restore the default value. Once you are happy with the results, just tap the “Ok” button to implement your changes.
04Why Did Filmora AI Portrait Attract People?
Apart from attracting editors, what makes Filmora AI portrait one of the best video effects that you can apply to your videos to engage viewers. Well, the answer is pretty simple; AI portrait effect makes the background of a video transparent.
It means the editors have the liberty to replace the dull boring background with a custom one and keep the engagement level high. This becomes really useful when you are trying to compile a long documentary and have a few shots with bad backgrounds. Since using such shots directly might affect the production quality of your videos, it would be better to first replace the background using the AI portrait effect.
So, regardless of your editing setup, production goals, or the type of video you want to compile at the end, you can use the AI portrait effect in Wondershare Filmora in different situations and protect the end results from becoming a failure. This will help you maximize the reach of your videos and attract more viewers more effectively. So, install Filmora today and sign up for its AI portrait effect to uplift the overall video quality of your projects.
Part 5 A Comparison to Other AI Portrait Software
Now, before saying goodbye, we also believe that it would be unfair if we only talk about a single tool and a single effect in this guide. Of course, Filmora’s AI portrait effect works like a charm in different situations, there are other tools in the market that you can try to achieve similar results. As a video editor, it’s always great to keep trying new things as it will add variation to your portfolio and make it much easier to attract new clients.
So, here’s a list of top 5 video editing software that you can use to get similar functionality like the AI portrait effect in Wondershare Filmora.
01Adobe Premiere Pro
Adobe Premiere Pro is undoubtedly one of the most popular video editing software with a strong fan base. Many industry leaders including Sam Kolder and Rory Kramer use Premier Pro to compile high-quality Hollywood-style videos for musicians as well as other clients.
Premiere Pro is more of an advanced video editing tool, which means even though it can help you remove background from portraits, you’ll have to do all the work manually. There’s no predefined add-on or effect that you can apply to the video to erase the background. Instead, you’ll have to manually mark the edges of the subject, erase the background and then, replace it with a different one to achieve the desired results.
In general, Premiere Pro is a great option for skilled editors who want to take things in their own hands to achieve the best results. If you are a beginner, you would be better off with a more user-friendly tool such as Wondershare Filmora.
Key Features:
● Extreme precision while erasing the background
● Achieve the desired results without compromising the quality of the main subject in the portrait
● An industry-preferred software
Pros:
● Existing Premiere Pro users will find it much easier to replicate the AI portrait effect
● Complete flexibility over your project
Cons:
● It can take several hours to precisely remove the background
● The entire process will be manual
02Final Cut Pro
Like Premiere Pro, Final Cut Pro is another famous video editing software that can help you replicate the results of the Filmora AI portrait effect and remove the background from different videos, images, and motion graphics. Keep in mind that Final Cut Pro is only available for macOS, which means if you own a Windows system, you won’t be able to use the software whatsoever.
Again, the only downside of using Final Cut Pro is the amount of manual effort you’ll have to put in to achieve the expected results. Being a full-scale video editing tool, there aren’t too many add-ons or predefined video effects.
Instead, you’ll have to rely on conventional methods such as keyframing to remove the background frame by frame and make your videos look professional. On the major side, Final Cut Pro will work in all situations. Even if you have a clip with too many moving objects, you’ll be able to mark the edges frame-by-frame and remove the background without losing any details from the foreground.
Key Features:
● Timeline-based interface for rapid video editing
● Exclusive macOS compatibility ensures high performance
● Ideal for experienced editors and designers
Pros:
● Final Cut Pro has an easy-to-use interface
● It’s easier to process each frame individually
Cons:
● Unlike Wondershare Filmora, there aren’t any ready-to-use add-ons
● While working on complex shots, it can take several hours to remove the background
03Unscreen Online
Unscreen is an online video background remover that’s specifically designed to remove background from videos with a single click. Being an online application, Unscreen is an ideal choice for short videos (up to 20 seconds) because longer-duration videos will likely take forever to upload. If you want to edit a video for Instagram Reels or YouTube shorts, Unscreen Online would be worth the consideration.
It’ll allow you to remove the background with one click and you won’t even need high-performance software to get the job done. The only drawback of Unscreen online is its lack of video format compatibility. Since it’s an online application, not all video formats are compatible with Unscreen Online.
Moreover, you can only use the tool to process shorter videos. In general, this is an ideal choice for an average Joe who doesn’t want to go through the hassle of installing and using a dedicated video editing software. So, if you are a professional, it would be far beneficial to stick to other premium tools like Filmora, Premiere Pro, and Final Cut Pro.
Key Features:
● You can access Unscreen Online on any device you want
● The edge detection is quite precise for videos with a single subject
● As compared to other premium options, Unscreen Online is relatively cheaper
Pros:
● Cross-platform compatibility
● Perfect for Instagram content creators
● Affordable pricing
Cons:
● Doesn’t achieve the expected results for more complex videos having too many subjects
● Can’t process videos having longer durations
04MOVAVI Video Editor
MOVAVI is another desktop-based video editing software that offers all the basic functionality one looks for in a video editing tool. The software is compatible with Windows and is an ideal choice for beginners who are just getting started on their video editing journey. You’ll find all the basic features along with a few advanced functions such as background removal. Like Filmora, MOVAVI also has a built-in add-on to remove the background from your clips. However, you might not be able to achieve the same precision, especially when we are talking about more complex frames.
Key Features:
● An ideal choice for beginners
● Compatible with Windows
● Can remove background from videos with a single subject
Pros:
● The user interface is pretty straightforward
● It’s easier to edit the videos, thanks to a timeline-based interface
Cons:
● For a beginner editing tool, the price is on the higher side
● You won’t be able to remove background from complex shots with multiple subjects in the foreground
05Kinemaster
Kinemaster is a video editing tool that’s only available on mobile devices, Android to be more specific. It boasts a plethora of features that make it one of the most sought-after editing tools among mobile users. Apart from the basic editing features, Kinemaster also has Chroma key and green screen functionality that allow users to remove background from the videos. Though it’s not as same as a professional-level video editing tool like Filmora Pro, you can still use Kinemaster to erase the background from your green screen footage to achieve the desired portrait look.
Features:
● Kinemaster is beginner-friendly
● Compatible with all Android devices
Pros:
● Green screen compatibility
● Offers advanced features such as chroma key
● Idea choice for novice video editors
Cons:
● It’s quite challenging to edit longer videos on a phone, making Kinemaster less reliable for large documentary-type videos
● Ending Thoughts →
● Wondershare Filmora has introduced a new AI Portrait feature that allows users to remove background from different video clips to shift the entire focus on the main subject.
● Filmora AI Portrait is applicable in different situations and can help editors maximize the production quality of their videos
● Apart from Filmora AI Portrait, there are several video editing tools that editors can give a try to replicate the AI portrait effect. Though, the results of such tools may differ as well.
In the recent few years, video editing has become one of the most-sought after professions, all thanks to the popularity of various video sharing platforms like YouTube. Today, creators don’t need big budgets to share their stories with the world. They can simply grab the camera, shoot the video, and use editing software to compile their brainchild into a dedicated movie. And, once the movie is ready, these creators can simply upload it to YouTube and gain the desired viewership. However, it’s worth noting that YouTube isn’t the only element that has helped content creators excel in their careers and follow their passion.
Editing software like Wondershare Filmora also play an equal role in the success of a creator in today’s digital world. These editing tools are equipped with a plethora of features that allow creators to unleash their creativity and compile high-quality videos for their viewers. What’s more interesting is that these tools keep receiving new updates that further streamlines the entire video editing process to help creators edit videos more conveniently.
Today, we are here to talk about one such feature - known as Filmora AI portrait - that recently got introduced to Wondershare Filmora and became an all-time favorite of many creators. We’ll be going in detail about Filmora AI portrait and how you can use it in your videos to uplift the production quality of your videos. We’ll also share some of the alternatives of this cool feature so that you can bring variety to your videos and keep the viewers engaged throughout the video.
In this article
01 [Why Did AI Portrait Become More and More Popular](#Part 1)
02 [What Scenes Apply to AI Portrait?](#Part 2)
03 [What Scenes Do Not Apply to AI Portrait?](#Part 3)
04 [Why Filmora AI Portrait Deserves to Try?](#Part 4)
05 [A Comparison to Other AI Portrait Software](#Part 5)
Part 1 Why Did AI Portrait Become More and More Popular
Let’s start with the basics first! What is Filmora AI portrait and why it has gained an immense popularity in the editing community. It’s basically an add-on effect in Wondershare Filmora X that was introduced with the latest Filmora X version 10.5.
By integrating this add-on into their video, editors can remove/change the background without losing any details of the main subject. So, let’s say if you don’t have green screen footage and still want to remove the background without affecting the foreground (a single subject), Filmora AI portrait will help you get the job done without any hassle.
Being an AI-powered feature, Filmora AI portrait automatically detects the shape and structure of the main subject and separates it from the background. This way even if you don’t have used a green screen or don’t know how to apply the Chroma key in your videos, you’ll be able to remove the background from the RAW footage and replace it with a custom background. This will allow you to make your videos more appealing and add a funny element for better engagement. For example, you can add a moving background to uplift the entire storyline to your videos.
Filmora AI portrait is a great feature for different types of creators such as gaming streamers, YouTube content creators, and daily vloggers. Regardless of your editing style, by integrating the Filmora AI portrait add-on, you’ll have the liberty to remove unwanted backgrounds from various shots and keep the production quality high.
In addition to removing the background, Filmora AI portrait is also a great tool to design thumbnails for your videos. Also, you can use this feature to apply borders, glitch effects, pixelated, noise, or segmentation video effects to your videos. All these elements will allow you to eliminate dull and low quality things from your videos and make the main characters pop-out in every frame.
Here are a few situations where one can implement the Filmora AI portrait and make the most out of its functions.
● If you livestream videos on YouTube, but don’t have a green screen yet, you can use the AI portrait feature in Filmora to remove the background and make your streaming setup look more elegant and professional.
● With the Filmora AI portrait feature, you can also design high-quality and captivating thumbnails for your videos and draw the maximum attention within YouTube’s rabbithole. Any new viewer is more likely to click on your videos when the thumbnail is engaging.
● You can also use Filmora AI portrait effect to remove background from interviews. Usually, when someone shoots an interview, they usually place a green screen behind the person. But, in case you don’t have green screen footage, you can easily make your interviews look more professional with the Filmora AI portrait effect.
● Finally, you can also use the Filmora AI portrait feature in regular YouTube vlogs. This would be applicable when there are unnecessary elements in the background of a clip that are ruining the entire frame. In this case by simply erasing the background and replacing it with a custom one, you’ll be able to keep the production quality high and keep the viewers engaged throughout the vlog.
Part 2 What Scenes Apply to AI Portrait?
While the AI portrait effect can work for all frames, there are a few situations when it delivers the best results. The designers at Wondershare Filmora claim that AI Portrait works like a charm when the frame has a single subject talking directly to the camera.
When there’s a single individual or subject in front of the camera, it’s relatively easier for the AI-algorithm to detect the edges and separate the background with high precision. Moreover, when the main subject is static, you are most likely to witness the best output in terms of background removal. Why? The reason being when there’s a single static subject, an AI-powered algorithm can precisely mark its edges and achieve relatively better results.
Let’s understand this with the help of a few examples.
One-Person Interview
Going back to the interview example - let’s say you are interviewing a person who’s sitting in a chair and talking directly to the camera in front of him. Now, since there isn’t too much movement on his side, the AI-algorithm will be able to detect his edges and remove the background accordingly. In fact, in such ideal cases, the tool will even be able to detect the hair of the subject with high precision.
Shot of a Monologue
Monologues are no longer limited to high-budget Hollywood movies only. They have become a regular part of conventional videos such as daily YouTube vlogs. Monologues boast better authenticity as the entire clip is shot in one go.
Since there are no random cuts, the presenter can easily convey his views to the viewers. But, for a monologue to work, it’s extremely crucial that it has a high-quality background otherwise it’ll fail to grab the viewer’s attention. In case you are also stuck with a monologue that has a bad background, you can use Filmora AI portrait to remove it and make the primary character of the video pop-up more effectively.
YouTube Vlogs
Again, YouTube vlogs are another great example where editors could really benefit from Filmora’s AI portrait effect. For daily vloggers, getting the perfect shot is always a challenge. And, more often than you think, they end up taking shots that have bad backgrounds. But, thanks to Filmora’s AI portrait effect, one could easily remove background from such shots and use them to convey the storyline more effectively. This won’t waste your efforts and you’ll be able to use the shot that would have otherwise gone to Trash.
So, these are a few situations where the AI portrait effect in Filmora can do wonders for your video editing process.
Part 3 What Scenes Do Not Apply to AI Portrait?
Now, as we mentioned in the previous part, the Filmora AI portrait effect works better in scenarios where there’s only a single subject in the frame. This means the effect isn’t applicable in all the situations.
If there is a lot of movement in the frame, the AI-algorithm may fail to detect the edges of the subject(s) and not deliver the expected results. For example if you are working on a vlog where you are moving the camera really fast, the AI effect will struggle to separate the background from the foreground and fail to achieve the desired precision while removing background.
Some of the other situations where you won’t be able to make the most out of the AI portrait effect include:
Shots With Multiple Moving Subjects
If you have a shot of a crowded place where too many people are moving in the frame, it’ll be challenging to detect the background properly. The movement of multiple subjects will interfere with the overall functionality of the algorithm, restricting users from achieving a background-free shot. In such a situation, you’ll either have to use the shot without removing the background or dump into the Trash folder.
Videos With Special Effects and Filters
Here’s the deal; special effects and filters have become an inevitable part of today’s social media-influenced world. People apply filters and visual effects to make their videos more appealing and grab more likes and comments on Instagram, Facebook, and Snapchat.
But, these filters are often a nightmare for video editors as it’s pretty challenging to process them in any video editing software. If you have a clip with filters or video effects, you’ll struggle to implement the Filmora AI portrait effect properly. In fact, the effect will not work as expected and you’ll be stuck with a shot that would be pretty useless for the entire storyline. So, do not apply unnecessary filters to your videos if you are planning to apply the AI portrait effect in the long run.
Videos With Backlights
The lighting setup of any video has a huge influence on how it will look at the end. Just like a human being, even the AI algorithm struggles to detect the background in a video that has poor lighting conditions or bad backlight. In such videos, it’s challenging for the algorithm to detect the main subject and then identify its edges.
To avoid such scenarios, it would be better to plan your shots in advance and shoot them when there are proper lighting conditions. In case you are going to shoot indoors, you can use a dedicated lighting setup. If anything, this will make it much easier to apply the Filmora AI portrait effect and achieve the best results in terms of background removal.
Paintings
Paintings aren’t like traditional videos. The color scheme is entirely different and it’s much challenging to identify the background and the foreground. So, if there are any images of paintings that you want to use as a thumbnail, it might get a bit challenging to remove the background. In such a scenario, it would be much better to either choose a different image for the thumbnail and use the painting without removing its background.
So, these are a few scenarios where using the Filmora AI portrait won’t be an effective solution for you. We would recommend to plan your shots in advance so that you don’t end up with random shots where it’s challenging to apply the AI portrait effect.
Part 4 Why Filmora AI Portrait Deserves to Try?
If you’ve come this far, you are most likely to be serious about video editing. So, now that we have clarified all the situations where using ****Wondershare Filmora Video Editor AI portrait** will be effective, let’s understand how you can use it in your videos.
01Are the Subscription Periods for Wondershare Filmora and the AI Portrait Add-on the Same?
So, first things first, will you get direct access to the AI portrait add-on along with your Filmora license? The answer is No! THe AI portrait add-on is available as a separate item and you’ll have to pay additional charges to use it on your videos. The default Filmora license will not give you access to the AI portrait mode whatsoever. In terms of pricing, the Filmora AI portrait is available at a pocket-friendly price.
For Win 7 or later (64-bit)
For macOS 10.12 or later
You can get this add-on by paying a minimal fee of $5.99 per month. One of the best things about choosing this add-on is that you can discontinue it whenever you want. So, let’s say you no longer need to remove backgrounds from your videos - in this situation, you can directly discontinue your subscription without affecting your regular Filmora subscription.
02How to Add AI Portrait Effects?
Now, coming to the real reason why you’ve come this far - the process to use the AI portrait effect in Filmora. To be honest, it’s a relatively easier process to add the AI portrait effect in Filmora. Even if you are not a Filmora user, you’ll be able to get the job done without any hassle. Let me quickly walk you through the step-by-step procedure of adding the AI portrait effect in Wondershare Filmora.
Step 1 - If you are not an existing user of Filmora, start by purchasing its license and install the software on your system to get started. On the other hand, if you’ve been using Filmora for a while, directly move to the next step to proceed further.
Step 2 - Now, launch the software and create a new project. You’ll be prompted to Filmora’s editing panel. At this point, you’ll have to drag the video clip (that you want to edit) to the timeline.
Step 3 - Once the video is successfully imported, switch to the “Effects” tab and search for “AI Portrait”. You’ll see a “premium” icon next to its name. Double-click on the effect and follow the on-screen instructions to complete the payment procedure.
Step 4 - After you have bought the effect, just drag it to the timeline and place it above your video.
Step 5 - Based on how long you want to keep this effect, you can elongate or shorten its duration by simply stretching its duration.
That’s it; the AI portrait effect will automatically detect and remove the background without requiring you to even lift a finger. After the background is removed, you can tap the “Export” button and choose the desired output format to save the file on your system.
03How to Adjust AI Portrait Effects?
Apart from its core ability to remove the background from a video/image, the another advantage of choosing Filmora AI portrait add-on is its fully customization support. Based on your requirements, you can adjust different parameters such as percentage, edge thickness, edge feather, etc. to achieve the desired results in the output.
Let’s have a closer look at all these parameters to understand their overall functionality more precisely.
● Percentage: By adjusting the percentage, you can decide how effective you want the AI portrait effect to appear in your videos. If you drag the slider all the way to the end, the background will be removed completely and you might not even recognize the main subject properly. On the other hand, if you keep it at a lower percentage, there will be a little bit of transparency in the background.
● Alpha: The alpha slider will decide the transparency of the portrait effect itself. You can drag this slider left or right until you have the perfect frame in front of you.
● Edge Thickness: As the name implies, edge thickness decides how thick the edges of the subject would appear in the video. A smaller percentage would mean thinner edges whereas a higher percentage would mean larger edges.
● Edge Feather: With Edge feather, you can define the blurriness of the edges themselves. The higher the value of the edge feather, the blurier the edges would appear in your videos.
Now, to access all these features, all you have to do is double-tap on the AI portrait effect within FIlmora’s timeline. This will automatically prompt you to the editing panel for this particular effect where you’ll be able to manipulate all these parameters and achieve the desired portrait results accordingly.
In case you are not happy with your customization, you can also tap the “Restore” button next to each parameter to restore the default value. Once you are happy with the results, just tap the “Ok” button to implement your changes.
04Why Did Filmora AI Portrait Attract People?
Apart from attracting editors, what makes Filmora AI portrait one of the best video effects that you can apply to your videos to engage viewers. Well, the answer is pretty simple; AI portrait effect makes the background of a video transparent.
It means the editors have the liberty to replace the dull boring background with a custom one and keep the engagement level high. This becomes really useful when you are trying to compile a long documentary and have a few shots with bad backgrounds. Since using such shots directly might affect the production quality of your videos, it would be better to first replace the background using the AI portrait effect.
So, regardless of your editing setup, production goals, or the type of video you want to compile at the end, you can use the AI portrait effect in Wondershare Filmora in different situations and protect the end results from becoming a failure. This will help you maximize the reach of your videos and attract more viewers more effectively. So, install Filmora today and sign up for its AI portrait effect to uplift the overall video quality of your projects.
Part 5 A Comparison to Other AI Portrait Software
Now, before saying goodbye, we also believe that it would be unfair if we only talk about a single tool and a single effect in this guide. Of course, Filmora’s AI portrait effect works like a charm in different situations, there are other tools in the market that you can try to achieve similar results. As a video editor, it’s always great to keep trying new things as it will add variation to your portfolio and make it much easier to attract new clients.
So, here’s a list of top 5 video editing software that you can use to get similar functionality like the AI portrait effect in Wondershare Filmora.
01Adobe Premiere Pro
Adobe Premiere Pro is undoubtedly one of the most popular video editing software with a strong fan base. Many industry leaders including Sam Kolder and Rory Kramer use Premier Pro to compile high-quality Hollywood-style videos for musicians as well as other clients.
Premiere Pro is more of an advanced video editing tool, which means even though it can help you remove background from portraits, you’ll have to do all the work manually. There’s no predefined add-on or effect that you can apply to the video to erase the background. Instead, you’ll have to manually mark the edges of the subject, erase the background and then, replace it with a different one to achieve the desired results.
In general, Premiere Pro is a great option for skilled editors who want to take things in their own hands to achieve the best results. If you are a beginner, you would be better off with a more user-friendly tool such as Wondershare Filmora.
Key Features:
● Extreme precision while erasing the background
● Achieve the desired results without compromising the quality of the main subject in the portrait
● An industry-preferred software
Pros:
● Existing Premiere Pro users will find it much easier to replicate the AI portrait effect
● Complete flexibility over your project
Cons:
● It can take several hours to precisely remove the background
● The entire process will be manual
02Final Cut Pro
Like Premiere Pro, Final Cut Pro is another famous video editing software that can help you replicate the results of the Filmora AI portrait effect and remove the background from different videos, images, and motion graphics. Keep in mind that Final Cut Pro is only available for macOS, which means if you own a Windows system, you won’t be able to use the software whatsoever.
Again, the only downside of using Final Cut Pro is the amount of manual effort you’ll have to put in to achieve the expected results. Being a full-scale video editing tool, there aren’t too many add-ons or predefined video effects.
Instead, you’ll have to rely on conventional methods such as keyframing to remove the background frame by frame and make your videos look professional. On the major side, Final Cut Pro will work in all situations. Even if you have a clip with too many moving objects, you’ll be able to mark the edges frame-by-frame and remove the background without losing any details from the foreground.
Key Features:
● Timeline-based interface for rapid video editing
● Exclusive macOS compatibility ensures high performance
● Ideal for experienced editors and designers
Pros:
● Final Cut Pro has an easy-to-use interface
● It’s easier to process each frame individually
Cons:
● Unlike Wondershare Filmora, there aren’t any ready-to-use add-ons
● While working on complex shots, it can take several hours to remove the background
03Unscreen Online
Unscreen is an online video background remover that’s specifically designed to remove background from videos with a single click. Being an online application, Unscreen is an ideal choice for short videos (up to 20 seconds) because longer-duration videos will likely take forever to upload. If you want to edit a video for Instagram Reels or YouTube shorts, Unscreen Online would be worth the consideration.
It’ll allow you to remove the background with one click and you won’t even need high-performance software to get the job done. The only drawback of Unscreen online is its lack of video format compatibility. Since it’s an online application, not all video formats are compatible with Unscreen Online.
Moreover, you can only use the tool to process shorter videos. In general, this is an ideal choice for an average Joe who doesn’t want to go through the hassle of installing and using a dedicated video editing software. So, if you are a professional, it would be far beneficial to stick to other premium tools like Filmora, Premiere Pro, and Final Cut Pro.
Key Features:
● You can access Unscreen Online on any device you want
● The edge detection is quite precise for videos with a single subject
● As compared to other premium options, Unscreen Online is relatively cheaper
Pros:
● Cross-platform compatibility
● Perfect for Instagram content creators
● Affordable pricing
Cons:
● Doesn’t achieve the expected results for more complex videos having too many subjects
● Can’t process videos having longer durations
04MOVAVI Video Editor
MOVAVI is another desktop-based video editing software that offers all the basic functionality one looks for in a video editing tool. The software is compatible with Windows and is an ideal choice for beginners who are just getting started on their video editing journey. You’ll find all the basic features along with a few advanced functions such as background removal. Like Filmora, MOVAVI also has a built-in add-on to remove the background from your clips. However, you might not be able to achieve the same precision, especially when we are talking about more complex frames.
Key Features:
● An ideal choice for beginners
● Compatible with Windows
● Can remove background from videos with a single subject
Pros:
● The user interface is pretty straightforward
● It’s easier to edit the videos, thanks to a timeline-based interface
Cons:
● For a beginner editing tool, the price is on the higher side
● You won’t be able to remove background from complex shots with multiple subjects in the foreground
05Kinemaster
Kinemaster is a video editing tool that’s only available on mobile devices, Android to be more specific. It boasts a plethora of features that make it one of the most sought-after editing tools among mobile users. Apart from the basic editing features, Kinemaster also has Chroma key and green screen functionality that allow users to remove background from the videos. Though it’s not as same as a professional-level video editing tool like Filmora Pro, you can still use Kinemaster to erase the background from your green screen footage to achieve the desired portrait look.
Features:
● Kinemaster is beginner-friendly
● Compatible with all Android devices
Pros:
● Green screen compatibility
● Offers advanced features such as chroma key
● Idea choice for novice video editors
Cons:
● It’s quite challenging to edit longer videos on a phone, making Kinemaster less reliable for large documentary-type videos
● Ending Thoughts →
● Wondershare Filmora has introduced a new AI Portrait feature that allows users to remove background from different video clips to shift the entire focus on the main subject.
● Filmora AI Portrait is applicable in different situations and can help editors maximize the production quality of their videos
● Apart from Filmora AI Portrait, there are several video editing tools that editors can give a try to replicate the AI portrait effect. Though, the results of such tools may differ as well.
How to Shoot Cinematic Footage From a Smartphone
Creating cinematic videos is easy if you have expensive equipment like a film set with high-quality cameras. But many of us can’t afford this, so read this article to get an alternative.
You can use smartphones to record cinematic shots if you don’t have expensive lenses. You’ll learn about filming and editing those shots into Wondershare Filmora to get professional results in the below lines.
But before we get into the filming process, having a general idea about the topic can help a lot. So first, let’s understand what cinematic videos are!
Part 1. What Is a Cinematic Video?
The world of cinema has developed and has high recording quality. A cinematic video is a video that is recorded to look more like a movie. These shots excel in all aspects of a video, such as Color, aspect ratio, and lighting techniques.
Most of the cinematic footage required unique cameras, i.e., IMAX cameras for movies. But these cameras are really costly and only suitable for large-scale production.
With the understanding of cinematic videos, you can now use alternative ways to record a cinematic video without an expensive camera. You can also record a cinematic video using only a smartphone with a few requirements.
Scroll below to learn more about what you need to record a cinematic video!
Part 2. Requirements to Record a Cinematic Video
To record a professional video with cinematic effects, you must have the following equipment in your studio:
1. A Gimbal Stabilizer
When you are recording footage from your smartphone, a significant issue that can disturb your video quality is the shaking of your phone. You may have to record while walking, or it could even be a static shot.
If the phone is held in your hands without support, you will end up with shaky footage. This will eventually ruin your video.
A gimbal stabilizer allows you to stabilize your footage with a handheld stand. Many gimbal stabilizers are available in the market, but for reference, we would be looking at the Q3 Gimbal from Zhiyun.

You can also connect the Gimbal from its app. Scroll below to learn more about the app!
Zhiyun Cami App
Zhiyun Q3 stabilizer also connects with the Zhiyun cami app. This app will allow users to access the filming features more intuitively and comprehensively. You can connect your Gimbal with the app via Bluetooth.

Zhiyun Stabilizer Shooting Modes
There are many modes on different Gimbals, but the Locking and the POV mode are the most useful, which are illustrated as shown below:
- The Locking mode: This mode allows you to lock all three motors of the Gimbal and allows your phone to remain fixed at a certain angle. Due to this, you can shoot your footage from multiple positions while keeping the camera fixed at one angle.
- The POV mode will allow you to unlock all the axes. This mode will also adjust in all three axes when moving around. This feature gives you more freedom of movement.

Extra Features of Zhiyun Q3 Stabilizer
When you are shooting a video using the Gimbal stabilizer, you come across a point where you want extra light. Thus, the Q3 stabilizer comes with a built-in flashlight.
This flashlight will not only light up those small corners of a dark room but also make a huge difference. If you are recording to focus on an object, such as a product, this flashlight will greatly help you.

You can also turn the flashlight towards yourself if you are recording a Vlog or taking a selfie. The light’s temperature is 4300K, giving a relatively warm light on the subject.

2. A Good Smartphone
Most smartphones these days are equipped with cameras with varying powers of recording. Some smartphone cameras focus on Mega Pixels, while others focus on the capture sensor. You need a smartphone camera that balances out all these qualities to record cinematic footage.
The recently released iPhone 14 pro camera is an excellent example of a good quality camera you can use to record cinematic videos.

3. Video Editing Software
There is no better software in the video editing field than the infamous Wondershare Filmora. It allows you to edit high-quality videos with creative features.
Wondershare Filmora allows access to the range of effects and filters you can apply to your videos to give them a more cinematic look. It also allows you to access the vast library of audio to utilize in your videos. Moreover, its engaging UI allows beginners to access to features of Wondershare Filmora easily.

Now that we have learned about the requirements for recording a cinematic video. Let’s look at the different cinematic movements you can use to record from your Smartphone.
Part 3. Top 3 Cinematic Movements to Record From a Smartphone
You may have watched many movies or TV shows, but the general audience usually ignores the effort put into a shot. Only an experienced videographer can detect the difference between a great cinematic shot and a poor one.
Of the great cinematic shots, some are described in this article. These shots can easily record by using a smartphone. The cinematic movements explained below are the best choice. Here we will look at the three camera movements you can record on your smartphone.
- The Reveal Movement.
- The 180° Presentation Movement.
- The Following Movement.
First, let’s take a look at the Reveal movement.
1. The Reveal Movement
This is the most popular movement used in cinematic shooting from your smartphone. With a Gimbal, the Reveal movement is one of the easiest shots to master. But for this, you will need to learn it first.
The Reveal Movement is a shot taken with an object as a perspective. The shot starts from a static object in the foreground. It could be focused at first, but as the camera moves, the focus will be diverted to reveal our target object. This is known as the Reveal Movement.
To shoot the reveal movement, follow the steps mentioned as shown:
- First, ensure your phone is connected properly to the Gimbal.
- Align your Smartphone camera behind the static object.
- Guide the target individual to be ready as you move the camera to reveal them.
- Slowly move the camera, focusing on the static object to change its focus on your main object.

![]()
Note: Make sure to practice and experiment a lot with the steps. Try to be more creative and innovative. With every video you shoot, you gain experience with the errors.
Another thing to remember is that when you are shooting a Reveal movement using the Gimbal, it is best to put it in Locking mode. This mode works the best as it allows the camera to stay fixed in one frame making your footage seem balanced and of quality.

2. The 180° Presentation Movement
The next movement we will be looking at will be the 180° presentation movement. The 180° presentation will move in a half-circle fashion. It will move from one side of the subject to the other side. This will allow you to cover the overall subject’s view.
Apart from that, it will allow you to capture the background with much clarity and detail to maintain a general sense of the ambiance. Making a 180° presentation shot is fairly easy to do so. With its multiple uses, you can use this method in any scenario.
As we will move from one side to the other in a circular manner, we need to fix the frame of our video to move along. Using the POV mode of the Zhiyun Gimbal stabilizer will be the best option in this sense.

Setting the Gimbal in POV mode will allow you to shoot the video from more than one angle while keeping the video balanced. Follow the steps mentioned to shoot a 180° presentation video:
- First, start recording from one side of the subject while keeping the Gimbal in the POV mode.
- Slowly start moving in front of the subject in an arch.
- When you face the subject, do not stop and keep moving to complete the arch.
- When you reach the end of the arch, close the video.

By following the steps mentioned, you can create the 180° presentation movement using a smartphone. Now, move forward to learn about “The Following movement.”
3. The Following Movement
You can use “The following movement” when recording a scene in which the object moves in random directions. Or when there is a high degree of movement of your object in the video, and you want to fix the focus of your footage to that object.
The Following movement is not technically a movement, but a setting that will allow you to record the footage while keeping the object and the video frame focused. In this type of footage, we will use the Zhiyun Cami app to focus on our target object.

To focus on our subject in the video by Cami app, follow the steps mentioned below:
- When recording the video, make sure to put the Gimbal on a tripod stand.
- After that, open the Cami app and draw a square over the object you want to keep in focus.
- Now, the camera will shift its angle to its perspective wherever the object goes.

This is how you will create the following movement.
Part 4. Edit the Clips with Wondershare Filmora
Now that we have recorded our footage, it is time to arrange it and apply the finishing touches. We are going to use Wondershare Filmora for editing the recorded footage.
Free Download For Win 7 or later(64-bit)
Free Download For macOS 10.14 or later
Follow the steps mentioned below to edit on Wondershare Filmora!
Step1 Download Wondershare Filmora
To download Wondershare Filmora, follow the steps outlined below:
- First, download the Wondershare Filmora.
- When the download is finished, click on the setup.
- The Wondershare Filmora installer will begin to load.
- Then you will have installed Wondershare Filmora on your PC or Mac.
If you want to purchase the premium plan’s features, check out the Wondershare Filmora Premium plans.
Step2 Add clips to the timeline
After downloading the Wondershare Filmora app, we must create a workplace. To do so, follow the steps mentioned:
- First of all, click on the import icon in the upper left corner of the home interface of Wondershare Filmora. This will open up your PC library.
- Then Import your footage in the import window.
- Click and drag to drop the footage in the Timeline.

Step3 Trim the Video Clips
After you have added the clips to the timeline, you may have some extra footage you don’t want. Go through the clips you added and trim them according to your wish.
Step4 Add The Effects
After you have trimmed the clips now, you will have to add the finishing touches. To perform this, follow the below instructions:
- Go to the effects icon on the upper bar above the import window.
- Here, you can see the range of effects Wondershare Filmora Provides. Select the one you want for your video.
- You can also search for effects from the search bar.
- Once you have found the effect you want, download it if not been downloaded before.
- Click and drag it to drop below your clips to add the effect.
- Double-click on the effect that you added to adjust its settings.
- Here, you can adjust the opacity to your liking.

Now that we have added the Effects, it is time to add the Overlays!
Step5 Add Overlays
You can also add overlays on your videos to make them pop up even more. You can add Overlays by the following steps:
- In the effects icon on the bar above the import window, you can see the multiple effects of Wondershare Filmora.
- In the left column, you can also see the Filters and Overlays.
- Go to the Overlay
- Select the Overlay that you want.
- Then click and drag it above your video.
- You can also add a border to your video by searching “Border” in the search bar and dragging it below your clips.

Step6 Add Some Music
To finish off your editing, you can also add audio music from the Wondershare Filmora Audio library:
- Before adding the audio music, make sure to lower the volume of your video clips.
- You can do so by dragging below the audio tab on your video clips in the timeline.
- Go to the Audio icon on the bar above the import window.
- Here, you can see the multiple audio available.
- Browse through the library till you find suitable audio.
- Download it and drag it below on the timeline.

Now play the Video from the beginning to see the final looks.

Congratulations! You have now successfully created a cinematic video using Wondershare Filmora.
Conclusion
Using expensive equipment to record a cinematic video can be a reliable step. But it is not in everyone’s budget. You can also use a smartphone to record a cinematic video by the steps mentioned above and give it a professional look by editing on Wondershare Filmora.
Although it might seem strange initially, but the time is close when everyone will create cinematic videos from their smartphones.
Another thing to remember is that when you are shooting a Reveal movement using the Gimbal, it is best to put it in Locking mode. This mode works the best as it allows the camera to stay fixed in one frame making your footage seem balanced and of quality.
2. The 180° Presentation Movement
The next movement we will be looking at will be the 180° presentation movement. The 180° presentation will move in a half-circle fashion. It will move from one side of the subject to the other side. This will allow you to cover the overall subject’s view.
Apart from that, it will allow you to capture the background with much clarity and detail to maintain a general sense of the ambiance. Making a 180° presentation shot is fairly easy to do so. With its multiple uses, you can use this method in any scenario.
As we will move from one side to the other in a circular manner, we need to fix the frame of our video to move along. Using the POV mode of the Zhiyun Gimbal stabilizer will be the best option in this sense.
Setting the Gimbal in POV mode will allow you to shoot the video from more than one angle while keeping the video balanced. Follow the steps mentioned to shoot a 180° presentation video:
- First, start recording from one side of the subject while keeping the Gimbal in the POV mode.
- Slowly start moving in front of the subject in an arch.
- When you face the subject, do not stop and keep moving to complete the arch.
- When you reach the end of the arch, close the video.
By following the steps mentioned, you can create the 180° presentation movement using a smartphone. Now, move forward to learn about “The Following movement.”
3. The Following Movement
You can use “The following movement” when recording a scene in which the object moves in random directions. Or when there is a high degree of movement of your object in the video, and you want to fix the focus of your footage to that object.
The Following movement is not technically a movement, but a setting that will allow you to record the footage while keeping the object and the video frame focused. In this type of footage, we will use the Zhiyun Cami app to focus on our target object.
To focus on our subject in the video by Cami app, follow the steps mentioned below:
- When recording the video, make sure to put the Gimbal on a tripod stand.
- After that, open the Cami app and draw a square over the object you want to keep in focus.
- Now, the camera will shift its angle to its perspective wherever the object goes.
This is how you will create the following movement.
Part 4. Edit the Clips with Wondershare Filmora
Now that we have recorded our footage, it is time to arrange it and apply the finishing touches. We are going to use Wondershare Filmora for editing the recorded footage.
Free Download For Win 7 or later(64-bit)
Free Download For macOS 10.14 or later
Follow the steps mentioned below to edit on Wondershare Filmora!
Step1 Download Wondershare Filmora
To download Wondershare Filmora, follow the steps outlined below:
- First, download the Wondershare Filmora.
- When the download is finished, click on the setup.
- The Wondershare Filmora installer will begin to load.
- Then you will have installed Wondershare Filmora on your PC or Mac.
If you want to purchase the premium plan’s features, check out the Wondershare Filmora Premium plans.
Step2 Add clips to the timeline
After downloading the Wondershare Filmora app, we must create a workplace. To do so, follow the steps mentioned:
- First of all, click on the import icon in the upper left corner of the home interface of Wondershare Filmora. This will open up your PC library.
- Then Import your footage in the import window.
- Click and drag to drop the footage in the Timeline.
Step3 Trim the Video Clips
After you have added the clips to the timeline, you may have some extra footage you don’t want. Go through the clips you added and trim them according to your wish.
Step4 Add The Effects
After you have trimmed the clips now, you will have to add the finishing touches. To perform this, follow the below instructions:
- Go to the effects icon on the upper bar above the import window.
- Here, you can see the range of effects Wondershare Filmora Provides. Select the one you want for your video.
- You can also search for effects from the search bar.
- Once you have found the effect you want, download it if not been downloaded before.
- Click and drag it to drop below your clips to add the effect.
- Double-click on the effect that you added to adjust its settings.
- Here, you can adjust the opacity to your liking.
Now that we have added the Effects, it is time to add the Overlays!
Step5 Add Overlays
You can also add overlays on your videos to make them pop up even more. You can add Overlays by the following steps:
- In the effects icon on the bar above the import window, you can see the multiple effects of Wondershare Filmora.
- In the left column, you can also see the Filters and Overlays.
- Go to the Overlay
- Select the Overlay that you want.
- Then click and drag it above your video.
- You can also add a border to your video by searching “Border” in the search bar and dragging it below your clips.
Step6 Add Some Music
To finish off your editing, you can also add audio music from the Wondershare Filmora Audio library:
- Before adding the audio music, make sure to lower the volume of your video clips.
- You can do so by dragging below the audio tab on your video clips in the timeline.
- Go to the Audio icon on the bar above the import window.
- Here, you can see the multiple audio available.
- Browse through the library till you find suitable audio.
- Download it and drag it below on the timeline.
Now play the Video from the beginning to see the final looks.
Congratulations! You have now successfully created a cinematic video using Wondershare Filmora.
Conclusion
Using expensive equipment to record a cinematic video can be a reliable step. But it is not in everyone’s budget. You can also use a smartphone to record a cinematic video by the steps mentioned above and give it a professional look by editing on Wondershare Filmora.
Although it might seem strange initially, but the time is close when everyone will create cinematic videos from their smartphones.
HDR Photography: How to Use HDR Mode on Your Android Devices
The present-day high-end smartphones, like iPhone, Samsung, and Huawei, come packed in with advanced camera features that can let you capture interesting and bright images having depth. To get this done, you first need to check if your smartphone has an HDR mode and if it does, how to use the same.
So, we are here to help you to learn in detail about HDR Android photography and how to use the HDR mode on your smartphone. Keep reading till the read and we assure you that you will be able to capture some breath-taking images with your phone.

Part 1: What is HDR photography?
First things first. Before using the HDR feature on your smartphone, let’s learn what actually is the function of HDR.
Standing for High Dynamic Range, HDR is an image capturing method where the dynamic range of an image is high. When we talk about dynamic range, it refers to the difference between the lightest and the darkest elements of a picture. Thus, in HDR images the range dynamic range of the image is greater than the actual capture and thus making the image look more real with higher contrast, colors, and saturation.
While using the HDR image capturing method, the subject is captured in multiple shots having different exposures. These multiple captured shots are then combined into a single picture thus making it look detailed and saturated.
Though HDR enhances the overall looks of an image it is not suitable only in certain situations and subjects like landscape, subjects captured in sunlight or bright background, low or dim light conditions, and more.

Part 2: How to tell if I can shoot HDR images on my Android devices or not?
HDR images can be captured using DSLR cameras, but you need to have a thorough knowledge of the camera and the process of capturing the HDR images. A simpler alternative to this is using an Android device. The principle of capturing HDR images using an Android phone is simpler in comparison to a professional DSLR camera and also quick. Using an Android device, the imbalance in the exposure is corrected and the details of the image background, as well as the foreground, are enhanced.
How-to steps to check the HDR camera Android feature
So now that you know that HDR images can be easily captured using your Android device, the next important thing is to check if your phone supports the HDR feature or not as not all Android devices have the HDR mode. Below listed are some of the options where you can the HDR option in the camera app of your Android device.
- Check for the HDR option under the Shooting Mode menu (this can be found on high-end Samsung phones.)
- In the devices like HTC One X, Desire X, and others with custom Camera apps, the feature can be found under the Camera Scenes section.
- In case you cannot locate the HDR option in both the above methods then try looking for it under the Settings menu of Camera. Devices like Sony Xperia T and Xperia V have the option here.
- For the Nexus 4 device that runs on Android 4.2 OS, the option of HDR mode can be turned on by simply long-tapping the viewfinder and then tapping on the HDR icon.
- You may also find the option of HDR mode under the labels like Backlight HDR or Backlight Correction HDR. On the Samsung Galaxy devices, HDR is labeled as Rich Tone and can be located under the Smart Modes menu.
Part 3: How to Take an HDR Shot with Your Android devices?
Once you have found the HDR mode on your Android device, using the feature is simple.
Below listed are the steps to take HDR shots on your Android phone.
Step1 First of all, open the camera app on your phone and find the option of HDR.
Step2 Enable the HDR option on your device.
Step3 Once the feature is enabled, you simply need to capture images like you would normally do- point and focus on the image subject and click the image.
The rest will be taken care and your HDR shot image will be captured.
![]()
Note: ensure to hold your phone with stable hands while capturing the image or you can even use a tripod. In Samsung devices, two images will be captured- one with normal exposure and the other one with HDR (image name having HDR word). You can choose the one as required.
Part 4: How to Use HDR Apps android to take HDR photography
As we have mentioned above not all Android phones come with HDR function. So, if your device does not have this function, no need to worry as there are Android apps available for the same. You can search and download one such HDR-capable camera app on your device from Google Play Store and enjoy capturing HDR images.
One such widely used app is HDR Camera that simple to use and allows for capturing high-quality HDR pictures. Using the upgraded version of the app you can even edit your captured images.
Steps to using HDR Camera Apps
Step1 First of all, download, install, and launch the HDR Camera app on your Android smartphone.
Step2 The interface of the app looks like the interface of the Android camera and the majority of the screen is taken up by the viewfinder.
Step3 Next, simply start taking the picture as you would do normally by pointing towards the subject and clicking on the shutter button.
Step4 If you have opted for the advanced version of the app, you can even add a pre-set filter or edit your images as needed.
Step5 Finally, save the HDR-captured image on your phone.

Part 5: Video Guide HDR on your Android device
If you are still not clear about using the HDR feature on your Android smartphone, the YouTube video tutorial will help you to learn the entire process.
https://www.youtube.com/watch?v=myMGalkNiP8
Part 6: Pro tip: How to Edit HDR Video without Washed Out Color
In several situations, you would want to edit the HDR videos recorded using your phone or other device but the major problem lies when the editing makes your video washed out. So, to ensure that this does not happen with your recordings, we suggest using a professional tool and one of the best that we recommend here is Wondershare Filmora .
This is a versatile Windows and Mac-based software that can let you edit and customize videos simply and quickly. The software is known for its multi-video editing facilities, it comes packed in with all basic as well as advanced features that may be needed for enhancing your overall videos.
The software supports all key video formats and to further make the files look interesting, you can add multiple effects supported by the tool.
Free Download For Win 7 or later(64-bit)
Free Download For macOS 10.14 or later
Steps to edit HDR videos using Wondershare Filmora
Step1 Download, install, and launch the software on your system. Click on the Create New Project on the main interface.

Step2 On the next screen that appears, tap on the Import Media Files Here button to browse and add the HDR video that has to be edited. Multiple files can be added here for batch processing.

Step3 Next, drag and move the added videos to the timeline at the bottom of the software interface. After the videos are added to the timeline, you can edit using the editing tool as needed.

Step4 When done with editing, click on the Export button, choose the target format, also, click the ‘Export Color Space’ drop/down icon from the ‘settings’ to change HDR video output quality (default quality is SDR - Rec.709). Then click on the ‘OK’ button once you’re done to finalize the operation.

Final Words
To take your mobile photography to another level and capture interesting and bright images, HDR mode is one of the great options to use. So, even if your smartphone does not support the HDR feature, install an app from the Google Store. When it comes to HDR videos and their editing, Wondershare Filmora works as the best tool as it helps to add those little tweaks and customize your files without worrying about the quality or washed-out color.
Part 4: How to Use HDR Apps android to take HDR photography
As we have mentioned above not all Android phones come with HDR function. So, if your device does not have this function, no need to worry as there are Android apps available for the same. You can search and download one such HDR-capable camera app on your device from Google Play Store and enjoy capturing HDR images.
One such widely used app is HDR Camera that simple to use and allows for capturing high-quality HDR pictures. Using the upgraded version of the app you can even edit your captured images.
Steps to using HDR Camera Apps
Step1 First of all, download, install, and launch the HDR Camera app on your Android smartphone.
Step2 The interface of the app looks like the interface of the Android camera and the majority of the screen is taken up by the viewfinder.
Step3 Next, simply start taking the picture as you would do normally by pointing towards the subject and clicking on the shutter button.
Step4 If you have opted for the advanced version of the app, you can even add a pre-set filter or edit your images as needed.
Step5 Finally, save the HDR-captured image on your phone.
Part 5: Video Guide HDR on your Android device
If you are still not clear about using the HDR feature on your Android smartphone, the YouTube video tutorial will help you to learn the entire process.
https://www.youtube.com/watch?v=myMGalkNiP8
Part 6: Pro tip: How to Edit HDR Video without Washed Out Color
In several situations, you would want to edit the HDR videos recorded using your phone or other device but the major problem lies when the editing makes your video washed out. So, to ensure that this does not happen with your recordings, we suggest using a professional tool and one of the best that we recommend here is Wondershare Filmora .
This is a versatile Windows and Mac-based software that can let you edit and customize videos simply and quickly. The software is known for its multi-video editing facilities, it comes packed in with all basic as well as advanced features that may be needed for enhancing your overall videos.
The software supports all key video formats and to further make the files look interesting, you can add multiple effects supported by the tool.
Free Download For Win 7 or later(64-bit)
Free Download For macOS 10.14 or later
Steps to edit HDR videos using Wondershare Filmora
Step1 Download, install, and launch the software on your system. Click on the Create New Project on the main interface.
Step2 On the next screen that appears, tap on the Import Media Files Here button to browse and add the HDR video that has to be edited. Multiple files can be added here for batch processing.
Step3 Next, drag and move the added videos to the timeline at the bottom of the software interface. After the videos are added to the timeline, you can edit using the editing tool as needed.
Step4 When done with editing, click on the Export button, choose the target format, also, click the ‘Export Color Space’ drop/down icon from the ‘settings’ to change HDR video output quality (default quality is SDR - Rec.709). Then click on the ‘OK’ button once you’re done to finalize the operation.
Final Words
To take your mobile photography to another level and capture interesting and bright images, HDR mode is one of the great options to use. So, even if your smartphone does not support the HDR feature, install an app from the Google Store. When it comes to HDR videos and their editing, Wondershare Filmora works as the best tool as it helps to add those little tweaks and customize your files without worrying about the quality or washed-out color.
Also read:
- Adobe Premiere Pro Guide to Slow-Down Video for 2024
- Best Ways to Merge FLV Files Windows, Mac,Android, iPhone & Online for 2024
- In 2024, The Availability of the Slow-Motion Feature on the iPhone Is Often Debated. This Article Will Guide You on How to Slow Down a Video on iPhone
- New In 2024, Time Bending Brilliance The Ultimate Slow Motion Video Makers
- New In 2024, Best 8 Online MPEG to GIF Converters
- Updated Wondering How to Rotate a Video in Windows at Any Desired Angle and Save It Permanently? Find Out All the Different Ways to Rotate Videos Temporarily as Well as Permanently
- Updated 10+ Best Unlimited FCPX Slideshow Templates for 2024
- New This Article Has a Detailed Description of How You Can Split the Videos in Lightworks Including the the Discussion of Splitting the Wondershare Filmora as an Alternative. It Is Also a Suitable Choice for 2024
- New You May Want to Create Your Video Tutorial and Share Your Knowledge with Others. Fortunately, You Can Easily Create a Professionally Edited Tutorial Video with Filmora. Keep Reading This Article Since We Will Show You How to Do It for 2024
- 2024 Approved Step by Step to Split a Clip in VLC
- In 2024, 10 Best Free Video Player for Windows 11
- Free Drone LUTs For Perfect Drone Footage for 2024
- New Mastering Video Speed Control Slow Down, Speed Up, and Edit with Ease for 2024
- New What Is MOV Format and How to Edit MOV Video Better?
- New 2024 Approved How to Make Video Slow Motion?
- Updated How to Resize FLV Videos EfficientlyWindows, Mac, Android, iPhone & Online
- Updated 2024 Approved Best 7 Color Match Paint Apps
- Updated In 2024, Fast Method to Match Color in Photoshop
- 2024 Approved How to Change Video Resolution in Filmora
- New Camtasia vs Final Cut Pro
- Something That You Should Know About MP4 Video Format for 2024
- New In 2024, How to Create Loop Videos with Filmora
- Updated 2024 Approved Create Motion Effect with Path Blur In Photoshop
- Updated In 2024, How to Make a Slideshow with Icecream Slideshow Maker
- Updated How to Become a Youtuber for 2024
- How to Rotate Videos With Media Player Classic for 2024
- Updated 2024 Approved How Can I Control Speed of a Video
- Updated 2024 Approved Deep Learning of AI Video Recognition - Guide
- 7 Tips to Create Teaching Videos
- 2024 Approved Good Slideshow Makers Sometimes Cost High and Free Slideshow Makers Provide Slideshows with the Watermark. How to Cope with This Problem? This Article Gives Solutions
- New In 2024, CapCut Lenta Template How It Benefits Slow Motion Video
- New Mastering the Art of Video Framing for 2024
- New Detailed Steps to Rotate Videos Using Kdenlive
- New 10 Best Free Text to Speech Software Windows, Mac,Android, iPhone & Online
- Updated 2024 Approved Are You Looking for a Video Format Converter Free? We Will Introduce the 5 Best Online Converters and Also the 5 Best Video Format Converters for PC
- Updated 10 Best Free Text to Speech Software Windows, Mac,Android, iPhone & Online
- New Live Stream on YouTube Using Zoom for 2024
- Updated 2024 Approved Slow Down the GIF to Emphasize Details Better. To Do so, Read This Guide and Learn to Use the Best Platforms for Slow-Motion GIFs
- New In 2024, In This Article We Will Be Covering the Most Important Topics You Have to Remember when Becoming a Successful YouTube-Star
- In 2024, Top 10 Best Spy Watches For your Vivo X100 | Dr.fone
- Recover your music after Tecno Camon 20 has been deleted
- 2024 Approved How to Make a GIF in Photoshop
- How to Fix It Motorola Edge 40 Wont Turn On | Dr.fone
- In 2024, How to Unlock SIM Card on Samsung Galaxy A23 5G online without jailbreak
- 2 Ways to Monitor Vivo Y78 5G Activity | Dr.fone
- Best Fixes For Lava Storm 5G Hard Reset | Dr.fone
- In 2024, How to Unlock iCloud lock on your Apple iPhone 14 Pro and iPad?
- Is GSM Flasher ADB Legit? Full Review To Bypass Your Tecno Spark 10 Pro Phone FRP Lock
- In 2024, For People Wanting to Mock GPS on Nokia G310 Devices | Dr.fone
- Infinix Data Recovery – recover lost data from Infinix Zero 30 5G
- In 2024, How to Intercept Text Messages on Xiaomi Redmi Note 12 Pro 4G | Dr.fone
- Hassle-Free Ways to Remove FRP Lock on Vivo Y100A Phones with/without a PC
- Updated In 2024, Top 5 AI YouTube Shorts Generators
- How To Transfer WhatsApp From iPhone 14 to other iPhone 14 devices? | Dr.fone
- A Detailed VPNa Fake GPS Location Free Review On Apple iPhone 7 Plus | Dr.fone
- How to Use Google Assistant on Your Lock Screen Of Nubia Red Magic 9 Pro+ Phone
- Hassle-Free Ways to Remove FRP Lock on Itel A60swith/without a PC
- In 2024, How to Use Pokémon Emerald Master Ball Cheat On Tecno Camon 20 Premier 5G | Dr.fone
- In 2024, Set Your Preferred Job Location on LinkedIn App of your Nubia Z50 Ultra | Dr.fone
- New Top 4 Elon Musk Voice Generator Programs to Make You Sound Like the Billionaire for 2024
- Why Does My Poco X6 Keep Turning Off By Itself? 6 Fixes Are Here | Dr.fone
- In 2024, How Can You Transfer Files From Oppo Reno 10 Pro 5G To iPhone 15/14/13? | Dr.fone
- In 2024, Find My App Troubleshooting No Location Found vs. Location Not Available & How to Fix Them On Apple iPhone 13 mini | Dr.fone
- In 2024, Latest way to get Shiny Meltan Box in Pokémon Go Mystery Box On Realme 12 Pro+ 5G | Dr.fone
- In 2024, Set Your Preferred Job Location on LinkedIn App of your OnePlus 11 5G | Dr.fone
- Forgotten The Voicemail Password Of Honor Magic 6 Lite? Try These Fixes
- Set Your Preferred Job Location on LinkedIn App of your Vivo T2 Pro 5G | Dr.fone
- Turning Off Two Factor Authentication On iPhone 15 Pro? 5 Tips You Must Know
- A Perfect Guide To Remove or Disable Google Smart Lock On Tecno Pop 8
- Top IMEI Unlokers for Your Nokia C32 Phone
- Sim Unlock Samsung Galaxy Z Flip 5 Phones without Code 2 Ways to Remove Android Sim Lock
- Title: 2024 Approved 11 Apps To Speed Up A Video On iPhone
- Author: Morgan
- Created at : 2024-05-19 05:11:45
- Updated at : 2024-05-20 05:11:45
- Link: https://ai-video-editing.techidaily.com/2024-approved-11-apps-to-speed-up-a-video-on-iphone/
- License: This work is licensed under CC BY-NC-SA 4.0.
