
:max_bytes(150000):strip_icc():format(webp)/dualsenseedge-749ef030e3c84376926d817913be924b.jpg)
2024 Approved 8 Apps to Custom GIF Stickers
8 Apps to Custom GIF Stickers
8 Apps to Custom Your GIF Stickers
An easy yet powerful editor
Numerous effects to choose from
Detailed tutorials provided by the official channel
GIF files are a new trend, and people are very happy to share them with their loved ones. Undoubtedly, according to the mood, the GIF file is available, and they can send it easily. But how can we forget that the present generation is quite curious to know about the process behind creating it?
If you are someone who is curious to know about the creation of GIF stickers and other related things, then you are on the right page. In this article, you will find out all the details regarding the making of such stickers and how you will be able to customize them as per your needs.
Stay tuned with us till the end because we will also share some of the best applications for custom GIF stickers that will help you. Let’s get started!
In this article
01 [Top 8 Apps to Custom GIF Stickers](#Part 1)
02 [How to Create Own Free Animated Stickers on Social Media?](#Part 2)
Part 1 Top 8 Apps to Custom GIF Stickers
When it comes to creating custom GIF stickers, it is also important to know about the applications that can cater to your needs. We all are aware about the availability of thousands of applications that claim to be the best ones, but relying on them is not easy. Well, in that case, we have come up with some applications that will help you. This includes:
01Gif Me! Camera
GIF Me! camera is an app that can easily generate GIF stickers. It turns photos and videos into GIFs and stickers. You can get a whole library of these stickers to use. This application allows users to create their own GIFs and share them with others on social media channels like Facebook, Instagram, Snapchat, and Twitter.
A user just needs to get the application and, after that, they are all set to create the hot GIF stickers of their choice and share them on different portals.

02Ezgif
Ezgif is a GIF maker that creates animated stickers. This application allows you to create animated GIF stickers from videos and pictures. The user can record a video and then select the part of the video they want to make into a sticker. Also, they can take a picture and turn it into an animated sticker. The stickers are then saved in the app’s library, which can be shared with other users or exported as an animated GIF file.
The stickers that are created can be shared on other portals easily, which simply means there will be no need to get any additional applications to complete the particular task.

03Pixel Animator: GIF Maker
Another good choice that you can make is The Pixel Animator app. This is a great option for those who want to make animated images from their photos. The app allows users to create animations using a timeline. It also has a photo editor that can be used to edit the images before they are converted into GIFs.
It is totally up to the user how they wish to create the GIF. The interface of the application is simple to understand, which clearly means that there will be no problem at all in getting your hands on this application. Also, the created stickers can be shared on other portals, including social media applications too.

04ImgPlay – GIF Maker
ImgPlay is a GIF Maker, an Explain App to create GIF stickers. ImgPlay provides animation effects, stickers, text, and emoji to make an animated video and stickers too. It also has powerful editing features like reverse playback, trimming, and cropping. The ImgPlay app can be used on any device with Android 4.0+ or iOS 9+. But one needs to make sure that initially, this application appears to be difficult to understand, but after getting all the details, this could be one of the simplest applications to use.

05Tumblr
Tumblr is a social media site that is focused on microblogging. Users can post text, photos, videos, quotes, links, and anything else they want. This is an app that allows users to create GIF stickers. By using the app, you can take a video or photo and turn it into a GIF sticker that you can then share on social media sites. This application is majorly under consideration by professionals because it has all the best features integrated into it.

06GIF Toaster
GIF Toaster is a web-based tool that helps you create GIF stickers, which are short looping videos that you can use in your messages. The tool is available at the URL toaster.co. Furthermore, this is a free mobile app that lets you create animated GIFs with just a few taps. After creating the stickers, you are all set to share them on all the portals out there without any problem.

07GIF Maker
GIF Maker is a mobile app that allows users to create GIF stickers from videos and images. Basically, this application is a fun and easy way to communicate with friends and family on social media with the help of available stickers. Simply put, users do not need any emoticons to express what they are feeling.
The created stickers can be easily shared on other portals too. A user just needs to be sure of the destination where they have saved it, and after choosing it, they are all set to use it and share it with their friends over these social media portals.

08GIF Camera
A GIF Camera is a mobile app that takes a series of photos and stitches them together to create a GIF. The app allows users to make their own GIFs or choose from an existing library of animated stickers.
This is a mobile app that uses artificial intelligence to generate animated GIFs from audio or video files. Furthermore, this is used for personal use as well as for business purposes such as marketing and training videos.

Part 2 How to Create Own Free Animated Stickers on Social Media?
Everyone is on social media nowadays, and undoubtedly, they share a lot of content with their friends. Well, if you are looking forward to sharing animated stickers on social media, do understand how to create them. There are others that will help you do it easily. Let’s understand!
01How to Create Telegram GIF Stickers?
Telegram is among the most popular social applications these days, and people are very happy to connect over it. Whenever you wish to create animated stickers for Telegram, there are third-party tools and applications that can help you. The method helping to create animated telegram stickers includes the use of “Filmora”.
**Wondershare Filmora Video Editor **is one of the best tools available to create the animated stickers of your choice. This tool comes with a simple interface and when you wish to create a Telegram GIF sticker, this tool will cater to all your needs. You just need to understand how to use this tool.

Wondershare Filmora - Best Video Editor for Mac/Windows
5,481,435 people have downloaded it.
Build unique custom animations without breaking a sweat.
Focus on creating epic stories and leave the details to Filmora’s auto features.
Start a creative adventure with drag & drop effects and endless possibilities.
Filmora simplifies advanced features to save you time and effort.
Filmora cuts out repetition so you can move on to your next creative breakthrough.
Steps to using Filmora to create telegram stickers:
Step 1: Get “Filmora” on your system and select the sticker. Upload the file from which you wish to cut out the area to create the sticker.
Step 2: Finish the cutout and select the editing options by clicking the continue button. If you wish to add any additional feature or effect to it, the sidebar will help you do it on filmora.
Step 3: When you are satisfied with the effect, just click on the “download” button to download it.
Once it is downloaded, you can find it right there in the downloaded files section on your device.
02How to Create Instagram GIF Stickers?
Instagram has become the most considerable application after Facebook. Instagram has millions of users who frequently share content on the platform. During chat, there is an option where users can send the animated stickers to their friends. Well, to send hot GIF stickers, it is important to understand how to do it. To create GIF stickers for Instagram, you need to use a third-party tool, and we suggest you consider Filmora.
The steps that you need to follow are the same as those that you have considered for creating stickers for the Telegram application. It is important to understand that after downloading the sticker, you just need to test the sticker on Instagram stories, and after that, you are all set to share it with your friends.
There is an option available where you can add layers of stickers to the stories that will help you to understand whether the speaker you have created is working successfully or not.
● Key Takeaways from This Episode →
● Filmora is the best tool to create GIF stickers.
● GIF stickers are a clear representation of your mood.
● GIF stickers can be shared on other portals too.
GIF files are a new trend, and people are very happy to share them with their loved ones. Undoubtedly, according to the mood, the GIF file is available, and they can send it easily. But how can we forget that the present generation is quite curious to know about the process behind creating it?
If you are someone who is curious to know about the creation of GIF stickers and other related things, then you are on the right page. In this article, you will find out all the details regarding the making of such stickers and how you will be able to customize them as per your needs.
Stay tuned with us till the end because we will also share some of the best applications for custom GIF stickers that will help you. Let’s get started!
In this article
01 [Top 8 Apps to Custom GIF Stickers](#Part 1)
02 [How to Create Own Free Animated Stickers on Social Media?](#Part 2)
Part 1 Top 8 Apps to Custom GIF Stickers
When it comes to creating custom GIF stickers, it is also important to know about the applications that can cater to your needs. We all are aware about the availability of thousands of applications that claim to be the best ones, but relying on them is not easy. Well, in that case, we have come up with some applications that will help you. This includes:
01Gif Me! Camera
GIF Me! camera is an app that can easily generate GIF stickers. It turns photos and videos into GIFs and stickers. You can get a whole library of these stickers to use. This application allows users to create their own GIFs and share them with others on social media channels like Facebook, Instagram, Snapchat, and Twitter.
A user just needs to get the application and, after that, they are all set to create the hot GIF stickers of their choice and share them on different portals.
02Ezgif
Ezgif is a GIF maker that creates animated stickers. This application allows you to create animated GIF stickers from videos and pictures. The user can record a video and then select the part of the video they want to make into a sticker. Also, they can take a picture and turn it into an animated sticker. The stickers are then saved in the app’s library, which can be shared with other users or exported as an animated GIF file.
The stickers that are created can be shared on other portals easily, which simply means there will be no need to get any additional applications to complete the particular task.
03Pixel Animator: GIF Maker
Another good choice that you can make is The Pixel Animator app. This is a great option for those who want to make animated images from their photos. The app allows users to create animations using a timeline. It also has a photo editor that can be used to edit the images before they are converted into GIFs.
It is totally up to the user how they wish to create the GIF. The interface of the application is simple to understand, which clearly means that there will be no problem at all in getting your hands on this application. Also, the created stickers can be shared on other portals, including social media applications too.
04ImgPlay – GIF Maker
ImgPlay is a GIF Maker, an Explain App to create GIF stickers. ImgPlay provides animation effects, stickers, text, and emoji to make an animated video and stickers too. It also has powerful editing features like reverse playback, trimming, and cropping. The ImgPlay app can be used on any device with Android 4.0+ or iOS 9+. But one needs to make sure that initially, this application appears to be difficult to understand, but after getting all the details, this could be one of the simplest applications to use.
05Tumblr
Tumblr is a social media site that is focused on microblogging. Users can post text, photos, videos, quotes, links, and anything else they want. This is an app that allows users to create GIF stickers. By using the app, you can take a video or photo and turn it into a GIF sticker that you can then share on social media sites. This application is majorly under consideration by professionals because it has all the best features integrated into it.
06GIF Toaster
GIF Toaster is a web-based tool that helps you create GIF stickers, which are short looping videos that you can use in your messages. The tool is available at the URL toaster.co. Furthermore, this is a free mobile app that lets you create animated GIFs with just a few taps. After creating the stickers, you are all set to share them on all the portals out there without any problem.
07GIF Maker
GIF Maker is a mobile app that allows users to create GIF stickers from videos and images. Basically, this application is a fun and easy way to communicate with friends and family on social media with the help of available stickers. Simply put, users do not need any emoticons to express what they are feeling.
The created stickers can be easily shared on other portals too. A user just needs to be sure of the destination where they have saved it, and after choosing it, they are all set to use it and share it with their friends over these social media portals.
08GIF Camera
A GIF Camera is a mobile app that takes a series of photos and stitches them together to create a GIF. The app allows users to make their own GIFs or choose from an existing library of animated stickers.
This is a mobile app that uses artificial intelligence to generate animated GIFs from audio or video files. Furthermore, this is used for personal use as well as for business purposes such as marketing and training videos.
Part 2 How to Create Own Free Animated Stickers on Social Media?
Everyone is on social media nowadays, and undoubtedly, they share a lot of content with their friends. Well, if you are looking forward to sharing animated stickers on social media, do understand how to create them. There are others that will help you do it easily. Let’s understand!
01How to Create Telegram GIF Stickers?
Telegram is among the most popular social applications these days, and people are very happy to connect over it. Whenever you wish to create animated stickers for Telegram, there are third-party tools and applications that can help you. The method helping to create animated telegram stickers includes the use of “Filmora”.
**Wondershare Filmora Video Editor **is one of the best tools available to create the animated stickers of your choice. This tool comes with a simple interface and when you wish to create a Telegram GIF sticker, this tool will cater to all your needs. You just need to understand how to use this tool.
Wondershare Filmora - Best Video Editor for Mac/Windows
5,481,435 people have downloaded it.
Build unique custom animations without breaking a sweat.
Focus on creating epic stories and leave the details to Filmora’s auto features.
Start a creative adventure with drag & drop effects and endless possibilities.
Filmora simplifies advanced features to save you time and effort.
Filmora cuts out repetition so you can move on to your next creative breakthrough.
Steps to using Filmora to create telegram stickers:
Step 1: Get “Filmora” on your system and select the sticker. Upload the file from which you wish to cut out the area to create the sticker.
Step 2: Finish the cutout and select the editing options by clicking the continue button. If you wish to add any additional feature or effect to it, the sidebar will help you do it on filmora.
Step 3: When you are satisfied with the effect, just click on the “download” button to download it.
Once it is downloaded, you can find it right there in the downloaded files section on your device.
02How to Create Instagram GIF Stickers?
Instagram has become the most considerable application after Facebook. Instagram has millions of users who frequently share content on the platform. During chat, there is an option where users can send the animated stickers to their friends. Well, to send hot GIF stickers, it is important to understand how to do it. To create GIF stickers for Instagram, you need to use a third-party tool, and we suggest you consider Filmora.
The steps that you need to follow are the same as those that you have considered for creating stickers for the Telegram application. It is important to understand that after downloading the sticker, you just need to test the sticker on Instagram stories, and after that, you are all set to share it with your friends.
There is an option available where you can add layers of stickers to the stories that will help you to understand whether the speaker you have created is working successfully or not.
● Key Takeaways from This Episode →
● Filmora is the best tool to create GIF stickers.
● GIF stickers are a clear representation of your mood.
● GIF stickers can be shared on other portals too.
MAGIX Vegas Pro Review: A Professional Video Editing Software
MAGIX Vegas Pro is a powerful and flexible solution for editing, creating, and adding a finishing touch to your videos. The software combines cutting-edge technology with a highly intuitive user interface, making it easy to use for newbies in the world of video production.
In this MAGIX Vegas Pro review, we’ll take a look at the software and tell you why it’s a great video editor. We’ll also provide a Sony Vegas vs. Adobe Premiere comparison to see how they stand against each other.
Part 1. What Is MAGIX Vegas Pro
Firstly, let’s have a deeper understanding of MAGIX Vegas Pro before we have a review in Part 2.
MAGIX is a computer software company that produces a variety of audio, video, and graphic design digital products. MAGIX has been in business for over 25 years, and its products are used by millions worldwide.
Vegas software was first released in 1999 by Sonic Foundry. Sony Creator Software purchased the program in 2003 and released its several versions till 2014. The company later sold it to MAGIX.
Sony Vegas History Series
Some of the Vegas software series released by Sony Creative Software are listed below:
- Vegas 4.0e: Released in November 2003, the first version by Sony.
- Vegas 5.0: Released in April 2004.
- Vegas 6.0: Released in April 2005.
- Vegas 7.0: Released in September 2006.
- Vegas Pro 8.0: Released in September 2007.
- Vegas Pro 8.1: First Sony Vegas version to support 64-bit.
- Vegas Pro 9.0: Released in 2009 with greater support for digital cinema.
- Vegas Pro 10: Released in 2010.
- Vegas Pro 11: Released on 17 October 2011.
- Vegas Pro 12: Released in November 2012.
- Vegas Pro 13: Released in April 2014 with new collaboration tools, the last version by Sony.
MAGIX Vegas Pro 20
MAGIX Vegas Pro 20 is an industry-leading video editing software program owned by MAGIX. The software can help you manipulate, combine, and edit your video clips with various tools in an easy-to-use interface. Vegas Pro is well known among professionals who need to create high-quality videos.
Some basic functions of the Vegas Pro 20 include Speech to Text functionality, Audio production with VST3, Eight Preset Window Layouts, Track effect, Color grading, Optical Flow mode, Fade In/Out features, Honeycomb, and Color Plane presets for GL transitions, and Add and Arrange Media.

Part 2. MAGIX Vegas Pro Review
The Vegas Pro 20 is a tailor-made software for content creators with an optimized interface, fast rendering speed, and many features to help them create video projects that stand out.
The Score On G2
MAGIX Vegas Pro - a top-of-the-line video editing software that has received several positive reviews from critics and developers on the G2, a famous software review platform.
- Ease of Use: 8.6 stars out of 10.
- Ease of Setup: 9.2 stars.
- Quality of Support: 7.2 stars.
- Overall: 4.2 stars out of 5.
Price
VEGAS editing software has three tiers that are each designed to fit your specific workflow requirements and budget:
- VEGAS Edit: Includes a basic package that costs $12.99/ month or $249 for a perpetual license.
- VEGAS Pro: Advanced package with SOUND FORGE Audio Studio and advanced video editing tools. The package is priced at $19.99/ month or $399 for a perpetual license.
- VEGAS Post: Ultimate bundle with Vegas effects for high-end compositing and RAW image support. The package will cost you $29.99/ month or $599 for a perpetual license.

![]()
Note: MAGIX Vegas Pro also offers a 30-day free trial that is only limited to basic features.
Functions Review
We’ll now review some of the most important features of MAGIX Vegas Pro 20 and see how they can be used to improve your video editing workflow.
- Color Touches: The interface has now got a new look that is a bit darker, sleeker, and more professional that lets the icons pop up and become more visible than before.
- Color Grading: The color grading panel has also received some improvements and is redesigned into a range-limited color wheel, providing more functionalities.

- Track Effects: The Vegas Pro 20 offers adjustment tracks that help apply effects to the entire track. You can also alter the intensity of these effects and use keyframes from the timeline.

- Scene Detection: The new “Automatic Scene Detection” feature saves you the hassle of cutting your video clips manually before adding them to the timeline. The software does this in three ways: Analyse, Detect, and Split the scenes to add them to the timeline in a sequence.
- Supported Formats: VEGAS Pro is compatible with Blackmagic RAW, MP4, Apple ProRes, MPEG-2, MPEG-1, AVI,AVC, Panasonic P2, and RED RAW video formats. The software also supports images and audio formats.
And we have prepared a video for you below, so that you can establish an overview of MAGIX Vegas Pro 20 better.
Video - Full Walkthrough of Vegas Pro 20
Part 3. MAGIX Vegas Pro Pros and Cons
Like any other software, MAGIX Vegas Pro also has pros and cons that you must be aware of before making any purchase.
Pros
- Comes with improved and user-friendly color grading tools.
- Offers free stock clips for the premium version.
- Improved rendering performance.
- Traditional nested timeline.
- Offers social export options such as YouTube and Facebook.
- Save your project automatically.
- Supports chroma key and AI AIDs.
- Has an advanced HDR color correction tool.
Cons
- Expensive for some users.
- Only supports Windows 10/11.
- Lacks convenience found in similar software.
- Unstable Multicam.
- The startup does not offer a Welcome panel.
- Lacks tutorials to help.
- Some programs lack stability.
- Do not support timely after-sale services.
Part 4. Sony Vegas VS Adobe Premiere, Which One is Better?
Both Sony Vegas and Adobe Premiere are powerful video editing software programs with their own unique strengths and weaknesses. As with any software decision, it ultimately comes down to the specific needs of the user to decide which one is better.
Here is our complete guide to the two software programs to help you decide which is best for your needs: Sony Vegas VS Adobe Premiere. Which One is Better ?

Conclusion
Vegas Pro 19 is an excellent video editor that offers robust features and a streamlined user experience. In addition, the software’s intuitive interface allows anyone to edit videos quickly and easily without having to know any complicated techniques.
In this article, we’ve provided the MAGIX Vegas Pro review to help you understand the features, pros, and cons and what the software has to offer for content creators. We’ve also explored the series of versions developed and released by Sony Vegas.
Hopefully, you find our Magix Vegas Pro 20 review helpful and can now make a better buying decision.
Free Download For Win 7 or later(64-bit)
Free Download For macOS 10.14 or later
Functions Review
We’ll now review some of the most important features of MAGIX Vegas Pro 20 and see how they can be used to improve your video editing workflow.
- Color Touches: The interface has now got a new look that is a bit darker, sleeker, and more professional that lets the icons pop up and become more visible than before.
- Color Grading: The color grading panel has also received some improvements and is redesigned into a range-limited color wheel, providing more functionalities.
- Track Effects: The Vegas Pro 20 offers adjustment tracks that help apply effects to the entire track. You can also alter the intensity of these effects and use keyframes from the timeline.
- Scene Detection: The new “Automatic Scene Detection” feature saves you the hassle of cutting your video clips manually before adding them to the timeline. The software does this in three ways: Analyse, Detect, and Split the scenes to add them to the timeline in a sequence.
- Supported Formats: VEGAS Pro is compatible with Blackmagic RAW, MP4, Apple ProRes, MPEG-2, MPEG-1, AVI,AVC, Panasonic P2, and RED RAW video formats. The software also supports images and audio formats.
And we have prepared a video for you below, so that you can establish an overview of MAGIX Vegas Pro 20 better.
Video - Full Walkthrough of Vegas Pro 20
Part 3. MAGIX Vegas Pro Pros and Cons
Like any other software, MAGIX Vegas Pro also has pros and cons that you must be aware of before making any purchase.
Pros
- Comes with improved and user-friendly color grading tools.
- Offers free stock clips for the premium version.
- Improved rendering performance.
- Traditional nested timeline.
- Offers social export options such as YouTube and Facebook.
- Save your project automatically.
- Supports chroma key and AI AIDs.
- Has an advanced HDR color correction tool.
Cons
- Expensive for some users.
- Only supports Windows 10/11.
- Lacks convenience found in similar software.
- Unstable Multicam.
- The startup does not offer a Welcome panel.
- Lacks tutorials to help.
- Some programs lack stability.
- Do not support timely after-sale services.
Part 4. Sony Vegas VS Adobe Premiere, Which One is Better?
Both Sony Vegas and Adobe Premiere are powerful video editing software programs with their own unique strengths and weaknesses. As with any software decision, it ultimately comes down to the specific needs of the user to decide which one is better.
Here is our complete guide to the two software programs to help you decide which is best for your needs: Sony Vegas VS Adobe Premiere. Which One is Better ?
Conclusion
Vegas Pro 19 is an excellent video editor that offers robust features and a streamlined user experience. In addition, the software’s intuitive interface allows anyone to edit videos quickly and easily without having to know any complicated techniques.
In this article, we’ve provided the MAGIX Vegas Pro review to help you understand the features, pros, and cons and what the software has to offer for content creators. We’ve also explored the series of versions developed and released by Sony Vegas.
Hopefully, you find our Magix Vegas Pro 20 review helpful and can now make a better buying decision.
Free Download For Win 7 or later(64-bit)
Free Download For macOS 10.14 or later
Best Ways to Slow Down Motion in CapCut
Since the slow-motion trend captured everyone’s attention, it never went out of fashion. Keeping this in view, many content creators followed the trend and created slo-mos. In filmmaking, slow motion assisted in emphasizing high-action scenes and details. Many tools and software like Adobe After Effects or Adobe Premiere Pro can do this.
Smartphone video editors were introduced to enhance the application of slow motion. One of these editors is CapCut , a multifunctional video editor capable of slo-mo creation. This article will focus on how to do slow-mo in CapCut. With tools brief review, you can find the detailed guide on the CapCut slow-mo effect . Along with learning how to do some in CapCut, we’ll look into its alternative.
Slow Motion Video Maker Slow your video’s speed with better control of your keyframes to create unique cinematic effects!
Make A Slow Motion Video Make A Slow Motion Video More Features

Part 1: CapCut Video Editor: An Exceptional Mobile App for Video Editing
CapCut is an editing application that caters to the needs of both Android and iPhone users. Whether you are working as a seasoned editor or a team member, it assists all. It harbors numerous video editing tools like the CapCut slow-motion effect. Moreover, users can also access keyframe editor, effects and filters, stock videos, and more.

The tool offers a sleek user interface with cutting-edge AI technology for automated editing. The interface looks artistic and organized for accessible editing. Along with video editing, users can perform audio, text, and image editing. You can access its Resource collection on its site, which is full of tips and tutorials. To give you a broader vision of CapCut slow-mo effect, here are some of its features:
- Video Filters and Effects: CapCut has a free collection of effects and filters to enhance your footage. The video effects and filters add uniqueness and hide any irregularities in videos. The collection keeps updating, and you can use Business, Ads, and other categories.
- Stock Videos: Use CapCut’s free stock media instead of roaming through the internet. If you must show your abilities as an editor, then try its royalty-free videos. These videos are editable, and you can apply multiple pre-installed animations and stickers to them.
- Keyframe Animation: Although CapCut offers a range of stock animations, you can create one. With its keyframe functioning, users can create custom animations. It offers custom settings like scale, position, opacity, and more adjustments.
- Background Remover: If you want to erase messy backgrounds and replace them, CapCut can assist. Its background remover eliminates video backgrounds with accuracy. Moreover, you can replace them with solid or gradient colors, images, and videos.
- Video Upscaler: This tool is available online and enhances video resolution up to 4K. The tool is compatible with diverse video contexts and gives professional outcomes. The tool is backed by AI, and hence, you just need to upload the video for upscaling.
Part 2: How to Create a Slow Mo on CapCut? A Guide
There are two seamless methods of creating slow-mo on CapCut via “Normal” and “Curve” options. The normal method involves slowing down videos via basic playback speed alteration. However, the Curve method involves multiple speed templates for this. If you do not find an expected speed template, you can utilize the “Custom” option. Following is the procedural guide to the CapCut slow-mo effect:
Step 1
After downloading and launching CapCut on your device, access its main menu. From the main menu, click the “New Project” option and upload a video.

Step 2
Once you have added the video, navigate towards the toolbar at the bottom. From there, locate and select the “Edit” option.

Step 3
From the appearing options, select the “Speed” option for the CapCut slow-mo effect.

Step 4
In the speed display, adjust the position of the slider to add the slo-mo effect. Further, go to the “Normal” section to start speed manipulation.

Step 5
Drag the playback speed slider toward the left side of the screen. This will add a slow-mo effect and will increase the video’s duration. In this section, you can also expand the “Make it smoother” option to enhance the quality. Moreover, you can also enable the “Pitch” option to maintain audio quality. Afterward, click the “ü” icon at the bottom right corner to finalize the slo-mo effect.

Part 3: CapCut Slow Mo Alternative: Wondershare Filmora for Smartphone Users
After seeing how to slow down videos on CapCut, you must think that it is so easy. However, there is an alternative editor that offers a minimal interface with similar qualities. Wondershare Filmora is a professional slow-motion creator catered to your needs. Whether you are skilled or just beginning your journey, it can assist you.
Using this CapCut slow-motion video has its benefits, as it offers multiple speed change options. You can change video speed using Normal playback speed or speed “Curve” alteration. In this section, we’ll teach you how to create a slow motion in Filmora. We are going to use the Curve technique to manipulate speed professionally.
Step-by-Step Guide to Slow Down Video in Filmora App
You can find multiple speed templates here to craft a cinematic-level slow motion. By utilizing the Custom speed setting options, this effect is possible. To fashion professional-grade and artistic slow motion in Filmora, follow these steps:
Step 1Import Videos After Creating a New Project
Download the Filmora app from the Play Store or App Store and launch it. Then, click the “New Project” tab and import a video from the device gallery.

Step 2Access the Speed Curve Option
After importing the video, navigate towards the timeline panel and select the video. From the options appearing in the bar at the bottom, select “Speed.” In the speed section, select the “Curve” section to access speed settings.

Step 3Adjust the Speed Curve Settings
From the appearing options, click the “Customize” option and start editing. To create the slo-mo effect, drag the slider in the downward direction. If you notice, the slider points are distant from each other. It is to edit videos and slow down videos at different durations. Once you are done editing in this CapCut slow-mo effect alternative, hit “Export.”

Bonus Part: Edit Your Slow Mo Video on Desktop with Filmora Desktop
No doubt Wondershare Filmora offers precise editing features compared to other apps. However, skilled and professional editors just prefer the desktop version to bring precision. In addition, there is an optical flow option and an extensive timeline panel. Both these features ensure professional outcomes and a smooth slow-motion effect.
Wondershare Filmora is a powerful alternative to CapCut slow-motion download. The software has a range of video editing features that open unlimited editing opportunities. With its various effects and filters, you can seize the audience’s attention. In addition, the software is compatible with Linux and macOS devices for diversity.
Free Download For Win 7 or later(64-bit)
Free Download For macOS 10.14 or later
Step-by-Step Guide to Create Slow Motion in Filmora for Desktop
In this method, we’ll use Filmora’s Uniform Speed functionality to generate a slow-motion video. This feature uses a simple speed slider to enhance or decelerate video speed. Find the guide to Filmora’s Uniform Speed feature attached below:
Step 1Access the Speed Tab to Start Editing
After opening a project in Filmora, select the video in the timeline and access the settings panel. From there, go to the “Speed” > “Uniform Speed” option and change the slider’s position. By dragging it towards the left side, you can add a slow-motion effect.

Step 2Add Optical Flow Effect
To add a layer of smoothness to your slow-motion video, access “AI Frame Interpolation.” You can find this option at the bottom of the Uniform Speed tab. Expand this option and select the “Optical Flow” option.

Step 3Activate Rendering and Export Video
To analyze the outcome of activating optical flow, navigate towards the timeline panel. From the given options, click on the “Render Preview” icon and wait for its completion. Once the rendering is complete, click the “Export” button after the preview.

Video Editing Features of Filmora
CapCut and Wondershare Filmora both possess AI powers to ensure seamless video creation. However, Filmora offers more video editing features, and all of them offer customization. The interface is just perfect for every professional or non-professional. With its accessible interface, you must try the following video editing tools:
1. Screen Recorder
For the seamless generation of tutorials and ‘How to” videos, this editor offers a screen recorder. The recorder is embedded with custom settings to cater to each user’s requirements. You can accommodate screen resolution, microphone settings, and cam settings with it.
2. Keyframing
Transform your illustrations into reality using Filmora’s keyframe editing feature. You can add keyframes at different points in the timeline to adjust the movements. There are custom settings like position, scale, opacity, color, and more for each keyframe.
3. Split Screen
Make your videos happening and captivating simultaneously with Filmora’s split screen option. This allows you to add distinct videos and auto-adjust them at different split screens. You can also enable manual visual, audio, and AI editing for each split video.
4. Assets Backup & Sync
Why worry about finishing a project at once when you can edit it later with Filmora? With its cloud backup option, you can start editing a video where you left off. In addition, the tool also offers synchronization across devices. This means you can access your videos, downloaded assets, and other storage data with a simple login.
5. AI Text-Based Editing
As discussed earlier, the AI algorithms allow you to edit with full efficiency. This feature of Filmora enhances productivity via text-to-speech function. It creates captions out of a video and allows you to seamlessly cut videos by removing text.
Conclusion
In conclusion, this article considered how to do slow-mo in CapCut. In addition, we saw how you can create a slow-motion video on a smartphone using CapCut. During times that demand the creation of sophisticated slow-motion content, we suggest Filmora. This editing software offers a myriad of editing tools and techniques, facilitating the creation and adjustment of slow motion.
Make A Slow Motion Video Make A Slow Motion Video More Features
Part 1: CapCut Video Editor: An Exceptional Mobile App for Video Editing
CapCut is an editing application that caters to the needs of both Android and iPhone users. Whether you are working as a seasoned editor or a team member, it assists all. It harbors numerous video editing tools like the CapCut slow-motion effect. Moreover, users can also access keyframe editor, effects and filters, stock videos, and more.
The tool offers a sleek user interface with cutting-edge AI technology for automated editing. The interface looks artistic and organized for accessible editing. Along with video editing, users can perform audio, text, and image editing. You can access its Resource collection on its site, which is full of tips and tutorials. To give you a broader vision of CapCut slow-mo effect, here are some of its features:
- Video Filters and Effects: CapCut has a free collection of effects and filters to enhance your footage. The video effects and filters add uniqueness and hide any irregularities in videos. The collection keeps updating, and you can use Business, Ads, and other categories.
- Stock Videos: Use CapCut’s free stock media instead of roaming through the internet. If you must show your abilities as an editor, then try its royalty-free videos. These videos are editable, and you can apply multiple pre-installed animations and stickers to them.
- Keyframe Animation: Although CapCut offers a range of stock animations, you can create one. With its keyframe functioning, users can create custom animations. It offers custom settings like scale, position, opacity, and more adjustments.
- Background Remover: If you want to erase messy backgrounds and replace them, CapCut can assist. Its background remover eliminates video backgrounds with accuracy. Moreover, you can replace them with solid or gradient colors, images, and videos.
- Video Upscaler: This tool is available online and enhances video resolution up to 4K. The tool is compatible with diverse video contexts and gives professional outcomes. The tool is backed by AI, and hence, you just need to upload the video for upscaling.
Part 2: How to Create a Slow Mo on CapCut? A Guide
There are two seamless methods of creating slow-mo on CapCut via “Normal” and “Curve” options. The normal method involves slowing down videos via basic playback speed alteration. However, the Curve method involves multiple speed templates for this. If you do not find an expected speed template, you can utilize the “Custom” option. Following is the procedural guide to the CapCut slow-mo effect:
Step 1
After downloading and launching CapCut on your device, access its main menu. From the main menu, click the “New Project” option and upload a video.
Step 2
Once you have added the video, navigate towards the toolbar at the bottom. From there, locate and select the “Edit” option.
Step 3
From the appearing options, select the “Speed” option for the CapCut slow-mo effect.
Step 4
In the speed display, adjust the position of the slider to add the slo-mo effect. Further, go to the “Normal” section to start speed manipulation.
Step 5
Drag the playback speed slider toward the left side of the screen. This will add a slow-mo effect and will increase the video’s duration. In this section, you can also expand the “Make it smoother” option to enhance the quality. Moreover, you can also enable the “Pitch” option to maintain audio quality. Afterward, click the “ü” icon at the bottom right corner to finalize the slo-mo effect.
Part 3: CapCut Slow Mo Alternative: Wondershare Filmora for Smartphone Users
After seeing how to slow down videos on CapCut, you must think that it is so easy. However, there is an alternative editor that offers a minimal interface with similar qualities. Wondershare Filmora is a professional slow-motion creator catered to your needs. Whether you are skilled or just beginning your journey, it can assist you.
Using this CapCut slow-motion video has its benefits, as it offers multiple speed change options. You can change video speed using Normal playback speed or speed “Curve” alteration. In this section, we’ll teach you how to create a slow motion in Filmora. We are going to use the Curve technique to manipulate speed professionally.
Step-by-Step Guide to Slow Down Video in Filmora App
You can find multiple speed templates here to craft a cinematic-level slow motion. By utilizing the Custom speed setting options, this effect is possible. To fashion professional-grade and artistic slow motion in Filmora, follow these steps:
Step 1Import Videos After Creating a New Project
Download the Filmora app from the Play Store or App Store and launch it. Then, click the “New Project” tab and import a video from the device gallery.
Step 2Access the Speed Curve Option
After importing the video, navigate towards the timeline panel and select the video. From the options appearing in the bar at the bottom, select “Speed.” In the speed section, select the “Curve” section to access speed settings.
Step 3Adjust the Speed Curve Settings
From the appearing options, click the “Customize” option and start editing. To create the slo-mo effect, drag the slider in the downward direction. If you notice, the slider points are distant from each other. It is to edit videos and slow down videos at different durations. Once you are done editing in this CapCut slow-mo effect alternative, hit “Export.”
Bonus Part: Edit Your Slow Mo Video on Desktop with Filmora Desktop
No doubt Wondershare Filmora offers precise editing features compared to other apps. However, skilled and professional editors just prefer the desktop version to bring precision. In addition, there is an optical flow option and an extensive timeline panel. Both these features ensure professional outcomes and a smooth slow-motion effect.
Wondershare Filmora is a powerful alternative to CapCut slow-motion download. The software has a range of video editing features that open unlimited editing opportunities. With its various effects and filters, you can seize the audience’s attention. In addition, the software is compatible with Linux and macOS devices for diversity.
Free Download For Win 7 or later(64-bit)
Free Download For macOS 10.14 or later
Step-by-Step Guide to Create Slow Motion in Filmora for Desktop
In this method, we’ll use Filmora’s Uniform Speed functionality to generate a slow-motion video. This feature uses a simple speed slider to enhance or decelerate video speed. Find the guide to Filmora’s Uniform Speed feature attached below:
Step 1Access the Speed Tab to Start Editing
After opening a project in Filmora, select the video in the timeline and access the settings panel. From there, go to the “Speed” > “Uniform Speed” option and change the slider’s position. By dragging it towards the left side, you can add a slow-motion effect.
Step 2Add Optical Flow Effect
To add a layer of smoothness to your slow-motion video, access “AI Frame Interpolation.” You can find this option at the bottom of the Uniform Speed tab. Expand this option and select the “Optical Flow” option.
Step 3Activate Rendering and Export Video
To analyze the outcome of activating optical flow, navigate towards the timeline panel. From the given options, click on the “Render Preview” icon and wait for its completion. Once the rendering is complete, click the “Export” button after the preview.
Video Editing Features of Filmora
CapCut and Wondershare Filmora both possess AI powers to ensure seamless video creation. However, Filmora offers more video editing features, and all of them offer customization. The interface is just perfect for every professional or non-professional. With its accessible interface, you must try the following video editing tools:
1. Screen Recorder
For the seamless generation of tutorials and ‘How to” videos, this editor offers a screen recorder. The recorder is embedded with custom settings to cater to each user’s requirements. You can accommodate screen resolution, microphone settings, and cam settings with it.
2. Keyframing
Transform your illustrations into reality using Filmora’s keyframe editing feature. You can add keyframes at different points in the timeline to adjust the movements. There are custom settings like position, scale, opacity, color, and more for each keyframe.
3. Split Screen
Make your videos happening and captivating simultaneously with Filmora’s split screen option. This allows you to add distinct videos and auto-adjust them at different split screens. You can also enable manual visual, audio, and AI editing for each split video.
4. Assets Backup & Sync
Why worry about finishing a project at once when you can edit it later with Filmora? With its cloud backup option, you can start editing a video where you left off. In addition, the tool also offers synchronization across devices. This means you can access your videos, downloaded assets, and other storage data with a simple login.
5. AI Text-Based Editing
As discussed earlier, the AI algorithms allow you to edit with full efficiency. This feature of Filmora enhances productivity via text-to-speech function. It creates captions out of a video and allows you to seamlessly cut videos by removing text.
Conclusion
In conclusion, this article considered how to do slow-mo in CapCut. In addition, we saw how you can create a slow-motion video on a smartphone using CapCut. During times that demand the creation of sophisticated slow-motion content, we suggest Filmora. This editing software offers a myriad of editing tools and techniques, facilitating the creation and adjustment of slow motion.
Top Animated Title Makers
You know that your video needs a title, but rather than just type in some bland text to introduce the video, you can create an animated title page that is far more attractive. Animated titles make a video more attractive and when done correctly, they can even guarantee that your target audience will stick around long enough to watch the entire video. They can also be very useful for introducing the content of the video.
But to make an effective animated title, you need a tool that is designed to do just that. In this article, we look at some of the top animated title makers that you can use to create the perfect animated title for your video.
Part 1. Animated Title Maker Online
If you don’t want to install software on your computer to create the animated title, the following are the top online tools to choose from;
Animaker
Link: https://www.animaker.com/text-animation-maker
Rating: 4.5/5
Animaker is an online tool that is specifically designed to help you create text animations that you can then add to your video project. Available online on all browsers, Animaker has a simple user interface that makes it easy to create text animations in a matter of minutes. It is so easy to use that even the average beginner can create stunning text animations.
If you don’t want to create the animations from scratch, Animaker has numerous pre-designed templates for you to choose from that you can then just edit to fit your design. It also has a lot of customizable infographics that you can repurpose.

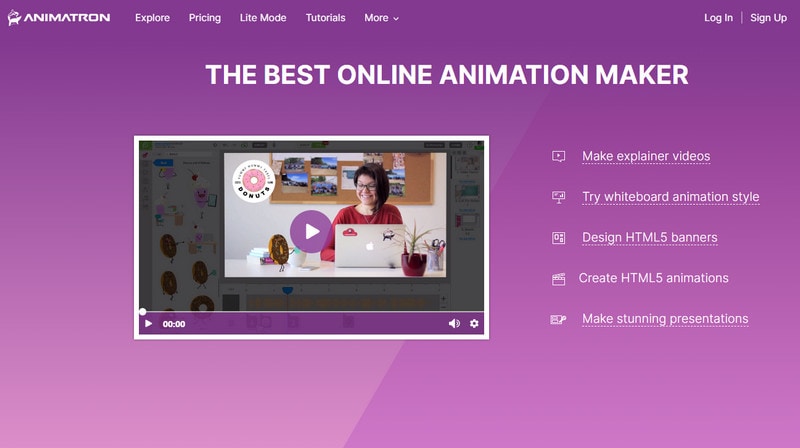
Animatron Studio
Link: https://www.animatron.com/studio
Rating: 4.5/5
The Animatron Studio is a one-stop solution for generating all types of animated texts. You can use it to create the perfect animated title for your video, but its numerous features also mean that it is one of the best ways to create attention-grabbing animated banner ads that can be posted on various ad sites,
It has a wealth of resources that you can use to create the title including more than 500,000 royalty-free images, videos, and audio to include in your project. If you don’t want to build the animated content from the ground up, you can select from the 200 pre-animated sets that Animatron Studio provides.
Kapwing Title Maker
Link: https://www.kapwing.com/animated-text-video-maker
Rating: 4.5/5
If your goal is to do more than just create an animated title for your video, Kapwing is a good solution. It is a complete online video editor that can also be used to create animated titles. As such, you can expect Kapwing to have more advanced features that allow you to customize the animated title in various ways.
For instance, it has a huge selection of animations that you can apply to the text. But you also get the option to upload your own animations, colors, and fonts. But please note that the free version of Kapwing will add a watermark to the video.

Biteable Animated Text Maker
Link: https://biteable.com/animated/text/
Rating: 4.5/5
Biteable is one of the most popular solutions that you can use to create all kinds of animated texts. It is simple enough to use that it is useful to both professionals and amateur video creators. It has numerous useful features including custom scenes, foundations, backgrounds, and characters all of which can work together to create the perfect animated title.
One of the main benefits of choosing Biteable is that you can share the videos you edit directly on social media without having to download the video.

Flexclip Video Maker
Link: https://www.flexclip.com/editor/
Rating: 4.5/5
Flexclip is another very easy-to-use and easily accessible solution to create animated texts for videos. Rather than create the texts from scratch, Flexclip allows you to create stunning animated texts just by selecting several parameters.
There are also a lot of pre-made designer text templates that are fully customizable. All you have to do is select one of the templates, and change the text, font, and any images to make it unique to you and your video.

Part 2. Animated Title Maker for Computer
Online tools can be useful, especially since they are more easily accessible. But if you want additional features and more ways to customize your animated title, the following desktop solutions may be more applicable to you;
Filmora
Rating: 4.5/5
Wondershare Filmora is a complete suite of video editing tools that can also come in handy when creating animated titles for videos. It is a very simple video editor with a simple user interface, making it an ideal solution even for beginner users. Adding a title to your video is easy and you get to choose from more than 200 different animations that you can apply to bring the text to life.
Filmora is also very useful because it comes with advanced editing features for the professional editor. You can use it to edit all aspects of the video including the clips and even any audio that may be on the project.

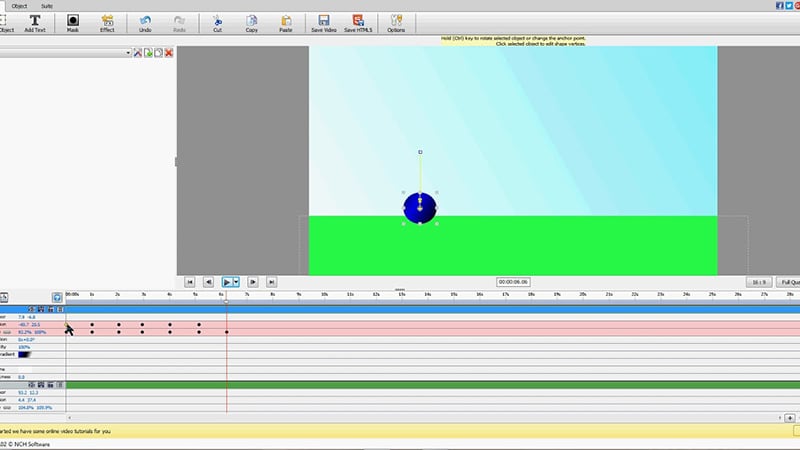
Adobe Animate
Rating: 4.5/5
Adobe Animate is a great option to create various animations for your video project, including animated texts. Used by animators to create 2D animated content, Adobe Animate has a lot of features designed to facilitate this kind of animation and is, therefore, one of the go-to solutions for designers looking to create illustrations like logos and infographics.
But like other Adobe programs, Adobe Animate is not very easy to use and the beginner may find that it takes quite a long time to figure out how it works. But once you figure it out, the 800+ web fonts can make it very easy for you to customize your animated title in various ways.

Express Animate
Rating: 4.5/5
Express Animate is a completely free program that you can download on your computer. It is a complete video editor which means that you can use it to animate text and characters, but it is also a great way to edit other aspects of the video including the audio tracks and adding digital effects.
With a simple user interface, Express Animate allows users to create 2D animations that can be used to create unique videos. It is also a good way to create GIFs and memes.
Movavi Video Editor
Rating: 4.5/5
Movavi Video Editor is another complete suite of editing tools that can also come in handy when you want to create an animated title for your video. Designed for both professionals and beginners, this video has all the advanced features you will need to edit all aspects of your video, including a built-in audio editor.
When it comes to animation, Movavi has a lot of effects and transitions as well as pre-made title templates to choose from. Once you have selected the title, you can easily customize the font and color to fit into your project.

Windows Movie Maker
Rating: 4.5/5
For PC users Windows Movie Maker is a simple to use and free way to edit videos. Included with the Windows OS, you likely don’t need to install any software to use and even though it is a free solution, Windows Movie Maker does have the necessary features to create and add animated titles to any video.
It comes with numerous effects, transitions, and templates to choose from when animating text. And it can also be used to edit videos in other ways including trimming and merging clips.

Part 3. Animated Title Maker Apps
If you are editing your videos on your mobile device, the following are the top animated title-making apps to choose from;
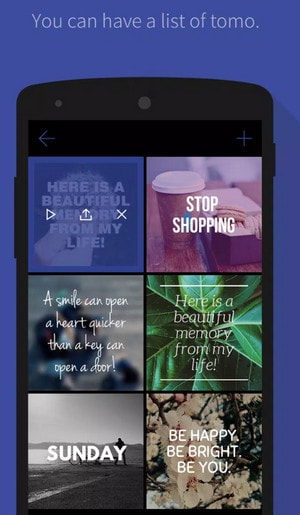
Tomo
Rating: 4.5/5
Link: https://m.apkpure.com/tomo-animate-text-in-video/com.entzeners.app.tomo
Tomo is one of the best apps that you can use to animate text in a video. It has robust features that allow you to easily add text to the video and then animate the text using various transitions and effects. Once the edits are complete, Tomo allows you to share the completed video directly on social media apps like Instagram and Twitter.
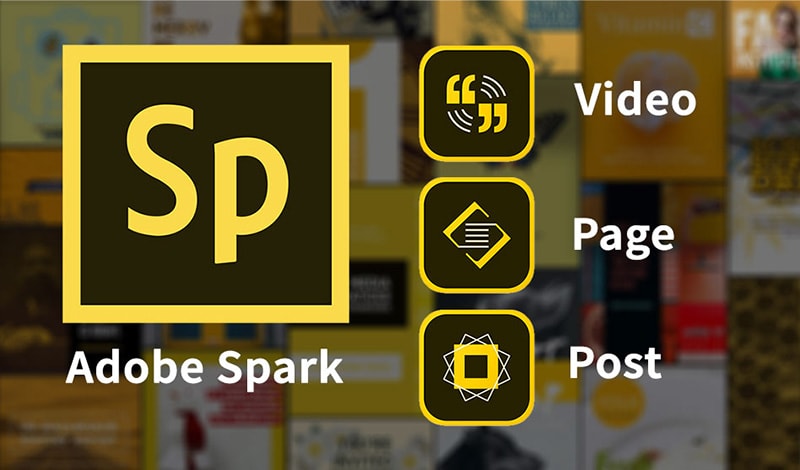
Adobe Spark
Rating: 4.5/5
Link:https://apps.apple.com/us/app/adobe-spark-post-design-maker/id1051937863
Available for both Android and iOS devices, Adobe Spark is a video editing tool that has numerous tools to add and edit texts on videos. You can use the professionally designed templates that you have access to when using Adobe Spark to create stunning animation titles. And since it easily integrates with other apps on the device, sharing the videos is very easy.
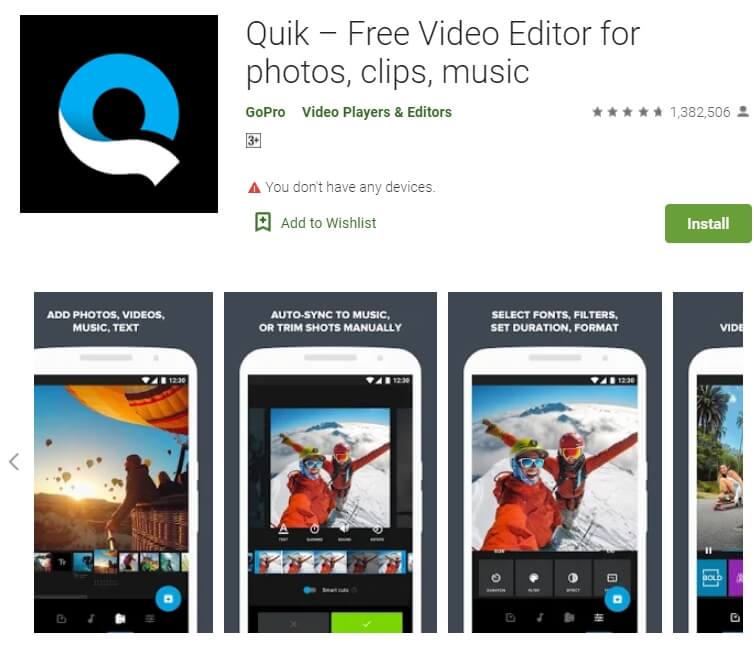
Quik
Rating: 4.5/5
Link: https://play.google.com/store/apps/details?id=com.gopro.smarty&hl=en&gl=US
Quik is an app that is dedicated to text animations and therefore one of the best solutions when you want to add and edit texts on videos. It is available for both iOS and Android and although the free version of the app is slightly limited, its basic editing features are still better than what you find on other more expensive solutions.
Hyper-type Animated Text Videos
Rating: 4.5/5
Link: https://itunes.apple.com/us/app/hype-type-animated-text-videos
This app gives you two options when it comes to animating the text on your video; auto-motion and typography. It focuses on just adding and editing text on a video and as such may not have any of the other video editing features you will find on some of the other apps. But if your goal is to create an interactive animated video title, Hyper-type Animated Text Videos is a great solution.
Vimeo
Rating: 4.5/5
Link: https://play.google.com/store/apps/details?id=com.vimeo.android.videoapp&hl=en&gl=US
Also available for both iOS and Android devices, Vimeo can also be a handy solution for the creation and editing of animated titles for videos. It has a lot of features to edit not just the text in videos, but also all other elements including audio. You even get a wide selection of royalty-free music that you can add to the video and motion stickers to make your title stand out even more. But the free version of Vimeo will add a watermark to the video.

Free Download For Win 7 or later(64-bit)
Free Download For macOS 10.14 or later
Also read:
- New Vintage Film Effect 1980S - How to Create for 2024
- New Quick Answer What Is a GIF File, In 2024
- Updated 2 Easy Methods | How To Zoom In On TikTok Videos for 2024
- 2024 Approved In This Guidepost, Youll Learn What an HDRI Photo Is and How to Use the Best Free HDRI Program to Edit Photos. Youll Also Know the Difference Between HDR and HDRI
- New Discover How to Change Sky Background with The Best Applications? A Review for 2024
- New 2024 Approved How to Create Liquid Water Reveal Intro?
- 2024 Approved Learn How to Change Aspect Ratio in iMovie on Mac, iPad, and iPhone in This Guide. And You Can Also Use iMovie Alternatives Like Wondershare Filmora to Edit Your Videos
- In 2024, Whatsapp Video converterKeywords Convert Video for Whatsapp 6600; Video Converter for Whatsapp 6600; Reduce Video Size for Whatsapp 1600; Whatsapp Supported Video Formats 720; Convert Video to Whatsapp Format 590
- New 2024 Approved Do You Want to Get Green Screen Effects on Your Video without Green Screen Setup in Your Background? Learn How to Get Virtual Green Screen Background and Shoot Videos Like a Pro
- New Here, You Will Get the Basic Steps to Use the Speed Ramping Effect in Your Videos by Wondershare Filmora Software. In This Article, You Get a Guide to Adding the BCC Glitch Effect to Give Your Sports Montages a More Professional Look
- New In 2024, Do You Want to Know How to Edit a Time Lapse Video on iPhone, Interesting Ideas, and some Tips and Pointers for Shooting a Professional Time Lapse Video? Find Out Everything in This Guide
- Updated 2024 Approved Transforming a Slow-Motion Video to Normal Mastering the Skill
- Updated Make Videos with Pictures and Music-10 Apps
- Learn 4 Proven Methods for Creating Engaging and Memorable Recap Videos. Elevate Your Event Coverage and Engage Your Audience with These Tips and Tricks for 2024
- Updated 2024 Approved Making Creative and Engaging Youtube Videos Is Now Easy with Several Tools. Now, YouTube Also Offers You Its Own Built-In Video Editor Through Which You Can Edit and Enhance the Video Quality
- New Color Matching Is the Trickiest Part of Graphic Designing. Learn in Detail About Using Canva Color Match Ideally While Working on Your Pins, Social Media Posts, and Other Designs
- New In 2024, GIF to JPG Is as Simple as a Blink of an Eye
- In 2024, Free Ways To Split Video For Whatsapp Status On All Platforms
- 2024 Approved Scaling and Setting Videos in Filmora | Tutorial
- Top 22 Free Video Editing Software
- 2024 Approved How to Create a Light Sweep (Shine) Effect with Filmora
- How to Create a Glitch Text Effect for 2024
- New Sometimes It May Happen to You that You Are Watching a Video that Has Very Low Graphics or, in Other Words, Low Visual Quality. You Might Wish to Change, Instead Improve the Video Quality. Here, AI Upscaling Video Comes to Use
- Gif to Svg, Svg to Gif, Convert Gif to Svg, Animated Svg to Gif, Convert Svg to Gif, Svg to Gif Converter, Svg to Gif Animation, Svg Animation to Gif, Gif to Svg Converter for 2024
- 2024 Approved Perfect Moody LUTs for VN Editor An Overview
- Updated 2024 Approved Learn Topaz Video Enhance AI Review and Achieve Powerful Video Conversion
- Updated Step by Step to Crop Videos with CyberLink PowerDirector for 2024
- How To Quickly Create A Screen Print Effect In Photoshop Detailed Gui
- All You Need To Know About Mega Greninja For Samsung Galaxy A24 | Dr.fone
- Android Safe Mode - How to Turn off Safe Mode on Lava Storm 5G? | Dr.fone
- Pokemon Go No GPS Signal? Heres Every Possible Solution On Realme 11X 5G | Dr.fone
- Fix App Not Available in Your Country Play Store Problem on Vivo Y28 5G | Dr.fone
- New In 2024, What Is AI Advertising? | Wondershare Virbo Glossary
- In 2024, Will Pokémon Go Ban the Account if You Use PGSharp On Honor Magic Vs 2 | Dr.fone
- In 2024, Full Guide to Bypass Vivo V27 Pro FRP
- In 2024, Dose Life360 Notify Me When Someone Checks My Location On Samsung Galaxy M14 5G? | Dr.fone
- How To Recover Data From Lost or Stolen iPhone 12 mini In Easy Steps | Stellar
- In 2024, How to Unlock Apple iPhone 6 Passcode without iTunes without Knowing Passcode? | Dr.fone
- In 2024, How to Factory Reset iPad or iPhone 14 Plus without iCloud Password or Apple ID?
- How to solve MKV lagging problem in Motorola Moto G34 5G?
- The Top 10 Apple iPhone 15 Pro Emualtors for Windows, Mac and Android | Dr.fone
- In 2024, How to Change Google Play Location On OnePlus Nord CE 3 5G | Dr.fone
- How To Deal With the Tecno Spark 20C Screen Black But Still Works? | Dr.fone
- In 2024, Top 15 Augmented Reality Games Like Pokémon GO To Play On Motorola Edge 40 | Dr.fone
- Updated 2024 Approved Translate Videos with Subtitle Cat Your Essential Guide
- Ultimate Guide on Honor 90 Pro FRP Bypass
- In 2024, Top 7 Skype Hacker to Hack Any Skype Account On your Vivo V27 | Dr.fone
- 9 Solutions to Fix Process System Isnt Responding Error on HTC U23 | Dr.fone
- New Top 10 Websites to Download Anime Subtitles for Free
- New 2024 Approved How to Define AI Video?
- Updated 2024 Approved 10 Great Apps to Turn Funny Animated Images Into Comics
- Easy steps to recover deleted data from Realme 10T 5G
- In 2024, Android to Apple How To Transfer Photos From Honor X50i+ to iPad Easily | Dr.fone
- How To Transfer Data From iPhone 13 mini To Other iPhone 13 devices? | Dr.fone
- Title: 2024 Approved 8 Apps to Custom GIF Stickers
- Author: Morgan
- Created at : 2024-05-19 05:11:48
- Updated at : 2024-05-20 05:11:48
- Link: https://ai-video-editing.techidaily.com/2024-approved-8-apps-to-custom-gif-stickers/
- License: This work is licensed under CC BY-NC-SA 4.0.
