

2024 Approved Best GIF to MOV Converters
Best GIF to MOV Converters
Powerful Video Editor - Wondershare Filmora
Provide abundant video effects - A creative video editor
Powerful color correction and grading
Detailed tutorials provided by the official channel
Nowadays, we tend to see more GIFs in email. Many businesses incorporate video in email to promote their products, but why use a video when you can convert GIFs to MOV?
Everyone needs to convert one file type to another sometimes and it can become a bit of a hassle. A lot of conversion apps and websites aren’t free, so you might want to find out if there’s an online or offline app that can help you to do it. This article will look at some of the top options that are worth looking at.
Best 5 GIF to MOV Converter Software
Love GIFs, but worried about support on email clients? It’s time to convert your animated GIFs to MOVs, eliminating the need for MP4 conversion. Here are some of the top GIF-to-MOV converters to get you started.
1. Wondershare Filmora

You may have heard of Filmora by Wondershare , a powerful but easy-to-use video editing suite that provides animation, video effects, and editing capabilities to users. But did you know you can convert GIFs to MOV files with it?
Wondershare Filmora lets you convert animated GIF files to video files in a breeze. So if you want to turn your unforgettable GIF images into remarkable home movies or promo videos, this free GIF to MOV converter will be your best choice!
It works well in real-time and you can also create short videos with it. For a very long time, this video editor has gained popularity among millions of people.
Pros
Available for all devices
Professional to run offline
Best offline video editing tool
Supports screen recording
User-friendly interface
Cons
Free version has watermarks
A bit more expensive than others
Not sophisticated with 4k video editing
2. Adobe Premiere Pro

Adobe Premiere Pro is the top-of-the-line video editing software. It is one of the most powerful and professional applications, and it is more than able to handle even the most serious projects.
If you are a professional video editor and have all Adobe products, then you’ll find this conversion process straightforward. However, if you are an amateur and don’t have any prior experience with editing software – then converting GIF to MOV can be quite challenging.
Still, for many people, it is simply too expensive, which is why choosing a less expensive option may be appropriate. Fortunately, there are other similar programs that are excellent choices in terms of quality versus price.
Pros
Support a plethora of file formats
Very professional video editing
Runs effectively on Windows OS, macOS
Integrated VR Support
Cons
Not an easy application for non-tech users
Free for only 30 day
3. Movavi Video Editor Plus

Movavi Video Editor Plus is one of the most favorite GIF to MOV offline and online converters because it offers all the options and tools you need to make videos. It comes with a lot of useful features, including 20+ filters, 15+ transition effects, 40+ video and audio effects, 60+ built-in templates, and 34 color schemes.
You simply upload our gif file, select the format of your choice, e.g. MOV, and run the process. This tool provides immediate results and an easy-to-use interface.
It’s a great option for users who want to create quality videos from animated GIFs but don’t want to pay a lot for the software.
Pros
Chroma keying
Sharp movie-creation app
Highly adaptive
Easy functions
Cons
No advance trimming options available for editing
Doesn’t support editing on Apple Silicon M1
4. VLC

VLC has been a popular video converter for many years because it can also be used as a multimedia player, and this is why we are going to introduce you to this software. If you are looking for a free, complete, and safe converter to convert your files easily, this is the best option for you.
VLC (Videolan Media Player) is a program with a large number of use cases. It can be used to play your music and videos, but it’s also an audio and video converter as well. This Multiplatform program is available for Windows, Mac, Linux, Android, and iOS systems.
The interface is very intuitive and easy to learn. We don’t need to mention that it is constantly being updated with new features from the development team.
Pros
Simple interface
Can be installed quickly
Free to use
Best solution to play all video formats
Cons
No updated features
5. Cyberlink PowerDirector

The CyberLink PowerDirector is a complete video editing suite used for creating outstanding videos from scratch. It comes with a number of advanced editing tools and offers simple three editing modes to users that help them create compelling videos at faster speeds.
With it, you can easily create photo slideshows and turn your visual memories into video masterpieces like a pro. It has advanced video editing tools and trendy transitions and effects. Also, the tool is a good converter of all formats that you can use as better content for multiple tasks.
Pros
Support over 100 stellar audio and video editing features
Supports end-to-end 3D and 4k animations
Fast in action and functions
Friendly layout
Support amazing effects, filters, themes, and transitions
Cons
Ads creating distraction
Expensive tool
Online GIF to MOV Converter
Why go to the offline gif to MOV converter page? Online converters are far easier to use as they don’t require you to install any software. For instance, you can convert gif files to MOV files just by logging onto different websites. All that is required is a few simple clicks and you are ready for your next step.
1. CloudConvert

If you ever need to convert a gif file to MOV or one of the other formats supported by CloudConvert , you’re in luck. CloudConvert is an online platform through which you can quickly and easily convert gifs to MOV or any other format. With it, you’ll enjoy fast conversions with lossless compression and a batch conversion feature to ensure performance-friendly uploads. Best of all, the service is free for personal use, has no hidden fees, and requires no downloads or plugins.
Pros
Free to use
Interactive layout
Smooth experience
Provides extra customization of file
Cloud-based technology
Cons
Large volume files can be troubling for tool
Work pace depends on internet speed
2. EZGIF.COM

Ezgif.com is an interesting website. It helps GIF fans around the world to convert their favorite gif image to MOV or MP4. It offers a fast, efficient, and high-quality conversion service. Their commitment to customer satisfaction is genuinely remarkable and the attention they give new clients is excellent. Would recommend them highly!
Apart from converting files, Ezgif.com is an awesome animated GIF maker. It converts, resizes, edits, and creates GIF animations, and works on virtually any device or browser. Nowadays, more and more people are switching to chat applications that support animated graphics, over old email systems so it’s useful for both personal and professional use.
Pros
Absolutely safe website
Upload file from cloud, computer, or URL
Quick functionality
No need for paid subscription
Cons
The design seems outdated
No feature of file customization
3. Convertio

Whether you need to convert a GIF to an AVI, MP4, or MOV, Convertio is one of the most comprehensive online programs which can do this for you.
It is an online conversion tool that lets you choose from and convert MOV, AVI, WMV, FLV, MPEG-1, MPEG-2, ASF, QT, and DivX formats. It boasts a ton of supported formats with really fast conversion (up to 3 files per minute) that can be done by drag & dropping.
Its simple interface shows two blocks from which you can select which file will be converted to which format. Choosing files, selecting format, and converting them is all that this process is about. So here we conclude that Convertio is so far the best and easy-to-use interface for all online conversions of documents.
Pros
No guide is required for starting conversion
Fast conversion tool
Satisfied performance
Highly interactive
Affordable to experience premium features
Cons
Free trial is limited
100 MB per file is daily limit under freemium use
How to Convert GIF to MOV Using Wondershare Filmora?
Step 1: Download and install
To get started, download the software for free and install it on your computer.

Step 2: Make a new project
Click on the filmora icon to open the software interface and create a new project. On the top menu, go to File and choose “Project Settings”.

Step 3: Download GIF
Download the GIF to convert and save it to your document folder or desktop.
Step 4: Import GIF
Click on the timeline to import your GIF. Now click the highlighted “EXPORT” at the top.

Step 5: Save MOV format
On the options given, select MOV as your output video file format and tap Find Target to save your video file.
Conclusion
The two main types of GIF to MOV Converters are online ones and offline apps. The most popular offline converter is Wondershare Filmora, as it’s been around longer than most. On the other hand, the best online video editor and file converter is Convertio. It supports a wide range of input and output formats, but there are many other free converters that convert from GIF to MOV, so you might like to check them out before deciding which one to use.
How to Zoom Picture in Picture [Easy Solution]
Zoom is one of the greatest options on the market for video conferencing. It doesn’t matter whether you use it at home or in an office environment; it will quickly link the team members. One of the most popular video conferencing programs is Zoom. When in-person meetings aren’t feasible, it enables you to communicate electronically with employees, and it’s been a major popularity for social occasions as well. In case you’re not acquainted, picture-in-picture mode enables you to watch videos from one app while using your PC normally. The movie will keep playing in a tiny thumbnail window so that two applications may work simultaneously on your smartphone.
You may create virtual audio and video conferences, webinars, live chats, screen sharing, and other collaboration tools with Zoom, a cloud-based video communications solution. Zoom’s most recent iPhone apps let you dismiss a Zoom Meeting while keeping the Zoom video call open in a picture-in-picture mode. To join a Zoom conference, you don’t need an account, and because the software works with Mac, Windows, Linux, iOS, and Android devices, nearly anybody can use it. Since using Zoom’s picture-in-picture mode is the same as using it with other applications, you shouldn’t have any trouble if you often use PiP mode. Here are the top 4 methods you can refer to picture in picture in Zoom.
Method 1: Swap Shared Screen with Video
You may move the Zoom Meeting PiP window across the screen, change the thumbnail’s size, and utilize other applications while it remains open, just like any other picture-in-picture window. Before leaving the meeting if you’re not giving a presentation or speaking, you should definitely mute Zoom on your iPhone to prevent noises from your typing or other activities from entering the conversation. Additionally, keep in mind to switch off the camera if you’re engaged in something distracting, at least for the duration of your activity. To reopen the Zoom Meeting and go back to the Zoom app, touch the Picture-in-Picture mode pane. Here are some actions to keep in mind:
Steps to Swap Shared Screen for Zoom Picture in Picture
Step1Launch or enter a Zoom meeting. Keep the video on your main screen at all times, closing the chat and participant list as necessary.
Step2Tap the Home button or swipe up from the bottom of the screen.
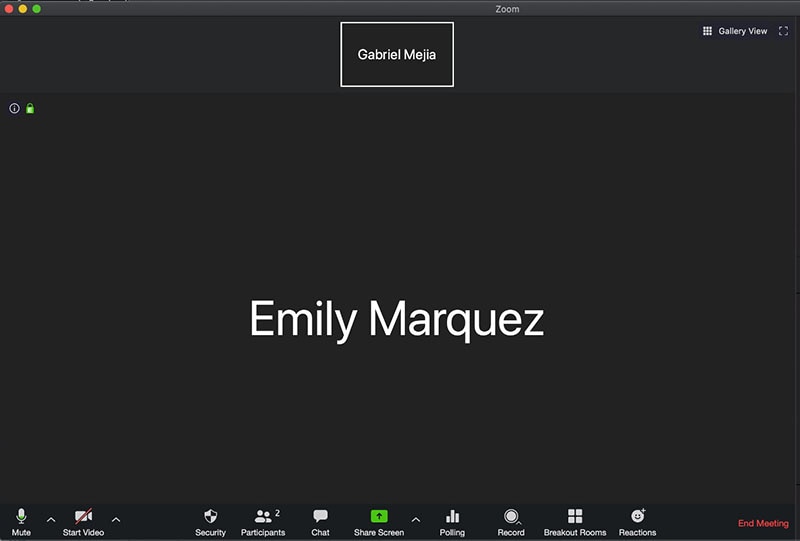
Step3Picture-in-picture mode should be activated automatically throughout the meeting.
Method 2: Use Ecamm Live
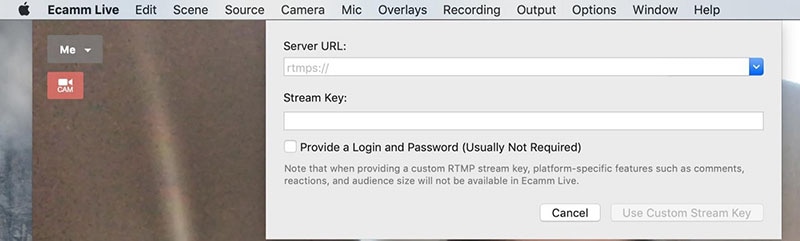
Live streaming is a fantastic way to provide original content and stand out from the crowd. To prevent any operational difficulties, a more sophisticated virtual camera is absolutely necessary. You now have magical abilities thanks to Ecamm virtual cam, including the ability to add text, animations, observe a live stream, post viewer comments, play music, share your screen, use sound effects, and many more. It offers the Ecamm live virtual camera zoom function for video conferences so you may improve your Zoom discussions by sending output to other PC programs. You could see a quality difference between what you view in Ecamm Live and what your Zoom visitors see while utilizing virtual camera with Zoom. The quality of a Zoom video stream cannot be improved using Ecamm Live. Simply broadcast the Zoom app using Ecamm Live’s Screen Share mode to utilize Ecamm Live for picture-in-picture virtual presentations on Zoom.
Steps to Use Ecamm Live for Zoom Picture in Picture
Step1Download the Ecamm Application
Install Ecamm Live on your computer, then choose the center button in the source switcher at the top of the main window to enter Screen Share mode.
Step2Create Scenes
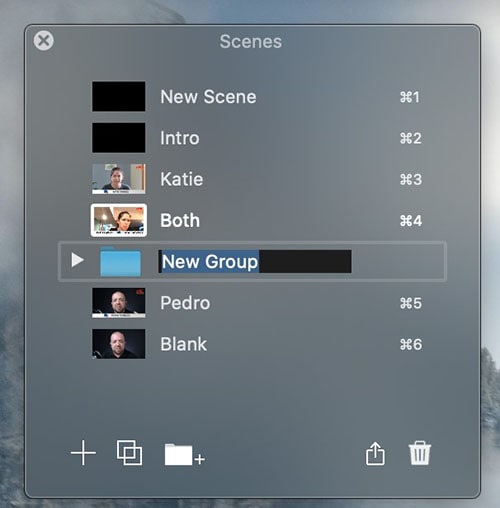
With the use of Ecamm Live’s Virtual Camera and Virtual Mic capabilities, you may transfer Ecamm Live’s output to almost any other Mac software, including Zoom. After setting, create the scenes in the program to quickly switch between various cameras.
Step3Select Ecamm on Zoom
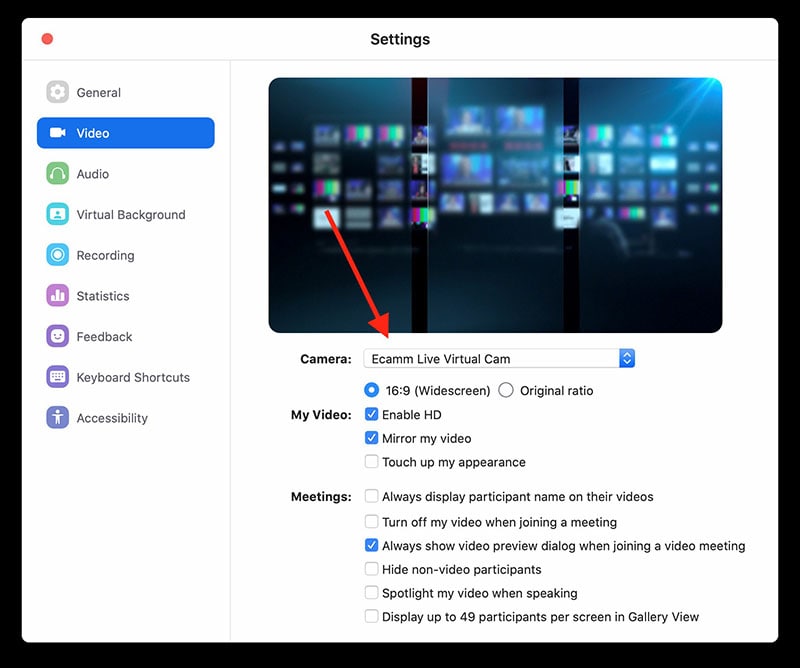
You may also utilize Ecamm Live’s Sharing Window capability to feed Ecamm Live output into Zoom. Simply activate the virtual camera, and then, as seen below, choose Ecamm Live Virtual Camera in Zoom’s video settings:
Step4Begin Your Presentation
Finally, click the PC share option to show your Zoom app to your audience. To conceal a picture-in-picture window that displays your camera image while live streaming, click the PIP button.
Method 3: Use Filmora as A Switcher
Zoom has solutions that will make your meetings simple and secure. It gives your remote staff a secure setting to interact and share crucial information. Ideal control over your film and configuration options to make them aesthetically pleasing is something Zoom lacks. To overcome the drawbacks and improve the quality of your online meetings, you may take use of the capabilities of Zoom in conjunction with Filmora. Filmora was developed with the intention of easing user burden and supporting applications. Though complicated, the program is simple to use. The perhaps most popular web information that may be saved on your computer can be easily captured by just angling your screen. For more information on how to record and save your Zoom for picture in picture, see the guide here.
To broadcast a variety of situations in a grid style, you may also combine inputs from your camera, microphone, computer screen, and web conferencing software. Wondershare -the finest desktop application for recording a Zoom Picture in Picture meeting- is Filmora. With the majority of cameras, this app’s screen recording capability is both user-friendly and feature-rich. Here, users may either choose a particular region to record or record their zoom meetings in Fullscreen mode. Additionally, you may choose the camera and input microphone that will be used while recording a video overlay. The addition of relevant comments like phrases, lines, drawings, symbols, etc. is also possible by users. The detailed procedure for recording a Zoom Picture-in-Picture meeting using a Filmora recorder is given below:
Free Download For Win 7 or later(64-bit)
Free Download For macOS 10.14 or later
Step1Download and Install Filmora Zoom Recorder
You may find both types, i.e., the most recent Windows and Mac versions, by first visiting the usual website and then using this Zoom. Install the program on your computer once you download it to get started.

Step2Initiate Filmora Recorder
After finishing the installation process for this Reside Zoom recorder, launch it from the main menus and choose “New Task” when prompted. It will take you to Filmora’s streamlined user interface where you can immediately start filming. Then, as seen in the picture below, you may adjust the screen recording using your preferred camera, microphone, and system settings:

Step3Begin/End the Recording
When you are through configuring this Zoom picture in picture recorder, click the Record button, and it will immediately begin recording your customized screen. Similar to that, after you’re done recording, click Stop, which will take you inside the video editor where you may edit your recorded information.

Step4Share Recordings
When you have everything ready, export your recording right away. After you’re done with the editing part, you do have a lot of options to choose from when displaying your screen capture and webcam stories. To do so, click the Export button in the item user interface’s top-right corner as shown below:
You may easily choose your preferred way to share from there if you choose to upload your work of zoom picture in picture recordings straight to the YouTube or other reputable websites right now. Simply refer to the Sharing plug-ins in the Export window to find out more.
Method 4: Use Hardware Switcher ATEM Mini Pro
Particularly on Zoom, the ATEM Mini is excellent for video conferences. The Blackmagic ATEM Mini is a USB video interface and HDMI switcher. Four HDMI inputs, or four cameras that can produce an HDMI video stream, may be switched between live. This device integrates Zoom meetings fast and makes it incredibly simple to set up your audio, a sometimes-forgotten aspect of video broadcasting. This sophisticated video switcher promises to offer broadcast-quality multi-camera footage with ease and is targeted at gamers, streamers, and online reviewers. It connects to a computer via a USB-C to USB-A connection. The video feed may then be sent to distant colleagues via a number of well-liked videos streaming services, including Zoom.
Step1The ATEM Mini Pro is a basic control switcher with pro-broadcast performance. Your ATEM Mini Pro is really simple to set up. You can connect a full setup with several cameras and microphones in around 30 minutes.
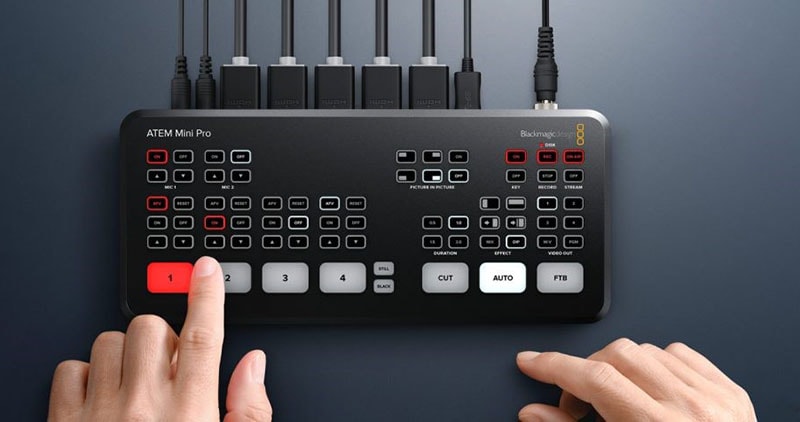
Step2You may connect several camera sources to the inputs of the ATEM Mini Pro. The 4 HDMI inputs each have a separate standards converter built in. As a result, the ATEM Mini can automatically convert inputs that are 1080p, 1080i, or 720p to the switcher’s video standard. You may make quick changes between inputs with no latency or disruption to your video output by using the ergonomic buttons.
Step3As a third option, Zoom offers ATEM Mini, which enables you to switch between several inputs, add custom visuals, and adjust audio levels all from a single interface. To improve the quality of your production, you may even use smooth transitions like wipes or fades. You can even test any input stream before making it live.
Conclusion
When you are doing a Zoom Meeting and share your screen, only to discover that what the other attendees see is a split screen with your material and the other Attendee cams, it is highly annoying. You may move the Zoom Meeting PiP window across the screen, change the thumbnail’s size, and utilize other applications while it remains open, just like any other picture-in-picture window. Someone must be sharing information in the Zoom conference for the Picture in Picture, or “Split Screen” option, to be active. We’ve listed the top techniques for doing it effectively above. To do this work without difficulty, use them as your guide.
Free Download For macOS 10.14 or later
Step1Download and Install Filmora Zoom Recorder
You may find both types, i.e., the most recent Windows and Mac versions, by first visiting the usual website and then using this Zoom. Install the program on your computer once you download it to get started.
Step2Initiate Filmora Recorder
After finishing the installation process for this Reside Zoom recorder, launch it from the main menus and choose “New Task” when prompted. It will take you to Filmora’s streamlined user interface where you can immediately start filming. Then, as seen in the picture below, you may adjust the screen recording using your preferred camera, microphone, and system settings:
Step3Begin/End the Recording
When you are through configuring this Zoom picture in picture recorder, click the Record button, and it will immediately begin recording your customized screen. Similar to that, after you’re done recording, click Stop, which will take you inside the video editor where you may edit your recorded information.
Step4Share Recordings
When you have everything ready, export your recording right away. After you’re done with the editing part, you do have a lot of options to choose from when displaying your screen capture and webcam stories. To do so, click the Export button in the item user interface’s top-right corner as shown below:
You may easily choose your preferred way to share from there if you choose to upload your work of zoom picture in picture recordings straight to the YouTube or other reputable websites right now. Simply refer to the Sharing plug-ins in the Export window to find out more.
Method 4: Use Hardware Switcher ATEM Mini Pro
Particularly on Zoom, the ATEM Mini is excellent for video conferences. The Blackmagic ATEM Mini is a USB video interface and HDMI switcher. Four HDMI inputs, or four cameras that can produce an HDMI video stream, may be switched between live. This device integrates Zoom meetings fast and makes it incredibly simple to set up your audio, a sometimes-forgotten aspect of video broadcasting. This sophisticated video switcher promises to offer broadcast-quality multi-camera footage with ease and is targeted at gamers, streamers, and online reviewers. It connects to a computer via a USB-C to USB-A connection. The video feed may then be sent to distant colleagues via a number of well-liked videos streaming services, including Zoom.
Step1The ATEM Mini Pro is a basic control switcher with pro-broadcast performance. Your ATEM Mini Pro is really simple to set up. You can connect a full setup with several cameras and microphones in around 30 minutes.
Step2You may connect several camera sources to the inputs of the ATEM Mini Pro. The 4 HDMI inputs each have a separate standards converter built in. As a result, the ATEM Mini can automatically convert inputs that are 1080p, 1080i, or 720p to the switcher’s video standard. You may make quick changes between inputs with no latency or disruption to your video output by using the ergonomic buttons.
Step3As a third option, Zoom offers ATEM Mini, which enables you to switch between several inputs, add custom visuals, and adjust audio levels all from a single interface. To improve the quality of your production, you may even use smooth transitions like wipes or fades. You can even test any input stream before making it live.
Conclusion
When you are doing a Zoom Meeting and share your screen, only to discover that what the other attendees see is a split screen with your material and the other Attendee cams, it is highly annoying. You may move the Zoom Meeting PiP window across the screen, change the thumbnail’s size, and utilize other applications while it remains open, just like any other picture-in-picture window. Someone must be sharing information in the Zoom conference for the Picture in Picture, or “Split Screen” option, to be active. We’ve listed the top techniques for doing it effectively above. To do this work without difficulty, use them as your guide.
How To Make a Polaroid Collage
How To Create a Polaroid Collage?
An easy yet powerful editor
Numerous effects to choose from
Detailed tutorials provided by the official channel
As it is said that “Old is gold”, the same holds true when it comes to collages. No matter how advanced the technology has become or the design has evolved with collages the old-fashioned polaroid collages are never out of fashion. Polaroid images are small pocket-sized images having a white border developed using polaroid cameras. When it comes to collages, you can develop these images using your special camera and then lay them out in the desired pattern.
With everything taking the digital route, collage creation is no exception and now you can quickly create customized polarised collages using all your favorite pictures. Learn more about polaroid collages, the best tools for their creation, and more in the following parts.
In this article
01 [How to Create an Impressive Polaroid Collage](#Part 1)
02 [How to Create a Polaroid Photo Collage in Photoshop](#Part 2)
03 [Best Place to Get Stock Images for Your Polaroid Collage](#Part 3)
04 [How to Make a Photo Collage Online](#Part 4)
Part 1 How to Create an Impressive Polaroid Collage
Like any other collage, a polaroid collage is one where several polaroid styles images are placed together in the desired pattern. To create an eye-catchy polaroid collage, some of the basic requirements are as follows.

01Use the right tool
First of all, select the right tool that can help you create the desired collage. There are several online as well as desktop programs available for this. Choose a tool that comes with multiple polaroid collage template and offers different editing options.
02Select a layout/design/template
Next, select the desired layout or the polaroid frame collage template from the available options that match your requirements.
03Add high-quality images
Now it’s time to add the images to the template. To make an impressive collage make sure to add high-quality images. You can either use the images captured by you or can also use the stock images available at different online sites.
04Personalize and customize the collage
Next, it’s time to customize the collage. After the images are added, you can further add elements like text, filters, effects, and others to make your collage look more appealing.
05Save, print, or share the collage
Finally, it’s time to save the collage, print it, or share it over online sites, social media platforms, or with your near and dear ones.
Part 2 How to Create a Polaroid Photo Collage in Photoshop
To create an interesting polaroid collage Photoshop works as a good tool. Both Photoshop CS6 and Photoshop Creative Cloud can be used for creating the desired collage with slight changes in the functioning of both versions.
01Steps to create polaroid collage using Photoshop polaroid collage maker
Step 1. Launch the Photoshop tool and add the first image. Choose the Rectangle Tool using its icon which is present in the lower half of the Tools panel.

Step 2. Next, at the left corner of the interface set the Shape option as Tool Mode for drawing the vector shapes.

Step 3. Next, choose the color of the rectangle shape, and to fill this select black at the Fill color swatch in the Options bar. A dialog box will appear to choose the type of fill and here you need to select the Solid Color option.
Click on the Enter button to close the dialog box.

Step 4. Also, ensure that there are no strokes around the edges, and for this tap on the Stroke swatch box on the right side of the Options bar. A Stroke Type dialog box will open where you need to select the None icon. Click on Enter to close the pop-up window.
Step 5. When all the above settings are done, press and hold the Shift key and then you need to click and drag the shape to move into the square box.

Step 6. A newly added shape layer will now appear at the Layers panel. Now you need to make a copy of this shape and then resize it for creating the outer frame of the polaroid.
The duplicate shape layer will be created and will appear on the Layers panel. Rename these shapes as desired.
Step 7. Now after selecting the border layer in the layers panel click again on the Fill color swatch and choose the White color (to make it look like a polaroid image).
Step 8. Next, move to the Edit menu and select Free Transform Path which will create the transform handles around the shape which can also be used for resizing.
Step 9. A shadow to the border can also be added by clicking on the icon of Layer Styles and then choosing the Drop Shadow option from the list.
Step 10. Choose the image area from the Layers panel.
Step 11. Next, use the Knockout function from the Blending Options.
Step 12. Now select both shape layers and group the layers by clicking on New Group from Layers in the menu. Give a desired name to the group.
Step 13. Next, click on the Background layer and choose New Fill or Adjustment Layer.
Step 14. Tap on the Polaroid layer group from the Layers panel and select it.
Step 15. Go to the Edit menu and select the Free Transform option.
Step 16. Now when all the major work is done, it’s time to create a duplicate layer group to create a new polaroid.

When multiple layer groups are added your polaroid photo collage will be ready.
Part 3 How to Make a Photo Collage Online
Creating a polaroid collage using Photoshop is quite complicated and a lengthy process. So, if you are looking for a simpler and quicker way to create the desired collage, we suggest using an online tool. Fotor is one such decent tool that works from your browser and comes with several pre-designed collage templates including polaroid.
The interface of this polaroid collage app is simple where you just need to select the polaroid-based template from the available options, add images, customize the collage by adding a text, filter, or any other element, and then download the created collage.
The interface is simple and user-friendly and the process of creating the collage is fast.

Part 4 Best Place To Get Stock Images For Your Polaroid Collage
To create an eye-catchy collage, the images added also need to be interesting. Besides your local pictures, you can even get stock images available at several sites. One such tool for stock images that we recommend is Wondershare Filmora Video Editor . Though this is an advanced video editing tool supporting a wide range of functions, it also comes with a library of images and other media files that can be used.
You can search from a vast collection of images in different categories and genres to be used for your collage. Additionally, the software also supports a split-screen feature where multiple videos can be played that appears like a video collage.
For Win 7 or later (64-bit)
For macOS 10.12 or later
● Ending Thoughts →
● Polaroid picture collage is one of the most interesting ways of making a collage.
● Photoshop is a great tool for creating a polaroid collage like a pro.
● Online tools like Fotor and others are simple and user-friendly and come with pre-designed templates for creating a polaroid collage.
● Wondershare Filmora is an excellent software to search for stock images and other files, editing videos, and also create a video collage.
As it is said that “Old is gold”, the same holds true when it comes to collages. No matter how advanced the technology has become or the design has evolved with collages the old-fashioned polaroid collages are never out of fashion. Polaroid images are small pocket-sized images having a white border developed using polaroid cameras. When it comes to collages, you can develop these images using your special camera and then lay them out in the desired pattern.
With everything taking the digital route, collage creation is no exception and now you can quickly create customized polarised collages using all your favorite pictures. Learn more about polaroid collages, the best tools for their creation, and more in the following parts.
In this article
01 [How to Create an Impressive Polaroid Collage](#Part 1)
02 [How to Create a Polaroid Photo Collage in Photoshop](#Part 2)
03 [Best Place to Get Stock Images for Your Polaroid Collage](#Part 3)
04 [How to Make a Photo Collage Online](#Part 4)
Part 1 How to Create an Impressive Polaroid Collage
Like any other collage, a polaroid collage is one where several polaroid styles images are placed together in the desired pattern. To create an eye-catchy polaroid collage, some of the basic requirements are as follows.
01Use the right tool
First of all, select the right tool that can help you create the desired collage. There are several online as well as desktop programs available for this. Choose a tool that comes with multiple polaroid collage template and offers different editing options.
02Select a layout/design/template
Next, select the desired layout or the polaroid frame collage template from the available options that match your requirements.
03Add high-quality images
Now it’s time to add the images to the template. To make an impressive collage make sure to add high-quality images. You can either use the images captured by you or can also use the stock images available at different online sites.
04Personalize and customize the collage
Next, it’s time to customize the collage. After the images are added, you can further add elements like text, filters, effects, and others to make your collage look more appealing.
05Save, print, or share the collage
Finally, it’s time to save the collage, print it, or share it over online sites, social media platforms, or with your near and dear ones.
Part 2 How to Create a Polaroid Photo Collage in Photoshop
To create an interesting polaroid collage Photoshop works as a good tool. Both Photoshop CS6 and Photoshop Creative Cloud can be used for creating the desired collage with slight changes in the functioning of both versions.
01Steps to create polaroid collage using Photoshop polaroid collage maker
Step 1. Launch the Photoshop tool and add the first image. Choose the Rectangle Tool using its icon which is present in the lower half of the Tools panel.
Step 2. Next, at the left corner of the interface set the Shape option as Tool Mode for drawing the vector shapes.
Step 3. Next, choose the color of the rectangle shape, and to fill this select black at the Fill color swatch in the Options bar. A dialog box will appear to choose the type of fill and here you need to select the Solid Color option.
Click on the Enter button to close the dialog box.
Step 4. Also, ensure that there are no strokes around the edges, and for this tap on the Stroke swatch box on the right side of the Options bar. A Stroke Type dialog box will open where you need to select the None icon. Click on Enter to close the pop-up window.
Step 5. When all the above settings are done, press and hold the Shift key and then you need to click and drag the shape to move into the square box.
Step 6. A newly added shape layer will now appear at the Layers panel. Now you need to make a copy of this shape and then resize it for creating the outer frame of the polaroid.
The duplicate shape layer will be created and will appear on the Layers panel. Rename these shapes as desired.
Step 7. Now after selecting the border layer in the layers panel click again on the Fill color swatch and choose the White color (to make it look like a polaroid image).
Step 8. Next, move to the Edit menu and select Free Transform Path which will create the transform handles around the shape which can also be used for resizing.
Step 9. A shadow to the border can also be added by clicking on the icon of Layer Styles and then choosing the Drop Shadow option from the list.
Step 10. Choose the image area from the Layers panel.
Step 11. Next, use the Knockout function from the Blending Options.
Step 12. Now select both shape layers and group the layers by clicking on New Group from Layers in the menu. Give a desired name to the group.
Step 13. Next, click on the Background layer and choose New Fill or Adjustment Layer.
Step 14. Tap on the Polaroid layer group from the Layers panel and select it.
Step 15. Go to the Edit menu and select the Free Transform option.
Step 16. Now when all the major work is done, it’s time to create a duplicate layer group to create a new polaroid.
When multiple layer groups are added your polaroid photo collage will be ready.
Part 3 How to Make a Photo Collage Online
Creating a polaroid collage using Photoshop is quite complicated and a lengthy process. So, if you are looking for a simpler and quicker way to create the desired collage, we suggest using an online tool. Fotor is one such decent tool that works from your browser and comes with several pre-designed collage templates including polaroid.
The interface of this polaroid collage app is simple where you just need to select the polaroid-based template from the available options, add images, customize the collage by adding a text, filter, or any other element, and then download the created collage.
The interface is simple and user-friendly and the process of creating the collage is fast.
Part 4 Best Place To Get Stock Images For Your Polaroid Collage
To create an eye-catchy collage, the images added also need to be interesting. Besides your local pictures, you can even get stock images available at several sites. One such tool for stock images that we recommend is Wondershare Filmora Video Editor . Though this is an advanced video editing tool supporting a wide range of functions, it also comes with a library of images and other media files that can be used.
You can search from a vast collection of images in different categories and genres to be used for your collage. Additionally, the software also supports a split-screen feature where multiple videos can be played that appears like a video collage.
For Win 7 or later (64-bit)
For macOS 10.12 or later
● Ending Thoughts →
● Polaroid picture collage is one of the most interesting ways of making a collage.
● Photoshop is a great tool for creating a polaroid collage like a pro.
● Online tools like Fotor and others are simple and user-friendly and come with pre-designed templates for creating a polaroid collage.
● Wondershare Filmora is an excellent software to search for stock images and other files, editing videos, and also create a video collage.
How to Fade to Black Premiere Pro
The most fundamental and typical sort of Fading is a simple cut, which is often used by editors to go from one shot to another. Applying effects between clips, at the start of a clip, or at its finish may sometimes help you smooth out or stylize your edit. Fade to black transition premiere pro can be used to get this outcome. To help users create current and trendy styles, Premiere Pro features a vast range of effects and tools including fade to black in premiere pro.
Going back to the days of black and white may sometimes be a welcome change of pace in the era of vivid digital and flashy film. Being a professional editor, you’ll understand that editing should be undetectable. If an editor has done their job well, no one will notice their efforts. You’ve failed as soon as the audience realizes the cut has occurred. But fading out to black (or white) seems out of the ordinary. Use this how to fade to black premiere pro guide to learn the steps in Adobe PR.
Part 1. What is Fade to Black
You will become a better filmmaker if you expand your vocabulary in video editing by learning about transitions. The dissolve-to-black, or fade-to-black (a fade to black in premiere pro), works well in part because it has a certain theatrical feel to it. A fade-out/fade-down, often known as a fade-to-black in theater, occurs in total darkness. One of the key components of video editing is using transitions in Adobe Premiere Pro.
The fundamental elements of many other transitions are fades. Effective use of Fades is a crucial skill in your video editing repertoire since it is subtle to the point of practically being undetectable. A video transition called a “fade to black” causes a scene or clip to gradually conclude with a black backdrop. It dates back to the time when the stage curtains were drawn and the lights were dimmed during a theatrical performance. The stage therefore went completely black while the team behind hurriedly changed into new clothing and stage items for the following action.
Those that seem to take place close together chronologically are edited together, while scenes that occur at separate periods or locales are faded out. These are recognizable features of the film. They alert us to the fact that the tale is moving to a later time or place, either thematically, chronologically, or geographically. In a practical sense, this is the time when the cast and crew switch out the set and clothes. But the fade-to-black marks the end of the scene in a symbolic and narrative sense.
Part 2. How to Fade to Black in Premiere Pro
One of the most widely used video editing programs is Adobe Premiere Pro. In Premiere Pro, a number of transitions are available. One of the first, most important responsibilities for a film editor to do is the utilization of numerous transitions. In fact, many aspiring film editors start off by learning how to fade to black in Premiere. Fortunately, creating a fade to black transition in Premiere isn’t that difficult to do step by step. Everything from straightforward dissolves to wipes, slides, and zooms may be found here.
Steps to Fade to Black in Premiere Pro:
Step1Launch the Program and Refer to the Effects
After launching Adobe Premier Pro CC, simply drag the Dip to Black effect from the Effects tab to the very start or very finish of the clip you want to use. The effect may then be moved around to change its duration as needed. Add two clips to the Premiere Pro timeline.

Step2 Add the fade to black transition
Drag and drop the Dip to Black effect between two clips on the timeline after selecting the Effects tab and typing “dip to black” into the search field. The right half of the clip will display the dip to black effect.

Step3 Customize the fade to black effect
Go to Effect Controls and, while the dip to black effect is chosen, alter the alignment to Center at Cut. Before video B starts, video A will now fade to black.
Step4 Optionally change the fade-to-black effect’s duration
just extend the timeline’s fade to black effect at the very end. The slower and smoother the fade to black effect will be, and vice versa, as you move the effect outward.

Part 3. Premiere Pro Alternative to Fade to Black
Although Premiere Pro is a powerful tool to fade to black, but what if your audience wishes to evoke a certain atmosphere, swap between tales, adopt a different point of view, spice up the narrative, or advance or recede in time? Here, more creative transitions would be beneficial. For that, Filmora is a fantastic substitute for Premiere Pro if you need to quickly apply a fade to black transition to your video.
The tool is packed with built-in features that are powerful enough to polish your videos in addition to fade to black effect. For creating scroll-stopping video content, you can also discover a ton of completely adjustable video templates for YouTube, TikTok, Instagram, Facebook, and other platforms as well as a ton of attractive overlay transitions and royalty-free music and sound effects.
Free Download For Win 7 or later(64-bit)
Free Download For macOS 10.14 or later
Steps to Fade to Black Using Filmora
Step1 Install Filmora on your laptop
You must first download this software application to your computer from one of the following sources in order to start:
You must install it on your computer once you’ve done downloading it before you can use it with your laptop.

Step2 Customize the Video
After the Import, you may edit your audio recordings using tools that are completely customizable. Use the editor in Filmora to edit your recorded audio files, using simple to advanced editing techniques. Your recorded video may be improved using Filmora’s Editor by adding animated titles, spectacular effects, audio enhancements, and more.

Step3 Fade to Black Videos
Spice up the Fade effect into your videos and add the effect into the timeline. You will be able to make it black at the ends by customizing the effect inside the Fade window.

Step4 Add VFX to Your Video
The software is embedded with Effects primarily to give your videos a polished appearance. You may utilize a variety of its eye-catching and adjustable effects to make your video productions stand out from the competition. In this area, we’ve covered some of the best effects for bringing life to your dull, unprofessional videos as shown below:

Step5 Save or Share the Videos
Finally, you may use the complete Filmora editor as previously mentioned when you’ve done editing the recorded video. When you want to submit your creative work right away to YouTube or another well-known website, click the Export option and choose the platform where you want to distribute your video clip. If you like, you may even make changes to the video before uploading it.
Part 4. Related FAQs
How do you fade a clip to black?
Utilizing the dip to black transition in your video sequence is the key to learning how to fade to black in Premiere. To produce the Fade to Black reaction you’re trying to accomplish, you must Dip to Black. Simply drag the feature to the conclusion of your sequence to complete the task. Where you want the fading to start and terminate. The length of the fade or dip may be altered using the effects control panel.
How do I fade to white in Premier Pro?
Contrarily, as this montage demonstrates, fading to white may be utilized to convey uncertainty or a feeling of optimism. One of the most traditional transition effects that is often utilized in movies and videos is the fade to white. Your film gains a cinematic feel from it, and the change from one scene to the next is more seamless.
How do you keyframe colors in Premiere?
You can find other color problems in Premiere Pro that you need to fix. Therefore, it makes sense to adjust your highlight, mid, and black points first and have them dialed in before addressing saturation and color temperature. Open the Color panel on the right side of the screen while your adjustment layer is highlighted in the sequence. Make your color adjustments while keeping in mind that the effect will be applied to every clip below it in the timeline.
We only stop feeling immersed when we notice abrupt cuts. It makes sense to know when to color correct your footage throughout the video editing process. If you color correct your film too early, you can be wasting your time by color grading footage that you might eventually cut out or never use. We hope that this article will assist you in streamlining your editing process if you’re just starting started using Premiere Pro’s adjustments layers. Try experimenting with Filmora if you often utilize them to improve your edits.
Free Download For macOS 10.14 or later
Steps to Fade to Black Using Filmora
Step1 Install Filmora on your laptop
You must first download this software application to your computer from one of the following sources in order to start:
You must install it on your computer once you’ve done downloading it before you can use it with your laptop.
Step2 Customize the Video
After the Import, you may edit your audio recordings using tools that are completely customizable. Use the editor in Filmora to edit your recorded audio files, using simple to advanced editing techniques. Your recorded video may be improved using Filmora’s Editor by adding animated titles, spectacular effects, audio enhancements, and more.
Step3 Fade to Black Videos
Spice up the Fade effect into your videos and add the effect into the timeline. You will be able to make it black at the ends by customizing the effect inside the Fade window.
Step4 Add VFX to Your Video
The software is embedded with Effects primarily to give your videos a polished appearance. You may utilize a variety of its eye-catching and adjustable effects to make your video productions stand out from the competition. In this area, we’ve covered some of the best effects for bringing life to your dull, unprofessional videos as shown below:
Step5 Save or Share the Videos
Finally, you may use the complete Filmora editor as previously mentioned when you’ve done editing the recorded video. When you want to submit your creative work right away to YouTube or another well-known website, click the Export option and choose the platform where you want to distribute your video clip. If you like, you may even make changes to the video before uploading it.
Part 4. Related FAQs
How do you fade a clip to black?
Utilizing the dip to black transition in your video sequence is the key to learning how to fade to black in Premiere. To produce the Fade to Black reaction you’re trying to accomplish, you must Dip to Black. Simply drag the feature to the conclusion of your sequence to complete the task. Where you want the fading to start and terminate. The length of the fade or dip may be altered using the effects control panel.
How do I fade to white in Premier Pro?
Contrarily, as this montage demonstrates, fading to white may be utilized to convey uncertainty or a feeling of optimism. One of the most traditional transition effects that is often utilized in movies and videos is the fade to white. Your film gains a cinematic feel from it, and the change from one scene to the next is more seamless.
How do you keyframe colors in Premiere?
You can find other color problems in Premiere Pro that you need to fix. Therefore, it makes sense to adjust your highlight, mid, and black points first and have them dialed in before addressing saturation and color temperature. Open the Color panel on the right side of the screen while your adjustment layer is highlighted in the sequence. Make your color adjustments while keeping in mind that the effect will be applied to every clip below it in the timeline.
We only stop feeling immersed when we notice abrupt cuts. It makes sense to know when to color correct your footage throughout the video editing process. If you color correct your film too early, you can be wasting your time by color grading footage that you might eventually cut out or never use. We hope that this article will assist you in streamlining your editing process if you’re just starting started using Premiere Pro’s adjustments layers. Try experimenting with Filmora if you often utilize them to improve your edits.
Also read:
- Updated In 2024, Create a Kickass COD Warzone Thumbnail for Free
- Updated 2024 Approved Add Zoom Blur Effect In Photoshop Step by Step
- New Vegas Pro - How to Download, Install and Use It, In 2024
- 2024 Approved As Video Editing Has Become a Pillar Stone in Post-Production Work, You Might Need to Upgrade Your Knowledge About It. In This Article, You Will Learn How to Rotate the Video
- Updated In 2024, Fascinated About Exploring Your Graphic Creativity by Experimenting with Designing Slideshow Presentations on a Variety of Software Programs? Stay Here to Get the Know-How of Using Clideo
- Want to Explore the Exciting World of GIFs? Here Is Everything You Will Ever Want to Know and Learn About the Most Appealing GIF Libraries, All at Once Place
- New What Is the Best FPS for YouTube Videos?
- Updated 2024 Approved Best 8 AR Apps for Android and iOS | Help You See the World of AR
- 2024 Approved 20 Best LUTs for Music Videos
- Things You Need to Know About Transparent PNG Remove and Convert
- Facts About GIF Background You Didnt Know
- Updated Whatsapp Video converterKeywords Convert Video for Whatsapp 6600; Video Converter for Whatsapp 6600; Reduce Video Size for Whatsapp 1600; Whatsapp Supported Video Formats 720; Convert Video to Whatsapp Format 590 for 2024
- New 2024 Approved Create Your Slow Zoom TikTok in Minutes
- New How-To Tutorials of Kapwing Collage Maker
- New Splitting Clips in Adobe After Effects Step by Step
- Updated 2024 Approved 15 Stunning GIF Splitter Examples You Need to Bookmark
- New 2024 Approved Before & After Editing Trick | Wondershare Filmora Tutorial
- Updated In 2024, 8 Ways To Live Stream Pre-Recorded Video
- New How to Add Effects in Premiere Pro for 2024
- New How to Create Fantastic Glitch Effects with Filmora? Read This Guide to Find Out How to Apply Glitch Effects on Your Videos and Make Custom Glitch Effects
- Updated In 2024, Do You Want to Get Green Screen Effects on Your Video without Green Screen Setup in Your Background? Learn How to Get Virtual Green Screen Background and Shoot Videos Like a Pro
- New Time Bending Brilliance The Ultimate Slow Motion Video Makers for 2024
- In 2024, Top Best Free LUTs For Premiere Pro
- In 2024, How To Use Special Features - Virtual Location On Xiaomi 13T Pro? | Dr.fone
- Additional Tips About Sinnoh Stone For Vivo X90S | Dr.fone
- How To Simulate GPS Movement With Location Spoofer On ZTE Blade A73 5G? | Dr.fone
- In 2024, Oppo F23 5G ADB Format Tool for PC vs. Other Unlocking Tools Which One is the Best?
- Removing Device From Apple ID For your iPhone 7
- New Transform YouTube Live with These Must-Know Secrets for 2024
- Easy steps to recover deleted videos from Honor 90 Pro
- How to Soft Reset Honor Magic5 Ultimate phone? | Dr.fone
- How to Transfer Data After Switching From Samsung Galaxy F14 5G to Latest Samsung | Dr.fone
- Simple Solutions to Fix Android SystemUI Has Stopped Error For Vivo Y27 4G | Dr.fone
- 6 Ways to Change Spotify Location On Your Samsung Galaxy S23 Tactical Edition | Dr.fone
- Best Android Data Recovery - Retrieve Lost Pictures from Nokia C12 Plus.
- In 2024, Pokemon Go No GPS Signal? Heres Every Possible Solution On Tecno Spark 10C | Dr.fone
- In 2024, Latest way to get Shiny Meltan Box in Pokémon Go Mystery Box On Motorola Moto G14 | Dr.fone
- How Can I Catch the Regional Pokémon without Traveling On Samsung Galaxy M14 4G | Dr.fone
- In 2024, Two Ways to Track My Boyfriends OnePlus 11 5G without Him Knowing | Dr.fone
- Tecno Spark 10 5G Video Recovery - Recover Deleted Videos from Tecno Spark 10 5G
- In 2024, How Can I Use a Fake GPS Without Mock Location On Google Pixel 8 Pro? | Dr.fone
- In 2024, Top 10 Telegram Spy Tools On Poco X6 Pro for Parents | Dr.fone
- In 2024, Here are Some Pro Tips for Pokemon Go PvP Battles On Apple iPhone 8 Plus | Dr.fone
- Best Ways on How to Unlock/Bypass/Swipe/Remove Oppo Reno 11F 5G Fingerprint Lock
- How to Fake Snapchat Location on Meizu 21 Pro | Dr.fone
- In 2024, How to Use Pokémon Emerald Master Ball Cheat On Apple iPhone XR | Dr.fone
- Title: 2024 Approved Best GIF to MOV Converters
- Author: Morgan
- Created at : 2024-07-01 13:02:29
- Updated at : 2024-07-02 13:02:29
- Link: https://ai-video-editing.techidaily.com/2024-approved-best-gif-to-mov-converters/
- License: This work is licensed under CC BY-NC-SA 4.0.
