
:max_bytes(150000):strip_icc():format(webp)/should-you-buy-a-kindle-5270180-b1c49aad9c1142dc8722cfdb5d02072c.jpg)
2024 Approved Change Speed of a Video on iPhone
| Change Speed of a Video on iPhone
Versatile Video Editor - Wondershare Filmora
An easy and powerful editor
Numerous effects to choose from
Detailed tutorials provided by the official channel
Do you want to know how to slow down a video on iPhone? Or maybe you want to know how to speed a video up on iPhone.
There might be times you need to speed up or slow down a video that you shoot on iPhone. There are apps and built-in option that allows you to adjust the video’s speed.
This guide will help you out of this problem with step by step process to speed up and slow down iPhone videos.
Let’s get started.
Best Free App for Changing Video Speed on iPhone
Want to know how to slow a video down on iPhone or speed it up? There are numerous apps that let you do this, but not all of them are free and intuitive. However, there’s one such option that stands out from the crowd for its free access and variety of other video editing tools.
Wondershare Filmora is an iOS app available on Apple App Store. You can download the app and install it on your iPhone.
It is essentially a video editing app with an intuitive interface. It can help you speed up videos, slow down videos, or record slowmo iPhone videos that can be shared on social media platforms.
In addition to changing video speed, you can do some basic video editing as well. It includes text effects, stickers effects, music, PIP, and more.
How to Slow Down A Video on iPhone?
Looking for how to slow down a video on iPhone? Keep reading and you’ll find out shortly exactly how to do it.
Have you ever seen a movie trailer and thought that the slow-motion effect looked really cool? Well, you can get the same effect on any of your videos. You can even reverse the effect and speed up your video to create some interesting video effects.
Whatever your reason for slowing down a video, it’s easy to change the speed of your clip using iMovie on iPhone.
Here’s how you can do it:
- You need to have iMovie app installed on your iPhone. If it’s already installed, launch iMovie on your iPhone and start a new project.
- Now, tap the plus sign that’s at the start of the Projects screen.

- Now, a pop-up window will appear where you need to select Movie.

- Now, find and select the video you want to slow down and tap Create Movie button at the center bottom of the screen.

- Now move the playhead to the start of the timeline and tap to select the video. At this point, you’ll see the timeline highlighted in yellow color.
- Look at the bottom of the screen and you’ll find the Speed button with the speedometer icon. Tap the Speed icon and a sliding bar will appear.

- To slow down the video, move the sliding bar to the left side, which’s towards the tortoise. It indicates that the speed of the video will decrease.

- Now click the Play button to preview and then tap Done.
How to Speed Up Videos on iPhone?
Do you want to know how to speed up a video on iPhone? Keep reading to find out.
There are plenty of reasons why you might want to speed up a video. Maybe it’s an educational video that is really slow and boring or it has been recorded in slo-mo. It might be the reason that the video is long and slow, and your audience will get bored midway.
Whatever the reason, speeding up a video is easy to do on iPhone.
Let’s look into two different methods to speed up video on iPhone.
The first method works for videos originally recorded in slo-mo mode on iPhone.
Speed up slo-mo videos using the Photos app
The easiest way to speed up slo-mo videos is using the Photos app that comes pre-installed on iPhone.
Just follow these steps to speed up slo-mo videos:
- Open the Photos app on your iPhone.
- Tap Albums.
- Now, scroll down and tap Slo-mo.

- Tap the slo-mo video you want to speed up.
- Once the video is open, tap Edit.
- You’ll see a set of vertical lines on the bottom of the screen. The vertical lines indicate the video’s speed at that point. Closer lines mean normal speed and a wider distance between lines indicates that the section is in slow motion.

- You can hold and drag a bar and bring it closer to the other one to speed up the slo-mo section of the video. Bringing the lines closer indicates the video is at normal speed.
- Once you have changed the speed, tap Done.

Speed up iPhone videos using iMovie app
Here’s how you can speed up a video on iPhone with iMovie app:
- Launch iMovie on your iPhone and start a new project.
- Now, tap the plus sign visible at the start of the Projects screen.
- A pop-up screen will appear where you need to select Movie.
- Now, you can find and select the video you’re looking to speed up on iPhone. Once sleected, tap Create Movie button at the center bottom of the screen.
- Now move the playhead to the start of the timeline and tap to select the video. At this point, you’ll see the timeline highlighted in yellow color.
- Look at the bottom of the screen and you’ll find the Speed icon. Tap the Speed icon and a sliding bar will appear with a tortoise on its left side and a hare on the right side.
- To speed up the time-lapse video, move the slider to the right side.
- Now click the Play button to preview and then tap Done.
After increasing the speed of the video on iPhone, you can save it or share on your social media accounts or with your friends via messaging apps.
Bonus Tip: How to Change up the speed of a video in Wondershare Filmora
In case you have a video stored on your computer and you need to adjust its speed, you can use Wondershare Filmora.
With Wondershare Filmora, you have the ability to adjust a video’s speed. Flipping through your editing options will reveal your options for doing so. You can increase or decrease the speed of the video with just a few simple clicks.
There are plenty of options around how much you can speed up/down. In fact, you can set a custom speed.
Let’s see how you can slow down and speed up a video using Wondershare Filmora.
How to speed a video up with Filmora
Follow these steps to increase the speed of the video using Wondershare Filmora:
- Download and install Wondershare Filmora on your computer.
- Launch Filmora and click the on new project, or you can just drag and drop the file that you want to edit.

- Click the Import button to load your file or drag and drop the file directly.

- Once imported, you need to drag the file to the timeline.

- Now that the video is on timeline, you need to click the Speed icon and select the Fast option. You can increase the speed by 2x, 4x, 8x, and so on. You can also set a custom speed using Custom Speed option.

- Save the file and use it the way you want.
How to slow down a video using Filmora
To slow down a video using Filmora, you need to follow the below steps:
- Make sure you have Wondershare Filmora installed on your computer.
- Launch Filmora and click the Import button. The browse file window will appear where you need to select the file you want to slow down. You can also drag and drop the file directly.
- Once imported to the media library, drag the file to the timeline.
- Now that the video is on the timeline, click the Speed icon. Since you want to slow down the video, select the Slow option. Filmora lets you slow down a video by 0.5x, 0.25x, 0.1x, 0.05x, and 0.01x. You can also set a custom speed.
- Now, click the Render button to apply the settings.
- Save the file and use it the way you want.
Conclusion
That’s really it! Changing video playback speed on your iPhone couldn’t be simpler, and it will help you save time by leaving you with shorter videos to edit.
We explained the step-by-step process to let you know how to slow down a video on iPhone or speed it up. With the help of a built-in method to speed up slo-mo video and using apps like iMovie and Filmora, you can easily speed up or slow down videos on your iPhone.
When it comes to changing the video’s speed on your computer, Wondershare Filmora is an excellent choice.
We hope this guide helps you to change the speed of videos on your iPhone – without scratching your head.
Do you want to know how to slow down a video on iPhone? Or maybe you want to know how to speed a video up on iPhone.
There might be times you need to speed up or slow down a video that you shoot on iPhone. There are apps and built-in option that allows you to adjust the video’s speed.
This guide will help you out of this problem with step by step process to speed up and slow down iPhone videos.
Let’s get started.
Best Free App for Changing Video Speed on iPhone
Want to know how to slow a video down on iPhone or speed it up? There are numerous apps that let you do this, but not all of them are free and intuitive. However, there’s one such option that stands out from the crowd for its free access and variety of other video editing tools.
Wondershare Filmora is an iOS app available on Apple App Store. You can download the app and install it on your iPhone.
It is essentially a video editing app with an intuitive interface. It can help you speed up videos, slow down videos, or record slowmo iPhone videos that can be shared on social media platforms.
In addition to changing video speed, you can do some basic video editing as well. It includes text effects, stickers effects, music, PIP, and more.
How to Slow Down A Video on iPhone?
Looking for how to slow down a video on iPhone? Keep reading and you’ll find out shortly exactly how to do it.
Have you ever seen a movie trailer and thought that the slow-motion effect looked really cool? Well, you can get the same effect on any of your videos. You can even reverse the effect and speed up your video to create some interesting video effects.
Whatever your reason for slowing down a video, it’s easy to change the speed of your clip using iMovie on iPhone.
Here’s how you can do it:
- You need to have iMovie app installed on your iPhone. If it’s already installed, launch iMovie on your iPhone and start a new project.
- Now, tap the plus sign that’s at the start of the Projects screen.
- Now, a pop-up window will appear where you need to select Movie.
- Now, find and select the video you want to slow down and tap Create Movie button at the center bottom of the screen.
- Now move the playhead to the start of the timeline and tap to select the video. At this point, you’ll see the timeline highlighted in yellow color.
- Look at the bottom of the screen and you’ll find the Speed button with the speedometer icon. Tap the Speed icon and a sliding bar will appear.
- To slow down the video, move the sliding bar to the left side, which’s towards the tortoise. It indicates that the speed of the video will decrease.
- Now click the Play button to preview and then tap Done.
How to Speed Up Videos on iPhone?
Do you want to know how to speed up a video on iPhone? Keep reading to find out.
There are plenty of reasons why you might want to speed up a video. Maybe it’s an educational video that is really slow and boring or it has been recorded in slo-mo. It might be the reason that the video is long and slow, and your audience will get bored midway.
Whatever the reason, speeding up a video is easy to do on iPhone.
Let’s look into two different methods to speed up video on iPhone.
The first method works for videos originally recorded in slo-mo mode on iPhone.
Speed up slo-mo videos using the Photos app
The easiest way to speed up slo-mo videos is using the Photos app that comes pre-installed on iPhone.
Just follow these steps to speed up slo-mo videos:
- Open the Photos app on your iPhone.
- Tap Albums.
- Now, scroll down and tap Slo-mo.
- Tap the slo-mo video you want to speed up.
- Once the video is open, tap Edit.
- You’ll see a set of vertical lines on the bottom of the screen. The vertical lines indicate the video’s speed at that point. Closer lines mean normal speed and a wider distance between lines indicates that the section is in slow motion.
- You can hold and drag a bar and bring it closer to the other one to speed up the slo-mo section of the video. Bringing the lines closer indicates the video is at normal speed.
- Once you have changed the speed, tap Done.
Speed up iPhone videos using iMovie app
Here’s how you can speed up a video on iPhone with iMovie app:
- Launch iMovie on your iPhone and start a new project.
- Now, tap the plus sign visible at the start of the Projects screen.
- A pop-up screen will appear where you need to select Movie.
- Now, you can find and select the video you’re looking to speed up on iPhone. Once sleected, tap Create Movie button at the center bottom of the screen.
- Now move the playhead to the start of the timeline and tap to select the video. At this point, you’ll see the timeline highlighted in yellow color.
- Look at the bottom of the screen and you’ll find the Speed icon. Tap the Speed icon and a sliding bar will appear with a tortoise on its left side and a hare on the right side.
- To speed up the time-lapse video, move the slider to the right side.
- Now click the Play button to preview and then tap Done.
After increasing the speed of the video on iPhone, you can save it or share on your social media accounts or with your friends via messaging apps.
Bonus Tip: How to Change up the speed of a video in Wondershare Filmora
In case you have a video stored on your computer and you need to adjust its speed, you can use Wondershare Filmora.
With Wondershare Filmora, you have the ability to adjust a video’s speed. Flipping through your editing options will reveal your options for doing so. You can increase or decrease the speed of the video with just a few simple clicks.
There are plenty of options around how much you can speed up/down. In fact, you can set a custom speed.
Let’s see how you can slow down and speed up a video using Wondershare Filmora.
How to speed a video up with Filmora
Follow these steps to increase the speed of the video using Wondershare Filmora:
- Download and install Wondershare Filmora on your computer.
- Launch Filmora and click the on new project, or you can just drag and drop the file that you want to edit.
- Click the Import button to load your file or drag and drop the file directly.
- Once imported, you need to drag the file to the timeline.
- Now that the video is on timeline, you need to click the Speed icon and select the Fast option. You can increase the speed by 2x, 4x, 8x, and so on. You can also set a custom speed using Custom Speed option.
- Save the file and use it the way you want.
How to slow down a video using Filmora
To slow down a video using Filmora, you need to follow the below steps:
- Make sure you have Wondershare Filmora installed on your computer.
- Launch Filmora and click the Import button. The browse file window will appear where you need to select the file you want to slow down. You can also drag and drop the file directly.
- Once imported to the media library, drag the file to the timeline.
- Now that the video is on the timeline, click the Speed icon. Since you want to slow down the video, select the Slow option. Filmora lets you slow down a video by 0.5x, 0.25x, 0.1x, 0.05x, and 0.01x. You can also set a custom speed.
- Now, click the Render button to apply the settings.
- Save the file and use it the way you want.
Conclusion
That’s really it! Changing video playback speed on your iPhone couldn’t be simpler, and it will help you save time by leaving you with shorter videos to edit.
We explained the step-by-step process to let you know how to slow down a video on iPhone or speed it up. With the help of a built-in method to speed up slo-mo video and using apps like iMovie and Filmora, you can easily speed up or slow down videos on your iPhone.
When it comes to changing the video’s speed on your computer, Wondershare Filmora is an excellent choice.
We hope this guide helps you to change the speed of videos on your iPhone – without scratching your head.
How to Create the Stranger Things Upside Down Effect
With stranger things season 4 ending, it seems like great timing to make a stranger things style transition to the Upside Down. In the Netflix series Stranger Things, there is an opposite version of our world called the Upside Down. The Upside Down is dark, creepy, and possibly filled with aliens, monsters, creatures, and other things.
Now, you can also apply the Stranger Things Upside Down Effect to your video! This effect combines camera tricks and video editing within Filmora to transition from the normal world into the Upside Down.
How-to Guide
1) Preparation
To make this effect, you will need two footage shots: one with the camera moving down and one with the camera coming back up.
When shooting for the footage, follow the steps below:
First shot
- Find any item close enough to the ground that we can block our frame with.

- Once you have your talent lined up, rotate your camera while lowering it below the foreground item at a constant speed and leaving the camera there. The key is making sure when you go behind the object, the frame is nothing but black.

For the next scene, have your actor change positions, or you can change the set around to look like the Upside Down. For instance, adding fake plants and flickering lights.
Second shot
Start bringing your camera back up at the same speed and rotate it again in the direction it was moving.

2) Steps
After you have all the footage, you can start editing it on Filmora. If you haven’t installed it yet, you can download Filmora at their official website at https://filmora.wondershare.com .
Free Download For Win 7 or later(64-bit)
Free Download For macOS 10.14 or later
Now, launch Filmora on your PC and follow the steps below:
Step1 Take your first clip in the “normal” world and drag it down to a video track on the timeline. Trim the edge of the clip, so it ends on pure black and in a downward motion.

Step2 Drag the second clip (in the Upside Down) onto the video track on the timeline after the first clip. Trim this video, so it begins in pure black and an upward motion.

Cut the clips to get the timing right since it should be a very fast transition. You can cut in the black frames so they won’t be too apparent.
If you don’t have a perfectly smooth transition, you can add a dissolve by going to Transitions > Basic > Dissolve.

Color Grading and Effects
After the transition, you can make the clip look a lot more like the Upside Down from the show with a color grade and Filmora effects. Follow the steps below:
Step1 Double-click on your second clip, then go to Color > Advanced. For a quick edit, you can try one of the presets available, such as “cool film.” It will give you the colder blue tones that Stranger Things used for the Upside Down.

Step2 You can further edit the color grading in the white balance menu. Drag the slider to the left to get a blue, cold vibe for the Upside Down.
The “cool” or “warm” color grading technically talks about color temperature. A “warmer” look will be more orange, and a “colder” look will be bluer. You can also use the tint slider to fine-tune the look.

Step3 Next, move down to the color, lower the brightness and increase contrast. It makes the scene darker and more sinister than the normal world.

Step4 Finally, go down to the vignette and drag the amount slider a tiny bit to give a Vinnette around your clip.

3) Pro Tips
You can still make your clip look even more like Upside Down with some Filmora elements.
Go to Elements > Smoke > Smokescreen 2. Drag this element on top of your Upside Down clip and trim it, so it starts at the same time the clip leaves the black frame.

You can adjust the opacity by double-clicking the smoke effect to open the setting.
Finally, go to the Transition > Basic > Dissolve to the start of the smoke and adjust it when the smoke gradually appears.

Resources from Filmostock
You can also use filmstock effects to bring our video to the next level. Go to Elements > Fire > Large Scale 12 and drag it down on top of your clip and the smoke.

Double-click the clip and change the scale of the effect to your needs. Then, go to compositing to change the blending mode to the screen to help the effect blend in more.

Now, go to color and open the white balance menu. Drag the two sliders to change the color of the particles to match your clip.

Summary
That is all you need to make a Stranger Things Upside Down effects to your video. Let us know if there are any other effects from tv shows you want to learn how to make.
Free Download For macOS 10.14 or later
Now, launch Filmora on your PC and follow the steps below:
Step1 Take your first clip in the “normal” world and drag it down to a video track on the timeline. Trim the edge of the clip, so it ends on pure black and in a downward motion.
Step2 Drag the second clip (in the Upside Down) onto the video track on the timeline after the first clip. Trim this video, so it begins in pure black and an upward motion.
Cut the clips to get the timing right since it should be a very fast transition. You can cut in the black frames so they won’t be too apparent.
If you don’t have a perfectly smooth transition, you can add a dissolve by going to Transitions > Basic > Dissolve.
Color Grading and Effects
After the transition, you can make the clip look a lot more like the Upside Down from the show with a color grade and Filmora effects. Follow the steps below:
Step1 Double-click on your second clip, then go to Color > Advanced. For a quick edit, you can try one of the presets available, such as “cool film.” It will give you the colder blue tones that Stranger Things used for the Upside Down.
Step2 You can further edit the color grading in the white balance menu. Drag the slider to the left to get a blue, cold vibe for the Upside Down.
The “cool” or “warm” color grading technically talks about color temperature. A “warmer” look will be more orange, and a “colder” look will be bluer. You can also use the tint slider to fine-tune the look.
Step3 Next, move down to the color, lower the brightness and increase contrast. It makes the scene darker and more sinister than the normal world.
Step4 Finally, go down to the vignette and drag the amount slider a tiny bit to give a Vinnette around your clip.
3) Pro Tips
You can still make your clip look even more like Upside Down with some Filmora elements.
Go to Elements > Smoke > Smokescreen 2. Drag this element on top of your Upside Down clip and trim it, so it starts at the same time the clip leaves the black frame.
You can adjust the opacity by double-clicking the smoke effect to open the setting.
Finally, go to the Transition > Basic > Dissolve to the start of the smoke and adjust it when the smoke gradually appears.
Resources from Filmostock
You can also use filmstock effects to bring our video to the next level. Go to Elements > Fire > Large Scale 12 and drag it down on top of your clip and the smoke.
Double-click the clip and change the scale of the effect to your needs. Then, go to compositing to change the blending mode to the screen to help the effect blend in more.
Now, go to color and open the white balance menu. Drag the two sliders to change the color of the particles to match your clip.
Summary
That is all you need to make a Stranger Things Upside Down effects to your video. Let us know if there are any other effects from tv shows you want to learn how to make.
Add Green Screen Video on TikTok
TikTok is the most popular platform for making short videos. You can create creative short videos and upload to TikTok so that they can entertain your followers and make your videos go viral. To add variety to your video content, the use of green screen in short videos is a great idea. You can replace the green screen with any background in your TikTok video. You need to know how to add green screen video on TikTok.
Adding green screen on TikTok videos has become a trend now as there are several green screen TikTok videos that have gone viral. In fact, creative green screen videos are extremely popular on social media platforms. Instead of replacing the green screen in your video with a single photo, you can replace it with multiple pictures on TikTok. We will illustrate how to add multiple pictures on TikTok green screen.
Part 1. How to Add Green Screen on TikTok?
To add green screen on TikTok video, you need to have a background of uniform color. It does not necessarily have to be a green screen. For example, if you are shooting a video of your legs and the floor tiles have uniform color, you can use green screen on TikTok to replace the tiles with any picture. Instead of using one picture on TikTok short video, you can use multiple pictures in the background to create stunning TikTok videos. Here are the steps on how to add multiple pictures to TikTok green screen.
Step1 Open TikTok app on your phone. Tap on Plus icon located at the bottom of the app screen to make a new video.
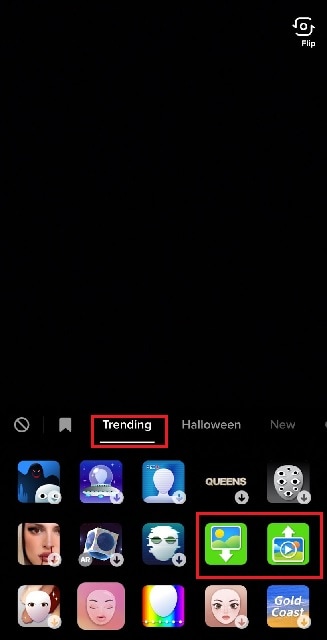
Step2 Choose the duration of the video as per your preference. Thereafter, tap on Effects option located at the bottom-left corner to see the different effects available on TikTok.
![]()
Step3 Go to Trending tab and you will see Green Screen and Green Screen Video icons. If you want your video to have green screen photo, tap on Green Screen icon. If you want your video to have green screen video, tap on Green Screen Video icon.
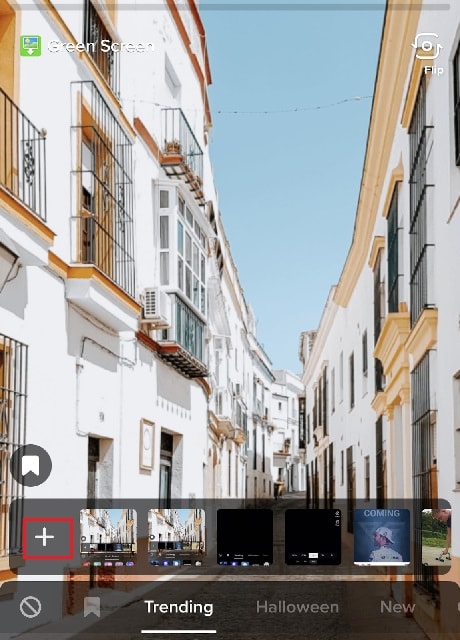
Step4 You will get a generic background and you can choose any preset background or select photo or video from your phone gallery by tapping on Plus icon. Once you are done, tap on Record button.
Step5 In order to use multiple pictures, you should stop recording in between and change your green screen image to anything you desire. Then tap on Record button again. TikTok will string your clips and it would appear that you have been changing multiple pictures of your background for your video.
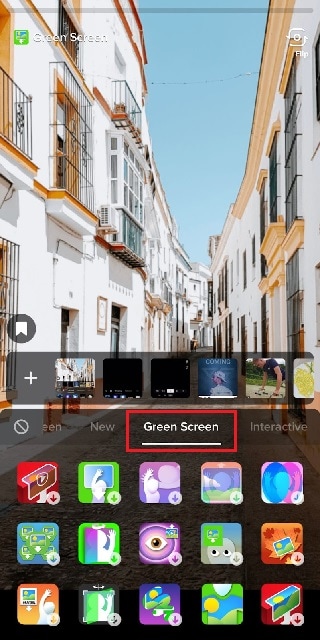
If you want to experiment with green scree effects, you can scroll down after tapping on Green Screen icon under Effects. You will see different types of green screen videos possible on TikTok to choose from.
Part 2. Creative Ideas to Make TikTok Green Screen Video
Now that you know how to add a video on TikTok green screen, you have to make the most out of it. If you are wondering how you can use green screen in your TikTok videos, here are some creative ideas for you.
Walking Out Videos – You can use green screen effect to show that you are walking out of plane, walking vertically on the wall like inception, walking on the roof of a building. In fact, you can show that you are walking out of popular monuments and palaces and trick your viewers into thinking that you were actually there.
Photoshoot Location – Create a TikTok video showing your favorite locations across the world where you dream of doing photoshoot. You can pose differently and place the location in your background through green screen effect.
How-To Video – If your TikTok channel is about tutorial and learning videos, you can explain things better by putting screenshots and multiple relevant pictures in the background so that viewers can get a pictorial representation of what you are speaking to them.
Mystery Story – You can a create short video describing unknowing facts and mysteries around certain places in the world. You can put photos or video clips of those mysterious places in your background to keep your viewers hooked and related to your narration.
Rate Them Video – You can use green screen effect to showcase your old Instagram photos or videos and rate them. This is an extremely popular trend in TikTok where people show their old photos, display work from the past, and rate them today.
Reveal Your Creation – Share your secrets or interesting stories behind some of the photos or videos you took in the past. You can talk about how creatively you took certain photos and put those photos in the background while discussing them.
Part 3. How to Make Green Screen Video on Computer?
If you have a computer and a webcam, you can record a green screen video on your computer. You can place the green screen in the background perfectly and place the webcam so that the background stays within the green screen. You will need a video recorder and a video editor to make green screen video as well as replace the green screen with any photo or video. We recommend Wondershare Filmora where you can record as well as edit green screen video.
Filmora is a professional video editor where you can record your computer screen as well as your webcam video with green screen background in Picture-in-Picture mode. After recording the video, you can replace the green screen with any video clip or photo instantly in a few steps. You can also fine-tune green screen effect for perfection. Therefore, you can save the video in any resolution and file format as per your preference.

Free Download For Win 7 or later(64-bit)
Free Download For macOS 10.14 or later
Conclusion
Adding green screen effect on TikTok videos can make your videos stand out. We have illustrated how to add multiple green screen videos on TikTok and your videos will have a better chance of getting viral. Keep the green screen ideas in mind while making TikTok green screen videos. If you want to make and edit green screen videos on computer, Wondershare Filmora is the best application available for Windows and Mac users.
HOW to Add Fade to Black on Premiere Pro
The most fundamental and typical sort of Fading is a simple cut, which is often used by editors to go from one shot to another. Applying effects between clips, at the start of a clip, or at its finish may sometimes help you smooth out or stylize your edit. Fade to black transition premiere pro can be used to get this outcome. To help users create current and trendy styles, Premiere Pro features a vast range of effects and tools including fade to black in premiere pro.
Going back to the days of black and white may sometimes be a welcome change of pace in the era of vivid digital and flashy film. Being a professional editor, you’ll understand that editing should be undetectable. If an editor has done their job well, no one will notice their efforts. You’ve failed as soon as the audience realizes the cut has occurred. But fading out to black (or white) seems out of the ordinary. Use this how to fade to black premiere pro guide to learn the steps in Adobe PR.
Part 1. What is Fade to Black
You will become a better filmmaker if you expand your vocabulary in video editing by learning about transitions. The dissolve-to-black, or fade-to-black (a fade to black in premiere pro), works well in part because it has a certain theatrical feel to it. A fade-out/fade-down, often known as a fade-to-black in theater, occurs in total darkness. One of the key components of video editing is using transitions in Adobe Premiere Pro.
The fundamental elements of many other transitions are fades. Effective use of Fades is a crucial skill in your video editing repertoire since it is subtle to the point of practically being undetectable. A video transition called a “fade to black” causes a scene or clip to gradually conclude with a black backdrop. It dates back to the time when the stage curtains were drawn and the lights were dimmed during a theatrical performance. The stage therefore went completely black while the team behind hurriedly changed into new clothing and stage items for the following action.
Those that seem to take place close together chronologically are edited together, while scenes that occur at separate periods or locales are faded out. These are recognizable features of the film. They alert us to the fact that the tale is moving to a later time or place, either thematically, chronologically, or geographically. In a practical sense, this is the time when the cast and crew switch out the set and clothes. But the fade-to-black marks the end of the scene in a symbolic and narrative sense.
Part 2. How to Fade to Black in Premiere Pro
One of the most widely used video editing programs is Adobe Premiere Pro. In Premiere Pro, a number of transitions are available. One of the first, most important responsibilities for a film editor to do is the utilization of numerous transitions. In fact, many aspiring film editors start off by learning how to fade to black in Premiere. Fortunately, creating a fade to black transition in Premiere isn’t that difficult to do step by step. Everything from straightforward dissolves to wipes, slides, and zooms may be found here.
Steps to Fade to Black in Premiere Pro:
Step1Launch the Program and Refer to the Effects
After launching Adobe Premier Pro CC, simply drag the Dip to Black effect from the Effects tab to the very start or very finish of the clip you want to use. The effect may then be moved around to change its duration as needed. Add two clips to the Premiere Pro timeline.

Step2 Add the fade to black transition
Drag and drop the Dip to Black effect between two clips on the timeline after selecting the Effects tab and typing “dip to black” into the search field. The right half of the clip will display the dip to black effect.

Step3 Customize the fade to black effect
Go to Effect Controls and, while the dip to black effect is chosen, alter the alignment to Center at Cut. Before video B starts, video A will now fade to black.
Step4 Optionally change the fade-to-black effect’s duration
just extend the timeline’s fade to black effect at the very end. The slower and smoother the fade to black effect will be, and vice versa, as you move the effect outward.

Part 3. Premiere Pro Alternative to Fade to Black
Although Premiere Pro is a powerful tool to fade to black, but what if your audience wishes to evoke a certain atmosphere, swap between tales, adopt a different point of view, spice up the narrative, or advance or recede in time? Here, more creative transitions would be beneficial. For that, Filmora is a fantastic substitute for Premiere Pro if you need to quickly apply a fade to black transition to your video.
The tool is packed with built-in features that are powerful enough to polish your videos in addition to fade to black effect. For creating scroll-stopping video content, you can also discover a ton of completely adjustable video templates for YouTube, TikTok, Instagram, Facebook, and other platforms as well as a ton of attractive overlay transitions and royalty-free music and sound effects.
Free Download For Win 7 or later(64-bit)
Free Download For macOS 10.14 or later
Steps to Fade to Black Using Filmora
Step1 Install Filmora on your laptop
You must first download this software application to your computer from one of the following sources in order to start:
You must install it on your computer once you’ve done downloading it before you can use it with your laptop.

Step2 Customize the Video
After the Import, you may edit your audio recordings using tools that are completely customizable. Use the editor in Filmora to edit your recorded audio files, using simple to advanced editing techniques. Your recorded video may be improved using Filmora’s Editor by adding animated titles, spectacular effects, audio enhancements, and more.

Step3 Fade to Black Videos
Spice up the Fade effect into your videos and add the effect into the timeline. You will be able to make it black at the ends by customizing the effect inside the Fade window.

Step4 Add VFX to Your Video
The software is embedded with Effects primarily to give your videos a polished appearance. You may utilize a variety of its eye-catching and adjustable effects to make your video productions stand out from the competition. In this area, we’ve covered some of the best effects for bringing life to your dull, unprofessional videos as shown below:

Step5 Save or Share the Videos
Finally, you may use the complete Filmora editor as previously mentioned when you’ve done editing the recorded video. When you want to submit your creative work right away to YouTube or another well-known website, click the Export option and choose the platform where you want to distribute your video clip. If you like, you may even make changes to the video before uploading it.
Part 4. Related FAQs
How do you fade a clip to black?
Utilizing the dip to black transition in your video sequence is the key to learning how to fade to black in Premiere. To produce the Fade to Black reaction you’re trying to accomplish, you must Dip to Black. Simply drag the feature to the conclusion of your sequence to complete the task. Where you want the fading to start and terminate. The length of the fade or dip may be altered using the effects control panel.
How do I fade to white in Premier Pro?
Contrarily, as this montage demonstrates, fading to white may be utilized to convey uncertainty or a feeling of optimism. One of the most traditional transition effects that is often utilized in movies and videos is the fade to white. Your film gains a cinematic feel from it, and the change from one scene to the next is more seamless.
How do you keyframe colors in Premiere?
You can find other color problems in Premiere Pro that you need to fix. Therefore, it makes sense to adjust your highlight, mid, and black points first and have them dialed in before addressing saturation and color temperature. Open the Color panel on the right side of the screen while your adjustment layer is highlighted in the sequence. Make your color adjustments while keeping in mind that the effect will be applied to every clip below it in the timeline.
We only stop feeling immersed when we notice abrupt cuts. It makes sense to know when to color correct your footage throughout the video editing process. If you color correct your film too early, you can be wasting your time by color grading footage that you might eventually cut out or never use. We hope that this article will assist you in streamlining your editing process if you’re just starting started using Premiere Pro’s adjustments layers. Try experimenting with Filmora if you often utilize them to improve your edits.
Free Download For macOS 10.14 or later
Steps to Fade to Black Using Filmora
Step1 Install Filmora on your laptop
You must first download this software application to your computer from one of the following sources in order to start:
You must install it on your computer once you’ve done downloading it before you can use it with your laptop.
Step2 Customize the Video
After the Import, you may edit your audio recordings using tools that are completely customizable. Use the editor in Filmora to edit your recorded audio files, using simple to advanced editing techniques. Your recorded video may be improved using Filmora’s Editor by adding animated titles, spectacular effects, audio enhancements, and more.
Step3 Fade to Black Videos
Spice up the Fade effect into your videos and add the effect into the timeline. You will be able to make it black at the ends by customizing the effect inside the Fade window.
Step4 Add VFX to Your Video
The software is embedded with Effects primarily to give your videos a polished appearance. You may utilize a variety of its eye-catching and adjustable effects to make your video productions stand out from the competition. In this area, we’ve covered some of the best effects for bringing life to your dull, unprofessional videos as shown below:
Step5 Save or Share the Videos
Finally, you may use the complete Filmora editor as previously mentioned when you’ve done editing the recorded video. When you want to submit your creative work right away to YouTube or another well-known website, click the Export option and choose the platform where you want to distribute your video clip. If you like, you may even make changes to the video before uploading it.
Part 4. Related FAQs
How do you fade a clip to black?
Utilizing the dip to black transition in your video sequence is the key to learning how to fade to black in Premiere. To produce the Fade to Black reaction you’re trying to accomplish, you must Dip to Black. Simply drag the feature to the conclusion of your sequence to complete the task. Where you want the fading to start and terminate. The length of the fade or dip may be altered using the effects control panel.
How do I fade to white in Premier Pro?
Contrarily, as this montage demonstrates, fading to white may be utilized to convey uncertainty or a feeling of optimism. One of the most traditional transition effects that is often utilized in movies and videos is the fade to white. Your film gains a cinematic feel from it, and the change from one scene to the next is more seamless.
How do you keyframe colors in Premiere?
You can find other color problems in Premiere Pro that you need to fix. Therefore, it makes sense to adjust your highlight, mid, and black points first and have them dialed in before addressing saturation and color temperature. Open the Color panel on the right side of the screen while your adjustment layer is highlighted in the sequence. Make your color adjustments while keeping in mind that the effect will be applied to every clip below it in the timeline.
We only stop feeling immersed when we notice abrupt cuts. It makes sense to know when to color correct your footage throughout the video editing process. If you color correct your film too early, you can be wasting your time by color grading footage that you might eventually cut out or never use. We hope that this article will assist you in streamlining your editing process if you’re just starting started using Premiere Pro’s adjustments layers. Try experimenting with Filmora if you often utilize them to improve your edits.
Also read:
- Updated How To Change Text Color In Premiere Pro for 2024
- New 2024 Approved Art of Time Manipulation A Guide to After Effects Slow Motion Mastery
- Updated Vlogs and Travel Content Are Incomplete without a Fast-Motion Effect. Learn Step-by-Step How to Make Fast Motion Video on an iPhone in This Article
- 2024 Approved Learn Color Correction in After Effects with These YouTube Videos
- Updated In 2024, Detailed Guide to Rotate Videos in Blender
- The Art of Fashioning Slow Motions Has Remained Popular Ever Since. Read This Article to Learn How to Do Slow-Mo in CapCut and Other Powerful Tools for 2024
- Updated Free
- Updated 2024 Approved Learn How to Create Your Own Unique Video in Cinematic Text Intro in Filmora. Its a Simple Process that Will Offer Professional-Level Intros of Your Own
- Updated How to Rotate a Video in Windows 10 for 2024
- In 2024, Do You Need to Make Your Video More Immersive? You Can Make It 60 FPS to Achieve That. And Here Are the 5 Best Tools that You Can Use
- Updated Ever Wondered About the Similarity You Bear with an Anime Character? If You Have Not yet Looked Into This Exciting Aspect of Motion Graphic Design, You Can Very Well Break the Ice Here
- Finest Approach to Slow Down a Video CapCut All-in-One Video Editor for 2024
- New How to Create An Eye-Catching Intro Videos with InVideo for 2024
- New 2024 Approved Want to Speed up Your Video to Shorten Its Duration and Make It More Entertaining? Here Is How to Speed up Videos in Final Cut Pro. Get a Better Alternative to FCP to Speed up Videos
- Are You Eager to Discover All About Dynamic Videos? You Are in the Right Place because This Article Provides Insight Into Dynamic Video Collages for 2024
- Updated Unleash the Power of Video Slow Motion with Wondershare Filmora. Find Out How to Create Slow Motion Video with the Effective Speed Ramping Feature on Filmora for 2024
- Updated 2024 Approved Top 5 Apps To Add Song To Video
- Best AR Video App - Top 10 Picks for 2024
- New 2024 Approved How to Make Video Slow Motion?
- New Making Slow Motion Videos in Premiere Pro A Review on The Best Method
- Updated 2024 Approved How to Rotate a Video in Windows 10
- New Create Slow Motion Videos Using Final Cut Pro with Ease
- In 2024, Getting the Pokemon Go GPS Signal Not Found 11 Error in Motorola Razr 40 Ultra | Dr.fone
- In 2024, What Legendaries Are In Pokemon Platinum On Tecno Spark 20 Pro? | Dr.fone
- New 2024 Approved How To Create Animated Clipart in PowerPoint
- Troubleshooting Guide How to Fix an Unresponsive Samsung Galaxy M14 4G Screen | Dr.fone
- In 2024, Bypass iCloud Activation Lock with IMEI Code From iPhone 12 Pro
- How to Exit Android Factory Mode On Infinix GT 10 Pro? | Dr.fone
- How to Reset a Vivo S18 Phone that is Locked?
- All Things You Need to Know about Wipe Data/Factory Reset For Samsung Galaxy M54 5G | Dr.fone
- Prevent Cross-Site Tracking on HTC U23 and Browser | Dr.fone
- In 2024, How to Sign Out of Apple ID On iPhone 11 Pro without Password?
- How to Factory Reset Vivo V27 without Losing Data | Dr.fone
- Best Anti Tracker Software For Lava Yuva 3 Pro | Dr.fone
- In 2024, How To Change Your SIM PIN Code on Your Motorola Moto G13 Phone
- In-Depth Review of Ivona Text to Speech Converter
- In 2024, The Magnificent Art of Pokemon Go Streaming On Samsung Galaxy A23 5G? | Dr.fone
- Title: 2024 Approved Change Speed of a Video on iPhone
- Author: Morgan
- Created at : 2024-05-19 05:11:52
- Updated at : 2024-05-20 05:11:52
- Link: https://ai-video-editing.techidaily.com/2024-approved-change-speed-of-a-video-on-iphone/
- License: This work is licensed under CC BY-NC-SA 4.0.
