
:max_bytes(150000):strip_icc():format(webp)/watch-free-movies-online-1356647-32f79b8cc3ed484ca1f9f898f503e416.png)
2024 Approved Do You Have Any Idea About Changing the Video Speed Using the Editors? Had You Worked with the VLC Playback Speed? This Article Enlightens You with the Best Video Edits Using the Perfect Tool in the Digital Space
Do You Have Any Idea About Changing the Video Speed Using the Editors? Had You Worked with the VLC Playback Speed? This Article Enlightens You with the Best Video Edits Using the Perfect Tool in the Digital Space
You can add fun by modifying the video speed when you play a video. To perform the detailed effects on the content, you need sophisticated programs that are reliable and user-friendly. Do you know about the VLC playback speed? Are there any options in the VLC app to edit the playback speed as per your needs?
Here, you will be learning about the precise video edits you can perform effortlessly on your captured content using VLC and its alternative application. Stay connected and scroll down for enlightening facts on it.

In this article
01 What is VLC?
02 How to speed up/down videos in VLC
03 Alternative for changing speed for videos
Part 1: What is VLC?
VLC is an open-source program, and it supports media files to play on its interface efficiently. This app supports different file formats and is available in many versions. You can use VLC players on Windows, Mac, and Linux platforms. There are options to play a part of a file using this program when trying to download any video file into your system.

Here, you can find video edit features like you can add subtitles and modifying the playback speed precisely. It is a flexible player with a simple user interface. You do not require any prior knowledge to play the desired content on this interface. All the essential controls are explicit and you can reach for them quickly.
Part 2: How to speed up/down videos in VLC
It is high time to learn about the VLC playback speed that you can implement on your video effortlessly. You must carefully follow up the below instructions and perform the right clicks to edit the video speed.
The stepwise guidelines to modify the video speed using the VLC application.
Step 1
Install VLC from its official webpage according to your system OS type and then upload the desired video into its working space.

Step 2
Now, tap the Playback option from the menu and choose the required speed duration of the content from the expanded items. Select faster, slower, normal speed in pace with your needs and modify the video speed accordingly.

Save the changes you had performed on the video and play the track to view the changes done on this media space.
The Filmora video editor is the reliable and performable tool that edits the video beyond limitations. The above instructions will guide you to edit the video speed using the VLC player. If you search for an alternative tool to perform further edits on your captures, then quickly scroll down for more enlightening facts.
Part 3: Alternative for changing speed for videos
The Filmora video editor provides you with in-built templates, filter effects, transitions to make the content attractive. If you take closer looks at the filters, you will find mesmerizing special effects available as ready to use the element to edit your uploaded content on the timeline. Few clicks are enough to bring the best in your video in no time. It is easy to use and you can embed efficient elements to the video precisely. There are options to insert desired elements from integrated libraries like Filmstock, Giphy to add flavors to your video content.
The Key Features of Filmora Video Editor program.
- This app supports all file types effortlessly, and you can import any media file quickly despite its size.
- Simple clicks are sufficient to include desired effects on the video content.
- Filters, transitions, and special elements to insert into the uploaded file.
- Use audio customization features like Audio ducking, audio equalizers, and detach audio to personalize the content.
- Tap the preview option to view the edited file before finalizing the export option.
Connect with the integrated libraries and download the desired elements to customize the uploaded content. During the export action, you can change its file type, resolution, and size to add compatibility for end streaming devices. Drag and drop the elements into the working timeline to insert the changes to the captured media.
The detailed guide on how to change the video speed using the Filmora video editor tool.
Step 1: Install the program
Download the application from its official website and install it by following the instruction wizard. Then, launch the app and import the media file into the working space. To make further edits, drag and drop the file into the timeline.

Step 2: Customize the video speed
Next, make a right-click on the imported media file and select the Speed and Duration option from the expanded list. Adjust the speed slider from the pop-up window to change the video duration while playing. Finally, save the changes by tapping the OK button.

Now, play the edited content to witness the changes in the video speed. The video plays according to the customized value, and you can have a preview before exporting it to the necessary storage space.
Conclusion
Wondershare Filmora
Get started easily with Filmora’s powerful performance, intuitive interface, and countless effects!
Try It Free Try It Free Try It Free Learn More about Filmora>

Thus, in detail, you had an enlightening discussion on the VLC playback speed. You would have understood the tips and tricks associated with these video edits. Use the Filmora video editor application to create stunning videos for your needs. It is a reliable program, and you can go for it without any hesitation. You can customize the content by modifying every detail of the content precisely. Choose Filmora and enjoy the video edits beyond boundaries. Create content as per your requirements without sacrificing any parameters. Stay tuned for many more facts on video edits using the Filmora video editor application.
02 How to speed up/down videos in VLC
03 Alternative for changing speed for videos
Part 1: What is VLC?
VLC is an open-source program, and it supports media files to play on its interface efficiently. This app supports different file formats and is available in many versions. You can use VLC players on Windows, Mac, and Linux platforms. There are options to play a part of a file using this program when trying to download any video file into your system.
Here, you can find video edit features like you can add subtitles and modifying the playback speed precisely. It is a flexible player with a simple user interface. You do not require any prior knowledge to play the desired content on this interface. All the essential controls are explicit and you can reach for them quickly.
Part 2: How to speed up/down videos in VLC
It is high time to learn about the VLC playback speed that you can implement on your video effortlessly. You must carefully follow up the below instructions and perform the right clicks to edit the video speed.
The stepwise guidelines to modify the video speed using the VLC application.
Step 1
Install VLC from its official webpage according to your system OS type and then upload the desired video into its working space.
Step 2
Now, tap the Playback option from the menu and choose the required speed duration of the content from the expanded items. Select faster, slower, normal speed in pace with your needs and modify the video speed accordingly.
Save the changes you had performed on the video and play the track to view the changes done on this media space.
The Filmora video editor is the reliable and performable tool that edits the video beyond limitations. The above instructions will guide you to edit the video speed using the VLC player. If you search for an alternative tool to perform further edits on your captures, then quickly scroll down for more enlightening facts.
Part 3: Alternative for changing speed for videos
The Filmora video editor provides you with in-built templates, filter effects, transitions to make the content attractive. If you take closer looks at the filters, you will find mesmerizing special effects available as ready to use the element to edit your uploaded content on the timeline. Few clicks are enough to bring the best in your video in no time. It is easy to use and you can embed efficient elements to the video precisely. There are options to insert desired elements from integrated libraries like Filmstock, Giphy to add flavors to your video content.
The Key Features of Filmora Video Editor program.
- This app supports all file types effortlessly, and you can import any media file quickly despite its size.
- Simple clicks are sufficient to include desired effects on the video content.
- Filters, transitions, and special elements to insert into the uploaded file.
- Use audio customization features like Audio ducking, audio equalizers, and detach audio to personalize the content.
- Tap the preview option to view the edited file before finalizing the export option.
Connect with the integrated libraries and download the desired elements to customize the uploaded content. During the export action, you can change its file type, resolution, and size to add compatibility for end streaming devices. Drag and drop the elements into the working timeline to insert the changes to the captured media.
The detailed guide on how to change the video speed using the Filmora video editor tool.
Step 1: Install the program
Download the application from its official website and install it by following the instruction wizard. Then, launch the app and import the media file into the working space. To make further edits, drag and drop the file into the timeline.
Step 2: Customize the video speed
Next, make a right-click on the imported media file and select the Speed and Duration option from the expanded list. Adjust the speed slider from the pop-up window to change the video duration while playing. Finally, save the changes by tapping the OK button.
Now, play the edited content to witness the changes in the video speed. The video plays according to the customized value, and you can have a preview before exporting it to the necessary storage space.
Conclusion
Wondershare Filmora
Get started easily with Filmora’s powerful performance, intuitive interface, and countless effects!
Try It Free Try It Free Try It Free Learn More about Filmora>
Thus, in detail, you had an enlightening discussion on the VLC playback speed. You would have understood the tips and tricks associated with these video edits. Use the Filmora video editor application to create stunning videos for your needs. It is a reliable program, and you can go for it without any hesitation. You can customize the content by modifying every detail of the content precisely. Choose Filmora and enjoy the video edits beyond boundaries. Create content as per your requirements without sacrificing any parameters. Stay tuned for many more facts on video edits using the Filmora video editor application.
Green Screen YouTube Videos
This is a large green backdrop that is placed in the background of a shot to allow for digital effects later on. A majority of popular YouTube vloggers use green to enhance interesting background views to their videos. Screen replaces the background and adds depth and visually interesting patterns that ends up keeping the viewer captivated.
Why use Green Screen
1. Creativity
There are several effects that can be applied to green screen video editing in the editing process, it gives one a chance to explore their imagination. A good editor can really customize the video to make the production really stand out from those of the competitors.
2. Flexibility
There are portable green screens that can be taken to any location of choice for video shooting. Location allows one endless possibilities without having to spend time and resources doing assembling of different sets and backgrounds. The desired feel to the video can be simply achieved by an image.
3. Budget
Filming YouTube using green screen is a cost effective way of producing professional video content on a small budget. This is a great idea for upcoming YouTube vloggers as expenses catering for travel and location are eliminated.
4. Consistency
At some point in YouTube green screen use, you may be affected by the weather and worse pf all, natural lighting may end up being problematic while you are on location doing your video shots. However, with YouTube Video green screen technology, ambient lighting is blocked out and the screen can be lit the same way every time. This brings consistency over a number of videos the user applies green screen on.
5. Clarity
Youtube video green screen allows for an additional visual ellements and diagrams such as graphics, this can be added on to the video to illustrate what the speaker is saying. This green screen effect helps the viewer to gain a better understanding of any concepts or complex illustrations mentioned by the presenter.
6. Branding
YouTube green screen logo and branding colors can be easily added into the video, this can easily make the viewers to identify the video with your business. Apart from standing out from other competitors, you will also have a professional, high quality and reliable video to use anytime you please.
Best Places to find Green Screen Effects
Filmstock
Filmstock features a massive library full of royalty-free stock video, video effects, sound effects, video templates, and so much more. There are resources on the platform for all kinds of creators, including video editors, content creators, social media influencers, and marketers. You get unlimited access to all these resources for a single price when you subscribe to Filmstock. While there are other marketplaces that offer similar options, Filmstock does things differently.
Green Screen Effects
1. Balance Beam
Ever wanted to walk across a small beam way high up in the air? Me neither, but you can make a cool effect that looks like you did. Throwing a green screen on the ground and then building a balance beam over top of it you can start recording the main shot. Strap a GoPro to your head and look down while walking across the beam.
2. Shrink Effect
Okay this one is really easy. Take some footage of a person walking in front of a green screen, ideally looking at something to be featured in the main shot to sell the effect. Then take a close up of a small object. Key out the green behind the person, take the footage and drop it over your close up, and then scale it to match. Duplicate it, mirror it horizontally to act as a reflection and then drop the opacity and add some blur to make it look more realistic. It’s a fun little trick.
3. Floating Object
This is a simple one, making an object appear to be floating. This is another two clip shot. First, take a shot with the object hanging in front of a blue screen. Then on the same location, take another shot but while pretending to levitate the hammer. Masking around the hammer will get rid of the string for hanging, key out the blue, and then dropping it on top of the other clip is all you need.
Best Green Screen Video Editor for YouTube
Filmora
If you’re just starting out with video editing, or just want a simple program that works, Wondershare Filmora might be what you’re looking for. It has the essential tools, and anyone can learn to use it easily.
Wondershare Filmora is the one of best video editing software with cool features that compares to other competing video editing Softwares. Many video editing programs claim to offer professional results; Filmora is one of a few consumer-level tools that actually delivers.
For Win 7 or later (64-bit)
For macOS 10.12 or later
Installation Steps
- Click the icon in the center of the Media Library to add files directly.
- Go File > Import Media > Import Media Files.
- Drag and drop to the Media Library directly.
While importing a media file, Wondershar Filmora may ask you if you wish to create a proxy file to accelerate the editing process. Select “Yes” to have a fast video editing experience.
You can also import video clips using your Touch Bar controls if your computer has Touch Bar.
Record a media file
Apart from the videos shot by your digital devices, you can also directly import media files by recording video from your webcam, capturing the computer screen, or recording a voice-over.
Find green screen effects: Now you can select the different types of green screen effects.

Apply green screen: drag the effects to the timeline to apply it to your videos.

Save and Export: Then you can save or export the video.
A green screen is a green surface used as a background when filming so that any image can replace the screen behind the actor or presenter. Shooting with a green screen involves filming a person or adding visual effects in front of a solid color. Then, by digitally removing or “keying out” that color, you can drop that scene onto the background of your choice in post-production. Removing the colored background is also referred to as “chroma keying.”
Steps with Images
The first step is to record footage in front of a green screen so that you can import it into WeVideo as a media file. To capture footage that is optimal for the Green Screen effect, please ensure the following:
- There is ample lighting distributed evenly around you with no shadows.
- You are in front of a solid background with no creases. Green or blue is the recommended color for your background.
- The quality of your camera is high enough so that the footage is not pixelated or grainy. 720p HD footage or above is recommended.
Step 2) Add media to the Timeline
Once you’ve captured the footage you want to use for the Green Screen effect, import that media file and add it to the Timeline. Remember to place the green screen footage in the Video 2 track and the clip you would like to use as the background in the Video 1 track.
If you are using more than two video tracks, place the green screen footage in the track above whichever track holds the background footage to ensure proper layering techniques are used.
Step 3) Open the clip editor
Double click on the green screen clip in the Timeline to open the clip editor. In the clip editor, navigate to the Color Keying tab.
Step 4) Use the color picker tool
Select the color picker tool and then click anywhere on the green screen footage to apply the effect.
Step 5) _(optional) Adjust the color settings
The Green Screen effect should automatically apply without the need to adjust the color settings. However, if you would like to make these additional modifications, you can use the scroll bars to make the following adjustments:
- **Show- You can select Mask to reveal a black and white representation of the mask you are applying using the color keying tool. Notice that the black area represents transparent sections of your video, while the white area represents opaque sections.
- **Color Balance- This adjusts how selective the effect is. The further right you scroll, the wider the range of tints and shades are removed.
- **Color Sensitivity- This smooths out any pixelation and rough edges of color that remain.
- **Defringe- This helps reduce color bleeding at the edges of your mask. The left and right sliders control the level of white and black respectively to help match the edges of the mask with your new background color.
For macOS 10.12 or later
Installation Steps
- Click the icon in the center of the Media Library to add files directly.
- Go File > Import Media > Import Media Files.
- Drag and drop to the Media Library directly.
While importing a media file, Wondershar Filmora may ask you if you wish to create a proxy file to accelerate the editing process. Select “Yes” to have a fast video editing experience.
You can also import video clips using your Touch Bar controls if your computer has Touch Bar.
Record a media file
Apart from the videos shot by your digital devices, you can also directly import media files by recording video from your webcam, capturing the computer screen, or recording a voice-over.
Find green screen effects: Now you can select the different types of green screen effects.
Apply green screen: drag the effects to the timeline to apply it to your videos.
Save and Export: Then you can save or export the video.
A green screen is a green surface used as a background when filming so that any image can replace the screen behind the actor or presenter. Shooting with a green screen involves filming a person or adding visual effects in front of a solid color. Then, by digitally removing or “keying out” that color, you can drop that scene onto the background of your choice in post-production. Removing the colored background is also referred to as “chroma keying.”
Steps with Images
The first step is to record footage in front of a green screen so that you can import it into WeVideo as a media file. To capture footage that is optimal for the Green Screen effect, please ensure the following:
- There is ample lighting distributed evenly around you with no shadows.
- You are in front of a solid background with no creases. Green or blue is the recommended color for your background.
- The quality of your camera is high enough so that the footage is not pixelated or grainy. 720p HD footage or above is recommended.
Step 2) Add media to the Timeline
Once you’ve captured the footage you want to use for the Green Screen effect, import that media file and add it to the Timeline. Remember to place the green screen footage in the Video 2 track and the clip you would like to use as the background in the Video 1 track.
If you are using more than two video tracks, place the green screen footage in the track above whichever track holds the background footage to ensure proper layering techniques are used.
Step 3) Open the clip editor
Double click on the green screen clip in the Timeline to open the clip editor. In the clip editor, navigate to the Color Keying tab.
Step 4) Use the color picker tool
Select the color picker tool and then click anywhere on the green screen footage to apply the effect.
Step 5) _(optional) Adjust the color settings
The Green Screen effect should automatically apply without the need to adjust the color settings. However, if you would like to make these additional modifications, you can use the scroll bars to make the following adjustments:
- **Show- You can select Mask to reveal a black and white representation of the mask you are applying using the color keying tool. Notice that the black area represents transparent sections of your video, while the white area represents opaque sections.
- **Color Balance- This adjusts how selective the effect is. The further right you scroll, the wider the range of tints and shades are removed.
- **Color Sensitivity- This smooths out any pixelation and rough edges of color that remain.
- **Defringe- This helps reduce color bleeding at the edges of your mask. The left and right sliders control the level of white and black respectively to help match the edges of the mask with your new background color.
How To Split Screen On Tiktok
TikTok is probably the most popular video-sharing app in the world right now. Many TikTokers have become famous for making videos that have a significant impact and encourage creativity and new ideas. One of the most popular TikTok trends is the split-screen effect. You’ve probably seen a lot of TikTok split-screen videos with cool effects that made you wonder how the user split their screen. Becoming skilled in using TikTok effects is not as difficult as it might look. It only requires a significant amount of practice. Read on as we show you how to make a TikTok split-screen video.
Using CapCut To Split Screen
CapCut is the official free TikTok Video Maker and Video Editor with Music for TikTok that is multifunctional. Its interface is quite similar and easy to use.
CapCut includes free advanced capabilities such as keyframe animation, stabilization, and Picture-in-Picture (PIP). These are in addition to its fundamental functions, such as video editing, adding stickers, text, and music.
Steps to Split Screen Video with CapCut On Android and IOS Devices
- To use the app, you need to install it first. iPhone and Android users can download CapCut. Navigate to the appropriate app store of your choice and download CapCut.
- After installation, launch the app.
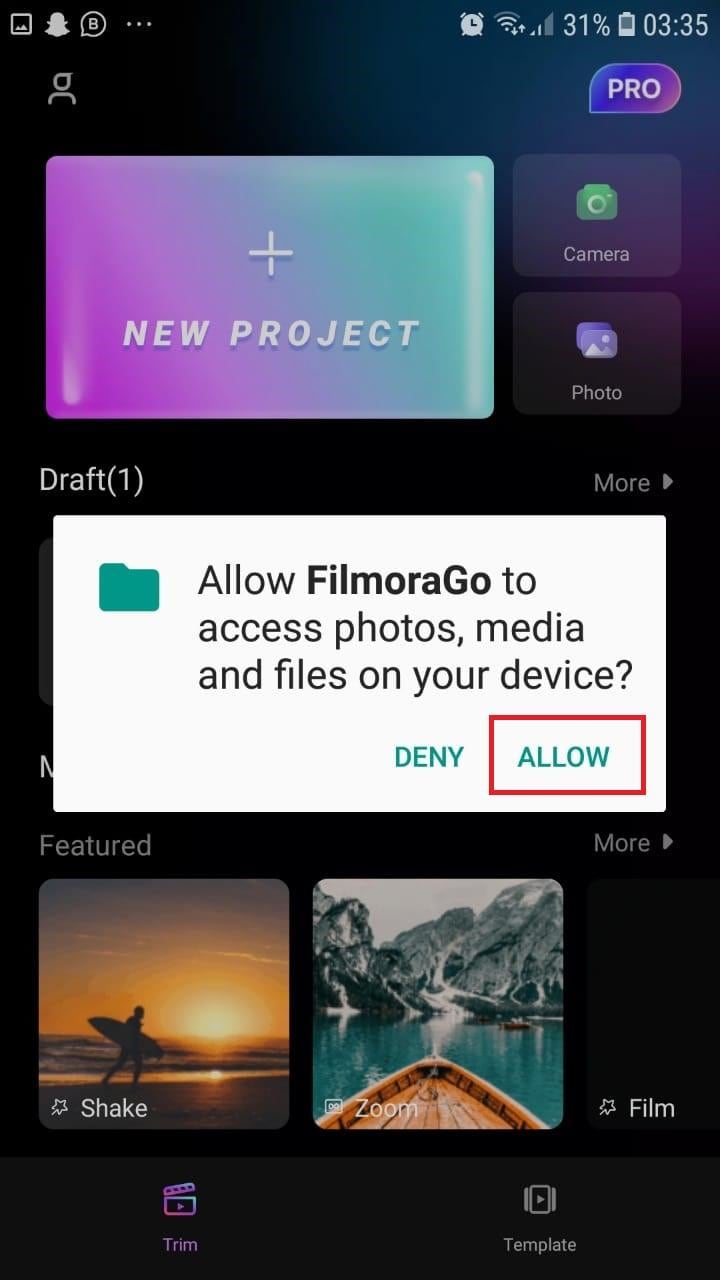
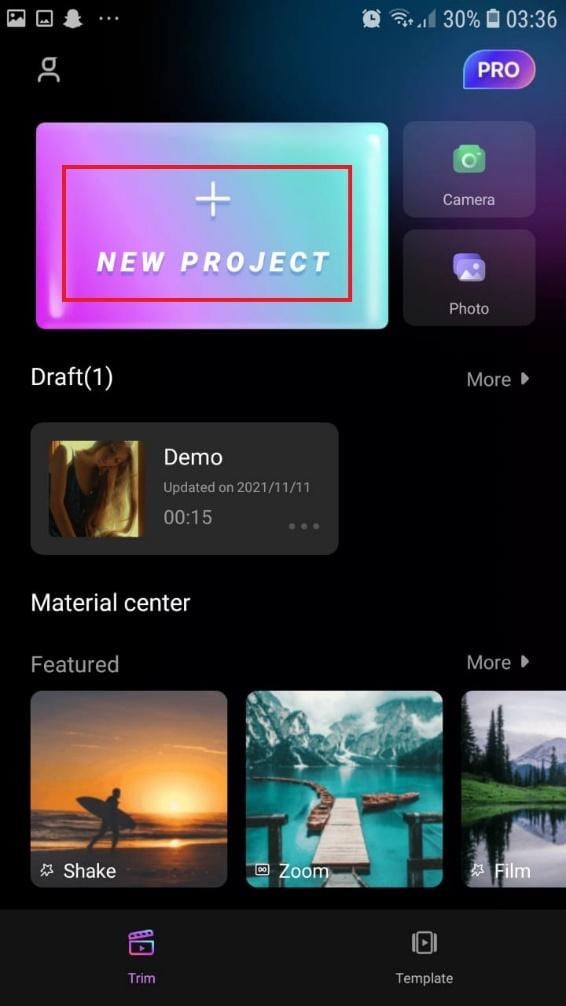
- Then go ahead and grant CapCut permission to view your camera roll. Incorporating video clips into your project has never been easier. Go to the app’s main screen and select “New Project“ from the drop-down menu.
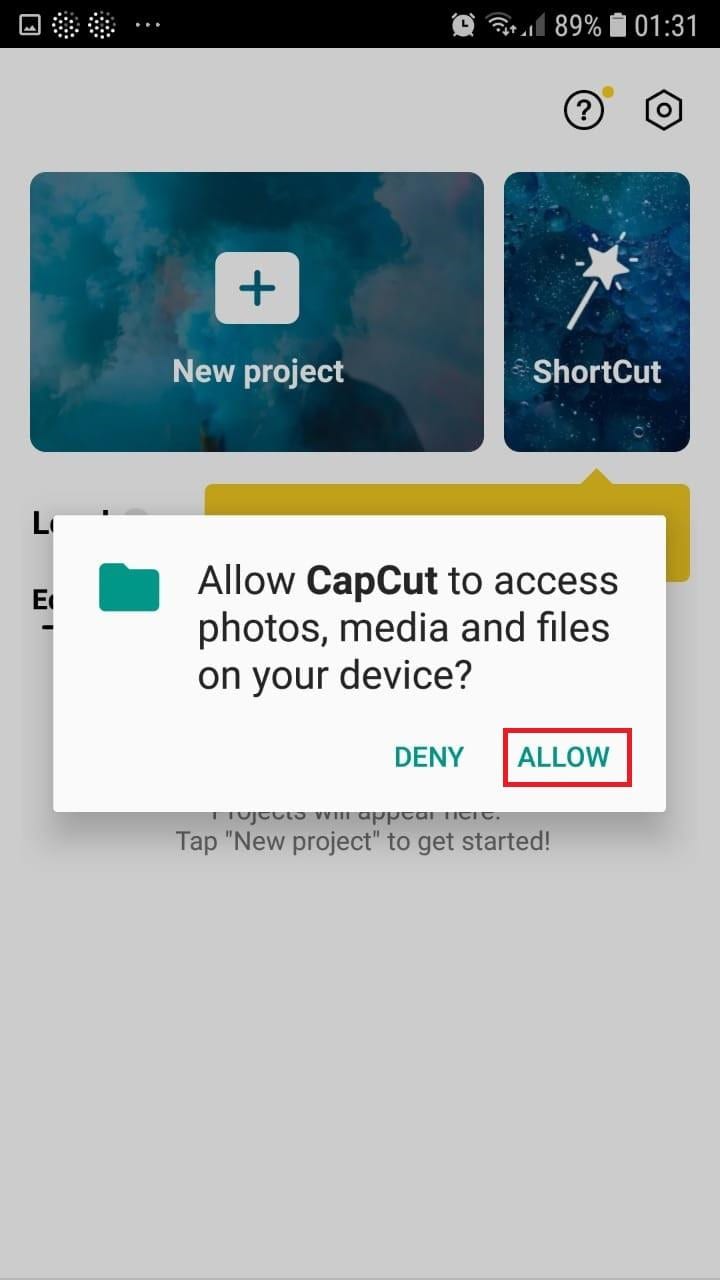
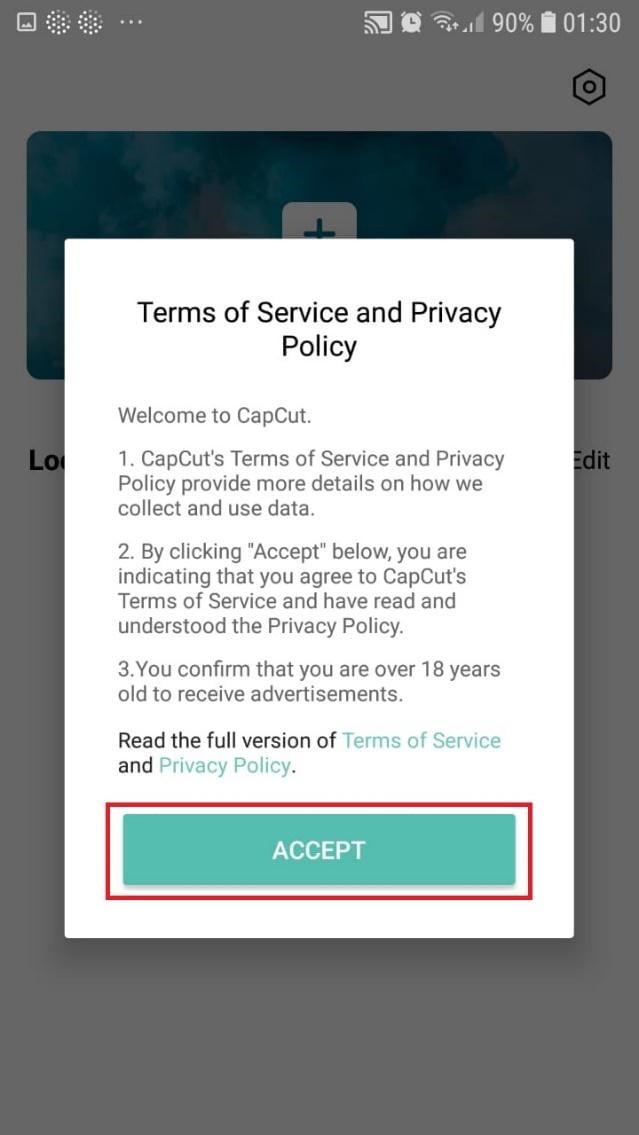
- To confirm your selection, click the green Accept This confirms that CapCut requires access to your photographs to function correctly. Tap on the button on the following pop-up window to gain access to all the photos. This is a one-time process that must be carried out the first time you launch the application.
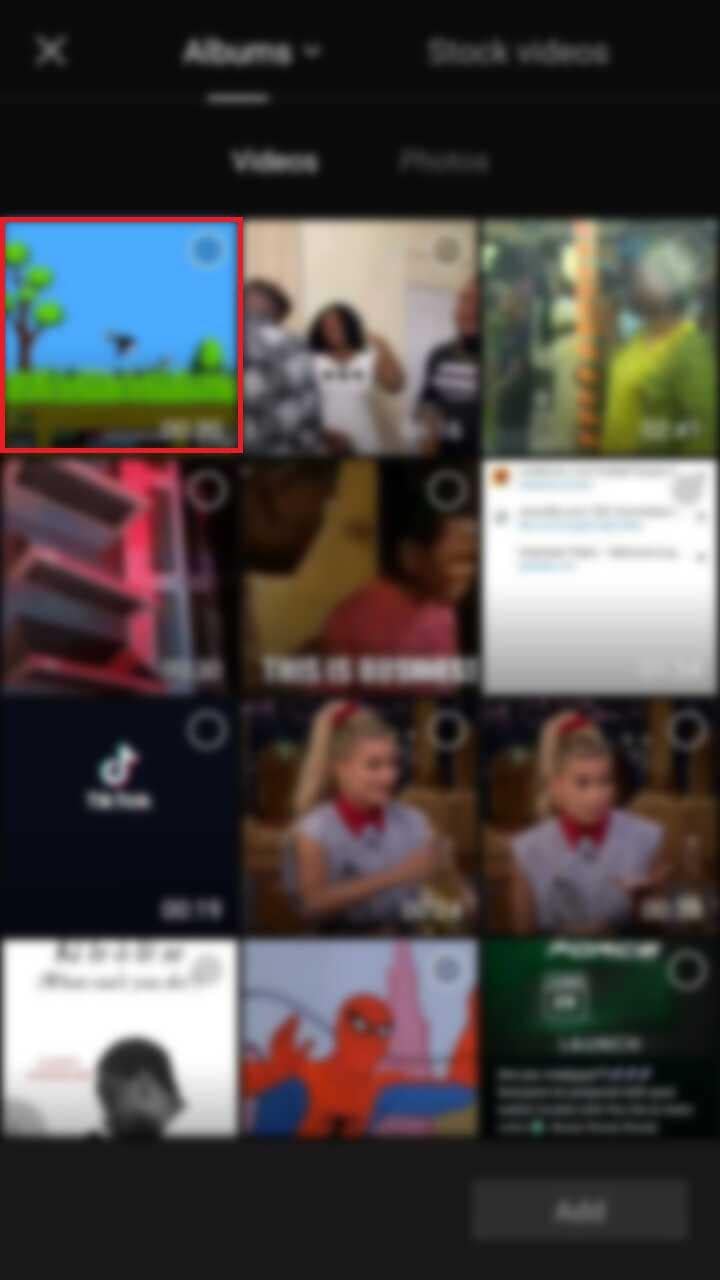
- Begin a New Project. After opening the app, press the “New Project“ icon to bring up a new screen showing your device’s videos.

- Choose a video clip. Locate the desired video clip for your project by scrolling through the pages displaying your camera roll. Tap the video’s thumbnail and then tap the “Add“ icon in the screen’s lower part.
- Get familiar with your workspace. Upon uploading your first clip, CapCut leads you to the primary workspace. This is where you will spend most of your time within the app. The preview panel, the timeline, and the toolbar are in order from top to bottom.
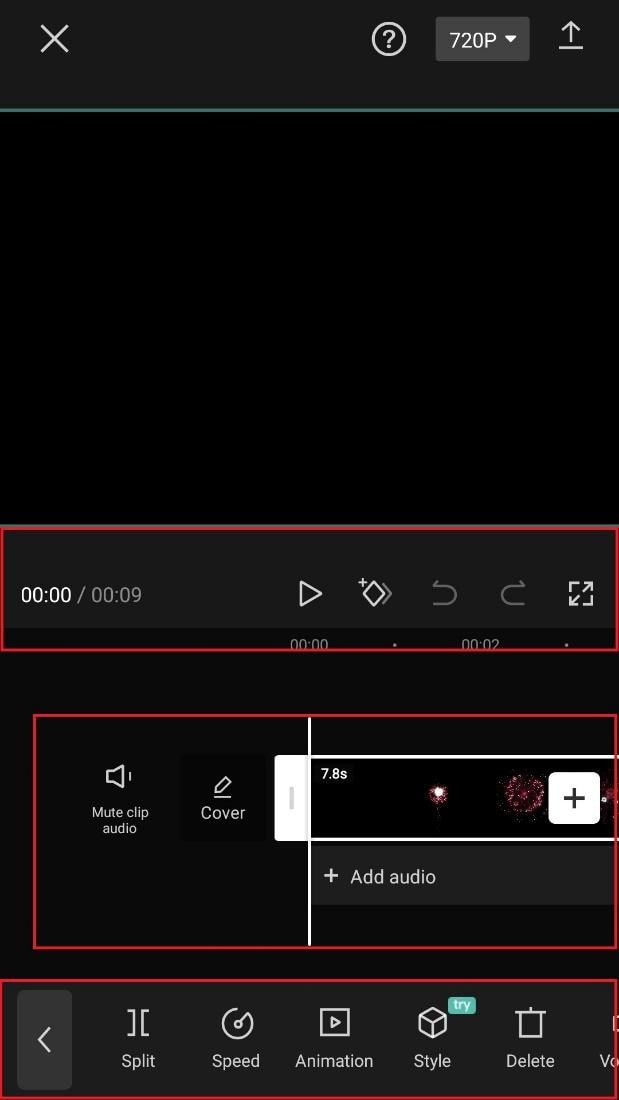
- View the toolbar and timeline. They represent your screen’s bottom half. The timeline, located below the preview panel, is where you’ll make all your adjustments. You can access all your video editing tools, including split, text, audio, effects, stickers, and more, on the toolbar at the bottom of your screen.
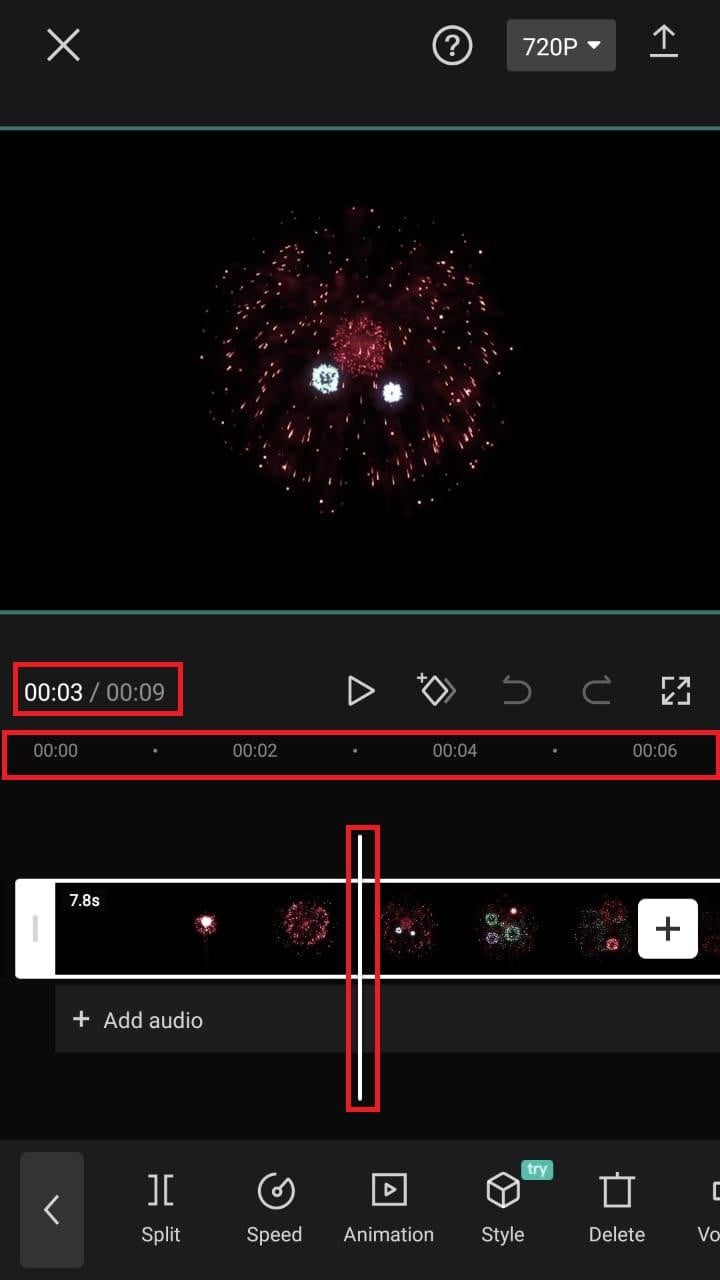
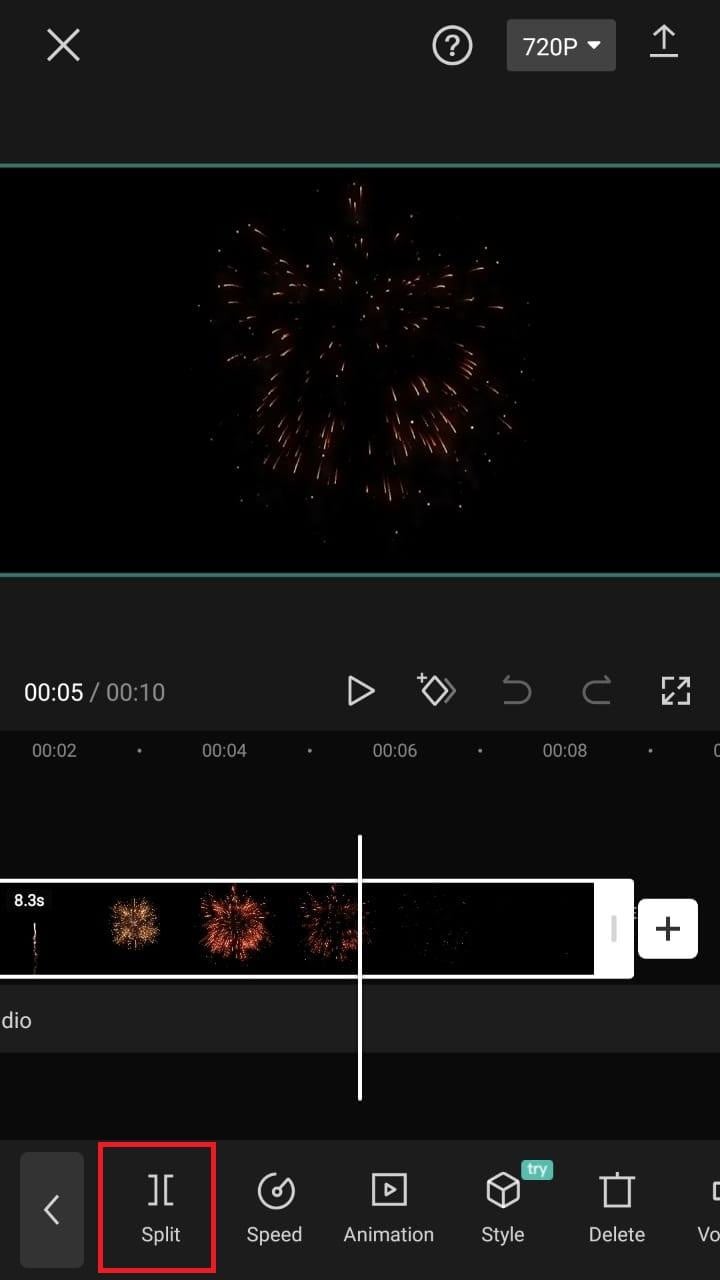
- Split video clips. To split a video clip in half, move the play head to the desired location on the timeline. Tap on your clip, then press the “Split“ toolbar icon. Your result now shows two different clips, not just one.
A Better Split-Screen Effect Video Editor
Filmora is one of the best free HD video makers and video editors with several functionalities, including text, backgrounds, filters, special effects, emoji, audio, and special effects.
Filmora is a feature-packed video editor which has a variety of tools to work with. With this video editor, producing memes, videos with images, pictures, music, stickers, and sound effects and editing videos for YouTube, Twitter, WhatsApp, Facebook, TikTok, and Instagram is simple and entertaining.
Free Download For Win 7 or later(64-bit)
Free Download For macOS 10.14 or later
Steps to Split Screen Video with Filmora
- Download Filmora from the App store
- After installation, launch it.
- Click on “Continue” to continue to use the app.

- Click on Allow to grant Filmora access to your photos and videos.
- You can now tap on “New Project” with the + Symbol.
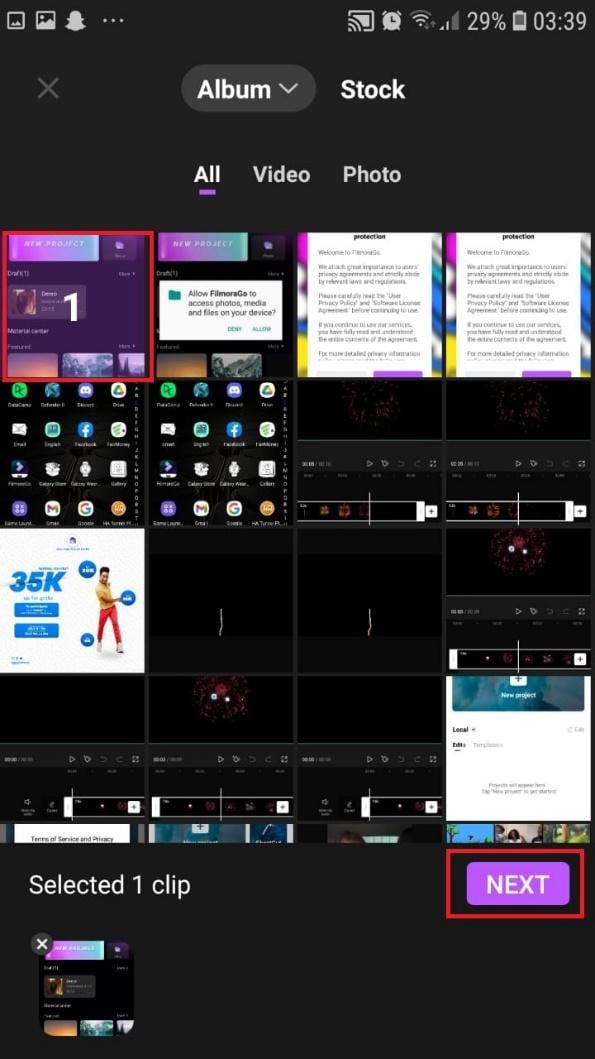
- Select your desired video and tap on “Next” at the bottom right of your screen
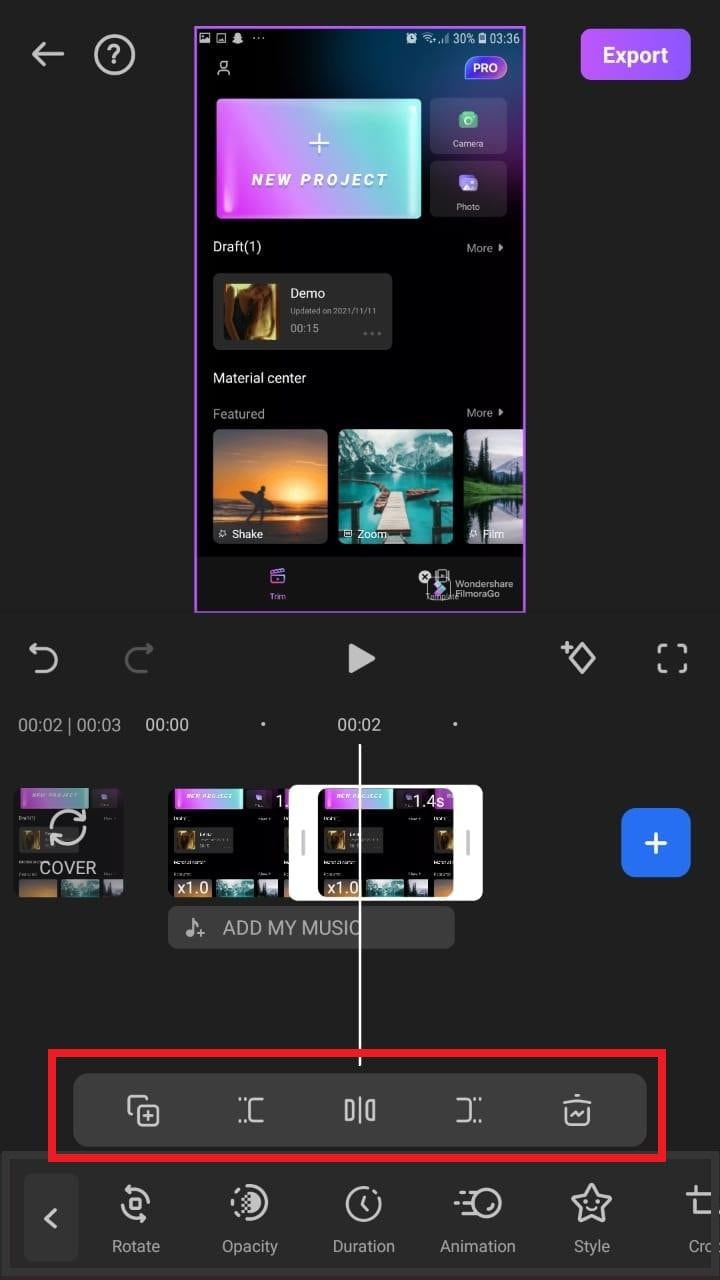
- You can select various options from the bottom of your screen to edit the selected video the way you like.

- Click on trim, and then you will see the different split-screen and collage feature options. Pick any that appeals to you.
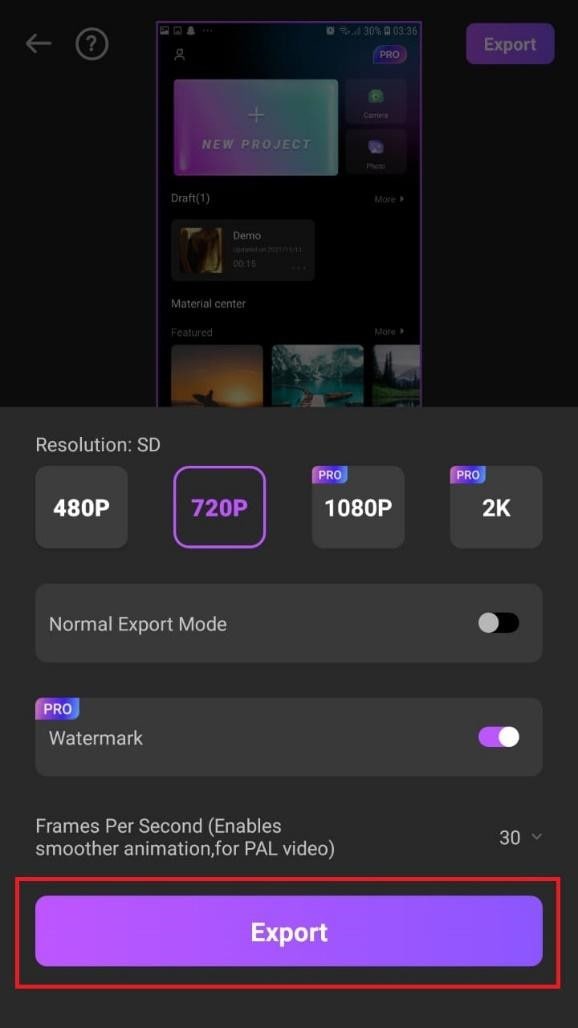
- When you are done with the editing, tap on “Export” at the top right of your screen.

- Go ahead and tap on “Export” on the next screen. Your video will be successfully exported and saved to your camera roll.
Using Filmora is very efficient in splitting your videos and making collage features for TikTok. It is a very simplified app available on both the Google Play Store and Apple Appstore.
Conclusion
TikTok is a platform that users use worldwide to create and share content. It could be pictures, videos, reels, or any other media type. Some people create videos for their audience on TikTok to educate them, while others do it to entertain them.
In any case, the goal is to build a more significant following on TikTok and garner greater attention from its users. You could even make money off the app.
One of the methods to impress your fans and explore multiple possibilities to build unique reels is to use the TikTok split-screen and collage feature effect available on TikTok. Although there are a few different ways to create a Split Screen on TikTok, the steps highlighted in this article are the most straightforward.
Free Download For macOS 10.14 or later
Steps to Split Screen Video with Filmora
- Download Filmora from the App store
- After installation, launch it.
- Click on “Continue” to continue to use the app.
- Click on Allow to grant Filmora access to your photos and videos.
- You can now tap on “New Project” with the + Symbol.
- Select your desired video and tap on “Next” at the bottom right of your screen
- You can select various options from the bottom of your screen to edit the selected video the way you like.
- Click on trim, and then you will see the different split-screen and collage feature options. Pick any that appeals to you.
- When you are done with the editing, tap on “Export” at the top right of your screen.
- Go ahead and tap on “Export” on the next screen. Your video will be successfully exported and saved to your camera roll.
Using Filmora is very efficient in splitting your videos and making collage features for TikTok. It is a very simplified app available on both the Google Play Store and Apple Appstore.
Conclusion
TikTok is a platform that users use worldwide to create and share content. It could be pictures, videos, reels, or any other media type. Some people create videos for their audience on TikTok to educate them, while others do it to entertain them.
In any case, the goal is to build a more significant following on TikTok and garner greater attention from its users. You could even make money off the app.
One of the methods to impress your fans and explore multiple possibilities to build unique reels is to use the TikTok split-screen and collage feature effect available on TikTok. Although there are a few different ways to create a Split Screen on TikTok, the steps highlighted in this article are the most straightforward.
How to Add a Custom Transition to OBS
OBS Studio is an open-source video editor that is widely popular for live streaming on online platforms. Even though OBS is a completely free application, its features are comparable to any premium video editor. We always look for available transition effects in a video editor and OBS takes it to the next level by allowing users to add custom transitions.
Among custom transitions, Stinger transitions have gained a lot of traction from the users. Stinger transitions are made popular by sports channels who use Stinger frequently whenever there is a change in the scene. We will illustrate how to add custom transitions in OBS and apply Stinger transitions in your video.
Part 1. What is Stinger in OBS
Stinger is a special type of customized animated video transition effect that is available in the latest version of OBS Studio. It is a combination of a transparent video animation and a cut transition. Stinger begins with the transparent video animation that grows into full-screen overlay, and it is followed by the cut transition. After the cut transition, you place the next scene or video clip. You will notice Stinger transition whenever sports channels show an instant replay during a live match.
The transparent video animation starts on top of the current video you are editing. When the animation expands and covers up the entire screen, you place the cut transition, and thereafter, you place the next video clip or scene as per your requirement. Some customized stinger effect also includes audio effects along with video effect.
Part 2. How to add stinger transitions to OBS
The Stinger transition is available on OBS Studio and Streamlabs, and both of them are open-source and free applications. Before you add stinger transition, you should have a video animation ready that you will play on top of the current video followed by the cut transition effect. You can download several stinger video animations from the internet and include any of them in OBS while adding stinger transition. Here are the steps on how to add a custom transition to OBS.
Step1 Go to Scene Transitions section and click on Effects option to open the drop-down menu.
Step2 From the drop-down menu, click on “Add: Stinger” option.

Step3 Give a name to the Stinger transition and click Ok button.

Step4 You will see Properties window now. Click on Browser button against Video file and select the transparent video animation file that you want to play on top of the current video before applying the cut transition effect.

Step5 For Transition Point Type, select Time(milliseconds) option. In the Transition Point field, add the duration of the transparent video animation so that the transition to the next scene takes place immediately after the video animation gets completed.

Step6 If your video animation has audio, go to Audio Monitoring and select Monitor and Output option from the dropdown. For Audio Fade Style, you can select Crossfade option for better output.

Step7 Scroll down and click on Preview Transition button to check if the stinger transition is taking place as expected. You can adjust the transition point and other parameters to get it perfect.

Step8 Finally, click on Ok button and play the video to check out the stinger transition on the big screen.
The steps on how to add a custom transition to Streamlabs OBS are almost similar, and therefore, you can add stinger transition using Streamlabs comfortably.
Part 3. OBS Alternative to Add Transitions
There is no denying the fact that OBS Studio has a complicated user interface. That is why most amateur video editors find OBS Studio difficult to learn quickly even though there is no dearth of features. Apart from add custom transition OBS, there are very limited effects available on OBS Studio. That is why many users look for an OBS alternative to add transitions to their videos.
We recommend Wondershare Filmora as the best alternative to OBS Studio when it comes to adding transition effects. That is because Filmora is a professional video editor with a wide range of effects. Most importantly, Filmora is widely loved by amateurs and professionals for its intuitive user interface. Here are the steps on how to add transitions to your video in Filmora.
Free Download For Win 7 or later(64-bit)
Free Download For macOS 10.14 or later
Step1 Download and install Filmora as per your operating system. Open Filmora and click on New Project option.

Step2 Import or drop your video clips under Project Media folder. Then drag and drop them on Timeline and place them sequentially as appropriate.

Step3 Go to Transitions tab located at the top of the application screen. You will see different categories of transitions on the left side.

Step4 Check them out and once you have selected one to apply, drag and drop it in between the video clips.

Step5 Play the video and click on Export button to save the video.
Part 4: Related FAQs about OBS Transitions
How do I add a transition overlay in OBS?
You need to go to Scene Transition tab and select any transition overlay effect that is available. Thereafter, you can change the settings and parameters to customize the transition effect as per your requirements. Apart from the built-in transitions, you can download and add plugins for more transitions.
Can you have different scene transitions in OBS?
Yes, you can have different scene transitions in OBS Studio. You can add them directly from Scene Transition tab one by one as per your requirements. You can add them in between scenes so that the transition effects play when you switch between scenes.
How do I download transitions in OBS?
Go to the OBS Forums from where you get to download transitions for OBS Studio. Click on Download button and download plugin installer as per your operating system. Double-click the installer file to install it on your computer. Go to OBS Studio and go to Scene Transition to use the installed transition.
Free Download For macOS 10.14 or later
Step1 Download and install Filmora as per your operating system. Open Filmora and click on New Project option.
Step2 Import or drop your video clips under Project Media folder. Then drag and drop them on Timeline and place them sequentially as appropriate.
Step3 Go to Transitions tab located at the top of the application screen. You will see different categories of transitions on the left side.
Step4 Check them out and once you have selected one to apply, drag and drop it in between the video clips.
Step5 Play the video and click on Export button to save the video.
Part 4: Related FAQs about OBS Transitions
How do I add a transition overlay in OBS?
You need to go to Scene Transition tab and select any transition overlay effect that is available. Thereafter, you can change the settings and parameters to customize the transition effect as per your requirements. Apart from the built-in transitions, you can download and add plugins for more transitions.
Can you have different scene transitions in OBS?
Yes, you can have different scene transitions in OBS Studio. You can add them directly from Scene Transition tab one by one as per your requirements. You can add them in between scenes so that the transition effects play when you switch between scenes.
How do I download transitions in OBS?
Go to the OBS Forums from where you get to download transitions for OBS Studio. Click on Download button and download plugin installer as per your operating system. Double-click the installer file to install it on your computer. Go to OBS Studio and go to Scene Transition to use the installed transition.
Also read:
- AI Features of Wondershare Filmora - Silence Detection in Videos
- Updated How to Put Emoji on Mac That Take Less Than 10 Mins for 2024
- 2024 Approved If Youre Trying to Create a Countdown Effect, but Youre Not Sure Where to Start, Then This Post Is Going to Show You some Ways to Create a Countdown Animation for Your Videos
- New 2024 Approved You Are Planning to Convert an AVI to GIF Online but You Are Not Sure How? If You Are Looking for an Idea on How to Do It, You Have Come to the Right Place
- Updated 2024 Approved How to Add a Green Screen to Zoom
- Updated What Is a Memoji and How to Make a Memoji? You Can Learn Top 8 Memoji Makers for PC, Android, or iOS, and the Steps to Make a Memoji for 2024
- Updated How to Create a Special Animated Transition in Filmora in Just 2 Minutes. This Simple Step-by-Step Guide Will Show You the Easy Way
- Updated How to Control the Speed of Video
- Updated 2024 Approved Step by Step to Rotate Videos Using OBS
- Updated What Is TS Format and How To Play TS Files?
- Updated In 2024, Tips That Show Anybody How To Create Youtube Slideshow – Guaranteed
- Some Facts About GIF Background You Didnt Know
- New 2024 Approved Top Shortcut Towards Timeline Template
- New Do You Want to Know About Phone Aspect Ratio Vertical? Trying to Learn About iPhone Vertical Video Dimensions? Read This Article to Get All Your Answers on Vertical Phone Aspect Ratio Definition, Types and Tips
- New Level Up Videos By Applying Keyframe Like A Pro
- New In 2024, Quick Answer What Is a Transparent Logo and Why Do You Need It
- New 2024 Approved Create the Night-to-Day Effect Videos
- New 2024 Approved How to Use Zoom in Google
- How to Stop Google Chrome from Tracking Your Location On Motorola Moto G04? | Dr.fone
- Full Guide How To Fix Connection Is Not Private on Vivo S17 | Dr.fone
- 6 Solutions to Fix Error 505 in Google Play Store on Vivo Y27 5G | Dr.fone
- In 2024, What Does Jailbreaking Apple iPhone 14 Plus i Do? Get Answers here | Dr.fone
- Will Pokémon Go Ban the Account if You Use PGSharp On Apple iPhone 7 | Dr.fone
- In 2024, How to Transfer Contacts from Honor 90 Lite to Other Android Devices Using Bluetooth? | Dr.fone
- Fix Excel 2021 formula not showing result | Stellar
- Easy Fixes How To Recover Forgotten iCloud Password From your Apple iPhone 12
- In 2024, Is GSM Flasher ADB Legit? Full Review To Bypass Your Motorola Edge 40 Phone FRP Lock
- In 2024, Effortless Ways to Transfer Data from Your Apple iPhone 12 to iPhone 15 | Dr.fone
- Poco M6 Pro 5G Not Connecting to Wi-Fi? 12 Quick Ways to Fix | Dr.fone
- Guide How To Unbrick a Bricked Oppo Find X6 Phone | Dr.fone
- Title: 2024 Approved Do You Have Any Idea About Changing the Video Speed Using the Editors? Had You Worked with the VLC Playback Speed? This Article Enlightens You with the Best Video Edits Using the Perfect Tool in the Digital Space
- Author: Morgan
- Created at : 2024-05-19 05:12:31
- Updated at : 2024-05-20 05:12:31
- Link: https://ai-video-editing.techidaily.com/2024-approved-do-you-have-any-idea-about-changing-the-video-speed-using-the-editors-had-you-worked-with-the-vlc-playback-speed-this-article-enlightens-you-w/
- License: This work is licensed under CC BY-NC-SA 4.0.
