
:max_bytes(150000):strip_icc():format(webp)/GettyImages-1353420724-65161751b9924195880d3273e327cb54.jpg)
2024 Approved Effective 10 Ways to Convert YouTube to MOV at Ease PC & Online
Effective 10 Ways to Convert YouTube to MOV at Ease [PC & Online]
Just like posting videos on YouTube, you can also convert the videos on the site into other formats for offline viewing. A YouTube to MOV converters are suitable to try out at this point for converting the videos in, for example, .AVI into multi-player-compatible MOV format.
We have listed our top choices for you to choose the right online or desktop-based converter. Read on.
Best 5 Software to convert YouTube to MOV
There are multiple options available for Windows or Mac-based usage to convert YouTube videos into offline MOV videos. We have compiled some of the best ones we found here.
Filmora
Filmora is a comprehensive video editor that users can opt for to create dynamic video projects. You can add custom changes like adding stickers, filters, animation, and text from the pre-set library. Make advanced changes like audio visualization, voiceover addition, adding effects, and other changes. Finally, export the file in the format of your choice.

Converting Speed: Extremely High
Supported Formats: MKV, MP4, MOV, AVI, WMV, F4V, TS, MPG, WEBM, MP3, GIF, etc.
Rating: 8 stars of 10 (TrustRadius)
Main Features:
- Get access to advanced effects with BorisFX, etc.
- Adjust the Speed Ramping effects.
- Change background and reMOVe objects from the video background.
- Merge multiple videos together.
Pros
- Cut, trim and rotate clips.
- Include audio effects, visual filters, keyframe changes, etc.
- Wondershare cloud storage support of 1 GB and higher with different plans.
Cons
- 4K video output is not available under Free Trial.
- Advanced effects like Filmstock library, speed ramping, etc., required a paid subscription.
How to convert YouTube to mov with Filmora
Free Download For Win 7 or later(64-bit)
Free Download For macOS 10.14 or later
Step1Launch the Filmora software after downloading.
Step2Press the “Click to Import Media Files” button and add your YouTube file.

Step3Drag the file(s) you are editing to the editing timeline on the lower side of the page.
Step4Make custom changes like speed adjustment, color adjustment, cutting, merging, volume adjustment, and more.

Step5After the video is up to your standards, click the Export button on top of the screen.
Step6Choose Local >MOV. Then, choose output settings like video quality and file saving location. Click the Export button to download.

![]()
Extra notes: The software is available for professional-level video editing with various features like audio enhancement, TTS/STT support, Instant Mode, etc.
Any Video Converter
Any Video Converter works well as a direct YouTube to MOV converter, assuring lossless quality conversion for all files. After quick specification changes, you can easily sync and download videos from the streaming site in different formats.

Converting Speed: Very high
Supported Formats: WMV, MKV, MPG, 3G2, FLV, SWF, MP4, 3GP, WEBM, OGV, AVI, ASF, M2TS, HD MOV, HD M2TS, HD MP4, HD ASF, HD MKV
Rating: 4 stars of 5 (TechRadar)
Main Features:
- AI-powered software for video/photo quality optimization.
- Upscale video quality to up to 8K.
- Lossless enlargement of photos by 400%.
- Quick and automatic editing tool with advanced effects like speed optimizer, etc.
Pros
- Free updates for all features are always available.
- Flip, crop, and rotate video files.
- Over 200 different supported formats.
Cons
- Cost is high for many users, starting at USD 39.95 for different plans.
- MOV format is only available for Mac users in HD format.
![]()
Extra notes: This YouTube to MOV converters assures lossless quality after video upscaling, cutting, flipping, and other customizations.
iMovie
iMovie is a known video converter with cinematic video editing templates, royalty-free music, and pre-set storyline-based themes to use for editing. You can convert the final file suitable for smart TV-level viewing and prepare intuitive and high-class short Movies.

Converting Speed: Very High
Supported Formats: DV, AVCHD, HDV, Apple Intermediate Codec, Motion JPEG/A, Apple Animation Codec, iFrame, MP4, MOV
Rating: 8.6 stars of 10 (TrustRadius)
Main Features:
- Over 29 templates of video trailers for preview and use.
- Instantly share and view videos on the software.
- Customize the text on different parts of the videos, like credits, titles, contributions, etc.
- Edit and save files to 4K HD resolution.
Pros
- Pre-made Movie and Storyboard projects are available.
- Adjust depth and focus in videos through the Cinematic mode.
- Enhance video elements like transitions and 3D effects easily.
Cons
- Devices require at least 3 GB of disk space to download this.
- Only good for macOS 11.5.1 users and up.
![]()
Extra notes: Best for video editors who want Movie-like advanced editing functions.
Digiber
Digiber is a popular YouTubeMovie converter, that supports a wide range of standard and HD format choices for the conversion. You can also make edits to videos using this software and get quick conversion of multiple files at a time.

Converting Speed: High
Supported Formats: D MPG, HD WMV, HD MPEG2, HD MPEG, HD MP4, HD QuickTime MOV, TRP, /MPEG-4 AVC, MKV, etc.
Rating: XXX stars of 5 (XXXX)
Main Features:
- Convert different files like DVD, BluRay, MP4 files, etc., into MOV files.
- Backup files (e.g., BluRay files) with total lossless quality.
- Input files from YouTube, iMovie, WMV, MP4, etc.
- Import or add subtitles with the editor.
Pros
- Download online videos after playing a preview.
- Create photo slideshows.
- Edit video files with custom effects, cropping, trimming, etc.
Cons
- High cost for software at USD 35 for individual users.
- Limited degree of customization in some formats.
![]()
Extra notes: This is not very technically complex software to start using.
MacXvideo
This YouTubeMovie converter for pc is useful for doing multiple types of advanced features for conversion. You can select different formats for the input and output and play the videos in preview to check quality first-hand.

Converting Speed: Very High
Supported Formats: Several formats, including MOV, MKV, MP4, AVI, MP3, FKV, etc.
Rating: 9 stars of 10 (FinancesOnline)
Main Features:
- Decode files to MP4 to change the compatibility factors.
- Playback videos with zero stutter.
- Convert SD/HD/4K videos into MOV, MKV, MP4, AVI, etc.
- Batch converts multiple audio files with this software.
Pros
- Encoding support up to 8K resolution.
- Convert, transfer, and store onto hardware elements like USD, NAS, etc.
- Convert files from YouTube and share videos to YouTube with this app.
Cons
- Only for Mac devices.
- Email support is the only way to contact.
![]()
Extra notes: Easily edit video and download files in high resolution upto 4K quality.
Best 5 YouTube converter MOV Online
Except for offline software, it is also possible to handle YouTube to MOV conversions using online tools to all. No installation is necessary with these solutions; people can access them from different web-based browsers. We present the top 5 of them for you.
Clip Converter
As a YouTube to Movie converter, Clip Converter is a notable mention with its quick and straightforward conversion tool. Add the YouTube video link directly, and then choose what customizations you require. Automated conversion is also possible here.

Converting Speed: High.
Supported Formats: MP4, MOV, AVI, MKV, 3GP
Rating: 3.5 stars of 5 (TrustPilot)
Main Features:
- Allows videos from YouTube and Vimeo.
- Support video quality up to 4K for output.
- Formats available for older mobile phones, like AVI, 3GP, etc.
- Varying audio formats are supported, like MP3, and M4A.
Pros
- Directly download files to the device.
- Insert file in preferred format from device library for conversion.
- Free to use.
Cons
- No advanced customizations are allowed.
- The count of supported formats is low.
How to download YouTube MOV with Clip Converter:
Step1Go to YouTube, find the video, and copy its URL.
Step2Paste it to the URL field on the Clip Converter page.
Step3Click on MOV format.
Step4Choose if you want automatic conversion or from starting to the ending point of the video.
Step5Press the Convert button to begin processing.
![]()
Extra notes: The output quality is high, at 720p, 1080p, to 4K levels.
Convertio
Convertio as a YouTube to MOV converter assures a smooth process of conversion, no matter which device you are using. You cannot directly add the protected YouTube URLs when making the change; download an offline copy and then quickly make the conversion.

Converting Speed: High
Supported Formats: Multiple formats, like MOV, MKV, MP4, AV1, 3GP, AAF, AVI, F4V, M2TS, and F4V.
Rating: 4 stars of 5 (Tech Radar)
Main Features:
- Use advanced customizations like metadata and aspect ratio adjustment.
- Rotate the video or make cuts.
- Merge more than one video file.
- Converted videos are removed after a total of 24 hours.
Pros
- It supports different platforms, like Linux, Mac, and Windows.
- Adjust video speed while using this YouTube converter MOV
- Unlimited storage as premium users.
Cons
- Users have to pay USD 9.99 each month with the lowest plan.
- Limit of 100 MB for video files in the free converter.
How to convert YouTube to MOV with Convertio :
Step1Click on Choose Files to add a video by URL, Dropbox, device, or Google Drive.
Step2Change format choice to MOV.
Step3Press the Convert button to begin.
![]()
Extra notes: This online converter has advanced benefits in the free version and additional user-friendly perks like multiple concurrent conversions.
Zamzar
This YouTube to MOV converter is one of the easiest online tools for changing different YouTube or saved files into the MOV format. The converter supports over 1100 formats, including video, audio, and image styles.

Converting Speed:Very high.
Supported Formats: 1100+ formats, like 3GA, 3GPP, GVI, F4V, AVI, MOV, 3G2, etc.
Rating: 4.7 stars of 5 (TrustPilot)
Main Features:
- The supported file size for conversion is 2GB for Business plan users.
- Diverse formats are supported for video/audio conversion.
- Personal inbox available for file storage/organization.
- Cloud storage is available for paid users between 5 GB – 100 GB.
Pros
- Priority first conversion benefits for all plan users.
- Conversions are quick.
- High-level customer support.
Cons <path d=”M17 2.00012H19.67C20.236 1.99011 20.7859 2.18825 21.2154 2.55694C21.645 2.92562 21.9242 3.43918 22 4.00012V11.0001C21.9242 11.5611 21.645 12.0746 21.2154 12.4433C20.7859 12.812 20.236 13.0101 19.67 13.0001H17M10 15.0001V19.0001C10 19.7958 10.3161 20.5588 10.8787 21.1214C11.4413 21.684 12.2044 22.0001 13 22.0001L17 13.0001V2.00012H5.72003C5.2377 1.99466 4.76965 2.16371 4.40212 2.47611C4.0346 2.78851 3.79235 3.22321 3.72003 3.70012L2.34003 12.7001C2.29652 12.9868 2.31586 13.2794 2.39669 13.5579C2.47753 13.8363 2.61793 14.0938 2.80817 14.3126C2.99842 14.5314 3.23395 14.7062 3.49846 14.8249C3.76297 14.9436 4.05012 15.0034 4.34003 15.0001H10Z” stro
- Clip Converter
- Convertio
- Zamzar
- Convert Files (Dan’s Tools)
- Free Convert
- Hot FAQs on Converting YouTube to MOV
Best 5 Software to convert YouTube to MOV
There are multiple options available for Windows or Mac-based usage to convert YouTube videos into offline MOV videos. We have compiled some of the best ones we found here.
Filmora
Filmora is a comprehensive video editor that users can opt for to create dynamic video projects. You can add custom changes like adding stickers, filters, animation, and text from the pre-set library. Make advanced changes like audio visualization, voiceover addition, adding effects, and other changes. Finally, export the file in the format of your choice.
Converting Speed: Extremely High
Supported Formats: MKV, MP4, MOV, AVI, WMV, F4V, TS, MPG, WEBM, MP3, GIF, etc.
Rating: 8 stars of 10 (TrustRadius)
Main Features:
- Get access to advanced effects with BorisFX, etc.
- Adjust the Speed Ramping effects.
- Change background and reMOVe objects from the video background.
- Merge multiple videos together.
Pros
- Cut, trim and rotate clips.
- Include audio effects, visual filters, keyframe changes, etc.
- Wondershare cloud storage support of 1 GB and higher with different plans.
Cons
- 4K video output is not available under Free Trial.
- Advanced effects like Filmstock library, speed ramping, etc., required a paid subscription.
How to convert YouTube to mov with Filmora
Free Download For Win 7 or later(64-bit)
Free Download For macOS 10.14 or later
Step1Launch the Filmora software after downloading.
Step2Press the “Click to Import Media Files” button and add your YouTube file.
Step3Drag the file(s) you are editing to the editing timeline on the lower side of the page.
Step4Make custom changes like speed adjustment, color adjustment, cutting, merging, volume adjustment, and more.
Step5After the video is up to your standards, click the Export button on top of the screen.
Step6Choose Local >MOV. Then, choose output settings like video quality and file saving location. Click the Export button to download.
![]()
Extra notes: The software is available for professional-level video editing with various features like audio enhancement, TTS/STT support, Instant Mode, etc.
Any Video Converter
Any Video Converter works well as a direct YouTube to MOV converter, assuring lossless quality conversion for all files. After quick specification changes, you can easily sync and download videos from the streaming site in different formats.
Converting Speed: Very high
Supported Formats: WMV, MKV, MPG, 3G2, FLV, SWF, MP4, 3GP, WEBM, OGV, AVI, ASF, M2TS, HD MOV, HD M2TS, HD MP4, HD ASF, HD MKV
Rating: 4 stars of 5 (TechRadar)
Main Features:
- AI-powered software for video/photo quality optimization.
- Upscale video quality to up to 8K.
- Lossless enlargement of photos by 400%.
- Quick and automatic editing tool with advanced effects like speed optimizer, etc.
Pros
- Free updates for all features are always available.
- Flip, crop, and rotate video files.
- Over 200 different supported formats.
Cons
- Cost is high for many users, starting at USD 39.95 for different plans.
- MOV format is only available for Mac users in HD format.
![]()
Extra notes: This YouTube to MOV converters assures lossless quality after video upscaling, cutting, flipping, and other customizations.
iMovie
iMovie is a known video converter with cinematic video editing templates, royalty-free music, and pre-set storyline-based themes to use for editing. You can convert the final file suitable for smart TV-level viewing and prepare intuitive and high-class short Movies.
Converting Speed: Very High
Supported Formats: DV, AVCHD, HDV, Apple Intermediate Codec, Motion JPEG/A, Apple Animation Codec, iFrame, MP4, MOV
Rating: 8.6 stars of 10 (TrustRadius)
Main Features:
- Over 29 templates of video trailers for preview and use.
- Instantly share and view videos on the software.
- Customize the text on different parts of the videos, like credits, titles, contributions, etc.
- Edit and save files to 4K HD resolution.
Pros
- Pre-made Movie and Storyboard projects are available.
- Adjust depth and focus in videos through the Cinematic mode.
- Enhance video elements like transitions and 3D effects easily.
Cons
- Devices require at least 3 GB of disk space to download this.
- Only good for macOS 11.5.1 users and up.
![]()
Extra notes: Best for video editors who want Movie-like advanced editing functions.
Digiber
Digiber is a popular YouTubeMovie converter, that supports a wide range of standard and HD format choices for the conversion. You can also make edits to videos using this software and get quick conversion of multiple files at a time.
Converting Speed: High
Supported Formats: D MPG, HD WMV, HD MPEG2, HD MPEG, HD MP4, HD QuickTime MOV, TRP, /MPEG-4 AVC, MKV, etc.
Rating: XXX stars of 5 (XXXX)
Main Features:
- Convert different files like DVD, BluRay, MP4 files, etc., into MOV files.
- Backup files (e.g., BluRay files) with total lossless quality.
- Input files from YouTube, iMovie, WMV, MP4, etc.
- Import or add subtitles with the editor.
Pros
- Download online videos after playing a preview.
- Create photo slideshows.
- Edit video files with custom effects, cropping, trimming, etc.
Cons
- High cost for software at USD 35 for individual users.
- Limited degree of customization in some formats.
![]()
Extra notes: This is not very technically complex software to start using.
MacXvideo
This YouTubeMovie converter for pc is useful for doing multiple types of advanced features for conversion. You can select different formats for the input and output and play the videos in preview to check quality first-hand.
Converting Speed: Very High
Supported Formats: Several formats, including MOV, MKV, MP4, AVI, MP3, FKV, etc.
Rating: 9 stars of 10 (FinancesOnline)
Main Features:
- Decode files to MP4 to change the compatibility factors.
- Playback videos with zero stutter.
- Convert SD/HD/4K videos into MOV, MKV, MP4, AVI, etc.
- Batch converts multiple audio files with this software.
Pros
- Encoding support up to 8K resolution.
- Convert, transfer, and store onto hardware elements like USD, NAS, etc.
- Convert files from YouTube and share videos to YouTube with this app.
Cons
- Only for Mac devices.
- Email support is the only way to contact.
![]()
Extra notes: Easily edit video and download files in high resolution upto 4K quality.
Best 5 YouTube converter MOV Online
Except for offline software, it is also possible to handle YouTube to MOV conversions using online tools to all. No installation is necessary with these solutions; people can access them from different web-based browsers. We present the top 5 of them for you.
Clip Converter
As a YouTube to Movie converter, Clip Converter is a notable mention with its quick and straightforward conversion tool. Add the YouTube video link directly, and then choose what customizations you require. Automated conversion is also possible here.
Converting Speed: High.
Supported Formats: MP4, MOV, AVI, MKV, 3GP
Rating: 3.5 stars of 5 (TrustPilot)
Main Features:
- Allows videos from YouTube and Vimeo.
- Support video quality up to 4K for output.
- Formats available for older mobile phones, like AVI, 3GP, etc.
- Varying audio formats are supported, like MP3, and M4A.
Pros
- Directly download files to the device.
- Insert file in preferred format from device library for conversion.
- Free to use.
Cons
- No advanced customizations are allowed.
- The count of supported formats is low.
How to download YouTube MOV with Clip Converter:
Step1Go to YouTube, find the video, and copy its URL.
Step2Paste it to the URL field on the Clip Converter page.
Step3Click on MOV format.
Step4Choose if you want automatic conversion or from starting to the ending point of the video.
Step5Press the Convert button to begin processing.
![]()
Extra notes: The output quality is high, at 720p, 1080p, to 4K levels.
Convertio
Convertio as a YouTube to MOV converter assures a smooth process of conversion, no matter which device you are using. You cannot directly add the protected YouTube URLs when making the change; download an offline copy and then quickly make the conversion.
Converting Speed: High
Supported Formats: Multiple formats, like MOV, MKV, MP4, AV1, 3GP, AAF, AVI, F4V, M2TS, and F4V.
Rating: 4 stars of 5 (Tech Radar)
Main Features:
- Use advanced customizations like metadata and aspect ratio adjustment.
- Rotate the video or make cuts.
- Merge more than one video file.
- Converted videos are removed after a total of 24 hours.
Pros
- It supports different platforms, like Linux, Mac, and Windows.
- Adjust video speed while using this YouTube converter MOV
- Unlimited storage as premium users.
Cons
- Users have to pay USD 9.99 each month with the lowest plan.
- Limit of 100 MB for video files in the free converter.
How to convert YouTube to MOV with Convertio :
Step1Click on Choose Files to add a video by URL, Dropbox, device, or Google Drive.
Step2Change format choice to MOV.
Step3Press the Convert button to begin.
![]()
Extra notes: This online converter has advanced benefits in the free version and additional user-friendly perks like multiple concurrent conversions.
Zamzar
This YouTube to MOV converter is one of the easiest online tools for changing different YouTube or saved files into the MOV format. The converter supports over 1100 formats, including video, audio, and image styles.
Converting Speed:Very high.
Supported Formats: 1100+ formats, like 3GA, 3GPP, GVI, F4V, AVI, MOV, 3G2, etc.
Rating: 4.7 stars of 5 (TrustPilot)
Main Features:
- The supported file size for conversion is 2GB for Business plan users.
- Diverse formats are supported for video/audio conversion.
- Personal inbox available for file storage/organization.
- Cloud storage is available for paid users between 5 GB – 100 GB.
Pros
- Priority first conversion benefits for all plan users.
- Conversions are quick.
- High-level customer support.
Cons <path d=”M17 2.00012H19.67C20.236 1.99011 20.7859 2.18825 21.2154 2.55694C21.645 2.92562 21.9242 3.43918 22 4.00012V11.0001C21.9242 11.5611 21.645 12.0746 21.2154 12.4433C20.7859 12.812 20.236 13.0101 19.67 13.0001H17M10 15.0001V19.0001C10 19.7958 10.3161 20.5588 10.8787 21.1214C11.4413 21.684 12.2044 22.0001 13 22.0001L17 13.0001V2.00012H5.72003C5.2377 1.99466 4.76965 2.16371 4.40212 2.47611C4.0346 2.78851 3.79235 3.22321 3.72003 3.70012L2.34003 12.7001C2.29652 12.9868 2.31586 13.2794 2.39669 13.5579C2.47753 13.8363 2.61793 14.0938 2.80817 14.3126C2.99842 14.5314 3.23395 14.7062 3.49846 14.8249C3.76297 14.9436 4.05012 15.0034 4.34003 15.0001H10Z” stro
Add Selective Color Effect to Your Videos Using Filmora
Selective color is an effect that lets you desaturate all the colors in a photo or video while preserving one or more colors of your choice. It is done by isolating a specific color of your choice in the frame while all other colors turn into black and white, just like this.

By using this effect, we can draw viewers’ attention to a specific point in the clip. If you want your video do the same, Filmora can be a good helper. Alright, we’ll be creating selective color effects in two examples. Let’s get started.
Tutorial 1 on making color isolation by selective color effect
In this first example, we are going to use stock footage showing a subject on a bike.
To add a selective color effect, download Wondershare Filmora on your PC or Mac. Now follow the steps as explained below to add this effect and isolate the color of your choice.
Free Download For Win 7 or later(64-bit)
Free Download For macOS 10.14 or later
Step1 Launch Wondershare Filmora and drag and drop your clip to the timeline.

Step2 Go to effects and then click “NewBlue FX” option and select Newblue filters.

Step3 Find the Selective Color Effect and drag it onto the clip. The effect will be instantly applied.

Step4 Next, double-click on the clip and check out the effects menu at the top of the screen.

Step5 Open the preset drop-down menu. There will be a lot of presets with different colors. Select the preset you want to use. In this scenario, let us select Just Blue.

Step6 If you see a blue tint at a place or object which you want to be white and black, click on the first color.

Step7 Now adjust the range slider to decrease the number of unwanted tints.

Step8 To blur the edges of the effects, turn up the softened slider and remove any unwanted tint previously remaining.

In this way, you can add a selective color effect to your video clips and isolate the color of your choice.
Tutorial 2 on make color isolation using eyedropper tool
You might ask how do we use the eyedropper tool here. It can sample colors from anywhere in a video or an image and add them to your swatch panel. The steps to use the eyedropper tool to add a selective color to your video are below.
Step1 As same as the first one, launching Wondershare Filmora is the first priority. And drag your clip to the timeline.

Step2 Go to effects at the top, and find Newblue effects, and click on the Newblue filters.

Step3 Find the selective color effect and drag it to the clip.

Step4 Double-click on the clip and visit the effects menu at the top of the screen.

Step5 Click on the ‘first color’ and select the eye dropper tool. This will allow us to select the red flower in the preview window. You can also click different parts of the image to get the color that we want.

Step6 Next, try selecting a second color to isolate within our shot. In this example, we are going to make the stems on the flowers stand out as well. Select second color and go to the tint section. And find a color that is close to the second color, which will be green in this case.

Step7 Pick the eyedropper tool and click it on the green part of the clip. Then adjust the range slider as needed.

Alright, let’s watch back the video to see how both colors are now isolated.

Follow all the steps in the correct order. This is how you can use NewBlue effects for color isolation using Wondershare Filmora. The color isolation using the selective color effect defines the point of interest in the clip for the viewers.
Free Download For macOS 10.14 or later
Step1 Launch Wondershare Filmora and drag and drop your clip to the timeline.
Step2 Go to effects and then click “NewBlue FX” option and select Newblue filters.
Step3 Find the Selective Color Effect and drag it onto the clip. The effect will be instantly applied.
Step4 Next, double-click on the clip and check out the effects menu at the top of the screen.
Step5 Open the preset drop-down menu. There will be a lot of presets with different colors. Select the preset you want to use. In this scenario, let us select Just Blue.
Step6 If you see a blue tint at a place or object which you want to be white and black, click on the first color.
Step7 Now adjust the range slider to decrease the number of unwanted tints.
Step8 To blur the edges of the effects, turn up the softened slider and remove any unwanted tint previously remaining.
In this way, you can add a selective color effect to your video clips and isolate the color of your choice.
Tutorial 2 on make color isolation using eyedropper tool
You might ask how do we use the eyedropper tool here. It can sample colors from anywhere in a video or an image and add them to your swatch panel. The steps to use the eyedropper tool to add a selective color to your video are below.
Step1 As same as the first one, launching Wondershare Filmora is the first priority. And drag your clip to the timeline.
Step2 Go to effects at the top, and find Newblue effects, and click on the Newblue filters.
Step3 Find the selective color effect and drag it to the clip.
Step4 Double-click on the clip and visit the effects menu at the top of the screen.
Step5 Click on the ‘first color’ and select the eye dropper tool. This will allow us to select the red flower in the preview window. You can also click different parts of the image to get the color that we want.
Step6 Next, try selecting a second color to isolate within our shot. In this example, we are going to make the stems on the flowers stand out as well. Select second color and go to the tint section. And find a color that is close to the second color, which will be green in this case.
Step7 Pick the eyedropper tool and click it on the green part of the clip. Then adjust the range slider as needed.
Alright, let’s watch back the video to see how both colors are now isolated.
Follow all the steps in the correct order. This is how you can use NewBlue effects for color isolation using Wondershare Filmora. The color isolation using the selective color effect defines the point of interest in the clip for the viewers.
Best Ways to Convert Video Frame Rate to 60FPS [Software and Online Choices]
One of the primary things that differentiate a good video from a low-quality one is its frame rate or burst rate. This refers to the frequency of a series of images or frames consecutively appearing during display. A low frame rate per second or FPS causes issues in most display screens, so you will need a 60 FPS video converter to update it.
You need to convert or make video 60FPS online through tools and software to improve the sharpness of frame speed and make it suitable for streaming sites like YouTube that play 60FPS only or create UHD/4K videos. Plus, most high-definition screens for gaming, computers, tablets, and smartphones require high FPS.
This article will teach you the best solutions to make the conversion possible. Choose your option after a full evaluation.

Part I. What does 60 FPS mean?
Before discussing the best tools available for frame rate conversion, you should know what frame rate is. Also known as update rate, this signifies the frequency of the display of consecutive series of frames or images. The speed of how they appear determines the fluid play of the video with no interruption or lag.
In the context of video and film cameras, motion capture systems, and computer graphics, you should try to convert video to 60FPS. There are multiple types available, like the low 24FPS or 30FPS or the higher 60FPS or 120FPS. 60FPS is the most accepted option for diverse operating systems, screens, and graphics.
Differences between 24FPS, 30FPS, and 60FPS
Here are the differences you will note between the three common frame rates per second in videos. For a simple overview, these differences are expressed in tabular form.
| 24FPS | 30FPS | 60FPS | |
|---|---|---|---|
| Description | This universally acceptable frame rate choice is used for transferring video signals to film. | 30FPS is a slightly higher frame rate choice for animations and show videos that are suitable for television viewing and online platforms. | Videos at 60FPS have better fluency and smoother definition, with sharp videos that work during gaming, high-definition streaming, and UHD/4K video editing. |
| Types of videos | Older videos and films. | Online videos, TV shows, and news. | HD-quality movies, online videos, and games. |
| Users | Movie suppliers | Entertainment and Media professionals. | Movie producers, video editors, gaming software developers, etc. |
Why Should You Convert Videos into 60FPS?
In the context of video FPS, the three variations- 30FPS, 60FPS, and 24FPS are the most common. However, there are specific reasons why 60FPS is the best option you should use, and take the time to convert your files with this frame rate.
- Playing 24FPS or 30FPS videos on LCD screens have more prominent motion blur, the sharpness of transition is low and rough, etc.
- Well-known streaming sites like YouTube set their standard for videos at 60FPS. If you use a file with a higher FPS, it will compress to 60FPS automatically. Anything lower than that is unacceptable since it creates a laggy video transition.
- Creating high-quality movies in UHD or 4K resolution requires a high FPS like 60FPS. Movies shot with 24FPS do not assure the best display in the native frame rate and need pulldown conversion. This causes judder, which affects video quality. Converting the video to 60fps ai online is a better choice.
- Modern devices like computers, smartphones, and tablets have a high refresh rate. So, these, including some gaming monitors and television varieties, accept videos with 60FPS best.
- In animation, most creators run 3-4 images per drawing, which means 6 or 8 drawings per second. For the best transition between shorts and images, converting the animation videos to 60FPS is useful.
If you want to know more about these FPS options and which one to select for long-term usage, read through the comprehensive review .
Part II. How to convert A Video to 60fps?
If you plan to use a 60fps video converter, luckily, multiple capable choices are available in the market. Here, we present the top options you can use with an accurate conversion that occurs quickly and with limited errors.
1. Best Software Converters
The following are the best software-based platforms that you can try out.
One notable ai 60fps converter that users find extremely useful all around for optimized video editing is Wondershare UniConverter. The tool comes with varying AI-powered tools you can try to change.
With this software, you can easily make changes to the file during the conversion, like upgrading the FPS and bitrate of various video codecs, adjusting the contrast, contrast, etc., for output. Plus, it is possible to change the speed of the videos you are editing through the Editing timeline, between 0.25X - 3X speed options.

- User Base: Professional video editors, social media vloggers, businesses, students, beginner-level users, etc.
Watch this video to get a visual representation of how the tool works for FPS conversion and other editing functions.
How to use Wondershare UniConverter for converting FPS?
Step1 Download and launch the Wondershare UniConverter software on your device after completing all installation steps.
Step2 Click or drag and drop the video file of which you will change the frame rate.

Step3 To make changes to the video, click the Edit button and do them- like speed change, cutting sections, etc.
Step4 Then press the Settings button. Choose the Video option and then select the format like MP4.
Step5 Tap the setting icon beside the format choice and set the frame rate option as 60FPS. Then, press the Create button.

Step6 To convert the file further, click the Convert button and choose the destination file format. Press Convert.

Features:
- Convert between different file formats.
- Edit or split the files.
- Change the speed of the video between various speed modes.
- Download files at high resolution as per customization.
Pros
- Easy to use for non-technical users.
- The free software includes most of the conversion functions.
- Zero quality loss or lagging FPS playthrough in the converted file.
Cons
- GPU acceleration and High-Speed Conversion are available for Pro users only.
- You can resize the file for social media platforms like YouTube once using the Free Trial version.
Another FPS video maker and converter tool that you must try is Format Factory. This professional-quality video and audio converter tool are useful for various levels of video editing, including specifications like the frame rate per second.
You can clip and join your video section and do audio mixing steps. Easily adjust your video frame speed to ensure top-grade video playback with limited to no resolution loss. You can easily set the frame rate to 60FPS after downloading YouTube videos and making adjustments.

Pros
- Compress file size with settings changes for frame rate.
- Supports different video formats.
- Compatible with HEIC and WEBP formats for conversion.
Cons
- Only suitable for Windows users.
- Slightly complex to try for beginner-level users.
One of the best 60fps video editor options available in the market is MiniTool Video Converter. This Windows-based native software can make multiple advanced changes to your video file during conversion. Not to mention, it supports quick batch processing, with zero drop in quality after the process.
You can easily change the frame rate speed to 60FPS or other speed options during the exporting process. Adding effects will maintain a strong frame rate frequency that you can also preview.

Pros
- Supports a variety of video formats for conversion.
- Batch conversion is supported here.
- No loss of quality when you change the frame rate or bitrate.
Cons
- The process will lag if there is not at least 1 GB of free storage space in your device.
- Only works on Windows devices.
2. Best Online Converters
If you want to use a 60fps video converter online, there are tools available for that as well. These converters come with limited advanced mechanisms or features. However, in terms of changing the FPS of videos, web-based tools are easier to operate and do straightforward tasks.
Plus, you will not need to register or download third-party software here- the tools are accessible through any browser or device.
1) AI Video Frame Rate Converter
One of the best tools for online video frame rate conversion is the AI Video Frame Rate Converter. With this online tool, you can easily insert your file into the tool you access on any browser of your choice.
Then, choose the conversion FPS like 60FPS for your video and get high-resolution video quality in the final file. The software does not keep the file on the server, which assures good privacy protection for users with their files and data.

Pros
- No need to install the software.
- Easily choose the FPS option to convert the file.
- The quick conversion process.
Cons
- The free version only allows 5 credits for users to try.
- No tools to enhance video quality with the free tool.
2) Video2Edit
Another top 60fps converter online that users should give a chance is Video2Edit. This tool is accessible through any web browser and allows one to change various aspects of the video they are converting, including the frame rate.
You can choose 60FPS as the target frame rate choice for the video that you add to your device’s tool. It also supports 120FPS and other options lower than 60FPS- the final converter file is still a high definition.

Pros
- Choose the frame rate per second for your video.
- Make settings changes for your video audio additionally.
- The tool is easily accessible and free to use.
Cons
- You have to take more steps for customization instead of directly getting the FPS changing option.
- Cannot convert multiple files simultaneously.
3) Aconvert
Users can try out this online video to 60fps converter to change elements of videos quickly during conversion. You can insert your file from a cloud account, device, or URL and choose the video format to convert.
Plus, it is much easier to directly set the frame rate you want to change in the video. This tool supports up to 60FPS for the change, and you can choose a custom FPS if necessary.

Pros
- Can convert video codec settings like bitrate, etc., for different file formats.
- Easily add a file from the device, URL, or cloud.
- Quick processing speed for the conversion.
Cons
- No batch conversion for multiple files.
- Big files can get slow to convert.
Bonus Tip. Use Wondershare Filmora to Create High-Quality Videos with 60FPS Support
If you plan to make further edits to your video clips and directly create a project with 60FPS support, using a capable 60fps maker software is necessary. Wondershare Filmora is suitable software for video editing professionals and regular users to try to make videos easily.
Free Download For Win 7 or later(64-bit)
Free Download For macOS 10.14 or later
You can use the different features available for quick and customized video projects. Here, you can try the Instant Mode feature for instantaneous video edits or directly try out the editor timeline with diverse features like Edit icon or Speed Ramping to make changes. As for adjusting the frame rate, you can make those changes during export.
Watch this video to know how to use Filmora for further video editing.
How to Change Frame Rate to 60FPS in Filmora?
Step1 After you have completed all of the edits, click on the Export button in the editor timeline of Filmora.
Step2 Choose the output format you will download the video file, e.g., MP4, from the Local tab.

Step3 Click on the Settings button. Adjust the specification of the video, like frame rate, and change to 60FPS. Make other changes if needed, and press OK.

Step4 Click on Export to download the file or directly upload it via Vimeo or YouTube through those tabs.
Conclusion
Indeed, adjusting the frame rate of your video will help you create high-quality videos with a fluid and lag-less transition. You should convert your file to 60FPS if it is a lower version at the time to improve sharpness and make it compatible with most screen types, 4K movie playing, and streaming.
Use the available online and native software options to make these changes quickly and efficiently. Additionally, if you want to create a file directly at 60FPS, you can do so using Filmora.
Give these tools a try first to get a better experience with the features and process.
Why Should You Convert Videos into 60FPS?
In the context of video FPS, the three variations- 30FPS, 60FPS, and 24FPS are the most common. However, there are specific reasons why 60FPS is the best option you should use, and take the time to convert your files with this frame rate.
- Playing 24FPS or 30FPS videos on LCD screens have more prominent motion blur, the sharpness of transition is low and rough, etc.
- Well-known streaming sites like YouTube set their standard for videos at 60FPS. If you use a file with a higher FPS, it will compress to 60FPS automatically. Anything lower than that is unacceptable since it creates a laggy video transition.
- Creating high-quality movies in UHD or 4K resolution requires a high FPS like 60FPS. Movies shot with 24FPS do not assure the best display in the native frame rate and need pulldown conversion. This causes judder, which affects video quality. Converting the video to 60fps ai online is a better choice.
- Modern devices like computers, smartphones, and tablets have a high refresh rate. So, these, including some gaming monitors and television varieties, accept videos with 60FPS best.
- In animation, most creators run 3-4 images per drawing, which means 6 or 8 drawings per second. For the best transition between shorts and images, converting the animation videos to 60FPS is useful.
If you want to know more about these FPS options and which one to select for long-term usage, read through the comprehensive review .
Part II. How to convert A Video to 60fps?
If you plan to use a 60fps video converter, luckily, multiple capable choices are available in the market. Here, we present the top options you can use with an accurate conversion that occurs quickly and with limited errors.
1. Best Software Converters
The following are the best software-based platforms that you can try out.
One notable ai 60fps converter that users find extremely useful all around for optimized video editing is Wondershare UniConverter. The tool comes with varying AI-powered tools you can try to change.
With this software, you can easily make changes to the file during the conversion, like upgrading the FPS and bitrate of various video codecs, adjusting the contrast, contrast, etc., for output. Plus, it is possible to change the speed of the videos you are editing through the Editing timeline, between 0.25X - 3X speed options.
- User Base: Professional video editors, social media vloggers, businesses, students, beginner-level users, etc.
Watch this video to get a visual representation of how the tool works for FPS conversion and other editing functions.
How to use Wondershare UniConverter for converting FPS?
Step1 Download and launch the Wondershare UniConverter software on your device after completing all installation steps.
Step2 Click or drag and drop the video file of which you will change the frame rate.
Step3 To make changes to the video, click the Edit button and do them- like speed change, cutting sections, etc.
Step4 Then press the Settings button. Choose the Video option and then select the format like MP4.
Step5 Tap the setting icon beside the format choice and set the frame rate option as 60FPS. Then, press the Create button.
Step6 To convert the file further, click the Convert button and choose the destination file format. Press Convert.
Features:
- Convert between different file formats.
- Edit or split the files.
- Change the speed of the video between various speed modes.
- Download files at high resolution as per customization.
Pros
- Easy to use for non-technical users.
- The free software includes most of the conversion functions.
- Zero quality loss or lagging FPS playthrough in the converted file.
Cons
- GPU acceleration and High-Speed Conversion are available for Pro users only.
- You can resize the file for social media platforms like YouTube once using the Free Trial version.
Another FPS video maker and converter tool that you must try is Format Factory. This professional-quality video and audio converter tool are useful for various levels of video editing, including specifications like the frame rate per second.
You can clip and join your video section and do audio mixing steps. Easily adjust your video frame speed to ensure top-grade video playback with limited to no resolution loss. You can easily set the frame rate to 60FPS after downloading YouTube videos and making adjustments.
Pros
- Compress file size with settings changes for frame rate.
- Supports different video formats.
- Compatible with HEIC and WEBP formats for conversion.
Cons
- Only suitable for Windows users.
- Slightly complex to try for beginner-level users.
One of the best 60fps video editor options available in the market is MiniTool Video Converter. This Windows-based native software can make multiple advanced changes to your video file during conversion. Not to mention, it supports quick batch processing, with zero drop in quality after the process.
You can easily change the frame rate speed to 60FPS or other speed options during the exporting process. Adding effects will maintain a strong frame rate frequency that you can also preview.
Pros
- Supports a variety of video formats for conversion.
- Batch conversion is supported here.
- No loss of quality when you change the frame rate or bitrate.
Cons
- The process will lag if there is not at least 1 GB of free storage space in your device.
- Only works on Windows devices.
2. Best Online Converters
If you want to use a 60fps video converter online, there are tools available for that as well. These converters come with limited advanced mechanisms or features. However, in terms of changing the FPS of videos, web-based tools are easier to operate and do straightforward tasks.
Plus, you will not need to register or download third-party software here- the tools are accessible through any browser or device.
1) AI Video Frame Rate Converter
One of the best tools for online video frame rate conversion is the AI Video Frame Rate Converter. With this online tool, you can easily insert your file into the tool you access on any browser of your choice.
Then, choose the conversion FPS like 60FPS for your video and get high-resolution video quality in the final file. The software does not keep the file on the server, which assures good privacy protection for users with their files and data.
Pros
- No need to install the software.
- Easily choose the FPS option to convert the file.
- The quick conversion process.
Cons
- The free version only allows 5 credits for users to try.
- No tools to enhance video quality with the free tool.
2) Video2Edit
Another top 60fps converter online that users should give a chance is Video2Edit. This tool is accessible through any web browser and allows one to change various aspects of the video they are converting, including the frame rate.
You can choose 60FPS as the target frame rate choice for the video that you add to your device’s tool. It also supports 120FPS and other options lower than 60FPS- the final converter file is still a high definition.
Pros
- Choose the frame rate per second for your video.
- Make settings changes for your video audio additionally.
- The tool is easily accessible and free to use.
Cons
- You have to take more steps for customization instead of directly getting the FPS changing option.
- Cannot convert multiple files simultaneously.
3) Aconvert
Users can try out this online video to 60fps converter to change elements of videos quickly during conversion. You can insert your file from a cloud account, device, or URL and choose the video format to convert.
Plus, it is much easier to directly set the frame rate you want to change in the video. This tool supports up to 60FPS for the change, and you can choose a custom FPS if necessary.
Pros
- Can convert video codec settings like bitrate, etc., for different file formats.
- Easily add a file from the device, URL, or cloud.
- Quick processing speed for the conversion.
Cons
- No batch conversion for multiple files.
- Big files can get slow to convert.
Bonus Tip. Use Wondershare Filmora to Create High-Quality Videos with 60FPS Support
If you plan to make further edits to your video clips and directly create a project with 60FPS support, using a capable 60fps maker software is necessary. Wondershare Filmora is suitable software for video editing professionals and regular users to try to make videos easily.
Free Download For Win 7 or later(64-bit)
Free Download For macOS 10.14 or later
You can use the different features available for quick and customized video projects. Here, you can try the Instant Mode feature for instantaneous video edits or directly try out the editor timeline with diverse features like Edit icon or Speed Ramping to make changes. As for adjusting the frame rate, you can make those changes during export.
Watch this video to know how to use Filmora for further video editing.
How to Change Frame Rate to 60FPS in Filmora?
Step1 After you have completed all of the edits, click on the Export button in the editor timeline of Filmora.
Step2 Choose the output format you will download the video file, e.g., MP4, from the Local tab.
Step3 Click on the Settings button. Adjust the specification of the video, like frame rate, and change to 60FPS. Make other changes if needed, and press OK.
Step4 Click on Export to download the file or directly upload it via Vimeo or YouTube through those tabs.
Conclusion
Indeed, adjusting the frame rate of your video will help you create high-quality videos with a fluid and lag-less transition. You should convert your file to 60FPS if it is a lower version at the time to improve sharpness and make it compatible with most screen types, 4K movie playing, and streaming.
Use the available online and native software options to make these changes quickly and efficiently. Additionally, if you want to create a file directly at 60FPS, you can do so using Filmora.
Give these tools a try first to get a better experience with the features and process.
How to Zoom Picture in Picture [Easy Solution]
Zoom is one of the greatest options on the market for video conferencing. It doesn’t matter whether you use it at home or in an office environment; it will quickly link the team members. One of the most popular video conferencing programs is Zoom. When in-person meetings aren’t feasible, it enables you to communicate electronically with employees, and it’s been a major popularity for social occasions as well. In case you’re not acquainted, picture-in-picture mode enables you to watch videos from one app while using your PC normally. The movie will keep playing in a tiny thumbnail window so that two applications may work simultaneously on your smartphone.
You may create virtual audio and video conferences, webinars, live chats, screen sharing, and other collaboration tools with Zoom, a cloud-based video communications solution. Zoom’s most recent iPhone apps let you dismiss a Zoom Meeting while keeping the Zoom video call open in a picture-in-picture mode. To join a Zoom conference, you don’t need an account, and because the software works with Mac, Windows, Linux, iOS, and Android devices, nearly anybody can use it. Since using Zoom’s picture-in-picture mode is the same as using it with other applications, you shouldn’t have any trouble if you often use PiP mode. Here are the top 4 methods you can refer to picture in picture in Zoom.
Method 1: Swap Shared Screen with Video
You may move the Zoom Meeting PiP window across the screen, change the thumbnail’s size, and utilize other applications while it remains open, just like any other picture-in-picture window. Before leaving the meeting if you’re not giving a presentation or speaking, you should definitely mute Zoom on your iPhone to prevent noises from your typing or other activities from entering the conversation. Additionally, keep in mind to switch off the camera if you’re engaged in something distracting, at least for the duration of your activity. To reopen the Zoom Meeting and go back to the Zoom app, touch the Picture-in-Picture mode pane. Here are some actions to keep in mind:
Steps to Swap Shared Screen for Zoom Picture in Picture
Step1Launch or enter a Zoom meeting. Keep the video on your main screen at all times, closing the chat and participant list as necessary.
Step2Tap the Home button or swipe up from the bottom of the screen.
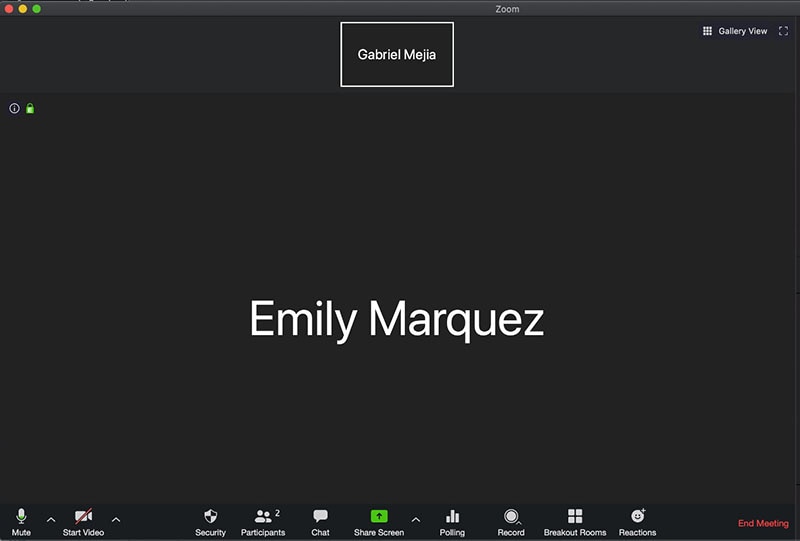
Step3Picture-in-picture mode should be activated automatically throughout the meeting.
Method 2: Use Ecamm Live
Live streaming is a fantastic way to provide original content and stand out from the crowd. To prevent any operational difficulties, a more sophisticated virtual camera is absolutely necessary. You now have magical abilities thanks to Ecamm virtual cam, including the ability to add text, animations, observe a live stream, post viewer comments, play music, share your screen, use sound effects, and many more. It offers the Ecamm live virtual camera zoom function for video conferences so you may improve your Zoom discussions by sending output to other PC programs. You could see a quality difference between what you view in Ecamm Live and what your Zoom visitors see while utilizing virtual camera with Zoom. The quality of a Zoom video stream cannot be improved using Ecamm Live. Simply broadcast the Zoom app using Ecamm Live’s Screen Share mode to utilize Ecamm Live for picture-in-picture virtual presentations on Zoom.
Steps to Use Ecamm Live for Zoom Picture in Picture
Step1Download the Ecamm Application
Install Ecamm Live on your computer, then choose the center button in the source switcher at the top of the main window to enter Screen Share mode.
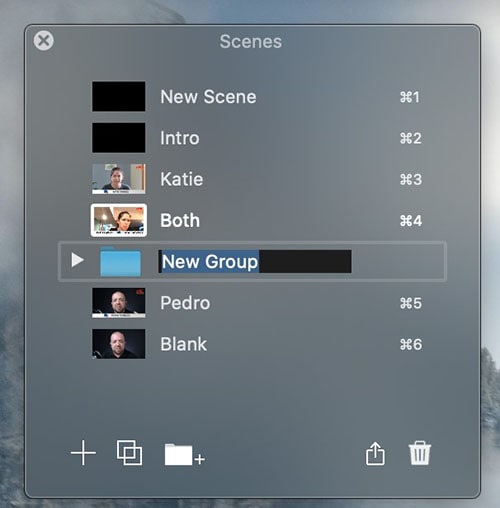
Step2Create Scenes
With the use of Ecamm Live’s Virtual Camera and Virtual Mic capabilities, you may transfer Ecamm Live’s output to almost any other Mac software, including Zoom. After setting, create the scenes in the program to quickly switch between various cameras.
Step3Select Ecamm on Zoom
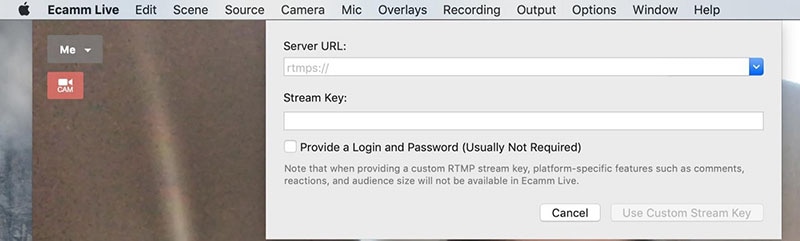
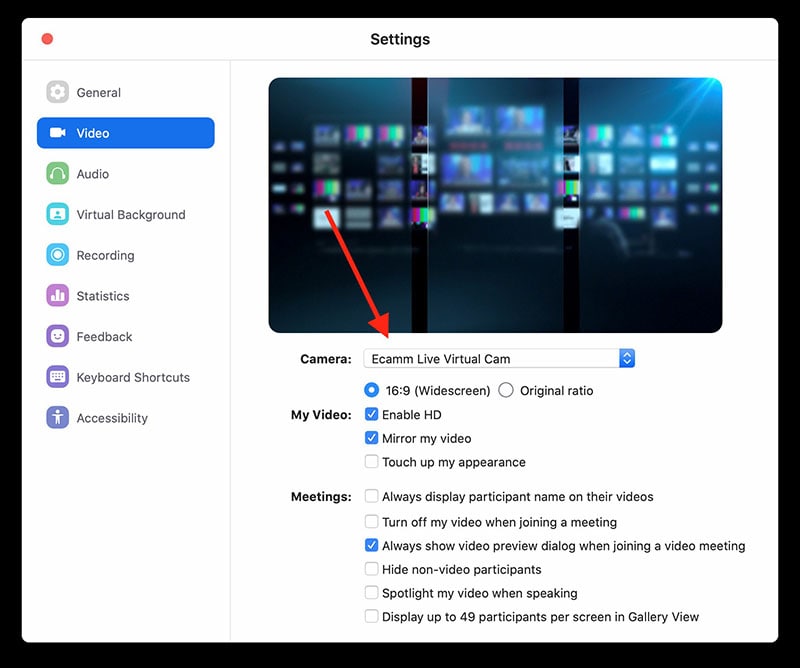
You may also utilize Ecamm Live’s Sharing Window capability to feed Ecamm Live output into Zoom. Simply activate the virtual camera, and then, as seen below, choose Ecamm Live Virtual Camera in Zoom’s video settings:
Step4Begin Your Presentation
Finally, click the PC share option to show your Zoom app to your audience. To conceal a picture-in-picture window that displays your camera image while live streaming, click the PIP button.
Method 3: Use Filmora as A Switcher
Zoom has solutions that will make your meetings simple and secure. It gives your remote staff a secure setting to interact and share crucial information. Ideal control over your film and configuration options to make them aesthetically pleasing is something Zoom lacks. To overcome the drawbacks and improve the quality of your online meetings, you may take use of the capabilities of Zoom in conjunction with Filmora. Filmora was developed with the intention of easing user burden and supporting applications. Though complicated, the program is simple to use. The perhaps most popular web information that may be saved on your computer can be easily captured by just angling your screen. For more information on how to record and save your Zoom for picture in picture, see the guide here.
To broadcast a variety of situations in a grid style, you may also combine inputs from your camera, microphone, computer screen, and web conferencing software. Wondershare -the finest desktop application for recording a Zoom Picture in Picture meeting- is Filmora. With the majority of cameras, this app’s screen recording capability is both user-friendly and feature-rich. Here, users may either choose a particular region to record or record their zoom meetings in Fullscreen mode. Additionally, you may choose the camera and input microphone that will be used while recording a video overlay. The addition of relevant comments like phrases, lines, drawings, symbols, etc. is also possible by users. The detailed procedure for recording a Zoom Picture-in-Picture meeting using a Filmora recorder is given below:
Free Download For Win 7 or later(64-bit)
Free Download For macOS 10.14 or later
Step1Download and Install Filmora Zoom Recorder
You may find both types, i.e., the most recent Windows and Mac versions, by first visiting the usual website and then using this Zoom. Install the program on your computer once you download it to get started.

Step2Initiate Filmora Recorder
After finishing the installation process for this Reside Zoom recorder, launch it from the main menus and choose “New Task” when prompted. It will take you to Filmora’s streamlined user interface where you can immediately start filming. Then, as seen in the picture below, you may adjust the screen recording using your preferred camera, microphone, and system settings:

Step3Begin/End the Recording
When you are through configuring this Zoom picture in picture recorder, click the Record button, and it will immediately begin recording your customized screen. Similar to that, after you’re done recording, click Stop, which will take you inside the video editor where you may edit your recorded information.

Step4Share Recordings
When you have everything ready, export your recording right away. After you’re done with the editing part, you do have a lot of options to choose from when displaying your screen capture and webcam stories. To do so, click the Export button in the item user interface’s top-right corner as shown below:
You may easily choose your preferred way to share from there if you choose to upload your work of zoom picture in picture recordings straight to the YouTube or other reputable websites right now. Simply refer to the Sharing plug-ins in the Export window to find out more.
Method 4: Use Hardware Switcher ATEM Mini Pro
Particularly on Zoom, the ATEM Mini is excellent for video conferences. The Blackmagic ATEM Mini is a USB video interface and HDMI switcher. Four HDMI inputs, or four cameras that can produce an HDMI video stream, may be switched between live. This device integrates Zoom meetings fast and makes it incredibly simple to set up your audio, a sometimes-forgotten aspect of video broadcasting. This sophisticated video switcher promises to offer broadcast-quality multi-camera footage with ease and is targeted at gamers, streamers, and online reviewers. It connects to a computer via a USB-C to USB-A connection. The video feed may then be sent to distant colleagues via a number of well-liked videos streaming services, including Zoom.
Step1The ATEM Mini Pro is a basic control switcher with pro-broadcast performance. Your ATEM Mini Pro is really simple to set up. You can connect a full setup with several cameras and microphones in around 30 minutes.
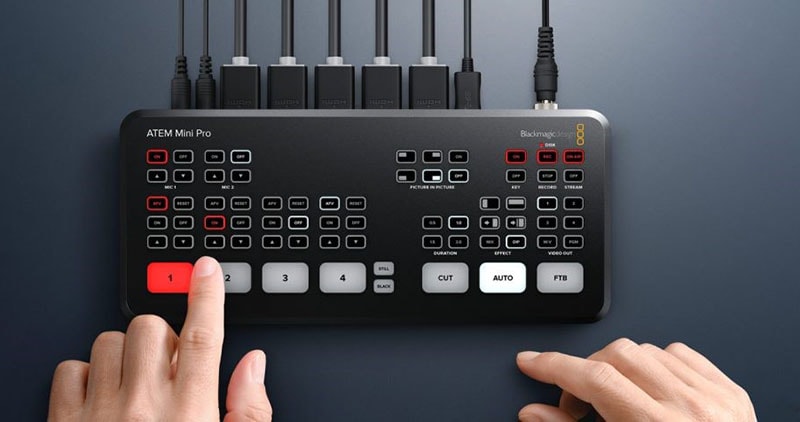
Step2You may connect several camera sources to the inputs of the ATEM Mini Pro. The 4 HDMI inputs each have a separate standards converter built in. As a result, the ATEM Mini can automatically convert inputs that are 1080p, 1080i, or 720p to the switcher’s video standard. You may make quick changes between inputs with no latency or disruption to your video output by using the ergonomic buttons.
Step3As a third option, Zoom offers ATEM Mini, which enables you to switch between several inputs, add custom visuals, and adjust audio levels all from a single interface. To improve the quality of your production, you may even use smooth transitions like wipes or fades. You can even test any input stream before making it live.
Conclusion
When you are doing a Zoom Meeting and share your screen, only to discover that what the other attendees see is a split screen with your material and the other Attendee cams, it is highly annoying. You may move the Zoom Meeting PiP window across the screen, change the thumbnail’s size, and utilize other applications while it remains open, just like any other picture-in-picture window. Someone must be sharing information in the Zoom conference for the Picture in Picture, or “Split Screen” option, to be active. We’ve listed the top techniques for doing it effectively above. To do this work without difficulty, use them as your guide.
Free Download For macOS 10.14 or later
Step1Download and Install Filmora Zoom Recorder
You may find both types, i.e., the most recent Windows and Mac versions, by first visiting the usual website and then using this Zoom. Install the program on your computer once you download it to get started.
Step2Initiate Filmora Recorder
After finishing the installation process for this Reside Zoom recorder, launch it from the main menus and choose “New Task” when prompted. It will take you to Filmora’s streamlined user interface where you can immediately start filming. Then, as seen in the picture below, you may adjust the screen recording using your preferred camera, microphone, and system settings:
Step3Begin/End the Recording
When you are through configuring this Zoom picture in picture recorder, click the Record button, and it will immediately begin recording your customized screen. Similar to that, after you’re done recording, click Stop, which will take you inside the video editor where you may edit your recorded information.
Step4Share Recordings
When you have everything ready, export your recording right away. After you’re done with the editing part, you do have a lot of options to choose from when displaying your screen capture and webcam stories. To do so, click the Export button in the item user interface’s top-right corner as shown below:
You may easily choose your preferred way to share from there if you choose to upload your work of zoom picture in picture recordings straight to the YouTube or other reputable websites right now. Simply refer to the Sharing plug-ins in the Export window to find out more.
Method 4: Use Hardware Switcher ATEM Mini Pro
Particularly on Zoom, the ATEM Mini is excellent for video conferences. The Blackmagic ATEM Mini is a USB video interface and HDMI switcher. Four HDMI inputs, or four cameras that can produce an HDMI video stream, may be switched between live. This device integrates Zoom meetings fast and makes it incredibly simple to set up your audio, a sometimes-forgotten aspect of video broadcasting. This sophisticated video switcher promises to offer broadcast-quality multi-camera footage with ease and is targeted at gamers, streamers, and online reviewers. It connects to a computer via a USB-C to USB-A connection. The video feed may then be sent to distant colleagues via a number of well-liked videos streaming services, including Zoom.
Step1The ATEM Mini Pro is a basic control switcher with pro-broadcast performance. Your ATEM Mini Pro is really simple to set up. You can connect a full setup with several cameras and microphones in around 30 minutes.
Step2You may connect several camera sources to the inputs of the ATEM Mini Pro. The 4 HDMI inputs each have a separate standards converter built in. As a result, the ATEM Mini can automatically convert inputs that are 1080p, 1080i, or 720p to the switcher’s video standard. You may make quick changes between inputs with no latency or disruption to your video output by using the ergonomic buttons.
Step3As a third option, Zoom offers ATEM Mini, which enables you to switch between several inputs, add custom visuals, and adjust audio levels all from a single interface. To improve the quality of your production, you may even use smooth transitions like wipes or fades. You can even test any input stream before making it live.
Conclusion
When you are doing a Zoom Meeting and share your screen, only to discover that what the other attendees see is a split screen with your material and the other Attendee cams, it is highly annoying. You may move the Zoom Meeting PiP window across the screen, change the thumbnail’s size, and utilize other applications while it remains open, just like any other picture-in-picture window. Someone must be sharing information in the Zoom conference for the Picture in Picture, or “Split Screen” option, to be active. We’ve listed the top techniques for doing it effectively above. To do this work without difficulty, use them as your guide.
Also read:
- 2024 Approved Best Cinematic LUTs For Premiere Pro Recommendation
- New Enhance Your Video Color Accuracy with Video Scopes
- 2024 Approved How to Make A Tattoo Disappear Like A Magic
- How to Use LUTs in VN Editor – Complete Guide and Best LUTs Download for 2024
- How to Use OBS Chroma Key With/Without Green Screen Easy Solutions
- Updated Ultimate Guide on How To Plan and Storyboard a Music Video for 2024
- Updated Competitive Guide To Use Slow Motion in After Effects
- New 2024 Approved 7 Ways Add Subtitles to MKV Videos on All Platforms
- Updated In 2024, Wondering How to Replace Sky in After Effects? Learn How
- New In 2024, Top List of Best VHS Video Effect Makers
- New 2024 Approved 10 Best Audio Visualizers Windows, Mac, Android, iPhone & Online
- Updated In 2024, Blender Is a 3D Animation Software that Can Be Used to Create Stunning 3D Models and Videos
- In 2024, Zoom In and Out on Discord
- Searching for the Best Video Editor to Make Your Video More Attractive? This Article Introduce You Everything About Choosing a Video Editing Software for 2024
- In 2024, Explore Your Skills in Dimensional Graphic Editing and Animation with Blender. The Software Lands Among the Best Platforms for Art Enthusiasts with Its Stunning Transparent Backgrounds
- In 2024, Movavi Video Editor Plus Review
- Updated Do You Know Anything About the Video Format Supported by WhatsApp? If Not, Then This Is the Right Time to Learn About WhatsApp-Supported Video Formats
- 2024 Approved 6 Instant Mp4 to GIF Online Tools
- 2024 Approved How to Turn Text Into a Podcast
- New 2024 Approved Finding The Finest Way to Add Subtitles to Videos | Filmora
- Discover the Ultimate LUTs for Wondershare Filmora Uncover the Answer for 2024
- How To Zoom In On TikTok Videos?
- New Best Online GIF to Image (PNG/JPG) Converters for 2024
- New 2024 Approved Easy Steps to Loop YouTube Videos on iPhone
- New Color Match Game Top Tips for You
- New Create Eye-Catching Slow-Motion Videos to Set Your Own Trend. For This Purpose, Read This Article to Find and Learn to Use CapCuts New Slow-Motion Templates for 2024
- New In 2024, Color Lut in Video -How to Color Grade Your Video
- Best Ways to Convert Video Frame Rate to 60FPS Software and Online Choices
- Updated A Full Guide to Funcall Voice Changer and Its Alternatives for 2024
- New In 2024, Do You Know How AI Is Helping Video Editors and Enthusiasts? Many Video Editing Software Allows an Auto Reframe Option to Use that Can Help Manage Videos
- Looking for Simple Steps to Apply Fade in Effect to Your Text in Premiere Pro? Here Are Two Different Methods Along with an Alternative Way to Fade Text in Videos
- Do You Know that You Can Apply Different LUTs and Create Your Own? There Are Many LUT Online and Offline Generators that You Can Use to Create Your LUT for 2024
- New How to Create a Slideshow with Movavi Slideshow Maker for 2024
- Updated 2024 Approved Ways to Learn Discord Game Bots – Even if Youre Just Starting Out
- New Movavi Slideshow Maker Is a Powerful Video Editing Tool that Can Be Used to Add Rich Effects to Videos Easily. This Guide Will Introduce the Features and Show You How to Apply Effects to Videos with This Tool for 2024
- Updated How to Create a Smooth Cut Transition Effect, In 2024
- 2024 Approved Go Through This Guide on All Steps in Freezing Frame Sequences in Videos Using Filmora. Details Include Splitting the Clip, Reversing Speed, and More
- New Best 8 Online GIF to APNG Converters
- Updated In 2024, Attaining Slow Motion Video Trend Finding The Best CapCut Templates
- Updated Best Practical Tips to Improve Your Lighting in the Sun
- Updated In 2024, Top 10 iPad Slideshow Apps to Create a Slideshow
- New 2024 Approved How to Make After Effects Gifs
- Updated 2024 Approved Here Are the Steps to Crop a Video in Sony Vegas Pro Step 1 Click on Import and Import the Video to Be Edited. Click on It and Drag-Drop to Timeline
- How to Turn On/Off Motion Blur in Minecraft?
- In 2024, Top IMEI Unlokers for Your Motorola Edge 40 Phone
- How to Unlock SIM Card on Apple iPhone 8 Plus online without jailbreak
- How To Transfer WhatsApp From Apple iPhone 13 to other iPhone 11 devices? | Dr.fone
- In 2024, How to Change Google Play Location On Tecno Camon 20 Pro 5G | Dr.fone
- How to Exit Android Factory Mode On Vivo T2 5G? | Dr.fone
- In 2024, How To Remove Passcode From Apple iPhone 6s Plus? Complete Guide | Dr.fone
- How To Transfer Data From Apple iPhone 13 Pro Max To Other iPhone 15 Pro Max devices? | Dr.fone
- Everything You Need to Know about Lock Screen Settings on your Infinix Hot 40
- 3 Methods to Mirror Vivo Y100i to Roku | Dr.fone
- Methods to Change GPS Location On Vivo V27 | Dr.fone
- Title: 2024 Approved Effective 10 Ways to Convert YouTube to MOV at Ease PC & Online
- Author: Morgan
- Created at : 2024-05-19 05:12:14
- Updated at : 2024-05-20 05:12:14
- Link: https://ai-video-editing.techidaily.com/2024-approved-effective-10-ways-to-convert-youtube-to-mov-at-ease-pc-and-online/
- License: This work is licensed under CC BY-NC-SA 4.0.
