
:max_bytes(150000):strip_icc():format(webp)/GettyImages-1139232374-700d343900854115ad26acf3f1dd80b3.jpg)
2024 Approved How to Add Motion Titles
How to Add Motion Titles
Do you want to make your videos eye-catching instantly? Looking for some cool title animations to make your texts stand out? You should definitely opt for motion title templates that are widely available in popular video editors. Motion title templates come preloaded with animated texts, engaging graphic elements, and even background effects.
You can add them directly to your video and customize them as per you requirements so that your video looks exactly the way you desire. Different video editors have different motion titles, and therefore, you should check them out one by one to find out the templates you are looking for. We will illustrate title motion graphics in all the leading video editors.
Part 1. Add Motion Title with Filmora
The easiest way to add motion title to your video on your computer is through Wondershare Filmora . Filmora is a professional video editor that is available for Windows and Mac users. Filmora has the best collection of motion title templates, and the user interface is super intuitive and anyone can use without any prior experience. Here are the steps to add motion title with Filmora.
Step1Install and launch Wondershare Filmora on your computer. Click on New Project option on the welcome screen or go to File menu and click on New Project option.

Step2Go to File menu and Import Media option to import your video file. Otherwise, you can simply drop the video file into Project Media folder.
Step3Drag the video file from Project Media folder and drop it into the Timeline.

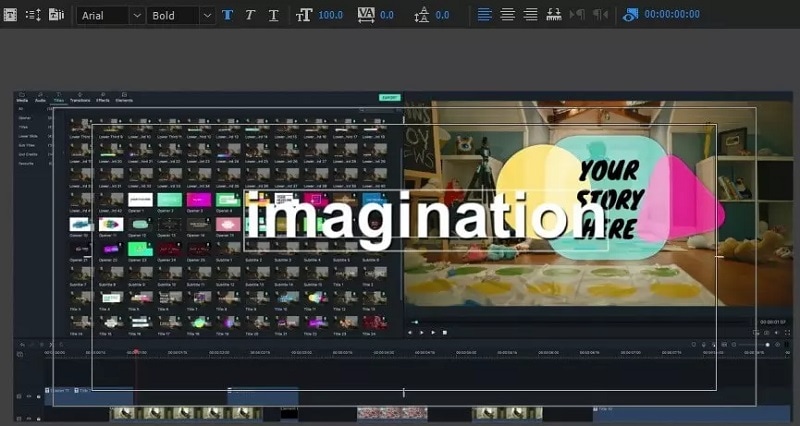
Step4Go to Titles at the top and go to the left panel. You can different categories of motion title templates. Select any desired text effect and drop into the Timeline above the video layer wherever you want.
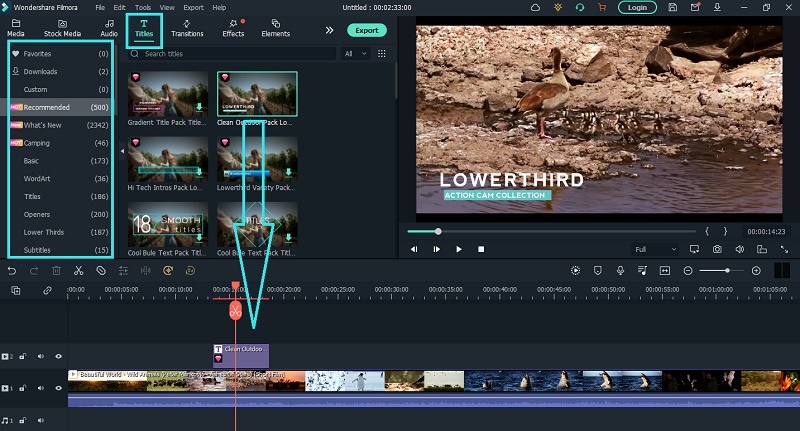
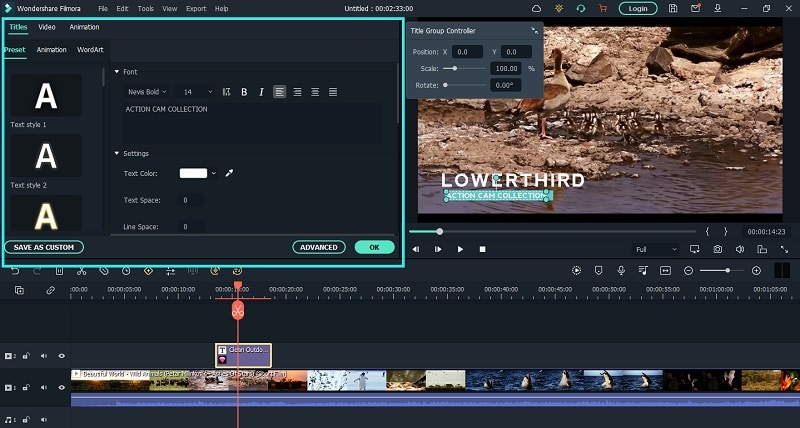
Step5Double clicking on the text layer on Timeline to edit the text and change the styles. Under Preset tab, you can change font, size, and color. Finally, click on OK button to save the edits done.
Part 2. Add Motion Title with Premiere Pro
Adobe Premiere Pro is a renowned video editor that is mostly used by professionals to edit videos and add effects and animations. Even though Premiere Pro has a steep learning curve, you can create motion title in simple steps. You can write any text on the video and select from different effects and animations to create motion title graphics. Here are the steps to add title motion graphics Premiere Pro free.
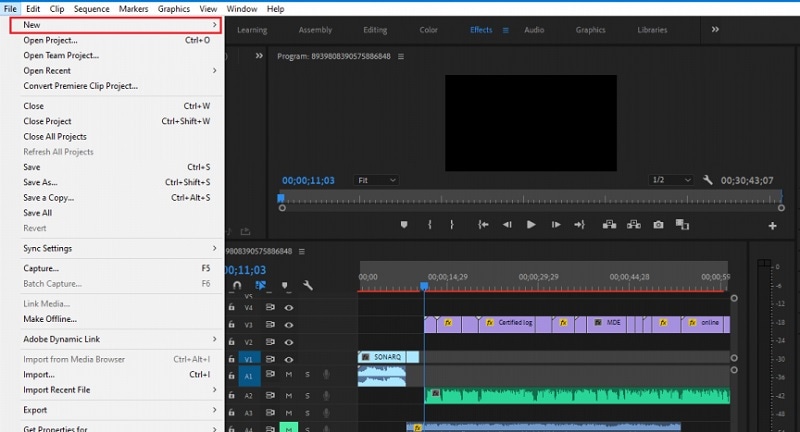
Step1Launch Premiere Pro and go to New> Project option. Import the video file and drop it into Timeline.
Step2Go to Title> New Title> Default Still option and follow the on-screen instructions.

Step3You will see different types of title styles and designs to choose from as you feel.

Step4Click on Type Tool option and click on the area on the video where you want the text to appear. You can customize them from the right panel from Title Styles, Title Properties, Tools and Title Actions.
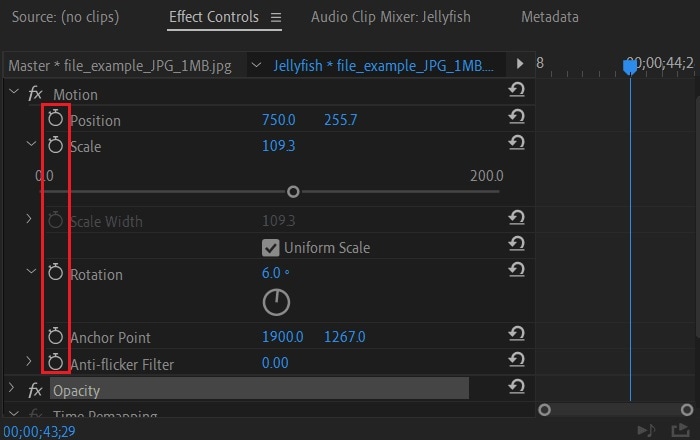
Step5To add motion to the title, click on Effects Control window. Click on any desired animation and turn to Stopwatch icon to apply the effect to the text. There is a dedicated Motion option available.
Part 3. Make motion title with Studio
Studio is a popular video editing software where you can not only apply motion title presets but also create motion title presets from scratch. The reason why video editors choose Studio is because it allows users to customize everything and create different templates and animations for personalization. Here are the steps to create title motion graphics in Studio as per your requirements.
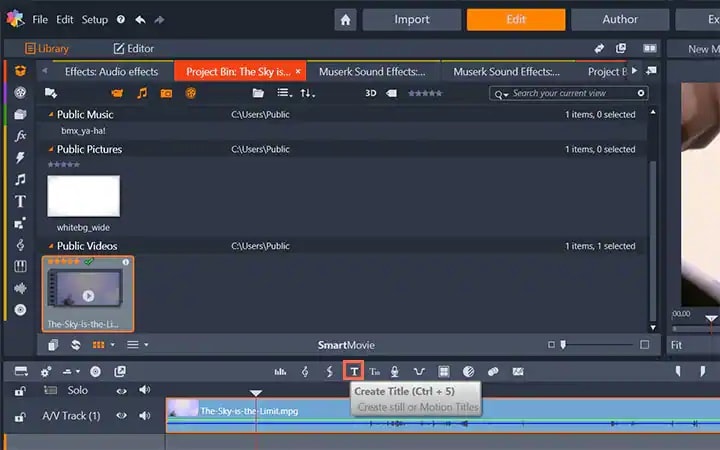
Step1Launch Studio. Import your video file, and you can import single frames such as images from a live video for stop motion titles. Once you have imported, go to the header bar above the Timeline. Click on Create Title option to open Title Editor to create title motion.
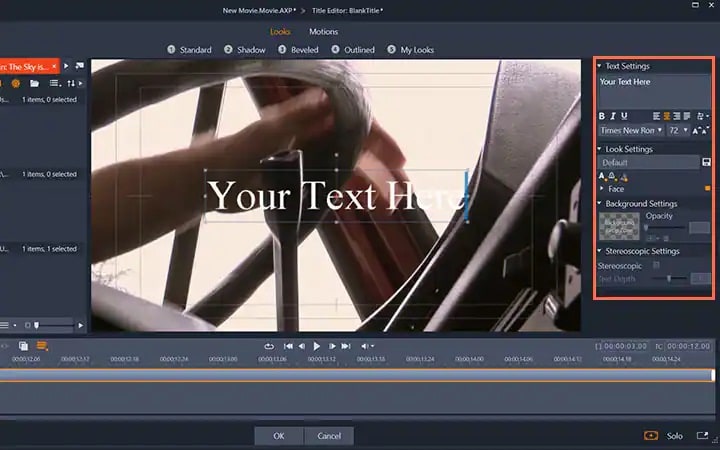
Step2Add your preferred text under Title Editor and adjust font, size, and style as you feel. Go to the right side to make changes to Look, Background, and Stereoscopic Settings to get the perfect text style from the wide range of choices available.
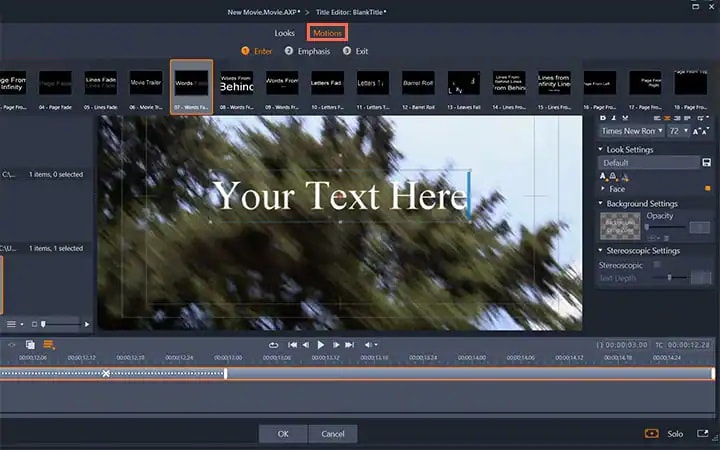
Step3Click on Motion option at the top to add motion to the text. Choose from the different motion title templates as per your preference.
Step4You can adjust the duration of the motion effect from the right panel and click on Ok button.

Part 4. Add Motion Title with WeVideo
WeVideo is a popular online video editor that you can use to add title motion graphics Premiere Pro free. You can find many motion titles on WeVideo for free like you get in Premiere Pro and there are many exclusive motion text templates available. You need to create a free account with WeVideo to get started. You can create your video from scratch by selecting from the available video templates. You can even import your recorded video and add motion texts and animations as per your preference. Here are the steps to add motion title with WeVideo.
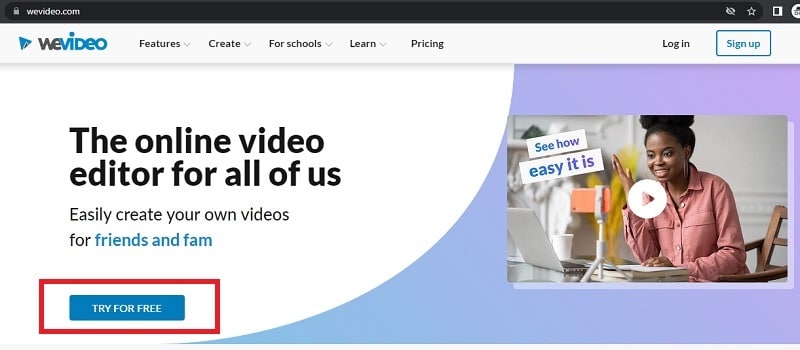
Step1Open your web browser and visit “wevideo.com”. Click on Try For Free button. Sign up for free and go to WeVideo video editor.
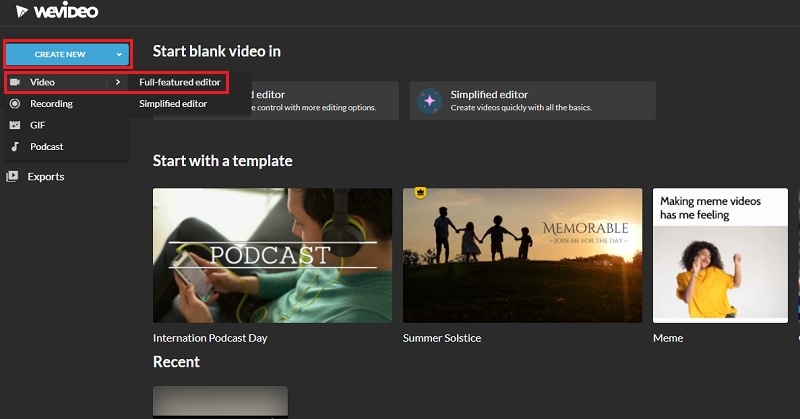
Step2Click on Create New button and select Video option. Click on Full-featured editor option.
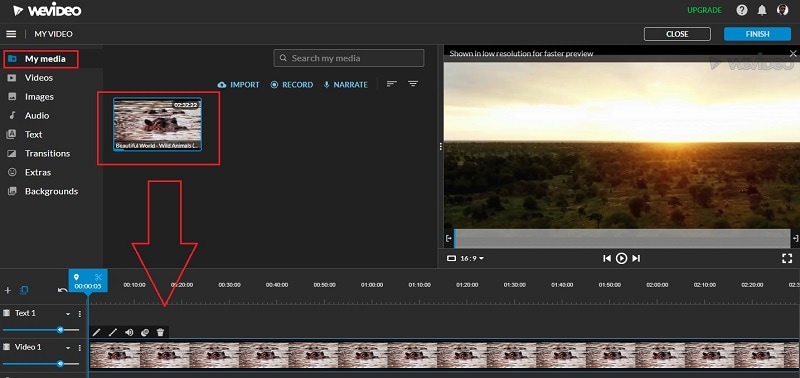
Step3Drag and drop your video file into My Media folder and bring it to Timeline.
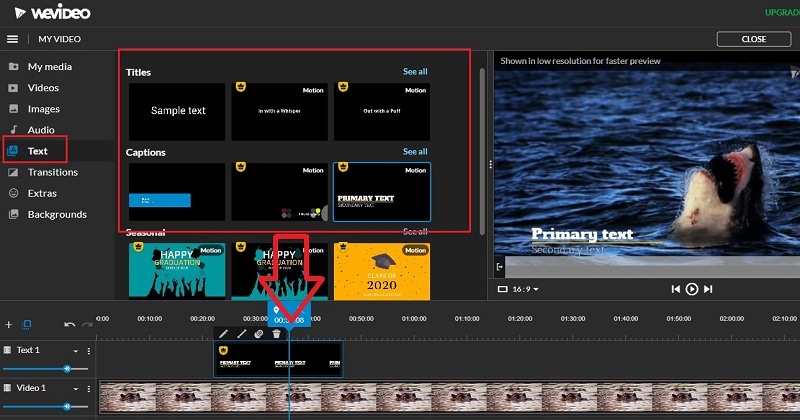
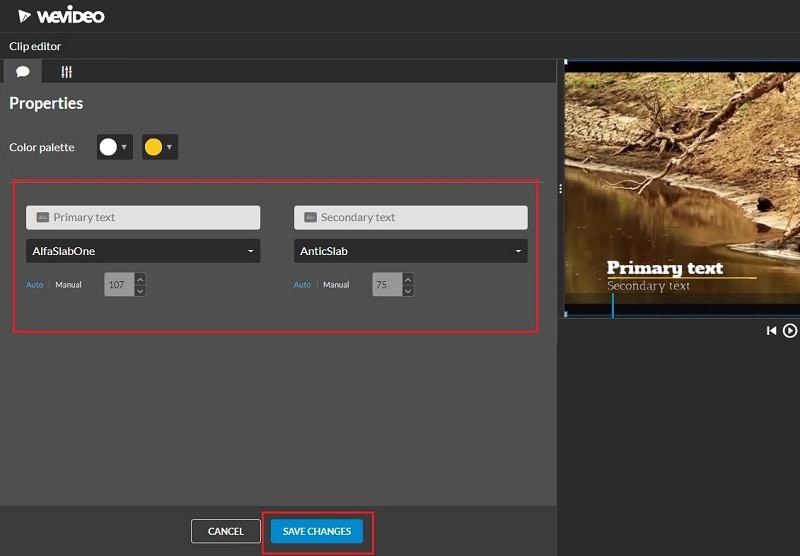
Step4Go to Text tab and you will see all the motion animated titles under Titles section. Click on them to check out their previews in Viewer. If you have selected anyone, drag and drop it into Timeline.
Step5Adjust the position where you want the title to appear on the video and stretch the duration as required. Double-click on the title to edit and customize it as per your preference. Finally, click on Save Changes button.
The Bottom Line
Motion titles are extremely important for any video because they bring in a variety to your video. They make the video eye-catching and help in getting the message across by grabbing the attention of the viewers. We have illustrated how to add motion titles Premiere Pro and Studio. You can also use WeVideo online video editor. We recommend Wondershare Filmora for its extensive collection of motion title templates to choose from and apply to your text.
Free Download For Win 7 or later(64-bit)
Free Download For macOS 10.14 or later
Do You Want to Replace the Sky in Your Media? Read the Article to Learn How to Change the Sky App on Your Mobile Phone
Sky replacement apps have become popular among content creators and social media influencers. Posting natural-looking pictures in front of the sky has become the new aesthetic of 2024, like the clean girl makeup. Many people try to get a flawless shot of themselves in front of the sky. But it’s hard to get the perfect and aesthetically pleasing photos and videos because of the background objects and extra bright or dull sky lightning.
This article will tell you about sky change apps and which apps you should consider. Read the article if you want to create an aesthetic sky picture using a replace sky app.
Sky Replacement A cross-platform works like magic for background removal or sky replacement photos!
Free Download Free Download Learn More

Part 1: Finding The Best iOS Apps to Change Sky Background in Media
Sky replacement apps are a fantastic way to give your pictures an entirely new viewpoint. Here are some of the top sky-changing applications for iOS:
- Background Changer & Eraser
- Bazaart: Design, Photo & Video
- Easy Photo Background Editor
- Superimpose+: Background Eraser
- Background Eraser: BG Remover
1. Background Changer & Eraser
Background Changer & Eraser is your go-to editor if you want to alter the backdrop, create incredible effects and overlays, apply filters, and modify the lighting in your pictures. Everyone who wishes to have gorgeous photos like those edited by a pro can do so with only one click using the one-click background changer and photo editing solution.

Pros
- Erases even the smallest part of a snapshot, easily trims out objects and fixes faults.
- With the extensive selection of overlays, including sparkles, lens flare, and glitter, you can add a little glitz to your photos.
Cons
- The app tends to become glitchy when you keep using it.
2. Bazaart: Design, Photo & Video
Bazaart is a one-stop app for all your design needs that combines the functions of a picture editor, video editor, and design studio. You can create stop motion films, GIFs, stickers, AI art, Reels, stories, logos, posters, flyers, memes, profile pictures, and product photography. Bazaart can assist with anything from digital marketing to social media posting to online sales.

Pros
- The app lets you personalize images and videos by changing exposure, color, highlights, and blur to enhance the media.
- You can add as many as 100 pictures and five video layers; each layer can be edited separately.
Cons
- The tool doesn’t cut out the edges so smoothly. The small leaves or messy hair are not fully cropped out.
3. Easy Photo Background Editor
With the Easy Photo Background Editor, you can share your photos with others by altering their backgrounds like a pro. This image and video sky change app can create beautiful and artistic photos and videos. Thanks to the app’s fantastic capabilities, users can quickly and effortlessly switch out their backgrounds with various high-quality, free HD backdrops available within the app.

Pros
- You can efficiently change the background of your media and adjust it with the foreground.
- The app has a collection of backgrounds you can choose and add if you don’t have one.
Cons
- The undo button can take a long time to react, which is risky, and you may need to edit your photos again.
4. Superimpose+: Background Eraser
Superimpose+: Background Eraser is an automatic sky replacement tool. People, animals, vehicles, and other objects can all be removed with a single tap. It doesn’t leave a watermark behind, so your photos and videos don’t get ruined. It lets you overlay numerous images and eliminate photo backgrounds within seconds. It also includes simple, automatic, and manual options for removing backgrounds.

Pros
- The app offers batch processing so that you can add multiple photos and videos and edit them.
- The app replaces or removes your background precisely with a single click.
Cons
- Too many advertisements are shown when editing the media files, which can be annoying.
5. Background Eraser: BG Remover
The background eraser app can quickly remove photos and let your imagination go wild. It is an AI-powered backdrop removal but can also do manual editing. You can add colorful background replacements and immediately share your photos with your viewers. It is one of the best weather apps to replace the dark sky when you are working on an iOS device.

Pros
- You can replace the sky background of your picture with a solid color or gradient shade.
- The auto background accurately recognizes the object and separates the background from it.
Cons
- The tool provides very limited editing options in the free version.
Part 2: Finding The Best Android Apps to Change Sky Background in Media
If you’re an Android user looking for a weather app to replace the dark sky, this is your lucky day. This part is dedicated to telling you about the apps you can use to replace the sky:
- Photo Background Change Editor
- Background Eraser Photo Editor
- PhotoRoom AI Photo Editor
- Photo Editor – Lumii
- Canva
1. Photo Background Change Editor
With the help of the Background Eraser and Changer, you can automatically crop images, eliminate backgrounds, and produce transparent PNG stamps that are precise to each pixel. With just one touch, the app can identify and eliminate your photo’s background, allowing you to swap out dull backdrops for an infinite number of 4K/HD backgrounds that will elevate your images.

Pros
- The tool offers 100+ background templates. You can choose solid colors, gradients, or images as backdrops.
- You can edit the sky in the background and enhance its look to match the picture.
Cons
- It removes the background with finger smearing, making it hard to remove the backdrop precisely.
2. Background Eraser Photo Editor
The app can cut out pictures automatically and is dedicated to becoming your only photo backdrop eraser and switcher. With over 10 million users, Background Eraser Photo Editor is an incredibly user-friendly tool for changing and editing photos’ backgrounds. Additionally, it has a library of more than 200 images, including sky pictures, which makes it a great dark sky app replacement tool.

Pros
- The app provides high-quality results by using AI-powered background remover.
- You can directly export and share your creation to popular social media platforms.
Cons
- The tool can only be used to remove the background of the images. You need a different tool for video background removal.
3. PhotoRoom AI Photo Editor
With PhotoRoom, you can manage your business from your phone by editing, designing, and optimizing high-quality visual content all in one app. You can apply presets, cut out or remove photo backgrounds, and produce content. You no longer need to be an expert photographer or designer because PhotoRoom lets you quickly convert your images into high-quality content.

Pros
- The app magically removes the unwanted objects from the background by brushing the magic re-toucher.
- It is a great app to change the sky You can replace it with another sky image from the app’s library.
Cons
- The quality of the images decreases, and the background looks glitchy and blurry due to that.
4. Photo Editor – Lumii
Lumii is a potent photo editor pro that offers trendy picture filters. It’s a great photo editing app that lets you alter photographs with over 100 gorgeous preset filters. Whether you are a beginner or an expert in photo editing and background removal, you can generate images that satisfy your aesthetic requirements using expert editing tools like BG Cutout, HSL, Curve, and Doodle.

Pros
- AI enhancement tools can automatically enhance the look of your picture and blend the object with the background.
- AI cutout isolates the object from the background with jaw-dropping accuracy.
Cons
- You must watch several advertisements if you want to access the pre-made filters in the app.
5. Canva
Canva is a free graphic design program that combines a photo editor, logo creator, and video editor all in one place. You can access the potent magic AI tools and use editable templates to create gorgeous pictures, videos, social network posts, and collages. The logo creator develops your brand or hones your graphic design talents. Moreover, you can use the Canva app to change the sky in photos and videos.

Pros
- The app offers efficient and professional editing and background removal for photos and videos.
- It has millions of photos, video templates, and fun elements to add to your media.
Cons
- It takes up huge space in your phone and provides limited features on the mobile app.
Bonus Part: A Perfect Background Changing Application For PC: Wondershare Filmora
Many professional users prefer editing their media through a PC as it is much easier, and computer editing software offers many more features. But most professional apps cost too much, and paying for them every month is hard. In this confusing situation, only one app comes to mind that can save us from all these troubles and give high-quality results: Wondershare Filmora .
The tool offers many royalty-free editing services that you can use to change the landscape of your video. It is the app that changes the sky and replaces the background of your media with perfection. You can enhance and upscale your video with this pro app and impress your viewers.
Free Download For Win 7 or later(64-bit)
Free Download For macOS 10.14 or later
Other Features of Wondershare Filmora to Look Out For
Wondershare Filmora has many amazing functions. Following are a few of its features that can assist you in creating wonderful content:
- AI Text-to-Video: This feature uses AI algorithms to examine data, including text, photographs, and videos. It then applies machine learning and computer vision techniques to produce a video.

- AI Smart Cutout: Filmora’s AI Smart Cutout makes identifying and removing any undesired backdrop or item from your videos and photos simple. It marks and cuts the object precisely using AI services.

- Instant Mode: Making a video with an Instant Mode doesn’t require any editing experience. Filmora will instantly create a video by adding the media you wish to display.

- AI Vocal Remover: With sophisticated algorithms, Filmora’s AI Vocal Remover can effectively remove vocals from background music without sacrificing a noticeable amount of audio quality.

- Background Remover: You can extract your object or eliminate the background from films using Filmora’s cutting-edge AI technology. Just import a photograph or a movie, and the AI will take care of the rest.

Steps To Change Background Using AI Portrait in Filmora
Wondershare Filmora provides a great replacement for the dark sky and keeps the quality of the media intact. Look at the easy guideline below to remove and replace the sky background.
Step 1: Bring In Media to Filmora
Open Filmora on your computer and click “New Project.” Now import the media whose background you want to change. After that, bring in the new background. Now, drag and drop the media and background into the editing timeline.

Step 2: Replace Background Using AI Portrait
Select the media that needs background changing. On the right side of the screen, you will see an editing option; click on “AI Tools” from the top right of the screen. Now go down and enable “AI Portrait.” Once you do it, the background of your media file will automatically change.

Step 3: Preview and Save
You can check to see if it is everything you were hoping for. After that, click “Export” from the top right of the screen and save the video on your computer.

Free Download For Win 7 or later(64-bit)
Free Download For macOS 10.14 or later
Conclusion
Changing the sky background can lift the tone of your image and video. Sky photos are the main element of the ‘soft girl aesthetic’ era. As a content creator, you must always search for a reliable editor to remove background and change your photos and videos.
This article introduces the best apps to replace dark sky in Android and iOS. You will also find a bonus part that can change your content editing journey.
Free Download Free Download Learn More
Part 1: Finding The Best iOS Apps to Change Sky Background in Media
Sky replacement apps are a fantastic way to give your pictures an entirely new viewpoint. Here are some of the top sky-changing applications for iOS:
- Background Changer & Eraser
- Bazaart: Design, Photo & Video
- Easy Photo Background Editor
- Superimpose+: Background Eraser
- Background Eraser: BG Remover
1. Background Changer & Eraser
Background Changer & Eraser is your go-to editor if you want to alter the backdrop, create incredible effects and overlays, apply filters, and modify the lighting in your pictures. Everyone who wishes to have gorgeous photos like those edited by a pro can do so with only one click using the one-click background changer and photo editing solution.
Pros
- Erases even the smallest part of a snapshot, easily trims out objects and fixes faults.
- With the extensive selection of overlays, including sparkles, lens flare, and glitter, you can add a little glitz to your photos.
Cons
- The app tends to become glitchy when you keep using it.
2. Bazaart: Design, Photo & Video
Bazaart is a one-stop app for all your design needs that combines the functions of a picture editor, video editor, and design studio. You can create stop motion films, GIFs, stickers, AI art, Reels, stories, logos, posters, flyers, memes, profile pictures, and product photography. Bazaart can assist with anything from digital marketing to social media posting to online sales.
Pros
- The app lets you personalize images and videos by changing exposure, color, highlights, and blur to enhance the media.
- You can add as many as 100 pictures and five video layers; each layer can be edited separately.
Cons
- The tool doesn’t cut out the edges so smoothly. The small leaves or messy hair are not fully cropped out.
3. Easy Photo Background Editor
With the Easy Photo Background Editor, you can share your photos with others by altering their backgrounds like a pro. This image and video sky change app can create beautiful and artistic photos and videos. Thanks to the app’s fantastic capabilities, users can quickly and effortlessly switch out their backgrounds with various high-quality, free HD backdrops available within the app.
Pros
- You can efficiently change the background of your media and adjust it with the foreground.
- The app has a collection of backgrounds you can choose and add if you don’t have one.
Cons
- The undo button can take a long time to react, which is risky, and you may need to edit your photos again.
4. Superimpose+: Background Eraser
Superimpose+: Background Eraser is an automatic sky replacement tool. People, animals, vehicles, and other objects can all be removed with a single tap. It doesn’t leave a watermark behind, so your photos and videos don’t get ruined. It lets you overlay numerous images and eliminate photo backgrounds within seconds. It also includes simple, automatic, and manual options for removing backgrounds.
Pros
- The app offers batch processing so that you can add multiple photos and videos and edit them.
- The app replaces or removes your background precisely with a single click.
Cons
- Too many advertisements are shown when editing the media files, which can be annoying.
5. Background Eraser: BG Remover
The background eraser app can quickly remove photos and let your imagination go wild. It is an AI-powered backdrop removal but can also do manual editing. You can add colorful background replacements and immediately share your photos with your viewers. It is one of the best weather apps to replace the dark sky when you are working on an iOS device.
Pros
- You can replace the sky background of your picture with a solid color or gradient shade.
- The auto background accurately recognizes the object and separates the background from it.
Cons
- The tool provides very limited editing options in the free version.
Part 2: Finding The Best Android Apps to Change Sky Background in Media
If you’re an Android user looking for a weather app to replace the dark sky, this is your lucky day. This part is dedicated to telling you about the apps you can use to replace the sky:
- Photo Background Change Editor
- Background Eraser Photo Editor
- PhotoRoom AI Photo Editor
- Photo Editor – Lumii
- Canva
1. Photo Background Change Editor
With the help of the Background Eraser and Changer, you can automatically crop images, eliminate backgrounds, and produce transparent PNG stamps that are precise to each pixel. With just one touch, the app can identify and eliminate your photo’s background, allowing you to swap out dull backdrops for an infinite number of 4K/HD backgrounds that will elevate your images.
Pros
- The tool offers 100+ background templates. You can choose solid colors, gradients, or images as backdrops.
- You can edit the sky in the background and enhance its look to match the picture.
Cons
- It removes the background with finger smearing, making it hard to remove the backdrop precisely.
2. Background Eraser Photo Editor
The app can cut out pictures automatically and is dedicated to becoming your only photo backdrop eraser and switcher. With over 10 million users, Background Eraser Photo Editor is an incredibly user-friendly tool for changing and editing photos’ backgrounds. Additionally, it has a library of more than 200 images, including sky pictures, which makes it a great dark sky app replacement tool.
Pros
- The app provides high-quality results by using AI-powered background remover.
- You can directly export and share your creation to popular social media platforms.
Cons
- The tool can only be used to remove the background of the images. You need a different tool for video background removal.
3. PhotoRoom AI Photo Editor
With PhotoRoom, you can manage your business from your phone by editing, designing, and optimizing high-quality visual content all in one app. You can apply presets, cut out or remove photo backgrounds, and produce content. You no longer need to be an expert photographer or designer because PhotoRoom lets you quickly convert your images into high-quality content.
Pros
- The app magically removes the unwanted objects from the background by brushing the magic re-toucher.
- It is a great app to change the sky You can replace it with another sky image from the app’s library.
Cons
- The quality of the images decreases, and the background looks glitchy and blurry due to that.
4. Photo Editor – Lumii
Lumii is a potent photo editor pro that offers trendy picture filters. It’s a great photo editing app that lets you alter photographs with over 100 gorgeous preset filters. Whether you are a beginner or an expert in photo editing and background removal, you can generate images that satisfy your aesthetic requirements using expert editing tools like BG Cutout, HSL, Curve, and Doodle.
Pros
- AI enhancement tools can automatically enhance the look of your picture and blend the object with the background.
- AI cutout isolates the object from the background with jaw-dropping accuracy.
Cons
- You must watch several advertisements if you want to access the pre-made filters in the app.
5. Canva
Canva is a free graphic design program that combines a photo editor, logo creator, and video editor all in one place. You can access the potent magic AI tools and use editable templates to create gorgeous pictures, videos, social network posts, and collages. The logo creator develops your brand or hones your graphic design talents. Moreover, you can use the Canva app to change the sky in photos and videos.
Pros
- The app offers efficient and professional editing and background removal for photos and videos.
- It has millions of photos, video templates, and fun elements to add to your media.
Cons
- It takes up huge space in your phone and provides limited features on the mobile app.
Bonus Part: A Perfect Background Changing Application For PC: Wondershare Filmora
Many professional users prefer editing their media through a PC as it is much easier, and computer editing software offers many more features. But most professional apps cost too much, and paying for them every month is hard. In this confusing situation, only one app comes to mind that can save us from all these troubles and give high-quality results: Wondershare Filmora .
The tool offers many royalty-free editing services that you can use to change the landscape of your video. It is the app that changes the sky and replaces the background of your media with perfection. You can enhance and upscale your video with this pro app and impress your viewers.
Free Download For Win 7 or later(64-bit)
Free Download For macOS 10.14 or later
Other Features of Wondershare Filmora to Look Out For
Wondershare Filmora has many amazing functions. Following are a few of its features that can assist you in creating wonderful content:
- AI Text-to-Video: This feature uses AI algorithms to examine data, including text, photographs, and videos. It then applies machine learning and computer vision techniques to produce a video.
- AI Smart Cutout: Filmora’s AI Smart Cutout makes identifying and removing any undesired backdrop or item from your videos and photos simple. It marks and cuts the object precisely using AI services.
- Instant Mode: Making a video with an Instant Mode doesn’t require any editing experience. Filmora will instantly create a video by adding the media you wish to display.
- AI Vocal Remover: With sophisticated algorithms, Filmora’s AI Vocal Remover can effectively remove vocals from background music without sacrificing a noticeable amount of audio quality.
- Background Remover: You can extract your object or eliminate the background from films using Filmora’s cutting-edge AI technology. Just import a photograph or a movie, and the AI will take care of the rest.
Steps To Change Background Using AI Portrait in Filmora
Wondershare Filmora provides a great replacement for the dark sky and keeps the quality of the media intact. Look at the easy guideline below to remove and replace the sky background.
Step 1: Bring In Media to Filmora
Open Filmora on your computer and click “New Project.” Now import the media whose background you want to change. After that, bring in the new background. Now, drag and drop the media and background into the editing timeline.
Step 2: Replace Background Using AI Portrait
Select the media that needs background changing. On the right side of the screen, you will see an editing option; click on “AI Tools” from the top right of the screen. Now go down and enable “AI Portrait.” Once you do it, the background of your media file will automatically change.
Step 3: Preview and Save
You can check to see if it is everything you were hoping for. After that, click “Export” from the top right of the screen and save the video on your computer.
Free Download For Win 7 or later(64-bit)
Free Download For macOS 10.14 or later
Conclusion
Changing the sky background can lift the tone of your image and video. Sky photos are the main element of the ‘soft girl aesthetic’ era. As a content creator, you must always search for a reliable editor to remove background and change your photos and videos.
This article introduces the best apps to replace dark sky in Android and iOS. You will also find a bonus part that can change your content editing journey.
How to Make Strobe Light Text Effect?
In video editing, professionals put in different types of effects to create a unique feel to the visuals. In fact, there are different styles available that you can use in videos to create a specific feel in the viewers—case in point, strobe lights.
This technique involves a series of intense short flashes of light in sections of the clip that create a suspenseful or thrilling ambiance, amping up the horror feel in viewers and more. You might have seen many examples of this in horror movies, thrillers, suspense or action-filled movies, sci-fi films, etc. Similarly, adding the effect to the titles gives a cinematic feel to them.
As a film or video editor, are you interested in adding this effect to your own project as well? Luckily, you do not need significant technical know-how or invest in different types of high-grade equipment to manage it - Wondershare Filmora allows users to add the effect easily in the titles. Want to know how? Read ahead.
Launch the software first
Of course, before you can begin adding the effect to your video, you must have the software. The downloading process for Wondershare Filmora 11 is very straightforward as long as you have a Mac or Windows PC.
Free Download For Win 7 or later(64-bit)
Free Download For macOS 10.14 or later
First, visit the official website to download the software. The Download button at the top of the screen or the description box is available to click on. That will instantly allow the Filmora installer to download into your device.

Double-click on the installer from your notifications or browser downloads section, then click Install. Allow the prompt for permission approval when it comes up, and the installation process will begin. This would take a little bit of time, and you can tap on the Start Now button at the last window that opens.

Add the title
The editor will open automatically next. You have to tap on the Create New Project button to access the editing screen, tap on the Titles tab, and choose the Default Title. If you prefer another version, browse through the different title presets available as options and download the one you prefer.

Then, drag the title from this section and drop it into the editing timeline. Double-click on the title in the timeline to open the title editing window. Insert the text you want to add as the title in the text field and adjust the size, font, and other font modifications here.
Edit the title and click snapshots
Then, you should drag the title clip you added to the timeline to an upper section and click on the Media tab following that. Then, choose the Sample Color option from the listed menu and tap on the Black color choice. After doing so, drag it down to the timeline onto the track under the Default Title clip you added and moved up.
Consequently, click on the Snapshot icon at the right side of the toolbar just above the timeline. This will take a screenshot of the black color picture you added second.

Then you should double-click on the original Default Title you added and start editing your title text once more. This time, add the term you want to appear under your original title here. Adjust the font for it as something other than the original one. For example, if you put Motor Oil 1937 M54 as the first title font, set the second as Montserrat SemBold. Make more adjustments, if necessary, to the font. Then, retake a snapshot of it.

Insert the snapshots
Remove the two title clips you added to the timeline. You have to work with the Snapshots you took now.
It is possible that you will not see the Snapshots saved in your media folder. In this case, tap on the “Click here to insert media” section and go to the device library. It will open in the Wondershare Filmora folder; if not, search for it and access it.
In the folder, double-click on the Snapshot folder. Choose both of the Snapshots you saved right now from here and tap on Open to import them into Filmora.

Import additional music and background visuals
After you have imported the snapshots to Filmora, you have to tap on the Import File option again. Go to the folder where you saved specific files like Lens flare, background video, particles, and sound effect clips. If you have these previously saved in other folders, make sure to keep them all in one folder ahead of time and open that one here.
Choose all files and click on Open to add them to the Filmora software. Now starts the process of merging them all into one cohesive effect.

Drag the files into the timeline
The background video is the first file you will drag and drop to the timeline. For the best effect, choose a flashing light background video. Next, drag the first title you edited into Track 2, right above the first one. Make sure to adjust the length of the clip to match the background video length. Repeat the same for the second snapshot, adding it above the first snapshot in the timeline.

Edit the snapshots via Chroma Key and Composting
You must hide the second snapshot you added, i.e., the one in the 3rd Track on the timeline. After that, click on snapshot 1 and tap on the Chroma Key icon in the toolbar right above the timeline.
When the Chroma Key window opens, tap on the Select Color option and go to the “More…” option. Tap on the basic white color and click on OK.
Following it, move the slider for Edge Thickness to extend it and see the preview to know if you are satisfied with the amount. Then, click on the unhide icon for the second snapshot. Right-click on it and tap on the Composting option. Under the Blending Mode parameter, change the option to Screen. The title background will remove automatically.
Press OK.

Add the sound effect
Again, you must hide the second snapshot in the timeline with the same step as before. Then, drag the sound effect to the audio track timeline next. Tap on the Play button under the Preview to see how the effect looks with the sound. Cut out the extra second of the sound effect clip to align it with the ending section of all of the other clips.
Add the initial keyframes
Choose the first snapshot in the timeline, below the second snapshot, and above the background video clip. Then, double-click on it to open the editor window and choose the Animation tab this time instead of Image.
Add the keyframe here and change the value of the Scale parameter to 400 or something high like that. In the preview, you will see that most of the font in this title is out of frame. After this, click on Rotate and turn the font to 45 degrees.

Move your playhead on this snapshot clip in the timeline by at least 1 second. Then, add another keyframe in this location by tapping the Add button. Here, reset the Scale and Rotate parameters and press the OK button to end.
Add the lens flare and particle video
Next, go back to the media section where all the files you added are present and drag your lens flare clip to the timeline, right on the track above the last one you added. Drop it here and adjust the length of it to match others if it does not show that automatically.
Above it, drag and drop the Particles video from the media files you added previously onto the track above the lens flare one. Do the same to delete the spare part by moving the play head to that point, clicking on the scissor icon, and removing the extra part.
Then, double-click on this Particles video clip on the timeline and go to the Compositing section. Tap on the Blending Mode drop-down choice and choose the Screen option. Press OK. Next, repeat the same for the lens flare video and tap the OK button.
Now, play the preview again.

Adjust the second title, again
Remember how you clicked on the hide button for the second snapshot for title 2? Now, you have to click on the unhide icon beside it.
Move the play head to the 3-second mark from the beginning. If you need clarification on this, check if the lens flare effect is beginning to start below the first title at this point. Move your playhead to that point for the second snapshot.
Here, tap on the Split icon and remove the clip’s first half. Then, double-click on the second half and go to Animation. Press the Add button to insert a keyframe here and change the scale and position of the title at this point. Move it to the placement you want, right above the lens flare. Also, drag the slider for the Opacity parameter to zero at this point.

Subsequently, move the play head to the point when the lens flare effect stop, which is around 2 seconds more. At this point, you have to add another keyframe and change the Opacity to 100.
Play the preview of the whole thing to see how the effect looks in completion.
Conclusion
Indeed, the strobe light effect in the title of movies or videos of different lengths can effectively create a heart-stopping moment on the screen. Moreover, it can work to incite a feeling of anticipation in viewers, especially with the right music beat in the backdrop.
Using Filmora will allow you to add the cinematic effect quickly and efficiently with simple, quick steps. Follow the phases mentioned in this post while trying out different variations before settling on your final shot choice.
Free Download For macOS 10.14 or later
First, visit the official website to download the software. The Download button at the top of the screen or the description box is available to click on. That will instantly allow the Filmora installer to download into your device.
Double-click on the installer from your notifications or browser downloads section, then click Install. Allow the prompt for permission approval when it comes up, and the installation process will begin. This would take a little bit of time, and you can tap on the Start Now button at the last window that opens.
Add the title
The editor will open automatically next. You have to tap on the Create New Project button to access the editing screen, tap on the Titles tab, and choose the Default Title. If you prefer another version, browse through the different title presets available as options and download the one you prefer.
Then, drag the title from this section and drop it into the editing timeline. Double-click on the title in the timeline to open the title editing window. Insert the text you want to add as the title in the text field and adjust the size, font, and other font modifications here.
Edit the title and click snapshots
Then, you should drag the title clip you added to the timeline to an upper section and click on the Media tab following that. Then, choose the Sample Color option from the listed menu and tap on the Black color choice. After doing so, drag it down to the timeline onto the track under the Default Title clip you added and moved up.
Consequently, click on the Snapshot icon at the right side of the toolbar just above the timeline. This will take a screenshot of the black color picture you added second.
Then you should double-click on the original Default Title you added and start editing your title text once more. This time, add the term you want to appear under your original title here. Adjust the font for it as something other than the original one. For example, if you put Motor Oil 1937 M54 as the first title font, set the second as Montserrat SemBold. Make more adjustments, if necessary, to the font. Then, retake a snapshot of it.
Insert the snapshots
Remove the two title clips you added to the timeline. You have to work with the Snapshots you took now.
It is possible that you will not see the Snapshots saved in your media folder. In this case, tap on the “Click here to insert media” section and go to the device library. It will open in the Wondershare Filmora folder; if not, search for it and access it.
In the folder, double-click on the Snapshot folder. Choose both of the Snapshots you saved right now from here and tap on Open to import them into Filmora.
Import additional music and background visuals
After you have imported the snapshots to Filmora, you have to tap on the Import File option again. Go to the folder where you saved specific files like Lens flare, background video, particles, and sound effect clips. If you have these previously saved in other folders, make sure to keep them all in one folder ahead of time and open that one here.
Choose all files and click on Open to add them to the Filmora software. Now starts the process of merging them all into one cohesive effect.
Drag the files into the timeline
The background video is the first file you will drag and drop to the timeline. For the best effect, choose a flashing light background video. Next, drag the first title you edited into Track 2, right above the first one. Make sure to adjust the length of the clip to match the background video length. Repeat the same for the second snapshot, adding it above the first snapshot in the timeline.
Edit the snapshots via Chroma Key and Composting
You must hide the second snapshot you added, i.e., the one in the 3rd Track on the timeline. After that, click on snapshot 1 and tap on the Chroma Key icon in the toolbar right above the timeline.
When the Chroma Key window opens, tap on the Select Color option and go to the “More…” option. Tap on the basic white color and click on OK.
Following it, move the slider for Edge Thickness to extend it and see the preview to know if you are satisfied with the amount. Then, click on the unhide icon for the second snapshot. Right-click on it and tap on the Composting option. Under the Blending Mode parameter, change the option to Screen. The title background will remove automatically.
Press OK.
Add the sound effect
Again, you must hide the second snapshot in the timeline with the same step as before. Then, drag the sound effect to the audio track timeline next. Tap on the Play button under the Preview to see how the effect looks with the sound. Cut out the extra second of the sound effect clip to align it with the ending section of all of the other clips.
Add the initial keyframes
Choose the first snapshot in the timeline, below the second snapshot, and above the background video clip. Then, double-click on it to open the editor window and choose the Animation tab this time instead of Image.
Add the keyframe here and change the value of the Scale parameter to 400 or something high like that. In the preview, you will see that most of the font in this title is out of frame. After this, click on Rotate and turn the font to 45 degrees.
Move your playhead on this snapshot clip in the timeline by at least 1 second. Then, add another keyframe in this location by tapping the Add button. Here, reset the Scale and Rotate parameters and press the OK button to end.
Add the lens flare and particle video
Next, go back to the media section where all the files you added are present and drag your lens flare clip to the timeline, right on the track above the last one you added. Drop it here and adjust the length of it to match others if it does not show that automatically.
Above it, drag and drop the Particles video from the media files you added previously onto the track above the lens flare one. Do the same to delete the spare part by moving the play head to that point, clicking on the scissor icon, and removing the extra part.
Then, double-click on this Particles video clip on the timeline and go to the Compositing section. Tap on the Blending Mode drop-down choice and choose the Screen option. Press OK. Next, repeat the same for the lens flare video and tap the OK button.
Now, play the preview again.
Adjust the second title, again
Remember how you clicked on the hide button for the second snapshot for title 2? Now, you have to click on the unhide icon beside it.
Move the play head to the 3-second mark from the beginning. If you need clarification on this, check if the lens flare effect is beginning to start below the first title at this point. Move your playhead to that point for the second snapshot.
Here, tap on the Split icon and remove the clip’s first half. Then, double-click on the second half and go to Animation. Press the Add button to insert a keyframe here and change the scale and position of the title at this point. Move it to the placement you want, right above the lens flare. Also, drag the slider for the Opacity parameter to zero at this point.
Subsequently, move the play head to the point when the lens flare effect stop, which is around 2 seconds more. At this point, you have to add another keyframe and change the Opacity to 100.
Play the preview of the whole thing to see how the effect looks in completion.
Conclusion
Indeed, the strobe light effect in the title of movies or videos of different lengths can effectively create a heart-stopping moment on the screen. Moreover, it can work to incite a feeling of anticipation in viewers, especially with the right music beat in the backdrop.
Using Filmora will allow you to add the cinematic effect quickly and efficiently with simple, quick steps. Follow the phases mentioned in this post while trying out different variations before settling on your final shot choice.
Tips for Choosing Location and Scheduling Music Video
Making viral music videos is everyone’s dream; what if you get exact tips to follow before shooting your music video to make it high-ranked? Obviously, it’ll be a treat for you!
Planning and preparing before the shoot is the key to making a music video successful. You can only achieve this after location scouting and emerging with the best one. And scheduling for big projects before the day is more important. Let’s directly move towards the things to consider before shooting!
Location scouting
The pleasant and eye-catchy location always makes your music video trending or flopping. You should first go with your budget and then come up with location ideas. In the upcoming tip, we will use 3lau’s song “Tokyo” as an example.

If you are going with large projects, you need to consider the following requirements!
1. Availability of electricity
You need rig lights and a large lighting setup to make your video more glow and give them aesthetic vibes. For this, make sure you choose a location where light is readily available.
2. Separate room
During shooting for big projects, you need room to store all gear and sensitive equipment in one place for many days.

3. Check the size
The foremost thing in choosing the location is to check the Height and Width of the studio. They should be enough to rig the lights in the studio easily and place every required thing in a decided space.
For Example, while shooting a 3lau song, there is a need for a bus to come into the studio easily, but there is an issue in entering the bus due to height issues of the door. Due to this, the director changed the location at the spot to sort out this issue.

![]()
A cross-platform for making videos anywhere for all creators

Why your video editing isn’t good enough? How about some creative inspo?
- 100 Million+ Users
- 150+ Countries and Regions
- 4 Million+ Social Media Followers
- 5 Million+ Stock Media for Use
* Secure Download

Alternate Ways of Location Scouting
If you don’t have enough budget to get a studio space, then you can easily shoot by selecting spaces that are in your use or available. These are the following locations you should regard!
Location 1. Your Home
You should go with the space available at your home to shoot, such as: on couches or in the bedroom, to give a good impression to your music video.
Location 2. Office Space
You can also make scenes of your music video in office space to better describe the work in the video.

Location 3. Outdoor Locations
For better daylight and illustrations in the music video, you can go with the outdoor location, which is free of cost.

Location 4. Public Places
Public places are easily available and have many options, such as public parks, playgrounds, bridges, and public parking.

![]()
Note: During public shooting, ensure that the space is empty, and there should be no interruption of the public in filming the shots.

The weather is also a major factor when shooting a video, which you must check before the shoot days. After selecting and scouting the location, now it’s time to make a schedule which you’ll get in hand in the below lines!
Scheduling for the Music Video
If you have a big project and more scenes to shoot, it’s better to make a whole plan about each and everything. You have to make a schedule of using even a single light at a specific time and space. The following are the main considerations you should take care of!
1. Pre-Rig Day
You need to come to the setup before the filming day to check the main things like electricity, measure exact spaces, check the lightning setup, loaded everything such as the bus, crew, and gears.

2. A Call Sheet
A call sheet is a daily shot list given to the cast and crew to follow the timelines, and it contains the phone number of everyone, their location, and the time to arrive on set. It also includes the nearest hospital, sunset, and sun-rising timing.

It consists of one to two pages according to shoot days and has a plan of everything that happens after the Pre-Rig day.
![]()
Note: When you wrap up for day 1, you have another call sheet for day 2, day 3, and so on!
3. Do Planning
You need to work efficiently and smartly to maintain everything according to the plan. You can cut the filming into halves to have a better lighting setup and character availability. On the shot day, you must change the lighting and rigging setup as little as possible.
Examples
On day 1 of the Tokyo song, the filming is done in two halves; the first half day goes towards filming everything in the bus, and the other half day, there is a shoot of everything outside the bus.
While in day 2, there is a filming of every memory. For this, there are setups of rooms and homes for making perfect shots according to the requirements of a music video.

4. Take No Stress
You should not blow up and take stress during shoot day because it’ll obviously cause chaos in every little scene and give a bad impression to the music video. You just should work hard and get all done.
Conclusion
After checking and following the above tips for location scouting and scheduling, you’ll obviously come up with an amazing filming setup and music video. There is no need to worry, just get the whole planning and then do all scenes one after the other patiently.
Filming with people is not always bulky and flopping, but if you have a cooperative team and follow all the timelines of shooting. Then you’ll rock the music video!
A cross-platform for making videos anywhere for all creators!
Why your video editing isn’t good enough? How about some creative inspo?
- 100 Million+ Users
- 150+ Countries and Regions
- 4 Million+ Social Media Followers
- 5 Million+ Stock Media for Use
* Secure Download
Alternate Ways of Location Scouting
If you don’t have enough budget to get a studio space, then you can easily shoot by selecting spaces that are in your use or available. These are the following locations you should regard!
Location 1. Your Home
You should go with the space available at your home to shoot, such as: on couches or in the bedroom, to give a good impression to your music video.
Location 2. Office Space
You can also make scenes of your music video in office space to better describe the work in the video.
Location 3. Outdoor Locations
For better daylight and illustrations in the music video, you can go with the outdoor location, which is free of cost.
Location 4. Public Places
Public places are easily available and have many options, such as public parks, playgrounds, bridges, and public parking.
![]()
Note: During public shooting, ensure that the space is empty, and there should be no interruption of the public in filming the shots.
The weather is also a major factor when shooting a video, which you must check before the shoot days. After selecting and scouting the location, now it’s time to make a schedule which you’ll get in hand in the below lines!
Scheduling for the Music Video
If you have a big project and more scenes to shoot, it’s better to make a whole plan about each and everything. You have to make a schedule of using even a single light at a specific time and space. The following are the main considerations you should take care of!
1. Pre-Rig Day
You need to come to the setup before the filming day to check the main things like electricity, measure exact spaces, check the lightning setup, loaded everything such as the bus, crew, and gears.
2. A Call Sheet
A call sheet is a daily shot list given to the cast and crew to follow the timelines, and it contains the phone number of everyone, their location, and the time to arrive on set. It also includes the nearest hospital, sunset, and sun-rising timing.
It consists of one to two pages according to shoot days and has a plan of everything that happens after the Pre-Rig day.
![]()
Note: When you wrap up for day 1, you have another call sheet for day 2, day 3, and so on!
3. Do Planning
You need to work efficiently and smartly to maintain everything according to the plan. You can cut the filming into halves to have a better lighting setup and character availability. On the shot day, you must change the lighting and rigging setup as little as possible.
Examples
On day 1 of the Tokyo song, the filming is done in two halves; the first half day goes towards filming everything in the bus, and the other half day, there is a shoot of everything outside the bus.
While in day 2, there is a filming of every memory. For this, there are setups of rooms and homes for making perfect shots according to the requirements of a music video.
4. Take No Stress
You should not blow up and take stress during shoot day because it’ll obviously cause chaos in every little scene and give a bad impression to the music video. You just should work hard and get all done.
Conclusion
After checking and following the above tips for location scouting and scheduling, you’ll obviously come up with an amazing filming setup and music video. There is no need to worry, just get the whole planning and then do all scenes one after the other patiently.
Filming with people is not always bulky and flopping, but if you have a cooperative team and follow all the timelines of shooting. Then you’ll rock the music video!
Also read:
- New 10 Best Camera for YouTube Beginners for 2024
- New 2024 Approved How to Create an Alternate Reality Effect
- New In 2024, Read This Review to Learn Everything You Need to Know About Leeming LUT Pro and How to Apply Pro LUTs Using Different Video Editors
- Updated In 2024, The Ultimate Guide to Slideshow Maker with Music
- Updated Finding the Best GIF Websites Was Never Easier
- New Denoise a Video in Adobe Premiere Pro – Audio and Video Noise Removal
- Updated 2024 Approved 22 Free Video Editing Software to Save Your Money and Time
- New How to Create Liquid Water Reveal Intro for 2024
- Updated 2024 Approved Splice Video Editor Online - Get Your Videos Splice
- 2024 Approved How to Create Video Contents That Convert Sales
- How to Speed Up Pictures on TikTok Slideshow
- With Everything Centered Around Videos on the Digital Platform, the Use and the Need for AI-Based Editing Tools Have Also Increased Manifold. We Have Curated a List of the Top Programs that Can Help You with AI Video Editing for 2024
- Updated 2024 Approved DVD Slideshow Builder Review and Tutorial
- New Camtasia vs Final Cut Pro
- Updated Detailed Guide to Merge Videos in VLC Media Player for 2024
- New This Article Has a Detailed Description of How You Can Split the Videos in Lightworks Including the the Discussion of Splitting the Wondershare Filmora as an Alternative. It Is Also a Suitable Choice for 2024
- New Step by Step to Cut a Video in QuickTime
- New 2024 Approved Easy Ways to Remove Motion Blur In Photoshop
- Updated In 2024, 15 Stunning GIF Splitter Examples You Need to Bookmark
- In 2024, How to Unlock Apple ID From your iPhone 7 without Security Questions?
- In 2024, How to Intercept Text Messages on Realme GT Neo 5 SE | Dr.fone
- Looking For A Location Changer On Gionee F3 Pro? Look No Further | Dr.fone
- In 2024, Apple iPhone 7 Asking for Passcode after iOS 17/14 Update, What to Do?
- A Comprehensive Guide to iPhone 15 Plus Blacklist Removal Tips and Tools | Dr.fone
- In 2024, What Legendaries Are In Pokemon Platinum On Oppo F23 5G? | Dr.fone
- Best Android Data Recovery - Retrieve Lost Photos from Infinix Hot 30 5G.
- In 2024, Easy Tutorial for Activating iCloud on Apple iPhone 14 Plus Safe and Legal
- In 2024, Disabling iPhone 15 Pro Max Parental Restrictions With/Without Password | Dr.fone
- 3uTools Virtual Location Not Working On Samsung Galaxy XCover 6 Pro Tactical Edition? Fix Now | Dr.fone
- Title: 2024 Approved How to Add Motion Titles
- Author: Morgan
- Created at : 2024-05-19 05:11:51
- Updated at : 2024-05-20 05:11:51
- Link: https://ai-video-editing.techidaily.com/2024-approved-how-to-add-motion-titles/
- License: This work is licensed under CC BY-NC-SA 4.0.
