
:max_bytes(150000):strip_icc():format(webp)/1LW4062264-InCar6-1500-5b803f8ec9e77c0025d3f4de.jpg)
2024 Approved How to Create a Light Sweep (Shine) Effect with Filmora
How to Create a Light Sweep (Shine) Effect with Filmora
Preparation
What you need to prepare:
- A computer (Windows or macOS)
- Your video materials.
- Filmora video editor
Step 1
If you haven’t already, go ahead and download the Filmora video editor . Install it and run the application on your computer.
Step 2
Create a New Project by clicking on the big blue button. Immediately after, go to File → Project Settings. Here, make sure the project is in full resolution and 60 fps.

Step 3
Select the Titles tab and drag the Default Title to the Timeline.

Step 4
Double-click on the Default Title inside the Timeline and go to Advanced. Here, you can change the text, pick a new font, change its size, and so on. Make sure you change the Color Type to Gradient Fill. Choose a color of your own liking. When you’re done customizing it, click on OK.

Step 5
Right-click on the Default Title clip and select Copy. Then, right-click anywhere on the Timeline and select Paste. After this, drag the copy of that clip on the Track above it.

Step 6
Double-click on the copied Title, go to Advanced, and change the Color Type to Color Fill. Click OK.

Step 7
Next, take a snapshot of the new title. Then, delete the copied Title clip from your Timeline. After this, drag the snapshot into the Timeline.

Step 8
Double-click on the Snapshot clip and go to the Mask tab. From here, select the Rectangle mask. Then, rotate it as you see in the image below. Don’t click on OK yet.

Step 9
Now, look at the settings panel on the left and scroll down. First, change its Rotation to 40. Then, drag the Blur bar to 15. Finally, move the Rectangle mask to the left side like in the image below. Don’t click OK yet.

Step 10
Now, move the Playhead to the starting position on the Timeline. Then, click on the “**+Add**” button to add a keyframe. Next, move the Playhead a few seconds forward and move the Rectangle mask all the way to the right side of the text. Click OK.

Step 11
You are finally done. You can review, Render, and Export the video now to use it as you wish. Congratulations on creating a light sweep effect in Filmora.
Summary
What you’ve learned:
- How to create a modern light sweep effect in the Filmora video editor
- How to use Masks in Filmora
- Edit titles like a pro
What you need to prepare:
- A computer (Windows or macOS)
- Your video materials.
- Filmora video editor
Step 1
If you haven’t already, go ahead and download the Filmora video editor . Install it and run the application on your computer.
Step 2
Create a New Project by clicking on the big blue button. Immediately after, go to File → Project Settings. Here, make sure the project is in full resolution and 60 fps.
Step 3
Select the Titles tab and drag the Default Title to the Timeline.
Step 4
Double-click on the Default Title inside the Timeline and go to Advanced. Here, you can change the text, pick a new font, change its size, and so on. Make sure you change the Color Type to Gradient Fill. Choose a color of your own liking. When you’re done customizing it, click on OK.
Step 5
Right-click on the Default Title clip and select Copy. Then, right-click anywhere on the Timeline and select Paste. After this, drag the copy of that clip on the Track above it.
Step 6
Double-click on the copied Title, go to Advanced, and change the Color Type to Color Fill. Click OK.
Step 7
Next, take a snapshot of the new title. Then, delete the copied Title clip from your Timeline. After this, drag the snapshot into the Timeline.
Step 8
Double-click on the Snapshot clip and go to the Mask tab. From here, select the Rectangle mask. Then, rotate it as you see in the image below. Don’t click on OK yet.
Step 9
Now, look at the settings panel on the left and scroll down. First, change its Rotation to 40. Then, drag the Blur bar to 15. Finally, move the Rectangle mask to the left side like in the image below. Don’t click OK yet.
Step 10
Now, move the Playhead to the starting position on the Timeline. Then, click on the “**+Add**” button to add a keyframe. Next, move the Playhead a few seconds forward and move the Rectangle mask all the way to the right side of the text. Click OK.
Step 11
You are finally done. You can review, Render, and Export the video now to use it as you wish. Congratulations on creating a light sweep effect in Filmora.
Summary
What you’ve learned:
- How to create a modern light sweep effect in the Filmora video editor
- How to use Masks in Filmora
- Edit titles like a pro
Filmora Is a Great Video Editor that Many Users Are Making Intro Video with It. This Article Will Guide You How to Create an Intro Video with Filmora
If you’re just starting out as a YouTuber, you should have an introductory video, especially when people don’t know you that well yet. When you want to start a YouTube career one of the things you need to think about is How to make a YouTube intro video.
Whether you’re a beginner or a pro, knowing how to create a video intro for YouTube can help you introduce your audience to your content, pique their interest and boost your brand. Stand out and engage your audience with quick and easy YouTube intro animations. Not sure how to make a YouTube intro? We’ve built this guide on how to make a video intro using Wondershare Filmora an editing software.
- Start by introducing yourself
- Get into details
- Add a call to action
- Add personalization to your video
- Video length
What is Intro Video
There are also different ways of using the intro video, it can be used in business, in YouTube channels and others.
Introductory videos are short videos which you personally introduce yourself, your business, your brands and your brand’s mission and show your personality to your audience.
Introductory videos can help you stand out from the competition and gain favorability because you’re talking to your users on a personal level. People love seeing faces behind a brand, having an introductory video will ensure that people remember you.
YouTube intro videos are short, introductory clips that play at the beginning of a YouTube channel. They usually include the tittle of the YouTube channel, brand features like logos and colors animation and an accompanying snippet of music.
As the word suggest, intro are visuals that mark the beginning of a video. Likewise, outro are the closing visuals that appear at the end of the video. The two are widely used in educational, entertaining, business videos, webcasts, podcast, corporate presentations and the like. There are several reasons why an intro are vital elements of any professional video.
It goes without saying that intros should not be too complicated or to confusing. Other wise they will fail in their purpose and will drive the audience away. Instead, they should be simply but thoughtfully designed.
YouTube intro Videos usually include:
- Memorable background music
- Text and titles
- Stickers and GIFs
- Emojis

Goal of a Video Introduction to Follow
Making intro video is not just only in doing a YouTube channel but you can also use this guide for any businesses like brand presentation, educational etc.
Step1 Start by introducing yourself.
Step2 Get into details.
Step3 Add a call to action.
Step4 Add personalization to your video.
Step5 Video Length.
1. Start by introducing yourself
You can always start your intro by introducing yourself but don’t just state your name and what
you do, tell them why you do it, what your core values are and what motivates and dives you to
do this kind of career. Because you all know doing vlog on YouTube is a job, work, and a career.
Share emotions with your audience, and help them relate to you. Doing so is going to help you stand out immediately from the crowd and get audiences interested enough to watch the remainder of your video’s content.
2. Get into details
Tip is always direct to the point, add a few facts about yourself, like your interest or previous experiences or who you are as a person. If you are a business owner and would want to talk about your business you can always share how it started.
If we are talking about the YouTube intro video. Every good YouTube intro video usually includes beneficial information for subscribers and viewers. Add any short important text that you feel is necessary from the video titles, your YouTube channel name, and social media handles. Keep your informative text in a consistent format and branding style.
3. Add a call to action
if you have successfully maintained the interest of your viewer until the very end of your video, use this opportunity to invite them to engage with your content more. It’s worth including a call to action in each video. Take a full advantage of YouTube to provide your audience with your social media channels and maybe a link or two to your other videos that might interest them,
4. Add personalization to your video
Even though an intro can be more than logo animation, the latter should still be a part of it. Otherwise, there’s a sense that something is messing. Include eye catchy visuals effects to your videos to stands out, so that people can easily remember your YouTube channel.

5. Video length
A long intro, even if it’s spectacular, can get boring once your audience has seen it a few times. An ideal length for intros is up to 8-10 seconds only. Just enough time to deliver your message and branding, and hook audiences in for the rest of the video. Any longer than that, and you might lose viewers who are waiting to see the video that they clicked on.
In the era of social media, tempting distractions and short attention spans, it’s critical to keep your content as short and sharp as you can.
How to Create Intro Video using Filmora
Wondershare Filmora is an editing software that is available to download in google. This software is easy to use and includes products for a range of users from beginner to intermediate. Common features of Filmora include a timeline, preview window and effects library that you can use to create a nice and creative introduction video for your YouTube channel.
Free Download For Win 7 or later(64-bit)
Free Download For macOS 10.14 or later
Free trails are available to demo the product before purchasing. Pricing options for the various programs are available on the official Filmora website.

Start your own design from scratch or you can search for a YouTube video template
Select the best video that you like to be your intro, either create a video introducing yourself or just a video with some creative effects.
First you can check the Stock Media and go click some GIFs find your best fit and start customizing. You can always download some free template online that you think much better to used.

Add ready made animated graphic stickers to your YouTube intro videos by dragging and dropping them into design. Just choose “Elements” and then “Stickers” to browse a library of options.

Change the image on your YouTube intro video by uploading your own or choosing from millions of free photos, graphics, and illustration in Filmora library.
Start editing your videos to make them look seamless and professional on any platforms. Whether it’s on a widescreen, tablet, or mobile device. Click some effects to add some creative design on your intro videos.
You can split, resize trim or cut your videos to tailor it to your needs.
Change the text and insert your own channel title and tagline. You can also change the font style, color, and size to better suit your brand look.
Finally, add music to your YouTube intro video by uploading a clip from a stock music of Filmora library. You can also make your own YouTube intro music using instrument or digital tools

Conclusion
Hope with these tips, you’ll be able to create quality video introductions that draw the audience in and help them get to know you better. Introduce your brand, explain your business, and connect with your prospective customers like never before. Whether your intro clips start off your YouTube videos or plays after the teaser clip, YouTube intro videos can be a valuable tool for any creator.
Remember your video doesn’t have to be a high-budget production or you don’t have to spend a lot of money on making a creative video. You could create a video that works with pretty much of any smartphone today. Have fun creating your introductions videos, set a positive mind and positive creation will come out.
What is Intro Video
There are also different ways of using the intro video, it can be used in business, in YouTube channels and others.
Introductory videos are short videos which you personally introduce yourself, your business, your brands and your brand’s mission and show your personality to your audience.
Introductory videos can help you stand out from the competition and gain favorability because you’re talking to your users on a personal level. People love seeing faces behind a brand, having an introductory video will ensure that people remember you.
YouTube intro videos are short, introductory clips that play at the beginning of a YouTube channel. They usually include the tittle of the YouTube channel, brand features like logos and colors animation and an accompanying snippet of music.
As the word suggest, intro are visuals that mark the beginning of a video. Likewise, outro are the closing visuals that appear at the end of the video. The two are widely used in educational, entertaining, business videos, webcasts, podcast, corporate presentations and the like. There are several reasons why an intro are vital elements of any professional video.
It goes without saying that intros should not be too complicated or to confusing. Other wise they will fail in their purpose and will drive the audience away. Instead, they should be simply but thoughtfully designed.
YouTube intro Videos usually include:
- Memorable background music
- Text and titles
- Stickers and GIFs
- Emojis
Goal of a Video Introduction to Follow
Making intro video is not just only in doing a YouTube channel but you can also use this guide for any businesses like brand presentation, educational etc.
Step1 Start by introducing yourself.
Step2 Get into details.
Step3 Add a call to action.
Step4 Add personalization to your video.
Step5 Video Length.
1. Start by introducing yourself
You can always start your intro by introducing yourself but don’t just state your name and what
you do, tell them why you do it, what your core values are and what motivates and dives you to
do this kind of career. Because you all know doing vlog on YouTube is a job, work, and a career.
Share emotions with your audience, and help them relate to you. Doing so is going to help you stand out immediately from the crowd and get audiences interested enough to watch the remainder of your video’s content.
2. Get into details
Tip is always direct to the point, add a few facts about yourself, like your interest or previous experiences or who you are as a person. If you are a business owner and would want to talk about your business you can always share how it started.
If we are talking about the YouTube intro video. Every good YouTube intro video usually includes beneficial information for subscribers and viewers. Add any short important text that you feel is necessary from the video titles, your YouTube channel name, and social media handles. Keep your informative text in a consistent format and branding style.
3. Add a call to action
if you have successfully maintained the interest of your viewer until the very end of your video, use this opportunity to invite them to engage with your content more. It’s worth including a call to action in each video. Take a full advantage of YouTube to provide your audience with your social media channels and maybe a link or two to your other videos that might interest them,
4. Add personalization to your video
Even though an intro can be more than logo animation, the latter should still be a part of it. Otherwise, there’s a sense that something is messing. Include eye catchy visuals effects to your videos to stands out, so that people can easily remember your YouTube channel.
5. Video length
A long intro, even if it’s spectacular, can get boring once your audience has seen it a few times. An ideal length for intros is up to 8-10 seconds only. Just enough time to deliver your message and branding, and hook audiences in for the rest of the video. Any longer than that, and you might lose viewers who are waiting to see the video that they clicked on.
In the era of social media, tempting distractions and short attention spans, it’s critical to keep your content as short and sharp as you can.
How to Create Intro Video using Filmora
Wondershare Filmora is an editing software that is available to download in google. This software is easy to use and includes products for a range of users from beginner to intermediate. Common features of Filmora include a timeline, preview window and effects library that you can use to create a nice and creative introduction video for your YouTube channel.
Free Download For Win 7 or later(64-bit)
Free Download For macOS 10.14 or later
Free trails are available to demo the product before purchasing. Pricing options for the various programs are available on the official Filmora website.
Start your own design from scratch or you can search for a YouTube video template
Select the best video that you like to be your intro, either create a video introducing yourself or just a video with some creative effects.
First you can check the Stock Media and go click some GIFs find your best fit and start customizing. You can always download some free template online that you think much better to used.
Add ready made animated graphic stickers to your YouTube intro videos by dragging and dropping them into design. Just choose “Elements” and then “Stickers” to browse a library of options.
Change the image on your YouTube intro video by uploading your own or choosing from millions of free photos, graphics, and illustration in Filmora library.
Start editing your videos to make them look seamless and professional on any platforms. Whether it’s on a widescreen, tablet, or mobile device. Click some effects to add some creative design on your intro videos.
You can split, resize trim or cut your videos to tailor it to your needs.
Change the text and insert your own channel title and tagline. You can also change the font style, color, and size to better suit your brand look.
Finally, add music to your YouTube intro video by uploading a clip from a stock music of Filmora library. You can also make your own YouTube intro music using instrument or digital tools
Conclusion
Hope with these tips, you’ll be able to create quality video introductions that draw the audience in and help them get to know you better. Introduce your brand, explain your business, and connect with your prospective customers like never before. Whether your intro clips start off your YouTube videos or plays after the teaser clip, YouTube intro videos can be a valuable tool for any creator.
Remember your video doesn’t have to be a high-budget production or you don’t have to spend a lot of money on making a creative video. You could create a video that works with pretty much of any smartphone today. Have fun creating your introductions videos, set a positive mind and positive creation will come out.
What Is Animated GIF | GIF Example & Advantages of GIF
What Is Animated GIF | GIF Example & Advantages of GIF
An easy yet powerful editor
Numerous effects to choose from
Detailed tutorials provided by the official channel
Gifs today have become an indispensable part of our social media conversations. Be it Whatsapp, Facebook, Instagram, or any other online messaging platform, no conversations are complete without using Gifs. These animated images can express the whole emotion during a conversation which cannot be expressed by a text message.
You all might have used or been using Gifs but most people never try to know and learn the different ways you can use Gifs. Gifs could be used in marketing and business to boost the attractiveness of your products.
So in this article we bring you all about Gifs, all your questions like What Are Gifs?, What are Different Kinds of Gifs?, How to Use Cool Gifs as Part of Your Marketing?, How to create animated custom Gifs? Which is the best gif template maker? And many more will be cleared after reading the whole article.
In this article
01 [What Is Animated GIF](#Part 1)
02 [10 Amazing Examples of Animated Gifs in Email Marketing Templates](#Part 2)
03 [5 GIF Makers That Lets You Create Unique Custom Animations](#Part 3)
Part 1 What Is Animated GIF
01What Are Gifs?
To begin with, we will start by understanding what is a Gif. Gif stands for Graphics Interface Format and the kind of animation you use today has had a presence on the internet for more than 30 years as of now. A Gif named “flying airplane” was first created by Steve Wilhite and his team of developers in 1987 while working for Compuserve. At the time of their inception, Gifs were small-sized normal moving images placed on any kind of background.
The early Gifs came into use with the increase in popularity of social sharing websites like Geocities, Myspace, and later Imgur and Tumblr. Today we are using the most advanced versions of Gifs, these can be downloaded or embedded on your website, we can use them on almost every messaging platform and creating Gifs today has become a child’s play.
02Different Kinds of Gifs
Now the question comes about what are different types of Gifs. After their creation, Gifs are now used for various purposes and hence then began a custom to define them according to their use.
● Reaction GIFs
These are the most widely used Gifs in social media and messaging platforms. You might have used them to comment to express your feelings. These help to convey your message by animation and you don’t need to type all the stuff. reaction GIFs are bits and pieces of videos or movies looped into a GIF. Almost all the emotions and feelings like applause, happiness, sadness, etc can be expressed by them.
● Illustration and Cartoon Gifs
GIFs that were illustrated specifically to be turned into a GIF comes under this category. These are mostly used to explain something in simple visual form rather than typing all the stuff. Very attractive animation and bright colors are used here to make them seamless.
● Gif Art
You might have not noticed but Gifs can be used very efficiently to showcase art. Many digital artists use the .gif format to create cool GIFs of their own to present their art. On the Gif website like Giphy, you can find thousands of artistic Gifs.
● Optical illusion GIFs
These kinds of Gifs create an illusion to the human eyes and are very attractive. You can use them while the conversation with your friends for a fun purpose.
● Branded Gifs
You might have noticed, nowadays almost all the brands use cool Gifs to promote their products online. Out of all, the apparel brands have made use of this feature in a very wide spectrum to promote their sales.
● Cinemagraphs
These are very special kinds of animated images. These are normal moving images that are continuously looped and make us feel like a real live image. Kevin Burg and Jamie Beck in 2011 created the first cinematograph Gif.
03Different Ways to Use Cool Gifs in Marketing
Gifs could be a fun way of using interesting and cool animations in your marketing. There are thousands of Gifs available on websites like Giphy from where you can choose the suitable Gif. You can also create a dedicated brand Gifs for your particular use. Just keep some of the important things in mind while selecting Gifs for your products and brand.
● It must deliver an appropriate message from your brand and product.
● It must be under legal circumference. Do not try to use copyrighted Gifs or celebrity faces Gifs without obtaining due permission.
● It must match your branding style on other platforms.
● Must be visually understandable and appealing.
04How to Use Cool Gifs as Part of Your Marketing
As you already know that apart from being a source of fun during social media conversations, Gifs could also be used in marketing. You can use very cool Gifs to promote your product and boost up your sales. Following are some creative ideas in which you can use Gifs to market your products.
● You can arrange a contest asking the participants to create a Gif based on your product.
● You can create cool Gifs related to your products and circulate them over different social media platforms, information on social media receives very quick attention.
● Cinemagraphs could be a great option when you want to showcase details about your product in an innovative form. This kind of Gifs could be very useful in fashion-related marketing.
● Create your brand Gifs and add cool emojis to them. Emojis in a Gif make it more attractive.
● You can use Gif for the “thank you” purpose. You can send a Gif “thank you” Gif when someone shares something about your product on social media.
● Infographics and Virtual representation are an important part of marketing today. You can use Gif to design creative infographics.
● The logo of your brand is like soul to product. Using Gifs you can design a catchy and attractive logo that helps in boosting the marketing of your product.
Part 2 10 Amazing Examples of Animated Gifs in Email Marketing Templates
Gif has become a cool and easy way of expressing your feelings so now you don’t need to type all those long boring messages. Nowadays, email marketers are using a wide range of Gifs to market their products to customers. These Gifs attract the interest of viewers and lead to an increase in sales. You too can use animated GIFs to display your products and services in action. Here you will see 10 amazing examples of marketing gif templates.
01ShoeMint
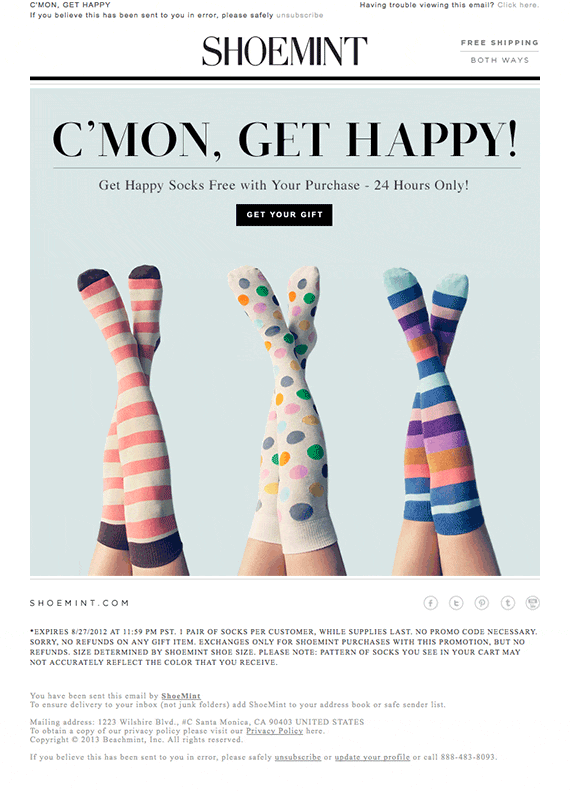
ShoeMint, a colored socks company has used very catchy Gif to market their socks. ShoeMint goes by email marketing template – “C’mon, Get Happy!” as their tag line and when you look at the Gif of colorful socks you will have a smile on your face.
02Modcloth
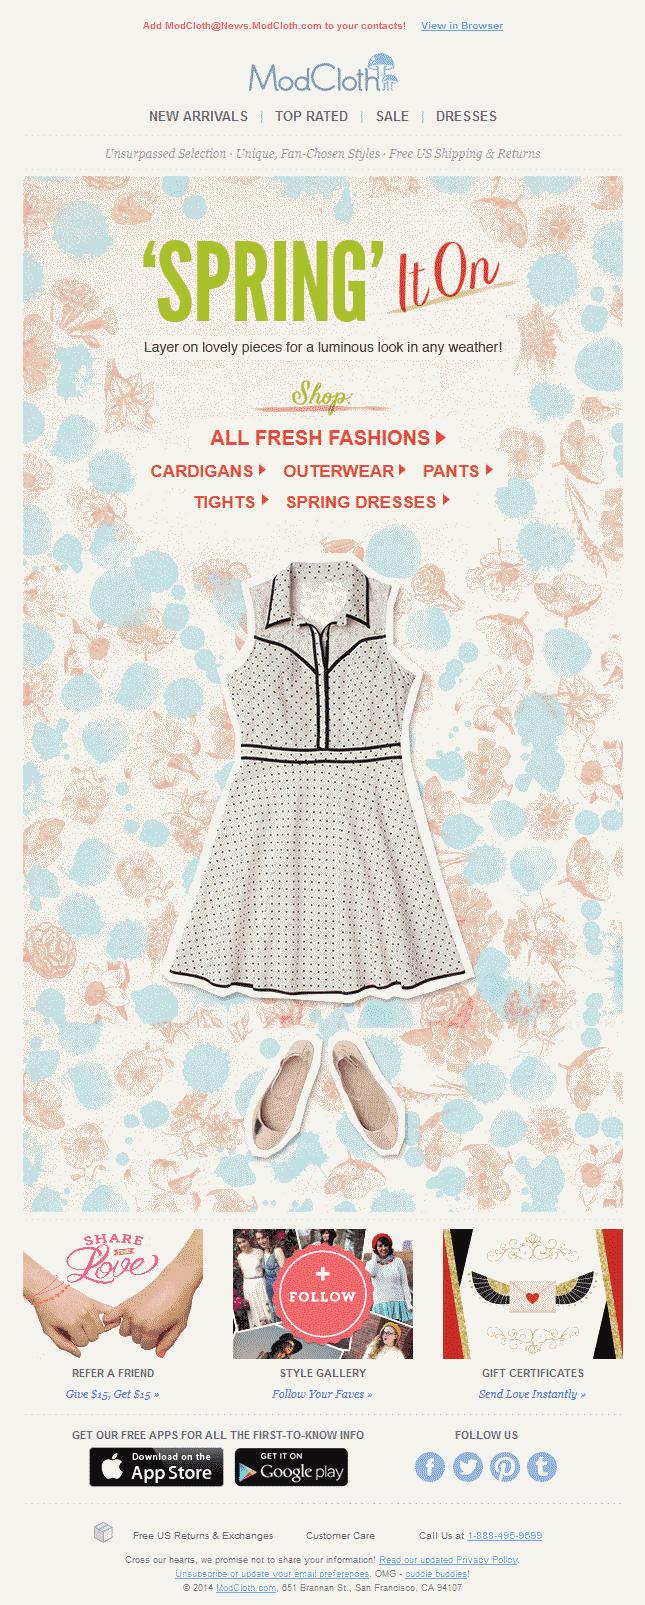
Modcloth markets the dresses which can be combined and paired with different trendy and stylish outfits. Their email marketing template attracts viewers’ attention when they see the same dress paired with different other dresses in an animated form.
03Bed Bath & Beyond
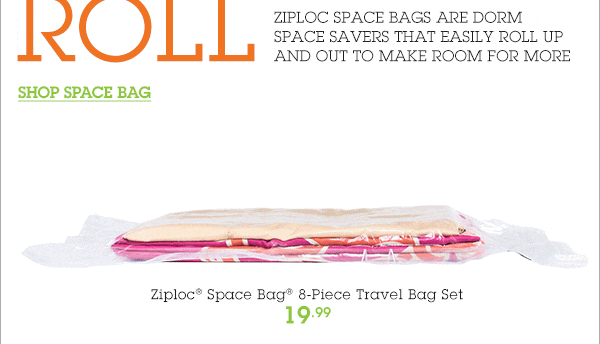
This brand markets a unique Ziploc Space Bag which can be folded and rolled up. The tag line of the email template is “dorm space savers that easily roll up and out to make room for more” and their animated Gifs very well explains the purpose and advantages of these bags.
04Bonobos
To promote their tearaway trousers, Bonobos uses a Gif in which the man removes his pants by just tearing them away. This email marketing template attracts viewers’ attention exactly in the way the company desires.

05Jack Spade
If you are a branded garment lover then you might have received email marketing templates from Jack Spade in the form of Gifs. This brand uses Gif at a wide range to promote its products online.
06Mr. Porter
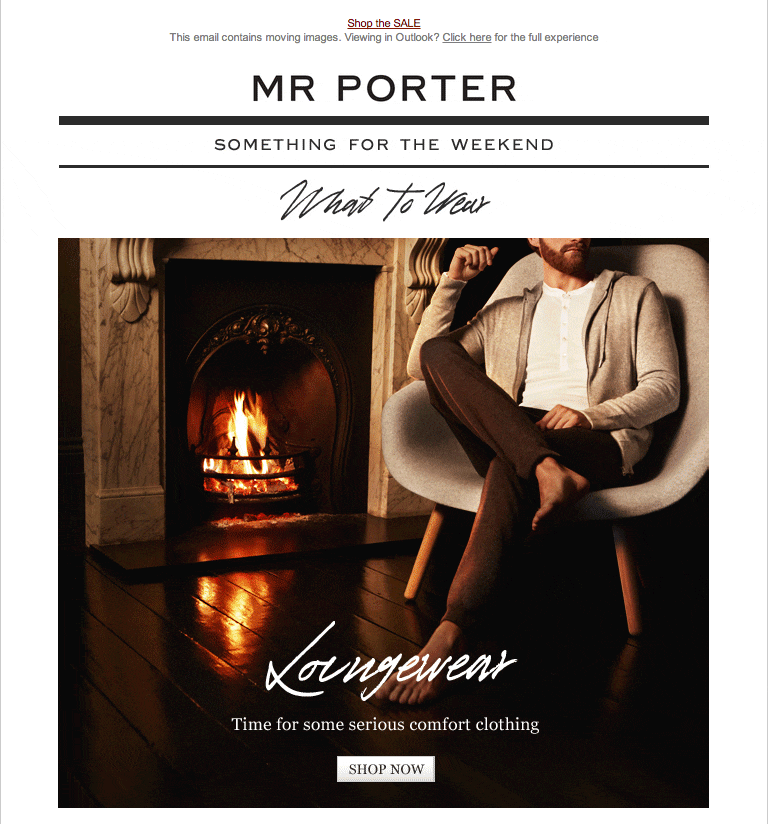
Mr. Porter, a brand which is known for its warm and cozy comfort wears. This email marketing template shows a man sitting in a very comfortable position near the fire. This Gif puts the urge for the same comfort level in the viewer’s mind.
07Anthropologie
Anthropologie makes use of octopus made out of paper and flapping its tentacles around in a joyous and happy manner. This catchy Gif abates the viewer to go for the product marketed by the email.

08West Elm
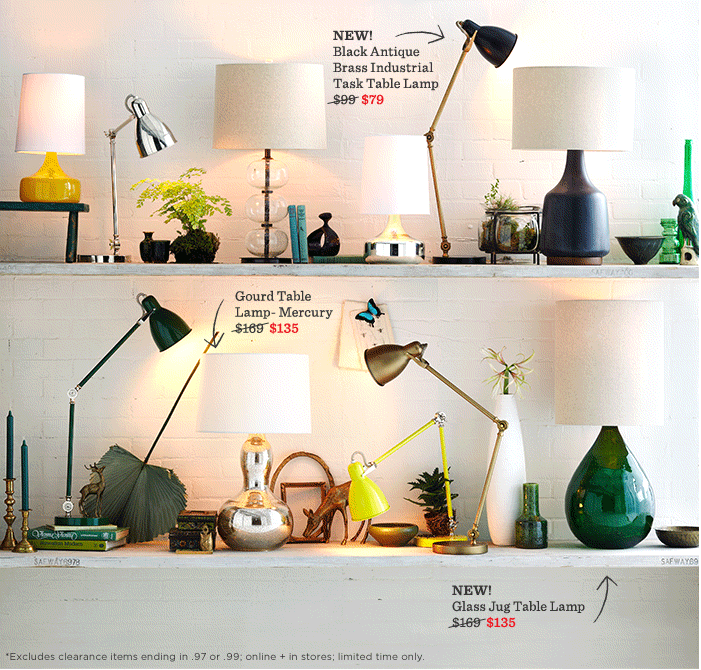
The modern furniture and home decoration company West Elm showcases various lamps in Gif form in their email newsletter. This Gif creates an urge in the viewer’s mind about their need for the home decoration.
09Chanel
The Watch making company Chanel showcases their triple row watches using wonderful animated Gif.

10 Singer 22
This company uses a party-type email marketing template to attract customers who’ve just reached the next level of their rewards program.

Part 3 5 GIF Makers That Lets You Create Unique Custom Animations
Now you might want to know which the best and easiest Gif maker to design unique custom animation is. If you search on Google for an online Gif maker, then your search result will be filled with hundreds of such Gifs makers. But here we have shortlisted the 5 best and easy-to-use Gif makers using which you can create unique custom animation as per your requirements.
01**Wondershare Filmora Video Editor **
To feature at the top of our list is Filmora. Filmora is one of the best video editing tools to turn videos into GIF images. This app uses fabulous text and animation effects to turn your video and images into catchy Gifs. This tool works very smoothly with various OS like Windows 7/Windows 8.1/Windows 10/Windows 11 ( 64 bit OS).

Wondershare Filmora - Best Video Editor for Mac/Windows
5,481,435 people have downloaded it.
Build unique custom animations without breaking a sweat.
Focus on creating epic stories and leave the details to Filmora’s auto features.
Start a creative adventure with drag & drop effects and endless possibilities.
Filmora simplifies advanced features to save you time and effort.
Filmora cuts out repetition so you can move on to your next creative breakthrough.
The best thing about this gif template maker is that you don’t need any technical expertise to use it. You can create gif from all popular video formats like .wmv, .mp4, .mkv, .evo, .dat, .wav, .mpeg and .avi etc. as per your requirements.
02Imgflip
Next on our list is Imgflip, apart from being an efficient Gif creator the main highlight of this tool is that you can create animated GIFs from your pictures or even a Facebook or YouTube video URL. You can also use webcam video directly and rearrange the image to create Gifs.

03GIFMaker.me
Another great gif template maker isGIFMaker.me. This tool enables the generation of quick and attractive Gifs in a matter of a few minutes. No matter you use Mac, Windows, or Linux, this tool will effortlessly create GIFs from images and videos.

04Gifs.com
Next on our list of best gif template makers is Gifs.com. The website claims to be “the fastest way to make and edit Gifs and short videos”. Gifs.com allows you to access a free and easy-to-use media editor which makes it the fastest GIF creator.
05Imgur
Last but not least to feature in our list of Imgur. Imgur is both a Gif gallery as well as a creator. This tool offers various functions to edit the GIFs you create with features like crop, rotate, resize, etc.
● Ending Thoughts →
● So guys, now it’s time to end the article. After reading this article you might have understood the meaning of Gifs. Gifs could be a fun way to interact on social media and also they could be an important tool in the marketing of your products.
● You can learn to design email templates from the examples provided in the articles. This will help you to boost the marketing of your products online.
● If you want to create Gifs as per your requirements then you can go for any of the five Gif makers suggested in the article but we suggest to go with Filmora first as it is the best and easiest of all the mentioned Gifs makers.
Gifs today have become an indispensable part of our social media conversations. Be it Whatsapp, Facebook, Instagram, or any other online messaging platform, no conversations are complete without using Gifs. These animated images can express the whole emotion during a conversation which cannot be expressed by a text message.
You all might have used or been using Gifs but most people never try to know and learn the different ways you can use Gifs. Gifs could be used in marketing and business to boost the attractiveness of your products.
So in this article we bring you all about Gifs, all your questions like What Are Gifs?, What are Different Kinds of Gifs?, How to Use Cool Gifs as Part of Your Marketing?, How to create animated custom Gifs? Which is the best gif template maker? And many more will be cleared after reading the whole article.
In this article
01 [What Is Animated GIF](#Part 1)
02 [10 Amazing Examples of Animated Gifs in Email Marketing Templates](#Part 2)
03 [5 GIF Makers That Lets You Create Unique Custom Animations](#Part 3)
Part 1 What Is Animated GIF
01What Are Gifs?
To begin with, we will start by understanding what is a Gif. Gif stands for Graphics Interface Format and the kind of animation you use today has had a presence on the internet for more than 30 years as of now. A Gif named “flying airplane” was first created by Steve Wilhite and his team of developers in 1987 while working for Compuserve. At the time of their inception, Gifs were small-sized normal moving images placed on any kind of background.
The early Gifs came into use with the increase in popularity of social sharing websites like Geocities, Myspace, and later Imgur and Tumblr. Today we are using the most advanced versions of Gifs, these can be downloaded or embedded on your website, we can use them on almost every messaging platform and creating Gifs today has become a child’s play.
02Different Kinds of Gifs
Now the question comes about what are different types of Gifs. After their creation, Gifs are now used for various purposes and hence then began a custom to define them according to their use.
● Reaction GIFs
These are the most widely used Gifs in social media and messaging platforms. You might have used them to comment to express your feelings. These help to convey your message by animation and you don’t need to type all the stuff. reaction GIFs are bits and pieces of videos or movies looped into a GIF. Almost all the emotions and feelings like applause, happiness, sadness, etc can be expressed by them.
● Illustration and Cartoon Gifs
GIFs that were illustrated specifically to be turned into a GIF comes under this category. These are mostly used to explain something in simple visual form rather than typing all the stuff. Very attractive animation and bright colors are used here to make them seamless.
● Gif Art
You might have not noticed but Gifs can be used very efficiently to showcase art. Many digital artists use the .gif format to create cool GIFs of their own to present their art. On the Gif website like Giphy, you can find thousands of artistic Gifs.
● Optical illusion GIFs
These kinds of Gifs create an illusion to the human eyes and are very attractive. You can use them while the conversation with your friends for a fun purpose.
● Branded Gifs
You might have noticed, nowadays almost all the brands use cool Gifs to promote their products online. Out of all, the apparel brands have made use of this feature in a very wide spectrum to promote their sales.
● Cinemagraphs
These are very special kinds of animated images. These are normal moving images that are continuously looped and make us feel like a real live image. Kevin Burg and Jamie Beck in 2011 created the first cinematograph Gif.
03Different Ways to Use Cool Gifs in Marketing
Gifs could be a fun way of using interesting and cool animations in your marketing. There are thousands of Gifs available on websites like Giphy from where you can choose the suitable Gif. You can also create a dedicated brand Gifs for your particular use. Just keep some of the important things in mind while selecting Gifs for your products and brand.
● It must deliver an appropriate message from your brand and product.
● It must be under legal circumference. Do not try to use copyrighted Gifs or celebrity faces Gifs without obtaining due permission.
● It must match your branding style on other platforms.
● Must be visually understandable and appealing.
04How to Use Cool Gifs as Part of Your Marketing
As you already know that apart from being a source of fun during social media conversations, Gifs could also be used in marketing. You can use very cool Gifs to promote your product and boost up your sales. Following are some creative ideas in which you can use Gifs to market your products.
● You can arrange a contest asking the participants to create a Gif based on your product.
● You can create cool Gifs related to your products and circulate them over different social media platforms, information on social media receives very quick attention.
● Cinemagraphs could be a great option when you want to showcase details about your product in an innovative form. This kind of Gifs could be very useful in fashion-related marketing.
● Create your brand Gifs and add cool emojis to them. Emojis in a Gif make it more attractive.
● You can use Gif for the “thank you” purpose. You can send a Gif “thank you” Gif when someone shares something about your product on social media.
● Infographics and Virtual representation are an important part of marketing today. You can use Gif to design creative infographics.
● The logo of your brand is like soul to product. Using Gifs you can design a catchy and attractive logo that helps in boosting the marketing of your product.
Part 2 10 Amazing Examples of Animated Gifs in Email Marketing Templates
Gif has become a cool and easy way of expressing your feelings so now you don’t need to type all those long boring messages. Nowadays, email marketers are using a wide range of Gifs to market their products to customers. These Gifs attract the interest of viewers and lead to an increase in sales. You too can use animated GIFs to display your products and services in action. Here you will see 10 amazing examples of marketing gif templates.
01ShoeMint
ShoeMint, a colored socks company has used very catchy Gif to market their socks. ShoeMint goes by email marketing template – “C’mon, Get Happy!” as their tag line and when you look at the Gif of colorful socks you will have a smile on your face.
02Modcloth
Modcloth markets the dresses which can be combined and paired with different trendy and stylish outfits. Their email marketing template attracts viewers’ attention when they see the same dress paired with different other dresses in an animated form.
03Bed Bath & Beyond
This brand markets a unique Ziploc Space Bag which can be folded and rolled up. The tag line of the email template is “dorm space savers that easily roll up and out to make room for more” and their animated Gifs very well explains the purpose and advantages of these bags.
04Bonobos
To promote their tearaway trousers, Bonobos uses a Gif in which the man removes his pants by just tearing them away. This email marketing template attracts viewers’ attention exactly in the way the company desires.
05Jack Spade
If you are a branded garment lover then you might have received email marketing templates from Jack Spade in the form of Gifs. This brand uses Gif at a wide range to promote its products online.
06Mr. Porter
Mr. Porter, a brand which is known for its warm and cozy comfort wears. This email marketing template shows a man sitting in a very comfortable position near the fire. This Gif puts the urge for the same comfort level in the viewer’s mind.
07Anthropologie
Anthropologie makes use of octopus made out of paper and flapping its tentacles around in a joyous and happy manner. This catchy Gif abates the viewer to go for the product marketed by the email.
08West Elm
The modern furniture and home decoration company West Elm showcases various lamps in Gif form in their email newsletter. This Gif creates an urge in the viewer’s mind about their need for the home decoration.
09Chanel
The Watch making company Chanel showcases their triple row watches using wonderful animated Gif.
10 Singer 22
This company uses a party-type email marketing template to attract customers who’ve just reached the next level of their rewards program.
Part 3 5 GIF Makers That Lets You Create Unique Custom Animations
Now you might want to know which the best and easiest Gif maker to design unique custom animation is. If you search on Google for an online Gif maker, then your search result will be filled with hundreds of such Gifs makers. But here we have shortlisted the 5 best and easy-to-use Gif makers using which you can create unique custom animation as per your requirements.
01**Wondershare Filmora Video Editor **
To feature at the top of our list is Filmora. Filmora is one of the best video editing tools to turn videos into GIF images. This app uses fabulous text and animation effects to turn your video and images into catchy Gifs. This tool works very smoothly with various OS like Windows 7/Windows 8.1/Windows 10/Windows 11 ( 64 bit OS).
Wondershare Filmora - Best Video Editor for Mac/Windows
5,481,435 people have downloaded it.
Build unique custom animations without breaking a sweat.
Focus on creating epic stories and leave the details to Filmora’s auto features.
Start a creative adventure with drag & drop effects and endless possibilities.
Filmora simplifies advanced features to save you time and effort.
Filmora cuts out repetition so you can move on to your next creative breakthrough.
The best thing about this gif template maker is that you don’t need any technical expertise to use it. You can create gif from all popular video formats like .wmv, .mp4, .mkv, .evo, .dat, .wav, .mpeg and .avi etc. as per your requirements.
02Imgflip
Next on our list is Imgflip, apart from being an efficient Gif creator the main highlight of this tool is that you can create animated GIFs from your pictures or even a Facebook or YouTube video URL. You can also use webcam video directly and rearrange the image to create Gifs.
03GIFMaker.me
Another great gif template maker isGIFMaker.me. This tool enables the generation of quick and attractive Gifs in a matter of a few minutes. No matter you use Mac, Windows, or Linux, this tool will effortlessly create GIFs from images and videos.
04Gifs.com
Next on our list of best gif template makers is Gifs.com. The website claims to be “the fastest way to make and edit Gifs and short videos”. Gifs.com allows you to access a free and easy-to-use media editor which makes it the fastest GIF creator.
05Imgur
Last but not least to feature in our list of Imgur. Imgur is both a Gif gallery as well as a creator. This tool offers various functions to edit the GIFs you create with features like crop, rotate, resize, etc.
● Ending Thoughts →
● So guys, now it’s time to end the article. After reading this article you might have understood the meaning of Gifs. Gifs could be a fun way to interact on social media and also they could be an important tool in the marketing of your products.
● You can learn to design email templates from the examples provided in the articles. This will help you to boost the marketing of your products online.
● If you want to create Gifs as per your requirements then you can go for any of the five Gif makers suggested in the article but we suggest to go with Filmora first as it is the best and easiest of all the mentioned Gifs makers.
Have You Ever Wondered How Those PowerPoint, Looping Slideshows You See in Conferences and Reception Areas Display and Move to the Next Slide Automatically without Clicking a Mouse? You Don’t Have to Be Amazed at This
How to make a PowerPoint looping slideshow
An easy yet powerful editor
Numerous effects to choose from
Detailed tutorials provided by the official channel
A PowerPoint Looping slideshow automatically starts over from the beginning after displaying the last slide. A particular slide is displayed for a certain amount of time interval. Once the time has elapsed, the slide automatically moves to the next one. It is sometimes used in seminars to keep the audience busy before the main presentation commences. In most tradeshows, the videos or information you notice repeatedly playing on its own are in a loop. The transition and slide sets get tweaked to work that way. In Nigeria, most banks use looped slides to display their welcome message. Looping slides make display work more accessible and give time to face other activities while your slide runs automatically.
In this article
01 [Advantages of PowerPoint looping slide](#Part 1)
02 [How to loop a PowerPoint in simple steps.](#Part 2)
Part 1 Advantages of PowerPoint Looping Slide.
PowerPoint slideshows aid and develop visual resources. Looping a PowerPoint slideshowmakes a presentation more accessible and more attractive. Studies show that humans tend to remember more of what they see than what they hear. You should use a PowerPoint-loop slideshow if you want to make a lasting impression while holding that conference, pitch to your boss at work, or even bid for that project**.** Here are some other reasons you should consider looping in your nextPowerPoint slide show.
A looping PowerPoint slideshow runs automatically. A typical PowerPoint presentation moves to the next slide when the presenter clicks the mouse, but a looping slideshow does not need human participation. It displays the next slide automatically after the time interval has elapsed.
It can be helpful to welcome guests to a meeting or Newcomers to an office reception area.
It ensures that latecomers do not miss any significant part of the presentation because a PowerPoint automatic slideshow loop starts all over again after displaying the last slide.
Setting up a looping slideshow is easy and does not require much equipment. You’re all set to go if you have a computer and projector.
It gives the speaker more time to focus on the audience and interact with them rather than concentrating on getting the next slide correctly.
With or without the presence of an operator, the PowerPoint presentation can display the slides configured to display.
It saves you the stress of arranging and rearranging slides during a meeting or an event.
It makes presentation easy and allows the large audience to flow with the speaker as they do not have to read from documents while trying to keep up with the speaker.
A PowerPoint configured to loop continuously can be used to pass general information.
Not everyone likes speaking in public or making a presentation in front of a large crowd. Someone like me immediately starts sweating profusely and has heart palpitations when many eyes are on me. In this kind of situation, a looped PowerPoint slideshow helps take the tension off a nervous speaker as the audience will most likely be concentrating on the slideshows instead of you.
Part 2 How to Loop a PowerPoint in Simple Steps.
Have you been wondering how to make PowerPoint looping slideshows? It seems like a challenging feat, but I’ll show you how to go about it. A looping PowerPoint presentation can create Visual presentations at various events like trade shows, kiosks, conferences, seminars, and many more gatherings. It can display automatically without the intervention of the presenter. With the correct procedure, you’ll be able to create a looping PowerPoint slideshow that will run without hitches. Setting up a looping PowerPoint presentation is relatively easy and doesn’t require rocket science as most people think. Below are simple steps on how to loop a slideshow on PowerPoint;
An easy way to set up looping slideshows is to apply automatic transitions and then set up your desired slideshow settings.
Step 1: Open your PowerPoint presentation
First, open and select the particular PowerPoint presentation you would like to loop.

Step 2: Set up the slideshow
Once your desired presentation is open, go to the “Set Up” group on the “Slide Show” tab and then click on the “Set Up Slide Show” button. Once your desired presentation is open, go to the “Set Up” group on the “Slide Show” tab and then click on the “Set Up Slide Show” button.

Step 3: Choose your mode of control over the slides.
Adialogue box will come up. In the” show options, “select if you want it to get presented by a speaker, which is the default setting of PowerPoint. This option gives the speaker or presenter control over when to advance the slide. The second option, which an individual browses, restricts the control of the speaker over the advancement of the slide, likewise the third option. Checkbox next to “Loop continuously until ‘Esc.’ Then click [OK]. The slide keeps looping automatically until the speaker or presenter presses ok.

Step 4: Select the number of slides you want to be displayed.
From the “Slides” preview side panel, tap your first slide, press and hold [Shift] and click your last slide or input the number of slides you want to display. This option will select all of the slides you want to display.

Step 5: Set up Transitions mode
Click the [Transitions] tab. The transition appears between slides when a slideshow is displayed. In the Transitions tab in PowerPoint, you can choose the type of transition (such as Fade). From the “Timing” group, uncheck the box next to “On Mouse Click” and check “After .”This setting enables the transition to occur after your preferred time and not when you click the mouse.

Step 6: Adjust the time interval
To adjust the duration you would like each slide to display, click the up and down arrows in the “After:” field within the “Timing” group. When your slideshow reaches the last slide, it will automatically loop back to the beginning.

****Wondershare Filmora Video Editor Software**
There are many video editing software, but one that stands out amongst them is filmora because of its unique video editing features. The Filmora software is undoubtedly one of the best beginner and professional-level video editing tools.
For Win 7 or later (64-bit)
For macOS 10.12 or later
Making loop videos is relatively easy with its timeline features. Video loops are short clips that replay for a particular duration or unlimited times without the user having to click the play button repeatedly. This kind of video is quite trendy on social media platforms. Filmora software also creates photo and video slideshows and can add music, texts, filters, different transition effects, and even animation to your slideshow. Many tools can help you create these kinds of videos, and Filmora is one of them.
● Ending Thoughts →
● I’m sure that post reading this guide, you will be able to create a PowerPoint looping slideshow and know what software to use in creating loop videos.
● Learning how to loop a PowerPoint slideshow is a game-changer for organizations and meetings that require a large audience or attendees. The major shortcoming of using a PowerPoint presentation slideshow is that a display cannot hold without a laptop and projector.
A PowerPoint Looping slideshow automatically starts over from the beginning after displaying the last slide. A particular slide is displayed for a certain amount of time interval. Once the time has elapsed, the slide automatically moves to the next one. It is sometimes used in seminars to keep the audience busy before the main presentation commences. In most tradeshows, the videos or information you notice repeatedly playing on its own are in a loop. The transition and slide sets get tweaked to work that way. In Nigeria, most banks use looped slides to display their welcome message. Looping slides make display work more accessible and give time to face other activities while your slide runs automatically.
In this article
01 [Advantages of PowerPoint looping slide](#Part 1)
02 [How to loop a PowerPoint in simple steps.](#Part 2)
Part 1 Advantages of PowerPoint Looping Slide.
PowerPoint slideshows aid and develop visual resources. Looping a PowerPoint slideshowmakes a presentation more accessible and more attractive. Studies show that humans tend to remember more of what they see than what they hear. You should use a PowerPoint-loop slideshow if you want to make a lasting impression while holding that conference, pitch to your boss at work, or even bid for that project**.** Here are some other reasons you should consider looping in your nextPowerPoint slide show.
A looping PowerPoint slideshow runs automatically. A typical PowerPoint presentation moves to the next slide when the presenter clicks the mouse, but a looping slideshow does not need human participation. It displays the next slide automatically after the time interval has elapsed.
It can be helpful to welcome guests to a meeting or Newcomers to an office reception area.
It ensures that latecomers do not miss any significant part of the presentation because a PowerPoint automatic slideshow loop starts all over again after displaying the last slide.
Setting up a looping slideshow is easy and does not require much equipment. You’re all set to go if you have a computer and projector.
It gives the speaker more time to focus on the audience and interact with them rather than concentrating on getting the next slide correctly.
With or without the presence of an operator, the PowerPoint presentation can display the slides configured to display.
It saves you the stress of arranging and rearranging slides during a meeting or an event.
It makes presentation easy and allows the large audience to flow with the speaker as they do not have to read from documents while trying to keep up with the speaker.
A PowerPoint configured to loop continuously can be used to pass general information.
Not everyone likes speaking in public or making a presentation in front of a large crowd. Someone like me immediately starts sweating profusely and has heart palpitations when many eyes are on me. In this kind of situation, a looped PowerPoint slideshow helps take the tension off a nervous speaker as the audience will most likely be concentrating on the slideshows instead of you.
Part 2 How to Loop a PowerPoint in Simple Steps.
Have you been wondering how to make PowerPoint looping slideshows? It seems like a challenging feat, but I’ll show you how to go about it. A looping PowerPoint presentation can create Visual presentations at various events like trade shows, kiosks, conferences, seminars, and many more gatherings. It can display automatically without the intervention of the presenter. With the correct procedure, you’ll be able to create a looping PowerPoint slideshow that will run without hitches. Setting up a looping PowerPoint presentation is relatively easy and doesn’t require rocket science as most people think. Below are simple steps on how to loop a slideshow on PowerPoint;
An easy way to set up looping slideshows is to apply automatic transitions and then set up your desired slideshow settings.
Step 1: Open your PowerPoint presentation
First, open and select the particular PowerPoint presentation you would like to loop.
Step 2: Set up the slideshow
Once your desired presentation is open, go to the “Set Up” group on the “Slide Show” tab and then click on the “Set Up Slide Show” button. Once your desired presentation is open, go to the “Set Up” group on the “Slide Show” tab and then click on the “Set Up Slide Show” button.
Step 3: Choose your mode of control over the slides.
Adialogue box will come up. In the” show options, “select if you want it to get presented by a speaker, which is the default setting of PowerPoint. This option gives the speaker or presenter control over when to advance the slide. The second option, which an individual browses, restricts the control of the speaker over the advancement of the slide, likewise the third option. Checkbox next to “Loop continuously until ‘Esc.’ Then click [OK]. The slide keeps looping automatically until the speaker or presenter presses ok.
Step 4: Select the number of slides you want to be displayed.
From the “Slides” preview side panel, tap your first slide, press and hold [Shift] and click your last slide or input the number of slides you want to display. This option will select all of the slides you want to display.
Step 5: Set up Transitions mode
Click the [Transitions] tab. The transition appears between slides when a slideshow is displayed. In the Transitions tab in PowerPoint, you can choose the type of transition (such as Fade). From the “Timing” group, uncheck the box next to “On Mouse Click” and check “After .”This setting enables the transition to occur after your preferred time and not when you click the mouse.
Step 6: Adjust the time interval
To adjust the duration you would like each slide to display, click the up and down arrows in the “After:” field within the “Timing” group. When your slideshow reaches the last slide, it will automatically loop back to the beginning.
****Wondershare Filmora Video Editor Software**
There are many video editing software, but one that stands out amongst them is filmora because of its unique video editing features. The Filmora software is undoubtedly one of the best beginner and professional-level video editing tools.
For Win 7 or later (64-bit)
For macOS 10.12 or later
Making loop videos is relatively easy with its timeline features. Video loops are short clips that replay for a particular duration or unlimited times without the user having to click the play button repeatedly. This kind of video is quite trendy on social media platforms. Filmora software also creates photo and video slideshows and can add music, texts, filters, different transition effects, and even animation to your slideshow. Many tools can help you create these kinds of videos, and Filmora is one of them.
● Ending Thoughts →
● I’m sure that post reading this guide, you will be able to create a PowerPoint looping slideshow and know what software to use in creating loop videos.
● Learning how to loop a PowerPoint slideshow is a game-changer for organizations and meetings that require a large audience or attendees. The major shortcoming of using a PowerPoint presentation slideshow is that a display cannot hold without a laptop and projector.
Also read:
- Updated Wondering How to Edit a Video to Slow Motion on iPhone and Android Devices? Find Out How to Use Wondershare Filmora to Create and Edit Slo Mo Videos in a Few Clicks for 2024
- Updated In 2024, 10 Matching Color Combination That Works Together
- 2024 Approved How to Make Audio Visualizer in Filmora Easy
- Best Free Video Editing Software to Boost Your Content Creation
- Updated How to DIY VHS Overlay in After Effects, In 2024
- New 2024 Approved How to Create Discord Logo GIF
- In 2024, Can You Make an Fcpx Slideshow? Undoubtedly Yes, with the Unlimited Best Fcpx Slideshow Templates Available. To Know How to, Follow the Discussion Below
- Updated In 2024, How to Make Discord GIF PFP
- New How to Create a Makeup Video
- New 2024 Approved 8 Frame Rate Video Converters You Must Try
- 2024 Approved How to Make GIF With Transparent Background?
- Updated 7 Best MP4 Editors on Mac Edit MP4 in Mac for 2024
- Are You Eager to Discover All About Dynamic Videos? You Are in the Right Place because This Article Provides Insight Into Dynamic Video Collages
- New Best 10 Tools to Convert a GIF Into a PDF
- 2024 Approved An Intro Video Describing You and Your Content Is the First and the Foremost Thing Which a Viewer Sees. Thinking of How to Make an Interesting Intro Video, This Blog Is Surely a Supportive Guide for You. Learn More Here
- New Modern Silence Detection Tools Are Changing the Face of Video Editing. Use Them to Improve the Quality of Your Video Clips. Learn How These Tools Let You Detect Silence with Pinpoint Accuracy for 2024
- New 2024 Approved Do You Wish to Make Your Discord PFP an Attention-Seeker? If Yes, Try the Animated Discord PFP. Lets Go over Essential Facts on the Topic, Including How to Get an Animated Discord PFP
- Updated A Vacation Slideshow Is a Great Way to Relive the Vacation Memories and Also Share Them with Your Loved Ones. If You Are Looking for Ways to Create a Slideshow in Just a Few Minutes, We Will Help You with the Best Tool for 2024
- New Doable Ways to Create Transparent Background in Procreate
- Best Android Apps For Creating Slow Motion Videos for 2024
- Updated Do You Want Your Video Footage to Resemble Kodak Films? You Can Get the Old Kodak Film Look by Searching for Kodak 2383 LUT Free Download on the Internet
- New Looking for Efficient Ways to Create a Slow-Motion Video? Read the Article for Reliable Solutions that Provide Excellent Results for 2024
- Best Online GIF to Image (PNG/JPG) Converters for 2024
- Do You Often Feel Fascinated to Try Hands at Anime Character Design to Spark up Your Editing Skills, or Just for a Fun-Filled Activity? Stay Here for the Best Inspirations You Can Ever Get for 2024
- New Guide To Scaling and Setting Videos in Filmora | Tutorial
- Updated In 2024, Steps to Create Makeup Videos
- Updated In 2024, 4 Methods to Merge MP4 and MP3
- In 2024, LumaFusion – What Is It and the Best Alternative to Use
- Updated In 2024, Make A Tattoo Disappear Like A Magic
- New 2024 Approved Video Editing Tips to Know Before Editing First Draft
- In 2024, Detailed Review of Kodak LUTs
- New In 2024, How Does the YouTube AI Algorithm Work - AI EXPLAINED
- New In 2024, Despite the Aforementioned Restrictions, Cartoon Video Makers Still Offer a Sea of Possibilities to Their Users, so Lets Dive Into the Magical World of Animated Videos
- Updated 2024 Approved Best 8 Online MPEG to GIF Converters
- New Best GIF to Video Converters
- How-To Tutorials of Kapwing Collage Maker for 2024
- New 2024 Approved How to Use Motion Tracking in Video Editing
- Best Cinematic LUTs For Premiere Pro You Can Come Across
- In 2024, How to Make Double Exposure Effect in Filmora
- Updated How to Add Video Effects with Movavi Slideshow Maker
- In 2024, Learning How to Slow Down a Video on iPhone Properly
- New How to Speed Up Pictures on TikTok Slideshow for 2024
- Updated In 2024, Motion Blur Photo With GIMP Step-By-Step Guide
- Updated Whatever the Reason You Want to Convert an Mp4 to GIF Online, There Are a Number of Ways to Do It. Use This Guide to Learn the Best Methods. Read More Here
- Updated 8 Best Video Editor with Useful Masking for 2024
- Updated Guaranteed 10 Storyboard Creators To Make Animation Easier For You
- This Article Has a Detailed Description of How You Can Split the Videos in Lightworks Including the the Discussion of Splitting the Wondershare Filmora as an Alternative. It Is Also a Suitable Choice for 2024
- In 2024, Which Pokémon can Evolve with a Moon Stone For Tecno Spark 10 Pro? | Dr.fone
- Top 11 Free Apps to Check IMEI on Vivo Y100A Phones
- How to Manually Install a Hardware Driver in Windows 10
- Fixing Persistent Pandora Crashes on Samsung Galaxy F04 | Dr.fone
- Three Ways to Sim Unlock Lava Blaze 2 5G
- Updated In 2024, The Top 10 AI Avatar Generators
- 8 Best Apps for Screen Mirroring Vivo Y27s PC | Dr.fone
- How to Fix My Vivo V29 Pro Location Is Wrong | Dr.fone
- Apple iPhone 8 Mirror to PC? Top Apps You Must Know | Dr.fone
- In 2024, 15 Best Strongest Pokémon To Use in Pokémon GO PvP Leagues For Honor Play 7T | Dr.fone
- The Best 8 VPN Hardware Devices Reviewed On Oppo Find X6 Pro | Dr.fone
- Unlocking the Power of Smart Lock A Beginners Guide for Samsung Galaxy A23 5G Users
- Title: 2024 Approved How to Create a Light Sweep (Shine) Effect with Filmora
- Author: Morgan
- Created at : 2024-05-19 05:12:16
- Updated at : 2024-05-20 05:12:16
- Link: https://ai-video-editing.techidaily.com/2024-approved-how-to-create-a-light-sweep-shine-effect-with-filmora/
- License: This work is licensed under CC BY-NC-SA 4.0.
