

2024 Approved How to Get Zoom on TV Easy Solutions
How to Get Zoom on TV [Easy Solutions]
The modern workforce needs adaptable alternatives to the conventional room-to-room conferencing. The latest integrated online collaboration platform is called Zoom. What’s more, now you can get Zoom on TV. Being one of the most well-known conferencing programs, it offers reliable and efficient hosting of online meetings. In a same vein, you may set up conference rooms, do video seminars, and use instant messaging to receive real-time communications. Moreover, can you get zoom on your tv? Then the answer is Yes! The ideal technique to expand a small conference is to mirror it on TV using Zoom meetings. Additionally, sharing across all platforms and devices is possible. Sharing HD video, audio, and material from your desktop and mobile devices to conference rooms and phone systems is simple, dependable, and safe with Zoom Meetings.
Zoom is one of the top videos calling applications available, however, in terms of functionality, dependability, and stability. Special features include screen sharing for multi-user annotation and local and cloud recording with transcription. With just a single click, you may share any file with supported and encrypted settings for increased security and communicate across all platforms. Zoom has now come to represent meetings for those who do their business remotely. For almost all platforms, including Android, iOS, macOS, Windows, Smart TVs, etc., the Zoom app is officially accessible. For the query how to get zoom on portal tv? you may activate Zoom screen casting whether you’re using a Windows 10 or a Mac laptop with the Chrome browser. This section will be useful to you if you want to benefit from Zoom on a TV. You may thus do so. Continue reading the article to learn more about how to get zoom on tv.
Part 1: Get Zoom on TV with HDMI Cable
Although Zoom provides companies and bigger organizations with a professional solution like Zoom Rooms, if you’re at home, you don’t need to put anything on your TV to use Zoom. You may start using Zoom right away by simply connecting your Zoom device to your TV. Connect your TV to your laptop’s HDMI port if it has one. Simple as that, however if the laptop doesn’t figure it out on its own you may need to explain what is going on with the second display. Although more reliable, connecting via cable means your source device is linked to the TV and you can’t go for a stroll. It also means you don’t have to worry about the wireless connection fading.
Steps to Get Zoom on TV with HDMI
Step1Connect the HDMI End to the TV and the Other End to Your Device
You may use this in its place if you don’t have an HDMI but do have a USB-C port. To connect to the HDMI cable coming into your TV, you’ll need a dongle, but you’ll need to make sure it’s compatible.
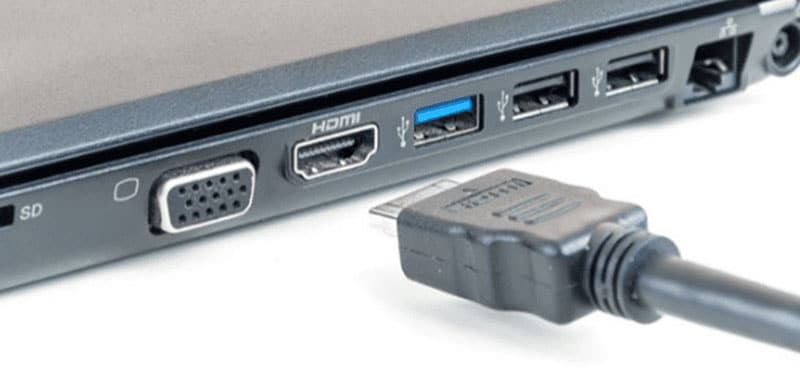
Step2Turn On your TV
Turn on your TV, then switch the video source to the HDMI port you just connected in your device to using the TV remote.
Step3Launch Zoom Meeting
Start or join a meeting by using the Zoom app on your smartphone (available for Android, iOS, Windows, and macOS).
Part 2: Use AirPlay to Connect Zoom to TV
Using AirPlay mirroring, MacOS or iOS devices may share content with Zoom rooms. On MacOS and iOS, Airplay is used to communicate between the Zoom client and the Zoom room. There may be a great potential for your own business requirements if you can figure out how to utilize Airplay to Zoom mirror your screen to your Apple TV. By default, AirPlay sends audio to the Apple TV. Depending on how loud your speakers are set to play and where your input device’s microphone is located, this may cause echoing and ever-louder feedback loops. Without further ado, let’s look at some of the important strategies you may use to maximize live screen streaming on your Apple TV device.
Steps to Use AirPlay to Connect Zoom to TV
Step1Navigate to the Airplay Display in the Apple menu’s top right corner. Choose your Apple TV from the list of AirPlay Display options in the Displays preference pane. The “Show mirroring option in the menu bar when available” checkbox makes it easier to reach the AirPlay menu.

Step2Select Room Management > Zoom Rooms after logging into the Zoom online interface to manage your current Zoom Rooms. Then, modify the account settings and turn on Apple screen mirroring using the location hierarchy system.
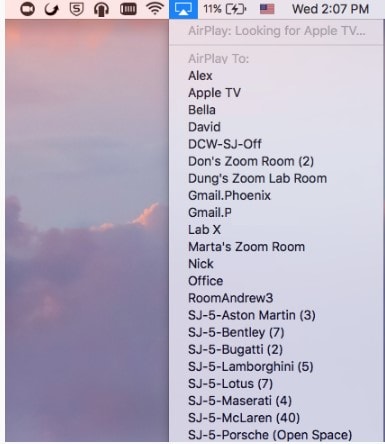
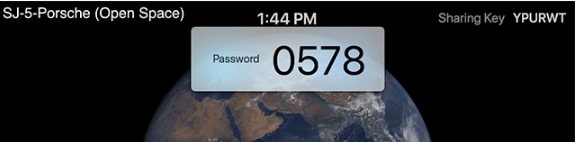
Step3Turn on Apple Screen Mirroring by going to the Meetings tab. If this happens, you may need to activate it from the verification dialog box; otherwise, screen mirroring ought to start immediately on your device and let you see Zoom on your Apple TV. A shared password will be required of you.
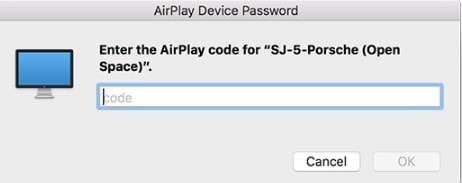
Step4Enter the passcode that is shown on the Zoom room’s screen. You may start using Airplay on your smartphone after enabling Apple screen mirroring.
Step5After that, turn off AirPlay Display by using the option in the preference pane or the system menu bar. To stop sharing, click Disconnect Airplay.
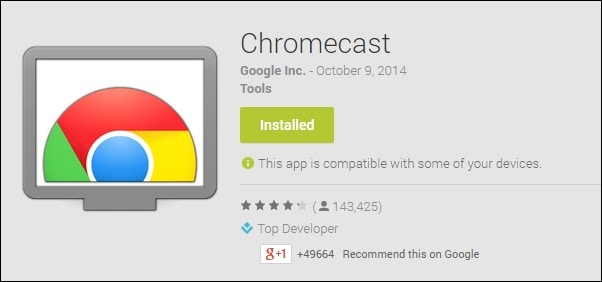
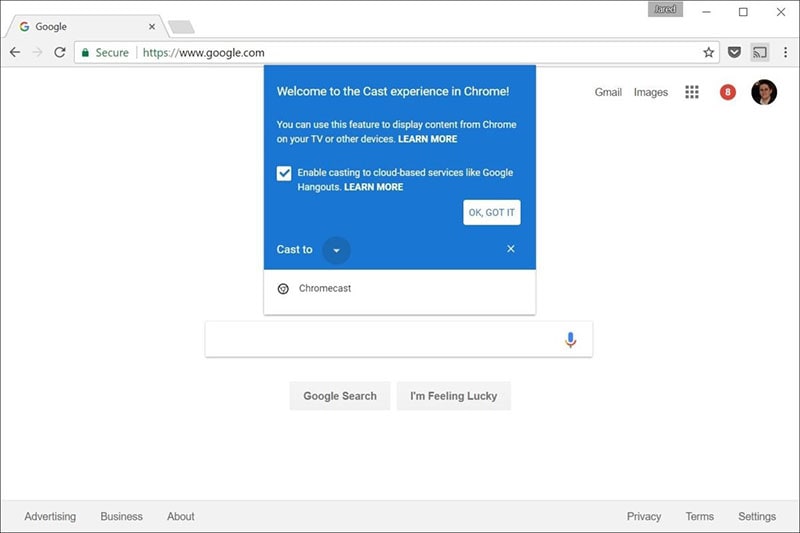
Part 3: Mirror Screen with Chromecast
The Chromecast gadgets from Google are well constructed. They should be able to cast more than just standard streaming services to your TV, logically speaking. Using a Chromecast device is one of the simplest methods to cast a Zoom conference to your TV. They are affordable, and any Google browser and the Google Home app for your Android or iOS smartphone both contain the cast capability. Between a device, such as your phone or computer, and the television, Chromecast offers the perfect connection. Chromecast makes it easy to cast Zoom meetings, particularly conferences with many of participants, since it can virtually reflect everything on your phone, tablet, or computer screen to your TV. For meetings with bigger attendance, it is advantageous to be able to cast Zoom meetings to almost any device, even a smart TV, using Chromecast.
Steps to Mirror Screen with Chromecast
Step1Install the Chromecast
Connect your Google Chromecast to the same internet source as your casting device by plugging it in.
Step2Manage Cast Settings
Locate the casting option on your device and search for recipients. Get the Zoom Cloud Meetings app for iOS or Android. You’ll also need to download the third-party software if you use an iPad or iPhone. After that, sign up for a Zoom account and log in to get started.
Step3Start Mirroring Zoom
The screen of your phone will show up on your TV when you tap your Chromecast. The best view is obtained by turning your phone into landscape after opening Zoom as usual. Once you place a call from here, the video will cast to your TV. Go to the next screen and click Start Broadcasting. You may now start casting to your Chromecast device by opening the Zoom Cloud Meeting app.
You must download the third-party app if you use an iPhone or iPad. The Chromecast Streamer software will let you cast a Zoom meeting on your Chromecast device as Zoom doesn’t provide a casting option.
Conclusion
Zoom’s popularity has skyrocketed as a result of the Pandemic. Zoom has emerged as the preferred video conferencing solution as the bulk of the global workforce shifts to a “work from home” environment. Now that more individuals than ever before work from home, video conferencing has emerged as a vital tool for marketing and corporate communication. Mirroring Zoom meetings to TV has never been this simple. In light of this, we hope that this guide has helped you come up with some of the greatest ideas and approaches for your personal zoom sharing needs. We really hope that this information has been helpful to you if you’ve been interested in learning more about screen sharing your Zoom to TV. Thanks to these methods, you can now mirror any device platform on TV.
The modern workforce needs adaptable alternatives to the conventional room-to-room conferencing. The latest integrated online collaboration platform is called Zoom. What’s more, now you can get Zoom on TV. Being one of the most well-known conferencing programs, it offers reliable and efficient hosting of online meetings. In a same vein, you may set up conference rooms, do video seminars, and use instant messaging to receive real-time communications. Moreover, can you get zoom on your tv? Then the answer is Yes! The ideal technique to expand a small conference is to mirror it on TV using Zoom meetings. Additionally, sharing across all platforms and devices is possible. Sharing HD video, audio, and material from your desktop and mobile devices to conference rooms and phone systems is simple, dependable, and safe with Zoom Meetings.
Zoom is one of the top videos calling applications available, however, in terms of functionality, dependability, and stability. Special features include screen sharing for multi-user annotation and local and cloud recording with transcription. With just a single click, you may share any file with supported and encrypted settings for increased security and communicate across all platforms. Zoom has now come to represent meetings for those who do their business remotely. For almost all platforms, including Android, iOS, macOS, Windows, Smart TVs, etc., the Zoom app is officially accessible. For the query how to get zoom on portal tv? you may activate Zoom screen casting whether you’re using a Windows 10 or a Mac laptop with the Chrome browser. This section will be useful to you if you want to benefit from Zoom on a TV. You may thus do so. Continue reading the article to learn more about how to get zoom on tv.
Part 1: Get Zoom on TV with HDMI Cable
Although Zoom provides companies and bigger organizations with a professional solution like Zoom Rooms, if you’re at home, you don’t need to put anything on your TV to use Zoom. You may start using Zoom right away by simply connecting your Zoom device to your TV. Connect your TV to your laptop’s HDMI port if it has one. Simple as that, however if the laptop doesn’t figure it out on its own you may need to explain what is going on with the second display. Although more reliable, connecting via cable means your source device is linked to the TV and you can’t go for a stroll. It also means you don’t have to worry about the wireless connection fading.
Steps to Get Zoom on TV with HDMI
Step1Connect the HDMI End to the TV and the Other End to Your Device
You may use this in its place if you don’t have an HDMI but do have a USB-C port. To connect to the HDMI cable coming into your TV, you’ll need a dongle, but you’ll need to make sure it’s compatible.
Step2Turn On your TV
Turn on your TV, then switch the video source to the HDMI port you just connected in your device to using the TV remote.
Step3Launch Zoom Meeting
Start or join a meeting by using the Zoom app on your smartphone (available for Android, iOS, Windows, and macOS).
Part 2: Use AirPlay to Connect Zoom to TV
Using AirPlay mirroring, MacOS or iOS devices may share content with Zoom rooms. On MacOS and iOS, Airplay is used to communicate between the Zoom client and the Zoom room. There may be a great potential for your own business requirements if you can figure out how to utilize Airplay to Zoom mirror your screen to your Apple TV. By default, AirPlay sends audio to the Apple TV. Depending on how loud your speakers are set to play and where your input device’s microphone is located, this may cause echoing and ever-louder feedback loops. Without further ado, let’s look at some of the important strategies you may use to maximize live screen streaming on your Apple TV device.
Steps to Use AirPlay to Connect Zoom to TV
Step1Navigate to the Airplay Display in the Apple menu’s top right corner. Choose your Apple TV from the list of AirPlay Display options in the Displays preference pane. The “Show mirroring option in the menu bar when available” checkbox makes it easier to reach the AirPlay menu.
Step2Select Room Management > Zoom Rooms after logging into the Zoom online interface to manage your current Zoom Rooms. Then, modify the account settings and turn on Apple screen mirroring using the location hierarchy system.
Step3Turn on Apple Screen Mirroring by going to the Meetings tab. If this happens, you may need to activate it from the verification dialog box; otherwise, screen mirroring ought to start immediately on your device and let you see Zoom on your Apple TV. A shared password will be required of you.
Step4Enter the passcode that is shown on the Zoom room’s screen. You may start using Airplay on your smartphone after enabling Apple screen mirroring.
Step5After that, turn off AirPlay Display by using the option in the preference pane or the system menu bar. To stop sharing, click Disconnect Airplay.
Part 3: Mirror Screen with Chromecast
The Chromecast gadgets from Google are well constructed. They should be able to cast more than just standard streaming services to your TV, logically speaking. Using a Chromecast device is one of the simplest methods to cast a Zoom conference to your TV. They are affordable, and any Google browser and the Google Home app for your Android or iOS smartphone both contain the cast capability. Between a device, such as your phone or computer, and the television, Chromecast offers the perfect connection. Chromecast makes it easy to cast Zoom meetings, particularly conferences with many of participants, since it can virtually reflect everything on your phone, tablet, or computer screen to your TV. For meetings with bigger attendance, it is advantageous to be able to cast Zoom meetings to almost any device, even a smart TV, using Chromecast.
Steps to Mirror Screen with Chromecast
Step1Install the Chromecast
Connect your Google Chromecast to the same internet source as your casting device by plugging it in.
Step2Manage Cast Settings
Locate the casting option on your device and search for recipients. Get the Zoom Cloud Meetings app for iOS or Android. You’ll also need to download the third-party software if you use an iPad or iPhone. After that, sign up for a Zoom account and log in to get started.
Step3Start Mirroring Zoom
The screen of your phone will show up on your TV when you tap your Chromecast. The best view is obtained by turning your phone into landscape after opening Zoom as usual. Once you place a call from here, the video will cast to your TV. Go to the next screen and click Start Broadcasting. You may now start casting to your Chromecast device by opening the Zoom Cloud Meeting app.
You must download the third-party app if you use an iPhone or iPad. The Chromecast Streamer software will let you cast a Zoom meeting on your Chromecast device as Zoom doesn’t provide a casting option.
Conclusion
Zoom’s popularity has skyrocketed as a result of the Pandemic. Zoom has emerged as the preferred video conferencing solution as the bulk of the global workforce shifts to a “work from home” environment. Now that more individuals than ever before work from home, video conferencing has emerged as a vital tool for marketing and corporate communication. Mirroring Zoom meetings to TV has never been this simple. In light of this, we hope that this guide has helped you come up with some of the greatest ideas and approaches for your personal zoom sharing needs. We really hope that this information has been helpful to you if you’ve been interested in learning more about screen sharing your Zoom to TV. Thanks to these methods, you can now mirror any device platform on TV.
How to Create a Light Sweep (Shine) Effect with Filmora
Preparation
What you need to prepare:
- A computer (Windows or macOS)
- Your video materials.
- Filmora video editor
Step 1
If you haven’t already, go ahead and download the Filmora video editor . Install it and run the application on your computer.
Step 2
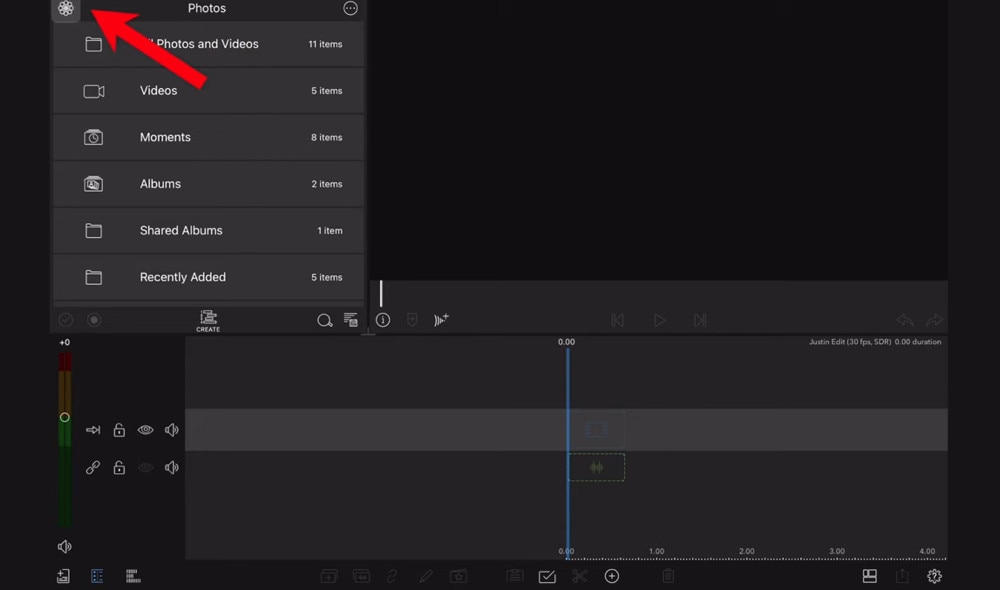
Create a New Project by clicking on the big blue button. Immediately after, go to File → Project Settings. Here, make sure the project is in full resolution and 60 fps.

Step 3
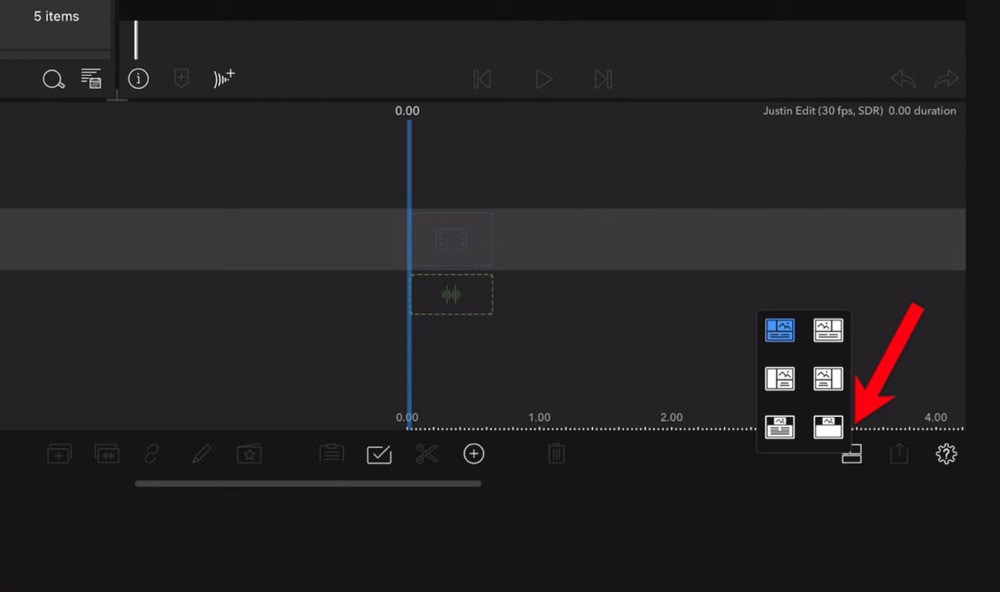
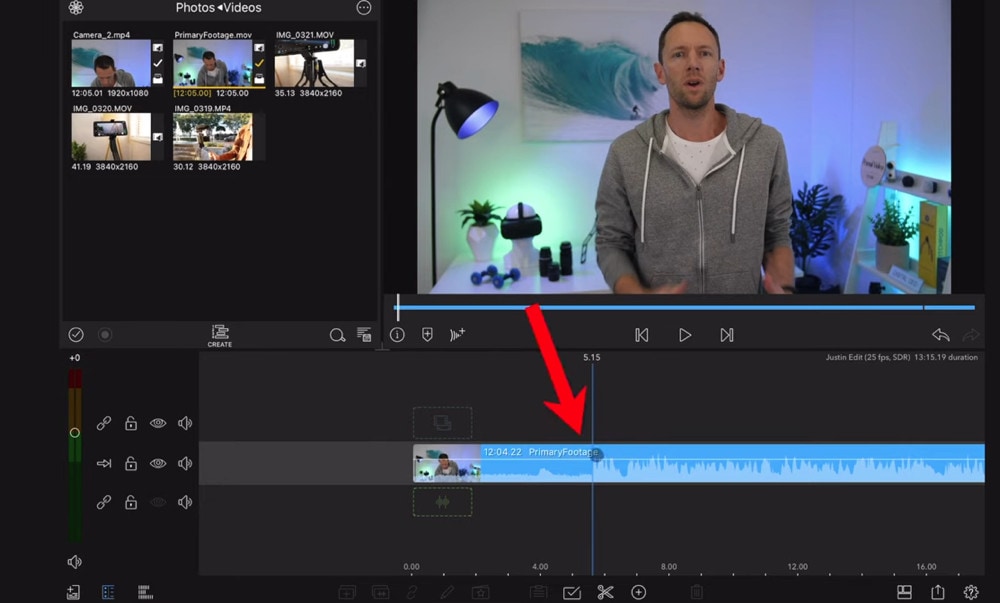
Select the Titles tab and drag the Default Title to the Timeline.

Step 4
Double-click on the Default Title inside the Timeline and go to Advanced. Here, you can change the text, pick a new font, change its size, and so on. Make sure you change the Color Type to Gradient Fill. Choose a color of your own liking. When you’re done customizing it, click on OK.

Step 5
Right-click on the Default Title clip and select Copy. Then, right-click anywhere on the Timeline and select Paste. After this, drag the copy of that clip on the Track above it.

Step 6
Double-click on the copied Title, go to Advanced, and change the Color Type to Color Fill. Click OK.

Step 7
Next, take a snapshot of the new title. Then, delete the copied Title clip from your Timeline. After this, drag the snapshot into the Timeline.

Step 8
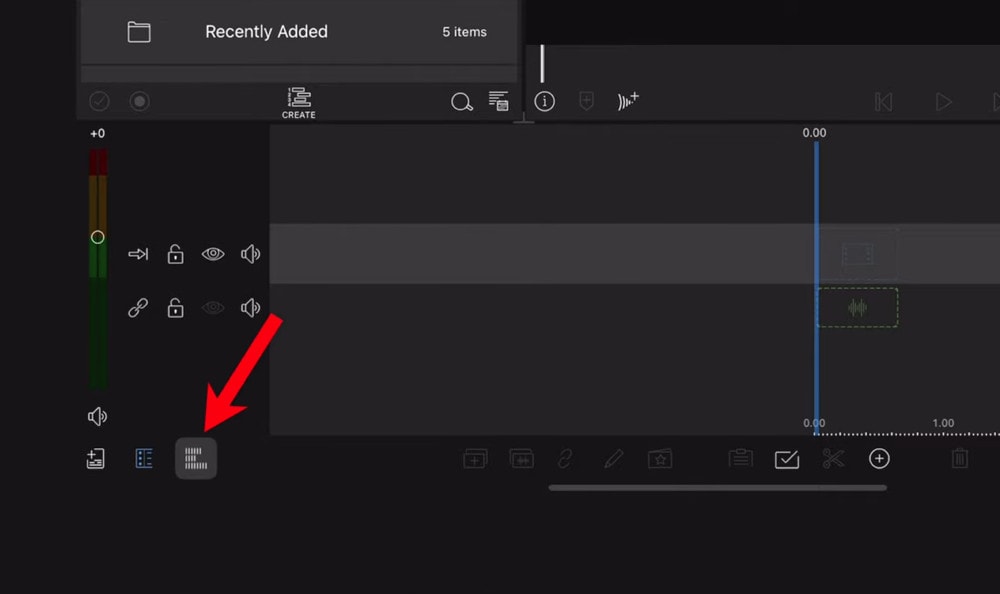
Double-click on the Snapshot clip and go to the Mask tab. From here, select the Rectangle mask. Then, rotate it as you see in the image below. Don’t click on OK yet.

Step 9
Now, look at the settings panel on the left and scroll down. First, change its Rotation to 40. Then, drag the Blur bar to 15. Finally, move the Rectangle mask to the left side like in the image below. Don’t click OK yet.

Step 10
Now, move the Playhead to the starting position on the Timeline. Then, click on the “**+Add**” button to add a keyframe. Next, move the Playhead a few seconds forward and move the Rectangle mask all the way to the right side of the text. Click OK.

Step 11
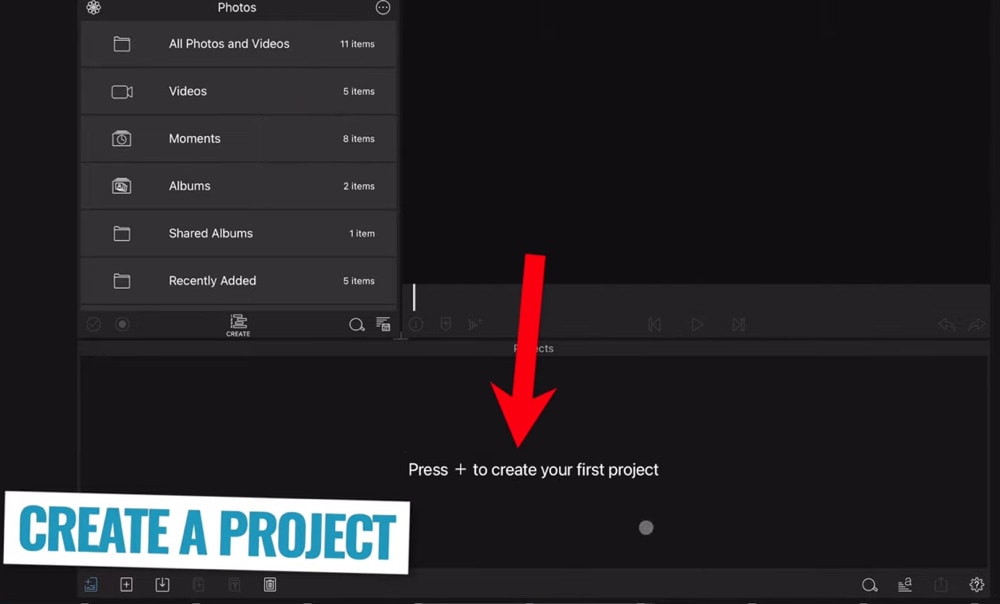
You are finally done. You can review, Render, and Export the video now to use it as you wish. Congratulations on creating a light sweep effect in Filmora.
Summary
What you’ve learned:
- How to create a modern light sweep effect in the Filmora video editor
- How to use Masks in Filmora
- Edit titles like a pro
What you need to prepare:
- A computer (Windows or macOS)
- Your video materials.
- Filmora video editor
Step 1
If you haven’t already, go ahead and download the Filmora video editor . Install it and run the application on your computer.
Step 2
Create a New Project by clicking on the big blue button. Immediately after, go to File → Project Settings. Here, make sure the project is in full resolution and 60 fps.
Step 3
Select the Titles tab and drag the Default Title to the Timeline.
Step 4
Double-click on the Default Title inside the Timeline and go to Advanced. Here, you can change the text, pick a new font, change its size, and so on. Make sure you change the Color Type to Gradient Fill. Choose a color of your own liking. When you’re done customizing it, click on OK.
Step 5
Right-click on the Default Title clip and select Copy. Then, right-click anywhere on the Timeline and select Paste. After this, drag the copy of that clip on the Track above it.
Step 6
Double-click on the copied Title, go to Advanced, and change the Color Type to Color Fill. Click OK.
Step 7
Next, take a snapshot of the new title. Then, delete the copied Title clip from your Timeline. After this, drag the snapshot into the Timeline.
Step 8
Double-click on the Snapshot clip and go to the Mask tab. From here, select the Rectangle mask. Then, rotate it as you see in the image below. Don’t click on OK yet.
Step 9
Now, look at the settings panel on the left and scroll down. First, change its Rotation to 40. Then, drag the Blur bar to 15. Finally, move the Rectangle mask to the left side like in the image below. Don’t click OK yet.
Step 10
Now, move the Playhead to the starting position on the Timeline. Then, click on the “**+Add**” button to add a keyframe. Next, move the Playhead a few seconds forward and move the Rectangle mask all the way to the right side of the text. Click OK.
Step 11
You are finally done. You can review, Render, and Export the video now to use it as you wish. Congratulations on creating a light sweep effect in Filmora.
Summary
What you’ve learned:
- How to create a modern light sweep effect in the Filmora video editor
- How to use Masks in Filmora
- Edit titles like a pro
How to Edit FLV Video Files with FLV Editor [Windows, Mac,Android, iPhone & Online]
FLV is a common container format for transferring digital video and audio information over the Internet. A.flv file is a flash video that may be seen on your computer with Adobe Flash Player, Adobe Air, or some third-party Adobe Flash plugins.
FLV has become the standard video format for web-based streaming video service providers such as Hulu and VEVO due to its superior functionality and tiny size. It’s also the default format for Quicktime on Mac systems.
If you wish to edit FLV videos without any problems, you should utilize a multipurpose video editor that supports the FLV file format.
Best FLV Editor to Edit FlV Video on Windows and Mac - Filmroa Video Editor
Filmora Video Editor is a professional FLV video editing application. This software allows you to edit 4K video files, share completed films directly on social media platforms, and add subtitles and audio files.
You may mix multiple films and enhance your footage with numerous transitions and other effects using this FLV video editing software. Furthermore, the free Filmora application is ideal for adding audio files or video clips from the wide library and uploading your soundtrack.
For Win 7 or later (64-bit)
For macOS 10.14 or later
Therefore, you can use the following steps to edit FLV video on Windows and Mac:
Step 1: Import file:

Step 2: Edit the FLV file:
Acquire the perfect tool in your palm for anything you want to do, such as clipping, cropping, rotating, and more.
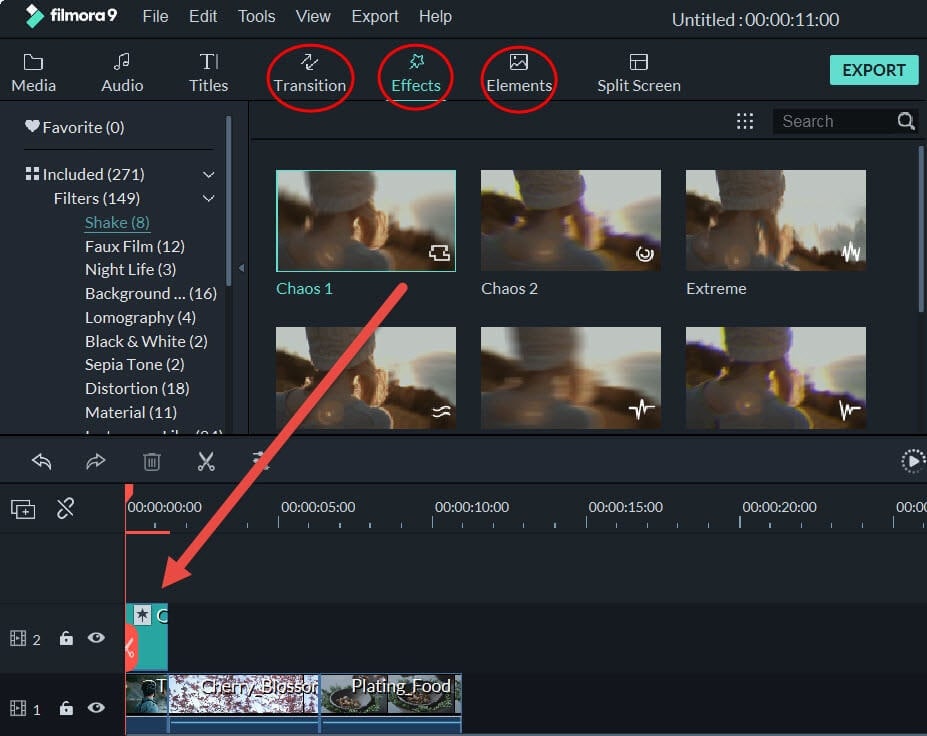
Furthermore, all editing capabilities in the toolbar allow drag-and-drop, making it even easier to touch up your films quickly. Consider the following scenario:
- Drag and drop a transition into the video/photo, or right-click it and select “Apply to All.”
- Please drag & drop a title template to the position where you want it to appear, then adjust it.
- To use the effects, select one from the 50+ available video effects, select it, and apply it to your photos/videos instantaneously.
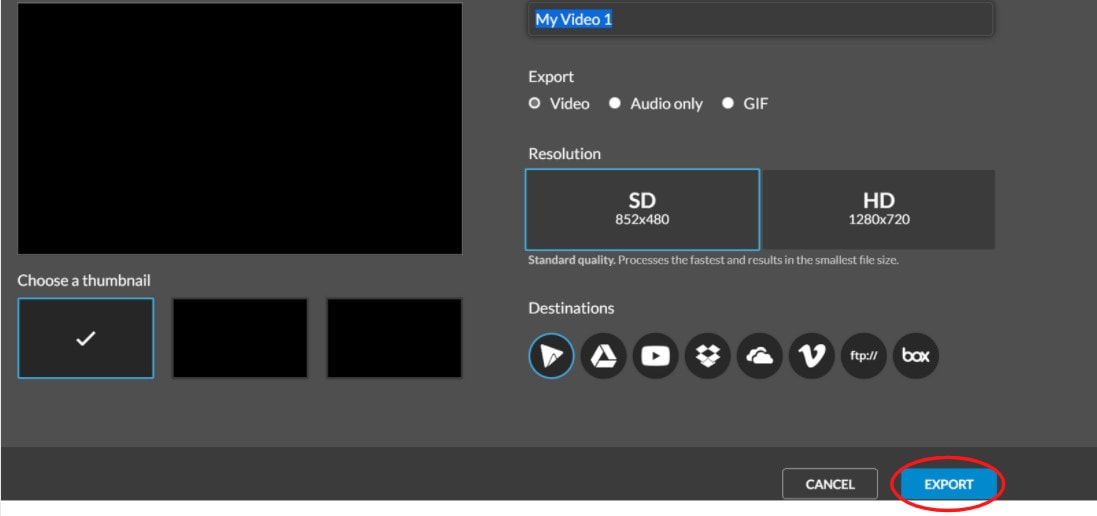
Step 3: Save or Export the file:

When you’re done, export your modified MP4 files to Windows/Mac and quickly share them on YouTube, with the option of sending a message to Facebook and Twitter. When you click Create in the program window’s middle right corner, you’ll be taken to the Output window below.
Alternative Way to Edit FlV Video on Windows
1. VSDC
VSDC is a free video editor along with a lot of advanced features. Cut, combine, trim, crop, and other editing capabilities are available to help you polish your FLV films.
Although it may not look logical, learning the editing capabilities hidden within modular boxes is simple. One noteworthy aspect of VSDC is its ability to produce good visual effects using many trendy video effects, transitions, and filters.
Furthermore, strong chroma keys, color correction, object modification, and other editing tools can be utilized to edit FLV videos. It not only creates excellent FLV videos, but it also supports a wide range of media conversion, allowing you to convert FLV files to various formats and export them without a watermark.
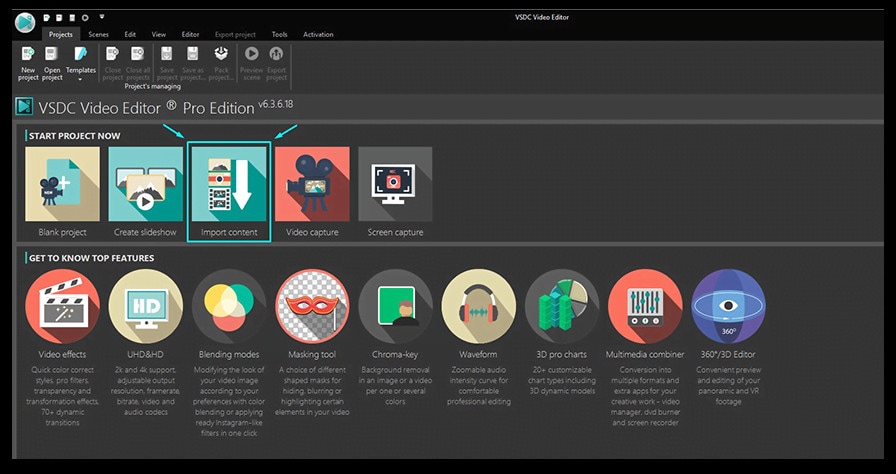
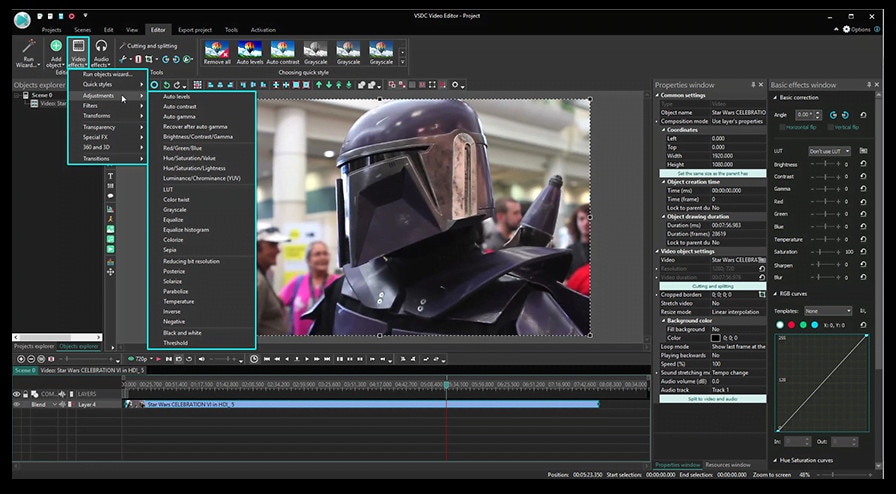
Therefore, follow the below mentioned steps to edit FLV video using VSDC:
Step 1: Install the software on the Windows. Open the application and import the video.
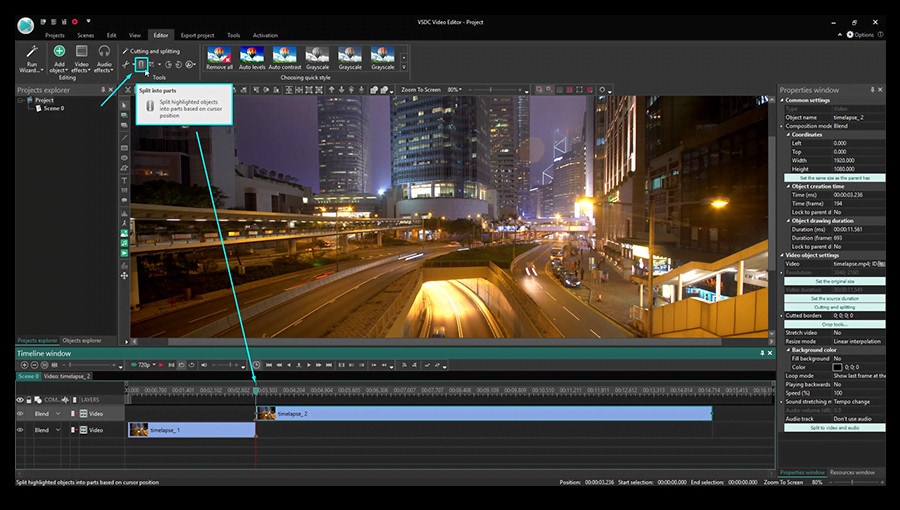
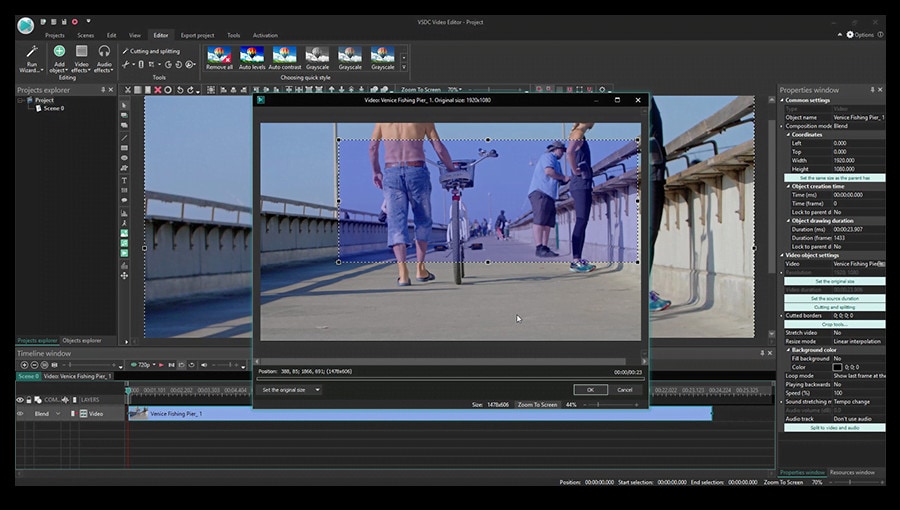
Step 2: Use cutting and splitting tools to edit the video.
The first icon is a picture of a pair of scissors, which is a cutting tool. It’s very useful when you need to cut the beginning or end of a film. Place the cursor exactly where you want to cut, then select “Trim start” or “Trim finish” from the dropdown cutting menu (the small triangle next to the scissors icon).
Cropping is also simple. If you have too much additional space around the scene object recorded, just choose the file you want to trim and select the cropping icon from the “Cutting and Splitting” option. A new window will appear, allowing you to select the region of the scene that should stay.
Step 3: Apply effects and transitions.
To use one, first select the video file you wish to edit, then go to the Video effects tab and select the effect you want to use. On the timeline, a new tab will appear, containing all of the effects done to the selected object. You can alter the effect’s duration and position in time by dragging it with the mouse there. The properties pane on the right-hand side can be used to change other parameters.
Transitions follow the same rule. Place your cursor where you want the transition to begin, then choose a transition from the Video effects dropdown menu and manually adjust the duration.
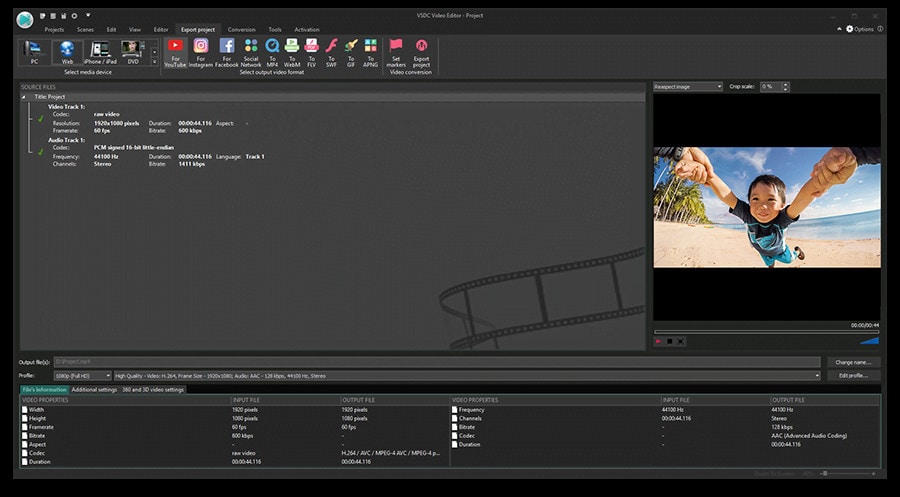
Step 4: Save changes and export video.
Make sure your movie appears exactly how you want it to before exporting it. If the video appears choppy, use the red preview button and lower the preview quality. When the PC’s resources are insufficient to process the video in real time, lagging can occur. Keep in mind that it has no bearing on the outcome. When you’re finished, navigate to the Export project tab and select an export format.
2. Adobe Premiere Pro:
Professional video editors use Premiere Pro to make everything from YouTube videos to Hollywood films like Mank, a 2021 Oscar candidate. It’s also widely utilized in the workflows of designers, animators, and VFX artists, and we can see why after lengthy testing.
We found the software’s UI to be simple to use, and it increased our productivity by separating things into various workspaces, such as editing, effects, and audio. When we tested it on both Mac and PC, we discovered that each workspace helps handle a specific activity while minimizing distraction.
Edit the FLV video with Adobe Premiere Pro using the following steps:
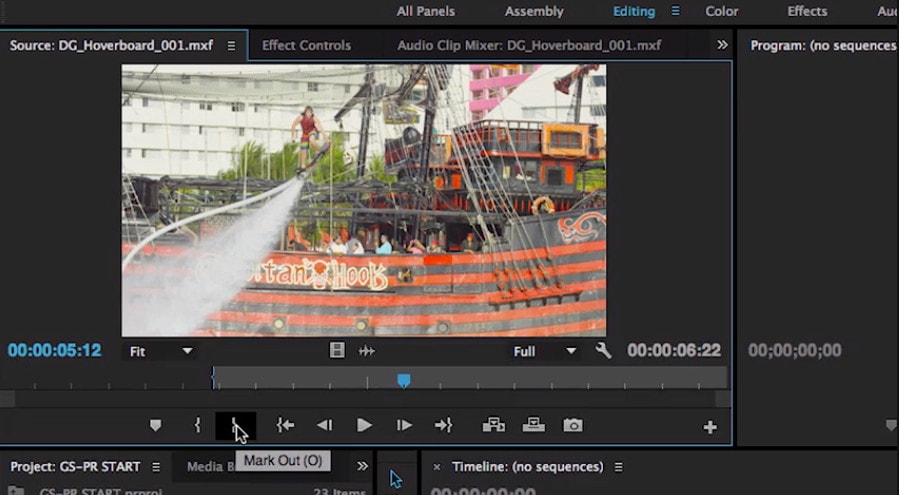
Step 1: Import the video and create initial sequence.
Step 2: In the Timeline, trim and rearrange clips, add audio, and transitions.
Step 3: Add title and graphics.
In Premiere Pro, you may make onscreen titles, as well as stylize and animate your images.
Step 4: Export your video.

Alternative Way to Edit FlV Video on Mac
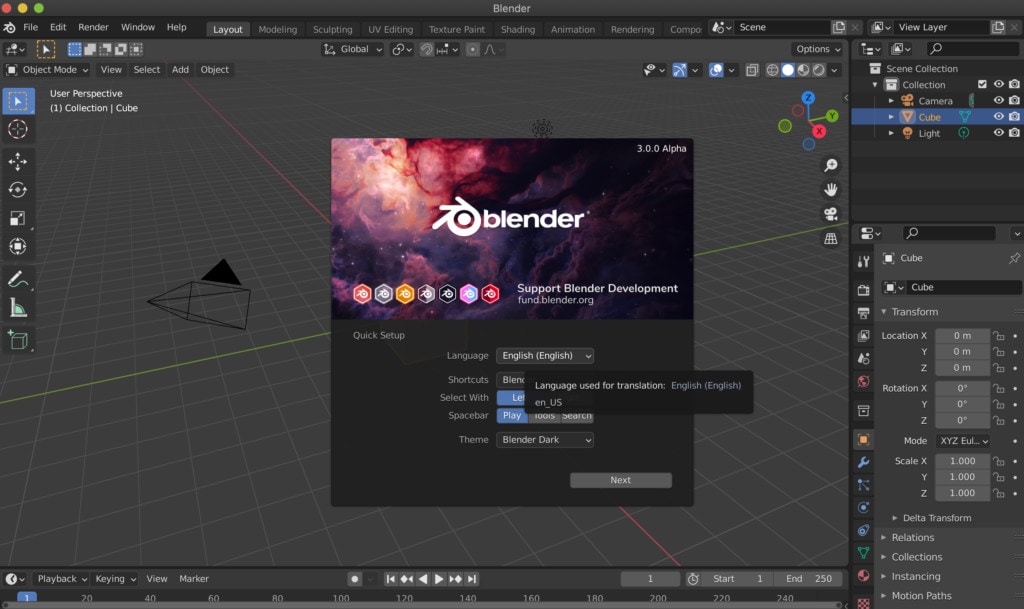
1. Blender:
Under the GNU General Public License, Blender is a free, open-source 3D content production program that runs on all major operating systems. Blender is one of the greatest video editors for both Windows and Mac, with advanced features such as modifier-based modeling tools, powerful character animation capabilities, a node-based material, etc.
Because it is developed for professionals, it is tough to use as a beginner. However, it is unrestricted in its use and distribution. In addition, color options are changeable and versatile in the UI.
In contrast, this free video editor is perfect for semi-pros or those who want to enhance their video editing skills. However, you’ll need a lot of time and effort to learn it.
Step 1: Open the application.
Step 2: Then, go into File->New->Video Editing to open the video editor.
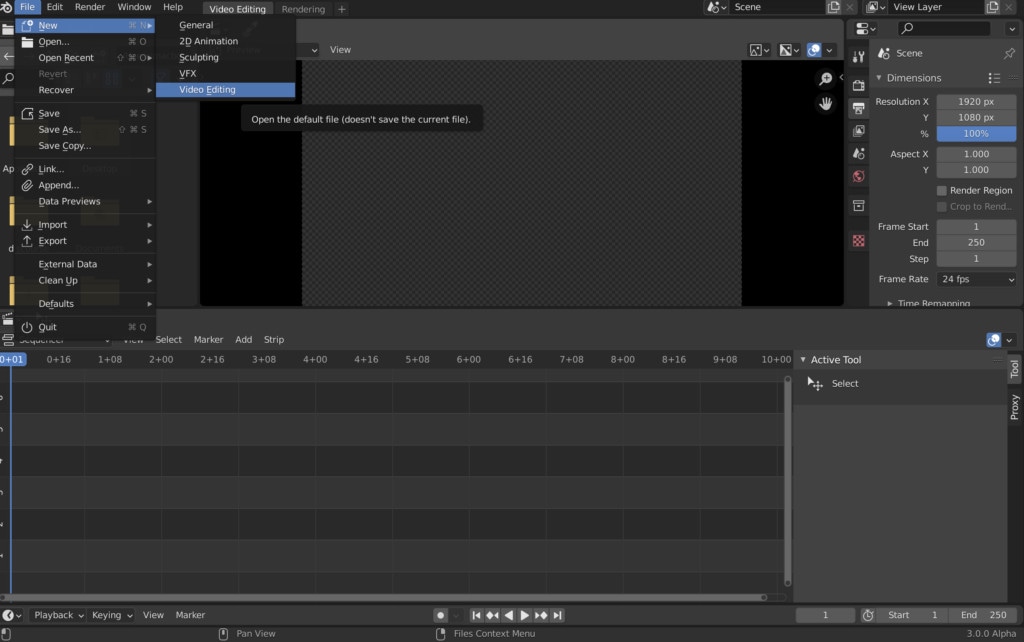
Step 3: Import the video and start editing using the editing tools.
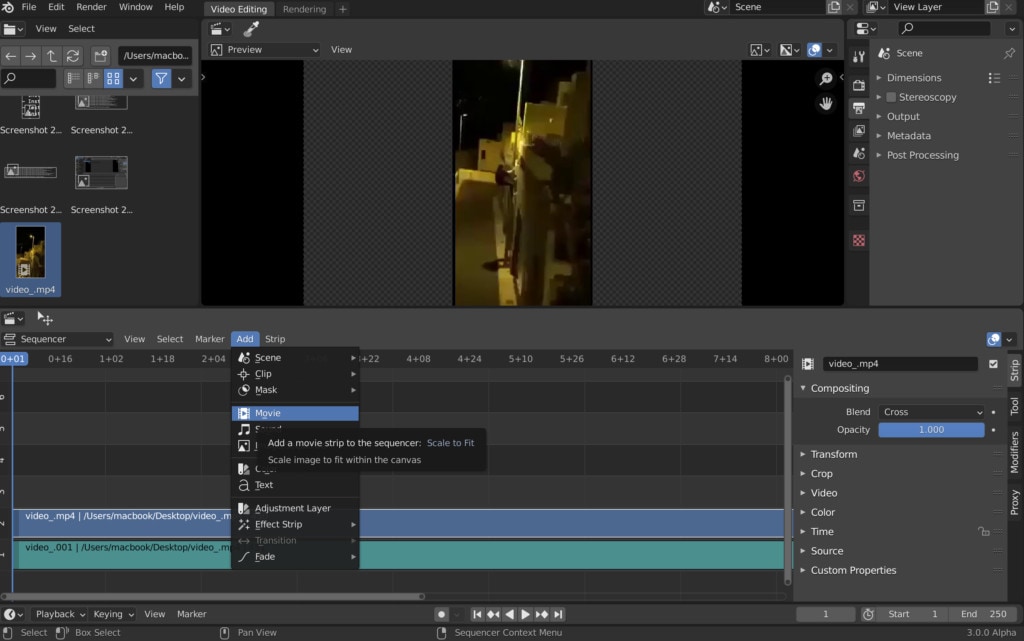
Step 4: Save and export the video.

2. Final Cut Pro:
When it comes to video editing software, Apple’s Final Cut Pro is one of the industry standards. As a result, it’s widely utilized in the television and film industries - at least among Mac users. However, one of the truly convincing reasons to choose it over Premiere Pro is because it is subscription-free: you only pay once.
The software’s Magnetic Timeline, grouping tools, a vast selection of effects, solid organizational capabilities, and simple ways to add and edit audio make it a favorite among professional video editors. 360° video, HDR, and powerful color correcting tools are among the other capabilities. It’s a strong software with a lot of features.
Follow the steps to edit FLV video using Final Cut Pro:
Step 1: Create Project.
To make a movie in Final Cut Pro, you must first establish a project, which keeps track of your editing selections and the media you utilize.
Step 2: Select and add clips to the timeline:
The second stage in making a movie with Final Cut Pro is to add and arrange clips in your project. In the timeline, you can move and reorder clips.
Step 3: Cut and trim video:
Final Cut Pro has a number of features for altering the start and stop points of clips in the timeline, as well as regulating the pacing of shots from one to the next.
Step 4: Edit the video by adding effects and transitions:
Final Cut Pro includes a number of advanced editing features that make it simple to create a professional film. Visual enhancements and colour correction are among the finishing touches.

Step 5: Save and export video:
2 Ways to Edit FlV Video on Android:
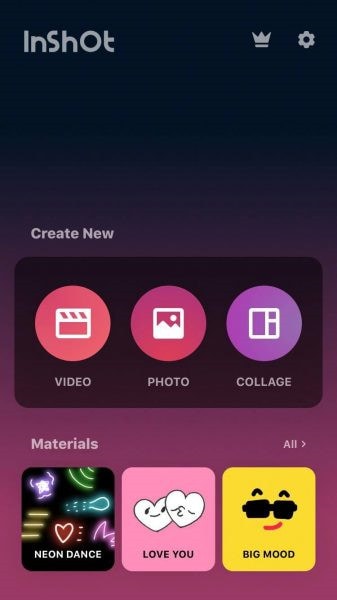
1. Inshot:
For Android users, Inshot is a fantastic image and video editor. This Android video editor allows you to add popular stickers and emoticons to your films, making them more fashionable and unique.
The program supports HD video output, allowing you more control over your footage. Moreover, the additional sound and video can be synchronized with the available video chronology.
You can quickly blend more than two movies into one with rich effects and sound with this Android editor app. In addition, you can generate a watermark using unique text provided in the app, and subtitles support allow you to produce one with a variety of fonts.
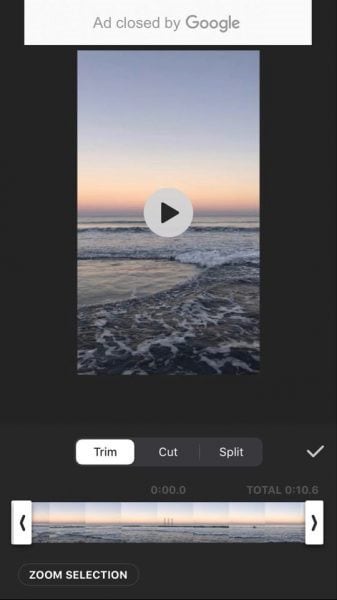
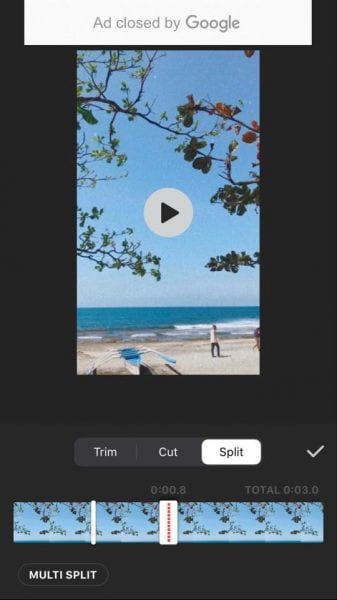
Following are the steps that you can follow to edit FLV video using Inshot:
Step 1: Open the app and import the video.
Tap “Video” to open your phone’s gallery folder and begin editing a video in the InShot app. Select a video to work with. Adjust the canvass after your video has been loaded into the InShot App. For your other social media accounts, there are aspect ratios and sizes that work well with the video. It also has the option of being in portrait or landscape mode.
Step 2: Trim and split videos.
Step 3: Merge videos (optional):
By combining clips, you can combine them into a single film or project. Simply choose the videos you want to import from the drop-down menu. By tapping the “+” button on the lower left of the screen, you can insert and merge more videos. Your project will then be updated using the selected video.
Step 4: Apply filters, add music, text and stickers.
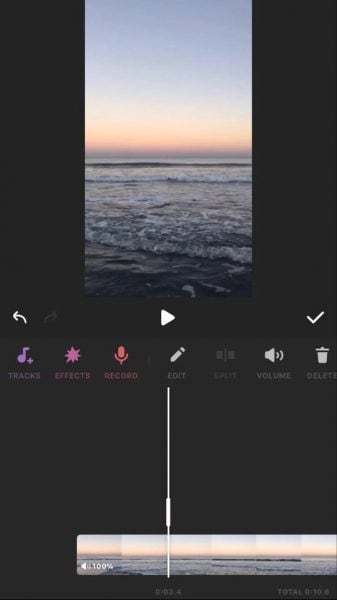
Step 5: Once you are done with the editing process, save the file.
2. Videoshow:
VideoShow has a lot of video editing options. It is a simple and practical video editing program and movie scene maker for art directors and beginners. Using this video cutter, you may reverse, blur, duplicate, edit, merge and split collage clips or films.
You can also use VideoShow to adjust the audio or add subtitles to any video. It also allows you to use different filters on any video on your device. Over 50 intricate themes are included in the program, allowing you to create gorgeous music videos, slide shows, and vlogs in no time.
The annual subscription package is for $135.19, or you can also make a one-time purchase for $225.78.
However, to edit the video, you can use the following steps:
Step 1: Download and install the videoshow application and open it. Upload the video that you want to edit.
Step 2: Edit the video by applying filters or cutting and trimming the part of the video that you want to remove.
Step 3: Save changes and export the video to your preferred location.
2 Ways to Edit FlV Video on iPhone:
1. LumaFusion:
No other software program on the iPhone comes close to the feature set that LumaFusion offers for video editing. It is the only premium app on this list, and it is well worth every penny.
But, of course, YouTubers aren’t the only ones who use the program; mobile journalists and professional video producers who don’t want to lug along their bulky camera equipment and editing apparatus also use it.
LumaFusion deals with up to six video and audio tracks for photographs, movies, audio, titles, and graphics, and six audio tracks for narration, music, and sound effects. You also receive a magnetic timeline; importing clips is a breeze once they’ve been imported.
There are many transitions and effects to choose from, all of which can be layered. Finally, it includes much royalty-free music, sound effects, and other assets. So if you need a professional video editing tool for your iPhone, LumaFusion ($29.99) is the way to go.
Follow these steps to edit FLV video using LumaFusion:
Step 1: To create your first project, press + at the bottom of the screen. You can create a new project by tapping that area or by tapping the Plus button.
Step 2: Import video:
The Import section is located in the top left corner of the screen. This defaults to the Photos tab when you initially launch a new project. All of the photographs and videos can be seen here.
Step 3: Check layout and adjust volume levels
Step 4: Edit the video and add titles.
Step 5: Export the video.
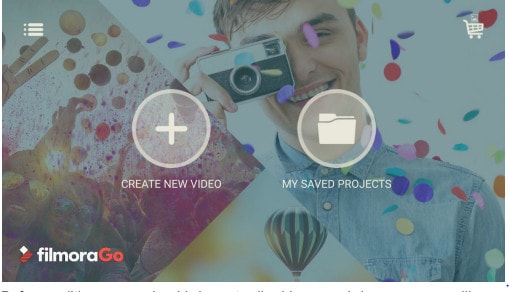
2. Filmora Go:
Without a doubt, Filmora is one of the greatest free video editors for iPhone that does not contain any watermarks. In addition, it’s compatible with both iPhones and Android devices and has a simple user interface.
Filmora is the greatest iPhone video editor for beginners, with themed filters and effects that add flair to your videos without any work.
Filmora has many unique features, including themes for your videos and ‘Materials,’ which are visual effects created by the program. Unfortunately, materials are only available with Filmora Pro, so keep that in mind.
Aside from that, you’ll find all of the typical features here. You can also add titles to videos, utilize stickers and effects, and add music to the background of your movie. You may also add another clip in picture-in-picture mode, which is beneficial.
Below are the following steps to edit FLV video:
Step 1: Open the application and select ‘Create new video’. Now, import the video by choosing the video icon.
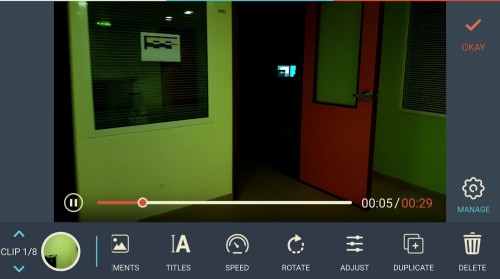
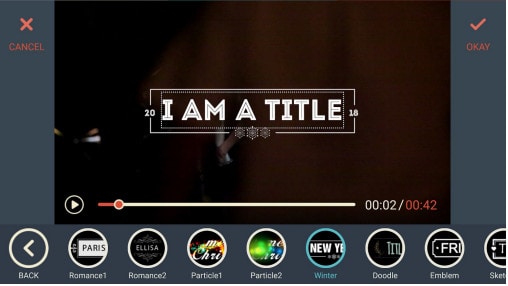
Step 2: Edit the video. Within the edit tool, you can trim and split the video. You can also improve the video quality by adding titles, transitions, and music, and voiceovers.


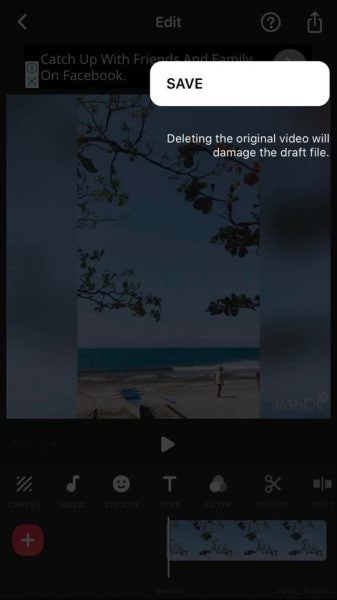
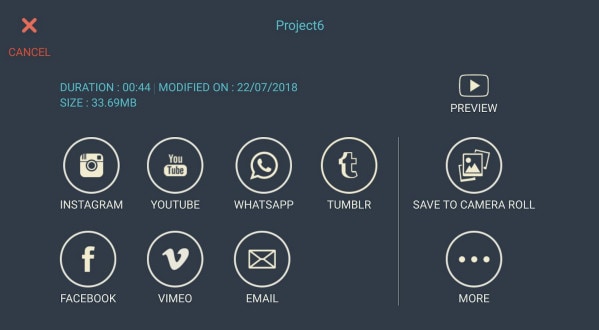
Step 3: After editing the video, select ‘SAVE’ and export the video or download it.
2 Ways to Edit FlV Video Online:
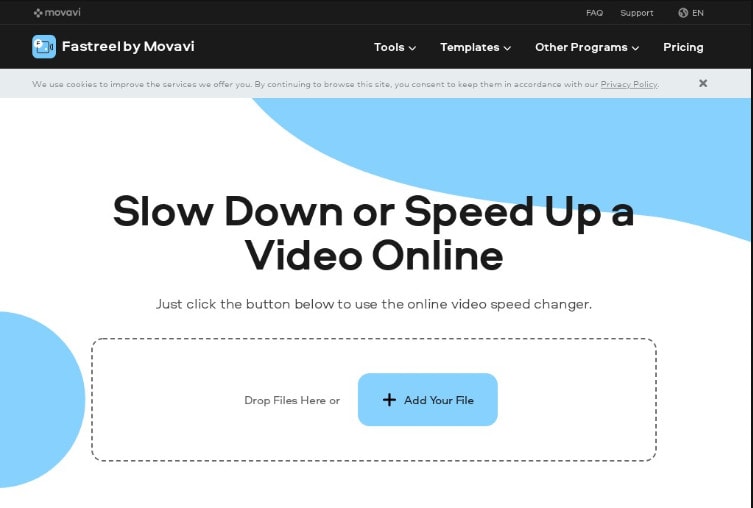
1. Fastreel:
If you’re seeking the finest free online video editor, Fastreel is a terrific tool to start with. This online video editing software provides a wide range of editing options. It can merge, edit, crop, and compress videos to make sharing easier.
It also includes many pre-made templates that you can change to create titles and transitions and other editing features like reverse, looping, and rotating. It’s also quite simple to use, and you can have polished videos in minutes.
There are also numerous pricing options to suit different customers, ranging from a completely free plan with watermarks to paid subscriptions with no limitations.
Use the following steps to edit FLV video:
Step 1: Open Fastreel web and import the video.
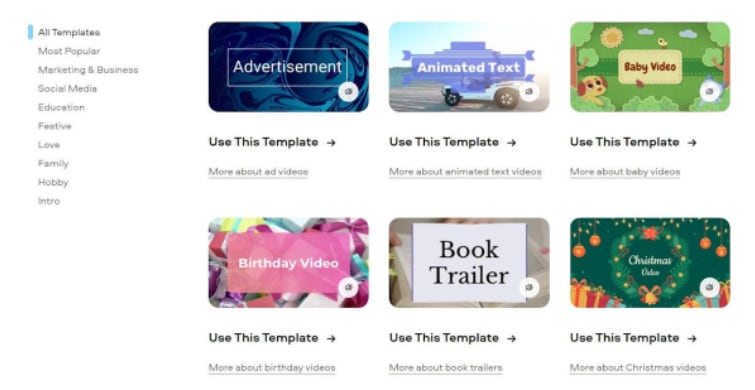
Step 2: Use templates to make it look attractive.
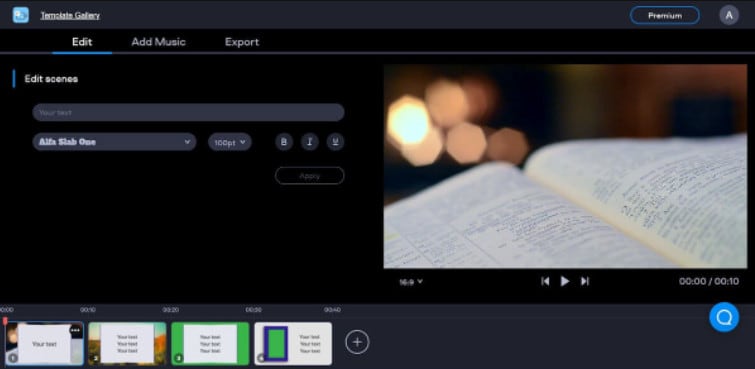
Step 3: Edit the video using the template.
Templates are unfinished videos with all of the effects already applied, such as backdrops, transitions, animated stickers, and titles. There are blank spots for your photos or videos, and you can arrange them in any sequence you like. You can also add music from the Fastreel library or upload your own track after entering your text.
Step 4: Once you are done with edits, save the video and export it.
2. WeVideo:
When you’re seeking the greatest video producer online, another wonderful choice to explore is WeVideo.
Google, Dropbox, Rover, and Roche are just a few of the huge names that trust our online editor. Its fast, versatile editing engine and vast stock content collection for adding stock movies, photos, and audio tracks to your productions are ideal for business users.
WeVideo also stands out since it provides unlimited cloud storage for all of your videos, which you can download and watch on any device. The only drawback is that all of this comes at a price, with WeVideo offering a variety of payment plans ranging from $4.99 to $36.99 a month.
Follow the steps to edit videos using WeVideo:
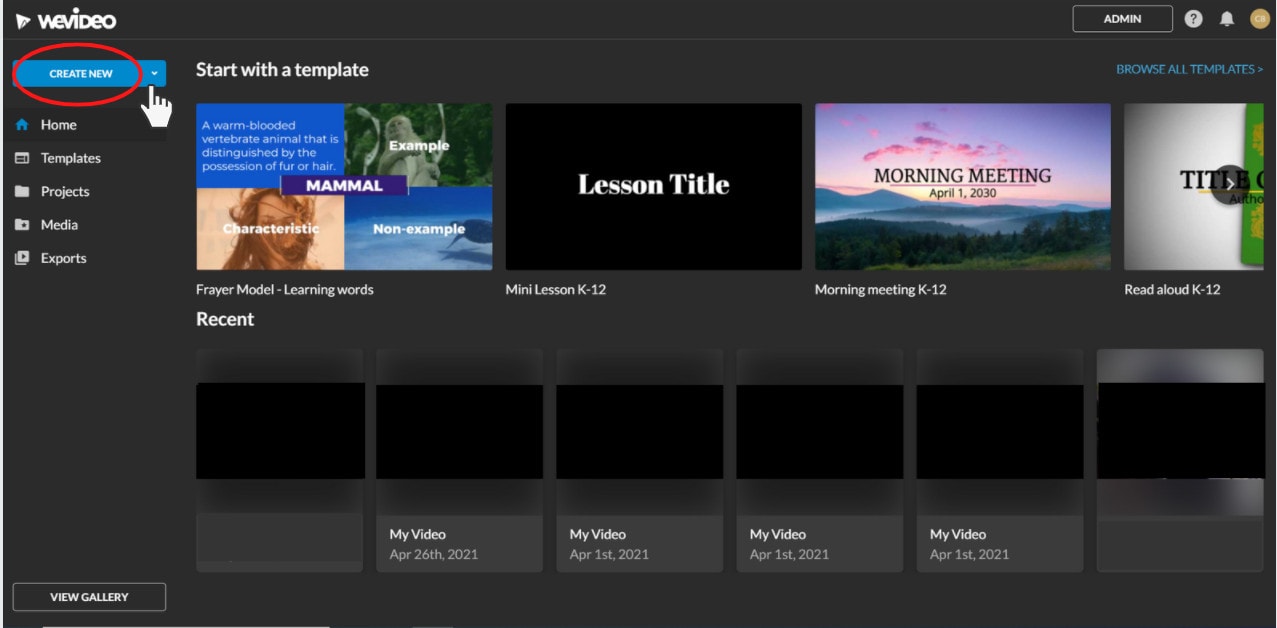
Step 1: Open WeVideo and import the video file.
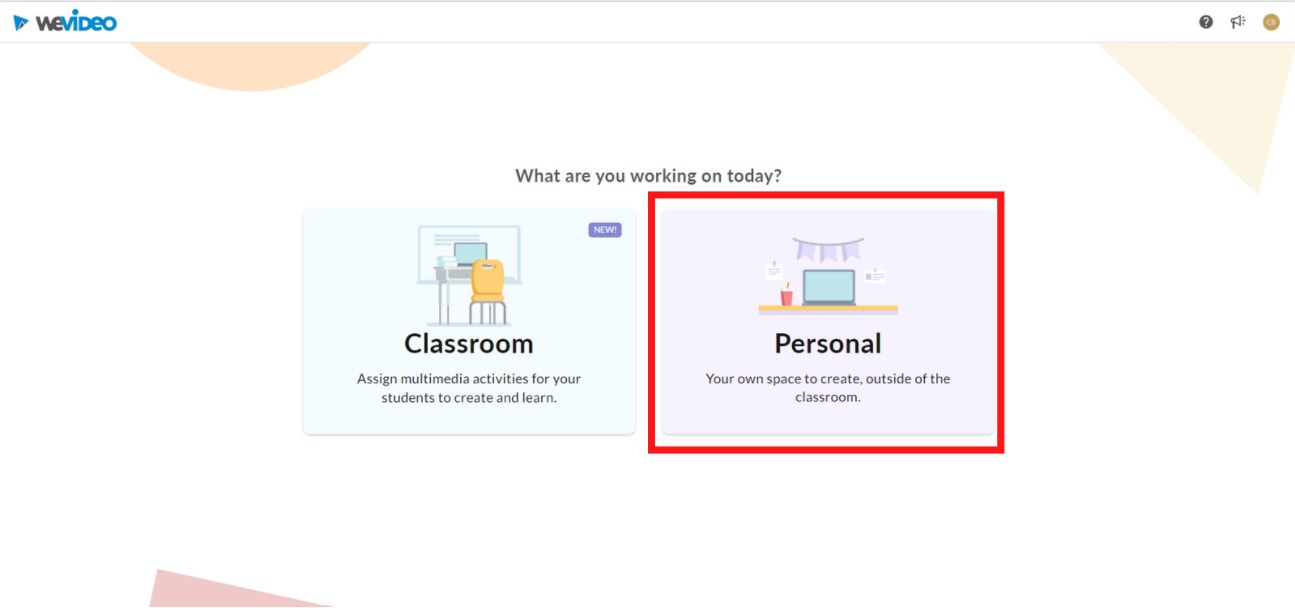
Step 2: Click on create new video in the left-hand corner of the screen.
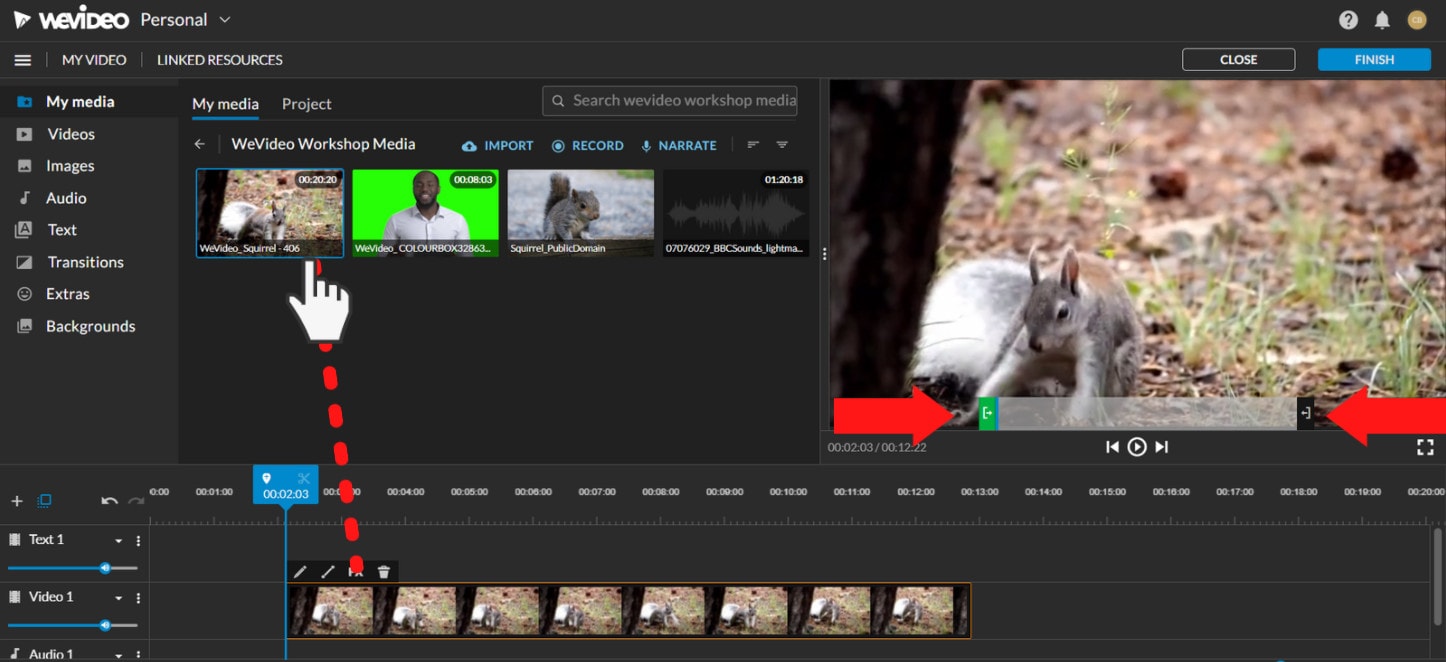
Step 3: Edit the video.
The video clip you imported will appear in the viewing window to the right once you click on it. By moving the arrows and either end, you can edit out the beginning or end of your footage.
- Drag the clip into your timeline from your media pool.
- Place the clip on your timeline by dragging and dropping it.
- Click the scissor symbol after moving the blue marker to the spot where you want to cut your clip.
- Once the material has been chopped, you can erase bits of it by selecting it with your mouse and then pressing delete on your keyboard or rearrange the clips in the timeline by dragging and dropping them to other positions.
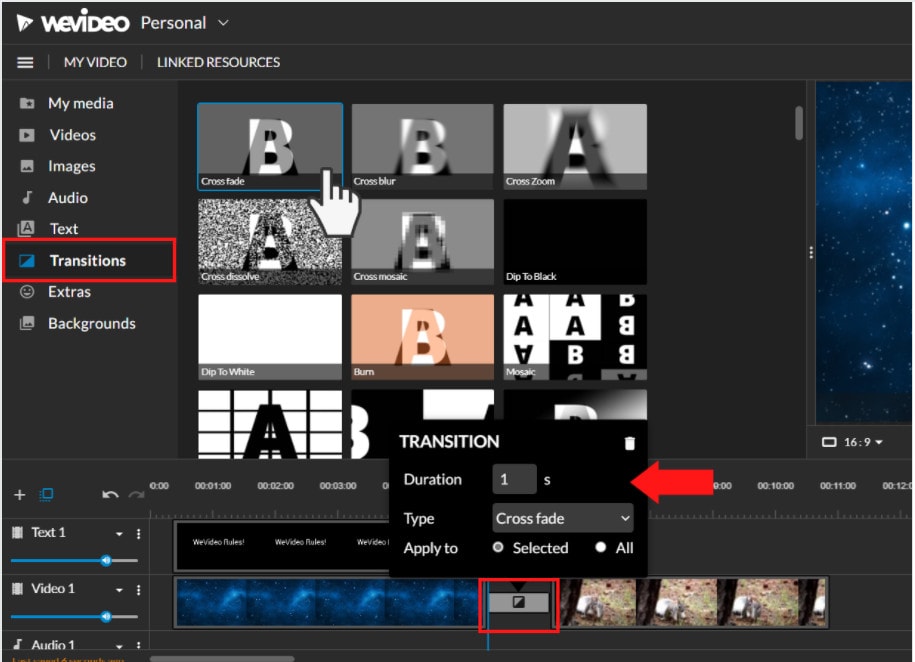
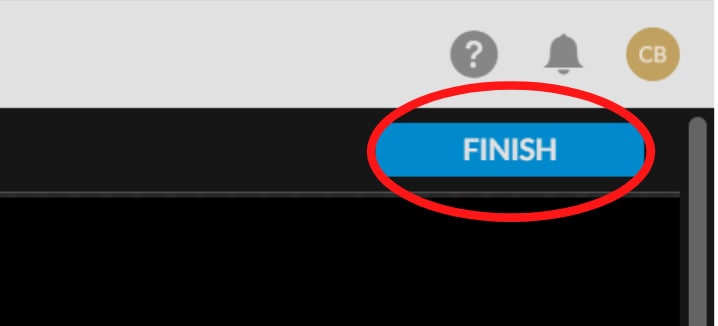
Step 4: Add effects, transitions, and music to the video.
Step 5: Save and export the video by clicking on the Finish tab.
FAQs about editing FLV video
- How to open FLV files?
Any FLV player is required to view FLV files. Various players are available, including VLC, FLV Player, Sothink FLV Player for Mac, Tonec Free FLV Player, Any FLV Player, and others.
- Is Filmora compatible with Mac?
Filmora requires macOS Sierra (version 10.12) or later and the Big Sur (version 11) and Apple M1 chips. Touch Bar compatibility for MacBook Pro users and custom shortcuts to speed up editing.
- What is the best online FLV editor?
There are numerous free online editors to choose from. Fastreel, WeVideo, and FlexClip Video Maker are a few of the most popular.
- Is FLV better than MP4?
Because FLV and MP4 are the two most popular video file formats, it’s crucial to know which one is preferable. Adobe’s proprietary format is FLV. Both formats employ video and audio codecs and have equal performance levels. In their unprocessed state, MP4 files are more adaptable. You can, however, use an FLV file at the same time if you have the correct player.
- How do I choose a video editor?
When comparing video editing software, there are six crucial elements to consider.
- Budget and cost
- Ease of use/learning curve
- Multi-GPGPU acceleration and video format support
- Tools for advanced editing
- Music, special effects, and other goodies
- Customer service is second to none.
For macOS 10.14 or later
Therefore, you can use the following steps to edit FLV video on Windows and Mac:
Step 1: Import file:
Step 2: Edit the FLV file:
Acquire the perfect tool in your palm for anything you want to do, such as clipping, cropping, rotating, and more.
Furthermore, all editing capabilities in the toolbar allow drag-and-drop, making it even easier to touch up your films quickly. Consider the following scenario:
- Drag and drop a transition into the video/photo, or right-click it and select “Apply to All.”
- Please drag & drop a title template to the position where you want it to appear, then adjust it.
- To use the effects, select one from the 50+ available video effects, select it, and apply it to your photos/videos instantaneously.
Step 3: Save or Export the file:
When you’re done, export your modified MP4 files to Windows/Mac and quickly share them on YouTube, with the option of sending a message to Facebook and Twitter. When you click Create in the program window’s middle right corner, you’ll be taken to the Output window below.
Alternative Way to Edit FlV Video on Windows
1. VSDC
VSDC is a free video editor along with a lot of advanced features. Cut, combine, trim, crop, and other editing capabilities are available to help you polish your FLV films.
Although it may not look logical, learning the editing capabilities hidden within modular boxes is simple. One noteworthy aspect of VSDC is its ability to produce good visual effects using many trendy video effects, transitions, and filters.
Furthermore, strong chroma keys, color correction, object modification, and other editing tools can be utilized to edit FLV videos. It not only creates excellent FLV videos, but it also supports a wide range of media conversion, allowing you to convert FLV files to various formats and export them without a watermark.
Therefore, follow the below mentioned steps to edit FLV video using VSDC:
Step 1: Install the software on the Windows. Open the application and import the video.
Step 2: Use cutting and splitting tools to edit the video.
The first icon is a picture of a pair of scissors, which is a cutting tool. It’s very useful when you need to cut the beginning or end of a film. Place the cursor exactly where you want to cut, then select “Trim start” or “Trim finish” from the dropdown cutting menu (the small triangle next to the scissors icon).
Cropping is also simple. If you have too much additional space around the scene object recorded, just choose the file you want to trim and select the cropping icon from the “Cutting and Splitting” option. A new window will appear, allowing you to select the region of the scene that should stay.
Step 3: Apply effects and transitions.
To use one, first select the video file you wish to edit, then go to the Video effects tab and select the effect you want to use. On the timeline, a new tab will appear, containing all of the effects done to the selected object. You can alter the effect’s duration and position in time by dragging it with the mouse there. The properties pane on the right-hand side can be used to change other parameters.
Transitions follow the same rule. Place your cursor where you want the transition to begin, then choose a transition from the Video effects dropdown menu and manually adjust the duration.
Step 4: Save changes and export video.
Make sure your movie appears exactly how you want it to before exporting it. If the video appears choppy, use the red preview button and lower the preview quality. When the PC’s resources are insufficient to process the video in real time, lagging can occur. Keep in mind that it has no bearing on the outcome. When you’re finished, navigate to the Export project tab and select an export format.
2. Adobe Premiere Pro:
Professional video editors use Premiere Pro to make everything from YouTube videos to Hollywood films like Mank, a 2021 Oscar candidate. It’s also widely utilized in the workflows of designers, animators, and VFX artists, and we can see why after lengthy testing.
We found the software’s UI to be simple to use, and it increased our productivity by separating things into various workspaces, such as editing, effects, and audio. When we tested it on both Mac and PC, we discovered that each workspace helps handle a specific activity while minimizing distraction.
Edit the FLV video with Adobe Premiere Pro using the following steps:
Step 1: Import the video and create initial sequence.
Step 2: In the Timeline, trim and rearrange clips, add audio, and transitions.
Step 3: Add title and graphics.
In Premiere Pro, you may make onscreen titles, as well as stylize and animate your images.
Step 4: Export your video.
Alternative Way to Edit FlV Video on Mac
1. Blender:
Under the GNU General Public License, Blender is a free, open-source 3D content production program that runs on all major operating systems. Blender is one of the greatest video editors for both Windows and Mac, with advanced features such as modifier-based modeling tools, powerful character animation capabilities, a node-based material, etc.
Because it is developed for professionals, it is tough to use as a beginner. However, it is unrestricted in its use and distribution. In addition, color options are changeable and versatile in the UI.
In contrast, this free video editor is perfect for semi-pros or those who want to enhance their video editing skills. However, you’ll need a lot of time and effort to learn it.
Step 1: Open the application.
Step 2: Then, go into File->New->Video Editing to open the video editor.
Step 3: Import the video and start editing using the editing tools.
Step 4: Save and export the video.
2. Final Cut Pro:
When it comes to video editing software, Apple’s Final Cut Pro is one of the industry standards. As a result, it’s widely utilized in the television and film industries - at least among Mac users. However, one of the truly convincing reasons to choose it over Premiere Pro is because it is subscription-free: you only pay once.
The software’s Magnetic Timeline, grouping tools, a vast selection of effects, solid organizational capabilities, and simple ways to add and edit audio make it a favorite among professional video editors. 360° video, HDR, and powerful color correcting tools are among the other capabilities. It’s a strong software with a lot of features.
Follow the steps to edit FLV video using Final Cut Pro:
Step 1: Create Project.
To make a movie in Final Cut Pro, you must first establish a project, which keeps track of your editing selections and the media you utilize.
Step 2: Select and add clips to the timeline:
The second stage in making a movie with Final Cut Pro is to add and arrange clips in your project. In the timeline, you can move and reorder clips.
Step 3: Cut and trim video:
Final Cut Pro has a number of features for altering the start and stop points of clips in the timeline, as well as regulating the pacing of shots from one to the next.
Step 4: Edit the video by adding effects and transitions:
Final Cut Pro includes a number of advanced editing features that make it simple to create a professional film. Visual enhancements and colour correction are among the finishing touches.
Step 5: Save and export video:
2 Ways to Edit FlV Video on Android:
1. Inshot:
For Android users, Inshot is a fantastic image and video editor. This Android video editor allows you to add popular stickers and emoticons to your films, making them more fashionable and unique.
The program supports HD video output, allowing you more control over your footage. Moreover, the additional sound and video can be synchronized with the available video chronology.
You can quickly blend more than two movies into one with rich effects and sound with this Android editor app. In addition, you can generate a watermark using unique text provided in the app, and subtitles support allow you to produce one with a variety of fonts.
Following are the steps that you can follow to edit FLV video using Inshot:
Step 1: Open the app and import the video.
Tap “Video” to open your phone’s gallery folder and begin editing a video in the InShot app. Select a video to work with. Adjust the canvass after your video has been loaded into the InShot App. For your other social media accounts, there are aspect ratios and sizes that work well with the video. It also has the option of being in portrait or landscape mode.
Step 2: Trim and split videos.
Step 3: Merge videos (optional):
By combining clips, you can combine them into a single film or project. Simply choose the videos you want to import from the drop-down menu. By tapping the “+” button on the lower left of the screen, you can insert and merge more videos. Your project will then be updated using the selected video.
Step 4: Apply filters, add music, text and stickers.
Step 5: Once you are done with the editing process, save the file.
2. Videoshow:
VideoShow has a lot of video editing options. It is a simple and practical video editing program and movie scene maker for art directors and beginners. Using this video cutter, you may reverse, blur, duplicate, edit, merge and split collage clips or films.
You can also use VideoShow to adjust the audio or add subtitles to any video. It also allows you to use different filters on any video on your device. Over 50 intricate themes are included in the program, allowing you to create gorgeous music videos, slide shows, and vlogs in no time.
The annual subscription package is for $135.19, or you can also make a one-time purchase for $225.78.
However, to edit the video, you can use the following steps:
Step 1: Download and install the videoshow application and open it. Upload the video that you want to edit.
Step 2: Edit the video by applying filters or cutting and trimming the part of the video that you want to remove.
Step 3: Save changes and export the video to your preferred location.
2 Ways to Edit FlV Video on iPhone:
1. LumaFusion:
No other software program on the iPhone comes close to the feature set that LumaFusion offers for video editing. It is the only premium app on this list, and it is well worth every penny.
But, of course, YouTubers aren’t the only ones who use the program; mobile journalists and professional video producers who don’t want to lug along their bulky camera equipment and editing apparatus also use it.
LumaFusion deals with up to six video and audio tracks for photographs, movies, audio, titles, and graphics, and six audio tracks for narration, music, and sound effects. You also receive a magnetic timeline; importing clips is a breeze once they’ve been imported.
There are many transitions and effects to choose from, all of which can be layered. Finally, it includes much royalty-free music, sound effects, and other assets. So if you need a professional video editing tool for your iPhone, LumaFusion ($29.99) is the way to go.
Follow these steps to edit FLV video using LumaFusion:
Step 1: To create your first project, press + at the bottom of the screen. You can create a new project by tapping that area or by tapping the Plus button.
Step 2: Import video:
The Import section is located in the top left corner of the screen. This defaults to the Photos tab when you initially launch a new project. All of the photographs and videos can be seen here.
Step 3: Check layout and adjust volume levels
Step 4: Edit the video and add titles.
Step 5: Export the video.
2. Filmora Go:
Without a doubt, Filmora is one of the greatest free video editors for iPhone that does not contain any watermarks. In addition, it’s compatible with both iPhones and Android devices and has a simple user interface.
Filmora is the greatest iPhone video editor for beginners, with themed filters and effects that add flair to your videos without any work.
Filmora has many unique features, including themes for your videos and ‘Materials,’ which are visual effects created by the program. Unfortunately, materials are only available with Filmora Pro, so keep that in mind.
Aside from that, you’ll find all of the typical features here. You can also add titles to videos, utilize stickers and effects, and add music to the background of your movie. You may also add another clip in picture-in-picture mode, which is beneficial.
Below are the following steps to edit FLV video:
Step 1: Open the application and select ‘Create new video’. Now, import the video by choosing the video icon.
Step 2: Edit the video. Within the edit tool, you can trim and split the video. You can also improve the video quality by adding titles, transitions, and music, and voiceovers.
Step 3: After editing the video, select ‘SAVE’ and export the video or download it.
2 Ways to Edit FlV Video Online:
1. Fastreel:
If you’re seeking the finest free online video editor, Fastreel is a terrific tool to start with. This online video editing software provides a wide range of editing options. It can merge, edit, crop, and compress videos to make sharing easier.
It also includes many pre-made templates that you can change to create titles and transitions and other editing features like reverse, looping, and rotating. It’s also quite simple to use, and you can have polished videos in minutes.
There are also numerous pricing options to suit different customers, ranging from a completely free plan with watermarks to paid subscriptions with no limitations.
Use the following steps to edit FLV video:
Step 1: Open Fastreel web and import the video.
Step 2: Use templates to make it look attractive.
Step 3: Edit the video using the template.
Templates are unfinished videos with all of the effects already applied, such as backdrops, transitions, animated stickers, and titles. There are blank spots for your photos or videos, and you can arrange them in any sequence you like. You can also add music from the Fastreel library or upload your own track after entering your text.
Step 4: Once you are done with edits, save the video and export it.
2. WeVideo:
When you’re seeking the greatest video producer online, another wonderful choice to explore is WeVideo.
Google, Dropbox, Rover, and Roche are just a few of the huge names that trust our online editor. Its fast, versatile editing engine and vast stock content collection for adding stock movies, photos, and audio tracks to your productions are ideal for business users.
WeVideo also stands out since it provides unlimited cloud storage for all of your videos, which you can download and watch on any device. The only drawback is that all of this comes at a price, with WeVideo offering a variety of payment plans ranging from $4.99 to $36.99 a month.
Follow the steps to edit videos using WeVideo:
Step 1: Open WeVideo and import the video file.
Step 2: Click on create new video in the left-hand corner of the screen.
Step 3: Edit the video.
The video clip you imported will appear in the viewing window to the right once you click on it. By moving the arrows and either end, you can edit out the beginning or end of your footage.
- Drag the clip into your timeline from your media pool.
- Place the clip on your timeline by dragging and dropping it.
- Click the scissor symbol after moving the blue marker to the spot where you want to cut your clip.
- Once the material has been chopped, you can erase bits of it by selecting it with your mouse and then pressing delete on your keyboard or rearrange the clips in the timeline by dragging and dropping them to other positions.
Step 4: Add effects, transitions, and music to the video.
Step 5: Save and export the video by clicking on the Finish tab.
FAQs about editing FLV video
- How to open FLV files?
Any FLV player is required to view FLV files. Various players are available, including VLC, FLV Player, Sothink FLV Player for Mac, Tonec Free FLV Player, Any FLV Player, and others.
- Is Filmora compatible with Mac?
Filmora requires macOS Sierra (version 10.12) or later and the Big Sur (version 11) and Apple M1 chips. Touch Bar compatibility for MacBook Pro users and custom shortcuts to speed up editing.
- What is the best online FLV editor?
There are numerous free online editors to choose from. Fastreel, WeVideo, and FlexClip Video Maker are a few of the most popular.
- Is FLV better than MP4?
Because FLV and MP4 are the two most popular video file formats, it’s crucial to know which one is preferable. Adobe’s proprietary format is FLV. Both formats employ video and audio codecs and have equal performance levels. In their unprocessed state, MP4 files are more adaptable. You can, however, use an FLV file at the same time if you have the correct player.
- How do I choose a video editor?
When comparing video editing software, there are six crucial elements to consider.
- Budget and cost
- Ease of use/learning curve
- Multi-GPGPU acceleration and video format support
- Tools for advanced editing
- Music, special effects, and other goodies
- Customer service is second to none.
Easy Guide to Apply Slow Zoom Effects to Videos
A raw video without any effect will fall flat on its face when it comes to engagement and watch time. Nobody likes watching videos without effects as there is no entertainment value, and the video is not soothing and pleasing to the eyes. That is why effects in videos are extremely important especially when it is a video you are posting on social media to get everyone’s attention. You should definitely consider adding slow zoom effect in your video to make it stand out.
The slow zoom effect is one of the most common but widely loved video effects that work for any video. Human eyes love when there is slow motion effect of panning and zooming into the central or specific portion of a video. The slow zoom in effect is extremely popular among TikTok videos. We will illustrate how to apply slow zoom effect to your video on your smartphone as well as on your computer.
Part 1. How to create slow zoom-in effect in Filmora
If you want to add slow zoom to any recorded video on your computer, you will need a dedicated video editor. There are many popular video editors available where slow zoom effect is not available. We recommend Wondershare Filmora which is a professional video editor that is available for Windows and Mac users. You will need to combine slow motion and keyframe to achieve the desired slow zoom effect. Here are the steps on how to create slow zoom in effect for your videos.
Free Download For Win 7 or later(64-bit)
Free Download For macOS 10.14 or later
Step1 Download and install Wondershare Filmora . Launch the application and click on New Project option from the welcome screen.

Step2 Drag and drop your video in Project Media folder. Thereafter, drag and drop the video into the Timeline.

Step3 Put the red header on the beginning part of the clip that you want to cut off and click on Cut(Scissor) icon. Then put the red header on the end part of the clip and click on Cut icon again. You should now have the separated clip for applying slow zoom effect.

Step4 Select the separated clip and click on Speed icon. Go to Slow option and select the speed according to the slowness of zooming you want.

Step5 Now you have to add multiple keyframes so that the slow zoom effect is smooth and soothing. Right-click on the clip, go to Animation and click on Add Animation. Go to Animation tab and then to Customization section.

Move the red header to the point where you want a keyframe and click on Add option. Similarly, move the red header slightly farther and add another keyframe. Keep adding like that till you reach the end point.

Step6 Double-click on the clip and go to Video> Basic> Transform. Select keyframes and slowly increase the scale slider for each keyframe to apply the zoom effect. Therefore, for every keyframe, zooming will increase gradually and you have already applied slow speed for complete slow zoom effect.

Part 2. How to do the slow zoom in effect on TikTok?
TikTok is one of the most popular short-video sharing platforms among teenagers and young adults. The slow zoom effect has been popularized by TikTokers as they use the effect quite regularly. Naturally, adding slow zoom in effect on your video on TikTok is the easiest. Here are the steps to follow one by one.
Step1 Launch TikTok app and you can shoot your video directly from TikTok. If you have already recorded the video, tap on “+” icon located at the bottom of the app screen and select the video.
Step2 After adding the video, go to Effects> Time. Under Time section, tap on “Slo-Mo” option to add slow-motion effect on your video.

Step3 Go to Visuals and you will find Zoom option. Place the header on the part of the video where you want to place the slow zoom effect. Thereafter, tap and hold Zoom effect so that the effect applies on the video clip. Release the effect where the desired section is covered.

Step4 Tap on Save option and play the video to see slow zoom effect. Tap on Next button and you can share the video on social media platforms as well.

There is another way you can apply slow zoom effect on TikTok. Here are the steps to find and apply slow zoom effect.
Step1 Launch TikTok app and tap on Discover option located at the bottom.

Step2 On the next screen, type “Slow Zoom” on the search bar and tap on Search option.

Step3 Now you will see the videos where different TikTok users have already applied slow zoom effect. Tap on Effects Slow Motion to apply the same effect to your video.

Step4 On the next screen, tap on Try This Effect button. You can select the duration of the zooming of the video you are about to shoot as well the zooming magnification.

Step5 Finally, tap on Record button to capture your video and apply slow zoom effect on the video automatically.

Conclusion
The slow zoom effect is one of the most viral and trending video effects on social media platforms. If you want to add slow zoom effect to your video for a certain portion, you can do the same from your smartphone as well as computer. For Windows and Mac users, we recommend you use Wondershare Filmora .
Free Download For macOS 10.14 or later
Step1 Download and install Wondershare Filmora . Launch the application and click on New Project option from the welcome screen.
Step2 Drag and drop your video in Project Media folder. Thereafter, drag and drop the video into the Timeline.
Step3 Put the red header on the beginning part of the clip that you want to cut off and click on Cut(Scissor) icon. Then put the red header on the end part of the clip and click on Cut icon again. You should now have the separated clip for applying slow zoom effect.
Step4 Select the separated clip and click on Speed icon. Go to Slow option and select the speed according to the slowness of zooming you want.
Step5 Now you have to add multiple keyframes so that the slow zoom effect is smooth and soothing. Right-click on the clip, go to Animation and click on Add Animation. Go to Animation tab and then to Customization section.
Move the red header to the point where you want a keyframe and click on Add option. Similarly, move the red header slightly farther and add another keyframe. Keep adding like that till you reach the end point.
Step6 Double-click on the clip and go to Video> Basic> Transform. Select keyframes and slowly increase the scale slider for each keyframe to apply the zoom effect. Therefore, for every keyframe, zooming will increase gradually and you have already applied slow speed for complete slow zoom effect.
Part 2. How to do the slow zoom in effect on TikTok?
TikTok is one of the most popular short-video sharing platforms among teenagers and young adults. The slow zoom effect has been popularized by TikTokers as they use the effect quite regularly. Naturally, adding slow zoom in effect on your video on TikTok is the easiest. Here are the steps to follow one by one.
Step1 Launch TikTok app and you can shoot your video directly from TikTok. If you have already recorded the video, tap on “+” icon located at the bottom of the app screen and select the video.
Step2 After adding the video, go to Effects> Time. Under Time section, tap on “Slo-Mo” option to add slow-motion effect on your video.
Step3 Go to Visuals and you will find Zoom option. Place the header on the part of the video where you want to place the slow zoom effect. Thereafter, tap and hold Zoom effect so that the effect applies on the video clip. Release the effect where the desired section is covered.
Step4 Tap on Save option and play the video to see slow zoom effect. Tap on Next button and you can share the video on social media platforms as well.
There is another way you can apply slow zoom effect on TikTok. Here are the steps to find and apply slow zoom effect.
Step1 Launch TikTok app and tap on Discover option located at the bottom.
Step2 On the next screen, type “Slow Zoom” on the search bar and tap on Search option.
Step3 Now you will see the videos where different TikTok users have already applied slow zoom effect. Tap on Effects Slow Motion to apply the same effect to your video.
Step4 On the next screen, tap on Try This Effect button. You can select the duration of the zooming of the video you are about to shoot as well the zooming magnification.
Step5 Finally, tap on Record button to capture your video and apply slow zoom effect on the video automatically.
Conclusion
The slow zoom effect is one of the most viral and trending video effects on social media platforms. If you want to add slow zoom effect to your video for a certain portion, you can do the same from your smartphone as well as computer. For Windows and Mac users, we recommend you use Wondershare Filmora .
Also read:
- In 2024, How to Create Intro Video with KineMaster
- New In 2024, How to Make a Video with My Phone
- A Guide to Speed up a Video on Splice for 2024
- New 2024 Approved Read This Review to Learn Everything You Need to Know About Leeming LUT Pro and How to Apply Pro LUTs Using Different Video Editors
- New In 2024, What Is Color Finale
- Updated How to Add Subtitles in VLC Media Play
- Whats an AV1 Format and How Does It Impact Your Life for 2024
- Wondering About Vimeo Slideshow Maker? Know Everything About the Platform Which Is Gaining Much Popularity. Also, Browse some Tips to Create Appealing Video Slideshows for 2024
- How to Rotate Videos With Media Player Classic for 2024
- 2024 Approved Working Through the Details of iMovie Slow Motion Video Making 100 Effective
- Updated 2024 Approved Blender Is a 3D Animation Software that Can Be Used to Create Stunning 3D Models and Videos
- New In 2024, Despite the Aforementioned Restrictions, Cartoon Video Makers Still Offer a Sea of Possibilities to Their Users, so Lets Dive Into the Magical World of Animated Videos
- New 2024 Approved Best 8 Free Video Editing Software Reddit
- In 2024, Practical Way to Resize Video in Handbrake
- Tactics to Make Transparent Image in Minimal Steps
- Updated How to Change the Speed of Video in DaVinci Resolve for 2024
- Updated In 2024, Do You Want to Edit a TikTok After Posting? This Article Will Provide Multiple Methods Through Which You Can Do It in No Time
- Updated How to Stabilize Videos for Free with Google Photos App
- Updated What Is Lumetri Color and How Do You Use It in Adobe After Effects? Find Out the Numerous Functions of Lumetri Panel and Ways to Apply Them to Your Video
- New Final Cut Pro for iPad- Is It Available for 2024
- Tips That Show Anybody How To Make Youtube Slideshow – Guaranteed for 2024
- Updated In 2024, Looking for a Way to Learn How to Merge Videos in HandBrake? Theres a Better Solution Waiting for You Inside
- New YouTube Lives Are Very Popular Nowadays and People Can Interact with the Anchor at Real Time. If You Want to Comment on a YouTube Live Chat, You Can Follow the Guide Below for 2024
- Updated In 2024, Get The Perfect Drone Footage With Free Drone LUTs
- Updated Are You Also Facing a Problem with the Snapchat Camera Zoomed In? Find Out the Easiest Methods to Fix This Error without Installing a Third-Party Tool for 2024
- New How to Use LUTs in Lumafusion & Free Resource
- Updated In 2024, How to Add Filter to Video Online
- Updated Do You Want to Excel at Using Adobe Premiere Pro Software for Splitting Videos and Audio? Learn About Splitting a Video and Audio Using Different Tools and Add a New Skill to Your Skillset with a Step-by-Step Guide in This Article for 2024
- New Guide to Synchronizing Your Audio And Videos Properly for 2024
- New 2024 Approved Figuring Out Proper Ways to Play a Video in Slow Motion on iPhone
- Updated How To Trim Video In Premiere Pro in Different Ways
- New 2024 Approved 15 Best Free MP4 Video Rotators Windows,Mac, Android, iPhone & Online
- 2024 Approved Find Out The Best Dark Moody LUTs During Editing
- Learn to Merge Clips in DaVinci Resolve with Simple Steps
- Updated In 2024, Separate Audio From Video in DaVinci Resolve Step by Step
- New In 2024, How to Apply Gaussian Blur Effect to Videos In Premiere Pro?
- How to Create a PowerPoint Looping Slideshow for 2024
- New Do You Want to Excel at Using Adobe Premiere Pro Software for Splitting Videos and Audio? Learn About Splitting a Video and Audio Using Different Tools and Add a New Skill to Your Skillset with a Step-by-Step Guide in This Article
- New Recommended Video Background Online Changers for 2024
- In 2024, Why Your WhatsApp Location is Not Updating and How to Fix On Vivo Y100 | Dr.fone
- Gmail Not Working on Motorola Defy 2 7 Common Problems & Fixes | Dr.fone
- The Best Android SIM Unlock Code Generators Unlock Your Vivo X100 Phone Hassle-Free
- The Best 8 VPN Hardware Devices Reviewed On Apple iPhone 13 Pro Max | Dr.fone
- 10 Free Location Spoofers to Fake GPS Location on your Itel P55+ | Dr.fone
- In 2024, How to Fake Snapchat Location without Jailbreak On Samsung Galaxy A05 | Dr.fone
- How to Restore Previous Version of Excel 2003 File? | Stellar
- Top 4 Ways for Apple iPhone 13 Pro to Mac Mirroring | Dr.fone
- Here Are Some Reliable Ways to Get Pokemon Go Friend Codes For Realme 11 Pro+ | Dr.fone
- In 2024, Best 3 Google Pixel 8 Emulator for Mac to Run Your Wanted Android Apps | Dr.fone
- How to Transfer Data from Nubia Red Magic 9 Pro+ to Other Android Devices? | Dr.fone
- In 2024, How to Unlock Disabled Apple iPhone 8/iPad Without Computer | Dr.fone
- In 2024, How to Transfer Apps from Infinix Hot 40 Pro to Another | Dr.fone
- In 2024, 10 Easy-to-Use FRP Bypass Tools for Unlocking Google Accounts On Xiaomi Redmi Note 12 Pro 4G
- Title: 2024 Approved How to Get Zoom on TV Easy Solutions
- Author: Morgan
- Created at : 2024-06-08 08:36:54
- Updated at : 2024-06-09 08:36:54
- Link: https://ai-video-editing.techidaily.com/2024-approved-how-to-get-zoom-on-tv-easy-solutions/
- License: This work is licensed under CC BY-NC-SA 4.0.
