
:max_bytes(150000):strip_icc():format(webp)/GettyImages-541365354-5c8ad42246e0fb00014a9687.jpg)
2024 Approved Learn How to Add Dynamic Shake Effects to Your Videos Using Alight Motion. Our Step-by-Step Guide Makes It Easy to Create Cinematic Footage
Learn How to Add Dynamic Shake Effects to Your Videos Using Alight Motion. Our Step-by-Step Guide Makes It Easy to Create Cinematic Footage
Are you looking to add some dynamic effects to your videos? Have you ever wanted to create footage that feels like shaking but didn’t know how to do it? Well, you’re in luck! This guide will show you how to use Alight Motion, a video editing app, to add shake effects to your videos.
Whether you’re a professional videographer or a hobbyist, this guide will take you step-by-step through adding shake effects with Alight Motion. With its easy-to-use interface and powerful features, Alight Motion makes it simple to take your videos to the next level. So, let’s get started and shake things up!

Overview of Alight Motion
Alight Motion is a powerful video editing app that allows users to create dynamic and engaging videos. It offers many features, including motion graphics, visual effects, and animation tools. With Alight Motion, you can easily add shake effects to your videos and other dynamic effects such as panning, zooming, and rotation.
One of the great things about Alight Motion is its user-friendly interface. The app is designed to be intuitive and easy to use, making it accessible to users of all skill levels.
Alight Motion has everything you need to create high-quality, cinematic footage, whether you’re a professional videographer or just getting started with video editing. So, if you want to take your videos to the next level, give Alight Motion a try!
How To Add Shake Effects to Your Video in Alight Motion?
By following these simple steps, you’ll be able to create footage that feels like shaking, adding a sense of dynamic movement to your videos. Shake effects can be a great addition to any video if you want to create a dramatic effect or add visual interest to your footage. So, let’s learn how to add shake effects to your videos in Alight Motion.
Step1 Open the Alight Motion app and tap “New Project.”

Step2 Import your video clip.

Step3 Adjust the length of your clip, then tap “Add Effect.”

Step4 Search for the video effect. In this case, search “Tiles.”

Step5 Adjust the video using the effect settings.

Step6 Search for the blur effect. In this case, search “Motion Blur.”

Step7 Search for the shake effect. In this case, search “Auto-Shake.”

Step8 Adjust the speed, magnitude, and other elements and effects of the video clip.

Step9 Preview the video and tap “Save.”

[Bonus] Filmora for Mobile – Best Alternative to Alight Motion
Filmora for mobile is a powerful video editing app that can be an alternative to Alight Motion. It has a user-friendly interface and offers a wide range of features that allow users to create professional-looking videos easily. Some of the key features of Filmora for mobile include:
Free Download For Win 7 or later(64-bit)
Free Download For macOS 10.14 or later
- Motion graphics and visual effects: Filmora for mobile has a wide range of motion graphics and visual effects that you can use to enhance your videos, including shake effects.
- Video trimming, merging, and splitting: The app allows you to trim, merge and split your videos to create the perfect footage.
- Music and audio editing: Filmora for mobile has a built-in music library and audio editing tools that you can use to add music and sound effects to your videos.
- Text and title overlays: You can add text and title overlays to your videos to create captions, subtitles, and more.
- Speed control: Adjust the speed of your videos to create fast-paced or slow-motion footage.
With Filmora for mobile, you can easily create high-quality, professional-looking videos with shake effects and all the other features that Alight Motion offers. The app has a simple and intuitive interface that makes it easy for users of all skill levels to create stunning videos.
Effects in Filmora for Mobile
Filmora for mobile offers a wide variety of effects that you can use to enhance your videos and make them stand out. The shaking effect is one popular effect that adds a sense of movement and drama to your footage. With Filmora, you can easily adjust the intensity of the shake effect to create a subtle or more pronounced effect.
Another great effect that Filmora for mobile offers is the split-screen effect. This allows you to split your screen into multiple sections and play different videos or images in each section. This can be useful for creating a sense of simultaneity and storytelling.
Additionally, Filmora for mobile offers a wide variety of transition effects that you can use to transition between different clips in your video smoothly. These effects include wipes, fades, and more. With these effects, you can take your videos to the next level.
How To Add Shake Effects in Filmora for Mobile
Shake effects can be a great addition to any video if you want to create a dramatic effect or add visual interest to your footage. By following the simple steps outlined in this guide, you’ll be able to add shake effects to your videos in Filmora for mobile and take your videos to the next level. So, let’s get started and learn how to add shake effects in Filmora for mobile.
Step1 Open the Filmora mobile app and tap “More.”

Step2 Select the effect in the list of effects loaded.

Step3 Click the “Use“ button to make the effect present in your clip.

Step4 Select the video clip from your device that you want to edit.

Step5 Select the shake effect you want to use and tap the check icon.

Step6 Adjust the duration of the effect to your desired length.

Step7 Tap the “Export“ button to save your video.
After following the steps outlined in this guide, you can easily add shake effects to your videos in Filmora for mobile. However, if you’re still having trouble, we recommend watching the following video for more detailed instructions:
Which Is Better? Alight Motion or Filmora for Mobile?
It ultimately depends on your specific needs and preferences when deciding between Alight Motion and Filmora for mobile. Both apps are powerful video editing tools that offer many features and effects but have their strengths and weaknesses.
| | Alight Motion | Filmora | |
| —————————- | ————————————————————————————————— | ——————————————————– |
| Operating System | Android and iOS | Android and iOS |
| App Store Rating | 4.4 out of 5 | 4.7 out of 5 |
| Google Play Store Rating | 3.6 out of 5 | 4.7 out of 5 |
| Pricing | Free with In-app Purchases | Free with In-app Purchases |
| Number of Shake Effects | 100+ shake effects | 8 different camera shake |
Alight Motion is a powerful video editing app that offers many features and effects, including 100+ shake effects. The app is available for Android and iOS and has received a 4.4 out of 5 rating on the App Store and a 3.6 out of 5 rating on the Google Play Store. Alight Motion is free to download and use, but some features and effects may require in-app purchases.
One of the standout features of Alight Motion is its motion graphics and visual effects capabilities. The app has a wide range of shake effects that you can use to add a sense of movement and drama to your footage.
Alight Motion is suitable for professional videographers who want to create high-quality and professional-looking videos. The app is also great for those who want to create videos for social media platforms, especially those who want to create dynamic and visually engaging videos.
On the other hand, Filmora for mobile is also a powerful video editing app that offers a wide range of features and effects, including 8 different camera shake effects.
The app is available for Android and iOS and has received a 4.7 out of 5 rating on the App Store and a 4.7 out of 5 rating on the Google Play Store. Filmora is free to download and use, but some features and effects may require in-app purchases.
The shake effect feature in Filmora for mobile is simple and allows you to add a subtle or more pronounced shake effect to your footage. Additionally, Filmora for mobile offers a wide range of other effects, including visual effects, transition effects, and color correction tools, that you can use to enhance your videos.
Filmora for mobile is suitable as a user-friendly and easy-to-use video editing app. The app is perfect for hobbyists, YouTubers, or social media content creators who want to create high-quality videos with various effects. It’s also great for those seeking a mobile-based alternative to desktop video editing software.
People Also Ask
Here are some questions that people commonly ask concerning the topic of adding shake effects to videos using Alight Motion.
Q1. How Do You Add Effects to Alight Motion?
To add effects to Alight Motion, you can follow these steps:
Step1 Open the Alight Motion app and create a new project or open an existing one.

Step2 Select the layer to which you want to add the effect, then tap on the “Effects“ button.

Step3 Browse the available effects and tap on the desired effect to apply it to the selected layer.

Step4 You can add multiple layers to your video.

Q2. How Many Effects Are in Alight Motion?
As of now, Alight Motion offers 100+ effects that you can use to enhance your videos and make them stand out. These effects include a wide range of motion graphics, visual effects, and animation tools. Some of the effects available in Alight Motion include shaking effects, panning, zooming, rotation, color correction, and many more.
The app is regularly updated, so the number of effects available may increase over time. The wide range of effects gives you the power to create dynamic and visually engaging videos. With Alight Motion, the possibilities are endless.
Q3. Is 8GB RAM Enough for Alight Motion?
8GB of RAM is generally enough for running Alight Motion, although the app’s recommended minimum is 2GB of RAM. Having more RAM would allow for smoother performance and the ability to handle larger and more complex projects. However, with 8GB of RAM, you should still be able to run Alight Motion without any major issues.
Conclusion
Alight Motion and Filmora for mobile are powerful video editing apps that offer a wide range of features and effects. Each app has its strengths and weaknesses, and it ultimately depends on your specific needs and preferences.
Alight Motion offers more shake effects, while Filmora for mobile offers more simplicity. Both apps can be used to create high-quality and professional-looking videos. It’s recommended to try both apps and see which one works best for you.
Free Download For macOS 10.14 or later
- Motion graphics and visual effects: Filmora for mobile has a wide range of motion graphics and visual effects that you can use to enhance your videos, including shake effects.
- Video trimming, merging, and splitting: The app allows you to trim, merge and split your videos to create the perfect footage.
- Music and audio editing: Filmora for mobile has a built-in music library and audio editing tools that you can use to add music and sound effects to your videos.
- Text and title overlays: You can add text and title overlays to your videos to create captions, subtitles, and more.
- Speed control: Adjust the speed of your videos to create fast-paced or slow-motion footage.
With Filmora for mobile, you can easily create high-quality, professional-looking videos with shake effects and all the other features that Alight Motion offers. The app has a simple and intuitive interface that makes it easy for users of all skill levels to create stunning videos.
Effects in Filmora for Mobile
Filmora for mobile offers a wide variety of effects that you can use to enhance your videos and make them stand out. The shaking effect is one popular effect that adds a sense of movement and drama to your footage. With Filmora, you can easily adjust the intensity of the shake effect to create a subtle or more pronounced effect.
Another great effect that Filmora for mobile offers is the split-screen effect. This allows you to split your screen into multiple sections and play different videos or images in each section. This can be useful for creating a sense of simultaneity and storytelling.
Additionally, Filmora for mobile offers a wide variety of transition effects that you can use to transition between different clips in your video smoothly. These effects include wipes, fades, and more. With these effects, you can take your videos to the next level.
How To Add Shake Effects in Filmora for Mobile
Shake effects can be a great addition to any video if you want to create a dramatic effect or add visual interest to your footage. By following the simple steps outlined in this guide, you’ll be able to add shake effects to your videos in Filmora for mobile and take your videos to the next level. So, let’s get started and learn how to add shake effects in Filmora for mobile.
Step1 Open the Filmora mobile app and tap “More.”
Step2 Select the effect in the list of effects loaded.
Step3 Click the “Use“ button to make the effect present in your clip.
Step4 Select the video clip from your device that you want to edit.
Step5 Select the shake effect you want to use and tap the check icon.
Step6 Adjust the duration of the effect to your desired length.
Step7 Tap the “Export“ button to save your video.
After following the steps outlined in this guide, you can easily add shake effects to your videos in Filmora for mobile. However, if you’re still having trouble, we recommend watching the following video for more detailed instructions:
Which Is Better? Alight Motion or Filmora for Mobile?
It ultimately depends on your specific needs and preferences when deciding between Alight Motion and Filmora for mobile. Both apps are powerful video editing tools that offer many features and effects but have their strengths and weaknesses.
| | Alight Motion | Filmora | |
| —————————- | ————————————————————————————————— | ——————————————————– |
| Operating System | Android and iOS | Android and iOS |
| App Store Rating | 4.4 out of 5 | 4.7 out of 5 |
| Google Play Store Rating | 3.6 out of 5 | 4.7 out of 5 |
| Pricing | Free with In-app Purchases | Free with In-app Purchases |
| Number of Shake Effects | 100+ shake effects | 8 different camera shake |
Alight Motion is a powerful video editing app that offers many features and effects, including 100+ shake effects. The app is available for Android and iOS and has received a 4.4 out of 5 rating on the App Store and a 3.6 out of 5 rating on the Google Play Store. Alight Motion is free to download and use, but some features and effects may require in-app purchases.
One of the standout features of Alight Motion is its motion graphics and visual effects capabilities. The app has a wide range of shake effects that you can use to add a sense of movement and drama to your footage.
Alight Motion is suitable for professional videographers who want to create high-quality and professional-looking videos. The app is also great for those who want to create videos for social media platforms, especially those who want to create dynamic and visually engaging videos.
On the other hand, Filmora for mobile is also a powerful video editing app that offers a wide range of features and effects, including 8 different camera shake effects.
The app is available for Android and iOS and has received a 4.7 out of 5 rating on the App Store and a 4.7 out of 5 rating on the Google Play Store. Filmora is free to download and use, but some features and effects may require in-app purchases.
The shake effect feature in Filmora for mobile is simple and allows you to add a subtle or more pronounced shake effect to your footage. Additionally, Filmora for mobile offers a wide range of other effects, including visual effects, transition effects, and color correction tools, that you can use to enhance your videos.
Filmora for mobile is suitable as a user-friendly and easy-to-use video editing app. The app is perfect for hobbyists, YouTubers, or social media content creators who want to create high-quality videos with various effects. It’s also great for those seeking a mobile-based alternative to desktop video editing software.
People Also Ask
Here are some questions that people commonly ask concerning the topic of adding shake effects to videos using Alight Motion.
Q1. How Do You Add Effects to Alight Motion?
To add effects to Alight Motion, you can follow these steps:
Step1 Open the Alight Motion app and create a new project or open an existing one.
Step2 Select the layer to which you want to add the effect, then tap on the “Effects“ button.
Step3 Browse the available effects and tap on the desired effect to apply it to the selected layer.
Step4 You can add multiple layers to your video.
Q2. How Many Effects Are in Alight Motion?
As of now, Alight Motion offers 100+ effects that you can use to enhance your videos and make them stand out. These effects include a wide range of motion graphics, visual effects, and animation tools. Some of the effects available in Alight Motion include shaking effects, panning, zooming, rotation, color correction, and many more.
The app is regularly updated, so the number of effects available may increase over time. The wide range of effects gives you the power to create dynamic and visually engaging videos. With Alight Motion, the possibilities are endless.
Q3. Is 8GB RAM Enough for Alight Motion?
8GB of RAM is generally enough for running Alight Motion, although the app’s recommended minimum is 2GB of RAM. Having more RAM would allow for smoother performance and the ability to handle larger and more complex projects. However, with 8GB of RAM, you should still be able to run Alight Motion without any major issues.
Conclusion
Alight Motion and Filmora for mobile are powerful video editing apps that offer a wide range of features and effects. Each app has its strengths and weaknesses, and it ultimately depends on your specific needs and preferences.
Alight Motion offers more shake effects, while Filmora for mobile offers more simplicity. Both apps can be used to create high-quality and professional-looking videos. It’s recommended to try both apps and see which one works best for you.
How to Zoom Desktop Screen
A video port that enables the connection of an external display to a modern laptop is often included in these devices; however, this might require you to learn how to un-zoom desktop. You could wish to use a laptop with a big display as a business professional to present data, images, or other media to users or coworkers during a meeting. However, if sat far away from the display, some individuals could find it difficult to read text or distinguish items on the screen. To better visibility, you may adjust the screen magnification as necessary. Users of the most recent versions of Windows and its programs may zoom in on the screen to expand any areas that are difficult for them to view, hence, learning how to zoom in on desktop is a necessary choice to make. You may zoom out to return to the regular screen after you’ve determined what is in the particular location.
There are methods and keyboard shortcuts that enable users to zoom in on the screen to expand anything that may be tough for certain users to read in Windows or even in various programs. Here are a few ways to zoom in Desktop or out the screen, if you unintentionally zoom on a Windows desktop screen or in an app like a web browser, depending on the circumstance. Have you ever had a zoomed-in screen? Your screen’s text, graphics, and icons all suddenly enlarge dramatically. You may need to zoom out at this point. Both PC and Mac users may change the magnification and resolution of a screen. If you notice bigger text or icons, you can be confused between these two. For further advice on how to zoom desktop screen, keep reading. In conclusion, there are several methods for doing this. We’ll go through the top 5 techniques with you.
- Method 1: Using a Keyboard
- Method 2: Touchscreen Method
- Method 3: Use Keyboard and Mouse Commands
- Method 4: Use the Desktop Magnifier Feature
- Method 5: Web Browser Method
Part 1: The Need to Zoom Computer Screen
You’ve been looking at your screen nonstop, but you can’t figure out what it says. You could find the answer you’re searching for by zooming in on your computer. On your computer screen, reading small type might be too difficult at times. There are several fast and simple methods to magnify your whole screen or zoom in on a specific area, whether you’re using a MacBook or a Windows 10 PC.
Many users who are utilizing the Windows desktop, reading text, or surfing the web claim that the screen suddenly becomes stuck on zoom. Having such huge icons, graphics, and text on your windows computer is annoying. You must zoom out on Windows in order to resolve this problem. Microsoft offers options for customizing desktop display settings, whether you want to keep the zoomed-in desktop or change the display settings. This might alter the settings for Windows’ Magnifier magnification, desktop icon size, or screen resolution.
Additionally, depending on the programs and utilities you have open, your computer’s desktop may sometimes resemble a broad landscape. Its size and expanse provide you a bird’s-eye perspective of the landscape. It may become a little challenging to read what’s on it, particularly if your vision isn’t as good as it once was. Popular desktop operating systems like Windows 10 and macOS include features that enable you to swiftly and eagle-like zoom in on just what you need.
Similar to this, if you aren’t careful and cautious while using your computer, you could accidentally activate a feature like its zoom function. If you’re using a shared computer, another user may utilize the zoom feature to make it easier for them to see tiny type on the screen. In any event, learning how to zoom out once more will allow you to utilize your computer anyway you see fit. Tools that zoom in on the desktop and make icons seem bigger than normal include screen resolution, icon views, and Windows Magnifier. These tools provide the greatest personalized settings to optimize display since they are made to enhance monitor display by making images and text understandable.
Part 2: How to Zoom in/out PC screen
Here are the top 5 methods to know how to zoom out on desktop or subsequently, how to zoom desktop screen. Use the easiest method for you from the guide below:
Method 1: Using a Keyboard
To zoom out or in on a webpage or document, hold down the Ctrl key while pressing the - (minus) or + (plus) key. You may utilize the - and + keys on the numeric keypad as well as those adjacent to the backspace key.
Step1Using the handy keyboard keys listed below is one of the most common methods to zoom in or out just in a certain window, website, or program.
- Ctrl + (+) to zoom in.
- Ctrl + (-) will zoom out.
Step2You may keep holding down the Command key while pressing the - or + keys to zoom as much as you like. Go ahead and try it.
Method 2: Touchscreen Method
You have access to yet another fantastic single window zooming option if you’re using a laptop with a trackpad. Simply squeeze two fingers together or spread them apart on your trackpad to zoom in or out. The Touch Bar at the bottom of your screen may be made bigger and simpler to read by choosing “Enable Touch Bar Zoom.” To try it out, all you have to do is touch and hold the Touch Bar.
Step1You may use a “reverse-pinch” motion on a laptop with a touch screen or trackpad to zoom in or out in a variety of programs as well as on the desktop. This is really simple and will work in most applications (including Microsoft Office apps).

However, this motion may not be supported by all applications. This functionality won’t work if you’ve turned off gestures on your trackpad or touchscreen.
Step2Put two fingers together on the touchscreen or trackpad. On the trackpad, you should place two fingers closely apart (they may even be touching).
Step3Put your fingers together directly over the region you wish to zoom out on while using a touchscreen display to focus in on a certain area.
Step4On the trackpad, spread your two fingers widely apart. The chosen website or app will zoom out to show more content when your two fingers separate from one another on the trackpad or touchscreen.
Method 3: Use Keyboard and Mouse Commands
Using the keyboard and Mouse shortcuts is the easiest method to zoom in and out desktop screen on computers. Follow the steps below to learn this technique hassle-free.
Steps to Use Keyboard and Mouse Method:
Step1To zoom in, scroll your mouse wheel up while holding down the Ctrl key. You may already use this to zoom in on your browser, for instance.

Step2Now for the Zoom out, hold the Ctrl key on the Keyboard and move the mouse wheel down to zoom out to the desired extent as shown here:
Method 4: Use the Desktop Magnifier Feature
The magnifier tool allows you to temporarily increase the size of a specific area of the screen. It is a built-in function of the Windows family. The user may enlarge the screen with the use of the magnifying tool. This function is highly beneficial for those who have hazy vision as well as for enlarging the specific picture shown to viewers through projectors. The magnifier app’s default view, Full Screen, may enlarge the whole screen. However, the user is unable to see the complete screen at once since a section of it enlarges and moves with your mouse pointer. By selecting the “Options” option, the user may modify the Magnifier app’s settings and access a variety of additional capabilities. Anyway, let’s get started to learn the processes.
Steps to Use Magnifier to Zoom Desktop Screen:
Step1Open the Windows search (a magnifier icon or a long search box on the taskbar). To launch Magnifier, enter “magnifier” into Windows search and then click the first result.
Step2The Windows 10 Magnifier window will appear. Then, at any moment, you may zoom in on your app, your web browser, or a few other applications by pressing the + button.

Step3Press the Windows logo key and + to enlarge the view (plus). or use the Magnifier controls’ + (plus) button.
Step4Press the Windows key and - to zoom out (minus). Or use the Magnifier controls’ - (minus) button.
Step5Press Windows logo key + Esc to close the Magnifier. In the top-right corner of the Magnifier controls, click the X (close) button.
Method 5: Web Browser Method
You may enhance your web browser reading experience in a number of different ways. One method is to zoom in on the online sites you wish to read and enlarge the text, photos, and icons. It’s possible that you need to do this since your eyes are weary or the screen’s quality isn’t the best. To restore items to their original state, you may need to reset the zoom level or zoom out at some point. On Windows 10, you may zoom in for a clearer view of the screen if you can’t read the text or the pictures on your computer screen.
Steps to Use Web Browser Method to Zoom Desktop Screen:
You may use the zoom in shortcut on any web browser to increase the browser’s zoom level. In other words, you may zoom in on your web browser using the keyboard.
Step1Launch a web browser. To zoom in on your web browser, hold down the Ctrl key while pressing the “+” key on your keyboard.

Step2Now, within the browser, hit the 3-dot menu at the right top corner. (This is available in every browser).
Step3To enlarge the view in your web browser, click the + sign next to Zoom. Clicking the minus button on your web browser will let you to un-zoom or zoom out.
Conclusion
Numerous features on modern computers are intended to simplify user tasks. The ability to zoom in and out on the screen is one feature that might make using a computer easier. Learning how to zoom in and out may be helpful if you have trouble seeing little text or pictures on your computer or if you need more screen real estate to view many things at once. You can see from reading this that using your computer to zoom in and out is fairly simple. You may simply choose one approach based on your needs to assist you. The zoom settings in Windows may be the cause of the abnormally huge graphics on the desktop.
Part 1: The Need to Zoom Computer Screen
You’ve been looking at your screen nonstop, but you can’t figure out what it says. You could find the answer you’re searching for by zooming in on your computer. On your computer screen, reading small type might be too difficult at times. There are several fast and simple methods to magnify your whole screen or zoom in on a specific area, whether you’re using a MacBook or a Windows 10 PC.
Many users who are utilizing the Windows desktop, reading text, or surfing the web claim that the screen suddenly becomes stuck on zoom. Having such huge icons, graphics, and text on your windows computer is annoying. You must zoom out on Windows in order to resolve this problem. Microsoft offers options for customizing desktop display settings, whether you want to keep the zoomed-in desktop or change the display settings. This might alter the settings for Windows’ Magnifier magnification, desktop icon size, or screen resolution.
Additionally, depending on the programs and utilities you have open, your computer’s desktop may sometimes resemble a broad landscape. Its size and expanse provide you a bird’s-eye perspective of the landscape. It may become a little challenging to read what’s on it, particularly if your vision isn’t as good as it once was. Popular desktop operating systems like Windows 10 and macOS include features that enable you to swiftly and eagle-like zoom in on just what you need.
Similar to this, if you aren’t careful and cautious while using your computer, you could accidentally activate a feature like its zoom function. If you’re using a shared computer, another user may utilize the zoom feature to make it easier for them to see tiny type on the screen. In any event, learning how to zoom out once more will allow you to utilize your computer anyway you see fit. Tools that zoom in on the desktop and make icons seem bigger than normal include screen resolution, icon views, and Windows Magnifier. These tools provide the greatest personalized settings to optimize display since they are made to enhance monitor display by making images and text understandable.
Part 2: How to Zoom in/out PC screen
Here are the top 5 methods to know how to zoom out on desktop or subsequently, how to zoom desktop screen. Use the easiest method for you from the guide below:
Method 1: Using a Keyboard
To zoom out or in on a webpage or document, hold down the Ctrl key while pressing the - (minus) or + (plus) key. You may utilize the - and + keys on the numeric keypad as well as those adjacent to the backspace key.
Step1Using the handy keyboard keys listed below is one of the most common methods to zoom in or out just in a certain window, website, or program.
- Ctrl + (+) to zoom in.
- Ctrl + (-) will zoom out.
Step2You may keep holding down the Command key while pressing the - or + keys to zoom as much as you like. Go ahead and try it.
Method 2: Touchscreen Method
You have access to yet another fantastic single window zooming option if you’re using a laptop with a trackpad. Simply squeeze two fingers together or spread them apart on your trackpad to zoom in or out. The Touch Bar at the bottom of your screen may be made bigger and simpler to read by choosing “Enable Touch Bar Zoom.” To try it out, all you have to do is touch and hold the Touch Bar.
Step1You may use a “reverse-pinch” motion on a laptop with a touch screen or trackpad to zoom in or out in a variety of programs as well as on the desktop. This is really simple and will work in most applications (including Microsoft Office apps).
However, this motion may not be supported by all applications. This functionality won’t work if you’ve turned off gestures on your trackpad or touchscreen.
Step2Put two fingers together on the touchscreen or trackpad. On the trackpad, you should place two fingers closely apart (they may even be touching).
Step3Put your fingers together directly over the region you wish to zoom out on while using a touchscreen display to focus in on a certain area.
Step4On the trackpad, spread your two fingers widely apart. The chosen website or app will zoom out to show more content when your two fingers separate from one another on the trackpad or touchscreen.
Method 3: Use Keyboard and Mouse Commands
Using the keyboard and Mouse shortcuts is the easiest method to zoom in and out desktop screen on computers. Follow the steps below to learn this technique hassle-free.
Steps to Use Keyboard and Mouse Method:
Step1To zoom in, scroll your mouse wheel up while holding down the Ctrl key. You may already use this to zoom in on your browser, for instance.
Step2Now for the Zoom out, hold the Ctrl key on the Keyboard and move the mouse wheel down to zoom out to the desired extent as shown here:
Method 4: Use the Desktop Magnifier Feature
The magnifier tool allows you to temporarily increase the size of a specific area of the screen. It is a built-in function of the Windows family. The user may enlarge the screen with the use of the magnifying tool. This function is highly beneficial for those who have hazy vision as well as for enlarging the specific picture shown to viewers through projectors. The magnifier app’s default view, Full Screen, may enlarge the whole screen. However, the user is unable to see the complete screen at once since a section of it enlarges and moves with your mouse pointer. By selecting the “Options” option, the user may modify the Magnifier app’s settings and access a variety of additional capabilities. Anyway, let’s get started to learn the processes.
Steps to Use Magnifier to Zoom Desktop Screen:
Step1Open the Windows search (a magnifier icon or a long search box on the taskbar). To launch Magnifier, enter “magnifier” into Windows search and then click the first result.
Step2The Windows 10 Magnifier window will appear. Then, at any moment, you may zoom in on your app, your web browser, or a few other applications by pressing the + button.
Step3Press the Windows logo key and + to enlarge the view (plus). or use the Magnifier controls’ + (plus) button.
Step4Press the Windows key and - to zoom out (minus). Or use the Magnifier controls’ - (minus) button.
Step5Press Windows logo key + Esc to close the Magnifier. In the top-right corner of the Magnifier controls, click the X (close) button.
Method 5: Web Browser Method
You may enhance your web browser reading experience in a number of different ways. One method is to zoom in on the online sites you wish to read and enlarge the text, photos, and icons. It’s possible that you need to do this since your eyes are weary or the screen’s quality isn’t the best. To restore items to their original state, you may need to reset the zoom level or zoom out at some point. On Windows 10, you may zoom in for a clearer view of the screen if you can’t read the text or the pictures on your computer screen.
Steps to Use Web Browser Method to Zoom Desktop Screen:
You may use the zoom in shortcut on any web browser to increase the browser’s zoom level. In other words, you may zoom in on your web browser using the keyboard.
Step1Launch a web browser. To zoom in on your web browser, hold down the Ctrl key while pressing the “+” key on your keyboard.
Step2Now, within the browser, hit the 3-dot menu at the right top corner. (This is available in every browser).
Step3To enlarge the view in your web browser, click the + sign next to Zoom. Clicking the minus button on your web browser will let you to un-zoom or zoom out.
Conclusion
Numerous features on modern computers are intended to simplify user tasks. The ability to zoom in and out on the screen is one feature that might make using a computer easier. Learning how to zoom in and out may be helpful if you have trouble seeing little text or pictures on your computer or if you need more screen real estate to view many things at once. You can see from reading this that using your computer to zoom in and out is fairly simple. You may simply choose one approach based on your needs to assist you. The zoom settings in Windows may be the cause of the abnormally huge graphics on the desktop.
Using Slow Motion in Adobe After Effects: A Step-by-Step Procession
A slow-motion effect in the videos can enhance the viewing experience. It can highlight a certain action by providing closer details. Moreover, it also evokes an emotional impact in any video scene. Along with creating a dramatic effect, a slow-mo effect also brings aesthetic appeal. Thus, the slow-motion effect can grasp the attention of the audience in an effortless manner.
This article will discuss how to create a slow-motion effect with Adobe After Effects. It’s a well-recognized tool for modifying videos with its powerful features. Hence, keep reading this guide to learn about After Effects slow motion.
Slow Motion Video Maker Slow your video’s speed with better control of your keyframes to create unique cinematic effects!
Make A Slow Motion Video Make A Slow Motion Video More Features

Part 1: What Does A Perfect Slow Motion Video Contains?
To create a perfect slow-motion video, you must consider several factors. In this section, you can come across some elements through which you can generate an accurate slow-motion effect.
- Resolution: Make sure to record your video in high resolution. By doing so, the slow-motion effect will add more visual clarity. Thus, the minimum resolution should be 1080p or 4K.
- Accurate Lighting: Perfect lighting can make a video look impactful. You can either use natural or artificial lighting to make a well-exposed slow-mo effect.
- Choosing Subject: To grasp the attention, choose the subject carefully. A slow-motion effect in sports activities or water droplets can look eye-catching. Thus, you should choose a subject that looks appealing in a slow-mo effect.
- Sound Selection: A slow-mo effect will look more convincing with a relevant sound design. You should search for slow-mo sound effects to generate attractive results. Also, ensure that the speed of sound effects with the video is managed smartly.
- Frame Rate: A frame rate plays a vital role in creating slow-motion effect. Higher frame rates influence a smooth, slow-motion effect. Thus, use 240fps or higher to create a seamless slow-mo effect.
Part 2: Creating Slow Motion Effect in Adobe After Effects
Adobe After Effects is a famous program used in post-production of video making. It contains many motion graphics effects to enhance a video. You can add animated shapes and text to the video with this tool. Many people use this platform to create VFX in their videos to create stunning videos. It also supports 2D and 3D elements to produce realistic effects.
Furthermore, it offers many tools for compositing and keying. Users can change the color patterns in their videos with this robust software. Moreover, it can create After Effects slow motion with perfect accuracy. You can manually adjust the timing and speed of the slow-motion effect with this tool. Thus, Adobe After Effects is a comprehensive tool for video editing.
Here are the instructions that can guide you to produce slow-motion effects After Effects. Thus, let’s dig into the details:
Step 1
Start by uploading a video on After Effects. Drag it to the timeline and edit it in a desired manner. Now, place the cursor in the timeline to begin the process. Right-click on the timeline layer and select “Time” from the pop-up menu. From there, select “Time Stretch.” It will open a Time Stretch window on the screen.

Step 2
On the Time Stretch window, make the “Stretch Factor” value to 250. Once done, press the “OK” button.

Step 3
For high-quality results, enable the “Frame Blending” option. Right-click on the layer and select “Frame Blending” from the pop-up menu. Here, you can select two options: Frame Mix and Pixel Motion. After the frame blending, you can render the final output. Select a suitable format and then export the video.

Part 3: Quick and Unique Alternative: Making Slow Motion Effect with Wondershare Filmora
An excellent alternative to After Effects is Wondershare Filmora . With the release of its Volume 13, you can enjoy many premium features. To boost your productivity, the tool offers many AI features. You can use its AI copywriting feature to produce video outlines. By doing so, you can have AI-generated content for video production. Furthermore, it provides a smooth performance with its robust interface.
It contains a wide range of filters and overlays. It also allows you to apply transitions in the video clip from various options. To replace backgrounds in the video, try its Green Screen feature. This advanced feature can add realistic backgrounds to the videos easily. Moreover, you can color-correct the video to add perfect exposure properties. You can modify brightness, saturation, and other elements in the color-correct options.
Free Download For Win 7 or later(64-bit)
Free Download For macOS 10.14 or later
How to Add Slow-Motion Effect With Filmora
Are you ready to create a slow-mo effect in Filmora? Read the following section to learn how to create a slow-motion effect using this tool.
Step 1: Select New Project
Begin by launching this desktop tool on your PC. Choose the “Profile” icon from the top and sign into the tool. Continue to select the “New Project” button on the main screen to open a new editing window.

Step 2: Import Video to Filmora
On the main interface, press “Ctrl + I” from your keyboard. By doing so, you can import the video clip from your PC. Once done, drag and drop the imported video to the timeline.

Step 3: Choose Optical Flow
Now, select the video you have dragged to the timeline. Go to the right panel and choose the “Speed” tab. Look through the “Uniform Speed” tab and look for the “AI Frame Interpolation” option. By expanding this option, choose “Optical Flow.”

Step 4: Render and Export the Video
Now, head to the toolbar of the timeline. From there, tap on “Render Preview,” through which you can see the final results. Once done, you can export the video to the desired platform.

With the new upgrade, you can add an accurate slow-mo effect from Filmora. It uses AI technology to achieve the best results. Hence, this editing tool is a game-changer in the video production industry.
Exceptional Features of Filmora
AI Music Generator: This tool allows you to create custom music sounds. To do so, select your music style and genre from the given options. Afterward, you can edit the music by adjusting its volume and other parameters.
Screen Recorder: Do you want to capture the on-screen activities of your PC? The screen recorder of this software can capture any area of the screen. It also allows webcam and microphone recording. Afterward, you can edit the screen recording with its basic tools.
Silence Detection: To add more clarity to your videos, try the Silence Detection feature. This option removes the silent parts from your video. The process is automatic and does not need your manual efforts. Thus, with a single tap, you can eradicate unwanted parts from the video.
Speech-to-Text: The STT feature transcribes the video in the selected language. You can add subtitles to the videos in up to 26 languages. This feature increases your editing efficiency and offers great accuracy.
Conclusion
A slow-motion effect can highlight an action in a video clip. It can engage the viewers by generating a cinematic impact. The After Effects is a common program to add a slow-mo effect in videos. However, to create a more captivating slow-motion effect, we suggest Filmora. Its latest version has introduced many premium features for video editing. With AI algorithms, you can add a smooth, slow-motion effect to your videos. The process is automatic, which saves you from manual work.
Make A Slow Motion Video Make A Slow Motion Video More Features
Part 1: What Does A Perfect Slow Motion Video Contains?
To create a perfect slow-motion video, you must consider several factors. In this section, you can come across some elements through which you can generate an accurate slow-motion effect.
- Resolution: Make sure to record your video in high resolution. By doing so, the slow-motion effect will add more visual clarity. Thus, the minimum resolution should be 1080p or 4K.
- Accurate Lighting: Perfect lighting can make a video look impactful. You can either use natural or artificial lighting to make a well-exposed slow-mo effect.
- Choosing Subject: To grasp the attention, choose the subject carefully. A slow-motion effect in sports activities or water droplets can look eye-catching. Thus, you should choose a subject that looks appealing in a slow-mo effect.
- Sound Selection: A slow-mo effect will look more convincing with a relevant sound design. You should search for slow-mo sound effects to generate attractive results. Also, ensure that the speed of sound effects with the video is managed smartly.
- Frame Rate: A frame rate plays a vital role in creating slow-motion effect. Higher frame rates influence a smooth, slow-motion effect. Thus, use 240fps or higher to create a seamless slow-mo effect.
Part 2: Creating Slow Motion Effect in Adobe After Effects
Adobe After Effects is a famous program used in post-production of video making. It contains many motion graphics effects to enhance a video. You can add animated shapes and text to the video with this tool. Many people use this platform to create VFX in their videos to create stunning videos. It also supports 2D and 3D elements to produce realistic effects.
Furthermore, it offers many tools for compositing and keying. Users can change the color patterns in their videos with this robust software. Moreover, it can create After Effects slow motion with perfect accuracy. You can manually adjust the timing and speed of the slow-motion effect with this tool. Thus, Adobe After Effects is a comprehensive tool for video editing.
Here are the instructions that can guide you to produce slow-motion effects After Effects. Thus, let’s dig into the details:
Step 1
Start by uploading a video on After Effects. Drag it to the timeline and edit it in a desired manner. Now, place the cursor in the timeline to begin the process. Right-click on the timeline layer and select “Time” from the pop-up menu. From there, select “Time Stretch.” It will open a Time Stretch window on the screen.
Step 2
On the Time Stretch window, make the “Stretch Factor” value to 250. Once done, press the “OK” button.
Step 3
For high-quality results, enable the “Frame Blending” option. Right-click on the layer and select “Frame Blending” from the pop-up menu. Here, you can select two options: Frame Mix and Pixel Motion. After the frame blending, you can render the final output. Select a suitable format and then export the video.
Part 3: Quick and Unique Alternative: Making Slow Motion Effect with Wondershare Filmora
An excellent alternative to After Effects is Wondershare Filmora . With the release of its Volume 13, you can enjoy many premium features. To boost your productivity, the tool offers many AI features. You can use its AI copywriting feature to produce video outlines. By doing so, you can have AI-generated content for video production. Furthermore, it provides a smooth performance with its robust interface.
It contains a wide range of filters and overlays. It also allows you to apply transitions in the video clip from various options. To replace backgrounds in the video, try its Green Screen feature. This advanced feature can add realistic backgrounds to the videos easily. Moreover, you can color-correct the video to add perfect exposure properties. You can modify brightness, saturation, and other elements in the color-correct options.
Free Download For Win 7 or later(64-bit)
Free Download For macOS 10.14 or later
How to Add Slow-Motion Effect With Filmora
Are you ready to create a slow-mo effect in Filmora? Read the following section to learn how to create a slow-motion effect using this tool.
Step 1: Select New Project
Begin by launching this desktop tool on your PC. Choose the “Profile” icon from the top and sign into the tool. Continue to select the “New Project” button on the main screen to open a new editing window.
Step 2: Import Video to Filmora
On the main interface, press “Ctrl + I” from your keyboard. By doing so, you can import the video clip from your PC. Once done, drag and drop the imported video to the timeline.
Step 3: Choose Optical Flow
Now, select the video you have dragged to the timeline. Go to the right panel and choose the “Speed” tab. Look through the “Uniform Speed” tab and look for the “AI Frame Interpolation” option. By expanding this option, choose “Optical Flow.”
Step 4: Render and Export the Video
Now, head to the toolbar of the timeline. From there, tap on “Render Preview,” through which you can see the final results. Once done, you can export the video to the desired platform.
With the new upgrade, you can add an accurate slow-mo effect from Filmora. It uses AI technology to achieve the best results. Hence, this editing tool is a game-changer in the video production industry.
Exceptional Features of Filmora
AI Music Generator: This tool allows you to create custom music sounds. To do so, select your music style and genre from the given options. Afterward, you can edit the music by adjusting its volume and other parameters.
Screen Recorder: Do you want to capture the on-screen activities of your PC? The screen recorder of this software can capture any area of the screen. It also allows webcam and microphone recording. Afterward, you can edit the screen recording with its basic tools.
Silence Detection: To add more clarity to your videos, try the Silence Detection feature. This option removes the silent parts from your video. The process is automatic and does not need your manual efforts. Thus, with a single tap, you can eradicate unwanted parts from the video.
Speech-to-Text: The STT feature transcribes the video in the selected language. You can add subtitles to the videos in up to 26 languages. This feature increases your editing efficiency and offers great accuracy.
Conclusion
A slow-motion effect can highlight an action in a video clip. It can engage the viewers by generating a cinematic impact. The After Effects is a common program to add a slow-mo effect in videos. However, to create a more captivating slow-motion effect, we suggest Filmora. Its latest version has introduced many premium features for video editing. With AI algorithms, you can add a smooth, slow-motion effect to your videos. The process is automatic, which saves you from manual work.
Steps To Fade Audio In Premier Pro
Audio is a very big part of any video project and it can make or break the video project. This is why it is very important to not just choose a video editor that also offers audio editing, but one that is easy to use and offers a lot of editing options. This way, you can edit the audio in your project to suit your video’s production and end up with a great professional final product.
One of the video editing tools that offer features that can accomplish all that is Adobe Premier Pro. In this article, we will look at how you can use Premier Pro to fade audio in or out.
Steps to Fade Audio in Premier Pro
Premier Pro gives you two different options to fade audio in or out. Let’s look at both options and then you can choose the one that suits you best;
Fade Audio using Crossfade Audio Transition
Step1To begin, open Premier Pro on your computer and then open the audio that you want to edit.
Step2Once it is open, select the audio clip in the timeline and then click on “Sequence” at the top menu and select “Apply Audio Transition.”
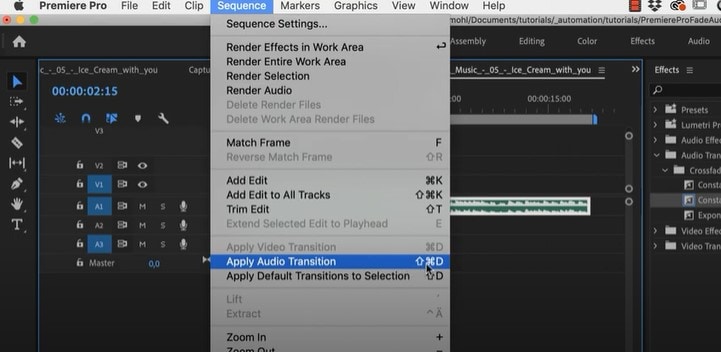
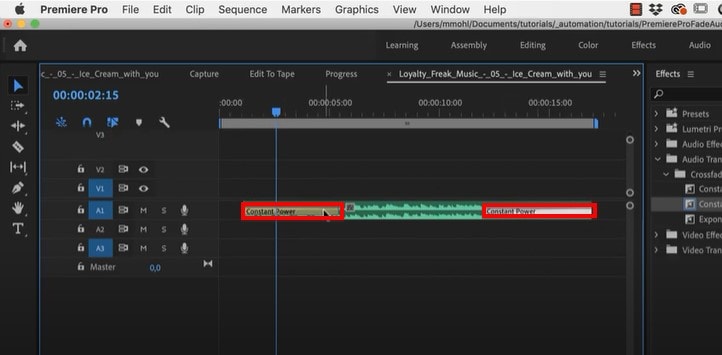
You can also use the keyboard shortcut Shift + Command + D (macOS) or Shift+ Ctrl + D (PC). This will add the “Constant Power Cross Fade” effect at the beginning and the end of the clip.
Step3You can then just change the duration of the effect by simply dragging the end of the transition.
Fade Audio using Clip Keyframes
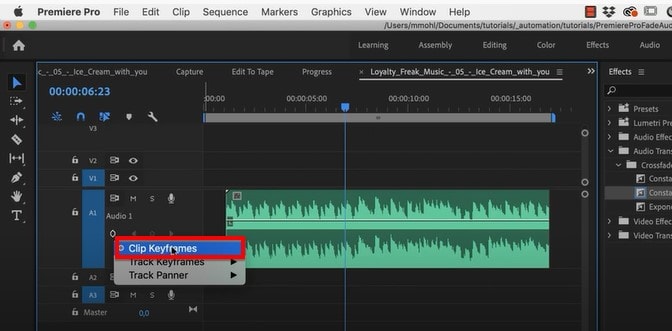
Step1Adobe Premier Pro has two volume keyframes; Track and Clip. Make the audio larger so you can see the volume line and then under the audio name, click on the volume keyframes option to make sure “Clip Keyframes” is enabled.
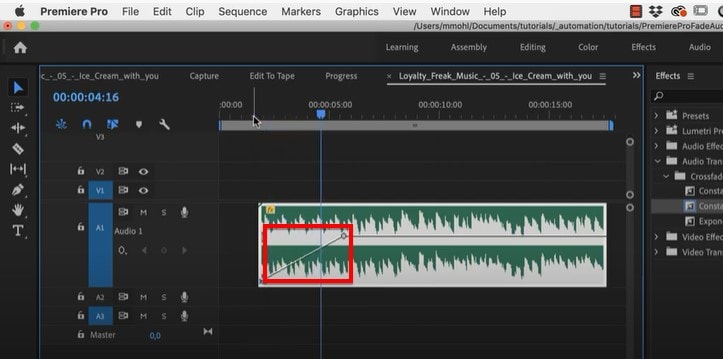
Step2You can then press down on the Command Key (macOS) or the Control Key (PC) and drag the volume line down to add a fade-in or fade-out effect.
Adobe Premiere Alternative Way to Fade Audio
If you are like most people and you find Adobe Premier Pro to be very difficult you use, we have a tool that is just as effective but also simplifies the process. This is the very simple to use Wondershare Filmora .
Just like Premier Pro, Filmora gives you two options to fade audio in and out. Let’s look at both options;
Adding Fade in and Out in Audio Pane
Step1Download and install Wondershare Filmora onto your computer, open the program and then import the audio clip that you want to edit.
Step2Once the video has been added to the timeline, double-click on it to access the “Audio” editing panel.
Step3Here, you can very simply add the fade-in and fade-out effects by simply dragging the sliders to the desired duration or by manually entering the duration in seconds.

Using the Audio Waveform
You can also use the fade icons on the left and right edges of the audio waveform to quickly add a fade in and out.
To add a fade-in effect, drag the fade-in maker to the right. Then go to the end of the clip to drag the fade-out maker to the left to add a fade-out effect.

Related FAQs about Audio Fade
1. How Do I Fade to Black in Adobe Premiere Pro?
You can easily add the Fade to Black transition in Adobe Premiere Pro using the “Effects” tab. Just open the two clips in Premiere Pro and go to “Effects.” Type in “dip to black” in the search box and when you find the effect, drag it between the two clips in the timeline. The effect will appear on the right side of the project.
You also have several customization options that you can apply to the effect to get it just right. To see these options, go to Effect Controls and you should be able to change the alignment of the effect to “Center at Cut” so that the first video fades out to black before the second video appears.
2. Premiere Pro Audio Fade Not Working?
Sometimes you can complete all the editing steps we have described above but you are unable to tell if the fade-in and fade-out effects are working because you can’t play the audio in Premiere. This is a very common problem that can easily be fixed using the following troubleshooting steps;
Check the master volume on your computer to see if this is the problem
Then check the volume in Premiere to see if the audio meter is moving as you play the clip. It is the green bar usually in the lower right corner.
If your volume is fine but you still can’t hear the audio, you may need to adjust several settings. Go to Edit > Preferences (on PC) or Preferences menu under the main Premiere Pro CC menu (macOS) and select “Audio Hardware” in the options that appear. You can then change the “Default Output” device to something else.
3. How Do You do Audio Transitions in Premiere Pro
Adding audio transitions in Premiere Pro is very easy; just open the audio that you want to edit and then Right-click (PC) or Control- Click (macOS) on either the “Constant Gain” or “Constant Power” effect from the Effects panel. Then choose “Set Selected as Default Transition” from the options in the menu.
To add a duration for the audio transitions, go to Edit > Preferences > Timeline (PC) or Premiere Pro Menu > Preferences (macOS) and enter the duration value under “Audio Transition Default Duration.”
Free Download For Win 7 or later(64-bit)
Free Download For macOS 10.14 or later
Also read:
- 2024 Approved Top Animated Title Makers
- Updated In 2024, How to Create a Smooth Cut Transition Effect?
- Updated Lets Introduce the Top 5 Applications to Add a Song to a Video for Free with some Amazing Sound and Visual Effects
- New | Top GIF to MP4 Converters
- Updated 2024 Approved 3 Actionable Ways to Create Countdown Animation for Videos
- New In 2024, For Artists Who Are Making Videos for Show Their Knowledge or Projects, Add some Effects for the Video Can Always Provoke Interests and Attention. This Article Will Show You How to Do that Easily
- Updated This Review Post Introduces You to EasyHDR to Review and Customize Your HDR Photos. Youll Also Learn the Best Desktop Application to Edit Your HDR Videos Effortlessly
- Use The Best LUTs for Lightroom
- Before & After Editing Trick - Filmora for 2024
- Updated 2024 Approved Methods on How to Speed Up Video on Splice
- 2024 Approved Best 8 AR Apps for Android and iOS | Help You See the World of AR
- 2024 Approved Boost Your Spirit Creating Motivational Status Videos
- 2024 Approved Finding Best GIF Websites Is Easy as Pie — Heres What You Should Know
- Updated 4 Ways to Merge MP4 and MP3
- Updated 2024 Approved Do You Wish to Make Changes Across Your Video? Are You Looking to Record Your Desktop Screen on Mac? Worry Not, as This Article Provides Details About QuickTime Player that Caters to All User Requirements
- Updated In 2024, How to Use LUTS to Color Grade on Your iPhone
- Updated In 2024, How to Make After Effects Gifs
- Want to Buy a Drone for Better Videography Creating? This Article Will Review 6 of the Best Drones on the Market for You to Consider
- New In 2024, Learning How to Create LUTs with LUTs Generator
- New Applying and Creating Gif Background on Your Devices and Presentations Is Not Hard. Read Below to Learn How to Apply a GIF Background on All Devices for 2024
- Separate Audio From Video in DaVinci Resolve Step by Step
- How To Make Ninja Jump Effect with Filmora
- End Screen Makers
- Updated 2024 Approved How to Make Fortnite Thumbnail with Motion Blur?
- How to Create Sports Intro and Outro for YouTube Video?
- Updated Deep Learning of AI Video Recognition for 2024
- Updated In 2024, Advancements in Game Recording Software A Comprehensive Overview
- Updated How To Quickly Create A Screen Print Effect In Photoshop Detailed Gui for 2024
- Updated List of Whatsapp Video Format That You May Need to Know
- New Are You Curious About Finding a Good iPhone Slow-Motion App? Discover the Top-Rated Applications in the Market that Will Help You Create the Perfect Video for 2024
- Updated 2024 Approved How To Use Motion Blur On Video Star?
- New In This Article Ill Share to You some of the Skin Care Vlog Ideas for You to Start Doing a Skin Care Review on Your YouTube Channel. But Before that Ill Share with You How Important Is Skin Care?
- 2024 Approved Guide To Cropping and Combining Content in Wondershare Filmora Latest
- New In 2024, Cropping Videos in VLC Step by Step
- Updated 2024 Approved How To Add Fade In Windows Video Editor
- Step by Step to Rotate Videos Using OBS
- New Fascinated About Exploring Your Graphic Creativity by Experimenting with Designing Slideshow Presentations on a Variety of Software Programs? Stay Here to Get the Know-How of Using Clideo
- Updated 2024 Approved Color Match Game Top Tips for You
- Updated 2024 Approved Read and Learn How to Convert a Slow-Motion Video to Normal in This Guide. Besides, Find the Best Desktop Solution to Adjust Video Speed Quickly and Easily
- Tutorial Guides for Video Maker with Song
- 2024 Approved How to Upload Videos to Twitch? Heres a Guide for Beginner
- New Step by Step to Rotate Videos in Davinci Resolve
- Updated Confused as to How to Add Subtitles to a Video on iPhone? No Worries as We Bring You the Best Solution to Get the Task Done for 2024
- In 2024, Get to Know How Excellent Sparkle Video Effects Can Significantly Impact Different Projects. Its Miraculous. Read Below to Learn More and Add Sparkle Effect to Your Videos
- Updated Create Glitch Text Effect for 2024
- How to Create a Light Sweep (Shine) Effect with Filmora for 2024
- Top 22 Free Video Editing Software for 2024
- Updated 2024 Approved Best 8 Top Premiere Pro Slideshow Templates
- Updated How to Easily Add VHS Green Screen to Your Video for 2024
- Updated In 2024, 3 Ways To Stream And Record At The Same Time
- In 2024, Full Guide to Fix iToolab AnyGO Not Working On Infinix Smart 7 HD | Dr.fone
- 8 Solutions to Solve YouTube App Crashing on Vivo V27e | Dr.fone
- How to recover deleted photos from Android Gallery without backup on 13T Pro
- In 2024, How to Reset your Samsung Galaxy M54 5G Lock Screen Password
- 15 Best Strongest Pokémon To Use in Pokémon GO PvP Leagues For Honor 90 Pro | Dr.fone
- In 2024, How to Mirror PC Screen to Xiaomi 14 Phones? | Dr.fone
- 5 Ways to Reset Vivo T2 Pro 5G Without Volume Buttons | Dr.fone
- Full Solutions to Fix Error Code 920 In Google Play on Xiaomi Redmi A2+ | Dr.fone
- In 2024, A Guide Oppo Reno 10 Pro+ 5G Wireless and Wired Screen Mirroring | Dr.fone
- Will Pokémon Go Ban the Account if You Use PGSharp On Vivo Y17s | Dr.fone
- Things You Dont Know About Tecno Spark 10 Pro Reset Code | Dr.fone
- In 2024, How to Turn Off Google Location to Stop Tracking You on Nokia C02 | Dr.fone
- Life360 Learn How Everything Works On Poco M6 Pro 4G | Dr.fone
- In 2024, Ultimate Guide from Vivo T2 5G FRP Bypass
- Fix Apple iPhone 7 Plus Stuck on Data Transfer Verified Solution! | Dr.fone
- How To Activate and Use Life360 Ghost Mode On OnePlus 12R | Dr.fone
- In 2024, 5 Ways To Teach You To Transfer Files from Vivo T2 5G to Other Android Devices Easily | Dr.fone
- How to restore wiped messages on Nokia G22
- How to Track Asus ROG Phone 8 Pro Location by Number | Dr.fone
- How to Hide/Fake Snapchat Location on Your Lava Yuva 3 | Dr.fone
- Sign Word 2003 Online for Free
- 2 Ways to Transfer Text Messages from Realme 12 Pro+ 5G to iPhone 15/14/13/12/11/X/8/ | Dr.fone
- How to recover deleted pictures from Galaxy S23 Tactical Edition.
- In 2024, Does Life360 Notify When You Log Out On Lenovo ThinkPhone? | Dr.fone
- Unlock Your Boost Mobile Apple iPhone 15 Pro Before the Plan Expires
- Fake Android Location without Rooting For Your Samsung Galaxy A24 | Dr.fone
- In 2024, Did Your Apple iPhone 8 Passcode Change Itself? Unlock It Now
- In 2024, 3 Methods to Mirror Motorola Edge 40 Neo to Roku | Dr.fone
- In 2024, Rootjunky APK To Bypass Google FRP Lock For Infinix Smart 8 Plus
- Title: 2024 Approved Learn How to Add Dynamic Shake Effects to Your Videos Using Alight Motion. Our Step-by-Step Guide Makes It Easy to Create Cinematic Footage
- Author: Morgan
- Created at : 2024-05-19 05:12:39
- Updated at : 2024-05-20 05:12:39
- Link: https://ai-video-editing.techidaily.com/2024-approved-learn-how-to-add-dynamic-shake-effects-to-your-videos-using-alight-motion-our-step-by-step-guide-makes-it-easy-to-create-cinematic-footage/
- License: This work is licensed under CC BY-NC-SA 4.0.
