
:max_bytes(150000):strip_icc():format(webp)/should-you-buy-an-apple-tv-5248431-f35331ef36b749b9895a2c1e3705cf22.jpg)
2024 Approved Making Slow Motion Videos in Premiere Pro A Review on The Best Method
Making Slow Motion Videos in Premiere Pro: A Review on The Best Method
Slow-motion videos can give your videos more depth, drama, and emotion. Your viewers will find your films more interesting if you use slow-motion effects. It can bring attention to a shot, produce an artistic effect, or relive a memorable scene. Slow-motion video has been used for decades to add dramatic effects to films and videos.
If you’re interested in how to do slow-mo in Premiere Pro, this article is your ultimate solution. Read the article and add artistic to dramatic slow-mo to your videos. You will eventually come to know how to do slow mo on Premiere Pro with ease.
Slow Motion Video Maker Slow your video’s speed with better control of your keyframes to create unique cinematic effects!
Make A Slow Motion Video Make A Slow Motion Video More Features

Part 1: What Are Some Potential Real-Life Use Cases of Having Slow Motion Videos?
Slow-motion movies can be utilized to record and examine events in greater depth. Before delving into how to make a slow-motion video in Premiere Pro, learn its use cases. Thus, below are a few applications of the slow motion in real life:
- Medical Research and Imaging: Slow-motion videos are used in medical research and education. They thoroughly examine surgical methods and practices. This promotes medical practice improvement and student’s better comprehension of concepts.
- Cinematography and Filmmaking: Filmmakers use slow motion to add dramatic and creative effects. It can arouse feelings, highlight particular movements, or produce a dreamlike mood. In commercials, these videos create sequences of the message you want to convey.
- Wildlife Observation: Slow-motion recordings can be very useful in animal research. They can be used to watch and record animal activity more closely. It gives researchers a better knowledge of the animal’s habits.
- Sports analysis: Slow-motion effect can analyze an athlete’s movement mechanics and give reviews. Coaches and athletes pinpoint areas where their technique needs to be improved.
- Product Testing and Quality Control: Video effects also prove useful in industries. It allows engineers to inspect high-speed operations and identify any flaws or malfunctions.
- **Crash Test Analysis:**Analyzing slow-motion video is essential for examining vehicle crash tests. It aids in improving car designs and evaluating the performance of safety systems.
Part 2: Performing Slow Mo in Adobe Premiere Pro: Using A Good Option
Adobe Premiere Pro’s editing interface makes its reputation high in the market. It is known as the industry standard tool because of its unparalleled features. Content developers and filmmakers can arrange and edit video files on it. It can also improve audio and image quality with its extensive editing toolkit.
Premier Pro offers many more functions than basic video editing. It offers some features that can change your content creation journey. Following are some of its basic features that you should know before learning Premiere Pro how to slow motion:
- Auto Reframe: This feature keeps the object of the image in the frame no matter which frame you choose. You can easily auto-frame a single clip or go for the entire video.
- Text-Based Editing: Text-based editing can give you more control over the transcript. It can deal with multi-channel audio recordings and remove gaps with a single click.
- Color Settings: Color settings allow you to adjust colors quickly and easily. It can check the result by combining multiple color selections into a single tab.
- Audio Auto-Tagging: This feature classifies audio files as either dialogue, music, or ambiance. It then provides access to the most useful tools for producing high-quality audio.
This guide will tell you how to make a slow-motion video on Premiere Pro. Follow the steps below to decrease the speed of your video across Adobe Premiere Pro:
Step 1
Import your video into the timeline and right-click on the icon you see with the video file on the timeline. From here, go to “Time-Remapping” and click on “Speed.” You will know the function has been activated when you see the white line on your timeline.

Step 2
Expand the timeline to see the ramping line. Now click on the ramping line by using the “Ctrl + click” command. You can also add keyframes by going to the toolkit on the left side of the screen and selecting the “Add Keyframe” button. Another option is the time remapping speed settings from the top and activating the keyframe.

Step 3
Move the timeline cursor to the right side and add another keyframe there. Now, double-click on the first keyframe and drag it to the right side just a bit. After that, drag the speed ramping line downwards to create a ramp. To change the length of keyframes more precisely, go to “Effects Control” from the top and manage its length.

Part 3: Quick Alternative: Wondershare Filmora and Slow-Motion Clips
You might have gotten the answer to “how to make slow-motion video in Premiere Pro” until now. But another question comes into mind: “How to make slow-mo videos easily ?” Using Adobe Premiere Pro can be tricky for starters, so they look for alternative tools. Filmora is a great option if you struggle with using Adobe Premier Pro.
The tool is easy to use and can process heavy videos, keeping its quality intact. With its AI features, the edits that used to take hours can now be done within minutes. The tool has amazing options for all kinds of media editing.
Step-by-Step Guide to Perform Slow Motion in Filmora Using Different Methods
Remarkable features of Filmora do not end here. If you want to know more about Filmora, you should download it, but first, learn how to add slow motion in reels. In this read, follow the guide below:
Free Download For Win 7 or later(64-bit)
Free Download For macOS 10.14 or later
Method 1: Using Uniform Speed
Using this method, you can slow down your video smartly with the help of AI. Some options in uniform speed will help you to automate the process while ensuring the quality of the content. Look at the steps below to add slo-mo to your video like a pro:
Step 1Import Media to the Timeline and Explore Uniform Speed
Install Filmora 13 on your device and open it to access “New Project” from the main interface. When you enter the editing window, import your file into the media panel.

Step 2Adjust the Speed and Other Use Advanced Options
Later, drag that file to the timeline and right-click on it to get a list. Select the “Uniform Speed” option from that list and head to the editing panel opened to the right. Under the “Speed,” there will be a slider. You have to move it to the left for slow-motion video. While adjusting speed with that slider, track video duration from the “Duration” section. Below that option, you can toggle the “Reverse Speed” option if required.

Otherwise, check the “Ripple Edit” and “Maintain Pitch” option for good. Now, extend the “AI Interpolation” menu and choose “Optical Flow.” It will let AI automatically adjust the video speed in slow motion with high quality.

Method 2: Using Speed Ramping
If you want to bring a professional look to Slow-motion videos, use Speed Ramping. It will ensure a smooth change in video speed when it increases or decreases. To add this refined touch to videos, look at the given steps:
Step 1Access the Speed Ramping Option in 2 Ways
Tap the “Speed Ramping” next to the “Uniform Speed” in the right-side panel. Optionally, you can right-click on your videos in the timeline. There, you will find the “Speed Ramping” option below the “Uniform Speed” option in the list.

Step 2Speed Ramping Your Videos and Get Render Preview
In the Speed Ramping Section, you will get 6 templates. Pick one or hit the “Customize” to design your own speed ramping in videos. Later, move to the toolbar of the timeline section and choose “Render Preview” next to the “Copilot” icon. It will bring a smooth playback of your speed ramping in videos.

Matchless Features of Wondershare Filmora
Wondershare Filmora offers a creative editing experience. It has a number of important features, some of which are discussed below:
AI Copilot: You can speed up your video editing process with the AI Copilot Editing function. It offers AI assistance anytime you need it and gives a quick response. This feature directs you towards the required feature with a button. To get assistance, users just have to prompt questions in natural language.
AI Text-Based Editing: You can edit your video content with the AI Text-Based Editing tool. This feature can transcribe your spoken words into editable text. Afterward, you can edit the text based on your preferences, and the changes in the video will be added. Moreover, Filmora allows you to save the generated text to reuse it in articles and blogs later.
AI Copywriting: If you are stuck creating a unique script, get help from AI copywriting in Filmora. It gives several video ideas to generate YouTube video titles and descriptions. This creative personal assistant will bring content aligning with your video goals. The generated script can be used to make videos from Filmora’s text-to-video feature.
Conclusion
Regular videos do not always generate the same level of response from viewers. Slow-mo videos can make a video more entertaining and improve the film’s narrative. It’s good to use when you want to draw attention to the most significant shot in a video. This article shows how to make slow motion in Premiere Pro and offers an amazing alternative. Thus, try to use Filmora and improve your editing experiences with ease.
Make A Slow Motion Video Make A Slow Motion Video More Features
Part 1: What Are Some Potential Real-Life Use Cases of Having Slow Motion Videos?
Slow-motion movies can be utilized to record and examine events in greater depth. Before delving into how to make a slow-motion video in Premiere Pro, learn its use cases. Thus, below are a few applications of the slow motion in real life:
- Medical Research and Imaging: Slow-motion videos are used in medical research and education. They thoroughly examine surgical methods and practices. This promotes medical practice improvement and student’s better comprehension of concepts.
- Cinematography and Filmmaking: Filmmakers use slow motion to add dramatic and creative effects. It can arouse feelings, highlight particular movements, or produce a dreamlike mood. In commercials, these videos create sequences of the message you want to convey.
- Wildlife Observation: Slow-motion recordings can be very useful in animal research. They can be used to watch and record animal activity more closely. It gives researchers a better knowledge of the animal’s habits.
- Sports analysis: Slow-motion effect can analyze an athlete’s movement mechanics and give reviews. Coaches and athletes pinpoint areas where their technique needs to be improved.
- Product Testing and Quality Control: Video effects also prove useful in industries. It allows engineers to inspect high-speed operations and identify any flaws or malfunctions.
- **Crash Test Analysis:**Analyzing slow-motion video is essential for examining vehicle crash tests. It aids in improving car designs and evaluating the performance of safety systems.
Part 2: Performing Slow Mo in Adobe Premiere Pro: Using A Good Option
Adobe Premiere Pro’s editing interface makes its reputation high in the market. It is known as the industry standard tool because of its unparalleled features. Content developers and filmmakers can arrange and edit video files on it. It can also improve audio and image quality with its extensive editing toolkit.
Premier Pro offers many more functions than basic video editing. It offers some features that can change your content creation journey. Following are some of its basic features that you should know before learning Premiere Pro how to slow motion:
- Auto Reframe: This feature keeps the object of the image in the frame no matter which frame you choose. You can easily auto-frame a single clip or go for the entire video.
- Text-Based Editing: Text-based editing can give you more control over the transcript. It can deal with multi-channel audio recordings and remove gaps with a single click.
- Color Settings: Color settings allow you to adjust colors quickly and easily. It can check the result by combining multiple color selections into a single tab.
- Audio Auto-Tagging: This feature classifies audio files as either dialogue, music, or ambiance. It then provides access to the most useful tools for producing high-quality audio.
This guide will tell you how to make a slow-motion video on Premiere Pro. Follow the steps below to decrease the speed of your video across Adobe Premiere Pro:
Step 1
Import your video into the timeline and right-click on the icon you see with the video file on the timeline. From here, go to “Time-Remapping” and click on “Speed.” You will know the function has been activated when you see the white line on your timeline.
Step 2
Expand the timeline to see the ramping line. Now click on the ramping line by using the “Ctrl + click” command. You can also add keyframes by going to the toolkit on the left side of the screen and selecting the “Add Keyframe” button. Another option is the time remapping speed settings from the top and activating the keyframe.
Step 3
Move the timeline cursor to the right side and add another keyframe there. Now, double-click on the first keyframe and drag it to the right side just a bit. After that, drag the speed ramping line downwards to create a ramp. To change the length of keyframes more precisely, go to “Effects Control” from the top and manage its length.
Part 3: Quick Alternative: Wondershare Filmora and Slow-Motion Clips
You might have gotten the answer to “how to make slow-motion video in Premiere Pro” until now. But another question comes into mind: “How to make slow-mo videos easily ?” Using Adobe Premiere Pro can be tricky for starters, so they look for alternative tools. Filmora is a great option if you struggle with using Adobe Premier Pro.
The tool is easy to use and can process heavy videos, keeping its quality intact. With its AI features, the edits that used to take hours can now be done within minutes. The tool has amazing options for all kinds of media editing.
Step-by-Step Guide to Perform Slow Motion in Filmora Using Different Methods
Remarkable features of Filmora do not end here. If you want to know more about Filmora, you should download it, but first, learn how to add slow motion in reels. In this read, follow the guide below:
Free Download For Win 7 or later(64-bit)
Free Download For macOS 10.14 or later
Method 1: Using Uniform Speed
Using this method, you can slow down your video smartly with the help of AI. Some options in uniform speed will help you to automate the process while ensuring the quality of the content. Look at the steps below to add slo-mo to your video like a pro:
Step 1Import Media to the Timeline and Explore Uniform Speed
Install Filmora 13 on your device and open it to access “New Project” from the main interface. When you enter the editing window, import your file into the media panel.
Step 2Adjust the Speed and Other Use Advanced Options
Later, drag that file to the timeline and right-click on it to get a list. Select the “Uniform Speed” option from that list and head to the editing panel opened to the right. Under the “Speed,” there will be a slider. You have to move it to the left for slow-motion video. While adjusting speed with that slider, track video duration from the “Duration” section. Below that option, you can toggle the “Reverse Speed” option if required.
Otherwise, check the “Ripple Edit” and “Maintain Pitch” option for good. Now, extend the “AI Interpolation” menu and choose “Optical Flow.” It will let AI automatically adjust the video speed in slow motion with high quality.
Method 2: Using Speed Ramping
If you want to bring a professional look to Slow-motion videos, use Speed Ramping. It will ensure a smooth change in video speed when it increases or decreases. To add this refined touch to videos, look at the given steps:
Step 1Access the Speed Ramping Option in 2 Ways
Tap the “Speed Ramping” next to the “Uniform Speed” in the right-side panel. Optionally, you can right-click on your videos in the timeline. There, you will find the “Speed Ramping” option below the “Uniform Speed” option in the list.
Step 2Speed Ramping Your Videos and Get Render Preview
In the Speed Ramping Section, you will get 6 templates. Pick one or hit the “Customize” to design your own speed ramping in videos. Later, move to the toolbar of the timeline section and choose “Render Preview” next to the “Copilot” icon. It will bring a smooth playback of your speed ramping in videos.
Matchless Features of Wondershare Filmora
Wondershare Filmora offers a creative editing experience. It has a number of important features, some of which are discussed below:
AI Copilot: You can speed up your video editing process with the AI Copilot Editing function. It offers AI assistance anytime you need it and gives a quick response. This feature directs you towards the required feature with a button. To get assistance, users just have to prompt questions in natural language.
AI Text-Based Editing: You can edit your video content with the AI Text-Based Editing tool. This feature can transcribe your spoken words into editable text. Afterward, you can edit the text based on your preferences, and the changes in the video will be added. Moreover, Filmora allows you to save the generated text to reuse it in articles and blogs later.
AI Copywriting: If you are stuck creating a unique script, get help from AI copywriting in Filmora. It gives several video ideas to generate YouTube video titles and descriptions. This creative personal assistant will bring content aligning with your video goals. The generated script can be used to make videos from Filmora’s text-to-video feature.
Conclusion
Regular videos do not always generate the same level of response from viewers. Slow-mo videos can make a video more entertaining and improve the film’s narrative. It’s good to use when you want to draw attention to the most significant shot in a video. This article shows how to make slow motion in Premiere Pro and offers an amazing alternative. Thus, try to use Filmora and improve your editing experiences with ease.
Getting To Know More About the Video Editing Interface of Wondershare Filmora
The importance of good editing software depends on its features and interface. A video editing interface is important when it comes to choosing editing software. The more user-friendly the interface, the easier it is to use the particular tool for editing. Many video editing software is available, but not every tool is popular. One of the reasons is their interface is not friendly enough for the user.
However, getting to know the software’s interface is as crucial as using the tool. Being familiar with the interface will help you understand the tool even better. An interface is like a map; if you’re familiar with the map, you can edit your videos using the tool. This article will explain the user interface design of Wondershare Filmora in detail.
Part 1: How Has Video Editing Improved Over the Years?
Video editing has significantly improved over the years due to advancements in technology. The development of new software and hardware has improved the editing process. You can read some of the most prominent ways video editing has improved.
Edit Video for Free For Win 7 or later(64-bit)
Edit Video for Free For macOS 10.14 or later


1. Digital Editing
The transition from analog to digital editing revolutionized the field. Digital editing eliminated the need for physical film and allowed for non-linear editing. In this way, video clips could be rearranged, trimmed, and modified on a computer. This digital workflow provided greater flexibility, efficiency, and creative possibilities.
2. Improved Software Capabilities
Video editing software has become more powerful with better features. Modern software offers a wide range of tools for editing for the user. These tools have offered color correction, visual effects, and audio mixing. The interfaces have become more friendly, making editing accessible to more people.
3. Real-Time Playback and Rendering
Advancements in hardware and software have enabled real-time video playback. It further eliminates the need for time-consuming rendering during the editing process. Additionally, it allows editors to see their changes, improving efficiency and productivity.
4. High-Resolution Video
With the availability of high-resolution cameras and displays, the quality has improved. Now, video editing has adapted to handle larger and more detailed video files. Such software can edit and export videos in higher resolutions, even up to 4K and 8K.
5. Special Effects and Visual Enhancements
These editing tools can handle complex visual effects and enhancements. Features such as green screens, motion tracking, and 3D effects have become easier to use. Furthermore, these tools allow editors to achieve sophisticated and professional-looking results.
6. Collaboration and Cloud-Based Editing
The rise of cloud computing has introduced new opportunities for collaboration in video editing. Such editing platforms enable multiple editors to work on the same project. Individuals can share files, get inspiration and collaborate remotely. This feature has facilitated more efficient workflows and improved collaboration among people.
Edit Video for Free For Win 7 or later(64-bit)
Edit Video for Free For macOS 10.14 or later
7. Faster Rendering and Exporting
Video editing software now utilizes multi-threading and GPU acceleration to speed up rendering. These new advancements in technology also help in exporting processes. It reduces the time required to generate the final video output. Additionally, it allows editors to meet tight deadlines and work more quickly.
8. Integration with Other Software and Formats
Editing tools have improved their compatibility with other software and formats. They now integrate with visual effects software, audio editing tools, and other tools. Additionally, these tools support a wide range of video file formats. This compatibility means easier import and export of videos from various sources.
9. Mobile Editing
Smartphones and tablets have brought video editing to mobile devices. Mobile apps now offer robust editing capabilities, allowing users to edit videos on the go. This advancement has increased accessibility and convenience for users as well. Now, people prefer to edit videos using their mobile devices.
10. AI-Assisted Editing
Artificial Intelligence (AI) is now integrated into photo and video editing tools. AI can automate certain repetitive tasks and suggest edits or effects based on patterns. This technology also makes change and even suggest edits by learning your preferences. This can save you time and assist editors in making creative decisions.
Part 2: What Should A Good Video Editing Software Constitute?
A good editing tool should possess several key features and functionalities. The purpose of these tools is to provide a comprehensive and efficient editing experience. Here are some important aspects that an excellent video editing tool should have. This help develops a narrative involving its user interface design:
Edit Video for Free For Win 7 or later(64-bit)
Edit Video for Free For macOS 10.14 or later
1. Comprehensive Editing Tools
The software should offer editing tools and features to accommodate different editing needs. This includes basic functions like trimming, cutting, and merging clips. Moreover, it should also offer some advanced capabilities and editing options as well. The software should provide flexibility and control over the editing process.
2. Support for Various Video Formats
Such software should support a wide range of video formats and codecs. This ensures compatibility with different cameras, file types, and video sources. It also allows editors to work with diverse content without the need for additional file conversion.
3. User-Friendly Interface
An editing tool should have a friendly interface and be easy to use. It also should allow users to navigate through the editing process smoothly. Such tools should provide easy access to tools, menus, and features. Additionally, a friendly video editing interface makes the tool simple for everyone.
4. High-Quality Output
These tools should be capable of producing high-quality video output. It should support exporting videos in different resolutions. This includes standard definition, high definition, and even 4K or higher resolutions. The ability to export in different formats and compression options is also valuable.
5. Efficient Performance
Video editing can be resource-intensive, so good software means efficient performance. It should utilize system resources and provide smooth playback for previewing. Additionally, it should minimize rendering times for quicker previews and exports.
6. Audio Editing Capabilities
Audio is one of the most important components of the video editing process. So, the software should offer different audio editing features. This includes the ability to adjust volume levels, apply audio effects, and much more. Furthermore, it should synchronize audio with video and support multiple audio tracks for editing as well.
7. Special Effects and Visual Enhancements
Advanced video editing software often includes special effects and other enhancement options. Filters, overlays, motion graphics, and other key functionalities should be offered. These features allow editors to improve their videos and achieve specific creative objectives.
8. Collaboration and Sharing Options
Powerful editing tools should facilitate collaboration among editors or team members. It should offer features like project sharing and version control. Also, it should provide users the option to work on the same project simultaneously. Additionally, seamless integration with cloud storage or online platforms can be beneficial.
9. Regular Updates and Support
Recommended tools should have a development team that regularly releases updates. The constant updates should address bugs, improve performance, and introduce new features. Timely customer support is also valuable for users to seek assistance.
10. Cost and Licensing Options
Consideration of the software’s pricing model and licensing options is important. Some software may offer a one-time purchase with perpetual usage. However, many others may have subscription-based models. It’s important to assess the pricing structure and determine if it aligns with your budget and editing needs.
Part 3: Wondershare Filmora: Does It Cover All The Points of a Good Video Editing Software?
Wondershare Filmora is a comprehensive video editing software that is available for everyone. One can download this tool from its official website and start editing. This tool provides a platform for professionals and for those who started editing. This tool allows you to edit your videos with many editing options. Additionally, this tool provides features from basic to more advanced ones.
Edit Video for Free For Win 7 or later(64-bit)
Edit Video for Free For macOS 10.14 or later
We have learned previously about what a good editing tool should offer. So, let’s discuss here what Wondershare Filmora has to offer its users.

Key Features of Wondershare Filmora
1. Wondershare Filmora is a complete editing software that you can download. It offers some basic editing options to more professional and advanced ones. You can find it to be the best platform to edit YouTube videos and more.
2. This tool has a friendly and easy-to-use interface. It makes navigation and editing easy, which further makes the process seamless.
3. The software interface supports different formats for images and videos. It includes PAL, MP4, JPEG, Cineform, and more. This makes the import and export of the files easier to share and edit.
4. Filmora is an editing platform that has the capability of handling higher resolutions. Using this tool, you can import and export your video files in up to 4K resolution.
5. Another excellent key feature of this tool is that you can add your audio files for edit . You can import your own audio files or can choose from the in-built library for your videos.
6. If you’re looking for a unique feature, then this feature will amaze you. Wondershare Filmora is equipped with the latest technology and is going through frequent updates. These updates help you to cut down the rendering speed.
7. You have so much to explore with this tool. Filmora has an in-built library that includes presets, effects, filters, and more. Users can use these presets for their editing work.
8. Additionally, if you want to share your videos for different platforms, you can with this tool. This software lets you change the aspect ratio of your video so you can easily share it on different platforms.
9. Besides editing options and features, this tool goes through constant updates and improvements. The latest version of Filmora comes with multiple AI features and support.
10. Lastly, Wondershare Filmora is free software but also offers premium plans for users. You can choose from different subscription plans.
Pricing Plans Offered by Wondershare Filmora
Are you satisfied with working on Wondershare Filmora’s interface? Look into the provided pricing table for some more prominent details:
| Type | Package | Pricing |
|---|---|---|
| Individual | Month Plan | $19.99 |
| Cross-Platform Plan | $69.99/Year | |
| Perpetual Plan | $79.99 | |
| Team & Business | Annual Plan | $155.88/User |
| Education | Monthly Plan | $19.99 |
| Annual Plan | $40.99 | |
| Perpetual Plan | $49.99 |
Part 4: Explaining The Interface - Wondershare Filmora
If you want to learn about the interface of Wondershare Filmora, you’re at the right place. Here you can learn about the video editing interface and the options available in the tool.
Edit Video for Free For Win 7 or later(64-bit)
Edit Video for Free For macOS 10.14 or later
1. The Main Screen
The main interface of the tool has all the essentials available. You will find a “New Project” tab, and beneath that, you will find different options for editing. Moreover, you will find the aspect ratio, from where you can choose preferred video dimensions. On the left side panel, you have the project options and the “Creator Hub” tab. Besides this, you have the search icon to find your previous projects.

2. Importing Videos
You can import your videos by pressing the designated key. This option allows you to import your media files. Furthermore, you can even import your media by dragging and dropping in the import tab. The import drop-down menu provides multiple import options. This menu also allows you to import your videos from your mobile or external camera.

3. Using the Stock Media
Wondershare Filmora allows you to add free stock media to your videos. The “Stock Media” option has a search option from where you can find your desired media files. Furthermore, this option has multiple free stock media tabs. You can choose the platform from the tabs where you can search and select stock media files.

4. Adding Audios to Videos
This tool allows you to add music or audio to your editing timeline. The tool has a separate “Audio” button, which allows you to select in-built audio files. You can search different sound effects and music files from this tab. Moreover, you can drag and drop your preferred audio file to the timeline. You can even select the audio file in the timeline to make further changes to the file.

5. Using Titles For Explanation
By pressing the “Titles” button, you can select the opening of your title template. This tool has many different title templates available that you can use for your video files. Moreover, you can find categorized titles from the list. This option also allows you to search for different title styles. You can even make changes to your title screen.

Edit Video for Free For Win 7 or later(64-bit)
Edit Video for Free For macOS 10.14 or later
6. Adding Transitions and Effects
Filmora interface is packed with many filters, overlays, and even transition effects. You can choose from different effects and filters by dragging and dropping to your layer. To apply a transition between two clips, simply place the transition effect between those clips. Additionally, you can change the opacity of the applied filters. Also, you can change the duration of your transition effects.

7. Inducing Elements for Improvement
In addition to overlays, filters, and effects, you can also use other elements too. For this, Wondershare Filmora allows you to add stickers to your video edit. By pressing the option, you will find stickers in many categories. You can select stickers from the list; otherwise, you can search for stickers using a keyword. Apply your favorite sticker by selecting and dropping it on a particular layer in the timeline.

8. Getting Aware of the Timeline
The timeline is the section where you add all the layers, effects, and other adjustments to your project. In the timeline section, you will find a particular layer’s hide and unhide option. Moreover, you can mute and unmute the audio of your media file. You can even find an option to manage your tracks in this section. Additionally, there is a Playhead that can also trim your video clip at a specific duration.

9. Things To Know While Exporting
While exporting your project, you will find many options, such as exporting to your device. Furthermore, you can even export your file directly to a specific platform from Filmora. In addition to this, you can even burn your video file to a DVD using this option. Users can also add a thumbnail of their edited video directly from this tool.

Conclusion
Understanding your video editing interface gives you greater creative control over your projects. You can explore and experiment with various editing options and more. Investing time in your tool is important if you’re a professional or an enthusiast. Wondershare Filmora is an amazing editing tool, and its interface is created to make things easy for you.
Edit Video for Free For macOS 10.14 or later
1. Digital Editing
The transition from analog to digital editing revolutionized the field. Digital editing eliminated the need for physical film and allowed for non-linear editing. In this way, video clips could be rearranged, trimmed, and modified on a computer. This digital workflow provided greater flexibility, efficiency, and creative possibilities.
2. Improved Software Capabilities
Video editing software has become more powerful with better features. Modern software offers a wide range of tools for editing for the user. These tools have offered color correction, visual effects, and audio mixing. The interfaces have become more friendly, making editing accessible to more people.
3. Real-Time Playback and Rendering
Advancements in hardware and software have enabled real-time video playback. It further eliminates the need for time-consuming rendering during the editing process. Additionally, it allows editors to see their changes, improving efficiency and productivity.
4. High-Resolution Video
With the availability of high-resolution cameras and displays, the quality has improved. Now, video editing has adapted to handle larger and more detailed video files. Such software can edit and export videos in higher resolutions, even up to 4K and 8K.
5. Special Effects and Visual Enhancements
These editing tools can handle complex visual effects and enhancements. Features such as green screens, motion tracking, and 3D effects have become easier to use. Furthermore, these tools allow editors to achieve sophisticated and professional-looking results.
6. Collaboration and Cloud-Based Editing
The rise of cloud computing has introduced new opportunities for collaboration in video editing. Such editing platforms enable multiple editors to work on the same project. Individuals can share files, get inspiration and collaborate remotely. This feature has facilitated more efficient workflows and improved collaboration among people.
Edit Video for Free For Win 7 or later(64-bit)
Edit Video for Free For macOS 10.14 or later
7. Faster Rendering and Exporting
Video editing software now utilizes multi-threading and GPU acceleration to speed up rendering. These new advancements in technology also help in exporting processes. It reduces the time required to generate the final video output. Additionally, it allows editors to meet tight deadlines and work more quickly.
8. Integration with Other Software and Formats
Editing tools have improved their compatibility with other software and formats. They now integrate with visual effects software, audio editing tools, and other tools. Additionally, these tools support a wide range of video file formats. This compatibility means easier import and export of videos from various sources.
9. Mobile Editing
Smartphones and tablets have brought video editing to mobile devices. Mobile apps now offer robust editing capabilities, allowing users to edit videos on the go. This advancement has increased accessibility and convenience for users as well. Now, people prefer to edit videos using their mobile devices.
10. AI-Assisted Editing
Artificial Intelligence (AI) is now integrated into photo and video editing tools. AI can automate certain repetitive tasks and suggest edits or effects based on patterns. This technology also makes change and even suggest edits by learning your preferences. This can save you time and assist editors in making creative decisions.
Part 2: What Should A Good Video Editing Software Constitute?
A good editing tool should possess several key features and functionalities. The purpose of these tools is to provide a comprehensive and efficient editing experience. Here are some important aspects that an excellent video editing tool should have. This help develops a narrative involving its user interface design:
Edit Video for Free For Win 7 or later(64-bit)
Edit Video for Free For macOS 10.14 or later
1. Comprehensive Editing Tools
The software should offer editing tools and features to accommodate different editing needs. This includes basic functions like trimming, cutting, and merging clips. Moreover, it should also offer some advanced capabilities and editing options as well. The software should provide flexibility and control over the editing process.
2. Support for Various Video Formats
Such software should support a wide range of video formats and codecs. This ensures compatibility with different cameras, file types, and video sources. It also allows editors to work with diverse content without the need for additional file conversion.
3. User-Friendly Interface
An editing tool should have a friendly interface and be easy to use. It also should allow users to navigate through the editing process smoothly. Such tools should provide easy access to tools, menus, and features. Additionally, a friendly video editing interface makes the tool simple for everyone.
4. High-Quality Output
These tools should be capable of producing high-quality video output. It should support exporting videos in different resolutions. This includes standard definition, high definition, and even 4K or higher resolutions. The ability to export in different formats and compression options is also valuable.
5. Efficient Performance
Video editing can be resource-intensive, so good software means efficient performance. It should utilize system resources and provide smooth playback for previewing. Additionally, it should minimize rendering times for quicker previews and exports.
6. Audio Editing Capabilities
Audio is one of the most important components of the video editing process. So, the software should offer different audio editing features. This includes the ability to adjust volume levels, apply audio effects, and much more. Furthermore, it should synchronize audio with video and support multiple audio tracks for editing as well.
7. Special Effects and Visual Enhancements
Advanced video editing software often includes special effects and other enhancement options. Filters, overlays, motion graphics, and other key functionalities should be offered. These features allow editors to improve their videos and achieve specific creative objectives.
8. Collaboration and Sharing Options
Powerful editing tools should facilitate collaboration among editors or team members. It should offer features like project sharing and version control. Also, it should provide users the option to work on the same project simultaneously. Additionally, seamless integration with cloud storage or online platforms can be beneficial.
9. Regular Updates and Support
Recommended tools should have a development team that regularly releases updates. The constant updates should address bugs, improve performance, and introduce new features. Timely customer support is also valuable for users to seek assistance.
10. Cost and Licensing Options
Consideration of the software’s pricing model and licensing options is important. Some software may offer a one-time purchase with perpetual usage. However, many others may have subscription-based models. It’s important to assess the pricing structure and determine if it aligns with your budget and editing needs.
Part 3: Wondershare Filmora: Does It Cover All The Points of a Good Video Editing Software?
Wondershare Filmora is a comprehensive video editing software that is available for everyone. One can download this tool from its official website and start editing. This tool provides a platform for professionals and for those who started editing. This tool allows you to edit your videos with many editing options. Additionally, this tool provides features from basic to more advanced ones.
Edit Video for Free For Win 7 or later(64-bit)
Edit Video for Free For macOS 10.14 or later
We have learned previously about what a good editing tool should offer. So, let’s discuss here what Wondershare Filmora has to offer its users.
Key Features of Wondershare Filmora
1. Wondershare Filmora is a complete editing software that you can download. It offers some basic editing options to more professional and advanced ones. You can find it to be the best platform to edit YouTube videos and more.
2. This tool has a friendly and easy-to-use interface. It makes navigation and editing easy, which further makes the process seamless.
3. The software interface supports different formats for images and videos. It includes PAL, MP4, JPEG, Cineform, and more. This makes the import and export of the files easier to share and edit.
4. Filmora is an editing platform that has the capability of handling higher resolutions. Using this tool, you can import and export your video files in up to 4K resolution.
5. Another excellent key feature of this tool is that you can add your audio files for edit . You can import your own audio files or can choose from the in-built library for your videos.
6. If you’re looking for a unique feature, then this feature will amaze you. Wondershare Filmora is equipped with the latest technology and is going through frequent updates. These updates help you to cut down the rendering speed.
7. You have so much to explore with this tool. Filmora has an in-built library that includes presets, effects, filters, and more. Users can use these presets for their editing work.
8. Additionally, if you want to share your videos for different platforms, you can with this tool. This software lets you change the aspect ratio of your video so you can easily share it on different platforms.
9. Besides editing options and features, this tool goes through constant updates and improvements. The latest version of Filmora comes with multiple AI features and support.
10. Lastly, Wondershare Filmora is free software but also offers premium plans for users. You can choose from different subscription plans.
Pricing Plans Offered by Wondershare Filmora
Are you satisfied with working on Wondershare Filmora’s interface? Look into the provided pricing table for some more prominent details:
| Type | Package | Pricing |
|---|---|---|
| Individual | Month Plan | $19.99 |
| Cross-Platform Plan | $69.99/Year | |
| Perpetual Plan | $79.99 | |
| Team & Business | Annual Plan | $155.88/User |
| Education | Monthly Plan | $19.99 |
| Annual Plan | $40.99 | |
| Perpetual Plan | $49.99 |
Part 4: Explaining The Interface - Wondershare Filmora
If you want to learn about the interface of Wondershare Filmora, you’re at the right place. Here you can learn about the video editing interface and the options available in the tool.
Edit Video for Free For Win 7 or later(64-bit)
Edit Video for Free For macOS 10.14 or later
1. The Main Screen
The main interface of the tool has all the essentials available. You will find a “New Project” tab, and beneath that, you will find different options for editing. Moreover, you will find the aspect ratio, from where you can choose preferred video dimensions. On the left side panel, you have the project options and the “Creator Hub” tab. Besides this, you have the search icon to find your previous projects.
2. Importing Videos
You can import your videos by pressing the designated key. This option allows you to import your media files. Furthermore, you can even import your media by dragging and dropping in the import tab. The import drop-down menu provides multiple import options. This menu also allows you to import your videos from your mobile or external camera.
3. Using the Stock Media
Wondershare Filmora allows you to add free stock media to your videos. The “Stock Media” option has a search option from where you can find your desired media files. Furthermore, this option has multiple free stock media tabs. You can choose the platform from the tabs where you can search and select stock media files.
4. Adding Audios to Videos
This tool allows you to add music or audio to your editing timeline. The tool has a separate “Audio” button, which allows you to select in-built audio files. You can search different sound effects and music files from this tab. Moreover, you can drag and drop your preferred audio file to the timeline. You can even select the audio file in the timeline to make further changes to the file.
5. Using Titles For Explanation
By pressing the “Titles” button, you can select the opening of your title template. This tool has many different title templates available that you can use for your video files. Moreover, you can find categorized titles from the list. This option also allows you to search for different title styles. You can even make changes to your title screen.
Edit Video for Free For Win 7 or later(64-bit)
Edit Video for Free For macOS 10.14 or later
6. Adding Transitions and Effects
Filmora interface is packed with many filters, overlays, and even transition effects. You can choose from different effects and filters by dragging and dropping to your layer. To apply a transition between two clips, simply place the transition effect between those clips. Additionally, you can change the opacity of the applied filters. Also, you can change the duration of your transition effects.
7. Inducing Elements for Improvement
In addition to overlays, filters, and effects, you can also use other elements too. For this, Wondershare Filmora allows you to add stickers to your video edit. By pressing the option, you will find stickers in many categories. You can select stickers from the list; otherwise, you can search for stickers using a keyword. Apply your favorite sticker by selecting and dropping it on a particular layer in the timeline.
8. Getting Aware of the Timeline
The timeline is the section where you add all the layers, effects, and other adjustments to your project. In the timeline section, you will find a particular layer’s hide and unhide option. Moreover, you can mute and unmute the audio of your media file. You can even find an option to manage your tracks in this section. Additionally, there is a Playhead that can also trim your video clip at a specific duration.
9. Things To Know While Exporting
While exporting your project, you will find many options, such as exporting to your device. Furthermore, you can even export your file directly to a specific platform from Filmora. In addition to this, you can even burn your video file to a DVD using this option. Users can also add a thumbnail of their edited video directly from this tool.
Conclusion
Understanding your video editing interface gives you greater creative control over your projects. You can explore and experiment with various editing options and more. Investing time in your tool is important if you’re a professional or an enthusiast. Wondershare Filmora is an amazing editing tool, and its interface is created to make things easy for you.
Create Promotional Video
When it comes to executing video marketing campaigns, there’s an unspoken rule that holds true no matter what your goals are. Ready for it? A great video is only as good as the brand behind it. Branding is a crucial aspect of any successful video marketing campaign because your audience needs to believe in your product or service before they will invest their time and money in you. If you want to make a real impact with your promotional videos, branding should be at the top of your mind.

What is Branding
When you think of branding, what comes to mind? Maybe it’s your favorite pair of shoes or a piece of clothing with a logo on it. Or maybe you think about big companies with catchy slogans and memorable commercials that have been around for years. But branding isn’t just about logos and slogans—it’s so much more than that.
Branding is the process of creating an identity for your product or service that differentiates itself from others in its category. This can be as simple as coming up with a name for your company, or it could mean developing an entire brand strategy that encompasses every aspect of how you present yourself to the world (and potential customers). Branding is all about finding ways to stand out from other businesses in your industry by establishing trust with consumers through consistency across all channels, including social media, websites, advertising campaigns, and more.
Why Branding is Important
Branding is vital for any business. It’s the foundation of your brand and it sets up a strong structure for your business to grow on.
Branding helps to build trust and loyalty with customers, which is crucial to gaining new customers and retaining old ones.
If you want people to remember you, then branding is important because it makes sure people will never forget about you!
With great branding comes great responsibility in terms of communicating clearly who you are as a company, what kind of products/services that you provide or sell, how those products/services will benefit consumers (or clients), etc., so make sure these things are always clear when designing promotional videos meant specifically for marketing purposes.
Branding in Video Marketing
Branding is an important part of video marketing because it helps to create a memorable video.
You should make sure you have a clear understanding of your brand before you start creating promotional videos. Your brand is the personality that people associate with your business or company, and this will help them to remember you.
For example, if you’re selling food products related to health and fitness, then having a healthy lifestyle theme throughout all aspects of the production process will be essential to getting people excited about what they see in their minds when they think about your product or service.
It can be challenging to keep track of all the aspects of your brand, but you can use Brand Guidelines to make sure that everything is aligned with your goals and values.
About Video Brand Guidelines
Video brand guidelines are a set of rules and regulations that govern how your videos should look, feel and sound. By having these in place, you can maintain a consistent style and tone across all your video content, whether that be explainer videos or social media posts.
Why do you need Video Brand Guidelines
1. Keeps your videos on-brand
The most important reason for creating video brand guidelines is to keep all your videos feeling like they come from the same place. This way, no matter what type of video it is, viewers will always know it’s from your brand.
2. Make sure everyone’s on the same page.
With so many people involved in the production of a single video, it can be hard to keep everyone on the same page. By having guidelines in place, you can make sure that everyone knows exactly what your brand’s video style is, and how to stay true to it.
3. Saves time and money.
In the long run, having video brand guidelines will save you both time and money. With a clear understanding of your brand’s video style, you can avoid costly mistakes and re-dos, and produce content faster and more efficiently.
4. Helps with planning
It can be difficult to plan video content without knowing what kind of videos you want to make. By having guidelines in place, you can map out a clear strategy for your video content, helping you to stay on track and hit your goals.
5. Improves creativity
Having video brand guidelines doesn’t mean that your videos have to be boring or formulaic. In fact, it can actually help to improve creativity, as it gives you a clear framework to work within. This way, you can experiment and try new things, safe in the knowledge that you’re still staying true to your brand.
Strong Pillars of Video Brand Guidelines
There are three strong pillars that make up a set of video brand guidelines: aesthetic (how it looks), technical (how it’s made), and messaging (what it says).
AESTHETIC
The Aesthetic Pillar is all about how your videos look, from the overall style to the specific details like color schemes and fonts. This is usually determined by your company’s branding guidelines.
TECHNICAL
The Technical Pillar covers the more practical elements of your video, such as file formats and resolution. This ensures that your videos are compatible with all kinds of devices and platforms.
MESSAGING
The Messaging Pillar deals with the actual content of your video, such as the script and narration. This is where you decide what message you want to communicate, and how you’re going to do it.
When writing your video brand standards, it’s important to keep all three pillars in mind. Each one plays a vital role in the overall impact of your video, so they should all be given equal attention.
Different Elements of Video Brand
There are several elements that make up a video that reflecting your brand. These include:
Logo
When and how should your logo be used? Should it appear at the beginning, end or throughout the video? These are just a few examples of what you might want to include in your guidelines. The important thing is to be as clear and concise as possible so that there’s no confusion about what does and doesn’t represent your brand.
Apple, for example, is a fantastic brand that uses its logo in video advertising. It may always be observed at the end of every video.
![]()
Color palette
What fonts best represent your brand and should be used in your videos?
Color has a huge impact on how people perceive your brand, so you want to choose colors that match your message and tone.

Typography choices
Typography is a key element of branding. It’s more than just picking the right typeface, though that’s important, too. Typography includes the font, size and style of your title, body copy and web copy, as well as how it’s used in your logo and all other graphics.

Imagery
If you want to use images or photos in your videos, what style should they be? And are there any specific colours that need to be used?

Voice
The way you speak to your customers is referred to as brand voice. Your brand’s communication style is what determines your brand voice. Your target audience will hear your brand voice, which can be informal or formal depending on the situation and needs of the client. It may have any tone as long as it feels genuine to your company’s principles and personality—
In terms of brand voice consistency, Apple conveys confidence, quality, and closeness. In terms of distinguishing oneself from the competition, Apple has always been the company to look up to. Many people feel welcomed and overindulged by having their own gadgets.
Graphics
If you want to use animation in your videos, you must first select a design that best represents your business. Is it going to be more cartoonish or more corporate?
It’s also crucial to provide rules for the use of certain visual components. If you want to include the speaker’s name and job title in the lower thirds, for example, you must state how that should appear.

Transitions
Transitions between shots may boost brand recognition. Consider American sports networks that frequently use a rapid logo reveal! You should decide what your branding standard for transitions will be. Will it be a basic and traditional transition, or will you utilize it to emphasize your brand?

Music and Sounds
Music can play a significant role in how your video is received. It should be used to create the right atmosphere and reinforce the tone of voice. Your brand guidelines should include examples of the types of music that would and wouldn’t be appropriate, as well as any sound effects that could be used.

Format
This section should detail what type of videos you want to produce. For example, do you want interview-style videos, or more dynamic explainer videos? It’s also worth including some general information about length, aspect ratio and file format.

Shooting Style
Do you want your videos to be shot in a particular way? If so, you should include information on that in your guidelines. For example, do you want close-ups or wide shots? Do you want lots of movement or static shots?
Your video brand guidelines should also consider where your videos will be shot. If you have a preferred location or style of location, such as an office or warehouse, make sure that is included.
Lighting is another important aspect of shooting style and can really affect the look and feel of a video. Consider what sort of lighting would work best with your brand - natural light, bright light, low light etc. - and include details in your guidelines.

Tagline
A tagline is a short phrase or sentence that identifies your brand. It’s often used in conjunction with a logo and other branding elements to create an overall marketing message
Nike recognized the need to appeal to a much wider audience, and transform their brand into more than simply fitness apparel. As a result of this, “Just Do It.” was created. The slogan is easy to understand and conveys the idea effectively. More significantly, it applies to everyone, not just world-class athletes
How to create Video Brand Guidelines?
Now that we’ve gone over why you need video brand guidelines, let’s take a look at how you can create them.
1. Define your brand voice
This is perhaps the most important step in creating your guidelines, as it will determine the tone and style of all your future videos. To do this, you need to think about what makes your brand unique, and how you want it to be perceived by others. Once you have a good understanding of your brand voice, you can start to put together the rest of your guidelines.
2. Choose a video style
Depending on the kind of videos you want to make, you’ll need to choose an appropriate style. This could be anything from animation to live action, so it’s important to pick something that will work well with your brand voice.
3. Decide on a look and feel
Just like with your choice of style, the look and feel of your videos should be in line with your brand identity. This means taking into account things like colour palette, typography and overall aesthetic.
4. Write a script
Once you have all the above elements in place, you can start to write a script for your video. This will act as a blueprint for the rest of the production process, so it’s important to get it right. When writing your script, be sure to keep your brand voice in mind, and make sure that the finished product stays true to your guidelines.
5. Find the right talent
To bring your script to life, you’ll need to find the right talent. This means finding voiceover artists, actors or presenters who fit with your brand identity and can help to sell your message.
6. Record and edit your video
With all the pieces in place, you’re finally ready to record and edit your video. During this process, it’s important to stick to your guidelines, so that the finished product is on-brand and consistent with your other content.
7. Publish and promote your video
Once your video is complete, it’s time to hit publish and start promoting it to your audience. Remember to use all the channels at your disposal, from social media to email marketing, to make sure that as many people as possible see your brand-new video.
Brand Guidelines Consistency
It’s important to be consistent with your brand. One of the biggest mistakes a company can make is trying to brand itself as something it isn’t. If you’re perceived as one thing and then suddenly change, it may do more harm than good for your business or organization.
The most well-known example of a company with a consistent brand is Coca Cola. It is one of the company brands with consistent brand image and a very strong reputation. This can be attributed to the company’s efforts in marketing and advertising to create a distinct brand image. The Coca Cola Company has spent millions of dollars on advertising campaigns that focus on creating a positive image for the product and reinforcing its original taste.
You need to have consistency in all aspects of your brand: logo, voice and tone (including social media), visuals (such as color scheme), and more. Your audience will immediately identify any inconsistencies between these elements - so make sure they match up well!
Wrap-up
Creating video brand guidelines may seem like a lot of work, but it’s worth it in the long run. By taking the time to put together a comprehensive guide, you can ensure that all your future videos are on-brand, efficient and effective. So what are you waiting for? Get started today! Do you have any tips for creating video brand guidelines? Let us know in the comments below!
Free Download For Win 7 or later(64-bit)
Free Download For macOS 10.14 or later
Free Download For macOS 10.14 or later
The Only Guide You’ll Ever Need to Learn GIF Design That Get Shared Like Crazy
The Only Guide You’ll Ever Need to Learn GIF Design That Get Shared Like Crazy
An easy yet powerful editor
Numerous effects to choose from
Detailed tutorials provided by the official channel
The Only Guide You’ll Ever Need to Learn GIF Design That Get Shared Like Crazy
In this article
01 [8 Principles for Great GIF Design](#Part 1)
02 [6 Amazing Examples of Animated Gifs in Web Design](#Part 2)
03 [Learn How to Create and Add Gifs to Interactive Layouts in Filmora](#Part 3)
Part 1 Principles for Great GIF Design
Creating GIFs for infotainment or casual information sharing is the current talk of the trend. You might have visibly landed across a heap of tantalizing GIFs in blogs, social media posts, product promotion websites and almost every other domain you can possibly think of. Using GIFs for any type of content promotion is bound to captivate the target audience in impressive multiplicities. Ever wondered what’s the cue behind the mass appeal that GIFs create? Well, an obvious answer is the stunning GIF design.
When going for GIF creation and selection, design plays the key role in creating considerable buzz about the information being transmitted. To add impact to your creation, you need to pay considerable attention to its design implications, thus ensuring that the right things get presented in the right way. Outlined below are some amazing principles you can use to enhance your GIF design to the next level:
01Ensure Accuracy and Preciseness
The primary concern you need to be attentive about while designing a GIF is its preciseness. Ensure ban exactness of information and confine your creation to the theme and requirement of your creation, like, the message you want to deliver or the impact you want to create through the GIF. Balance your creativity within specific content parameters and avoid getting carried away or overdoing on the beautifying aspect.
As an example, it is visibly not appealing to add a wholesome mix of 15 shades and 20 different elements in a nature-based GIF. You will end up getting too harsh on the viewers’ eyes, confusing them with a hoard of speeding elements and banging colors. You can instead stick to 2 or 3 frames with an intelligent mix of 2 complementary shades.
02Maintain Visual Identity
An important aspect to keep in mind while attempting to design GIF is, it should visually relate to the underlying content. For instance, if you are intending a brand promotion through your GIF, lay stress on adding elements like, brand definition, product specifications, know-how of your work patterns, etc. ensure that your content flows naturally and has exactness.
Other alternatives are, using your product logo as the GIF background, character representation of your brand or using some explicit product oriented themes. While, you are free to pick anything that suits your preferences and needs, just make sure that using it in your GIF adds value to your brand instead of giving an out of the box feel.
Image Name: The-only-guide-you’ll-ever-need-to-learn-gif-design-that-get-shared-like-crazy-1

03Cut Down on Unnecessary Frames
Have you ever encountered a halt in the natural loop of your GIF out of nowhere? While pondering over the underlying cause, it is a common assumption to take this as an animation fallacy, but that’s evidently not the case. The actual culprits behind this glitch are those extra frames that contribute towards nothing but adding weight to an already heavy file.
To set this straight, you should switch to removing any extra frames, while saving a particular one which you may stretch to a desired duration according to the break point of your contents in the GIF. However, take caution to maintain the visual quality of your GIF while you remove those extra frames.
04Make Your GIF Accessible
You should always adhere to the concern of accessibility while creating a GIF. The reason being, your content is visibly going to get mass attention across the web and you cannot filter out visitors, make sure your GIF is easily accessible to all kind of users, particularly those with vision limitations, like, epileptic patients or the ones using screen readers.
Focus on describing your GIF content with alt text and using a limited blinking and flashing rate. In case your GIF content is primarily text based, take care to limit the effective color and image movement and adjust the frames rates to avoid constant and quick movement of image frames when adding many clips on a single page.
Pay additional heed to the auto play feature of your GIFs. It can be visibly annoying to be welcomed on a site homepage with GIFs enjoying an auto play session of their own. You can alternatively, incorporate a ‘Click to Play’ option or grant your site visitors the liberty to decide on what is to be played when.

05Use Storyboards
When aiming to create visibly appealing GIFs, you need to lay considerable stress on choosing an apt background story. Don’t get misled by the wrong assumption of using any random background, owing to the short play duration of GIFs. An impressive solution to this concern is taking the help of a storyboard to keep track of your GIF’s content flow.
Using a storyboard is quite effective means of being in line with the direction of content movement, rescuing you from the hustle of going off the track. This comes explicitly handy when you are working with a team of creators. The storyboard is there to keep everything at the exact place, thus improving member communications and boosting up the design process.

06Focus on Creating Loops
Consider creating an animated motion loop for your GIF allowing a repeated and comprehensive view of your content. Looping projects a deeper observation of the clip and its contents in a seamless transition. However, creating an infinite motion loop in GIFs is quite tricky, as you need to pay utmost concern to ensure a smooth content flow and chances of even the slightest errors are not entertained.
Any loopholes in placement of your GIF elements will get noticed within a blink and lead to an unsatisfactory user experience. Hence, you need to check each of your content frames separately to eliminate chances of possible errors. If you are a beginner, try working with geometrical animations to get the initial pickup. This will be advantageous in deciding the exact element positions at the start and end of the GIF.
07Make Use of Motion Blur
Using the concept of motion blur is pivotal in providing a natural flow and feel to your GIF, which, in an otherwise case would ordinarily appear as a mere collection of static images clubbed together. This would give a wobbling feel with unsteady frame movements to your viewers. The motion blur effect potentially ensures a smooth content flow, and your GIF looks like a short video captured from a camera.

08Stick to a Reduced File Size
Creating GIF of within a standard size range is quite difficult, owing to the fact that these are shared across a variety of media platforms, each having a different file size constraint. It is, however, recommended to stick to a file size as low as possible to escape the notch of modifying the same, ener5y time you need to work with the GIF on a different platform.
Listed below are a few ways to limit your GIF to a lower file size:
● Restrict your GIF to a frame count under 150, exceeding which, it will get difficult to export the GIF to most of the commonly visited social media and content sharing platforms.
● When your GIF is ready to export, adjust its lossy parameter between 5 and 10 to boost the file compression rate. Look for a setting that decreases the effective file size without compromising with the overall GIF design.
● Restrict to a minimum possible color usage. This will not only intensify the GIF design, but also contribute in maintaining a decreased file size. You can instead, focus on playing with animations or adjusting your image frames to longer play durations.
● Don’t experiment with multiple background gradients in your GIF. You can select from either a completely opaque, or a totally transparent background. Adding unnecessary gradients will end up giving your GIF a hazy look, along with a visibly large file that will be difficult to export non any platform.
Part 2 Amazing Examples of Animated Gifs in Web Design
GIFs are an effective means of adding appeal to brand promotions and achieving improved market buildup by delivering just the right content in the most captivating and interesting ways. You can use them as creative web design tools to add spark to your product sites, which can potentially boost the market value and reach of your product by multiplying the number of visitors to your site.
Discussed below are some stunning examples of using animated GIFs to enhance commercial web design, which you can use to create a significant buzz about your product among a target audience:
01Marie Weber
This is a shoe designer company in France, famous for its classy, handmade shoes. On visiting the company’s site, you are welcomed by a simple and subtle, animated product logo on each page. This animated logo is a masterpiece in itself, telling you the about the lavishness of the associated product.
On navigating further, you will find animated elements, like; shoe images and collection names, which appear on the screen before a zoom out. There are underlined links that pop up to animate beneath the name, indicating the link you are going to visit.

02Wonderful Weekends Festival
This is an absolute animation delight, where the welcome page of the site greets you with vibrant pieces in motion, and a pop up box informs you of the festival’s arrival time and asks you to select one from the options of ‘Play Now’ or ‘Show Me the Festival’.
As you click to make a choice, the Google brand shines with associated colors. As you continue to browse through the site, pages open up with brand color animations, along with colored active links flashing on the pages.

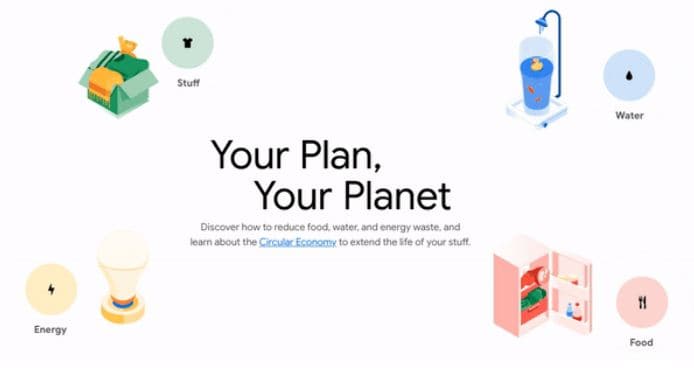
03Google
This is a brand name that needs no introduction. Google has launched its ‘Your Plan, Your Planet’ site to infuse awareness about environment conservation and eco friendly lifestyles, guiding visitors on ways and means of introducing related changes. The site greets you with a simple layout, with a short text moving in and getting still. Click on ‘Let’s Get Started’ and you will see 4 amazingly animated icons that open up to more vibrant animations.
Tap any one of the swinging refrigerator door, the illuminated light bulb, the running faucet or the teddy bear waving at you, to land on a schema that informs you about effective means of improving on conservation in within your selected section. This is a perfect example of using animations as a marketing strategy to captivate people’s attention on a subject that evidently turns them off.
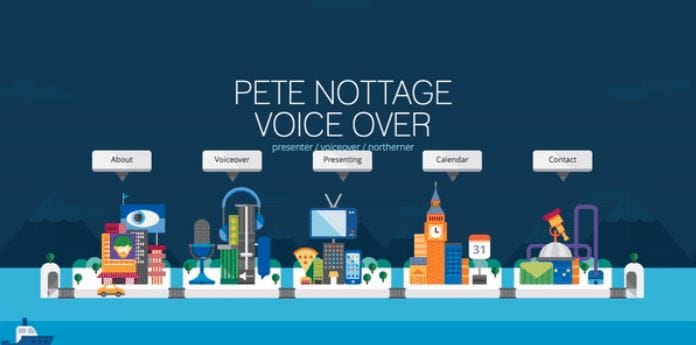
04Pete Nottage
Designed explicitly as a hiring site for voice presenter Pete Nottage, this website tells you everything about the actor and the credibility of hiring him. The site lands among the best examples of web animation usage. The welcome page of the site greets you with the brand logo. Tap on the red swipe and you will get to know that the brand infuses vibrancy to something that’s originally dull.
Next, you will find a plethora of dynamic and elegant animations in a plying plane, cityscape, flowing sea and sailing boats, moving cars and excusive motion graphics on each building. Visiting the animated site links provides you an insight of the actor’s personality. In the ‘About’ section, you can find a headshot animation, that disappears on clicking, and is followed by a more dynamic motion snippet.
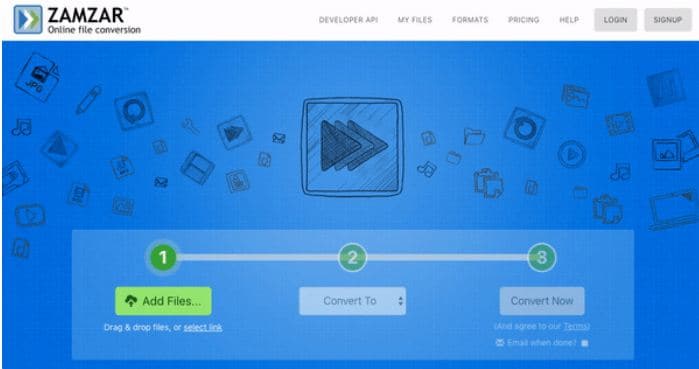
05Zamzar
This one is an online file conversion site and lives up to its tagline ‘File Conversion Made Easy’ through a concrete animation on the welcome page. The file conversion on this site is quick, 3-step process, with a blinking animation indicating the current conversion stage.
For instance, when you are at the first step of selecting a file to convert, the animation shoes a blinking glow on number 1. This continues for the rest of the steps, till your file is finally converted into the desired file format.
06Blizzard: Warcraft III Reforged
Warcraft was one complete heaven of adventure and thrill for console gamers. While the enticing cutscenes with stunning motion graphics were an absolute favorite, the game had a plenty of other exciting elements.
The relaunched game (Warcraft III Reforged) website has a mix of gaming adventures and cutscenes running in the site’s background with the game title and pitch appearing as an overlaid animation. On navigating through the site, you will find classy animated elements that take you on a nostalgic trip of the original game.
Part 3 Learn How to Create and Add Gifs to Interactive Layouts in Filmora
Now that you are quite familiar with the utility of GIFs in almost every market field, and have seen stunning examples of GIF design and usage for an impressive brand promotion, let’s take a dive into creating and using these motion clips to make interactive graphic layouts for websites, social media blogs and posts, and a variety of other applications that require some brilliant imagery for market promotion.
When looking for the perfect GIF designer software, Wondershare Filmora Video Editor is the most affordable pick. This is a free and an enhanced GIF design tool, packed with world class and premium quality features that are most suitable for giving the much appreciated professional touch to your graphic artwork. Here’s how you can work with Filmora to make alluring graphic layouts:
Step 1: Launch Filmora
The software is readily compatible to your Windows and MacOS devices and you don’t even require a signup to use the application. Just download and install the software in your preferred device and launch the same to reach the software’s welcome interface.
Filmora Free Download Link:
Step 2: Upload Media Files
Select and import the desired media files from your device to upload them to the Filmora timeline. You can either pick a video or choose a series of static images.
Step 3: Add to Timeline
Once imported, you need to add the selected files to the software’s editor timeline. You can use the ‘Drag and Drop’ method to get this done.

Wondershare Filmora - Best Video Editor for Mac/Windows
5,481,435 people have downloaded it.
Build unique custom animations without breaking a sweat.
Focus on creating epic stories and leave the details to Filmora’s auto features.
Start a creative adventure with drag & drop effects and endless possibilities.
Filmora simplifies advanced features to save you time and effort.
Filmora cuts out repetition so you can move on to your next creative breakthrough.
Step 4: Explore Your Editing Skills
As already stated, the Filmora effects library is an extensive inventory of stunning features to compliment your artwork with matchless class. You are free to choose from tons of image and video editing effects and filters suited to your GIF content to create excellent pieces of graphic art.
When starting to customize your GIF in Filmora, you can begin with cropping and trimming your images or video to the perfect part, or even cut and split them to ward off unwanted portions, or rotate and flip the images to set them in the perfect orientation.
You can further add elements like, graphic transitions, overlays, animations and texts, and etc., to customize your artwork to your heart’s content. The software’s audio-visual library facilitates you with around 300 audio-visual effects and music choices to supplement your creation with a conducive sound feel. You can also make adjustments in frame speed and play durations to get the best most snippet ever!
You are granted the liberty to choose almost any common file format to create and customize GIFs in Filmora. A more convincing feature is, the software does not leave a watermark on your artwork and you can easily share your creation across media platforms.

Step 5: Save and Export
Once your creation satisfies you, save it to your device with a .gif extension, from where it can be exported to various media sharing platforms with ease.
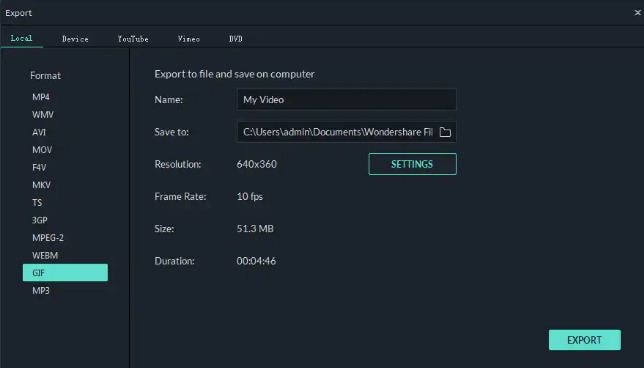
● Key Takeaways from This Episode →
● When planning a perfect and appealing product marketing strategy, you can consider using GIFs to enhance the feel. Complement your product site with suitable GIF design and graphic transitions can prove pivotal to target and hold your related audience.
● Looking for the best GIF creator and customization software, you can rely on Filmora to create and customize professional quality GIFs with utmost convenience.
The Only Guide You’ll Ever Need to Learn GIF Design That Get Shared Like Crazy
In this article
01 [8 Principles for Great GIF Design](#Part 1)
02 [6 Amazing Examples of Animated Gifs in Web Design](#Part 2)
03 [Learn How to Create and Add Gifs to Interactive Layouts in Filmora](#Part 3)
Part 1 Principles for Great GIF Design
Creating GIFs for infotainment or casual information sharing is the current talk of the trend. You might have visibly landed across a heap of tantalizing GIFs in blogs, social media posts, product promotion websites and almost every other domain you can possibly think of. Using GIFs for any type of content promotion is bound to captivate the target audience in impressive multiplicities. Ever wondered what’s the cue behind the mass appeal that GIFs create? Well, an obvious answer is the stunning GIF design.
When going for GIF creation and selection, design plays the key role in creating considerable buzz about the information being transmitted. To add impact to your creation, you need to pay considerable attention to its design implications, thus ensuring that the right things get presented in the right way. Outlined below are some amazing principles you can use to enhance your GIF design to the next level:
01Ensure Accuracy and Preciseness
The primary concern you need to be attentive about while designing a GIF is its preciseness. Ensure ban exactness of information and confine your creation to the theme and requirement of your creation, like, the message you want to deliver or the impact you want to create through the GIF. Balance your creativity within specific content parameters and avoid getting carried away or overdoing on the beautifying aspect.
As an example, it is visibly not appealing to add a wholesome mix of 15 shades and 20 different elements in a nature-based GIF. You will end up getting too harsh on the viewers’ eyes, confusing them with a hoard of speeding elements and banging colors. You can instead stick to 2 or 3 frames with an intelligent mix of 2 complementary shades.
02Maintain Visual Identity
An important aspect to keep in mind while attempting to design GIF is, it should visually relate to the underlying content. For instance, if you are intending a brand promotion through your GIF, lay stress on adding elements like, brand definition, product specifications, know-how of your work patterns, etc. ensure that your content flows naturally and has exactness.
Other alternatives are, using your product logo as the GIF background, character representation of your brand or using some explicit product oriented themes. While, you are free to pick anything that suits your preferences and needs, just make sure that using it in your GIF adds value to your brand instead of giving an out of the box feel.
Image Name: The-only-guide-you’ll-ever-need-to-learn-gif-design-that-get-shared-like-crazy-1
03Cut Down on Unnecessary Frames
Have you ever encountered a halt in the natural loop of your GIF out of nowhere? While pondering over the underlying cause, it is a common assumption to take this as an animation fallacy, but that’s evidently not the case. The actual culprits behind this glitch are those extra frames that contribute towards nothing but adding weight to an already heavy file.
To set this straight, you should switch to removing any extra frames, while saving a particular one which you may stretch to a desired duration according to the break point of your contents in the GIF. However, take caution to maintain the visual quality of your GIF while you remove those extra frames.
04Make Your GIF Accessible
You should always adhere to the concern of accessibility while creating a GIF. The reason being, your content is visibly going to get mass attention across the web and you cannot filter out visitors, make sure your GIF is easily accessible to all kind of users, particularly those with vision limitations, like, epileptic patients or the ones using screen readers.
Focus on describing your GIF content with alt text and using a limited blinking and flashing rate. In case your GIF content is primarily text based, take care to limit the effective color and image movement and adjust the frames rates to avoid constant and quick movement of image frames when adding many clips on a single page.
Pay additional heed to the auto play feature of your GIFs. It can be visibly annoying to be welcomed on a site homepage with GIFs enjoying an auto play session of their own. You can alternatively, incorporate a ‘Click to Play’ option or grant your site visitors the liberty to decide on what is to be played when.
05Use Storyboards
When aiming to create visibly appealing GIFs, you need to lay considerable stress on choosing an apt background story. Don’t get misled by the wrong assumption of using any random background, owing to the short play duration of GIFs. An impressive solution to this concern is taking the help of a storyboard to keep track of your GIF’s content flow.
Using a storyboard is quite effective means of being in line with the direction of content movement, rescuing you from the hustle of going off the track. This comes explicitly handy when you are working with a team of creators. The storyboard is there to keep everything at the exact place, thus improving member communications and boosting up the design process.
06Focus on Creating Loops
Consider creating an animated motion loop for your GIF allowing a repeated and comprehensive view of your content. Looping projects a deeper observation of the clip and its contents in a seamless transition. However, creating an infinite motion loop in GIFs is quite tricky, as you need to pay utmost concern to ensure a smooth content flow and chances of even the slightest errors are not entertained.
Any loopholes in placement of your GIF elements will get noticed within a blink and lead to an unsatisfactory user experience. Hence, you need to check each of your content frames separately to eliminate chances of possible errors. If you are a beginner, try working with geometrical animations to get the initial pickup. This will be advantageous in deciding the exact element positions at the start and end of the GIF.
07Make Use of Motion Blur
Using the concept of motion blur is pivotal in providing a natural flow and feel to your GIF, which, in an otherwise case would ordinarily appear as a mere collection of static images clubbed together. This would give a wobbling feel with unsteady frame movements to your viewers. The motion blur effect potentially ensures a smooth content flow, and your GIF looks like a short video captured from a camera.
08Stick to a Reduced File Size
Creating GIF of within a standard size range is quite difficult, owing to the fact that these are shared across a variety of media platforms, each having a different file size constraint. It is, however, recommended to stick to a file size as low as possible to escape the notch of modifying the same, ener5y time you need to work with the GIF on a different platform.
Listed below are a few ways to limit your GIF to a lower file size:
● Restrict your GIF to a frame count under 150, exceeding which, it will get difficult to export the GIF to most of the commonly visited social media and content sharing platforms.
● When your GIF is ready to export, adjust its lossy parameter between 5 and 10 to boost the file compression rate. Look for a setting that decreases the effective file size without compromising with the overall GIF design.
● Restrict to a minimum possible color usage. This will not only intensify the GIF design, but also contribute in maintaining a decreased file size. You can instead, focus on playing with animations or adjusting your image frames to longer play durations.
● Don’t experiment with multiple background gradients in your GIF. You can select from either a completely opaque, or a totally transparent background. Adding unnecessary gradients will end up giving your GIF a hazy look, along with a visibly large file that will be difficult to export non any platform.
Part 2 Amazing Examples of Animated Gifs in Web Design
GIFs are an effective means of adding appeal to brand promotions and achieving improved market buildup by delivering just the right content in the most captivating and interesting ways. You can use them as creative web design tools to add spark to your product sites, which can potentially boost the market value and reach of your product by multiplying the number of visitors to your site.
Discussed below are some stunning examples of using animated GIFs to enhance commercial web design, which you can use to create a significant buzz about your product among a target audience:
01Marie Weber
This is a shoe designer company in France, famous for its classy, handmade shoes. On visiting the company’s site, you are welcomed by a simple and subtle, animated product logo on each page. This animated logo is a masterpiece in itself, telling you the about the lavishness of the associated product.
On navigating further, you will find animated elements, like; shoe images and collection names, which appear on the screen before a zoom out. There are underlined links that pop up to animate beneath the name, indicating the link you are going to visit.
02Wonderful Weekends Festival
This is an absolute animation delight, where the welcome page of the site greets you with vibrant pieces in motion, and a pop up box informs you of the festival’s arrival time and asks you to select one from the options of ‘Play Now’ or ‘Show Me the Festival’.
As you click to make a choice, the Google brand shines with associated colors. As you continue to browse through the site, pages open up with brand color animations, along with colored active links flashing on the pages.
03Google
This is a brand name that needs no introduction. Google has launched its ‘Your Plan, Your Planet’ site to infuse awareness about environment conservation and eco friendly lifestyles, guiding visitors on ways and means of introducing related changes. The site greets you with a simple layout, with a short text moving in and getting still. Click on ‘Let’s Get Started’ and you will see 4 amazingly animated icons that open up to more vibrant animations.
Tap any one of the swinging refrigerator door, the illuminated light bulb, the running faucet or the teddy bear waving at you, to land on a schema that informs you about effective means of improving on conservation in within your selected section. This is a perfect example of using animations as a marketing strategy to captivate people’s attention on a subject that evidently turns them off.
04Pete Nottage
Designed explicitly as a hiring site for voice presenter Pete Nottage, this website tells you everything about the actor and the credibility of hiring him. The site lands among the best examples of web animation usage. The welcome page of the site greets you with the brand logo. Tap on the red swipe and you will get to know that the brand infuses vibrancy to something that’s originally dull.
Next, you will find a plethora of dynamic and elegant animations in a plying plane, cityscape, flowing sea and sailing boats, moving cars and excusive motion graphics on each building. Visiting the animated site links provides you an insight of the actor’s personality. In the ‘About’ section, you can find a headshot animation, that disappears on clicking, and is followed by a more dynamic motion snippet.
05Zamzar
This one is an online file conversion site and lives up to its tagline ‘File Conversion Made Easy’ through a concrete animation on the welcome page. The file conversion on this site is quick, 3-step process, with a blinking animation indicating the current conversion stage.
For instance, when you are at the first step of selecting a file to convert, the animation shoes a blinking glow on number 1. This continues for the rest of the steps, till your file is finally converted into the desired file format.
06Blizzard: Warcraft III Reforged
Warcraft was one complete heaven of adventure and thrill for console gamers. While the enticing cutscenes with stunning motion graphics were an absolute favorite, the game had a plenty of other exciting elements.
The relaunched game (Warcraft III Reforged) website has a mix of gaming adventures and cutscenes running in the site’s background with the game title and pitch appearing as an overlaid animation. On navigating through the site, you will find classy animated elements that take you on a nostalgic trip of the original game.
Part 3 Learn How to Create and Add Gifs to Interactive Layouts in Filmora
Now that you are quite familiar with the utility of GIFs in almost every market field, and have seen stunning examples of GIF design and usage for an impressive brand promotion, let’s take a dive into creating and using these motion clips to make interactive graphic layouts for websites, social media blogs and posts, and a variety of other applications that require some brilliant imagery for market promotion.
When looking for the perfect GIF designer software, Wondershare Filmora Video Editor is the most affordable pick. This is a free and an enhanced GIF design tool, packed with world class and premium quality features that are most suitable for giving the much appreciated professional touch to your graphic artwork. Here’s how you can work with Filmora to make alluring graphic layouts:
Step 1: Launch Filmora
The software is readily compatible to your Windows and MacOS devices and you don’t even require a signup to use the application. Just download and install the software in your preferred device and launch the same to reach the software’s welcome interface.
Filmora Free Download Link:
Step 2: Upload Media Files
Select and import the desired media files from your device to upload them to the Filmora timeline. You can either pick a video or choose a series of static images.
Step 3: Add to Timeline
Once imported, you need to add the selected files to the software’s editor timeline. You can use the ‘Drag and Drop’ method to get this done.
Wondershare Filmora - Best Video Editor for Mac/Windows
5,481,435 people have downloaded it.
Build unique custom animations without breaking a sweat.
Focus on creating epic stories and leave the details to Filmora’s auto features.
Start a creative adventure with drag & drop effects and endless possibilities.
Filmora simplifies advanced features to save you time and effort.
Filmora cuts out repetition so you can move on to your next creative breakthrough.
Step 4: Explore Your Editing Skills
As already stated, the Filmora effects library is an extensive inventory of stunning features to compliment your artwork with matchless class. You are free to choose from tons of image and video editing effects and filters suited to your GIF content to create excellent pieces of graphic art.
When starting to customize your GIF in Filmora, you can begin with cropping and trimming your images or video to the perfect part, or even cut and split them to ward off unwanted portions, or rotate and flip the images to set them in the perfect orientation.
You can further add elements like, graphic transitions, overlays, animations and texts, and etc., to customize your artwork to your heart’s content. The software’s audio-visual library facilitates you with around 300 audio-visual effects and music choices to supplement your creation with a conducive sound feel. You can also make adjustments in frame speed and play durations to get the best most snippet ever!
You are granted the liberty to choose almost any common file format to create and customize GIFs in Filmora. A more convincing feature is, the software does not leave a watermark on your artwork and you can easily share your creation across media platforms.
Step 5: Save and Export
Once your creation satisfies you, save it to your device with a .gif extension, from where it can be exported to various media sharing platforms with ease.
● Key Takeaways from This Episode →
● When planning a perfect and appealing product marketing strategy, you can consider using GIFs to enhance the feel. Complement your product site with suitable GIF design and graphic transitions can prove pivotal to target and hold your related audience.
● Looking for the best GIF creator and customization software, you can rely on Filmora to create and customize professional quality GIFs with utmost convenience.
Also read:
- How Did AI Video Games Act More Human Than Human?
- Why Your Transparent GIF Is Hard to Remove and How to Do With It for 2024
- Updated 2024 Approved A Guide to Color Grade Your Picture in LightRoom
- In 2024, Steps To Fade Audio In Premier Pro
- Updated Learn Color Correction in After Effects with These Videos for 2024
- 2 Ways to Add Custom Subtitles to Netflix
- Updated How to Create an Adobe Slideshow the Easy Way for 2024
- The Ultimate Guide for the 10 Leading Slow-Motion Cameras for 2024
- New 7 Solutions to Cut Video on Mac without Using FFmpeg?
- Updated 2024 Approved Mask Tracking Is Believed to Be a Helpful Procedure for Marking Proper Areas in Videos. Learn How to Perform Premiere Pro Mask Tracking in This Guide
- Green Screens Are a Fun Way for Creators to Bring Their Personality to Their Stream, Allowing Them to Dynamically Alter Their Stream Background and Make Their Content Appear Even More Engaging and Polished for 2024
- Quick Answer Why Did Filmora AI Portrait Attract People for 2024
- New Simple Tricks Make 3D GIF Production of Inspiration Pop up Constantly for 2024
- Top 6 End Screen Makers for 2024
- New In 2024, Based on Preferences, You Can Adjust the Speed of YouTube Videos. Learn How to Produce a YouTube Slow-Motion Video in This Article
- 2024 Approved Camtasia Review – Is It The Best Video Editor?
- New In 2024, Best Ways to Convert Video Frame Rate to 60FPS Software and Online Choices
- New 2024 Approved Little Tricks to Create Canva Slideshow No One Is Telling You
- Updated 2024 Approved How To Add Scrolling Text Effect
- Updated In 2024, How to Use Rule of Thirds in Video
- Updated 2024 Approved Do You Want to Record Videos with a Phantom High-Speed Camera? In This Guide, You Can Get a Detailed Note on the Phantom Camera
- 2024 Approved 10 Best Websites to Discover Free Premiere Pro Video Templates
- Updated Do You Want to Know About Efficient Motion Blur Plugins for Adobe Effects? Read This Article to Find Out How to Use Motion Blur Plugins for Enhanced Results for 2024
- Updated 2024 Approved Ways to Make Sure Your Recording Slideshow in Powerpoint Is Not Wrong
- New Creating a Slideshow Is Necessity of the Modern Time. Whether You Plan a Business Meeting or You Are Going to Do some Family Event with Slideshow Presentation, a Good Slideshow Maker Will Help You in This Direction for 2024
- New 2024 Approved Premiere Pro Best Slow Motion Effects To Use
- In 2024, Frame Blending Is a Great Way to Smooth Out Your Video Footage in Adobe Premiere Pro. Using This Technique, You Can Create a More Natural Looking Motion by Averaging Out the Frames in Your Clips
- Updated How to Create a Custom Sequence Preset in Premiere Pro for 2024
- New How to Use Filmora Slideshow Maker for Making Slideshow? What Is Slideshow Filmora? Know the Steps to Make Filmora Slideshow. What Are Steps to Make Filmora Slideshow Template?
- Updated 2024 Approved 11 Ways To Speed Up A Video On iPhone
- In 2024, Expolring Top 6 Best Alternatives to Clownfish Voice Changer
- In 2024, 10 Best Free Video Player for Windows 11
- This Article Will Help You Understand How to Create Video Contents that Convert Sales
- New How to Loop a Video on Vimeo, In 2024
- Creating Motivational Videos with AI Comprehensive Guide 2024
- New How to Make Tutorial Video with Filmora for 2024
- New How to Be a Good Podcast Host for 2024
- Updated In 2024, 5 Tips for Aquasoft Slideshow
- New 2024 Approved Looking for the Best Way to Create Stunning Video Animations? Here, We Look at some of the Best Animated Video Maker Solutions to Use
- In 2024, Hyperlapse VS Timelapse Videos
- New How to Make a Time-Lapse Video Online
- New How to Add Zoom Blur Effect In Photoshop for 2024
- Top iPhone 12 Pro Max Message Recovery Software | Stellar
- In 2024, How to Transfer Apps from Vivo Y78+ to Another | Dr.fone
- In 2024, How to Mirror Your OnePlus 12R Screen to PC with Chromecast | Dr.fone
- How to Update iPhone 15 Pro Max without Losing Anything? | Dr.fone
- About Xiaomi Redmi 13C FRP Bypass
- Full Guide How To Fix Connection Is Not Private on Poco M6 5G | Dr.fone
- In 2024, Infinix Zero 5G 2023 Turbo ADB Format Tool for PC vs. Other Unlocking Tools Which One is the Best?
- Best 3 Oppo F23 5G Emulator for Mac to Run Your Wanted Android Apps | Dr.fone
- How To Unbrick a Dead Vivo Y77t | Dr.fone
- In 2024, Top 10 Fingerprint Lock Apps to Lock Your Samsung Galaxy A14 5G Phone
- 6 Methods for Switching from Apple iPhone 7 Plus to Samsung | Dr.fone
- In 2024, How To Bypass iCloud Activation Lock On iPod and Apple iPhone 15 Pro The Right Way
- Removing Device From Apple ID For your iPhone 14 Plus
- In 2024, A Step-by-Step Guide on Using ADB and Fastboot to Remove FRP Lock from your Motorola Moto G04
- How to Unlock Apple iPhone 14 Plus Passcode without Computer? | Dr.fone
- In 2024, Additional Tips About Sinnoh Stone For Vivo Y27 5G | Dr.fone
- In 2024, The Updated Method to Bypass Google Pixel Fold FRP
- All About Apple iPhone 13 Pro Max Unlock Chip You Need to Know
- In 2024, Here are Some of the Best Pokemon Discord Servers to Join On Tecno Camon 20 | Dr.fone
- 4 Easy Ways for Your Infinix Note 30i Hard Reset | Dr.fone
- In 2024, How to Change Google Play Location On Motorola Moto G24 | Dr.fone
- Pattern Locks Are Unsafe Secure Your Itel Phone Now with These Tips
- How To Do Tecno Spark 20 Screen Sharing | Dr.fone
- In 2024, Where Is the Best Place to Catch Dratini On Oppo Reno 11 5G | Dr.fone
- In 2024, Complete Guide For iPhone 15 Plus Lock Screen
- Cellular Network Not Available for Voice Calls On Samsung Galaxy S24 Ultra | Dr.fone
- In 2024, Review of LazLive Live Selling Platform With Guide
- In 2024, Can I Bypass a Forgotten Phone Password Of Xiaomi Civi 3 Disney 100th Anniversary Edition?
- In 2024, Mastering Android Device Manager The Ultimate Guide to Unlocking Your Vivo S18 Device
- Prank Your Friends! Easy Ways to Fake and Share Google Maps Location On Lava Storm 5G | Dr.fone
- In 2024, 10 Free Location Spoofers to Fake GPS Location on your Xiaomi Redmi K70E | Dr.fone
- In 2024, How to Cast Vivo Y100A to Computer for iPhone and Android? | Dr.fone
- In 2024, Pokemon Go Error 12 Failed to Detect Location On Samsung Galaxy A25 5G? | Dr.fone
- In 2024, A Guide Xiaomi Mix Fold 3 Wireless and Wired Screen Mirroring | Dr.fone
- Why does the pokemon go battle league not available On Oppo Find N3 | Dr.fone
- How to Bypass FRP from Oppo A18?
- In 2024, 8 Ways to Transfer Photos from Tecno Spark 20 Pro+ to iPhone Easily | Dr.fone
- Title: 2024 Approved Making Slow Motion Videos in Premiere Pro A Review on The Best Method
- Author: Morgan
- Created at : 2024-05-19 05:12:22
- Updated at : 2024-05-20 05:12:22
- Link: https://ai-video-editing.techidaily.com/2024-approved-making-slow-motion-videos-in-premiere-pro-a-review-on-the-best-method/
- License: This work is licensed under CC BY-NC-SA 4.0.
