

2024 Approved Powerpoint Slideshow Icon, Slide Sorter View Icon, Slideshow Icon Powerpoint, Slide Show View Icon
Powerpoint Slideshow Icon, Slide Sorter View Icon, Slideshow Icon Powerpoint, Slide Show View Icon
Customise Powerpoint Slideshow Icon in Simple Ways
An easy yet powerful editor
Numerous effects to choose from
Detailed tutorials provided by the official channel
We often need to make different PowerPoint presentations. Be it for school projects, office presentations, college work or corporate presentations, PowerPoint slides are the major and the most commonly used technique for presenting any study or work material.
There are many methods to make your PowerPoint presentation stand out among the rest. Among all the ways, one of the most effective ones is customizing slideshow icons in PowerPoint. If you do not yet know about customizing slideshow icons in a PowerPoint, follow the following discussion, as we will discuss all the necessary information about it.
In this article
01 [Where is the Slide Show Button in PowerPoint?](#Part 1)
02 [What Are the Icons of PowerPoint Presentation?](#Part 2)
03 [How to Get More Icons for PowerPoint?](#Part 3)
04 [How to Customize PowerPoint Slideshow Icon in 8 Simple Ways](#Part 4)
Part 1 Where is the Slide Show Button in PowerPoint?
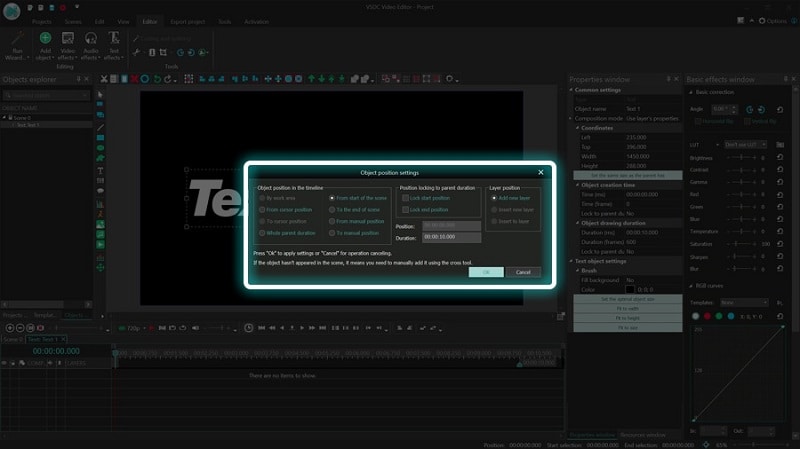
To present the PowerPoint presentation you make, you will have to find and click on the slide show view icon. The slide show option helps you to present the PowerPoint presentation. You can present each of the slides, one after the other.
You can choose to change the slides manually, or there is also an option where the slides can change automatically. You can readily select either of the options according to your needs. Also, you can fix the time duration that would determine how long would each slide stay on the screen if you choose to present your PowerPoint presentation automatically.
But before accessing all of them, it is crucial, or rather necessary, for you to know the slide show button in PowerPoint. So, here are the different steps that will help you find the slide sorter view icon in PowerPoint.
● Step 1
Open Microsoft PowerPoint.
![]()
● Step 2
Reach out to the top Menu bar.
![]()
● Step 3
You will find the option of “Slide Show” there.
● Step 4
You can make the necessary customization about the slide show setting of your presentation there.
![]()
● Step 5
Select the option “From Beginning” to begin your PowerPoint slide show from the first slide. Or, you can select the option “From Current Slide” if you’re going to start the slide show from the slide you are currently present.
![]()
Part 2 What Are the Icons of PowerPoint Presentation?
Customizing your slides for your slide show with the help of the innumerable icons of the PowerPoint requires you to know about the various groups of available icons. So, we will now discuss the different groups of icons available in the PowerPoint.
The following are the different icons of PowerPoint that you can integrate into your PowerPoint presentation.
● Accessibility
The first groups of icons are about accessibility. It denotes the symbols or icons that depict the differently-abled or specially-abled people. It helps represent and include a large community of specially-abled people.
![]()
● Analytics
The following group represents the different symbols related to Mathematics, analysis, presentation, graphs and the like.
● Animals
This set of icons includes the symbols for various animals and birds that one can include in their presentation and make it look more attractive.
![]()
● Apparel
This group of icons include the different symbols of the outfits, clothes, dresses and the other accessories that we wear.
● Arrows
It includes the symbols for the arrows pointing in different directions. This group of icons can be one of the most useful ones among the rest.
● Art
It includes a group of icons that depict anything and everything artistic.
![]()
● Body Parts
You will get the symbols for all the body parts in this icon group.
![]()
● Bugs
Get the symbols of the bugs and insects under this category.
● Buildings
This set of symbols shows different types of buildings. It can be a house, a church, a bakery, etc.
There are many such groups of icons, which include the follows.
● Business
● Commerce
● Communication
● Celebration
● Education
● Faces
● Dinosaurs
● Food and Drinks
● Holidays
● Home
● Interface
● Landscape
● Location
● Medical
● Nature and Outdoors
● Occupation
● People
● Process
● Puzzles and Games
● Security and Justice
● Signs and Symbols
● Sports
● Technology and electronics
● Tools and Buildings
● Vehicles
● Weather and Seasons
Part 3 How to Get More Icons for PowerPoint?
PowerPoint has an endless variety of icons for your presentation. No matter what your need is or which type of presentation you are making. You will find any type of icon to ornament your presentation to the fullest.
But, how can you get more icons for your PowerPoint presentation? So, here are the steps for integrating as many icons as you want in your PowerPoint presentation.
Step 1
Go to PowerPoint and reach out to the top Menu bar.
![]()
Step 2
Select the option “Insert”.
Step 3
Select the option “Icons.”
Step 4
Search for as many and whatever type of icon you want to integrate into your PowerPoint presentation.
![]()
Step 5
Select “Insert” option.
![]()
Part 4 How to Customize PowerPoint Slideshow Icon in 8 Simple Ways
Here are the eight different ways in which you can customize the PowerPoint Slideshow Icon.
01Using sketchy lines
First thing, insert any icon of PowerPoint and then use the option “Convert to Shape”.
Go to the “Shape Format Tab” and go to the “Shape Outline.”
Select “Sketchpad”.
You can readily customize the icons in PowerPoint using this recently introduced option at PowerPoint.
![]()
02Adding Simple Shapes
Through this step, you can add some additional details and make the icons of PowerPoint even more enhanced and attractive. You have the option of including a simple and basic shape. Or you can also add some detailing to the icons. You have the freedom of letting your creativity flow to the fullest.
● Group your icon
● Make it effortless to copy and paste and move around all over the slide.
03Adding Animations
You can present your icons in the PowerPoint presentation in the form of animations. You can make them appear through different animation speeds and variations. You can resize them and add layers for animating the icons in PowerPoint.
04Changing the properties of the icons
You can also change the icons’ brightness, contrast, or colours to make them look more enhanced and engaging.
05Adding entrances and exists
You can make your icons enter and leave the presentation in many unique ways.
![]()
06Select the icon you prefer to customise
● Choose the “BrightSlide tab.”
● Go to “My Animations”
Choose your preferred way of making your icon enter or exit the slide
07Using mask
For this, here are the steps.
● Cover a part of the entire slide by selecting a rectangle.
● Match your design and change the fill colour.
● Use the “Align” tools to make circles.
● Animate the icons according to the way you prefer.
08Direction
Another exciting yet straightforward way of customising your icons in PowerPoint is by making them appear from a different direction. Although it sounds simple, it will make your presentation look more formal and intreating.
09Fading in and out
You can readily make your icons fade in or fade out and make them appear more exciting and engaging for your presentation.
Another way of making your presentation look entirely out of the box is with one of the best video editing tools: Filmora. Wondershare Filmora Video Editor has been the best tool for editing videos and enhancing them, and you can readily use it for presenting any slide show or presentation.
For Win 7 or later (64-bit)
For macOS 10.12 or later
It will make your presentation unique, as it has some of the most extraordinary and incredible features. Some of the features are as follows.
● Motion Tracking feature- This feature will make your videos look more fascinating. You can use your creativity to customise the motion of your videos and edit them according to your ideas and inspirations.
● Effects-There are as many as more than 800 effects in Filmora. So, if you want to make your presentation look absolutely different and more incredible from the crowd, use Fimlora and its numerous effects to make your presentation the best of the best.
● Text and Titles- Add texts and titles wherever necessary so that you do not miss out on any information about your topic at the presentation.
● Music Library- Add some more uniqueness and exciting feature to your PowerPoint presentation with the help of the various music and tunes present at the Music Library of Filmora.
There are several other features of Filmora that, if we start including them, will make a list unending. It is the ideal tool for editing videos and also using it for producing some of the most wonderful presentations.
● Ending Thoughts →
● So, now you can readily make some of the most exciting and engaging PowerPoint presentations as you are well aware of the different ways of searching for the icons in PowerPoint, searching for the slideshow icon at PowerPoint, and also slideshow icons in PowerPoint.
● Additionally, you can use the best video editing tool, Filmora, for making your presentation stand out among the crowd in the optimal way possible.
● If you enjoyed reading this article, don’t forget to drop a comment below. Also, share your views with us regarding the content or anything related to the topic.
We often need to make different PowerPoint presentations. Be it for school projects, office presentations, college work or corporate presentations, PowerPoint slides are the major and the most commonly used technique for presenting any study or work material.
There are many methods to make your PowerPoint presentation stand out among the rest. Among all the ways, one of the most effective ones is customizing slideshow icons in PowerPoint. If you do not yet know about customizing slideshow icons in a PowerPoint, follow the following discussion, as we will discuss all the necessary information about it.
In this article
01 [Where is the Slide Show Button in PowerPoint?](#Part 1)
02 [What Are the Icons of PowerPoint Presentation?](#Part 2)
03 [How to Get More Icons for PowerPoint?](#Part 3)
04 [How to Customize PowerPoint Slideshow Icon in 8 Simple Ways](#Part 4)
Part 1 Where is the Slide Show Button in PowerPoint?
To present the PowerPoint presentation you make, you will have to find and click on the slide show view icon. The slide show option helps you to present the PowerPoint presentation. You can present each of the slides, one after the other.
You can choose to change the slides manually, or there is also an option where the slides can change automatically. You can readily select either of the options according to your needs. Also, you can fix the time duration that would determine how long would each slide stay on the screen if you choose to present your PowerPoint presentation automatically.
But before accessing all of them, it is crucial, or rather necessary, for you to know the slide show button in PowerPoint. So, here are the different steps that will help you find the slide sorter view icon in PowerPoint.
● Step 1
Open Microsoft PowerPoint.
![]()
● Step 2
Reach out to the top Menu bar.
![]()
● Step 3
You will find the option of “Slide Show” there.
● Step 4
You can make the necessary customization about the slide show setting of your presentation there.
![]()
● Step 5
Select the option “From Beginning” to begin your PowerPoint slide show from the first slide. Or, you can select the option “From Current Slide” if you’re going to start the slide show from the slide you are currently present.
![]()
Part 2 What Are the Icons of PowerPoint Presentation?
Customizing your slides for your slide show with the help of the innumerable icons of the PowerPoint requires you to know about the various groups of available icons. So, we will now discuss the different groups of icons available in the PowerPoint.
The following are the different icons of PowerPoint that you can integrate into your PowerPoint presentation.
● Accessibility
The first groups of icons are about accessibility. It denotes the symbols or icons that depict the differently-abled or specially-abled people. It helps represent and include a large community of specially-abled people.
![]()
● Analytics
The following group represents the different symbols related to Mathematics, analysis, presentation, graphs and the like.
● Animals
This set of icons includes the symbols for various animals and birds that one can include in their presentation and make it look more attractive.
![]()
● Apparel
This group of icons include the different symbols of the outfits, clothes, dresses and the other accessories that we wear.
● Arrows
It includes the symbols for the arrows pointing in different directions. This group of icons can be one of the most useful ones among the rest.
● Art
It includes a group of icons that depict anything and everything artistic.
![]()
● Body Parts
You will get the symbols for all the body parts in this icon group.
![]()
● Bugs
Get the symbols of the bugs and insects under this category.
● Buildings
This set of symbols shows different types of buildings. It can be a house, a church, a bakery, etc.
There are many such groups of icons, which include the follows.
● Business
● Commerce
● Communication
● Celebration
● Education
● Faces
● Dinosaurs
● Food and Drinks
● Holidays
● Home
● Interface
● Landscape
● Location
● Medical
● Nature and Outdoors
● Occupation
● People
● Process
● Puzzles and Games
● Security and Justice
● Signs and Symbols
● Sports
● Technology and electronics
● Tools and Buildings
● Vehicles
● Weather and Seasons
Part 3 How to Get More Icons for PowerPoint?
PowerPoint has an endless variety of icons for your presentation. No matter what your need is or which type of presentation you are making. You will find any type of icon to ornament your presentation to the fullest.
But, how can you get more icons for your PowerPoint presentation? So, here are the steps for integrating as many icons as you want in your PowerPoint presentation.
Step 1
Go to PowerPoint and reach out to the top Menu bar.
![]()
Step 2
Select the option “Insert”.
Step 3
Select the option “Icons.”
Step 4
Search for as many and whatever type of icon you want to integrate into your PowerPoint presentation.
![]()
Step 5
Select “Insert” option.
![]()
Part 4 How to Customize PowerPoint Slideshow Icon in 8 Simple Ways
Here are the eight different ways in which you can customize the PowerPoint Slideshow Icon.
01Using sketchy lines
First thing, insert any icon of PowerPoint and then use the option “Convert to Shape”.
Go to the “Shape Format Tab” and go to the “Shape Outline.”
Select “Sketchpad”.
You can readily customize the icons in PowerPoint using this recently introduced option at PowerPoint.
![]()
02Adding Simple Shapes
Through this step, you can add some additional details and make the icons of PowerPoint even more enhanced and attractive. You have the option of including a simple and basic shape. Or you can also add some detailing to the icons. You have the freedom of letting your creativity flow to the fullest.
● Group your icon
● Make it effortless to copy and paste and move around all over the slide.
03Adding Animations
You can present your icons in the PowerPoint presentation in the form of animations. You can make them appear through different animation speeds and variations. You can resize them and add layers for animating the icons in PowerPoint.
04Changing the properties of the icons
You can also change the icons’ brightness, contrast, or colours to make them look more enhanced and engaging.
05Adding entrances and exists
You can make your icons enter and leave the presentation in many unique ways.
![]()
06Select the icon you prefer to customise
● Choose the “BrightSlide tab.”
● Go to “My Animations”
Choose your preferred way of making your icon enter or exit the slide
07Using mask
For this, here are the steps.
● Cover a part of the entire slide by selecting a rectangle.
● Match your design and change the fill colour.
● Use the “Align” tools to make circles.
● Animate the icons according to the way you prefer.
08Direction
Another exciting yet straightforward way of customising your icons in PowerPoint is by making them appear from a different direction. Although it sounds simple, it will make your presentation look more formal and intreating.
09Fading in and out
You can readily make your icons fade in or fade out and make them appear more exciting and engaging for your presentation.
Another way of making your presentation look entirely out of the box is with one of the best video editing tools: Filmora. Wondershare Filmora Video Editor has been the best tool for editing videos and enhancing them, and you can readily use it for presenting any slide show or presentation.
For Win 7 or later (64-bit)
For macOS 10.12 or later
It will make your presentation unique, as it has some of the most extraordinary and incredible features. Some of the features are as follows.
● Motion Tracking feature- This feature will make your videos look more fascinating. You can use your creativity to customise the motion of your videos and edit them according to your ideas and inspirations.
● Effects-There are as many as more than 800 effects in Filmora. So, if you want to make your presentation look absolutely different and more incredible from the crowd, use Fimlora and its numerous effects to make your presentation the best of the best.
● Text and Titles- Add texts and titles wherever necessary so that you do not miss out on any information about your topic at the presentation.
● Music Library- Add some more uniqueness and exciting feature to your PowerPoint presentation with the help of the various music and tunes present at the Music Library of Filmora.
There are several other features of Filmora that, if we start including them, will make a list unending. It is the ideal tool for editing videos and also using it for producing some of the most wonderful presentations.
● Ending Thoughts →
● So, now you can readily make some of the most exciting and engaging PowerPoint presentations as you are well aware of the different ways of searching for the icons in PowerPoint, searching for the slideshow icon at PowerPoint, and also slideshow icons in PowerPoint.
● Additionally, you can use the best video editing tool, Filmora, for making your presentation stand out among the crowd in the optimal way possible.
● If you enjoyed reading this article, don’t forget to drop a comment below. Also, share your views with us regarding the content or anything related to the topic.
Create Glitch Text Effect
Glitch text effect is a trending video effect whereby the texts get distorted for a few seconds. The effect is comparable to the glitch you face when your screen starts to malfunction, and the screen appears to be wavy and disoriented. A glitch text effect is better than a regular animated text effect as it helps to get the attention of the viewers immediately and get the message across clearly.
The glitch effect can be applied to the entire video as well as the text as per your preference. There are several video editors available where the glitch text effect comes pre-loaded. All you need to do is to apply it to the text and get it done in a few steps. We will illustrate how to add glitch text effect Premiere Pro. But we recommend Filmora for the best glitter text effect that you can add to your video instantly.
Part 1. Create Glitch Text in Video with Filmora
We have already stated that Wondershare Filmora is the best video editor for the best glitch text effect download and apply to your video in simple steps. Filmora is a premium video editor that is widely used by amateur and professional video editors. You can get all glitch text effect After Effects and add them to your video conveniently in comparison to After Effects.
As a matter of fact, there are literally unlimited video and text effects available, and you can find different types of glitch text effects to apply to your titles and texts. Filmora is available for both Windows and mac users. Here are the steps to create glitch text in video with Filmora.
Free Download For Win 7 or later(64-bit)
Free Download For macOS 10.14 or later
Step1 Download and install Filmora on your computer. Go to File> New Project from the menu bar to start video editing project.

Step2 Go to File> Import Media > Import Media Files to import the video clips where you want to add glitch text effect. Drop the clip into the Timeline to get started.

Step3 Go to Titles tab located at the top. From the left panel, click on Titles option. Search “glitch” in the search field and you will see all the glitch text effects that you can apply to the text in your video.
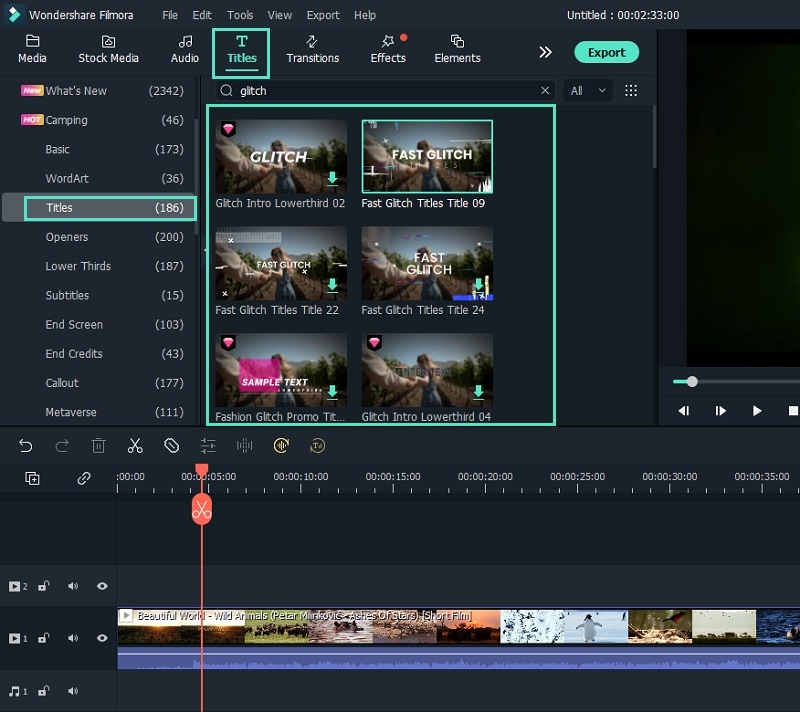
Step4 Select any glitch text effect and drop it into the Timeline above the video clip exactly where you want the text and the effect to appear.
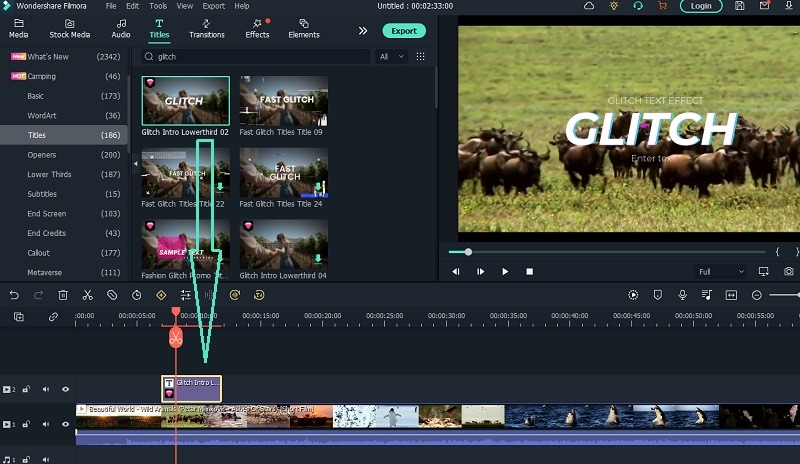
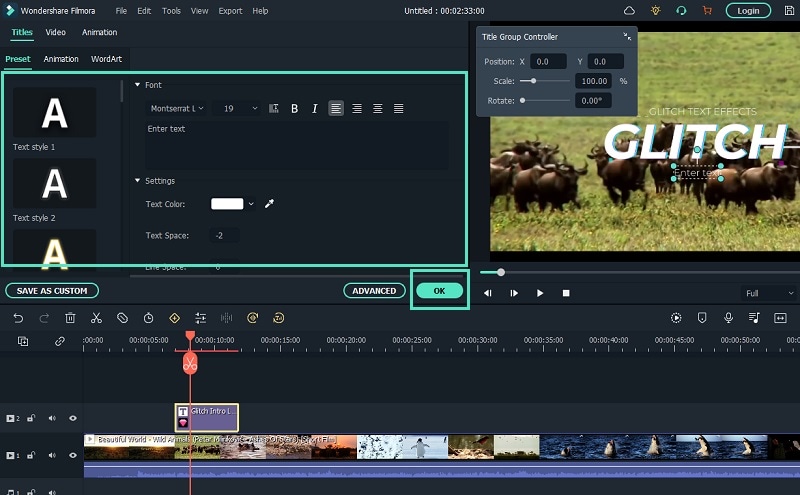
Step5 Double-click on the glitch text effect located on Timeline and edit the text, style, and other parameters as per your preference. Click on Ok and play the video to see your edited video with the glitch text effect.
Part 2. How to Make Glitch Text Effect with Premiere Pro
Adobe Premiere Pro is another renowned video editor where you can add glitch text effect to your video. Premiere Pro is strictly for professional video editors as the user interface is not as intuitive as Filmora . The learning curve is steep, and therefore, you need to go through the steps to add glitch text effect Premiere Pro. There are several glitch text effect presets available that you can apply to any text on your video to make them engaging. Here are the steps to make glitch text effect with Premiere Pro.
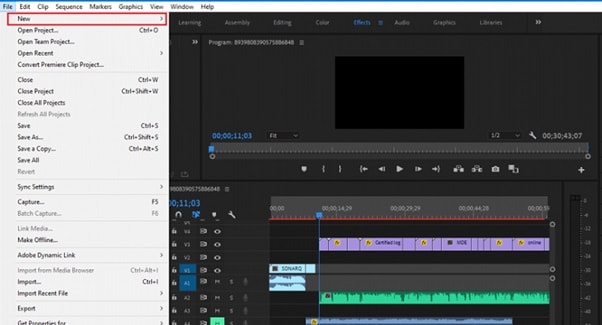
Step1 Launch Adobe Premiere Pro and go to New> Project to get started. Import your video and drop it into Timeline.
Step2 Use the Type tool to write any text on your video to add glitch text effect. You should have a text layer on Timeline.
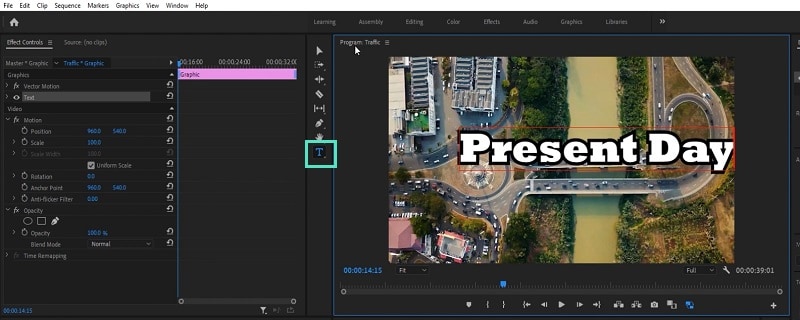
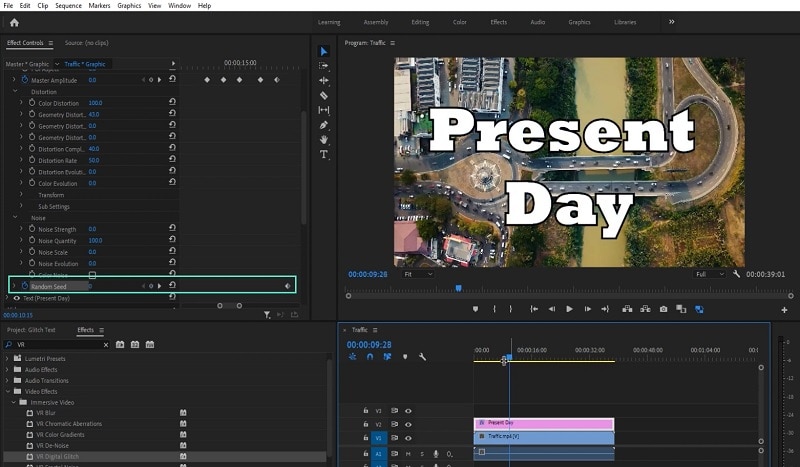
Step3 Go to Effects> Immersive Video> VR Digital Glitch option. Drag and drop the effect to text layer.
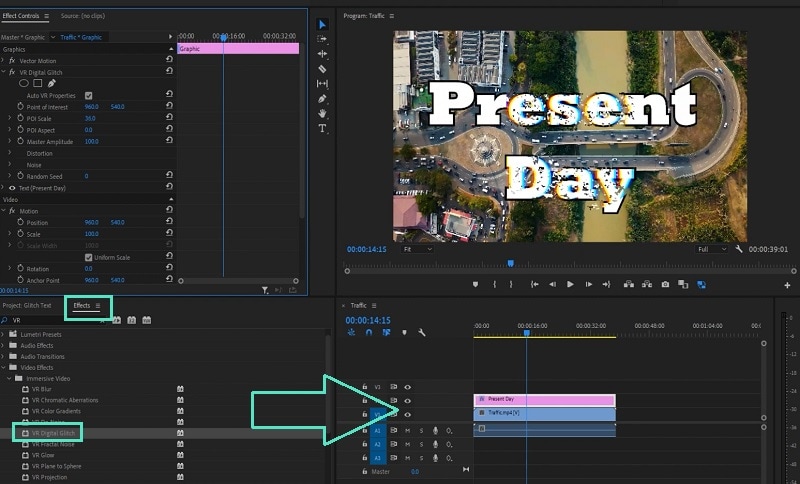
Step4 Under Effect Controls tab, you will find all the different parameters that you can adjust to get the glitch text effect perfectly.
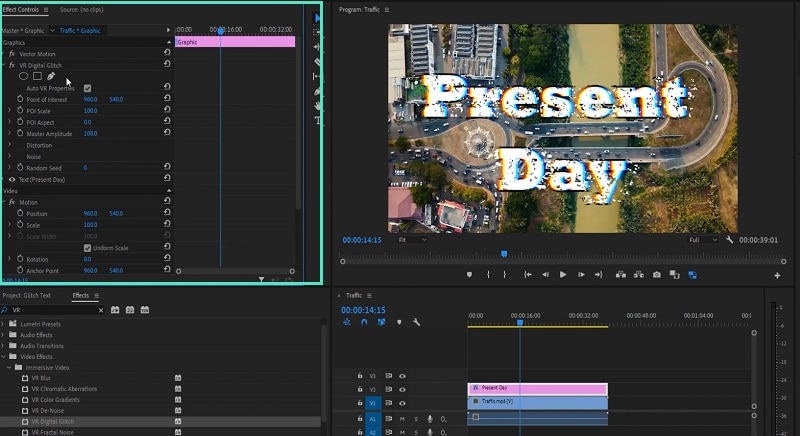
Step5 Turn on Master Amplitude and add multiple keyframes as different points in the Timeline and change the distortion value to make the effect prominent.
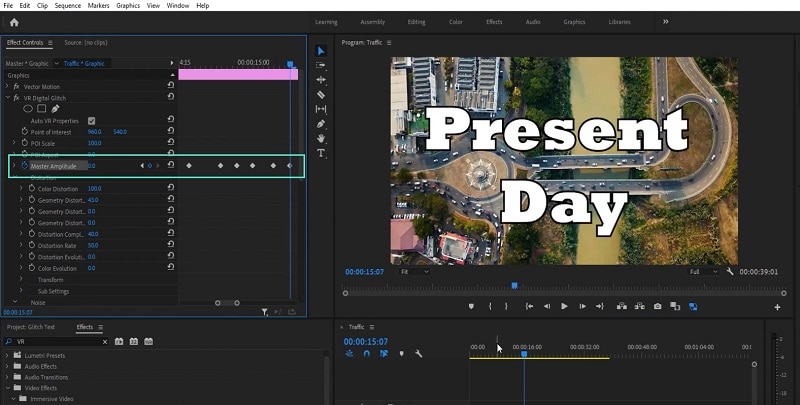
Step6 Go to the first keyframe and turn on Random Seed effect. Go to the last keyframe and turn on Random Seed effect and change the value to 75. Play the video to check the entire video with glitch text effect.
Part 3. Use VSDC Video Editor to Create Glitch Text
If you do not have any premium video editor on your computer and you do not want to purchase any premium video editor, you can still get glitter text effect free. You need to download and install VSDC free video editor on your computer. But the steps to create glitch text on VSDC video editor are slightly complicated as the user interface is not as intuitive as Filmora . Here are the steps to add free glitch text effect on your video.
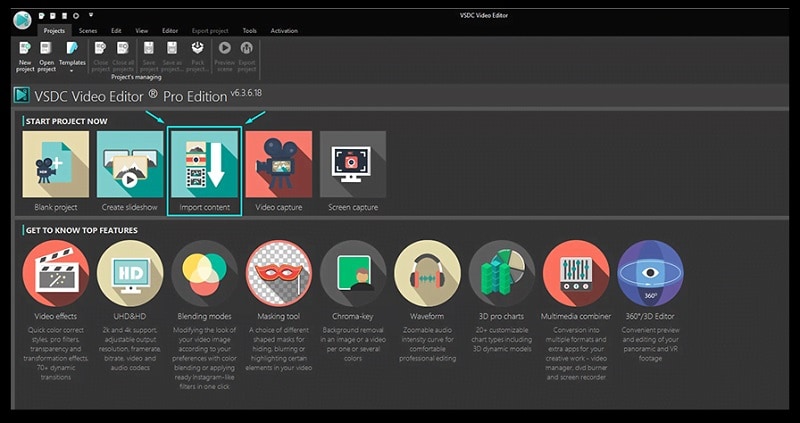
Step1 Download and install VSDC video editor. Launch the editor and click on New Project to get started. Import your video to your project where you want to add glitch text effect.
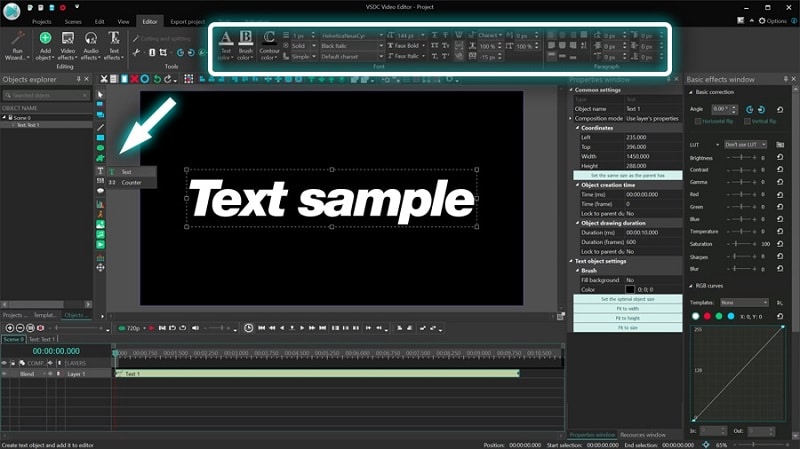
Step2 Use Type tool to write a text on the video. You can press Shift+T shortcut as well. After typing the text, adjust the text style as per your preference.
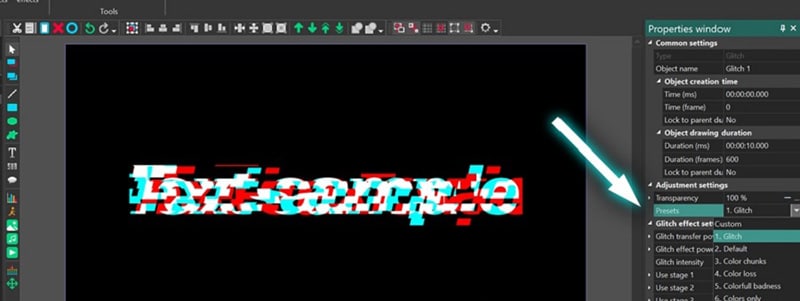
Step3 Double-click on the text layer on Timeline and go to Video Effects> Special FX and click on Glitch option.
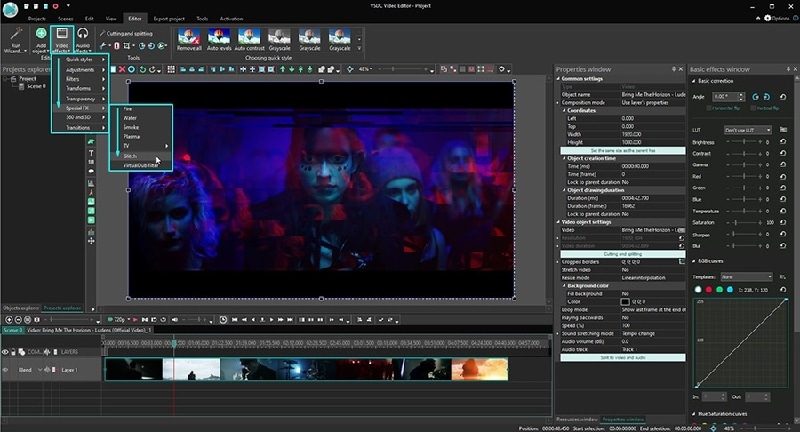
Step4 A window will appear where you can set the starting point, duration, and different parameters. Click on Ok button.
Step5 Go to Properties Windows and click on Presets to select different types of glitch text effects. You can also adjust the intensity of the text effects and other parameters as you feel.
Part 4. Related FAQs about Glitch Text
1. How do you animate glitch text?
If you want to animate glitch text for free, VSDC video editor is ideal as you can customize the effect on any text in simple steps. If you want to use a premium video editor, we recommend Filmora as there are various glitch text effects available to apply to any text on your video instantly.
2. How do you glitch text on video?
First, you have to import your video in your video editor. Type the desired text and set the style. Thereafter, go to glitch text effect presets available on the video editor and apply it to the text instantly. You can customize the glitch text effect as per your preference to make the animation more prominent.
3. How do you glitch text on Android?
You should first install Glitch Video Effect: Glitch FX app from Play Store. Edit your video on the app to add any text, and thereafter, add glitch text effect instantly. In fact, the glitch text effect is available in almost all popular video editor apps on Android due to the effect being trendy and viral.
Free Download For macOS 10.14 or later
Step1 Download and install Filmora on your computer. Go to File> New Project from the menu bar to start video editing project.
Step2 Go to File> Import Media > Import Media Files to import the video clips where you want to add glitch text effect. Drop the clip into the Timeline to get started.
Step3 Go to Titles tab located at the top. From the left panel, click on Titles option. Search “glitch” in the search field and you will see all the glitch text effects that you can apply to the text in your video.
Step4 Select any glitch text effect and drop it into the Timeline above the video clip exactly where you want the text and the effect to appear.
Step5 Double-click on the glitch text effect located on Timeline and edit the text, style, and other parameters as per your preference. Click on Ok and play the video to see your edited video with the glitch text effect.
Part 2. How to Make Glitch Text Effect with Premiere Pro
Adobe Premiere Pro is another renowned video editor where you can add glitch text effect to your video. Premiere Pro is strictly for professional video editors as the user interface is not as intuitive as Filmora . The learning curve is steep, and therefore, you need to go through the steps to add glitch text effect Premiere Pro. There are several glitch text effect presets available that you can apply to any text on your video to make them engaging. Here are the steps to make glitch text effect with Premiere Pro.
Step1 Launch Adobe Premiere Pro and go to New> Project to get started. Import your video and drop it into Timeline.
Step2 Use the Type tool to write any text on your video to add glitch text effect. You should have a text layer on Timeline.
Step3 Go to Effects> Immersive Video> VR Digital Glitch option. Drag and drop the effect to text layer.
Step4 Under Effect Controls tab, you will find all the different parameters that you can adjust to get the glitch text effect perfectly.
Step5 Turn on Master Amplitude and add multiple keyframes as different points in the Timeline and change the distortion value to make the effect prominent.
Step6 Go to the first keyframe and turn on Random Seed effect. Go to the last keyframe and turn on Random Seed effect and change the value to 75. Play the video to check the entire video with glitch text effect.
Part 3. Use VSDC Video Editor to Create Glitch Text
If you do not have any premium video editor on your computer and you do not want to purchase any premium video editor, you can still get glitter text effect free. You need to download and install VSDC free video editor on your computer. But the steps to create glitch text on VSDC video editor are slightly complicated as the user interface is not as intuitive as Filmora . Here are the steps to add free glitch text effect on your video.
Step1 Download and install VSDC video editor. Launch the editor and click on New Project to get started. Import your video to your project where you want to add glitch text effect.
Step2 Use Type tool to write a text on the video. You can press Shift+T shortcut as well. After typing the text, adjust the text style as per your preference.
Step3 Double-click on the text layer on Timeline and go to Video Effects> Special FX and click on Glitch option.
Step4 A window will appear where you can set the starting point, duration, and different parameters. Click on Ok button.
Step5 Go to Properties Windows and click on Presets to select different types of glitch text effects. You can also adjust the intensity of the text effects and other parameters as you feel.
Part 4. Related FAQs about Glitch Text
1. How do you animate glitch text?
If you want to animate glitch text for free, VSDC video editor is ideal as you can customize the effect on any text in simple steps. If you want to use a premium video editor, we recommend Filmora as there are various glitch text effects available to apply to any text on your video instantly.
2. How do you glitch text on video?
First, you have to import your video in your video editor. Type the desired text and set the style. Thereafter, go to glitch text effect presets available on the video editor and apply it to the text instantly. You can customize the glitch text effect as per your preference to make the animation more prominent.
3. How do you glitch text on Android?
You should first install Glitch Video Effect: Glitch FX app from Play Store. Edit your video on the app to add any text, and thereafter, add glitch text effect instantly. In fact, the glitch text effect is available in almost all popular video editor apps on Android due to the effect being trendy and viral.
Top 10 Secret Tips & Tricks to Use in Wondershare Filmora
Wondershare Filmora is a great video editing software with millions of users worldwide. It has many features that it provides to its users. However, there are some other features hidden up its sleeve.
This article will share some “secrets” of Wondershare Filmora features you may not know that they exist in Filmora. Scroll below to see the features that level up your editing skills.
Part 1. Shared Media Folder
You might have had the hassle of importing the same videos for a considerable time in a different project. It can become a problem for you. It may be fine if you have organized your videos from the start.
Shared Media Folder in Filmora, now called the Global Media Folder, can store video and audio that you’ve imported for future projects. So you don’t have to keep re-importing your media for future videos.

Moreover, when you have imported files into the Shared Media Folder, you can create new Sub-Folders. You can name these folders according to the types of media you are going to use.
Suppose you are a content creator and want to spice up your content with memes. You can create a meme folder to import recent memes into your videos.
Once you have imported them into the Wondershare Filmora’s Shared Media Folder, you can access them anytime. Doing so will allow you to save time and build a base for your future projects.
Free Download For Win 7 or later(64-bit)
Free Download For macOS 10.14 or later
Part 2. Customize Proxy Files
Before understanding the custom proxy settings, let us know what proxy files are.
Proxy Files
Proxy files in Wondershare Filmora allow you to render and edit 4K and other higher-resolution videos easily, regardless of your computer’s processing power.
No one wants to compromise PC performance when editing videos. But if you are importing a video with a higher resolution than your PC, you can only play it sometimes. Other than that, your PC might get stuck and slow down.
If your PC has a built-in resolution of 1080p, but the video you are going to import is 2160p, you can encounter rendering and performance problems. But in the case of Wondershare Filmora Proxy files, you can smoothly edit your videos without any trouble.
How to Customize Proxy Files in Filmora
Although Wondershare Filmora automatically creates proxy files when it encounters resolutions more significant than the PC performance. But you can also set them to your preference.
And customize your proxy files takes some simple and easy steps. But first, follow the steps mentioned below.
Step1 Find the File option on the top left corner of the Wonderhsare Filmora home interface.
Step2 Click on Files and go to Preferences.
Step3 A window will pop up, and here you can see multiple options.
Step4 Go to the performance.
Step5 In the performance tab, scroll down till your see Proxy.
Step6 Here check the box that says, “Automatically create proxies when resolution higher than:”

Step7 Below you can see multiple options. In these options, select the resolution that you want.
Step8 You can also click on the box below to automatically delete the proxies when you close your project.
Now, whenever you encounter a resolution of a higher video than the one you selected, Wondershare Filmora will do its magic.
Part 3. Delete Project Render Cache
Another hack you can use to save space on your hard drive is Deleting the Render cache. But before we do that, let us understand what Render cache is!
What is Render Cache?
Rendering can be a giant leap to give you a smooth performance experience. However, when you import your videos into the timeline, you can always render to have an uninterrupted playback experience.
Doing so will allow you to work in your zone quickly and efficiently. You can do a manual rendering before you begin the editing process. Or you can also opt to choose automatic rendering. In the automatic rendering option, you can continue your editing process. In the meantime, your timeline will be rendered.
How to Delete Render Cache in Filmora
To save up storage space on your computer, you can delete your render cache by following the steps.
Step1 Click on files in the top left corner of the Wondershare Filmora home interface.
Step2 Go to Preferences.
Step3 A window will pop up and go to Performance.
Step4 In the performance tab, scroll down below to the Preview Render.
Step5 Check the box saying, “Automatically delete render files when a project is closed.”

Step6 Click on OK to save your changes.
Now, whenever you close your project, your render cache will be deleted and would have given you extra space on your computer.
Part 4. Remove Split Button on Playhead
In some instances, when you are moving the playhead on the timelines, it can distract you from doing your editing. Or even more, you can mistakenly click on the Split button to split the clips you don’t want them to.
Well, no worries at all! Wondershare Filmora takes care of that for you. You can hide or remove the Split button on the playhead. It only takes a few simple and easy steps. Follow the steps mentioned below to remove the Split button:
Step1 You will notice the File option on the top left corner of the Wonderhsare Filmora home interface.
Step2 Click on Files and go to Preferences.
Step3 A window will pop up, and here you can see multiple options.
Step4 Go to the editing
Step5 In the editing tab, scroll down till your see the Split button.

Step6 Check the box. Then, click OK to save your changes.
Doing so would have removed the Split button from your playhead. So now you can edit your videos without any distractions.
Part 5. Copy and Paste Effects
Copy and paste are one of the oldest tricks in editing procedures. Wondershare Filmora comes with a range of commands and features that allow you to save time and be reliable.
Suppose you want to add an effect to a video clip in the timeline. Then, after adding the effect to your video, make custom changes to make it look more closely to the style you want. You can now use the copy-and-paste function to add the same effect to another clip. That helps you save a lot of time from tedious and time-consuming work.
How to Copy and Paste Effects
While editing, you will need to ensure that your editing process is as clean as possible and that you have all the time on hand.
But there is a solution! You can easily copy and paste the effects you placed on one video clip to another. Just follow the steps mentioned, and you will be good to go:
Step1 Right-click on the video to you added the effects too.
Step2 A drop-down column will pop up.
Step3 In the options below, you will notice an option called “Copy Effects.”
Step4 Click on the “Copy Effects” option.
Step5 Now move the playhead to the video clip on which you want to paste the effects.
Step6 Right-click on the video that you want to place the effect on.
Step7 In the pop-up column, select the Paste Effect
Step8 It adjusts the video clip according to the changes of the prior one.
You can save editing time by simply copying and pasting video effects.

Part 6. Timeline Snap
You might have added multiple videos in the same timeline track. If you removed the video ahead of the video clip, you have to close the gap in between.
So, arranging and moving clips in the timeline are hectic and time-consuming. However, that is the case without timeline snapping.
How to Apply Timeline Snap in Filmora
Timeline snapping will allow you to arrange video clips side by side without any breaks and cut-offs. Also, it will enable you to place it precisely above other video and audio gaps in the timeline.
In most cases, Timeline snapping is enabled from the start. But if you are encountering some problems managing your videos. Or if you want to remove the Timeline snap feature. Follow the steps mentioned below:
Step1 Right-click on the Timeline.
Step2 A pop will open up, giving you multiple options.
Step3 Click on timeline Snapping to either enable it or disable it.

Now you can easily enable and disable timeline snapping according to your choice!
Part 7. Color Code Video Clips
When editing footage from multiple cameras, you might want to organize which media is from which source in the timeline. You can do this by color coding your clips.
Steps to Color Code Your Videos
Color coding allows you to edit all the clips marked with a particular color to be selected simultaneously without selecting them manually in the timeline.
To color code a video, follow the steps as mentioned:
Step1 Select the clips you want to color code, right-click, and choose from the available colors.
Step2 Once you’ve color coded your clips, you can right-click on the clip again and choose to select all clips from the color mark option.
Step3 And all the clips marked with that color will be selected.

Part 8. Group Clips Together
Now in an editing timeline, you might encounter a situation where you want to arrange a video clip with specific audio. Again, it allows you to stay organized and save up a lot of time.
Grouping clips together can also be helpful when you want to edit multiple clips in the timeline but want to maintain a particular order. The group will remain in its place and allow you to edit your other video clips quickly.
Stepwise Guide to Grouping the Clips in Filmora
You can group video and audio clips in straightforward steps. Just follow the actions ahead, and you will be good to go:
Step1 Hold Left-click and drag across the clips that you want to select.
Step2 When you are done, Right-click on the clip to open the options tab.
Step3 Scroll down, and you will see a “” option.
Step4 Select Group, and that’s done.

Your whole group will be selected whenever you select a video clip or an audio clip.
Part 9. Pan and Zoom Shortcut
Editing shortcuts are excellent. They allow you to save up a lot of time. Some people prefer to use a mouse only to edit their videos, but professionals always use a keyboard.
But there are some other shortcuts too! In these shortcuts, you would not necessarily need a keyboard; only a mouse will work and give a good outcome.
You might have seen those videos in which a specific screen ratio moves over a picture. Or, in some cases when you have to pan and zoom to create a flow effect.
Instead of manually adjusting the ratio of your videos and photos, Pan and Zoom shortcuts will allow you to use multiple features. These features allow you to select where your video or photo will start, zoom, and end.
These shortcuts are so easy to apply. Just go through the steps below, and you will accomplish the following:
Step1 Right-click on a photo or a video clip.
Step2 Go to the crop and zoom tab above the timeline.
Step3 In the window that opens up, you will see a pan and zoom option in the top left corner. Click on it.
Step4 And on the bottom right corner of the window, you can see the pan and zoom shortcuts available.
Step5 Please select any of them you want and then click on OK.

Part 10. New Feature Request
One of the significant features of Wondershare Filmora that sets it among the best is its capability to listen to the users. When you have been using Wondershare Filmora for a long time, there will come a time when you wish for a feature. You can also do so in a few simple steps. Just follow the steps mentioned:
Step1 Multiple options are available on the top left corner of the Wondershare Filmora home interface. Click on help.
Step2 A drop-down box will open up.
Step3 In the options offered to you, select suggest a feature.

Step4 It automatically directs you to your default browser, where you can see the multiple feature requests.
Step5 You can vote for a feature you want in the next update.
Step6 Or you can also create a request for another particular feature.

Summing Up
Wondershare Filmora is the best in the business regarding editing your videos. It has such creative and easy-to-use software that even a beginner efficiently edits videos.
There are a lot of features that Wondershare Filmora provides. But now, with these secret and hidden tips, you can edit your videos more creatively.
Free Download For macOS 10.14 or later
Part 2. Customize Proxy Files
Before understanding the custom proxy settings, let us know what proxy files are.
Proxy Files
Proxy files in Wondershare Filmora allow you to render and edit 4K and other higher-resolution videos easily, regardless of your computer’s processing power.
No one wants to compromise PC performance when editing videos. But if you are importing a video with a higher resolution than your PC, you can only play it sometimes. Other than that, your PC might get stuck and slow down.
If your PC has a built-in resolution of 1080p, but the video you are going to import is 2160p, you can encounter rendering and performance problems. But in the case of Wondershare Filmora Proxy files, you can smoothly edit your videos without any trouble.
How to Customize Proxy Files in Filmora
Although Wondershare Filmora automatically creates proxy files when it encounters resolutions more significant than the PC performance. But you can also set them to your preference.
And customize your proxy files takes some simple and easy steps. But first, follow the steps mentioned below.
Step1 Find the File option on the top left corner of the Wonderhsare Filmora home interface.
Step2 Click on Files and go to Preferences.
Step3 A window will pop up, and here you can see multiple options.
Step4 Go to the performance.
Step5 In the performance tab, scroll down till your see Proxy.
Step6 Here check the box that says, “Automatically create proxies when resolution higher than:”
Step7 Below you can see multiple options. In these options, select the resolution that you want.
Step8 You can also click on the box below to automatically delete the proxies when you close your project.
Now, whenever you encounter a resolution of a higher video than the one you selected, Wondershare Filmora will do its magic.
Part 3. Delete Project Render Cache
Another hack you can use to save space on your hard drive is Deleting the Render cache. But before we do that, let us understand what Render cache is!
What is Render Cache?
Rendering can be a giant leap to give you a smooth performance experience. However, when you import your videos into the timeline, you can always render to have an uninterrupted playback experience.
Doing so will allow you to work in your zone quickly and efficiently. You can do a manual rendering before you begin the editing process. Or you can also opt to choose automatic rendering. In the automatic rendering option, you can continue your editing process. In the meantime, your timeline will be rendered.
How to Delete Render Cache in Filmora
To save up storage space on your computer, you can delete your render cache by following the steps.
Step1 Click on files in the top left corner of the Wondershare Filmora home interface.
Step2 Go to Preferences.
Step3 A window will pop up and go to Performance.
Step4 In the performance tab, scroll down below to the Preview Render.
Step5 Check the box saying, “Automatically delete render files when a project is closed.”
Step6 Click on OK to save your changes.
Now, whenever you close your project, your render cache will be deleted and would have given you extra space on your computer.
Part 4. Remove Split Button on Playhead
In some instances, when you are moving the playhead on the timelines, it can distract you from doing your editing. Or even more, you can mistakenly click on the Split button to split the clips you don’t want them to.
Well, no worries at all! Wondershare Filmora takes care of that for you. You can hide or remove the Split button on the playhead. It only takes a few simple and easy steps. Follow the steps mentioned below to remove the Split button:
Step1 You will notice the File option on the top left corner of the Wonderhsare Filmora home interface.
Step2 Click on Files and go to Preferences.
Step3 A window will pop up, and here you can see multiple options.
Step4 Go to the editing
Step5 In the editing tab, scroll down till your see the Split button.
Step6 Check the box. Then, click OK to save your changes.
Doing so would have removed the Split button from your playhead. So now you can edit your videos without any distractions.
Part 5. Copy and Paste Effects
Copy and paste are one of the oldest tricks in editing procedures. Wondershare Filmora comes with a range of commands and features that allow you to save time and be reliable.
Suppose you want to add an effect to a video clip in the timeline. Then, after adding the effect to your video, make custom changes to make it look more closely to the style you want. You can now use the copy-and-paste function to add the same effect to another clip. That helps you save a lot of time from tedious and time-consuming work.
How to Copy and Paste Effects
While editing, you will need to ensure that your editing process is as clean as possible and that you have all the time on hand.
But there is a solution! You can easily copy and paste the effects you placed on one video clip to another. Just follow the steps mentioned, and you will be good to go:
Step1 Right-click on the video to you added the effects too.
Step2 A drop-down column will pop up.
Step3 In the options below, you will notice an option called “Copy Effects.”
Step4 Click on the “Copy Effects” option.
Step5 Now move the playhead to the video clip on which you want to paste the effects.
Step6 Right-click on the video that you want to place the effect on.
Step7 In the pop-up column, select the Paste Effect
Step8 It adjusts the video clip according to the changes of the prior one.
You can save editing time by simply copying and pasting video effects.
Part 6. Timeline Snap
You might have added multiple videos in the same timeline track. If you removed the video ahead of the video clip, you have to close the gap in between.
So, arranging and moving clips in the timeline are hectic and time-consuming. However, that is the case without timeline snapping.
How to Apply Timeline Snap in Filmora
Timeline snapping will allow you to arrange video clips side by side without any breaks and cut-offs. Also, it will enable you to place it precisely above other video and audio gaps in the timeline.
In most cases, Timeline snapping is enabled from the start. But if you are encountering some problems managing your videos. Or if you want to remove the Timeline snap feature. Follow the steps mentioned below:
Step1 Right-click on the Timeline.
Step2 A pop will open up, giving you multiple options.
Step3 Click on timeline Snapping to either enable it or disable it.
Now you can easily enable and disable timeline snapping according to your choice!
Part 7. Color Code Video Clips
When editing footage from multiple cameras, you might want to organize which media is from which source in the timeline. You can do this by color coding your clips.
Steps to Color Code Your Videos
Color coding allows you to edit all the clips marked with a particular color to be selected simultaneously without selecting them manually in the timeline.
To color code a video, follow the steps as mentioned:
Step1 Select the clips you want to color code, right-click, and choose from the available colors.
Step2 Once you’ve color coded your clips, you can right-click on the clip again and choose to select all clips from the color mark option.
Step3 And all the clips marked with that color will be selected.
Part 8. Group Clips Together
Now in an editing timeline, you might encounter a situation where you want to arrange a video clip with specific audio. Again, it allows you to stay organized and save up a lot of time.
Grouping clips together can also be helpful when you want to edit multiple clips in the timeline but want to maintain a particular order. The group will remain in its place and allow you to edit your other video clips quickly.
Stepwise Guide to Grouping the Clips in Filmora
You can group video and audio clips in straightforward steps. Just follow the actions ahead, and you will be good to go:
Step1 Hold Left-click and drag across the clips that you want to select.
Step2 When you are done, Right-click on the clip to open the options tab.
Step3 Scroll down, and you will see a “” option.
Step4 Select Group, and that’s done.
Your whole group will be selected whenever you select a video clip or an audio clip.
Part 9. Pan and Zoom Shortcut
Editing shortcuts are excellent. They allow you to save up a lot of time. Some people prefer to use a mouse only to edit their videos, but professionals always use a keyboard.
But there are some other shortcuts too! In these shortcuts, you would not necessarily need a keyboard; only a mouse will work and give a good outcome.
You might have seen those videos in which a specific screen ratio moves over a picture. Or, in some cases when you have to pan and zoom to create a flow effect.
Instead of manually adjusting the ratio of your videos and photos, Pan and Zoom shortcuts will allow you to use multiple features. These features allow you to select where your video or photo will start, zoom, and end.
These shortcuts are so easy to apply. Just go through the steps below, and you will accomplish the following:
Step1 Right-click on a photo or a video clip.
Step2 Go to the crop and zoom tab above the timeline.
Step3 In the window that opens up, you will see a pan and zoom option in the top left corner. Click on it.
Step4 And on the bottom right corner of the window, you can see the pan and zoom shortcuts available.
Step5 Please select any of them you want and then click on OK.
Part 10. New Feature Request
One of the significant features of Wondershare Filmora that sets it among the best is its capability to listen to the users. When you have been using Wondershare Filmora for a long time, there will come a time when you wish for a feature. You can also do so in a few simple steps. Just follow the steps mentioned:
Step1 Multiple options are available on the top left corner of the Wondershare Filmora home interface. Click on help.
Step2 A drop-down box will open up.
Step3 In the options offered to you, select suggest a feature.
Step4 It automatically directs you to your default browser, where you can see the multiple feature requests.
Step5 You can vote for a feature you want in the next update.
Step6 Or you can also create a request for another particular feature.
Summing Up
Wondershare Filmora is the best in the business regarding editing your videos. It has such creative and easy-to-use software that even a beginner efficiently edits videos.
There are a lot of features that Wondershare Filmora provides. But now, with these secret and hidden tips, you can edit your videos more creatively.
Denoise Video in Adobe Premiere Pro – Audio and Video Noise Removal
What’s the key to our success? And what’s the process that it takes us? How can we attract audiences and guarantee the viewers’ transition to loyalty? – these are the questions that people in the professions connected to the technology should ask. There is no recipe, but at least, we know what NOT to do – DO NOT create bad content! You will never have a desired amount of listeners for your podcasts if the voice of the actor or noise of the whole track is annoying, you will struggle to have success on Youtube if your shots are unpleasant to watch, and the list goes on – there are just too many things you should not do!
But sometimes bad quality just happens. It happens when you know you have a problem and it happens when you think everything is going well in producing. You might come back from the production and find out that every shot you took had bad lightning, or there was an almost naked guy running on the background, or there is a noise on the background that just makes the whole experience of watching and listening not worthwhile! This might be something that sinks your heart…
But the mistakes we make don’t ensure that there has been a verdict cast for our failure. Nowadays, the will is everything – if you are really willing to make something work, you will just have to find the right tools, and learn a little about them, and, Voila! – Maybe you can turn bad into something good? Unacceptable into something acceptable? Annoying into interesting, and unpleasant into enjoyable?
This is called EDITING. And Editing covers different, almost endless days – too many computer programs, too many tools, too many opportunities to modify almost anything you want to make look and sound better - All of this feels like magic!
Among many instruments and techniques, there is one thing called denoising, with two different meaning. You might find noise in two areas – video and audio. Audio denoising means to remove or reduce the background noise, such as air conditioner hum, someone screaming from far away, birds chirping, the waves, etc. the noise in photo and video terms means that the scene we are looking at is grainy and makes watching the scene a little more difficult, with a less clear picture. And whenever these kind of things appear, mostly out of the blue, – because no one wants to take a bad video or record a bad voice-over, - our magical tools and abilities come to play…
One of those is called Adobe Premiere Pro, using for video editing, viewed as the most sophisticated video editor software. So, in this article, we will learn how to handle bot noise-s – in video as well as audio terms, and how to create a better viewer/listener experience in this very program. Lastly, we’ll touch upon an alternative for background noise removal, so, there’s nothing left but tuning in!
Video denoising in Adobe Premiere Pro
Reducing the noise in the video in this software can be achieved through using effect which is called Median. Before discovering it, without any doubt, we need to add our footage into the Timeline in Premiere Pro. Then, we can proceed to finding the Effects Panel, where our wanted Median can be found – just drag and drop the effect to your clip.

In order to make sure that the Median touches the grainiest parts of the whole clip, we need to use something called masks. In the Effects Control panel, we can select the mask shape for our clip –either choose rectangle, circle, or pen tool. Pen tool is something with which we move the Mask around the screen and resize it to include the desired area and cover it.

Changing Feather setting to 100 will make sure that the effect loses a visible edge and there is some smoothness added to those edges.

There might be the need to repeat this process and create several masks, if that means to have covered all of the grainy area of the scene.
Lastly, tom reduce the noise, adjusting the effect settings is needed.

Technically, what the Median effect does is just blurring the graininess, not exactly “taking it away”. And if we play with the Radius settings there, we can find our desired look!
How to remove background noise in Adobe Premiere Pro
Removing background noise in Adobe Premiere Pro can be a pretty simple process and lead to much better results. First of all, of course, import the desired material into your software so you can see the video and audio in the sequence visually. After having the project set up, you will need to find the Efffects Panel, which might be hidden a little, but it must be on the left and bottom of the program layout; or, you can find it on the top, in the navbar.

After having located the Effects panel, go for the search bar and type: denoise, and you’ll see that DeNoise effect is under Audio Effects.

You hold onto the effect, drag and drop it on the audio track in the timeline itself! Then, you just click on the audio in the sequence and on the top right Effect Controls will appear, which we need to concentrate on. You will scroll down a little there and below Audio notice: fx DeNoise, where you hit on the Edit button. This will open the Clip Fx Editor for the Audio denoising.

Basically, it only has one, Amount scale, and if you drag the slider of it to the right at 100%, it will remove the whole noise, but setting it on 0% will not remove any noise at all. So, you need to choose your preferred percentage! Just listen what is acceptable for you, but the general suggestion here would be that you can choose as high percent as you want, but if the effect starts taking out the voice and actually wanted parts, then you will have to stop and keep it that way. So, that’s actually it!
Bonus tip: how to remove audio noise in video with Wondershare Filmora
What we have promised in the beginning in the video, we like to offer now – the alternative to reduce or remove audio noise in the video is called Wondershare Filmora, which functions in a very simple way. So, we can start using these guides:
Drag and drop your video into the timeline. Right-clicking on the video and hitting Detach Audio will enable us to separate audio and video from one another, getting us a chance to work on them individually.

Double-click on the audio track shows the editing panel, where we see Remove background noise – choosing this option removes the noise!

Though, there is another way to do this too. If you don’t want to detach the audio, then first, double-click on the video clip in the timeline and when the editing panel opens, switch to Audio. If you check the box next to Remove background noise, you will see that there are three levels – weak, mid, and strong, which determine the strength of how toe noise is going to be reduced. Choosing one of them is up to you!
In case you find that the voice sounds a little robotics, you’ll need to make it sound more natural, of course. For it, you will need to click Customize, which will take you into the Customize Equalizer department.

The low tunes are on the left, while the highs are on the right. Background noises are often the low ones, so we better lower them even more, but we would raise the middle ones to achieve a natural sound.

And, that’s it – you are done with audio background noise removal!
So, in this article, we learned how to remove the video noise and grain and audio background noise using the software Adobe Premire Pro, while we also discussed how to do the latter using Wondershare Filmora – hope you can start using your new knowledge and tools very soon and create the content you never thought you could have created!
In order to make sure that the Median touches the grainiest parts of the whole clip, we need to use something called masks. In the Effects Control panel, we can select the mask shape for our clip –either choose rectangle, circle, or pen tool. Pen tool is something with which we move the Mask around the screen and resize it to include the desired area and cover it.
Changing Feather setting to 100 will make sure that the effect loses a visible edge and there is some smoothness added to those edges.
There might be the need to repeat this process and create several masks, if that means to have covered all of the grainy area of the scene.
Lastly, tom reduce the noise, adjusting the effect settings is needed.
Technically, what the Median effect does is just blurring the graininess, not exactly “taking it away”. And if we play with the Radius settings there, we can find our desired look!
How to remove background noise in Adobe Premiere Pro
Removing background noise in Adobe Premiere Pro can be a pretty simple process and lead to much better results. First of all, of course, import the desired material into your software so you can see the video and audio in the sequence visually. After having the project set up, you will need to find the Efffects Panel, which might be hidden a little, but it must be on the left and bottom of the program layout; or, you can find it on the top, in the navbar.
After having located the Effects panel, go for the search bar and type: denoise, and you’ll see that DeNoise effect is under Audio Effects.
You hold onto the effect, drag and drop it on the audio track in the timeline itself! Then, you just click on the audio in the sequence and on the top right Effect Controls will appear, which we need to concentrate on. You will scroll down a little there and below Audio notice: fx DeNoise, where you hit on the Edit button. This will open the Clip Fx Editor for the Audio denoising.
Basically, it only has one, Amount scale, and if you drag the slider of it to the right at 100%, it will remove the whole noise, but setting it on 0% will not remove any noise at all. So, you need to choose your preferred percentage! Just listen what is acceptable for you, but the general suggestion here would be that you can choose as high percent as you want, but if the effect starts taking out the voice and actually wanted parts, then you will have to stop and keep it that way. So, that’s actually it!
Bonus tip: how to remove audio noise in video with Wondershare Filmora
What we have promised in the beginning in the video, we like to offer now – the alternative to reduce or remove audio noise in the video is called Wondershare Filmora, which functions in a very simple way. So, we can start using these guides:
Drag and drop your video into the timeline. Right-clicking on the video and hitting Detach Audio will enable us to separate audio and video from one another, getting us a chance to work on them individually.
Double-click on the audio track shows the editing panel, where we see Remove background noise – choosing this option removes the noise!
Though, there is another way to do this too. If you don’t want to detach the audio, then first, double-click on the video clip in the timeline and when the editing panel opens, switch to Audio. If you check the box next to Remove background noise, you will see that there are three levels – weak, mid, and strong, which determine the strength of how toe noise is going to be reduced. Choosing one of them is up to you!
In case you find that the voice sounds a little robotics, you’ll need to make it sound more natural, of course. For it, you will need to click Customize, which will take you into the Customize Equalizer department.
The low tunes are on the left, while the highs are on the right. Background noises are often the low ones, so we better lower them even more, but we would raise the middle ones to achieve a natural sound.
And, that’s it – you are done with audio background noise removal!
So, in this article, we learned how to remove the video noise and grain and audio background noise using the software Adobe Premire Pro, while we also discussed how to do the latter using Wondershare Filmora – hope you can start using your new knowledge and tools very soon and create the content you never thought you could have created!
Also read:
- Updated In 2024, Unlock Your Video Editing Potential With Wondershare Filmora
- Updated In 2024, In This Article We Will Be Covering the Most Important Topics You Have to Remember when Becoming a Successful YouTube-Star
- In 2024, 8 Frame Rate Video Converters You Must Try
- 2024 Approved Discover the Top Slow Motion Camera App to Use
- New In 2024, Best 10 Anime Movies for All Time
- Updated Do You Want to Create a Motion Blur Effect in Your Videos? Read This Well-Described Guide to Learn How to Add Motion Blur on CapCut on iPhone and Android Devices
- Updated
- New 10 Best Free GIF Background Remover for PC and Online
- Updated Time Lapse Videos Play an Important Part in Videography. If You Want to Start Video Shooting, Then You Shouldnt Miss Time Lapse Video. This Article Will Show You some Ideas over This for 2024
- How To Blur The Video Background in After Effects for 2024
- In 2024, Finding The Best Filmic Pro LUTs For Video Editing
- Updated This Article Discusses What Is Vegas Pro, How to Download, Install and Use It, and Its Key Features. It Further Discusses Its Alternative for Editing Your Videos and More. Check Out Now for 2024
- New Adobe Premiere Pro Rec 709 LUTs Finding The Best Options
- New 2024 Approved How to Create Cinematic Style Videos?
- Updated In 2024, How to Make a Bokeh Effect
- Updated In 2024, Adding Shake Effects to Your Video With Alight Motion
- Updated In 2024, Top 15 Best Free MP4 Video Rotators Windows, Mac, Android, iPhone & Online
- 2024 Approved Video Course and Online Learning Are Very Popular Nowadays. Here We Are Going to Recommend some of the Best Video Websites for Teachers to Use
- Updated 2024 Approved How to Use Filmora Slideshow Maker for Making Slideshow? What Is Slideshow Filmora? Know the Steps to Make Filmora Slideshow. What Are Steps to Make Filmora Slideshow Template?
- Updated 2024 Approved Can You Enhance Your Drone Footage with Cinematic Drone LUTs? This Article Discusses Top Drone LUTs Recommendations to Simplify Video Editing
- New In 2024, What Are the 10 Best GIF Creator?
- 7 Ways Add Subtitles to MKV Videos on All Platforms
- New Learn Eight Simple Steps that Will Allow You to Create a Stunning Text Reveal Animation in Filmora. Simple yet Very Professional
- Troubleshoot Snapchat Camera Zoomed in Issue 4 Tips
- MAGIX Vegas Pro Review A Professional Video Editing Software for 2024
- New Split Audio From Video in Adobe Premiere Pro Step by Step for 2024
- Updated 2024 Approved Do You Want to Make TikTok Videos More Elemental by Using Countdown but Dont Know How to Do This? Here We Will Thoroughly Guide You About This
- How to Create A Freeze Frame Sequence in Video for 2024
- Updated In 2024, Some Top Methods to Create AI Slow Motion Videos
- New How to Record Video Streams With FFmpeg on Windows and Mac, In 2024
- Updated Detailed Guide to Merge Videos in VLC Media Player for 2024
- How to Transfer Music from Tecno Spark 10 4G to iPod | Dr.fone
- How to Factory Reset Oppo Find X7 without Losing Data | Dr.fone
- Updated 2024 Approved Translate Videos and Subtitles with Veed.io
- How to Delete All Photos from iPhone 7 Beyond Scope of Recovery? | Stellar
- In 2024, 3 Solutions to Find Your Motorola Moto G13 Current Location of a Mobile Number | Dr.fone
- In 2024, Top 10 Password Cracking Tools For Samsung Galaxy M14 5G
- Stuck at Android System Recovery Of Vivo S18e ? Fix It Easily | Dr.fone
- How To Repair iOS System Issues of Apple iPhone 14? | Dr.fone
- Apple ID Locked for Security Reasons On Apple iPhone 14? Find the Best Solution Here
- How to Reset a Locked Vivo Y200e 5G Phone
- How to Downgrade Apple iPhone SE to the Previous iOS Version? | Dr.fone
- How to Stop My Spouse from Spying on My Apple iPhone XS | Dr.fone
- How To Update or Downgrade Apple iPhone 13 Pro Max Without Losing Anything? | Dr.fone
- In 2024, Unlock Your Vivo S18e Phone with Ease The 3 Best Lock Screen Removal Tools
- Reset iTunes Backup Password Of iPhone 14 Pro Prevention & Solution
- How to Get and Use Pokemon Go Promo Codes On Realme 12 Pro 5G | Dr.fone
- In 2024, Is Fake GPS Location Spoofer a Good Choice On Oppo Reno 10 Pro+ 5G? | Dr.fone
- In 2024, How PGSharp Save You from Ban While Spoofing Pokemon Go On Vivo S18? | Dr.fone
- Best Anti Tracker Software For Apple iPhone 11 | Dr.fone
- In 2024, How to use Snapchat Location Spoofer to Protect Your Privacy On Motorola Moto G23? | Dr.fone
- 9 Mind-Blowing Tricks to Hatch Eggs in Pokemon Go Without Walking On OnePlus Nord N30 5G | Dr.fone
- How to Change/Fake Your Itel P55 5G Location on Viber | Dr.fone
- How to Reset Realme Narzo N53 Without the Home Button | Dr.fone
- How to Factory Reset Lava Blaze 2 Pro in 5 Easy Ways | Dr.fone
- In 2024, How to Mirror Apple iPhone SE to Mac? | Dr.fone
- In 2024, Full Guide to Unlock Your Samsung Galaxy F14 5G
- In 2024, Guide to Mirror Your Poco M6 Pro 5G to Other Android devices | Dr.fone
- Why Is My Huawei Nova Y71 Offline? Troubleshooting Guide | Dr.fone
- Title: 2024 Approved Powerpoint Slideshow Icon, Slide Sorter View Icon, Slideshow Icon Powerpoint, Slide Show View Icon
- Author: Morgan
- Created at : 2024-06-08 08:36:41
- Updated at : 2024-06-09 08:36:41
- Link: https://ai-video-editing.techidaily.com/2024-approved-powerpoint-slideshow-icon-slide-sorter-view-icon-slideshow-icon-powerpoint-slide-show-view-icon/
- License: This work is licensed under CC BY-NC-SA 4.0.
