
2024 Approved Shotcut Review – Is It The Best Free Video Editor?

Shotcut Review – Is It The Best Free Video Editor?
If you are looking for a free video editor, you should definitely opt for an open-source video editor. They come free of cost without locking any feature and they are compatible with all desktop operating systems. The user interface of Shotcut looks powerful still easy to operate. There are dockable panels and flexible layouts to customize the interface.
Coming to the features, there are plenty of video effects and filters to enhance video content. You can do all the standard video editing works comfortably. There are certain advanced features available such as keyframe, audio mixing and much more. However, can we consider Shotcut video editor the best for editing professional-quality videos? Find out the complete Shotcut reviews.
Part 1. How to Download and Install Shotcut
Shotcut is completely compatible with Windows, Mac and Linux. The company has discontinued Shotcut 32 bit version and the current version only supports 64 bit computer. Shotcut is safe to download and the installer is free of spyware and malware. Here are the steps to download and install Shotcut.

Step 1: From your web browser, visit “shotcut.org/download”. It automatically detects your operating system and provides you the installer to download Shotcut that could be compatible with your system.
Step 2: You can download the installer from Site 1(FossHub) or Site 2(GitHub). Besides, you can download the .exe file from Windows installer link or .zip file from Windows portable zip file.
Step 3: After downloading the installer file, install Shotcut from it by following the on-screen instructions.
Step 4: After installation, launch Shotcut and import all video and audio clips from Open File option. Bring them down to Timeline for basic editing.
Part 2. Key Features of Shotcut
Shotcut has all the standard features for basic video editing. Before downloading Shotcut, you should be aware of the features so that you can decide whether the video editor is suitable for your video editing purpose. Here are all the key features of Shotcut that stand out.
Video Capture – You can capture your screen as well as webcam video. Shotcut supports audio capture from the system as well as from the external mic. In fact, the software supports 4K resolution which is great being an open-source video editor.
Standard Editing – You can trim video clips and perform cut-copy-paste on clips. You can also append clips, insert clips in between, and extract audio from the videos. There are keyframes for video filters, presents, and markers. You can drag and drop files and keep notes. Besides, Shotcut uses proxy editing for handling high-resolution video files.
Audio Features – Shotcut comes with several audio filters that you can apply on your audio clips to enhance them. There are options for volume control, audio mixing, tone generator, and pitch adjustment. The popular fade in and fade out effects are also available along with audio scopes.
Video Effects – There is no dearth of effects and filters on Shotcut. In fact, you can compare Shotcut with premium video editors when it comes to video filters. Besides, there are blending modes and track compositing. Moreover, there are several transitions and deinterlacing. You can opt for 360-degree filters and reverse video clips as well as use video scopes.
Wide Support – Shotcut supports almost all the different video and audio formats. In fact, you get to select different photo file formats. The multi-format timeline supports mixing video and audio of different parameters perfectly. The software also supports network streaming and alpha channel videos.
Part 3. How to Edit Videos with Shotcut
Shotcut is good as a free video editor for standard editing options. You can add texts and titles, crop and trim video clips, as well as split and join clips. Besides, you can control the speed of the video clips as well as add transitions. Thereafter, you can export the video and publish online. Here are the steps about Shotcut editing videos.
Step 1: Launch Shotcut and go to File> New. Select Projects Folder and Video Mode and enter Project Name. Finally, click on Start button to get started.
Step 2: Go to View> Layout> Timeline Project for the best editing layer.
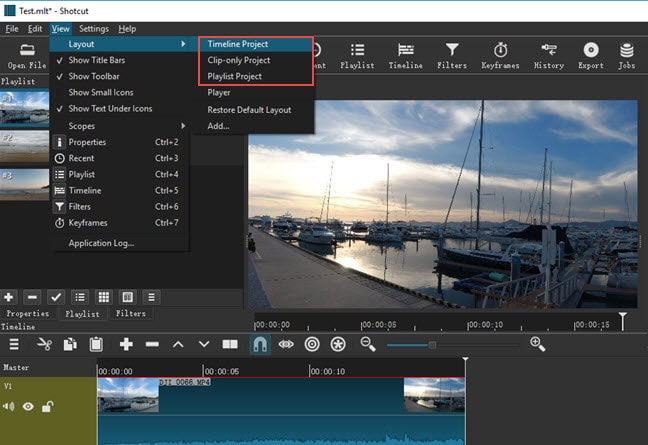
Step 3: To import media files, go to File> Open File> and select media files.
Step 4: To add texts, go to Filters> “+” icon> Video tab> select “Text:Simple”. Thereafter, type anything and choose a font and select any color.

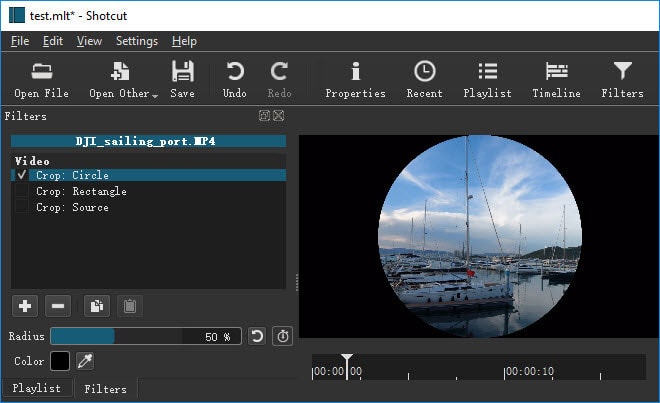
Step 5: To crop any video, go to Filters> Video> and Crop option. You can select various geometry shapes as you think appropriate.
Step 6: To add transitions, keep two clips on the same track and get them overlapped. Choose a transition from Properties and apply to your video.
Step 7: Finally, go to File> Export Video option. You can choose from different option and select frame rate, video resolution, and others from Advanced option.

Part 4. Shotcut Alternative to Edit Videos
There are many reasons why you could be looking for a better alternative to Shotcut. First of all, there is a big lack of advanced video editing features. That is why editing professional-quality videos with Shotcut is not highly feasible. The user interface is not as robust as the standard user interface of video. The editing cannot be as fluent as any premium and professional video editor. That is why we recommend Wondershare Filmora as the best alternative to Shotcut.
Wondershare Filmora is a premium video editor where there is a perfect balance of standard and advanced features. You can also capture screen and webcam video. There are tons of transitions, effects, filters, elements, and much more. There is also a stock media library available. Filmora has wider support for different file formats. Here are the steps on how to edit videos with Filmora.
For Win 7 or later (64-bit)
For macOS 10.12 or later
Step 1: Download and install Filmora as per your operating system. Launch Filmora and click on New Project option on the welcome screen. Drag and drop media files into Project Media folder.
Step 2: Drag and drop video clips and audio clips on the timeline in proper sequence. Thereafter, you can do basic editing such as trimming, cropping, splitting, and much more.

Step 3: Go to Transitions option and add your desired transitions in between clips. You can also opt for Titles for texts, Effects for animations, and Elements for objects.

Step 4: Once you are satisfied with the editing, click on Export button to save your video to your hard drive.

Part 5. FAQs about Shotcut
**Is Shotcut totally free?
Yes, Shotcut is a completely free video editor as it belongs to the open-source software category. It is available for free for Windows, Mac, and Linux users. All the features are completely unlocked, and there is no premium version available.
**Is Openshot better than Shotcut?
Openshot is equally good as Shotcut in terms of features. But in terms of user experience and editing 4K videos, Shotcut scores better than Openshot. Shotcut is a more lightweight video editor, and hence, the chances of crashes are relatively low.
**Is Shotcut good for YouTube?
Shotcut is particularly good for YouTube if you need only basic editing on your videos. You can export the edited video file from Shotcut to YouTube after basic editing. You can get eh frame rate, video resolution, and aspect ratio as per your requirements.
For macOS 10.12 or later
Step 1: Download and install Filmora as per your operating system. Launch Filmora and click on New Project option on the welcome screen. Drag and drop media files into Project Media folder.
Step 2: Drag and drop video clips and audio clips on the timeline in proper sequence. Thereafter, you can do basic editing such as trimming, cropping, splitting, and much more.

Step 3: Go to Transitions option and add your desired transitions in between clips. You can also opt for Titles for texts, Effects for animations, and Elements for objects.

Step 4: Once you are satisfied with the editing, click on Export button to save your video to your hard drive.

Part 5. FAQs about Shotcut
**Is Shotcut totally free?
Yes, Shotcut is a completely free video editor as it belongs to the open-source software category. It is available for free for Windows, Mac, and Linux users. All the features are completely unlocked, and there is no premium version available.
**Is Openshot better than Shotcut?
Openshot is equally good as Shotcut in terms of features. But in terms of user experience and editing 4K videos, Shotcut scores better than Openshot. Shotcut is a more lightweight video editor, and hence, the chances of crashes are relatively low.
**Is Shotcut good for YouTube?
Shotcut is particularly good for YouTube if you need only basic editing on your videos. You can export the edited video file from Shotcut to YouTube after basic editing. You can get eh frame rate, video resolution, and aspect ratio as per your requirements.
For macOS 10.12 or later
Step 1: Download and install Filmora as per your operating system. Launch Filmora and click on New Project option on the welcome screen. Drag and drop media files into Project Media folder.
Step 2: Drag and drop video clips and audio clips on the timeline in proper sequence. Thereafter, you can do basic editing such as trimming, cropping, splitting, and much more.

Step 3: Go to Transitions option and add your desired transitions in between clips. You can also opt for Titles for texts, Effects for animations, and Elements for objects.

Step 4: Once you are satisfied with the editing, click on Export button to save your video to your hard drive.

Part 5. FAQs about Shotcut
**Is Shotcut totally free?
Yes, Shotcut is a completely free video editor as it belongs to the open-source software category. It is available for free for Windows, Mac, and Linux users. All the features are completely unlocked, and there is no premium version available.
**Is Openshot better than Shotcut?
Openshot is equally good as Shotcut in terms of features. But in terms of user experience and editing 4K videos, Shotcut scores better than Openshot. Shotcut is a more lightweight video editor, and hence, the chances of crashes are relatively low.
**Is Shotcut good for YouTube?
Shotcut is particularly good for YouTube if you need only basic editing on your videos. You can export the edited video file from Shotcut to YouTube after basic editing. You can get eh frame rate, video resolution, and aspect ratio as per your requirements.
For macOS 10.12 or later
Step 1: Download and install Filmora as per your operating system. Launch Filmora and click on New Project option on the welcome screen. Drag and drop media files into Project Media folder.
Step 2: Drag and drop video clips and audio clips on the timeline in proper sequence. Thereafter, you can do basic editing such as trimming, cropping, splitting, and much more.

Step 3: Go to Transitions option and add your desired transitions in between clips. You can also opt for Titles for texts, Effects for animations, and Elements for objects.

Step 4: Once you are satisfied with the editing, click on Export button to save your video to your hard drive.

Part 5. FAQs about Shotcut
**Is Shotcut totally free?
Yes, Shotcut is a completely free video editor as it belongs to the open-source software category. It is available for free for Windows, Mac, and Linux users. All the features are completely unlocked, and there is no premium version available.
**Is Openshot better than Shotcut?
Openshot is equally good as Shotcut in terms of features. But in terms of user experience and editing 4K videos, Shotcut scores better than Openshot. Shotcut is a more lightweight video editor, and hence, the chances of crashes are relatively low.
**Is Shotcut good for YouTube?
Shotcut is particularly good for YouTube if you need only basic editing on your videos. You can export the edited video file from Shotcut to YouTube after basic editing. You can get eh frame rate, video resolution, and aspect ratio as per your requirements.
Deleting White Background in Photoshop Is Hard?
Deleting White Background in Photoshop Is Hard? No
An easy yet powerful editor
Numerous effects to choose from
Detailed tutorials provided by the official channel
Know how Photoshop make white background transparent. Learn to create transparent background in Photoshop in simple steps. How to delete white background in image?
In this article
01 [Why Shooting with a White Background Makes Sense](#Part 1)
02 [When We Need to Delete White Background and when Not?](#Part 2)
03 [How to Delete White Background in Photoshop (5 Fast Ways)](#Part 3)
04 [Which Photoshop Selection Tool is Best for White Backdrop Removal](#Part 4)
Part 1 Why Shooting with a White Background Makes Sense
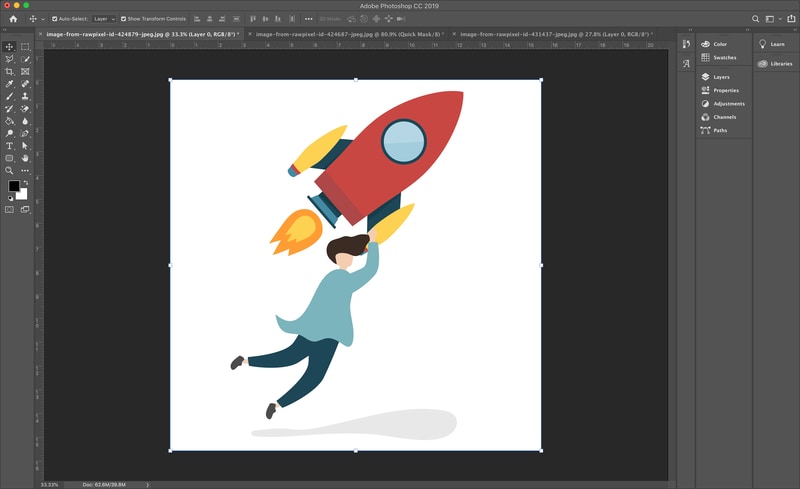
Products have gone online with E-commerce and people explore the products over internet more than they pick it from the stores. So, every business needs to showcase their products in a attractive way to get more customers. This needs an attractive photography by experts. Photography for e-commerce products requires expert product photography or commercial photography. They are very important for a business to get success in long run. To do branding the product image should be accurate and attractive.
So, if your company is going online, your products photography should be attractive enough to make buyers purchase your products. Background is essential part of any photography or video making. Whether it is product catalogue, shoot, advertising or commercial videos, white backdrop and white background are always good. With white background one can pay attention to the product. Every details of the product are highlighted when a white background is used.
When you need bright and highlighted images for any commercial videos, using a right technique for background color is must. White background creates a clean and bright commercial photo. If the same is not done correctly, the white background may turn to be off white or grey. A white background is good for isolating an object in the picture.
So, let’s know why shooting with white background make sense. Here are some reasons for it:

Removal of background becomes Easy and quick:
The most important benefit of applying white background is that it can be easily removed or replaced. In place of the blank white background, one can easily apply other background color or make it transparent. The white background has a speciality that it reflects the color of the product better which makes the product image visually good. This can be done with the help of any tool or application. Thus, using a white background gives an opportunity to apply any other background on it.
Promoting product in every occasion: An image with colorful background may not be useful to present in every event or occasion. For example a simple image with colorful background will not look good in a promotional event, while a colorful background will look happening in any festival event celebration. This, a blank background has the option to change as per the need of the occasion.
An image with white background can be changed as per the occasion. This helps a business to use a single image throughout the year without any additional cost for making a different picture. You can just change the white background of any image through various application or software.
Time saving: Removing white background is easy and streamlined as compared to any other color. The reason is that it does not require much editing and work on the edges. So, the steps in removing the white background are less and thus it saves time of the artist and the editors.
Saves location and bulk shooting expenses: When shooting with a white background is done; the same picture with some changes can be reused for number of times in several occasions. Thus, it saves the cost of shooting different in pictures in different location.
Good to celebrate every special day: A picture with white background is perfect and ready to edit for any special day. Whether it I a father’s day, mother’s day or any special day, a single picture can be edited as per the requirement. It will be a great gifting idea also after changing white background of the picture as per the special day.
Part 2 When We Need to Delete White Background and when Not?
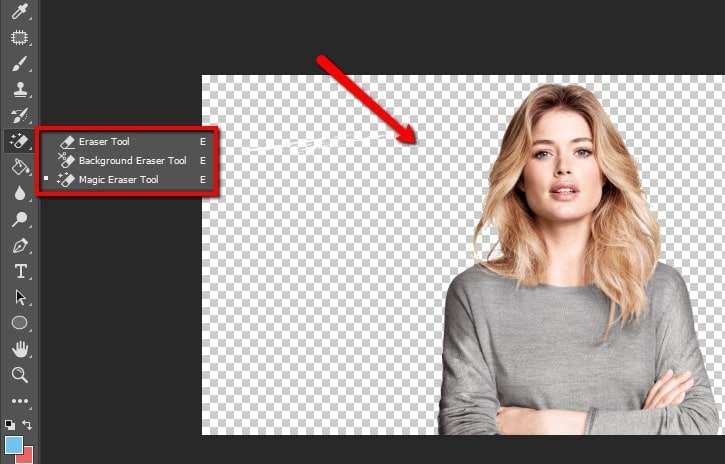
A single picture of a person or product cannot be used for a single instance or purpose. Especially when it is a promotional campaign or commercial advertisements, a product is required to be showcased in several marketing campaign for different categories of consumers. Thus, a white background image is good for several purposes while in some circumstances, it requires changes. So, let’s see when to delete white background and when not:
When a picture requires special editing: When a picture requires some special effects like reflection, highlights and shadow effects, the picture with white background is required to be changed. When improvement in picture is requires, the white, transparent and color background can be changed accordingly.
Enhancing the visual impact of the picture: A white background picture grab the attention of the customers. So, it is good for advertising and promotion. While this needs to be removed when one desire to add some visual impact on the pictures or deliver some message to the viewers. So, it requires adding colorful and visually good background in a picture.
Adding more items to a picture: A white background need to be removed when more items are required to be included in it. Special edits and enhancing the pictures requires removing or adding a white background as per the purpose of the picture.
Part 3 How to Delete White Background in Photoshop (5 Fast Ways)
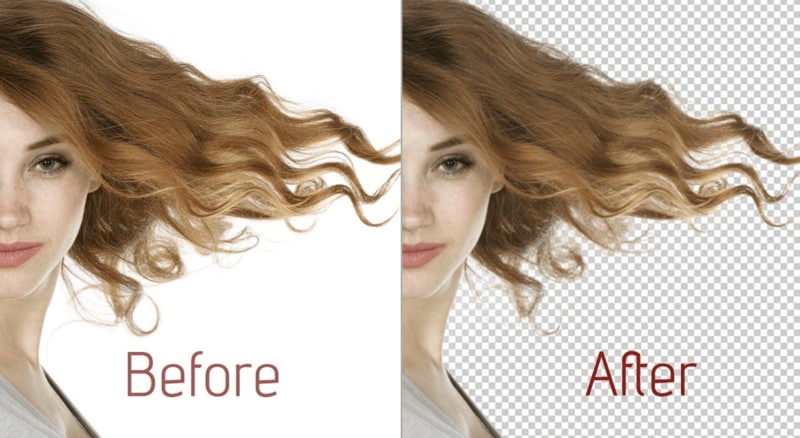
Editing a picture with white background can be done in easy steps through various applications. Deleting white background in Photoshop can be done through various tools. Some of the top 5 fast ways to clear background Photoshop are**:**
With the object selection tool:
● Start Photoshop and open the picture. Select the “object selection” from the tool bar. Hover cursor over subject till it turns blue. The subject is selected.
● Press the shift key to remove the background while selecting the objects which you want in the picture.
● To invert the selection go to Select>Inverse.
● Unlock the image based on what you want in the background. It will no longer be a background. It can be also used to create transparent background Photoshop.
● Click on Erase tool and start erasing the background.
Removing background with quick action
This is the quick method for removing a background when a user is going for own purpose. It is in-built quick action in Photoshop for removing the background. Although it is good for performing work, but the same cannot meet the perfection level that any other method does. It can be done by following the mentioned steps:
● Open the image in Photoshop, right click on background layer and click Duplicate layer. Then click on OK.
● Always try to open the properties panel by going to Window>Properties.
● Click on new layer at Layer panel. Go to Quick action and click on Remove Background.
● The background gets removed with quick action.
● At this point refinements and adjustments can be made.
Using pen tool to remove the background
● Open image in Photoshop, right click on background layer and go to Duplicate Layer. Name the layer and click OK.
● Select the Pen tool from the toolbox. Zoom the area. Start at the edge of subject. Start working on the object; add anchors which will outline the subject.
● Click-hold-drag to produce a curved line.
● Use the Direct Selection tool in the toolbox if you want to adjust an anchor point or directional lines for fine tuning
● Complete the path from where you started and save it by going to Windows>paths. Go to three bar menu, click New Path to name it and then save.
● Go to path panel and right click New Path. Choose Make selection and click OK. This will give the outline of the path.
● Go to Select> Inverse if you don’t want to delete what is inside the selection. An outline can be seen around the image.
● Press delete to delete the background. It can be also done to add Adobe Photoshop transparent background.
With Magnetic Lasso Tool
● Right click Background layer and click duplicate layer on the image opened in Photoshop. Name the layer and then click OK. From the toolbox, select Magic Lasso tool. Start drawing at the edges of subject.
● Move around the subject and complete till the start point. Marching ants can be seen around the selection.
● Go to Selection>Save selection to save and give it a name.
● Select>Inverse to delete the background. Photoshop checkered background is visible now.
With quick selection tool
● Click on Duplicate Layer by right clicking on background layer of the picture opened on the Photoshop. Name the layer and click OK.
● Go to the tool box and select quick selection tool.
● Paint the subject by using tool.
● Clean up the selection path with click by holding the Option key (macOS) or Alt key (Windows).
● Go to Selection>Save selection to save and give it a name.
● Select>Inverse to delete the background. The white background can be seen now.
Part 4 Which Photoshop Selection Tool is Best for White Backdrop Removal

There are various tools available at Photoshop to turn a background white. Each one of them has great utility based on the applications. Background Eraser tool is one of the good tools if there is need of more control over removing the background in Photoshop. It is highly effective and saves time of the user. It gives the desired outcome with perfection to an image. The visualization of image becomes better when the background is turned into white with the help of Background Eraser tool.
The other application that is very helpful in making background white to any image is Filmora.
Filmora is an excellent image and video editing software which helps the users in creating some amazing images and videos. It has wide range of image and video editing tools that can make any user a professional in image and video editing. It has features to add or remove background of an image to make it more visually good. Changing background and adding special effects to images and videos can be easily done through filmora.
Wondershare Filmora Video Editor allows transformation of pictures and videos in a better way by adding filters and graphics. Availability of support, drawing tools, editing tools, special effects and sound make it a complete application for both beginners and professionals. It can be used with various other applications also. Those who wish to know how to make a layer transparent in Photoshop can learn it from Filmora.
For Win 7 or later (64-bit)
For macOS 10.12 or later
● Ending Thoughts →
● Making white background or transparent background adobe photoshop has many benefits like it highlight the picture and make it good for various applications and occasions. It saves money and cost for the image editors and video makers.
● One should also know when to use the white background for images, catalogue and video shoot. Adding and deleting white background can only be done when required as per the demand of the occasion and the category of the user like marketing, media, customers etc.
● Various tools on Photoshop make it easy for the users to add or remove white background of images. Filmora is one of the applications that is very popular for its image editing features. It can be used to give special effects to any image or video.
Know how Photoshop make white background transparent. Learn to create transparent background in Photoshop in simple steps. How to delete white background in image?
In this article
01 [Why Shooting with a White Background Makes Sense](#Part 1)
02 [When We Need to Delete White Background and when Not?](#Part 2)
03 [How to Delete White Background in Photoshop (5 Fast Ways)](#Part 3)
04 [Which Photoshop Selection Tool is Best for White Backdrop Removal](#Part 4)
Part 1 Why Shooting with a White Background Makes Sense

Products have gone online with E-commerce and people explore the products over internet more than they pick it from the stores. So, every business needs to showcase their products in a attractive way to get more customers. This needs an attractive photography by experts. Photography for e-commerce products requires expert product photography or commercial photography. They are very important for a business to get success in long run. To do branding the product image should be accurate and attractive.
So, if your company is going online, your products photography should be attractive enough to make buyers purchase your products. Background is essential part of any photography or video making. Whether it is product catalogue, shoot, advertising or commercial videos, white backdrop and white background are always good. With white background one can pay attention to the product. Every details of the product are highlighted when a white background is used.
When you need bright and highlighted images for any commercial videos, using a right technique for background color is must. White background creates a clean and bright commercial photo. If the same is not done correctly, the white background may turn to be off white or grey. A white background is good for isolating an object in the picture.
So, let’s know why shooting with white background make sense. Here are some reasons for it:

Removal of background becomes Easy and quick:
The most important benefit of applying white background is that it can be easily removed or replaced. In place of the blank white background, one can easily apply other background color or make it transparent. The white background has a speciality that it reflects the color of the product better which makes the product image visually good. This can be done with the help of any tool or application. Thus, using a white background gives an opportunity to apply any other background on it.
Promoting product in every occasion: An image with colorful background may not be useful to present in every event or occasion. For example a simple image with colorful background will not look good in a promotional event, while a colorful background will look happening in any festival event celebration. This, a blank background has the option to change as per the need of the occasion.
An image with white background can be changed as per the occasion. This helps a business to use a single image throughout the year without any additional cost for making a different picture. You can just change the white background of any image through various application or software.
Time saving: Removing white background is easy and streamlined as compared to any other color. The reason is that it does not require much editing and work on the edges. So, the steps in removing the white background are less and thus it saves time of the artist and the editors.
Saves location and bulk shooting expenses: When shooting with a white background is done; the same picture with some changes can be reused for number of times in several occasions. Thus, it saves the cost of shooting different in pictures in different location.
Good to celebrate every special day: A picture with white background is perfect and ready to edit for any special day. Whether it I a father’s day, mother’s day or any special day, a single picture can be edited as per the requirement. It will be a great gifting idea also after changing white background of the picture as per the special day.
Part 2 When We Need to Delete White Background and when Not?

A single picture of a person or product cannot be used for a single instance or purpose. Especially when it is a promotional campaign or commercial advertisements, a product is required to be showcased in several marketing campaign for different categories of consumers. Thus, a white background image is good for several purposes while in some circumstances, it requires changes. So, let’s see when to delete white background and when not:
When a picture requires special editing: When a picture requires some special effects like reflection, highlights and shadow effects, the picture with white background is required to be changed. When improvement in picture is requires, the white, transparent and color background can be changed accordingly.
Enhancing the visual impact of the picture: A white background picture grab the attention of the customers. So, it is good for advertising and promotion. While this needs to be removed when one desire to add some visual impact on the pictures or deliver some message to the viewers. So, it requires adding colorful and visually good background in a picture.
Adding more items to a picture: A white background need to be removed when more items are required to be included in it. Special edits and enhancing the pictures requires removing or adding a white background as per the purpose of the picture.
Part 3 How to Delete White Background in Photoshop (5 Fast Ways)

Editing a picture with white background can be done in easy steps through various applications. Deleting white background in Photoshop can be done through various tools. Some of the top 5 fast ways to clear background Photoshop are**:**
With the object selection tool:
● Start Photoshop and open the picture. Select the “object selection” from the tool bar. Hover cursor over subject till it turns blue. The subject is selected.
● Press the shift key to remove the background while selecting the objects which you want in the picture.
● To invert the selection go to Select>Inverse.
● Unlock the image based on what you want in the background. It will no longer be a background. It can be also used to create transparent background Photoshop.
● Click on Erase tool and start erasing the background.
Removing background with quick action
This is the quick method for removing a background when a user is going for own purpose. It is in-built quick action in Photoshop for removing the background. Although it is good for performing work, but the same cannot meet the perfection level that any other method does. It can be done by following the mentioned steps:
● Open the image in Photoshop, right click on background layer and click Duplicate layer. Then click on OK.
● Always try to open the properties panel by going to Window>Properties.
● Click on new layer at Layer panel. Go to Quick action and click on Remove Background.
● The background gets removed with quick action.
● At this point refinements and adjustments can be made.
Using pen tool to remove the background
● Open image in Photoshop, right click on background layer and go to Duplicate Layer. Name the layer and click OK.
● Select the Pen tool from the toolbox. Zoom the area. Start at the edge of subject. Start working on the object; add anchors which will outline the subject.
● Click-hold-drag to produce a curved line.
● Use the Direct Selection tool in the toolbox if you want to adjust an anchor point or directional lines for fine tuning
● Complete the path from where you started and save it by going to Windows>paths. Go to three bar menu, click New Path to name it and then save.
● Go to path panel and right click New Path. Choose Make selection and click OK. This will give the outline of the path.
● Go to Select> Inverse if you don’t want to delete what is inside the selection. An outline can be seen around the image.
● Press delete to delete the background. It can be also done to add Adobe Photoshop transparent background.
With Magnetic Lasso Tool
● Right click Background layer and click duplicate layer on the image opened in Photoshop. Name the layer and then click OK. From the toolbox, select Magic Lasso tool. Start drawing at the edges of subject.
● Move around the subject and complete till the start point. Marching ants can be seen around the selection.
● Go to Selection>Save selection to save and give it a name.
● Select>Inverse to delete the background. Photoshop checkered background is visible now.
With quick selection tool
● Click on Duplicate Layer by right clicking on background layer of the picture opened on the Photoshop. Name the layer and click OK.
● Go to the tool box and select quick selection tool.
● Paint the subject by using tool.
● Clean up the selection path with click by holding the Option key (macOS) or Alt key (Windows).
● Go to Selection>Save selection to save and give it a name.
● Select>Inverse to delete the background. The white background can be seen now.
Part 4 Which Photoshop Selection Tool is Best for White Backdrop Removal

There are various tools available at Photoshop to turn a background white. Each one of them has great utility based on the applications. Background Eraser tool is one of the good tools if there is need of more control over removing the background in Photoshop. It is highly effective and saves time of the user. It gives the desired outcome with perfection to an image. The visualization of image becomes better when the background is turned into white with the help of Background Eraser tool.
The other application that is very helpful in making background white to any image is Filmora.
Filmora is an excellent image and video editing software which helps the users in creating some amazing images and videos. It has wide range of image and video editing tools that can make any user a professional in image and video editing. It has features to add or remove background of an image to make it more visually good. Changing background and adding special effects to images and videos can be easily done through filmora.
Wondershare Filmora Video Editor allows transformation of pictures and videos in a better way by adding filters and graphics. Availability of support, drawing tools, editing tools, special effects and sound make it a complete application for both beginners and professionals. It can be used with various other applications also. Those who wish to know how to make a layer transparent in Photoshop can learn it from Filmora.
For Win 7 or later (64-bit)
For macOS 10.12 or later
● Ending Thoughts →
● Making white background or transparent background adobe photoshop has many benefits like it highlight the picture and make it good for various applications and occasions. It saves money and cost for the image editors and video makers.
● One should also know when to use the white background for images, catalogue and video shoot. Adding and deleting white background can only be done when required as per the demand of the occasion and the category of the user like marketing, media, customers etc.
● Various tools on Photoshop make it easy for the users to add or remove white background of images. Filmora is one of the applications that is very popular for its image editing features. It can be used to give special effects to any image or video.
Know how Photoshop make white background transparent. Learn to create transparent background in Photoshop in simple steps. How to delete white background in image?
In this article
01 [Why Shooting with a White Background Makes Sense](#Part 1)
02 [When We Need to Delete White Background and when Not?](#Part 2)
03 [How to Delete White Background in Photoshop (5 Fast Ways)](#Part 3)
04 [Which Photoshop Selection Tool is Best for White Backdrop Removal](#Part 4)
Part 1 Why Shooting with a White Background Makes Sense

Products have gone online with E-commerce and people explore the products over internet more than they pick it from the stores. So, every business needs to showcase their products in a attractive way to get more customers. This needs an attractive photography by experts. Photography for e-commerce products requires expert product photography or commercial photography. They are very important for a business to get success in long run. To do branding the product image should be accurate and attractive.
So, if your company is going online, your products photography should be attractive enough to make buyers purchase your products. Background is essential part of any photography or video making. Whether it is product catalogue, shoot, advertising or commercial videos, white backdrop and white background are always good. With white background one can pay attention to the product. Every details of the product are highlighted when a white background is used.
When you need bright and highlighted images for any commercial videos, using a right technique for background color is must. White background creates a clean and bright commercial photo. If the same is not done correctly, the white background may turn to be off white or grey. A white background is good for isolating an object in the picture.
So, let’s know why shooting with white background make sense. Here are some reasons for it:

Removal of background becomes Easy and quick:
The most important benefit of applying white background is that it can be easily removed or replaced. In place of the blank white background, one can easily apply other background color or make it transparent. The white background has a speciality that it reflects the color of the product better which makes the product image visually good. This can be done with the help of any tool or application. Thus, using a white background gives an opportunity to apply any other background on it.
Promoting product in every occasion: An image with colorful background may not be useful to present in every event or occasion. For example a simple image with colorful background will not look good in a promotional event, while a colorful background will look happening in any festival event celebration. This, a blank background has the option to change as per the need of the occasion.
An image with white background can be changed as per the occasion. This helps a business to use a single image throughout the year without any additional cost for making a different picture. You can just change the white background of any image through various application or software.
Time saving: Removing white background is easy and streamlined as compared to any other color. The reason is that it does not require much editing and work on the edges. So, the steps in removing the white background are less and thus it saves time of the artist and the editors.
Saves location and bulk shooting expenses: When shooting with a white background is done; the same picture with some changes can be reused for number of times in several occasions. Thus, it saves the cost of shooting different in pictures in different location.
Good to celebrate every special day: A picture with white background is perfect and ready to edit for any special day. Whether it I a father’s day, mother’s day or any special day, a single picture can be edited as per the requirement. It will be a great gifting idea also after changing white background of the picture as per the special day.
Part 2 When We Need to Delete White Background and when Not?

A single picture of a person or product cannot be used for a single instance or purpose. Especially when it is a promotional campaign or commercial advertisements, a product is required to be showcased in several marketing campaign for different categories of consumers. Thus, a white background image is good for several purposes while in some circumstances, it requires changes. So, let’s see when to delete white background and when not:
When a picture requires special editing: When a picture requires some special effects like reflection, highlights and shadow effects, the picture with white background is required to be changed. When improvement in picture is requires, the white, transparent and color background can be changed accordingly.
Enhancing the visual impact of the picture: A white background picture grab the attention of the customers. So, it is good for advertising and promotion. While this needs to be removed when one desire to add some visual impact on the pictures or deliver some message to the viewers. So, it requires adding colorful and visually good background in a picture.
Adding more items to a picture: A white background need to be removed when more items are required to be included in it. Special edits and enhancing the pictures requires removing or adding a white background as per the purpose of the picture.
Part 3 How to Delete White Background in Photoshop (5 Fast Ways)

Editing a picture with white background can be done in easy steps through various applications. Deleting white background in Photoshop can be done through various tools. Some of the top 5 fast ways to clear background Photoshop are**:**
With the object selection tool:
● Start Photoshop and open the picture. Select the “object selection” from the tool bar. Hover cursor over subject till it turns blue. The subject is selected.
● Press the shift key to remove the background while selecting the objects which you want in the picture.
● To invert the selection go to Select>Inverse.
● Unlock the image based on what you want in the background. It will no longer be a background. It can be also used to create transparent background Photoshop.
● Click on Erase tool and start erasing the background.
Removing background with quick action
This is the quick method for removing a background when a user is going for own purpose. It is in-built quick action in Photoshop for removing the background. Although it is good for performing work, but the same cannot meet the perfection level that any other method does. It can be done by following the mentioned steps:
● Open the image in Photoshop, right click on background layer and click Duplicate layer. Then click on OK.
● Always try to open the properties panel by going to Window>Properties.
● Click on new layer at Layer panel. Go to Quick action and click on Remove Background.
● The background gets removed with quick action.
● At this point refinements and adjustments can be made.
Using pen tool to remove the background
● Open image in Photoshop, right click on background layer and go to Duplicate Layer. Name the layer and click OK.
● Select the Pen tool from the toolbox. Zoom the area. Start at the edge of subject. Start working on the object; add anchors which will outline the subject.
● Click-hold-drag to produce a curved line.
● Use the Direct Selection tool in the toolbox if you want to adjust an anchor point or directional lines for fine tuning
● Complete the path from where you started and save it by going to Windows>paths. Go to three bar menu, click New Path to name it and then save.
● Go to path panel and right click New Path. Choose Make selection and click OK. This will give the outline of the path.
● Go to Select> Inverse if you don’t want to delete what is inside the selection. An outline can be seen around the image.
● Press delete to delete the background. It can be also done to add Adobe Photoshop transparent background.
With Magnetic Lasso Tool
● Right click Background layer and click duplicate layer on the image opened in Photoshop. Name the layer and then click OK. From the toolbox, select Magic Lasso tool. Start drawing at the edges of subject.
● Move around the subject and complete till the start point. Marching ants can be seen around the selection.
● Go to Selection>Save selection to save and give it a name.
● Select>Inverse to delete the background. Photoshop checkered background is visible now.
With quick selection tool
● Click on Duplicate Layer by right clicking on background layer of the picture opened on the Photoshop. Name the layer and click OK.
● Go to the tool box and select quick selection tool.
● Paint the subject by using tool.
● Clean up the selection path with click by holding the Option key (macOS) or Alt key (Windows).
● Go to Selection>Save selection to save and give it a name.
● Select>Inverse to delete the background. The white background can be seen now.
Part 4 Which Photoshop Selection Tool is Best for White Backdrop Removal

There are various tools available at Photoshop to turn a background white. Each one of them has great utility based on the applications. Background Eraser tool is one of the good tools if there is need of more control over removing the background in Photoshop. It is highly effective and saves time of the user. It gives the desired outcome with perfection to an image. The visualization of image becomes better when the background is turned into white with the help of Background Eraser tool.
The other application that is very helpful in making background white to any image is Filmora.
Filmora is an excellent image and video editing software which helps the users in creating some amazing images and videos. It has wide range of image and video editing tools that can make any user a professional in image and video editing. It has features to add or remove background of an image to make it more visually good. Changing background and adding special effects to images and videos can be easily done through filmora.
Wondershare Filmora Video Editor allows transformation of pictures and videos in a better way by adding filters and graphics. Availability of support, drawing tools, editing tools, special effects and sound make it a complete application for both beginners and professionals. It can be used with various other applications also. Those who wish to know how to make a layer transparent in Photoshop can learn it from Filmora.
For Win 7 or later (64-bit)
For macOS 10.12 or later
● Ending Thoughts →
● Making white background or transparent background adobe photoshop has many benefits like it highlight the picture and make it good for various applications and occasions. It saves money and cost for the image editors and video makers.
● One should also know when to use the white background for images, catalogue and video shoot. Adding and deleting white background can only be done when required as per the demand of the occasion and the category of the user like marketing, media, customers etc.
● Various tools on Photoshop make it easy for the users to add or remove white background of images. Filmora is one of the applications that is very popular for its image editing features. It can be used to give special effects to any image or video.
Know how Photoshop make white background transparent. Learn to create transparent background in Photoshop in simple steps. How to delete white background in image?
In this article
01 [Why Shooting with a White Background Makes Sense](#Part 1)
02 [When We Need to Delete White Background and when Not?](#Part 2)
03 [How to Delete White Background in Photoshop (5 Fast Ways)](#Part 3)
04 [Which Photoshop Selection Tool is Best for White Backdrop Removal](#Part 4)
Part 1 Why Shooting with a White Background Makes Sense

Products have gone online with E-commerce and people explore the products over internet more than they pick it from the stores. So, every business needs to showcase their products in a attractive way to get more customers. This needs an attractive photography by experts. Photography for e-commerce products requires expert product photography or commercial photography. They are very important for a business to get success in long run. To do branding the product image should be accurate and attractive.
So, if your company is going online, your products photography should be attractive enough to make buyers purchase your products. Background is essential part of any photography or video making. Whether it is product catalogue, shoot, advertising or commercial videos, white backdrop and white background are always good. With white background one can pay attention to the product. Every details of the product are highlighted when a white background is used.
When you need bright and highlighted images for any commercial videos, using a right technique for background color is must. White background creates a clean and bright commercial photo. If the same is not done correctly, the white background may turn to be off white or grey. A white background is good for isolating an object in the picture.
So, let’s know why shooting with white background make sense. Here are some reasons for it:

Removal of background becomes Easy and quick:
The most important benefit of applying white background is that it can be easily removed or replaced. In place of the blank white background, one can easily apply other background color or make it transparent. The white background has a speciality that it reflects the color of the product better which makes the product image visually good. This can be done with the help of any tool or application. Thus, using a white background gives an opportunity to apply any other background on it.
Promoting product in every occasion: An image with colorful background may not be useful to present in every event or occasion. For example a simple image with colorful background will not look good in a promotional event, while a colorful background will look happening in any festival event celebration. This, a blank background has the option to change as per the need of the occasion.
An image with white background can be changed as per the occasion. This helps a business to use a single image throughout the year without any additional cost for making a different picture. You can just change the white background of any image through various application or software.
Time saving: Removing white background is easy and streamlined as compared to any other color. The reason is that it does not require much editing and work on the edges. So, the steps in removing the white background are less and thus it saves time of the artist and the editors.
Saves location and bulk shooting expenses: When shooting with a white background is done; the same picture with some changes can be reused for number of times in several occasions. Thus, it saves the cost of shooting different in pictures in different location.
Good to celebrate every special day: A picture with white background is perfect and ready to edit for any special day. Whether it I a father’s day, mother’s day or any special day, a single picture can be edited as per the requirement. It will be a great gifting idea also after changing white background of the picture as per the special day.
Part 2 When We Need to Delete White Background and when Not?

A single picture of a person or product cannot be used for a single instance or purpose. Especially when it is a promotional campaign or commercial advertisements, a product is required to be showcased in several marketing campaign for different categories of consumers. Thus, a white background image is good for several purposes while in some circumstances, it requires changes. So, let’s see when to delete white background and when not:
When a picture requires special editing: When a picture requires some special effects like reflection, highlights and shadow effects, the picture with white background is required to be changed. When improvement in picture is requires, the white, transparent and color background can be changed accordingly.
Enhancing the visual impact of the picture: A white background picture grab the attention of the customers. So, it is good for advertising and promotion. While this needs to be removed when one desire to add some visual impact on the pictures or deliver some message to the viewers. So, it requires adding colorful and visually good background in a picture.
Adding more items to a picture: A white background need to be removed when more items are required to be included in it. Special edits and enhancing the pictures requires removing or adding a white background as per the purpose of the picture.
Part 3 How to Delete White Background in Photoshop (5 Fast Ways)

Editing a picture with white background can be done in easy steps through various applications. Deleting white background in Photoshop can be done through various tools. Some of the top 5 fast ways to clear background Photoshop are**:**
With the object selection tool:
● Start Photoshop and open the picture. Select the “object selection” from the tool bar. Hover cursor over subject till it turns blue. The subject is selected.
● Press the shift key to remove the background while selecting the objects which you want in the picture.
● To invert the selection go to Select>Inverse.
● Unlock the image based on what you want in the background. It will no longer be a background. It can be also used to create transparent background Photoshop.
● Click on Erase tool and start erasing the background.
Removing background with quick action
This is the quick method for removing a background when a user is going for own purpose. It is in-built quick action in Photoshop for removing the background. Although it is good for performing work, but the same cannot meet the perfection level that any other method does. It can be done by following the mentioned steps:
● Open the image in Photoshop, right click on background layer and click Duplicate layer. Then click on OK.
● Always try to open the properties panel by going to Window>Properties.
● Click on new layer at Layer panel. Go to Quick action and click on Remove Background.
● The background gets removed with quick action.
● At this point refinements and adjustments can be made.
Using pen tool to remove the background
● Open image in Photoshop, right click on background layer and go to Duplicate Layer. Name the layer and click OK.
● Select the Pen tool from the toolbox. Zoom the area. Start at the edge of subject. Start working on the object; add anchors which will outline the subject.
● Click-hold-drag to produce a curved line.
● Use the Direct Selection tool in the toolbox if you want to adjust an anchor point or directional lines for fine tuning
● Complete the path from where you started and save it by going to Windows>paths. Go to three bar menu, click New Path to name it and then save.
● Go to path panel and right click New Path. Choose Make selection and click OK. This will give the outline of the path.
● Go to Select> Inverse if you don’t want to delete what is inside the selection. An outline can be seen around the image.
● Press delete to delete the background. It can be also done to add Adobe Photoshop transparent background.
With Magnetic Lasso Tool
● Right click Background layer and click duplicate layer on the image opened in Photoshop. Name the layer and then click OK. From the toolbox, select Magic Lasso tool. Start drawing at the edges of subject.
● Move around the subject and complete till the start point. Marching ants can be seen around the selection.
● Go to Selection>Save selection to save and give it a name.
● Select>Inverse to delete the background. Photoshop checkered background is visible now.
With quick selection tool
● Click on Duplicate Layer by right clicking on background layer of the picture opened on the Photoshop. Name the layer and click OK.
● Go to the tool box and select quick selection tool.
● Paint the subject by using tool.
● Clean up the selection path with click by holding the Option key (macOS) or Alt key (Windows).
● Go to Selection>Save selection to save and give it a name.
● Select>Inverse to delete the background. The white background can be seen now.
Part 4 Which Photoshop Selection Tool is Best for White Backdrop Removal

There are various tools available at Photoshop to turn a background white. Each one of them has great utility based on the applications. Background Eraser tool is one of the good tools if there is need of more control over removing the background in Photoshop. It is highly effective and saves time of the user. It gives the desired outcome with perfection to an image. The visualization of image becomes better when the background is turned into white with the help of Background Eraser tool.
The other application that is very helpful in making background white to any image is Filmora.
Filmora is an excellent image and video editing software which helps the users in creating some amazing images and videos. It has wide range of image and video editing tools that can make any user a professional in image and video editing. It has features to add or remove background of an image to make it more visually good. Changing background and adding special effects to images and videos can be easily done through filmora.
Wondershare Filmora Video Editor allows transformation of pictures and videos in a better way by adding filters and graphics. Availability of support, drawing tools, editing tools, special effects and sound make it a complete application for both beginners and professionals. It can be used with various other applications also. Those who wish to know how to make a layer transparent in Photoshop can learn it from Filmora.
For Win 7 or later (64-bit)
For macOS 10.12 or later
● Ending Thoughts →
● Making white background or transparent background adobe photoshop has many benefits like it highlight the picture and make it good for various applications and occasions. It saves money and cost for the image editors and video makers.
● One should also know when to use the white background for images, catalogue and video shoot. Adding and deleting white background can only be done when required as per the demand of the occasion and the category of the user like marketing, media, customers etc.
● Various tools on Photoshop make it easy for the users to add or remove white background of images. Filmora is one of the applications that is very popular for its image editing features. It can be used to give special effects to any image or video.
Final Cut Pro - How to Download and Install It
We all know that video editing takes the video content to a whole another level. The video editing tools provide the users with an opportunity to modify their created videos. And one such pioneering application available for video editing in the market is the Final Cut Pro. It is an iOS-based application that facilitates dozens of editing tools for its users. Also, it comes with a free trial for all users. Visual contents are a key factor in providing information to the audience since they are more effective than text.
And with the introduction of applications like YouTube, Facebook, and other video streaming platforms, the necessity for quality video content has greatly increased. The video editing tools are perfect applications to make any video more attractive and cinematic. In this article, we are going to look into the process of editing videos with Final Cut Pro and the different benefits of using this application.
How to Download and Install Final Cut Pro?
Final Cut Pro is a very popular iOS application that has limitless possibilities in editing and creating videos. And one of the main reasons for its popularity is because its user interface allows even the new users to work with videos flawlessly. And if you have an apple device and you are looking for an application that can help you edit your video contents, then this application is just for you.

For final cut pro free download and installation, you will need to follow these steps:
- First, go to the apple store from your iOS device and search for Final Cut Pro in the search bar provided. This will open the application page where the Final Cut Pro icon will be shown.
- Now, you can click on the “Free Trial” option to download the 90-day free trial version, and then the download will start. Again, in this step, if you have already tried the free version and want to buy the premium version of Final Cut Pro by paying the required amount. To do that you can click on the “Buy” option and the download will start after you initiate the payment.
- Alternatively, you can download the Final Cut Pro application from your web browser too. To do that first open any web browser and search for Final Cut Pro in the search bar.
- The first result will be from the official apple website with the “Final Cut Pro” name on it. Click on that and you will be headed to the official apple website.
- Here you will see the same “Free Trial” or “Buy” option which you can choose as explained in the previous steps.
- After the file is downloaded to your device, click on the “Install” option and the installation will start. This process will take some time and after it’s completed, you will be able to use the Final Cut Pro without any issues.
Key Features of Final Cut Pro
The several key features of Final Cut Pro are:
- Importing and exporting high-quality HD videos are possible
- Multiple resolution and format support for any video
- Easy to use basic tools such as cropping, merging, filters, and many more.
- Dozens of editing tools such as transitions, texts, etc.
- An intuitive user interface to encourage users with its simple approach
- Modern metal engine support for faster delivery of videos
- Workflow extension support for an extension to other applications
- Advanced color grading tools to create stunning cinematic videos
How to Edit Videos with Final Cut Pro
Final Cut Pro is believed to be one of the most efficient applications in video editing. This is because of its simple yet efficient interface for designing and creating awesome cinematic videos. It has industry-standard color grading tools that work with AI power to enable its users to enhance their video creations. It also is available with voiceover and video overlay features. Now, these can help social media content creators easily develop their video content.
And after installing Final Cut Pro if you are overwhelmed by its tons of features, then here are the steps following which you will be able to use Final Cut Pro:
- First, open the application. Now, it will ask to allow for the permissions to use your files along with your camera and other audiovisual devices. After allowing that, you will be able to enter the user interface of Final Cut Pro.
- Here, you will have to click on the “New project” icon.
- It will then ask you to import any media files to the application. Select the video file that you want to edit and it will take some time to import the media file.
![]()
- Alternatively, you can also import any media file by pressing the “cmd+I” keys and selecting the video file. You should note that Final Cut Pro organizes all the contents and media files into different libraries, events as well as projects. This way if you are working on multiple projects, then it is easy to switch between them.
- Now, after importing, a thumbnail of your media file will be appearing at the bottom of the screen.
- You can now trim or crop your media files from the below timeline. And if you want to add new clips to your project, then you can do so by clicking the “+” icon available.
- In the timeline, you can also rearrange the timeline of your video clips.
- You can add texts and titles to your videos by clicking on the “Titles” options located in the toolbar. This toolbar is the same browser where you imported the media files in the previous steps. You can also add transitions to add subtle movements between hard-cut clips.
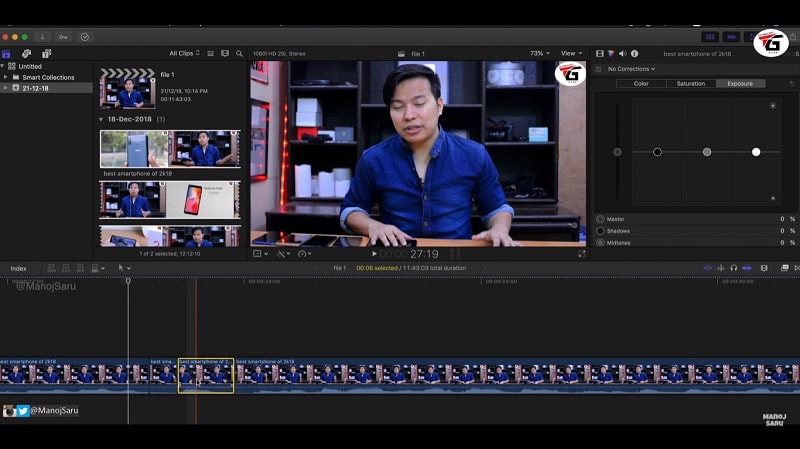
- The effect tools available in the toolbar allow you to use the built-in effects that can bring life to any video. And along with this, you can also use the colors tool to color grade your videos and make them more cinematic. There is also the option to add music and voiceover to your project if you need that.
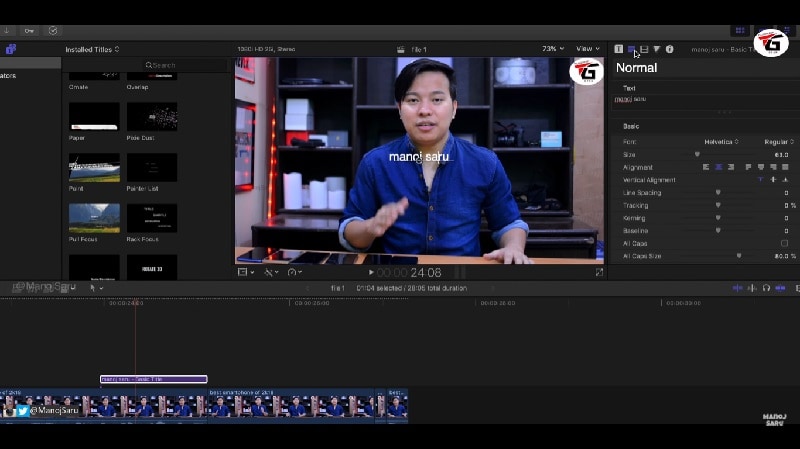
- After you are done with your changes, click on the “share” option available on the screen and then click on “Share Master File” and you will be able to export the project successfully.
Final Cut Pro Alternative to Edit Videos
Content creators who have access to Apple devices can enjoy the features of Final Cut Pro without any difficulties. But for people with other operating systems, Final Cut Pro isn’t available. It is why they need alternatives for this application. And if you are looking for the best alternative to Final Cut Pro, then Filmora is the best choice for you. Here is how you can use Filmora to edit your contents:

For Win 7 or later (64-bit)
For macOS 10.12 or later
- First, install the Filmora application and then open it on your device.
- Then click on the “Import” option and then select the video files that you want to edit.
- Now if you have selected multiple video files, then you can rearrange, cut, split, and trim your videos in your preferred order.
- After you are done with that head to the toolbar where you will be able to add effects, music, transition, and texts to your clip.
- WonderShare Filmora also supports voiceover and video overlay that is perfect for content creators.
- After you have finished editing your videos, click on the “Export” option available on the toolbar and then save the video file to your device.
FAQs about Final Cut Pro
1. Is Final Cut Pro available for free?
Final Cut Pro is available with a free trial for all the users who are on iOS. But to unlock all the tools of Final Cut Pro you will need to purchase the application. It can be done by paying a premium amount of money to the company.
2. Is Final Cut Pro for mac only?
Yes, Final Cut Pro is only available for Mac and it isn’t supported in any other operating system. For users who have any other OS, they can try using Filmora. It is one of the best alternatives for Final Cut Pro on the market.
3. Is the Final Cut Pro good for editing?
Yes, Final Cut Pro is believed to be one of the finest video editing applications that even is used by popular content creators. This application has a variety of tools that can elevate the content of any video to a whole another level.
Final Cut Pro is one of the most trusted video editing applications. This is used by most content creators around the world and it is popular because of its versatile tools. This article discussed some of the key aspects of Final Cut Pro and how it can help creators and general users fulfill their needs for video editing. And for creators who are looking for any alternatives to final cut pro editing, we also discussed the use of Filmora thoroughly which can help them create stunning videos.

Key Features of Final Cut Pro
The several key features of Final Cut Pro are:
- Importing and exporting high-quality HD videos are possible
- Multiple resolution and format support for any video
- Easy to use basic tools such as cropping, merging, filters, and many more.
- Dozens of editing tools such as transitions, texts, etc.
- An intuitive user interface to encourage users with its simple approach
- Modern metal engine support for faster delivery of videos
- Workflow extension support for an extension to other applications
- Advanced color grading tools to create stunning cinematic videos
How to Edit Videos with Final Cut Pro
Final Cut Pro is believed to be one of the most efficient applications in video editing. This is because of its simple yet efficient interface for designing and creating awesome cinematic videos. It has industry-standard color grading tools that work with AI power to enable its users to enhance their video creations. It also is available with voiceover and video overlay features. Now, these can help social media content creators easily develop their video content.
And after installing Final Cut Pro if you are overwhelmed by its tons of features, then here are the steps following which you will be able to use Final Cut Pro:
- First, open the application. Now, it will ask to allow for the permissions to use your files along with your camera and other audiovisual devices. After allowing that, you will be able to enter the user interface of Final Cut Pro.
- Here, you will have to click on the “New project” icon.
- It will then ask you to import any media files to the application. Select the video file that you want to edit and it will take some time to import the media file.
![]()
- Alternatively, you can also import any media file by pressing the “cmd+I” keys and selecting the video file. You should note that Final Cut Pro organizes all the contents and media files into different libraries, events as well as projects. This way if you are working on multiple projects, then it is easy to switch between them.
- Now, after importing, a thumbnail of your media file will be appearing at the bottom of the screen.
- You can now trim or crop your media files from the below timeline. And if you want to add new clips to your project, then you can do so by clicking the “+” icon available.
- In the timeline, you can also rearrange the timeline of your video clips.
- You can add texts and titles to your videos by clicking on the “Titles” options located in the toolbar. This toolbar is the same browser where you imported the media files in the previous steps. You can also add transitions to add subtle movements between hard-cut clips.

- The effect tools available in the toolbar allow you to use the built-in effects that can bring life to any video. And along with this, you can also use the colors tool to color grade your videos and make them more cinematic. There is also the option to add music and voiceover to your project if you need that.

- After you are done with your changes, click on the “share” option available on the screen and then click on “Share Master File” and you will be able to export the project successfully.
Final Cut Pro Alternative to Edit Videos
Content creators who have access to Apple devices can enjoy the features of Final Cut Pro without any difficulties. But for people with other operating systems, Final Cut Pro isn’t available. It is why they need alternatives for this application. And if you are looking for the best alternative to Final Cut Pro, then Filmora is the best choice for you. Here is how you can use Filmora to edit your contents:

For Win 7 or later (64-bit)
For macOS 10.12 or later
- First, install the Filmora application and then open it on your device.
- Then click on the “Import” option and then select the video files that you want to edit.
- Now if you have selected multiple video files, then you can rearrange, cut, split, and trim your videos in your preferred order.
- After you are done with that head to the toolbar where you will be able to add effects, music, transition, and texts to your clip.
- WonderShare Filmora also supports voiceover and video overlay that is perfect for content creators.
- After you have finished editing your videos, click on the “Export” option available on the toolbar and then save the video file to your device.
FAQs about Final Cut Pro
1. Is Final Cut Pro available for free?
Final Cut Pro is available with a free trial for all the users who are on iOS. But to unlock all the tools of Final Cut Pro you will need to purchase the application. It can be done by paying a premium amount of money to the company.
2. Is Final Cut Pro for mac only?
Yes, Final Cut Pro is only available for Mac and it isn’t supported in any other operating system. For users who have any other OS, they can try using Filmora. It is one of the best alternatives for Final Cut Pro on the market.
3. Is the Final Cut Pro good for editing?
Yes, Final Cut Pro is believed to be one of the finest video editing applications that even is used by popular content creators. This application has a variety of tools that can elevate the content of any video to a whole another level.
Final Cut Pro is one of the most trusted video editing applications. This is used by most content creators around the world and it is popular because of its versatile tools. This article discussed some of the key aspects of Final Cut Pro and how it can help creators and general users fulfill their needs for video editing. And for creators who are looking for any alternatives to final cut pro editing, we also discussed the use of Filmora thoroughly which can help them create stunning videos.

Key Features of Final Cut Pro
The several key features of Final Cut Pro are:
- Importing and exporting high-quality HD videos are possible
- Multiple resolution and format support for any video
- Easy to use basic tools such as cropping, merging, filters, and many more.
- Dozens of editing tools such as transitions, texts, etc.
- An intuitive user interface to encourage users with its simple approach
- Modern metal engine support for faster delivery of videos
- Workflow extension support for an extension to other applications
- Advanced color grading tools to create stunning cinematic videos
How to Edit Videos with Final Cut Pro
Final Cut Pro is believed to be one of the most efficient applications in video editing. This is because of its simple yet efficient interface for designing and creating awesome cinematic videos. It has industry-standard color grading tools that work with AI power to enable its users to enhance their video creations. It also is available with voiceover and video overlay features. Now, these can help social media content creators easily develop their video content.
And after installing Final Cut Pro if you are overwhelmed by its tons of features, then here are the steps following which you will be able to use Final Cut Pro:
- First, open the application. Now, it will ask to allow for the permissions to use your files along with your camera and other audiovisual devices. After allowing that, you will be able to enter the user interface of Final Cut Pro.
- Here, you will have to click on the “New project” icon.
- It will then ask you to import any media files to the application. Select the video file that you want to edit and it will take some time to import the media file.
![]()
- Alternatively, you can also import any media file by pressing the “cmd+I” keys and selecting the video file. You should note that Final Cut Pro organizes all the contents and media files into different libraries, events as well as projects. This way if you are working on multiple projects, then it is easy to switch between them.
- Now, after importing, a thumbnail of your media file will be appearing at the bottom of the screen.
- You can now trim or crop your media files from the below timeline. And if you want to add new clips to your project, then you can do so by clicking the “+” icon available.
- In the timeline, you can also rearrange the timeline of your video clips.
- You can add texts and titles to your videos by clicking on the “Titles” options located in the toolbar. This toolbar is the same browser where you imported the media files in the previous steps. You can also add transitions to add subtle movements between hard-cut clips.

- The effect tools available in the toolbar allow you to use the built-in effects that can bring life to any video. And along with this, you can also use the colors tool to color grade your videos and make them more cinematic. There is also the option to add music and voiceover to your project if you need that.

- After you are done with your changes, click on the “share” option available on the screen and then click on “Share Master File” and you will be able to export the project successfully.
Final Cut Pro Alternative to Edit Videos
Content creators who have access to Apple devices can enjoy the features of Final Cut Pro without any difficulties. But for people with other operating systems, Final Cut Pro isn’t available. It is why they need alternatives for this application. And if you are looking for the best alternative to Final Cut Pro, then Filmora is the best choice for you. Here is how you can use Filmora to edit your contents:

For Win 7 or later (64-bit)
For macOS 10.12 or later
- First, install the Filmora application and then open it on your device.
- Then click on the “Import” option and then select the video files that you want to edit.
- Now if you have selected multiple video files, then you can rearrange, cut, split, and trim your videos in your preferred order.
- After you are done with that head to the toolbar where you will be able to add effects, music, transition, and texts to your clip.
- WonderShare Filmora also supports voiceover and video overlay that is perfect for content creators.
- After you have finished editing your videos, click on the “Export” option available on the toolbar and then save the video file to your device.
FAQs about Final Cut Pro
1. Is Final Cut Pro available for free?
Final Cut Pro is available with a free trial for all the users who are on iOS. But to unlock all the tools of Final Cut Pro you will need to purchase the application. It can be done by paying a premium amount of money to the company.
2. Is Final Cut Pro for mac only?
Yes, Final Cut Pro is only available for Mac and it isn’t supported in any other operating system. For users who have any other OS, they can try using Filmora. It is one of the best alternatives for Final Cut Pro on the market.
3. Is the Final Cut Pro good for editing?
Yes, Final Cut Pro is believed to be one of the finest video editing applications that even is used by popular content creators. This application has a variety of tools that can elevate the content of any video to a whole another level.
Final Cut Pro is one of the most trusted video editing applications. This is used by most content creators around the world and it is popular because of its versatile tools. This article discussed some of the key aspects of Final Cut Pro and how it can help creators and general users fulfill their needs for video editing. And for creators who are looking for any alternatives to final cut pro editing, we also discussed the use of Filmora thoroughly which can help them create stunning videos.

Key Features of Final Cut Pro
The several key features of Final Cut Pro are:
- Importing and exporting high-quality HD videos are possible
- Multiple resolution and format support for any video
- Easy to use basic tools such as cropping, merging, filters, and many more.
- Dozens of editing tools such as transitions, texts, etc.
- An intuitive user interface to encourage users with its simple approach
- Modern metal engine support for faster delivery of videos
- Workflow extension support for an extension to other applications
- Advanced color grading tools to create stunning cinematic videos
How to Edit Videos with Final Cut Pro
Final Cut Pro is believed to be one of the most efficient applications in video editing. This is because of its simple yet efficient interface for designing and creating awesome cinematic videos. It has industry-standard color grading tools that work with AI power to enable its users to enhance their video creations. It also is available with voiceover and video overlay features. Now, these can help social media content creators easily develop their video content.
And after installing Final Cut Pro if you are overwhelmed by its tons of features, then here are the steps following which you will be able to use Final Cut Pro:
- First, open the application. Now, it will ask to allow for the permissions to use your files along with your camera and other audiovisual devices. After allowing that, you will be able to enter the user interface of Final Cut Pro.
- Here, you will have to click on the “New project” icon.
- It will then ask you to import any media files to the application. Select the video file that you want to edit and it will take some time to import the media file.
![]()
- Alternatively, you can also import any media file by pressing the “cmd+I” keys and selecting the video file. You should note that Final Cut Pro organizes all the contents and media files into different libraries, events as well as projects. This way if you are working on multiple projects, then it is easy to switch between them.
- Now, after importing, a thumbnail of your media file will be appearing at the bottom of the screen.
- You can now trim or crop your media files from the below timeline. And if you want to add new clips to your project, then you can do so by clicking the “+” icon available.
- In the timeline, you can also rearrange the timeline of your video clips.
- You can add texts and titles to your videos by clicking on the “Titles” options located in the toolbar. This toolbar is the same browser where you imported the media files in the previous steps. You can also add transitions to add subtle movements between hard-cut clips.

- The effect tools available in the toolbar allow you to use the built-in effects that can bring life to any video. And along with this, you can also use the colors tool to color grade your videos and make them more cinematic. There is also the option to add music and voiceover to your project if you need that.

- After you are done with your changes, click on the “share” option available on the screen and then click on “Share Master File” and you will be able to export the project successfully.
Final Cut Pro Alternative to Edit Videos
Content creators who have access to Apple devices can enjoy the features of Final Cut Pro without any difficulties. But for people with other operating systems, Final Cut Pro isn’t available. It is why they need alternatives for this application. And if you are looking for the best alternative to Final Cut Pro, then Filmora is the best choice for you. Here is how you can use Filmora to edit your contents:

For Win 7 or later (64-bit)
For macOS 10.12 or later
- First, install the Filmora application and then open it on your device.
- Then click on the “Import” option and then select the video files that you want to edit.
- Now if you have selected multiple video files, then you can rearrange, cut, split, and trim your videos in your preferred order.
- After you are done with that head to the toolbar where you will be able to add effects, music, transition, and texts to your clip.
- WonderShare Filmora also supports voiceover and video overlay that is perfect for content creators.
- After you have finished editing your videos, click on the “Export” option available on the toolbar and then save the video file to your device.
FAQs about Final Cut Pro
1. Is Final Cut Pro available for free?
Final Cut Pro is available with a free trial for all the users who are on iOS. But to unlock all the tools of Final Cut Pro you will need to purchase the application. It can be done by paying a premium amount of money to the company.
2. Is Final Cut Pro for mac only?
Yes, Final Cut Pro is only available for Mac and it isn’t supported in any other operating system. For users who have any other OS, they can try using Filmora. It is one of the best alternatives for Final Cut Pro on the market.
3. Is the Final Cut Pro good for editing?
Yes, Final Cut Pro is believed to be one of the finest video editing applications that even is used by popular content creators. This application has a variety of tools that can elevate the content of any video to a whole another level.
Final Cut Pro is one of the most trusted video editing applications. This is used by most content creators around the world and it is popular because of its versatile tools. This article discussed some of the key aspects of Final Cut Pro and how it can help creators and general users fulfill their needs for video editing. And for creators who are looking for any alternatives to final cut pro editing, we also discussed the use of Filmora thoroughly which can help them create stunning videos.
Mastering Video Speed Control: Slow Down, Speed Up, and Edit with Ease
Have you ever wondered how to slow down the video to make it more surreal? You may want add an extra flair or revamp educational content in the video. You may want to slow down a product demo or glide through a lengthy instructional video. Adjusting the speed of the video can be beneficial in many ways. Let’s explore how to slow down videos or speed them up for various reasons. In this article, you will learn three ways on how to speed up a slow mo video or slow a fast motoon one.
Speed Ramping Video Maker Slow down or speed up your videos with better control of your keyframes to create unique cinematic effects!
Make A Slow Motion Video Make A Speed Ramping Video More Features

Part 1. Slowing Down or Speeding Up Videos on PC: Windows and Mac Guide
The most effective way to adjust the speed of a video on a PC is to use video editing software. With Wondershare Filmora, you get the tools and features to adjust the speed of your videos. The AI Co-piloy feature is particularly useful in guiding you through the steps of editing your videos. The versatile video editing software helps you adjust the speed with just a few clicks. The approach is similar for both Windows and Mac devices, making Filmora a user-friendly and effective software for editors at all experience levels. So, how do you make a video fast-motion?
Free Download For Win 7 or later(64-bit)
Free Download For macOS 10.14 or later
Step 1: Launch Filmora and Import Video Files
Once you start Filmora on your PC, click on New Project. Then select the Import icon to choose the files you want to import from your computer library. Another way is to drag and drop the files from your computer into Filmora.
Step 2: Add the Clips to the Timeline
After importing the video files, drag and drop them onto the timeline. This prepares the clips for speed adjustment.
Step 3: Open the Speed Adjustment Panel
The Filmora feature that allows you to adjust the speed of your video clips is the speed adjustment panel or Uniform Speed. To open the Uniform Speed Panel, double-click the video clip in the timeline. Find the Uniform Speed option in the pop-up column that appears and click on it. Make adjustments using the speed control.
Step 4: Adjust the Speed Slider
In the speed control panel, clikd the speed adjuster slider. Adjust the slider to the rate of speed you want for your clips between 0.5 (slowest) to 2.00 (fastest).
Step 5: Detach the Audio
Once you adjust the speed of your video, the audio will be affected. It can be a great idea to detach the audio to further edit the video. Right-click the video clip on the timeline, and select the Detach Audio option from the pop-up column. Once the audio has detached, you can further adjust it with fade and other available options.
Step 6: Export Video
Once satisfied with your video adjustments, export it to the desired format. For this step, click the Export button. Select the directory and video format and other preferences, then click ok.
Part 2. How to Quickly Adjust Video Speed Using Online Tool
Are you wondering how to speed up slow mo video or slow a video without installing a special video editor on your computer, using an online tool is the best choice. A free online tool like Fastreel helps you change the speed of short videos, which are smaller than 500 MB with just a few steps. However, this online tool oonly works with MP4 format. When working with other video formats, you will have to convert them first.
Here’s how to speed up a slo mo video using Fastreel
Step 1
Go to the Fastreel website . Upload the video you want to slow down or speed up. Click the Add Your File button to choose and upload the clips.
Step 2
Set the Appropriate Speed. Select the speed you want for your video onVideo Speed section. The results will be displayed in the preview window. Save Processed Video. Mute the video by clicking the corresponding icon if necessary. Then, save the video by selecting the Export Results button.
Part 3. A Guide to Slowing Down or Speeding Up Videos on Android and iPhone
How to speed up slow mo video on phone is a normal concern for many people. Luckily, there are many apps available to do that. In most cases, making a mobile video bit slower or faster will make it seem better. You may want to reduce the duration of your video or check out the details in a specific scene. You may want to speed watch or speed listen to the content. Let’s have a look at how you can achieve this on your Android or Apple device.
1. How to Change the Speed of Your Video on Android
When someone asks how do I slow down a video? The first response that comes to mind is using their phone. This is the device they always have with them. And most people, consider editng easier on theior phones than compiters. For someonw with an Android phone, the Gallery app makes it easier to adjust the speed of a video. Find out how to make fast motion video or slow mo with Android phone. Follow these few steps:
Step 1Launch the Gallery app
Open the video you want to edit. Then, tap on the Edit icon at the bottom to open the video editor.
Step 2Find the Speed Icon
Scroll through the list of the icons at the bottom. Then tap on the Speed icon to start making the adjustments
Step 3Adjust the Speed of the Video
The default speed of the video is 1x. Tap on 2x to seep it up or 1/2x to slow down the video. Then press the Play icon to preview the view with these speed settings.
Step 4Save the Video
Once satisfied with the speed of the video, tap the save button.
2. How to Change the Speed of Your Video on iPhone
The iMovie app offers an easy and effective way of speeding up or slowing down videos on your iPhone. How do you make a video fast motion? The free video editing app from Apple is available for iOS and and can also be used on iPads:
Step 1Launch iMovie App
Once you have installed and opened the iMovie app on your phone, tap on the Create Projects (+) button.
Step 2Select Movie
The app will prompt you to select the kind of project you want between Movie and Trailer.
Step 3Create Movie
Tap on the video that you want to adjust speed. Then, tap on the Create Movie button.
Step 4Adjust the Speed of the Video
On the editing screen, tap on the video clip. The video editing tools will appear at the bottom, allowing you to make the adjustments of your choise. Tap on the Speed icon that looks like a speedometer and drag the slider until you attain the speed you want.
Step 5Preview and Safe
After adjusting the speed, play the video to preview it with the new speed. Then tap on the Done button at the top to save the project. Hit the Share icon, and the Save the Video.
Conclusion
When it comes to creating slow motion videos, Wondershare Filmora stands out as a great software to use. Filmora V13 allows you to speed up or slow down videos with only a few clicks. The versatile video editing software can be used on Windows and Mac PC while producing the same quality of videos. Be sure to check out the range of AI features available in the software. These are helpful in automating most of the tasks and doing a lot more with your editing tasks.
Make A Slow Motion Video Make A Speed Ramping Video More Features

Part 1. Slowing Down or Speeding Up Videos on PC: Windows and Mac Guide
The most effective way to adjust the speed of a video on a PC is to use video editing software. With Wondershare Filmora, you get the tools and features to adjust the speed of your videos. The AI Co-piloy feature is particularly useful in guiding you through the steps of editing your videos. The versatile video editing software helps you adjust the speed with just a few clicks. The approach is similar for both Windows and Mac devices, making Filmora a user-friendly and effective software for editors at all experience levels. So, how do you make a video fast-motion?
Free Download For Win 7 or later(64-bit)
Free Download For macOS 10.14 or later
Step 1: Launch Filmora and Import Video Files
Once you start Filmora on your PC, click on New Project. Then select the Import icon to choose the files you want to import from your computer library. Another way is to drag and drop the files from your computer into Filmora.
Step 2: Add the Clips to the Timeline
After importing the video files, drag and drop them onto the timeline. This prepares the clips for speed adjustment.
Step 3: Open the Speed Adjustment Panel
The Filmora feature that allows you to adjust the speed of your video clips is the speed adjustment panel or Uniform Speed. To open the Uniform Speed Panel, double-click the video clip in the timeline. Find the Uniform Speed option in the pop-up column that appears and click on it. Make adjustments using the speed control.
Step 4: Adjust the Speed Slider
In the speed control panel, clikd the speed adjuster slider. Adjust the slider to the rate of speed you want for your clips between 0.5 (slowest) to 2.00 (fastest).
Step 5: Detach the Audio
Once you adjust the speed of your video, the audio will be affected. It can be a great idea to detach the audio to further edit the video. Right-click the video clip on the timeline, and select the Detach Audio option from the pop-up column. Once the audio has detached, you can further adjust it with fade and other available options.
Step 6: Export Video
Once satisfied with your video adjustments, export it to the desired format. For this step, click the Export button. Select the directory and video format and other preferences, then click ok.
Part 2. How to Quickly Adjust Video Speed Using Online Tool
Are you wondering how to speed up slow mo video or slow a video without installing a special video editor on your computer, using an online tool is the best choice. A free online tool like Fastreel helps you change the speed of short videos, which are smaller than 500 MB with just a few steps. However, this online tool oonly works with MP4 format. When working with other video formats, you will have to convert them first.
Here’s how to speed up a slo mo video using Fastreel
Step 1
Go to the Fastreel website . Upload the video you want to slow down or speed up. Click the Add Your File button to choose and upload the clips.
Step 2
Set the Appropriate Speed. Select the speed you want for your video onVideo Speed section. The results will be displayed in the preview window. Save Processed Video. Mute the video by clicking the corresponding icon if necessary. Then, save the video by selecting the Export Results button.
Part 3. A Guide to Slowing Down or Speeding Up Videos on Android and iPhone
How to speed up slow mo video on phone is a normal concern for many people. Luckily, there are many apps available to do that. In most cases, making a mobile video bit slower or faster will make it seem better. You may want to reduce the duration of your video or check out the details in a specific scene. You may want to speed watch or speed listen to the content. Let’s have a look at how you can achieve this on your Android or Apple device.
1. How to Change the Speed of Your Video on Android
When someone asks how do I slow down a video? The first response that comes to mind is using their phone. This is the device they always have with them. And most people, consider editng easier on theior phones than compiters. For someonw with an Android phone, the Gallery app makes it easier to adjust the speed of a video. Find out how to make fast motion video or slow mo with Android phone. Follow these few steps:
Step 1Launch the Gallery app
Open the video you want to edit. Then, tap on the Edit icon at the bottom to open the video editor.
Step 2Find the Speed Icon
Scroll through the list of the icons at the bottom. Then tap on the Speed icon to start making the adjustments
Step 3Adjust the Speed of the Video
The default speed of the video is 1x. Tap on 2x to seep it up or 1/2x to slow down the video. Then press the Play icon to preview the view with these speed settings.
Step 4Save the Video
Once satisfied with the speed of the video, tap the save button.
2. How to Change the Speed of Your Video on iPhone
The iMovie app offers an easy and effective way of speeding up or slowing down videos on your iPhone. How do you make a video fast motion? The free video editing app from Apple is available for iOS and and can also be used on iPads:
Step 1Launch iMovie App
Once you have installed and opened the iMovie app on your phone, tap on the Create Projects (+) button.
Step 2Select Movie
The app will prompt you to select the kind of project you want between Movie and Trailer.
Step 3Create Movie
Tap on the video that you want to adjust speed. Then, tap on the Create Movie button.
Step 4Adjust the Speed of the Video
On the editing screen, tap on the video clip. The video editing tools will appear at the bottom, allowing you to make the adjustments of your choise. Tap on the Speed icon that looks like a speedometer and drag the slider until you attain the speed you want.
Step 5Preview and Safe
After adjusting the speed, play the video to preview it with the new speed. Then tap on the Done button at the top to save the project. Hit the Share icon, and the Save the Video.
Conclusion
When it comes to creating slow motion videos, Wondershare Filmora stands out as a great software to use. Filmora V13 allows you to speed up or slow down videos with only a few clicks. The versatile video editing software can be used on Windows and Mac PC while producing the same quality of videos. Be sure to check out the range of AI features available in the software. These are helpful in automating most of the tasks and doing a lot more with your editing tasks.
Also read:
- Cropping Videos in Final Cut Pro Step by Step for 2024
- Time Lapse Videos Play an Important Part in Videography. If You Want to Start Video Shooting, Then You Shouldnt Miss Time Lapse Video. This Article Will Show You some Ideas over This for 2024
- New Do You Wish to Make Your Discord PFP an Attention-Seeker? If Yes, Try the Animated Discord PFP. Lets Go over Essential Facts on the Topic, Including How to Get an Animated Discord PFP for 2024
- Updated How to Apply Video Filters for 2024
- New In 2024, Best Movie Title Maker
- In 2024, Top Online Video Background Changers Transform Your Videos with Ease
- Create Eye-Catching Slow-Motion Videos to Set Your Own Trend. For This Purpose, Read This Article to Find and Learn to Use CapCuts New Slow-Motion Templates
- 2024 Approved You Must Be Wondering Which the Best Online Transparent Image-Maker Is! Well, There Is No Need to Get Confused as Here; You Will Get a Curated List for the Same
- New 2024 Approved How to Select and Use The Best BRAW LUTs
- Updated Discover the Top 10 Video Editing Apps with Templates for Professional-Grade Results. Edit Like a Pro with These Tools
- New Things About Transparent PNG Remove and Convert
- Updated 2024 Approved Can You Make an Fcpx Slideshow? Undoubtedly Yes, with the Unlimited Best Fcpx Slideshow Templates Available. To Know How to, Follow the Discussion Below
- New 2024 Approved Why Vimeo Slideshow Maker Become Popular
- Updated Frame Blending Is a Great Way to Smooth Out Your Video Footage in Adobe Premiere Pro. Using This Technique, You Can Create a More Natural Looking Motion by Averaging Out the Frames in Your Clips
- 2024 Approved 6 Top Online MP4 Croppers
- Updated 2024 Approved 2 Effective Ways to Easily Convert VTT to SRT
- Updated 2024 Approved An Overview of the Best Free LUTs to Use
- New 2024 Approved To Add SRT to MP4 Is Not as Hard as You Might Think. All You Just Need Is the Right Tool to Help You Get the Job Done. Read This Article and Learn the 8 Latest Methods to Merge SRT with MP4 Effortlessly
- 2024 Approved Learn How to Blur Faces in Your Video on iPhone
- In 2024, Useful Tips for Tiktok Video Aspect Ratio Included
- Best GIF to MOV Converters
- 10 BEST TEXT TO SPEECH VIDEO MAKERS for 2024
- Updated Recommended Video Background Changers for 2024
- Updated The Power of Music in Videos (+Filmora Editing Tricks) for 2024
- In 2024, This Guide Will Help You to Understand Everything About the Zoho Show. Also, Know What the Zoho Show Slide Is, Why It Is Used and All Related Information
- Updated Finding The Best LUTs for Wondershare Filmora
- 2024 Approved How To Split Screen On Tiktok
- New In 2024, 4 Methods How To Make a Recap Video
- AVI Editors for Windows 11/10/8.1/8/7 Easily Edit AVI Files on PC for 2024
- Updated 2024 Approved Guide to Making Cinematography for Music Video
- New MAGIX Vegas Pro Review A Professional Video Editing Software
- In 2024, Steps to Create Gold Text Effects After Effects
- 2024 Approved Have You Ever Used an Adjustment Layer in Photoshop? Read This Article to Find Out How to Add, Resize, Change, and Use an Adjustment Layer in Photoshop Efficiently
- 2024 Approved Follow a Few Simple Steps and Learn How to Create a Professional Glowing Edge Effect to Your Videos in Filmora
- Updated In 2024, Which 10 Best Video Editing Online Makers Is Worth Your Attention?
- Easy Way to Inset Text in Video for 2024
- In 2024, Free Ways To Split Video For Whatsapp Status On All Platforms
- In 2024, Sometimes, when It Comes to Editing a Video, We Dont Even Know Where to Start, because There Are Too Many Options –Online Platforms Which Instantly Help Us Edit Our Clips, without Lengthy Process of Downloading and Installing Computer Programs
- Deleting White Background in Photoshop Is Hard, In 2024
- Updated In 2024, Top 8 AR Apps for Android and iOS | Help You See the World of AR
- New 10+ Top Unlimited FCPX Slideshow Templates
- Hitfilm Express Video Editor Review
- Updated 2024 Approved Would You Like to Know How to Change the Ratio of the Video or Which Is the Correct Aspect Ratio for Uploading to the Online Platform? Then, Go Through the Article to Get Complete Details About the Video Aspect Ratio
- New Want to Apply a Filter on Your Video Using Your iPhone or Mac? Here Are the Simple Steps to Put Add Filters on iMovie. Find Out a Better iMovie Alternative with More Filters for 2024
- The Ultimate Guide to Slideshow Maker with Music for 2024
- Updated 2024 Approved How to Start a Video Editing Career
- In 2024, Preparation to Beat Giovani in Pokemon Go For Apple iPhone 13 mini | Dr.fone
- How to Factory Reset Xiaomi Redmi Note 12 Pro 4G in 5 Easy Ways | Dr.fone
- In 2024, Why Apple Account Disabled On your Apple iPhone 12 Pro? How to Fix
- In 2024, Must-Read Learn From Deepfake Scandals & Protect Your Stream
- 2 Ways to Monitor Honor Play 8T Activity | Dr.fone
- How to use Pokemon Go Joystick on Tecno Spark Go (2024)? | Dr.fone
- 9 Best Phone Monitoring Apps for Nubia Red Magic 8S Pro+ | Dr.fone
- New In 2024, How to Make Lip Sync Video Without Installing Any App
- The Ultimate Guide to Infinix Pattern Lock Screen Everything You Need to Know
- Different Methods To Unlock Your iPhone 12 mini
- Ways to stop parent tracking your Vivo Y36 | Dr.fone
- In 2024, How To Stream Anything From Samsung Galaxy XCover 6 Pro Tactical Edition to Apple TV | Dr.fone
- 6 Things We Can Do To Save A Water Damaged iPhone SE (2022) | Stellar
- In 2024, Guide to Mirror Your Nokia C22 to Other Android devices | Dr.fone
- Full Solutions to Fix Error Code 920 In Google Play on Oppo A78 5G | Dr.fone
- How to Change Spotify Location After Moving to Another Country On OnePlus Nord N30 5G | Dr.fone
- Does Motorola G54 5G has native MKV support?
- How To Transfer WhatsApp From Apple iPhone 8 to other iPhone 15 Pro devices? | Dr.fone
- Life360 Learn How Everything Works On Realme 10T 5G | Dr.fone
- Can’t view MKV movies content on Moto G 5G (2023)
- How To Recover Lost Data on Apple iPhone 6s? | Dr.fone
- How to Transfer Videos from Samsung Galaxy A14 4G to iPad | Dr.fone
- In 2024, Everything You Need to Know about Lock Screen Settings on your Realme C55
- In 2024, How to Remove Apple iPhone XS Max Device from iCloud
- How to Unlock Realme Narzo 60 5G Pattern Lock if Forgotten? 6 Ways
- How to Restore Contacts on iPhone 7 Plus (4 Methods) | Stellar
- In 2024, How to Bypass Activation Lock from iPhone 11 Pro Max or iPad?
- How to solve MKV lagging problem in Samsung Galaxy M14 5G?
- Title: 2024 Approved Shotcut Review – Is It The Best Free Video Editor?
- Author: Morgan
- Created at : 2024-06-08 08:36:51
- Updated at : 2024-06-09 08:36:51
- Link: https://ai-video-editing.techidaily.com/2024-approved-shotcut-review-is-it-the-best-free-video-editor/
- License: This work is licensed under CC BY-NC-SA 4.0.


