
:max_bytes(150000):strip_icc():format(webp)/samsungtvhomepage-58f0d708245a4140bb4bbad8ea0cfc26.jpg)
2024 Approved Want to Make an Epic CSGO Montage? You Are in the Right Place. This In-Depth Guide Will Explain How You Can Make an Attention-Grabbing Gaming Montage
Want to Make an Epic CSGO Montage? You Are in the Right Place. This In-Depth Guide Will Explain How You Can Make an Attention-Grabbing Gaming Montage
CSGO (Counter-Strike: Global Offensive) is a popular objective-based multiplayer FPS (first-person shooter) released in 2012. The developers of this game are Hidden Path Entertainment and Valve. It’s one of the world’s most popular global eSports video games remains one of the most popular global esports, with millions of people playing it. Many people also love watching other skilled gamers play CSGO as montage videos.
With that in mind, we’ll explain how you can make CSGO montage videos and add effects to make them stand out and engaging.
How to Make Your CSGO Montage
If you are wondering: How can I create a CSGO montage video? Follow these steps:
Step1Record Your CSGO Gameplay
CSGO is compatible with Linux, PlayStation 3, Xbox 360, macOS, and Windows. You can record the CSGO demo by going to the top menu. The application will ask you to select the Capture option. Here, you can define the area you want to record and the audio settings. Specify a location where you want to save your recorded file.
You can also use a screen capture tool, such as Wondershare DemoCreator, to record your CSGO gameplay. The software saves the video clips you have captured on your PC’s hard drive.
To record your CSGO gameplay using DemoCreator, follow the steps below:
- Open the software and click “Capture.” You can set various specifications, including the audio settings for your recording and the recorded area.

Record Screen with Democreator
- Specify the location where you would like to save your recorded file.
- Press F10 or click the start capturing option to start the recording. By indicating you’re recording a game, you’ll be able to increase the frame rate.
- Click on F10 to stop the recording. The program will save the file on your PC.
Step2Choose Background Music that Fits Your CSGO Montage
The capability of music conveying emotions, authentic interactions, and a sense of realism is crucial to the viewers’ watching experience. It holds the attention of viewers and makes them want to continue watching your gaming montage.
Make sure the music you choose fits the theme of your CSGO montage video. The right music will provide a constant through-line that ties numerous CSGO gameplay clips together. What’s more? It can lend your montage a level of professionalism while giving it a polish.
Only use royalty-free music in your montage video, as this means you won’t pay any ongoing royalties when you use the music track. There are loads of royalty-free music libraries online, where you can find non-copyrighted montage music. These include StoryBlocks, FreeSound, and SoundCloud.
Once you’ve found the music you like, download it and use it in your CSGO montage video.
Step3Download Video Editing Software
You’ll need video editing software to put your series of CSGO gameplay clips together and make a montage video. While you’ll find numerous desktop-based video editing programs available, choose the best one.
A reliable video editing software should be user-friendly. The last thing you want is to get a video editing program that will make you spend months trying to learn how to edit your first montage video.
Pick a program with video editing templates; this will allow you to create CSGO montage videos swiftly because you only have to substitute the existing placeholder media with the content you are making. It should also have special effects and music.
If you’re tired of the plain and common video editing effects, check out Filmora. This video editing software has tons of cool effects that you can add to your CSGO montage videos.
Why We Need to Add Effects to Our CSGO Montage
Adding effects to your CSGO montage is crucial because of various reasons. They produce powerful entertainment for viewers. Special effects provide a creative way to spice up your gaming montage views. You can use them to captivate your audience and make them feel like your video is realistic.
Effects also help you add emotions and personality to your CSGO montage videos. You can also use them to set the tone and ensure your audience enjoys an exhilarating viewing experience.
Additionally, effects help you set the stage for your next scene, convey a mood, and move the story along. You can use them to emphasize the action occurring in the video and make viewers focus on it.
Useful Effects in Filmora that Can Make Your CSGO Video Impressive
We’ll now explore some of the effects Filmora offers on their video editing software. You can use them to make epic CSGO montage videos. Let’s dive in.
1. Split Screen Effect
Also known as video overlaying or picture-in-picture effect, Filmora’s split-screen effect allows you to display two or more video clips simultaneously in up-down style or side by side. You can use it to tell your story creatively by showing multiple viewpoints.
Filmora offers a range of animated split-screen layouts that you can use in your gaming montage video. You can also add multiple split screens.

Split Screen
2. Pan and Zoom
Also known as the Ken Burns effect, Fimora’s Pan and Zoom effect allows users to focus on specific parts of their CSGO montage video. You can use this feature to zoom in on an object or scenery to create movement or evoke emotional storytelling experiences in the video.
3. Fast Motion
Filmora’s time-lapse or fast motion effect makes your video clip play faster. The software allows you to increase the speed of your montage video by dragging the speed slider or the duration you need.
4. Transitions
Transitions improve the flow of your montage video and help you capture the viewers’ attention, as they make it look professional and cinematic. Filmora has loads of transitions that you can add between video clips to add interest and improve the flow of your montage video.
5. Overlays
Filmora has tons of overlays that you can apply to your CSGO montage videos. You can overlay a video clip on a video and an image or photo on your video. You can also size and mask the video overlay, adjust the position of the overlay, and add elements and animation to your video overlay.
6. Filters
The software allows you to add as many filters as you want to your montage video. These filters can dramatically change the feel and look of your gaming montage in a couple of clicks. You can add glitch effects, make your video shake or black and white, and much more.
Wondershare Filmora11 Express Better
Achieve More
Grow Together
Free Download Free Download Learn More

![]()
Step-By-Step Guide to Adding Effects to Your CSGO Montage Using Filmora
Applying transitions, overlays, filters, and transitions is a breeze. Just follow the steps below.
- Launch Filmora and import your video file. You can do this by pressing Ctrl+I. A window will then pop up and allow you to find your video.
- Select the video and click on the Open button to import it to Filmora’s media library.
- Drag your CSGO montage and drop it to the timeline.

Import Media
- To add transitions, head to the Transition tab. Here, you will find tons of transitions that you can use.

Add Transition
- Choose the transition you want, then drag it to the beginning or end of the gaming montage in your timeline.
- To add an overlay to your montage video, go to Effects>Overlay. You’ll find several categories here; click on one subcategory to check the available overlays. To add the effect, drag the overlay you like to your timeline. You can also take your mouse on the overlay effect, then click the plus icon to add the effect to your video.

Add Overlays
- To add a filter effect to your montage, go to Effects and select the Filters option on your left side menu. Here, you’ll find several categories of filters. Choose the one you like and drag it to the video on your timeline. Double-click on the effect if you want to make changes to the filter.

Add Filters
- To pan and zoom your video, right-click on your video in the timeline, then select the Video option and click on Crop and Zoom. Now select the Pan & Zoom option. You’ll see frames marked blue and orange over the video clip viewer. Click the Start frame, then modify the pan and zoom with the resizer and dragger to get the desired results before clicking the End frame.

Pan & Zoom
- To add the Fast Motion effect, right-click on your montage video on the timeline and select Speed. Click on the Uniform Speed option. Now, drag the speed slider to the right side to increase the speed of your video.

Fast Motion
Once you have made all the changes in your CSGO montage, click Export. This option allows you to export and save your video on your computer.
Closing Thoughts:
You can make an impressive CSGO montage video that will capture the attention of viewers and get lots of views. Use Filmora to add effects that will make your gaming montage stand out and keep viewers watching until the end of the video.
Free Download Free Download Learn More
![]()
Step-By-Step Guide to Adding Effects to Your CSGO Montage Using Filmora
Applying transitions, overlays, filters, and transitions is a breeze. Just follow the steps below.
- Launch Filmora and import your video file. You can do this by pressing Ctrl+I. A window will then pop up and allow you to find your video.
- Select the video and click on the Open button to import it to Filmora’s media library.
- Drag your CSGO montage and drop it to the timeline.
Import Media
- To add transitions, head to the Transition tab. Here, you will find tons of transitions that you can use.
Add Transition
- Choose the transition you want, then drag it to the beginning or end of the gaming montage in your timeline.
- To add an overlay to your montage video, go to Effects>Overlay. You’ll find several categories here; click on one subcategory to check the available overlays. To add the effect, drag the overlay you like to your timeline. You can also take your mouse on the overlay effect, then click the plus icon to add the effect to your video.
Add Overlays
- To add a filter effect to your montage, go to Effects and select the Filters option on your left side menu. Here, you’ll find several categories of filters. Choose the one you like and drag it to the video on your timeline. Double-click on the effect if you want to make changes to the filter.
Add Filters
- To pan and zoom your video, right-click on your video in the timeline, then select the Video option and click on Crop and Zoom. Now select the Pan & Zoom option. You’ll see frames marked blue and orange over the video clip viewer. Click the Start frame, then modify the pan and zoom with the resizer and dragger to get the desired results before clicking the End frame.
Pan & Zoom
- To add the Fast Motion effect, right-click on your montage video on the timeline and select Speed. Click on the Uniform Speed option. Now, drag the speed slider to the right side to increase the speed of your video.
Fast Motion
Once you have made all the changes in your CSGO montage, click Export. This option allows you to export and save your video on your computer.
Closing Thoughts:
You can make an impressive CSGO montage video that will capture the attention of viewers and get lots of views. Use Filmora to add effects that will make your gaming montage stand out and keep viewers watching until the end of the video.
How to Zoom Picture in Picture [Easy Solution]
Zoom is one of the greatest options on the market for video conferencing. It doesn’t matter whether you use it at home or in an office environment; it will quickly link the team members. One of the most popular video conferencing programs is Zoom. When in-person meetings aren’t feasible, it enables you to communicate electronically with employees, and it’s been a major popularity for social occasions as well. In case you’re not acquainted, picture-in-picture mode enables you to watch videos from one app while using your PC normally. The movie will keep playing in a tiny thumbnail window so that two applications may work simultaneously on your smartphone.
You may create virtual audio and video conferences, webinars, live chats, screen sharing, and other collaboration tools with Zoom, a cloud-based video communications solution. Zoom’s most recent iPhone apps let you dismiss a Zoom Meeting while keeping the Zoom video call open in a picture-in-picture mode. To join a Zoom conference, you don’t need an account, and because the software works with Mac, Windows, Linux, iOS, and Android devices, nearly anybody can use it. Since using Zoom’s picture-in-picture mode is the same as using it with other applications, you shouldn’t have any trouble if you often use PiP mode. Here are the top 4 methods you can refer to picture in picture in Zoom.
Method 1: Swap Shared Screen with Video
You may move the Zoom Meeting PiP window across the screen, change the thumbnail’s size, and utilize other applications while it remains open, just like any other picture-in-picture window. Before leaving the meeting if you’re not giving a presentation or speaking, you should definitely mute Zoom on your iPhone to prevent noises from your typing or other activities from entering the conversation. Additionally, keep in mind to switch off the camera if you’re engaged in something distracting, at least for the duration of your activity. To reopen the Zoom Meeting and go back to the Zoom app, touch the Picture-in-Picture mode pane. Here are some actions to keep in mind:
Steps to Swap Shared Screen for Zoom Picture in Picture
Step1Launch or enter a Zoom meeting. Keep the video on your main screen at all times, closing the chat and participant list as necessary.
Step2Tap the Home button or swipe up from the bottom of the screen.
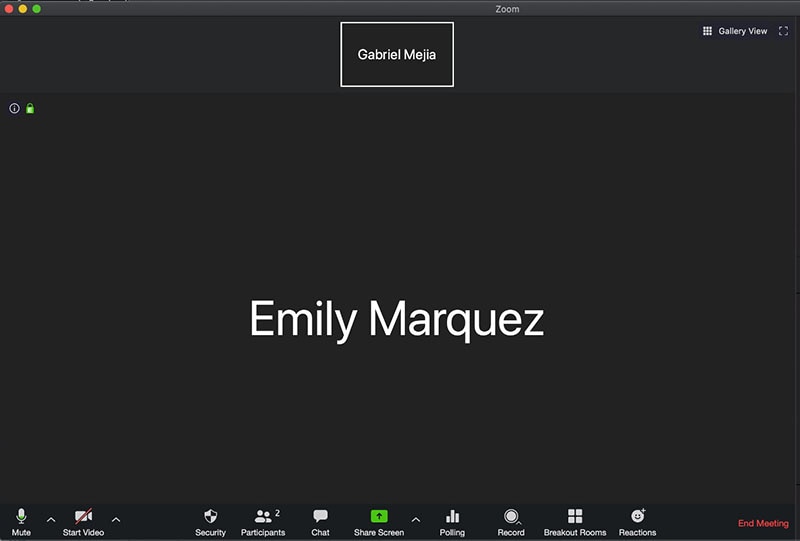
Step3Picture-in-picture mode should be activated automatically throughout the meeting.
Method 2: Use Ecamm Live
Live streaming is a fantastic way to provide original content and stand out from the crowd. To prevent any operational difficulties, a more sophisticated virtual camera is absolutely necessary. You now have magical abilities thanks to Ecamm virtual cam, including the ability to add text, animations, observe a live stream, post viewer comments, play music, share your screen, use sound effects, and many more. It offers the Ecamm live virtual camera zoom function for video conferences so you may improve your Zoom discussions by sending output to other PC programs. You could see a quality difference between what you view in Ecamm Live and what your Zoom visitors see while utilizing virtual camera with Zoom. The quality of a Zoom video stream cannot be improved using Ecamm Live. Simply broadcast the Zoom app using Ecamm Live’s Screen Share mode to utilize Ecamm Live for picture-in-picture virtual presentations on Zoom.
Steps to Use Ecamm Live for Zoom Picture in Picture
Step1Download the Ecamm Application
Install Ecamm Live on your computer, then choose the center button in the source switcher at the top of the main window to enter Screen Share mode.
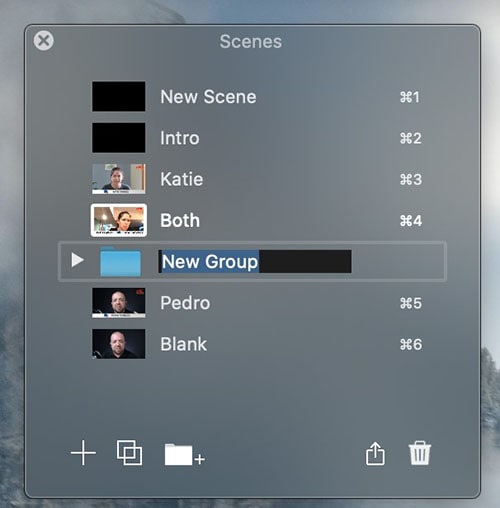
Step2Create Scenes
With the use of Ecamm Live’s Virtual Camera and Virtual Mic capabilities, you may transfer Ecamm Live’s output to almost any other Mac software, including Zoom. After setting, create the scenes in the program to quickly switch between various cameras.
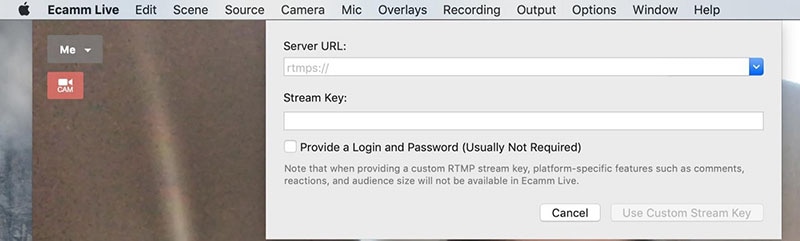
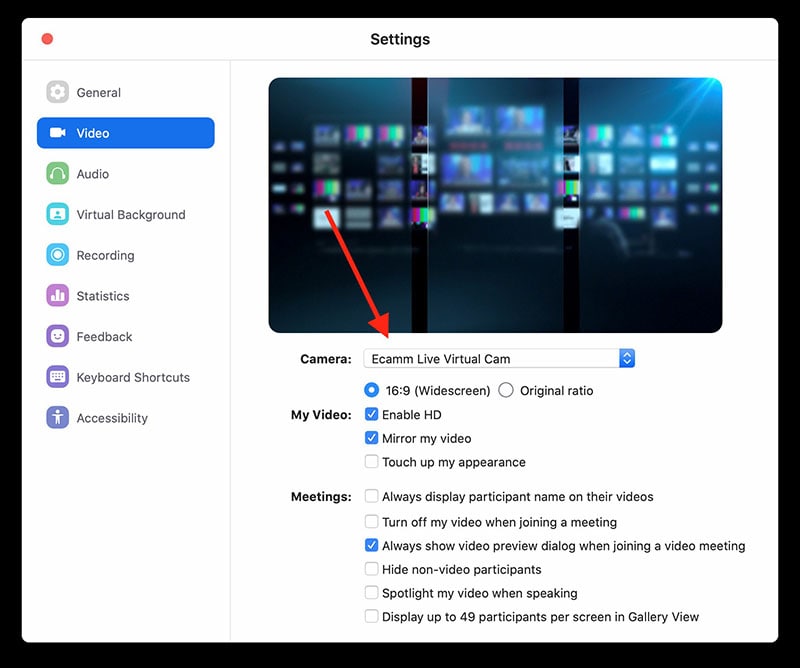
Step3Select Ecamm on Zoom
You may also utilize Ecamm Live’s Sharing Window capability to feed Ecamm Live output into Zoom. Simply activate the virtual camera, and then, as seen below, choose Ecamm Live Virtual Camera in Zoom’s video settings:
Step4Begin Your Presentation
Finally, click the PC share option to show your Zoom app to your audience. To conceal a picture-in-picture window that displays your camera image while live streaming, click the PIP button.
Method 3: Use Filmora as A Switcher
Zoom has solutions that will make your meetings simple and secure. It gives your remote staff a secure setting to interact and share crucial information. Ideal control over your film and configuration options to make them aesthetically pleasing is something Zoom lacks. To overcome the drawbacks and improve the quality of your online meetings, you may take use of the capabilities of Zoom in conjunction with Filmora. Filmora was developed with the intention of easing user burden and supporting applications. Though complicated, the program is simple to use. The perhaps most popular web information that may be saved on your computer can be easily captured by just angling your screen. For more information on how to record and save your Zoom for picture in picture, see the guide here.
To broadcast a variety of situations in a grid style, you may also combine inputs from your camera, microphone, computer screen, and web conferencing software. Wondershare -the finest desktop application for recording a Zoom Picture in Picture meeting- is Filmora. With the majority of cameras, this app’s screen recording capability is both user-friendly and feature-rich. Here, users may either choose a particular region to record or record their zoom meetings in Fullscreen mode. Additionally, you may choose the camera and input microphone that will be used while recording a video overlay. The addition of relevant comments like phrases, lines, drawings, symbols, etc. is also possible by users. The detailed procedure for recording a Zoom Picture-in-Picture meeting using a Filmora recorder is given below:
Free Download For Win 7 or later(64-bit)
Free Download For macOS 10.14 or later
Step1Download and Install Filmora Zoom Recorder
You may find both types, i.e., the most recent Windows and Mac versions, by first visiting the usual website and then using this Zoom. Install the program on your computer once you download it to get started.

Step2Initiate Filmora Recorder
After finishing the installation process for this Reside Zoom recorder, launch it from the main menus and choose “New Task” when prompted. It will take you to Filmora’s streamlined user interface where you can immediately start filming. Then, as seen in the picture below, you may adjust the screen recording using your preferred camera, microphone, and system settings:

Step3Begin/End the Recording
When you are through configuring this Zoom picture in picture recorder, click the Record button, and it will immediately begin recording your customized screen. Similar to that, after you’re done recording, click Stop, which will take you inside the video editor where you may edit your recorded information.

Step4Share Recordings
When you have everything ready, export your recording right away. After you’re done with the editing part, you do have a lot of options to choose from when displaying your screen capture and webcam stories. To do so, click the Export button in the item user interface’s top-right corner as shown below:
You may easily choose your preferred way to share from there if you choose to upload your work of zoom picture in picture recordings straight to the YouTube or other reputable websites right now. Simply refer to the Sharing plug-ins in the Export window to find out more.
Method 4: Use Hardware Switcher ATEM Mini Pro
Particularly on Zoom, the ATEM Mini is excellent for video conferences. The Blackmagic ATEM Mini is a USB video interface and HDMI switcher. Four HDMI inputs, or four cameras that can produce an HDMI video stream, may be switched between live. This device integrates Zoom meetings fast and makes it incredibly simple to set up your audio, a sometimes-forgotten aspect of video broadcasting. This sophisticated video switcher promises to offer broadcast-quality multi-camera footage with ease and is targeted at gamers, streamers, and online reviewers. It connects to a computer via a USB-C to USB-A connection. The video feed may then be sent to distant colleagues via a number of well-liked videos streaming services, including Zoom.
Step1The ATEM Mini Pro is a basic control switcher with pro-broadcast performance. Your ATEM Mini Pro is really simple to set up. You can connect a full setup with several cameras and microphones in around 30 minutes.
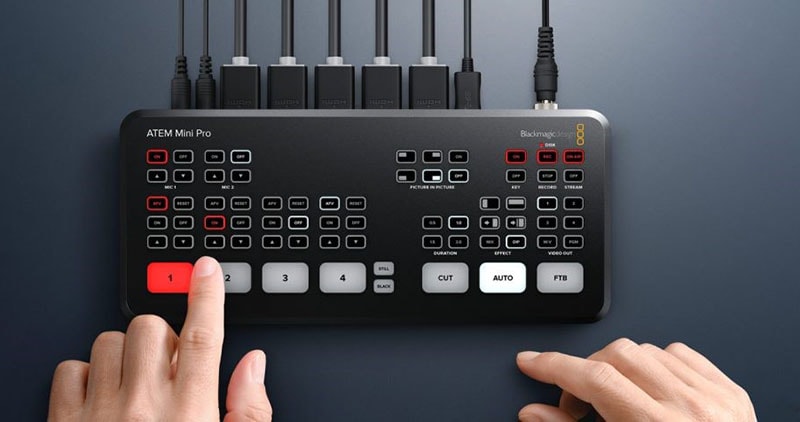
Step2You may connect several camera sources to the inputs of the ATEM Mini Pro. The 4 HDMI inputs each have a separate standards converter built in. As a result, the ATEM Mini can automatically convert inputs that are 1080p, 1080i, or 720p to the switcher’s video standard. You may make quick changes between inputs with no latency or disruption to your video output by using the ergonomic buttons.
Step3As a third option, Zoom offers ATEM Mini, which enables you to switch between several inputs, add custom visuals, and adjust audio levels all from a single interface. To improve the quality of your production, you may even use smooth transitions like wipes or fades. You can even test any input stream before making it live.
Conclusion
When you are doing a Zoom Meeting and share your screen, only to discover that what the other attendees see is a split screen with your material and the other Attendee cams, it is highly annoying. You may move the Zoom Meeting PiP window across the screen, change the thumbnail’s size, and utilize other applications while it remains open, just like any other picture-in-picture window. Someone must be sharing information in the Zoom conference for the Picture in Picture, or “Split Screen” option, to be active. We’ve listed the top techniques for doing it effectively above. To do this work without difficulty, use them as your guide.
Free Download For macOS 10.14 or later
Step1Download and Install Filmora Zoom Recorder
You may find both types, i.e., the most recent Windows and Mac versions, by first visiting the usual website and then using this Zoom. Install the program on your computer once you download it to get started.
Step2Initiate Filmora Recorder
After finishing the installation process for this Reside Zoom recorder, launch it from the main menus and choose “New Task” when prompted. It will take you to Filmora’s streamlined user interface where you can immediately start filming. Then, as seen in the picture below, you may adjust the screen recording using your preferred camera, microphone, and system settings:
Step3Begin/End the Recording
When you are through configuring this Zoom picture in picture recorder, click the Record button, and it will immediately begin recording your customized screen. Similar to that, after you’re done recording, click Stop, which will take you inside the video editor where you may edit your recorded information.
Step4Share Recordings
When you have everything ready, export your recording right away. After you’re done with the editing part, you do have a lot of options to choose from when displaying your screen capture and webcam stories. To do so, click the Export button in the item user interface’s top-right corner as shown below:
You may easily choose your preferred way to share from there if you choose to upload your work of zoom picture in picture recordings straight to the YouTube or other reputable websites right now. Simply refer to the Sharing plug-ins in the Export window to find out more.
Method 4: Use Hardware Switcher ATEM Mini Pro
Particularly on Zoom, the ATEM Mini is excellent for video conferences. The Blackmagic ATEM Mini is a USB video interface and HDMI switcher. Four HDMI inputs, or four cameras that can produce an HDMI video stream, may be switched between live. This device integrates Zoom meetings fast and makes it incredibly simple to set up your audio, a sometimes-forgotten aspect of video broadcasting. This sophisticated video switcher promises to offer broadcast-quality multi-camera footage with ease and is targeted at gamers, streamers, and online reviewers. It connects to a computer via a USB-C to USB-A connection. The video feed may then be sent to distant colleagues via a number of well-liked videos streaming services, including Zoom.
Step1The ATEM Mini Pro is a basic control switcher with pro-broadcast performance. Your ATEM Mini Pro is really simple to set up. You can connect a full setup with several cameras and microphones in around 30 minutes.
Step2You may connect several camera sources to the inputs of the ATEM Mini Pro. The 4 HDMI inputs each have a separate standards converter built in. As a result, the ATEM Mini can automatically convert inputs that are 1080p, 1080i, or 720p to the switcher’s video standard. You may make quick changes between inputs with no latency or disruption to your video output by using the ergonomic buttons.
Step3As a third option, Zoom offers ATEM Mini, which enables you to switch between several inputs, add custom visuals, and adjust audio levels all from a single interface. To improve the quality of your production, you may even use smooth transitions like wipes or fades. You can even test any input stream before making it live.
Conclusion
When you are doing a Zoom Meeting and share your screen, only to discover that what the other attendees see is a split screen with your material and the other Attendee cams, it is highly annoying. You may move the Zoom Meeting PiP window across the screen, change the thumbnail’s size, and utilize other applications while it remains open, just like any other picture-in-picture window. Someone must be sharing information in the Zoom conference for the Picture in Picture, or “Split Screen” option, to be active. We’ve listed the top techniques for doing it effectively above. To do this work without difficulty, use them as your guide.
How to Easily Add VHS Green Screen to Your Video
Create High-Quality Video - Wondershare Filmora
An easy and powerful YouTube video editor
Numerous video and audio effects to choose from
Detailed tutorials provided by the official channel
When making a video, it is always fun to add an effect. You can do this for either atmospheric or aesthetic reasons. VHS green screen effects are among the world’s most popular effects people use today.
We’ll give you the low-down on VHS Green Screen, including how it became popular and where to get these effects for free. Keep reading to learn more.
In this article
01 What Is VHS?
02 How Did VHS Green Screen Become Popular?
03 Free VHS Green Screen Effect Resource to Download
04 How to Edit VHS Green Screen with Filmora
What Is VHS?
Since its introduction in 1976, VHS has been the most frequently used video cassette recording technology. The VHS format is a consumer-level analog video cassette recording standard for videotaping. The acronym VHS referred to Vertical Helical Scan and was eventually modified as the popularity of this technology increased.
Produced by a Japan Victor Company, the technology uses a magnetic tape measuring half an inch. By the 1950s, magnetic tape video recording had become a vital part of the television industry. The technology is exclusively utilized in professional settings like TV studios and medical imaging (fluoroscopy).
As consumer access to videotape increased in the 1970s, a new economy centered on home video emerged, drastically altering the economics of the film and television industries. By 1980, VHS had captured 70% of the market and had established itself as the industry standard for entertainment and instruction.
The original standard has a picture quality equivalent to that of analog television. High-definition television content could be recorded and re-created using digital VHS (D-VHS). Progressively, a new format was launched dubbed S-VHS (Super VHS), which featured improved video quality from 240 to 400 lines; however, people did not use it extensively.
VHS tape, compared to its competition at the time, Betamax tapes had longer tape lifespans. VHS tapes were preferred because they recorded three times as long as Betamax tapes because of their higher storage capacity.
The last VHS recorder manufacturer, Funai Electric of Japan, discontinued manufacturing in 2016 after the introduction of DVDs into the market.
How Did VHS Green Screen Become Popular?
The green screen effect allows you to superimpose subjects onto different virtual background video clips. Essentially, you take a video that’s going to be your background, then overlay another video on top of this background. Using green screen properly will make your video stands out from the crowd. Let’s look at some that made increased the popularity of the VHS green screen:
- Clarity and Interactivity
VHS green screen allows for better understanding and comprehension, especially when explaining complex concepts and processes.
VHS green screen allows users to interact with virtual elements. Essentially, it enhances customer engagement while improving communication between you and the audience.
- Creativity and Versatility
Differentiation is key to the world of business. Therefore, adding VHS green screen to your content allows it to be unique and customized to your business. The best part is: Your imagination is the only limit.
The green screen also helps people avoid building and breaking down sets, allowing them to complete several shoots in a single session, which provides greater efficiency for their business.
- Save Time
With VHS green screen, you can shoot your video anywhere and anytime. That means it helps you remove the extended production time while providing you with one location and infinite possibilities. For this reason, it’s ideal for those who want to get the job done swiftly without hindering the quality.
- Budget and Logistical Solution
It eliminates expenses in the production line, like location, travel, and operational costs. In turn, you’ll free up more budget that you can spend on other things that your business needs.
Additionally, it allows you to control your environment. Shooting a video depends on the weather; however, shooting a video on VHS green screen disregards weather. It also provides an effective solution to problems in different areas, including travel, lighting, sound, and location.
Branding
VHS green screen popularity has grown over the years because it allows you to superimpose your logo onto the background. This makes your videos look professional and clean and provides you with a chance to advertise your business or brand your service or product with your company identity.
Free VHS Green Screen Effect Resource to Download
If you are looking for free VHS green screen effects to make your videos stand out, here are some resources that you might want to consider.
1. ANFX
ANFX is a stock video, after-effects projects, and motion graphics download hub. You can download a range of VHS green screen effects. All items that you will find on this website are licensed under a Creative Commons (CC) Attribution 4.0 International License. That means you can use the effects for any legal purpose, but you have to give them credit.

2. Videezy
As one of the world’s largest video communities, Videezy offers free high-quality footage designed to make filmmaking easy and affordable. You can also download a range of free VHS green screen effects in 4k. The site has more than 4,000 free green screen videos.

3. Gfycat
VHS green screens for animated gifs is a thing, and Gfycat is a good resource for making animated gifs. It is free to use the green screen gifs on this platform. This user-generated short video hosting company is one of the first web services that offered video encoding of GIFs.

4. Videvo
Videvo offers VHS green-screen effects, music, motion graphics, and sound effects. The site has a variety of effects available in resolutions from 720p-4k. While you’ll need to pay for some premium clips, there are loads of free resources. The site is particularly helpful for those who want green-screen effects that allow them to present content as though it is on a phone, computer, or tablet.

5. Pixabay
This user-submitted content site offers free content for commercial use. You can make attributions or choose not to. The effects on this site are of high quality. All contents are released to users under Creative Commons CC0, making them safe to use without giving credit to the artist or asking for permission. What’s more? You can even use the effects for commercial purposes.

6. YouTube
YouTube is home to millions of users looking for parts to build their videos. You will need to learn how to download YouTube videos to take advantage of these resources. There are tons of YouTube channels devoted to providing users with free VHS green screen effects. Some of the notable channels include BestGreenScreen, HD Green Screen, Free Green HD, and Green Screen Animation.

How to Edit VHS Green Screen with Filmora
Filmora is a relatively new program that has taken the world by storm. This professional video editor is a lifeline for all videographers and creators who work with videos to increase their proficiency and create professional-grade videos without breaking the bank. To learn how to Use VHS green screen in Filmora, follow the steps below.
Step 1\
Import the video with the VHS green screen and the background video into the media library.

Step 2\
Drag the video with the green screen and the background video that you want to replace the green screen with into the timeline and add it to one of the tracks. The video with the green screen should come second in the timeline.

Step 3\
Right-click the green screen on the timeline and select the Green Screen option.

Step 4\
Select a color from the green screen menu.

Various settings under this menu allow you to customize how your video is affected by VHS Green Screen. Experiments with different settings may allow you to make good videos even better or give your videos a whole new feel.
The Tolerance slider adjusts how much of the green screen will be allowed in your subject.
Edge Thickness allows you to adjust the amount of the edge thickness you’ll bring into the shot.
Use the Edge Feather slider to soften the edges of your subject.
Touch your mouse’s right button and move your cursor to select the video you want to insert into the timeline or “Add Video to Timeline” if you are using a project that does not accept videos as sources.
Open Project Settings > Video Editor tab > VHS Green Screen and select Source Video from the drop-down menu to change the video from whatever it is currently set as.
You can also add VHS Green Screen to a Sub-track by pressing Ctrl + Alt combination.
After selecting your video and adding it to the timeline, you will see the Video Properties window.
You can edit the Source Video under Source Video Settings in the Video Properties menu or use the keyframes window to change its settings via a timeline.
You can also watch the below video to get a better underestanding about how to use Green Screen in Filmora.
For Win 7 or later (64-bit)
For macOS 10.12 or later
Conclusion
● VHS video effects have become popular over the years because of the many benefits they offer. They allow you to save time, make unique content, be creative, and more. You can use Filmora’s green screen feature to make your videos stand out.
When making a video, it is always fun to add an effect. You can do this for either atmospheric or aesthetic reasons. VHS green screen effects are among the world’s most popular effects people use today.
We’ll give you the low-down on VHS Green Screen, including how it became popular and where to get these effects for free. Keep reading to learn more.
In this article
01 What Is VHS?
02 How Did VHS Green Screen Become Popular?
03 Free VHS Green Screen Effect Resource to Download
04 How to Edit VHS Green Screen with Filmora
What Is VHS?
Since its introduction in 1976, VHS has been the most frequently used video cassette recording technology. The VHS format is a consumer-level analog video cassette recording standard for videotaping. The acronym VHS referred to Vertical Helical Scan and was eventually modified as the popularity of this technology increased.
Produced by a Japan Victor Company, the technology uses a magnetic tape measuring half an inch. By the 1950s, magnetic tape video recording had become a vital part of the television industry. The technology is exclusively utilized in professional settings like TV studios and medical imaging (fluoroscopy).
As consumer access to videotape increased in the 1970s, a new economy centered on home video emerged, drastically altering the economics of the film and television industries. By 1980, VHS had captured 70% of the market and had established itself as the industry standard for entertainment and instruction.
The original standard has a picture quality equivalent to that of analog television. High-definition television content could be recorded and re-created using digital VHS (D-VHS). Progressively, a new format was launched dubbed S-VHS (Super VHS), which featured improved video quality from 240 to 400 lines; however, people did not use it extensively.
VHS tape, compared to its competition at the time, Betamax tapes had longer tape lifespans. VHS tapes were preferred because they recorded three times as long as Betamax tapes because of their higher storage capacity.
The last VHS recorder manufacturer, Funai Electric of Japan, discontinued manufacturing in 2016 after the introduction of DVDs into the market.
How Did VHS Green Screen Become Popular?
The green screen effect allows you to superimpose subjects onto different virtual background video clips. Essentially, you take a video that’s going to be your background, then overlay another video on top of this background. Using green screen properly will make your video stands out from the crowd. Let’s look at some that made increased the popularity of the VHS green screen:
- Clarity and Interactivity
VHS green screen allows for better understanding and comprehension, especially when explaining complex concepts and processes.
VHS green screen allows users to interact with virtual elements. Essentially, it enhances customer engagement while improving communication between you and the audience.
- Creativity and Versatility
Differentiation is key to the world of business. Therefore, adding VHS green screen to your content allows it to be unique and customized to your business. The best part is: Your imagination is the only limit.
The green screen also helps people avoid building and breaking down sets, allowing them to complete several shoots in a single session, which provides greater efficiency for their business.
- Save Time
With VHS green screen, you can shoot your video anywhere and anytime. That means it helps you remove the extended production time while providing you with one location and infinite possibilities. For this reason, it’s ideal for those who want to get the job done swiftly without hindering the quality.
- Budget and Logistical Solution
It eliminates expenses in the production line, like location, travel, and operational costs. In turn, you’ll free up more budget that you can spend on other things that your business needs.
Additionally, it allows you to control your environment. Shooting a video depends on the weather; however, shooting a video on VHS green screen disregards weather. It also provides an effective solution to problems in different areas, including travel, lighting, sound, and location.
Branding
VHS green screen popularity has grown over the years because it allows you to superimpose your logo onto the background. This makes your videos look professional and clean and provides you with a chance to advertise your business or brand your service or product with your company identity.
Free VHS Green Screen Effect Resource to Download
If you are looking for free VHS green screen effects to make your videos stand out, here are some resources that you might want to consider.
1. ANFX
ANFX is a stock video, after-effects projects, and motion graphics download hub. You can download a range of VHS green screen effects. All items that you will find on this website are licensed under a Creative Commons (CC) Attribution 4.0 International License. That means you can use the effects for any legal purpose, but you have to give them credit.
2. Videezy
As one of the world’s largest video communities, Videezy offers free high-quality footage designed to make filmmaking easy and affordable. You can also download a range of free VHS green screen effects in 4k. The site has more than 4,000 free green screen videos.
3. Gfycat
VHS green screens for animated gifs is a thing, and Gfycat is a good resource for making animated gifs. It is free to use the green screen gifs on this platform. This user-generated short video hosting company is one of the first web services that offered video encoding of GIFs.
4. Videvo
Videvo offers VHS green-screen effects, music, motion graphics, and sound effects. The site has a variety of effects available in resolutions from 720p-4k. While you’ll need to pay for some premium clips, there are loads of free resources. The site is particularly helpful for those who want green-screen effects that allow them to present content as though it is on a phone, computer, or tablet.
5. Pixabay
This user-submitted content site offers free content for commercial use. You can make attributions or choose not to. The effects on this site are of high quality. All contents are released to users under Creative Commons CC0, making them safe to use without giving credit to the artist or asking for permission. What’s more? You can even use the effects for commercial purposes.
6. YouTube
YouTube is home to millions of users looking for parts to build their videos. You will need to learn how to download YouTube videos to take advantage of these resources. There are tons of YouTube channels devoted to providing users with free VHS green screen effects. Some of the notable channels include BestGreenScreen, HD Green Screen, Free Green HD, and Green Screen Animation.
How to Edit VHS Green Screen with Filmora
Filmora is a relatively new program that has taken the world by storm. This professional video editor is a lifeline for all videographers and creators who work with videos to increase their proficiency and create professional-grade videos without breaking the bank. To learn how to Use VHS green screen in Filmora, follow the steps below.
Step 1\
Import the video with the VHS green screen and the background video into the media library.
Step 2\
Drag the video with the green screen and the background video that you want to replace the green screen with into the timeline and add it to one of the tracks. The video with the green screen should come second in the timeline.
Step 3\
Right-click the green screen on the timeline and select the Green Screen option.
Step 4\
Select a color from the green screen menu.
Various settings under this menu allow you to customize how your video is affected by VHS Green Screen. Experiments with different settings may allow you to make good videos even better or give your videos a whole new feel.
The Tolerance slider adjusts how much of the green screen will be allowed in your subject.
Edge Thickness allows you to adjust the amount of the edge thickness you’ll bring into the shot.
Use the Edge Feather slider to soften the edges of your subject.
Touch your mouse’s right button and move your cursor to select the video you want to insert into the timeline or “Add Video to Timeline” if you are using a project that does not accept videos as sources.
Open Project Settings > Video Editor tab > VHS Green Screen and select Source Video from the drop-down menu to change the video from whatever it is currently set as.
You can also add VHS Green Screen to a Sub-track by pressing Ctrl + Alt combination.
After selecting your video and adding it to the timeline, you will see the Video Properties window.
You can edit the Source Video under Source Video Settings in the Video Properties menu or use the keyframes window to change its settings via a timeline.
You can also watch the below video to get a better underestanding about how to use Green Screen in Filmora.
For Win 7 or later (64-bit)
For macOS 10.12 or later
Conclusion
● VHS video effects have become popular over the years because of the many benefits they offer. They allow you to save time, make unique content, be creative, and more. You can use Filmora’s green screen feature to make your videos stand out.
Dollar-Store DIY Hacks to Use for Filmmaking on a Budget
Filmmaking is usually an expensive hobby, but slowly over time, it’s become more affordable. Regular gear like cameras and lights are slightly cheaper, but there are plenty of ways to DIY regular items to use as film gear.
Making DIY film gear may not give you the same look as professional gear, but it could be a fun project and give you similar looks on a budget. In this article, let’s look at some dollar-store DIY hacks that you can use for filmmaking on a budget.

Tip 1. Add foreground elements to improve the frame of videos
Let’s start with something we can do to enhance your framing. Sometimes we want to direct our audience’s attention to a specific part of the frame. In this case, it’s the talent of placing an object in the shot’s foreground that can help us do that. While also making a more attractive frame. At the dollar store, try using something like these fake plants.

You can place it in front of your lens. Then focus on the talent behind it, giving a blurry foreground that perfectly frames the talent. Here’s how the shot looks with and without foreground elements.

![]()
Note: Remember, you can also use a different angle than simply approaching the object from the front. You can try and use different perspectives until you find the shot or footage you are looking for.
Tip 2. Adjust lights with poster boards
The shot below looks dark and boring because the background has no light. Here’s the shot with and without the lights.

A practical light is a light that shows up on screen rather than lighting talent from off-screen. For example, some dollar stores have small LED accent lights for around three dollars.
Others even have lights with adhesive backings that allow you to place them all over the room—creating great lighting accents with small eye-catching pockets of light.

On film sets, crews use a bounce to reflect light from one light source in another direction. At the dollar store, we can find something like this poster board to get a similar effect.

By reflecting the light onto the bounce, we get softer, more spread-out light when it’s reflected. Then you will get the result in a nicer look. Using poster boards, you can do multiple things with light.
- Use white to bounce light.
- Use black as a flag to shape or block light.

- You can also use green for a small green screen when filming a product video
You might have seen how big production companies create those alienated landscapes, such as in the movie Avatar and many more.
The concept is recording your object in front of a green screen behind it. Then, it’s much easier to add a separately filmed background to the final footage with a video editor like Filmora.

Tip 3. Smooth audio with felt pads or socks
Do you ever have audio pop while you are recording? It can get annoying. So, to fix the issues, we are now teaching you three practical ways.
1. Felt pads
Felt pads with adhesive backs can be stuck onto noisy props like a coffee mug. This way, we won’t hear the mug hitting the table when we’re recording sound.

2. Socks as pop filters
Professionals use what they call a pop filter because a pop filter can reduce the loud pops from their mouths. But what is pop? Pops usually occur when people say words that start with the letter P or B.
Then what is a pop filter? You might have seen in some YouTube videos, especially live streamers, where they use a microphone with a plate on its head; that’s called a pop filter. You can purchase pricey gear like a pop filter, or we can get a pack of cheap socks at the dollar store and place them over the mic.
It will make your voiceover slightly quieter, but it should also get rid of the popping. So keep adding socks until you hear no more pops in your voiceover.

Conclusion
See how easy it was! Keep in mind these dollar store hacks in your next video. And you can edit your footage like a pro with an easy-to-use video editor like Wondershare Filmora . Keep exploring different ideas and perspectives to record.
Free Download For Win 7 or later(64-bit)
Free Download For macOS 10.14 or later
Tip 2. Adjust lights with poster boards
The shot below looks dark and boring because the background has no light. Here’s the shot with and without the lights.
A practical light is a light that shows up on screen rather than lighting talent from off-screen. For example, some dollar stores have small LED accent lights for around three dollars.
Others even have lights with adhesive backings that allow you to place them all over the room—creating great lighting accents with small eye-catching pockets of light.
On film sets, crews use a bounce to reflect light from one light source in another direction. At the dollar store, we can find something like this poster board to get a similar effect.
By reflecting the light onto the bounce, we get softer, more spread-out light when it’s reflected. Then you will get the result in a nicer look. Using poster boards, you can do multiple things with light.
- Use white to bounce light.
- Use black as a flag to shape or block light.
- You can also use green for a small green screen when filming a product video
You might have seen how big production companies create those alienated landscapes, such as in the movie Avatar and many more.
The concept is recording your object in front of a green screen behind it. Then, it’s much easier to add a separately filmed background to the final footage with a video editor like Filmora.
Tip 3. Smooth audio with felt pads or socks
Do you ever have audio pop while you are recording? It can get annoying. So, to fix the issues, we are now teaching you three practical ways.
1. Felt pads
Felt pads with adhesive backs can be stuck onto noisy props like a coffee mug. This way, we won’t hear the mug hitting the table when we’re recording sound.
2. Socks as pop filters
Professionals use what they call a pop filter because a pop filter can reduce the loud pops from their mouths. But what is pop? Pops usually occur when people say words that start with the letter P or B.
Then what is a pop filter? You might have seen in some YouTube videos, especially live streamers, where they use a microphone with a plate on its head; that’s called a pop filter. You can purchase pricey gear like a pop filter, or we can get a pack of cheap socks at the dollar store and place them over the mic.
It will make your voiceover slightly quieter, but it should also get rid of the popping. So keep adding socks until you hear no more pops in your voiceover.
Conclusion
See how easy it was! Keep in mind these dollar store hacks in your next video. And you can edit your footage like a pro with an easy-to-use video editor like Wondershare Filmora . Keep exploring different ideas and perspectives to record.
Free Download For Win 7 or later(64-bit)
Free Download For macOS 10.14 or later
Also read:
- Updated 2024 Approved How to Convert Images Into Video - Kapwing Tutorial
- 2024 Approved Top Fixes to Resolve Issues with Premiere Pro Slow Playback
- New What Is the Best Voice Changer for WhatsApp? Discover the Seven (7) Best Voice Changers for WhatsApp Here in This Post
- 2024 Approved Vintage Film Effect 1920S - How to Make
- New 2024 Approved Are You Stuck with How to Use Discord GIF Ideally? Check that Out in This Article, as We Will Guide You on All You Need to Know About GIFs for Discord
- 2024 Approved 10 Best Cartoon Video Makers (Online and Desktop Solution)
- New 2024 Approved How to Resize FLV Videos EfficientlyWindows, Mac, Android, iPhone & Online
- Updated 2024 Approved How to Remove or Mute Audio in Video with Android Phones?
- Detailed Guide to Crop Videos in Sony Vegas Pro for 2024
- Updated You Can Match Paint Colors From Pictures for Your Wall, as Well as for Your Videos. And to Know How to Do Both, We Have Laid Down the Following Discussion for 2024
- New How to Add Effects in Premiere Pro for 2024
- Time Bending Brilliance The Ultimate Slow Motion Video Makers for 2024
- New 2024 Approved How to Create a Light Sweep (Shine) Effect
- New 2024 Approved 100+ Best TikTok Captions Enhance Your Content
- How to Make a Slideshow with Icecream Slideshow Maker for 2024
- Get The Perfect Drone Footage With Free Drone LUTs
- Updated How To Edit Youtube Videos In Simple Steps for 2024
- New 2024 Approved How To Quick Guide for Creating Google Slideshows
- Speed Control Is Frequently Used in Video Editing. By Speed up or Slow Down the Video Speed, You Can Achieve Different Visual Results. This Article Will Show You How to Control the Speed of a Video for 2024
- New 2024 Approved How To Speed Up Video With Lightworks Video Editor
- New Want to Imbibe Your Graphic Expertise with Designing Classic iMovie Presentations? Be Here to Work Through the Process Within the Quickest Possible Time Span for 2024
- New Discover Vintage LUTs Premiere Pro Free and Paid Options Available for 2024
- This Article Will Show You How to Make a Tattoo Disappear on Your Body Magically for 2024
- Updated In 2024, How to Make Falling Text Effect in Filmora?
- Updated 6 Instant Mp4 to GIF Online Tools for You for 2024
- Updated Video Course and Online Learning Are Very Popular Nowadays. Here We Are Going to Recommend some of the Best Video Websites for Teachers to Use for 2024
- New In 2024, How Does the YouTube AI Algorithm Work - AI EXPLAINED
- New In 2024, 4 Solutions to Crop a Video on Android Easily
- New In 2024, How to Make a Gaming Montage - Guide & Tips
- Detailed Steps to Rotate Videos Using OBS
- Updated How to Edit A Time Lapse Video on iPhone, In 2024
- New In 2024, Perfectly Use the Audio Mixer in Filmora
- In 2024, Do You Know that Google Photos App Can Be Used to Edit and Stabilize Shaky Videos? In This Article, I Will Show You a Step by Step Tutorial About How to Use Google Photos to Stabilize Videos
- Updated 2024 Approved How to Create Intro with Legend Intro Maker
- Updated VN Video Editor Templates A Game-Changer for Your Videos for 2024
- How to Vlog? A Beginners Guide to Start Vlogging
- Updated 2024 Approved Know How to Create OBS Slideshow. Creating OBS Slideshow in Simple Steps; Application for Creating OBS Slideshow. Make OBS Slideshow Online
- Detailed Review of doctorSIM Unlock Service For Apple iPhone 15 Pro
- Unlock Your Apple iPhone 13 mini in Minutes with ICCID Code Everything You Need to Know
- How To Transfer Data From Apple iPhone 6 To Other iPhone 13 devices? | Dr.fone
- How to Fix OnePlus Ace 2 Find My Friends No Location Found? | Dr.fone
- Best Fixes For Realme C51 Hard Reset | Dr.fone
- In 2024, iSpoofer is not working On Motorola Moto G34 5G? Fixed | Dr.fone
- In 2024, How to Send and Fake Live Location on Facebook Messenger Of your Oppo A59 5G | Dr.fone
- Forgot Locked iPhone XS Password? Learn the Best Methods To Unlock | Dr.fone
- Unlock Apple iPhone 12 Pro Without Passcode Easily | Dr.fone
- 7 Ways to Unlock a Locked Tecno Spark 20 Phone
- In 2024, Latest Guide How To Bypass Lava Storm 5G FRP Without Computer
- How to Fix Xiaomi 13 Ultra Find My Friends No Location Found? | Dr.fone
- In 2024, Why Your WhatsApp Live Location is Not Updating and How to Fix on your Vivo Y02T | Dr.fone
- How to Track Motorola G54 5G Location without Installing Software? | Dr.fone
- Realme Narzo 60 5G Bootloop Problem, How to Fix it Without Data Loss | Dr.fone
- How to Detect and Remove Spyware on Vivo S17 Pro? | Dr.fone
- Realme GT 5 Not Receiving Texts? 10 Hassle-Free Solutions Here | Dr.fone
- In 2024, Step-by-Step Tutorial How To Bypass Xiaomi Redmi 13C 5G FRP
- In 2024, What Is a SIM Network Unlock PIN? Get Your Oppo A1x 5G Phone Network-Ready
- How To Update or Downgrade Apple iPhone 12 mini Without Data Loss? | Dr.fone
- In 2024, How Motorola Moto G13 Mirror Screen to PC? | Dr.fone
- In 2024, Hacks to do pokemon go trainer battles For Sony Xperia 10 V | Dr.fone
- Full Guide on Mirroring Your Poco M6 Pro 5G to Your PC/Mac | Dr.fone
- A Working Guide For Pachirisu Pokemon Go Map On Vivo Y200e 5G | Dr.fone
- What to Do if Google Play Services Keeps Stopping on Vivo Y28 5G | Dr.fone
- In 2024, How to Mirror Apple iPhone 14 Pro to Mac? | Dr.fone
- How To Transfer Data From iPhone 12 To Other iPhone 13 Pro Max devices? | Dr.fone
- In 2024, How To Bypass iCloud Activation Lock On iPod and iPhone 15 Pro The Right Way
- Title: 2024 Approved Want to Make an Epic CSGO Montage? You Are in the Right Place. This In-Depth Guide Will Explain How You Can Make an Attention-Grabbing Gaming Montage
- Author: Morgan
- Created at : 2024-05-19 05:12:45
- Updated at : 2024-05-20 05:12:45
- Link: https://ai-video-editing.techidaily.com/2024-approved-want-to-make-an-epic-csgo-montage-you-are-in-the-right-place-this-in-depth-guide-will-explain-how-you-can-make-an-attention-grabbing-gaming-mo/
- License: This work is licensed under CC BY-NC-SA 4.0.
