:max_bytes(150000):strip_icc():format(webp)/gopro-2619915_1920-2ca3364339c348e5ba44afb3fa79458b.jpg)
4 Methods for Rotating Your GoPro Videos Professionally for 2024

4 Methods for Rotating Your GoPro Videos Professionally
Video editing has secured a prominent position among other post-production works with innovation in cameras. Now, you do not need to hold the reins of your imagination tight.
With its advanced technology, Go-Pro has grabbed the attention of technology lovers. It offers video stabilization, making it the best gadget for capturing sports activities and other outdoor events.
If you have recorded your video in an odd direction? Also, you don’t want to lose that precious memory? There is no need to worry.
Rotating your video horizontally or vertically can change the entire perspective of your project.
The process of changing the orientation of the video is convenient. There are different tools for rotating your Go-Pro videos simply and easily.
In this article, you’ll find four solutions for rotating your Go-Pro Videos. The following tools will be used for this purpose.
- Wondershare Filmora
- GoPro Quik
- VLC Media Player
- Online Converter (Ezgif)
Filmora Wondershare-A companion to rotate your GoPro Videos
If you want to experience new dimensions of video editing by changing the orientation of your videos, then Filmora Video Editor is there for you. If you have made a video with your Go-pro at the wrong angle, video rotation can solve your problem.
Filmora is there to keep you out of trouble. It comes with the option of changing the direction of your videos. Apart from that, you can crop the unwanted parts or even zoom in on videos.
For Win 7 or later (64-bit)
For macOS 10.14 or later
Here is the step-by-step guide for rotating your go-pro video.
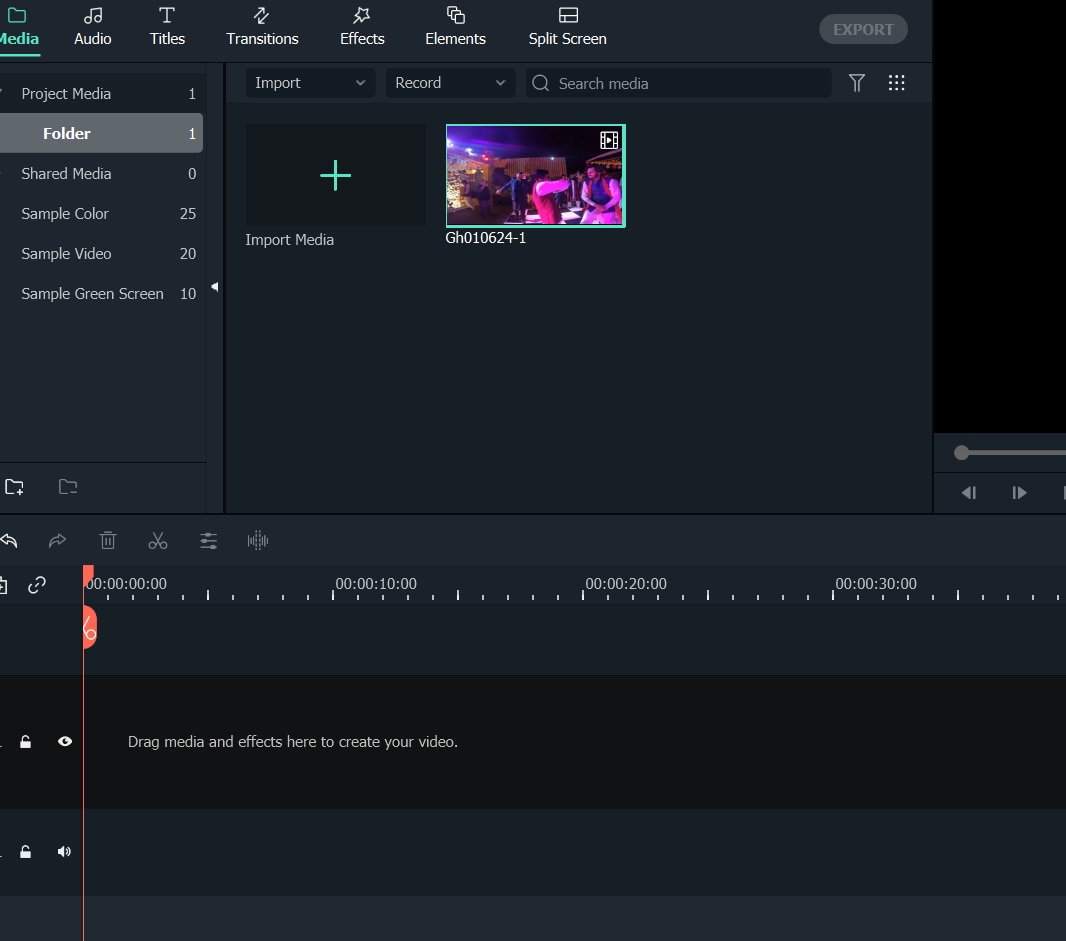
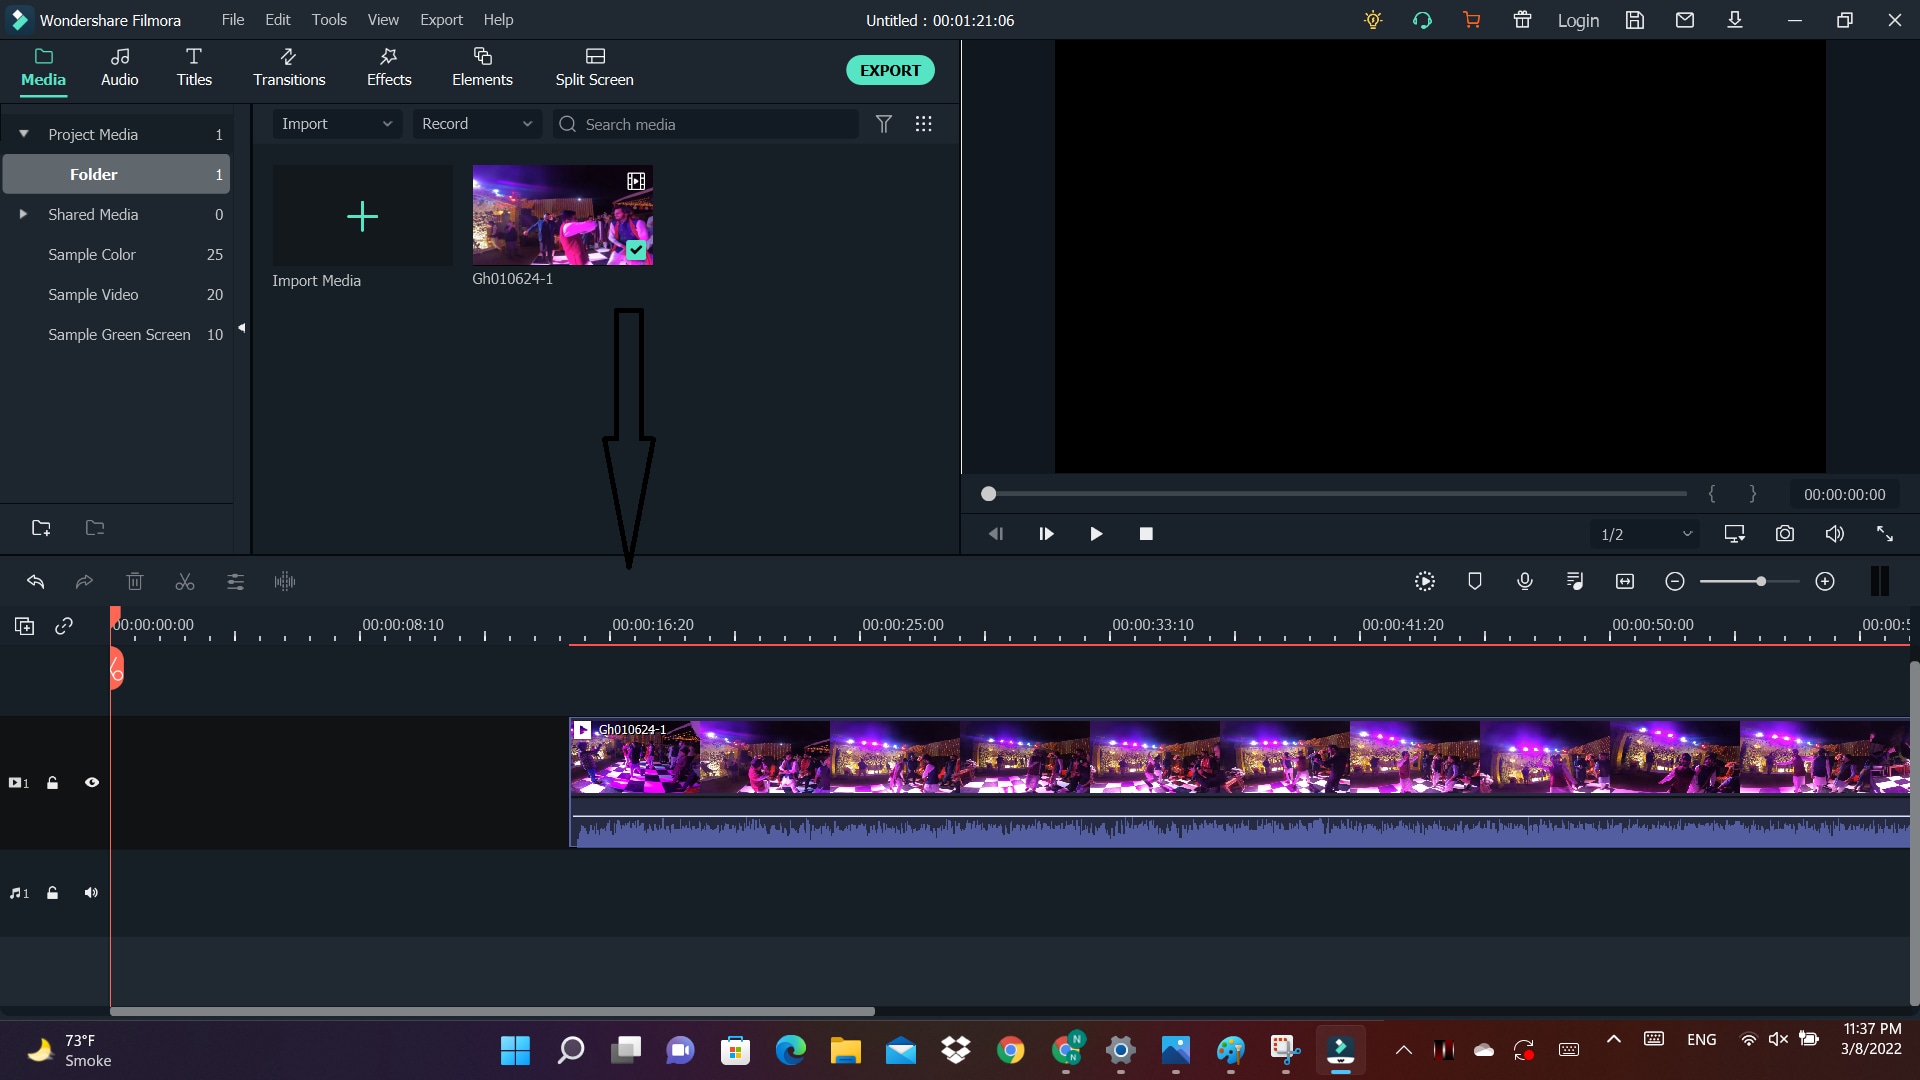
Step 1: Drag and Drop
The interface of Filmora is user-friendly and convenient. The video rotation process starts with importing the video file and then adding the drag and drop feature to the timeline.
Step 2: Video Rotation
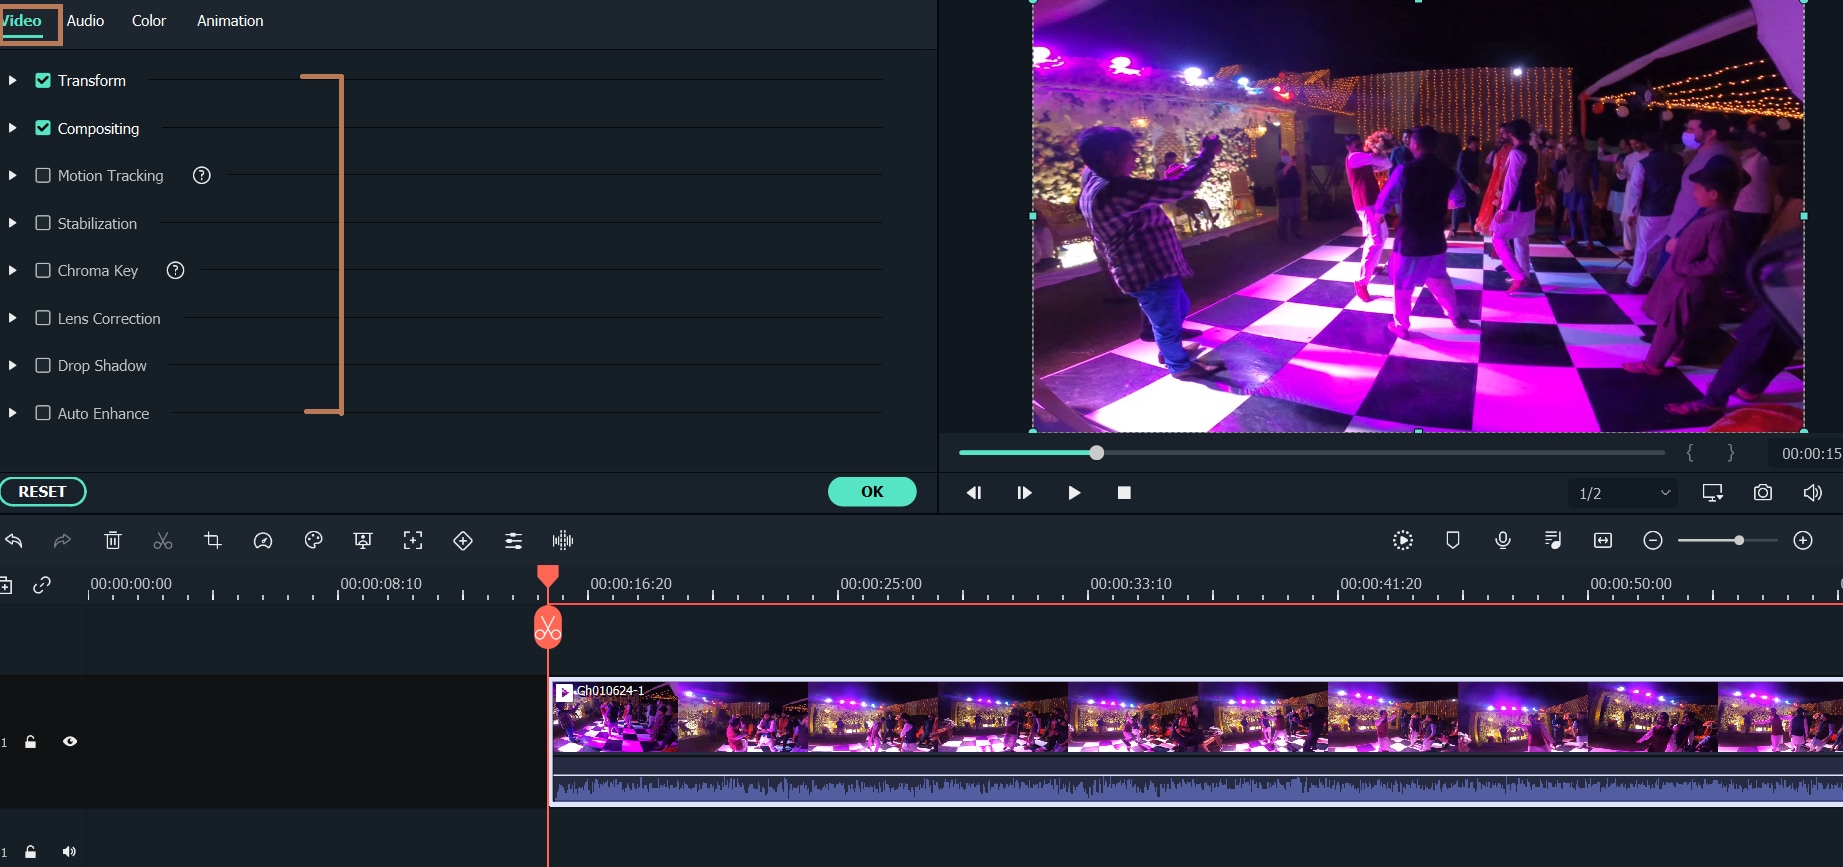
- In the timeline, double-click on the video clip.
- The video tab will appear with several options like transformation and lens correction.
Step 3: Exploring the Transform Tab
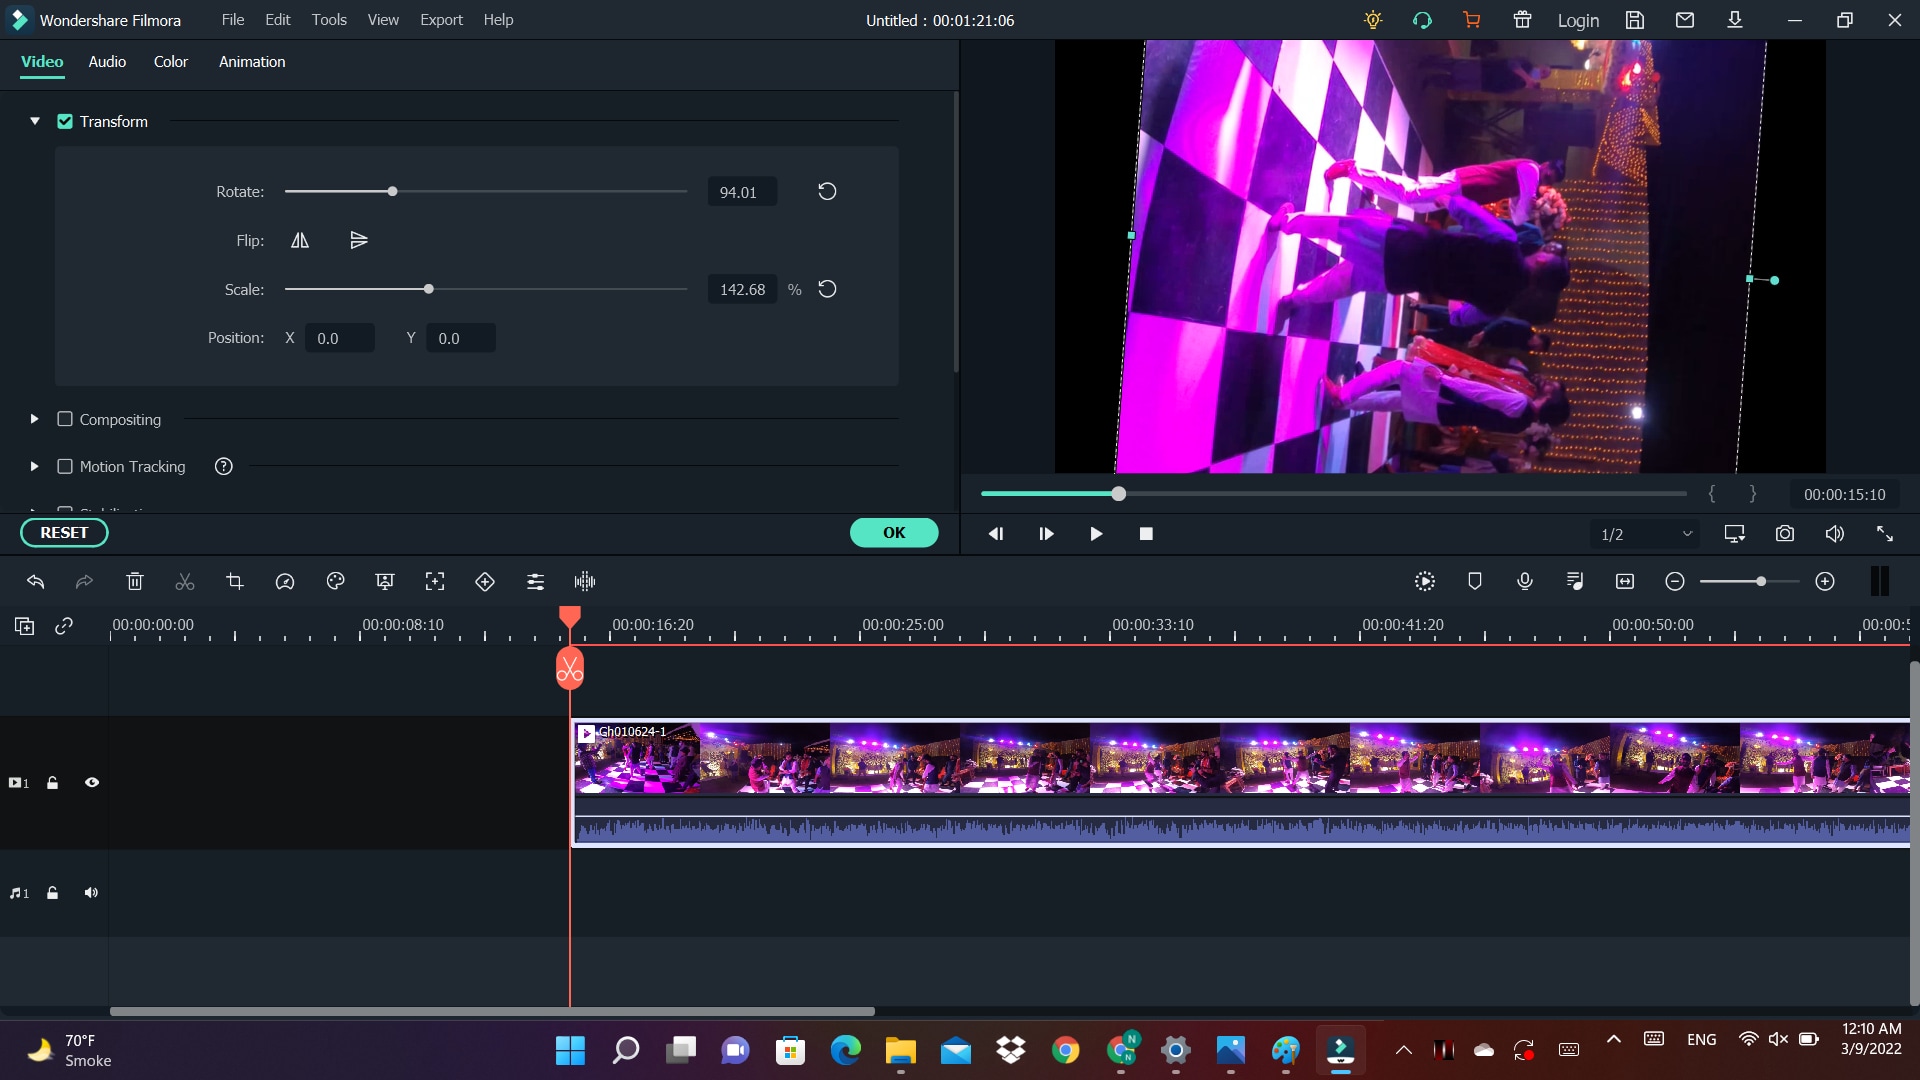
- Expand the Transform tab.
- You will see the options like rotation, flip, scale, and position.
- You can now rotate your Go-pro video by either rotating the slider or entering a specific value for the degree of rotation.
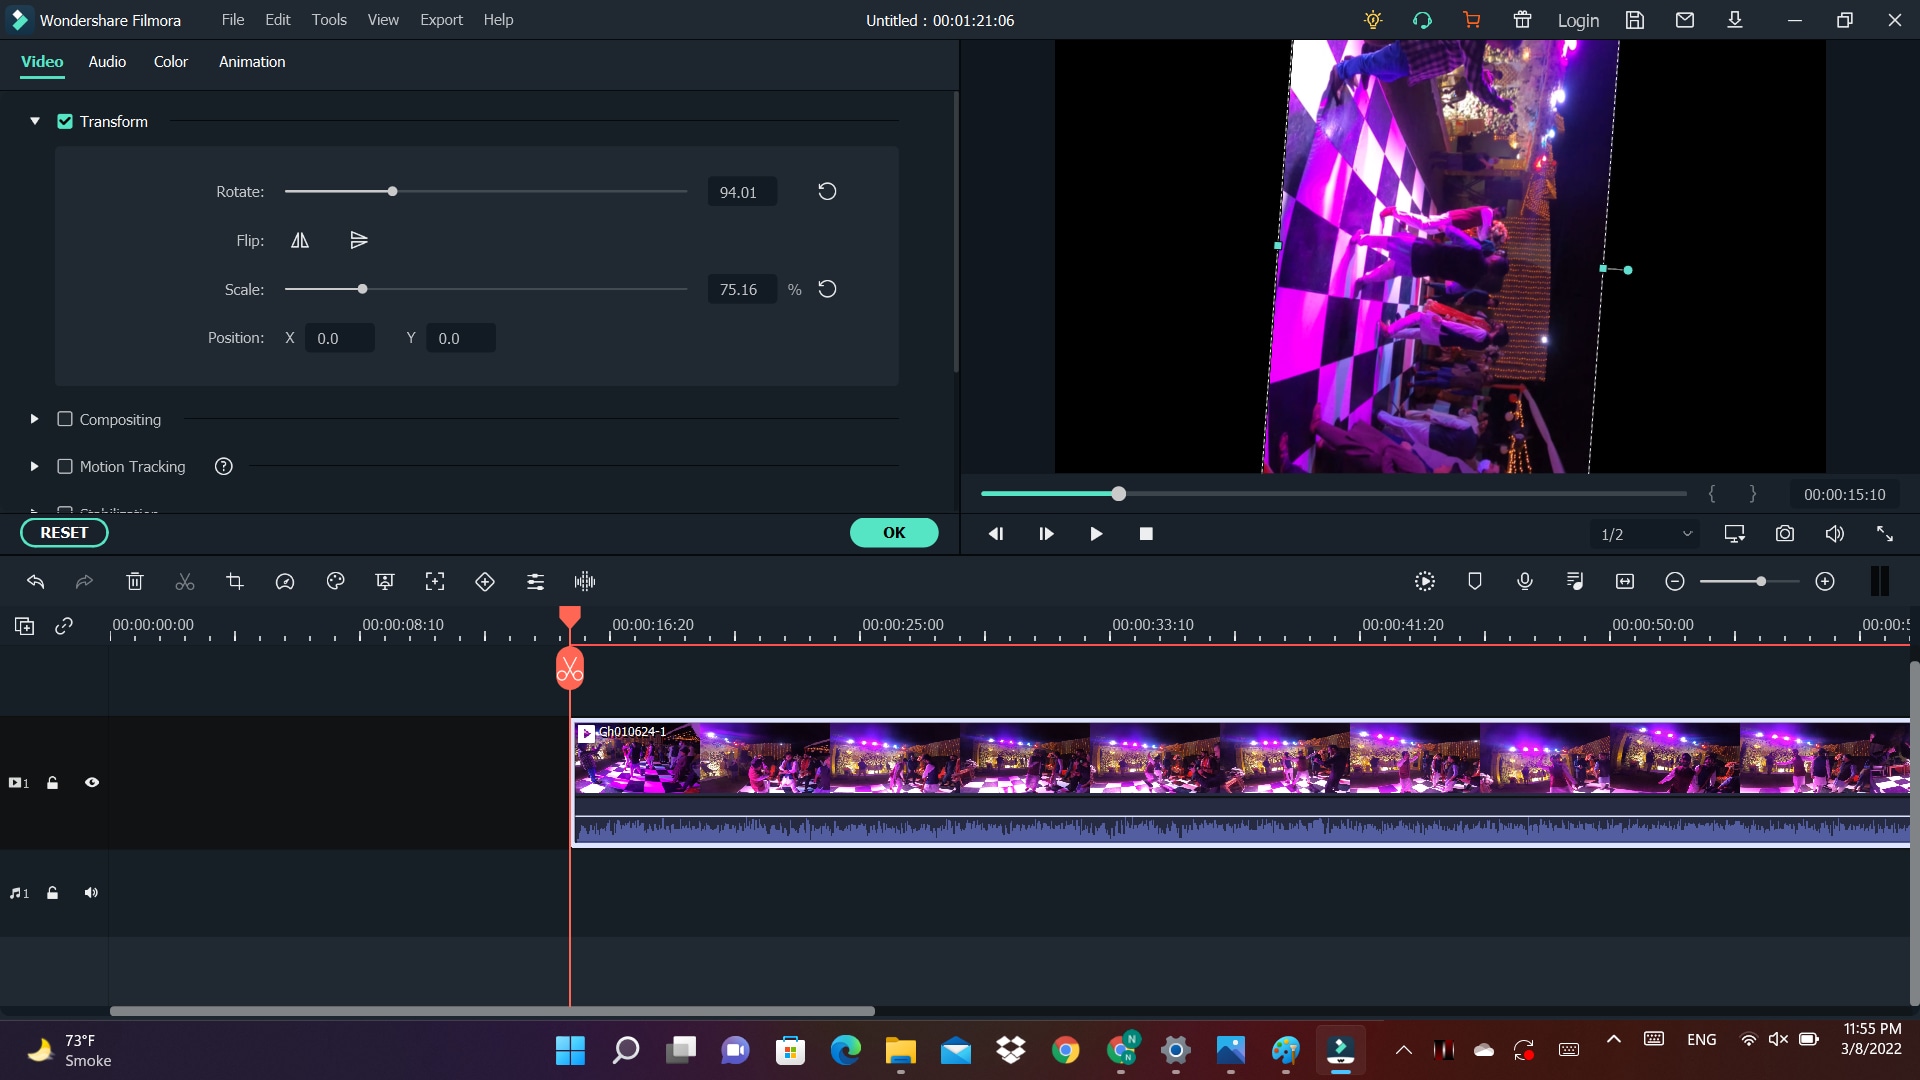
- You can also use the scale slider to adjust the image size.
Step 4:Exporting the rotated Go-pro Video
- After changing the orientation of your video, now is the time to export your project.
- Click on the Export tab.
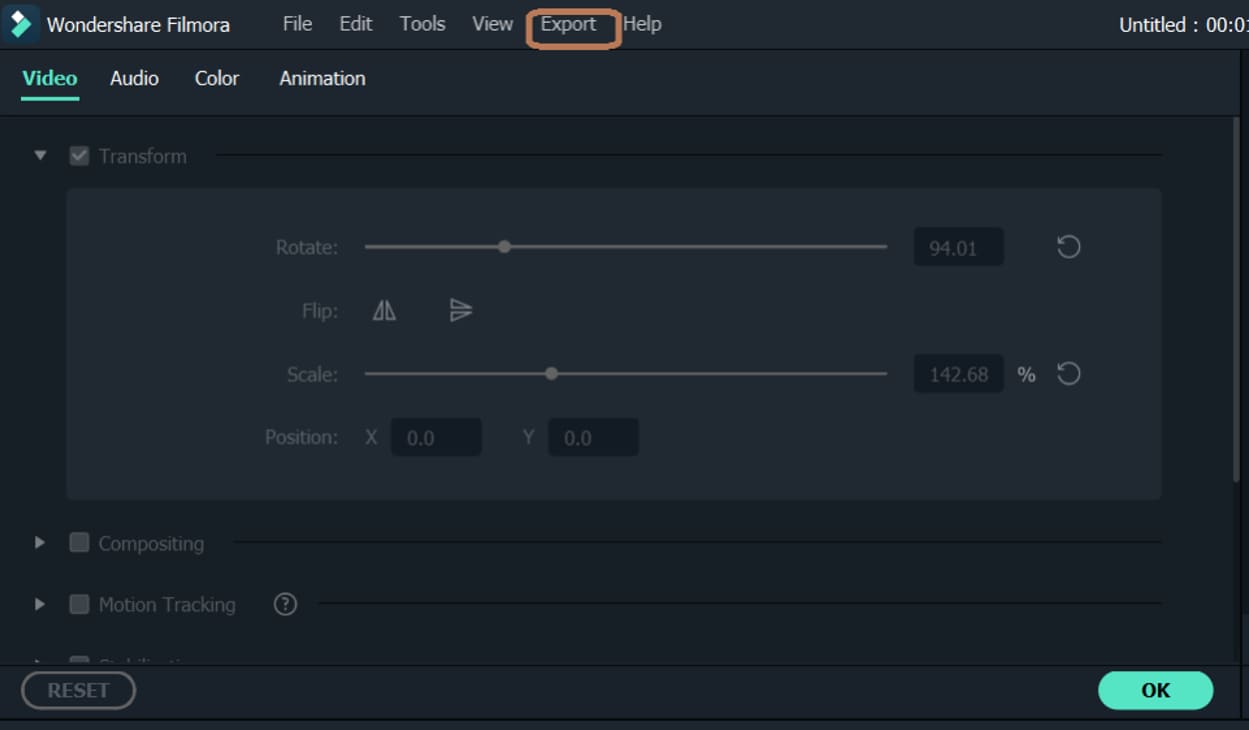
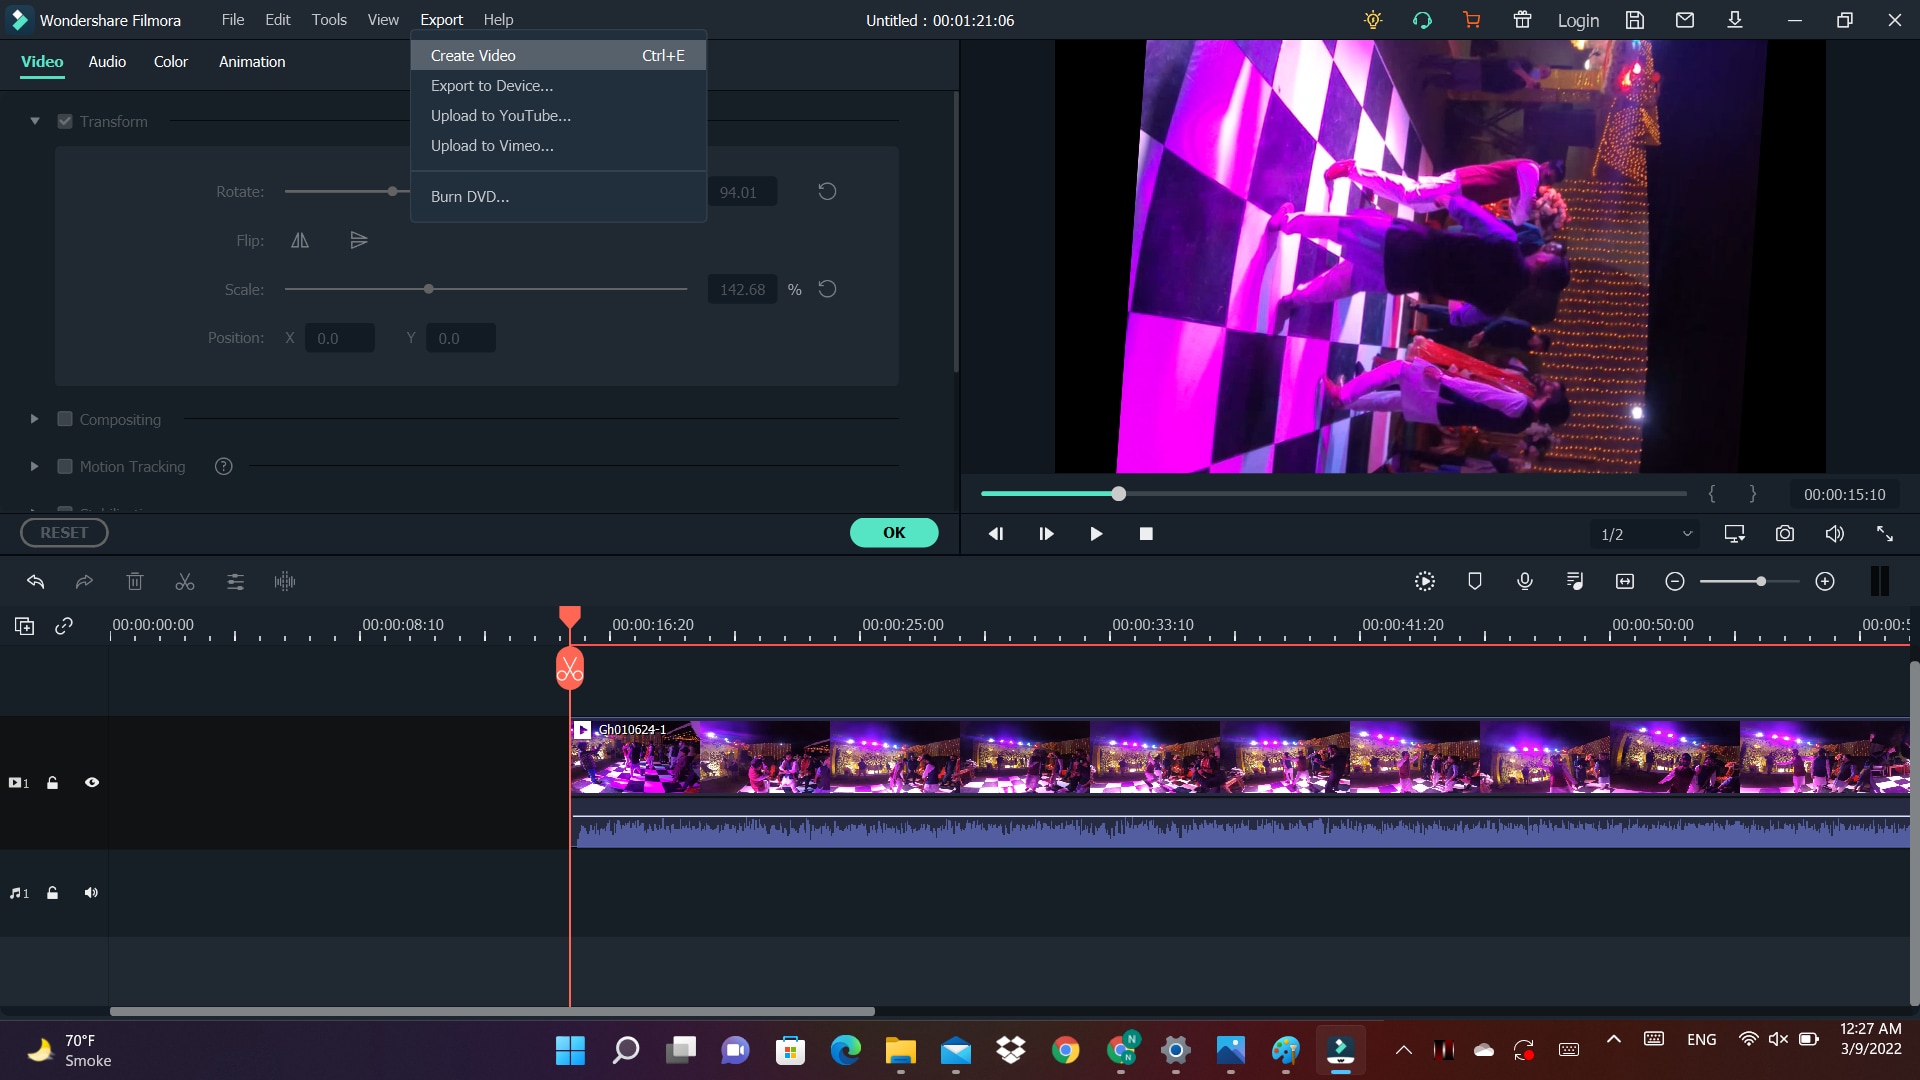
The Export tab shows a list of options whether you want to export the rotated video directly to your computer or share it with your friends via social media.
Exploring the Rotation of Video through GoPro Quik
GoPro Quik provides an alternative for changing the direction of videos. It comes with built-in tools specifically meant to deal with GoPro videos. Irrespective of the quality of your videos or format, it can rotate GoPro videos with ease.
You can rotate GoPro Video with GoPro Quik by following these steps
- Download and install the software and launch it afterward.
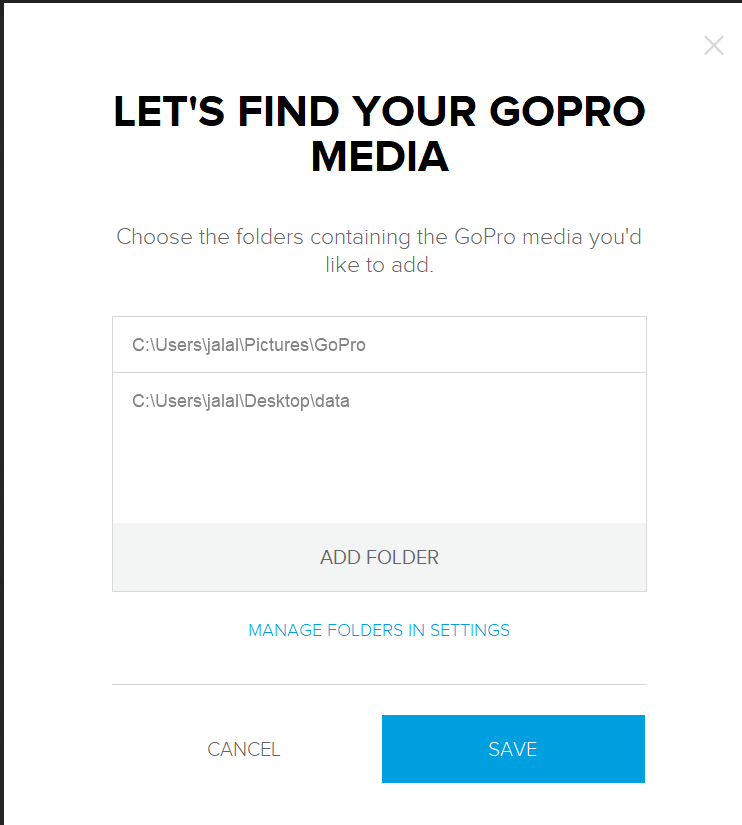
- You can connect your GoPro device to your computer or choose a folder to add media.

- Upload the media folder into the GoPro Quik program.
- Go to the video you want to rotate and double click on it.
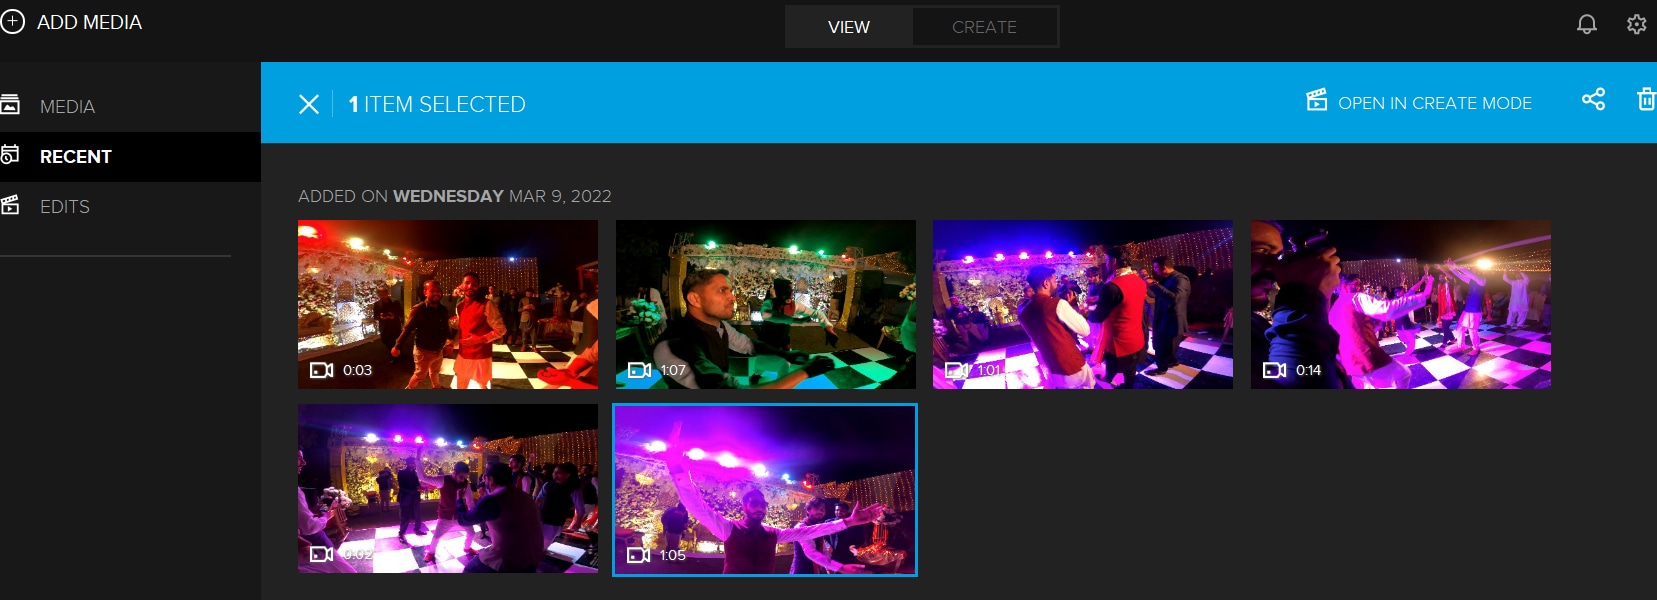
- A new window will open. Select the circle-shaped icon.

- The video is rotated at 90 degrees with each click.
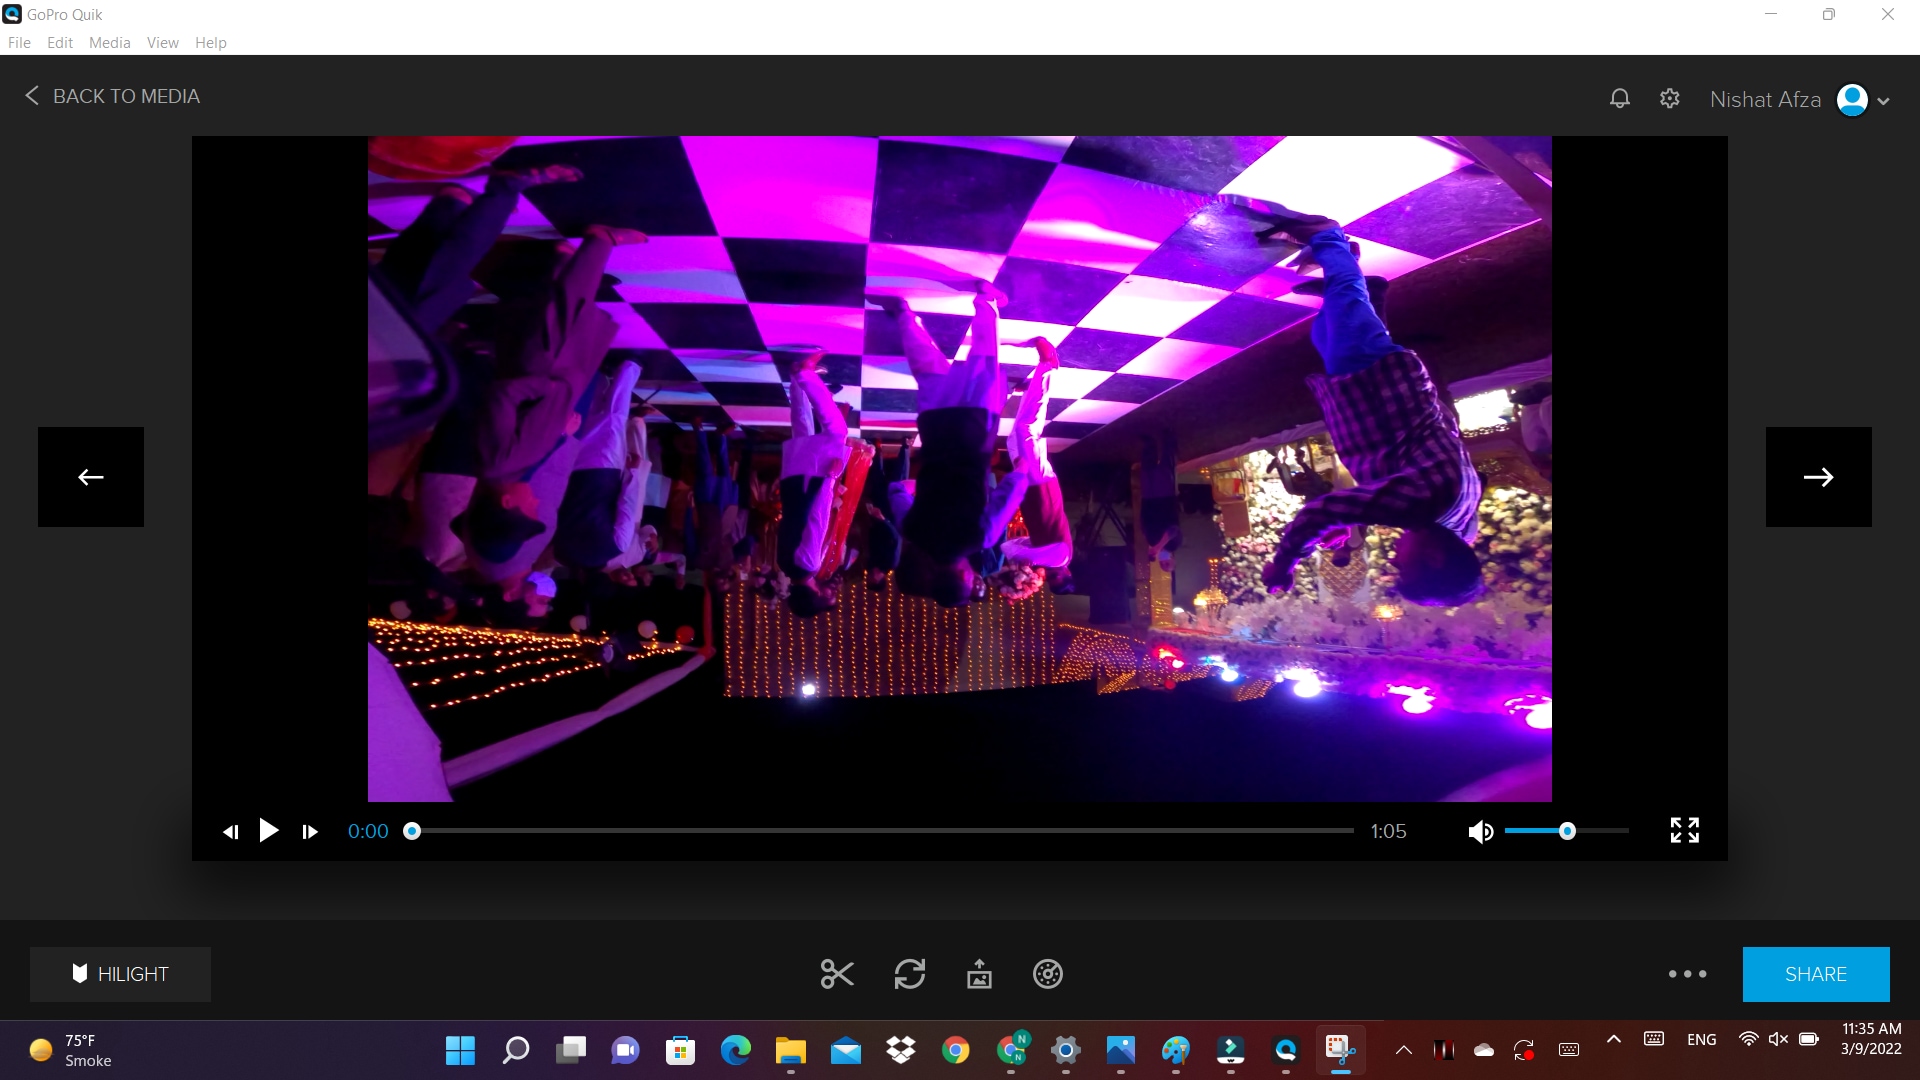
- Apart from that, on the far right side is a three-dotted button. Click on it to enter Create Mode.
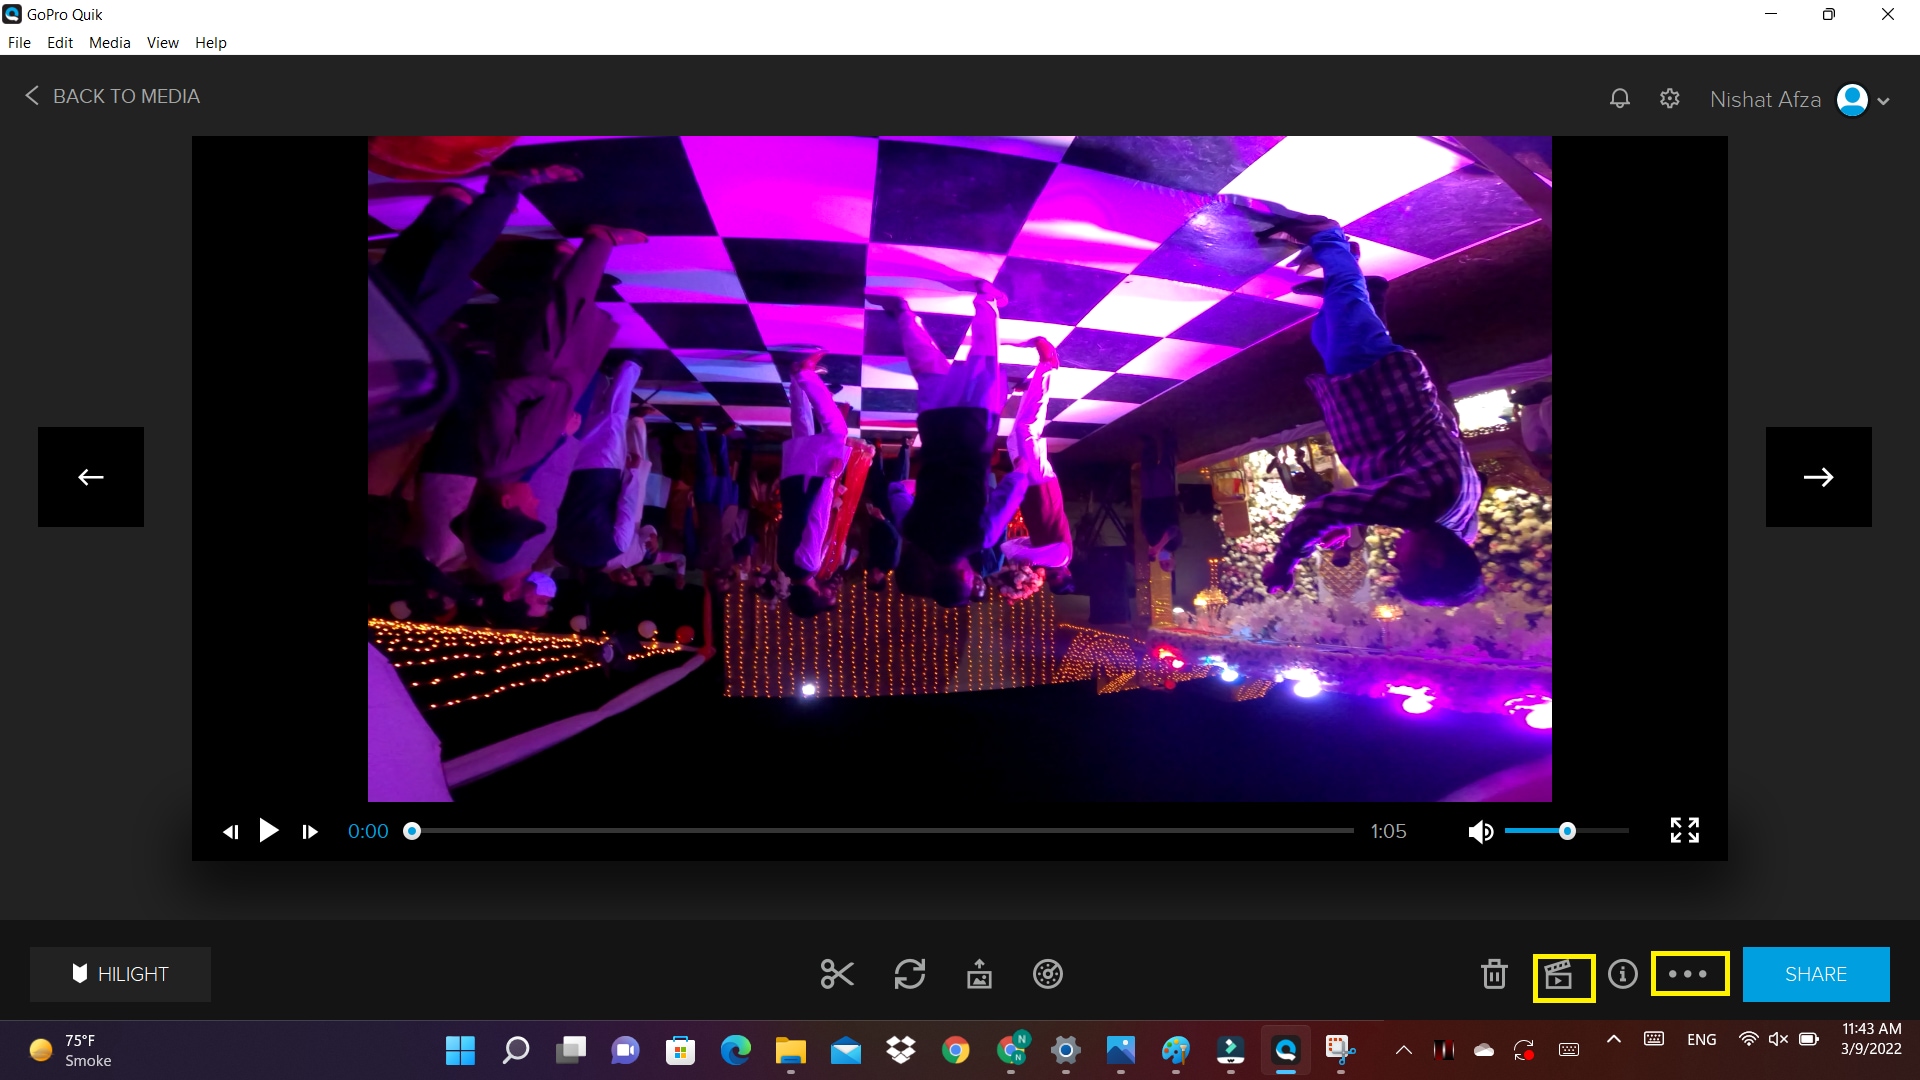
- Afterward, select Open.
- Click on the Save button to save all the editing.
Pros:
- User-friendly and convenient
- It connects to the GoPro camera easily.
- Background tracks can be imported to audio libraries.
- Supports importing of background tracks to music libraries.
Cons:
- It is slow when dealing with 4K and files.
Changing the orientation of a Go-pro video using a VLC player
The majority consider VLC as only a media player. But, it also performs the functions of a video editor. The software is user-friendly and supports every existing operating system, including Windows and Linux. The cherry on top is that it supports all audio and video formats. Unlike other tools, there is no need to download add-ons.
- After downloading the VLC media player, launch the software.
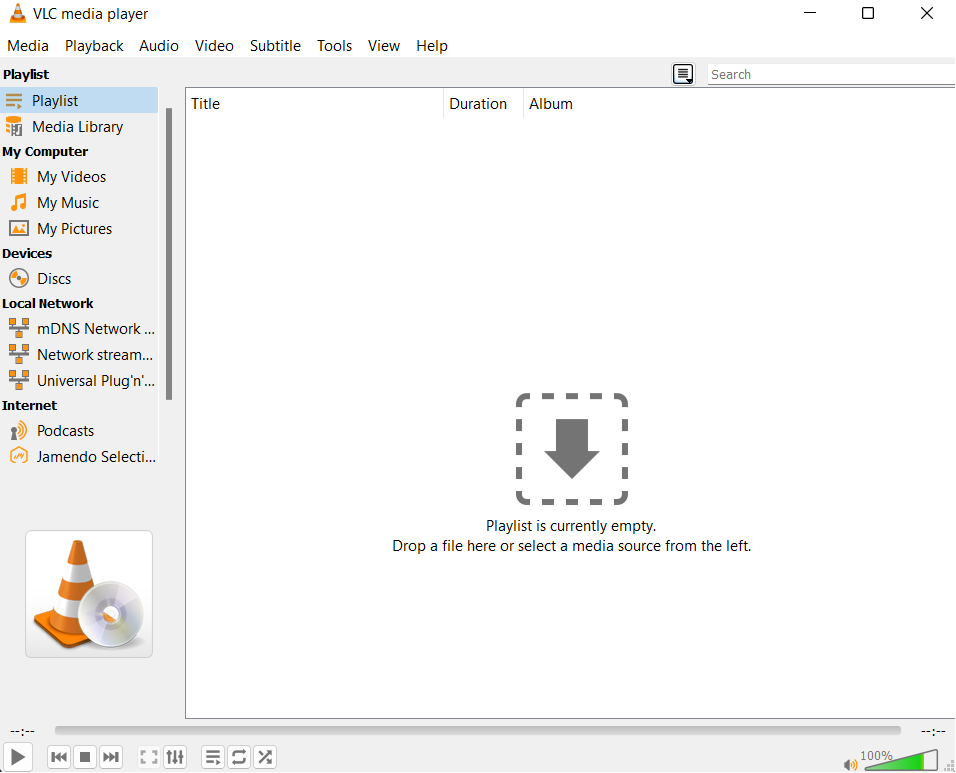
- Now, you need to import the video file you want to rotate. This is done by dragging the media file to the timeline or selecting a media source from the left.
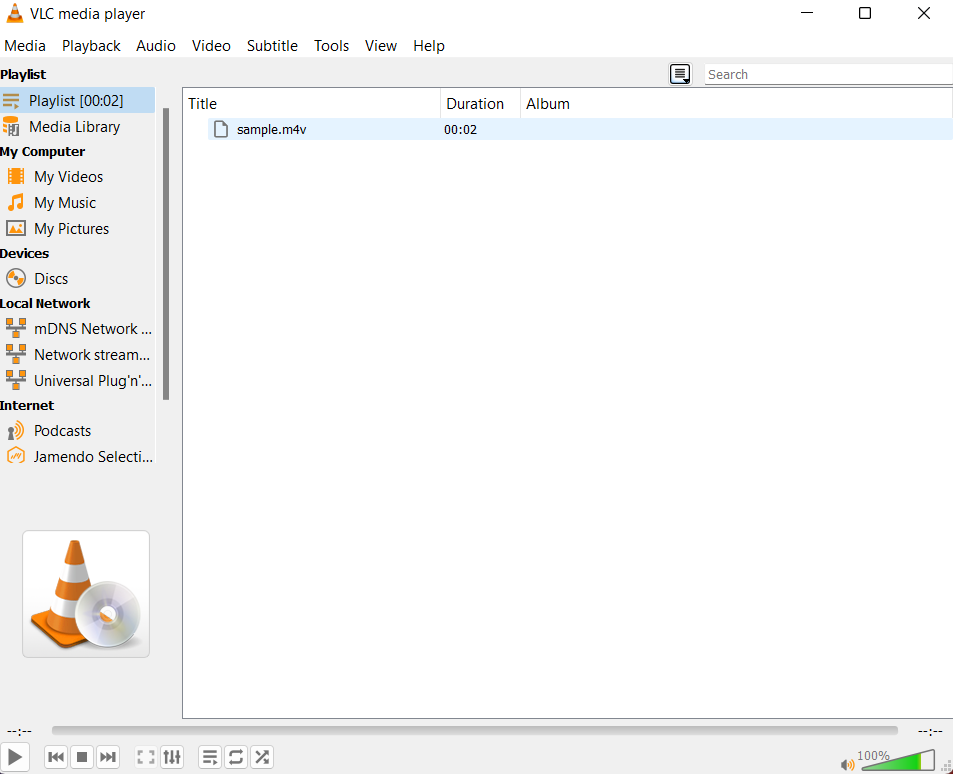
- In the VLC menu, go to Tools and then select Effects and Filters.
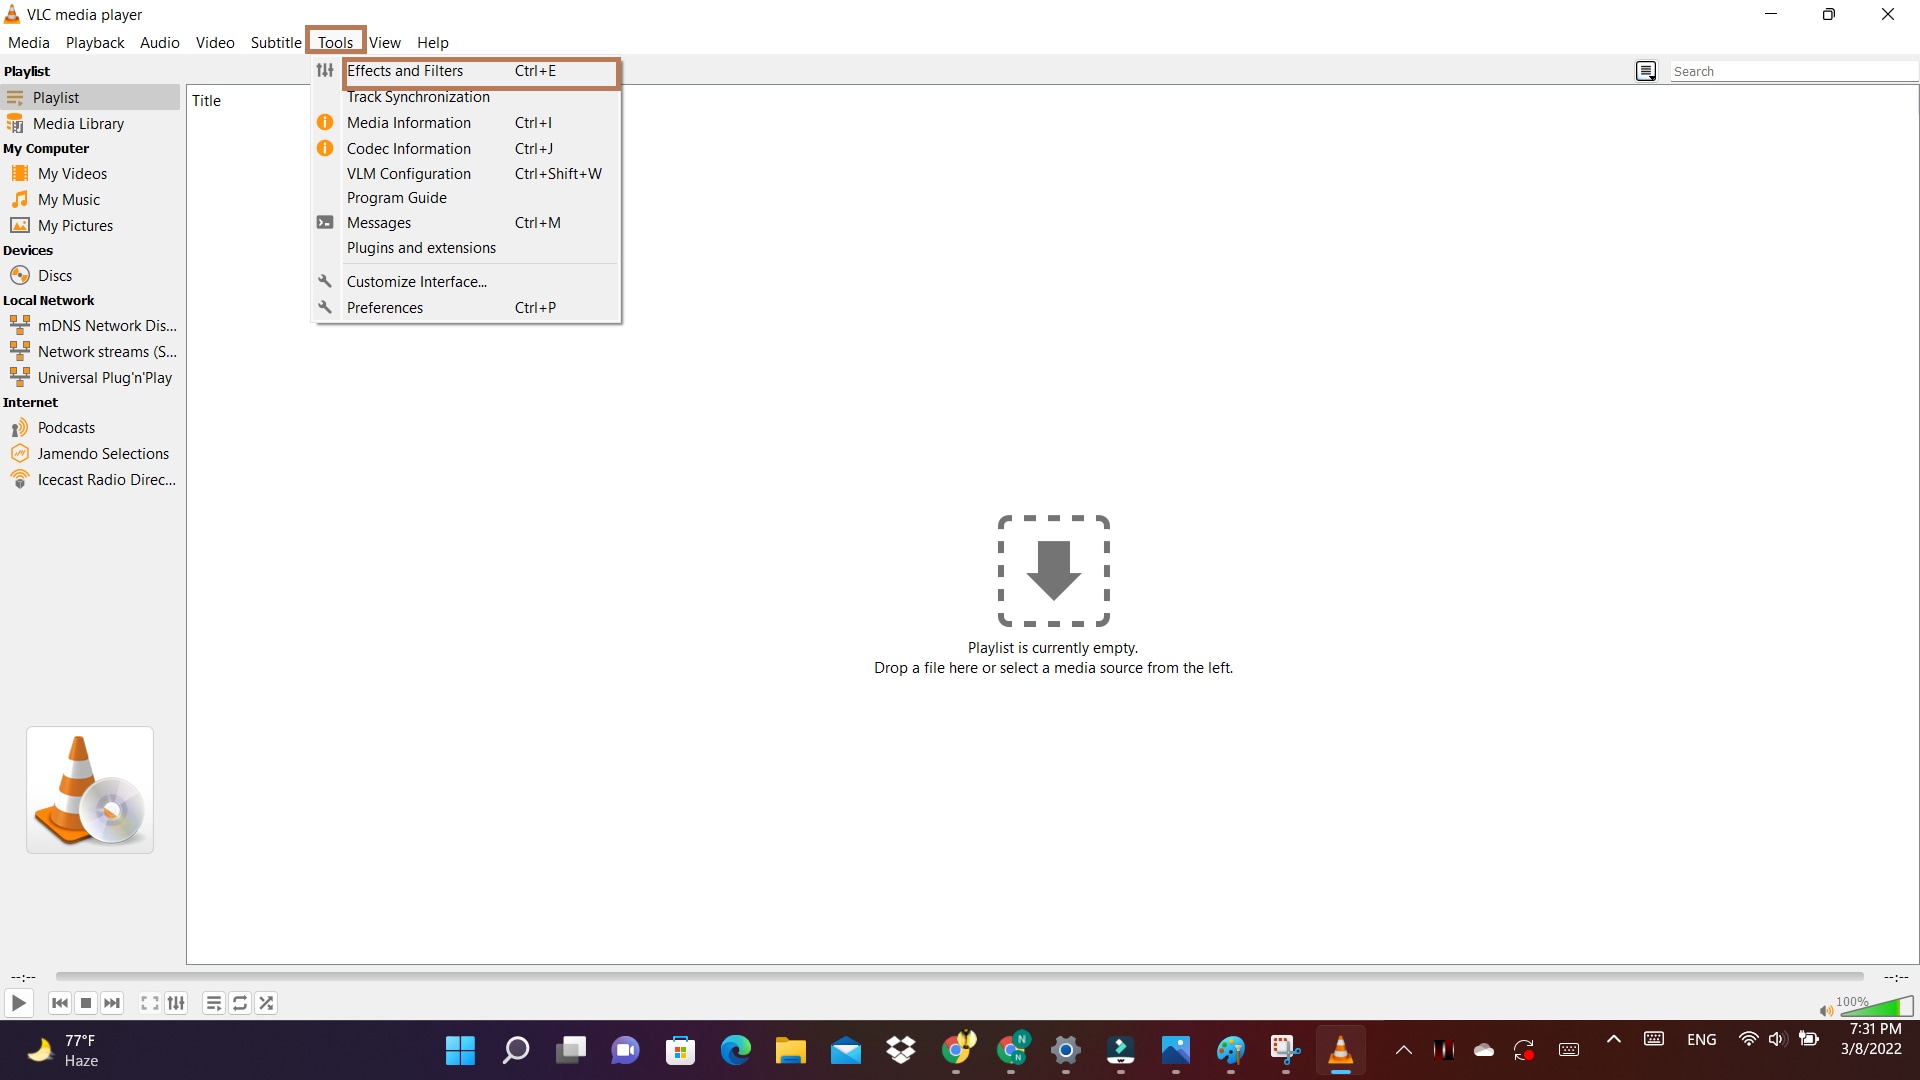
Tip: You can use the shortcut CTRL+E for the same purpose.
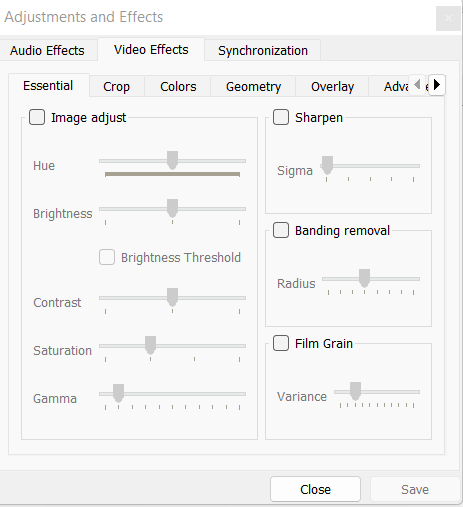
- The effects and filter tab will open a dialogue box with different options. Select the Video Effects tab.
- The video effect tab has many sub-tabs. You need to select the Geometry tab.
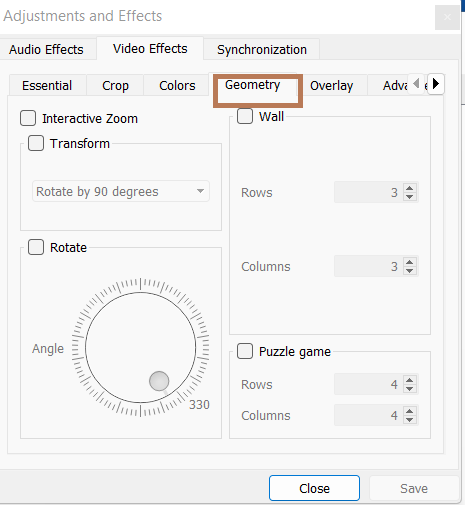
- Select the Transform option. A drop-down menu will appear with different options for rotating your video at different angles.
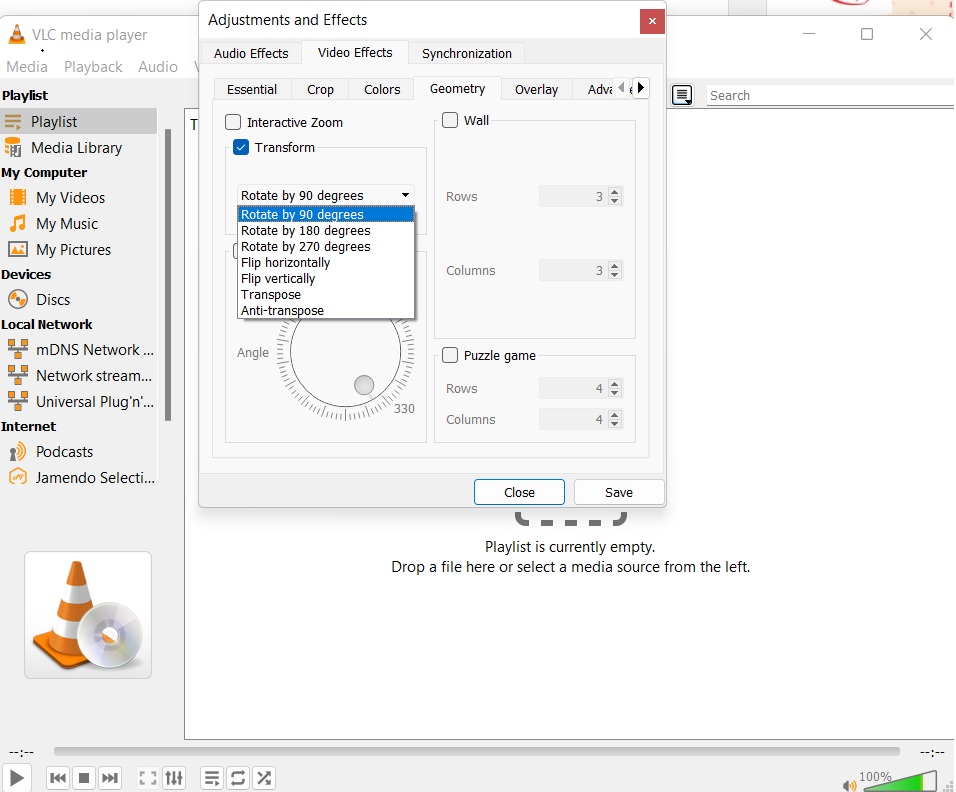
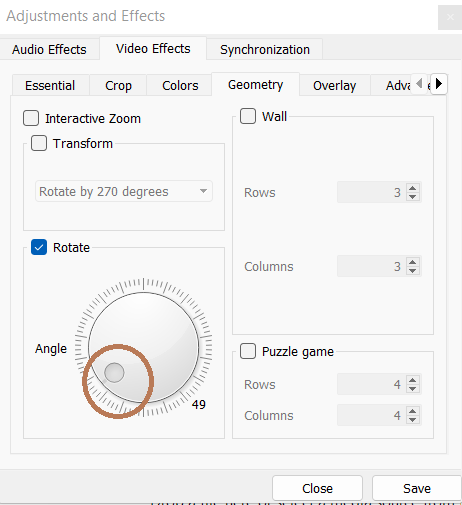
- Tick the checkbox that says Rotate to flip your video at a certain angle. Then, move the angle dialer. This will rotate your video to the angle you have specified.
- Click on the save option to complete the rotation process.
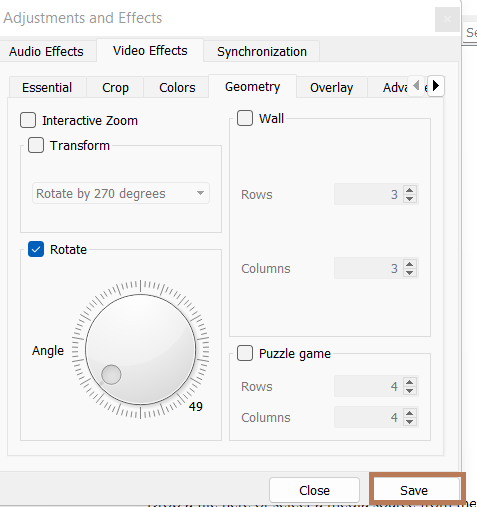
Note: The rotation settings are saved. Thus, you need to uncheck the option if you don’t want to rotate your next video.
Permanent Rotation of Video
The above steps rotated the video for only playing once. If you want to make the orientation of the video permanently to be flipped, then follow these instructions after the above steps.
Go to Media and select Convert/Save on the menu bar or use the shortcut CTRL+R.
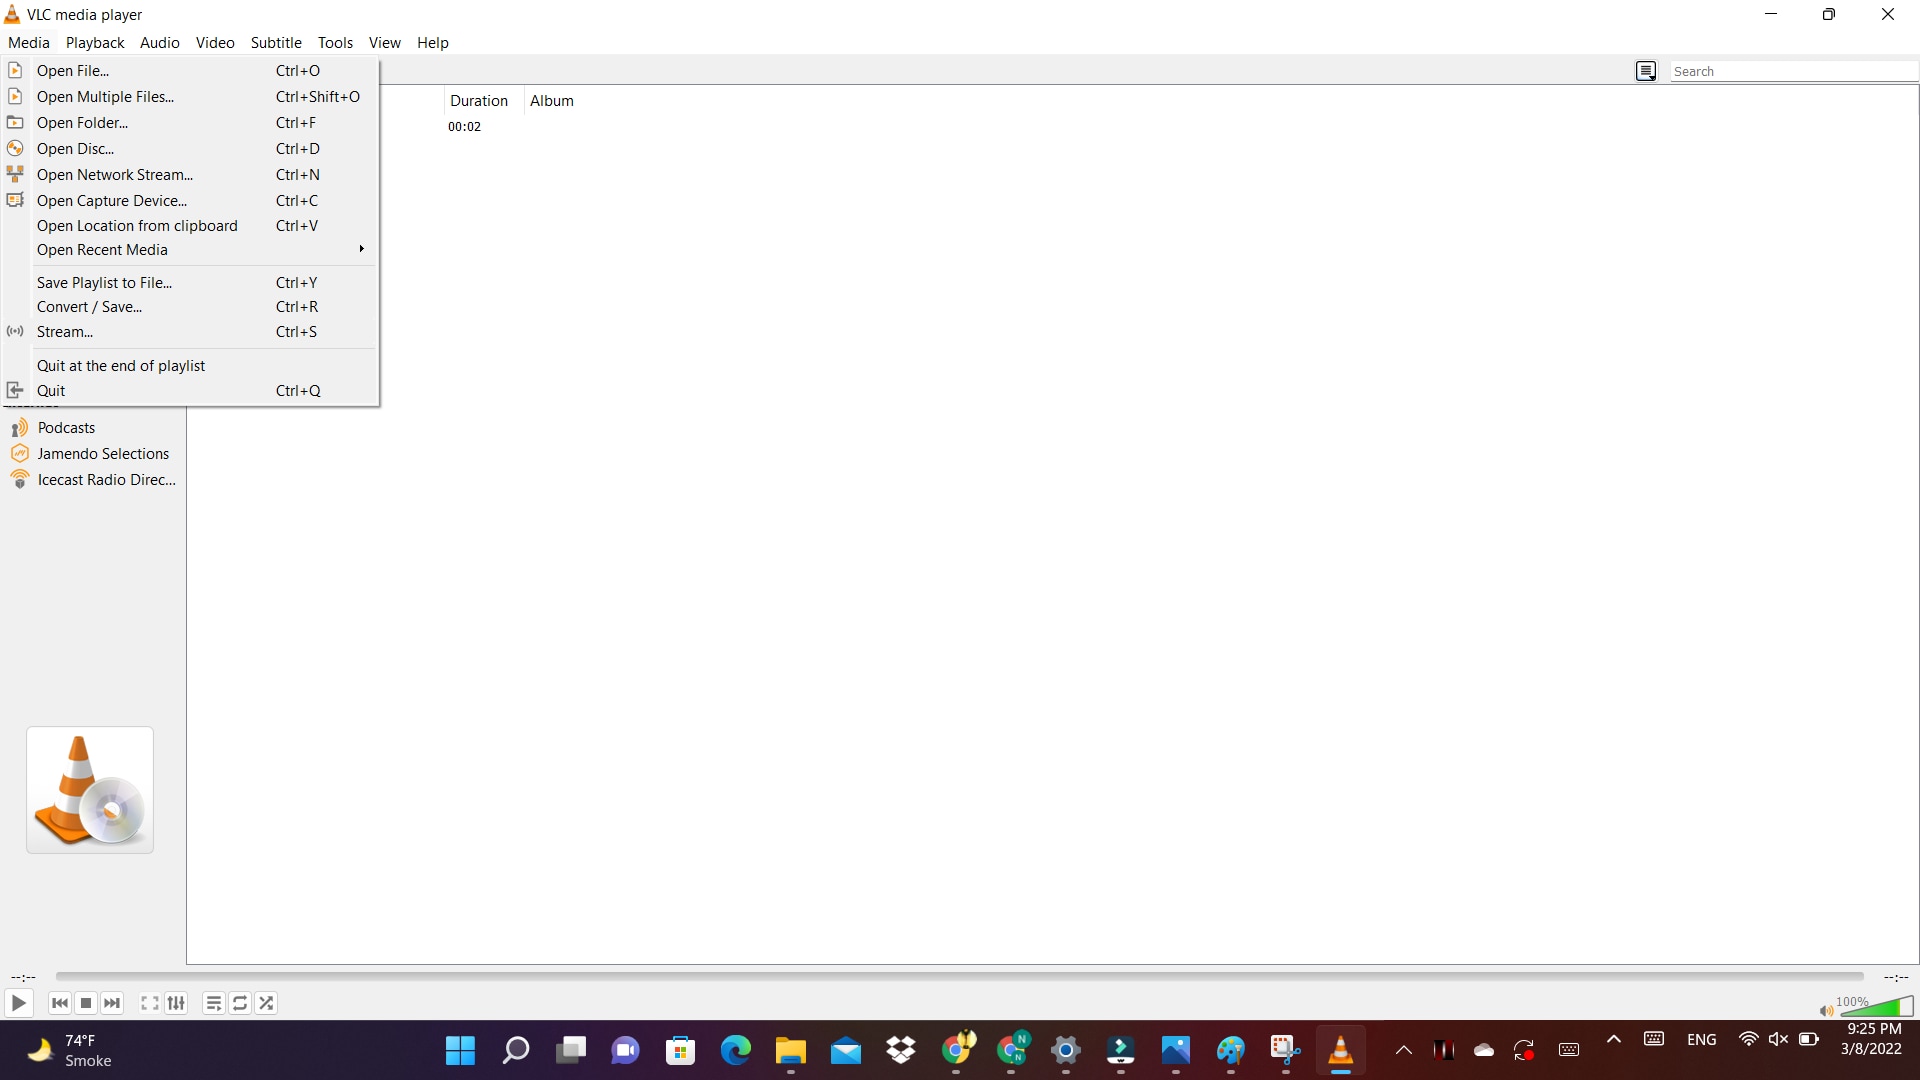
A pop-up window will appear. Click on the Add button. Your video will be added.
Afterward, select the option Convert/Save.
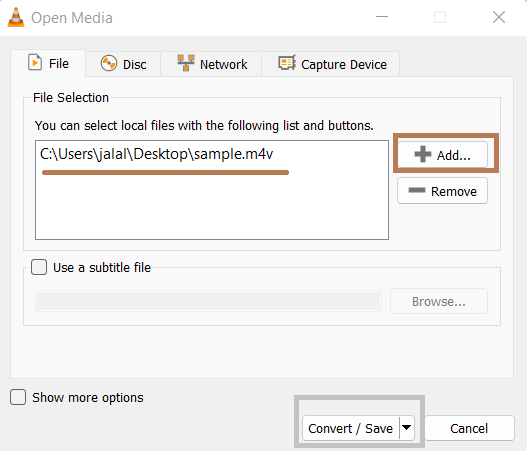
A pop-up window will appear in which you have to select the settings logo, located next to Profile
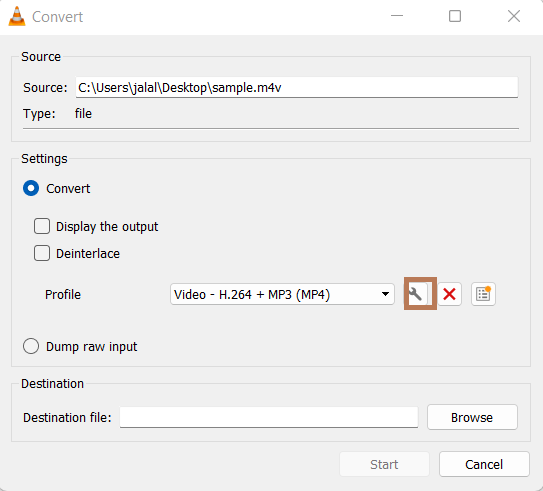
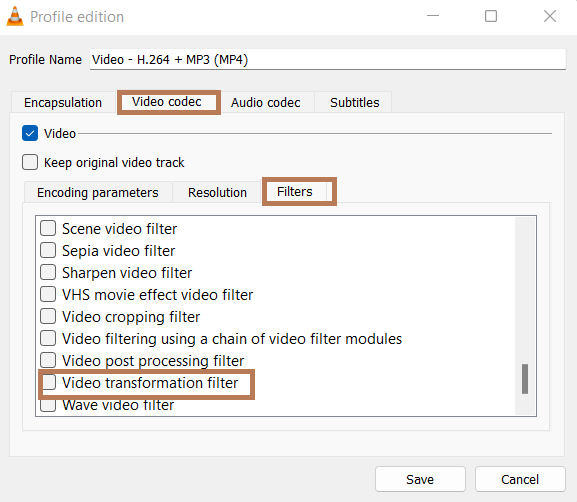
- A pop-up window will appear; click on the Video codec tab.
- Select the Filters tab and click on the Video transformation filter
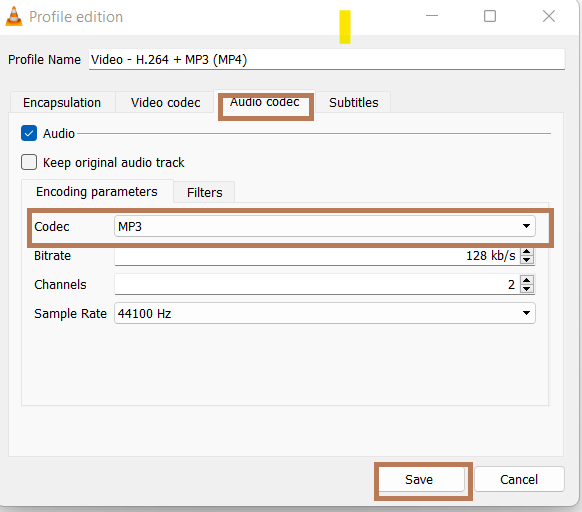
In the Audio Codec tab, under the encoding parameters, select MP3 in the codec option.
Select the save option.
Note: Make sure to add the destination file in the convert dialogue box.
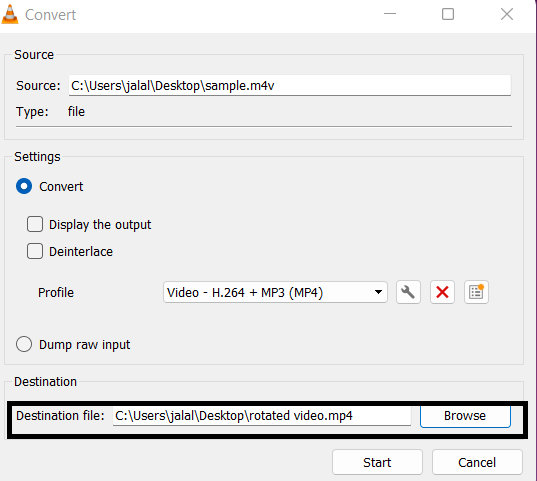
Click on the start button to begin the transformation.
Using the Online Converter
The Online Converter is a tool that assists you in rotating the direction of your GoPro. It is an online resource and does not require downloading and installing the cumbersome trouble. It is user-friendly and compatible with different video formats like MP4, MKV,3GP, and more.
Pros:
It is free for users. Therefore, there is no need for installation.
Cons:
- If it takes longer to upload a file, you may have to re-submit it. Hence, it can be time-consuming.
- It does not support encrypted files.
Fixing the Orientation of Go-pro video by Ezgif
If you have no time to download different tools for rotating your Go-Pro videos, then the Internet has got a solution to your problem. There are various resources available on the web that facilitate the online rotation of your videos.
The Ezgif online video rotation is a handy tool. With it, you can flip your Go-pro video both horizontally and vertically. Not only that, but it also gives you the option of rotating your video at different angles. It supports various video formats like MP4, MOV, and many others.
You need to follow these simple steps to fix the orientation of your Go-Pro video.
- Upload your desired video file.
- You can also paste an URL.
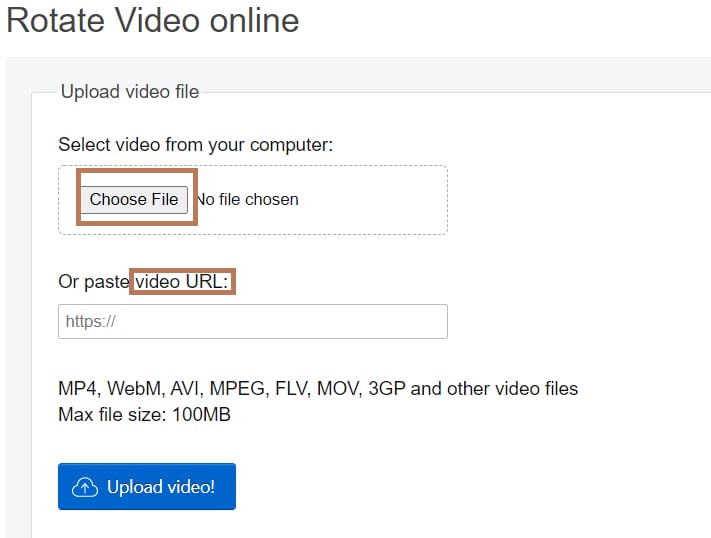
- Select the rotation options and then click the Rotate video button.
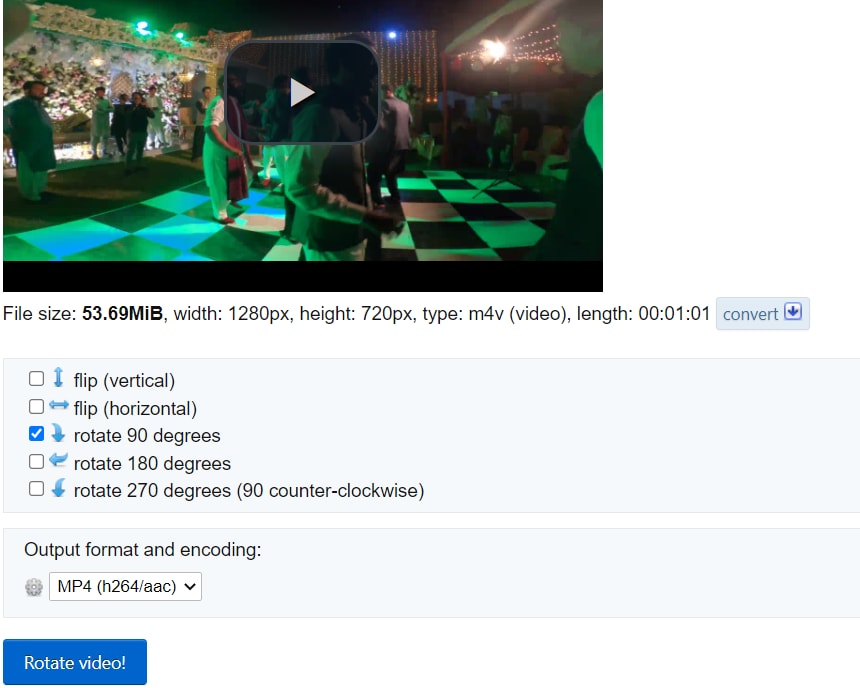
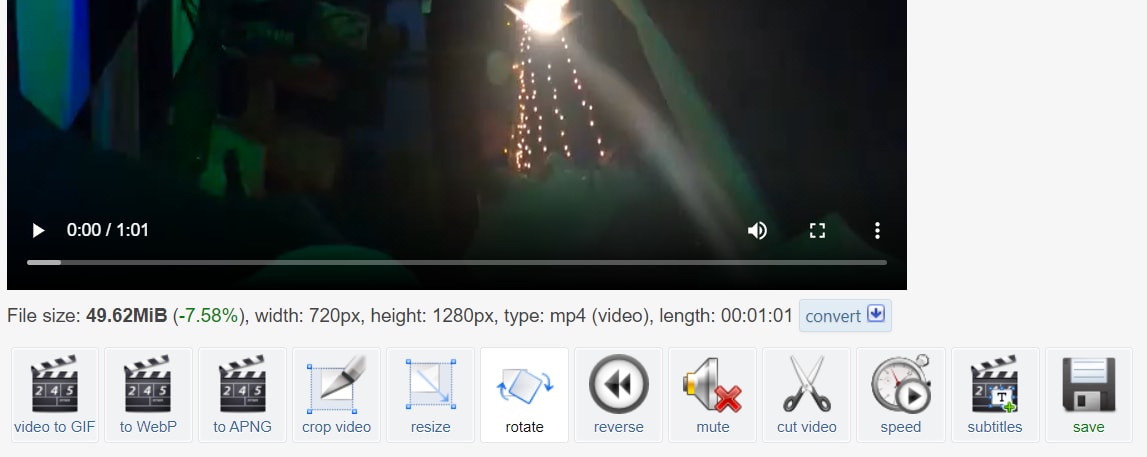
Viola! Your new rotated video is there in no time.
- You will also see several options ranging from cropping the video to changing the speed of the video.
Pros:
- There would be no watermarks in the rotated version.
- The output of the created file is mostly similar to the pre-rotated video.
Cons:
- If you have poor internet connectivity, the conversion process may take a little longer than usual.
Conclusion
With the rising trend in the development of video editing tools, Go-pro Quik is not the only app for editing its videos. Whether you are a beginner or an intermediate, editing multimedia files has added spark to the creativity of the artists. You can add the desired rotation effects to yours.
Changing the rotation of your Go-Pro videos has been made easier due to the availability of user-friendly tools. These are available for all types of operating systems. Their interface is not complicated. Hence, it makes it easy for beginners to polish their video-editing skills.
By changing the orientation of your video, you can turn an ordinary video into a mesmerizing and cherishable lifelong memory. So be it an indoor or outdoor activity, enhance your video editing skills by playing with different orientations of your videos.
For macOS 10.14 or later
Here is the step-by-step guide for rotating your go-pro video.
Step 1: Drag and Drop
The interface of Filmora is user-friendly and convenient. The video rotation process starts with importing the video file and then adding the drag and drop feature to the timeline.


Step 2: Video Rotation
- In the timeline, double-click on the video clip.
- The video tab will appear with several options like transformation and lens correction.

Step 3: Exploring the Transform Tab
- Expand the Transform tab.
- You will see the options like rotation, flip, scale, and position.
- You can now rotate your Go-pro video by either rotating the slider or entering a specific value for the degree of rotation.

- You can also use the scale slider to adjust the image size.

Step 4:Exporting the rotated Go-pro Video
- After changing the orientation of your video, now is the time to export your project.
- Click on the Export tab.

The Export tab shows a list of options whether you want to export the rotated video directly to your computer or share it with your friends via social media.

Exploring the Rotation of Video through GoPro Quik
GoPro Quik provides an alternative for changing the direction of videos. It comes with built-in tools specifically meant to deal with GoPro videos. Irrespective of the quality of your videos or format, it can rotate GoPro videos with ease.
You can rotate GoPro Video with GoPro Quik by following these steps
- Download and install the software and launch it afterward.
- You can connect your GoPro device to your computer or choose a folder to add media.

- Upload the media folder into the GoPro Quik program.

- Go to the video you want to rotate and double click on it.

- A new window will open. Select the circle-shaped icon.

- The video is rotated at 90 degrees with each click.

- Apart from that, on the far right side is a three-dotted button. Click on it to enter Create Mode.

- Afterward, select Open.
- Click on the Save button to save all the editing.
Pros:
- User-friendly and convenient
- It connects to the GoPro camera easily.
- Background tracks can be imported to audio libraries.
- Supports importing of background tracks to music libraries.
Cons:
- It is slow when dealing with 4K and files.
Changing the orientation of a Go-pro video using a VLC player
The majority consider VLC as only a media player. But, it also performs the functions of a video editor. The software is user-friendly and supports every existing operating system, including Windows and Linux. The cherry on top is that it supports all audio and video formats. Unlike other tools, there is no need to download add-ons.
- After downloading the VLC media player, launch the software.

- Now, you need to import the video file you want to rotate. This is done by dragging the media file to the timeline or selecting a media source from the left.

- In the VLC menu, go to Tools and then select Effects and Filters.

Tip: You can use the shortcut CTRL+E for the same purpose.
- The effects and filter tab will open a dialogue box with different options. Select the Video Effects tab.

- The video effect tab has many sub-tabs. You need to select the Geometry tab.

- Select the Transform option. A drop-down menu will appear with different options for rotating your video at different angles.

- Tick the checkbox that says Rotate to flip your video at a certain angle. Then, move the angle dialer. This will rotate your video to the angle you have specified.

- Click on the save option to complete the rotation process.

Note: The rotation settings are saved. Thus, you need to uncheck the option if you don’t want to rotate your next video.
Permanent Rotation of Video
The above steps rotated the video for only playing once. If you want to make the orientation of the video permanently to be flipped, then follow these instructions after the above steps.
Go to Media and select Convert/Save on the menu bar or use the shortcut CTRL+R.

A pop-up window will appear. Click on the Add button. Your video will be added.
Afterward, select the option Convert/Save.

A pop-up window will appear in which you have to select the settings logo, located next to Profile

- A pop-up window will appear; click on the Video codec tab.
- Select the Filters tab and click on the Video transformation filter

In the Audio Codec tab, under the encoding parameters, select MP3 in the codec option.
Select the save option.

Note: Make sure to add the destination file in the convert dialogue box.

Click on the start button to begin the transformation.
Using the Online Converter
The Online Converter is a tool that assists you in rotating the direction of your GoPro. It is an online resource and does not require downloading and installing the cumbersome trouble. It is user-friendly and compatible with different video formats like MP4, MKV,3GP, and more.
Pros:
It is free for users. Therefore, there is no need for installation.
Cons:
- If it takes longer to upload a file, you may have to re-submit it. Hence, it can be time-consuming.
- It does not support encrypted files.
Fixing the Orientation of Go-pro video by Ezgif
If you have no time to download different tools for rotating your Go-Pro videos, then the Internet has got a solution to your problem. There are various resources available on the web that facilitate the online rotation of your videos.
The Ezgif online video rotation is a handy tool. With it, you can flip your Go-pro video both horizontally and vertically. Not only that, but it also gives you the option of rotating your video at different angles. It supports various video formats like MP4, MOV, and many others.
You need to follow these simple steps to fix the orientation of your Go-Pro video.
- Upload your desired video file.
- You can also paste an URL.

- Select the rotation options and then click the Rotate video button.

Viola! Your new rotated video is there in no time.
- You will also see several options ranging from cropping the video to changing the speed of the video.

Pros:
- There would be no watermarks in the rotated version.
- The output of the created file is mostly similar to the pre-rotated video.
Cons:
- If you have poor internet connectivity, the conversion process may take a little longer than usual.
Conclusion
With the rising trend in the development of video editing tools, Go-pro Quik is not the only app for editing its videos. Whether you are a beginner or an intermediate, editing multimedia files has added spark to the creativity of the artists. You can add the desired rotation effects to yours.
Changing the rotation of your Go-Pro videos has been made easier due to the availability of user-friendly tools. These are available for all types of operating systems. Their interface is not complicated. Hence, it makes it easy for beginners to polish their video-editing skills.
By changing the orientation of your video, you can turn an ordinary video into a mesmerizing and cherishable lifelong memory. So be it an indoor or outdoor activity, enhance your video editing skills by playing with different orientations of your videos.
For macOS 10.14 or later
Here is the step-by-step guide for rotating your go-pro video.
Step 1: Drag and Drop
The interface of Filmora is user-friendly and convenient. The video rotation process starts with importing the video file and then adding the drag and drop feature to the timeline.


Step 2: Video Rotation
- In the timeline, double-click on the video clip.
- The video tab will appear with several options like transformation and lens correction.

Step 3: Exploring the Transform Tab
- Expand the Transform tab.
- You will see the options like rotation, flip, scale, and position.
- You can now rotate your Go-pro video by either rotating the slider or entering a specific value for the degree of rotation.

- You can also use the scale slider to adjust the image size.

Step 4:Exporting the rotated Go-pro Video
- After changing the orientation of your video, now is the time to export your project.
- Click on the Export tab.

The Export tab shows a list of options whether you want to export the rotated video directly to your computer or share it with your friends via social media.

Exploring the Rotation of Video through GoPro Quik
GoPro Quik provides an alternative for changing the direction of videos. It comes with built-in tools specifically meant to deal with GoPro videos. Irrespective of the quality of your videos or format, it can rotate GoPro videos with ease.
You can rotate GoPro Video with GoPro Quik by following these steps
- Download and install the software and launch it afterward.
- You can connect your GoPro device to your computer or choose a folder to add media.

- Upload the media folder into the GoPro Quik program.

- Go to the video you want to rotate and double click on it.

- A new window will open. Select the circle-shaped icon.

- The video is rotated at 90 degrees with each click.

- Apart from that, on the far right side is a three-dotted button. Click on it to enter Create Mode.

- Afterward, select Open.
- Click on the Save button to save all the editing.
Pros:
- User-friendly and convenient
- It connects to the GoPro camera easily.
- Background tracks can be imported to audio libraries.
- Supports importing of background tracks to music libraries.
Cons:
- It is slow when dealing with 4K and files.
Changing the orientation of a Go-pro video using a VLC player
The majority consider VLC as only a media player. But, it also performs the functions of a video editor. The software is user-friendly and supports every existing operating system, including Windows and Linux. The cherry on top is that it supports all audio and video formats. Unlike other tools, there is no need to download add-ons.
- After downloading the VLC media player, launch the software.

- Now, you need to import the video file you want to rotate. This is done by dragging the media file to the timeline or selecting a media source from the left.

- In the VLC menu, go to Tools and then select Effects and Filters.

Tip: You can use the shortcut CTRL+E for the same purpose.
- The effects and filter tab will open a dialogue box with different options. Select the Video Effects tab.

- The video effect tab has many sub-tabs. You need to select the Geometry tab.

- Select the Transform option. A drop-down menu will appear with different options for rotating your video at different angles.

- Tick the checkbox that says Rotate to flip your video at a certain angle. Then, move the angle dialer. This will rotate your video to the angle you have specified.

- Click on the save option to complete the rotation process.

Note: The rotation settings are saved. Thus, you need to uncheck the option if you don’t want to rotate your next video.
Permanent Rotation of Video
The above steps rotated the video for only playing once. If you want to make the orientation of the video permanently to be flipped, then follow these instructions after the above steps.
Go to Media and select Convert/Save on the menu bar or use the shortcut CTRL+R.

A pop-up window will appear. Click on the Add button. Your video will be added.
Afterward, select the option Convert/Save.

A pop-up window will appear in which you have to select the settings logo, located next to Profile

- A pop-up window will appear; click on the Video codec tab.
- Select the Filters tab and click on the Video transformation filter

In the Audio Codec tab, under the encoding parameters, select MP3 in the codec option.
Select the save option.

Note: Make sure to add the destination file in the convert dialogue box.

Click on the start button to begin the transformation.
Using the Online Converter
The Online Converter is a tool that assists you in rotating the direction of your GoPro. It is an online resource and does not require downloading and installing the cumbersome trouble. It is user-friendly and compatible with different video formats like MP4, MKV,3GP, and more.
Pros:
It is free for users. Therefore, there is no need for installation.
Cons:
- If it takes longer to upload a file, you may have to re-submit it. Hence, it can be time-consuming.
- It does not support encrypted files.
Fixing the Orientation of Go-pro video by Ezgif
If you have no time to download different tools for rotating your Go-Pro videos, then the Internet has got a solution to your problem. There are various resources available on the web that facilitate the online rotation of your videos.
The Ezgif online video rotation is a handy tool. With it, you can flip your Go-pro video both horizontally and vertically. Not only that, but it also gives you the option of rotating your video at different angles. It supports various video formats like MP4, MOV, and many others.
You need to follow these simple steps to fix the orientation of your Go-Pro video.
- Upload your desired video file.
- You can also paste an URL.

- Select the rotation options and then click the Rotate video button.

Viola! Your new rotated video is there in no time.
- You will also see several options ranging from cropping the video to changing the speed of the video.

Pros:
- There would be no watermarks in the rotated version.
- The output of the created file is mostly similar to the pre-rotated video.
Cons:
- If you have poor internet connectivity, the conversion process may take a little longer than usual.
Conclusion
With the rising trend in the development of video editing tools, Go-pro Quik is not the only app for editing its videos. Whether you are a beginner or an intermediate, editing multimedia files has added spark to the creativity of the artists. You can add the desired rotation effects to yours.
Changing the rotation of your Go-Pro videos has been made easier due to the availability of user-friendly tools. These are available for all types of operating systems. Their interface is not complicated. Hence, it makes it easy for beginners to polish their video-editing skills.
By changing the orientation of your video, you can turn an ordinary video into a mesmerizing and cherishable lifelong memory. So be it an indoor or outdoor activity, enhance your video editing skills by playing with different orientations of your videos.
For macOS 10.14 or later
Here is the step-by-step guide for rotating your go-pro video.
Step 1: Drag and Drop
The interface of Filmora is user-friendly and convenient. The video rotation process starts with importing the video file and then adding the drag and drop feature to the timeline.


Step 2: Video Rotation
- In the timeline, double-click on the video clip.
- The video tab will appear with several options like transformation and lens correction.

Step 3: Exploring the Transform Tab
- Expand the Transform tab.
- You will see the options like rotation, flip, scale, and position.
- You can now rotate your Go-pro video by either rotating the slider or entering a specific value for the degree of rotation.

- You can also use the scale slider to adjust the image size.

Step 4:Exporting the rotated Go-pro Video
- After changing the orientation of your video, now is the time to export your project.
- Click on the Export tab.

The Export tab shows a list of options whether you want to export the rotated video directly to your computer or share it with your friends via social media.

Exploring the Rotation of Video through GoPro Quik
GoPro Quik provides an alternative for changing the direction of videos. It comes with built-in tools specifically meant to deal with GoPro videos. Irrespective of the quality of your videos or format, it can rotate GoPro videos with ease.
You can rotate GoPro Video with GoPro Quik by following these steps
- Download and install the software and launch it afterward.
- You can connect your GoPro device to your computer or choose a folder to add media.

- Upload the media folder into the GoPro Quik program.

- Go to the video you want to rotate and double click on it.

- A new window will open. Select the circle-shaped icon.

- The video is rotated at 90 degrees with each click.

- Apart from that, on the far right side is a three-dotted button. Click on it to enter Create Mode.

- Afterward, select Open.
- Click on the Save button to save all the editing.
Pros:
- User-friendly and convenient
- It connects to the GoPro camera easily.
- Background tracks can be imported to audio libraries.
- Supports importing of background tracks to music libraries.
Cons:
- It is slow when dealing with 4K and files.
Changing the orientation of a Go-pro video using a VLC player
The majority consider VLC as only a media player. But, it also performs the functions of a video editor. The software is user-friendly and supports every existing operating system, including Windows and Linux. The cherry on top is that it supports all audio and video formats. Unlike other tools, there is no need to download add-ons.
- After downloading the VLC media player, launch the software.

- Now, you need to import the video file you want to rotate. This is done by dragging the media file to the timeline or selecting a media source from the left.

- In the VLC menu, go to Tools and then select Effects and Filters.

Tip: You can use the shortcut CTRL+E for the same purpose.
- The effects and filter tab will open a dialogue box with different options. Select the Video Effects tab.

- The video effect tab has many sub-tabs. You need to select the Geometry tab.

- Select the Transform option. A drop-down menu will appear with different options for rotating your video at different angles.

- Tick the checkbox that says Rotate to flip your video at a certain angle. Then, move the angle dialer. This will rotate your video to the angle you have specified.

- Click on the save option to complete the rotation process.

Note: The rotation settings are saved. Thus, you need to uncheck the option if you don’t want to rotate your next video.
Permanent Rotation of Video
The above steps rotated the video for only playing once. If you want to make the orientation of the video permanently to be flipped, then follow these instructions after the above steps.
Go to Media and select Convert/Save on the menu bar or use the shortcut CTRL+R.

A pop-up window will appear. Click on the Add button. Your video will be added.
Afterward, select the option Convert/Save.

A pop-up window will appear in which you have to select the settings logo, located next to Profile

- A pop-up window will appear; click on the Video codec tab.
- Select the Filters tab and click on the Video transformation filter

In the Audio Codec tab, under the encoding parameters, select MP3 in the codec option.
Select the save option.

Note: Make sure to add the destination file in the convert dialogue box.

Click on the start button to begin the transformation.
Using the Online Converter
The Online Converter is a tool that assists you in rotating the direction of your GoPro. It is an online resource and does not require downloading and installing the cumbersome trouble. It is user-friendly and compatible with different video formats like MP4, MKV,3GP, and more.
Pros:
It is free for users. Therefore, there is no need for installation.
Cons:
- If it takes longer to upload a file, you may have to re-submit it. Hence, it can be time-consuming.
- It does not support encrypted files.
Fixing the Orientation of Go-pro video by Ezgif
If you have no time to download different tools for rotating your Go-Pro videos, then the Internet has got a solution to your problem. There are various resources available on the web that facilitate the online rotation of your videos.
The Ezgif online video rotation is a handy tool. With it, you can flip your Go-pro video both horizontally and vertically. Not only that, but it also gives you the option of rotating your video at different angles. It supports various video formats like MP4, MOV, and many others.
You need to follow these simple steps to fix the orientation of your Go-Pro video.
- Upload your desired video file.
- You can also paste an URL.

- Select the rotation options and then click the Rotate video button.

Viola! Your new rotated video is there in no time.
- You will also see several options ranging from cropping the video to changing the speed of the video.

Pros:
- There would be no watermarks in the rotated version.
- The output of the created file is mostly similar to the pre-rotated video.
Cons:
- If you have poor internet connectivity, the conversion process may take a little longer than usual.
Conclusion
With the rising trend in the development of video editing tools, Go-pro Quik is not the only app for editing its videos. Whether you are a beginner or an intermediate, editing multimedia files has added spark to the creativity of the artists. You can add the desired rotation effects to yours.
Changing the rotation of your Go-Pro videos has been made easier due to the availability of user-friendly tools. These are available for all types of operating systems. Their interface is not complicated. Hence, it makes it easy for beginners to polish their video-editing skills.
By changing the orientation of your video, you can turn an ordinary video into a mesmerizing and cherishable lifelong memory. So be it an indoor or outdoor activity, enhance your video editing skills by playing with different orientations of your videos.
Tactics to Make Transparent Image in Minimal Steps
Tactics to Make Transparent Image in Minimal Steps
An easy yet powerful editor
Numerous effects to choose from
Detailed tutorials provided by the official channel
We always want to have the images that give us the power to do customizations as needed. Until and unless an image with appropriate adjustments is not there, we cannot think of editing them as wanted. But how can we forget sometimes the images are already occupied that we cannot make the changes. This sometimes makes us feel annoyed too. But don’t worry about it as now different tools to make pictures transparent are available. After making the image transparent, you can add on the effects as needed.
If you are having confusion how to use these tools or anything else, then keep reading till the last. In this read, we are discussing some transparent image makers that will help you to do it seamlessly. Let’s get started!
In this article
01 [Similarities and Differences Between PNG Vs. JPG Vs. GIF](#Part 1)
02 [Minimal Steps to Make Background Transparent](#Part 2)
03 [How to Insert Transparent Image in Video](#Part 3)
Part 1 Similarities and Differences Between PNG Vs. JPG Vs. GIF
As we all know, there are so many formats in which these images are available. But sometimes it happens we are not aware of the similarities and differences corresponding to them. This confusion sometimes let us chooses the wrong format. But not anymore, and in this section, we are discussing the similarities and differences between PNG Vs. JPG Vs. GIF.
● PNG
PNG is a lossless compression format which means that it can be compressed without losing any data. It also supports transparency. The compression ratio is usually higher than JPG and GIF.
● JPG
JPG is a lossy compression format which means that it can be compressed without losing any data, but the image quality will suffer because of the loss of information. It supports transparency but is not as good as PNG.
● GIF
GIF is a lossless or lossy compression format which means that it can be compressed without losing any data or quality respectively. It does not support transparency and has a limited color range compared to PNG or JPG.
Part 2 Minimal Steps to Make Background Transparent
In this section, we are discussing the steps that you need to follow with transparent image-makers. Here we discuss some of the best tools available so that you can feel a bit confident in utilizing them for editing. This list includes:-
● Canva
Canva is a graphic design tool that helps users creates professional-quality designs. It has easy to use templates and fonts that are free to use. Users can also customize their own templates and fonts, add images and videos, make collages, infographics, and other designs.
Steps to Make in Canva
Step 1: Get “Canva” available on your system and open it.

Step 2: Mode to “Edit Image” and “upload the image” in which you wish to make the background transparent.

Step 3: Choose the “Effect tab” and select the “background remover” option.


Step 4: If you wish to add on any other effect, do it.
Step 5: Click on the “Download icon” and save it for future use.
● Photoshop
Photoshop can be used to edit video footage and create special effects. You can cut video clips together and shape them into a movie sequence by adding transitions and overlays to visualize the actions between shots. You can also use it to add graphics or other visual elements, like animations or even text. But don’t forget this tool also gives you the option to make the backgrounds transparent.
Steps to Make in Photoshop
Step 1: Get Photoshop o your system and import the image you wish to edit.
Step 2: Press Ctrl+J in order to create duplicate layers. (This is important in order to keep an eye on the section you are doing for making the editing.)

Step 3: Move to “Windows” and click on “Properties”

Step 4: From the list of options, hit on “Remove Background”

Step 5: Click on the “Eye icon” to view the transparent image.

Step 6: Save the image for future use.
● Picsart
Picsart is a robust photo editing app which has features such as filters, stickers, and overlays. It also has the ability to create collages and videos. The app also has a feature called “edit & share” which allows the user to edit the photo right in the app, then share it with their friends on social media. Picsart doesn’t require any special knowledge or expertise in photography; so anyone can pick up the basics of using it in no time.
Steps to use Picsart
Step 1: Get the Picsart app in your device or visit the online portal.
Step 2: Upload the image you wish to edit.

Step 3: Click on “Start Editing” button and then choose either of the option from “Behind Person” or “Behind Object” as per your situation.


Step 4: The tool will automatically remove the background and make it transparent. Download the image now.

Part 3 How to Insert Transparent Image in Video
After creating outstanding video content, there is a possibility that you might be looking forward to integrating any transparent image into it. Well, in this case, it is important that you have access to the best tool. Until and unless the best software or tool is not here, you cannot think of getting the task done. Don’t worry because for catering to this need, Filmora is one of the best options to choose.
Wondershare Filmora Video Editor is all-in-one video editing software to help people edit their videos and make them look professional. The best thing about this software is that it doesn’t require any expertise or knowledge of video editing before using it. The user can create a video from scratch just by importing the photos and videos from their camera roll, which are automatically combined into a single video with transitions and music in just a few steps.
For Win 7 or later (64-bit)
For macOS 10.12 or later
Also, this software is both intuitive and easy to use. It also provides many features that you can customize depending on what outcome you want. In addition, this tool also includes tutorials and support services via phone, email or chat line, so all your questions are answered quickly and efficiently.
Furthermore, this allows you to make your videos better by inserting transparent images or graphics in them. You can achieve amazing effects and superimpose without having to spend hours editing your video. With Filmora, it’s simple to create professional-quality videos without using any other software and spending too much time on the editing process.
● Steps to use Filmora
Step 1: After browsing all these features, you might be curious to try out the features integrated into it. The steps you need to follow are:-
Step 2: Get Filmora available on your system. It is compatible with Windows and Mac both.
Step 3: Open Filmora and select “Import-Import Media Files”.

Step 4: Add the imported images. You can do this by doing the right-click and selecting the insert image option. Alternatively you can do it u drag and drop option too.

Step 5: The inserted images will appear in the timeline, and double click on them. The settings menu appear to select the “Chroma key” and enable it.

Step 6: The image will get transparent in no time. If you wish to add on any extra colour or effect to the image, choose it from the editing menu available. The “Color Picker” option is also there that will be helpful in adding the colors.
Step 7: Click on “Ok” to make the changes saved.

Step 7: After getting the expected transparent image, you can simply overlay it into the video.

● Ending Thoughts →
● Transparent images give you the chance to make the editing as required. This simply means there will be no need for you to occupy the image with unnecessary stuff because after making the image transparent only the required content will have a pace on it.
● Filmora is the best tool to insert transparent images in the video. This tool have innovative interface and let users have the best options to make the editing in the video they are creating. Along with making the background transparent, this tool has other editing features too.
● Making transparent images is just a matter of a few steps. One just needs to be sure of the right tools. If they are not having the right tool gett9ing the expected outcome will not be their thing.
We always want to have the images that give us the power to do customizations as needed. Until and unless an image with appropriate adjustments is not there, we cannot think of editing them as wanted. But how can we forget sometimes the images are already occupied that we cannot make the changes. This sometimes makes us feel annoyed too. But don’t worry about it as now different tools to make pictures transparent are available. After making the image transparent, you can add on the effects as needed.
If you are having confusion how to use these tools or anything else, then keep reading till the last. In this read, we are discussing some transparent image makers that will help you to do it seamlessly. Let’s get started!
In this article
01 [Similarities and Differences Between PNG Vs. JPG Vs. GIF](#Part 1)
02 [Minimal Steps to Make Background Transparent](#Part 2)
03 [How to Insert Transparent Image in Video](#Part 3)
Part 1 Similarities and Differences Between PNG Vs. JPG Vs. GIF
As we all know, there are so many formats in which these images are available. But sometimes it happens we are not aware of the similarities and differences corresponding to them. This confusion sometimes let us chooses the wrong format. But not anymore, and in this section, we are discussing the similarities and differences between PNG Vs. JPG Vs. GIF.
● PNG
PNG is a lossless compression format which means that it can be compressed without losing any data. It also supports transparency. The compression ratio is usually higher than JPG and GIF.
● JPG
JPG is a lossy compression format which means that it can be compressed without losing any data, but the image quality will suffer because of the loss of information. It supports transparency but is not as good as PNG.
● GIF
GIF is a lossless or lossy compression format which means that it can be compressed without losing any data or quality respectively. It does not support transparency and has a limited color range compared to PNG or JPG.
Part 2 Minimal Steps to Make Background Transparent
In this section, we are discussing the steps that you need to follow with transparent image-makers. Here we discuss some of the best tools available so that you can feel a bit confident in utilizing them for editing. This list includes:-
● Canva
Canva is a graphic design tool that helps users creates professional-quality designs. It has easy to use templates and fonts that are free to use. Users can also customize their own templates and fonts, add images and videos, make collages, infographics, and other designs.
Steps to Make in Canva
Step 1: Get “Canva” available on your system and open it.

Step 2: Mode to “Edit Image” and “upload the image” in which you wish to make the background transparent.

Step 3: Choose the “Effect tab” and select the “background remover” option.


Step 4: If you wish to add on any other effect, do it.
Step 5: Click on the “Download icon” and save it for future use.
● Photoshop
Photoshop can be used to edit video footage and create special effects. You can cut video clips together and shape them into a movie sequence by adding transitions and overlays to visualize the actions between shots. You can also use it to add graphics or other visual elements, like animations or even text. But don’t forget this tool also gives you the option to make the backgrounds transparent.
Steps to Make in Photoshop
Step 1: Get Photoshop o your system and import the image you wish to edit.
Step 2: Press Ctrl+J in order to create duplicate layers. (This is important in order to keep an eye on the section you are doing for making the editing.)

Step 3: Move to “Windows” and click on “Properties”

Step 4: From the list of options, hit on “Remove Background”

Step 5: Click on the “Eye icon” to view the transparent image.

Step 6: Save the image for future use.
● Picsart
Picsart is a robust photo editing app which has features such as filters, stickers, and overlays. It also has the ability to create collages and videos. The app also has a feature called “edit & share” which allows the user to edit the photo right in the app, then share it with their friends on social media. Picsart doesn’t require any special knowledge or expertise in photography; so anyone can pick up the basics of using it in no time.
Steps to use Picsart
Step 1: Get the Picsart app in your device or visit the online portal.
Step 2: Upload the image you wish to edit.

Step 3: Click on “Start Editing” button and then choose either of the option from “Behind Person” or “Behind Object” as per your situation.


Step 4: The tool will automatically remove the background and make it transparent. Download the image now.

Part 3 How to Insert Transparent Image in Video
After creating outstanding video content, there is a possibility that you might be looking forward to integrating any transparent image into it. Well, in this case, it is important that you have access to the best tool. Until and unless the best software or tool is not here, you cannot think of getting the task done. Don’t worry because for catering to this need, Filmora is one of the best options to choose.
Wondershare Filmora Video Editor is all-in-one video editing software to help people edit their videos and make them look professional. The best thing about this software is that it doesn’t require any expertise or knowledge of video editing before using it. The user can create a video from scratch just by importing the photos and videos from their camera roll, which are automatically combined into a single video with transitions and music in just a few steps.
For Win 7 or later (64-bit)
For macOS 10.12 or later
Also, this software is both intuitive and easy to use. It also provides many features that you can customize depending on what outcome you want. In addition, this tool also includes tutorials and support services via phone, email or chat line, so all your questions are answered quickly and efficiently.
Furthermore, this allows you to make your videos better by inserting transparent images or graphics in them. You can achieve amazing effects and superimpose without having to spend hours editing your video. With Filmora, it’s simple to create professional-quality videos without using any other software and spending too much time on the editing process.
● Steps to use Filmora
Step 1: After browsing all these features, you might be curious to try out the features integrated into it. The steps you need to follow are:-
Step 2: Get Filmora available on your system. It is compatible with Windows and Mac both.
Step 3: Open Filmora and select “Import-Import Media Files”.

Step 4: Add the imported images. You can do this by doing the right-click and selecting the insert image option. Alternatively you can do it u drag and drop option too.

Step 5: The inserted images will appear in the timeline, and double click on them. The settings menu appear to select the “Chroma key” and enable it.

Step 6: The image will get transparent in no time. If you wish to add on any extra colour or effect to the image, choose it from the editing menu available. The “Color Picker” option is also there that will be helpful in adding the colors.
Step 7: Click on “Ok” to make the changes saved.

Step 7: After getting the expected transparent image, you can simply overlay it into the video.

● Ending Thoughts →
● Transparent images give you the chance to make the editing as required. This simply means there will be no need for you to occupy the image with unnecessary stuff because after making the image transparent only the required content will have a pace on it.
● Filmora is the best tool to insert transparent images in the video. This tool have innovative interface and let users have the best options to make the editing in the video they are creating. Along with making the background transparent, this tool has other editing features too.
● Making transparent images is just a matter of a few steps. One just needs to be sure of the right tools. If they are not having the right tool gett9ing the expected outcome will not be their thing.
We always want to have the images that give us the power to do customizations as needed. Until and unless an image with appropriate adjustments is not there, we cannot think of editing them as wanted. But how can we forget sometimes the images are already occupied that we cannot make the changes. This sometimes makes us feel annoyed too. But don’t worry about it as now different tools to make pictures transparent are available. After making the image transparent, you can add on the effects as needed.
If you are having confusion how to use these tools or anything else, then keep reading till the last. In this read, we are discussing some transparent image makers that will help you to do it seamlessly. Let’s get started!
In this article
01 [Similarities and Differences Between PNG Vs. JPG Vs. GIF](#Part 1)
02 [Minimal Steps to Make Background Transparent](#Part 2)
03 [How to Insert Transparent Image in Video](#Part 3)
Part 1 Similarities and Differences Between PNG Vs. JPG Vs. GIF
As we all know, there are so many formats in which these images are available. But sometimes it happens we are not aware of the similarities and differences corresponding to them. This confusion sometimes let us chooses the wrong format. But not anymore, and in this section, we are discussing the similarities and differences between PNG Vs. JPG Vs. GIF.
● PNG
PNG is a lossless compression format which means that it can be compressed without losing any data. It also supports transparency. The compression ratio is usually higher than JPG and GIF.
● JPG
JPG is a lossy compression format which means that it can be compressed without losing any data, but the image quality will suffer because of the loss of information. It supports transparency but is not as good as PNG.
● GIF
GIF is a lossless or lossy compression format which means that it can be compressed without losing any data or quality respectively. It does not support transparency and has a limited color range compared to PNG or JPG.
Part 2 Minimal Steps to Make Background Transparent
In this section, we are discussing the steps that you need to follow with transparent image-makers. Here we discuss some of the best tools available so that you can feel a bit confident in utilizing them for editing. This list includes:-
● Canva
Canva is a graphic design tool that helps users creates professional-quality designs. It has easy to use templates and fonts that are free to use. Users can also customize their own templates and fonts, add images and videos, make collages, infographics, and other designs.
Steps to Make in Canva
Step 1: Get “Canva” available on your system and open it.

Step 2: Mode to “Edit Image” and “upload the image” in which you wish to make the background transparent.

Step 3: Choose the “Effect tab” and select the “background remover” option.


Step 4: If you wish to add on any other effect, do it.
Step 5: Click on the “Download icon” and save it for future use.
● Photoshop
Photoshop can be used to edit video footage and create special effects. You can cut video clips together and shape them into a movie sequence by adding transitions and overlays to visualize the actions between shots. You can also use it to add graphics or other visual elements, like animations or even text. But don’t forget this tool also gives you the option to make the backgrounds transparent.
Steps to Make in Photoshop
Step 1: Get Photoshop o your system and import the image you wish to edit.
Step 2: Press Ctrl+J in order to create duplicate layers. (This is important in order to keep an eye on the section you are doing for making the editing.)

Step 3: Move to “Windows” and click on “Properties”

Step 4: From the list of options, hit on “Remove Background”

Step 5: Click on the “Eye icon” to view the transparent image.

Step 6: Save the image for future use.
● Picsart
Picsart is a robust photo editing app which has features such as filters, stickers, and overlays. It also has the ability to create collages and videos. The app also has a feature called “edit & share” which allows the user to edit the photo right in the app, then share it with their friends on social media. Picsart doesn’t require any special knowledge or expertise in photography; so anyone can pick up the basics of using it in no time.
Steps to use Picsart
Step 1: Get the Picsart app in your device or visit the online portal.
Step 2: Upload the image you wish to edit.

Step 3: Click on “Start Editing” button and then choose either of the option from “Behind Person” or “Behind Object” as per your situation.


Step 4: The tool will automatically remove the background and make it transparent. Download the image now.

Part 3 How to Insert Transparent Image in Video
After creating outstanding video content, there is a possibility that you might be looking forward to integrating any transparent image into it. Well, in this case, it is important that you have access to the best tool. Until and unless the best software or tool is not here, you cannot think of getting the task done. Don’t worry because for catering to this need, Filmora is one of the best options to choose.
Wondershare Filmora Video Editor is all-in-one video editing software to help people edit their videos and make them look professional. The best thing about this software is that it doesn’t require any expertise or knowledge of video editing before using it. The user can create a video from scratch just by importing the photos and videos from their camera roll, which are automatically combined into a single video with transitions and music in just a few steps.
For Win 7 or later (64-bit)
For macOS 10.12 or later
Also, this software is both intuitive and easy to use. It also provides many features that you can customize depending on what outcome you want. In addition, this tool also includes tutorials and support services via phone, email or chat line, so all your questions are answered quickly and efficiently.
Furthermore, this allows you to make your videos better by inserting transparent images or graphics in them. You can achieve amazing effects and superimpose without having to spend hours editing your video. With Filmora, it’s simple to create professional-quality videos without using any other software and spending too much time on the editing process.
● Steps to use Filmora
Step 1: After browsing all these features, you might be curious to try out the features integrated into it. The steps you need to follow are:-
Step 2: Get Filmora available on your system. It is compatible with Windows and Mac both.
Step 3: Open Filmora and select “Import-Import Media Files”.

Step 4: Add the imported images. You can do this by doing the right-click and selecting the insert image option. Alternatively you can do it u drag and drop option too.

Step 5: The inserted images will appear in the timeline, and double click on them. The settings menu appear to select the “Chroma key” and enable it.

Step 6: The image will get transparent in no time. If you wish to add on any extra colour or effect to the image, choose it from the editing menu available. The “Color Picker” option is also there that will be helpful in adding the colors.
Step 7: Click on “Ok” to make the changes saved.

Step 7: After getting the expected transparent image, you can simply overlay it into the video.

● Ending Thoughts →
● Transparent images give you the chance to make the editing as required. This simply means there will be no need for you to occupy the image with unnecessary stuff because after making the image transparent only the required content will have a pace on it.
● Filmora is the best tool to insert transparent images in the video. This tool have innovative interface and let users have the best options to make the editing in the video they are creating. Along with making the background transparent, this tool has other editing features too.
● Making transparent images is just a matter of a few steps. One just needs to be sure of the right tools. If they are not having the right tool gett9ing the expected outcome will not be their thing.
We always want to have the images that give us the power to do customizations as needed. Until and unless an image with appropriate adjustments is not there, we cannot think of editing them as wanted. But how can we forget sometimes the images are already occupied that we cannot make the changes. This sometimes makes us feel annoyed too. But don’t worry about it as now different tools to make pictures transparent are available. After making the image transparent, you can add on the effects as needed.
If you are having confusion how to use these tools or anything else, then keep reading till the last. In this read, we are discussing some transparent image makers that will help you to do it seamlessly. Let’s get started!
In this article
01 [Similarities and Differences Between PNG Vs. JPG Vs. GIF](#Part 1)
02 [Minimal Steps to Make Background Transparent](#Part 2)
03 [How to Insert Transparent Image in Video](#Part 3)
Part 1 Similarities and Differences Between PNG Vs. JPG Vs. GIF
As we all know, there are so many formats in which these images are available. But sometimes it happens we are not aware of the similarities and differences corresponding to them. This confusion sometimes let us chooses the wrong format. But not anymore, and in this section, we are discussing the similarities and differences between PNG Vs. JPG Vs. GIF.
● PNG
PNG is a lossless compression format which means that it can be compressed without losing any data. It also supports transparency. The compression ratio is usually higher than JPG and GIF.
● JPG
JPG is a lossy compression format which means that it can be compressed without losing any data, but the image quality will suffer because of the loss of information. It supports transparency but is not as good as PNG.
● GIF
GIF is a lossless or lossy compression format which means that it can be compressed without losing any data or quality respectively. It does not support transparency and has a limited color range compared to PNG or JPG.
Part 2 Minimal Steps to Make Background Transparent
In this section, we are discussing the steps that you need to follow with transparent image-makers. Here we discuss some of the best tools available so that you can feel a bit confident in utilizing them for editing. This list includes:-
● Canva
Canva is a graphic design tool that helps users creates professional-quality designs. It has easy to use templates and fonts that are free to use. Users can also customize their own templates and fonts, add images and videos, make collages, infographics, and other designs.
Steps to Make in Canva
Step 1: Get “Canva” available on your system and open it.

Step 2: Mode to “Edit Image” and “upload the image” in which you wish to make the background transparent.

Step 3: Choose the “Effect tab” and select the “background remover” option.


Step 4: If you wish to add on any other effect, do it.
Step 5: Click on the “Download icon” and save it for future use.
● Photoshop
Photoshop can be used to edit video footage and create special effects. You can cut video clips together and shape them into a movie sequence by adding transitions and overlays to visualize the actions between shots. You can also use it to add graphics or other visual elements, like animations or even text. But don’t forget this tool also gives you the option to make the backgrounds transparent.
Steps to Make in Photoshop
Step 1: Get Photoshop o your system and import the image you wish to edit.
Step 2: Press Ctrl+J in order to create duplicate layers. (This is important in order to keep an eye on the section you are doing for making the editing.)

Step 3: Move to “Windows” and click on “Properties”

Step 4: From the list of options, hit on “Remove Background”

Step 5: Click on the “Eye icon” to view the transparent image.

Step 6: Save the image for future use.
● Picsart
Picsart is a robust photo editing app which has features such as filters, stickers, and overlays. It also has the ability to create collages and videos. The app also has a feature called “edit & share” which allows the user to edit the photo right in the app, then share it with their friends on social media. Picsart doesn’t require any special knowledge or expertise in photography; so anyone can pick up the basics of using it in no time.
Steps to use Picsart
Step 1: Get the Picsart app in your device or visit the online portal.
Step 2: Upload the image you wish to edit.

Step 3: Click on “Start Editing” button and then choose either of the option from “Behind Person” or “Behind Object” as per your situation.


Step 4: The tool will automatically remove the background and make it transparent. Download the image now.

Part 3 How to Insert Transparent Image in Video
After creating outstanding video content, there is a possibility that you might be looking forward to integrating any transparent image into it. Well, in this case, it is important that you have access to the best tool. Until and unless the best software or tool is not here, you cannot think of getting the task done. Don’t worry because for catering to this need, Filmora is one of the best options to choose.
Wondershare Filmora Video Editor is all-in-one video editing software to help people edit their videos and make them look professional. The best thing about this software is that it doesn’t require any expertise or knowledge of video editing before using it. The user can create a video from scratch just by importing the photos and videos from their camera roll, which are automatically combined into a single video with transitions and music in just a few steps.
For Win 7 or later (64-bit)
For macOS 10.12 or later
Also, this software is both intuitive and easy to use. It also provides many features that you can customize depending on what outcome you want. In addition, this tool also includes tutorials and support services via phone, email or chat line, so all your questions are answered quickly and efficiently.
Furthermore, this allows you to make your videos better by inserting transparent images or graphics in them. You can achieve amazing effects and superimpose without having to spend hours editing your video. With Filmora, it’s simple to create professional-quality videos without using any other software and spending too much time on the editing process.
● Steps to use Filmora
Step 1: After browsing all these features, you might be curious to try out the features integrated into it. The steps you need to follow are:-
Step 2: Get Filmora available on your system. It is compatible with Windows and Mac both.
Step 3: Open Filmora and select “Import-Import Media Files”.

Step 4: Add the imported images. You can do this by doing the right-click and selecting the insert image option. Alternatively you can do it u drag and drop option too.

Step 5: The inserted images will appear in the timeline, and double click on them. The settings menu appear to select the “Chroma key” and enable it.

Step 6: The image will get transparent in no time. If you wish to add on any extra colour or effect to the image, choose it from the editing menu available. The “Color Picker” option is also there that will be helpful in adding the colors.
Step 7: Click on “Ok” to make the changes saved.

Step 7: After getting the expected transparent image, you can simply overlay it into the video.

● Ending Thoughts →
● Transparent images give you the chance to make the editing as required. This simply means there will be no need for you to occupy the image with unnecessary stuff because after making the image transparent only the required content will have a pace on it.
● Filmora is the best tool to insert transparent images in the video. This tool have innovative interface and let users have the best options to make the editing in the video they are creating. Along with making the background transparent, this tool has other editing features too.
● Making transparent images is just a matter of a few steps. One just needs to be sure of the right tools. If they are not having the right tool gett9ing the expected outcome will not be their thing.
Hitfilm Express - A Guide to Download, Install, Key Features
If you are involved in video editing, you better know the importance of using hitfilm express download. This video editing tool helps the users to perform video editing efficiently. Along with basic features, the program also provides advanced-level functionality that makes edited videos phenomenal. Every casual video editor gets attracted to the hitfilm express download for its extraordinary features. Anyone can download the video editing software from an online platform named FXHome.
The free software is so impressive that it can give tough competition to paid video editing platforms like Studio, Adobe Premiere Pro, and After Effects. For both novice and seasoned youtubers, this platform provides some amusing features like 400+ visual effects, compositing tools presets, and cinematic features to unveil their creativity at its best.
1. How to download and install Hitfilm Express?
People increasingly depend on this software since it is free to download. Available for both Mac and Windows, this software works as exceptional community support. The software comes with documentation and tutorials so that new users don’t face any difficulty getting used to the platform. You can download hitfilm express editing software from any third-party platform, but it is advisable to download the video editor from the official website directly. You only have to ensure that your internet connection is speedy enough for activation.
Here is the step-by-step process for the online installation of HitFilm Express.

- First, go to the official website of HItFilm Express and click the download button.
- You have to fill in the details directly on the registration page. You will get the download URL in your mail address by doing this. Check your inbox to download the installer.
- Now, allow the installation file to run and then follow the steps.
- Once the installation is completed, it’s time to activate the software. A dialog box will appear on opening the program with options like login and activation. Click the “Get Free License” to land on the website.
- After getting into the website, log in to your previously created FXhome account. When you have finally logged in to your account, search the serial code.
- Revert the software and hit the Activate and Unlock button to enter the serial code and opt for software activation. It is how your entire installation process will be completed.
2. Key Features of Hitfilm Express
If you want to take your video editing to the next level like a professional, hitfilm express editing software is your one-stop solution. Here is a wide array of features that provides amateurs to professionals a seamless experience.
**Professional project quality: The UHD support and RAM preview of HitFilm Express provide the users the supreme quality formats. Whatever footage you collect from documentaries captured by high-end cameras or smartphones, HItFilm will manage everything.
**Commentator recorder: Once you click the button, you will easily adjoin voiceover to the uploaded videos without leaving the HitFilm. The HitFilm Express is designed so that your recording will promptly add to a soundtrack so that you can do the finishing touches with the audio effects.
**Integrated timelines: Keep switching from one tab to another, same as you do on the browser, as per your needs. You can edit in one tab, make a composition in the other, and then get back to the editor without the necessity of loading other software.
**Customized playback: You can personalize playback. It will help you get exposed to non-stop playback in the trimmer, thus preventing lagging and making edits easier. It allows you to control the playback quality and make hasty edits.
**Smart search: With the help of HitFilm Express, you can locate your desired keyword quickly. It will also help you find properties for all the effects, media, and timelines. In case you come from a different software system, the algorithm of hitfilm express editor identifies the keyword links and assists you in finding your search.
**Numerous streams: To allow the gamers to have a rejoicing experience, HitFilm allows importing files with multiple audio streams and provides you with complete flexibility over workflow.
**Adjustable trimmer: With HitFilm Express, you can re-trim clips even after adding to the timeline. The moment you double-click the clip, it will automatically get sent to the trimmer panel to allow you to make necessary adjustments. Once you have completed the changes, the clip will be again updated.
**Cinematic outlook: You can prepare your film with the classic cine-effects of HItFilm Express. Choose your most preferred effects like Day For Night, Three-Strip Color, Film Grain, and other styles to give a cinematic edge.
3. How to edit videos with Hitfilm Express?
Editing is cutting and accumulating the selected clips to tell the story better. Editing consists of adding sound effects, transitions, and other visual elements to help it view excellent results.

You have to set up the editor timeline and start importing clips to edit your clips. Use the editor tools like roll, slip, drag, selection, ripple, and others to customize your edit.

- Choose the Set in point button from the point where you want to start the clip. In the timeline, you will notice an orange section representing the part of the clip you want to play.
- Now, skip through, and decide where you want to end the clip. You have to click the Set-out button. You can alternatively use the I and 0 keys as shortcuts.
- Once you get your selected start and endpoint, you can drag down the portion of the video into the timeline. This time, you can get a message that shows the editor settings are different from the adding clip. It is your choice how you want to keep your settings.
- If you find the selected set of a good standard, you can move forward and select “Yes” to ensure that your project gets changed into that setting.
- In the viewer section, you will get to view the final outlook of the video. Here, on the downside of the timeline, you can click on the Zoom bar to see things in detail. Your previews will depend on the selected settings that you have made beforehand.
- If you want to change your default setting, you can come to the hamburger icon for tracking and changing the size of the video to different ones.
- Add a clip to the timeline: Position the play head at the timeline point where you want to start the clip, and then hit the insert clip button.

4. Hitfilm Express Alternative to Edit Videos
Anyone who finds video editing fun filling can try out Filmora . It is an ideal alternative to hitfilm express editing tutorial. Whether you shoot in an entry-level camera or a high-end video camera, Filmora will help you create and edit the most suitable videos. During the video editing procedure, you can experience multiple challenges that help you stay patient and work slowly to come out with the project.

It is the best video editing platform for beginners since it can provide comprehensive support for creating different video formats. The user-friendly interface and powerful editing features make the video editor one of the most used video editing software.
For Win 7 or later (64-bit)
For macOS 10.12 or later
Step-by-step guide for editing videos with Filmora
Step 1: Double click on the Filmora’s icon to start working on your project. Either open the new project or click on the aspect ratio for time-saving editing.
Step 2: Select the “project setting” option to customize the aspect ratio as per your need. Next, you will go to the import media files to choose the import with the instant cutter tool and opt for easy trimming of videos.
You can also use a lens correction tool to improve the quality of videos.
Step 3: Create a new folder and organize the clips alphabetically to increase efficiency.
Step 4: Drag and drop the trimmed videos on the timeline and rearrange them to remove the unnecessary parts. Press the play button to get previews of your added video clips.
Step 5: Now, it’s time to add audio and visual effects to your trimmed footage. You can also add opening titles and subtitles and use text templates to work on the video transition.
Step 6: With the help of a color correction tool, you can make the videos look vivid. It takes enough time and dedication to master color correction for your videos.
Step 7: When you are 100% sure about the final outlook of the project, you have to export the videos on YouTube for fast uploading on social media networks. Otherwise, you can opt for saving the video on the hard drives.
5. FAQs about Hitfilm Express
1.Is Hitfilm Express still free?
Ans: HitFilm Express is still free with alternative paid add-ons. The free video editing software helps make excellent films and video games with the professional-grade VFX. From students, beginners, and gamers to you Tubers – anyone can work on their creativity without spending a penny.
2.Is Hitfilm Express safe to download?
Ans: With more than 5 million active users across 160 countries, HitFilm Express is safe and legit software to download. If you are susceptible to using this platform, it is an excellent option to experience some remarkable features and learn A to Z of video editing.
3.Is Hitfilm Express still worth it?
Ans: IF anyone opts for the paid version, it will be expensive. However, the video editing software has beginner-friendly features like different AI tools for guided editing, 4K support, and others that hardly make any sense compared with other free software.
Looking at its professional features and high-quality editing, it is the most powerful video editing platform.
Conclusion
In a nutshell, HItFilm is an entirely free version of video editing software. Beginners can quickly learn it since the editing features can be easily grasped. To create amateur videos for professional ones, HitFilm Express is your one-stop solution. The customizable effects and compositing layers provide your videos with an excellent cinematic look. Everything you will get without spending any money.
Therefore, if you want to learn the A to Z of video editing for absolutely free, you can blindly rely on the hitfilm express editor.
2. Key Features of Hitfilm Express
If you want to take your video editing to the next level like a professional, hitfilm express editing software is your one-stop solution. Here is a wide array of features that provides amateurs to professionals a seamless experience.
**Professional project quality: The UHD support and RAM preview of HitFilm Express provide the users the supreme quality formats. Whatever footage you collect from documentaries captured by high-end cameras or smartphones, HItFilm will manage everything.
**Commentator recorder: Once you click the button, you will easily adjoin voiceover to the uploaded videos without leaving the HitFilm. The HitFilm Express is designed so that your recording will promptly add to a soundtrack so that you can do the finishing touches with the audio effects.
**Integrated timelines: Keep switching from one tab to another, same as you do on the browser, as per your needs. You can edit in one tab, make a composition in the other, and then get back to the editor without the necessity of loading other software.
**Customized playback: You can personalize playback. It will help you get exposed to non-stop playback in the trimmer, thus preventing lagging and making edits easier. It allows you to control the playback quality and make hasty edits.
**Smart search: With the help of HitFilm Express, you can locate your desired keyword quickly. It will also help you find properties for all the effects, media, and timelines. In case you come from a different software system, the algorithm of hitfilm express editor identifies the keyword links and assists you in finding your search.
**Numerous streams: To allow the gamers to have a rejoicing experience, HitFilm allows importing files with multiple audio streams and provides you with complete flexibility over workflow.
**Adjustable trimmer: With HitFilm Express, you can re-trim clips even after adding to the timeline. The moment you double-click the clip, it will automatically get sent to the trimmer panel to allow you to make necessary adjustments. Once you have completed the changes, the clip will be again updated.
**Cinematic outlook: You can prepare your film with the classic cine-effects of HItFilm Express. Choose your most preferred effects like Day For Night, Three-Strip Color, Film Grain, and other styles to give a cinematic edge.
3. How to edit videos with Hitfilm Express?
Editing is cutting and accumulating the selected clips to tell the story better. Editing consists of adding sound effects, transitions, and other visual elements to help it view excellent results.

You have to set up the editor timeline and start importing clips to edit your clips. Use the editor tools like roll, slip, drag, selection, ripple, and others to customize your edit.

- Choose the Set in point button from the point where you want to start the clip. In the timeline, you will notice an orange section representing the part of the clip you want to play.
- Now, skip through, and decide where you want to end the clip. You have to click the Set-out button. You can alternatively use the I and 0 keys as shortcuts.
- Once you get your selected start and endpoint, you can drag down the portion of the video into the timeline. This time, you can get a message that shows the editor settings are different from the adding clip. It is your choice how you want to keep your settings.
- If you find the selected set of a good standard, you can move forward and select “Yes” to ensure that your project gets changed into that setting.
- In the viewer section, you will get to view the final outlook of the video. Here, on the downside of the timeline, you can click on the Zoom bar to see things in detail. Your previews will depend on the selected settings that you have made beforehand.
- If you want to change your default setting, you can come to the hamburger icon for tracking and changing the size of the video to different ones.
- Add a clip to the timeline: Position the play head at the timeline point where you want to start the clip, and then hit the insert clip button.

4. Hitfilm Express Alternative to Edit Videos
Anyone who finds video editing fun filling can try out Filmora . It is an ideal alternative to hitfilm express editing tutorial. Whether you shoot in an entry-level camera or a high-end video camera, Filmora will help you create and edit the most suitable videos. During the video editing procedure, you can experience multiple challenges that help you stay patient and work slowly to come out with the project.

It is the best video editing platform for beginners since it can provide comprehensive support for creating different video formats. The user-friendly interface and powerful editing features make the video editor one of the most used video editing software.
For Win 7 or later (64-bit)
For macOS 10.12 or later
Step-by-step guide for editing videos with Filmora
Step 1: Double click on the Filmora’s icon to start working on your project. Either open the new project or click on the aspect ratio for time-saving editing.
Step 2: Select the “project setting” option to customize the aspect ratio as per your need. Next, you will go to the import media files to choose the import with the instant cutter tool and opt for easy trimming of videos.
You can also use a lens correction tool to improve the quality of videos.
Step 3: Create a new folder and organize the clips alphabetically to increase efficiency.
Step 4: Drag and drop the trimmed videos on the timeline and rearrange them to remove the unnecessary parts. Press the play button to get previews of your added video clips.
Step 5: Now, it’s time to add audio and visual effects to your trimmed footage. You can also add opening titles and subtitles and use text templates to work on the video transition.
Step 6: With the help of a color correction tool, you can make the videos look vivid. It takes enough time and dedication to master color correction for your videos.
Step 7: When you are 100% sure about the final outlook of the project, you have to export the videos on YouTube for fast uploading on social media networks. Otherwise, you can opt for saving the video on the hard drives.
5. FAQs about Hitfilm Express
1.Is Hitfilm Express still free?
Ans: HitFilm Express is still free with alternative paid add-ons. The free video editing software helps make excellent films and video games with the professional-grade VFX. From students, beginners, and gamers to you Tubers – anyone can work on their creativity without spending a penny.
2.Is Hitfilm Express safe to download?
Ans: With more than 5 million active users across 160 countries, HitFilm Express is safe and legit software to download. If you are susceptible to using this platform, it is an excellent option to experience some remarkable features and learn A to Z of video editing.
3.Is Hitfilm Express still worth it?
Ans: IF anyone opts for the paid version, it will be expensive. However, the video editing software has beginner-friendly features like different AI tools for guided editing, 4K support, and others that hardly make any sense compared with other free software.
Looking at its professional features and high-quality editing, it is the most powerful video editing platform.
Conclusion
In a nutshell, HItFilm is an entirely free version of video editing software. Beginners can quickly learn it since the editing features can be easily grasped. To create amateur videos for professional ones, HitFilm Express is your one-stop solution. The customizable effects and compositing layers provide your videos with an excellent cinematic look. Everything you will get without spending any money.
Therefore, if you want to learn the A to Z of video editing for absolutely free, you can blindly rely on the hitfilm express editor.
2. Key Features of Hitfilm Express
If you want to take your video editing to the next level like a professional, hitfilm express editing software is your one-stop solution. Here is a wide array of features that provides amateurs to professionals a seamless experience.
**Professional project quality: The UHD support and RAM preview of HitFilm Express provide the users the supreme quality formats. Whatever footage you collect from documentaries captured by high-end cameras or smartphones, HItFilm will manage everything.
**Commentator recorder: Once you click the button, you will easily adjoin voiceover to the uploaded videos without leaving the HitFilm. The HitFilm Express is designed so that your recording will promptly add to a soundtrack so that you can do the finishing touches with the audio effects.
**Integrated timelines: Keep switching from one tab to another, same as you do on the browser, as per your needs. You can edit in one tab, make a composition in the other, and then get back to the editor without the necessity of loading other software.
**Customized playback: You can personalize playback. It will help you get exposed to non-stop playback in the trimmer, thus preventing lagging and making edits easier. It allows you to control the playback quality and make hasty edits.
**Smart search: With the help of HitFilm Express, you can locate your desired keyword quickly. It will also help you find properties for all the effects, media, and timelines. In case you come from a different software system, the algorithm of hitfilm express editor identifies the keyword links and assists you in finding your search.
**Numerous streams: To allow the gamers to have a rejoicing experience, HitFilm allows importing files with multiple audio streams and provides you with complete flexibility over workflow.
**Adjustable trimmer: With HitFilm Express, you can re-trim clips even after adding to the timeline. The moment you double-click the clip, it will automatically get sent to the trimmer panel to allow you to make necessary adjustments. Once you have completed the changes, the clip will be again updated.
**Cinematic outlook: You can prepare your film with the classic cine-effects of HItFilm Express. Choose your most preferred effects like Day For Night, Three-Strip Color, Film Grain, and other styles to give a cinematic edge.
3. How to edit videos with Hitfilm Express?
Editing is cutting and accumulating the selected clips to tell the story better. Editing consists of adding sound effects, transitions, and other visual elements to help it view excellent results.

You have to set up the editor timeline and start importing clips to edit your clips. Use the editor tools like roll, slip, drag, selection, ripple, and others to customize your edit.

- Choose the Set in point button from the point where you want to start the clip. In the timeline, you will notice an orange section representing the part of the clip you want to play.
- Now, skip through, and decide where you want to end the clip. You have to click the Set-out button. You can alternatively use the I and 0 keys as shortcuts.
- Once you get your selected start and endpoint, you can drag down the portion of the video into the timeline. This time, you can get a message that shows the editor settings are different from the adding clip. It is your choice how you want to keep your settings.
- If you find the selected set of a good standard, you can move forward and select “Yes” to ensure that your project gets changed into that setting.
- In the viewer section, you will get to view the final outlook of the video. Here, on the downside of the timeline, you can click on the Zoom bar to see things in detail. Your previews will depend on the selected settings that you have made beforehand.
- If you want to change your default setting, you can come to the hamburger icon for tracking and changing the size of the video to different ones.
- Add a clip to the timeline: Position the play head at the timeline point where you want to start the clip, and then hit the insert clip button.

4. Hitfilm Express Alternative to Edit Videos
Anyone who finds video editing fun filling can try out Filmora . It is an ideal alternative to hitfilm express editing tutorial. Whether you shoot in an entry-level camera or a high-end video camera, Filmora will help you create and edit the most suitable videos. During the video editing procedure, you can experience multiple challenges that help you stay patient and work slowly to come out with the project.

It is the best video editing platform for beginners since it can provide comprehensive support for creating different video formats. The user-friendly interface and powerful editing features make the video editor one of the most used video editing software.
For Win 7 or later (64-bit)
For macOS 10.12 or later
Step-by-step guide for editing videos with Filmora
Step 1: Double click on the Filmora’s icon to start working on your project. Either open the new project or click on the aspect ratio for time-saving editing.
Step 2: Select the “project setting” option to customize the aspect ratio as per your need. Next, you will go to the import media files to choose the import with the instant cutter tool and opt for easy trimming of videos.
You can also use a lens correction tool to improve the quality of videos.
Step 3: Create a new folder and organize the clips alphabetically to increase efficiency.
Step 4: Drag and drop the trimmed videos on the timeline and rearrange them to remove the unnecessary parts. Press the play button to get previews of your added video clips.
Step 5: Now, it’s time to add audio and visual effects to your trimmed footage. You can also add opening titles and subtitles and use text templates to work on the video transition.
Step 6: With the help of a color correction tool, you can make the videos look vivid. It takes enough time and dedication to master color correction for your videos.
Step 7: When you are 100% sure about the final outlook of the project, you have to export the videos on YouTube for fast uploading on social media networks. Otherwise, you can opt for saving the video on the hard drives.
5. FAQs about Hitfilm Express
1.Is Hitfilm Express still free?
Ans: HitFilm Express is still free with alternative paid add-ons. The free video editing software helps make excellent films and video games with the professional-grade VFX. From students, beginners, and gamers to you Tubers – anyone can work on their creativity without spending a penny.
2.Is Hitfilm Express safe to download?
Ans: With more than 5 million active users across 160 countries, HitFilm Express is safe and legit software to download. If you are susceptible to using this platform, it is an excellent option to experience some remarkable features and learn A to Z of video editing.
3.Is Hitfilm Express still worth it?
Ans: IF anyone opts for the paid version, it will be expensive. However, the video editing software has beginner-friendly features like different AI tools for guided editing, 4K support, and others that hardly make any sense compared with other free software.
Looking at its professional features and high-quality editing, it is the most powerful video editing platform.
Conclusion
In a nutshell, HItFilm is an entirely free version of video editing software. Beginners can quickly learn it since the editing features can be easily grasped. To create amateur videos for professional ones, HitFilm Express is your one-stop solution. The customizable effects and compositing layers provide your videos with an excellent cinematic look. Everything you will get without spending any money.
Therefore, if you want to learn the A to Z of video editing for absolutely free, you can blindly rely on the hitfilm express editor.
2. Key Features of Hitfilm Express
If you want to take your video editing to the next level like a professional, hitfilm express editing software is your one-stop solution. Here is a wide array of features that provides amateurs to professionals a seamless experience.
**Professional project quality: The UHD support and RAM preview of HitFilm Express provide the users the supreme quality formats. Whatever footage you collect from documentaries captured by high-end cameras or smartphones, HItFilm will manage everything.
**Commentator recorder: Once you click the button, you will easily adjoin voiceover to the uploaded videos without leaving the HitFilm. The HitFilm Express is designed so that your recording will promptly add to a soundtrack so that you can do the finishing touches with the audio effects.
**Integrated timelines: Keep switching from one tab to another, same as you do on the browser, as per your needs. You can edit in one tab, make a composition in the other, and then get back to the editor without the necessity of loading other software.
**Customized playback: You can personalize playback. It will help you get exposed to non-stop playback in the trimmer, thus preventing lagging and making edits easier. It allows you to control the playback quality and make hasty edits.
**Smart search: With the help of HitFilm Express, you can locate your desired keyword quickly. It will also help you find properties for all the effects, media, and timelines. In case you come from a different software system, the algorithm of hitfilm express editor identifies the keyword links and assists you in finding your search.
**Numerous streams: To allow the gamers to have a rejoicing experience, HitFilm allows importing files with multiple audio streams and provides you with complete flexibility over workflow.
**Adjustable trimmer: With HitFilm Express, you can re-trim clips even after adding to the timeline. The moment you double-click the clip, it will automatically get sent to the trimmer panel to allow you to make necessary adjustments. Once you have completed the changes, the clip will be again updated.
**Cinematic outlook: You can prepare your film with the classic cine-effects of HItFilm Express. Choose your most preferred effects like Day For Night, Three-Strip Color, Film Grain, and other styles to give a cinematic edge.
3. How to edit videos with Hitfilm Express?
Editing is cutting and accumulating the selected clips to tell the story better. Editing consists of adding sound effects, transitions, and other visual elements to help it view excellent results.

You have to set up the editor timeline and start importing clips to edit your clips. Use the editor tools like roll, slip, drag, selection, ripple, and others to customize your edit.

- Choose the Set in point button from the point where you want to start the clip. In the timeline, you will notice an orange section representing the part of the clip you want to play.
- Now, skip through, and decide where you want to end the clip. You have to click the Set-out button. You can alternatively use the I and 0 keys as shortcuts.
- Once you get your selected start and endpoint, you can drag down the portion of the video into the timeline. This time, you can get a message that shows the editor settings are different from the adding clip. It is your choice how you want to keep your settings.
- If you find the selected set of a good standard, you can move forward and select “Yes” to ensure that your project gets changed into that setting.
- In the viewer section, you will get to view the final outlook of the video. Here, on the downside of the timeline, you can click on the Zoom bar to see things in detail. Your previews will depend on the selected settings that you have made beforehand.
- If you want to change your default setting, you can come to the hamburger icon for tracking and changing the size of the video to different ones.
- Add a clip to the timeline: Position the play head at the timeline point where you want to start the clip, and then hit the insert clip button.

4. Hitfilm Express Alternative to Edit Videos
Anyone who finds video editing fun filling can try out Filmora . It is an ideal alternative to hitfilm express editing tutorial. Whether you shoot in an entry-level camera or a high-end video camera, Filmora will help you create and edit the most suitable videos. During the video editing procedure, you can experience multiple challenges that help you stay patient and work slowly to come out with the project.

It is the best video editing platform for beginners since it can provide comprehensive support for creating different video formats. The user-friendly interface and powerful editing features make the video editor one of the most used video editing software.
For Win 7 or later (64-bit)
For macOS 10.12 or later
Step-by-step guide for editing videos with Filmora
Step 1: Double click on the Filmora’s icon to start working on your project. Either open the new project or click on the aspect ratio for time-saving editing.
Step 2: Select the “project setting” option to customize the aspect ratio as per your need. Next, you will go to the import media files to choose the import with the instant cutter tool and opt for easy trimming of videos.
You can also use a lens correction tool to improve the quality of videos.
Step 3: Create a new folder and organize the clips alphabetically to increase efficiency.
Step 4: Drag and drop the trimmed videos on the timeline and rearrange them to remove the unnecessary parts. Press the play button to get previews of your added video clips.
Step 5: Now, it’s time to add audio and visual effects to your trimmed footage. You can also add opening titles and subtitles and use text templates to work on the video transition.
Step 6: With the help of a color correction tool, you can make the videos look vivid. It takes enough time and dedication to master color correction for your videos.
Step 7: When you are 100% sure about the final outlook of the project, you have to export the videos on YouTube for fast uploading on social media networks. Otherwise, you can opt for saving the video on the hard drives.
5. FAQs about Hitfilm Express
1.Is Hitfilm Express still free?
Ans: HitFilm Express is still free with alternative paid add-ons. The free video editing software helps make excellent films and video games with the professional-grade VFX. From students, beginners, and gamers to you Tubers – anyone can work on their creativity without spending a penny.
2.Is Hitfilm Express safe to download?
Ans: With more than 5 million active users across 160 countries, HitFilm Express is safe and legit software to download. If you are susceptible to using this platform, it is an excellent option to experience some remarkable features and learn A to Z of video editing.
3.Is Hitfilm Express still worth it?
Ans: IF anyone opts for the paid version, it will be expensive. However, the video editing software has beginner-friendly features like different AI tools for guided editing, 4K support, and others that hardly make any sense compared with other free software.
Looking at its professional features and high-quality editing, it is the most powerful video editing platform.
Conclusion
In a nutshell, HItFilm is an entirely free version of video editing software. Beginners can quickly learn it since the editing features can be easily grasped. To create amateur videos for professional ones, HitFilm Express is your one-stop solution. The customizable effects and compositing layers provide your videos with an excellent cinematic look. Everything you will get without spending any money.
Therefore, if you want to learn the A to Z of video editing for absolutely free, you can blindly rely on the hitfilm express editor.
Detailed Tutorial to Crop a Video in KineMaster
“Create. Edit. Share. Transform your videos with KineMaster! Powerful tools, easy to use.” – a few words we read when we come up with the official web-site of KineMaster, a mobile video editing application.

Scrolling down, we see a rich list of all the features KineMaster offers to its users, such as: Assets, Projects, Backup and Share, Blending Modes, Reverse, Chroma Key, High Resolution, Video Layers. Simply put, on KineMaster, you can download projects, add more than 2 500 effects, use powerful tools, add cinematic color, etc…

This many features make you think – how come it is possible to do all that on a mobile phone? How come Kinemaster is not only a software you can download, pay for, and use on your computer, which, on its behalf, should also be a powerful one? It would be a logical question, but remember, we are in 2022 already, so, no limits are put to the technology of today! On Google Play Store, in the description of the abovementioned app, it reads: “KineMaster makes video editing fun on your phone, tablet, or Chromebook!” – So, why not use this opportunity, to explore new ways of making our content better and as appealing as ever for our viewers?
Even though Kinemaster deserves a bigger article with more explanation of each tool, for now, we will only be focusing on cropping a video in this app. First off, why crop a video at all? – well, sometimes we have a wonderful footage but the aspect ratio just doesn’t work for us. It might be because we want to upload our clip on a platform needing a specific aspect ratio, or, we just need to crop and pan (which means to move around within a clip or an image) because we don’t like some things shown in the original video – we might as well need to zoom in and out, in order to get the best out of our footage. For whatever reason, when you need or just wish to crop a video, it should not be a big deal, and let’s see how KineMaster makes it a good and easy experience.
So, the first thing we do in almost every situation is to access the platform or an application itself! – you guessed it right, download KineMaster from Google Play Store! Once you have it on your phone, open it and enjoy the introduction of the app itself.

The interesting fact you will notice is that the layout of the app is horizontal, not vertical, unlike in most cases. So, it makes you feel like you are at least close to what video editors who work on their computers represent. The interface of the app is quite enjoyable for your eyes, as it is kind of fun, as well.
It is needless to say that, if you are going to do a specific “operation” to the video, such as cropping, you will already have figured out which one of your footage you want to crop and pan. So, it’s wise to jump on the button which says: Create New.

This will take you to the editor. Even though in the media section you will find the video you want to work on, but you might be struggling to notice a Crop button. It is because unfortunately, it’s not possible to crop your video right away in KineMaster – first, you will need to add a background, for example, a black one.

Then, you will go back to the menu and find Media section again to add the video clip you want to crop.

After adding it to the editor, you need to tap on the video file which has appeared in the sequence – this will show you different features you can use on the right. You have to scroll down a little and Voila! – here you find Cropping. After having clicked on that, a little cropping window will appear on the screen.

You can resize the clip, and in order to crop the video, turning on the mask option is needed.


After you have finished cropping and resizing it to your liking, you need to click on the icon on the top right, and it will take you to the Save and Share page.

There, you will choose the Resolution and Frame rate, and Save as Video.

You can check your new cropped video on your gallery.
An easier way to crop video in Wondershare Filmora
An alternate way of cropping your video would be Filmora Video Editor , which is a software you can download and install on your computer and use its features only then. You can also try your hand at this very handy computer program which has an easy and user-friendly interface.
For Win 7 or later (64-bit)
For macOS 10.14 or later
Frist, as mentioned, you need to download and install Wondershare Filmora X. To add your files, you will need to click on Import Media Files Here.

You will choose your clip(s) you would like to crop and then drag and drop it in the sequence.

Above your video in the sequence you will see little icons and find a Crop one.

After clicking on it, a new window will open – it’s for Crop and Zoom, where you can choose a needed ratio or do it manually (for it, you have to select Custom first).

After clicking OK, your video will be cropped as you like. Then, you can proceed with Exporting it – click on Export, choose your preferred settings, and save the video at last.

So, in this article, you have learned how to crop a video using a mobile app KineMaster, as well as using a software – Wondershare Filmora X. of course, there are many other ways in which you can crop your video and make the best out of it. The technology and innovation gives us the opportunity to have great results with as little work as just a few minutes. You might need to crop your video for your channel on Youtube, or for your page on social media, or an official web-page of your company; last but not least is cropping and editing your video for your own pleasure, which is also a great way to interact with the virtual world around us.
Scrolling down, we see a rich list of all the features KineMaster offers to its users, such as: Assets, Projects, Backup and Share, Blending Modes, Reverse, Chroma Key, High Resolution, Video Layers. Simply put, on KineMaster, you can download projects, add more than 2 500 effects, use powerful tools, add cinematic color, etc…

This many features make you think – how come it is possible to do all that on a mobile phone? How come Kinemaster is not only a software you can download, pay for, and use on your computer, which, on its behalf, should also be a powerful one? It would be a logical question, but remember, we are in 2022 already, so, no limits are put to the technology of today! On Google Play Store, in the description of the abovementioned app, it reads: “KineMaster makes video editing fun on your phone, tablet, or Chromebook!” – So, why not use this opportunity, to explore new ways of making our content better and as appealing as ever for our viewers?
Even though Kinemaster deserves a bigger article with more explanation of each tool, for now, we will only be focusing on cropping a video in this app. First off, why crop a video at all? – well, sometimes we have a wonderful footage but the aspect ratio just doesn’t work for us. It might be because we want to upload our clip on a platform needing a specific aspect ratio, or, we just need to crop and pan (which means to move around within a clip or an image) because we don’t like some things shown in the original video – we might as well need to zoom in and out, in order to get the best out of our footage. For whatever reason, when you need or just wish to crop a video, it should not be a big deal, and let’s see how KineMaster makes it a good and easy experience.
So, the first thing we do in almost every situation is to access the platform or an application itself! – you guessed it right, download KineMaster from Google Play Store! Once you have it on your phone, open it and enjoy the introduction of the app itself.

The interesting fact you will notice is that the layout of the app is horizontal, not vertical, unlike in most cases. So, it makes you feel like you are at least close to what video editors who work on their computers represent. The interface of the app is quite enjoyable for your eyes, as it is kind of fun, as well.
It is needless to say that, if you are going to do a specific “operation” to the video, such as cropping, you will already have figured out which one of your footage you want to crop and pan. So, it’s wise to jump on the button which says: Create New.

This will take you to the editor. Even though in the media section you will find the video you want to work on, but you might be struggling to notice a Crop button. It is because unfortunately, it’s not possible to crop your video right away in KineMaster – first, you will need to add a background, for example, a black one.

Then, you will go back to the menu and find Media section again to add the video clip you want to crop.

After adding it to the editor, you need to tap on the video file which has appeared in the sequence – this will show you different features you can use on the right. You have to scroll down a little and Voila! – here you find Cropping. After having clicked on that, a little cropping window will appear on the screen.

You can resize the clip, and in order to crop the video, turning on the mask option is needed.


After you have finished cropping and resizing it to your liking, you need to click on the icon on the top right, and it will take you to the Save and Share page.

There, you will choose the Resolution and Frame rate, and Save as Video.

You can check your new cropped video on your gallery.
An easier way to crop video in Wondershare Filmora
An alternate way of cropping your video would be Filmora Video Editor , which is a software you can download and install on your computer and use its features only then. You can also try your hand at this very handy computer program which has an easy and user-friendly interface.
For Win 7 or later (64-bit)
For macOS 10.14 or later
Frist, as mentioned, you need to download and install Wondershare Filmora X. To add your files, you will need to click on Import Media Files Here.

You will choose your clip(s) you would like to crop and then drag and drop it in the sequence.

Above your video in the sequence you will see little icons and find a Crop one.

After clicking on it, a new window will open – it’s for Crop and Zoom, where you can choose a needed ratio or do it manually (for it, you have to select Custom first).

After clicking OK, your video will be cropped as you like. Then, you can proceed with Exporting it – click on Export, choose your preferred settings, and save the video at last.

So, in this article, you have learned how to crop a video using a mobile app KineMaster, as well as using a software – Wondershare Filmora X. of course, there are many other ways in which you can crop your video and make the best out of it. The technology and innovation gives us the opportunity to have great results with as little work as just a few minutes. You might need to crop your video for your channel on Youtube, or for your page on social media, or an official web-page of your company; last but not least is cropping and editing your video for your own pleasure, which is also a great way to interact with the virtual world around us.
Scrolling down, we see a rich list of all the features KineMaster offers to its users, such as: Assets, Projects, Backup and Share, Blending Modes, Reverse, Chroma Key, High Resolution, Video Layers. Simply put, on KineMaster, you can download projects, add more than 2 500 effects, use powerful tools, add cinematic color, etc…

This many features make you think – how come it is possible to do all that on a mobile phone? How come Kinemaster is not only a software you can download, pay for, and use on your computer, which, on its behalf, should also be a powerful one? It would be a logical question, but remember, we are in 2022 already, so, no limits are put to the technology of today! On Google Play Store, in the description of the abovementioned app, it reads: “KineMaster makes video editing fun on your phone, tablet, or Chromebook!” – So, why not use this opportunity, to explore new ways of making our content better and as appealing as ever for our viewers?
Even though Kinemaster deserves a bigger article with more explanation of each tool, for now, we will only be focusing on cropping a video in this app. First off, why crop a video at all? – well, sometimes we have a wonderful footage but the aspect ratio just doesn’t work for us. It might be because we want to upload our clip on a platform needing a specific aspect ratio, or, we just need to crop and pan (which means to move around within a clip or an image) because we don’t like some things shown in the original video – we might as well need to zoom in and out, in order to get the best out of our footage. For whatever reason, when you need or just wish to crop a video, it should not be a big deal, and let’s see how KineMaster makes it a good and easy experience.
So, the first thing we do in almost every situation is to access the platform or an application itself! – you guessed it right, download KineMaster from Google Play Store! Once you have it on your phone, open it and enjoy the introduction of the app itself.

The interesting fact you will notice is that the layout of the app is horizontal, not vertical, unlike in most cases. So, it makes you feel like you are at least close to what video editors who work on their computers represent. The interface of the app is quite enjoyable for your eyes, as it is kind of fun, as well.
It is needless to say that, if you are going to do a specific “operation” to the video, such as cropping, you will already have figured out which one of your footage you want to crop and pan. So, it’s wise to jump on the button which says: Create New.

This will take you to the editor. Even though in the media section you will find the video you want to work on, but you might be struggling to notice a Crop button. It is because unfortunately, it’s not possible to crop your video right away in KineMaster – first, you will need to add a background, for example, a black one.

Then, you will go back to the menu and find Media section again to add the video clip you want to crop.

After adding it to the editor, you need to tap on the video file which has appeared in the sequence – this will show you different features you can use on the right. You have to scroll down a little and Voila! – here you find Cropping. After having clicked on that, a little cropping window will appear on the screen.

You can resize the clip, and in order to crop the video, turning on the mask option is needed.


After you have finished cropping and resizing it to your liking, you need to click on the icon on the top right, and it will take you to the Save and Share page.

There, you will choose the Resolution and Frame rate, and Save as Video.

You can check your new cropped video on your gallery.
An easier way to crop video in Wondershare Filmora
An alternate way of cropping your video would be Filmora Video Editor , which is a software you can download and install on your computer and use its features only then. You can also try your hand at this very handy computer program which has an easy and user-friendly interface.
For Win 7 or later (64-bit)
For macOS 10.14 or later
Frist, as mentioned, you need to download and install Wondershare Filmora X. To add your files, you will need to click on Import Media Files Here.

You will choose your clip(s) you would like to crop and then drag and drop it in the sequence.

Above your video in the sequence you will see little icons and find a Crop one.

After clicking on it, a new window will open – it’s for Crop and Zoom, where you can choose a needed ratio or do it manually (for it, you have to select Custom first).

After clicking OK, your video will be cropped as you like. Then, you can proceed with Exporting it – click on Export, choose your preferred settings, and save the video at last.

So, in this article, you have learned how to crop a video using a mobile app KineMaster, as well as using a software – Wondershare Filmora X. of course, there are many other ways in which you can crop your video and make the best out of it. The technology and innovation gives us the opportunity to have great results with as little work as just a few minutes. You might need to crop your video for your channel on Youtube, or for your page on social media, or an official web-page of your company; last but not least is cropping and editing your video for your own pleasure, which is also a great way to interact with the virtual world around us.
Scrolling down, we see a rich list of all the features KineMaster offers to its users, such as: Assets, Projects, Backup and Share, Blending Modes, Reverse, Chroma Key, High Resolution, Video Layers. Simply put, on KineMaster, you can download projects, add more than 2 500 effects, use powerful tools, add cinematic color, etc…

This many features make you think – how come it is possible to do all that on a mobile phone? How come Kinemaster is not only a software you can download, pay for, and use on your computer, which, on its behalf, should also be a powerful one? It would be a logical question, but remember, we are in 2022 already, so, no limits are put to the technology of today! On Google Play Store, in the description of the abovementioned app, it reads: “KineMaster makes video editing fun on your phone, tablet, or Chromebook!” – So, why not use this opportunity, to explore new ways of making our content better and as appealing as ever for our viewers?
Even though Kinemaster deserves a bigger article with more explanation of each tool, for now, we will only be focusing on cropping a video in this app. First off, why crop a video at all? – well, sometimes we have a wonderful footage but the aspect ratio just doesn’t work for us. It might be because we want to upload our clip on a platform needing a specific aspect ratio, or, we just need to crop and pan (which means to move around within a clip or an image) because we don’t like some things shown in the original video – we might as well need to zoom in and out, in order to get the best out of our footage. For whatever reason, when you need or just wish to crop a video, it should not be a big deal, and let’s see how KineMaster makes it a good and easy experience.
So, the first thing we do in almost every situation is to access the platform or an application itself! – you guessed it right, download KineMaster from Google Play Store! Once you have it on your phone, open it and enjoy the introduction of the app itself.

The interesting fact you will notice is that the layout of the app is horizontal, not vertical, unlike in most cases. So, it makes you feel like you are at least close to what video editors who work on their computers represent. The interface of the app is quite enjoyable for your eyes, as it is kind of fun, as well.
It is needless to say that, if you are going to do a specific “operation” to the video, such as cropping, you will already have figured out which one of your footage you want to crop and pan. So, it’s wise to jump on the button which says: Create New.

This will take you to the editor. Even though in the media section you will find the video you want to work on, but you might be struggling to notice a Crop button. It is because unfortunately, it’s not possible to crop your video right away in KineMaster – first, you will need to add a background, for example, a black one.

Then, you will go back to the menu and find Media section again to add the video clip you want to crop.

After adding it to the editor, you need to tap on the video file which has appeared in the sequence – this will show you different features you can use on the right. You have to scroll down a little and Voila! – here you find Cropping. After having clicked on that, a little cropping window will appear on the screen.

You can resize the clip, and in order to crop the video, turning on the mask option is needed.


After you have finished cropping and resizing it to your liking, you need to click on the icon on the top right, and it will take you to the Save and Share page.

There, you will choose the Resolution and Frame rate, and Save as Video.

You can check your new cropped video on your gallery.
An easier way to crop video in Wondershare Filmora
An alternate way of cropping your video would be Filmora Video Editor , which is a software you can download and install on your computer and use its features only then. You can also try your hand at this very handy computer program which has an easy and user-friendly interface.
For Win 7 or later (64-bit)
For macOS 10.14 or later
Frist, as mentioned, you need to download and install Wondershare Filmora X. To add your files, you will need to click on Import Media Files Here.

You will choose your clip(s) you would like to crop and then drag and drop it in the sequence.

Above your video in the sequence you will see little icons and find a Crop one.

After clicking on it, a new window will open – it’s for Crop and Zoom, where you can choose a needed ratio or do it manually (for it, you have to select Custom first).

After clicking OK, your video will be cropped as you like. Then, you can proceed with Exporting it – click on Export, choose your preferred settings, and save the video at last.

So, in this article, you have learned how to crop a video using a mobile app KineMaster, as well as using a software – Wondershare Filmora X. of course, there are many other ways in which you can crop your video and make the best out of it. The technology and innovation gives us the opportunity to have great results with as little work as just a few minutes. You might need to crop your video for your channel on Youtube, or for your page on social media, or an official web-page of your company; last but not least is cropping and editing your video for your own pleasure, which is also a great way to interact with the virtual world around us.
Also read:
- Updated 2024 Approved Every Compositor Should Know The Tips of Color Match in After Effects
- 2024 Approved How to Rotate AVI in Vertical/Portrait Orientation Windows, Mac,Andro
- Updated Updated 2024 Top Free Vintage LUTs to Use
- Are You Looking to Make Subscribe Channel Graphics? Here Is a Complete Guide on How to Make One on Your Own for 2024
- Detailed Steps to Rotate Videos in Davinci Resolve
- How to Polish Your Music Video Edits Using Filmora for 2024
- In 2024, Best 7 Color Match Paint Apps
- New 2024 Approved Step by Step to Crop Videos with CyberLink PowerDirector
- New 2024 Approved Guide To Using Luts Perfectly in Final Cut Pro
- In 2024, Best Online GIF to Image (PNG/JPG) Converter
- Updated Best Video Title Generators for 2024
- In 2024, Make Videos with Pictures and Music-10 Apps
- New In 2024, Have You Tried a Discord Boost Before? What Does a Discord Server Boost Entail, and Is It Worthwhile? What Are the Advantages? Heres a Quick Guide to Assist You in Making Your Decision
- Updated 2024 Approved How To Use Motion Blur On Video Star?
- New 2024 Approved How to Make Falling Text Effect in Filmora?
- Updated 2024 Approved Do You Want to Create a Motion Blur Effect in Your Videos? Read This Well-Described Guide to Learn How to Add Motion Blur on CapCut on iPhone and Android Devices
- New In 2024, The Complete Guide to Converting GIF to SVG With Ease
- Updated How to Create Emoji on Mac That Take Less Than 10 Mins for 2024
- New Powerpoint Slideshow Icon, Slide Sorter View Icon, Slideshow Icon Powerpoint, Slide Show View Icon for 2024
- 2024 Approved 6 Websites to Free Download Motivational Video Footage
- Updated In 2024, Here Are the Steps to Crop a Video in Sony Vegas Pro Step 1 Click on Import and Import the Video to Be Edited. Click on It and Drag-Drop to Timeline
- New In 2024, How to Use iMovie Text Effects
- Updated Best Video Grabbers for Chrome for 2024
- Updated 2024 Approved 2 Effective Ways to Make SRT File Translation Like a Pro
- This Article Talks About Pixel Art Wallpapers. It Gives Examples of Different Pixel Art to Show You How to Customize Your Own Pixel Art Wallpapers, and How to Make a Pixel Art Gif on Filmora for 2024
- New How to Use LUTs in Adobe Premiere Pro for 2024
- New In 2024, Efficient Ways to Manage Your Timeline
- In 2024, Discover the Top 10 Video Editing Apps with Templates for Professional-Grade Results. Edit Like a Pro with These Tools
- 2024 Approved 5 Tips for Aquasoft Slideshow
- New 20 Best LUTs for Music Videos
- 2024 Approved Learn About Open Broadcaster Software and How to Perform Obs Color Correction. Also, Explore the Various Aspects of Color Correction Like Contrast, Brightness, Saturation, Among Others
- 2024 Approved How to Make Cool COD Warzone Thumbnail
- New How to Use Filmora Slideshow Maker for Making Slideshow, In 2024 What Is Slideshow Filmora? Know the Steps to Make Filmora Slideshow. What Are Steps to Make Filmora Slideshow Template?
- Updated 2024 Approved Learn Topaz Video Enhance AI Review and Achieve Powerful Video Conversion
- Updated 2024 Approved How to Create Video Contents That Convert Sales
- In 2024, Create Promotional Video
- New 2024 Approved Fast Method to Match Color in Photoshop
- Google Meet Green Screen Is the Latest Addition to the Virtual Meeting App. It Is a Crucial Feature as It Allows Users to Maintain a Semblance of Privacy Through Virtual Backgrounds
- This Article Talks About if the Windows Movie Maker Available and if Yes, Then How You Can Download It and so On. It Further Comprises an Alternative to the Same to Create Videos for 2024
- In 2024, Step by Step to Rotate Videos Using OBS
- Updated Use This Color Match Paint Technique to Find the Exact Shade of Any Hue You Have in Mind for Your Paint Project. Match the Paint to Your Desired Color Even without Knowing the Paint Name or Brand with Automotive Paint Matching
- New In 2024, This Article Aims to Show You How to Export Videos in Filmora
- The Top 10 Effective SRT Editors Online for 2024
- Updated The Best GIF Editors Weve Tested Heres What We Learned for 2024
- Updated How to Change Video Thumbnail in Google Drive
- New Several Tips Can Facilitate How You Edit Videos Faster and Easier. All You Need to Do Is to Read This Article to Find Out What They Are for 2024
- New In 2024, 4 Methods to Resize a WebM File
- Updated 2024 Approved How to Make Audio Visualizer in Filmora Easy
- New A Wedding Is One of the Exciting Parts that Will Happen in Your Life. Its Not that Easy to Plan a Wedding, Theres a Lot to Be Consider Like Wedding Dress, Food, Venue, Videographer Etc for 2024
- In 2024, About Vivo T2x 5G FRP Bypass
- Stuck at Android System Recovery Of Samsung Galaxy A05 ? Fix It Easily | Dr.fone
- How to convert AVCHD MTS to MP4 for Motorola ?
- 9 Solutions to Fix Process System Isnt Responding Error on Tecno Spark 10 4G | Dr.fone
- Possible solutions to restore deleted contacts from Honor X50.
- In 2024, Easy Guide How To Bypass Tecno Phantom V Flip FRP Android 10/11/12/13
- iSpoofer is not working On Vivo Y200? Fixed | Dr.fone
- Does Nokia 105 Classic Have Find My Friends? | Dr.fone
- How to Fake Snapchat Location on Samsung Galaxy F04 | Dr.fone
- What to Do if Google Play Services Keeps Stopping on Vivo Y02T | Dr.fone
- How to Unlock Disabled iPhone 14 Pro Max/iPad Without Computer
- How to Factory Reset Asus ROG Phone 8 Pro in 5 Easy Ways | Dr.fone
- The Best iSpoofer Alternative to Try On OnePlus 12 | Dr.fone
- How to Screen Mirroring Vivo Y100t? | Dr.fone
- Does Galaxy Z Flip 5 support AVCHD video?
- Easy Fixes How To Recover Forgotten iCloud Password From your Apple iPhone 11 Pro
- Stellar Photo Recovery
- In 2024, How to Fix Pokemon Go Route Not Working On Vivo S17 Pro? | Dr.fone
- In 2024, How to Unlock Apple iPhone 15 Passcode without iTunes without Knowing Passcode? | Dr.fone
- Easily Unlock Your Vivo Y27 4G Device SIM
- How to Cast Realme 10T 5G to Computer for iPhone and Android? | Dr.fone
- How to retrieve lost files from Magic 6?
- In 2024, 3 Facts You Need to Know about Screen Mirroring Honor X50i | Dr.fone
- How To Remove Screen Lock PIN On Nubia Red Magic 9 Pro+ Like A Pro 5 Easy Ways
- In 2024, How to Use Google Assistant on Your Lock Screen Of Xiaomi Redmi K70 Pro Phone
- In 2024, List of Pokémon Go Joysticks On Vivo Y36i | Dr.fone
- Latest Guide on iPad 2/3 and Apple iPhone 13 Pro iCloud Activation Lock Bypass
- Mastering Android Device Manager The Ultimate Guide to Unlocking Your Xiaomi 14 Device
- 10 Best Fake GPS Location Spoofers for Apple iPhone 13 Pro | Dr.fone
- In 2024, How To Unlock Xiaomi Redmi Note 13 5G Phone Without Password?
- The Ultimate Guide to Get the Rare Candy on Pokemon Go Fire Red On Xiaomi Redmi Note 12T Pro | Dr.fone
- Recover your contacts after Oppo A1x 5G has been deleted.
- In 2024, Full Guide to Catch 100 IV Pokémon Using a Map On Samsung Galaxy A05s | Dr.fone
- 8 Best Apps for Screen Mirroring Xiaomi Civi 3 PC | Dr.fone
- Title: 4 Methods for Rotating Your GoPro Videos Professionally for 2024
- Author: Morgan
- Created at : 2024-05-19 05:11:46
- Updated at : 2024-05-20 05:11:46
- Link: https://ai-video-editing.techidaily.com/4-methods-for-rotating-your-gopro-videos-professionally-for-2024/
- License: This work is licensed under CC BY-NC-SA 4.0.

