:max_bytes(150000):strip_icc():format(webp)/zenbook-17-fold-oled-72de5601b7334834a2962b7a8c7b4e9b-16fb2ba97f414911a71ffd37c82c541e.png)
4 Solutions to Resize a WebM File for 2024

4 Solutions to Resize a WebM File
People resize videos for many reasons, the most common one being to reduce file size. Others might be to meet a specification, or for compatibility. When you resize a video file, you reduce its file size considerably- making it load faster on devices, reduce processing time, and save a lot of space. Most people prefer watching videos that are smaller in size compared to larger ones, that’s why some social media sites like Instagram, Tiktok, etc have preferred video resolutions, so if you are a user on these sites you might want to resize your video to fit.
The biggest concern most people have about resizing videos is whether it will retain its quality, another concern is that you don’t want to crop out your video while resizing. If the format of the video is mp4, wmv, avi, etc which usually have very large size, resizing it might be a bit of a problem because the video quality will reduce a lot, but if it’s a WebM video file, you can still achieve a good video quality even after multiple compression or changing its resolution, that’s because its codecs- VP8 and VP9 were designed specifically for that, and it’s supported by all browsers.
In the course of this article, we’re assuming you already have a WebM video and you want to resize it, and still maintain its quality so you can upload on your favourite websites without any hassles. We have handpicked some proven methods to help you with that, let’s see them:
Method 1: Resize WebM file with Wondershare Filmora
Wondershare Filmora Video Editor is a great video editing software that comes with a lot of features. You can easily perform basic editing techniques in a few minutes. It also comes with lots of filters to make your videos pop.
For video resizing, Filmora offers you a couple of options: First you have an option of changing the resolution just before you export your video; you also have the option of cropping your videos to your preferred size and cutting out redundant parts of your videos to save space; but the third option is what we’ll show you in this guide, because we imagine you already have your video exported and you just want to resize. You can easily do that by changing the aspect ratio and we’ll show you in a few steps:
For Win 7 or later (64-bit)
For macOS 10.14 or later
Step 1: Go to the official Wondershare Filmora website and download the software.
Step 2: Install Wondershare Filmora on your PC and double click to launch.
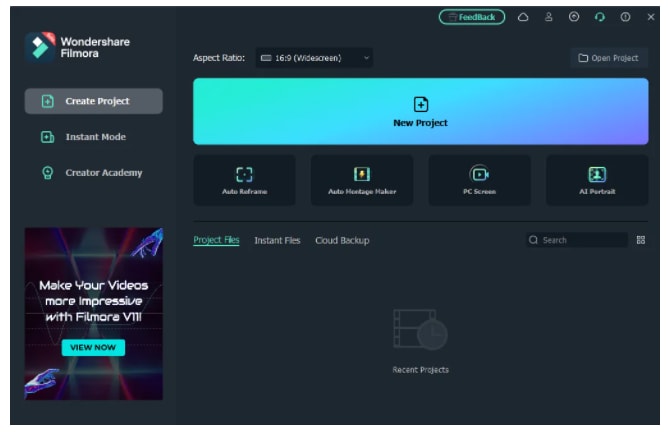
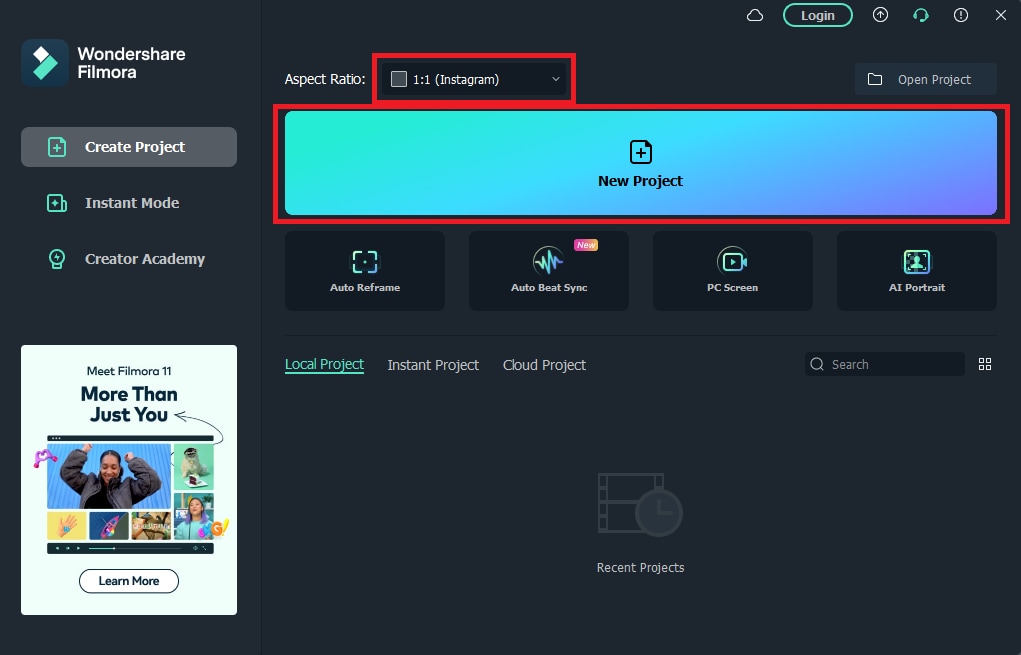
Step 3: Change your aspect ratio. When you launch Filmora, you’re allowed to choose your preferred aspect ratio on the start page.
Select your preferred aspect ratio from the list of options- 16:9 (widescreen), 4:3 (standard), 1:1 (Instagram), 9:16 (portrait). For example, if you import a 16:9 video file into Filmora, and set it to 1:1 aspect ratio then, the final output file will be 1:1, which is the perfect aspect ratio for Instagram posts.
You’ll see below that I selected 1:1 for instagram. After you are done selecting your preferred aspect ratio, hit ‘New Project’.
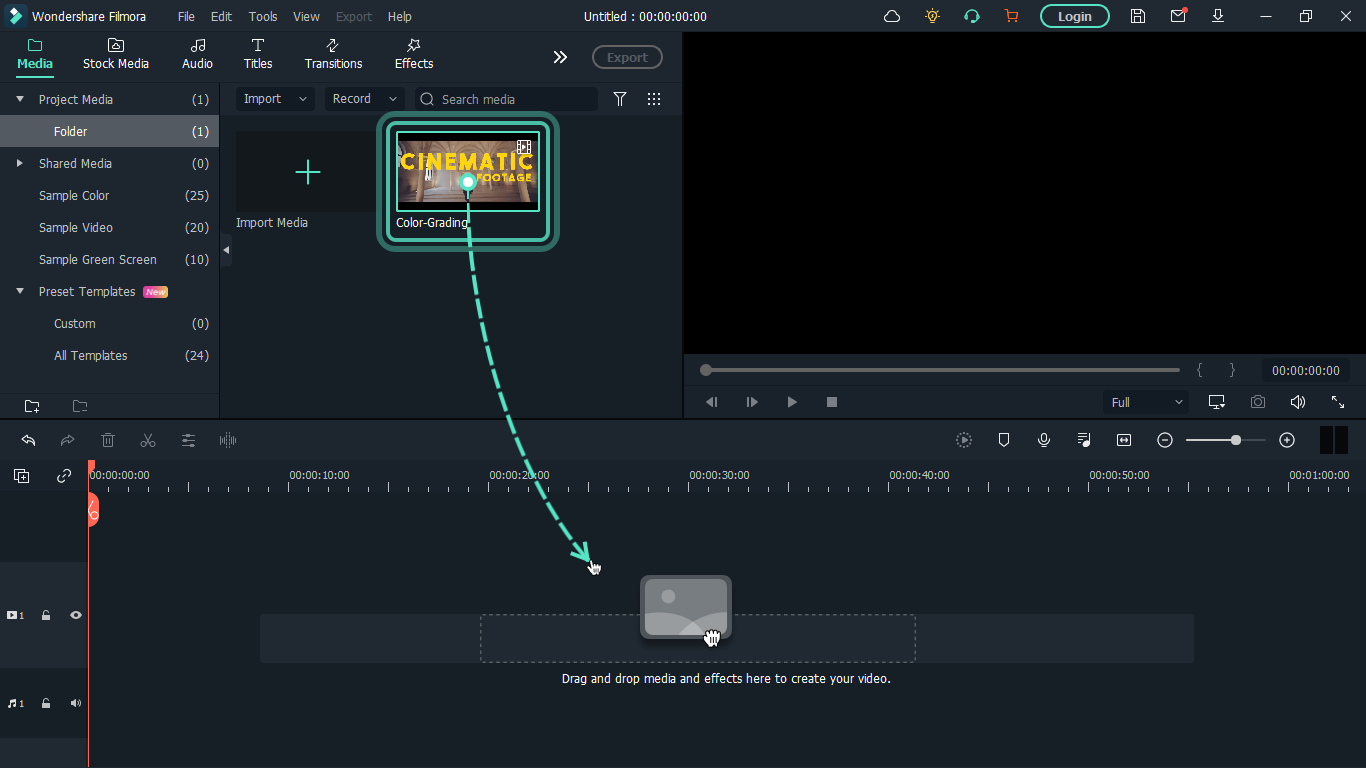
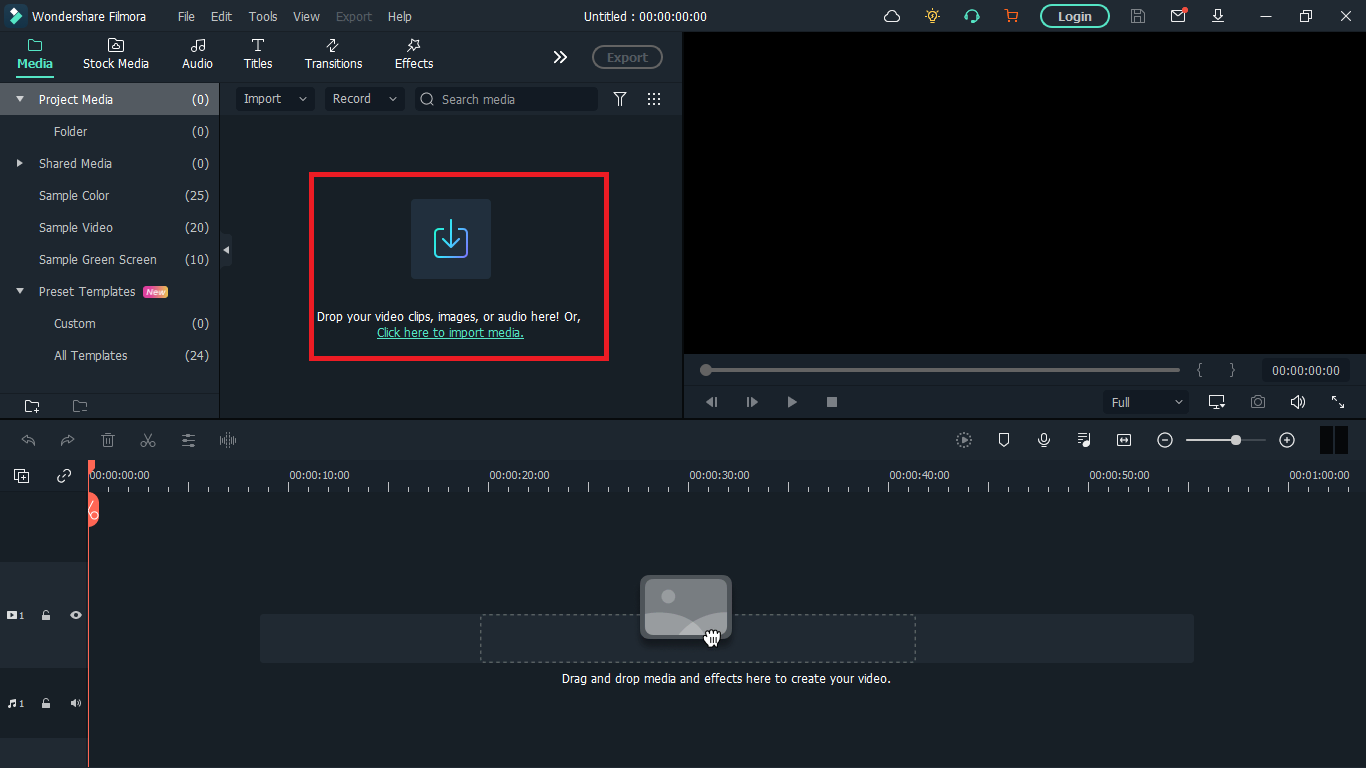
Step 4: Import your WebM video. After you must have selected your preferred aspect ratio, the next step is to import the video you want to resize; you can do this by clicking on the import icon shown below. Once done, drag the video to the timeline also shown below.
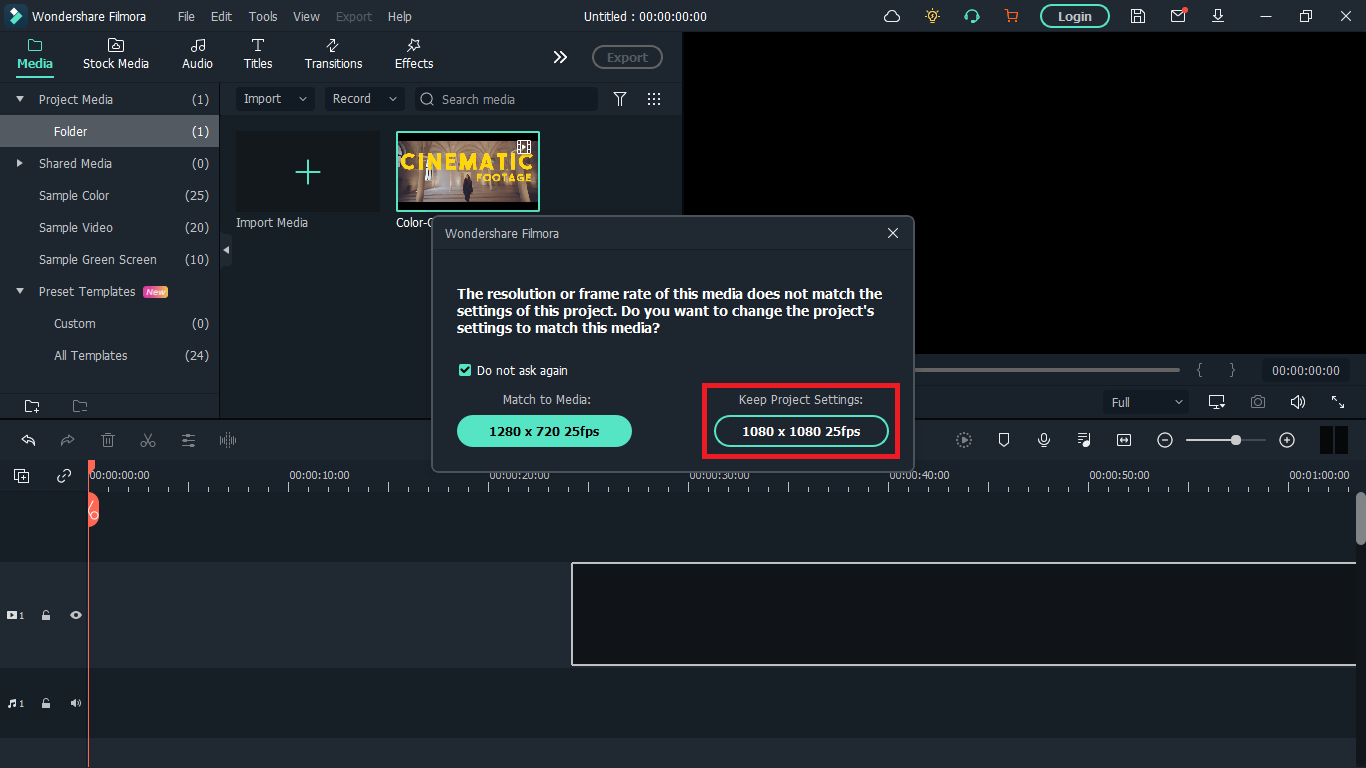
A floating window will appear and you’ll be asked to change project settings to match the media. Click on ‘Keep project settings’. Filmora will change the aspect ratio of the original video you imported to your preferred aspect ratio.
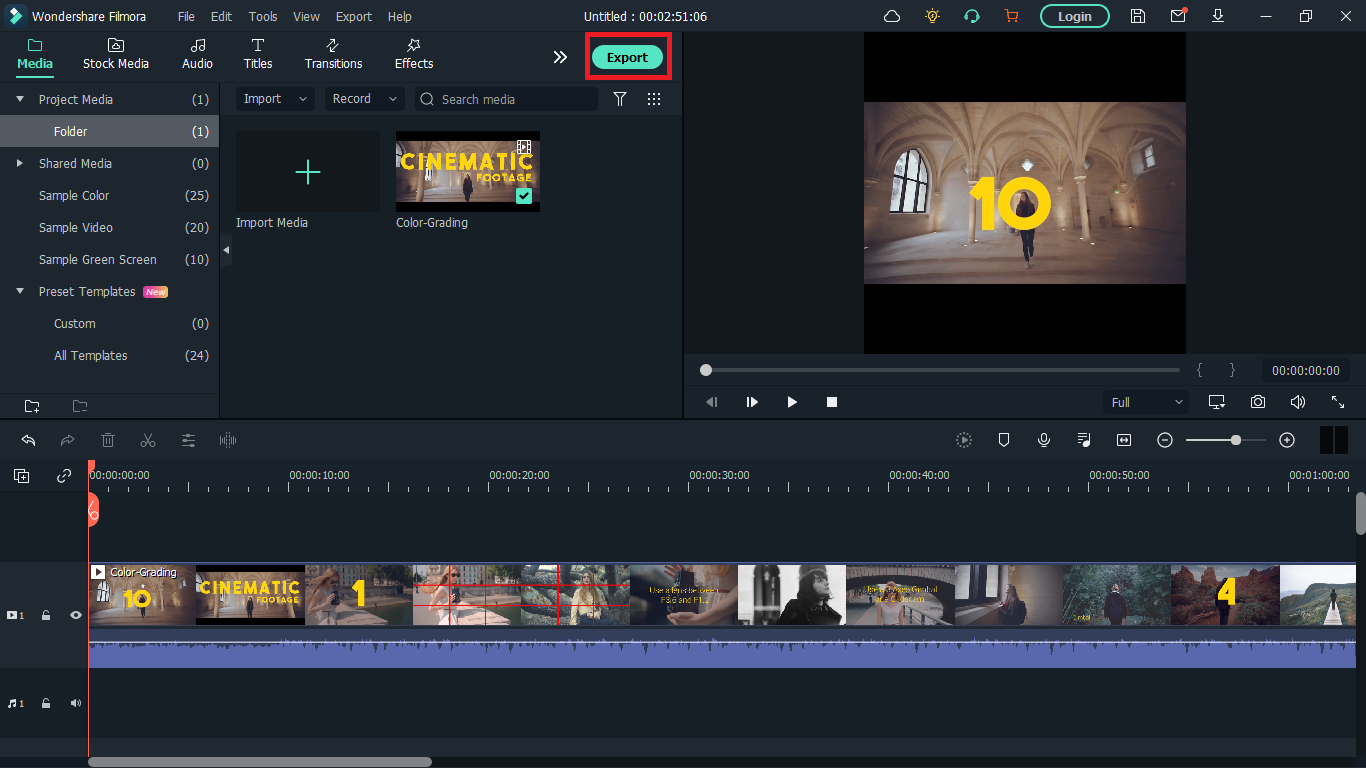
Step 5: Save your video. Once the video is now properly placed in the timeline, next thing is hit ‘export’ to save your video. You can go to the ‘format tab’ to change the video output format to WebM or whatever format you choose then hit ‘Export’.
Method 2: How to resize WebM file with VLC
VLC is a free and open source multimedia player. It is arguably the best media player out there and that’s for a reason- it can play almost everything without the need for any external codecs.
The playback feature is amazing but that’s not the only thing it can do. VLC outshines most other media players because of some extra features it possesses. It resizes and converts media files, downloads and adds subtitles, records screen, as well as is customizable in settings and expandable via plugins.
What we want to use in this guide is its media resizing feature, so let’s show you how you can use it in these steps:
Step 1: Download VLC Media player from the official VLC page and install it on your windows or Mac PC.
Step 2: Launch VLC after installing by double-clicking on the software.
Step 3: Click “Media” in the toolbar.
Step 4: Select “Convert / Save”. You can also tap shortcut keys Ctrl + R to quickly open a new window.
Step 5: Click “Add”. You can load one or more video files. Here, I’ll choose a colour grading video on my desktop. You can see it has the extension ‘.webm’. After loading the video file you want to resize, click “Convert / Save” again.
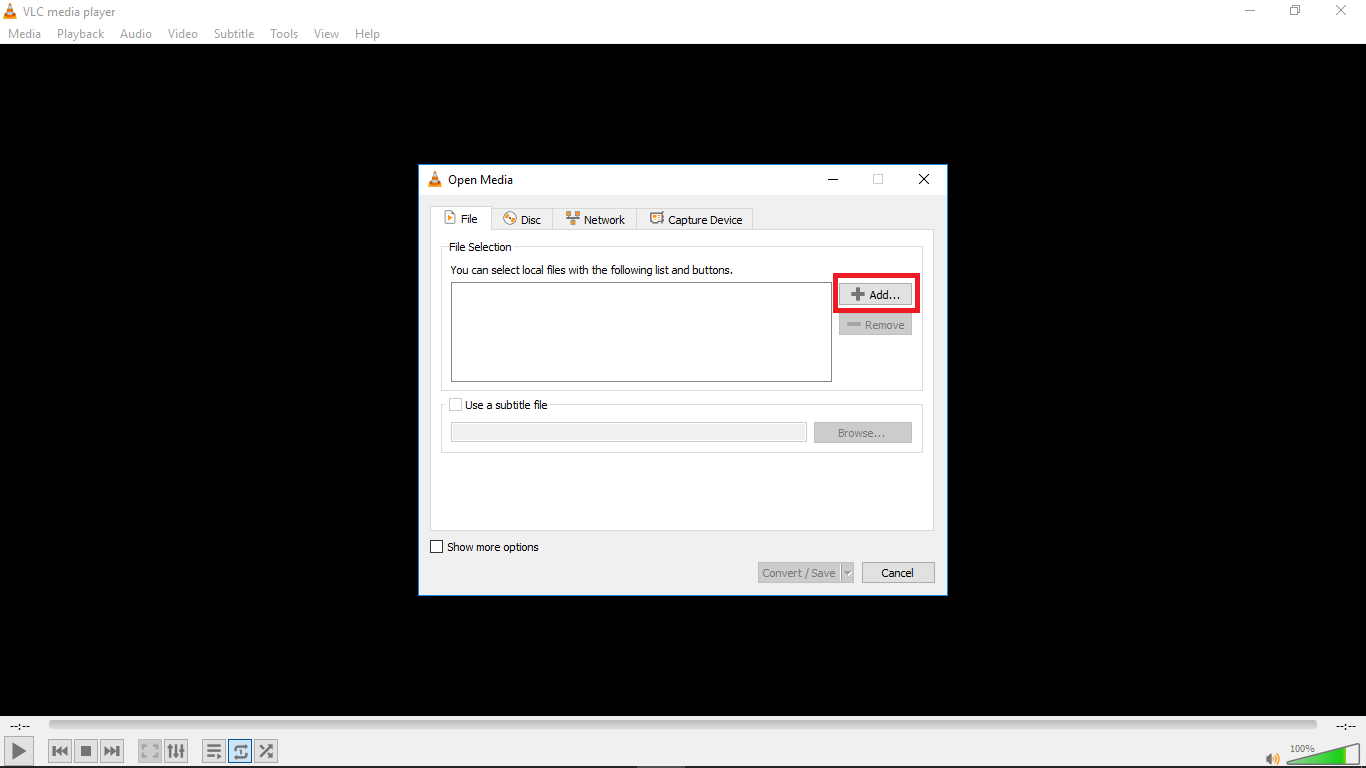
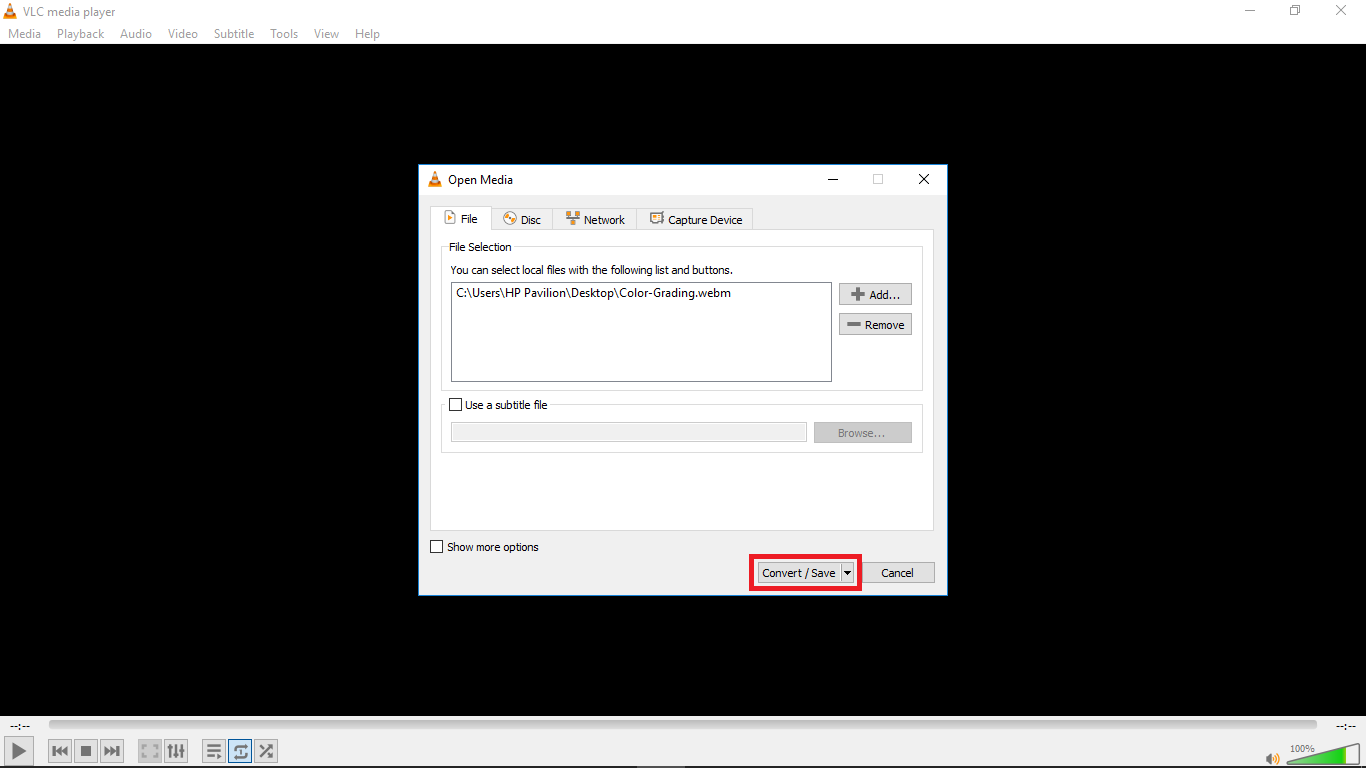
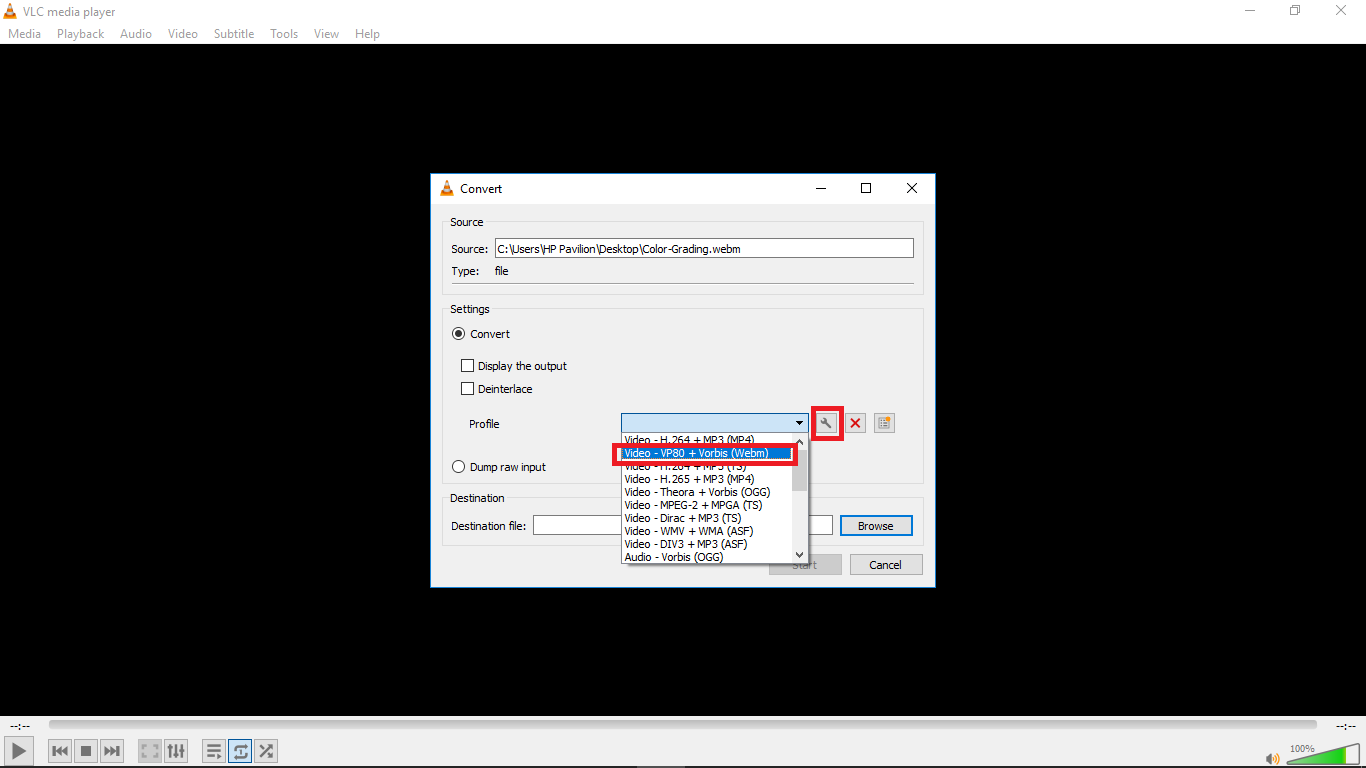
Step 6: Choose your desired output profile type. With VLC, you can resize video to MP4, WebM, TS, and other formats.
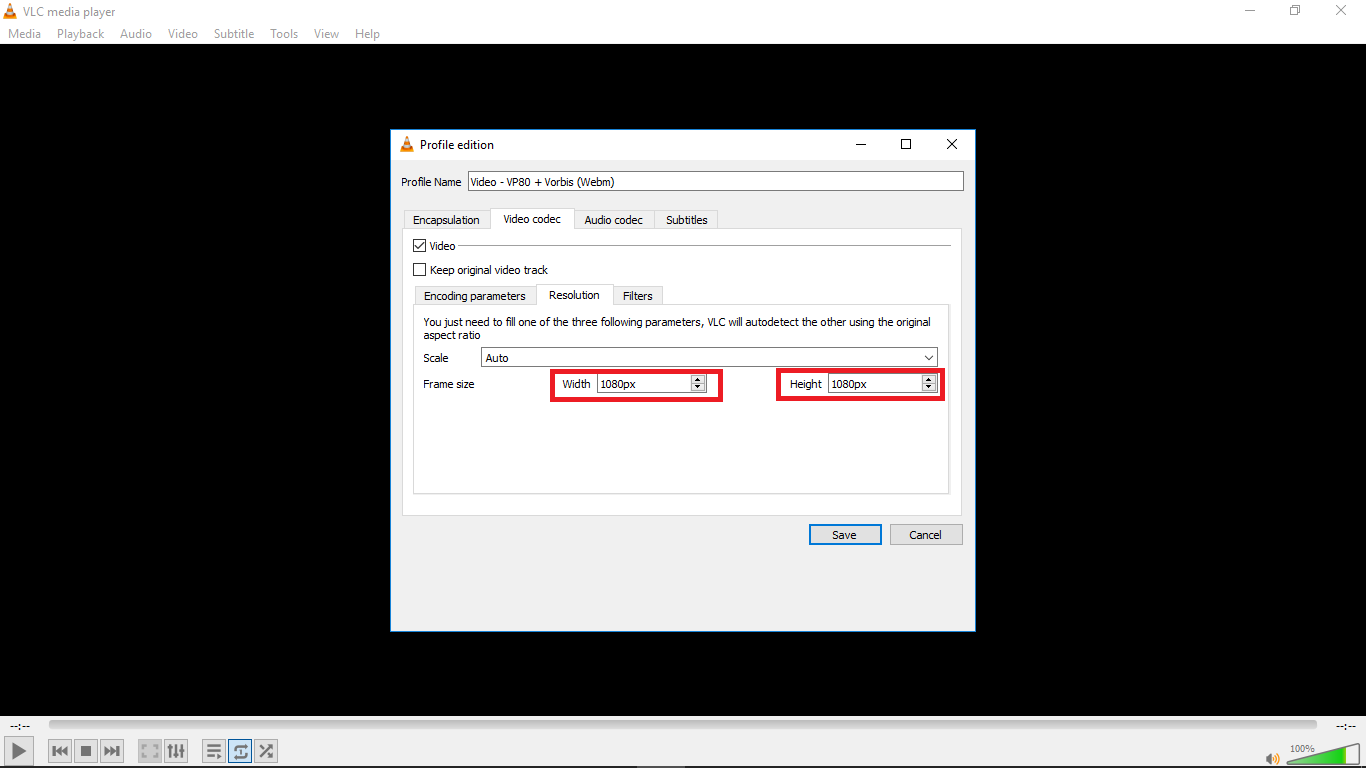
Step 8: Click the settings icon to access the settings window and select the video codec where you can adjust parameters like frame rate, bitrate, resolution, etc to change video file size. I changed the frame rate of my video to 30fps which is ideal for high quality videos. Also click the resolution tab and set your desired resolution then click save.
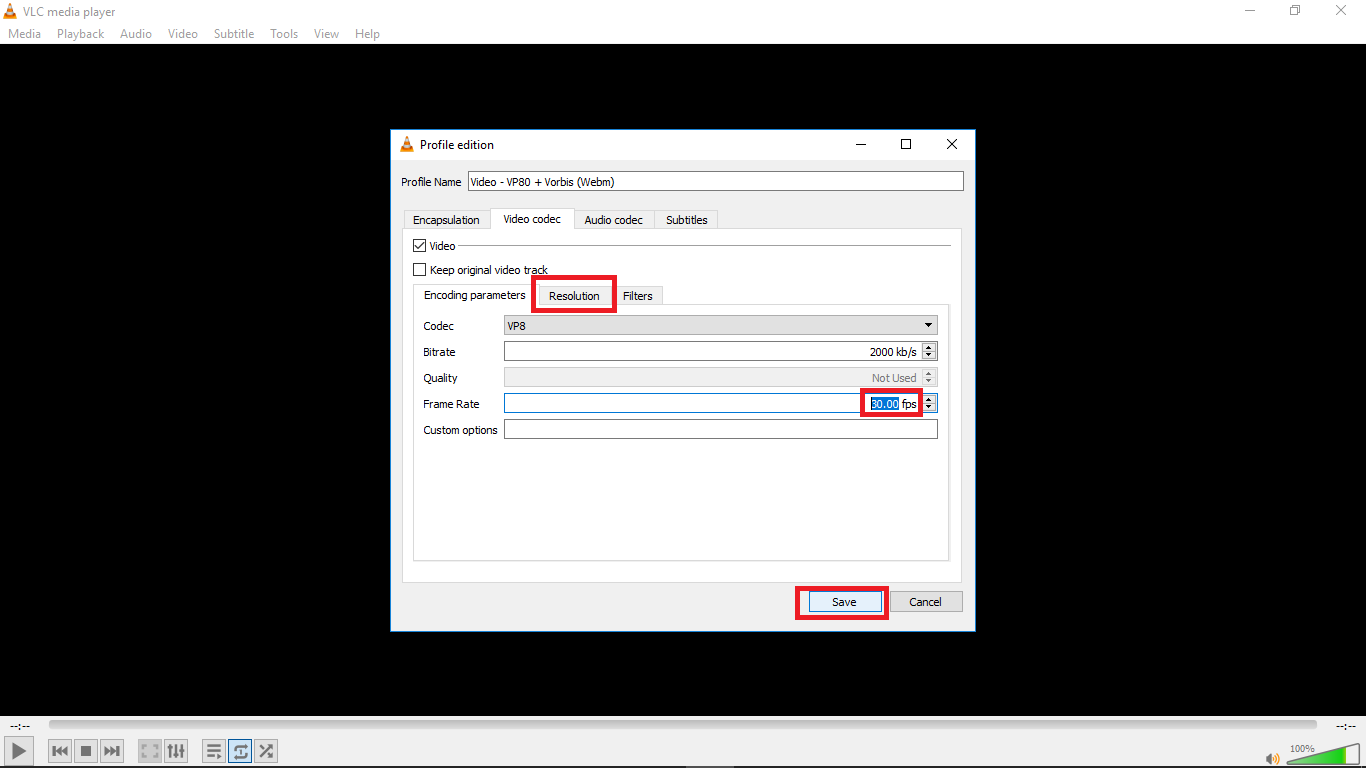
Step 9: Select the destination folder and click start. VLC will resize the video and retain most of its quality.
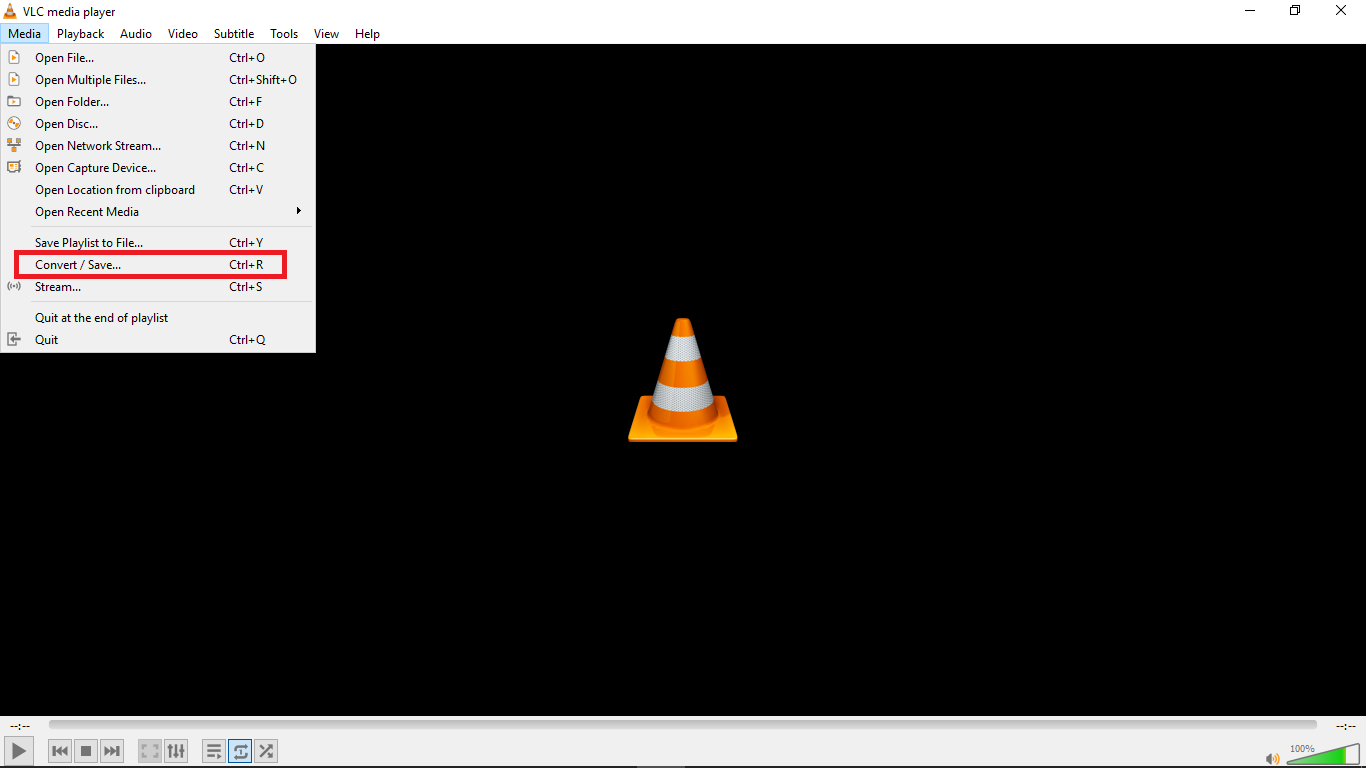
Method 3: Resize Videos With Ezgif
An alternative way to resize videos is by using Ezgif Video Resizer. If you are looking for a quick way to resize your WebM videos, this is a great tool. Ezgif is a free online video resizer with a very simple interface that can aid easy navigation for new users. The whole video resizing operation is pretty quick so you don’t have to worry about wasting so much time.
Ezgif supports various video formats like MP4, MOV, FLV, WEBM, MPEG, 3GP and more. Aside from the basic size change, it also allows you to rotate, crop, cut, mute, speed, reverse and add subtitles.
Here’s how you can resize your WebM video with Ezgif in a few steps:
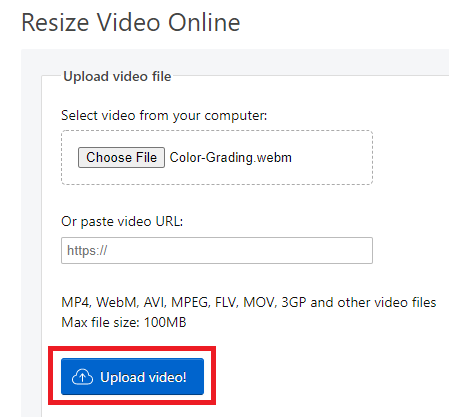
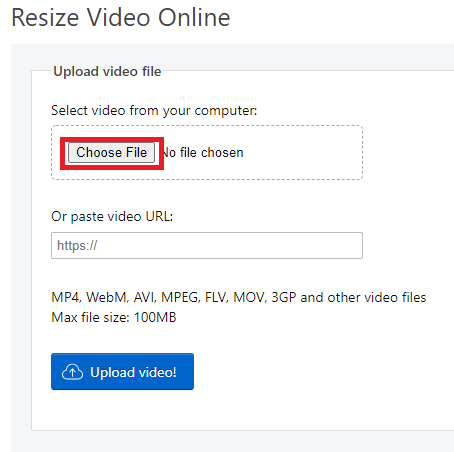
Step 1: Go to Ezgif Resize Video on your web browser and add your WebM file by clicking “Choose File” or pasting the video URL.
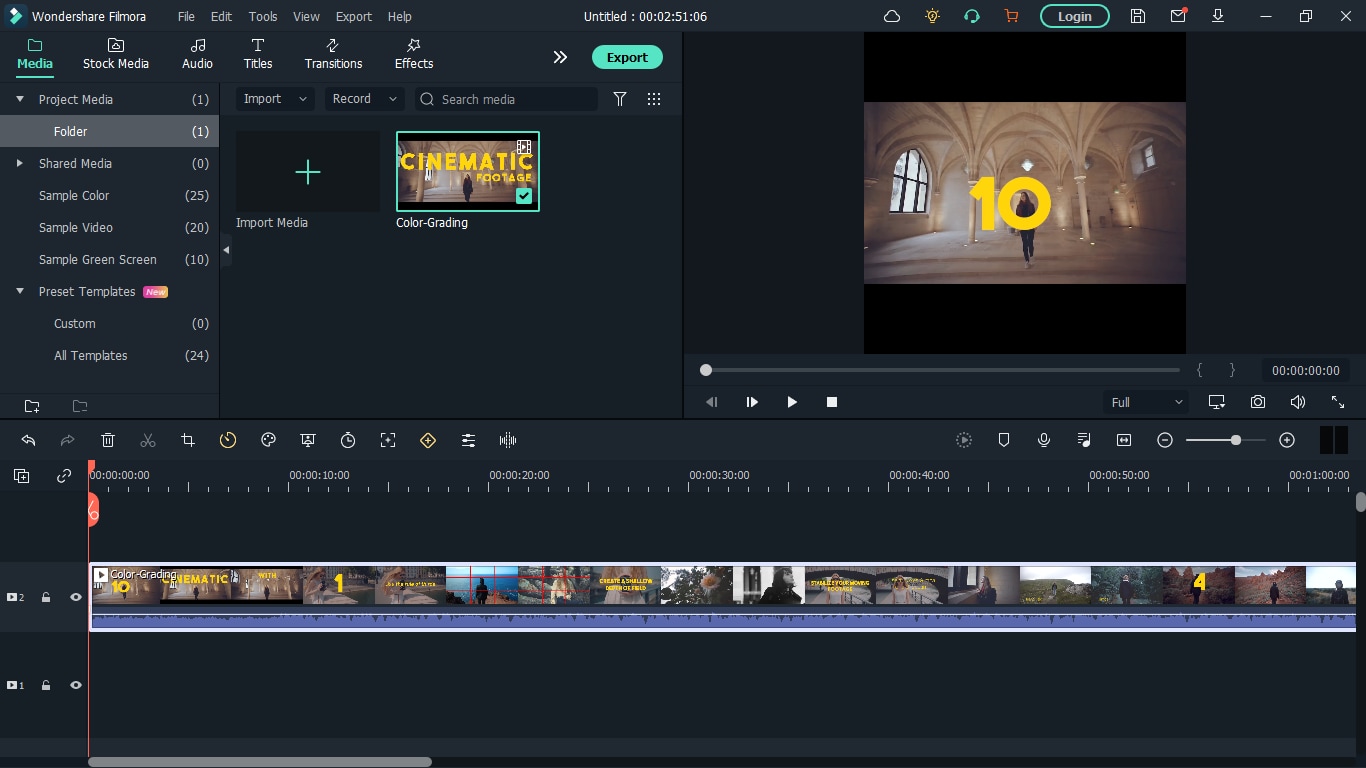
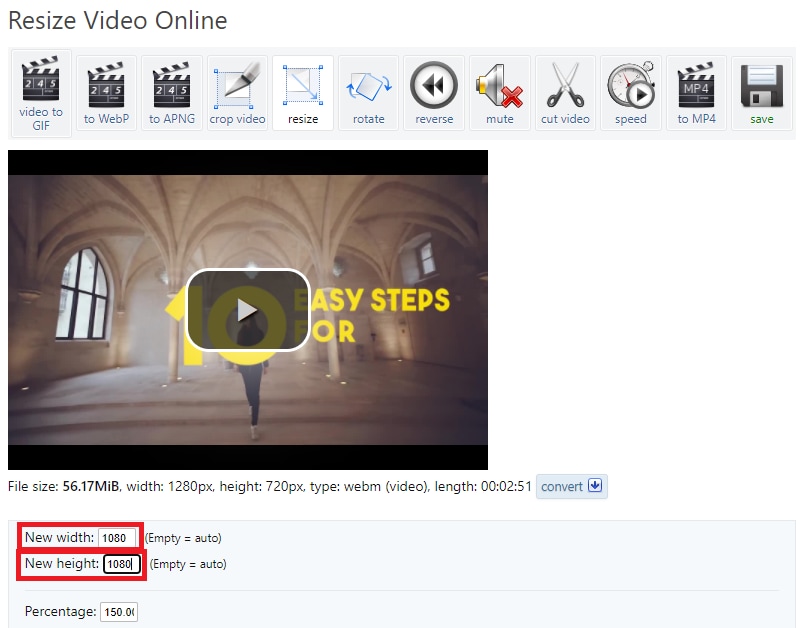
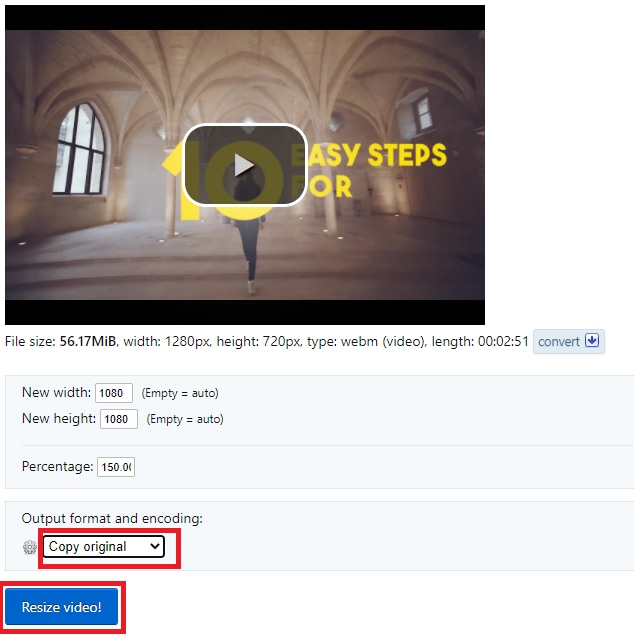
Step 2: Click “Upload Video”. You’ll see that I chose a colour grading video with the .webm extension which I want to resize. After clicking ‘Upload Video’, a floating window will appear with the video details displayed.
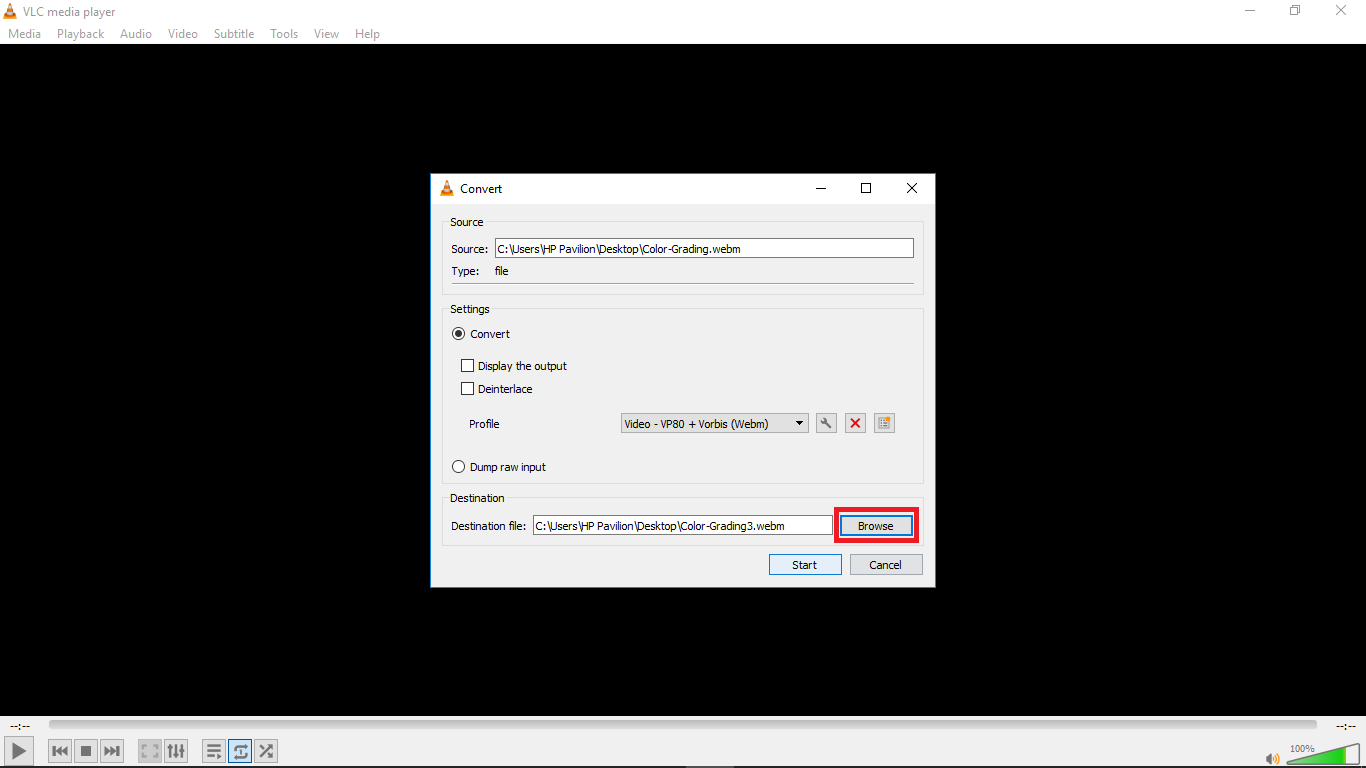
Step 3: Type in specific “New width” and “New height” to confirm a new size.
Step 4: Check “output format and encoding” and press “Resize video!” to save your WebM file.
Whether you are a content creator or a social media influencer, resizing videos is one thing you’ll be doing regularly and these tools will come in handy. Maybe you are a video editor and your client wants a different video format after you are done exporting, these tools will definitely save you all the stress of readjusting and hours or re-exporting.
For macOS 10.14 or later
Step 1: Go to the official Wondershare Filmora website and download the software.
Step 2: Install Wondershare Filmora on your PC and double click to launch.
Step 3: Change your aspect ratio. When you launch Filmora, you’re allowed to choose your preferred aspect ratio on the start page.

Select your preferred aspect ratio from the list of options- 16:9 (widescreen), 4:3 (standard), 1:1 (Instagram), 9:16 (portrait). For example, if you import a 16:9 video file into Filmora, and set it to 1:1 aspect ratio then, the final output file will be 1:1, which is the perfect aspect ratio for Instagram posts.
You’ll see below that I selected 1:1 for instagram. After you are done selecting your preferred aspect ratio, hit ‘New Project’.

Step 4: Import your WebM video. After you must have selected your preferred aspect ratio, the next step is to import the video you want to resize; you can do this by clicking on the import icon shown below. Once done, drag the video to the timeline also shown below.


A floating window will appear and you’ll be asked to change project settings to match the media. Click on ‘Keep project settings’. Filmora will change the aspect ratio of the original video you imported to your preferred aspect ratio.


Step 5: Save your video. Once the video is now properly placed in the timeline, next thing is hit ‘export’ to save your video. You can go to the ‘format tab’ to change the video output format to WebM or whatever format you choose then hit ‘Export’.

Method 2: How to resize WebM file with VLC
VLC is a free and open source multimedia player. It is arguably the best media player out there and that’s for a reason- it can play almost everything without the need for any external codecs.
The playback feature is amazing but that’s not the only thing it can do. VLC outshines most other media players because of some extra features it possesses. It resizes and converts media files, downloads and adds subtitles, records screen, as well as is customizable in settings and expandable via plugins.
What we want to use in this guide is its media resizing feature, so let’s show you how you can use it in these steps:
Step 1: Download VLC Media player from the official VLC page and install it on your windows or Mac PC.
Step 2: Launch VLC after installing by double-clicking on the software.
Step 3: Click “Media” in the toolbar.
Step 4: Select “Convert / Save”. You can also tap shortcut keys Ctrl + R to quickly open a new window.

Step 5: Click “Add”. You can load one or more video files. Here, I’ll choose a colour grading video on my desktop. You can see it has the extension ‘.webm’. After loading the video file you want to resize, click “Convert / Save” again.


Step 6: Choose your desired output profile type. With VLC, you can resize video to MP4, WebM, TS, and other formats.
Step 8: Click the settings icon to access the settings window and select the video codec where you can adjust parameters like frame rate, bitrate, resolution, etc to change video file size. I changed the frame rate of my video to 30fps which is ideal for high quality videos. Also click the resolution tab and set your desired resolution then click save.


Step 9: Select the destination folder and click start. VLC will resize the video and retain most of its quality.

Method 3: Resize Videos With Ezgif
An alternative way to resize videos is by using Ezgif Video Resizer. If you are looking for a quick way to resize your WebM videos, this is a great tool. Ezgif is a free online video resizer with a very simple interface that can aid easy navigation for new users. The whole video resizing operation is pretty quick so you don’t have to worry about wasting so much time.
Ezgif supports various video formats like MP4, MOV, FLV, WEBM, MPEG, 3GP and more. Aside from the basic size change, it also allows you to rotate, crop, cut, mute, speed, reverse and add subtitles.
Here’s how you can resize your WebM video with Ezgif in a few steps:
Step 1: Go to Ezgif Resize Video on your web browser and add your WebM file by clicking “Choose File” or pasting the video URL.

Step 2: Click “Upload Video”. You’ll see that I chose a colour grading video with the .webm extension which I want to resize. After clicking ‘Upload Video’, a floating window will appear with the video details displayed.

Step 3: Type in specific “New width” and “New height” to confirm a new size.

Step 4: Check “output format and encoding” and press “Resize video!” to save your WebM file.

Whether you are a content creator or a social media influencer, resizing videos is one thing you’ll be doing regularly and these tools will come in handy. Maybe you are a video editor and your client wants a different video format after you are done exporting, these tools will definitely save you all the stress of readjusting and hours or re-exporting.
For macOS 10.14 or later
Step 1: Go to the official Wondershare Filmora website and download the software.
Step 2: Install Wondershare Filmora on your PC and double click to launch.
Step 3: Change your aspect ratio. When you launch Filmora, you’re allowed to choose your preferred aspect ratio on the start page.

Select your preferred aspect ratio from the list of options- 16:9 (widescreen), 4:3 (standard), 1:1 (Instagram), 9:16 (portrait). For example, if you import a 16:9 video file into Filmora, and set it to 1:1 aspect ratio then, the final output file will be 1:1, which is the perfect aspect ratio for Instagram posts.
You’ll see below that I selected 1:1 for instagram. After you are done selecting your preferred aspect ratio, hit ‘New Project’.

Step 4: Import your WebM video. After you must have selected your preferred aspect ratio, the next step is to import the video you want to resize; you can do this by clicking on the import icon shown below. Once done, drag the video to the timeline also shown below.


A floating window will appear and you’ll be asked to change project settings to match the media. Click on ‘Keep project settings’. Filmora will change the aspect ratio of the original video you imported to your preferred aspect ratio.


Step 5: Save your video. Once the video is now properly placed in the timeline, next thing is hit ‘export’ to save your video. You can go to the ‘format tab’ to change the video output format to WebM or whatever format you choose then hit ‘Export’.

Method 2: How to resize WebM file with VLC
VLC is a free and open source multimedia player. It is arguably the best media player out there and that’s for a reason- it can play almost everything without the need for any external codecs.
The playback feature is amazing but that’s not the only thing it can do. VLC outshines most other media players because of some extra features it possesses. It resizes and converts media files, downloads and adds subtitles, records screen, as well as is customizable in settings and expandable via plugins.
What we want to use in this guide is its media resizing feature, so let’s show you how you can use it in these steps:
Step 1: Download VLC Media player from the official VLC page and install it on your windows or Mac PC.
Step 2: Launch VLC after installing by double-clicking on the software.
Step 3: Click “Media” in the toolbar.
Step 4: Select “Convert / Save”. You can also tap shortcut keys Ctrl + R to quickly open a new window.

Step 5: Click “Add”. You can load one or more video files. Here, I’ll choose a colour grading video on my desktop. You can see it has the extension ‘.webm’. After loading the video file you want to resize, click “Convert / Save” again.


Step 6: Choose your desired output profile type. With VLC, you can resize video to MP4, WebM, TS, and other formats.
Step 8: Click the settings icon to access the settings window and select the video codec where you can adjust parameters like frame rate, bitrate, resolution, etc to change video file size. I changed the frame rate of my video to 30fps which is ideal for high quality videos. Also click the resolution tab and set your desired resolution then click save.


Step 9: Select the destination folder and click start. VLC will resize the video and retain most of its quality.

Method 3: Resize Videos With Ezgif
An alternative way to resize videos is by using Ezgif Video Resizer. If you are looking for a quick way to resize your WebM videos, this is a great tool. Ezgif is a free online video resizer with a very simple interface that can aid easy navigation for new users. The whole video resizing operation is pretty quick so you don’t have to worry about wasting so much time.
Ezgif supports various video formats like MP4, MOV, FLV, WEBM, MPEG, 3GP and more. Aside from the basic size change, it also allows you to rotate, crop, cut, mute, speed, reverse and add subtitles.
Here’s how you can resize your WebM video with Ezgif in a few steps:
Step 1: Go to Ezgif Resize Video on your web browser and add your WebM file by clicking “Choose File” or pasting the video URL.

Step 2: Click “Upload Video”. You’ll see that I chose a colour grading video with the .webm extension which I want to resize. After clicking ‘Upload Video’, a floating window will appear with the video details displayed.

Step 3: Type in specific “New width” and “New height” to confirm a new size.

Step 4: Check “output format and encoding” and press “Resize video!” to save your WebM file.

Whether you are a content creator or a social media influencer, resizing videos is one thing you’ll be doing regularly and these tools will come in handy. Maybe you are a video editor and your client wants a different video format after you are done exporting, these tools will definitely save you all the stress of readjusting and hours or re-exporting.
For macOS 10.14 or later
Step 1: Go to the official Wondershare Filmora website and download the software.
Step 2: Install Wondershare Filmora on your PC and double click to launch.
Step 3: Change your aspect ratio. When you launch Filmora, you’re allowed to choose your preferred aspect ratio on the start page.

Select your preferred aspect ratio from the list of options- 16:9 (widescreen), 4:3 (standard), 1:1 (Instagram), 9:16 (portrait). For example, if you import a 16:9 video file into Filmora, and set it to 1:1 aspect ratio then, the final output file will be 1:1, which is the perfect aspect ratio for Instagram posts.
You’ll see below that I selected 1:1 for instagram. After you are done selecting your preferred aspect ratio, hit ‘New Project’.

Step 4: Import your WebM video. After you must have selected your preferred aspect ratio, the next step is to import the video you want to resize; you can do this by clicking on the import icon shown below. Once done, drag the video to the timeline also shown below.


A floating window will appear and you’ll be asked to change project settings to match the media. Click on ‘Keep project settings’. Filmora will change the aspect ratio of the original video you imported to your preferred aspect ratio.


Step 5: Save your video. Once the video is now properly placed in the timeline, next thing is hit ‘export’ to save your video. You can go to the ‘format tab’ to change the video output format to WebM or whatever format you choose then hit ‘Export’.

Method 2: How to resize WebM file with VLC
VLC is a free and open source multimedia player. It is arguably the best media player out there and that’s for a reason- it can play almost everything without the need for any external codecs.
The playback feature is amazing but that’s not the only thing it can do. VLC outshines most other media players because of some extra features it possesses. It resizes and converts media files, downloads and adds subtitles, records screen, as well as is customizable in settings and expandable via plugins.
What we want to use in this guide is its media resizing feature, so let’s show you how you can use it in these steps:
Step 1: Download VLC Media player from the official VLC page and install it on your windows or Mac PC.
Step 2: Launch VLC after installing by double-clicking on the software.
Step 3: Click “Media” in the toolbar.
Step 4: Select “Convert / Save”. You can also tap shortcut keys Ctrl + R to quickly open a new window.

Step 5: Click “Add”. You can load one or more video files. Here, I’ll choose a colour grading video on my desktop. You can see it has the extension ‘.webm’. After loading the video file you want to resize, click “Convert / Save” again.


Step 6: Choose your desired output profile type. With VLC, you can resize video to MP4, WebM, TS, and other formats.
Step 8: Click the settings icon to access the settings window and select the video codec where you can adjust parameters like frame rate, bitrate, resolution, etc to change video file size. I changed the frame rate of my video to 30fps which is ideal for high quality videos. Also click the resolution tab and set your desired resolution then click save.


Step 9: Select the destination folder and click start. VLC will resize the video and retain most of its quality.

Method 3: Resize Videos With Ezgif
An alternative way to resize videos is by using Ezgif Video Resizer. If you are looking for a quick way to resize your WebM videos, this is a great tool. Ezgif is a free online video resizer with a very simple interface that can aid easy navigation for new users. The whole video resizing operation is pretty quick so you don’t have to worry about wasting so much time.
Ezgif supports various video formats like MP4, MOV, FLV, WEBM, MPEG, 3GP and more. Aside from the basic size change, it also allows you to rotate, crop, cut, mute, speed, reverse and add subtitles.
Here’s how you can resize your WebM video with Ezgif in a few steps:
Step 1: Go to Ezgif Resize Video on your web browser and add your WebM file by clicking “Choose File” or pasting the video URL.

Step 2: Click “Upload Video”. You’ll see that I chose a colour grading video with the .webm extension which I want to resize. After clicking ‘Upload Video’, a floating window will appear with the video details displayed.

Step 3: Type in specific “New width” and “New height” to confirm a new size.

Step 4: Check “output format and encoding” and press “Resize video!” to save your WebM file.

Whether you are a content creator or a social media influencer, resizing videos is one thing you’ll be doing regularly and these tools will come in handy. Maybe you are a video editor and your client wants a different video format after you are done exporting, these tools will definitely save you all the stress of readjusting and hours or re-exporting.
How To Mirror a Video Clip in Premiere Pro
Video editing is a crucial part of filmmaking, and it can make or break the outcome of a project. Adobe Premiere Pro is a widely used video editing software that provides a vast range of tools for professional video editing. One of the features that Premiere Pro offers is the ability to mirror video clips, which can add an interesting visual element to your footage.
In this article, we will look at how to mirror a video clip in Premiere Pro in a few simple steps. Whether you’re a seasoned video editor or just starting, this guide will help you achieve the desired effect in your videos. From basic mirroring to advanced techniques, we will cover everything you need to know to create a symmetrical and visually appealing look in your projects.
What Is To “Mirror” a Video?
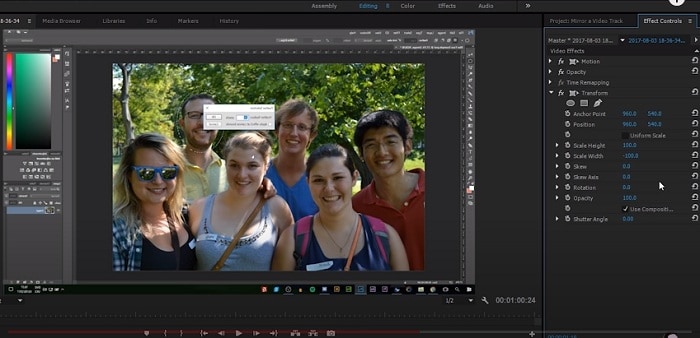
Mirroring a video in Adobe Premiere Pro refers to reflecting the footage along either the horizontal or vertical axis. This results in the composition being flipped and reversed, creating a reflection-like effect. Flipping a video is distinct from rotating it, as the orientation of the elements is changed, but their position remains the same.
Flipping can serve both creative and practical purposes. On the one hand, it can add a unique and visually interesting element to a project, creating a form of self-reflection or self-analysis. On the other hand, flipping can also be used to correct videos accidentally captured upside down. For example, flipping a video recorded with a selfie camera along the horizontal axis will correctly display the right side up.
It is important to note the distinction between flipping and rotating a video. A flipped video will look like a mirror image, whereas a video rotated 180 degrees will not. By understanding the differences between these techniques, you can effectively use mirroring to achieve the desired result in your projects.
How To Mirror a Video in Adobe Premiere Pro
Mirroring a video in Adobe Premiere Pro is a quick and simple process that can add a unique and visually appealing touch to your projects. Whether you want to create a symmetrical look or experiment with a new visual style, this guide will mirror a video clip in Premiere Pro. From basic to advanced techniques, you’ll be able to create stunning and reflective videos in no time. So, let’s get started!
Step1 Choose the “Effects“ option from the menu.
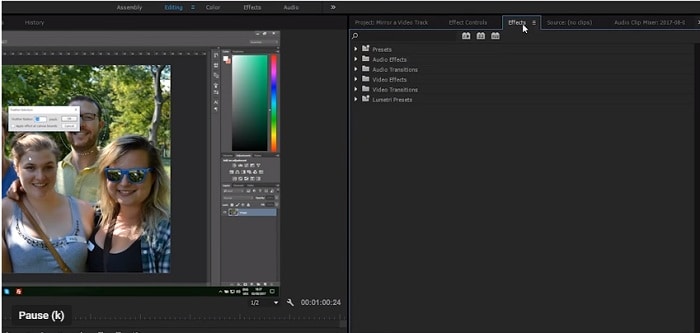
Step2 Look for the “Transform“ tab.
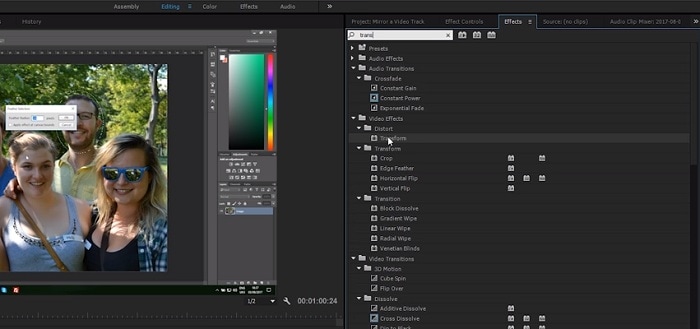
Step3 Pick the “Horizontal Flip“ or “Vertical Flip“ from the drop-down list.
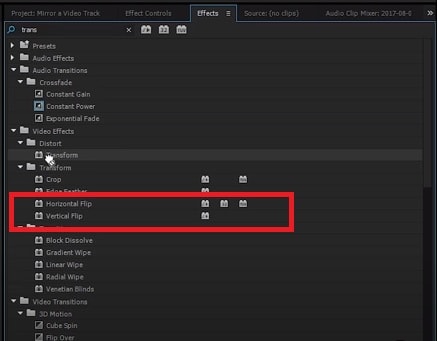
Step4 Drag the desired flip onto the selected clip, which will immediately reverse the image displayed on the Program Monitor.
How To Create Mirror Video Effect in Premiere Pro
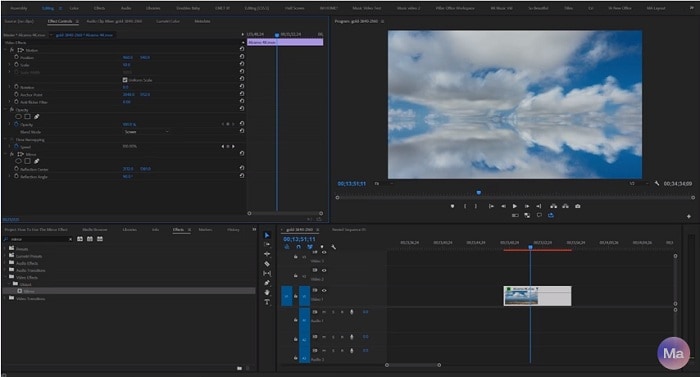
Creating a mirror video effect in Adobe Premiere Pro opens up a world of artistic possibilities for your projects. With the right techniques, you can create visually appealing and symmetrical videos that stand out from the crowd. This guide will show you how to master the art of mirror video effects in Premiere Pro, from the basics to more advanced techniques. Get ready to explore the creative side of video editing and elevate your projects to the next level.
Step1 Access the “Effects“ menu and select “Video Effects.”
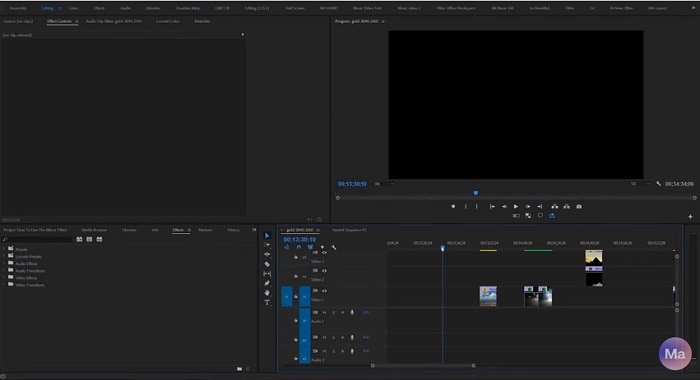
Step2 Pick “Distort“, then the “Mirror“.
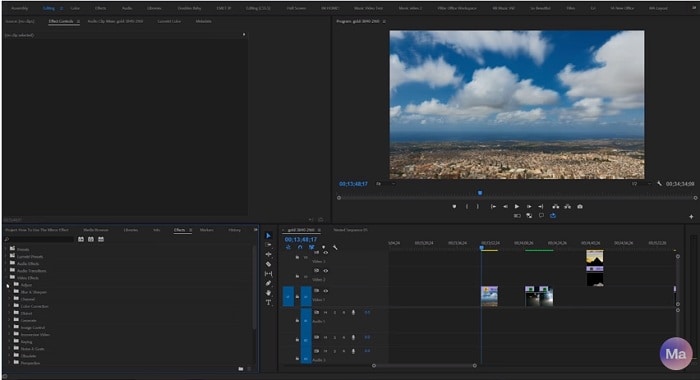
Step3 Apply the Mirror effect to your clip.
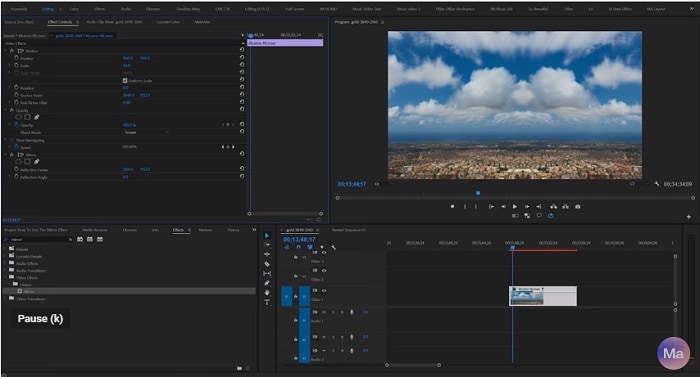
Step4 Adjust “Reflection Center“ for side-by-side effect or “Reflection Angle“ for up-and-down effect in the Effect Controls panel.
[Bonus] Wondershare Filmora – A Great Alternative to Premiere Pro Mirror Tool
Wondershare Filmora is a great alternative to Adobe Premiere Pro for video editing. Not only does it offer an intuitive interface for both beginners and professionals, but it also offers a range of video editing tools and features. One of those features is its ability to easily mirror a video. With Filmora, you can flip your videos vertically or horizontally with just a few clicks.
Free Download For Win 7 or later(64-bit)
Free Download For macOS 10.14 or later

Filmora also offers a variety of creative video effects and templates, making it easy to add a unique touch to your projects. In addition, its built-in audio editing tools allow you to create professional-sounding soundtracks for your videos. Filmora’s easy-to-use keyframe animation feature gives you precise control over the animation of your elements, allowing you to add movement and bring your videos to life.
Furthermore, Filmora’s advanced color correction tools help you achieve the perfect color balance in your videos. Whether you’re a beginner or a professional, Wondershare Filmora is a great option for anyone looking for a powerful and easy-to-use video editor.
How To Mirror a Video Clip With Wondershare Filmora
Mirroring a video clip is a simple process with Wondershare Filmora. This video editing software provides an intuitive and user-friendly interface, making it easy to achieve the desired result.
To mirror your video in Filmora, you can follow a few straightforward steps. Whether you want to flip your video horizontally or vertically, Filmora’s mirroring tool will help you achieve the perfect reflection with just a few clicks. So, if you’re looking for an alternative to Adobe Premiere Pro, Wondershare Filmora is a great option to consider for your video editing needs.
Step1 Within the “Flip“ section, there are four options available. To flip the clip from left to right, select the “Flip Horizontal“ icon, or if you want to turn the clip upside down, choose the “Flip “ option.
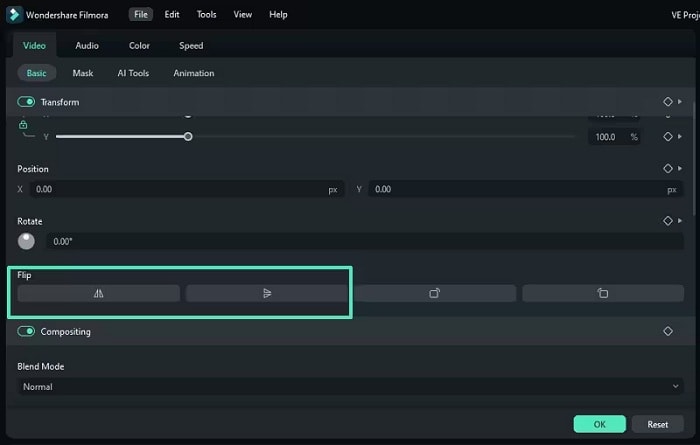
Step2 You can rotate the clip by clicking either the “Clockwise“ or “Counterclockwise“ icons under the Rotate section.

Step3 If you want to specify the rotation angle, you can either enter a value in the box under the Rotate tab or manipulate the dot in the circle to achieve the desired angle.

How To Create Mirror Video Effect in Wondershare Filmora
Wondershare Filmora is an excellent video editing software that offers a simple solution for creating a mirror video effect. Its intuitive interface and powerful features make it possible for amateur and professional video editors to achieve stunning results. Filmora provides users with an array of tools to create a mirror effect on their video clip effortlessly.
Whether you want to create a reversed image, flip the orientation vertically, or rotate the clip in a specific direction, Filmora has got you covered. Let’s see how to create a mirror video effect with Wondershare Filmora.
Step1 Add the video clip to a video track on the timeline
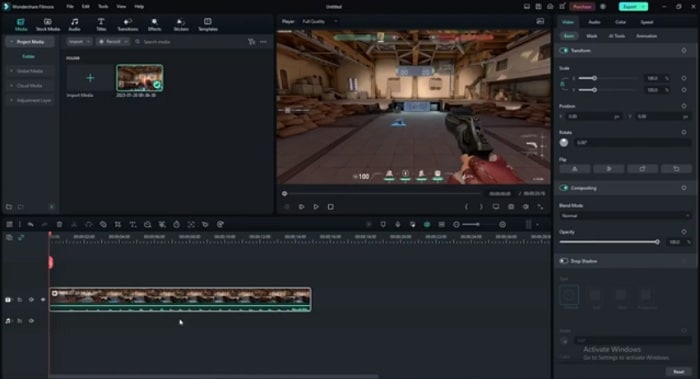
Step2 Click the “Filters“ icon and choose the “Distortion“ category
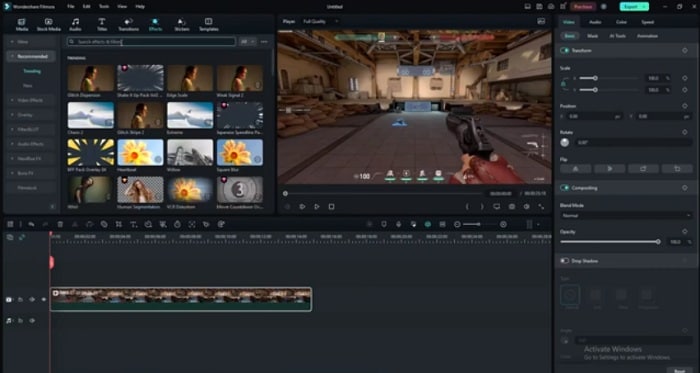
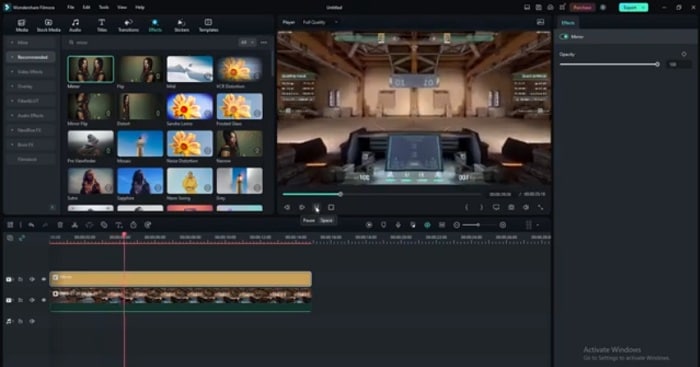
Step3 Locate the “Mirror“ effect, drag and drop it to the filter track, and adjust its duration to match the video clip
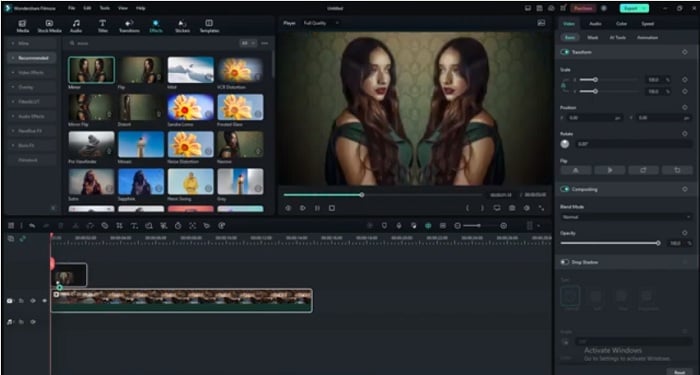
Step4 Preview the results in the Preview Window before exporting the video from Filmora.
Conclusion
Mirroring a video can add an interesting and unique visual effect to your videos. Adobe Premiere Pro and Wondershare Filmora provide easy-to-use tools to achieve this effect. While Premiere Pro offers more advanced features and customization options, Filmora provides a simpler and more user-friendly interface for those who want to achieve the same results without the hassle. Whichever option you choose, you can create stunning mirror videos in no time.
Free Download For macOS 10.14 or later

Filmora also offers a variety of creative video effects and templates, making it easy to add a unique touch to your projects. In addition, its built-in audio editing tools allow you to create professional-sounding soundtracks for your videos. Filmora’s easy-to-use keyframe animation feature gives you precise control over the animation of your elements, allowing you to add movement and bring your videos to life.
Furthermore, Filmora’s advanced color correction tools help you achieve the perfect color balance in your videos. Whether you’re a beginner or a professional, Wondershare Filmora is a great option for anyone looking for a powerful and easy-to-use video editor.
How To Mirror a Video Clip With Wondershare Filmora
Mirroring a video clip is a simple process with Wondershare Filmora. This video editing software provides an intuitive and user-friendly interface, making it easy to achieve the desired result.
To mirror your video in Filmora, you can follow a few straightforward steps. Whether you want to flip your video horizontally or vertically, Filmora’s mirroring tool will help you achieve the perfect reflection with just a few clicks. So, if you’re looking for an alternative to Adobe Premiere Pro, Wondershare Filmora is a great option to consider for your video editing needs.
Step1 Within the “Flip“ section, there are four options available. To flip the clip from left to right, select the “Flip Horizontal“ icon, or if you want to turn the clip upside down, choose the “Flip “ option.

Step2 You can rotate the clip by clicking either the “Clockwise“ or “Counterclockwise“ icons under the Rotate section.

Step3 If you want to specify the rotation angle, you can either enter a value in the box under the Rotate tab or manipulate the dot in the circle to achieve the desired angle.

How To Create Mirror Video Effect in Wondershare Filmora
Wondershare Filmora is an excellent video editing software that offers a simple solution for creating a mirror video effect. Its intuitive interface and powerful features make it possible for amateur and professional video editors to achieve stunning results. Filmora provides users with an array of tools to create a mirror effect on their video clip effortlessly.
Whether you want to create a reversed image, flip the orientation vertically, or rotate the clip in a specific direction, Filmora has got you covered. Let’s see how to create a mirror video effect with Wondershare Filmora.
Step1 Add the video clip to a video track on the timeline

Step2 Click the “Filters“ icon and choose the “Distortion“ category

Step3 Locate the “Mirror“ effect, drag and drop it to the filter track, and adjust its duration to match the video clip

Step4 Preview the results in the Preview Window before exporting the video from Filmora.

Conclusion
Mirroring a video can add an interesting and unique visual effect to your videos. Adobe Premiere Pro and Wondershare Filmora provide easy-to-use tools to achieve this effect. While Premiere Pro offers more advanced features and customization options, Filmora provides a simpler and more user-friendly interface for those who want to achieve the same results without the hassle. Whichever option you choose, you can create stunning mirror videos in no time.
Exploring Tools to Integrate Special Mask Effects Into Your Content. Read the Following Article to Master some Tools Experts in Mask Tracking
Mask tracking refers to editing a specific part of a video without overlapping. Masking helps with creative transitions and background removal with ease. The integration of AI technology in masking tools has made masking more accessible. They help with masking an object or landscape with precision.
In addition, you can correct the colors of a specific part through a motion tracking mask. In this article, we’ll discuss masker tracking using three different software. Two of those software are renowned for their professionalism and precision. We’ll discuss masking in Adobe After Effects , Adobe Premiere Pro , and an alternative.
AI Smart Masking Spice up your video content with the endless possibilities of AI masking functions!
Free Download Free Download Learn More

Part 1: Working Out the Comprehensive Methods to Perform Mask Tracking on Adobe After Effects
Adobe After Effects is a powerful tool for mask tracking and other functions. The interface of this tool tailors your content to your needs with precision. The process of masking is convenient and accessible and provides accurate results. Its advanced masking options, like filling up the mask, add a realistic touch. Before learning about masking in After Effects, let’s discuss some of its features:
- Text Animations: Animating your text in Adobe After Effects is a comprehensive experience. It is because the software has amazing text fonts and animation options. You can also set the appearance settings like opacity, color, and more text. In addition, the software has pre-installed effects and presets to ease the process.
- VFX/Visual Effects: Elevate your images and videos using Adobe’s amazing visual elements. It can eliminate mistakes, and results are so promising that they become invisible. You can use the mask tracking effect to hide and fill objects. In addition, you can turn your transitions into high-resolution 3D or 4D videos.
- Motion Graphics: It moves anything with its motion graphics functionality and advanced keyframing. Along with animating text, the feature allows you to move the logos. You can move a logo on any background from top to bottom or left to right. With its flickering and wiggling effects, make animations without keyframing.
- Rotoscoping: This After Effects function eliminates using green screens in your videos. Using the pen tool, you can merge a different object in a different footage. Afterward, you can polish the mask by resizing and adjusting opacity values.
- Motion Tracking: Elevate the graphics of your videos using the motion tracking feature. This function connects any image with an object’s motion. Therefore, your images become animated and add a creative element to the content. Its cloud collaboration with other software allows users to download assets.
Step-by-Step Procedure for Masking in Adobe After Effects
Now that you know the After Effects masker line tracking feature, let’s move forward. Read the following guide to learn more about masking:
Step 1
After importing your clip into the timeline, select it in the timeline panel. Navigate towards the upper toolbar and select the “Pen Tool” option. Afterward, create a mask around the object that you want to remove.
![]()
Step 2
You’ll see a mask around the object, and the rest of the screen will disappear. Navigate to the timeline panel, expand the video track options, and select “Mask.” Click the “Mask” navigation arrow and select “None.”
![]()
Step 3
Click the “Mask” button and select the “Track Mask” option. A mask tracker window will appear on the right side; expand the “Method” option. Following that, select the type of masking you want, like “Position.” Play the video from beginning to end for motion detection. Afterward, change the “Mask” mode to “Add” to apply masking.
![]()
Step 4
Afterward, change the Mask mode to “Subtract” from the timeline. Now, navigate towards the topmost toolbar and expand the “Window” tab. From the expansion menu, click the “Content-Aware Fill” option.
![]()
Step 5
Move towards the “Mask” option, expand “Mask Path,” and change the values below. Now, go to the right side, increase “Alpha Expansion,” and click “Generate Fill Layer.” Once the mask tracking completes, download your video.
![]()
Part 2: Providing a Detailed Guide on How to Do Mask Tracking with Adobe Premiere Pro
Adobe Premiere Pro is one of the industry’s leading tools for editing videos. It offers a wide range of features and built-in effects to elevate content. The software offers precise editing capabilities for mask tracking and other enhancements. In addition, it has many visual, video, and audio effects and presets to apply. Let’s discuss some key features of this tool that make it worthy of being top:
- Motion Graphics Templates: With its seamless After Effect collaboration, it offers built-in templates. These templates include multiple text, shapes, and graphics. You can also customize these templates as per content relevancy and taste.
- Edit Audio: Premiere Pro has multiple audio editing options to maintain audio quality. The tool allows you to decrease the volume of one track while increasing others. In addition, you can make audio adjustments that fit a sound.
- Color Correction: Enhance the graphical element in your videos using this feature. It offers both color correction and enhancing capabilities. You can employ this color correction if you have overexposed or underexposed videos.
- Movie and Film Editing: A professional editor offers applications in the media industry. The Premiere Pro offers seamless collaboration with all video and audio formats. In addition, it can import files from all sources like DSLRs and more.
- Speech to Text: It doesn’t just limit you to video editing but also offers transcript creation. The software analyzes your footage’s audio and creates transcripts. Afterward, you can use them as subtitles and captions.
Step-by-Step Procedure for Masking in Premiere Pro
After introducing mask tracking in Adobe Premiere Pro, let’s progress further. Continue reading the following guide to gain a deeper understanding of masking:
Step 1
After importing your video in the timeline, select it and navigate towards the toolbar. In the “Edit > Effect” section, select “Lumetri Color” under “Video Effects.” Then, select the mask option under Lumetri colors and set it on the screen.
![]()
Step 2
Then, apply the color correction options on the masked areas.
![]()
Step 3
Select “Mask Path” under the Mask section and play it upon color correcting. This will start the mask tracking throughout the clip. The color corrections will be applied to the masked area throughout the video.
![]()
Part 3: Make Mask Tracking Easy with Wondershare Filmora: Working Out the Details
The above-mentioned mask tracking software is professional but is difficult to comprehend. This software is not compatible in terms of convenience. This was when users needed software with easy access and an editing interface. Wondershare Filmora performs diverse creation and editing tasks with expertise. The software assists in diverse audio, video, and text-editing tasks.
The AI-backed algorithms have made achieving perfection in your editing task seamless. In Filmora’s new V13 upgrade, it has introduced an AI masking feature. This feature offers to mask character or subject and auto-analyzes the selected area. In addition, for manual motion tracking masks, users can also resize the mask brush.
Step-by-Step Guide to AI Masking in Filmora
To understand this mask tracking feature better, we have assembled the steps of it. In the following guide, you will learn about accessing and applying this tool:
Step 1Place Media to the Timeline
Upon entering Filmora, click the “New Project” button and access its editing interface. Go to the Project Media section and click the “Import” button. Afterward, import your file and bring it to the timeline using your cursor.
![]()
Step 2Access and Employ AI Masking
Select the video in the timeline and navigate towards the right-side settings panel. In the “Video” tab, you’ll find the “Mask” section. Under this section, select the “AI Mask” option and scroll down to adjust its settings. Expand the “AI Mask” section, and choose the options you want masking for. Once you see the masked results on the preview screen, adjust the other settings below.
![]()
Step 3Save the Settings and Export
Afterward, click the “Save as custom” button to save these settings as a preset for later use. Further, make other adjustments and click on the “Export” button to finalize.
![]()
Free Download For Win 7 or later(64-bit)
Free Download For macOS 10.14 or later
Additional Editing Features of Wondershare Filmora
Along with masker line tracking, there are other video editing and AI features of Filmora. Keep reading the below section to know more about them:
1. AI Text-to-Video
Turn your words into graphics using this generative AI of Filmora. It transforms your textual directions into videos, along with images and voices. Using this AI will save you the effort of creating or hiring a professional.
2. AI Copilot Editing
Why spend hours exploring Filmora’s interface when you can have your guide? The AI Copilot acts like your personal chatbot assistant. You can converse with it like regular people, and it will show you directions on the feature. In addition, it features buttons to employ a specific effect or function.
3. Screen Recorder
Are you a creator who uploads video tutorials and educational videos? You can use Filmora’s screen recorder to create content in a seamless manner. It offers microphone recording and webcam recording for maximum interactivity. In addition, you can adjust custom screen resolution settings and more.
4. Video Background Remover
Leave the effort of adding a green screen in your background during video creation. Filmora’s AI technology can remove video backgrounds without any flaws. Users can replace the background with solid colors, gradients, and more afterward.
5. Silence Detection
Those long or short pauses during video recording are annoying for your audience. They decline the quality of the video and ultimately decline audience engagement. To remove such pauses, use Filmora silence detection AI to auto-eliminate them.
Free Download For Win 7 or later(64-bit)
Free Download For macOS 10.14 or later
Conclusion
In this article, users have gained insights into top mask tracking software. Along with their applications, the article discussed how to access and apply masking. However, masking in the first two tools can be difficult for some people. Hence, we introduced Wondershare Filmora as an easy desktop alternative. If you want to employ an easy motion tracking mask, use this versatile software.
Free Download Free Download Learn More

Part 1: Working Out the Comprehensive Methods to Perform Mask Tracking on Adobe After Effects
Adobe After Effects is a powerful tool for mask tracking and other functions. The interface of this tool tailors your content to your needs with precision. The process of masking is convenient and accessible and provides accurate results. Its advanced masking options, like filling up the mask, add a realistic touch. Before learning about masking in After Effects, let’s discuss some of its features:
- Text Animations: Animating your text in Adobe After Effects is a comprehensive experience. It is because the software has amazing text fonts and animation options. You can also set the appearance settings like opacity, color, and more text. In addition, the software has pre-installed effects and presets to ease the process.
- VFX/Visual Effects: Elevate your images and videos using Adobe’s amazing visual elements. It can eliminate mistakes, and results are so promising that they become invisible. You can use the mask tracking effect to hide and fill objects. In addition, you can turn your transitions into high-resolution 3D or 4D videos.
- Motion Graphics: It moves anything with its motion graphics functionality and advanced keyframing. Along with animating text, the feature allows you to move the logos. You can move a logo on any background from top to bottom or left to right. With its flickering and wiggling effects, make animations without keyframing.
- Rotoscoping: This After Effects function eliminates using green screens in your videos. Using the pen tool, you can merge a different object in a different footage. Afterward, you can polish the mask by resizing and adjusting opacity values.
- Motion Tracking: Elevate the graphics of your videos using the motion tracking feature. This function connects any image with an object’s motion. Therefore, your images become animated and add a creative element to the content. Its cloud collaboration with other software allows users to download assets.
Step-by-Step Procedure for Masking in Adobe After Effects
Now that you know the After Effects masker line tracking feature, let’s move forward. Read the following guide to learn more about masking:
Step 1
After importing your clip into the timeline, select it in the timeline panel. Navigate towards the upper toolbar and select the “Pen Tool” option. Afterward, create a mask around the object that you want to remove.
![]()
Step 2
You’ll see a mask around the object, and the rest of the screen will disappear. Navigate to the timeline panel, expand the video track options, and select “Mask.” Click the “Mask” navigation arrow and select “None.”
![]()
Step 3
Click the “Mask” button and select the “Track Mask” option. A mask tracker window will appear on the right side; expand the “Method” option. Following that, select the type of masking you want, like “Position.” Play the video from beginning to end for motion detection. Afterward, change the “Mask” mode to “Add” to apply masking.
![]()
Step 4
Afterward, change the Mask mode to “Subtract” from the timeline. Now, navigate towards the topmost toolbar and expand the “Window” tab. From the expansion menu, click the “Content-Aware Fill” option.
![]()
Step 5
Move towards the “Mask” option, expand “Mask Path,” and change the values below. Now, go to the right side, increase “Alpha Expansion,” and click “Generate Fill Layer.” Once the mask tracking completes, download your video.
![]()
Part 2: Providing a Detailed Guide on How to Do Mask Tracking with Adobe Premiere Pro
Adobe Premiere Pro is one of the industry’s leading tools for editing videos. It offers a wide range of features and built-in effects to elevate content. The software offers precise editing capabilities for mask tracking and other enhancements. In addition, it has many visual, video, and audio effects and presets to apply. Let’s discuss some key features of this tool that make it worthy of being top:
- Motion Graphics Templates: With its seamless After Effect collaboration, it offers built-in templates. These templates include multiple text, shapes, and graphics. You can also customize these templates as per content relevancy and taste.
- Edit Audio: Premiere Pro has multiple audio editing options to maintain audio quality. The tool allows you to decrease the volume of one track while increasing others. In addition, you can make audio adjustments that fit a sound.
- Color Correction: Enhance the graphical element in your videos using this feature. It offers both color correction and enhancing capabilities. You can employ this color correction if you have overexposed or underexposed videos.
- Movie and Film Editing: A professional editor offers applications in the media industry. The Premiere Pro offers seamless collaboration with all video and audio formats. In addition, it can import files from all sources like DSLRs and more.
- Speech to Text: It doesn’t just limit you to video editing but also offers transcript creation. The software analyzes your footage’s audio and creates transcripts. Afterward, you can use them as subtitles and captions.
Step-by-Step Procedure for Masking in Premiere Pro
After introducing mask tracking in Adobe Premiere Pro, let’s progress further. Continue reading the following guide to gain a deeper understanding of masking:
Step 1
After importing your video in the timeline, select it and navigate towards the toolbar. In the “Edit > Effect” section, select “Lumetri Color” under “Video Effects.” Then, select the mask option under Lumetri colors and set it on the screen.
![]()
Step 2
Then, apply the color correction options on the masked areas.
![]()
Step 3
Select “Mask Path” under the Mask section and play it upon color correcting. This will start the mask tracking throughout the clip. The color corrections will be applied to the masked area throughout the video.
![]()
Part 3: Make Mask Tracking Easy with Wondershare Filmora: Working Out the Details
The above-mentioned mask tracking software is professional but is difficult to comprehend. This software is not compatible in terms of convenience. This was when users needed software with easy access and an editing interface. Wondershare Filmora performs diverse creation and editing tasks with expertise. The software assists in diverse audio, video, and text-editing tasks.
The AI-backed algorithms have made achieving perfection in your editing task seamless. In Filmora’s new V13 upgrade, it has introduced an AI masking feature. This feature offers to mask character or subject and auto-analyzes the selected area. In addition, for manual motion tracking masks, users can also resize the mask brush.
Step-by-Step Guide to AI Masking in Filmora
To understand this mask tracking feature better, we have assembled the steps of it. In the following guide, you will learn about accessing and applying this tool:
Step 1Place Media to the Timeline
Upon entering Filmora, click the “New Project” button and access its editing interface. Go to the Project Media section and click the “Import” button. Afterward, import your file and bring it to the timeline using your cursor.
![]()
Step 2Access and Employ AI Masking
Select the video in the timeline and navigate towards the right-side settings panel. In the “Video” tab, you’ll find the “Mask” section. Under this section, select the “AI Mask” option and scroll down to adjust its settings. Expand the “AI Mask” section, and choose the options you want masking for. Once you see the masked results on the preview screen, adjust the other settings below.
![]()
Step 3Save the Settings and Export
Afterward, click the “Save as custom” button to save these settings as a preset for later use. Further, make other adjustments and click on the “Export” button to finalize.
![]()
Free Download For Win 7 or later(64-bit)
Free Download For macOS 10.14 or later
Additional Editing Features of Wondershare Filmora
Along with masker line tracking, there are other video editing and AI features of Filmora. Keep reading the below section to know more about them:
1. AI Text-to-Video
Turn your words into graphics using this generative AI of Filmora. It transforms your textual directions into videos, along with images and voices. Using this AI will save you the effort of creating or hiring a professional.
2. AI Copilot Editing
Why spend hours exploring Filmora’s interface when you can have your guide? The AI Copilot acts like your personal chatbot assistant. You can converse with it like regular people, and it will show you directions on the feature. In addition, it features buttons to employ a specific effect or function.
3. Screen Recorder
Are you a creator who uploads video tutorials and educational videos? You can use Filmora’s screen recorder to create content in a seamless manner. It offers microphone recording and webcam recording for maximum interactivity. In addition, you can adjust custom screen resolution settings and more.
4. Video Background Remover
Leave the effort of adding a green screen in your background during video creation. Filmora’s AI technology can remove video backgrounds without any flaws. Users can replace the background with solid colors, gradients, and more afterward.
5. Silence Detection
Those long or short pauses during video recording are annoying for your audience. They decline the quality of the video and ultimately decline audience engagement. To remove such pauses, use Filmora silence detection AI to auto-eliminate them.
Free Download For Win 7 or later(64-bit)
Free Download For macOS 10.14 or later
Conclusion
In this article, users have gained insights into top mask tracking software. Along with their applications, the article discussed how to access and apply masking. However, masking in the first two tools can be difficult for some people. Hence, we introduced Wondershare Filmora as an easy desktop alternative. If you want to employ an easy motion tracking mask, use this versatile software.
Also read:
- New How to Create Emoji on Mac That Take Less Than 10 Mins
- Updated How to Add Echo Effect to Video for 2024
- Updated “Create. Edit. Share. Transform Your Videos with KineMaster! Powerful Tools, Easy to Use.” – a Few Words We Read when We Come up with the Official Web-Site of KineMaster, a Mobile Video Editing Application for 2024
- In 2024, 12 Top Marketing Slideshow Templates
- Updated 15 Must-Use Gifs Editors
- New Customize PowerPoint Slideshow Icon in 8 Simple Ways for 2024
- Updated 2024 Approved Splitting Clips in Adobe After Effects Step by Step
- Best AR Video App - Top 10 Picks
- Updated Find Out the Best Animated Text Video Tools and Learn How to Animate Text in a Video in Simple Steps. Discover the Best Fonts to Animate Text Along with the Text Animation Templates for 2024
- New How D AI Video Games Act More Human Than Human?
- Updated In 2024, Simple Step by Step Tutorial on Creating a Lightroom Collage
- New In 2024, Learn How to Do Velocity Edits on PC to Enhance Your Videos, Adjusting Speed for Dynamic and Visually Engaging Results
- Updated In 2024, Making Slow Motion Videos in Final Cut Pro The Best Methods
- Updated 2024 Approved Efficient Ways to Change Slow Motion Video to Normal on iPhone
- Updated How to Export iMovie?
- In 2024, 11 Apps To Speed Up A Video On iPhone
- New 2024 Approved Are You Looking for an Ideal Halloween Countdown Video Clip for Your Video? This Article Will Walk You Through the Best Ones You Can Use to Get the Job Done Perfectly
- Updated 2024 Approved Would You Like to Know How to Change the Ratio of the Video or Which Is the Correct Aspect Ratio for Uploading to the Online Platform? Then, Go Through the Article to Get Complete Details About the Video Aspect Ratio
- Updated 2024 Approved How To Edit Youtube Videos In Easy Steps
- Easy Step by Step Tutorial on Creating a Lightroom Collage
- 2024 Approved Vintage Film Effect 1920S - How to Make
- 2024 Approved A Review On 3D LUT Creator
- In 2024, Ways to Make Canva Collages
- Detailed Steps to Rotate Videos Using Kdenlive
- New In 2024, Cropping Videos in VLC Step by Step
- Updated How To Create A Green Screen Video In After Effects
- Updated 2024 Approved Are You Eager to Discover the Method of Video Scaling in Filmora? You Are in the Right Place because This Discussion Will Cover the Content on This Matter
- New In 2024, 4 Methods to Resize a WebM File
- How to Resize FLV Videos Efficiently Windows, Mac,Android, iPhone & Online for 2024
- New In 2024, Best GIF to MOV Converters
- Updated This Article Will Show You How to Make a Tattoo Disappear on Your Body Magically for 2024
- New In 2024, Best Cloud Storage Service for Videos
- In 2024, | How to Livestream Zoom on Facebook?
- Updated Discover How You Can Use Vectorscope to Adjust Luminance, Color Grading, and More in Your Video Editing Projects for 2024
- Pattern Locks Are Unsafe Secure Your Samsung Phone Now with These Tips
- Complete Fixes To Solve iPhone 13 Pro Max Randomly Asking for Apple ID Password
- Honor Magic 5 Lite Camera Not Working Unexpected Error? Fix It Now | Dr.fone
- 3 Solutions to Find Your Oppo K11x Current Location of a Mobile Number | Dr.fone
- How To Revive Your Bricked Vivo Y100 5G in Minutes | Dr.fone
- 5 Easy Ways to Change Location on YouTube TV On Realme C55 | Dr.fone
- In 2024, How does the stardust trade cost In pokemon go On Motorola Moto G23? | Dr.fone
- In 2024, How to enter the iSpoofer discord server On Apple iPhone 13 Pro Max | Dr.fone
- In 2024, How to Reset your Itel A05s Lock Screen Password
- In 2024, The Ultimate Guide to Get the Rare Candy on Pokemon Go Fire Red On Nubia Red Magic 9 Pro | Dr.fone
- Bypassing Google Account With vnROM Bypass For Tecno Spark 10 5G
- 10 Free Location Spoofers to Fake GPS Location on your Vivo V27 | Dr.fone
- How Can I Catch the Regional Pokémon without Traveling On Honor Play 7T | Dr.fone
- How To Get the Apple ID Verification Code From iPhone 12 mini in the Best Ways
- A Detailed Guide on Faking Your Location in Mozilla Firefox On Motorola G24 Power | Dr.fone
- In 2024, How To Delete iCloud Account Remove Your Apple ID Permanently From iPhone 6s
- In 2024, 3 Effective Ways to Unlock iCloud Account Without Password On iPhone 6s Plus
- In 2024, Solutions to Spy on Xiaomi Redmi Note 12 4G with and without jailbreak | Dr.fone
- Which is the Best Fake GPS Joystick App On Oppo Reno 10 Pro+ 5G? | Dr.fone
- Complete guide for recovering photos files on V Purse.
- In 2024, How to Change Location On Facebook Dating for your Poco F5 5G | Dr.fone
- 7 Ways to Lock Apps on Apple iPhone 14 Plus and iPad Securely
- How to Find iSpoofer Pro Activation Key On Vivo Y100i? | Dr.fone
- In 2024, Here Are Some Reliable Ways to Get Pokemon Go Friend Codes For Sony Xperia 10 V | Dr.fone
- New How to Make an Adorable Video for Your Babys First Year for 2024
- Recover iPhone 14 Plus Data From iOS iTunes Backup | Dr.fone
- How to Fix PDF File Couldnt Open in Protected View | Stellar
- Title: 4 Solutions to Resize a WebM File for 2024
- Author: Morgan
- Created at : 2024-05-19 05:11:47
- Updated at : 2024-05-20 05:11:47
- Link: https://ai-video-editing.techidaily.com/4-solutions-to-resize-a-webm-file-for-2024/
- License: This work is licensed under CC BY-NC-SA 4.0.


