:max_bytes(150000):strip_icc():format(webp)/tiktok-messages-889fef4cdfac41babb84770288f32cf2.jpg)
A Full Review of Leeming LUT Pro

A Full Review of Leeming LUT Pro
Create High-Quality Video - Wondershare Filmora
An easy and powerful YouTube video editor
Numerous video and audio effects to choose from
Detailed tutorials are provided by the official channel
Color grading can be a tedious process, especially if you don’t have the technical skills required to achieve the desired result. That’s where a LUT can come in handy. So, what is a LUT?
LUT stands for “look up table.” Simply put, a LUT is a color preset that you can apply to your video footage to speed up the color grading process. While LUTs are commonly used to speed up the color grading process, they can also be used for other tasks, such as color transfer between software, monitor calibration, and more.
In this article, we’ll explore a particular LUT – Leeming LUT Pro™ and how you can use it in various video editors.

In this article
02 Supported Cameras of Leeming LUT Pro™
03 How to Import and Use Leeming LUT Pro™ in Different Video Editors
What is Leeming LUT Pro™?
Leeming LUT Pro™ is the world’s first unified, corrective Look Up Table (LUT) system for supported cameras. It’s designed to maximize dynamic range, fix skin tones, remove unwanted color casts and provide an accurate Rec709 starting point for further creative color grading.
The Pro LUTs are designed for perfect Rec709 colorimetry and have a linear luma curve, with an average measured dE(2000) of less than 1. As a result, they are visually indistinguishable from reality to the human eye.
Athena LUTs are a brighter version of Pro. They are designed around how the eye sees while retaining the same perfect colorimetry as Pro.
Supported Cameras of Leeming LUT Pro™
- Panasonic G Series: All G series cameras with Cine-D, V-LogL, and HLG for Rec709
- Panasonic S Series: All S series cameras with V-Log, V-Log BRAW, V-Log ProRes RAW, Cine-D, Cine-D2, and HLG for Rec709
- Fujifilm X Series: All X Series cameras with F-Log, Eterna Cinema, Pro Neg Std, and HLG for Rec709
- Canon R Series: All R series cameras with the Faithful Picture Style, C-Log, C-Log3, and CanonRAW
- Canon C Series: All C series cameras with BT.709, C-Log2, C-Log3, HDR-PQ for Rec709, and HLG for Rec709
- Blackmagic Pocket 4K/6K/6K Pro: All cameras with Gen 4 or Gen5 Film
- Blackmagic Pocket/Micro: Older cameras with Gen1 Film
- Nikon Z Series: All cameras with N-Log, Flat
- Sony A Series: All cameras with Picture profile menus, like the A7, with Cine2, S-Log2, S-Log3, HLG/3 for Rec709, and S-Cinetone
- JVC: GY-LS300 with J-Log1
- RunCam: 5 Orange Normal, Flat
- GoPro: 6,7 8, 9 & 10 ProTune, 4 & 5 ProTune, Session ProTune
- DJI: Mavic3, Phantom 4 Pro, Air 2S, Mavic 2 Pro, Mavic Air 2, Mini Series, Mavic Air, Mavic Pro, Pocket 2, Osmo Pocket, Osmo Action, X5 Series
How to Import and Use Leeming LUT Pro™ in Different Video Editors
Leeming LUT Pro™ is supported by various video editors, coloring software, and motion graphics programs, such as:
- Final Cut Pro X
- Avid Media Composer
- DaVinci Resolve
- Adobe Premiere Pro
- Adobe After Effects
- Magix Vegas
- Grass Valley Edius
- Lightworks
- Cyberlink PowerDirector
- LumaFusion
Next, we’ll explore how you can use Leeming LUT in some popular video editors.
1. How to Use Leeming LUT in FCPX
Follow these steps to use Leeming LUT in Final Cut Pro:
Step 1. Import Footage
Launch Final Cut Pro and import your footage. To import your footage, navigate to the top left corner and click on the import icon (the arrow pointing downwards).
In the window that opens, your camera or device name should appear in the left column under devices.
Click on your camera or device to display the media you want to import. Then select the media you want to import and click on the import selected button in the bottom right corner to import your footage.

Step 2. Highlight the Footage
Highlight all the footage by clicking and dragging your pointer over the footage or press Command + A to select all the footage.

Step 3. Open the Inspector
After highlighting all the footage, open the Inspector menu and click the little i icon. Then go down to the bottom of the Inspector and switch from Basic to General.
Step 4. Select the Camera LUT Option
Select Camera LUT from the options under General and click on the Add Custom Camera LUT option.
Step 5. Import Leeming LUTs into FCPX
Find the folder where your Leeming LUTs are stored and import them into Final Cut Pro by clicking on Open.
Step 6. Select the LUT
Once imported, go back to the Camera LUT option under General and click on it. Then scroll down the available options and select your Leeming LUT under the Custom Camera options.
Finally, click the profile you used to apply it to your footage.
2. How to Use Leeming LUT in PowerDirector
Follow these steps to use a LUT in PowerDirector:
Step 1. Launch PowerDirector
Open PowerDirector and select Full Mode.
Step 2. Import Media
Click the import button and then select Import Media Folder to import the video footage you want to apply the Leeming LUT to.
Step 3. Add Footage to Timeline
Drag and drop the imported video footage into your project’s timeline.
Step 4. Select the Fix/Enhance Option
Click on the video clip on the timeline and choose the Fix/Enhance option.
Step 5. Select the Color Presets & CLUTs Option
In the top left window that opens above the timeline, select the Color Presets & CLUTs option under Enhance.
Step 6. Apply the Leeming LUT to the Footage
Click on the import button in the panel to import the Leeming LUT file. Once imported, apply it to give your video a more vibrant look.
Part 5: Bonus! Use Filmora – Easy to Use Video Editor for Color LUTs
Besides Final Cut Pro and PowerDirector, Filmora is another excellent video editing software that you can use to apply LUTs to your video.
Designed for beginners and intermediate users, Filmora is an intuitive yet powerful video editing software.
For instance, you can apply 3D LUTs to your video using Filmora. Unlike 1D LUTs, which can only control one value setting, 3D LUTs can allow you to control various value settings. As a result, 3D LUTs can give you more control over specific color values in your video.
Here’s how you can apply LUTs using Filmora:
Step 1. Import the Footage
Launch Filmora and choose New Project. In the New Project window that opens, import the video you want to apply the LUT to by clicking on Import and selecting one of the drop-down options.
Step 2. Add the Video to the Timeline
Drag and drop the video into your project’s timeline.
Step 3. Open the Color Tab
Double click the video on the timeline to select it. Once it’s selected, go to the top left panel and click on the color tab.

Step 4. Apply a LUT to the Video
Under the color tab, navigate to the 3D LUT option and select one of the available options in the 3D LUT drop-down menu to apply a LUT.
Many LUTs are named after popular TV shows and series whose visual styles they mimic, such as Batman, House of Cards, Game of Thrones, Mission Impossible, Harry Potter, Star Wars, and more.
Once you apply a LUT, you can see your changes in the Preview Window. Besides using the preset LUTs, Filmora also allows you to use custom LUTs. Instead of choosing one of the presets, click on the Load New LUT option to import your custom LUT into Filmora.
Step 5. Make Fine Adjustments
Once you apply a LUT, Filmora can allow you to make further modifications to the video. Click on the Advanced button at the bottom of the color tab to view advanced color correction options.
In the new window that opens, you can adjust several things, such as color, light, HSL, and more. You can also choose from a variety of other available presets.

Step 6. Save the Changes
Once you’re satisfied with the changes you’ve applied, click on the OK button in the lower right corner to save the changes.
For Win 7 or later (64-bit)
For macOS 10.12 or later
Conclusion
LUTs are a fast way to color grade your footage after color correction. However, to ensure your LUTs work effectively, here are some important guidelines you should observe when using LUTs:
- Ensure your footage matches from shot to shot, especially if you’re applying LUTs to multiple clips.
- Ensure your exposure is correct before using LUTs. You can use a histogram to help you set the exposure.
- Ensure you apply LUTs to a video that’s been properly color corrected.
- Make small adjustments to things, such as brightness, saturation, contrast, exposure, color temperature, and tint for best results.
- Test out various LUTs before settling for one because shooting conditions can drastically affect how different LUTs look.
Ultimately, LUTs are an excellent way to make your video more cinematic. If you don’t have advanced video editing skills or prior experience working with LUTs, don’t worry. Filmora is a user-friendly video editing software that allows you to quickly apply LUTs with no video editing experience. Just download Filmora for free to get started.
Color grading can be a tedious process, especially if you don’t have the technical skills required to achieve the desired result. That’s where a LUT can come in handy. So, what is a LUT?
LUT stands for “look up table.” Simply put, a LUT is a color preset that you can apply to your video footage to speed up the color grading process. While LUTs are commonly used to speed up the color grading process, they can also be used for other tasks, such as color transfer between software, monitor calibration, and more.
In this article, we’ll explore a particular LUT – Leeming LUT Pro™ and how you can use it in various video editors.

In this article
02 Supported Cameras of Leeming LUT Pro™
03 How to Import and Use Leeming LUT Pro™ in Different Video Editors
What is Leeming LUT Pro™?
Leeming LUT Pro™ is the world’s first unified, corrective Look Up Table (LUT) system for supported cameras. It’s designed to maximize dynamic range, fix skin tones, remove unwanted color casts and provide an accurate Rec709 starting point for further creative color grading.
The Pro LUTs are designed for perfect Rec709 colorimetry and have a linear luma curve, with an average measured dE(2000) of less than 1. As a result, they are visually indistinguishable from reality to the human eye.
Athena LUTs are a brighter version of Pro. They are designed around how the eye sees while retaining the same perfect colorimetry as Pro.
Supported Cameras of Leeming LUT Pro™
- Panasonic G Series: All G series cameras with Cine-D, V-LogL, and HLG for Rec709
- Panasonic S Series: All S series cameras with V-Log, V-Log BRAW, V-Log ProRes RAW, Cine-D, Cine-D2, and HLG for Rec709
- Fujifilm X Series: All X Series cameras with F-Log, Eterna Cinema, Pro Neg Std, and HLG for Rec709
- Canon R Series: All R series cameras with the Faithful Picture Style, C-Log, C-Log3, and CanonRAW
- Canon C Series: All C series cameras with BT.709, C-Log2, C-Log3, HDR-PQ for Rec709, and HLG for Rec709
- Blackmagic Pocket 4K/6K/6K Pro: All cameras with Gen 4 or Gen5 Film
- Blackmagic Pocket/Micro: Older cameras with Gen1 Film
- Nikon Z Series: All cameras with N-Log, Flat
- Sony A Series: All cameras with Picture profile menus, like the A7, with Cine2, S-Log2, S-Log3, HLG/3 for Rec709, and S-Cinetone
- JVC: GY-LS300 with J-Log1
- RunCam: 5 Orange Normal, Flat
- GoPro: 6,7 8, 9 & 10 ProTune, 4 & 5 ProTune, Session ProTune
- DJI: Mavic3, Phantom 4 Pro, Air 2S, Mavic 2 Pro, Mavic Air 2, Mini Series, Mavic Air, Mavic Pro, Pocket 2, Osmo Pocket, Osmo Action, X5 Series
How to Import and Use Leeming LUT Pro™ in Different Video Editors
Leeming LUT Pro™ is supported by various video editors, coloring software, and motion graphics programs, such as:
- Final Cut Pro X
- Avid Media Composer
- DaVinci Resolve
- Adobe Premiere Pro
- Adobe After Effects
- Magix Vegas
- Grass Valley Edius
- Lightworks
- Cyberlink PowerDirector
- LumaFusion
Next, we’ll explore how you can use Leeming LUT in some popular video editors.
1. How to Use Leeming LUT in FCPX
Follow these steps to use Leeming LUT in Final Cut Pro:
Step 1. Import Footage
Launch Final Cut Pro and import your footage. To import your footage, navigate to the top left corner and click on the import icon (the arrow pointing downwards).
In the window that opens, your camera or device name should appear in the left column under devices.
Click on your camera or device to display the media you want to import. Then select the media you want to import and click on the import selected button in the bottom right corner to import your footage.

Step 2. Highlight the Footage
Highlight all the footage by clicking and dragging your pointer over the footage or press Command + A to select all the footage.

Step 3. Open the Inspector
After highlighting all the footage, open the Inspector menu and click the little i icon. Then go down to the bottom of the Inspector and switch from Basic to General.
Step 4. Select the Camera LUT Option
Select Camera LUT from the options under General and click on the Add Custom Camera LUT option.
Step 5. Import Leeming LUTs into FCPX
Find the folder where your Leeming LUTs are stored and import them into Final Cut Pro by clicking on Open.
Step 6. Select the LUT
Once imported, go back to the Camera LUT option under General and click on it. Then scroll down the available options and select your Leeming LUT under the Custom Camera options.
Finally, click the profile you used to apply it to your footage.
2. How to Use Leeming LUT in PowerDirector
Follow these steps to use a LUT in PowerDirector:
Step 1. Launch PowerDirector
Open PowerDirector and select Full Mode.
Step 2. Import Media
Click the import button and then select Import Media Folder to import the video footage you want to apply the Leeming LUT to.
Step 3. Add Footage to Timeline
Drag and drop the imported video footage into your project’s timeline.
Step 4. Select the Fix/Enhance Option
Click on the video clip on the timeline and choose the Fix/Enhance option.
Step 5. Select the Color Presets & CLUTs Option
In the top left window that opens above the timeline, select the Color Presets & CLUTs option under Enhance.
Step 6. Apply the Leeming LUT to the Footage
Click on the import button in the panel to import the Leeming LUT file. Once imported, apply it to give your video a more vibrant look.
Part 5: Bonus! Use Filmora – Easy to Use Video Editor for Color LUTs
Besides Final Cut Pro and PowerDirector, Filmora is another excellent video editing software that you can use to apply LUTs to your video.
Designed for beginners and intermediate users, Filmora is an intuitive yet powerful video editing software.
For instance, you can apply 3D LUTs to your video using Filmora. Unlike 1D LUTs, which can only control one value setting, 3D LUTs can allow you to control various value settings. As a result, 3D LUTs can give you more control over specific color values in your video.
Here’s how you can apply LUTs using Filmora:
Step 1. Import the Footage
Launch Filmora and choose New Project. In the New Project window that opens, import the video you want to apply the LUT to by clicking on Import and selecting one of the drop-down options.
Step 2. Add the Video to the Timeline
Drag and drop the video into your project’s timeline.
Step 3. Open the Color Tab
Double click the video on the timeline to select it. Once it’s selected, go to the top left panel and click on the color tab.

Step 4. Apply a LUT to the Video
Under the color tab, navigate to the 3D LUT option and select one of the available options in the 3D LUT drop-down menu to apply a LUT.
Many LUTs are named after popular TV shows and series whose visual styles they mimic, such as Batman, House of Cards, Game of Thrones, Mission Impossible, Harry Potter, Star Wars, and more.
Once you apply a LUT, you can see your changes in the Preview Window. Besides using the preset LUTs, Filmora also allows you to use custom LUTs. Instead of choosing one of the presets, click on the Load New LUT option to import your custom LUT into Filmora.
Step 5. Make Fine Adjustments
Once you apply a LUT, Filmora can allow you to make further modifications to the video. Click on the Advanced button at the bottom of the color tab to view advanced color correction options.
In the new window that opens, you can adjust several things, such as color, light, HSL, and more. You can also choose from a variety of other available presets.

Step 6. Save the Changes
Once you’re satisfied with the changes you’ve applied, click on the OK button in the lower right corner to save the changes.
For Win 7 or later (64-bit)
For macOS 10.12 or later
Conclusion
LUTs are a fast way to color grade your footage after color correction. However, to ensure your LUTs work effectively, here are some important guidelines you should observe when using LUTs:
- Ensure your footage matches from shot to shot, especially if you’re applying LUTs to multiple clips.
- Ensure your exposure is correct before using LUTs. You can use a histogram to help you set the exposure.
- Ensure you apply LUTs to a video that’s been properly color corrected.
- Make small adjustments to things, such as brightness, saturation, contrast, exposure, color temperature, and tint for best results.
- Test out various LUTs before settling for one because shooting conditions can drastically affect how different LUTs look.
Ultimately, LUTs are an excellent way to make your video more cinematic. If you don’t have advanced video editing skills or prior experience working with LUTs, don’t worry. Filmora is a user-friendly video editing software that allows you to quickly apply LUTs with no video editing experience. Just download Filmora for free to get started.
Color grading can be a tedious process, especially if you don’t have the technical skills required to achieve the desired result. That’s where a LUT can come in handy. So, what is a LUT?
LUT stands for “look up table.” Simply put, a LUT is a color preset that you can apply to your video footage to speed up the color grading process. While LUTs are commonly used to speed up the color grading process, they can also be used for other tasks, such as color transfer between software, monitor calibration, and more.
In this article, we’ll explore a particular LUT – Leeming LUT Pro™ and how you can use it in various video editors.

In this article
02 Supported Cameras of Leeming LUT Pro™
03 How to Import and Use Leeming LUT Pro™ in Different Video Editors
What is Leeming LUT Pro™?
Leeming LUT Pro™ is the world’s first unified, corrective Look Up Table (LUT) system for supported cameras. It’s designed to maximize dynamic range, fix skin tones, remove unwanted color casts and provide an accurate Rec709 starting point for further creative color grading.
The Pro LUTs are designed for perfect Rec709 colorimetry and have a linear luma curve, with an average measured dE(2000) of less than 1. As a result, they are visually indistinguishable from reality to the human eye.
Athena LUTs are a brighter version of Pro. They are designed around how the eye sees while retaining the same perfect colorimetry as Pro.
Supported Cameras of Leeming LUT Pro™
- Panasonic G Series: All G series cameras with Cine-D, V-LogL, and HLG for Rec709
- Panasonic S Series: All S series cameras with V-Log, V-Log BRAW, V-Log ProRes RAW, Cine-D, Cine-D2, and HLG for Rec709
- Fujifilm X Series: All X Series cameras with F-Log, Eterna Cinema, Pro Neg Std, and HLG for Rec709
- Canon R Series: All R series cameras with the Faithful Picture Style, C-Log, C-Log3, and CanonRAW
- Canon C Series: All C series cameras with BT.709, C-Log2, C-Log3, HDR-PQ for Rec709, and HLG for Rec709
- Blackmagic Pocket 4K/6K/6K Pro: All cameras with Gen 4 or Gen5 Film
- Blackmagic Pocket/Micro: Older cameras with Gen1 Film
- Nikon Z Series: All cameras with N-Log, Flat
- Sony A Series: All cameras with Picture profile menus, like the A7, with Cine2, S-Log2, S-Log3, HLG/3 for Rec709, and S-Cinetone
- JVC: GY-LS300 with J-Log1
- RunCam: 5 Orange Normal, Flat
- GoPro: 6,7 8, 9 & 10 ProTune, 4 & 5 ProTune, Session ProTune
- DJI: Mavic3, Phantom 4 Pro, Air 2S, Mavic 2 Pro, Mavic Air 2, Mini Series, Mavic Air, Mavic Pro, Pocket 2, Osmo Pocket, Osmo Action, X5 Series
How to Import and Use Leeming LUT Pro™ in Different Video Editors
Leeming LUT Pro™ is supported by various video editors, coloring software, and motion graphics programs, such as:
- Final Cut Pro X
- Avid Media Composer
- DaVinci Resolve
- Adobe Premiere Pro
- Adobe After Effects
- Magix Vegas
- Grass Valley Edius
- Lightworks
- Cyberlink PowerDirector
- LumaFusion
Next, we’ll explore how you can use Leeming LUT in some popular video editors.
1. How to Use Leeming LUT in FCPX
Follow these steps to use Leeming LUT in Final Cut Pro:
Step 1. Import Footage
Launch Final Cut Pro and import your footage. To import your footage, navigate to the top left corner and click on the import icon (the arrow pointing downwards).
In the window that opens, your camera or device name should appear in the left column under devices.
Click on your camera or device to display the media you want to import. Then select the media you want to import and click on the import selected button in the bottom right corner to import your footage.

Step 2. Highlight the Footage
Highlight all the footage by clicking and dragging your pointer over the footage or press Command + A to select all the footage.

Step 3. Open the Inspector
After highlighting all the footage, open the Inspector menu and click the little i icon. Then go down to the bottom of the Inspector and switch from Basic to General.
Step 4. Select the Camera LUT Option
Select Camera LUT from the options under General and click on the Add Custom Camera LUT option.
Step 5. Import Leeming LUTs into FCPX
Find the folder where your Leeming LUTs are stored and import them into Final Cut Pro by clicking on Open.
Step 6. Select the LUT
Once imported, go back to the Camera LUT option under General and click on it. Then scroll down the available options and select your Leeming LUT under the Custom Camera options.
Finally, click the profile you used to apply it to your footage.
2. How to Use Leeming LUT in PowerDirector
Follow these steps to use a LUT in PowerDirector:
Step 1. Launch PowerDirector
Open PowerDirector and select Full Mode.
Step 2. Import Media
Click the import button and then select Import Media Folder to import the video footage you want to apply the Leeming LUT to.
Step 3. Add Footage to Timeline
Drag and drop the imported video footage into your project’s timeline.
Step 4. Select the Fix/Enhance Option
Click on the video clip on the timeline and choose the Fix/Enhance option.
Step 5. Select the Color Presets & CLUTs Option
In the top left window that opens above the timeline, select the Color Presets & CLUTs option under Enhance.
Step 6. Apply the Leeming LUT to the Footage
Click on the import button in the panel to import the Leeming LUT file. Once imported, apply it to give your video a more vibrant look.
Part 5: Bonus! Use Filmora – Easy to Use Video Editor for Color LUTs
Besides Final Cut Pro and PowerDirector, Filmora is another excellent video editing software that you can use to apply LUTs to your video.
Designed for beginners and intermediate users, Filmora is an intuitive yet powerful video editing software.
For instance, you can apply 3D LUTs to your video using Filmora. Unlike 1D LUTs, which can only control one value setting, 3D LUTs can allow you to control various value settings. As a result, 3D LUTs can give you more control over specific color values in your video.
Here’s how you can apply LUTs using Filmora:
Step 1. Import the Footage
Launch Filmora and choose New Project. In the New Project window that opens, import the video you want to apply the LUT to by clicking on Import and selecting one of the drop-down options.
Step 2. Add the Video to the Timeline
Drag and drop the video into your project’s timeline.
Step 3. Open the Color Tab
Double click the video on the timeline to select it. Once it’s selected, go to the top left panel and click on the color tab.

Step 4. Apply a LUT to the Video
Under the color tab, navigate to the 3D LUT option and select one of the available options in the 3D LUT drop-down menu to apply a LUT.
Many LUTs are named after popular TV shows and series whose visual styles they mimic, such as Batman, House of Cards, Game of Thrones, Mission Impossible, Harry Potter, Star Wars, and more.
Once you apply a LUT, you can see your changes in the Preview Window. Besides using the preset LUTs, Filmora also allows you to use custom LUTs. Instead of choosing one of the presets, click on the Load New LUT option to import your custom LUT into Filmora.
Step 5. Make Fine Adjustments
Once you apply a LUT, Filmora can allow you to make further modifications to the video. Click on the Advanced button at the bottom of the color tab to view advanced color correction options.
In the new window that opens, you can adjust several things, such as color, light, HSL, and more. You can also choose from a variety of other available presets.

Step 6. Save the Changes
Once you’re satisfied with the changes you’ve applied, click on the OK button in the lower right corner to save the changes.
For Win 7 or later (64-bit)
For macOS 10.12 or later
Conclusion
LUTs are a fast way to color grade your footage after color correction. However, to ensure your LUTs work effectively, here are some important guidelines you should observe when using LUTs:
- Ensure your footage matches from shot to shot, especially if you’re applying LUTs to multiple clips.
- Ensure your exposure is correct before using LUTs. You can use a histogram to help you set the exposure.
- Ensure you apply LUTs to a video that’s been properly color corrected.
- Make small adjustments to things, such as brightness, saturation, contrast, exposure, color temperature, and tint for best results.
- Test out various LUTs before settling for one because shooting conditions can drastically affect how different LUTs look.
Ultimately, LUTs are an excellent way to make your video more cinematic. If you don’t have advanced video editing skills or prior experience working with LUTs, don’t worry. Filmora is a user-friendly video editing software that allows you to quickly apply LUTs with no video editing experience. Just download Filmora for free to get started.
Color grading can be a tedious process, especially if you don’t have the technical skills required to achieve the desired result. That’s where a LUT can come in handy. So, what is a LUT?
LUT stands for “look up table.” Simply put, a LUT is a color preset that you can apply to your video footage to speed up the color grading process. While LUTs are commonly used to speed up the color grading process, they can also be used for other tasks, such as color transfer between software, monitor calibration, and more.
In this article, we’ll explore a particular LUT – Leeming LUT Pro™ and how you can use it in various video editors.

In this article
02 Supported Cameras of Leeming LUT Pro™
03 How to Import and Use Leeming LUT Pro™ in Different Video Editors
What is Leeming LUT Pro™?
Leeming LUT Pro™ is the world’s first unified, corrective Look Up Table (LUT) system for supported cameras. It’s designed to maximize dynamic range, fix skin tones, remove unwanted color casts and provide an accurate Rec709 starting point for further creative color grading.
The Pro LUTs are designed for perfect Rec709 colorimetry and have a linear luma curve, with an average measured dE(2000) of less than 1. As a result, they are visually indistinguishable from reality to the human eye.
Athena LUTs are a brighter version of Pro. They are designed around how the eye sees while retaining the same perfect colorimetry as Pro.
Supported Cameras of Leeming LUT Pro™
- Panasonic G Series: All G series cameras with Cine-D, V-LogL, and HLG for Rec709
- Panasonic S Series: All S series cameras with V-Log, V-Log BRAW, V-Log ProRes RAW, Cine-D, Cine-D2, and HLG for Rec709
- Fujifilm X Series: All X Series cameras with F-Log, Eterna Cinema, Pro Neg Std, and HLG for Rec709
- Canon R Series: All R series cameras with the Faithful Picture Style, C-Log, C-Log3, and CanonRAW
- Canon C Series: All C series cameras with BT.709, C-Log2, C-Log3, HDR-PQ for Rec709, and HLG for Rec709
- Blackmagic Pocket 4K/6K/6K Pro: All cameras with Gen 4 or Gen5 Film
- Blackmagic Pocket/Micro: Older cameras with Gen1 Film
- Nikon Z Series: All cameras with N-Log, Flat
- Sony A Series: All cameras with Picture profile menus, like the A7, with Cine2, S-Log2, S-Log3, HLG/3 for Rec709, and S-Cinetone
- JVC: GY-LS300 with J-Log1
- RunCam: 5 Orange Normal, Flat
- GoPro: 6,7 8, 9 & 10 ProTune, 4 & 5 ProTune, Session ProTune
- DJI: Mavic3, Phantom 4 Pro, Air 2S, Mavic 2 Pro, Mavic Air 2, Mini Series, Mavic Air, Mavic Pro, Pocket 2, Osmo Pocket, Osmo Action, X5 Series
How to Import and Use Leeming LUT Pro™ in Different Video Editors
Leeming LUT Pro™ is supported by various video editors, coloring software, and motion graphics programs, such as:
- Final Cut Pro X
- Avid Media Composer
- DaVinci Resolve
- Adobe Premiere Pro
- Adobe After Effects
- Magix Vegas
- Grass Valley Edius
- Lightworks
- Cyberlink PowerDirector
- LumaFusion
Next, we’ll explore how you can use Leeming LUT in some popular video editors.
1. How to Use Leeming LUT in FCPX
Follow these steps to use Leeming LUT in Final Cut Pro:
Step 1. Import Footage
Launch Final Cut Pro and import your footage. To import your footage, navigate to the top left corner and click on the import icon (the arrow pointing downwards).
In the window that opens, your camera or device name should appear in the left column under devices.
Click on your camera or device to display the media you want to import. Then select the media you want to import and click on the import selected button in the bottom right corner to import your footage.

Step 2. Highlight the Footage
Highlight all the footage by clicking and dragging your pointer over the footage or press Command + A to select all the footage.

Step 3. Open the Inspector
After highlighting all the footage, open the Inspector menu and click the little i icon. Then go down to the bottom of the Inspector and switch from Basic to General.
Step 4. Select the Camera LUT Option
Select Camera LUT from the options under General and click on the Add Custom Camera LUT option.
Step 5. Import Leeming LUTs into FCPX
Find the folder where your Leeming LUTs are stored and import them into Final Cut Pro by clicking on Open.
Step 6. Select the LUT
Once imported, go back to the Camera LUT option under General and click on it. Then scroll down the available options and select your Leeming LUT under the Custom Camera options.
Finally, click the profile you used to apply it to your footage.
2. How to Use Leeming LUT in PowerDirector
Follow these steps to use a LUT in PowerDirector:
Step 1. Launch PowerDirector
Open PowerDirector and select Full Mode.
Step 2. Import Media
Click the import button and then select Import Media Folder to import the video footage you want to apply the Leeming LUT to.
Step 3. Add Footage to Timeline
Drag and drop the imported video footage into your project’s timeline.
Step 4. Select the Fix/Enhance Option
Click on the video clip on the timeline and choose the Fix/Enhance option.
Step 5. Select the Color Presets & CLUTs Option
In the top left window that opens above the timeline, select the Color Presets & CLUTs option under Enhance.
Step 6. Apply the Leeming LUT to the Footage
Click on the import button in the panel to import the Leeming LUT file. Once imported, apply it to give your video a more vibrant look.
Part 5: Bonus! Use Filmora – Easy to Use Video Editor for Color LUTs
Besides Final Cut Pro and PowerDirector, Filmora is another excellent video editing software that you can use to apply LUTs to your video.
Designed for beginners and intermediate users, Filmora is an intuitive yet powerful video editing software.
For instance, you can apply 3D LUTs to your video using Filmora. Unlike 1D LUTs, which can only control one value setting, 3D LUTs can allow you to control various value settings. As a result, 3D LUTs can give you more control over specific color values in your video.
Here’s how you can apply LUTs using Filmora:
Step 1. Import the Footage
Launch Filmora and choose New Project. In the New Project window that opens, import the video you want to apply the LUT to by clicking on Import and selecting one of the drop-down options.
Step 2. Add the Video to the Timeline
Drag and drop the video into your project’s timeline.
Step 3. Open the Color Tab
Double click the video on the timeline to select it. Once it’s selected, go to the top left panel and click on the color tab.

Step 4. Apply a LUT to the Video
Under the color tab, navigate to the 3D LUT option and select one of the available options in the 3D LUT drop-down menu to apply a LUT.
Many LUTs are named after popular TV shows and series whose visual styles they mimic, such as Batman, House of Cards, Game of Thrones, Mission Impossible, Harry Potter, Star Wars, and more.
Once you apply a LUT, you can see your changes in the Preview Window. Besides using the preset LUTs, Filmora also allows you to use custom LUTs. Instead of choosing one of the presets, click on the Load New LUT option to import your custom LUT into Filmora.
Step 5. Make Fine Adjustments
Once you apply a LUT, Filmora can allow you to make further modifications to the video. Click on the Advanced button at the bottom of the color tab to view advanced color correction options.
In the new window that opens, you can adjust several things, such as color, light, HSL, and more. You can also choose from a variety of other available presets.

Step 6. Save the Changes
Once you’re satisfied with the changes you’ve applied, click on the OK button in the lower right corner to save the changes.
For Win 7 or later (64-bit)
For macOS 10.12 or later
Conclusion
LUTs are a fast way to color grade your footage after color correction. However, to ensure your LUTs work effectively, here are some important guidelines you should observe when using LUTs:
- Ensure your footage matches from shot to shot, especially if you’re applying LUTs to multiple clips.
- Ensure your exposure is correct before using LUTs. You can use a histogram to help you set the exposure.
- Ensure you apply LUTs to a video that’s been properly color corrected.
- Make small adjustments to things, such as brightness, saturation, contrast, exposure, color temperature, and tint for best results.
- Test out various LUTs before settling for one because shooting conditions can drastically affect how different LUTs look.
Ultimately, LUTs are an excellent way to make your video more cinematic. If you don’t have advanced video editing skills or prior experience working with LUTs, don’t worry. Filmora is a user-friendly video editing software that allows you to quickly apply LUTs with no video editing experience. Just download Filmora for free to get started.
Magic Effects Video Making [How To]
Magic inspires and fascinates everyone. Editors often rely on it to create suspense and attraction in their films. With an all-in-one video editor, Filmora, you can get creative and use ample stupefying effects to amuse your viewers. Before delving into the details of step-by-step guides of some magic effects, let’s examine these effects.
Part 1. What Are Magic Effects?
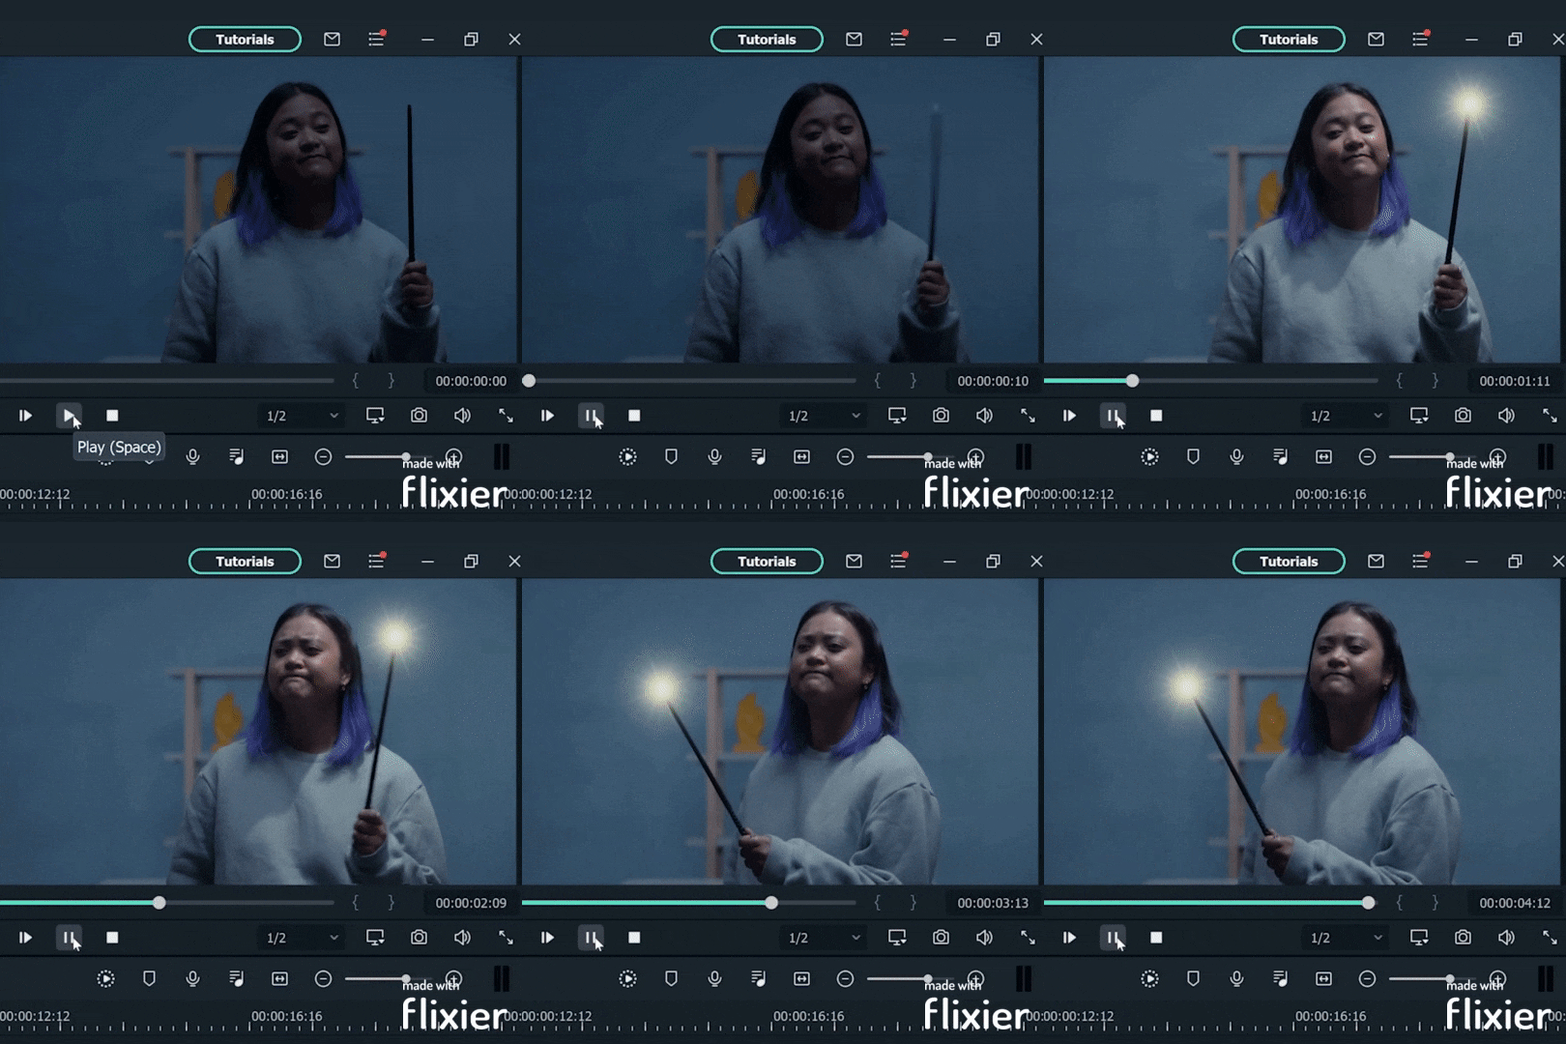
In terms of video editing, visual effects which imply the presence of supernatural forces (the ones having power over natural forces) are called magic effects. They could belong to any of the effects of charm, i.e., sudden appearance, vanishing, transposition, transformation, etc. For example, in Harry Potter’s classic scene, everyone waves a lit magic wand. To make this kinetic effect ourselves at home, read on.

Part 2. How to Create a Magic Effect with Filmora
An easy-to-use and all-in-one video editing software is necessary to realize this magic fully. Here, we use Wondershare Filmora . It can personalize anything in detail. You can also use footage from its stock media with unlimited options. By using this platform for editing, you can reduce your lengthy hours.
Free Download For Win 7 or later(64-bit)
Free Download For macOS 10.14 or later
There are many different ways you can do spellbound editing on Filmora. To learn the complete step-by-step instructions, continue scrolling.
Step1 Download and Install Wondershare Filmora
Launch the most recent version of the software on your computer to produce an outstanding film. To do this, take the following actions:
- You must first download Wondershare Filmora and open it on your PC or Mac.

Step2 Import Your Photos and Videos
When you open Wondershare Filmora, you will notice the main import window in the top left corner.
- Click in the center of the import window upon the import icon.
- After clicking, Wondershare Filmora will automatically direct you to your PC library.
- Browse to where your target Clips or Images are stored.
- Select all the objects you want to import.
- Click on Open, and you will have imported files.

Step3 Add Your Photos and Videos to the Timeline
Your next step will be to add the imported videos and images to the timeline. When you have many videos and photos imported into the timeline, you can add them simultaneously.
Or you can also add them one by one wherever you need. To add an item to your timeline, follow the steps mentioned.
- Right-click on the photo or video you want to add to the timeline.
- Keep holding the right-click and drag it down to the timeline.

Step4 Adding the Magic Imitating Effect
After these initial setups, you must add the effects from filmstock to our clips. These are pre-made presets of different clipart and graphics, executing unique movements and effects. For their introduction in the video, read along with the following procedure:
- After dragging and dropping the clip onto the first track on the timeline, go to the stickers tab on the top left ribbon, click it, and scroll down to the filmstock dropdown.

- From there, open the Bling Bling Effect Pack and choose the bling light effect of your liking. Then, drag and drop that effect onto the second video track on the timeline.

- Adjust the element’s scale according to your required size from the editing menu after double-clicking the element.

- Move the playhead to locate the brightest moment of the element. Now, right-click and select Add Freeze Frame. It will freeze the element at that exact frame

- Find the spot on the base clip’s timeline where the corresponding LED used while shooting turns on. Then, bring the element to the second track and adjust its position.
![]()
Note: ensure the element’s freeze frame starts when the anticipated magic wand light is glowing.

- Adjust the duration to match the end of the two clips on the timeline.

Step5 Adding Keyframe Movement to the Element
It is time to add some keyframes. Once you have successfully added the effect element onto your editing workspace, you have to make it do the magic. Attaching the magic effect bling to the base (background) video is like painting your canvas for the magic to occur. It is a crucial step for bringing out those Harry Potter-like magical feats. Continue scrolling for step-by-step instructions.
- Double-click the effect element and open the Editing Menu.

- In the basic tab, as visible above, Check the key-shaped button in front of the Transform button. It will create a Keyframe in the default form of your motion element. Then adjust the element’s position at the wand’s tip on the preview window.

Step6 Detailing the Effect Through Keyframing
This part of the procedure is iterative. You will see how keyframing can open several doors of creative freedom in front of you and how many motion effects are possible through it.
- Move the playhead further right and stop where the element is not on top of the magic wand’s tip. Then, add another keyframe following the same procedure and adjust the element’s position onto the wand’s tip.

Repeat the above step for as long as the wand is in motion in the clip. Feel free to spend more time on this step. The more keyframes you add, the more seamless your stunt will look.
Finally, it is time to look at the results. Witness how you have curated a magical masterpiece.
Conclusion
Magic amazes us all, and experiencing it while being creative with your projects makes it even more exciting. Filmora provides multiple tips and tricks to build the supernatural realm onto your screens. Whatever you wish to bring to the screen from the unrealistic realm, Wondershare Filmora is your genie friend. Here’s to every Filmora enthusiast casting spells onto their screens. We are eager to witness the tricks and wonders you have up your sleeves. Happy creating!
Free Download For macOS 10.14 or later
There are many different ways you can do spellbound editing on Filmora. To learn the complete step-by-step instructions, continue scrolling.
Step1 Download and Install Wondershare Filmora
Launch the most recent version of the software on your computer to produce an outstanding film. To do this, take the following actions:
- You must first download Wondershare Filmora and open it on your PC or Mac.

Step2 Import Your Photos and Videos
When you open Wondershare Filmora, you will notice the main import window in the top left corner.
- Click in the center of the import window upon the import icon.
- After clicking, Wondershare Filmora will automatically direct you to your PC library.
- Browse to where your target Clips or Images are stored.
- Select all the objects you want to import.
- Click on Open, and you will have imported files.

Step3 Add Your Photos and Videos to the Timeline
Your next step will be to add the imported videos and images to the timeline. When you have many videos and photos imported into the timeline, you can add them simultaneously.
Or you can also add them one by one wherever you need. To add an item to your timeline, follow the steps mentioned.
- Right-click on the photo or video you want to add to the timeline.
- Keep holding the right-click and drag it down to the timeline.

Step4 Adding the Magic Imitating Effect
After these initial setups, you must add the effects from filmstock to our clips. These are pre-made presets of different clipart and graphics, executing unique movements and effects. For their introduction in the video, read along with the following procedure:
- After dragging and dropping the clip onto the first track on the timeline, go to the stickers tab on the top left ribbon, click it, and scroll down to the filmstock dropdown.

- From there, open the Bling Bling Effect Pack and choose the bling light effect of your liking. Then, drag and drop that effect onto the second video track on the timeline.

- Adjust the element’s scale according to your required size from the editing menu after double-clicking the element.

- Move the playhead to locate the brightest moment of the element. Now, right-click and select Add Freeze Frame. It will freeze the element at that exact frame

- Find the spot on the base clip’s timeline where the corresponding LED used while shooting turns on. Then, bring the element to the second track and adjust its position.
![]()
Note: ensure the element’s freeze frame starts when the anticipated magic wand light is glowing.

- Adjust the duration to match the end of the two clips on the timeline.

Step5 Adding Keyframe Movement to the Element
It is time to add some keyframes. Once you have successfully added the effect element onto your editing workspace, you have to make it do the magic. Attaching the magic effect bling to the base (background) video is like painting your canvas for the magic to occur. It is a crucial step for bringing out those Harry Potter-like magical feats. Continue scrolling for step-by-step instructions.
- Double-click the effect element and open the Editing Menu.

- In the basic tab, as visible above, Check the key-shaped button in front of the Transform button. It will create a Keyframe in the default form of your motion element. Then adjust the element’s position at the wand’s tip on the preview window.

Step6 Detailing the Effect Through Keyframing
This part of the procedure is iterative. You will see how keyframing can open several doors of creative freedom in front of you and how many motion effects are possible through it.
- Move the playhead further right and stop where the element is not on top of the magic wand’s tip. Then, add another keyframe following the same procedure and adjust the element’s position onto the wand’s tip.

Repeat the above step for as long as the wand is in motion in the clip. Feel free to spend more time on this step. The more keyframes you add, the more seamless your stunt will look.
Finally, it is time to look at the results. Witness how you have curated a magical masterpiece.

Conclusion
Magic amazes us all, and experiencing it while being creative with your projects makes it even more exciting. Filmora provides multiple tips and tricks to build the supernatural realm onto your screens. Whatever you wish to bring to the screen from the unrealistic realm, Wondershare Filmora is your genie friend. Here’s to every Filmora enthusiast casting spells onto their screens. We are eager to witness the tricks and wonders you have up your sleeves. Happy creating!
How Long Does It Take To Edit A Video
If you want to put together the pieces for online videos the number one thing most of the time takes is editing.
Why does editing take so much time and what to do for that?
- Too many choices.
It completely depends upon how many choices you are giving yourself while editing a video. It takes time to make choices. For example, if your friend asks you to buy a card (any card) from the store. You go into the store and start searching cards from more than 50000 cards, it takes time. On the other hand, if your friend asks you to buy a card for his uncle’s pet dog. This time it becomes easier for you to go straight and choose from the pet cards without moving around the birthday and anniversary cards.
- Amount of footage.
It depends upon how much footage you have on your edit and what kind of content you are editing. Some of the content is really complex and takes a lot of time like V-logging but at the same time, you may have content that requires very less edit or zero edit.
The video editing will become a slit and a quick process for you compared to what it was a few years back. But there are a few key things that really speed up the editing process.
I am going to discuss from beginning to end how to edit a video.
- Outline
You should take a paper and write down what you are going to say about your video. It would make your editing easy because you have already structured your content.
- Avoid distractions
While editing you make a flow state in which the editing process becomes easier. But when you got distracted it takes a lot of time to get back to that flow state.
- My kids are my big distraction so, I usually start my editing process after they go to bed. (You can set yours).
- Keep your phone away because it is another distraction that consumes most of your time.
- Don’t keep re-watching your video all the time. Usually, people edit the first clip and before starting to edit the second clip they watch the first clip. After that, they edit the second clip and then re-watch the first and the second clip. It is also wasting a lot of your time. Do it at the end.
How to Edit Video Faster with the Best Video Editor
Filmora 11 is one of the easiest to learn and one of the most beginner-friendly apps. It is available on both Mac and windows. You can download it for free to use its features. Now let’s get started to go deep down into the steps.
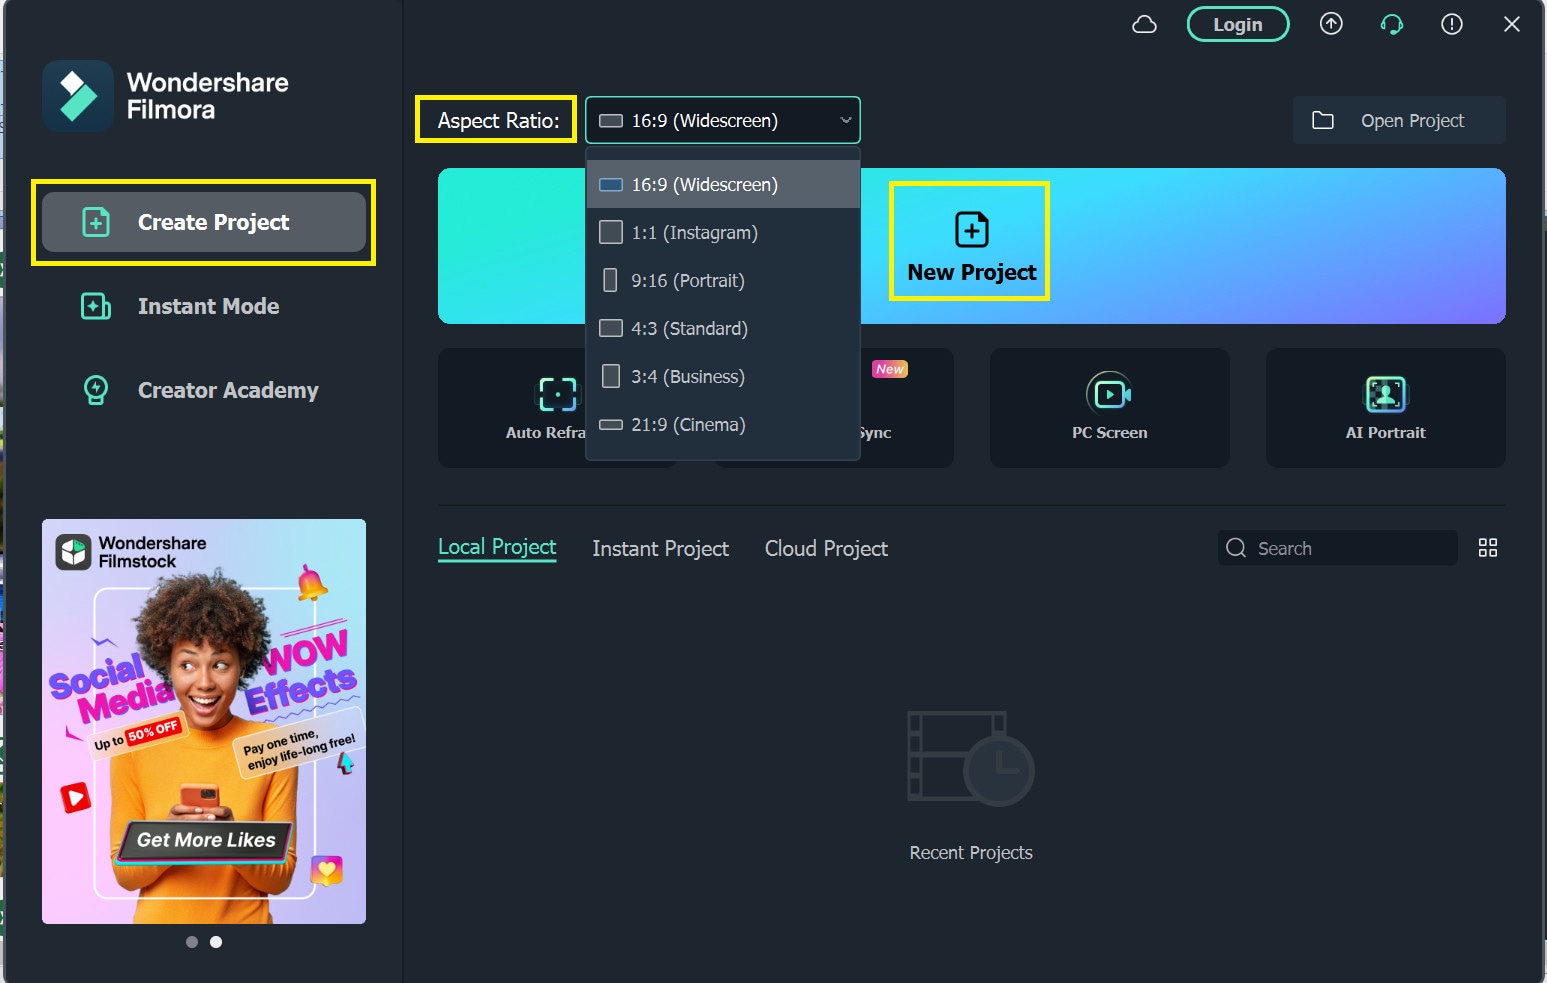
- Open the Filmora 11, a window will be opened.
- The Create Project is for a new project.
- You can change the Aspect Ratio coinciding with the social media platforms. Widescreen 16:9 is for TV or YouTube.
- You can use the previously made projects.
- To start with a new project hit the New Project.
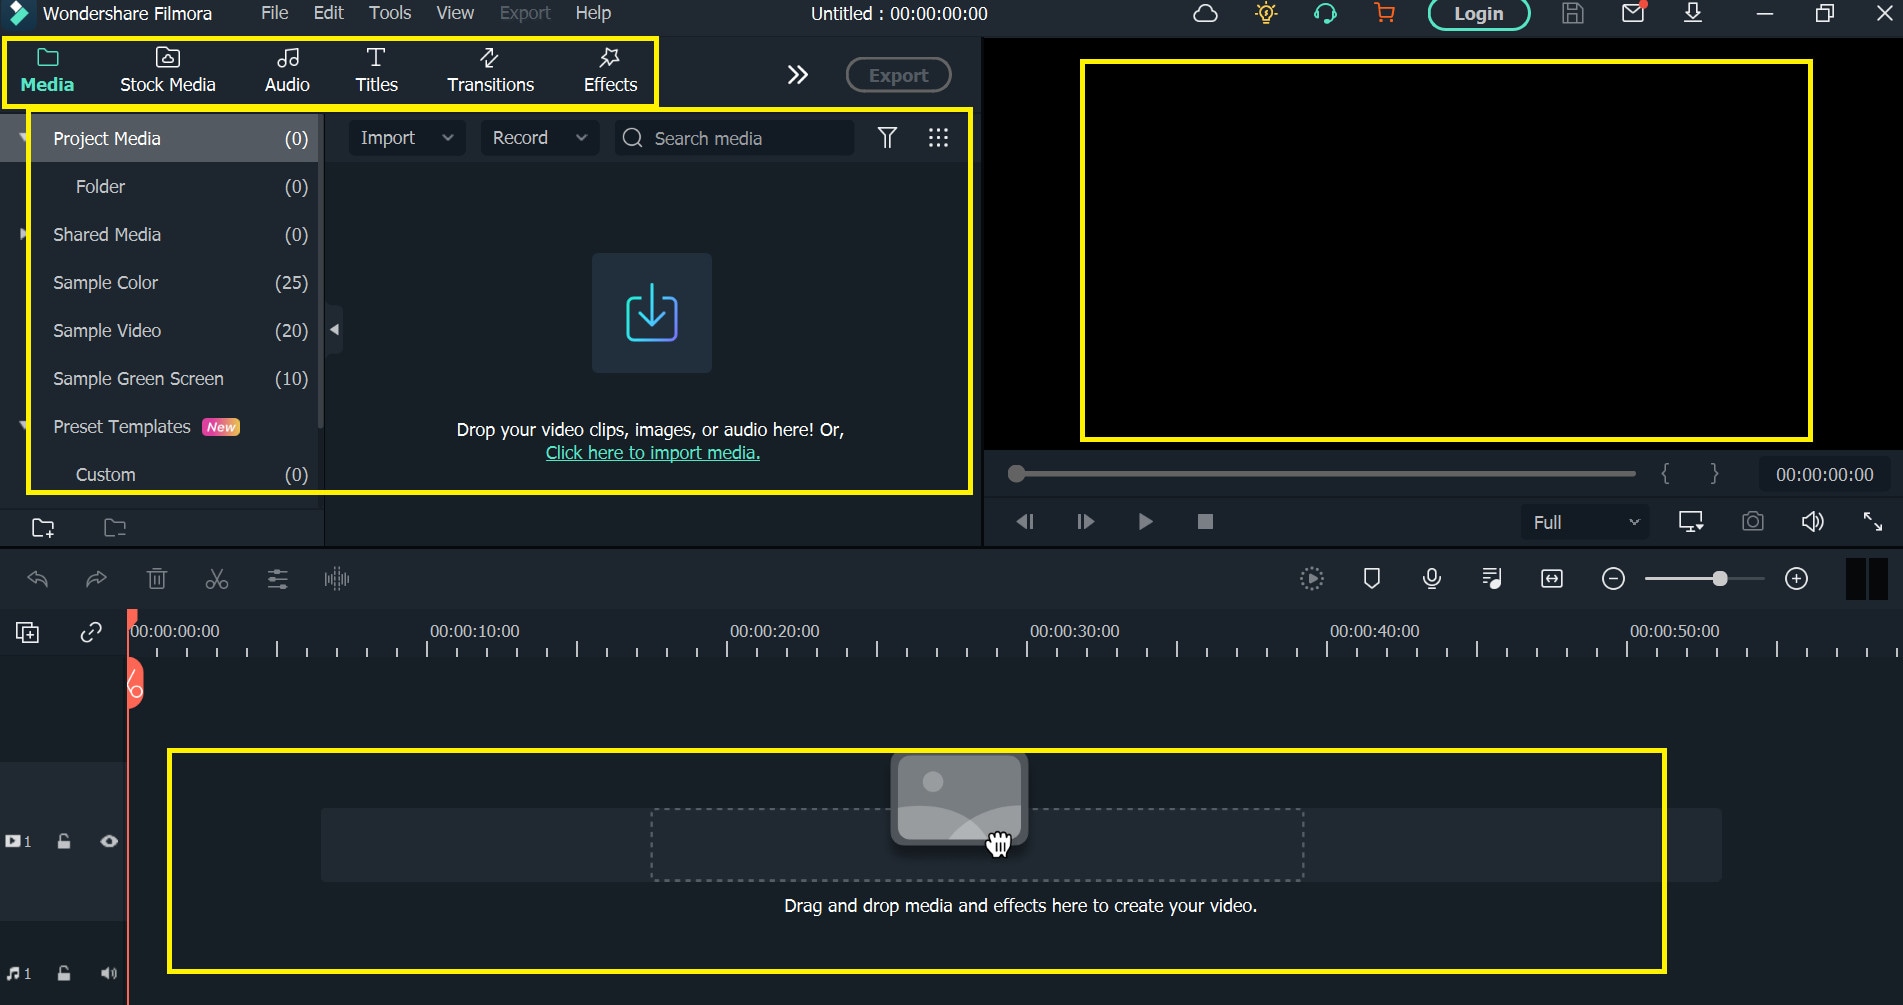
In the user interphase, there are 3 basic sections.
- Editing tabs are at the top to change the formatting of the videos.
- Media tab is to Import videos or photos.
- Preview window to watch the editing process.
- Down here is the timeline where all the editing process takes place.
- Select the video from the system storage and drag it and drop it into the timeline.
- The video then be visible in the preview window.
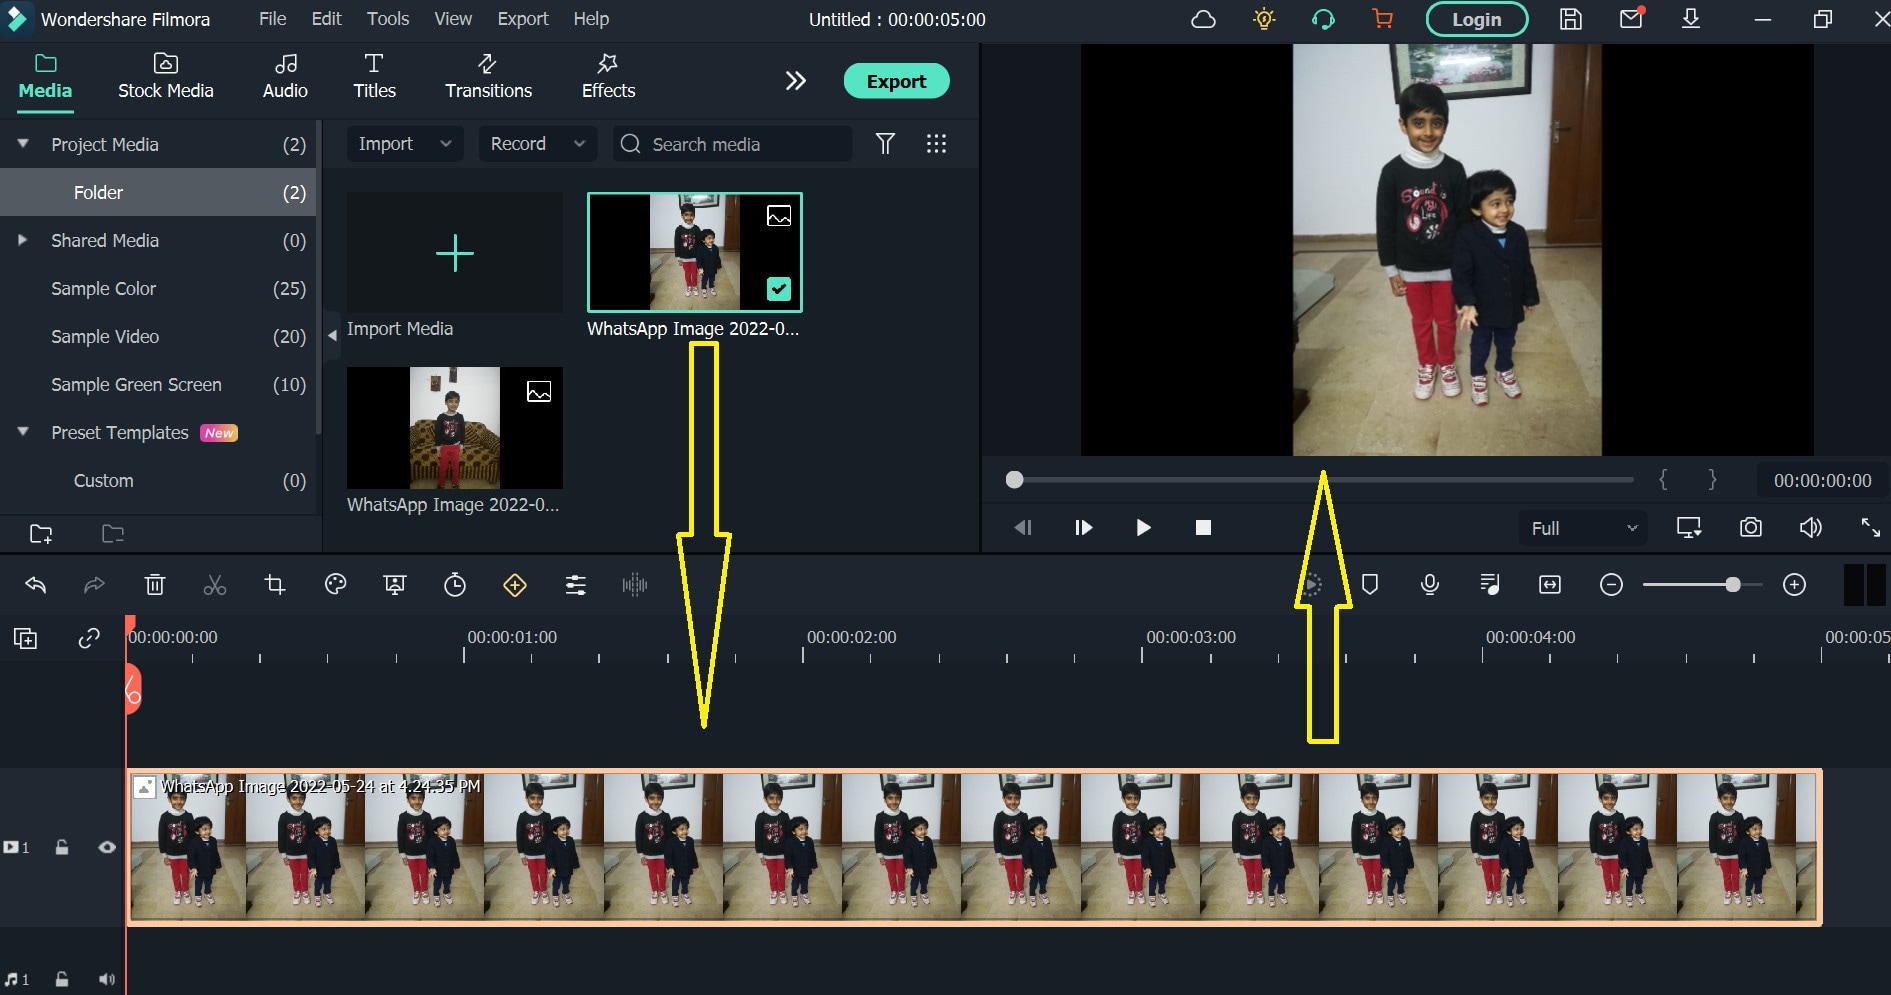
You can split, cut, trim, delete, animate, and add effects and music. There are hundreds of editing features inside the menu bar that provide the edit controls and you can enjoy editing in the palm of your hand.
Here is an important feature you should know.
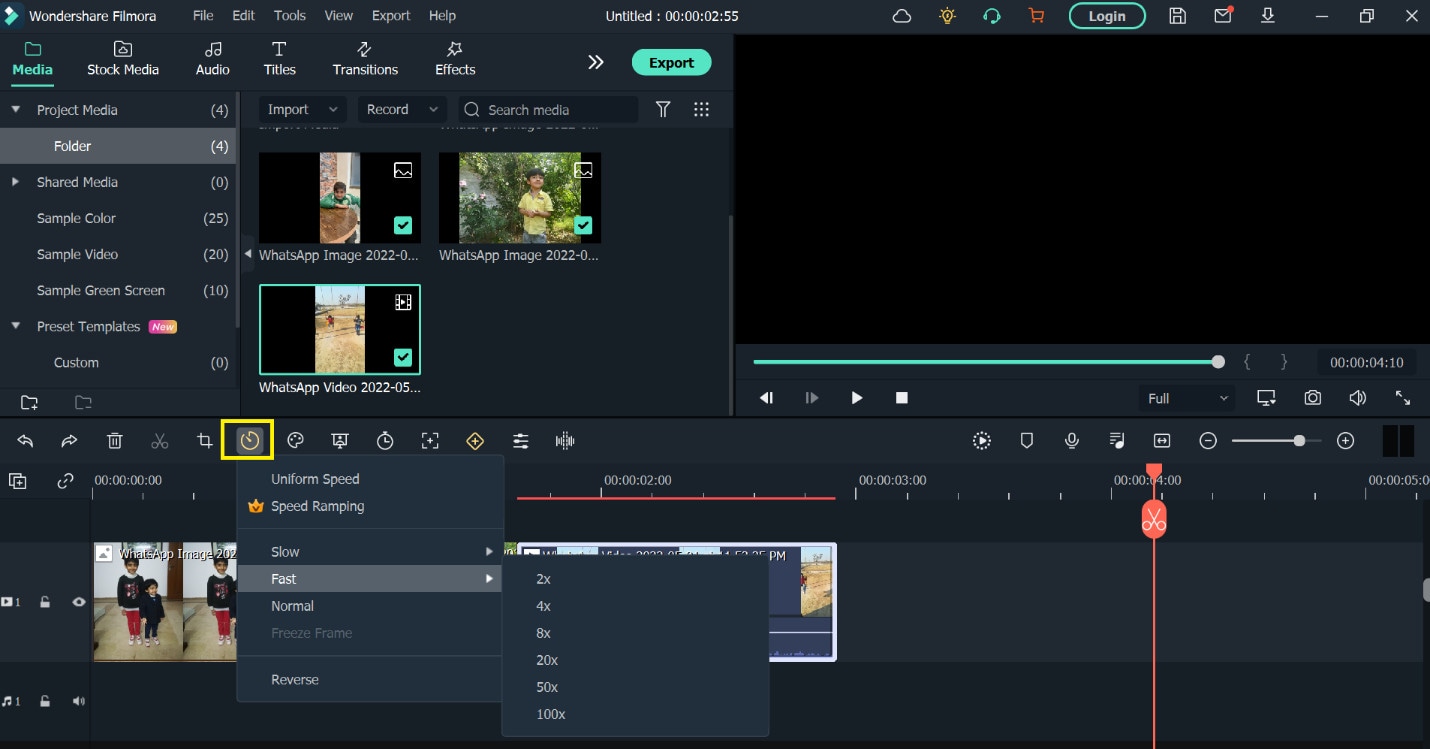
- Select the video and hit the speed
- You can select slow, fast, normal, and the most interesting one is speed ramping.
- Speed ramping allows you to set automatically made patterns to slow down then fast again slow. It will create a cinematic effect in the video. But this feature is only for paid users.
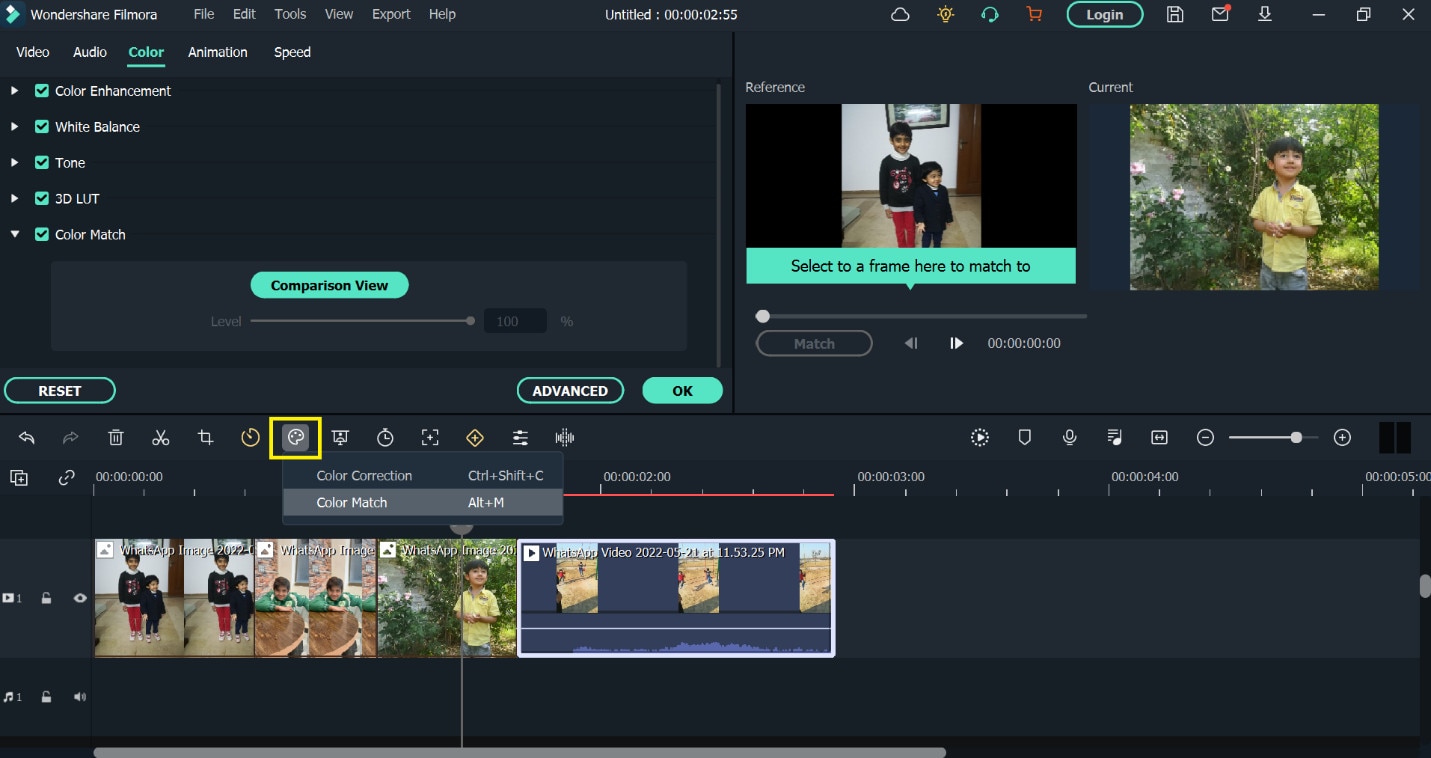
- Here is another very interesting tool the color correction tool. To get a uniform color in the combination of different clips, you can automatically set the color correction and color match.
- You can match the reference frame with the current to match their colors.
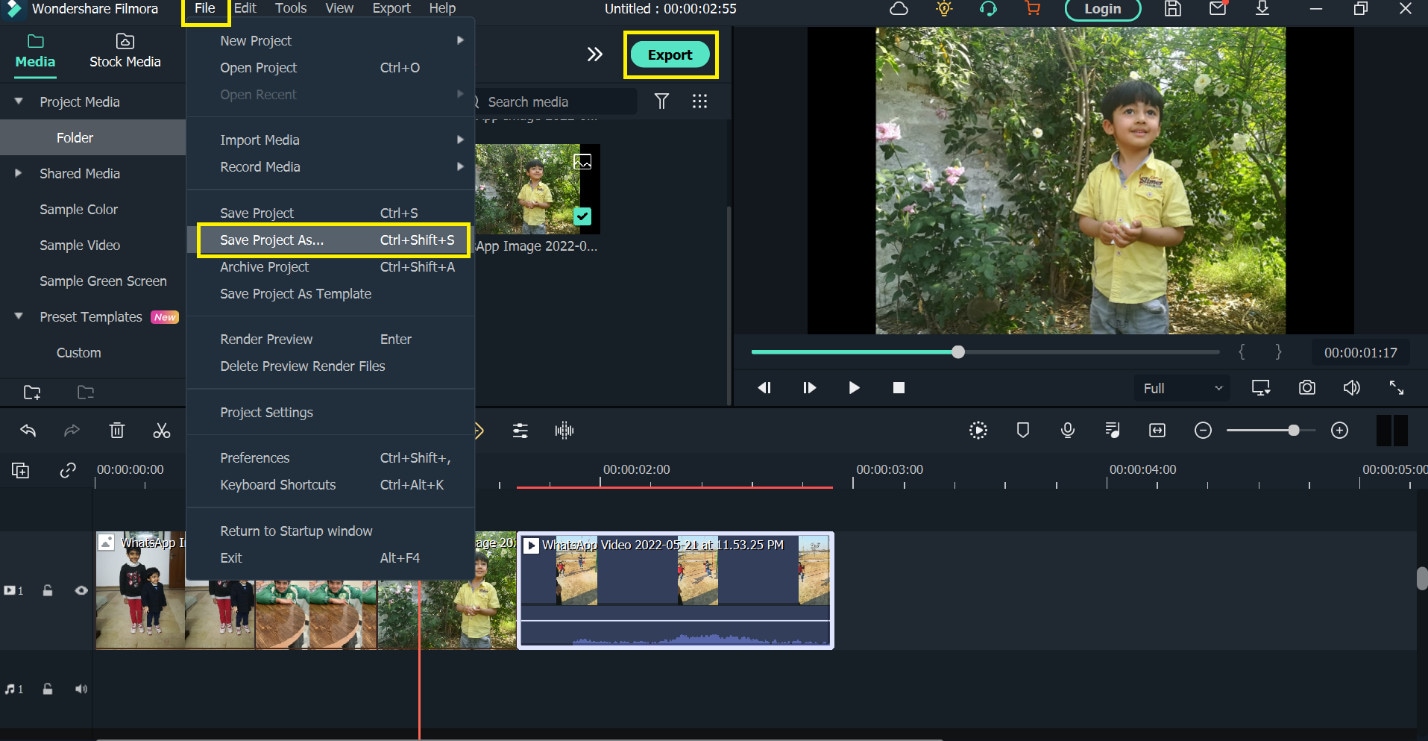
- Hit the File option and select the Save as Project.
- Now hit the Export tab to export the video. You can set the format of the video and the platform like YouTube, Instagram, Facebook, or any of them.
It will give you the fundamental framework for editing any video using Filmora 11.
1. Photos app for Windows 10.
I am going to show you how you can edit videos in Windows 10 using the app that comes with windows 10. Yes! Windows 10 include a free video editor and I am going to tell you step-by-step how to take advantage of it. If you are using windows 7 or windows 8 don’t feel let down, you can also create windows 10 totally free.
Microsoft has added the Photos app to Windows 10 and has added a fully functional video editor. You can do all sorts of things like trimming and splitting clips and re-organizing clips.
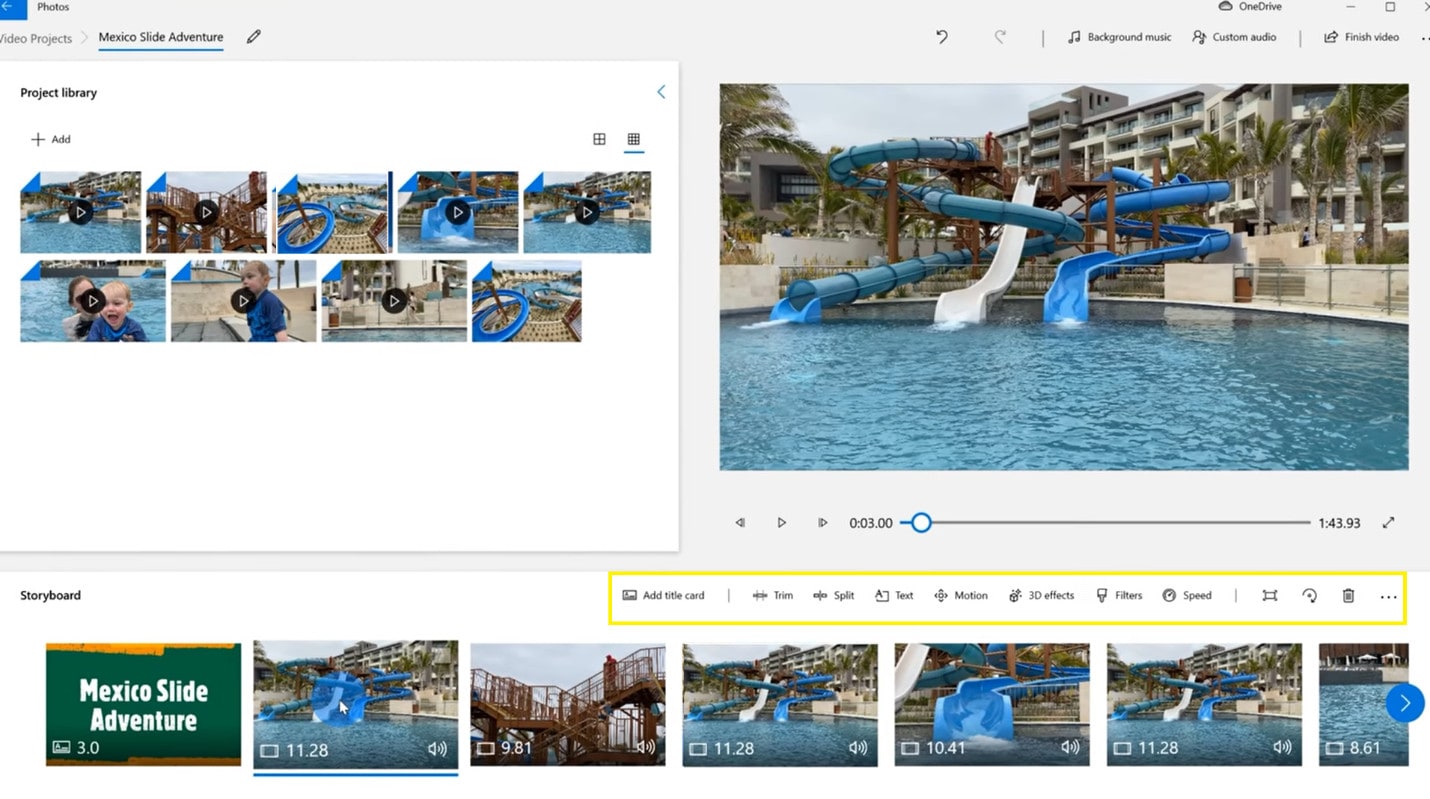
The great news is you don’t have to go out and buy a video editor or search for the video editor to download on your system instead if you are Windows 10 you already have some awesome software to edit your videos.
2. CapCut App for Android.
CapCut is the best video editing app, whether you are making videos for youtube, TikTok, Instagram, or Facebook. It is a free and all-in-one video editing app and you can use it without watermarks and annoying ads. The good thing about this app is, that it is very easy to use. Now let’s have a quick overview of the CapCut app.
- After opening your video select the clips you want to edit and here you will get a project timeline.
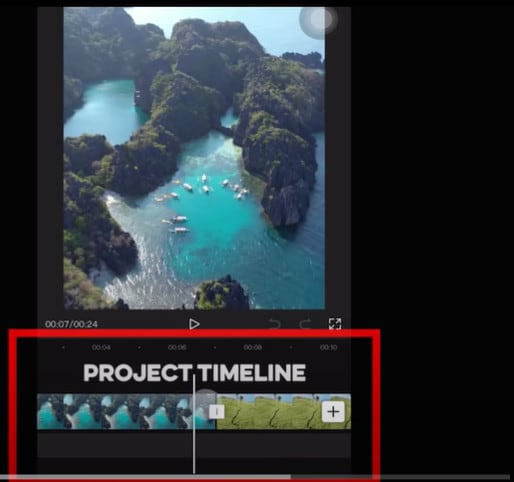
Here you can add, move or replace clips and can perform even more editing in the timeline.
You can split, trim, and delete
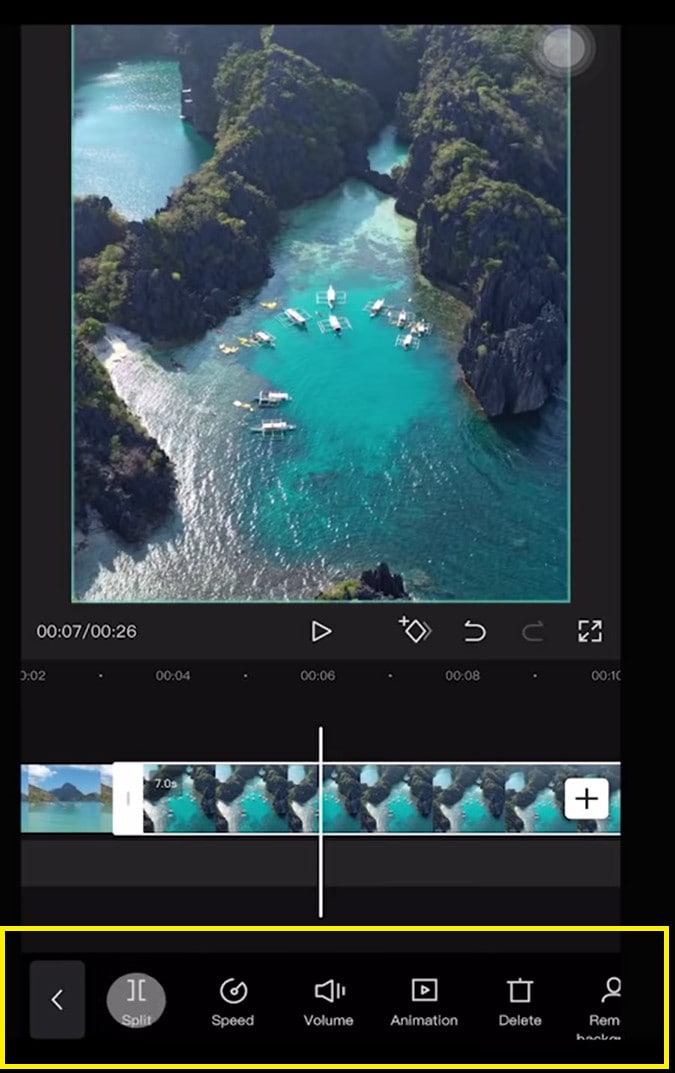
You can also apply some filters and adjustments. Adding text, stickers, and audio and the rest of the editing is just fun doing in CapCut. You can change the animation and style of your video in just a few clicks.
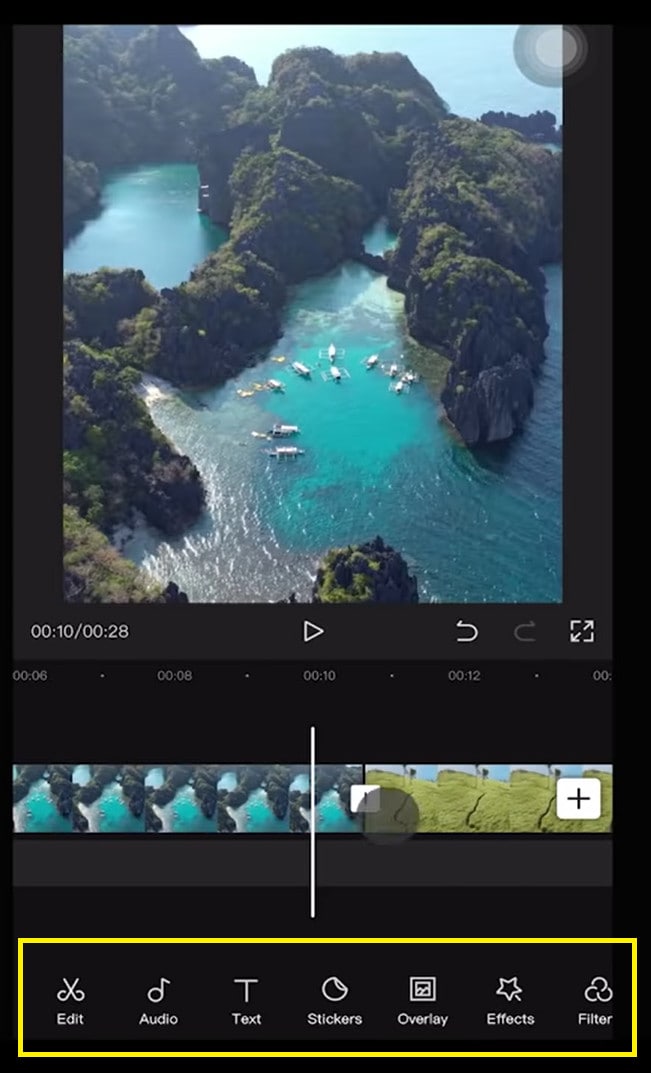
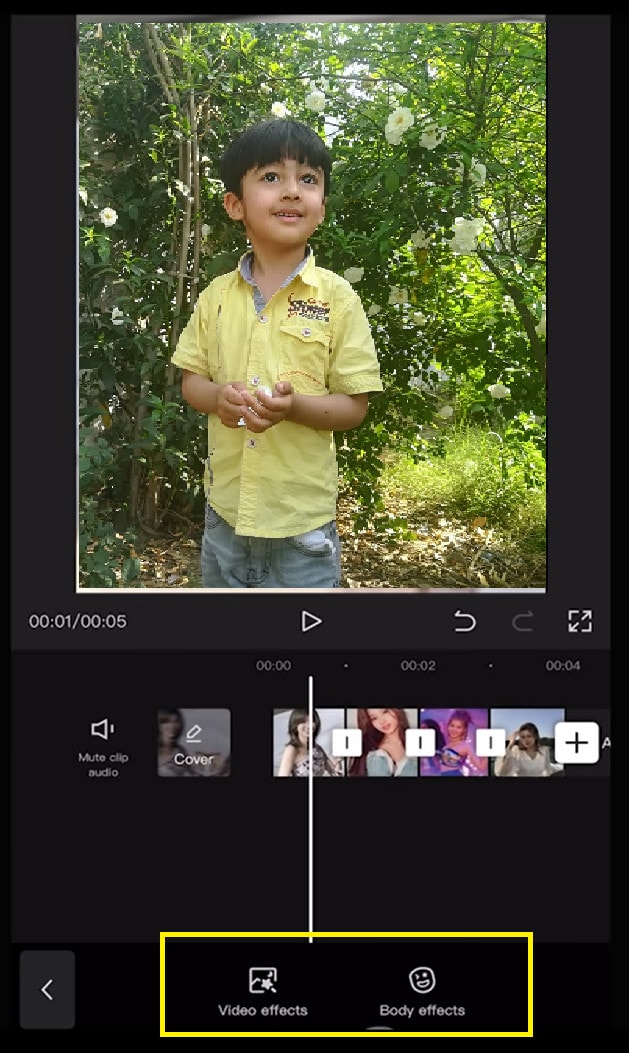
It also provides us with the Effects options.
- The video effects are effects on the entire video.
- The body effects are the effects applied only on the body.
Let’s enjoy its advanced features without paying for monthly subscription.
3. Davinci Resolve for Mac.
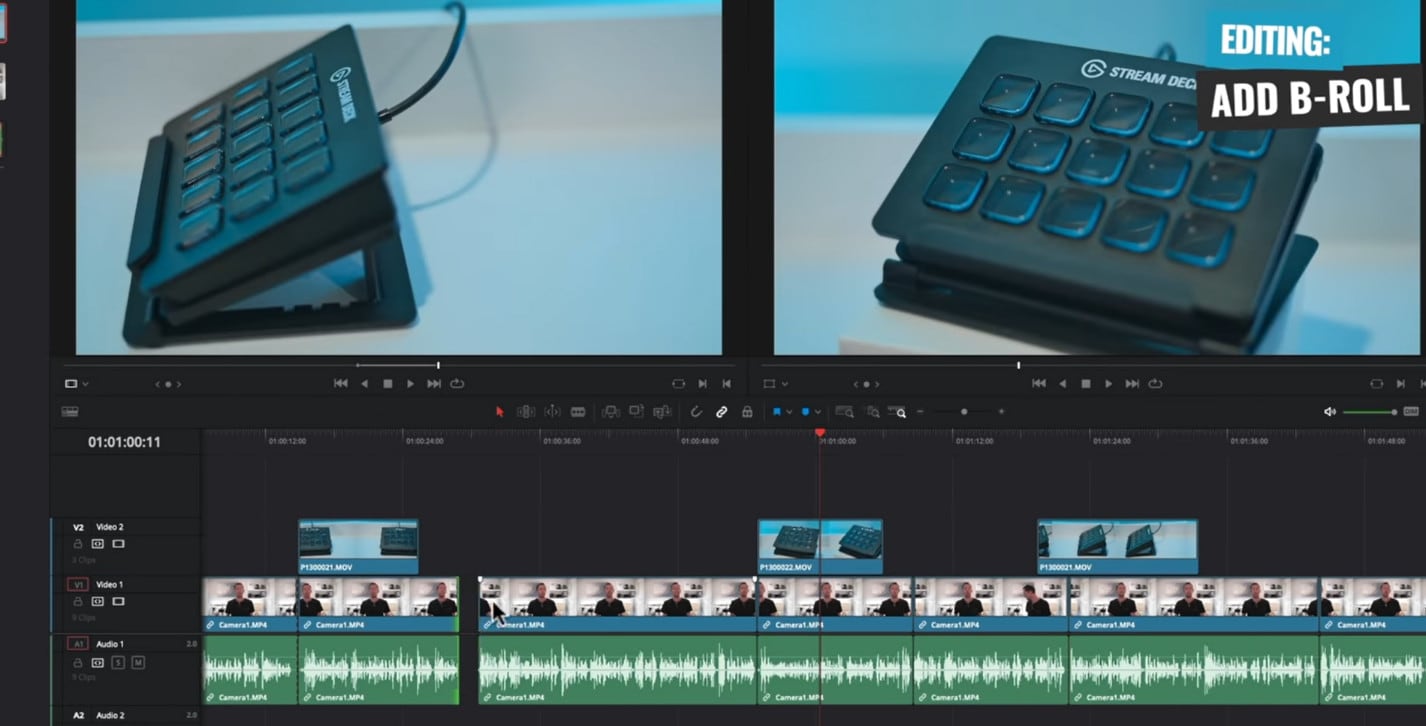
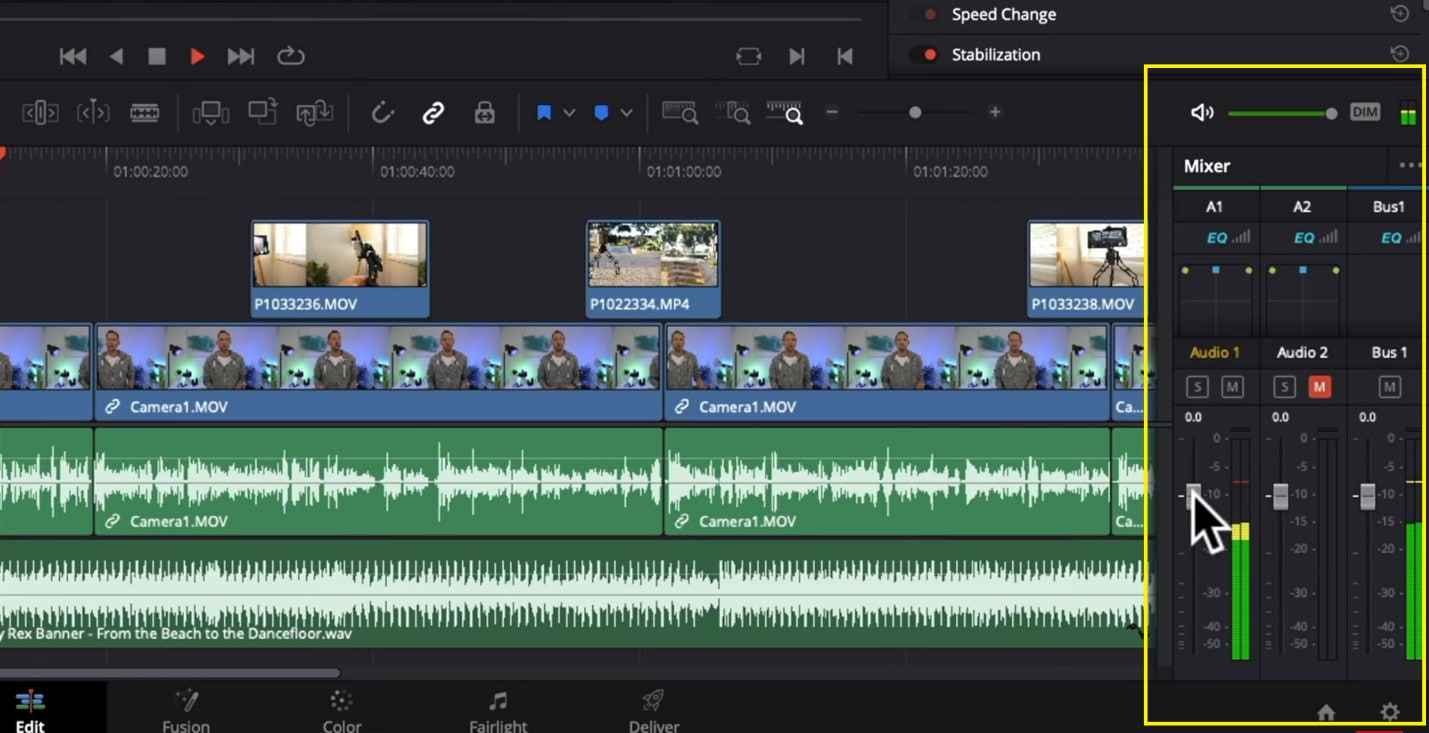
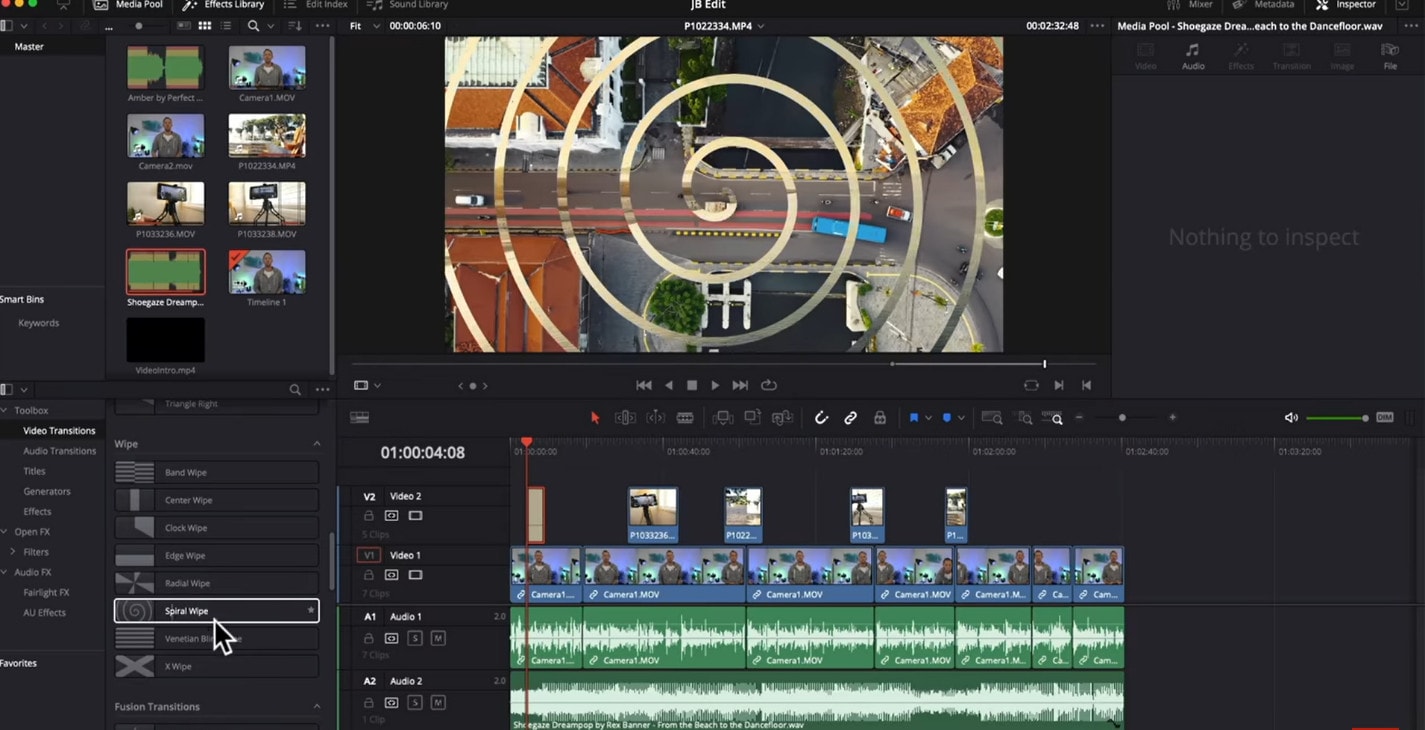
The Davinci Resolve is the most professional video editing software on Mac. It is absolutely ridiculous that it is giving access to you for free. Along with this, it is very professional video editing software that people used to create Hollywood movies and that kind of stuff. It provides a very easy and professional interphase that anyone can use without having training.
- The controls and features in the software are amazing and can edit videos frame by frame.
- There is also a dedicated area for audio creation.
- The motion graphics and
- A specific area just for color grading and color correcting.
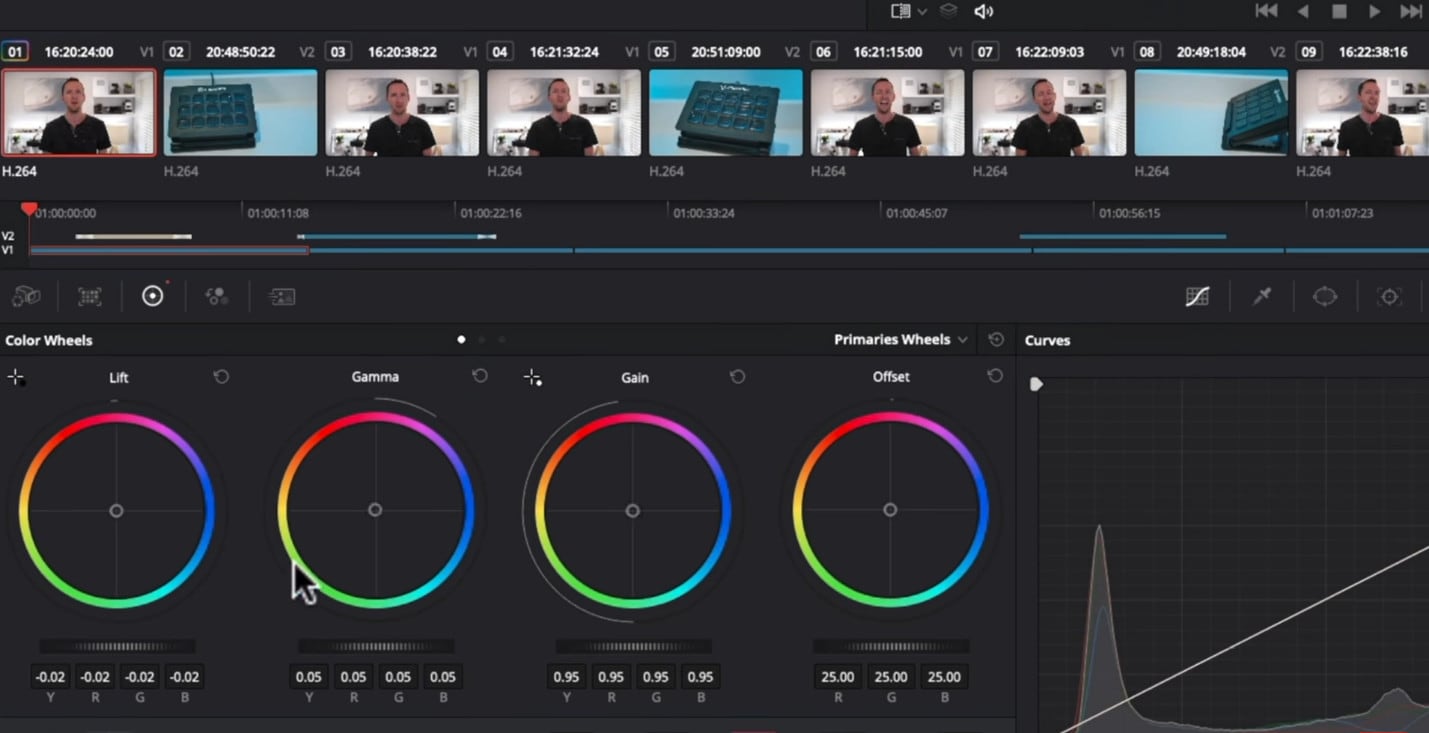
That’s why the Davinci Resolve has got its name as a finishing application of movies. People come in and color grade their videos. As it is a very powerful software hence if you are working with an old computer and that’s not really a powerful computer, the Davinci Resolve would not be going to work properly for you.
It completely depends upon how many choices you are giving yourself while editing a video. It takes time to make choices. For example, if your friend asks you to buy a card (any card) from the store. You go into the store and start searching cards from more than 50000 cards, it takes time. On the other hand, if your friend asks you to buy a card for his uncle’s pet dog. This time it becomes easier for you to go straight and choose from the pet cards without moving around the birthday and anniversary cards.
- Amount of footage.
It depends upon how much footage you have on your edit and what kind of content you are editing. Some of the content is really complex and takes a lot of time like V-logging but at the same time, you may have content that requires very less edit or zero edit.
The video editing will become a slit and a quick process for you compared to what it was a few years back. But there are a few key things that really speed up the editing process.
I am going to discuss from beginning to end how to edit a video.
- Outline
You should take a paper and write down what you are going to say about your video. It would make your editing easy because you have already structured your content.
- Avoid distractions
While editing you make a flow state in which the editing process becomes easier. But when you got distracted it takes a lot of time to get back to that flow state.
- My kids are my big distraction so, I usually start my editing process after they go to bed. (You can set yours).
- Keep your phone away because it is another distraction that consumes most of your time.
- Don’t keep re-watching your video all the time. Usually, people edit the first clip and before starting to edit the second clip they watch the first clip. After that, they edit the second clip and then re-watch the first and the second clip. It is also wasting a lot of your time. Do it at the end.
How to Edit Video Faster with the Best Video Editor
Filmora 11 is one of the easiest to learn and one of the most beginner-friendly apps. It is available on both Mac and windows. You can download it for free to use its features. Now let’s get started to go deep down into the steps.
- Open the Filmora 11, a window will be opened.
- The Create Project is for a new project.
- You can change the Aspect Ratio coinciding with the social media platforms. Widescreen 16:9 is for TV or YouTube.
- You can use the previously made projects.
- To start with a new project hit the New Project.

In the user interphase, there are 3 basic sections.
- Editing tabs are at the top to change the formatting of the videos.
- Media tab is to Import videos or photos.
- Preview window to watch the editing process.
- Down here is the timeline where all the editing process takes place.

- Select the video from the system storage and drag it and drop it into the timeline.
- The video then be visible in the preview window.

You can split, cut, trim, delete, animate, and add effects and music. There are hundreds of editing features inside the menu bar that provide the edit controls and you can enjoy editing in the palm of your hand.
Here is an important feature you should know.
- Select the video and hit the speed
- You can select slow, fast, normal, and the most interesting one is speed ramping.
- Speed ramping allows you to set automatically made patterns to slow down then fast again slow. It will create a cinematic effect in the video. But this feature is only for paid users.

- Here is another very interesting tool the color correction tool. To get a uniform color in the combination of different clips, you can automatically set the color correction and color match.
- You can match the reference frame with the current to match their colors.

- Hit the File option and select the Save as Project.
- Now hit the Export tab to export the video. You can set the format of the video and the platform like YouTube, Instagram, Facebook, or any of them.

It will give you the fundamental framework for editing any video using Filmora 11.
1. Photos app for Windows 10.
I am going to show you how you can edit videos in Windows 10 using the app that comes with windows 10. Yes! Windows 10 include a free video editor and I am going to tell you step-by-step how to take advantage of it. If you are using windows 7 or windows 8 don’t feel let down, you can also create windows 10 totally free.
Microsoft has added the Photos app to Windows 10 and has added a fully functional video editor. You can do all sorts of things like trimming and splitting clips and re-organizing clips.

The great news is you don’t have to go out and buy a video editor or search for the video editor to download on your system instead if you are Windows 10 you already have some awesome software to edit your videos.
2. CapCut App for Android.
CapCut is the best video editing app, whether you are making videos for youtube, TikTok, Instagram, or Facebook. It is a free and all-in-one video editing app and you can use it without watermarks and annoying ads. The good thing about this app is, that it is very easy to use. Now let’s have a quick overview of the CapCut app.
- After opening your video select the clips you want to edit and here you will get a project timeline.

Here you can add, move or replace clips and can perform even more editing in the timeline.
You can split, trim, and delete

You can also apply some filters and adjustments. Adding text, stickers, and audio and the rest of the editing is just fun doing in CapCut. You can change the animation and style of your video in just a few clicks.

It also provides us with the Effects options.
- The video effects are effects on the entire video.
- The body effects are the effects applied only on the body.

Let’s enjoy its advanced features without paying for monthly subscription.
3. Davinci Resolve for Mac.
The Davinci Resolve is the most professional video editing software on Mac. It is absolutely ridiculous that it is giving access to you for free. Along with this, it is very professional video editing software that people used to create Hollywood movies and that kind of stuff. It provides a very easy and professional interphase that anyone can use without having training.
- The controls and features in the software are amazing and can edit videos frame by frame.

- There is also a dedicated area for audio creation.

- The motion graphics and

- A specific area just for color grading and color correcting.

That’s why the Davinci Resolve has got its name as a finishing application of movies. People come in and color grade their videos. As it is a very powerful software hence if you are working with an old computer and that’s not really a powerful computer, the Davinci Resolve would not be going to work properly for you.
It completely depends upon how many choices you are giving yourself while editing a video. It takes time to make choices. For example, if your friend asks you to buy a card (any card) from the store. You go into the store and start searching cards from more than 50000 cards, it takes time. On the other hand, if your friend asks you to buy a card for his uncle’s pet dog. This time it becomes easier for you to go straight and choose from the pet cards without moving around the birthday and anniversary cards.
- Amount of footage.
It depends upon how much footage you have on your edit and what kind of content you are editing. Some of the content is really complex and takes a lot of time like V-logging but at the same time, you may have content that requires very less edit or zero edit.
The video editing will become a slit and a quick process for you compared to what it was a few years back. But there are a few key things that really speed up the editing process.
I am going to discuss from beginning to end how to edit a video.
- Outline
You should take a paper and write down what you are going to say about your video. It would make your editing easy because you have already structured your content.
- Avoid distractions
While editing you make a flow state in which the editing process becomes easier. But when you got distracted it takes a lot of time to get back to that flow state.
- My kids are my big distraction so, I usually start my editing process after they go to bed. (You can set yours).
- Keep your phone away because it is another distraction that consumes most of your time.
- Don’t keep re-watching your video all the time. Usually, people edit the first clip and before starting to edit the second clip they watch the first clip. After that, they edit the second clip and then re-watch the first and the second clip. It is also wasting a lot of your time. Do it at the end.
How to Edit Video Faster with the Best Video Editor
Filmora 11 is one of the easiest to learn and one of the most beginner-friendly apps. It is available on both Mac and windows. You can download it for free to use its features. Now let’s get started to go deep down into the steps.
- Open the Filmora 11, a window will be opened.
- The Create Project is for a new project.
- You can change the Aspect Ratio coinciding with the social media platforms. Widescreen 16:9 is for TV or YouTube.
- You can use the previously made projects.
- To start with a new project hit the New Project.

In the user interphase, there are 3 basic sections.
- Editing tabs are at the top to change the formatting of the videos.
- Media tab is to Import videos or photos.
- Preview window to watch the editing process.
- Down here is the timeline where all the editing process takes place.

- Select the video from the system storage and drag it and drop it into the timeline.
- The video then be visible in the preview window.

You can split, cut, trim, delete, animate, and add effects and music. There are hundreds of editing features inside the menu bar that provide the edit controls and you can enjoy editing in the palm of your hand.
Here is an important feature you should know.
- Select the video and hit the speed
- You can select slow, fast, normal, and the most interesting one is speed ramping.
- Speed ramping allows you to set automatically made patterns to slow down then fast again slow. It will create a cinematic effect in the video. But this feature is only for paid users.

- Here is another very interesting tool the color correction tool. To get a uniform color in the combination of different clips, you can automatically set the color correction and color match.
- You can match the reference frame with the current to match their colors.

- Hit the File option and select the Save as Project.
- Now hit the Export tab to export the video. You can set the format of the video and the platform like YouTube, Instagram, Facebook, or any of them.

It will give you the fundamental framework for editing any video using Filmora 11.
1. Photos app for Windows 10.
I am going to show you how you can edit videos in Windows 10 using the app that comes with windows 10. Yes! Windows 10 include a free video editor and I am going to tell you step-by-step how to take advantage of it. If you are using windows 7 or windows 8 don’t feel let down, you can also create windows 10 totally free.
Microsoft has added the Photos app to Windows 10 and has added a fully functional video editor. You can do all sorts of things like trimming and splitting clips and re-organizing clips.

The great news is you don’t have to go out and buy a video editor or search for the video editor to download on your system instead if you are Windows 10 you already have some awesome software to edit your videos.
2. CapCut App for Android.
CapCut is the best video editing app, whether you are making videos for youtube, TikTok, Instagram, or Facebook. It is a free and all-in-one video editing app and you can use it without watermarks and annoying ads. The good thing about this app is, that it is very easy to use. Now let’s have a quick overview of the CapCut app.
- After opening your video select the clips you want to edit and here you will get a project timeline.

Here you can add, move or replace clips and can perform even more editing in the timeline.
You can split, trim, and delete

You can also apply some filters and adjustments. Adding text, stickers, and audio and the rest of the editing is just fun doing in CapCut. You can change the animation and style of your video in just a few clicks.

It also provides us with the Effects options.
- The video effects are effects on the entire video.
- The body effects are the effects applied only on the body.

Let’s enjoy its advanced features without paying for monthly subscription.
3. Davinci Resolve for Mac.
The Davinci Resolve is the most professional video editing software on Mac. It is absolutely ridiculous that it is giving access to you for free. Along with this, it is very professional video editing software that people used to create Hollywood movies and that kind of stuff. It provides a very easy and professional interphase that anyone can use without having training.
- The controls and features in the software are amazing and can edit videos frame by frame.

- There is also a dedicated area for audio creation.

- The motion graphics and

- A specific area just for color grading and color correcting.

That’s why the Davinci Resolve has got its name as a finishing application of movies. People come in and color grade their videos. As it is a very powerful software hence if you are working with an old computer and that’s not really a powerful computer, the Davinci Resolve would not be going to work properly for you.
It completely depends upon how many choices you are giving yourself while editing a video. It takes time to make choices. For example, if your friend asks you to buy a card (any card) from the store. You go into the store and start searching cards from more than 50000 cards, it takes time. On the other hand, if your friend asks you to buy a card for his uncle’s pet dog. This time it becomes easier for you to go straight and choose from the pet cards without moving around the birthday and anniversary cards.
- Amount of footage.
It depends upon how much footage you have on your edit and what kind of content you are editing. Some of the content is really complex and takes a lot of time like V-logging but at the same time, you may have content that requires very less edit or zero edit.
The video editing will become a slit and a quick process for you compared to what it was a few years back. But there are a few key things that really speed up the editing process.
I am going to discuss from beginning to end how to edit a video.
- Outline
You should take a paper and write down what you are going to say about your video. It would make your editing easy because you have already structured your content.
- Avoid distractions
While editing you make a flow state in which the editing process becomes easier. But when you got distracted it takes a lot of time to get back to that flow state.
- My kids are my big distraction so, I usually start my editing process after they go to bed. (You can set yours).
- Keep your phone away because it is another distraction that consumes most of your time.
- Don’t keep re-watching your video all the time. Usually, people edit the first clip and before starting to edit the second clip they watch the first clip. After that, they edit the second clip and then re-watch the first and the second clip. It is also wasting a lot of your time. Do it at the end.
How to Edit Video Faster with the Best Video Editor
Filmora 11 is one of the easiest to learn and one of the most beginner-friendly apps. It is available on both Mac and windows. You can download it for free to use its features. Now let’s get started to go deep down into the steps.
- Open the Filmora 11, a window will be opened.
- The Create Project is for a new project.
- You can change the Aspect Ratio coinciding with the social media platforms. Widescreen 16:9 is for TV or YouTube.
- You can use the previously made projects.
- To start with a new project hit the New Project.

In the user interphase, there are 3 basic sections.
- Editing tabs are at the top to change the formatting of the videos.
- Media tab is to Import videos or photos.
- Preview window to watch the editing process.
- Down here is the timeline where all the editing process takes place.

- Select the video from the system storage and drag it and drop it into the timeline.
- The video then be visible in the preview window.

You can split, cut, trim, delete, animate, and add effects and music. There are hundreds of editing features inside the menu bar that provide the edit controls and you can enjoy editing in the palm of your hand.
Here is an important feature you should know.
- Select the video and hit the speed
- You can select slow, fast, normal, and the most interesting one is speed ramping.
- Speed ramping allows you to set automatically made patterns to slow down then fast again slow. It will create a cinematic effect in the video. But this feature is only for paid users.

- Here is another very interesting tool the color correction tool. To get a uniform color in the combination of different clips, you can automatically set the color correction and color match.
- You can match the reference frame with the current to match their colors.

- Hit the File option and select the Save as Project.
- Now hit the Export tab to export the video. You can set the format of the video and the platform like YouTube, Instagram, Facebook, or any of them.

It will give you the fundamental framework for editing any video using Filmora 11.
1. Photos app for Windows 10.
I am going to show you how you can edit videos in Windows 10 using the app that comes with windows 10. Yes! Windows 10 include a free video editor and I am going to tell you step-by-step how to take advantage of it. If you are using windows 7 or windows 8 don’t feel let down, you can also create windows 10 totally free.
Microsoft has added the Photos app to Windows 10 and has added a fully functional video editor. You can do all sorts of things like trimming and splitting clips and re-organizing clips.

The great news is you don’t have to go out and buy a video editor or search for the video editor to download on your system instead if you are Windows 10 you already have some awesome software to edit your videos.
2. CapCut App for Android.
CapCut is the best video editing app, whether you are making videos for youtube, TikTok, Instagram, or Facebook. It is a free and all-in-one video editing app and you can use it without watermarks and annoying ads. The good thing about this app is, that it is very easy to use. Now let’s have a quick overview of the CapCut app.
- After opening your video select the clips you want to edit and here you will get a project timeline.

Here you can add, move or replace clips and can perform even more editing in the timeline.
You can split, trim, and delete

You can also apply some filters and adjustments. Adding text, stickers, and audio and the rest of the editing is just fun doing in CapCut. You can change the animation and style of your video in just a few clicks.

It also provides us with the Effects options.
- The video effects are effects on the entire video.
- The body effects are the effects applied only on the body.

Let’s enjoy its advanced features without paying for monthly subscription.
3. Davinci Resolve for Mac.
The Davinci Resolve is the most professional video editing software on Mac. It is absolutely ridiculous that it is giving access to you for free. Along with this, it is very professional video editing software that people used to create Hollywood movies and that kind of stuff. It provides a very easy and professional interphase that anyone can use without having training.
- The controls and features in the software are amazing and can edit videos frame by frame.

- There is also a dedicated area for audio creation.

- The motion graphics and

- A specific area just for color grading and color correcting.

That’s why the Davinci Resolve has got its name as a finishing application of movies. People come in and color grade their videos. As it is a very powerful software hence if you are working with an old computer and that’s not really a powerful computer, the Davinci Resolve would not be going to work properly for you.
Also read:
- 2024 Approved 20 Best LUTs for Music Videos
- Updated This Article Talks in Detail About How to Download Windows Movie Maker 2012 Version, the Key Features, How to Use It, Etc. It Further Discusses an Alternative Way to Create Videos on Windows PC. Check Out
- 2024 Approved Using This Article as a Reference, the Users Would Create a Café Meal Intro and YouTube End Screen While Knowing Multiple Ways to Download Cooking Background Music
- New In 2024, Do You Want to Explore some Available Opportunities to Create Slow Motion? Discover the Best Slow-Motion Video Editors for Desktop, Android, and iPhone Here
- Updated Are You Searching for the Best Cinematic LUTs for Premiere Pro? You Are in the Right Place because This Article Is Dedicated to LUTs
- New How to Correct Lens Distortion With Filmora for 2024
- New Learn How to Change Aspect Ratio in iMovie on Mac, iPad, and iPhone in This Guide. And You Can Also Use iMovie Alternatives Like Wondershare Filmora to Edit Your Videos for 2024
- Updated 2024 Approved Best Way to Freeze-Frame in Final Cut Pro
- How to Add Adjustment Layer (Clip) in DaVinci Resolve?
- New How to Use LUTs in Lumafusion & Free LUTs Resource
- New How To Fade Audio With Movavi Editor for 2024
- Updated In 2024, Do You Know How to Zoom on Facebook Livestream Videos? Through This Article, You Will Find Multiple Ways and Detailed Steps to Zoom in on the Facebook Livestream Videos
- New 2024 Approved Find The Best LUTs for Lightroom
- Updated Do You Know You Can Trim and Cut Your Video Into the Desired Portions Using a Reliable Video Splitter? Get an Easy Video Splitter Now to Simplify Your Work. Here Are 33 Carefully Chosen Apps to Help You in This for 2024
- Updated Want to Save Your Edited Video File in MP4 Format in Windows Movie Maker? Here Are the Simple Steps Along with a Better Alternative
- 2024 Approved 4K Videos Are the in Thing because of Their Flexibility and High Resolution. Stick Around to Learn How to Choose the Best Frame Rate for 4K Videos
- New In 2024, Best Love Video Maker with Music
- New 2024 Approved Experience Time Differently with The Top Slow-Motion Applications
- Updated Step by Step to Cut Videos in Adobe Premiere Pro for 2024
- New 3 Best Effects to Appear on Camera
- In 2024, Discover the Top 10 Video Editing Apps with Templates for Professional-Grade Results. Edit Like a Pro with These Tools
- Updated Separating Audio From Video in DaVinci Resolve Step by Step for 2024
- New 2024 Approved Looking for the Best Way to Create Stunning Video Animations? Here, We Look at some of the Best Animated Video Maker Solutions to Use
- Step by Step to Rotate Videos Using Kdenlive
- 2024 Approved Have You Ever Heard Hyperlapse and Tume Lapse Videos? Do You Know the Differences Between Them? This Article Will Introduce the Concepts, Features and Differnces of Them
- In 2024, Find a Solution for Effortless Sky Replacement Photoshop in This Comprehensive Guide. Also, Use the Easiest Video Editing Tool to Make Your Media Stunning
- New This Article Will Help You Understand How to Create Flying Objects Using Editing Tools Such as Wondershare Filmora for 2024
- In 2024, VSDC Free Video Editor Review 2023
- New Top Free Video Editing Software Enhance Your Content with These Essential Tools
- New 2024 Approved Want to Take Your Editing Creativity to the Next Level by Designing Top-Class, Professional-Quality Slideshows in Aquasoft? Rest Assured, You Have Landed at the Right Place
- Updated 2024 Approved How to Vlog? A Beginners Guide to Start Vlogging
- New How to Make GIF With Transparent Background?
- New In 2024, Best 6 WMV to GIF Converters
- How To Create A Green Screen Video In After Effects
- New How to Control the Speed of Video for 2024
- 2024 Approved We All Know Very Well that a 1-Second-Video Has Several Images in a Single Row. Even with iMovie Time-Lapse, You Can Create This! So, without Any Further Ado, Lets Learn How to Make a Timelapse in iMovie
- New In 2024, Recording Video in Slow Motion Some Considerable Points
- New 2024 Approved 10 2D/3D Animation Tips & Tricks for You
- Easy Guide to Vivo T2 Pro 5G FRP Bypass With Best Methods
- In 2024, 4 Ways to Transfer Music from Apple iPhone 12 to iPod touch | Dr.fone
- Your Complete Guide To Reset Vivo X90S | Dr.fone
- In 2024, Fixing Foneazy MockGo Not Working On Oppo A18 | Dr.fone
- How to recover old music from your Nokia G310
- In 2024, How to Transfer Data from Infinix Smart 7 HD to BlackBerry | Dr.fone
- In 2024, 2 Ways to Transfer Text Messages from Oppo Find X6 Pro to iPhone 15/14/13/12/11/X/8/ | Dr.fone
- In 2024, Tips and Tricks for Setting Up your Nubia Red Magic 8S Pro Phone Pattern Lock
- Complete guide for recovering call logs on 90 GT
- Title: A Full Review of Leeming LUT Pro
- Author: Morgan
- Created at : 2024-05-19 05:11:33
- Updated at : 2024-05-20 05:11:33
- Link: https://ai-video-editing.techidaily.com/a-full-review-of-leeming-lut-pro/
- License: This work is licensed under CC BY-NC-SA 4.0.

