
A Guide To Adopting Lumetri Color Presets in Effective Color Grading

A Guide To Adopting Lumetri Color Presets in Effective Color Grading
Color grading plays a crucial role in a video’s post-production. It can impact a video’s appearance and atmosphere. The Lumetri Color panel in Adobe Premiere Pro provides an efficient and powerful set of tools for color grading. However, knowing where to start or how to achieve the desired look can be challenging. One approach is to use Lumetri Color presets, which are pre-configured color grading settings.
You can apply these to your footage with a few clicks. This article will provide a guide on how to adopt Lumetri Color presets. We’ll cover the basics of color grading and their importance. We will also learn how to access and use Lumetri presets. By the end of this guide, you’ll have the knowledge and tools to take your color grading skills to the next level.
Part 1: What are Lumetri Color Presets?
Lumetri Color Presets are pre-made color grading settings that you can use for videos. These are used in Adobe’s Lumetri Color panel in Premiere Pro or After Effects. The Lumetri Color panel allows editors and colorists to adjust the colors and tones of a video clip. It improves your video’s visual appeal and storytelling impact.
The Lumetri Color panel is a powerful tool that provides a range of controls for color grading. It allows you to adjust these image attributes and see the changes in real time. Lumetri Looks provides a simple way to apply a pre-designed look or style to your footage. These presets can range from subtle adjustments to drastic color grading effects. Moreover, you can customize them further to fit your needs.
Empower your videos with a new mood using different LUTs. Filmora now offers 100+ top-quality 3D LUTs cover a broad range of scenarios. Transform your videos with Filmora’s powerful 3D LUTs.
Apply LUT on Videos Apply LUT on Videos Learn More

Part 2: Why Are Lumetri Color Presets Important?
There are many benefits attached to the use of a Lumetri preset. These benefits range from saving your time and effort to enhancing your video to new heights. Given below are some factors which emphasize the importance of Lumetri color presets:
Saves Time
Lumetri color can save a lot of time for video content creators. People adjust the colors and tones in a video to achieve a specific look. Instead, a Lumetri color preset can be applied in a few clicks. It is especially useful when working on larger projects or when deadlines are tight.
Enhanced Look
Color grading is an essential part of video production. Here, Lumetri color can help improve the look of a video. By applying a preset, you can achieve a specific mood or tone that would otherwise be hectic to create. It results in more visually appealing and professional-looking content.
Further Adjustments
You can use Lumetri color presets as a base for further color grading adjustments. After applying a preset, you can still make manual adjustments to fine-tune the colors. It helps achieve a more personalized look while still saving a lot of time and effort.
Maintains Consistency
Using Lumetri color can help maintain consistency across different video projects. It is especially important for branding purposes. Furthermore, it can help establish a recognizable visual style. Besides, using similar presets across different videos gives a cohesive look.
Part 3: How To Install Free Lumetri Color Presets on Device?
There is no doubt that Lumetri Color Presets are an essential tool for video editors. These presets help enhance the quality of their videos. Moreover, they also offer various color grading options. If you are looking for free Lumetri Color Presets, we have good news. Given below are the simple steps for free Lumetri Color download and installation:
Step 1Download Special Presets and Access Adobe Premiere Pro Folder
Start by downloading the “PremiumBeat Hollywood Lumetri Looks” folder from the official website. Now unzip the folder to view its contents. Next, you need to open the Adobe Premiere Pro folder.
To open the Premiere Pro folder, you need to open “Finder” and navigate to “Application.” Here open the “Adobe Premiere Pro CC” folder. Windows users can access the “Adobe Premiere Pro CC” through the “Program Files” of their “C:/” drive.

Step 2Lead Into Its Lumetri Folder
Here, you need to access the “Lumetri” folder. To do that, you need to hold “Command,” click “Adobe Premiere CC,” and choose “Show Package Contents.” Now go to the “Lumetri” folder in “Contents.” Windows users can access the “Lumetri” folder through the “Adobe Premiere Pro CC” folder.
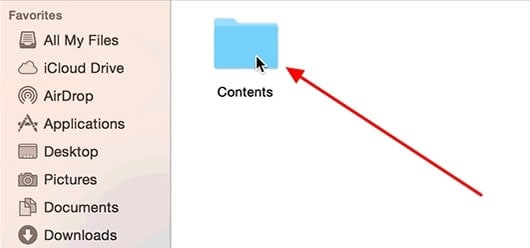
Step 3Unzip The Presets To Lumetri Folder
Now, you need to access the “Cine” folder within the “Lumetri” folder. Afterward, move all “.look” files from the unzipped “PremiumBeat Hollywood Lumetri Looks” folder. Mac users can do that using the drag-and-drop method, while Windows users can do copy/paste.

Part 4: How To Use Lumetri LUT Presets in Premiere Pro?
Now that you have installed free Lumetri presets, the next part is how to use them. These presets can become a powerful feature in your Premiere Pro. It will allow you to apply a pre-defined color grading effect to your footage. In this guide, we will walk you through the steps to use Lumetri LUT presets in Adobe Premiere Pro:
Step 1Open the Color Workspace
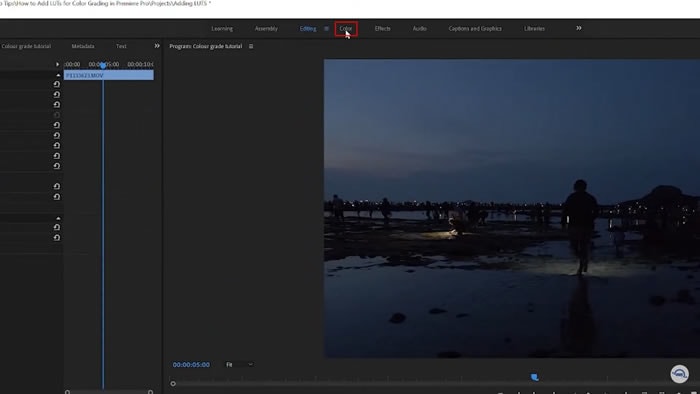
After downloading free Lumetri presets, you need to restart your Adobe Premier Pro. Now open your project and access the “Lumetri Color” panel through “Color” from the top bar.
Step 2Lead Into Lumetri Color Section
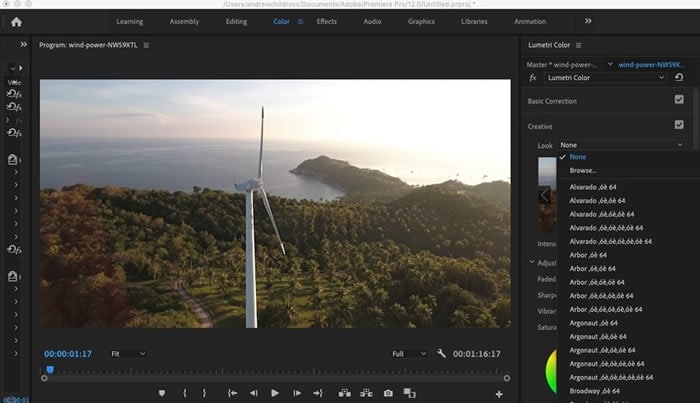
Scroll down in the “Lumetri Color” panel to find the “Creative” section. Here click the “Look” dropdown menu, and you will find all the installed presets here.
Step 3Apply the Required Presets
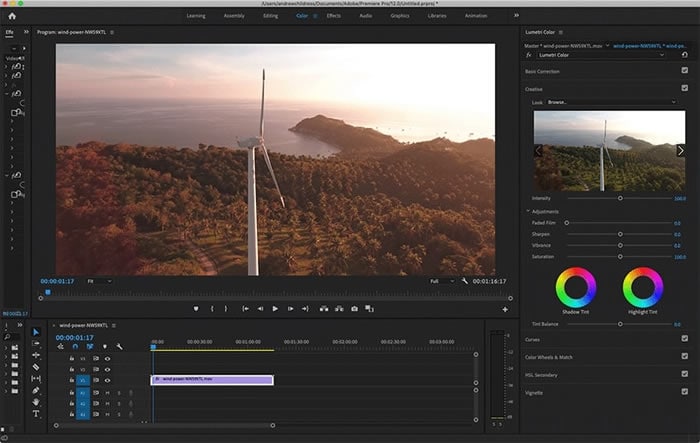
Choose a preset and apply it to your project. You can preview the file to see the effect of a preset on your footage.
Bonus Part: Using Lumetri Color Preset LUTs in Wondershare Filmora
Using Lumetri Color Presets or LUTs is essential during the post-production of your footage. However, using Adobe Premier Pro can be tough, especially for beginners. It has a steep learning curve and is also expensive. As a replacement, you can use Wondershare Filmora . It is a video editor known for its extensive features and affordable cost. This tool started its journey with more than 100 LUTs to use in your video.
Add LUTs on Video For Win 7 or later(64-bit)
Add LUTs on Video For macOS 10.14 or later
Furthermore, the video editing innovation has introduced 100+ new LUTs, taking the total number to well past 200. You can use this wide range of LUTs to enhance your video or footage to new heights. Moreover, it allows you to preview each LUT file as you hover over it. When using LUTs in Filmora, you can also set their intensity to your liking.

Main Features of Wondershare Filmora
- Filmora comes with various built-in effects, including transitions, filters, overlays, etc.
- Its Green Screen feature lets you replace the background of your videos with custom images or videos.
- The LUTs section of Filmora include scenarios like travel vlogger, event record, landscape film, and more.
- Using its motion-tracking feature, you can add text or graphics on a moving object or person in your video.
Conclusion
To sum it up, adopting Lumetri Presets is an effective way to enhance your video content. You can get professional-level color grading results by using the provided instructions. While Premiere Pro is a good choice for color grading, it has a steep learning curve. That’s why Wondershare Filmora stands out as the best choice due to its clean interface and affordable price.
Moreover, it offers an extensive library of built-in LUTs. You can take your video content to the next level using Filmora and the knowledge gained from this guide.
Apply LUT on Videos Apply LUT on Videos Learn More

Part 2: Why Are Lumetri Color Presets Important?
There are many benefits attached to the use of a Lumetri preset. These benefits range from saving your time and effort to enhancing your video to new heights. Given below are some factors which emphasize the importance of Lumetri color presets:
Saves Time
Lumetri color can save a lot of time for video content creators. People adjust the colors and tones in a video to achieve a specific look. Instead, a Lumetri color preset can be applied in a few clicks. It is especially useful when working on larger projects or when deadlines are tight.
Enhanced Look
Color grading is an essential part of video production. Here, Lumetri color can help improve the look of a video. By applying a preset, you can achieve a specific mood or tone that would otherwise be hectic to create. It results in more visually appealing and professional-looking content.
Further Adjustments
You can use Lumetri color presets as a base for further color grading adjustments. After applying a preset, you can still make manual adjustments to fine-tune the colors. It helps achieve a more personalized look while still saving a lot of time and effort.
Maintains Consistency
Using Lumetri color can help maintain consistency across different video projects. It is especially important for branding purposes. Furthermore, it can help establish a recognizable visual style. Besides, using similar presets across different videos gives a cohesive look.
Part 3: How To Install Free Lumetri Color Presets on Device?
There is no doubt that Lumetri Color Presets are an essential tool for video editors. These presets help enhance the quality of their videos. Moreover, they also offer various color grading options. If you are looking for free Lumetri Color Presets, we have good news. Given below are the simple steps for free Lumetri Color download and installation:
Step 1Download Special Presets and Access Adobe Premiere Pro Folder
Start by downloading the “PremiumBeat Hollywood Lumetri Looks” folder from the official website. Now unzip the folder to view its contents. Next, you need to open the Adobe Premiere Pro folder.
To open the Premiere Pro folder, you need to open “Finder” and navigate to “Application.” Here open the “Adobe Premiere Pro CC” folder. Windows users can access the “Adobe Premiere Pro CC” through the “Program Files” of their “C:/” drive.

Step 2Lead Into Its Lumetri Folder
Here, you need to access the “Lumetri” folder. To do that, you need to hold “Command,” click “Adobe Premiere CC,” and choose “Show Package Contents.” Now go to the “Lumetri” folder in “Contents.” Windows users can access the “Lumetri” folder through the “Adobe Premiere Pro CC” folder.

Step 3Unzip The Presets To Lumetri Folder
Now, you need to access the “Cine” folder within the “Lumetri” folder. Afterward, move all “.look” files from the unzipped “PremiumBeat Hollywood Lumetri Looks” folder. Mac users can do that using the drag-and-drop method, while Windows users can do copy/paste.

Part 4: How To Use Lumetri LUT Presets in Premiere Pro?
Now that you have installed free Lumetri presets, the next part is how to use them. These presets can become a powerful feature in your Premiere Pro. It will allow you to apply a pre-defined color grading effect to your footage. In this guide, we will walk you through the steps to use Lumetri LUT presets in Adobe Premiere Pro:
Step 1Open the Color Workspace
After downloading free Lumetri presets, you need to restart your Adobe Premier Pro. Now open your project and access the “Lumetri Color” panel through “Color” from the top bar.

Step 2Lead Into Lumetri Color Section
Scroll down in the “Lumetri Color” panel to find the “Creative” section. Here click the “Look” dropdown menu, and you will find all the installed presets here.

Step 3Apply the Required Presets
Choose a preset and apply it to your project. You can preview the file to see the effect of a preset on your footage.

Bonus Part: Using Lumetri Color Preset LUTs in Wondershare Filmora
Using Lumetri Color Presets or LUTs is essential during the post-production of your footage. However, using Adobe Premier Pro can be tough, especially for beginners. It has a steep learning curve and is also expensive. As a replacement, you can use Wondershare Filmora . It is a video editor known for its extensive features and affordable cost. This tool started its journey with more than 100 LUTs to use in your video.
Add LUTs on Video For Win 7 or later(64-bit)
Add LUTs on Video For macOS 10.14 or later
Furthermore, the video editing innovation has introduced 100+ new LUTs, taking the total number to well past 200. You can use this wide range of LUTs to enhance your video or footage to new heights. Moreover, it allows you to preview each LUT file as you hover over it. When using LUTs in Filmora, you can also set their intensity to your liking.

Main Features of Wondershare Filmora
- Filmora comes with various built-in effects, including transitions, filters, overlays, etc.
- Its Green Screen feature lets you replace the background of your videos with custom images or videos.
- The LUTs section of Filmora include scenarios like travel vlogger, event record, landscape film, and more.
- Using its motion-tracking feature, you can add text or graphics on a moving object or person in your video.
Conclusion
To sum it up, adopting Lumetri Presets is an effective way to enhance your video content. You can get professional-level color grading results by using the provided instructions. While Premiere Pro is a good choice for color grading, it has a steep learning curve. That’s why Wondershare Filmora stands out as the best choice due to its clean interface and affordable price.
Moreover, it offers an extensive library of built-in LUTs. You can take your video content to the next level using Filmora and the knowledge gained from this guide.
A Comprehensive Guide to Slow Motion YouTube Videos and How to Manage Them
Everyone loves slow-mo scenes, dance videos, and content in related genres. Creativity is embedded in slow-motion videos to elevate your content. Not only do they refine the quality of your videos, but they also improve comprehension. YouTube is one of the well-known sources for gaining information. To understand a practical procedure, it offers a YouTube slow-motion option.
This option involves adjusting the playback speed of video for YouTube slo-mo. This article sheds light on how to slow down a YouTube video . There will be a detailed discussion on reducing YouTube video speed. In addition, we will introduce a high-performance video editor to perform this task. Keep reading this article to expand your creative horizons about slow YouTube videos.
Slow Motion Video Maker Slow your video’s speed with better control of your keyframes to create unique cinematic effects!
Make A Slow Motion Video Make A Slow Motion Video More Features

Part 1: How to Slow Down Videos in YouTube?
If you watch YouTube videos often, you must have been aware of the YouTube slow-down feature. The playback adjustment option on YouTube helps with that. By enabling that option, the whole YouTube video slows down. For adding slow-motion effects at specific durations, you can use Wondershare Filmora . In this part, we’ll explore both methods of slowing down a YouTube video:
Method 1. Direct Method
If you have the YouTube application, you can commence this action straight. If not, you can also open YouTube on your browser. Given below are the steps to play YouTube in slow motion:
Step 1
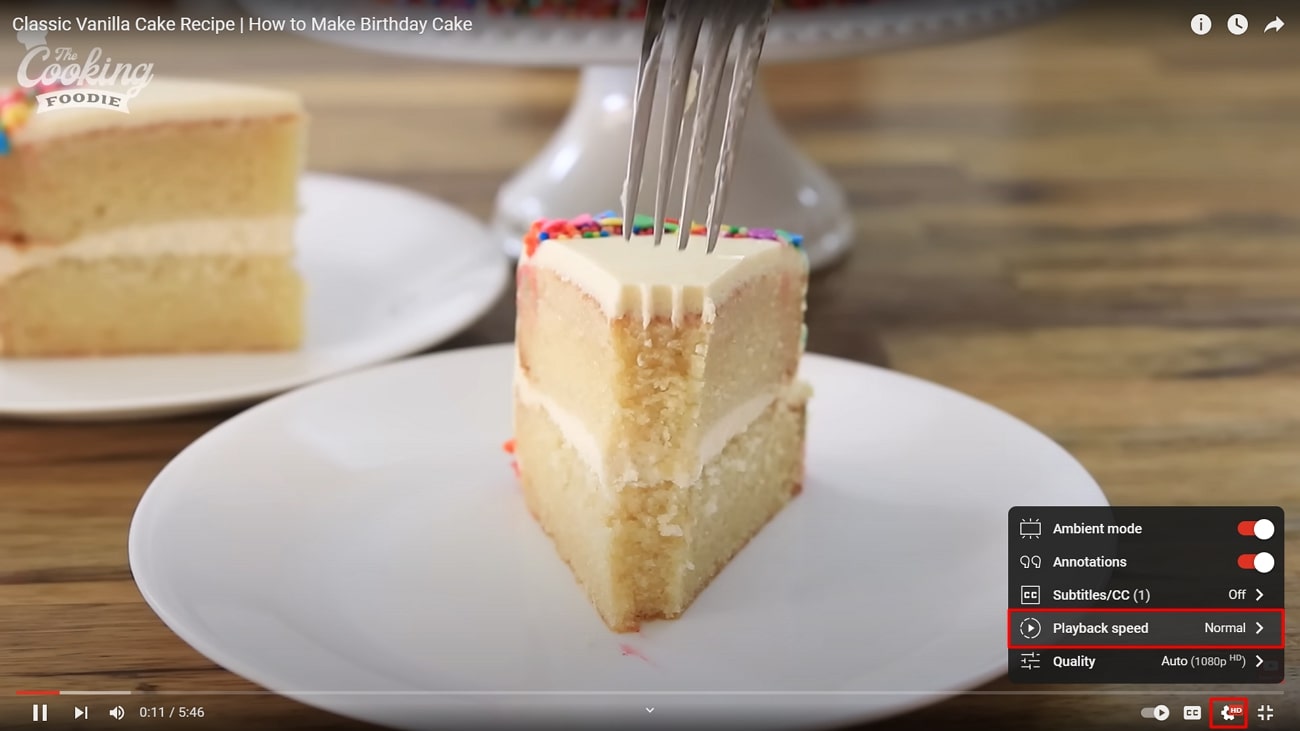
Once you play a YouTube video, navigate towards the bottom of this video. Afterward, click on the “Settings” option and select the “Playback speed” option.
Step 2
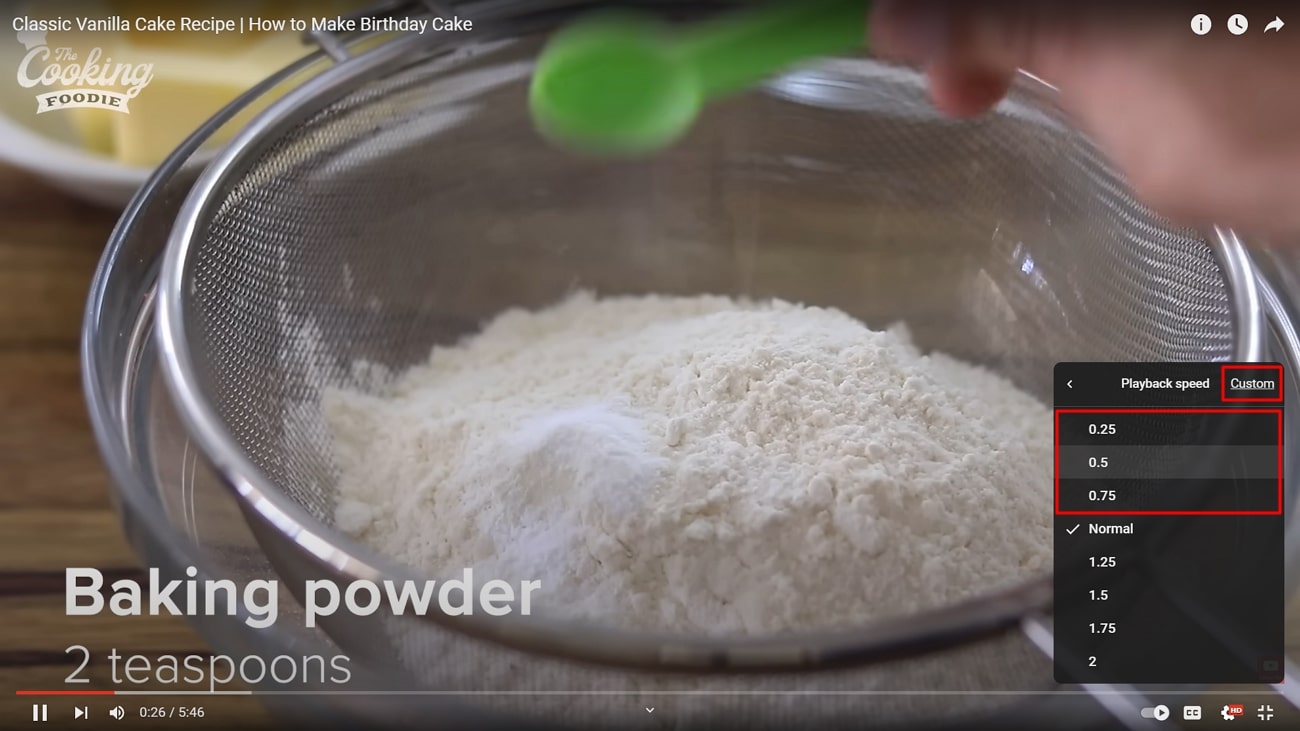
From the expansion menu, select a playback speed option as per preferences. You can select a speed between 0.75, 0.5, and 0.25. Afterward, play your video and see if the speed is right. This is the simplest method for YouTube video slow motion.
Method 2. Using Wondershare Filmora
In Wondershare Filmora, there are two methods to slow down YouTube videos. You can either use the Uniform Speed option or the Speed Ramping option. Moreover, you can add the Optical Flow effect to ensure a smooth, slow motion. In this section, we will first familiarize you with downloading a YouTube video. Here are the three major steps to create slow-motion in Filmora:
Free Download For Win 7 or later(64-bit)
Free Download For macOS 10.14 or later
Step 1Downloading a YouTube Video
YouTube doesn’t allow users to download a YouTube video on their devices. Hence, you will need third-party support to do so. Many sites offer YouTube video download services. We are using the y2mate.com , and here are the steps for it:
1. Copy the YouTube Video Link
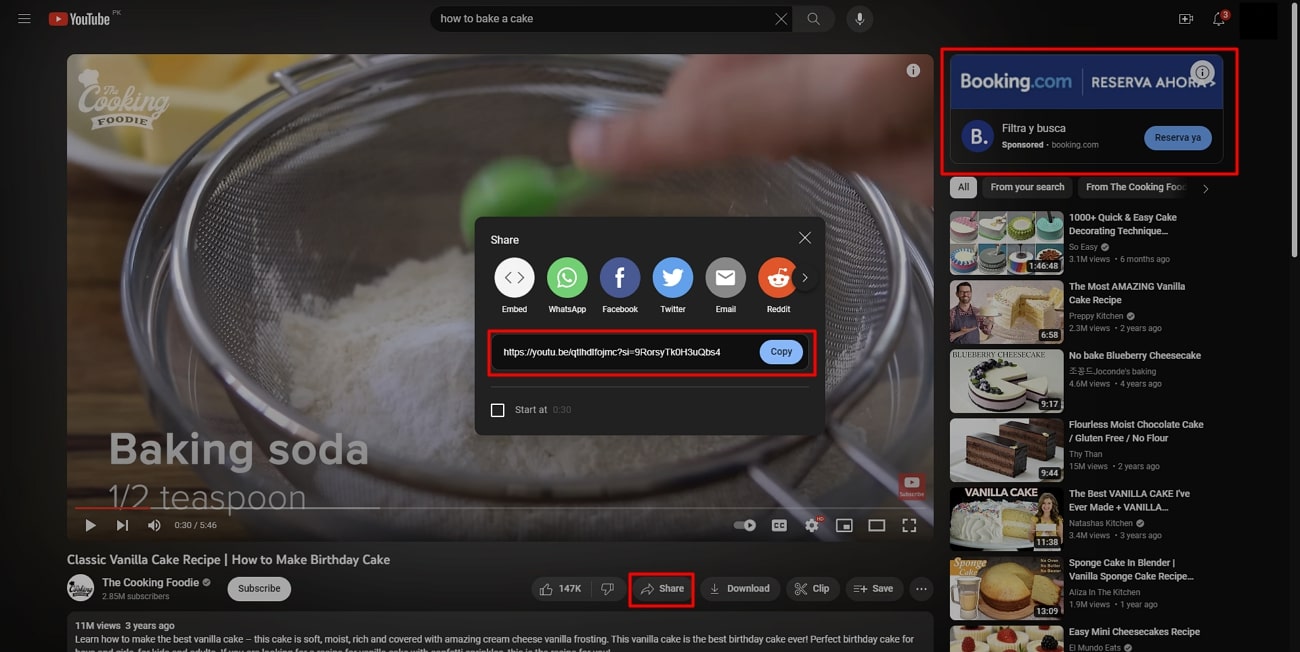
First, access the respective video that you want to download from YouTube. Locate the “Share” option at the bottom of this video and select it. Then click the “Copy” option to copy your video’s link.
2. Access the Site
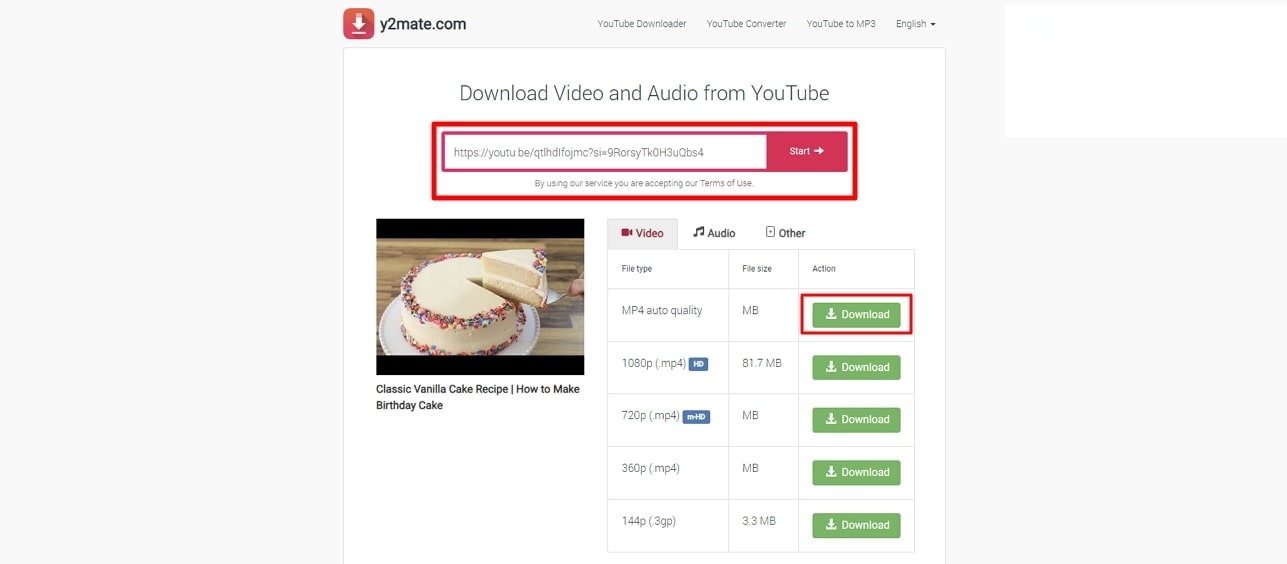
After copying the video’s link, access the site using your web browser. In the “Search or paste link here” box, paste the video link and click “Start.” From the download options appearing at the bottom, select a suitable option. Click on the “Download” button adjacent to your option.
Step 2Slow Down YouTube Video in Filmora
Once you have downloaded the video on your device, it is time to slow down the YouTube video. Filmora offers a plain and simple method to slow down a video. Here is a step-by-step guide to help you create video slow-mo in Filmora:
1. Import the YouTube Video
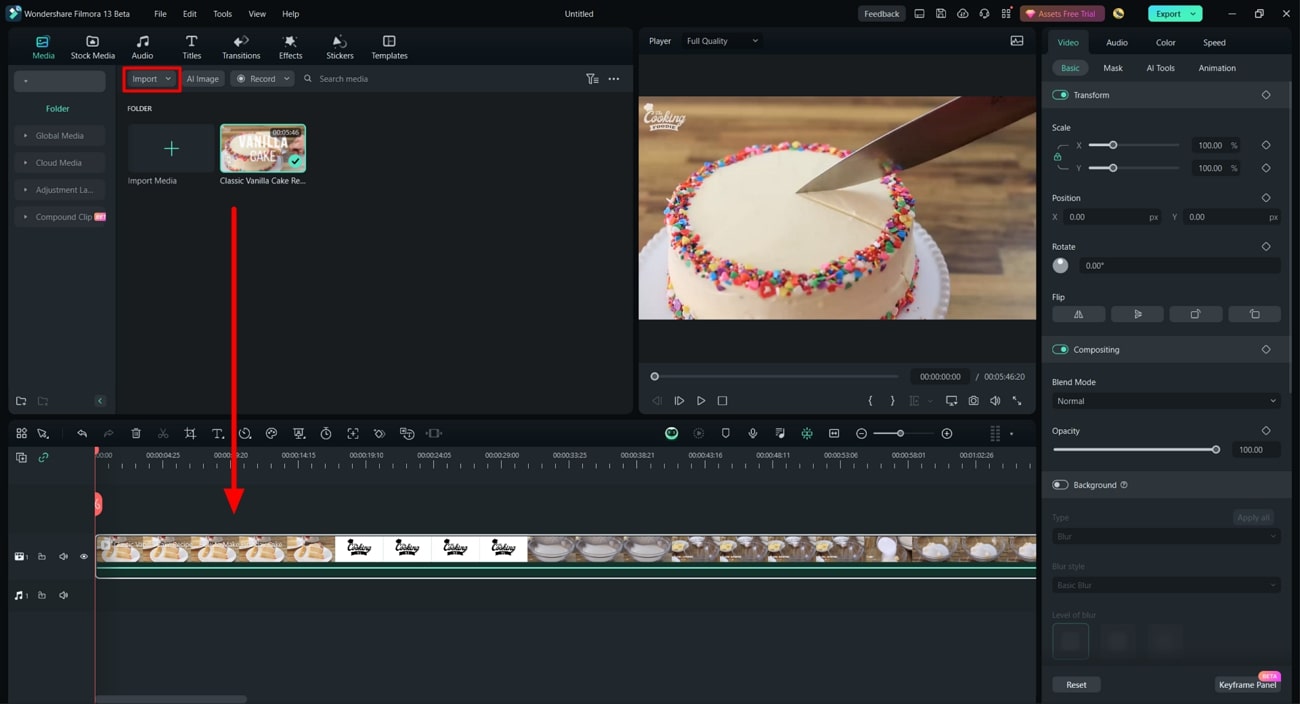
Since Wondershare Filmora is a desktop tool, you must download it first. Initiate it and click the “New Project” option to reach its editing interface. Click on the “Import” option to import the video you downloaded. Afterward, bring this video to the timeline using the drag-and-drop technique.
2. Access Uniform Speed
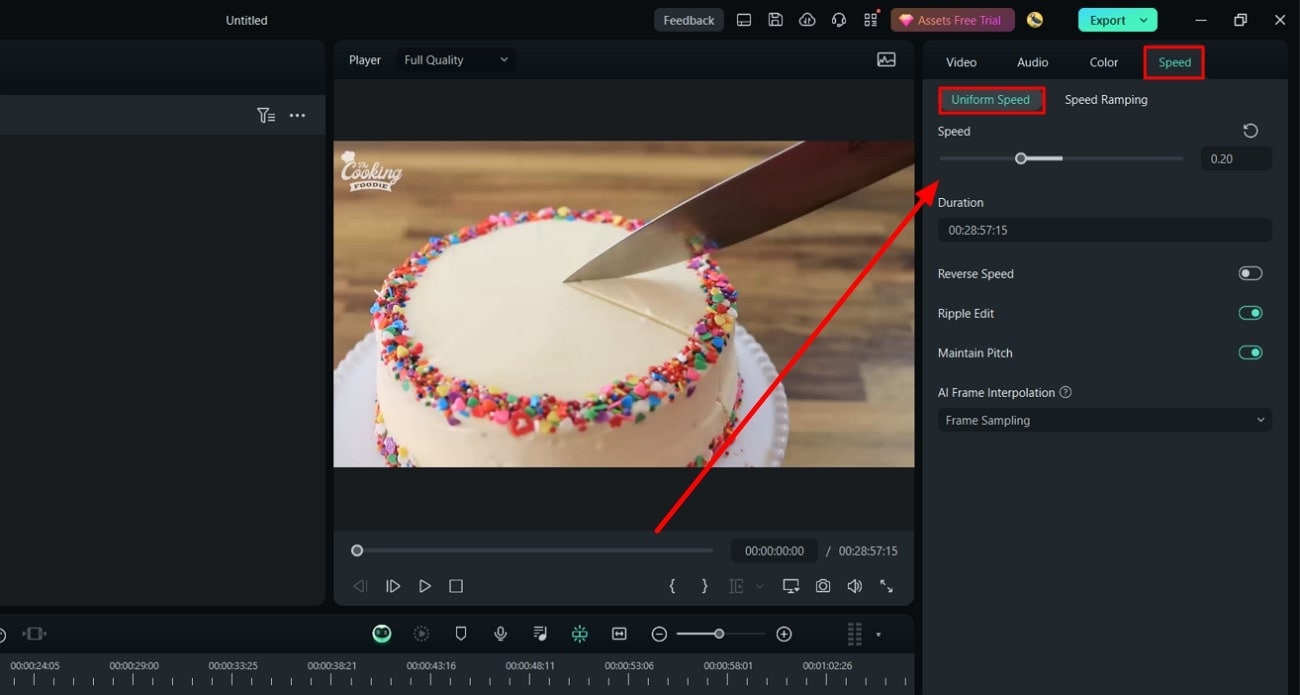
Select the video in the timeline and direct it toward the settings panel appearing on the right side. From the given tabs, go to the “Speed” tab and select “Uniform Speed.” Further, adjust the “Speed” slider or its value in the given box. This will slow down your video, and you can preview it to adjust further.
Step 3Smoothing Out the YouTube Slow-Mo
Upon previewing the YouTube slo-mo, you might notice some roughness in it. For creating a smooth slow-mo, use the Optical Flow option. Here are the steps to enable this option in Filmora:
1. Enable the Optical Flow Option
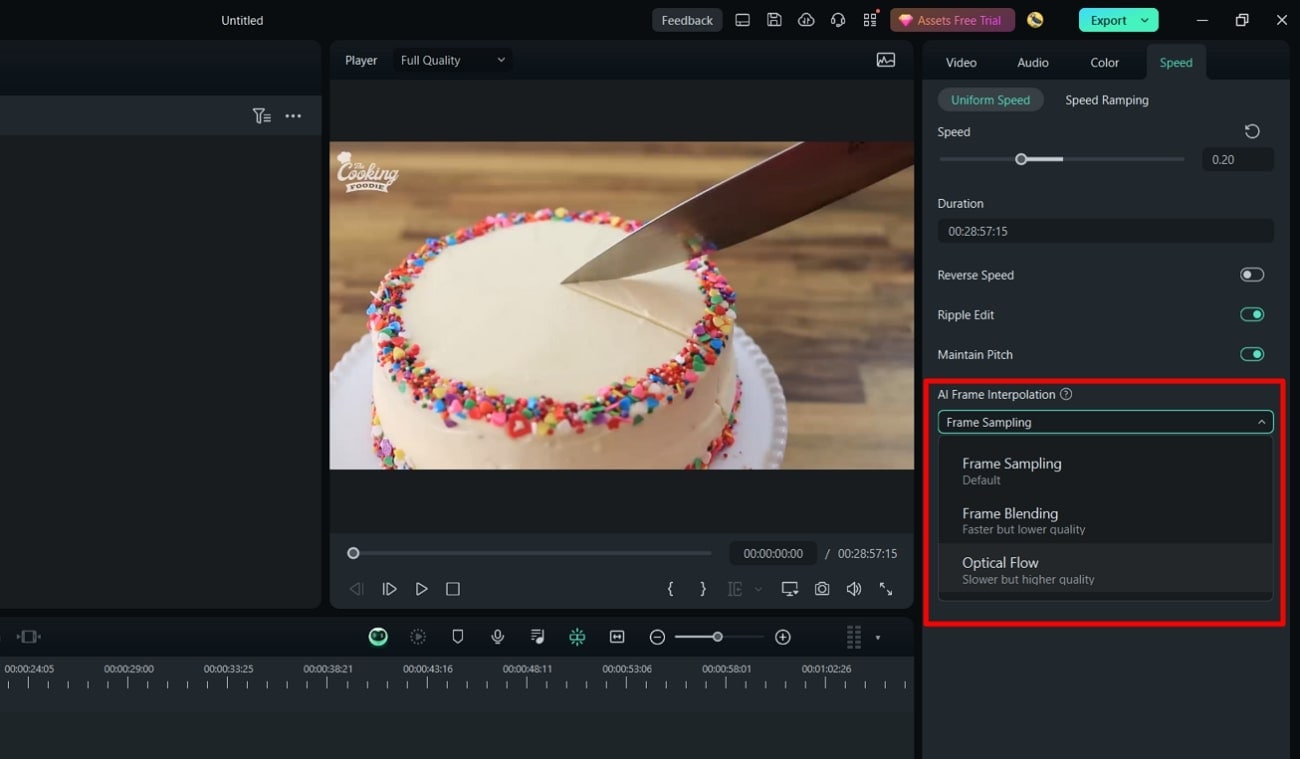
Navigate toward the “AI Frame Interpolation” section. You can find it at the bottom of the Uniform Speed tab. Afterward, expand this section and select the “Optical Flow” option.
2. Render the YouTube Slow-Mo
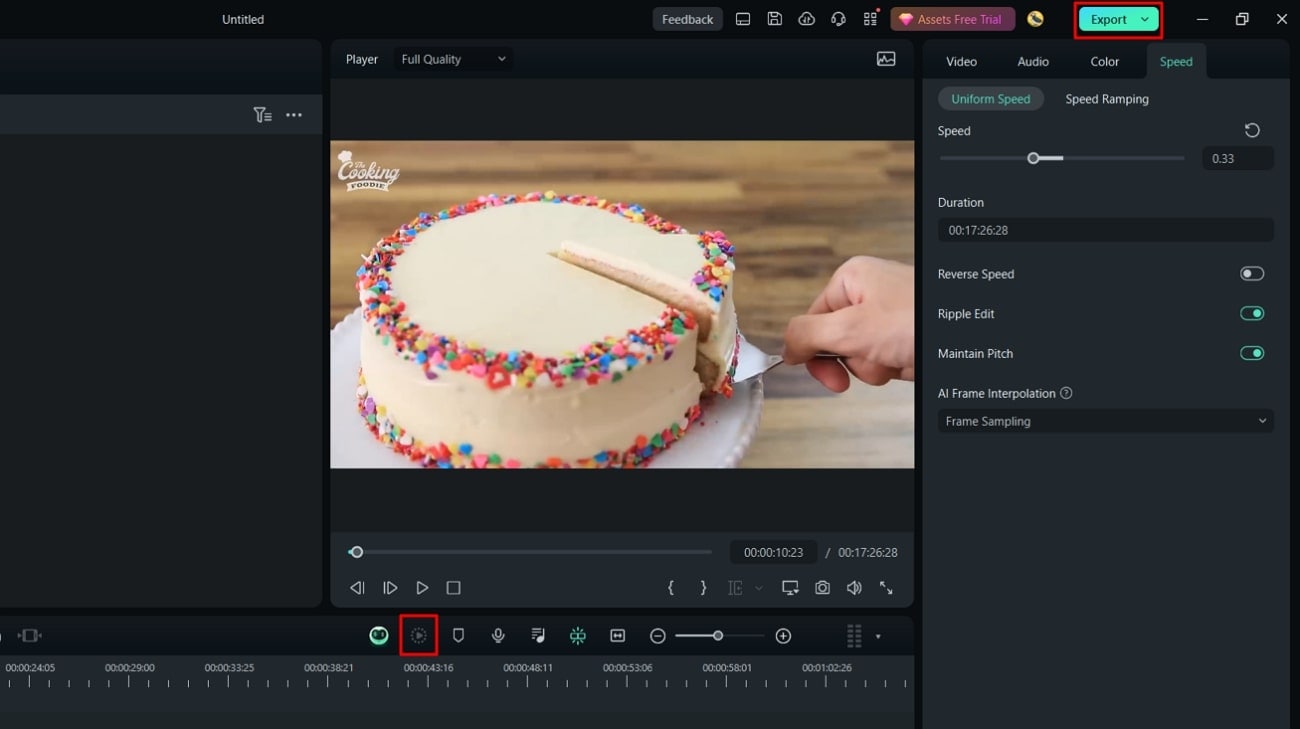
Once you have enabled optical flow, direct it toward the timeline tool panel. Select the “Render Preview” option from there and see your video afterward. You’ll have a professional-level slow YouTube slow-motion video.
Part 2: Other Features Offered by Wondershare Filmora
Wondershare Filmora is a professional video editor that offers AI editing options. You can bring so much creativity to your videos with its effects and colors. It offers AI Chroma Key or AI Background Remover features to change backgrounds. Moreover, it runs on a timeline editing interface that helps with precise cut and trim.
You can slow down a video and increase its speed to save time. Wondershare Filmora is all about video editing, and there is no limit to its creativity. Let’s dive into this section to learn about some of those AI features below:
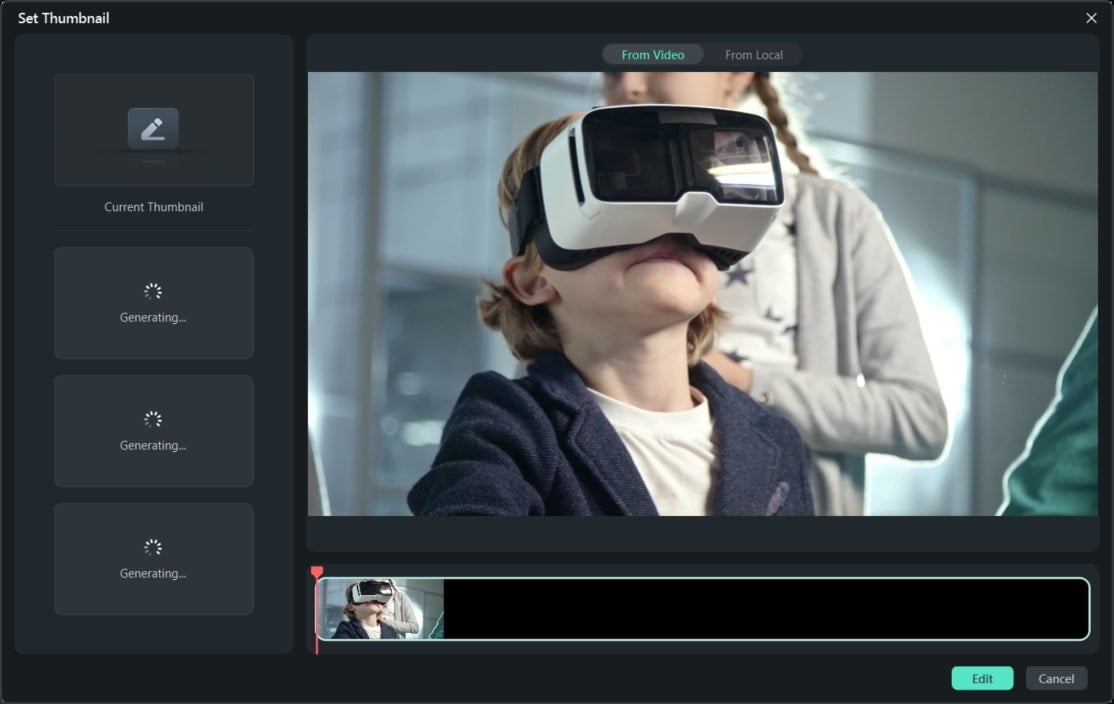
1. AI Thumbnail Creator
When creating a YouTube video for your channel, thumbnails play an important role. Filmora allows you to generate creative thumbnails for your videos. Through the support of AI, it opts for the finest frame out of your video as a thumbnail. Afterward, it offers you built-in templates that fit many content categories.
2. Speed Ramping
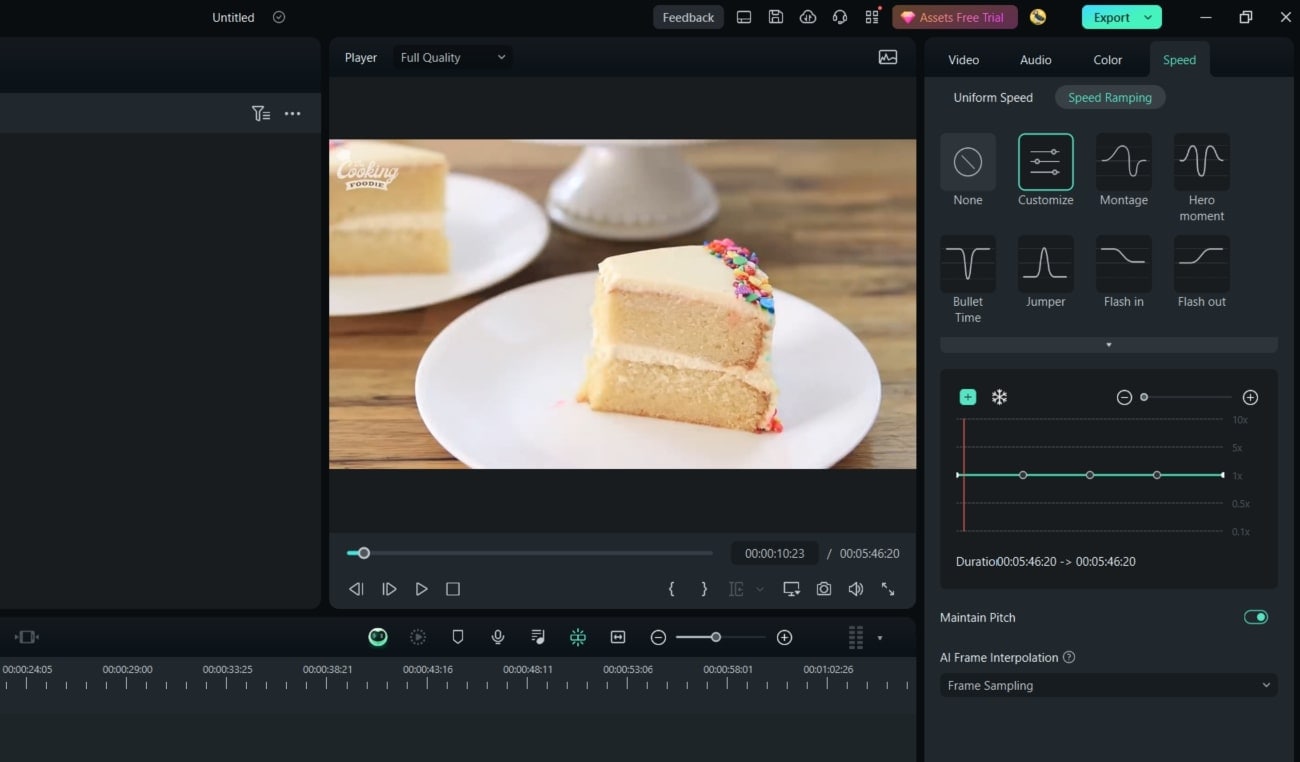
This function also allows you to slow down YouTube videos precisely. Using this feature, you can slow down specific parts of a video. It offers pre-designed speed options; however, you can also customize it. Montage, Hero moment, Bullet Time, Jumper, and other options exist as presets. Afterward, you can manipulate the frame speed option for a smooth outlook.
3. Silence Detection
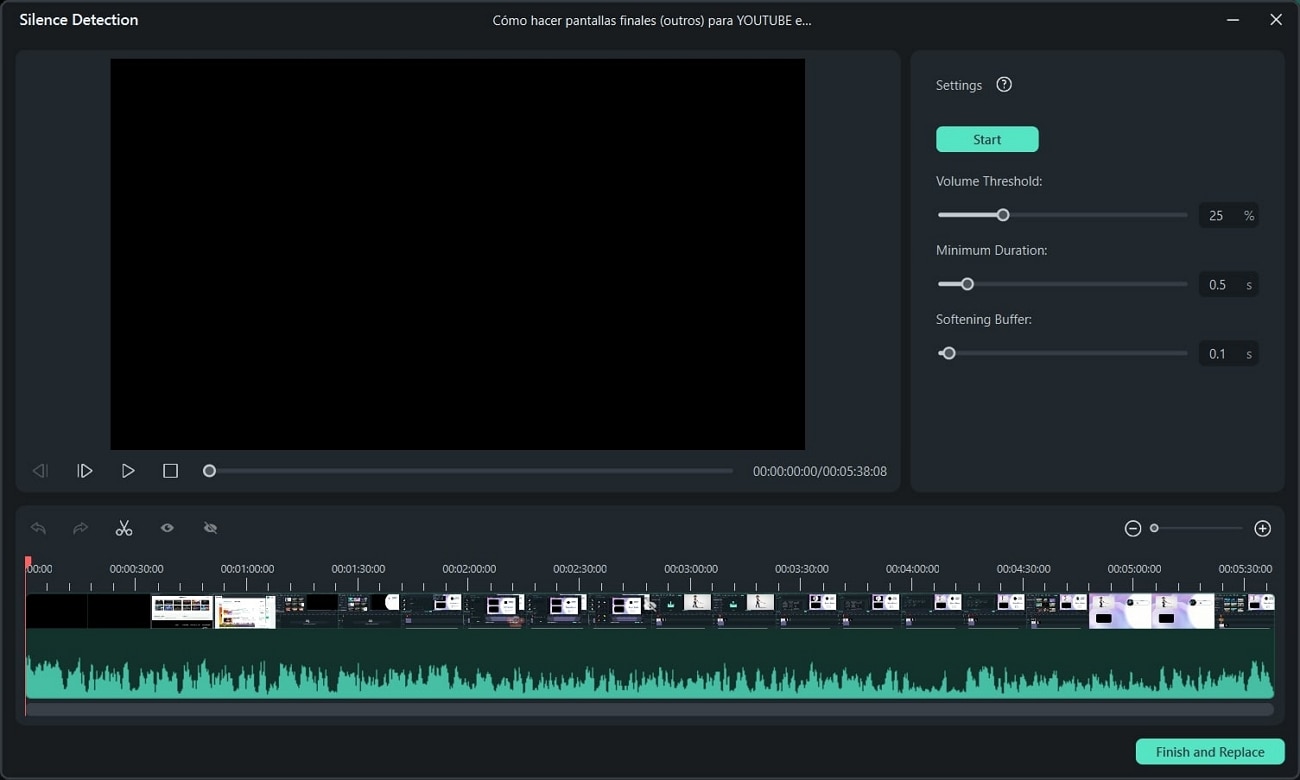
Silent pauses or loud breath noise in videos is often disturbing. Such elements decrease the audio and overall quality of a video clip or audio track. To avoid this, Filmora offers a Silence Detection feature backed by AI. It robotically spots the silent pauses, hums, and breaths in audio and eliminates them. This will save you from audience backlash and maintain content quality.
4. Speech-to-Text
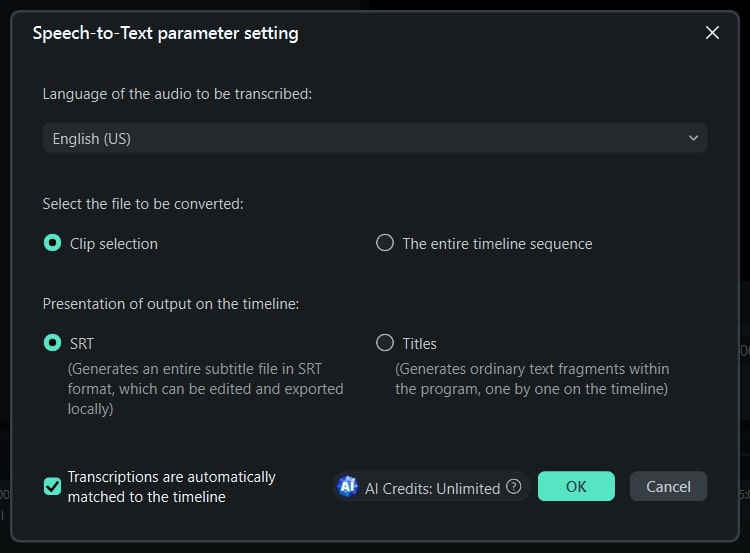
This feature belongs in the text editing category of Wondershare Filmora. The STT tool of Filmora has many applications in the field of filmmaking. It uses AI technology and NLP systems to analyze speech and convert it to text. You can use this text to create captions and subtitles for YouTube videos. In addition, you can use this feature for text-based editing in Filmora or other tools.
Conclusion
After reading this article, users have a comprehensive knowledge of YouTube slow motion. We discussed certain advantages of slowing down videos. The article also discussed how to slow down a YouTube video with precision. It was explained using a professional-grade video editor with a detailed guide. If you want to create a perfect YouTube slow-mo or slow down a specific part, use Filmora.
Make A Slow Motion Video Make A Slow Motion Video More Features

Part 1: How to Slow Down Videos in YouTube?
If you watch YouTube videos often, you must have been aware of the YouTube slow-down feature. The playback adjustment option on YouTube helps with that. By enabling that option, the whole YouTube video slows down. For adding slow-motion effects at specific durations, you can use Wondershare Filmora . In this part, we’ll explore both methods of slowing down a YouTube video:
Method 1. Direct Method
If you have the YouTube application, you can commence this action straight. If not, you can also open YouTube on your browser. Given below are the steps to play YouTube in slow motion:
Step 1
Once you play a YouTube video, navigate towards the bottom of this video. Afterward, click on the “Settings” option and select the “Playback speed” option.

Step 2
From the expansion menu, select a playback speed option as per preferences. You can select a speed between 0.75, 0.5, and 0.25. Afterward, play your video and see if the speed is right. This is the simplest method for YouTube video slow motion.

Method 2. Using Wondershare Filmora
In Wondershare Filmora, there are two methods to slow down YouTube videos. You can either use the Uniform Speed option or the Speed Ramping option. Moreover, you can add the Optical Flow effect to ensure a smooth, slow motion. In this section, we will first familiarize you with downloading a YouTube video. Here are the three major steps to create slow-motion in Filmora:
Free Download For Win 7 or later(64-bit)
Free Download For macOS 10.14 or later
Step 1Downloading a YouTube Video
YouTube doesn’t allow users to download a YouTube video on their devices. Hence, you will need third-party support to do so. Many sites offer YouTube video download services. We are using the y2mate.com , and here are the steps for it:
1. Copy the YouTube Video Link
First, access the respective video that you want to download from YouTube. Locate the “Share” option at the bottom of this video and select it. Then click the “Copy” option to copy your video’s link.

2. Access the Site
After copying the video’s link, access the site using your web browser. In the “Search or paste link here” box, paste the video link and click “Start.” From the download options appearing at the bottom, select a suitable option. Click on the “Download” button adjacent to your option.

Step 2Slow Down YouTube Video in Filmora
Once you have downloaded the video on your device, it is time to slow down the YouTube video. Filmora offers a plain and simple method to slow down a video. Here is a step-by-step guide to help you create video slow-mo in Filmora:
1. Import the YouTube Video
Since Wondershare Filmora is a desktop tool, you must download it first. Initiate it and click the “New Project” option to reach its editing interface. Click on the “Import” option to import the video you downloaded. Afterward, bring this video to the timeline using the drag-and-drop technique.

2. Access Uniform Speed
Select the video in the timeline and direct it toward the settings panel appearing on the right side. From the given tabs, go to the “Speed” tab and select “Uniform Speed.” Further, adjust the “Speed” slider or its value in the given box. This will slow down your video, and you can preview it to adjust further.

Step 3Smoothing Out the YouTube Slow-Mo
Upon previewing the YouTube slo-mo, you might notice some roughness in it. For creating a smooth slow-mo, use the Optical Flow option. Here are the steps to enable this option in Filmora:
1. Enable the Optical Flow Option
Navigate toward the “AI Frame Interpolation” section. You can find it at the bottom of the Uniform Speed tab. Afterward, expand this section and select the “Optical Flow” option.

2. Render the YouTube Slow-Mo
Once you have enabled optical flow, direct it toward the timeline tool panel. Select the “Render Preview” option from there and see your video afterward. You’ll have a professional-level slow YouTube slow-motion video.

Part 2: Other Features Offered by Wondershare Filmora
Wondershare Filmora is a professional video editor that offers AI editing options. You can bring so much creativity to your videos with its effects and colors. It offers AI Chroma Key or AI Background Remover features to change backgrounds. Moreover, it runs on a timeline editing interface that helps with precise cut and trim.
You can slow down a video and increase its speed to save time. Wondershare Filmora is all about video editing, and there is no limit to its creativity. Let’s dive into this section to learn about some of those AI features below:
1. AI Thumbnail Creator
When creating a YouTube video for your channel, thumbnails play an important role. Filmora allows you to generate creative thumbnails for your videos. Through the support of AI, it opts for the finest frame out of your video as a thumbnail. Afterward, it offers you built-in templates that fit many content categories.

2. Speed Ramping
This function also allows you to slow down YouTube videos precisely. Using this feature, you can slow down specific parts of a video. It offers pre-designed speed options; however, you can also customize it. Montage, Hero moment, Bullet Time, Jumper, and other options exist as presets. Afterward, you can manipulate the frame speed option for a smooth outlook.

3. Silence Detection
Silent pauses or loud breath noise in videos is often disturbing. Such elements decrease the audio and overall quality of a video clip or audio track. To avoid this, Filmora offers a Silence Detection feature backed by AI. It robotically spots the silent pauses, hums, and breaths in audio and eliminates them. This will save you from audience backlash and maintain content quality.

4. Speech-to-Text
This feature belongs in the text editing category of Wondershare Filmora. The STT tool of Filmora has many applications in the field of filmmaking. It uses AI technology and NLP systems to analyze speech and convert it to text. You can use this text to create captions and subtitles for YouTube videos. In addition, you can use this feature for text-based editing in Filmora or other tools.

Conclusion
After reading this article, users have a comprehensive knowledge of YouTube slow motion. We discussed certain advantages of slowing down videos. The article also discussed how to slow down a YouTube video with precision. It was explained using a professional-grade video editor with a detailed guide. If you want to create a perfect YouTube slow-mo or slow down a specific part, use Filmora.
Best Ai Generated Memes
Memes are the most popular elements you will come across on social media platforms. People get a laugh out of them, share them with their friends through instant messages and group messages and make them go completely viral. In fact, you will see most video creators using popular memes in their videos to entertain their viewers. However, instead of sharing the regular and already seen memes, you can create your own memes with AI meme generator and make them popular.
If you do not have the time or the skills and creativity required to come up with memes that can go viral, you can take the help of artificial intelligence to generate new memes in a few steps. Therefore, you can have the choice to check AI generator meme and reject it to move on to the next one. We will illustrate how you can create AI generated memes using the popular AI meme generators.
Part 1. Use Super Meme AI Generator
Super Meme AI Generator is one of the most popular online platforms where you can create computer generated memes instantly. The platform supports 110+ languages in which you can create memes and share on your social media accounts.
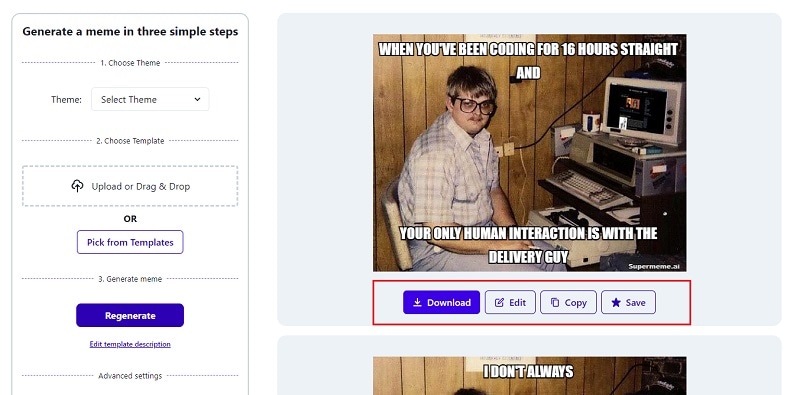
All you need to do is to select a theme based on your meme genre, select a template or upload a relatable image, and Super Meme will generate random meme for you. Here are the simple steps that you can perform from your mobile devices as well.
Step1Open your web browser and visit “www.supermeme.ai” . Click on Start for Free button.

Step2You need to sign in with your email address to proceed. Type in your email address and you will get a link in your email to get started.

Step3Once Super Meme editor opens, select a theme for your meme from the left panel.
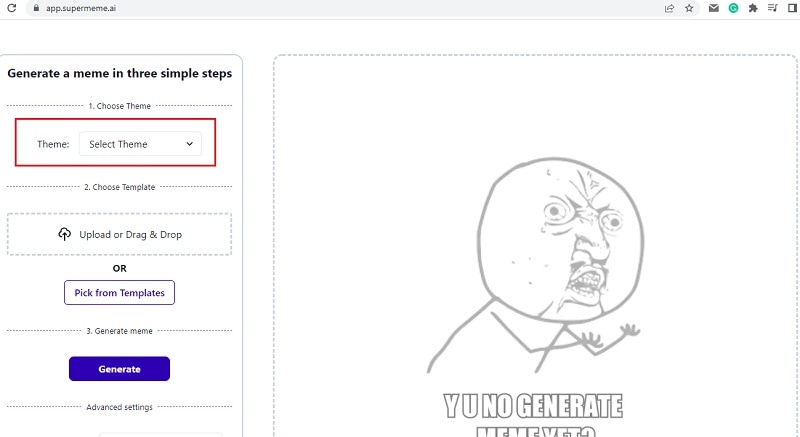
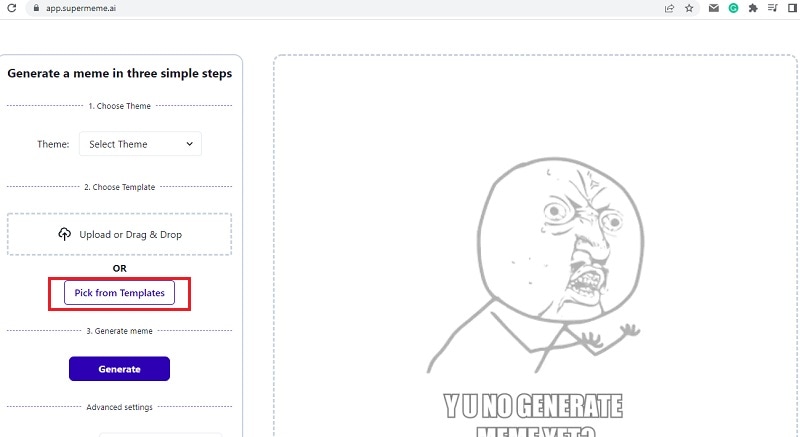
Step4Click on Pick from Templates button to select a built-in meme background.
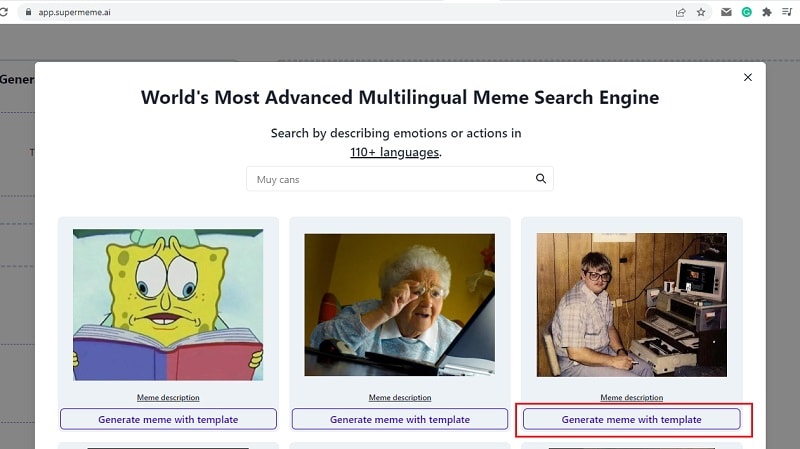
Click on Generate meme with template button. Otherwise, you can drag and drop an image from your device to set as the meme background.
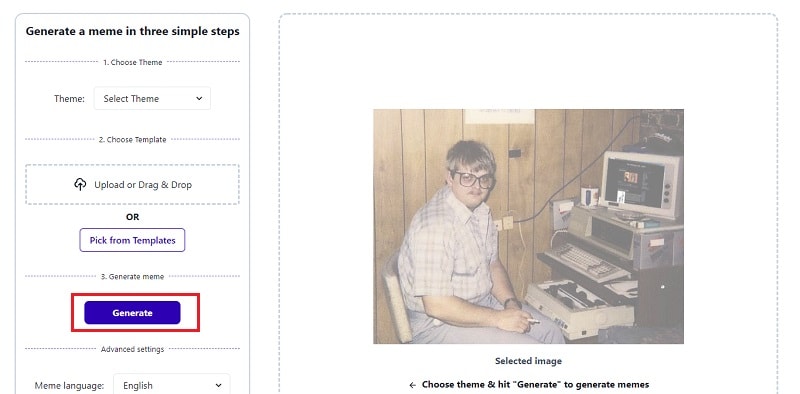
Step5Finally, click on Generate button to get the AI generated meme on your select background. You will get three memes based on the same background.
Step6Click on Download button to save them on your device. You can even edit them as well as copy them to share anywhere you want.
Part 2. Use Dalle Mini Meme Tool
You might have seen on social media platforms that people use photo memes to reply to any post or comment sarcastically. Not just on social media, you will find users using creative meme photos on instant messaging apps. If you are wondering how and where they get those out-of-the-box memes, well, most of them use meme generator AI.
Dalle Mini Meme Tool is a great platform where you can mention the type of meme you want, and it will automatically generate memes based on your mentioned keyword. You can copy and paste them anywhere you want instantly, and you will surely get traction and appreciation for using creative memes. Here are the steps to generate computer generated memes using Dalle Mini Meme Tool.
Step1Open your web browser and visit “huggingface.co/spaces/dalle-mini/dalle-mini”.

Step2Type the genre of the meme that you want to generate and click on Run button.
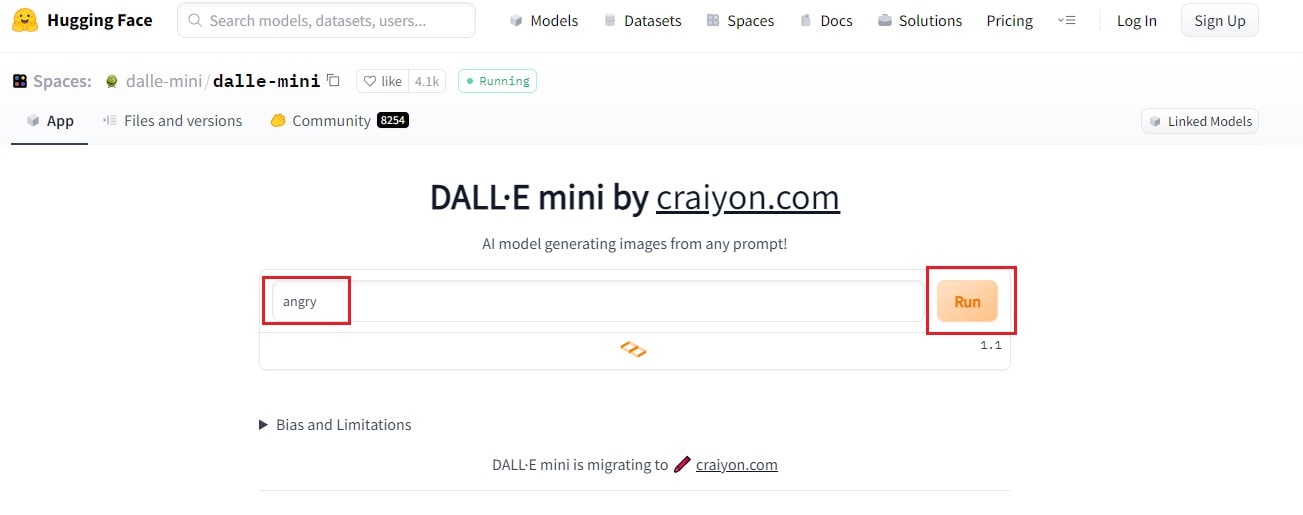
Step3Wait for a few seconds for the platform to generate memes based on your keyword. You can click on Run button multiple times using the same keyword to get new memes every single time.

Step4If you want to copy any meme, click on it and click on Screenshot button to copy it. You can paste it anywhere you want.

Part 3. Extra Info: Create Meme Video on Computer
So far, we have mentioned online AI meme generator where you can create meme images only. However, if you want to create meme videos on your computer for social media platforms as well as video streaming platforms, we recommend Wondershare Filmora . You can select from video templates and animated memes and add funny texts and titles to create your desired meme video. Here are the steps to create meme video on computer using Filmora.
Step1Filmora is available for both Windows and Mac and download accordingly and install Filmora on your computer.
Launch Filmora after installation and click on New Project button from the welcome screen. Otherwise, you can go to File> New Project option to start creating meme video.

Step2If you want to start from scratch, select any preferred video template from Stock Media> Pexels > Videos. You can also select from Pixabay. In fact, there are also background photos available to use as meme background.

Step3If you want to add any trending animated memes, go to Stock Media> GIPHY and drop your selected GIF into the Timeline. Copy and paste it multiple times to stretch its duration.
Step4Go to Titles> Social Media and drop any title template on the Timeline. If the title template has a background, delete it by selecting it from Viewer. You can also move around the texts to place them exactly where you want them.

Step5Double-click on the Title template located on the Timeline and edit the meme text. You can select different styles, animations, WordArt and much more.
You can also check out Elements, Effects, and Audio options located at the top to add them to your video wherever appropriate.
Step6Click on OK button and play the video. Click on Export button to save the video.
Takeaway
Generating creative and refreshing memes is no more a monopoly on professional meme creators. You can create meme images on any genre or keyword instantly with meme generator AI. We have stated how you can create static memes with artificial intelligence instantly from online platforms. If you want to create meme video on your computer, we recommend Wondershare Filmora where you can create creative meme videos instantly.
Free Download For Win 7 or later(64-bit)
Free Download For macOS 10.14 or later
How to Use Rules of Thirds
So you have your work flow sorted out and you’re well on your way with Filmora but you’re not quite happy with your results or something just seems off when you watch your videos back. You may be missing an important element of all visual media and that’s composition. This is where the building blocks of every frame come together to make a visually pleasing piece for the viewer and helps the eyes concentrate on the content rather than trying to figure out what they are looking at.
I’m sure you may have heard of the rule of thirds for art or photography and you may not know or understand what it is. You may even be wondering how the rule of thirds can help you with your video creation. Well, that is what I’m going to show and explain to you today.
What is the rule of thirds
At its core the rule of thirds is a guide to follow whenever you create something visual.
You break an image into thirds both horizontally and vertically, in doing this you are left with nine boxes and four gridlines, the rule states that by placing key elements in line with gridlines you will have an overall better composition.
To gain a better understanding of this here is a visual example of the gridlines and nine boxes.

This may seem simple but is often overlooked due to time restraints and eagerness to get that video out there. By following these guidelines your overall composition will gain interesting and pleasing results that can help with viewer engagement. This is only one piece of the puzzle but as any photography professional or artist will tell you, It’s the small things that add up.
How to use the rule of thirds
To show how to use the rule of thirds I will be showing an image with and without the use of the guidelines. In doing this you will be able to see how impactful this system is and how it can help with your own creations within Filmora .
This will be our scene example, you can see buildings, boats, water and skyline. This may be typical of a backdrop or an insert for a holiday picture amongst many other things.
I will now show this picture with no compositional thought and without the use of the thirds system.

Notice how all the elements are in the scene but it just looks interesting and something just seems off when you look at it. You may find yourself searching for understanding of the image rather than taking the image in and concentrating on what the creator intended. This is seen commonly due to the need to fit every element in the scene but sometimes it is best to sacrifice something you may see as important for the sake of the whole picture.
We will now look at the example image with the rule of thirds in place and see if overall this makes a more interesting scene.

We have aligned the skyline with the first horizontal grid line and aligned the boats with the vertical grid lines. We have sacrificed the crane in the scene but overall I’m sure you can agree that this is more pleasing and makes more sense when you’re viewing this. The whole middle section of the scene now has information within it and the contrast between the middle and the rest of the scene directs your eyes to what was intended to be viewed, This is called effect use of empty space. In doing this you save yourself time from adding more information to direct the viewer.
Placing key elements directly in the center of your scene can seem static and boring but by placing elements to one side or using the first and second horizontal grid lines you create something called Dynamism , where the viewer sees an element along the grid and takes a journey through the rest of the image.
Studies have shown that this is the humans natural way of viewing imagery, we first find something interesting to look at and then journey around that. So by using this rule you are creating a more natural process for your viewer.
Tips when starting using the rule of thirds
The first tip I would say is to view other videos, YouTube is a good starting point. Watch interviews and notice where the chairs are aligned. Watch reviewers and notice where they position themselves in the scene. Lastly watch movies and pause on an interesting scene and try to deconstruct where everything is placed and why they chose that composition.
The idea with the rule is to have it become something you do naturally, by always considering the form you save yourself time in the editing process. The key things you have in your mind whenever you make a scene should be.
1. What is the key element in my scene or what am I trying to make the viewer focus on.
2. where do I intend to place these in my scene?
3. Have I created a balanced scene with enough negative space to direct the eye.
If you consider this with every video you make then in time this will become as natural as drinking water on a hot day. As a practice you could open some old projects and apply this rule to your video to see the results and you may find yourself impressed with the change.
When is it best to not use the rule of thirds?
The rule is very useful when you’re aiming to grab the attention towards a certain element but that being said, when you have a symmetrical scene you can get away with not using the rule as your eyes can make sense of symmetry very well.
Even when working with a symmetrical scene you can incorporate the rule within for elements such as people or key figures but in this situation it is down to the creator to figure what they feel is best in any given shot.
How to Use Rule of Thirds in Filmora
The tools provided within Filmora are generous and one great feature is the crop and size tool.
When inserting an image or movie file you can right click on the timeline and select crop and size bringing up a handy screen with the gridlines already there for you. It’s just a matter of aligning your shot for the best composition.
For reference I will show you what this looks like.
First right click the timeline on the image you want to reposition. Alternatively you can select the desired insert and press Alt+C this will also bring up the same editing box.

Now click on the crop and zoom option and this editor will appear.

As you can see you are able to align the shot and change the aspect ratio to align with your project. For a better look at the built in grid lines see image below.

Conclusion
To conclude, the rule of thirds is very important within visual media and is tough within the fundamentals of art and photography from beginner level right up to the highest point of education, Practice thinking about your placement of key elements within your videos and how this affects your overall composition. The goal is to have this as an automatic thought when shooting your videos or still images. This is a small change you can make but has a big impact on how a viewer engages your content and in return leaves a positive opinion towards your creativity and eye for detail.
Free Download For Win 7 or later(64-bit)
Free Download For macOS 10.14 or later
Free Download For macOS 10.14 or later
Also read:
- [Updated] 2024 Approved Deciding on the Best GoPro Max or Hero 11?
- [Updated] Best of Background Tracks Selection for 2024
- [Updated] Compilation of The Best 9 Multi-Platform Video Communication Devices (iOS/Android)
- Essential Tips for a Working WinShift.
- Expert Advice on Fixing the Unresponsive SteelSeries Arctis Mic ([Product Code]) Problems
- How Can I Catch the Regional Pokémon without Traveling On Vivo Y28 5G | Dr.fone
- How to Change Huawei Nova Y71 Location on Skout | Dr.fone
- New 2024 Approved Are You Looking for a Video Format Converter Free? We Will Introduce the 5 Best Online Converters and Also the 5 Best Video Format Converters for PC
- New 2024 Approved Do You Wish to Create High-Quality Videos and Experience Effective Videos with Editing? No Problem at All because the Keyboard Shortcuts Listed Here Will Assist You
- New 2024 Approved How to Use Adjustment Layer in Photoshop?
- New In 2024, Through Speed Ramping, Create a Smooth Transition in Slow-Motion Videos. Follow This Guide and Learn About Premiere Pro Slow Motion and a Better Alternative
- New Step-by-Step Guide to Storyboard for 2024
- Strategies for Sustainable Brand Collaboration with YouTubers
- The Veiled Path to Compromised Data Security
- Top 4 SIM Location Trackers To Easily Find Your Lost ZTE Blade A73 5G Device
- Updated In 2024, How Much Information Do You Have About MP4 Digital File Storage? Let Us Tell You More About the MP4 File Format; Get Ready to Increase Your Knowledge
- Updated In 2024, Using AI to Replace Skies Finding the Right Methods
- Updated Premiere Pro Slow Playback Issues Finding The Best Solutions for 2024
- Updated Top Ways to Make Fast Motion Video on iPhone Solved for 2024
- Title: A Guide To Adopting Lumetri Color Presets in Effective Color Grading
- Author: Morgan
- Created at : 2024-10-05 05:02:36
- Updated at : 2024-10-06 01:37:10
- Link: https://ai-video-editing.techidaily.com/a-guide-to-adopting-lumetri-color-presets-in-effective-color-grading/
- License: This work is licensed under CC BY-NC-SA 4.0.

