
Add Effects to Video Online for 2024
Add Effects to Video Online
Recording a video is work half done. Editing the video is an equally important part. Apart from trimming out unnecessary parts and joining trimmed video clips, you have to add video effects to your video clips so that your video looks interesting. In fact, video effects are responsible for enhancing the beauty of the recorded video clips in the eyes of the viewers.
There is a wide range of video effects available to use on your videos, and turn them from ordinary video clips to stunning videos. The best part is that you do not have to install a video editor application on your device to apply video effects. This is because you can add effects to video online and that too for free of cost. We will discuss all the ways to add effects to your videos online that everyone can use conveniently.
- Way 1. Use Veed.io Video Editor
- Way 2. Use Kapwing Video Editor
- Way 3. Use FlexClip Video Effects Editor
Part 1. Popular Video Effects to Use Online
If you are wondering which effects to add to your videos to make them look extra-ordinary, here is the list of the popular video affects you can apply to your videos online.
Sparkle Effect – When you add sparkle effect to your video, you will see tiny flashes of lights like twinkling stars around the subject of the video or the entire frame of the video. There can also be stars shinning and glittering to enhance the glamour factor of the subject in your videos.
Snow Effect – When you add snow effect to video online, you get to see animated snowflakes falling across the video like snowfall in the winter. You need a proper scene to add snow effect, and it represents romantic and joyous mood in a video.
Speed Change Effect – Speed change effect is extremely common whereby you can slow down and fasten up the video playing speed as per your requirements. Slow-motion video is a part of speed change effect to emphasize a scene for a long period of time.
Reverb Effect – In this video effect, you see a particular scene reverberating, especially when the subject goes into imagining things and recalling memories. You can add reverb to video online when there is a jump cut scene in your video to smoothen the transition.
Transition Effect – Transition effect is a special type of video effects that you insert when you are making a transition from one scene to another. Transition effects smoothen the scene cuts for the eyes of the audience and refresh the mind to let them focus on the next scene.
Overlay Effect – Overlay effect is widely used in intro and outro of videos as well as to show titles and call to action options. Beautiful overlay effects can enhance the video content immensely and make it appear soothing to the eyes.
Part 2. Ways to Add Effects to Video Online
Here are the three top video editors available online where you can add effects to your videos in a few simple steps.
Way 1. Use Veed.io Video Editor (https://www.veed.io/tools/video-editor-effects )
Veed.io is one of the most popular video editors where you can apply various video effects to your videos online for free. There are super cool video effects that are eye-catching and visually stunning. Starting from glitch and snow effects to cinematic effects, you can also add emojis, dynamic text effects as well as special effects to your videos. Here are the steps to add effects to video online free using Veed.io.
Step1 Open your web browser and visit “veed.io/tools/video-editor-effects”. Click on Choose Video button.

Step2 Drag and drop your video to add video filters.

Step3 Go to Filters on the left panel and select Effects tab.

Step4 There are several effects available and click on them one by one to check the effects on the video. Select one video effect ultimately to apply to your video.

Step5 Finally, click on Export button to save the edited video in your desired video resolution.

Way 2. Use Kapwing Video Editor (https://www.kapwing.com/tools/add-effects-to-video )
Kapwing Video Editor is one of the fastest video editors where you can enhance your video with video filters. You can add special filters, greenscreen effect, animations, transitions, speed change effects and much more. You can apply pan and zoom effect, fade in and out effect, customize video speed, slow-motion effect, time-lapse effect, slideshow effects just to name a few. Among online video editors, Kapwing video editor has the best collection of video effects. Here are the steps to add effects to video online.
Step1 Open web browser and visit “kapwing.com/tools/add-effects-to-video”. Click on Upload video to start button.

Step2 Drag and drop your video file in Studio. You can even paste URL of your video available on Google Drive and Google Photos.

Step3 Go to Transitions and you will see the different video effects. Place your mouse point on them to see a preview of the effect.

Step4 You can drag and drop any desired effect between two video clips on Timeline. You can also go to Elements> Backgrounds to apply video effects to the background of your video. Similarly, you can check all the different elements, shapes, and emojis to use in your video.

Step5 Finally, click on Export Project button and select any file format and video resolution to save the edited video.

Way 3. Use FlexClip Video Effects Editor (https://www.flexclip.com /)
FlexClip video editor has different categories of video effects starting from elements to overlays. There are also background video effects available that will enhance your video content. Most importantly, there is a wide range of text effects available. FlexClip is perfect for adding effects for branded videos as well. There are also video templates available to create stunning videos from scratch. Here are the steps add sparkle to video online with FlexClip video editor.
Step1 Open your web browser and visit “flexclip.com/editor/app”.
Step2 Drag and drop your video clips and add them to instant viewer.

Step3 To add sparkle effect, you have to go to Photo on the left panel. Thereafter, select GIF tab.

Step4 Search for transparent Sparkle and add it to instant viewer.

Step5 You can go to Text, Elements, and Overlays to add further video effects.

Step6 Finally, click on Export button and sign up to save the edited video.

Part 3. FAQs about Video Effects
1. How do you edit a video with add filters?
Veed.io is the best online video editor to edit your video and add filters to enhance your video content. There are several filters available starting from colour grading to video effects.
2. How to add effects to video online free without watermark?
ClipChamp is a great online video editor where you can add video effects to your videos instantly. You can export and save your edited videos without any watermark and without purchasing any plan.
Free Download For Win 7 or later(64-bit)
Free Download For macOS 10.14 or later
Part 1. Popular Video Effects to Use Online
If you are wondering which effects to add to your videos to make them look extra-ordinary, here is the list of the popular video affects you can apply to your videos online.
Sparkle Effect – When you add sparkle effect to your video, you will see tiny flashes of lights like twinkling stars around the subject of the video or the entire frame of the video. There can also be stars shinning and glittering to enhance the glamour factor of the subject in your videos.
Snow Effect – When you add snow effect to video online, you get to see animated snowflakes falling across the video like snowfall in the winter. You need a proper scene to add snow effect, and it represents romantic and joyous mood in a video.
Speed Change Effect – Speed change effect is extremely common whereby you can slow down and fasten up the video playing speed as per your requirements. Slow-motion video is a part of speed change effect to emphasize a scene for a long period of time.
Reverb Effect – In this video effect, you see a particular scene reverberating, especially when the subject goes into imagining things and recalling memories. You can add reverb to video online when there is a jump cut scene in your video to smoothen the transition.
Transition Effect – Transition effect is a special type of video effects that you insert when you are making a transition from one scene to another. Transition effects smoothen the scene cuts for the eyes of the audience and refresh the mind to let them focus on the next scene.
Overlay Effect – Overlay effect is widely used in intro and outro of videos as well as to show titles and call to action options. Beautiful overlay effects can enhance the video content immensely and make it appear soothing to the eyes.
Part 2. Ways to Add Effects to Video Online
Here are the three top video editors available online where you can add effects to your videos in a few simple steps.
Way 1. Use Veed.io Video Editor (https://www.veed.io/tools/video-editor-effects )
Veed.io is one of the most popular video editors where you can apply various video effects to your videos online for free. There are super cool video effects that are eye-catching and visually stunning. Starting from glitch and snow effects to cinematic effects, you can also add emojis, dynamic text effects as well as special effects to your videos. Here are the steps to add effects to video online free using Veed.io.
Step1 Open your web browser and visit “veed.io/tools/video-editor-effects”. Click on Choose Video button.
Step2 Drag and drop your video to add video filters.
Step3 Go to Filters on the left panel and select Effects tab.
Step4 There are several effects available and click on them one by one to check the effects on the video. Select one video effect ultimately to apply to your video.
Step5 Finally, click on Export button to save the edited video in your desired video resolution.
Way 2. Use Kapwing Video Editor (https://www.kapwing.com/tools/add-effects-to-video )
Kapwing Video Editor is one of the fastest video editors where you can enhance your video with video filters. You can add special filters, greenscreen effect, animations, transitions, speed change effects and much more. You can apply pan and zoom effect, fade in and out effect, customize video speed, slow-motion effect, time-lapse effect, slideshow effects just to name a few. Among online video editors, Kapwing video editor has the best collection of video effects. Here are the steps to add effects to video online.
Step1 Open web browser and visit “kapwing.com/tools/add-effects-to-video”. Click on Upload video to start button.
Step2 Drag and drop your video file in Studio. You can even paste URL of your video available on Google Drive and Google Photos.
Step3 Go to Transitions and you will see the different video effects. Place your mouse point on them to see a preview of the effect.
Step4 You can drag and drop any desired effect between two video clips on Timeline. You can also go to Elements> Backgrounds to apply video effects to the background of your video. Similarly, you can check all the different elements, shapes, and emojis to use in your video.
Step5 Finally, click on Export Project button and select any file format and video resolution to save the edited video.
Way 3. Use FlexClip Video Effects Editor (https://www.flexclip.com /)
FlexClip video editor has different categories of video effects starting from elements to overlays. There are also background video effects available that will enhance your video content. Most importantly, there is a wide range of text effects available. FlexClip is perfect for adding effects for branded videos as well. There are also video templates available to create stunning videos from scratch. Here are the steps add sparkle to video online with FlexClip video editor.
Step1 Open your web browser and visit “flexclip.com/editor/app”.
Step2 Drag and drop your video clips and add them to instant viewer.
Step3 To add sparkle effect, you have to go to Photo on the left panel. Thereafter, select GIF tab.
Step4 Search for transparent Sparkle and add it to instant viewer.
Step5 You can go to Text, Elements, and Overlays to add further video effects.
Step6 Finally, click on Export button and sign up to save the edited video.
Part 3. FAQs about Video Effects
1. How do you edit a video with add filters?
Veed.io is the best online video editor to edit your video and add filters to enhance your video content. There are several filters available starting from colour grading to video effects.
2. How to add effects to video online free without watermark?
ClipChamp is a great online video editor where you can add video effects to your videos instantly. You can export and save your edited videos without any watermark and without purchasing any plan.
Free Download For Win 7 or later(64-bit)
Free Download For macOS 10.14 or later
Top 7 Easy Ways to Convert a Video to a GIF Online
Looking for the best video to gif online conversion tools? No worries, as we have done all the research work and have shortlisted the best tools that can assist you with the task. GIF is short and cute animated files that help in interestingly conveying a message. These short-animated visuals help in reaching and creating an impact on the target audience. So, if you have some videos, GIF animations can be created from them using a good converter tool which can be an online program or system software.
Online programs are preferred by the users owing to their simple and hassle-free use, support for basic features, and cost-saving options. So, here in this topic, we will discuss the top and easy ways to convert video to GIF online.

Part 1: Top 7 Easy Ways to Convert a Video to a GIF Online
Several online tools can be used for converting a video file into GIF, but all do not stand up to the tall claims it makes. So, if you are in search of an easy yet effective tool, shortlisted below are the top 7 tools for video into GIF online conversion.
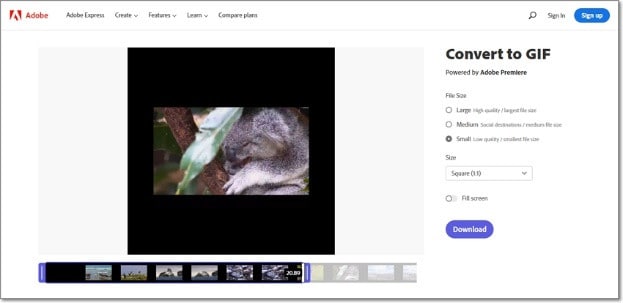
1. Adobe Express
Powered by Adobe Premiere, this is an excellent online tool that allows converting videos in all key formats in GIF format. The free version allows adding videos for up to 1 hour and the processed files can be downloaded to the local system.
Key features
- Video files in all key formats can be converted to GIF.
- Allows selecting the aspect ratio and the file size of the target file.
- This video to GIF converter online tool support drag and drop feature.
- Allows trimming the video so that the file portion can be selected.
Pros:
- Simple and clean interface.
- Quick file processing.
- Allows selecting aspect ratio and file size.
Cons:
- Only one file at a time can be processed.
- Only desktop files can be added.
- To download the file, you need to free sign-up.
User Review:
A good online multi-platform service that works with interesting features. -TechRadar
This is one of the best programs that comes packed with wide range of features that can assist you in getting the target customized files.
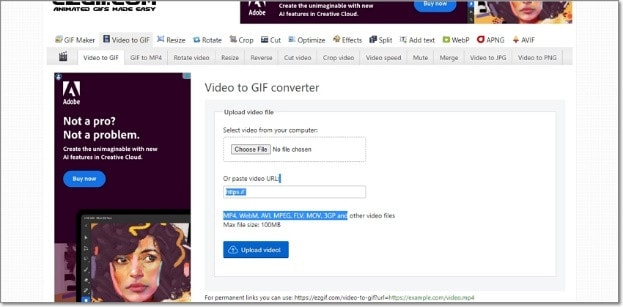
2. Ezgif
Using this browser-based tool, local as well as online videos in key formats can be converted to GIFs. The interface is simple where you just need to add the file and the conversion will be done automatically.
Key features
- GIF can be created from the local and online video files in all key formats.
- Choose the video part for creating the GIF file else by default, the first 5 seconds of the video are used.
Pros:
- All popular video formats like MP4, MPEG, FLV, MOV, and others are supported for conversion to GIF.
- Local, as well as file links in case of online files, can be added.
- Allows selecting the video part for which the GIF has to be created.
- Allows choosing the frame rate, and the size of the video.
This online GIF converter has an option to set static background.
Cons:
- File size limitation of 100 MB.
- Internet dependency.
User Review
“A website with many important and good tools that facilitates making your task easier. You get all features in one place. -Sasa011, Mywot.
This simple online tool is a pocket friendly option for converting your videos into GIF with added option for editing them. Supporting all key formats, the program supports additional tools as well.
3. Img2Go
Your videos on the system, cloud storage, as well as using URLs can be added to this online tool for conversion to GIF format. The look and the quality of GIFs can be adjusted by making changes in the file parameters.

Key features
- Convert all key video files like MP4, MOV, MPEG, and others to GIF.
- Customize the GIF look by editing the file size and applying the color filter.
- This online video to GIF converter allows to choose to enhance, sharpen, equalize, and edit files in other ways.
- Files to be converted can be added from the desktop, Google Drive, Dropbox, as well as URL.
- Processed files can be saved to the cloud storage in addition to the local system.
Pros:
- Multiple sources to add the video file.
- Customize the file parameters and enhance its look.
- Converted file is downloaded automatically to the local system.
Cons:
- Free version allows converting only 3 files at a time.
- Dependency on internet connectivity.
User review:
“This is the best online converter app I have discovered. It is really easy and fast to use. I absolutely recommend it and it really works.”-Maria Ancil, ChromeStats
When you need to convert only a few files at a time in a hassle-free manner consider this simple online tool. After the conversion is done, you would not have any hassles of file downloading as it is automatically saved to the system.
4. CloudConvert
Convert your videos in MP4, FLV, WebM, and other key formats to GIF using this browser-based tool that is simple and free to use. Multiple file parameters can be changed using the tool to get the desired file.

Key Features:
- Allows converting all key video formats.
- Files to be converted can be added from the desktop, URL, Dropbox, Google Drive, and OneDrive.
- Allows adjusting the fit, codec, resolution, aspect ratio, and fps.
- Option to trim the file and also add a watermark.
Pros:
- Files to be converted can be added from multiple sources.
- All key video formats supported.
- Option to control the video size, quality, and aspect ratio.
Cons:
- Free version allows only 25 conversions per day.
- Converted files need to be downloaded.
User Review
“Instant way of converting small-sized files online in many different formats.”
-Sushil, SoftwareAdvice
When conversion of cloud-based files is needed, this works a good online tool that also allows you to edit and change the key file parameters.
5. io
This is a free browser-based tool that allows creating of animated GIF files from videos. There are several video editing options also supported by the tool like split, cut, adding text, and more. You can even add a YouTube video or its link to create a GIF.

Key features:
- Free online tool for creating a GIF file.
- Support all key video formats like MP4, MOV, FLV, and others.
- Local, YouTube as well as videos from Dropbox can be added.
- Option to record the video and create its GIF.
- ‘Allows choosing the size, duration, background color, and several other file parameters.
Pros:
- Videos from multiple sources can be added.
- YouTube videos can also be converted to GIFs.
- Option to record the video and create its GIF.
- Support multiple video editing options.
Cons:
- Slow processing speed.
- Files processed through the free version have a watermark.
- Free version allows processing files under 10 minutes and of 250Mb in size.
User Review:
“It is just a perfect tool and easy to use. It supports a wide variety of media files.” - Koi, Trustpilot.
Option to convert the YouTube videos as well as the recorded videos make this tool different from the others. All popular file formats are supported and you can even customize and change the file parameters as per your requirements.
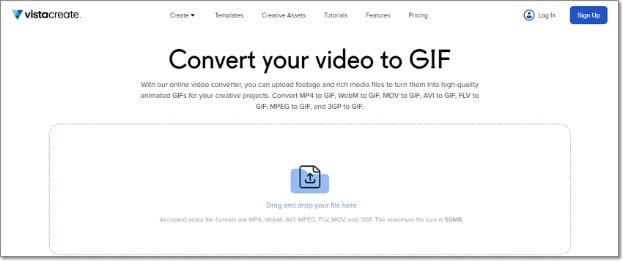
6. VistaCreate
This is another simple-to-use tool that allows converting all key video formats to a GIF file. The program allows setting various parameters as needed.
Key Features
- Convert MP4, WebM, AVI, MPEG, FLV, MOV, and 3GP to GIF.
- Support Drag and Drop feature.
- Videos up to 50MB can be processed.
- Allows choosing the video start and the end time for which GIF is to be created. If no time is selected, the first 5 seconds of the video are used.
Pros:
- Simple user interface.
- Allows selecting the video part for which GIF is to be created.
- Choose the frame rate and the speed.
Cons:
- Limited format support.
- Free version has a limitation of 50Mb file size.
- Processing speed is slow.
User Review:
“It is a simple and fast online tool that works. The program allows creating eye-catchy visuals and is free to use.”-Kshitij T, G2. Com
Simple to use, this online tool is apt when you need selected parts of the video for creating a GIF. Though it is compatible with a few selected formats, the process of conversion is simple.
7. XConvert
This online tool support conversion of wide range of file types and formats including videos to GIF. The supported video formats are MP4, WebM, MOV, and MKV. The tool also allows changing the target file parameters.

Key Features
- Free to use online tool with a simple interface.
- Allows converting MO4, MOV, WebM, and MKV videos to GIF.
- Frame Rate and resolution of the target GIF file can be selected.
- Allows adding local as well as files saved to the cloud storage.
Pros:
- Add videos from the desktop, Google Drive, and Dropbox.
- Choose the desired frame rate and resolution.
- Option to save the processed file to the system or Dropbox. Option to get the converted file download link.
Cons:
- Limited file support.
- Converted files need to be downloaded.
- Internet dependency.
User Review:
Portable, nice UI, cross-platform tool and has a lot of actions and run fast. -Roflpancake, Alternativeto
When simple conversion with basic file editing is needed, consider this online tool for your task. In addition to the local system, you can even save the files to your cloud storage.
Part 2: Comparison Table of the Best Video to GIF Converters
The table below compares the above 7 listed tools based on the formats supports, speed of file processing, and the watermark on the processed files.
| Features/Tool | Supported Format | Free Version with watermark or not | Speed of conversion |
|---|---|---|---|
| Adobe Express | All key video formats | No watermark | 2 (Fast) |
| Ezgif | All key formats including MP4, MPEG, FLV, MOV, and others. | No watermark. | 4 (Slow) |
| Img2Go | MP4, FLV, MOV, and all key video formats. | No Watermark | 2 (Fast) |
| CloudConvert | All popular video formats including MP4, MOV, FLV, MPEG, and more. | No Watermark | 2(Fast) |
| Veed.io | All key formats | Yes, free version has a watermark. | 5 (very Slow) |
| VistaCreate | MP4, WebM, AVI, MPEG, FLV, MOV, and 3GP. | No watermark | 5 (Very Slow) |
| XConvert | MP4, WebM, MOV, MKV. | No watermark | 3 (Average) |
Part 3: Best Solution to Convert Video to GIF on Windows/Mac
To convert videos to GIF on your Windows and Mac without worrying about any limitations or internet dependency, desktop software works as the best option. If you too have been looking for one such desktop program, we recommend Filmora Video Editor as the best choice. Though the software is used majorly for advanced video editing options, it is capable of performing a variety of other tasks as well including video to GIF conversion. The software allows file conversion through its export feature.
For Win 7 or later (64-bit)
For macOS 10.14 or later
Key Features
- Almost all video formats like MOV, MP4, MKV, FLV, and others can be converted to GIF.
- High-quality conversion at a fast speed.
- Support batch processing so that multiple files can be processed at a time.
- Allows editing and customizing videos using the built-in features of the software like effects, subtitles, crop, cut, and more.
Pros:
- The interface is simple which makes the software suitable even for beginners.
- Almost all popular video formats are supported.
- High-quality conversion in a hassle-free manner.
- Windows and Mac support.
Cons:
- Being a desktop software, it needs download and installation.
- Need to purchase the software subscription.
Steps to convert videos to GIF using Wondershare Filmora
Step 1. Launch the installed software on your system and the main interface select Create Project > New Project.

Step 2. Click on Import Media Files Here option under the Media tab to browse and add the local video file. Multiple files for batch processing can be added here.

Step 3. After the files are added, now it’s time to move them to the time and for this, you can simply drag and drop them to the bottom. Now at the timeline, using the built-in editing features, customization can be done as required.

Step 4. Finally, tap on the Export button and then choose GIF as the desired target format and also the location to save the converted files.

Conclusion
If one of the above-listed online tools serves your videos for GIF conversion purposes, it’s great. If not, you can use the Wondershare Filmora software. Once downloaded, the software can be used for several editing and other video-related tasks.
For macOS 10.14 or later
Key Features
- Almost all video formats like MOV, MP4, MKV, FLV, and others can be converted to GIF.
- High-quality conversion at a fast speed.
- Support batch processing so that multiple files can be processed at a time.
- Allows editing and customizing videos using the built-in features of the software like effects, subtitles, crop, cut, and more.
Pros:
- The interface is simple which makes the software suitable even for beginners.
- Almost all popular video formats are supported.
- High-quality conversion in a hassle-free manner.
- Windows and Mac support.
Cons:
- Being a desktop software, it needs download and installation.
- Need to purchase the software subscription.
Steps to convert videos to GIF using Wondershare Filmora
Step 1. Launch the installed software on your system and the main interface select Create Project > New Project.
Step 2. Click on Import Media Files Here option under the Media tab to browse and add the local video file. Multiple files for batch processing can be added here.
Step 3. After the files are added, now it’s time to move them to the time and for this, you can simply drag and drop them to the bottom. Now at the timeline, using the built-in editing features, customization can be done as required.
Step 4. Finally, tap on the Export button and then choose GIF as the desired target format and also the location to save the converted files.
Conclusion
If one of the above-listed online tools serves your videos for GIF conversion purposes, it’s great. If not, you can use the Wondershare Filmora software. Once downloaded, the software can be used for several editing and other video-related tasks.
How to Use Adjustment Layer in Final Cut Pro
Final Cut Pro is an advanced editing software that is available for Mac users exclusively. Using this high-end software, you can create compelling storytelling in your video clips. It offers different features through which you can effortlessly add audio and motion graphics to your videos. You can also add cinematic effects to your videos using Final Cut Pro to modify their focus points.
You can also add adjustment layers in Final Cut Pro to efficiently add the effects in video clips. By reading this article, you will learn how to add an adjustment layer in Final Cut Pro.

Part 1: What is Adjustment Layer in Final Cut Pro?
The adjustment layer in video editing can provide you with great ease as you can apply effects to multiple videos using this particular layer. Using the adjustment layer, you can apply effects and color grading to your video clips that come beneath this layer. So, apart from adding effects and executing color correction to individual clips, you can use an adjustment layer to generate quicker results.
After creating an adjustment layer in any video editor, you can easily cut and extend it like any other clip. You can also remove it anytime from your timeline with a single tap. In Final Cut Pro, you cannot insert adjustment layers in its timeline directly, like in Premiere Pro or After Effects.
To do so, you have to use third-party tools to create adjustment layers from scratch in Final Cut Pro. The process of creating an adjustment layer in Final Cut Pro is a little bit longer compared to other editors. To learn more about the adjustment layer in FCPX, continue reading this article.

Part 2: How to Add an Adjustment Layer in Final Cut Pro?
Are you eager to know how to add adjustment layers in Final Cut Pro? In this section, you can find simple instructions to generate an adjustment layer in Final Cut Pro without hassle.
Step1 First, click on this link to download the adjustment layer in your MacBook. Once done, copy your “Adjustment Layer” folder to the “User” folder. Afterward, move it to “Movies” and then “Motion Templates.” Once done, copy it to the “Titles” folder eventually.

Step2 Now open Final Cut Pro and locate the “Adjustment Layer” under the “Titles” section. After locating it, drag and drop it into the timeline. This adjustment layer was created as a title layer in Apple Motion that got published in Final Cut Pro using the built-in publishing tools.

Step3 Once you have created the adjustment layer, you can apply any sort of effects to the video clips. However, you should make sure to place the adjustment layer above in the layers stack.

Bonus Tips – How to Use Adjustment Layers in the Best Alternative to FCPX?
If you want to use an alternative to Final Cut Pro for creating the adjustment layer, you can try Wondershare Filmora 12 . You can edit your videos in an advanced and secure environment using this tool. It supports all multiple platforms, such as Windows, Mac, Android, and iOS. You can do color correction in your videos to manage the saturation, brightness, contrast, exposure, and other factors in Filmora.
Free Download For Win 7 or later(64-bit)
Free Download For macOS 10.14 or later
Moreover, you can also create 3D animated titles in Filmora to give your project a unique look. It also provides a wide range of keyboard shortcut presets through which you can make your editing easier and faster. Apart from editing and modifying your videos, you can also increase their vibrancy by using Filmora effects. You can explore and select a diverse range of visual effects in Filmora to give a new dimension to your video clips.
Key Features of Filmora
- Filmora offers cloud services that allow you to collaborate with your team members effectively. On its workspace cloud platform, you can share and review the edited video clips with your team members in a comfortable environment.
- It offers a pen tool through which you can draw complex mask shapes, such as straight lines or curves around the objects.
- Using the AI Smart Cutout feature, you can use advanced technology to select people or objects in the video effectively.
- Are you annoyed by the background noises in your video clips? You can try the AI Denoise feature of Filmora that can help you to eradicate background noises from the video clips precisely.
How to Add an Adjustment Layer Using Filmora
To create and use the adjustment layer in Wondershare Filmora 12, you can proceed to the following steps:
Step1 Import the Video Clip
Launch Filmora and click on the “New Project” button. Afterward, upload the video file on the project media and then drag and drop it into the timeline.

Step2 Add the Adjustment Layer
Now head to the “Media” section on the left side, where you can find the option of the “Adjustment Layer.” Next, drag and drop the adjustment layer into the timeline. You can double-click on it to change its settings effectively.

Step3 Add Multiple Presets to Adjustment Layer
From the settings, you can change blending mode, rotation, position, and opacity easily. Moreover, you can add different presets to the adjustment layer for more modifications. You can use the color match tool to adjust the colors in your video clip. With this tool, you can also add a border across the video clips using the adjustment layer. Also, you can color code the adjustment layer to create a more attractive look in the video clip.

Conclusion
Adjustment layers can make your editing process easy and fast. If you want to pursue video editing as your profession, you should know how to use the adjustment layer in famous tools like Final Cut Pro. After reading this article, you have learned how to create an adjustment layer in Final Cut Pro without complications.
However, if you want a more compatible and easier-to-use tool to generate adjustment layers, you can try Wondershare Filmora. It’s a powerful video editor that you can use to perform professional editing using adjustment layers.
Free Download For macOS 10.14 or later
Moreover, you can also create 3D animated titles in Filmora to give your project a unique look. It also provides a wide range of keyboard shortcut presets through which you can make your editing easier and faster. Apart from editing and modifying your videos, you can also increase their vibrancy by using Filmora effects. You can explore and select a diverse range of visual effects in Filmora to give a new dimension to your video clips.
Key Features of Filmora
- Filmora offers cloud services that allow you to collaborate with your team members effectively. On its workspace cloud platform, you can share and review the edited video clips with your team members in a comfortable environment.
- It offers a pen tool through which you can draw complex mask shapes, such as straight lines or curves around the objects.
- Using the AI Smart Cutout feature, you can use advanced technology to select people or objects in the video effectively.
- Are you annoyed by the background noises in your video clips? You can try the AI Denoise feature of Filmora that can help you to eradicate background noises from the video clips precisely.
How to Add an Adjustment Layer Using Filmora
To create and use the adjustment layer in Wondershare Filmora 12, you can proceed to the following steps:
Step1 Import the Video Clip
Launch Filmora and click on the “New Project” button. Afterward, upload the video file on the project media and then drag and drop it into the timeline.
Step2 Add the Adjustment Layer
Now head to the “Media” section on the left side, where you can find the option of the “Adjustment Layer.” Next, drag and drop the adjustment layer into the timeline. You can double-click on it to change its settings effectively.
Step3 Add Multiple Presets to Adjustment Layer
From the settings, you can change blending mode, rotation, position, and opacity easily. Moreover, you can add different presets to the adjustment layer for more modifications. You can use the color match tool to adjust the colors in your video clip. With this tool, you can also add a border across the video clips using the adjustment layer. Also, you can color code the adjustment layer to create a more attractive look in the video clip.
Conclusion
Adjustment layers can make your editing process easy and fast. If you want to pursue video editing as your profession, you should know how to use the adjustment layer in famous tools like Final Cut Pro. After reading this article, you have learned how to create an adjustment layer in Final Cut Pro without complications.
However, if you want a more compatible and easier-to-use tool to generate adjustment layers, you can try Wondershare Filmora. It’s a powerful video editor that you can use to perform professional editing using adjustment layers.
How to Edit A Time Lapse Video on iPhone?
Versatile Video Editor - Wondershare Filmora
An easy and powerful editor
Numerous effects to choose from
Detailed tutorials provided by the official channel
Do you want to edit a time lapse video on an iPhone or want to know how to shoot a time-lapse video? If so, you’ve come to the right place.
Time-lapses, which show how much something changes over a period of time are some of the coolest videos you can make.
They aren’t exactly easy to make and edit at first, but we’ve put together this guide to take you through the steps. We’ll give you a few time lapse video ideas, steps to shoot them, and good practices for managing your footage after you’ve shot it.
Let’s get started.
What Is A Time Lapse Video?
In its simplest definition, a time lapse video is a cinematography technique where the frequency at which film frames are captured (the frame rate) is much lower than that used to view the sequence.
When played at normal speed, time appears to be moving faster and thus lapsing. For example, an image of a scene may be captured once every second, then played back at 30 frames per second; the result is an apparent 30 times speed increase.
Time-lapse photography can be considered to be the opposite of slow motion.
How to Shoot A Time-Lapse Video?
Subjects to shoot in a time-lapse video
Wondering what can be shot in a time-lapse video? The answer is any subject that moves, grows, decays, or changes. But what’s more important than the subject is the motion and change that it goes through.
When shooting a time-lapse video, you are composing not only the shot but also the movement of the subject. If a subject doesn’t move or change throughout your film, then it is just a regular video. So try to think of subjects that are constantly moving or changing.
Time-Lapse videos are visually appealing and easy to make. When it comes to subjects that can be chosen to shoot in a time-lapse video, the possibilities are endless. But if you’re stuck for ideas, here are 10 suggestions to get you started:
1. Sunset/Sunrise
These are quite possibly the most common subjects for timelapse videos, but there’s a reason for it! Watching the sun go up and down is always mesmerizing.
2. Clouds
Clouds move very slowly most of the time, making them perfect for time-lapse sequences. You can shoot a single cloud passing overhead, or record a passing storm front as it sweeps across the sky. Depending on the weather conditions and movement of clouds, this can look stunning or simply spectacular!
3. Starry sky
Probably one of the most fascinating time lapse videos is the ones with stars on the move. Time-lapses that capture the Milky Way or starry sky are becoming increasingly popular as camera technology improves. There are even some cameras now that have built-in settings specifically for capturing stars and other celestial bodies.
4. Flowers
Flowers blooming is another fantastic subject for time-lapse photography. The change can be incredibly subtle; however, if you shoot a timelapse over several days or weeks, you will be amazed at just how much they grow and change!
5. Season changing
The most obvious example is trees budding and shedding leaves, but all sorts of plants and animals follow seasonal cycles. You can see flowers blooming, grasses growing, and migrating birds. Even if you don’t have a chance to go somewhere exotic for your subject matter, you can find something interesting right outside your own door.
6. Cars or Pedestrians
If you want something a little more exciting then you can choose things like cars passing by or people walking on the street.
7. Cooking dinner
Got a recipe for dinner that has lots of steps? Rather than just snap photos of the process, why not make a time-lapse video instead? It’s easy and fun to do, especially if you have kids who can help you out!
8. DIY projects
Are you building something? Whether it’s a new table, shelves, or whatever else, set up your camera and take photos as you go along in a time lapse mode and you’ll get a fun time lapse video. It works well to show people how it all came together.
9. Construction work in progress
If you’re watching construction work being done on your property or nearby, consider recording its time lapse video. It’s hard to imagine the amount of resources it takes to construct an office building or skyscraper before it’s finished. Time-lapse videos have helped reveal just how much work goes into something like that.
10. A fun art project
Capturing a time lapse video of an art project can make a mesmerizing video. Whether it’s you or someone else doing the artwork, always capture its time lapse video to show to others what goes into completing an art project. All you need to do is to set your camera up on a tripod aimed at the canvas and capture one or two frames per second to get an excellent time lapse video.
Steps to shoot a time-lapse video
Time-lapse videography is something that most photographers and videographers are familiar with. But, shooting a time-lapse video needs more than setting the camera on a tripod and waiting for it to shoot for several hours.
The amazing thing about time-lapse videos is that they can be shot using your smartphone. There are apps and built-in camera settings to capture time lapse videos with just a click of the button.
If you want to create a time-lapse video that is high quality, you have to use professional cameras, and learn some important steps.
1. Decide on a subject
The movement of clouds, a sunrise or sunset, waves crashing at the beach, cars coming and going in your parking lot, people walking around your office building — all of these subjects can yield great time-lapse sequences.
2. Find a place to set up your camera on tripod
While recording a time-lapse video, it’s important to keep the camera as stable as possible. It ensures a smooth video, making it visually appealing and easy to edit post-shooting. Typically, a tripod is needed for stable recording. If you are not using a tripod, find something steady and level to set it upon.
Important tip: Shoot only with manual settings. You don’t want the camera to adjust for you; rather, you should adjust the camera settings so that it takes optimal pictures. Even if you use auto mode, make sure you take control of the camera and push it to its limits to get great shots.
3. Set the camera focus
Use either autofocus or manual focus to make sure the camera is focused on what you want to be the main subject of the video.
4. Set your exposure settings
Depending on how much the light is going to change over time, you may want to use aperture priority or shutter priority so that the camera will automatically adjust for changes in light. Or, if you know exactly how much light will be changing over time, you could set all exposure settings manually.
5. Calculate how many frames and shots are needed
For example, if you are shooting at 10 frames per second and want a total of 30 seconds of video at 24 fps (which is standard), you will need 720 frames/photos (30 seconds x 24 fps = 720 frames).
6. Import and stitch together
Once you’ve captured the images, import them into a video editing software, stitch them together, and perform necessary editing.
How to Edit The Time Lapse on iPhone?
Now that you’ve recorded a time-lapse video, you might watch it and think it’s slower or faster than you want it to be. Fortunately, you can speed up and slow down the time lapse video on iPhone using iMovie.
Let’s see how to slow down time lapse on iPhone iMovie.
1. Speed up The Time Lapse on iPhone
So you’ve taken a time lapse video on your iPhone and now you’re trying to get it to speed up in iMovie but it looks a little jumpy or there is too much footage. Here’s how to do it in iMovie for iOS.
- Launch iMovie on your iPhone and start a new project to speed up the captured time-lapse video.
- Now, tap the plus sign visible at the start of the Projects screen, then select Movie.

- From the next window, find and select the recorded time-lapse video you want to speed up.

- Tap Create Movie button at the center-bottom of the screen.

- Now move the playhead to the start of the timeline and tap to select the video. At this point, you’ll see the timeline highlighted in yellow color.
- Look at the bottom of the screen and you’ll find the Speed icon. Tap the Speed icon and a sliding bar will appear with tortoise on its left side and hare on the right side.

- To speed up the time-lapse video, move the slider to the right side and you’ll see the duration of the video reduced, indicating time-lapse video has been sped up.

- Now click the Play button to preview and then tap Done.
Once you’ve increased the speed of time-lapse video, you can share it and post it where you want.
2. Slow Down The Time Lapse on iPhone
Just like you can speed up the time-lapse video on an iPhone, iMovie lets you slow down the time-lapse video.
Here’s how you can do it:
- Launch iMovie on your iPhone and start a new project to speed up the captured time-lapse video.
- Now, tap the plus sign visible at the start of the Projects screen, then select Movie.

- From the next window, find and select your recorded time-lapse video you want to speed up.

- Tap Create Movie button at the center-bottom of the screen.

- Now move the playhead to the start of the timeline and tap to select the video. At this point, you’ll see the timeline highlighted in yellow color.
- Look at the bottom of the screen and you’ll find the Speed icon. Tap the Speed icon and a sliding bar will appear with tortoise on its left side and hare on the right side.

- To slow down the time-lapse video, move the slider to the left side and you’ll see the duration of the video increased, indicating time-lapse video has been slowed down.

- Now click the Play button to preview and then tap Done.
Advanced Software: Edit A Time Lapse Video in Wondershare Filmora
If you have professionally captured RAW images of the time-lapse video, you need to use advanced software to stitch them together. That’s where Wondershare Filmora comes into play.
Wondershare Filmore is a professional video editing software with a wide variety of basic to advanced-level editing tools. It allows for turning RAW videos into fun, engaging, and professional videos.
If you need to refine your time-lapse video, you can use it and benefit from its capabilities. Similarly, you can use it to speed up or slow down your time-lapse video.
Let’s see how you can do both with Filmora.
Speed up your time-lapse video
Why speed up a time-lapse in the first place? There are a couple of reasons you might want to speed up your time-lapse.
When shooting with a fast lens, you might want to dial down the shutter speed to achieve more motion blur, to make the scenes more interesting. However, doing so can also create motion blur on time-lapse footage when sped up.
Another reason you might want to speed up your time-lapse is when you have too many frames. When you shoot at low frame rate (e.g. 15 FPS), not everyone will experience the same viewing quality if they don’t have high frame rate monitors. Speeding up the footage is one way to reduce the number of frames without compromising the quality of your video.
Follow these steps to speed up the time-lapse video using Filmora:
- Download and install Wondershare Filmora on your computer.
- Launch Filmora and click the New project button to open the video editor or drag and drop the file directly.

- Once imported, drag the file to the timeline.

- Click the Speed icon and select the Fast option. Select 2x, 4x, 8x, etc, depending on how much you want to speed up.

- Save the file and use it the way you want.
Slow down your time-lapse video
As the speed at which your time-lapse moves increases, so does the amount of motion blur. This can make for an undesirable look, especially in shots where there is already a lot of movement.
The best way to avoid this is to slow down your time-lapse as much as possible while still maintaining an interesting level of movement within your shot.
You can slow down your time-lapse video in Filmora following the same process as you’d do for speeding-up the video (Explained above). However, there’s only one catch; instead of opting for the Fast option choose Slow when you’re at step 4.
Conclusion
Hopefully, this guide has provided a good knowledge of how to put together your own time lapse video – and how to edit it on iPhone and Wondershare Filmora. It’s easier than you may think, and the resulting videos are quite impressive.
Take your time with it, record your movies from different angles, and don’t be afraid to create something unique and experimental.
Do you want to edit a time lapse video on an iPhone or want to know how to shoot a time-lapse video? If so, you’ve come to the right place.
Time-lapses, which show how much something changes over a period of time are some of the coolest videos you can make.
They aren’t exactly easy to make and edit at first, but we’ve put together this guide to take you through the steps. We’ll give you a few time lapse video ideas, steps to shoot them, and good practices for managing your footage after you’ve shot it.
Let’s get started.
What Is A Time Lapse Video?
In its simplest definition, a time lapse video is a cinematography technique where the frequency at which film frames are captured (the frame rate) is much lower than that used to view the sequence.
When played at normal speed, time appears to be moving faster and thus lapsing. For example, an image of a scene may be captured once every second, then played back at 30 frames per second; the result is an apparent 30 times speed increase.
Time-lapse photography can be considered to be the opposite of slow motion.
How to Shoot A Time-Lapse Video?
Subjects to shoot in a time-lapse video
Wondering what can be shot in a time-lapse video? The answer is any subject that moves, grows, decays, or changes. But what’s more important than the subject is the motion and change that it goes through.
When shooting a time-lapse video, you are composing not only the shot but also the movement of the subject. If a subject doesn’t move or change throughout your film, then it is just a regular video. So try to think of subjects that are constantly moving or changing.
Time-Lapse videos are visually appealing and easy to make. When it comes to subjects that can be chosen to shoot in a time-lapse video, the possibilities are endless. But if you’re stuck for ideas, here are 10 suggestions to get you started:
1. Sunset/Sunrise
These are quite possibly the most common subjects for timelapse videos, but there’s a reason for it! Watching the sun go up and down is always mesmerizing.
2. Clouds
Clouds move very slowly most of the time, making them perfect for time-lapse sequences. You can shoot a single cloud passing overhead, or record a passing storm front as it sweeps across the sky. Depending on the weather conditions and movement of clouds, this can look stunning or simply spectacular!
3. Starry sky
Probably one of the most fascinating time lapse videos is the ones with stars on the move. Time-lapses that capture the Milky Way or starry sky are becoming increasingly popular as camera technology improves. There are even some cameras now that have built-in settings specifically for capturing stars and other celestial bodies.
4. Flowers
Flowers blooming is another fantastic subject for time-lapse photography. The change can be incredibly subtle; however, if you shoot a timelapse over several days or weeks, you will be amazed at just how much they grow and change!
5. Season changing
The most obvious example is trees budding and shedding leaves, but all sorts of plants and animals follow seasonal cycles. You can see flowers blooming, grasses growing, and migrating birds. Even if you don’t have a chance to go somewhere exotic for your subject matter, you can find something interesting right outside your own door.
6. Cars or Pedestrians
If you want something a little more exciting then you can choose things like cars passing by or people walking on the street.
7. Cooking dinner
Got a recipe for dinner that has lots of steps? Rather than just snap photos of the process, why not make a time-lapse video instead? It’s easy and fun to do, especially if you have kids who can help you out!
8. DIY projects
Are you building something? Whether it’s a new table, shelves, or whatever else, set up your camera and take photos as you go along in a time lapse mode and you’ll get a fun time lapse video. It works well to show people how it all came together.
9. Construction work in progress
If you’re watching construction work being done on your property or nearby, consider recording its time lapse video. It’s hard to imagine the amount of resources it takes to construct an office building or skyscraper before it’s finished. Time-lapse videos have helped reveal just how much work goes into something like that.
10. A fun art project
Capturing a time lapse video of an art project can make a mesmerizing video. Whether it’s you or someone else doing the artwork, always capture its time lapse video to show to others what goes into completing an art project. All you need to do is to set your camera up on a tripod aimed at the canvas and capture one or two frames per second to get an excellent time lapse video.
Steps to shoot a time-lapse video
Time-lapse videography is something that most photographers and videographers are familiar with. But, shooting a time-lapse video needs more than setting the camera on a tripod and waiting for it to shoot for several hours.
The amazing thing about time-lapse videos is that they can be shot using your smartphone. There are apps and built-in camera settings to capture time lapse videos with just a click of the button.
If you want to create a time-lapse video that is high quality, you have to use professional cameras, and learn some important steps.
1. Decide on a subject
The movement of clouds, a sunrise or sunset, waves crashing at the beach, cars coming and going in your parking lot, people walking around your office building — all of these subjects can yield great time-lapse sequences.
2. Find a place to set up your camera on tripod
While recording a time-lapse video, it’s important to keep the camera as stable as possible. It ensures a smooth video, making it visually appealing and easy to edit post-shooting. Typically, a tripod is needed for stable recording. If you are not using a tripod, find something steady and level to set it upon.
Important tip: Shoot only with manual settings. You don’t want the camera to adjust for you; rather, you should adjust the camera settings so that it takes optimal pictures. Even if you use auto mode, make sure you take control of the camera and push it to its limits to get great shots.
3. Set the camera focus
Use either autofocus or manual focus to make sure the camera is focused on what you want to be the main subject of the video.
4. Set your exposure settings
Depending on how much the light is going to change over time, you may want to use aperture priority or shutter priority so that the camera will automatically adjust for changes in light. Or, if you know exactly how much light will be changing over time, you could set all exposure settings manually.
5. Calculate how many frames and shots are needed
For example, if you are shooting at 10 frames per second and want a total of 30 seconds of video at 24 fps (which is standard), you will need 720 frames/photos (30 seconds x 24 fps = 720 frames).
6. Import and stitch together
Once you’ve captured the images, import them into a video editing software, stitch them together, and perform necessary editing.
How to Edit The Time Lapse on iPhone?
Now that you’ve recorded a time-lapse video, you might watch it and think it’s slower or faster than you want it to be. Fortunately, you can speed up and slow down the time lapse video on iPhone using iMovie.
Let’s see how to slow down time lapse on iPhone iMovie.
1. Speed up The Time Lapse on iPhone
So you’ve taken a time lapse video on your iPhone and now you’re trying to get it to speed up in iMovie but it looks a little jumpy or there is too much footage. Here’s how to do it in iMovie for iOS.
- Launch iMovie on your iPhone and start a new project to speed up the captured time-lapse video.
- Now, tap the plus sign visible at the start of the Projects screen, then select Movie.
- From the next window, find and select the recorded time-lapse video you want to speed up.
- Tap Create Movie button at the center-bottom of the screen.
- Now move the playhead to the start of the timeline and tap to select the video. At this point, you’ll see the timeline highlighted in yellow color.
- Look at the bottom of the screen and you’ll find the Speed icon. Tap the Speed icon and a sliding bar will appear with tortoise on its left side and hare on the right side.
- To speed up the time-lapse video, move the slider to the right side and you’ll see the duration of the video reduced, indicating time-lapse video has been sped up.
- Now click the Play button to preview and then tap Done.
Once you’ve increased the speed of time-lapse video, you can share it and post it where you want.
2. Slow Down The Time Lapse on iPhone
Just like you can speed up the time-lapse video on an iPhone, iMovie lets you slow down the time-lapse video.
Here’s how you can do it:
- Launch iMovie on your iPhone and start a new project to speed up the captured time-lapse video.
- Now, tap the plus sign visible at the start of the Projects screen, then select Movie.
- From the next window, find and select your recorded time-lapse video you want to speed up.
- Tap Create Movie button at the center-bottom of the screen.
- Now move the playhead to the start of the timeline and tap to select the video. At this point, you’ll see the timeline highlighted in yellow color.
- Look at the bottom of the screen and you’ll find the Speed icon. Tap the Speed icon and a sliding bar will appear with tortoise on its left side and hare on the right side.
- To slow down the time-lapse video, move the slider to the left side and you’ll see the duration of the video increased, indicating time-lapse video has been slowed down.
- Now click the Play button to preview and then tap Done.
Advanced Software: Edit A Time Lapse Video in Wondershare Filmora
If you have professionally captured RAW images of the time-lapse video, you need to use advanced software to stitch them together. That’s where Wondershare Filmora comes into play.
Wondershare Filmore is a professional video editing software with a wide variety of basic to advanced-level editing tools. It allows for turning RAW videos into fun, engaging, and professional videos.
If you need to refine your time-lapse video, you can use it and benefit from its capabilities. Similarly, you can use it to speed up or slow down your time-lapse video.
Let’s see how you can do both with Filmora.
Speed up your time-lapse video
Why speed up a time-lapse in the first place? There are a couple of reasons you might want to speed up your time-lapse.
When shooting with a fast lens, you might want to dial down the shutter speed to achieve more motion blur, to make the scenes more interesting. However, doing so can also create motion blur on time-lapse footage when sped up.
Another reason you might want to speed up your time-lapse is when you have too many frames. When you shoot at low frame rate (e.g. 15 FPS), not everyone will experience the same viewing quality if they don’t have high frame rate monitors. Speeding up the footage is one way to reduce the number of frames without compromising the quality of your video.
Follow these steps to speed up the time-lapse video using Filmora:
- Download and install Wondershare Filmora on your computer.
- Launch Filmora and click the New project button to open the video editor or drag and drop the file directly.
- Once imported, drag the file to the timeline.
- Click the Speed icon and select the Fast option. Select 2x, 4x, 8x, etc, depending on how much you want to speed up.
- Save the file and use it the way you want.
Slow down your time-lapse video
As the speed at which your time-lapse moves increases, so does the amount of motion blur. This can make for an undesirable look, especially in shots where there is already a lot of movement.
The best way to avoid this is to slow down your time-lapse as much as possible while still maintaining an interesting level of movement within your shot.
You can slow down your time-lapse video in Filmora following the same process as you’d do for speeding-up the video (Explained above). However, there’s only one catch; instead of opting for the Fast option choose Slow when you’re at step 4.
Conclusion
Hopefully, this guide has provided a good knowledge of how to put together your own time lapse video – and how to edit it on iPhone and Wondershare Filmora. It’s easier than you may think, and the resulting videos are quite impressive.
Take your time with it, record your movies from different angles, and don’t be afraid to create something unique and experimental.
Also read:
- Do You Know You Can Trim and Cut Your Video Into the Desired Portions Using a Reliable Video Splitter? Get an Easy Video Splitter Now to Simplify Your Work. Here Are 33 Carefully Chosen Apps to Help You in This for 2024
- Updated 2024 Approved 2 Methods to Crop a Video Using After Effects
- Learn How to Change Aspect Ratio in iMovie on Mac, iPad, and iPhone in This Guide. And You Can Also Use iMovie Alternatives Like Wondershare Filmora to Edit Your Videos for 2024
- Updated How to Make a Time-Lapse Video Online for 2024
- Basic Introduction of LumaFusion Color Grading for 2024
- Do You Know You Dont Need a PC or Mac to Apply LUTs on Your Media? You Can Use Many Smartphone Apps to Apply LUTs, Such as 3DLUT Mobile App
- New Do You Want to Stream and Record at the Same Time but Cant Find an Easy Solution? This Guide Will Help You Get This Done Using Three Easy-to-Follow Methods for 2024
- New Splitting Audio From Video in Sony Vegas Step by Step for 2024
- In 2024, Here Is a Guide on How You Can Resize Videos via Handbrake and Wondershare Filmora. The Former Is a Lightweight Tool Perfect for Batch Resizing Videos, While the Latter Is a Powerful Free Video Editing Software
- Updated 2024 Approved How to Make Double Exposure Effect in Filmora
- Easy Step by Step Tutorial on Creating a Lightroom Collage
- Updated 2024 Approved Guide Adopting Lumetri Color Presets in Effective Color Grading
- New In 2024, Learning Some Perfect Ways to Convert a Slow-Motion Video to Normal
- Best 6 Online MP4 Croppers
- Updated A Guide to Find a High-Quality Video Marketing Agency for 2024
- Easy Guide to Vivo Y17s FRP Bypass With Best Methods
- In 2024, The Magnificent Art of Pokemon Go Streaming On Vivo V27 Pro? | Dr.fone
- How to Downgrade Apple iPhone 14 Pro without iTunes? | Dr.fone
- Life360 Learn How Everything Works On Vivo Y78+ (T1) Edition | Dr.fone
- Hassle-Free Ways to Remove FRP Lock on Oppo Reno 10 Pro+ 5Gwith/without a PC
- Top 4 Ways to Trace Xiaomi Redmi 12 Location | Dr.fone
- What Is AI Pixel Art Generator?
- How to Restore Previous Version of Excel 2003 File?
- The Most Useful Tips for Pokemon Go Ultra League On Tecno Phantom V Flip | Dr.fone
- Why Your WhatsApp Location is Not Updating and How to Fix On Vivo Y100 | Dr.fone
- In 2024, How To Get the Apple ID Verification Code From Apple iPhone 13 in the Best Ways
- Title: Add Effects to Video Online for 2024
- Author: Morgan
- Created at : 2024-05-19 05:11:50
- Updated at : 2024-05-20 05:11:50
- Link: https://ai-video-editing.techidaily.com/add-effects-to-video-online-for-2024/
- License: This work is licensed under CC BY-NC-SA 4.0.
