An Ultimate Guide to Edit a Music Video Aspect Ratio and First Cut

An Ultimate Guide to Edit a Music Video: Aspect Ratio and First Cut
Are you planning to edit your music video? Do you need on out how to edit your first music video draft? Editing a music video is a creative task but can be challenging.
One of the key elements of this process is selecting the aspect ratio and making the first cut. In this blog, we will explore these steps in detail, providing important tips and tricks. Whether you’re a beginner or an experienced editor, get ready to take your music video to the next level. Let’s get started.
Which software will you need?
As we have a lot of software in the market, we must select the right software for high-quality editing. Wondershare Filmora is an amazing video editing software. It offers a ton of video editing tools. You can add special effects, transitions, and more to make your music video captivating.
Free Download For Win 7 or later(64-bit)
Free Download For macOS 10.14 or later
![]()
Note: Before you start editing your project, make sure that you have a backup. You can copy the project to an external USB or hard drive for a backup.
Adjust the aspect ratio
The aspect ratio is known as the size of the video frame. For example, the most common aspect ratios are 16:9 and 4:3. The first number represents the width, and the second represents the height.
You should always ask your cinematographer about the aspect ratio. There are chances when cameras won’t shoot at the intended aspect ratio they were framed for. In that case, you’ll need to crop or letterbox them when editing.

How to find the width/height of the frame?
Most of the frames that are being shot on the camera are 3424 pixels wide, which is a little under 4k. If you have a measurement of one side of the frame, you can find the other by using some math. Let’s suppose your frame is 3424 pixels wide. You can use this formula to find the height.
Formula: 3424 pixels wide x 1 high / 2.35 wide (or whatever your aspect ratio)

Now you can cancel out the width from the multiplier and the denominator.
= 3424 pixels wide x 1 high / 2.35 wide

Now you are left with the equation:
= 3424 pixels high / 2.35
After solving this equation, you will get the answer which is: 1457 pixels high. Let’s adjust it on the music video as well, follow the steps given below:
Free Download For Win 7 or later(64-bit)
Free Download For macOS 10.14 or later
Step1Open the aspect ratio setting tab
Open your music video project in Filmora and click on the screen icon, as shown in the picture.
![]()
Then select the Change Project Aspect Ratio.

Step2Add values
Now set the project Width to 3424 pixels and its Height to 1457 pixels. You can also adjust the frame rate by selecting the one in which you shot the video. Then click OK.

Assembly
The next step is assembly. You will arrange the shots, clips, and elements in this process and get everything in order. It can be daunting and inspiring for you, as it’s a blank canvas you are going to start with. Before editing, you can also get some guidance from your art director.
If your music video has shots of the band performing, drop them off first and sync them with the audio. On the contrary, if you are doing a narrative style, you can arrange the shots according to the story you want to portray.

Step1Drop the media
You can start by dragging and dropping the music onto the audio timeline. Then you can add the shots of your music video.

Step2Arrange the shots
Arrange the shots according to the storyboard you created and sync them with the audio.

Step3Add the title
Once you arrange all shots in order, you can add the title of your music video. Click on the Titles, then choose your desired style and add the name of your music video in the title box. You can also change the text’s size, font, and color.

Step4Flip the clip
One last thing is, if you shot any scene in mirror-image format, you can flip it. Click on the clip you want to flip and select the flip icon in the video properties.

Send your first draft
The first draft is the video in which you added audio and re-ordered the shots. You decided on the pace and flow of the video to create a basic structure. You made changes to make it interesting and captivating.
Before you put too much effort into editing your video, send it to your director, producer, or client for review. It will help ensure that any big changes can be made before you invest too much time in the edit.
For first drafts, you don’t need anything fancy. A lower-resolution and more compressed file can make sending it to a director or client much easier. You can also add a timer on the music video, so the person reviewing it can give you accurate timing on where he wants any revision.
How to add the timer in the music video?
- Click on Effects and search for Timecode in the search bar.
- Choose the timer style you like and drop it onto the new timeline.
- Extend the timer to the end of the video.
- Adjust the position and add the duration of your music video.

Now you are all set to export the first draft of your music video. You can also adjust the video format on the export option, but MP4 is recommended.
Conclusion
We hope this blog has helped you edit the initials of your music video. By adjusting the aspect ratio to fit the desired screen size and properly planning the first cut, you can lay a solid foundation for the rest of the editing process.
These two steps can greatly impact the overall look and feel of the final product. Remember to communicate with your director, producer, or client throughout the process to ensure that the final product meets their expectations.
Free Download For macOS 10.14 or later
![]()
Note: Before you start editing your project, make sure that you have a backup. You can copy the project to an external USB or hard drive for a backup.
Adjust the aspect ratio
The aspect ratio is known as the size of the video frame. For example, the most common aspect ratios are 16:9 and 4:3. The first number represents the width, and the second represents the height.
You should always ask your cinematographer about the aspect ratio. There are chances when cameras won’t shoot at the intended aspect ratio they were framed for. In that case, you’ll need to crop or letterbox them when editing.

How to find the width/height of the frame?
Most of the frames that are being shot on the camera are 3424 pixels wide, which is a little under 4k. If you have a measurement of one side of the frame, you can find the other by using some math. Let’s suppose your frame is 3424 pixels wide. You can use this formula to find the height.
Formula: 3424 pixels wide x 1 high / 2.35 wide (or whatever your aspect ratio)

Now you can cancel out the width from the multiplier and the denominator.
= 3424 pixels wide x 1 high / 2.35 wide

Now you are left with the equation:
= 3424 pixels high / 2.35
After solving this equation, you will get the answer which is: 1457 pixels high. Let’s adjust it on the music video as well, follow the steps given below:
Free Download For Win 7 or later(64-bit)
Free Download For macOS 10.14 or later
Step1Open the aspect ratio setting tab
Open your music video project in Filmora and click on the screen icon, as shown in the picture.
![]()
Then select the Change Project Aspect Ratio.

Step2Add values
Now set the project Width to 3424 pixels and its Height to 1457 pixels. You can also adjust the frame rate by selecting the one in which you shot the video. Then click OK.

Assembly
The next step is assembly. You will arrange the shots, clips, and elements in this process and get everything in order. It can be daunting and inspiring for you, as it’s a blank canvas you are going to start with. Before editing, you can also get some guidance from your art director.
If your music video has shots of the band performing, drop them off first and sync them with the audio. On the contrary, if you are doing a narrative style, you can arrange the shots according to the story you want to portray.

Step1Drop the media
You can start by dragging and dropping the music onto the audio timeline. Then you can add the shots of your music video.

Step2Arrange the shots
Arrange the shots according to the storyboard you created and sync them with the audio.

Step3Add the title
Once you arrange all shots in order, you can add the title of your music video. Click on the Titles, then choose your desired style and add the name of your music video in the title box. You can also change the text’s size, font, and color.

Step4Flip the clip
One last thing is, if you shot any scene in mirror-image format, you can flip it. Click on the clip you want to flip and select the flip icon in the video properties.

Send your first draft
The first draft is the video in which you added audio and re-ordered the shots. You decided on the pace and flow of the video to create a basic structure. You made changes to make it interesting and captivating.
Before you put too much effort into editing your video, send it to your director, producer, or client for review. It will help ensure that any big changes can be made before you invest too much time in the edit.
For first drafts, you don’t need anything fancy. A lower-resolution and more compressed file can make sending it to a director or client much easier. You can also add a timer on the music video, so the person reviewing it can give you accurate timing on where he wants any revision.
How to add the timer in the music video?
- Click on Effects and search for Timecode in the search bar.
- Choose the timer style you like and drop it onto the new timeline.
- Extend the timer to the end of the video.
- Adjust the position and add the duration of your music video.

Now you are all set to export the first draft of your music video. You can also adjust the video format on the export option, but MP4 is recommended.
Conclusion
We hope this blog has helped you edit the initials of your music video. By adjusting the aspect ratio to fit the desired screen size and properly planning the first cut, you can lay a solid foundation for the rest of the editing process.
These two steps can greatly impact the overall look and feel of the final product. Remember to communicate with your director, producer, or client throughout the process to ensure that the final product meets their expectations.
Have You Ever Played Roblox Games? Read This Article to Find Out How to Get Motion Blur in Roblox Using Simple and Efficient Ways
Game lovers always look for unique ways to make their gaming experience enjoyable. One of the common ways to make the gameplays look cinematic and realistic is by adding the motion blur effect. This effect can make a huge difference in your gameplay by adding a sense of speed. However, if you are a beginner, you may not be aware of how to apply the motion blur effect appropriately.
If you love playing games on Roblox and want to add a motion blur effect efficiently, you are at the right place. In this article, we will guide you on how to get motion blur in Roblox accurately. Thus, keep reading the instructions mentioned in this guide carefully to avoid any chances of mistakes.
Part 1: What is Roblox?
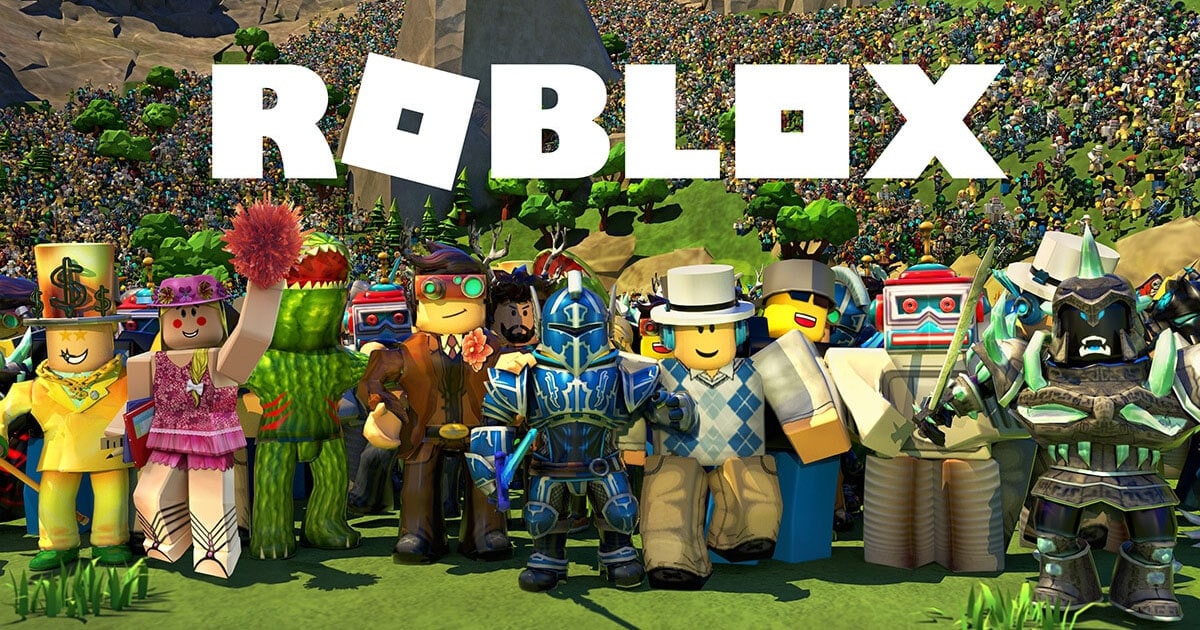
Roblox is an online gaming platform that enables you to play a wide range of games in a secure environment. It was launched in 2006 and acted as a virtual universe that provides various genres of games to players. These games are known as “Experiences,” having different avatars, adventures, obstacles, and goals.
In recent years, Roblox gained immense popularity as over 52 million people play games on Roblox each day. The reports have shown that teenagers, especially of the age between 12 to 16 years old, are highly engaged on this online platform. However, recent reports suggest that even adults aged from 17 to 24 years are now also becoming interested in Roblox games.
Some of the popular Roblox games are MeepCity, Royale High, Adopt Me, Blox Fruits, Murder Mystery 2, etc. As Roblox is a free gaming platform, you can easily play games free of cost. However, you can still make purchases within each game to buy accessories, upgrades, and clothing to make your gaming experience more memorable. Moreover, you can also use this platform to make connections with other people to create a global community.
Part 2: How to Get Motion Blur in Roblox?
Are you curious to know how to use motion blur in Roblox? In this section, we will address how you can apply the motion blur effect while playing Roblox games efficiently.
Step1 First, download and launch the “Reshade Me ” software on your device. Make sure to download and install the 5.5.2 version of this software. Once done, search for the Roblox Player on your PC. Right-click on it and choose “Open File Location.”
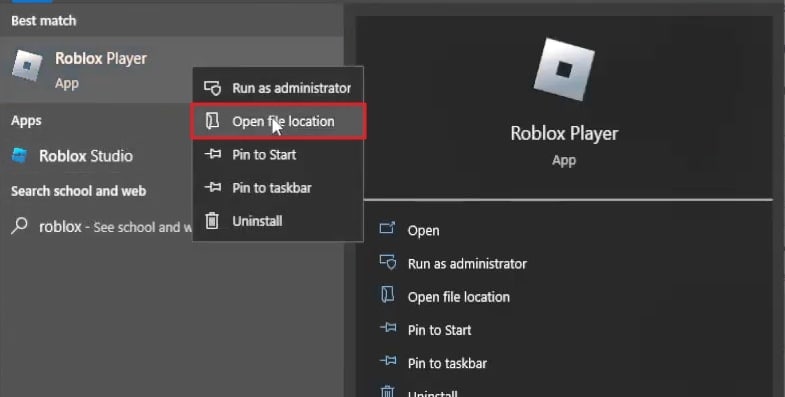
Step2 Now copy the file location of Roblox to proceed further. Once done, go back to Reshade Me and hit the “Browse” button. Afterward, paste the file location of Roblox above the “New Folder” space. Press the “Enter” button, which will display the Roblox Player.
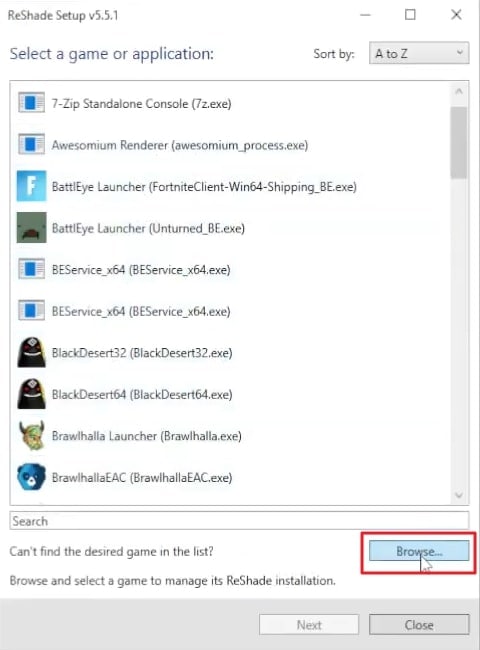
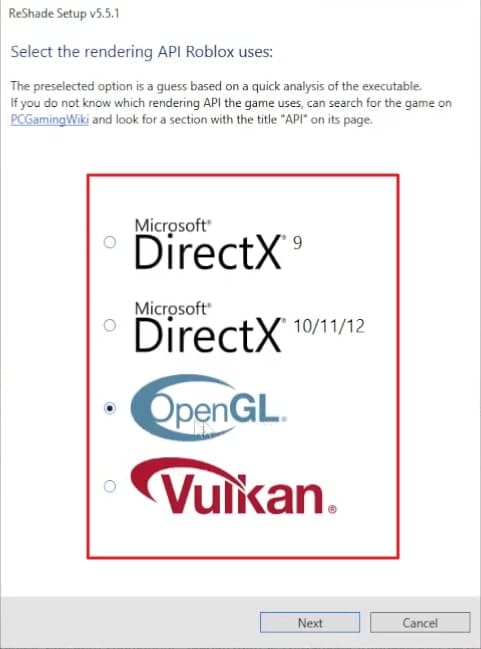
Step3 Now choose the Roblox Player and click on the “Open” button. Now click on the “Next” button that will open the “rendering API Roblox uses” window. You can select either OpenGL or DirectX. Once done, tap on the “Next” button and then on the “Modify” option.
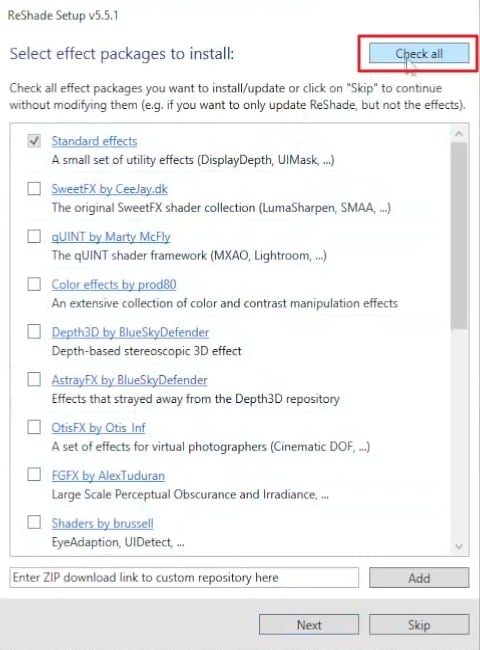
Step4 To proceed further, tap on the “Skip” button and then tap on the “Uncheck All” button. Once done, click on the “Check All” button. Once each and every option is selected, click on the “Next” button. Once you have successfully installed the Reshade Me software, open the Roblox Player.
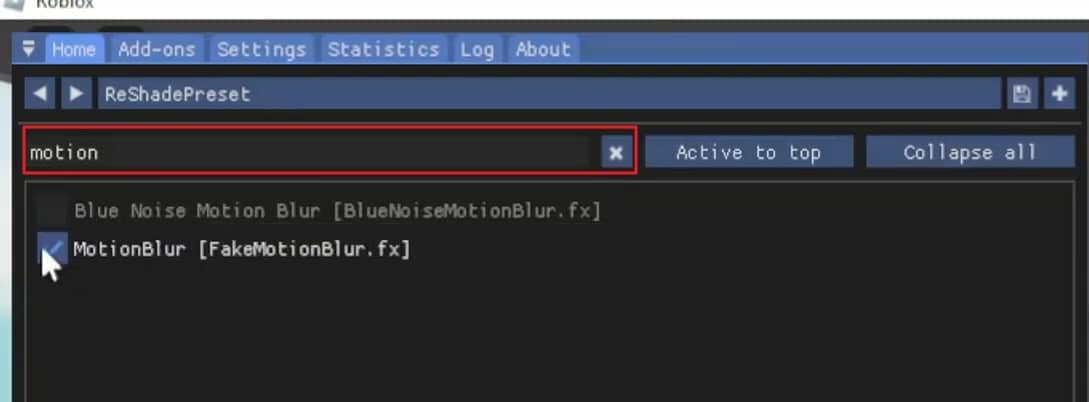
Step5 Now open any game on Roblox and press the “Home” button. On the search bar, type motion blur to find and select it. Now you can play your game while applying the motion blur effect.
Bonus Tips – How to Add Motion Blur to Your Roblox Gaming Video
If you are finding the above instructions for adding the motion blur effect difficult or lengthy, we will provide you with the best alternative. If you want to use a simpler yet more efficient tool to add a motion blur effect in your Roblox games, Wondershare Filmora is the most suitable option. It is a popular video editing software that enables you to modify your videos using its various distinct features.
Free Download For Win 7 or later(64-bit)
Free Download For macOS 10.14 or later
Apart from performing basic editing such as trimming, merging, cropping, and resizing, you can also get benefit from its advanced options. Using this professional and complete software, you can get rid of any major and minor flaws in your videos within seconds. It supports 4K and HD videos and does not harm their quality during the editing process. Furthermore, it has a friendly user interface that allows you to perform video editing without any complications.
Key Features of Filmora
- Filmora provides more than 900 diverse effects that you can apply to your videos to unleash your creativity. In its library, you can find every kind of effect that can easily match the genre of your videos.
- By using its Speed Ramping feature, you can adjust the speed of your video according to your choice. You can either speed up your videos or make a precise slow mo efficiently.
- To match your audio with your video flawlessly, you can utilize its “Auto Synchronization” feature. Thus, your embedded audio clip with your video will sound more clear to you using this feature.
- Filmora offers a screen recorder that can help you to capture your gameplays, online meetings, or product demos in high quality.
How to Add Motion Blur in Roblox Using Filmora
If you want to add motion blur in Roblox recorded gameplay videos, then follow the instructions that are described below for your ease:
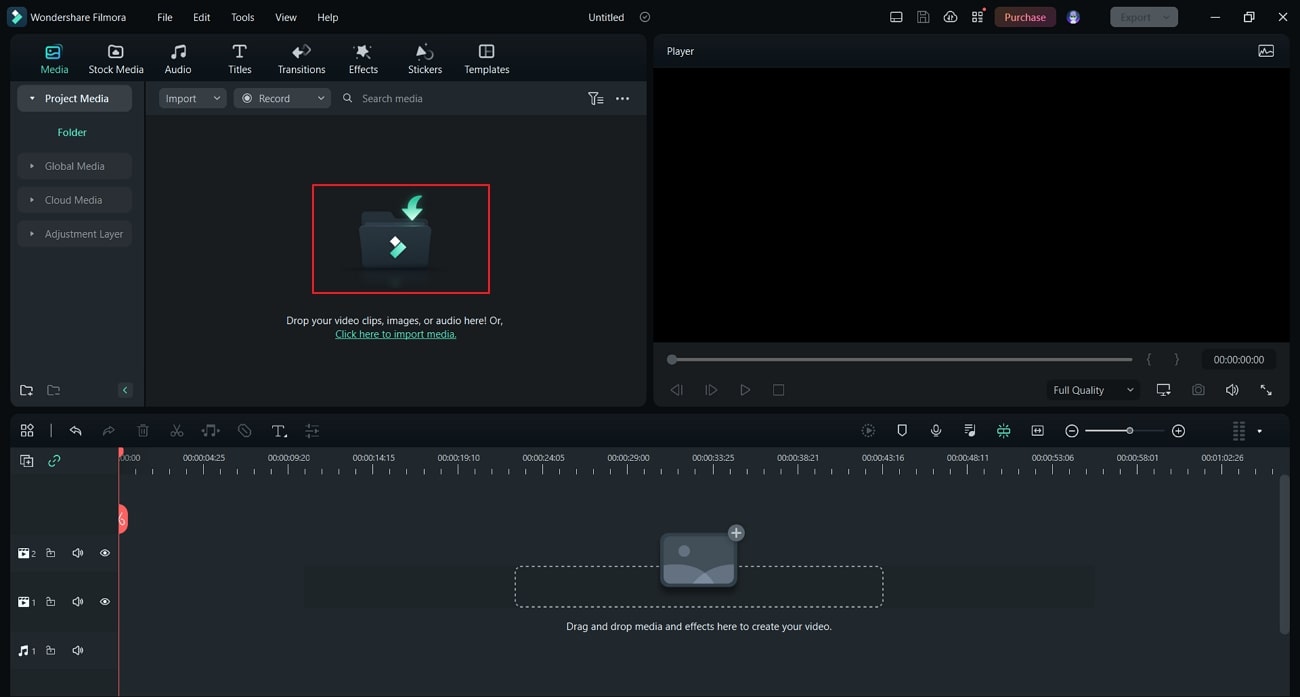
Step1 Import Roblox Gameplay Video
Once you have launched the Filmora software on your PC/Mac, click on the “New Project” option to proceed with the editor. To move further, hit the “Import” icon and upload your recorded Roblox game on the project media.
Step2 Split the Video on Timeline
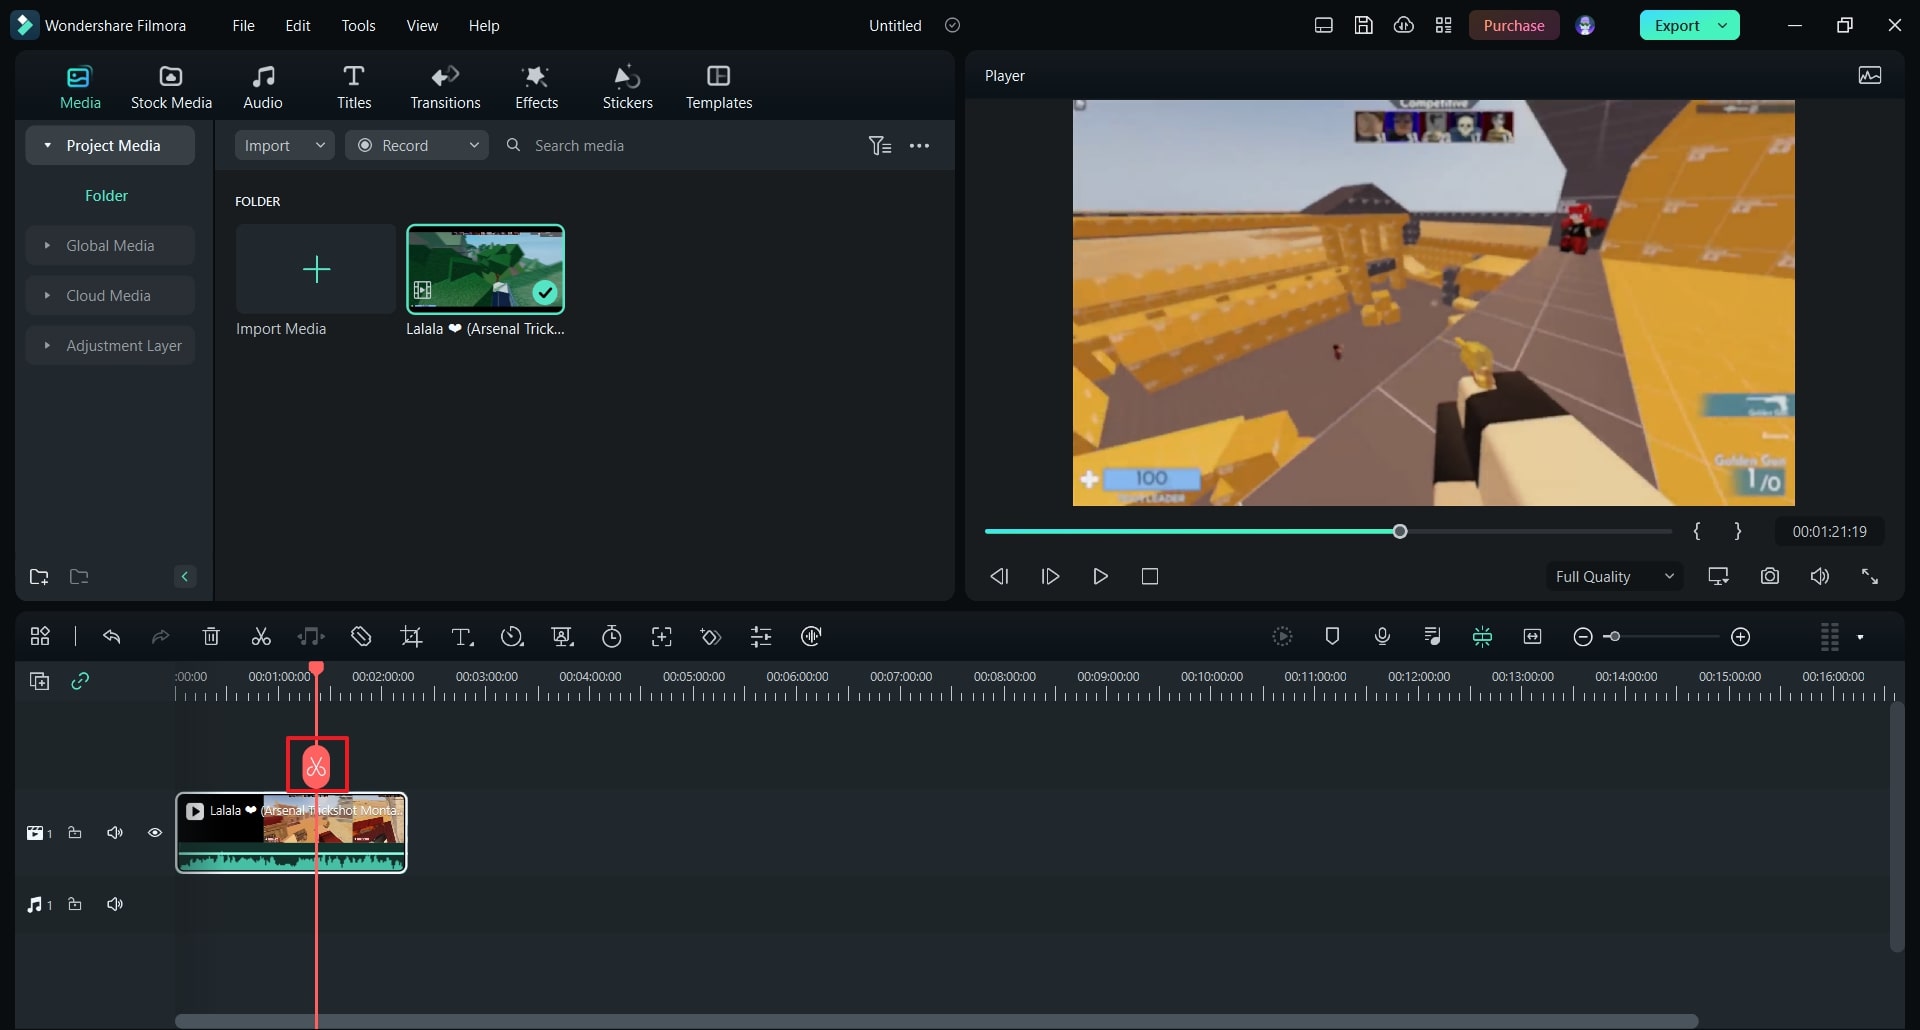
Now drag and drop the uploaded video on the timeline of this tool. Once you are done with it, move the play head to the position where you want to add the motion blur effect. Navigate to the “Scissors” icon and split the Roblox gameplay video.
Step3 Search for the Desired Blur Effect
Locate the “Effects” tab from above and click on “Video Effects” from the left side. On the search bar, type “Blur” and select the preferred blur effect from the results. Drag the chosen effect to the timeline to proceed.

Step4 Apply a Transition
To make the final output of your Roblox gameplay video look smooth and neat, go to the “Transitions” tab. From there, select the “Dissolve” transition and apply it to the timeline. Afterward, you can click on the “Export” button to save or share your customized video.

Conclusion
Roblox games are highly popular among teenagers and youngsters. If you want to make the experience of playing Roblox games more enjoyable and realistic, you can apply the motion blur effect. This article has helped you as it has listed all the necessary instructions for Roblox motion blur if you were unaware of this special effect before. Moreover, you can also try the Wondershare Filmora tool to add a motion blur effect on Roblox gameplay videos effortlessly.
Free Download For macOS 10.14 or later
Apart from performing basic editing such as trimming, merging, cropping, and resizing, you can also get benefit from its advanced options. Using this professional and complete software, you can get rid of any major and minor flaws in your videos within seconds. It supports 4K and HD videos and does not harm their quality during the editing process. Furthermore, it has a friendly user interface that allows you to perform video editing without any complications.
Key Features of Filmora
- Filmora provides more than 900 diverse effects that you can apply to your videos to unleash your creativity. In its library, you can find every kind of effect that can easily match the genre of your videos.
- By using its Speed Ramping feature, you can adjust the speed of your video according to your choice. You can either speed up your videos or make a precise slow mo efficiently.
- To match your audio with your video flawlessly, you can utilize its “Auto Synchronization” feature. Thus, your embedded audio clip with your video will sound more clear to you using this feature.
- Filmora offers a screen recorder that can help you to capture your gameplays, online meetings, or product demos in high quality.
How to Add Motion Blur in Roblox Using Filmora
If you want to add motion blur in Roblox recorded gameplay videos, then follow the instructions that are described below for your ease:
Step1 Import Roblox Gameplay Video
Once you have launched the Filmora software on your PC/Mac, click on the “New Project” option to proceed with the editor. To move further, hit the “Import” icon and upload your recorded Roblox game on the project media.

Step2 Split the Video on Timeline
Now drag and drop the uploaded video on the timeline of this tool. Once you are done with it, move the play head to the position where you want to add the motion blur effect. Navigate to the “Scissors” icon and split the Roblox gameplay video.

Step3 Search for the Desired Blur Effect
Locate the “Effects” tab from above and click on “Video Effects” from the left side. On the search bar, type “Blur” and select the preferred blur effect from the results. Drag the chosen effect to the timeline to proceed.

Step4 Apply a Transition
To make the final output of your Roblox gameplay video look smooth and neat, go to the “Transitions” tab. From there, select the “Dissolve” transition and apply it to the timeline. Afterward, you can click on the “Export” button to save or share your customized video.

Conclusion
Roblox games are highly popular among teenagers and youngsters. If you want to make the experience of playing Roblox games more enjoyable and realistic, you can apply the motion blur effect. This article has helped you as it has listed all the necessary instructions for Roblox motion blur if you were unaware of this special effect before. Moreover, you can also try the Wondershare Filmora tool to add a motion blur effect on Roblox gameplay videos effortlessly.
Do You Want to Know About the DaVinci Resolve Adjustment Layer? Read This Article to Learn How to Use an Adjustment Layer (Clip) in DaVinci Resolve to Edit Videos
DaVinci Resolve is one of the popular video editors comprising many advanced features. This tool allows you to conduct 3D video editing and adjust color grading properties. You can also access its audio library to find out suitable music clips. Moreover, you can add transitions and animations to your videos for more enhancements.
While executing video editing, many people add an adjustment layer (clip) in DaVinci Resolve for convenience. By reading this article, you can discover the DaVinci Resolve adjustment layer and an easy method to add it during video editing.
Part 1: What is the Adjustment Layer (clip) in DaVinci Resolve?
Do you know the benefits of adding an adjustment layer (clip) in DaVinci Resolve? The adjustment layer (clip) in DaVinci Resolve gives you more control and flexibility during video editing. By adding this particular layer above your other clips, you can apply tons of effects to them.
Due to this ease, you don’t have to apply the same effect to multiple clips. Thus, it saves your time and manual effort on DaVinci Resolve. One of the main advantages of adding an adjustment layer (clip) is that it does not modify the original pixels of the video. You can also rename the adjustment layers (clips) in DaVinci Resolve according to your desire.
Hence, adjustment layers in any video editor like DaVinci Resolve provide a non-destructive way to edit and apply effects to the video.
Part 2: How to Add an Adjustment Layer (clip) in DaVinci Resolve?
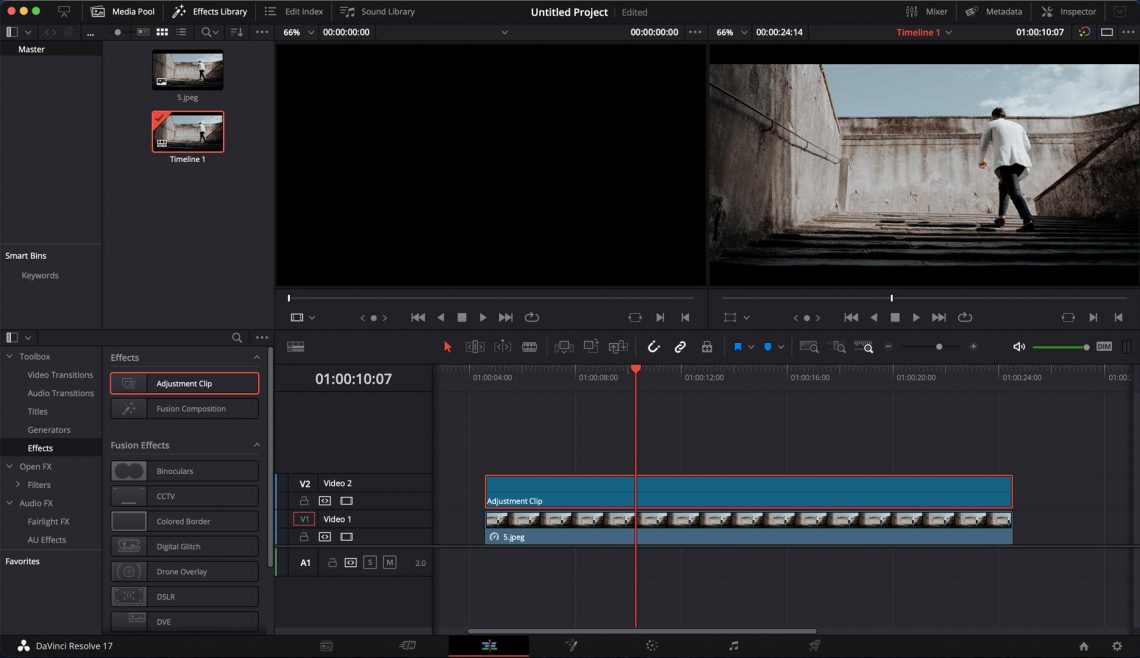
Are you keen to know how to add an adjustment layer in DaVinci Resolve? By reading this section, you can find easy instructions to apply the adjustment layer (clip) in DaVinci Resolve without hassle.
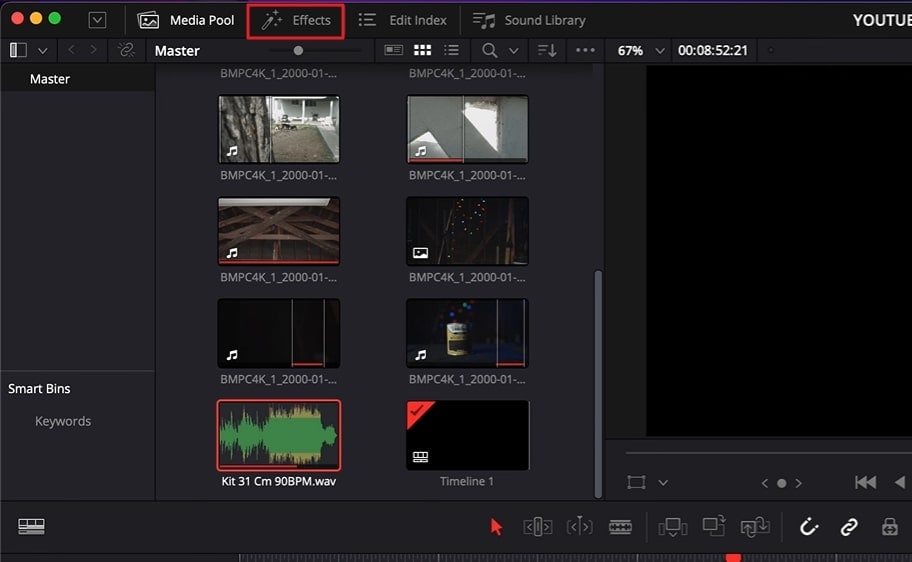
Step1 To add an adjustment layer in DaVinci Resolve, head to the “Effects Library.” From there, click on “Toolbox” and select “Effects.”
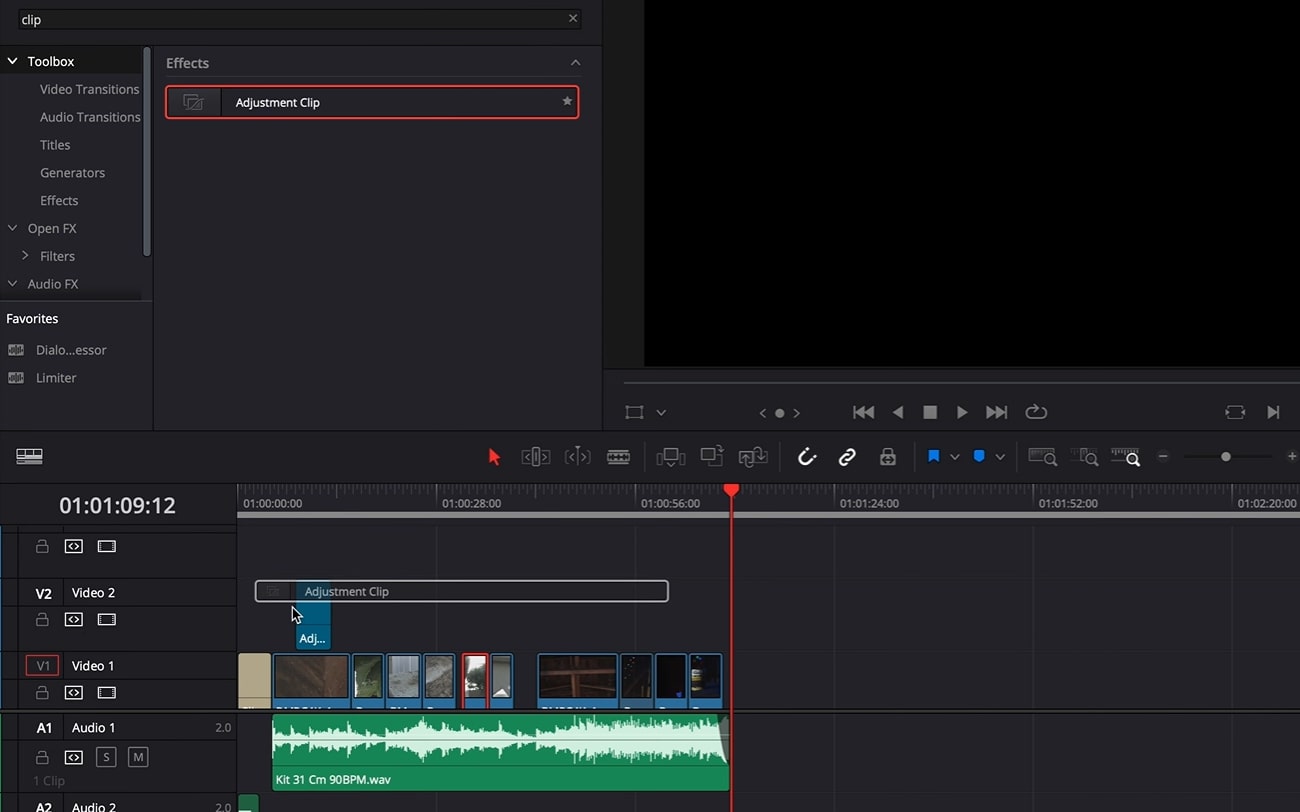
Step2 From the Effects section, you will have to search for the “Adjustment Clip.” Drag and drop the adjustment clip and apply it above the layers that you want to edit.
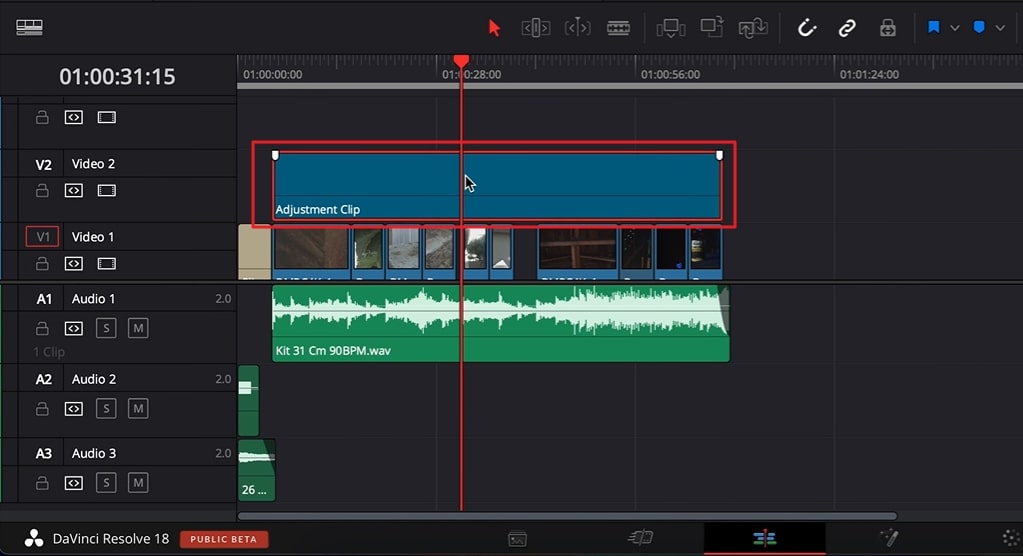
Step3 Now extend the adjustment clip according to the layers. Once done, you can apply effects and transitions to the adjustment clip to add modifications.
Part 3: Three Ways to Use Adjustment Layers in DaVinci Resolve
Do you want to know how to use the DaVinci Resolve adjustment layer? Read this part of the article to discover how to use the adjustment layer (clip) in DaVinci Resolve.
1. Zoom in
Do you want to give the zoom-in element in your video to emphasize your subject? The zoom-in effect is created to focus on the subject to engage the viewers. On DaVinci Resolve, you can create the zoom-in effect using the adjustment layer (clip). To do so, you can read and follow the below instructions:
Step1 First, add the adjustment layer to your timeline by heading to Effects Library and then Toolbox. Make sure to apply the adjustment layer above your talking head on the timeline.
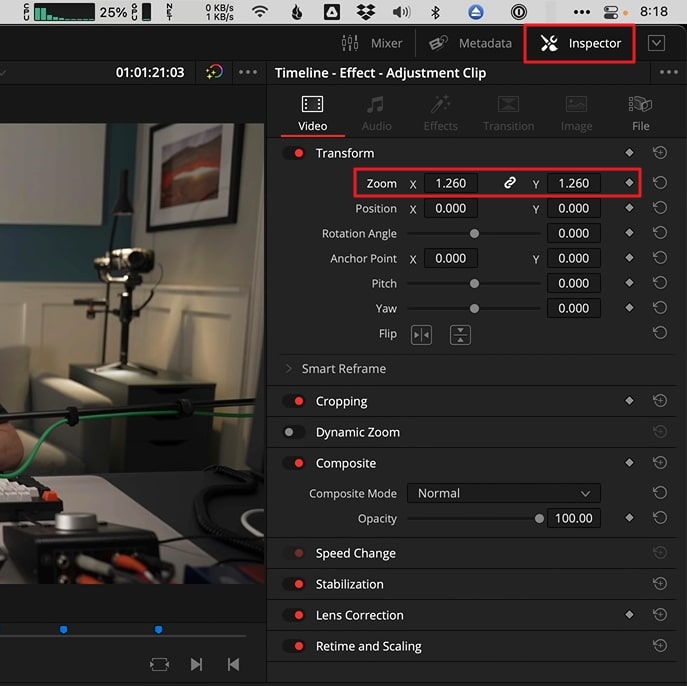
Step2 Now click on “Inspector” from the top right corner and enhance the “Zoom” value according to your desire. Once done, you can play the video to check the results.
2. Color Grading
Color grading can change the perspective of your video clip. Do you want to give your video an aesthetic, gloomy, or colorful vibe? Change the color grading properties using the adjustment layer (clip) in DaVinci Resolve. To use an adjustment layer for color grading, we have jotted down the simple steps below:
Step1 Drag and drop your clip above on the timeline. Once you are done, head to the “Color Page” given below.
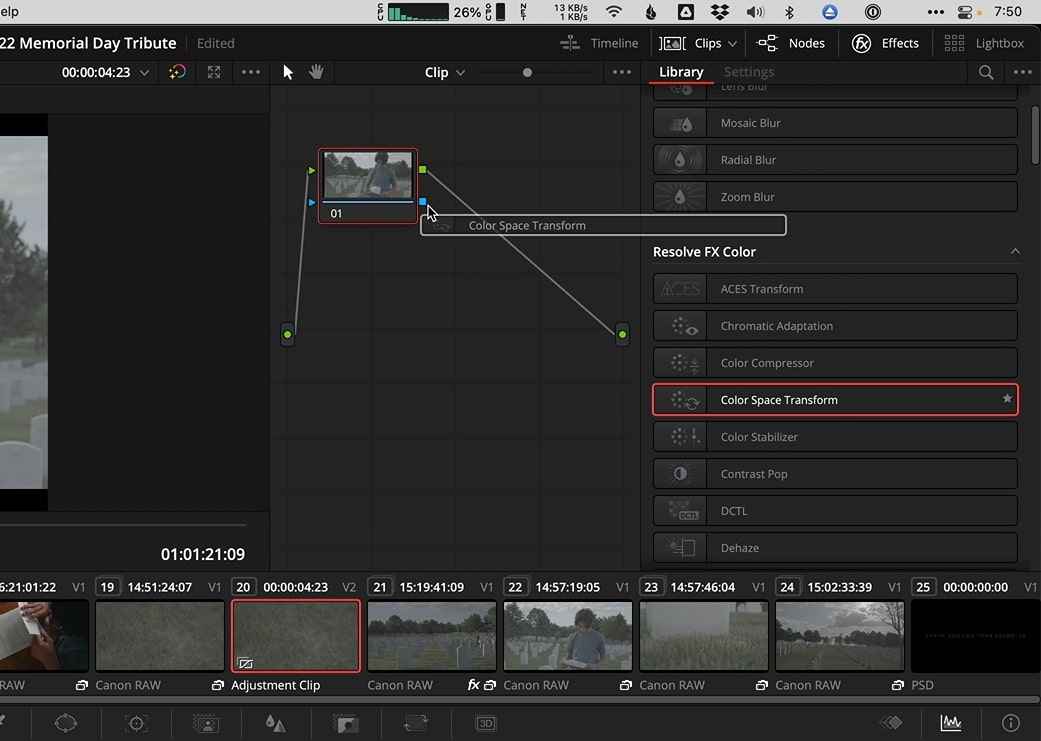
Step2 On the Color page, go to “Library” from the right side and select the effect called “Color Space Transform” from the Resolve FX Color section. After applying this effect, you can enhance the visual appearance of your video.
3. Shake Transition
The shake transition adds a dramatic feel to your video to hook up the audience. If you have recorded a music video, you can add a shake transition to make it more captivating. To add this particular transition to your video, we will use the adjustment layer in DaVinci Resolve to produce accurate results.
Step1 Add the adjustment layer to your timeline. Trim it according to the specific part of your clip where you want to create the shake transition effect.
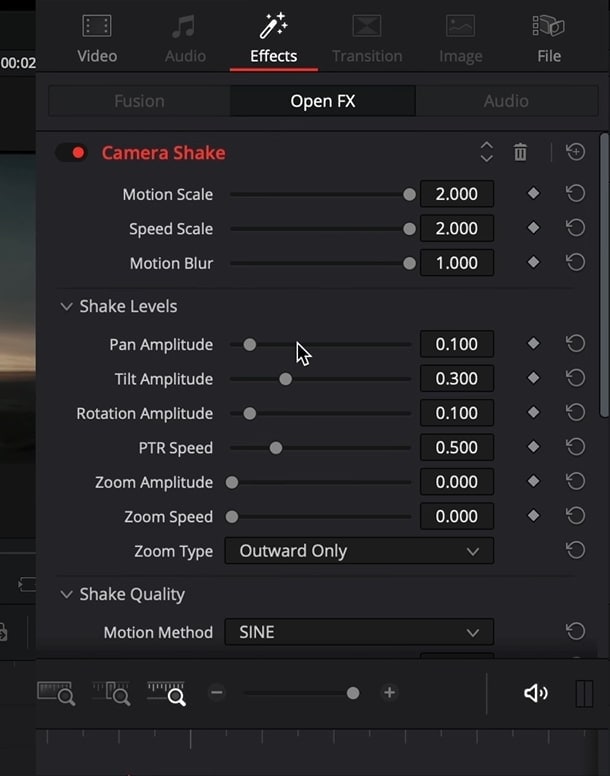
Step2 Now, from the left side, select “Open FX” library and search “Camera shake” effect. Apply it to the adjustment layer and navigate to the “Effects” tab from the top right corner. From there, increase the values of motion scale, speed scale, and motion blur. You can also make further changes in the “Shake Levels” section.
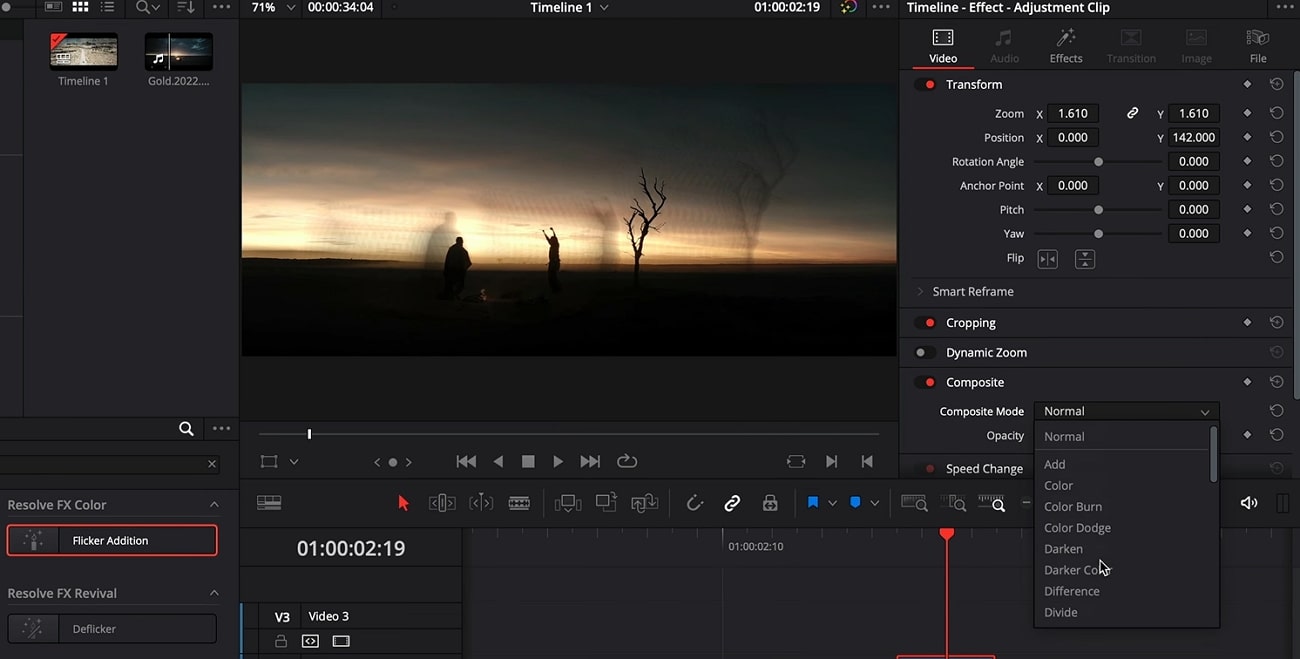
Step3 Afterward, scroll to the bottom and change the Border Type to “Reflect.” Now head back to the Open FX library and select the “Flicker Addition” effect. Apply this particular effect to the adjustment layer. From the “Effects” tab on the right side, select “Flicker Gain” as your flicker type. You can also go to the “Video” tab to enhance the zoom and position value.
Step4 You can also select different composite modes. You can also duplicate the adjustment clip and alter the composite mode of the second clip. Once done, decrease the opacity of the second clip. Now copy and place the adjustment clips on your timeline according to your desire.
Bonus Tips: Use Adjustment Layers in the Best Alternative to DaVinci Resolve
If you are not satisfied with the results of the DaVinci Resolve adjustment layer, you can try Wondershare Filmora . This professional software can prove to be the best alternative to DaVinci Resolve due to its numerous key features. You can find this tool on every major platform, such as iOS, Android, Windows, and Mac. This tool has a clean and friendly user interface so that you can enjoy editing and modifying your videos.
Free Download For Win 7 or later(64-bit)
Free Download For macOS 10.14 or later
You can also use adjustment layers to edit with great ease on this compatible video editor. Moreover, you can find multiple trending effects in its library that can help you to enhance your video clips. To add an adjustment layer in Filmora, you can follow the below steps.
Step1 Start with New Project
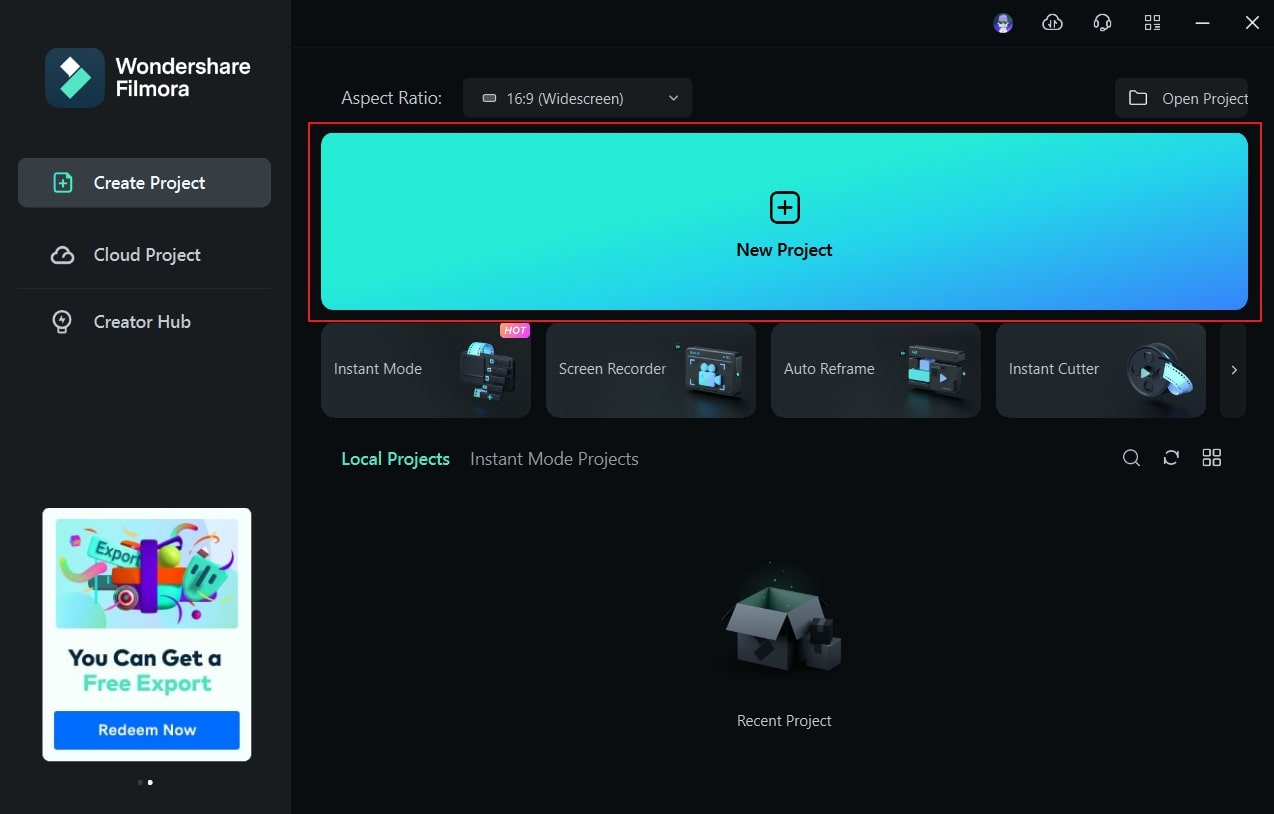
Once done with launching Filmora, hit the “New Project” button and upload the desired video. Drag and drop the added video to the timeline to proceed further.
Step2 Add the Adjustment Layer
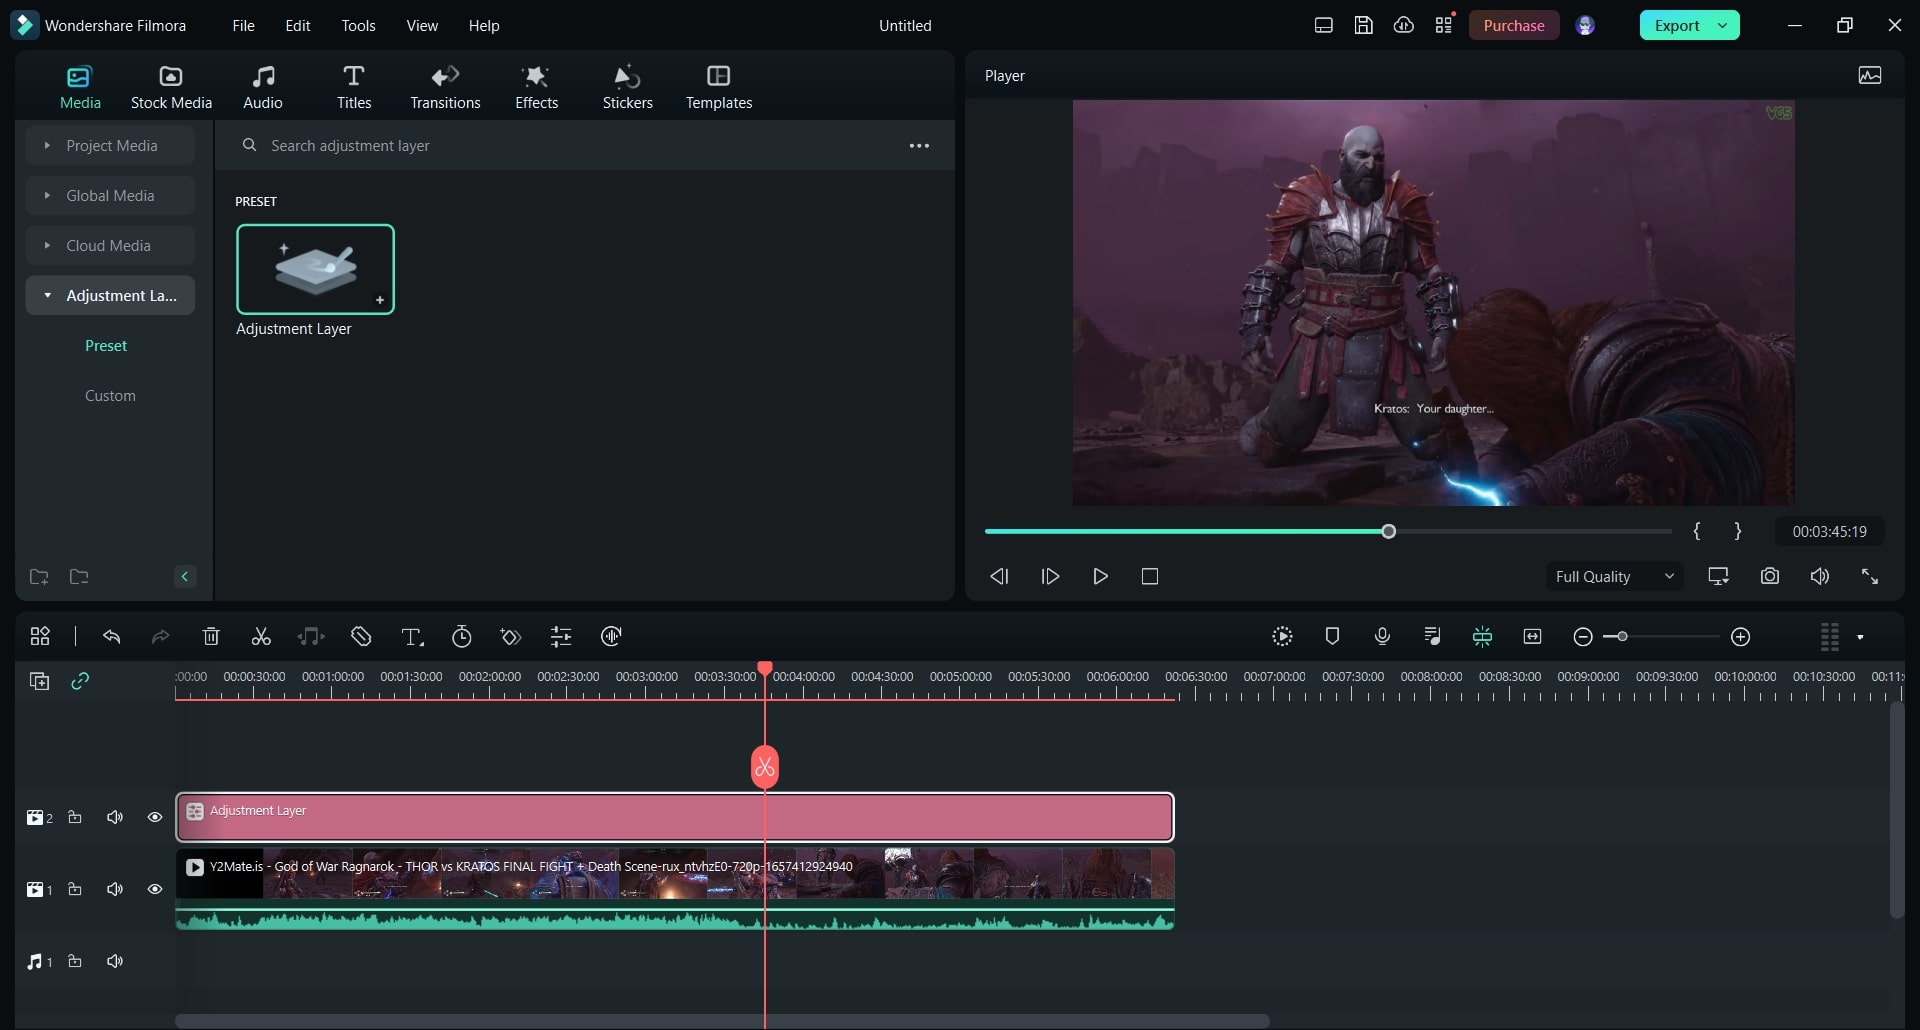
Go to the “Media” tab and locate the option “Adjustment Layer.” Once done, drag and drop the adjustment layer to the timeline and double-click on it to change its settings.
Step3 Manage the Adjustment Layer Settings
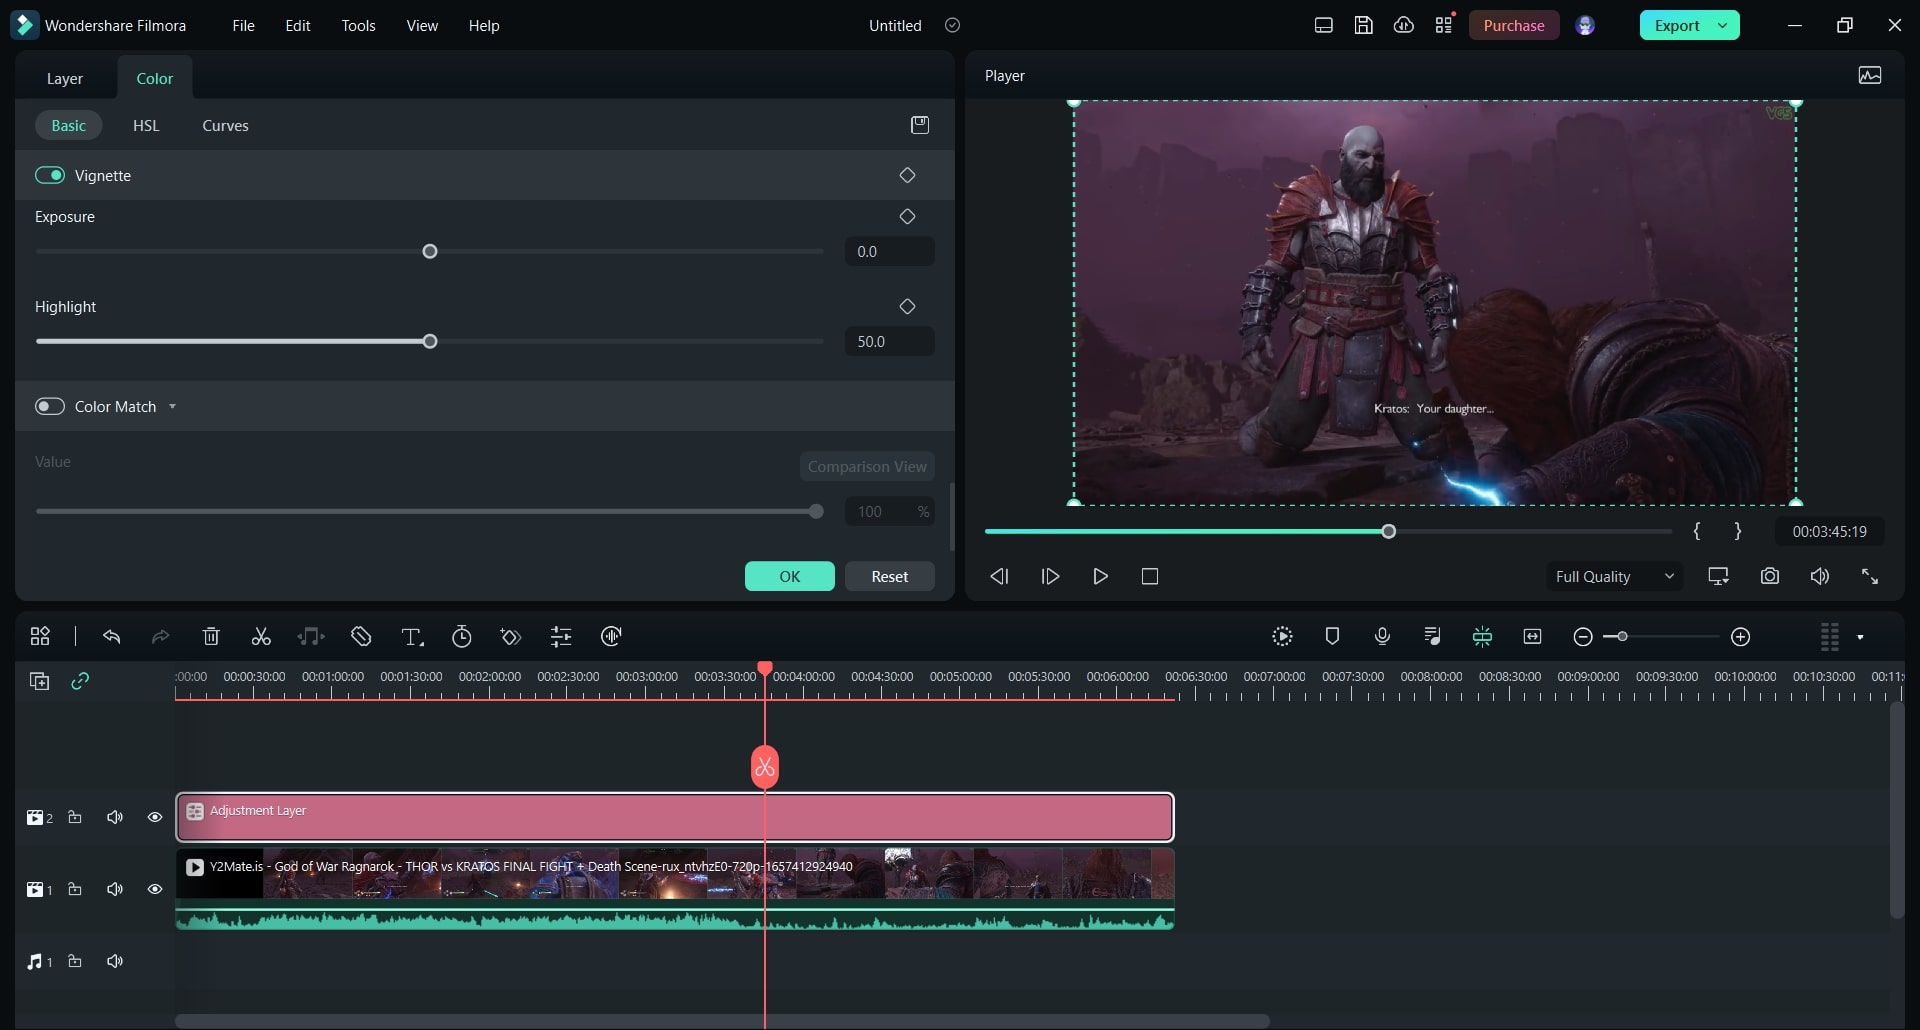
From the opened settings, you can alter the blending mode according to your choice. You can also change opacity and position for more adjustments. Also, you can apply various presets to add a cinematic look. Moreover, you can apply different borders across your video clip for a more enhanced look.
Conclusion
DaVinci Resolve is one of the most famous video editors among professionals. If you want to become an expert in using DaVinci Resolve, you must know how to add an adjustment layer (clip) to this tool. For your help, this article has provided complete guidelines on how to add an adjustment layer in DaVinci Resolve.
Moreover, we have also highlighted a better option than DaVinci Resolve, known as Wondershare Filmora. Using this software, you can apply the adjustment layers to your video to generate more precise and accurate results.
Free Download For macOS 10.14 or later
You can also use adjustment layers to edit with great ease on this compatible video editor. Moreover, you can find multiple trending effects in its library that can help you to enhance your video clips. To add an adjustment layer in Filmora, you can follow the below steps.
Step1 Start with New Project
Once done with launching Filmora, hit the “New Project” button and upload the desired video. Drag and drop the added video to the timeline to proceed further.

Step2 Add the Adjustment Layer
Go to the “Media” tab and locate the option “Adjustment Layer.” Once done, drag and drop the adjustment layer to the timeline and double-click on it to change its settings.

Step3 Manage the Adjustment Layer Settings
From the opened settings, you can alter the blending mode according to your choice. You can also change opacity and position for more adjustments. Also, you can apply various presets to add a cinematic look. Moreover, you can apply different borders across your video clip for a more enhanced look.

Conclusion
DaVinci Resolve is one of the most famous video editors among professionals. If you want to become an expert in using DaVinci Resolve, you must know how to add an adjustment layer (clip) to this tool. For your help, this article has provided complete guidelines on how to add an adjustment layer in DaVinci Resolve.
Moreover, we have also highlighted a better option than DaVinci Resolve, known as Wondershare Filmora. Using this software, you can apply the adjustment layers to your video to generate more precise and accurate results.
How To Use Voicemod On Discord [Desktop+Mobile]
Powerful Video Editor - Wondershare Filmora
Provide abundant video effects - A creative video editor
Powerful color correction and grading
Detailed tutorials are provided by the official channel
Introduction
In today’s world, these voice-changing tools are in use by a lot of online gamers for them to remain anonymous on popular game streaming platforms like Twitch. However, we are more focused on Discord in this article. With everything that’s happening in the world today, voice changers can be used for good or can be misused, depending on who is using them. However, we promote such tools for the immerse benefits they offer users as we do not condone the suggestive use of such devices.
Therefore, in a bid to rave about this phenomenal voice-changing tool, we will talk about the best voice changer for Discord which is Voicemod.
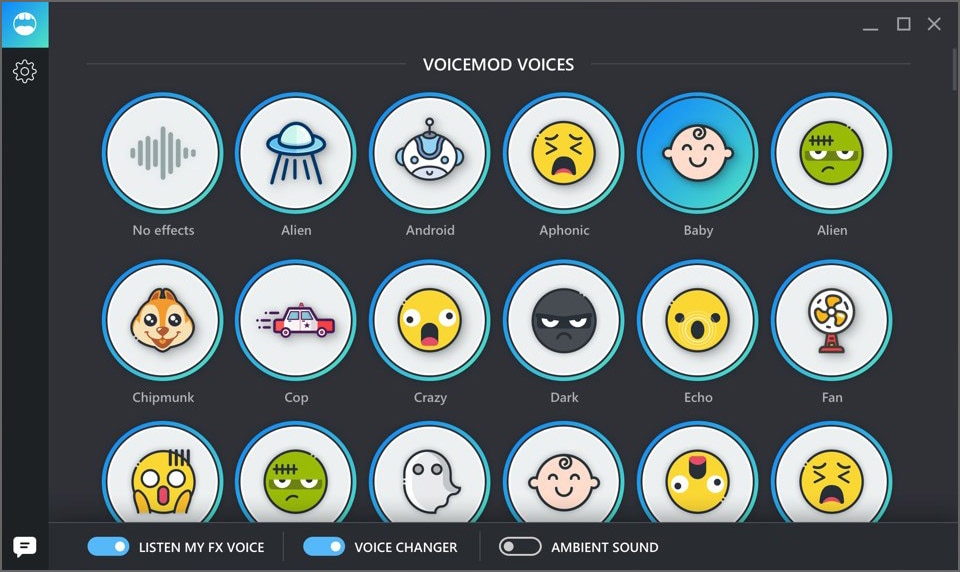
Voicemod is an excellent tool with an impressive list of voice filters at its disposal. With this tool, users can choose from a wide range of voice effects that can have both fun and practical uses. Also, if you are looking to use the tool like a robot, Voicemod can help you do that. The tool is spectacularly easy to use, free across all Windows platforms, and operates in real-time. Additionally, the software can work on Skype, Twitch, and other online chat or streaming platforms.
In this article
01 How to Use Voicemod Voice Changer for Discord on Desktop (Win+Mac)?
02 How to Use Voicemod Voice Changer for Discord on Mobile (Android+iPhone)?
Part 1: How to Use Voicemod Voice Changer for Discord on Desktop (Win+Mac)?
Voicemod Discord works for Windows and Mac operating systems smoothly. Its new Mac OS version is on its way, and you can choose to get notified once it launches.
With a voice changer for Discord, you can add sound effects and change your voice in your communication. You can download this free application on your Windows 10/11 (64-bit) desktop. Its 90 different voices and effects integrate perfectly with Discord to give you strict and most efficient performance.
Now that you know about Voicemod, explore how to use Voicemod on Discord for Desktop.
Step 1: Install Voicemod
Before jumping straight to how we can use Discord for Desktop, we must first know how to install it on our Windows and Mac PC. Here is how to install Voicemod:
- First of all, visit the Voicemod website to start the download process.
- Next, you will see the “Get Voicemod Free” screen. Click it!
- After clicking, you will need to sign in to your account from Discord, Twitch, to Google. Make sure you use your Discord login details to sign in.
- After signing in, the “.exe” file will download to your Windows and Mac download folder. Open it.
- Then an install wizard opens. Navigate through it to install the program on your Windows and Mac computer.
- After complete installation, the installation wizard will ask you to restart your Windows’ or Mac computer.
- However, you can skip the restart process, but it’s best to restart it for smooth operations. Once your Mac or Windows computer restarts, you will see the Voicemod application icon on your desktop screen.
Step 2. Go to Settings>Voice and Video
To configure Voicemod with Discord, open your discord account and go to the settings option located in the screen’s bottom-left corner. Then tap on the “Voice and Video” option right under the app settings.
Step 3. In the “Input Device” section, Choose “Microphone Voicemod Virtual Audio.”
To make Voicemod usable, you are required to change the Voice settings. So, navigate within the “Input Device” option and select the option that says “Microphone Voicemod Virtual Audio.” Once the audio setting changes, it makes it easy for you to change the voice within the program. Also, other users can hear your audio alteration.
Step 4. Choose Your Favorite Voice
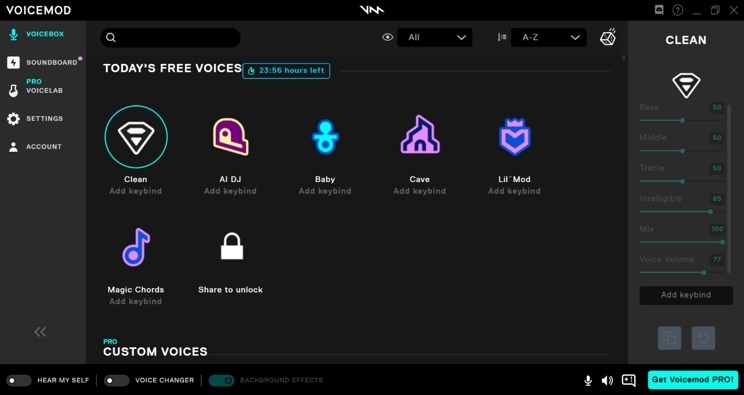
In the “basic version,” you have the authorization to change seven free voice choices each day. In addition, with the “pro-version,” you have access to more than 80 different voice options.
Therefore, if you are looking for a simple and easy Windows and Mac application, do not look further than Voicemod!
Part 2: How to Use Voicemod Voice Changer for Discord on Mobile (Android+iPhone)?
“Voicemod clips” is the version that is available for both Apple and Android devices. The application help users to make very high-quality content using its wide selection of one-of-a-kind effects that will change your voice so that you won’t even recognize yourself. Additionally, you can add filters connected to your cell phone’s camera to create hilarious, exciting videos. Also, you get the option to select from 10 different voices, and you can also make infinite videos and audio from the humorous to the terrifying.
Some of the Voicemod for Discord voices that are available on mobile devices include;
- Male-to-female
- Different robot effects
- Celebrities
- Scary voices, etc.
Also, the changes are on how you would like to modify your voice. It can also be cross-share to popular social networking platforms such as Facebook, Twitter, Instagram, TikTok, and Snapchat using your smartphone.
Here are step-by-step instructions:
Step 1: Download Voicemod for Mobile
Ensure you have downloaded the Voicemod application on your Android and iPhone and appropriately configured it. To configure, follow the step below;
- Open it to set your profile using Discord. Additionally, you can view all the different filters for videos and available voices.
- Also, you can decide the type of content you want to create, whether it is a video clip or audio.
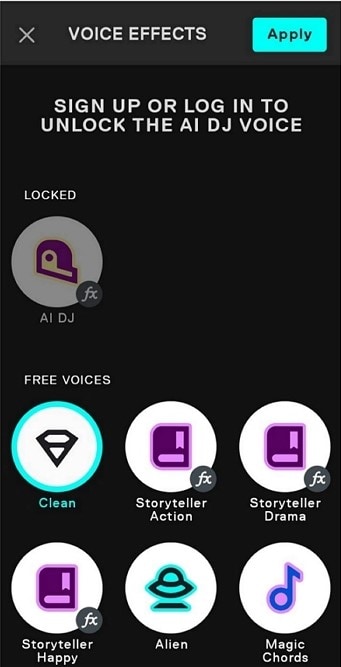
Step 2: Access Sound Effects
Open Discord and tap the “cogwheel icon” near your name and avatar. You will see a “settings” page located within it. Tap the “Voice & Video” option. Then under the “Input Device” option, select Voicemod and the headset under the “Output Device” option and tap escape. Then you will have access to numerous exciting sounds.
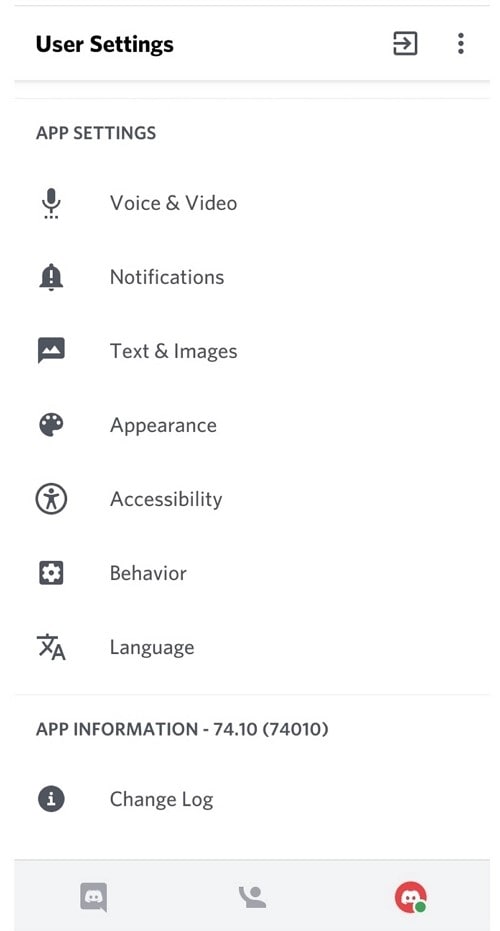
Finally, add your favorite effect, save and start using your new enhanced voice from Voicemod Discord.
Part 3: People Also Want to Know
This section will look at some basic questions about Voicemod Discord that appeared in Q&A forums.
Is Voicemod safe for Discord?
Yes, Voicemod is safe, but you must download it from its official website or the Google Playstore and Apple’s App Store, as there are many cracked versions of Voicemod online.
Is there a voice changer for Discord?
Yes, a voice changer for Discord and Voicemod is known to be the best. It is an advanced and easy-to-use voice changer that allows you to sound like a man, woman, robot, or anything else you can ever imagine.
Key Takeaways from This Episode
Thus, as you saw, in this report, we have summarised a few essential points that you should know regarding Voicemod Discord. You learned:
- The best voice changer for Discordis Voicemod
- How to use Voicemod for Windows and Mac computers
- How to use Voicemod for mobile (iPhone and Android)
- Finally, a few FAQs for users to better understand the discord voice changer (Voicemod).
So, use the new knowledge about how to use Voicemod on Discord you acquired above and spin some voice changes.
Introduction
In today’s world, these voice-changing tools are in use by a lot of online gamers for them to remain anonymous on popular game streaming platforms like Twitch. However, we are more focused on Discord in this article. With everything that’s happening in the world today, voice changers can be used for good or can be misused, depending on who is using them. However, we promote such tools for the immerse benefits they offer users as we do not condone the suggestive use of such devices.
Therefore, in a bid to rave about this phenomenal voice-changing tool, we will talk about the best voice changer for Discord which is Voicemod.
Voicemod is an excellent tool with an impressive list of voice filters at its disposal. With this tool, users can choose from a wide range of voice effects that can have both fun and practical uses. Also, if you are looking to use the tool like a robot, Voicemod can help you do that. The tool is spectacularly easy to use, free across all Windows platforms, and operates in real-time. Additionally, the software can work on Skype, Twitch, and other online chat or streaming platforms.
In this article
01 How to Use Voicemod Voice Changer for Discord on Desktop (Win+Mac)?
02 How to Use Voicemod Voice Changer for Discord on Mobile (Android+iPhone)?

Part 1: How to Use Voicemod Voice Changer for Discord on Desktop (Win+Mac)?
Voicemod Discord works for Windows and Mac operating systems smoothly. Its new Mac OS version is on its way, and you can choose to get notified once it launches.
With a voice changer for Discord, you can add sound effects and change your voice in your communication. You can download this free application on your Windows 10/11 (64-bit) desktop. Its 90 different voices and effects integrate perfectly with Discord to give you strict and most efficient performance.
Now that you know about Voicemod, explore how to use Voicemod on Discord for Desktop.
Step 1: Install Voicemod
Before jumping straight to how we can use Discord for Desktop, we must first know how to install it on our Windows and Mac PC. Here is how to install Voicemod:
- First of all, visit the Voicemod website to start the download process.
- Next, you will see the “Get Voicemod Free” screen. Click it!
- After clicking, you will need to sign in to your account from Discord, Twitch, to Google. Make sure you use your Discord login details to sign in.
- After signing in, the “.exe” file will download to your Windows and Mac download folder. Open it.
- Then an install wizard opens. Navigate through it to install the program on your Windows and Mac computer.
- After complete installation, the installation wizard will ask you to restart your Windows’ or Mac computer.
- However, you can skip the restart process, but it’s best to restart it for smooth operations. Once your Mac or Windows computer restarts, you will see the Voicemod application icon on your desktop screen.
Step 2. Go to Settings>Voice and Video
To configure Voicemod with Discord, open your discord account and go to the settings option located in the screen’s bottom-left corner. Then tap on the “Voice and Video” option right under the app settings.
Step 3. In the “Input Device” section, Choose “Microphone Voicemod Virtual Audio.”
To make Voicemod usable, you are required to change the Voice settings. So, navigate within the “Input Device” option and select the option that says “Microphone Voicemod Virtual Audio.” Once the audio setting changes, it makes it easy for you to change the voice within the program. Also, other users can hear your audio alteration.
Step 4. Choose Your Favorite Voice
In the “basic version,” you have the authorization to change seven free voice choices each day. In addition, with the “pro-version,” you have access to more than 80 different voice options.
Therefore, if you are looking for a simple and easy Windows and Mac application, do not look further than Voicemod!

Part 2: How to Use Voicemod Voice Changer for Discord on Mobile (Android+iPhone)?
“Voicemod clips” is the version that is available for both Apple and Android devices. The application help users to make very high-quality content using its wide selection of one-of-a-kind effects that will change your voice so that you won’t even recognize yourself. Additionally, you can add filters connected to your cell phone’s camera to create hilarious, exciting videos. Also, you get the option to select from 10 different voices, and you can also make infinite videos and audio from the humorous to the terrifying.
Some of the Voicemod for Discord voices that are available on mobile devices include;
- Male-to-female
- Different robot effects
- Celebrities
- Scary voices, etc.
Also, the changes are on how you would like to modify your voice. It can also be cross-share to popular social networking platforms such as Facebook, Twitter, Instagram, TikTok, and Snapchat using your smartphone.
Here are step-by-step instructions:
Step 1: Download Voicemod for Mobile
Ensure you have downloaded the Voicemod application on your Android and iPhone and appropriately configured it. To configure, follow the step below;
- Open it to set your profile using Discord. Additionally, you can view all the different filters for videos and available voices.
- Also, you can decide the type of content you want to create, whether it is a video clip or audio.

Step 2: Access Sound Effects
Open Discord and tap the “cogwheel icon” near your name and avatar. You will see a “settings” page located within it. Tap the “Voice & Video” option. Then under the “Input Device” option, select Voicemod and the headset under the “Output Device” option and tap escape. Then you will have access to numerous exciting sounds.

Finally, add your favorite effect, save and start using your new enhanced voice from Voicemod Discord.
Part 3: People Also Want to Know
This section will look at some basic questions about Voicemod Discord that appeared in Q&A forums.
Is Voicemod safe for Discord?
Yes, Voicemod is safe, but you must download it from its official website or the Google Playstore and Apple’s App Store, as there are many cracked versions of Voicemod online.
Is there a voice changer for Discord?
Yes, a voice changer for Discord and Voicemod is known to be the best. It is an advanced and easy-to-use voice changer that allows you to sound like a man, woman, robot, or anything else you can ever imagine.
Key Takeaways from This Episode
Thus, as you saw, in this report, we have summarised a few essential points that you should know regarding Voicemod Discord. You learned:
- The best voice changer for Discordis Voicemod
- How to use Voicemod for Windows and Mac computers
- How to use Voicemod for mobile (iPhone and Android)
- Finally, a few FAQs for users to better understand the discord voice changer (Voicemod).
So, use the new knowledge about how to use Voicemod on Discord you acquired above and spin some voice changes.
Introduction
In today’s world, these voice-changing tools are in use by a lot of online gamers for them to remain anonymous on popular game streaming platforms like Twitch. However, we are more focused on Discord in this article. With everything that’s happening in the world today, voice changers can be used for good or can be misused, depending on who is using them. However, we promote such tools for the immerse benefits they offer users as we do not condone the suggestive use of such devices.
Therefore, in a bid to rave about this phenomenal voice-changing tool, we will talk about the best voice changer for Discord which is Voicemod.
Voicemod is an excellent tool with an impressive list of voice filters at its disposal. With this tool, users can choose from a wide range of voice effects that can have both fun and practical uses. Also, if you are looking to use the tool like a robot, Voicemod can help you do that. The tool is spectacularly easy to use, free across all Windows platforms, and operates in real-time. Additionally, the software can work on Skype, Twitch, and other online chat or streaming platforms.
In this article
01 How to Use Voicemod Voice Changer for Discord on Desktop (Win+Mac)?
02 How to Use Voicemod Voice Changer for Discord on Mobile (Android+iPhone)?

Part 1: How to Use Voicemod Voice Changer for Discord on Desktop (Win+Mac)?
Voicemod Discord works for Windows and Mac operating systems smoothly. Its new Mac OS version is on its way, and you can choose to get notified once it launches.
With a voice changer for Discord, you can add sound effects and change your voice in your communication. You can download this free application on your Windows 10/11 (64-bit) desktop. Its 90 different voices and effects integrate perfectly with Discord to give you strict and most efficient performance.
Now that you know about Voicemod, explore how to use Voicemod on Discord for Desktop.
Step 1: Install Voicemod
Before jumping straight to how we can use Discord for Desktop, we must first know how to install it on our Windows and Mac PC. Here is how to install Voicemod:
- First of all, visit the Voicemod website to start the download process.
- Next, you will see the “Get Voicemod Free” screen. Click it!
- After clicking, you will need to sign in to your account from Discord, Twitch, to Google. Make sure you use your Discord login details to sign in.
- After signing in, the “.exe” file will download to your Windows and Mac download folder. Open it.
- Then an install wizard opens. Navigate through it to install the program on your Windows and Mac computer.
- After complete installation, the installation wizard will ask you to restart your Windows’ or Mac computer.
- However, you can skip the restart process, but it’s best to restart it for smooth operations. Once your Mac or Windows computer restarts, you will see the Voicemod application icon on your desktop screen.
Step 2. Go to Settings>Voice and Video
To configure Voicemod with Discord, open your discord account and go to the settings option located in the screen’s bottom-left corner. Then tap on the “Voice and Video” option right under the app settings.
Step 3. In the “Input Device” section, Choose “Microphone Voicemod Virtual Audio.”
To make Voicemod usable, you are required to change the Voice settings. So, navigate within the “Input Device” option and select the option that says “Microphone Voicemod Virtual Audio.” Once the audio setting changes, it makes it easy for you to change the voice within the program. Also, other users can hear your audio alteration.
Step 4. Choose Your Favorite Voice
In the “basic version,” you have the authorization to change seven free voice choices each day. In addition, with the “pro-version,” you have access to more than 80 different voice options.
Therefore, if you are looking for a simple and easy Windows and Mac application, do not look further than Voicemod!

Part 2: How to Use Voicemod Voice Changer for Discord on Mobile (Android+iPhone)?
“Voicemod clips” is the version that is available for both Apple and Android devices. The application help users to make very high-quality content using its wide selection of one-of-a-kind effects that will change your voice so that you won’t even recognize yourself. Additionally, you can add filters connected to your cell phone’s camera to create hilarious, exciting videos. Also, you get the option to select from 10 different voices, and you can also make infinite videos and audio from the humorous to the terrifying.
Some of the Voicemod for Discord voices that are available on mobile devices include;
- Male-to-female
- Different robot effects
- Celebrities
- Scary voices, etc.
Also, the changes are on how you would like to modify your voice. It can also be cross-share to popular social networking platforms such as Facebook, Twitter, Instagram, TikTok, and Snapchat using your smartphone.
Here are step-by-step instructions:
Step 1: Download Voicemod for Mobile
Ensure you have downloaded the Voicemod application on your Android and iPhone and appropriately configured it. To configure, follow the step below;
- Open it to set your profile using Discord. Additionally, you can view all the different filters for videos and available voices.
- Also, you can decide the type of content you want to create, whether it is a video clip or audio.

Step 2: Access Sound Effects
Open Discord and tap the “cogwheel icon” near your name and avatar. You will see a “settings” page located within it. Tap the “Voice & Video” option. Then under the “Input Device” option, select Voicemod and the headset under the “Output Device” option and tap escape. Then you will have access to numerous exciting sounds.

Finally, add your favorite effect, save and start using your new enhanced voice from Voicemod Discord.
Part 3: People Also Want to Know
This section will look at some basic questions about Voicemod Discord that appeared in Q&A forums.
Is Voicemod safe for Discord?
Yes, Voicemod is safe, but you must download it from its official website or the Google Playstore and Apple’s App Store, as there are many cracked versions of Voicemod online.
Is there a voice changer for Discord?
Yes, a voice changer for Discord and Voicemod is known to be the best. It is an advanced and easy-to-use voice changer that allows you to sound like a man, woman, robot, or anything else you can ever imagine.
Key Takeaways from This Episode
Thus, as you saw, in this report, we have summarised a few essential points that you should know regarding Voicemod Discord. You learned:
- The best voice changer for Discordis Voicemod
- How to use Voicemod for Windows and Mac computers
- How to use Voicemod for mobile (iPhone and Android)
- Finally, a few FAQs for users to better understand the discord voice changer (Voicemod).
So, use the new knowledge about how to use Voicemod on Discord you acquired above and spin some voice changes.
Introduction
In today’s world, these voice-changing tools are in use by a lot of online gamers for them to remain anonymous on popular game streaming platforms like Twitch. However, we are more focused on Discord in this article. With everything that’s happening in the world today, voice changers can be used for good or can be misused, depending on who is using them. However, we promote such tools for the immerse benefits they offer users as we do not condone the suggestive use of such devices.
Therefore, in a bid to rave about this phenomenal voice-changing tool, we will talk about the best voice changer for Discord which is Voicemod.
Voicemod is an excellent tool with an impressive list of voice filters at its disposal. With this tool, users can choose from a wide range of voice effects that can have both fun and practical uses. Also, if you are looking to use the tool like a robot, Voicemod can help you do that. The tool is spectacularly easy to use, free across all Windows platforms, and operates in real-time. Additionally, the software can work on Skype, Twitch, and other online chat or streaming platforms.
In this article
01 How to Use Voicemod Voice Changer for Discord on Desktop (Win+Mac)?
02 How to Use Voicemod Voice Changer for Discord on Mobile (Android+iPhone)?

Part 1: How to Use Voicemod Voice Changer for Discord on Desktop (Win+Mac)?
Voicemod Discord works for Windows and Mac operating systems smoothly. Its new Mac OS version is on its way, and you can choose to get notified once it launches.
With a voice changer for Discord, you can add sound effects and change your voice in your communication. You can download this free application on your Windows 10/11 (64-bit) desktop. Its 90 different voices and effects integrate perfectly with Discord to give you strict and most efficient performance.
Now that you know about Voicemod, explore how to use Voicemod on Discord for Desktop.
Step 1: Install Voicemod
Before jumping straight to how we can use Discord for Desktop, we must first know how to install it on our Windows and Mac PC. Here is how to install Voicemod:
- First of all, visit the Voicemod website to start the download process.
- Next, you will see the “Get Voicemod Free” screen. Click it!
- After clicking, you will need to sign in to your account from Discord, Twitch, to Google. Make sure you use your Discord login details to sign in.
- After signing in, the “.exe” file will download to your Windows and Mac download folder. Open it.
- Then an install wizard opens. Navigate through it to install the program on your Windows and Mac computer.
- After complete installation, the installation wizard will ask you to restart your Windows’ or Mac computer.
- However, you can skip the restart process, but it’s best to restart it for smooth operations. Once your Mac or Windows computer restarts, you will see the Voicemod application icon on your desktop screen.
Step 2. Go to Settings>Voice and Video
To configure Voicemod with Discord, open your discord account and go to the settings option located in the screen’s bottom-left corner. Then tap on the “Voice and Video” option right under the app settings.
Step 3. In the “Input Device” section, Choose “Microphone Voicemod Virtual Audio.”
To make Voicemod usable, you are required to change the Voice settings. So, navigate within the “Input Device” option and select the option that says “Microphone Voicemod Virtual Audio.” Once the audio setting changes, it makes it easy for you to change the voice within the program. Also, other users can hear your audio alteration.
Step 4. Choose Your Favorite Voice
In the “basic version,” you have the authorization to change seven free voice choices each day. In addition, with the “pro-version,” you have access to more than 80 different voice options.
Therefore, if you are looking for a simple and easy Windows and Mac application, do not look further than Voicemod!

Part 2: How to Use Voicemod Voice Changer for Discord on Mobile (Android+iPhone)?
“Voicemod clips” is the version that is available for both Apple and Android devices. The application help users to make very high-quality content using its wide selection of one-of-a-kind effects that will change your voice so that you won’t even recognize yourself. Additionally, you can add filters connected to your cell phone’s camera to create hilarious, exciting videos. Also, you get the option to select from 10 different voices, and you can also make infinite videos and audio from the humorous to the terrifying.
Some of the Voicemod for Discord voices that are available on mobile devices include;
- Male-to-female
- Different robot effects
- Celebrities
- Scary voices, etc.
Also, the changes are on how you would like to modify your voice. It can also be cross-share to popular social networking platforms such as Facebook, Twitter, Instagram, TikTok, and Snapchat using your smartphone.
Here are step-by-step instructions:
Step 1: Download Voicemod for Mobile
Ensure you have downloaded the Voicemod application on your Android and iPhone and appropriately configured it. To configure, follow the step below;
- Open it to set your profile using Discord. Additionally, you can view all the different filters for videos and available voices.
- Also, you can decide the type of content you want to create, whether it is a video clip or audio.

Step 2: Access Sound Effects
Open Discord and tap the “cogwheel icon” near your name and avatar. You will see a “settings” page located within it. Tap the “Voice & Video” option. Then under the “Input Device” option, select Voicemod and the headset under the “Output Device” option and tap escape. Then you will have access to numerous exciting sounds.

Finally, add your favorite effect, save and start using your new enhanced voice from Voicemod Discord.
Part 3: People Also Want to Know
This section will look at some basic questions about Voicemod Discord that appeared in Q&A forums.
Is Voicemod safe for Discord?
Yes, Voicemod is safe, but you must download it from its official website or the Google Playstore and Apple’s App Store, as there are many cracked versions of Voicemod online.
Is there a voice changer for Discord?
Yes, a voice changer for Discord and Voicemod is known to be the best. It is an advanced and easy-to-use voice changer that allows you to sound like a man, woman, robot, or anything else you can ever imagine.
Key Takeaways from This Episode
Thus, as you saw, in this report, we have summarised a few essential points that you should know regarding Voicemod Discord. You learned:
- The best voice changer for Discordis Voicemod
- How to use Voicemod for Windows and Mac computers
- How to use Voicemod for mobile (iPhone and Android)
- Finally, a few FAQs for users to better understand the discord voice changer (Voicemod).
So, use the new knowledge about how to use Voicemod on Discord you acquired above and spin some voice changes.
Also read:
- In 2024, The Ultimate Guide to Using Shotcut To Rotate Videos
- Updated Using Adobe After Effects as a Pro-Level Editing Platforms Demands You to Add Expressions in After Effects. If Youre Looking for the Solutions on After Effects How to Add Expressions Then Weve Got You Covered. Learn More Here for 2024
- New 2024 Approved Adjust Background to Black for Your Product Review Video
- Updated In 2024, So, You Are a Gamer and Have Been on the Cool App Discord for a While, and You Keep Hearing People Talk About Game Bots in Discord, Like, Robot Gamers? This Article Will Discuss All Discord Game Bots and Much More
- New In 2024, OBS Studio Is a Free and Open-Source App for Screen-Casting and Live Streaming
- New How to Create Emoji on Mac That Take Less Than 10 Mins
- New Logo Intro Videos Are the Hottest Trend in Town and Are Gaining Popularity Quickly. Keep Reading This Article to Learn Their Importance and How to Design One for 2024
- New 2024 Approved Top Shortcut Towards Timeline Template
- Read on to Learn About OpenCV Object Tracking, What It Is, and How to Implement It in Python, and OpenCV
- In 2024, Guide To Slowing Down Videos in Snapchat Discussing the Details
- New How to Windows Online Movie Maker Complete Guide for 2024
- Updated How to Livestream Zoom on Facebook, In 2024
- New 2024 Approved How to Use Kahoot! On Zoom
- New In 2024, Whatsapp Video converterKeywords Convert Video for Whatsapp 6600; Video Converter for Whatsapp 6600; Reduce Video Size for Whatsapp 1600; Whatsapp Supported Video Formats 720; Convert Video to Whatsapp Format 590
- New 2024 Approved Create the Night-to-Day Effect Videos
- New The Easiest Way to Make Time-Lapse Videos. Yes, You Can Make a Time-Lapse Video with Your Phone. It Powers a Very Simple and Easy Way to Make Time-Lapse Videos for 2024
- 2024 Approved This Article Will Help You Understand How to Create Video Contents that Convert Sales
- Updated REVIEW Whats Best 10 Software to Make AI Upscaling Video
- Updated In 2024, Green Screens Are a Fun Way for Creators to Bring Their Personality to Their Stream, Allowing Them to Dynamically Alter Their Stream Background and Make Their Content Appear Even More Engaging and Polished
- Updated Replacing the Sky in Adobe After Effects An Extensive Guide
- Updated Wondering How to Rotate a Video in Windows at Any Desired Angle and Save It Permanently? Find Out All the Different Ways to Rotate Videos Temporarily as Well as Permanently
- New Find Out How to Add Subtitles in the VLC Media Player on Your Windows and Mac System with Quick and Simple Instructions for 2024
- New 2024 Approved How to Do Censor Effects with Filmora
- Updated How to Create a Bokeh Effect
- Want to Make an Epic CSGO Montage? You Are in the Right Place. This In-Depth Guide Will Explain How You Can Make an Attention-Grabbing Gaming Montage
- In 2024, How To Quick Guide for Creating Google Slideshows
- The Background in Your Footage Might Be Bland or Unpleasant. This Article Will Discuss Video Background Templates You Can Use to Spice Things up and Make Your Videos Go Viral for 2024
- New Top 10 Sony LUT for Different Purposes for 2024
- Updated 2024 Approved Are You Looking for a Video Format Converter Free? We Will Introduce the 5 Best Online Converters and Also the 5 Best Video Format Converters for PC
- New This Article Will Show You the Steps to Make Coin Magic in Videos with Filmora
- New Best Image (JPG/PNG) to GIF Converters
- New How to Make Dynamic Video Collages?
- New In 2024, How To Create Transparent Background On Picsart
- New In 2024, How to Create Cooking Video Intro and End Screen for YouTube Channel?
- New How to Use Lumetri Color in After Effects
- Updated Are You Convincingly Fascinated by the Whole Idea of Augmented Reality and Want to Level up Your Marketing Skills with an AR Integration? Rest Assured, Youve Found the Right Place
- 2024 Approved Add Selective Color Effect to Your Videos Using Filmora
- New 2024 Approved How to Make First Impression Review Video
- New How to Edit Facebook eCommerce Video Ads
- New In 2024, Adobe After Effects Review
- 2 Methods to Crop a Video Using After Effects for 2024
- Updated In 2024, How to Download and Use Vegas Pro
- 2024 Approved Find Out What the Flexclip Trimmer Is, Its Key Features, and How to Use It to Trim Your Videos to Remove Unwanted Parts with Just a Few Clicks
- New Guide To Cropping and Combining Content in Wondershare Filmora Latest
- 2024 Approved How to Make A Funny Vlog for TikTok?
- Updated 2024 Approved Zoom In and Out on Discord (Desktop + App + Browser Solutions)
- Looking For The Best Slow Motion Effect in Premiere Pro for 2024
- Simple ways to get lost music back from Oppo Reno 9A
- How to Share/Fake Location on WhatsApp for Lava Agni 2 5G | Dr.fone
- Complete Fixes To Solve Apple iPhone 15 Pro Max Randomly Asking for Apple ID Password | Dr.fone
- Tecno Data Retrieval tool – restore lost data from Tecno Spark 20 Pro+
- How To Transfer Data From iPhone 13 Pro Max To Other iPhone 14 Pro Max devices? | Dr.fone
- Best 3 Itel P55 5G Emulator for Mac to Run Your Wanted Android Apps | Dr.fone
- Does Airplane Mode Turn off GPS Location On Motorola Moto G73 5G? | Dr.fone
- In 2024, The Ultimate Guide to Get the Rare Candy on Pokemon Go Fire Red On Honor Magic 6 Lite | Dr.fone
- How to Unlock Apple iPhone 15 Passcode without Computer?
- Still Using Pattern Locks with Itel P55T? Tips, Tricks and Helpful Advice
- 5 Ways to Track Apple iPhone 12 Pro without App | Dr.fone
- Easy Ways to Manage Your Tecno Camon 30 Pro 5G Location Settings | Dr.fone
- 7 Solutions to Fix Error Code 963 on Google Play Of Realme C33 2023 | Dr.fone
- In 2024, Can I Bypass a Forgotten Phone Password Of Xiaomi Civi 3 Disney 100th Anniversary Edition?
- 3 Effective Ways to Bypass Activation Lock on Apple iPhone SE (2022)
- How to Bypass Google FRP Lock on Honor 80 Pro Straight Screen Edition Devices
- The Best 8 VPN Hardware Devices Reviewed On Oppo A59 5G | Dr.fone
- Can I recover permanently deleted photos from Realme Narzo 60x 5G
- What To Do When Oppo Reno 11F 5G Has Black Screen of Death? | Dr.fone
- How to Transfer Photos from Vivo X Flip to Laptop Without USB | Dr.fone
- Reasons for Google Pixel Fold Stuck on Startup Screen and Ways To Fix Them | Dr.fone
- In 2024, Change Location on Yik Yak For your Realme GT Neo 5 to Enjoy More Fun | Dr.fone
- How to play an MP4 on Xiaomi Redmi Note 13 Pro+ 5G?
- A Detailed Guide on Faking Your Location in Mozilla Firefox On Samsung Galaxy A14 5G | Dr.fone
- How to Transfer Data from Realme V30T to BlackBerry | Dr.fone
- Different Methods for Resetting Xiaomi Redmi 12 5G Phones with Screen Locked and Not | Dr.fone
- In 2024, List of Pokémon Go Joysticks On Tecno Camon 30 Pro 5G | Dr.fone
- How To Transfer Data From Apple iPhone 14 Plus To Others Android Devices? | Dr.fone
- New 12+ Stunning Instagram GIF Stickers for 2024
- iOS & Android WhatsApp Transfer
- 8 Quick Fixes Unfortunately, Snapchat has Stopped on Nokia G42 5G | Dr.fone
- 6 Solutions to Unlock Sony Phones If You Forgot Password, PIN, Pattern
- Play Store Not Working On Vivo V27e? 8 Solutions Inside | Dr.fone
- In 2024, Easily Unlock Your Samsung Galaxy A14 4G Device SIM
- In 2024, How to Unlock a Network Locked Infinix Note 30 VIP Racing Edition Phone?
- In 2024, What Pokémon Evolve with A Dawn Stone For Tecno Camon 30 Pro 5G? | Dr.fone
- Complete Tutorial to Use GPS Joystick to Fake GPS Location On Honor Magic 5 | Dr.fone
- How to Track Nokia G42 5G by Phone Number | Dr.fone
- How to fix iCloud lock from your iPhone XR and iPad
- How to Repair Broken video files of Samsung Galaxy A15 4G?
- Locked Out of Apple iPhone 15? 5 Ways to get into a Locked Apple iPhone 15
- Vivo Y17s Not Receiving Texts? 10 Hassle-Free Solutions Here | Dr.fone
- Will iSpoofer update On Nokia C300 | Dr.fone
- Ultimate Guide from Vivo S18 Pro FRP Bypass
- Dose Life360 Notify Me When Someone Checks My Location On Vivo X Fold 2? | Dr.fone
- In 2024, Tutorial to Change Samsung Galaxy M54 5G IMEI without Root A Comprehensive Guide
- Title: An Ultimate Guide to Edit a Music Video Aspect Ratio and First Cut
- Author: Morgan
- Created at : 2024-06-08 08:36:40
- Updated at : 2024-06-09 08:36:40
- Link: https://ai-video-editing.techidaily.com/an-ultimate-guide-to-edit-a-music-video-aspect-ratio-and-first-cut/
- License: This work is licensed under CC BY-NC-SA 4.0.

