:max_bytes(150000):strip_icc():format(webp)/GettyImages-1168002788-1bccccf67a1f4988bd355c09748383ab.jpg)
An Ultimate Guide to Flexclip Online Trimmer

An Ultimate Guide to Flexclip Online Trimmer
Flexclip video trimmer is a robust and easy-to-use online tool that lets you cut the unwanted section of any of your videos to get the desired result.
Pros
- Online trimming - no need for software.
- No ads during the editing process.
- Real-time preview of what is happening.
- Additional robust video editing features.
- Simple and intuitive UI.
Cons
- The free version lacks advanced features.
- Video export duration is limited to 1 minute in the free version.
- Signup is required for exporting videos.
Part 1. What is Flexclip Video Trimmer?
Do you want to trim your videos quickly without downloading and installing any complicated software? Well, Flexclip Trimmer might be your answer.
Flexclip is a free-to-use online video editing tool that makes it effortless for you to trim, crop, and edit your videos. The editor has an intuitive and user-friendly interface, making it easy to use even for beginners.
Besides video trimming, Flexclip has numerous other features video trimming, including support for a wide range of video formats, slideshow making, screen and voice recording, royalty-free music, pictures and video libraries, and other advanced tools.
Price: You can use the Flexclip trimmer for free. However, export duration is limited to 1 minute, and a watermark will be added to it.
Besides the free version, Flexclip comes with three pricing tiers:
- Basic: $5.99/month or $71.88/year.
- Plus: $ 9.99 /month or $119.88/ year.
- Business: $ 19.99 /month or $239.88/year.
Part 2. Key Features Of Flexclip Video Trimmer
As a powerful and easy-to-use online video trimmer, Flexclip has helped numerous users make great videos without too much hassle.
Therefore, if you’re looking for a video trimmer with all the bells and whistles, this editor must be at the top of your list. Here are some of the key features that make Flexclip Free Video Trimmer stand out from the rest:
Online Video Cutter: Flexclip Video Trimmer eliminates the need to download complex software to cut videos. Head to the website, upload your video, and let the trimmer do its magic.
Safe and Secure to Use: Flexclip editor provides guaranteed security from any malware or data breach.
Easy to Use: Flexclip trimmer is designed with simplicity in mind. Even if you’ve never edited/trimmed a video before, you’ll be able to figure out how to use this tool in no time. Upload your footage, and with a few clicks/adjustments, you will get it trimmed.
Completely Free: Flexclip offers the trimming tool completely free, and no annoying ads will be displayed during the editing process.
Real-Time Preview: Not only is the Flexclip video trimmer convenient to use, but it also provides a real-time preview of the project, so you can see exactly how your edits will look before you save them.
Multiple Video Formats Support: Flexclip Video Trimmer is a versatile and powerful tool that supports a vast range of video formats, including MOV, WEBM, M4V, and MP4.
Part 3. How To Use Flexclip Trimmer To Trim Videos?
Videos are an excellent way to share memories, tell stories, or just have some fun. But sometimes, you might want to trim a clip to make it shorter, edit out certain parts, or just give it a different look. Flexclip’s video trimmer is a splendid way to do this in just a few steps:
Step1 First, ensure you have a stable internet connection. Now, launch a browser of your choice on your PC and visit theFlexclip Video Trimmer website.
Step2 Now, drag and drop your video clip or click the “Browse Video” option to find and upload the video from your computer in the supported MP4, M4V, MOV, or WEBM video formats.
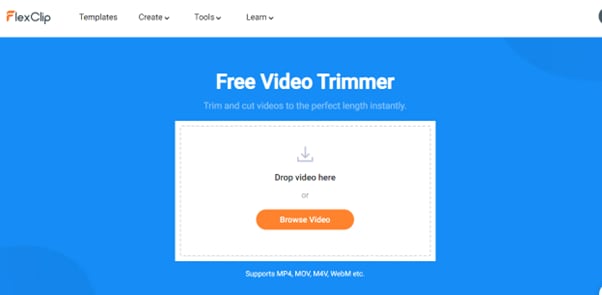
Step3 Next, wait for a few seconds to complete the video uploading process. You will be taken to the editing interface, and the trimming window will pop up. If not, click the Scissor icon below the video.
Step4 Use the handles on either side of the video timeline to select the part of the video you want to keep. Next, click the “Trim Video” button to apply your changes.
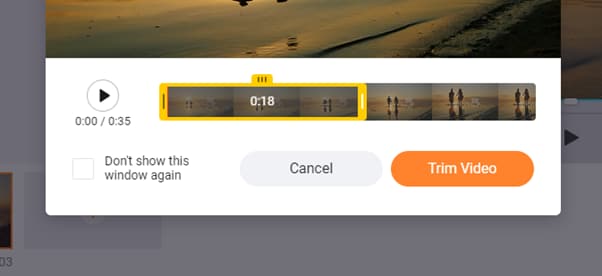
Step5 You can also use the trimming tool to split the video into multiple clips. Once you’re done, click “Export” to save your project.
You’ll be asked to sign in to export the video. Create a new account or use the existing one and click “Export” again.
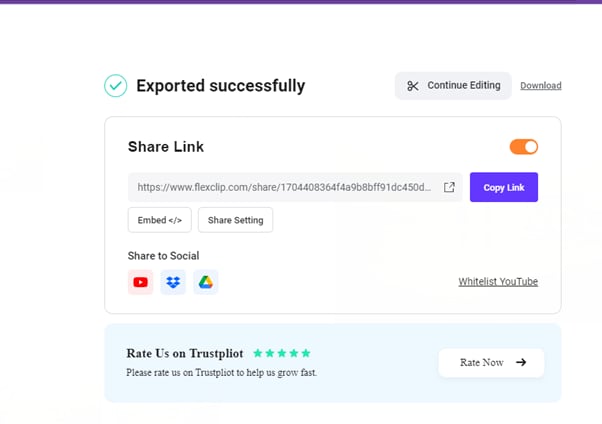
Step6 Finally, select the video resolution but bear in mind that the free version only allows 480p resolution for exporting a clip. Click the Export option and wait for the process to complete. You can also share your video to Youtube, Dropbox, or Google Drive.
Bonus Tips: Best Flexclip Video Trimmer Alternative On Desktop
A desktop video editor has a number of advantages over an online editor, such as:
- More control over the editing process.
- Can Fine tune your edits with more precision.
- Support for a wider range of video and audio formats.
- More flexibility.
- A more comprehensive set of features than online editors.
Filmora is an excellent desktop alternative to the Flexclip video trimmer and includes more advanced features with a user-friendly interface. The software also supports a bit more video formats and higher video output resolution.
Here’s how you can use Filmora to trim your video:
Step1 Download and install the Filmora software from the official website. Click the “New Project” option and select your video to upload. Next, drag and drop the clip to the timeline.
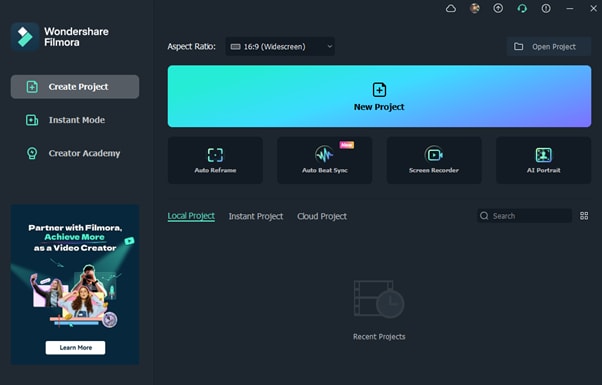
Step2 Hover your mouse near the starting or ending edges and drag the trim icon to cut your video into the desired length. You can also use the Split option to remove the unwanted part in the middle of your clip.
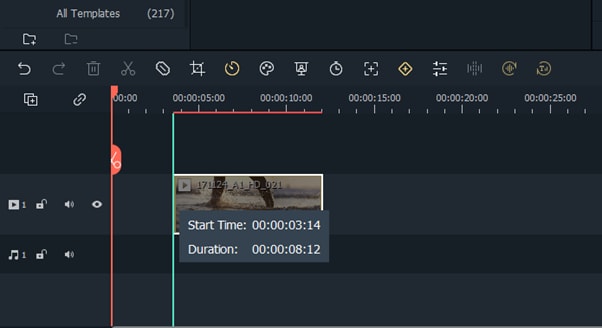
Step3 Once you are done with your video trimming, click the Export option. Select the format from the left-hand side menu and click Export again.
You can also export your videos with YouTube, Vimeo, DVD, or your device.
Conclusion
In this article, we’ve explored the Flexclip video trimmer online tool, its key features, and how to use it to trim videos with simple instructions. We also discussed the best Flexclip video trimmer alternative on desktop - Filmora and provided a step-by-step guide to help you cut an unwanted section from your clip.
Hopefully, you found this comprehensive guide useful and that you now know everything you need to know about trimming videos with Flexclip.
Free Download For Win 7 or later(64-bit)
Free Download For macOS 10.14 or later
Part 1. What is Flexclip Video Trimmer?
Do you want to trim your videos quickly without downloading and installing any complicated software? Well, Flexclip Trimmer might be your answer.
Flexclip is a free-to-use online video editing tool that makes it effortless for you to trim, crop, and edit your videos. The editor has an intuitive and user-friendly interface, making it easy to use even for beginners.
Besides video trimming, Flexclip has numerous other features video trimming, including support for a wide range of video formats, slideshow making, screen and voice recording, royalty-free music, pictures and video libraries, and other advanced tools.
Price: You can use the Flexclip trimmer for free. However, export duration is limited to 1 minute, and a watermark will be added to it.
Besides the free version, Flexclip comes with three pricing tiers:
- Basic: $5.99/month or $71.88/year.
- Plus: $ 9.99 /month or $119.88/ year.
- Business: $ 19.99 /month or $239.88/year.
Part 2. Key Features Of Flexclip Video Trimmer
As a powerful and easy-to-use online video trimmer, Flexclip has helped numerous users make great videos without too much hassle.
Therefore, if you’re looking for a video trimmer with all the bells and whistles, this editor must be at the top of your list. Here are some of the key features that make Flexclip Free Video Trimmer stand out from the rest:
Online Video Cutter: Flexclip Video Trimmer eliminates the need to download complex software to cut videos. Head to the website, upload your video, and let the trimmer do its magic.
Safe and Secure to Use: Flexclip editor provides guaranteed security from any malware or data breach.
Easy to Use: Flexclip trimmer is designed with simplicity in mind. Even if you’ve never edited/trimmed a video before, you’ll be able to figure out how to use this tool in no time. Upload your footage, and with a few clicks/adjustments, you will get it trimmed.
Completely Free: Flexclip offers the trimming tool completely free, and no annoying ads will be displayed during the editing process.
Real-Time Preview: Not only is the Flexclip video trimmer convenient to use, but it also provides a real-time preview of the project, so you can see exactly how your edits will look before you save them.
Multiple Video Formats Support: Flexclip Video Trimmer is a versatile and powerful tool that supports a vast range of video formats, including MOV, WEBM, M4V, and MP4.
Part 3. How To Use Flexclip Trimmer To Trim Videos?
Videos are an excellent way to share memories, tell stories, or just have some fun. But sometimes, you might want to trim a clip to make it shorter, edit out certain parts, or just give it a different look. Flexclip’s video trimmer is a splendid way to do this in just a few steps:
Step1 First, ensure you have a stable internet connection. Now, launch a browser of your choice on your PC and visit theFlexclip Video Trimmer website.
Step2 Now, drag and drop your video clip or click the “Browse Video” option to find and upload the video from your computer in the supported MP4, M4V, MOV, or WEBM video formats.

Step3 Next, wait for a few seconds to complete the video uploading process. You will be taken to the editing interface, and the trimming window will pop up. If not, click the Scissor icon below the video.
Step4 Use the handles on either side of the video timeline to select the part of the video you want to keep. Next, click the “Trim Video” button to apply your changes.

Step5 You can also use the trimming tool to split the video into multiple clips. Once you’re done, click “Export” to save your project.
You’ll be asked to sign in to export the video. Create a new account or use the existing one and click “Export” again.
Step6 Finally, select the video resolution but bear in mind that the free version only allows 480p resolution for exporting a clip. Click the Export option and wait for the process to complete. You can also share your video to Youtube, Dropbox, or Google Drive.

Bonus Tips: Best Flexclip Video Trimmer Alternative On Desktop
A desktop video editor has a number of advantages over an online editor, such as:
- More control over the editing process.
- Can Fine tune your edits with more precision.
- Support for a wider range of video and audio formats.
- More flexibility.
- A more comprehensive set of features than online editors.
Filmora is an excellent desktop alternative to the Flexclip video trimmer and includes more advanced features with a user-friendly interface. The software also supports a bit more video formats and higher video output resolution.
Here’s how you can use Filmora to trim your video:
Step1 Download and install the Filmora software from the official website. Click the “New Project” option and select your video to upload. Next, drag and drop the clip to the timeline.

Step2 Hover your mouse near the starting or ending edges and drag the trim icon to cut your video into the desired length. You can also use the Split option to remove the unwanted part in the middle of your clip.

Step3 Once you are done with your video trimming, click the Export option. Select the format from the left-hand side menu and click Export again.
You can also export your videos with YouTube, Vimeo, DVD, or your device.
Conclusion
In this article, we’ve explored the Flexclip video trimmer online tool, its key features, and how to use it to trim videos with simple instructions. We also discussed the best Flexclip video trimmer alternative on desktop - Filmora and provided a step-by-step guide to help you cut an unwanted section from your clip.
Hopefully, you found this comprehensive guide useful and that you now know everything you need to know about trimming videos with Flexclip.
Free Download For Win 7 or later(64-bit)
Free Download For macOS 10.14 or later
Use Mobile Phones to Shoot a Video Is Very Convenient Compare with Professional Cameras. In This Article, We’ll List You some Tips to Help Capture a High-Quality Video on Your Phone
Never before has video recording been so simple or effortless. Everybody has a smartphone, which is a capable video camera, in their pocket. In fact, the use of smartphones for mobile creation has increased to the point that some people consider it to be the main function and equally crucial to communication.
Pocket-lint has compiled ten ideas in an effort to assist you in getting whatever it is you want in the best possible way. Even if some of the advice may seem apparent, using it all should always produce fantastic videos.

1. Get ready for filming
Make sure that you have everything you need to start recording your videos, including the necessary
equipment, props, scripts, actors, and locations, before you start the recording process. In addition, ensure that your mobile device is of high quality and that it has a sufficient amount of storage space (available memory) to save the film. High definition (HD) video files can be quite large and storing them can quickly deplete a battery’s capacity.

They add a great point; you need to think about stabilization, and they’ve included a few great options for
obtaining steady video. This video by Filmic Pro titled “5 Things to Do Before You Shoot iPhone Video” covers a lot of what we’ve discussed as well, including memory storage, battery life, audio, and resolution.
2. Use good lighting
Because smartphone cameras have smaller image sensors and lenses, proper illumination has a significant impact on their performance. As much as you can, try to film your video in well-lit environments. By doing this, you can reduce the amount of unwanted shadow and grain in your video. On the other hand, you also need to be cautious to avoid pointing the camera straight towards bright light sources because this will result in useless overexposed footage and lens flare. The lighting should be consistent and steady because most smartphone image sensors take a while to respond to abrupt changes in brightness.

If shooting your video in low light is still difficult, experiment with your phone’s or app’s backlighting and white balance settings. In case your camera is focusing on the incorrect part of your composition, most phones now provide “touch focusing.” The automatic exposure control will have an easier time making minor adjustments if the lighting condition changes once the focus has been placed on the most crucial part of the video.
3. Film horizontally, not vertically
Your natural inclination may be to hold the smartphone in a vertical position when you are using it to record video, just as you do when you are using it for the vast majority of other purposes. However, if you want to edit your video and post it online and on social media, this may place certain restrictions on your ability to do so.

4. Make sure to have good audio
We’re going to go ahead and say that sound is one of the most essential components of any video. The difficulty is in the fact that the audio quality on your smartphone is not always of the highest caliber. When it comes to audio, there is a general rule that the smartphone should be as close to the speaker as is physically possible in order to obtain the clearest sound possible from it. Even if you are only a few meters away from the person whose voice you want to record on your smartphone, you won’t be able to get a good recording of them.
This is not the fault of your smartphone; rather, smartphones are intended to be used by speaking into them at close range; hence, you should think about employing the use of an external microphone in order to improve the sound quality. However, if you are unable to do so, there is no need for concern because you can use an additional smartphone in its place.
You can record audio on your mobile device by opening the voice memo app and selecting the record button. Your audio will immediately be improved if you position the phone’s microphone such that it is facing your topic and is somewhat close to them. Clap once at the beginning of the recording to serve as a reference point for both the video and the audio, which will help you save time while editing. After that, it will be simple for you to locate the point at which the clap occurred and synchronize the high-quality audio that is on the memo with the audio that is in your film.
5. Edit your video
Now that you’ve gathered all of your film, it’s time to cut it up, add some color, and get creative with effects! Fortunately, there are numerous video editing apps available that make it easier and faster than ever to use. You can edit videos on your phone just as you would on a computer using apps like Adobe Rush and iMovie, and it’s easier than you think.

You’ve probably heard of iMovie, Apple’s free video editing software that works on both your iPhone and Mac. You can add titles, music, and additional effects to your video clips, much like in Adobe Rush. iMovie is really easy to use, especially if you’re new to editing. The main distinction between Adobe Rush and iMovie is that Adobe Rush includes more professional and technical changes, whilst iMovie has a considerably larger selection of video effects and transitions.
Adobe Rush is the most user-friendly app for editing and creating high-quality films on your smartphone. One of Adobe Rush’s best features is the ability to incorporate motion graphics, video effects, text, and mix audio. If you prefer a larger screen to edit on, Adobe Rush seamlessly transfers the files to your computer, allowing you to resume editing where you left off on your smartphone. This program is simple to use, and there are numerous guidelines and tutorials available online to help you get started.
Conclusion
You probably weren’t aware of this, but your smartphone is actually a very capable piece of equipment that can be used to record videos of a high quality. You will be able to enhance the quality of your material to a greater extent by putting into practice the strategies that are discussed in this piece. Grab your smartphone and get ready to start producing content that the people in your fanbase will always come back for.
Free Download For Win 7 or later(64-bit)
Free Download For macOS 10.14 or later
Free Download For macOS 10.14 or later
11 Tips to Make Product Ad Videos
In the list of various video types, let’s check out product ad videos. This type of video gives more details about a product and it is normally used by businesses in promoting their products both new and old to the public. Product ad videos are videos that help to enlighten the public about products and also show them what they will gain in going for such products. These videos are best used for unveiling new products. Product ad videos have been in existence for a very long time.

Some people regard them as business ad videos, advertisement videos or even marketing videos. Not only do product ad videos help your products to stand out among the very many, but it also brings about numerous engagements from your audience by making your products to be found online by both far and near viewers. Product ad video answers every question in the heart of the audience and makes the audience build trust in the products. There are a lot of things to put into consideration while going for product ads videos and they include:
1. Good Quality Video and Picture Coverage
Now, among several things to consider in creating product ad video, is good and quality video or picture coverage which can only be possible when there is correct lighting that can help to get a very clear video or image of those products. This helps attract the attention of the customers. This also makes your products stand out among several products on sale. It also will help in creating quality videos because the quality of the pictures and the videos are not compressed.
2. Concise Videos
Another thing to put into consideration is the concise nature of your video. It must be brief and comprehensive. There should not be a lot of bulky information in the video so as not to make the customers tired and burdened.
3. Correct Colour Combination
This is something that must not be neglected in making product ad videos. The colour combination must be correct and matches very well with both the products and the things written on the products. It is better to work at most with just three colours that complement one another. This will not only attract the customers but will make the customer see how professional you are and will pay anything to get the products.
4. Short Videos
Videos are best with at most one minute depending on the platforms you want to advertise them on. This will make the customers not wait for a long time to understand the video and it will help the client to make the decision quickly without wasting a lot of time. It will help him make the decision quickly. Studies and statistics have it that attention span is only 8.5 seconds so you must try to make proper use of the first few seconds of your video.
5. Product Prize
The goals of a product ads video are to either make the announcement of a new product on sale or to also advertise particular products to sell to make great sales. Therefore, if the product needs to be sold, then the prize should be written down boldly in such a way that the buyer can see the price. The real prize and the promo size can also be written to entice the customers more to buy.
6. Text, The Font Styles, The Font Size And The Font Color
This is another important area that must not be neglected. This is another area in product ads that catches the eyes of the customers. So, the font, the font styles, and font color must go in line with the products, the text on the products and the background color of the products.
7. Aspect Ratio
This is another important thing to consider while making the video for product ads. Each social media platform has its unique aspect ratio. Aspect ratio talks about the ratio of the length and width of a video. Therefore before creating any video for any platform, first look for the aspect ratio of the platform. Facebook has its aspect ratio as also Instagram, TikTok, Facebook story and reels. This will make your video fit into the platform and make the video come out professionally and grandly.
8. Product Ads Software/Applications
Aside from knowing all that has been discussed, it is important to look out for the best software for the job. There is a lot of software that will be of help in creating product ads videos, go for the ones that you can understand and can help you create product ads video. Software like:
- Kinemaster.
- Imovie.
- Quik.
- Adobe Premiere Pro.
- Wondershare Filmora.
- Video ads Maker.
- Video Guru.
- Videolicious.
- AndroVid
- FiLMiC Pro.
- movie.
- Doodly.
- WeVideo.
- Vimeo Create.
- Power Director.
- Canva etc.
9. Good Reviews
Another important thing that makes product ad videos convert and confidence in the heart of the audience is the reviews from customers who have used such products. Therefore, try always to get reviews on the products from buyers. Now, it can come as a note, audio or video of the buyers reviewing the product. Adding these reviews from various buyers will not only draw the attention of viewers but also make them trust the authenticity of the products. So, try to add such reviews to your product ads video.
10. Graphics And Music
This is important also in creating product ad videos. You need nice and eye-catching graphics and music that goes in line with the products. Your music must be good and 100% natural.
11. Call To Action
This is a very important thing that must not be exempted in your product ads videos. Your video must have the ability to call the audience to action. Now after all has been done and the question in the heart of the audience will be, ’How can I get this product?’.The ‘call to action answers this question. So, it must be included. The call to action can be at the beginning of the video, middle of the video and end of the video but it is best placed in the middle and at end of the video.
The above and more are what should be considered and applied if you want a product ads video that can convert very well and yield massive sales.
Conclusion
Product ads video is the order of the day and it is very important as a businessman to leverage the conversions being generated by it to make a profit and to build up engagement for your business, websites etc.
Free Download For Win 7 or later(64-bit)
Free Download For macOS 10.14 or later
Free Download For macOS 10.14 or later
Best Ways to Merge FLV Files [Windows, Mac,Android, iPhone & Online]
It’s typical to download numerous small FLV files of a popular movie from YouTube or other video-sharing sites instead of the entire movie. Let me tell you here that an FLV (Flash Video) is a container format used to transmit video or audio over the internet. At this point, you may want to combine multiple FLV files into one. Combining multiple FLV files to create a masterpiece, like a trailer, is of course a terrific idea. Well, to combine these FLV files, you need a professional FLV merger as your assistant.
So, let me help you here. Filmora Video Editor may be the best FLV combiner for Windows and Mac available nowadays. This clever tool is ideal for users seeking professional editing functions like video merging. The software is available for download on Windows and Mac systems and allows for the lossless merging of FLV, MP4, MOV, WebM, and many more file formats. It makes it a lot easier for you to merge or combine FLV files into a large video collection without compromising on video quality even if you lack technical expertise. And, you can use it to watch a movie or your favorite content without any annoying interruptions.
Now, I’ll show you how to quickly and effortlessly merge your favorite video clips into a new video collection.
For Win 7 or later (64-bit)
For macOS 10.14 or later
A Step-by-Step Guide to Merge FLV files on Windows/Mac using Wondershare Filmora
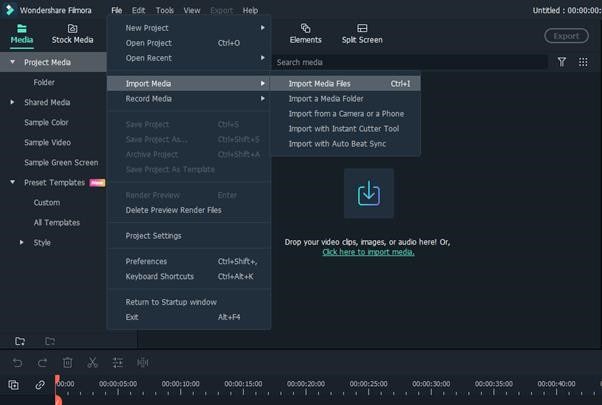
Step 1: Launch Wondershare Filmora and load FLV files…
When you run this FLV joiner, simply click “Import” to load all of the local FLV files that you want to merge to the User’s album of this FLV video merger. You can also just drag and drop the target files from your PC into the album.
Step 2: Merge FLV files into one…
At the bottom of this FLV file merger, there lies a Timeline. Drag FLV files from the album to the Timeline and use the slider bar to help you arrange all FLV files in the Timeline without overlapping them. That’s very important as if you put one video to another, the original video will get split. Also, make sure that all FLV files are placed in the sequence in which they are to be played. If not, you can rearrange any video clip with a simple drag-and-drop.

Step 3: Choose the target format as FLV…
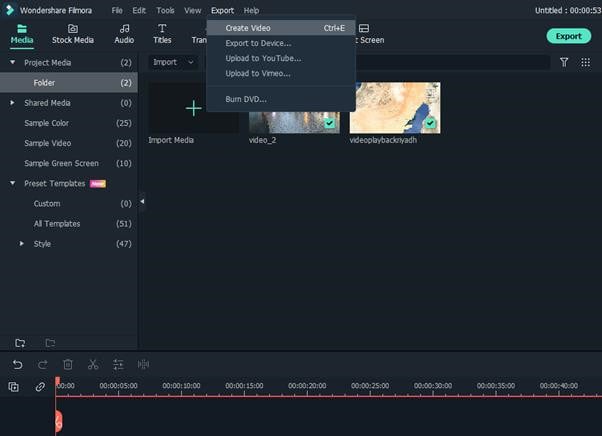
When you are sure that all FLV files are in the correct required order on the Timeline, you can view the effect in real-time in the preview pane. If everything is fine, you are now ready to export this new FLV file. All you have to do is just press the “Create”
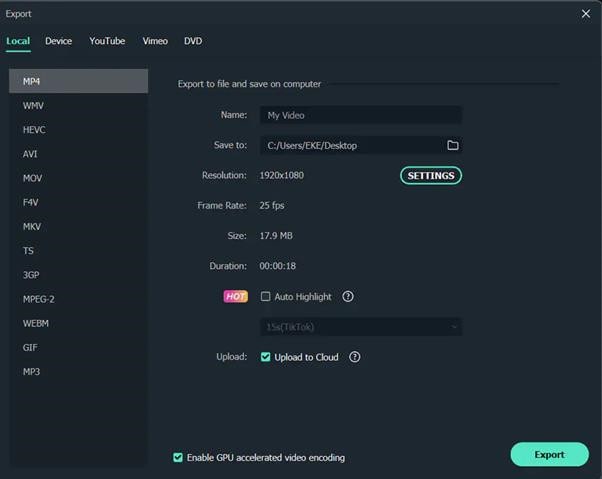
button, then go to the “Format” tab > “FLV” output format in the output window.
Step 4: Export a new FLV file…
Finally, click the “Create” button to save the settings and export the new FLV file simultaneously. When it’s done, simply navigate to the whole FLV video using the output file path.
Alternative Way to Merge/Combine FLV Files on Windows
Joyoshare Media Cutter (Paid tool to merge FLV Files)
Joyoshare Video Joiner for Windows is a comprehensive and user-friendly audio and video merging software that supports a wide range of file formats such as FLV, F4V, HD,4K, MP4, M4V, M4A, DV, MPEG, FLAV, WMA, and others. It is not only a superb video joiner for joining FLV files in batches without re-encoding, but it is also a video editor thanks to the built-in advanced editing tool. That means you can customize and enhance your FLV files as required before integrating them. The two combing modes (high-speed mode and encoding mode) it employs are also noteworthy. With high-speed mode, you can join an unlimited number of FLV files losslessly and swiftly. You can merge files in different formats without gaps and customize the codec, resolution, bit rate, frame rate, and other parameters of your FLV files while in encoding mode.
A Step-by-Step Guide
Step 1: Add FLV files…
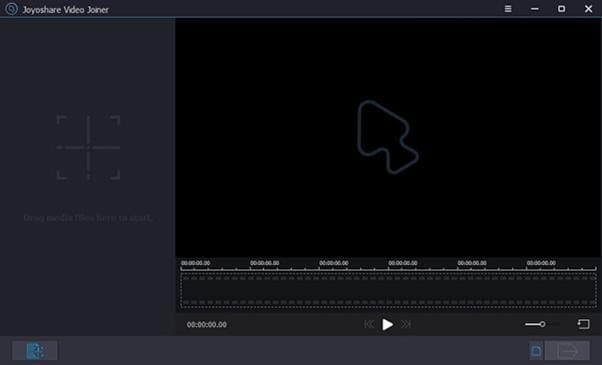
First, go to the Joyoshare website and download the Joyoshare Video Joiner installation package. Install and configure it on your computer. Then, import FLV files into the video joiner. There are two options: click “Open File” to choose them or drag them directly into the software.
Step 2: Choose a merging mode and export format…
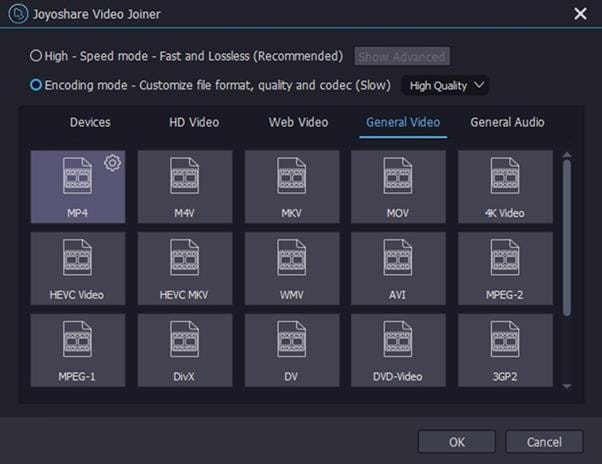
You must pick a format from high-speed mode and encoding mode based on your requirements by using the “Format” button. The former is only for combining files of the same format losslessly at 60 X speed. The other is for users who want to modify files while joining files in different formats. With the use of a gear icon beside the selected output format, users can change video settings such as resolution, bit rate, codes, and so on while in encoding mode.
Step 3: Remove undesirable parts…
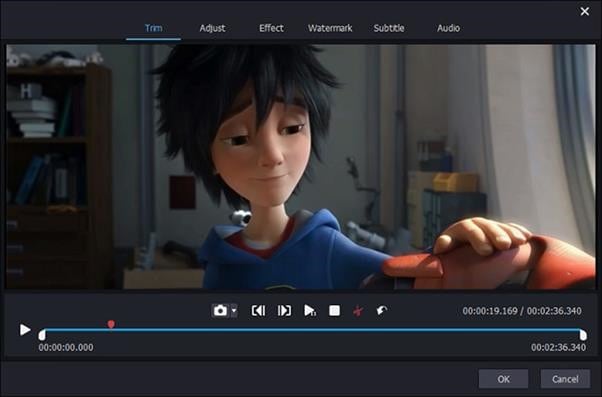
Once finished choosing mode and format, simply press “OK” to go back to the main screen. Then double-click these FLV files one by one to preview them. You can change the timeline to remove unnecessary sections from your FLV videos. Moreover, renaming and rearranging these video files can also be realized in this step.

Step 4: Edit FLV files (optional)…
The software has an editor that allows you to easily and flexibly enhance your FLV video files by clicking “Edit” next to each file before joining.
Step 5: Merge FLV files and save…
Finally, all you have to do is press the “Convert” button to enable Joyoshare Video Joiner to begin combining these FLV files. The merged FLV file will be saved as a converted file on your computer.
Format Factory (Free tool to merge FLV Files)
Format Factory is a free Windows video joiner, recorder, converter, downloader, and editor. It supports a wide range of file types, including FLV, MKV, MP4, 3GP, WMV, SWF, AVI, MPG, VOB, WebM, and others. It is not difficult to use it to combine FLV files.
A Step-by-Step Guide
Step 1: Run Format Factory…
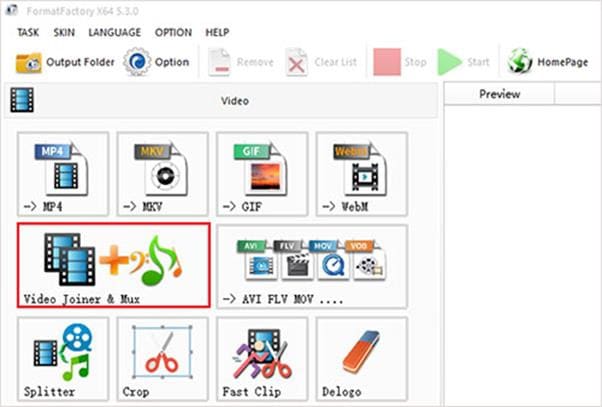
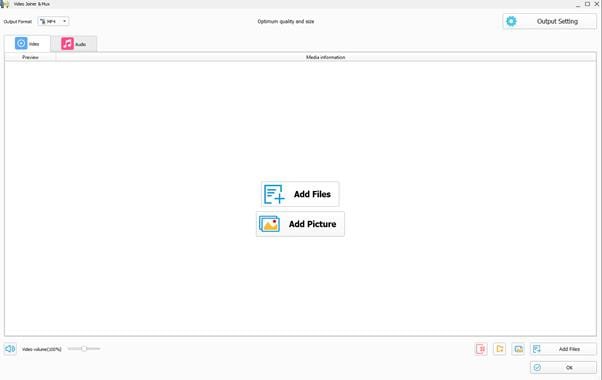
After installing Format Factory, go to “Video Joiner & Mux” to proceed.
Step 2: Add FLV files…
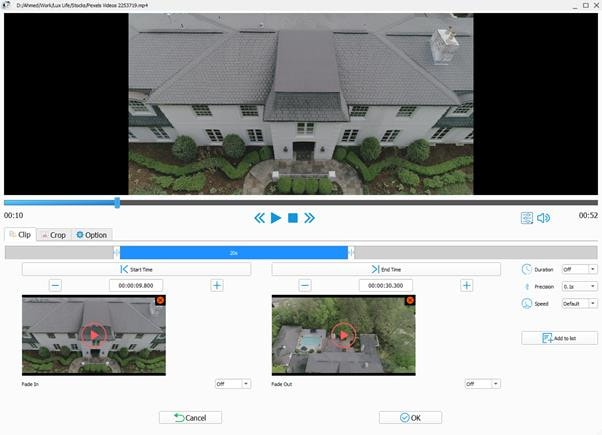
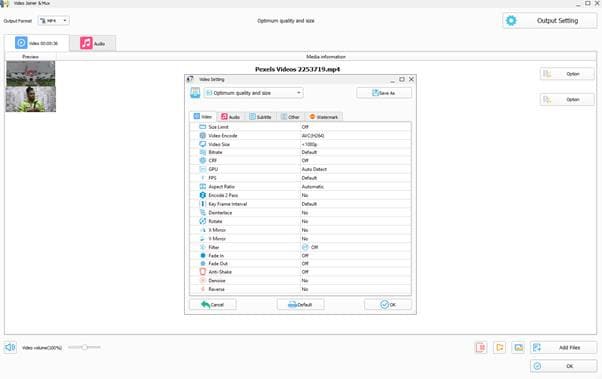
“Add Files” allows you to import FLV files in batches. When all FLV files have been loaded, click “Clip” to clip and crop FLV files as needed. Then, under “Output Settings,” choose an output format and further customize the output quality.
Step 3: Merge files…
Once done, click “OK” to get back to the first window and press “Start” to begin the merging
process.

Alternative Way to Merge/Combine FLV Files on Mac
iDealshare VideoGo (Paid tool to merge FLV Files)
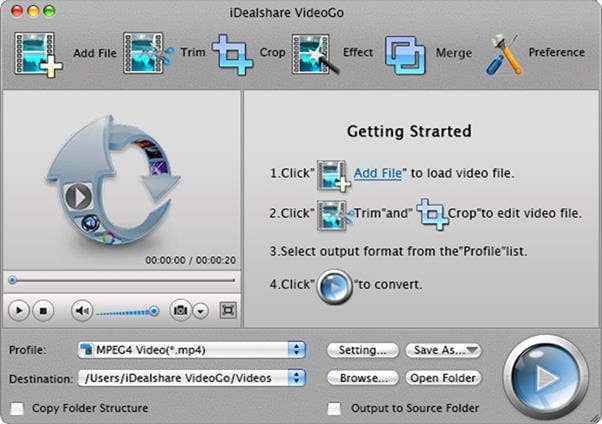
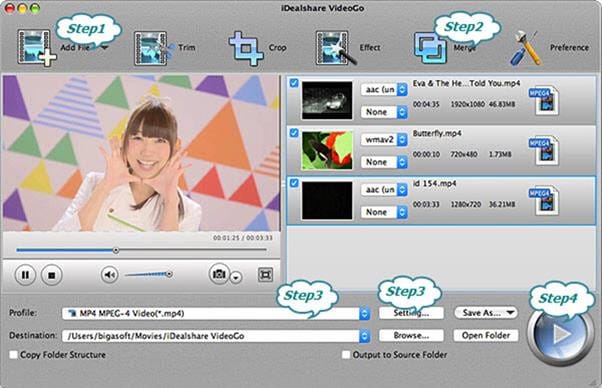
You can use iDealshare VideoGo to convert media files for playback anywhere. It supports a wide range of video formats, both SD and HD. The application also features its own editor, which includes a wide range of activities. It allows you to trim the selected video, crop it, modify the brightness, contrast, and saturation, add text and image watermarks, and manage or add your own subtitles.
A Step-by-Step Guide
Step 1: Import FLV files…
To import the FLV video files that you want to merge, click the “Add File” button or just drag & drop the files.
Step 2: Choose output format…
Choose FLV as the output video format. Select FLV from the “General Video” category from the “Profile” pop-up menu.
Step 3: Merge FLV files…
Select the FLV video files that you wish to merge into one in the main window list, and then choose the “Merge Selected into One” option from the context menu. Click the “Convert” button to start combining the videos.
Faasoft FLV Joiner/Merger (Free tool to merge FLV Files)
Faasoft FLV Joiner/Merger is used to combine FLV files without any re-encoding as well as retain the output quality. Merges FLV files and converts them to more popular formats as well like; MP4, AVI, MOV, WMV, MKV, ASF, ProRes, MXF, OGV, 3GP, etc. to get played on multiple mediums. Apart from FLV files, Faasoft FLV Joiner allows you to merge various kinds of video and audio clips. In addition, this powerful tool works more than just an FLV Merger, i.e.; It is, even more, an in-built video and audio editor, with which, you can optimize any files as per requirement.
A Step-by-Step Guide
Step 1: Load FLV files…
To add FLV files to this Joiner, run FLV Merger and drag and drop the folder containing FLV files to the program’s main screen. If the FLV files you wish to merge are not in the same folder, you can drag them one by one to the software. You should put them together first to save time.
Step 2: List to merge…
Once all FLV files have loaded, pick them all and choose “Merge Selected into One” from the context menu. In the task list, the combined FLV file will have an extension name similar to “Merge 1.”
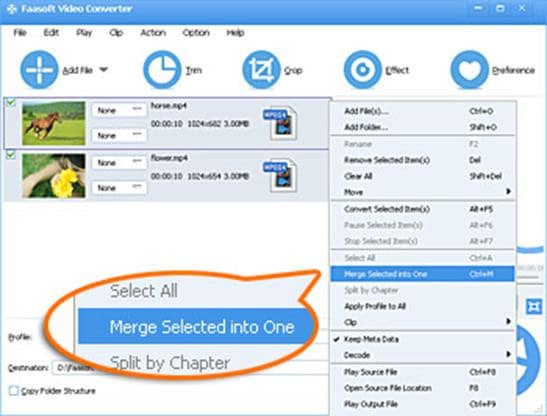
Step 3: Convert FLV clips…
Click the “Profile” drop-down button to select “FLV Flash Video Format (*.flv)” from the “Picture & Animation” category as the output format. If you want to re-encode the merged FLV file to another video format, select another output format from the list above.
Step 4: Start joining…
Simply click the round “Convert” button in the bottom right corner and let this fantastic tool do the rest.
2 Ways to Merge/Combine FLV Files on Android
Video Merger by Alyaanah (Paid tool to merge FLV Files)
Video Merger can merge any number of videos together in one video. It also accepts almost any format of videos as input. Some of the input formats for merging that are supported are mp4, mkv, 3gp, 3gpp, mov, flv, avi, mpg, mpeg, m4v, vob, wmv, webm, mts, ts, m2ts, and so on. It can also convert the combined video to a variety of formats. Merged output formats supported include mp4, mkv, mov, avi, 3gp, and others. This application allows you to combine videos with different formats, bitrates, and frame rates into a single video. It also scales multiple videos into a single scale and merges them together. It can also merge videos with different resolutions into one video. The merged videos can also be compressed together maintaining original quality to a smaller sized video than all the original video sizes combined.
Video merger allows you to merge in three different ways as follows;
Side by side:
Choose two files, and they will be merged in a side-by-side format (Horizontal stack).
Top-Bottom:
Choose two files, and they will be merged top to bottom (Vertical stack).
Sequential:
You can select unlimited files and they will be merged one after the other in a sequential format.
VideoChain by Arypex Initiative (Free tool to merge FLV Files)
Now you can combine video files from your Android device camera as well and for free. VideoChain is an easy to learn and use app (with in-built instructions) that allows you to easily combine video clips to create one video using the most advanced encoding techniques. It is an excellent tool for merging video clips from your front and rear cameras, as well as portrait and landscape video files, into a single file. It can combine MP4, MPEG, MKV, FLV, and other video clips with four different quality/compression settings available.
2 Ways to Merge/Combine FLV Files on iPhone
Magisto Video Editor (Paid tool to merge FLV Files)
It is a wonderful app to put FLV clips together on an iPhone. Using this versatile video editing app, you can merge multiple videos and create eye-catching files of up to 5 minutes. You can add text, colors, and even text slides between video frames to the video. The app’s filters can be used to further enhance the files. The app also supports a large library of audio files, which you can use to add music to your video files. And, to use all of the app’s features, you must have a paid subscription.


iMovie (Free tool to merge FLV Files)
iMovie is one of the most popular video editing apps for iOS users. You can edit and merge videos on iMovie with ease. The app is free and secure. If you are looking for a professional way to put two videos together on your iPhone, iMovie can be a good choice. FLV videos can be converted to WMV, M4V, and other popular video formats after merging. You can also modify the video output settings and delete the selected video segments as well.
A Step-by-Step Guide
Step 1: Launch the iMovie app on your iPhone. In the Projects window, press the + button.
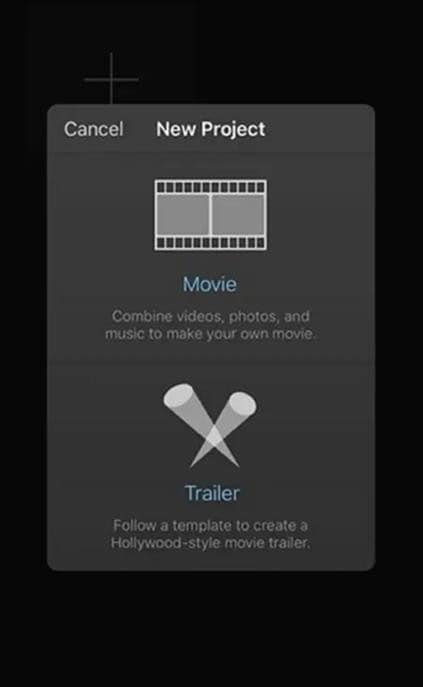
Step 2: In the New Project window, select Movie. Browse through your video clips in the gallery and import them.
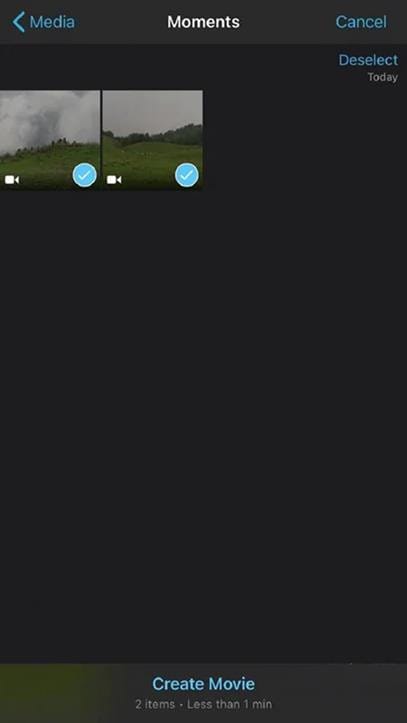
Step 3: Tap Create Movie at the iPhone screen’s bottom. The videos will automatically get merged in the iMovie timeline.
Step 4: Select the desired video file. You can include transition effects, background music, and other profiles.
Step 5: Tap Done to combine two videos into one on the iPhone using iMovie.
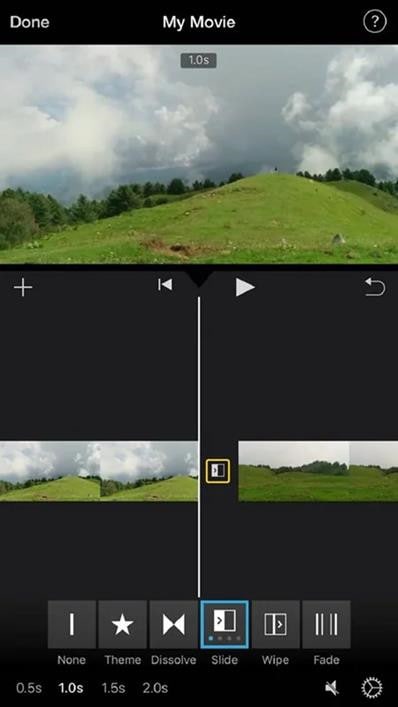
Step 6: To export your merged video file, tap the Share icon to save the video.
2 Ways to Merge/Combine FLV Files Online
Clideo (Paid online tool to merge FLV Files)
Now you can combine your FLV files online using Clideo’s FLV Merger. It allows you to combine several videos, images, and audio files. You will also be able to download the finished product in any format you want. And, as the tool operates online, it will not consume any of your device’s memory. Each file you add in the free edition can be up to 500 MB in size; if this is insufficient for you, you can always subscribe to Clideo Pro.
A Step-by-Step Guide
Step 1: Upload the FLV files…
Click on the “Choose files” button and select the necessary videos from your device. To add a video from Google Drive or Dropbox, use the little arrow to call a drop-down menu.
Step 2: Merge FLV and other files
To add more content, use the menu with all of the options from the previous stage. Rearrange them as you see fit. Crop the frame using one of the available aspect ratios. Upload a soundtrack, then cut it with the scissors icon and adjust the volume. When you’re done, choose a format and click “Merge.”
Step 3: Save joined FLV
Take a peek at the outcome. If you like it, save it to your device or cloud storage. Otherwise, you can return to editing without having to start over.
Veed’s Video Editor (Free online tool to merge FLV Files)
Now there’s no need to pay for expensive apps like Filmora or Wondershare Uniconvertor. You can merge your FLV files using Veed’s Video Editor. It lets you combine multiple flash videos together and export them as a single video file. You can simply do it all straight from your browser and from any device. Veed’s Video Editor is compatible with Windows XP, Windows 10, Mac, Linux, and all mobile devices. And, it is absolutely free. There’s no need for an account or to download anything.
A Step-by-Step Guide
Step 1: Upload the FLV files…
Select multiple FLV videos after clicking on ‘Choose FLV Files’. You can also drag and drop your videos into the box. They’ll be added to the editor.
Step 2: Start editing or add more videos…
You’ll be directed to the video editor, where you can split, combine, and rearrange your video clips. This is a purely optional step. More videos can be added by clicking the plus (+) sign in the editing window or by selecting “Upload” from the left menu.
Step 3: Export your new video…
You can now save your merged videos as a single MP4 file. Simply select ‘Export,’ and your download will initiate.
FAQs about Merging FLV Files
Question 1: How to combine FLV files?
Answer: To combine FLV files, hold down the Ctrl or Shift key while selecting multiple FLV files in the User’s Album, and then drag and drop to the video track on the Timeline. All FLV files will automatically merge one after the other in order.
Question 2: What browser should be used to Merge FLV?
Answer: You can use any modern browser to Merge FLV, such as Google Chrome, Firefox, Opera, or Safari.
Question 3: How long does it take to Merge FLV files?
Answer: The FLV file merger is quite quick and takes only a few seconds.
So, if you have been looking for the best options on how to merge FLV files on different mediums, the above-listed apps will serve your purpose. Now, check out the supported features, formats, and other merging functions of all the apps and choose the one that best meets your needs.
For macOS 10.14 or later
A Step-by-Step Guide to Merge FLV files on Windows/Mac using Wondershare Filmora
Step 1: Launch Wondershare Filmora and load FLV files…
When you run this FLV joiner, simply click “Import” to load all of the local FLV files that you want to merge to the User’s album of this FLV video merger. You can also just drag and drop the target files from your PC into the album.

Step 2: Merge FLV files into one…
At the bottom of this FLV file merger, there lies a Timeline. Drag FLV files from the album to the Timeline and use the slider bar to help you arrange all FLV files in the Timeline without overlapping them. That’s very important as if you put one video to another, the original video will get split. Also, make sure that all FLV files are placed in the sequence in which they are to be played. If not, you can rearrange any video clip with a simple drag-and-drop.

Step 3: Choose the target format as FLV…
When you are sure that all FLV files are in the correct required order on the Timeline, you can view the effect in real-time in the preview pane. If everything is fine, you are now ready to export this new FLV file. All you have to do is just press the “Create”
button, then go to the “Format” tab > “FLV” output format in the output window.

Step 4: Export a new FLV file…
Finally, click the “Create” button to save the settings and export the new FLV file simultaneously. When it’s done, simply navigate to the whole FLV video using the output file path.

Alternative Way to Merge/Combine FLV Files on Windows
Joyoshare Media Cutter (Paid tool to merge FLV Files)
Joyoshare Video Joiner for Windows is a comprehensive and user-friendly audio and video merging software that supports a wide range of file formats such as FLV, F4V, HD,4K, MP4, M4V, M4A, DV, MPEG, FLAV, WMA, and others. It is not only a superb video joiner for joining FLV files in batches without re-encoding, but it is also a video editor thanks to the built-in advanced editing tool. That means you can customize and enhance your FLV files as required before integrating them. The two combing modes (high-speed mode and encoding mode) it employs are also noteworthy. With high-speed mode, you can join an unlimited number of FLV files losslessly and swiftly. You can merge files in different formats without gaps and customize the codec, resolution, bit rate, frame rate, and other parameters of your FLV files while in encoding mode.
A Step-by-Step Guide
Step 1: Add FLV files…
First, go to the Joyoshare website and download the Joyoshare Video Joiner installation package. Install and configure it on your computer. Then, import FLV files into the video joiner. There are two options: click “Open File” to choose them or drag them directly into the software.

Step 2: Choose a merging mode and export format…
You must pick a format from high-speed mode and encoding mode based on your requirements by using the “Format” button. The former is only for combining files of the same format losslessly at 60 X speed. The other is for users who want to modify files while joining files in different formats. With the use of a gear icon beside the selected output format, users can change video settings such as resolution, bit rate, codes, and so on while in encoding mode.

Step 3: Remove undesirable parts…
Once finished choosing mode and format, simply press “OK” to go back to the main screen. Then double-click these FLV files one by one to preview them. You can change the timeline to remove unnecessary sections from your FLV videos. Moreover, renaming and rearranging these video files can also be realized in this step.

Step 4: Edit FLV files (optional)…
The software has an editor that allows you to easily and flexibly enhance your FLV video files by clicking “Edit” next to each file before joining.

Step 5: Merge FLV files and save…
Finally, all you have to do is press the “Convert” button to enable Joyoshare Video Joiner to begin combining these FLV files. The merged FLV file will be saved as a converted file on your computer.
Format Factory (Free tool to merge FLV Files)
Format Factory is a free Windows video joiner, recorder, converter, downloader, and editor. It supports a wide range of file types, including FLV, MKV, MP4, 3GP, WMV, SWF, AVI, MPG, VOB, WebM, and others. It is not difficult to use it to combine FLV files.
A Step-by-Step Guide
Step 1: Run Format Factory…
After installing Format Factory, go to “Video Joiner & Mux” to proceed.

Step 2: Add FLV files…
“Add Files” allows you to import FLV files in batches. When all FLV files have been loaded, click “Clip” to clip and crop FLV files as needed. Then, under “Output Settings,” choose an output format and further customize the output quality.


Step 3: Merge files…
Once done, click “OK” to get back to the first window and press “Start” to begin the merging
process.

Alternative Way to Merge/Combine FLV Files on Mac
iDealshare VideoGo (Paid tool to merge FLV Files)
You can use iDealshare VideoGo to convert media files for playback anywhere. It supports a wide range of video formats, both SD and HD. The application also features its own editor, which includes a wide range of activities. It allows you to trim the selected video, crop it, modify the brightness, contrast, and saturation, add text and image watermarks, and manage or add your own subtitles.

A Step-by-Step Guide
Step 1: Import FLV files…
To import the FLV video files that you want to merge, click the “Add File” button or just drag & drop the files.
Step 2: Choose output format…
Choose FLV as the output video format. Select FLV from the “General Video” category from the “Profile” pop-up menu.
Step 3: Merge FLV files…
Select the FLV video files that you wish to merge into one in the main window list, and then choose the “Merge Selected into One” option from the context menu. Click the “Convert” button to start combining the videos.

Faasoft FLV Joiner/Merger (Free tool to merge FLV Files)
Faasoft FLV Joiner/Merger is used to combine FLV files without any re-encoding as well as retain the output quality. Merges FLV files and converts them to more popular formats as well like; MP4, AVI, MOV, WMV, MKV, ASF, ProRes, MXF, OGV, 3GP, etc. to get played on multiple mediums. Apart from FLV files, Faasoft FLV Joiner allows you to merge various kinds of video and audio clips. In addition, this powerful tool works more than just an FLV Merger, i.e.; It is, even more, an in-built video and audio editor, with which, you can optimize any files as per requirement.
A Step-by-Step Guide
Step 1: Load FLV files…
To add FLV files to this Joiner, run FLV Merger and drag and drop the folder containing FLV files to the program’s main screen. If the FLV files you wish to merge are not in the same folder, you can drag them one by one to the software. You should put them together first to save time.
Step 2: List to merge…
Once all FLV files have loaded, pick them all and choose “Merge Selected into One” from the context menu. In the task list, the combined FLV file will have an extension name similar to “Merge 1.”

Step 3: Convert FLV clips…
Click the “Profile” drop-down button to select “FLV Flash Video Format (*.flv)” from the “Picture & Animation” category as the output format. If you want to re-encode the merged FLV file to another video format, select another output format from the list above.
Step 4: Start joining…
Simply click the round “Convert” button in the bottom right corner and let this fantastic tool do the rest.
2 Ways to Merge/Combine FLV Files on Android
Video Merger by Alyaanah (Paid tool to merge FLV Files)
Video Merger can merge any number of videos together in one video. It also accepts almost any format of videos as input. Some of the input formats for merging that are supported are mp4, mkv, 3gp, 3gpp, mov, flv, avi, mpg, mpeg, m4v, vob, wmv, webm, mts, ts, m2ts, and so on. It can also convert the combined video to a variety of formats. Merged output formats supported include mp4, mkv, mov, avi, 3gp, and others. This application allows you to combine videos with different formats, bitrates, and frame rates into a single video. It also scales multiple videos into a single scale and merges them together. It can also merge videos with different resolutions into one video. The merged videos can also be compressed together maintaining original quality to a smaller sized video than all the original video sizes combined.
Video merger allows you to merge in three different ways as follows;
Side by side:
Choose two files, and they will be merged in a side-by-side format (Horizontal stack).
Top-Bottom:
Choose two files, and they will be merged top to bottom (Vertical stack).
Sequential:
You can select unlimited files and they will be merged one after the other in a sequential format.
VideoChain by Arypex Initiative (Free tool to merge FLV Files)
Now you can combine video files from your Android device camera as well and for free. VideoChain is an easy to learn and use app (with in-built instructions) that allows you to easily combine video clips to create one video using the most advanced encoding techniques. It is an excellent tool for merging video clips from your front and rear cameras, as well as portrait and landscape video files, into a single file. It can combine MP4, MPEG, MKV, FLV, and other video clips with four different quality/compression settings available.
2 Ways to Merge/Combine FLV Files on iPhone
Magisto Video Editor (Paid tool to merge FLV Files)
It is a wonderful app to put FLV clips together on an iPhone. Using this versatile video editing app, you can merge multiple videos and create eye-catching files of up to 5 minutes. You can add text, colors, and even text slides between video frames to the video. The app’s filters can be used to further enhance the files. The app also supports a large library of audio files, which you can use to add music to your video files. And, to use all of the app’s features, you must have a paid subscription.


iMovie (Free tool to merge FLV Files)
iMovie is one of the most popular video editing apps for iOS users. You can edit and merge videos on iMovie with ease. The app is free and secure. If you are looking for a professional way to put two videos together on your iPhone, iMovie can be a good choice. FLV videos can be converted to WMV, M4V, and other popular video formats after merging. You can also modify the video output settings and delete the selected video segments as well.
A Step-by-Step Guide
Step 1: Launch the iMovie app on your iPhone. In the Projects window, press the + button.

Step 2: In the New Project window, select Movie. Browse through your video clips in the gallery and import them.

Step 3: Tap Create Movie at the iPhone screen’s bottom. The videos will automatically get merged in the iMovie timeline.
Step 4: Select the desired video file. You can include transition effects, background music, and other profiles.
Step 5: Tap Done to combine two videos into one on the iPhone using iMovie.

Step 6: To export your merged video file, tap the Share icon to save the video.
2 Ways to Merge/Combine FLV Files Online
Clideo (Paid online tool to merge FLV Files)
Now you can combine your FLV files online using Clideo’s FLV Merger. It allows you to combine several videos, images, and audio files. You will also be able to download the finished product in any format you want. And, as the tool operates online, it will not consume any of your device’s memory. Each file you add in the free edition can be up to 500 MB in size; if this is insufficient for you, you can always subscribe to Clideo Pro.
A Step-by-Step Guide
Step 1: Upload the FLV files…
Click on the “Choose files” button and select the necessary videos from your device. To add a video from Google Drive or Dropbox, use the little arrow to call a drop-down menu.
Step 2: Merge FLV and other files
To add more content, use the menu with all of the options from the previous stage. Rearrange them as you see fit. Crop the frame using one of the available aspect ratios. Upload a soundtrack, then cut it with the scissors icon and adjust the volume. When you’re done, choose a format and click “Merge.”
Step 3: Save joined FLV
Take a peek at the outcome. If you like it, save it to your device or cloud storage. Otherwise, you can return to editing without having to start over.
Veed’s Video Editor (Free online tool to merge FLV Files)
Now there’s no need to pay for expensive apps like Filmora or Wondershare Uniconvertor. You can merge your FLV files using Veed’s Video Editor. It lets you combine multiple flash videos together and export them as a single video file. You can simply do it all straight from your browser and from any device. Veed’s Video Editor is compatible with Windows XP, Windows 10, Mac, Linux, and all mobile devices. And, it is absolutely free. There’s no need for an account or to download anything.
A Step-by-Step Guide
Step 1: Upload the FLV files…
Select multiple FLV videos after clicking on ‘Choose FLV Files’. You can also drag and drop your videos into the box. They’ll be added to the editor.
Step 2: Start editing or add more videos…
You’ll be directed to the video editor, where you can split, combine, and rearrange your video clips. This is a purely optional step. More videos can be added by clicking the plus (+) sign in the editing window or by selecting “Upload” from the left menu.
Step 3: Export your new video…
You can now save your merged videos as a single MP4 file. Simply select ‘Export,’ and your download will initiate.
FAQs about Merging FLV Files
Question 1: How to combine FLV files?
Answer: To combine FLV files, hold down the Ctrl or Shift key while selecting multiple FLV files in the User’s Album, and then drag and drop to the video track on the Timeline. All FLV files will automatically merge one after the other in order.
Question 2: What browser should be used to Merge FLV?
Answer: You can use any modern browser to Merge FLV, such as Google Chrome, Firefox, Opera, or Safari.
Question 3: How long does it take to Merge FLV files?
Answer: The FLV file merger is quite quick and takes only a few seconds.
So, if you have been looking for the best options on how to merge FLV files on different mediums, the above-listed apps will serve your purpose. Now, check out the supported features, formats, and other merging functions of all the apps and choose the one that best meets your needs.
For macOS 10.14 or later
A Step-by-Step Guide to Merge FLV files on Windows/Mac using Wondershare Filmora
Step 1: Launch Wondershare Filmora and load FLV files…
When you run this FLV joiner, simply click “Import” to load all of the local FLV files that you want to merge to the User’s album of this FLV video merger. You can also just drag and drop the target files from your PC into the album.

Step 2: Merge FLV files into one…
At the bottom of this FLV file merger, there lies a Timeline. Drag FLV files from the album to the Timeline and use the slider bar to help you arrange all FLV files in the Timeline without overlapping them. That’s very important as if you put one video to another, the original video will get split. Also, make sure that all FLV files are placed in the sequence in which they are to be played. If not, you can rearrange any video clip with a simple drag-and-drop.

Step 3: Choose the target format as FLV…
When you are sure that all FLV files are in the correct required order on the Timeline, you can view the effect in real-time in the preview pane. If everything is fine, you are now ready to export this new FLV file. All you have to do is just press the “Create”
button, then go to the “Format” tab > “FLV” output format in the output window.

Step 4: Export a new FLV file…
Finally, click the “Create” button to save the settings and export the new FLV file simultaneously. When it’s done, simply navigate to the whole FLV video using the output file path.

Alternative Way to Merge/Combine FLV Files on Windows
Joyoshare Media Cutter (Paid tool to merge FLV Files)
Joyoshare Video Joiner for Windows is a comprehensive and user-friendly audio and video merging software that supports a wide range of file formats such as FLV, F4V, HD,4K, MP4, M4V, M4A, DV, MPEG, FLAV, WMA, and others. It is not only a superb video joiner for joining FLV files in batches without re-encoding, but it is also a video editor thanks to the built-in advanced editing tool. That means you can customize and enhance your FLV files as required before integrating them. The two combing modes (high-speed mode and encoding mode) it employs are also noteworthy. With high-speed mode, you can join an unlimited number of FLV files losslessly and swiftly. You can merge files in different formats without gaps and customize the codec, resolution, bit rate, frame rate, and other parameters of your FLV files while in encoding mode.
A Step-by-Step Guide
Step 1: Add FLV files…
First, go to the Joyoshare website and download the Joyoshare Video Joiner installation package. Install and configure it on your computer. Then, import FLV files into the video joiner. There are two options: click “Open File” to choose them or drag them directly into the software.

Step 2: Choose a merging mode and export format…
You must pick a format from high-speed mode and encoding mode based on your requirements by using the “Format” button. The former is only for combining files of the same format losslessly at 60 X speed. The other is for users who want to modify files while joining files in different formats. With the use of a gear icon beside the selected output format, users can change video settings such as resolution, bit rate, codes, and so on while in encoding mode.

Step 3: Remove undesirable parts…
Once finished choosing mode and format, simply press “OK” to go back to the main screen. Then double-click these FLV files one by one to preview them. You can change the timeline to remove unnecessary sections from your FLV videos. Moreover, renaming and rearranging these video files can also be realized in this step.

Step 4: Edit FLV files (optional)…
The software has an editor that allows you to easily and flexibly enhance your FLV video files by clicking “Edit” next to each file before joining.

Step 5: Merge FLV files and save…
Finally, all you have to do is press the “Convert” button to enable Joyoshare Video Joiner to begin combining these FLV files. The merged FLV file will be saved as a converted file on your computer.
Format Factory (Free tool to merge FLV Files)
Format Factory is a free Windows video joiner, recorder, converter, downloader, and editor. It supports a wide range of file types, including FLV, MKV, MP4, 3GP, WMV, SWF, AVI, MPG, VOB, WebM, and others. It is not difficult to use it to combine FLV files.
A Step-by-Step Guide
Step 1: Run Format Factory…
After installing Format Factory, go to “Video Joiner & Mux” to proceed.

Step 2: Add FLV files…
“Add Files” allows you to import FLV files in batches. When all FLV files have been loaded, click “Clip” to clip and crop FLV files as needed. Then, under “Output Settings,” choose an output format and further customize the output quality.


Step 3: Merge files…
Once done, click “OK” to get back to the first window and press “Start” to begin the merging
process.

Alternative Way to Merge/Combine FLV Files on Mac
iDealshare VideoGo (Paid tool to merge FLV Files)
You can use iDealshare VideoGo to convert media files for playback anywhere. It supports a wide range of video formats, both SD and HD. The application also features its own editor, which includes a wide range of activities. It allows you to trim the selected video, crop it, modify the brightness, contrast, and saturation, add text and image watermarks, and manage or add your own subtitles.

A Step-by-Step Guide
Step 1: Import FLV files…
To import the FLV video files that you want to merge, click the “Add File” button or just drag & drop the files.
Step 2: Choose output format…
Choose FLV as the output video format. Select FLV from the “General Video” category from the “Profile” pop-up menu.
Step 3: Merge FLV files…
Select the FLV video files that you wish to merge into one in the main window list, and then choose the “Merge Selected into One” option from the context menu. Click the “Convert” button to start combining the videos.

Faasoft FLV Joiner/Merger (Free tool to merge FLV Files)
Faasoft FLV Joiner/Merger is used to combine FLV files without any re-encoding as well as retain the output quality. Merges FLV files and converts them to more popular formats as well like; MP4, AVI, MOV, WMV, MKV, ASF, ProRes, MXF, OGV, 3GP, etc. to get played on multiple mediums. Apart from FLV files, Faasoft FLV Joiner allows you to merge various kinds of video and audio clips. In addition, this powerful tool works more than just an FLV Merger, i.e.; It is, even more, an in-built video and audio editor, with which, you can optimize any files as per requirement.
A Step-by-Step Guide
Step 1: Load FLV files…
To add FLV files to this Joiner, run FLV Merger and drag and drop the folder containing FLV files to the program’s main screen. If the FLV files you wish to merge are not in the same folder, you can drag them one by one to the software. You should put them together first to save time.
Step 2: List to merge…
Once all FLV files have loaded, pick them all and choose “Merge Selected into One” from the context menu. In the task list, the combined FLV file will have an extension name similar to “Merge 1.”

Step 3: Convert FLV clips…
Click the “Profile” drop-down button to select “FLV Flash Video Format (*.flv)” from the “Picture & Animation” category as the output format. If you want to re-encode the merged FLV file to another video format, select another output format from the list above.
Step 4: Start joining…
Simply click the round “Convert” button in the bottom right corner and let this fantastic tool do the rest.
2 Ways to Merge/Combine FLV Files on Android
Video Merger by Alyaanah (Paid tool to merge FLV Files)
Video Merger can merge any number of videos together in one video. It also accepts almost any format of videos as input. Some of the input formats for merging that are supported are mp4, mkv, 3gp, 3gpp, mov, flv, avi, mpg, mpeg, m4v, vob, wmv, webm, mts, ts, m2ts, and so on. It can also convert the combined video to a variety of formats. Merged output formats supported include mp4, mkv, mov, avi, 3gp, and others. This application allows you to combine videos with different formats, bitrates, and frame rates into a single video. It also scales multiple videos into a single scale and merges them together. It can also merge videos with different resolutions into one video. The merged videos can also be compressed together maintaining original quality to a smaller sized video than all the original video sizes combined.
Video merger allows you to merge in three different ways as follows;
Side by side:
Choose two files, and they will be merged in a side-by-side format (Horizontal stack).
Top-Bottom:
Choose two files, and they will be merged top to bottom (Vertical stack).
Sequential:
You can select unlimited files and they will be merged one after the other in a sequential format.
VideoChain by Arypex Initiative (Free tool to merge FLV Files)
Now you can combine video files from your Android device camera as well and for free. VideoChain is an easy to learn and use app (with in-built instructions) that allows you to easily combine video clips to create one video using the most advanced encoding techniques. It is an excellent tool for merging video clips from your front and rear cameras, as well as portrait and landscape video files, into a single file. It can combine MP4, MPEG, MKV, FLV, and other video clips with four different quality/compression settings available.
2 Ways to Merge/Combine FLV Files on iPhone
Magisto Video Editor (Paid tool to merge FLV Files)
It is a wonderful app to put FLV clips together on an iPhone. Using this versatile video editing app, you can merge multiple videos and create eye-catching files of up to 5 minutes. You can add text, colors, and even text slides between video frames to the video. The app’s filters can be used to further enhance the files. The app also supports a large library of audio files, which you can use to add music to your video files. And, to use all of the app’s features, you must have a paid subscription.


iMovie (Free tool to merge FLV Files)
iMovie is one of the most popular video editing apps for iOS users. You can edit and merge videos on iMovie with ease. The app is free and secure. If you are looking for a professional way to put two videos together on your iPhone, iMovie can be a good choice. FLV videos can be converted to WMV, M4V, and other popular video formats after merging. You can also modify the video output settings and delete the selected video segments as well.
A Step-by-Step Guide
Step 1: Launch the iMovie app on your iPhone. In the Projects window, press the + button.

Step 2: In the New Project window, select Movie. Browse through your video clips in the gallery and import them.

Step 3: Tap Create Movie at the iPhone screen’s bottom. The videos will automatically get merged in the iMovie timeline.
Step 4: Select the desired video file. You can include transition effects, background music, and other profiles.
Step 5: Tap Done to combine two videos into one on the iPhone using iMovie.

Step 6: To export your merged video file, tap the Share icon to save the video.
2 Ways to Merge/Combine FLV Files Online
Clideo (Paid online tool to merge FLV Files)
Now you can combine your FLV files online using Clideo’s FLV Merger. It allows you to combine several videos, images, and audio files. You will also be able to download the finished product in any format you want. And, as the tool operates online, it will not consume any of your device’s memory. Each file you add in the free edition can be up to 500 MB in size; if this is insufficient for you, you can always subscribe to Clideo Pro.
A Step-by-Step Guide
Step 1: Upload the FLV files…
Click on the “Choose files” button and select the necessary videos from your device. To add a video from Google Drive or Dropbox, use the little arrow to call a drop-down menu.
Step 2: Merge FLV and other files
To add more content, use the menu with all of the options from the previous stage. Rearrange them as you see fit. Crop the frame using one of the available aspect ratios. Upload a soundtrack, then cut it with the scissors icon and adjust the volume. When you’re done, choose a format and click “Merge.”
Step 3: Save joined FLV
Take a peek at the outcome. If you like it, save it to your device or cloud storage. Otherwise, you can return to editing without having to start over.
Veed’s Video Editor (Free online tool to merge FLV Files)
Now there’s no need to pay for expensive apps like Filmora or Wondershare Uniconvertor. You can merge your FLV files using Veed’s Video Editor. It lets you combine multiple flash videos together and export them as a single video file. You can simply do it all straight from your browser and from any device. Veed’s Video Editor is compatible with Windows XP, Windows 10, Mac, Linux, and all mobile devices. And, it is absolutely free. There’s no need for an account or to download anything.
A Step-by-Step Guide
Step 1: Upload the FLV files…
Select multiple FLV videos after clicking on ‘Choose FLV Files’. You can also drag and drop your videos into the box. They’ll be added to the editor.
Step 2: Start editing or add more videos…
You’ll be directed to the video editor, where you can split, combine, and rearrange your video clips. This is a purely optional step. More videos can be added by clicking the plus (+) sign in the editing window or by selecting “Upload” from the left menu.
Step 3: Export your new video…
You can now save your merged videos as a single MP4 file. Simply select ‘Export,’ and your download will initiate.
FAQs about Merging FLV Files
Question 1: How to combine FLV files?
Answer: To combine FLV files, hold down the Ctrl or Shift key while selecting multiple FLV files in the User’s Album, and then drag and drop to the video track on the Timeline. All FLV files will automatically merge one after the other in order.
Question 2: What browser should be used to Merge FLV?
Answer: You can use any modern browser to Merge FLV, such as Google Chrome, Firefox, Opera, or Safari.
Question 3: How long does it take to Merge FLV files?
Answer: The FLV file merger is quite quick and takes only a few seconds.
So, if you have been looking for the best options on how to merge FLV files on different mediums, the above-listed apps will serve your purpose. Now, check out the supported features, formats, and other merging functions of all the apps and choose the one that best meets your needs.
For macOS 10.14 or later
A Step-by-Step Guide to Merge FLV files on Windows/Mac using Wondershare Filmora
Step 1: Launch Wondershare Filmora and load FLV files…
When you run this FLV joiner, simply click “Import” to load all of the local FLV files that you want to merge to the User’s album of this FLV video merger. You can also just drag and drop the target files from your PC into the album.

Step 2: Merge FLV files into one…
At the bottom of this FLV file merger, there lies a Timeline. Drag FLV files from the album to the Timeline and use the slider bar to help you arrange all FLV files in the Timeline without overlapping them. That’s very important as if you put one video to another, the original video will get split. Also, make sure that all FLV files are placed in the sequence in which they are to be played. If not, you can rearrange any video clip with a simple drag-and-drop.

Step 3: Choose the target format as FLV…
When you are sure that all FLV files are in the correct required order on the Timeline, you can view the effect in real-time in the preview pane. If everything is fine, you are now ready to export this new FLV file. All you have to do is just press the “Create”
button, then go to the “Format” tab > “FLV” output format in the output window.

Step 4: Export a new FLV file…
Finally, click the “Create” button to save the settings and export the new FLV file simultaneously. When it’s done, simply navigate to the whole FLV video using the output file path.

Alternative Way to Merge/Combine FLV Files on Windows
Joyoshare Media Cutter (Paid tool to merge FLV Files)
Joyoshare Video Joiner for Windows is a comprehensive and user-friendly audio and video merging software that supports a wide range of file formats such as FLV, F4V, HD,4K, MP4, M4V, M4A, DV, MPEG, FLAV, WMA, and others. It is not only a superb video joiner for joining FLV files in batches without re-encoding, but it is also a video editor thanks to the built-in advanced editing tool. That means you can customize and enhance your FLV files as required before integrating them. The two combing modes (high-speed mode and encoding mode) it employs are also noteworthy. With high-speed mode, you can join an unlimited number of FLV files losslessly and swiftly. You can merge files in different formats without gaps and customize the codec, resolution, bit rate, frame rate, and other parameters of your FLV files while in encoding mode.
A Step-by-Step Guide
Step 1: Add FLV files…
First, go to the Joyoshare website and download the Joyoshare Video Joiner installation package. Install and configure it on your computer. Then, import FLV files into the video joiner. There are two options: click “Open File” to choose them or drag them directly into the software.

Step 2: Choose a merging mode and export format…
You must pick a format from high-speed mode and encoding mode based on your requirements by using the “Format” button. The former is only for combining files of the same format losslessly at 60 X speed. The other is for users who want to modify files while joining files in different formats. With the use of a gear icon beside the selected output format, users can change video settings such as resolution, bit rate, codes, and so on while in encoding mode.

Step 3: Remove undesirable parts…
Once finished choosing mode and format, simply press “OK” to go back to the main screen. Then double-click these FLV files one by one to preview them. You can change the timeline to remove unnecessary sections from your FLV videos. Moreover, renaming and rearranging these video files can also be realized in this step.

Step 4: Edit FLV files (optional)…
The software has an editor that allows you to easily and flexibly enhance your FLV video files by clicking “Edit” next to each file before joining.

Step 5: Merge FLV files and save…
Finally, all you have to do is press the “Convert” button to enable Joyoshare Video Joiner to begin combining these FLV files. The merged FLV file will be saved as a converted file on your computer.
Format Factory (Free tool to merge FLV Files)
Format Factory is a free Windows video joiner, recorder, converter, downloader, and editor. It supports a wide range of file types, including FLV, MKV, MP4, 3GP, WMV, SWF, AVI, MPG, VOB, WebM, and others. It is not difficult to use it to combine FLV files.
A Step-by-Step Guide
Step 1: Run Format Factory…
After installing Format Factory, go to “Video Joiner & Mux” to proceed.

Step 2: Add FLV files…
“Add Files” allows you to import FLV files in batches. When all FLV files have been loaded, click “Clip” to clip and crop FLV files as needed. Then, under “Output Settings,” choose an output format and further customize the output quality.


Step 3: Merge files…
Once done, click “OK” to get back to the first window and press “Start” to begin the merging
process.

Alternative Way to Merge/Combine FLV Files on Mac
iDealshare VideoGo (Paid tool to merge FLV Files)
You can use iDealshare VideoGo to convert media files for playback anywhere. It supports a wide range of video formats, both SD and HD. The application also features its own editor, which includes a wide range of activities. It allows you to trim the selected video, crop it, modify the brightness, contrast, and saturation, add text and image watermarks, and manage or add your own subtitles.

A Step-by-Step Guide
Step 1: Import FLV files…
To import the FLV video files that you want to merge, click the “Add File” button or just drag & drop the files.
Step 2: Choose output format…
Choose FLV as the output video format. Select FLV from the “General Video” category from the “Profile” pop-up menu.
Step 3: Merge FLV files…
Select the FLV video files that you wish to merge into one in the main window list, and then choose the “Merge Selected into One” option from the context menu. Click the “Convert” button to start combining the videos.

Faasoft FLV Joiner/Merger (Free tool to merge FLV Files)
Faasoft FLV Joiner/Merger is used to combine FLV files without any re-encoding as well as retain the output quality. Merges FLV files and converts them to more popular formats as well like; MP4, AVI, MOV, WMV, MKV, ASF, ProRes, MXF, OGV, 3GP, etc. to get played on multiple mediums. Apart from FLV files, Faasoft FLV Joiner allows you to merge various kinds of video and audio clips. In addition, this powerful tool works more than just an FLV Merger, i.e.; It is, even more, an in-built video and audio editor, with which, you can optimize any files as per requirement.
A Step-by-Step Guide
Step 1: Load FLV files…
To add FLV files to this Joiner, run FLV Merger and drag and drop the folder containing FLV files to the program’s main screen. If the FLV files you wish to merge are not in the same folder, you can drag them one by one to the software. You should put them together first to save time.
Step 2: List to merge…
Once all FLV files have loaded, pick them all and choose “Merge Selected into One” from the context menu. In the task list, the combined FLV file will have an extension name similar to “Merge 1.”

Step 3: Convert FLV clips…
Click the “Profile” drop-down button to select “FLV Flash Video Format (*.flv)” from the “Picture & Animation” category as the output format. If you want to re-encode the merged FLV file to another video format, select another output format from the list above.
Step 4: Start joining…
Simply click the round “Convert” button in the bottom right corner and let this fantastic tool do the rest.
2 Ways to Merge/Combine FLV Files on Android
Video Merger by Alyaanah (Paid tool to merge FLV Files)
Video Merger can merge any number of videos together in one video. It also accepts almost any format of videos as input. Some of the input formats for merging that are supported are mp4, mkv, 3gp, 3gpp, mov, flv, avi, mpg, mpeg, m4v, vob, wmv, webm, mts, ts, m2ts, and so on. It can also convert the combined video to a variety of formats. Merged output formats supported include mp4, mkv, mov, avi, 3gp, and others. This application allows you to combine videos with different formats, bitrates, and frame rates into a single video. It also scales multiple videos into a single scale and merges them together. It can also merge videos with different resolutions into one video. The merged videos can also be compressed together maintaining original quality to a smaller sized video than all the original video sizes combined.
Video merger allows you to merge in three different ways as follows;
Side by side:
Choose two files, and they will be merged in a side-by-side format (Horizontal stack).
Top-Bottom:
Choose two files, and they will be merged top to bottom (Vertical stack).
Sequential:
You can select unlimited files and they will be merged one after the other in a sequential format.
VideoChain by Arypex Initiative (Free tool to merge FLV Files)
Now you can combine video files from your Android device camera as well and for free. VideoChain is an easy to learn and use app (with in-built instructions) that allows you to easily combine video clips to create one video using the most advanced encoding techniques. It is an excellent tool for merging video clips from your front and rear cameras, as well as portrait and landscape video files, into a single file. It can combine MP4, MPEG, MKV, FLV, and other video clips with four different quality/compression settings available.
2 Ways to Merge/Combine FLV Files on iPhone
Magisto Video Editor (Paid tool to merge FLV Files)
It is a wonderful app to put FLV clips together on an iPhone. Using this versatile video editing app, you can merge multiple videos and create eye-catching files of up to 5 minutes. You can add text, colors, and even text slides between video frames to the video. The app’s filters can be used to further enhance the files. The app also supports a large library of audio files, which you can use to add music to your video files. And, to use all of the app’s features, you must have a paid subscription.


iMovie (Free tool to merge FLV Files)
iMovie is one of the most popular video editing apps for iOS users. You can edit and merge videos on iMovie with ease. The app is free and secure. If you are looking for a professional way to put two videos together on your iPhone, iMovie can be a good choice. FLV videos can be converted to WMV, M4V, and other popular video formats after merging. You can also modify the video output settings and delete the selected video segments as well.
A Step-by-Step Guide
Step 1: Launch the iMovie app on your iPhone. In the Projects window, press the + button.

Step 2: In the New Project window, select Movie. Browse through your video clips in the gallery and import them.

Step 3: Tap Create Movie at the iPhone screen’s bottom. The videos will automatically get merged in the iMovie timeline.
Step 4: Select the desired video file. You can include transition effects, background music, and other profiles.
Step 5: Tap Done to combine two videos into one on the iPhone using iMovie.

Step 6: To export your merged video file, tap the Share icon to save the video.
2 Ways to Merge/Combine FLV Files Online
Clideo (Paid online tool to merge FLV Files)
Now you can combine your FLV files online using Clideo’s FLV Merger. It allows you to combine several videos, images, and audio files. You will also be able to download the finished product in any format you want. And, as the tool operates online, it will not consume any of your device’s memory. Each file you add in the free edition can be up to 500 MB in size; if this is insufficient for you, you can always subscribe to Clideo Pro.
A Step-by-Step Guide
Step 1: Upload the FLV files…
Click on the “Choose files” button and select the necessary videos from your device. To add a video from Google Drive or Dropbox, use the little arrow to call a drop-down menu.
Step 2: Merge FLV and other files
To add more content, use the menu with all of the options from the previous stage. Rearrange them as you see fit. Crop the frame using one of the available aspect ratios. Upload a soundtrack, then cut it with the scissors icon and adjust the volume. When you’re done, choose a format and click “Merge.”
Step 3: Save joined FLV
Take a peek at the outcome. If you like it, save it to your device or cloud storage. Otherwise, you can return to editing without having to start over.
Veed’s Video Editor (Free online tool to merge FLV Files)
Now there’s no need to pay for expensive apps like Filmora or Wondershare Uniconvertor. You can merge your FLV files using Veed’s Video Editor. It lets you combine multiple flash videos together and export them as a single video file. You can simply do it all straight from your browser and from any device. Veed’s Video Editor is compatible with Windows XP, Windows 10, Mac, Linux, and all mobile devices. And, it is absolutely free. There’s no need for an account or to download anything.
A Step-by-Step Guide
Step 1: Upload the FLV files…
Select multiple FLV videos after clicking on ‘Choose FLV Files’. You can also drag and drop your videos into the box. They’ll be added to the editor.
Step 2: Start editing or add more videos…
You’ll be directed to the video editor, where you can split, combine, and rearrange your video clips. This is a purely optional step. More videos can be added by clicking the plus (+) sign in the editing window or by selecting “Upload” from the left menu.
Step 3: Export your new video…
You can now save your merged videos as a single MP4 file. Simply select ‘Export,’ and your download will initiate.
FAQs about Merging FLV Files
Question 1: How to combine FLV files?
Answer: To combine FLV files, hold down the Ctrl or Shift key while selecting multiple FLV files in the User’s Album, and then drag and drop to the video track on the Timeline. All FLV files will automatically merge one after the other in order.
Question 2: What browser should be used to Merge FLV?
Answer: You can use any modern browser to Merge FLV, such as Google Chrome, Firefox, Opera, or Safari.
Question 3: How long does it take to Merge FLV files?
Answer: The FLV file merger is quite quick and takes only a few seconds.
So, if you have been looking for the best options on how to merge FLV files on different mediums, the above-listed apps will serve your purpose. Now, check out the supported features, formats, and other merging functions of all the apps and choose the one that best meets your needs.
Also read:
- Updated In 2024, How to Create Educational Teaching Videos in An Outstanding Way?
- 2024 Approved Best 12 AI Video Generators to Pick
- New Learn More About the Video Editing Interface of Wondershare Filmora
- New Find Out What Ray Tracing Is in After Effects, How It Works, and Learn About Ray-Traced 3D Settings with Simple Instructions
- 2024 Approved 10 Best Slow-Motion Cameras to Try
- How To Quickly Create A Screen Print Effect In Photoshop Detailed Gui
- New 2024 Approved How to Do Motion Graphics in Filmora
- New General Knowledge About MP4 Format and Best MP4 Video Editor
- New 2024 Approved How to Create a Smooth Cut Transition Effect?
- New 2024 Approved An Ultimate Guide to Flexclip Online Trimmer
- Updated If Youre Wondering How to Employ Transition Effects in Your Videos to Create Your Signature Look, This Article Can Help
- Detailed Review of Kodak LUTs for 2024
- Updated In 2024, Want to Add an Exciting Countdown Timer to Your Wedding, Product Launch or Any Other Video Using After Effects or an Alternative Tool? This Article Will Help You Learn All About After Effects Countdown and the Procedure
- 2024 Approved A Guide to Effective Video Marketing
- Updated In 2024, Create Perfect Slow Motion Videos With The Best CapCut Templates
- Updated 2024 Approved The Quick and Simple Way to Mirror Video in Premiere Pro
- Updated 2024 Approved Here Is a Guide on How You Can Resize Videos via Handbrake and Wondershare Filmora. The Former Is a Lightweight Tool Perfect for Batch Resizing Videos, While the Latter Is a Powerful Free Video Editing Software
- New Best 8 Online GIF to APNG Converters
- Solutions to restore deleted files from Tecno Pop 8
- In 2024, Hassle-Free Ways to Remove FRP Lock on Vivo Y100i Phones with/without a PC
- What is the best Pokemon for pokemon pvp ranking On Realme 11 Pro+? | Dr.fone
- A Perfect Guide To Remove or Disable Google Smart Lock On Realme GT 5 Pro
- 15 Best Strongest Pokémon To Use in Pokémon GO PvP Leagues For Samsung Galaxy F34 5G | Dr.fone
- In 2024, How does the stardust trade cost In pokemon go On Oppo Find X7 Ultra? | Dr.fone
- How to Fix iPad or Apple iPhone 6s Plus Stuck On Activation Lock?
- Apple iPhone 7 Asking for Passcode after iOS 17/14 Update, What to Do?
- Step-by-Step Tutorial How To Bypass Nokia G42 5G FRP
- Undeleted lost videos from Smart 8
- Easy Ways to Manage Your Google Pixel 7a Location Settings | Dr.fone
- Top 12 Prominent Samsung Galaxy A14 5G Fingerprint Not Working Solutions
- Top 10 Telegram Spy Tools On Vivo Y78t for Parents | Dr.fone
- In 2024, How to Cast Samsung Galaxy A15 4G Screen to PC Using WiFi | Dr.fone
- How to Unlock Vivo X100 Bootloader Easily
- How to Unlock iPhone 14 With an Apple Watch & What to Do if It Doesnt Work | Dr.fone
- In 2024, 3 Effective Ways to Unlock iCloud Account Without Password On Apple iPhone 15 Pro
- How To Stream Anything From Motorola Moto G04 to Apple TV | Dr.fone
- Title: An Ultimate Guide to Flexclip Online Trimmer
- Author: Morgan
- Created at : 2024-05-19 05:11:37
- Updated at : 2024-05-20 05:11:37
- Link: https://ai-video-editing.techidaily.com/an-ultimate-guide-to-flexclip-online-trimmer/
- License: This work is licensed under CC BY-NC-SA 4.0.

