
Are You Looking to Make Subscribe Channel Graphics? Here Is a Complete Guide on How to Make One on Your Own

Are You Looking to Make Subscribe Channel Graphics? Here Is a Complete Guide on How to Make One on Your Own
Professional video creators earn billions from YouTube, Tick Tock, and such platforms today. That strongly encourages newcomers to create their video content. But is it that easy? Of course not. To create a successful video and catch people’s attention, subscribe channel graphics are essential.
We have introduced how to create a simple custom subscribe button animation for beginners. We are here to give a more advanced and fully animated graphic that will provide your video with a professional look. Let’s start with knowing what a Subscription channel graphic is.
What Is a Subscribe Channel Graphic?
We here give a simple explanation for those new to a subscribe channel graphic. Have you ever watched videos on a platform like YouTube? If yes, you must have noticed some unique pictures encouraging viewers to subscribe to the channel. That is exactly what a subscribe channel graphic is. It looks like as below.
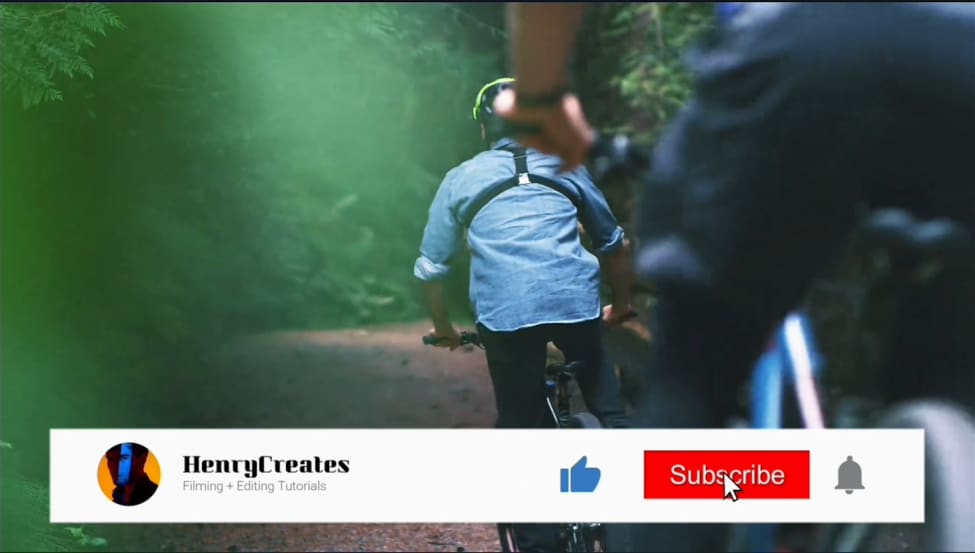
Every video crater incorporates such graphics on their videos before posting them. However, the hardest part is how to create one. We are now moving forward to see how we can make some outstanding subscribe button graphics using Wondershare Filmora.
Create Advanced Subscription Channel Graphics With Wondershare Filmora
Before we dive into our step-by-step guide, let’s first have an overview of our video editor. Wondershare Filmora is an incredible video editor with robust editing features. These features will transform your video into a stunning one within minutes. It also comes with a powerful screen recorder and a large filmstock of templates.
So using these templates, icons, and other features, here are the steps you need to follow to make an advanced subscribe channel graphic.
Free Download For Win 7 or later(64-bit)
Free Download For macOS 10.14 or later
Step1 Download and install Wondershare Filmora
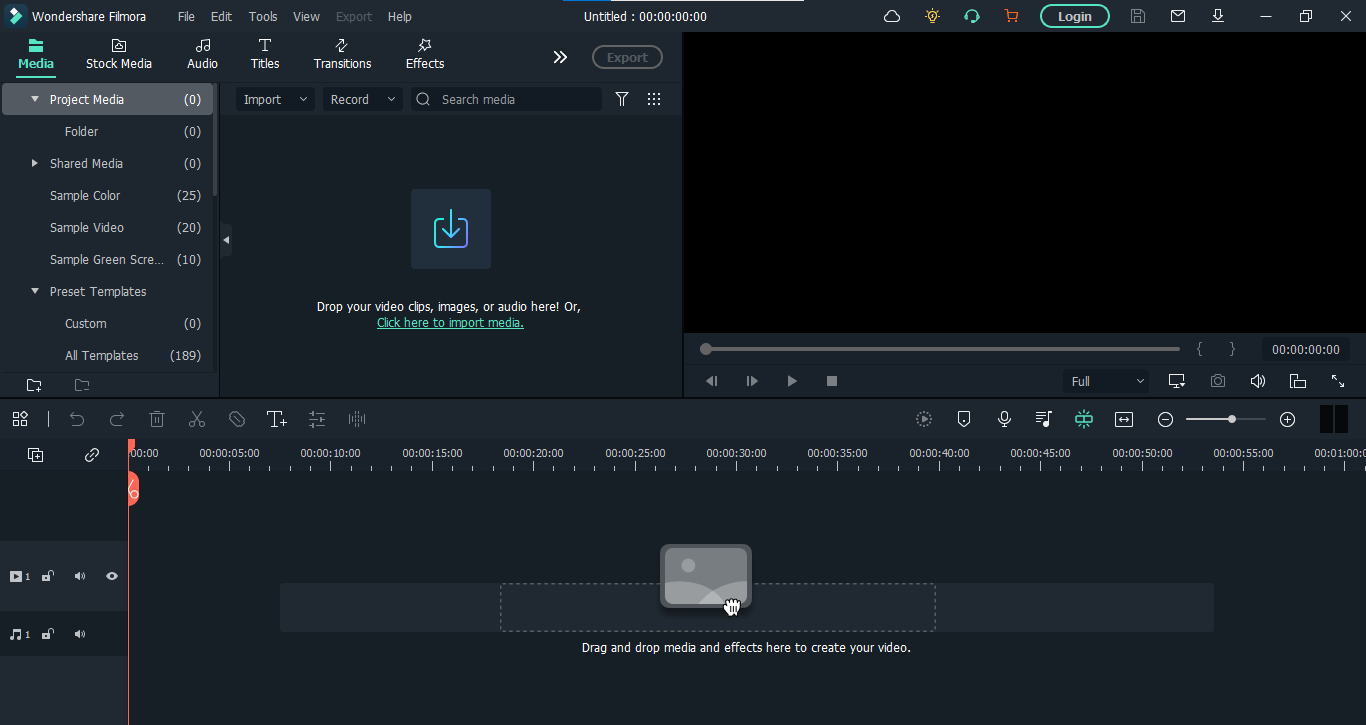
First, you need to download and install the video editor, Filmora. If you’ve already done that, then launch the software right away. But if you haven’t, then download it below. Once the download finishes, install the software on your computer.
When you launch the Filmora, click on “New Project.”
Step2 Make the structure of your graphics
For creating anything, we first need a flawless structure. Here, we can make the structure of Subscribe channel graphics using different colors, icons, texts, and channel photos. We’ll start by adding color layers.
1. Add color layers
- Go to the “Media” on the top left corner of the interface and Click on “Sample Color.” Here find the Green color and add it in the panel below as the first video layer by the drag-n-drop function.
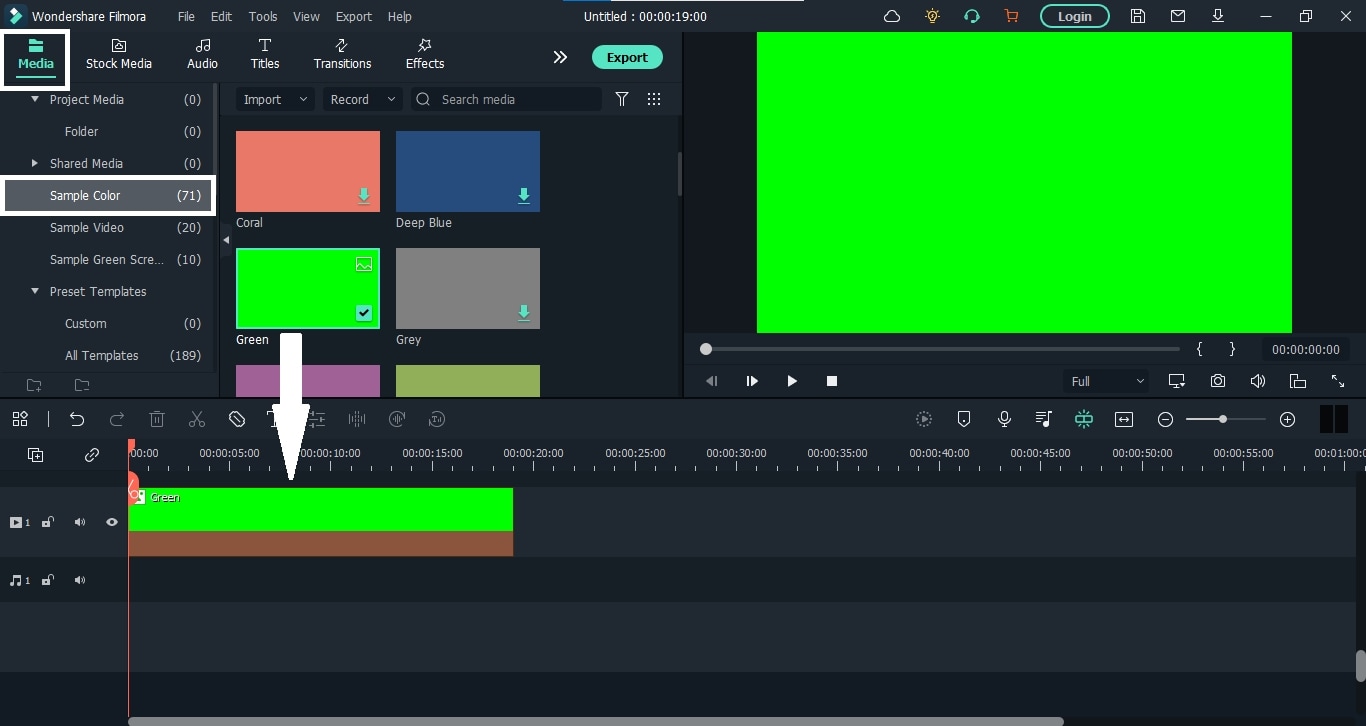
- We will key this layer at the end, so make sure not to use any other green graphics for your animation.
- Let’s lock this layer because we will no longer use it. For this, click on the “Lock” icon on the layer’s left side.
- Add white and red colors and stack them on top of the green color layer.
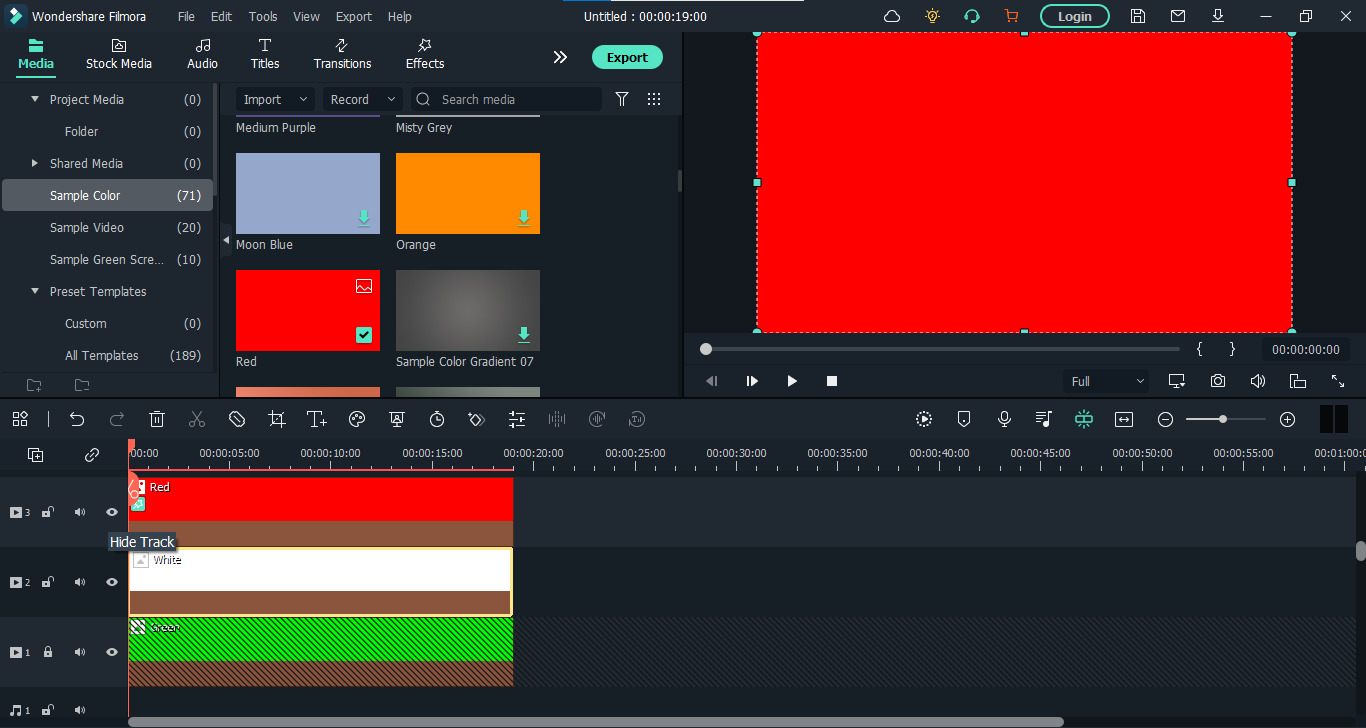
After adding all three color layers, it’s time to crop these layers to make the structure of our graphic.
Crop the Color Layers
- Go to the “Effects” tab from the top bar and search for the “Crop” effect. Then drag the effect and add it to the white and red layers on the panel.
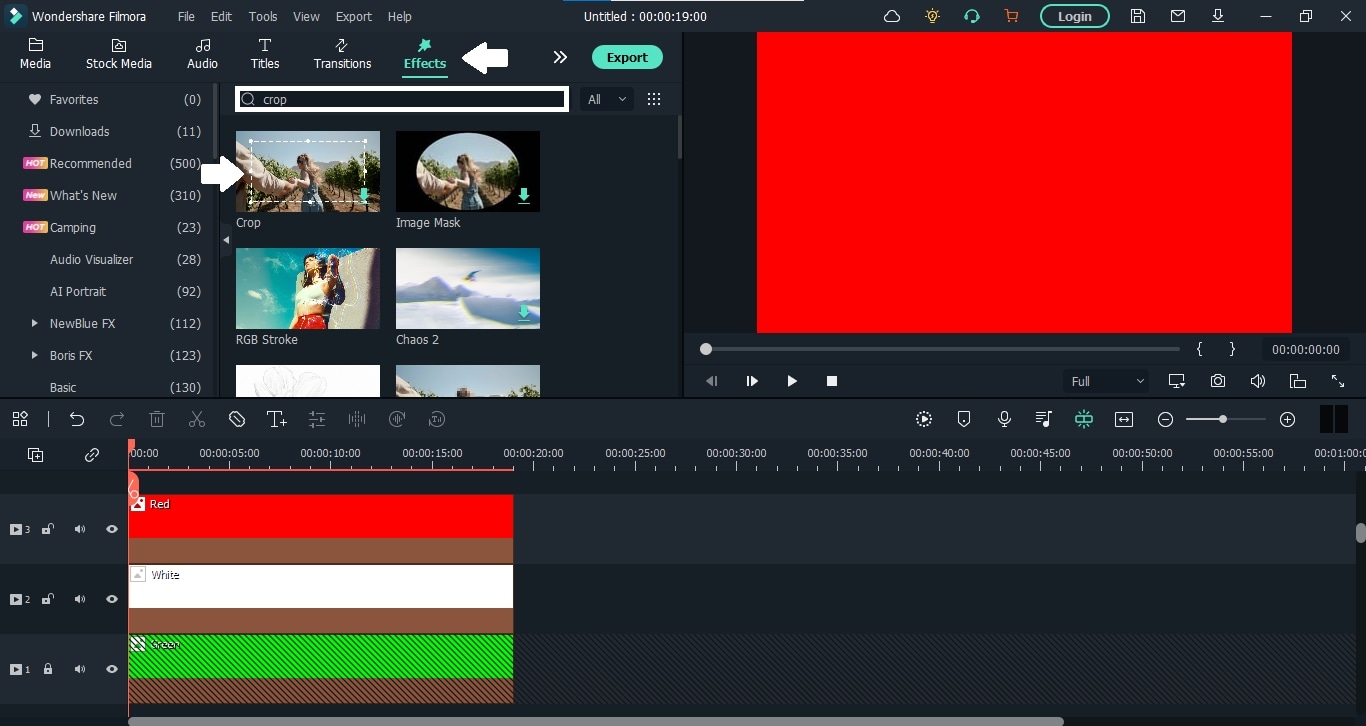
- First, click on the “Eye” icon beside the red color layer to hide it. Then double-click the white layer to see its properties. When the properties appear, select “Effects” from there.
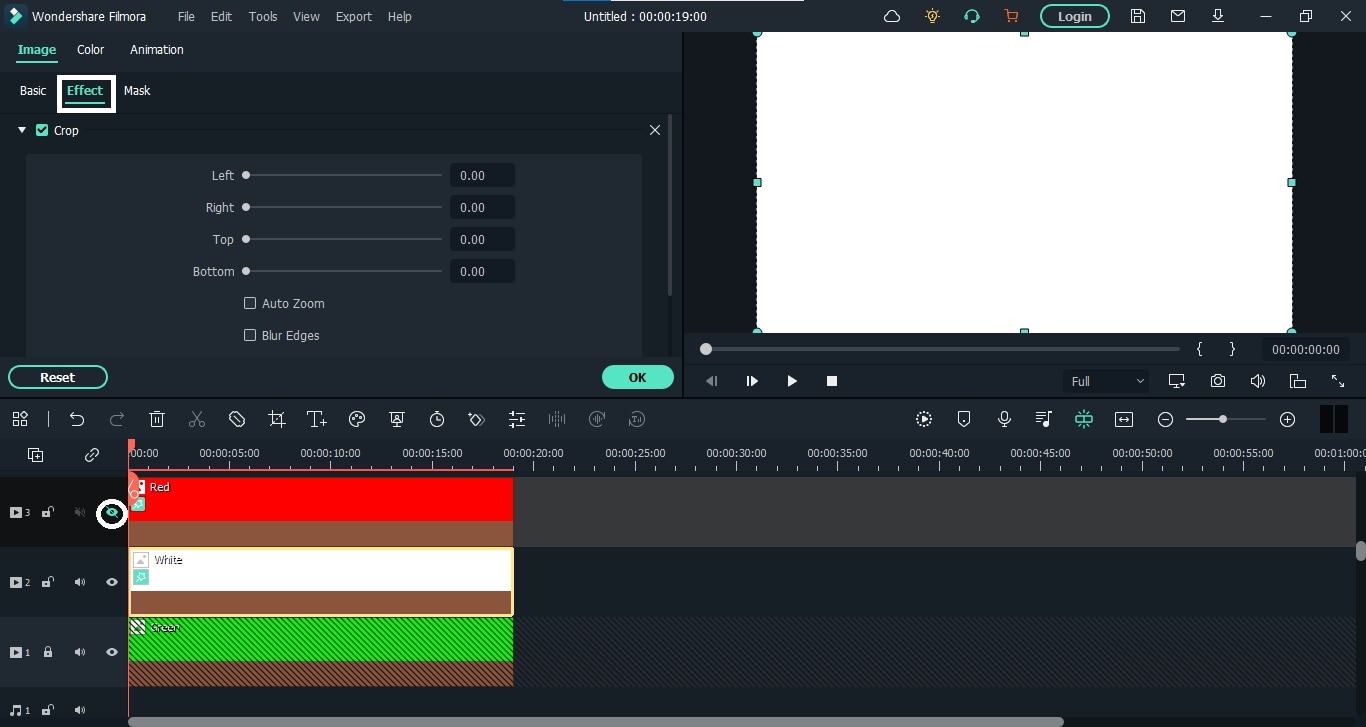
- You can also enable the safe zones from the display settings on the right side of the panel. After that, crop the white layer first, then show the red layer and crop it too. It will look like this.
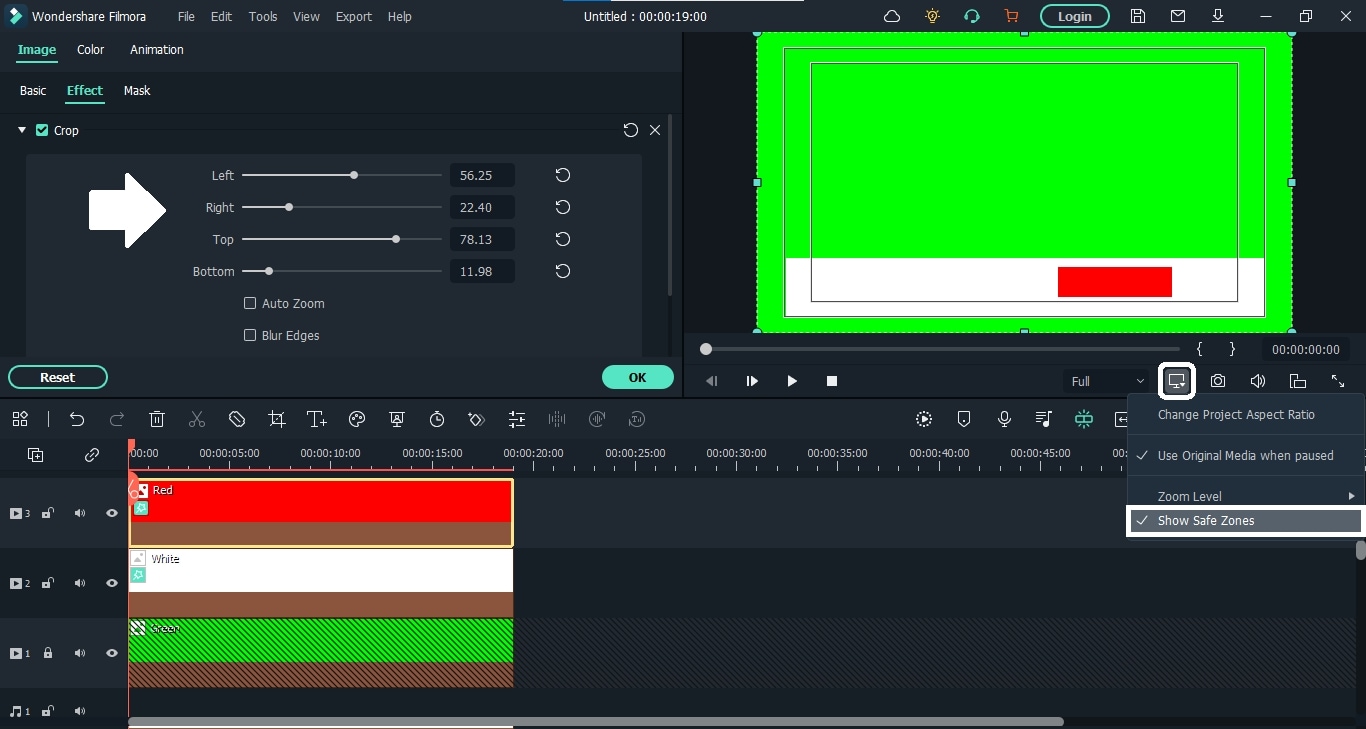
That’s it, folks. Our color backgrounds are here. Now we have to add our channel photo to this. So let’s move on to see how to do it.
2. Add a channel photo
- To add the channel photo, you can upload the image. Here we are going to use some images from the stock media. No matter the image, drop it down on the panel above the red color layer.
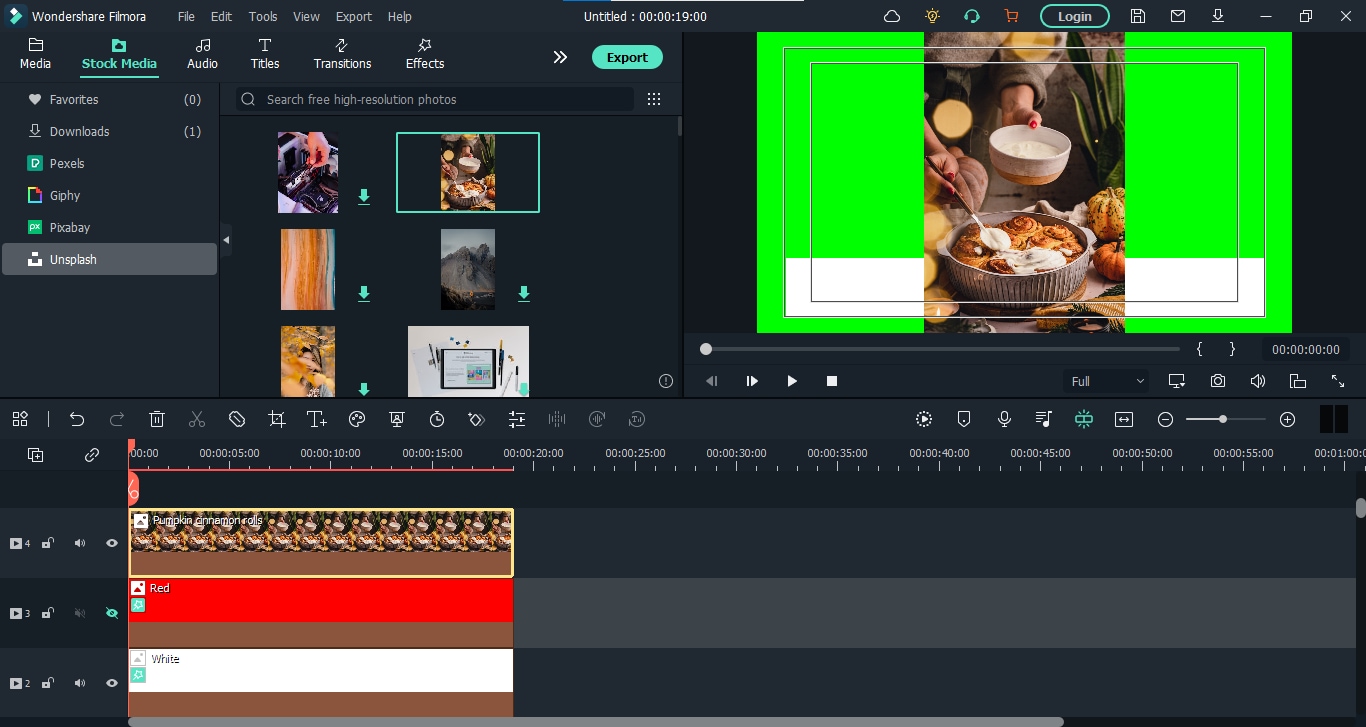
- Now double-click on the image layer, and from the properties, go to the “Mask” option and select the circle. You can also select any other shape you like.
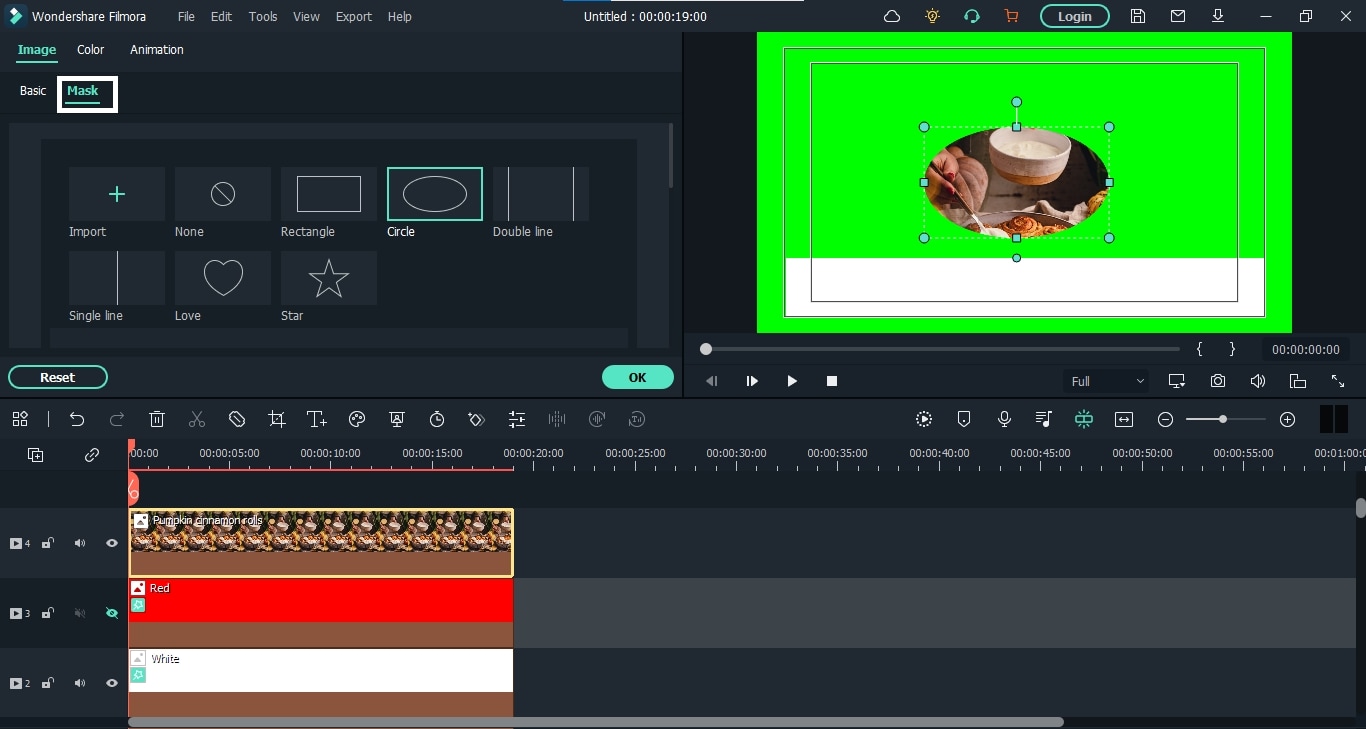
- After that, scroll down and make the circle even by matching all numbers. Then scale it down and place it on the left corner of the white layer.
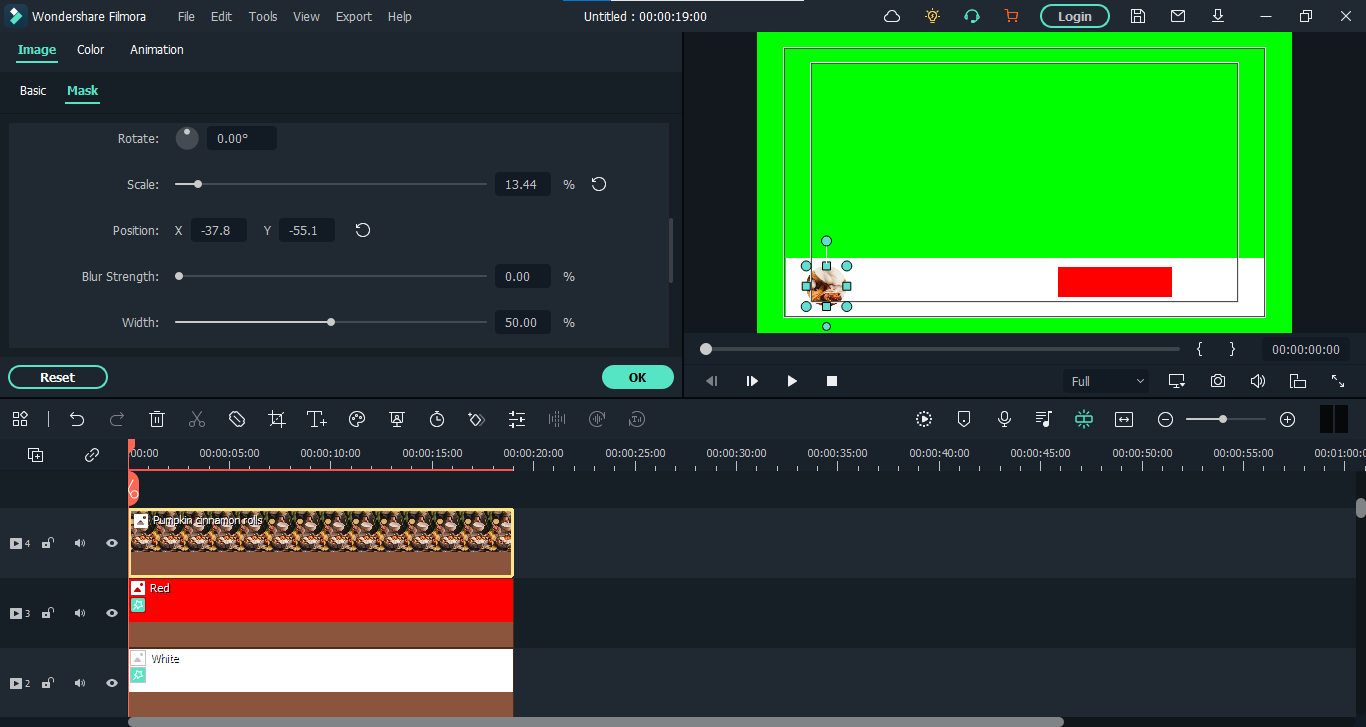
It’s done. Let’s add our channel text now.
3. Add texts
- For adding text, go to the “Titles” from the top bar and add the title you like to the panel.
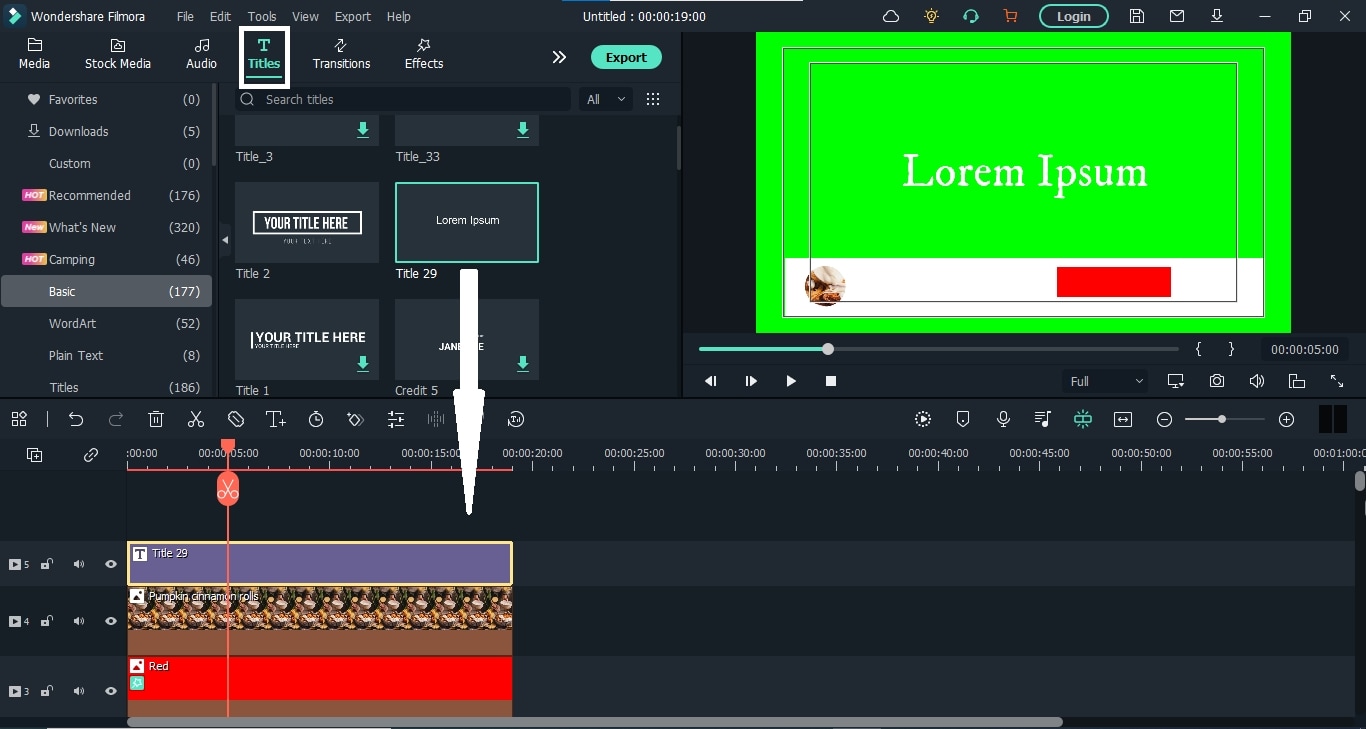
- Now double-click this layer and add the text you want. You can also change the color of the text, scale it down and place it where ever you want.
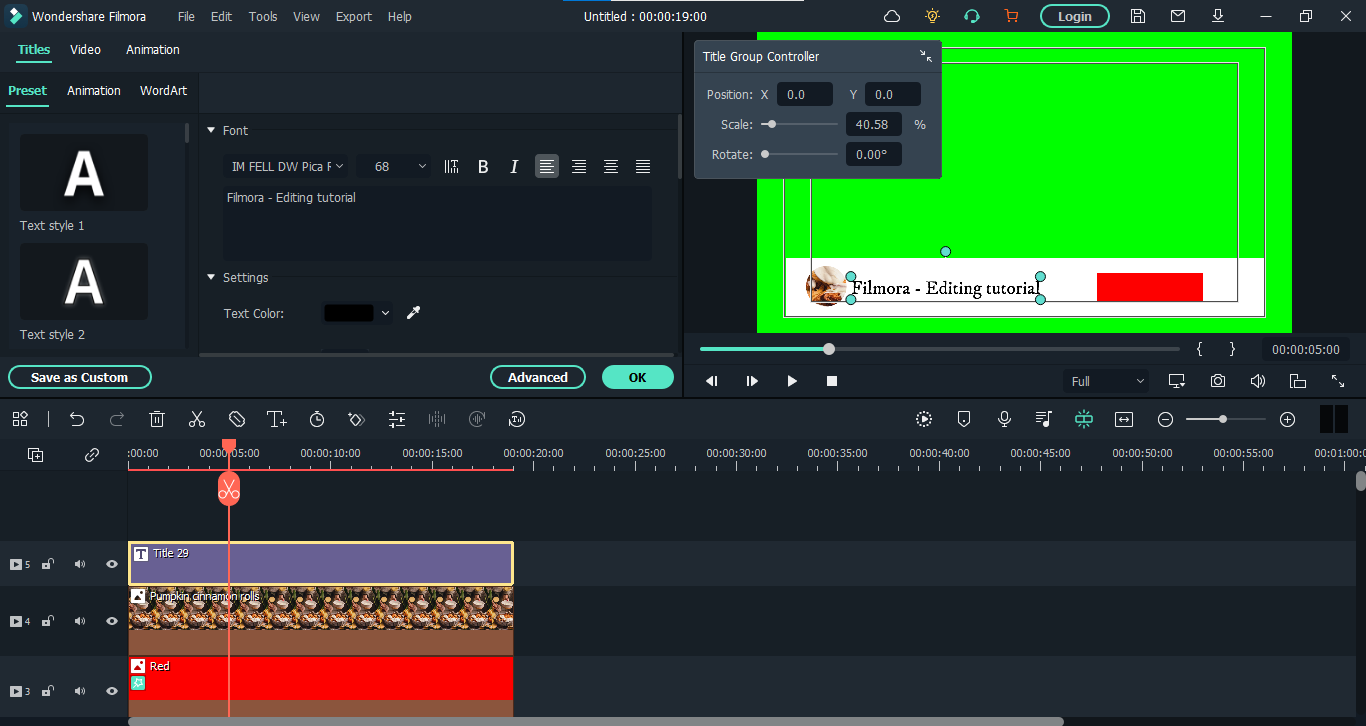
- Now, let’s add another title for the subscribe button. You have to place it on the red layer.
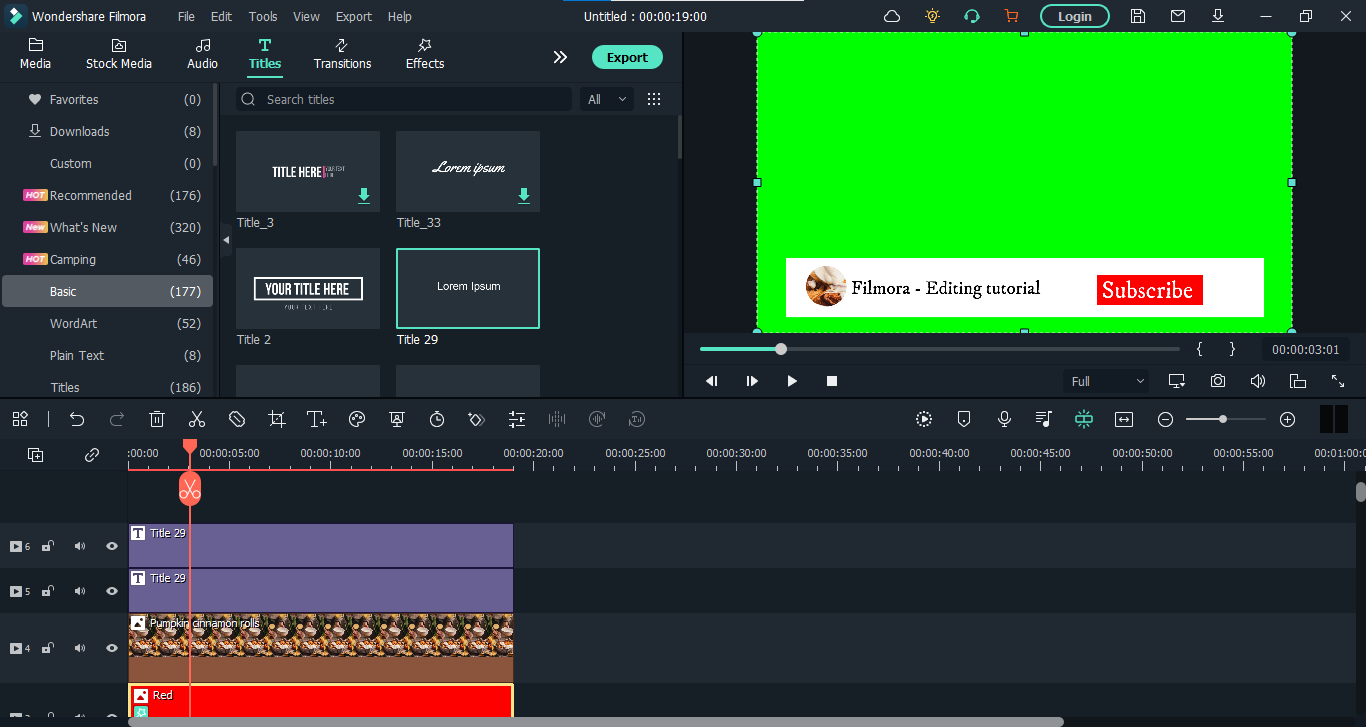
We can’t finish our structure without icons, can we? So let’s move on to them.
4. Add icons
- Hit the “Element” from the top bar and search for the “Bell” icon. You will find the short animations of the bell. Add the suitable one to the panel.
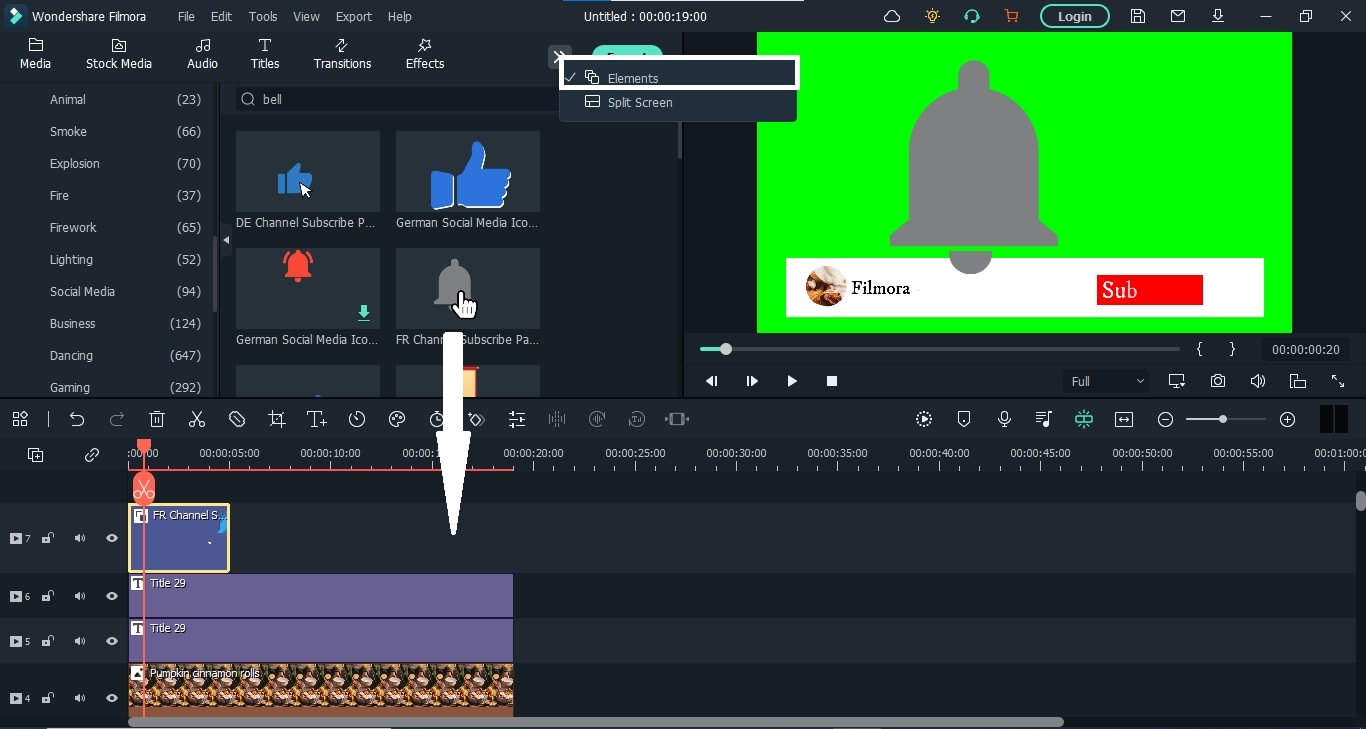
- Now find a suitable place in the animation, stop it at that point, right-click on the element layer and add a freeze frame.
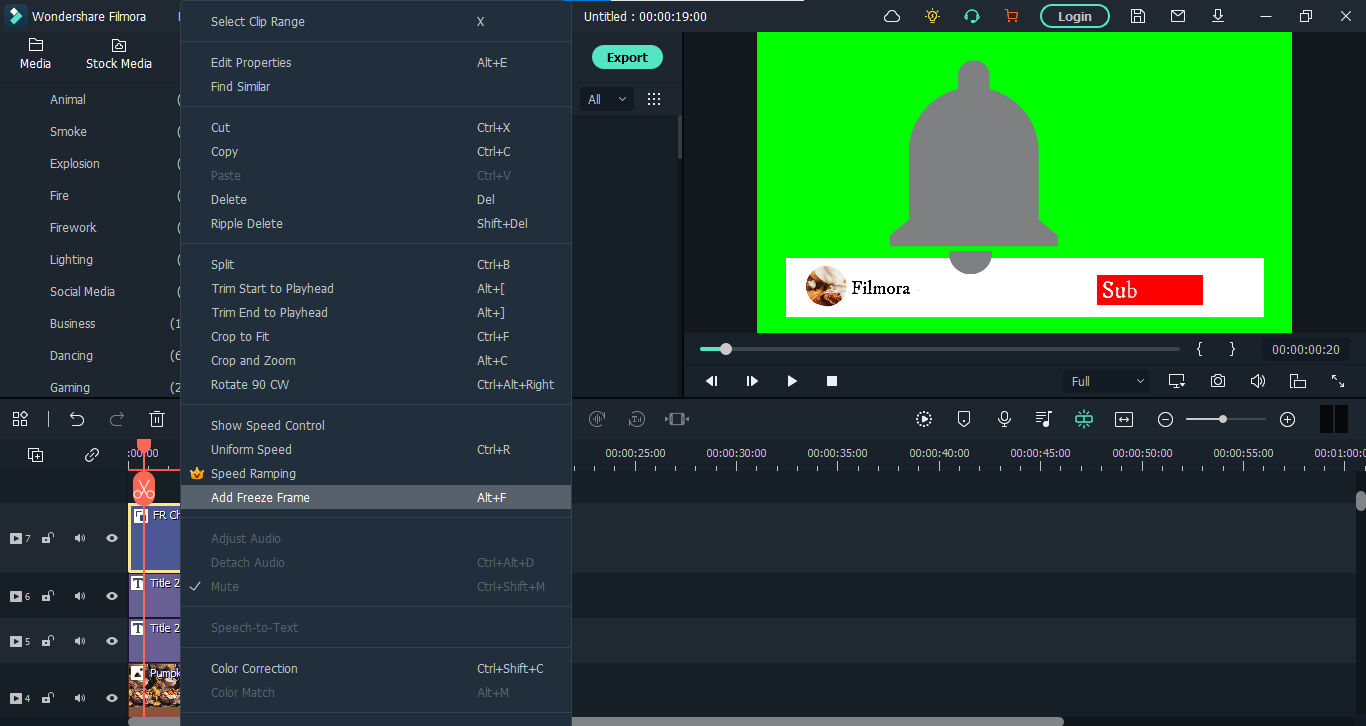
- You can also extend the freeze frame and remove the other parts. Then reduce its size and place it beside the “Subscribe” text.
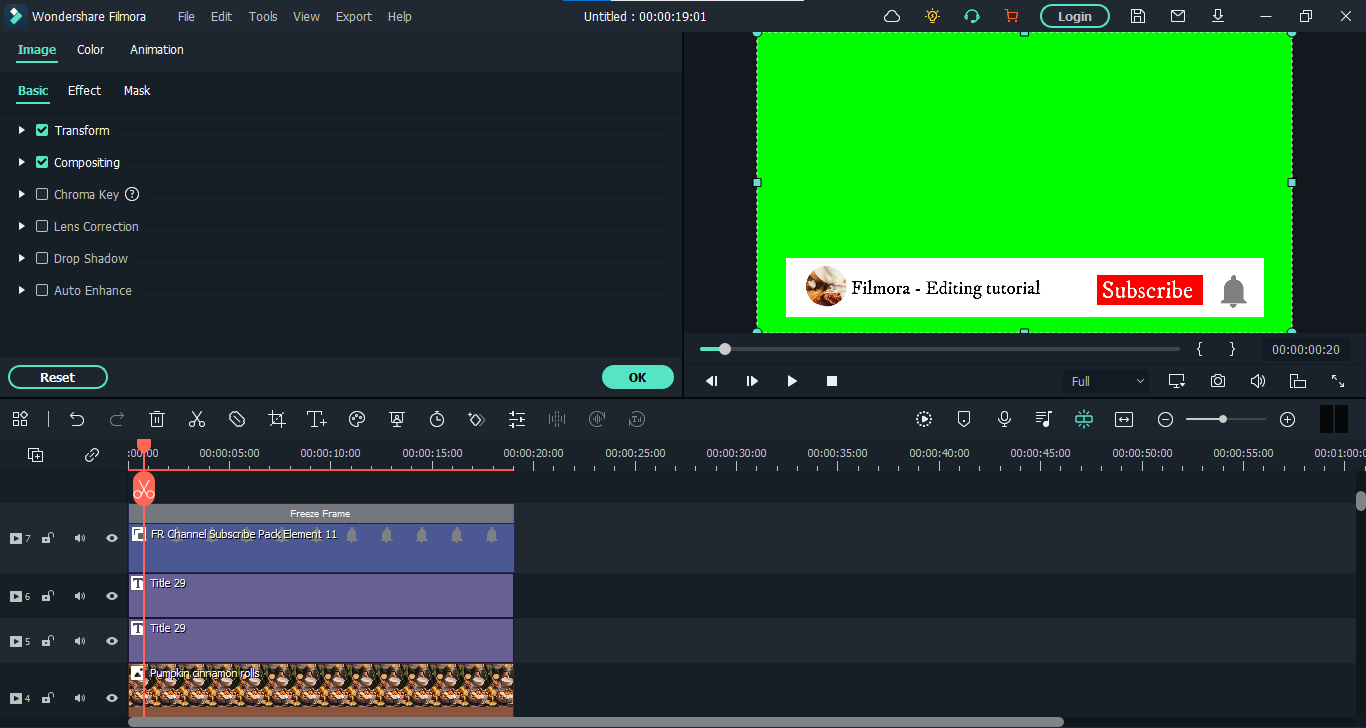
- Similarly, add “Thumbs Up” and “Mouse Cursor” icons on the panel.
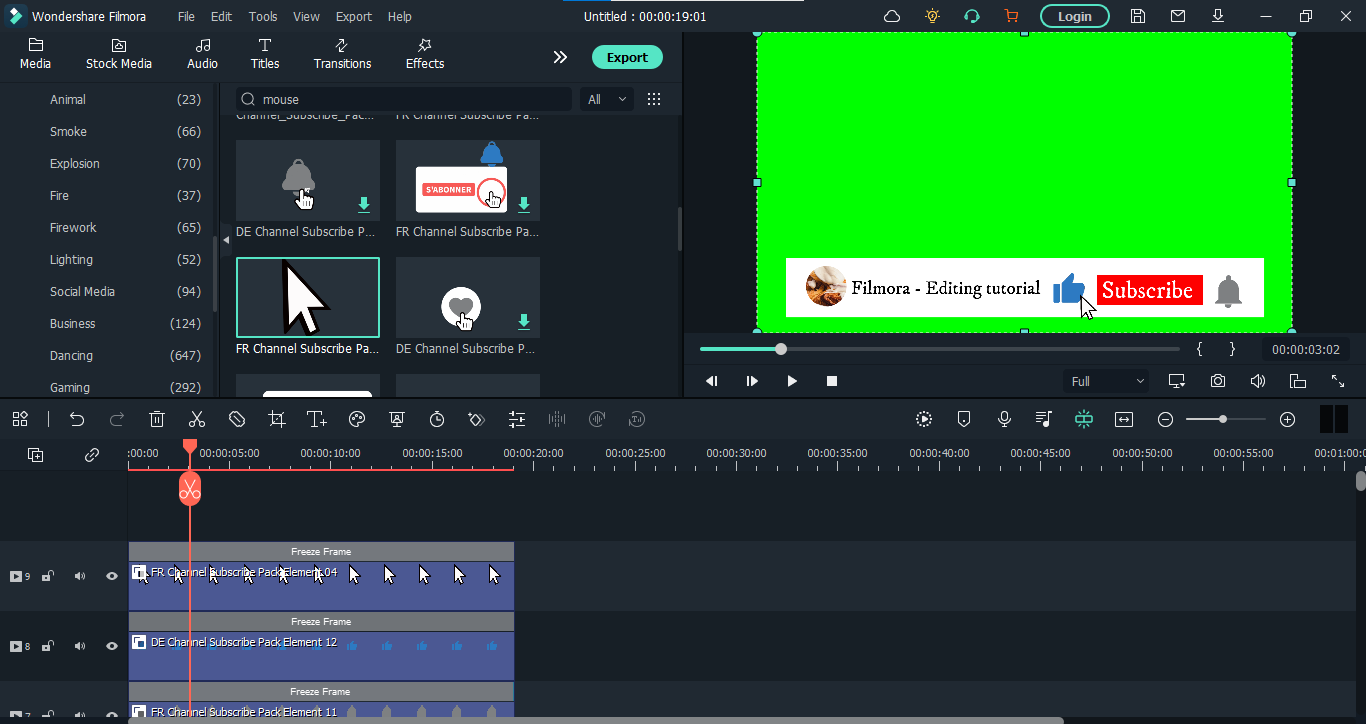
Finally, our structure is finished. Now let’s start animating.
Step3 Animate the graphics
First, we’ll make it so that all these graphics come in from below the view.
- Go to the white layer first and double-click on it. Then hit the “Animation” option and scroll down. Here add a new keyframe by clicking “Add.” Now move the playhead to the beginning and place the white color layer out of the frame.
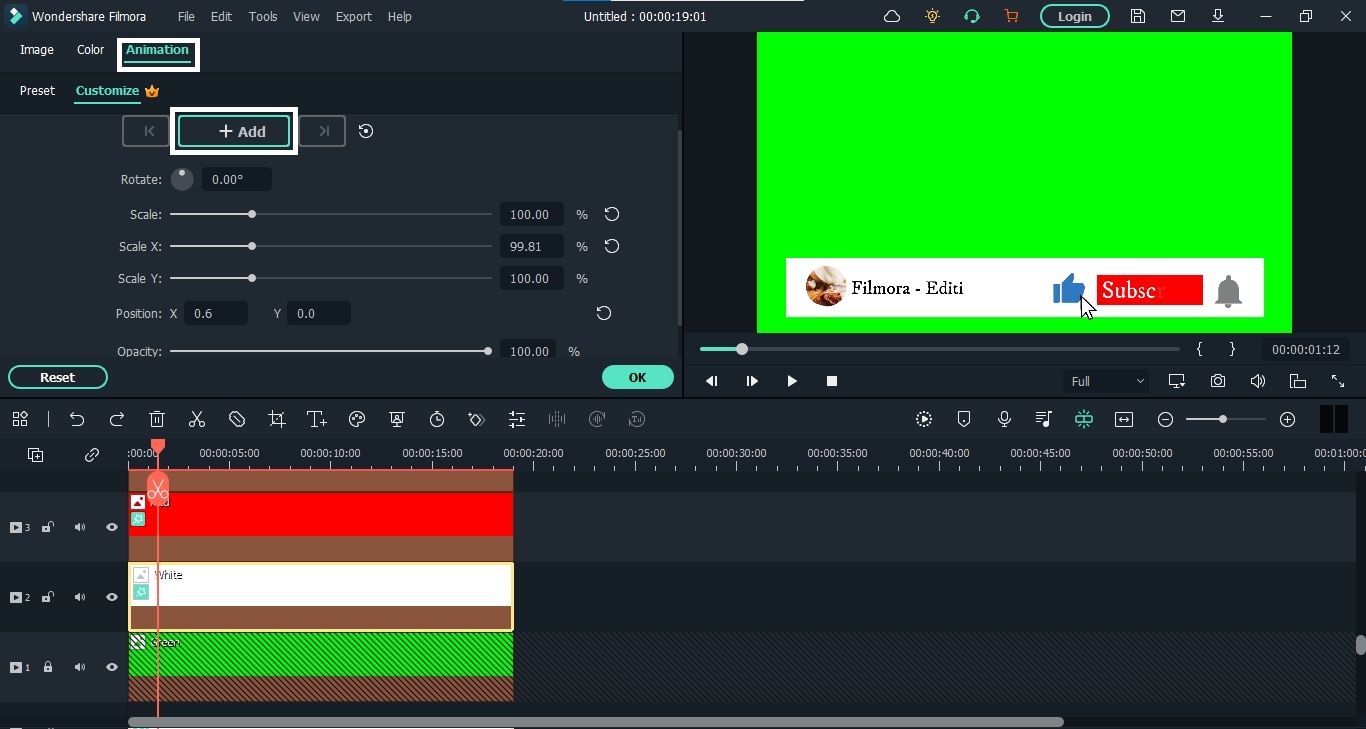
- Now, do the same for channel photos and icons. The whole animation will look like this.
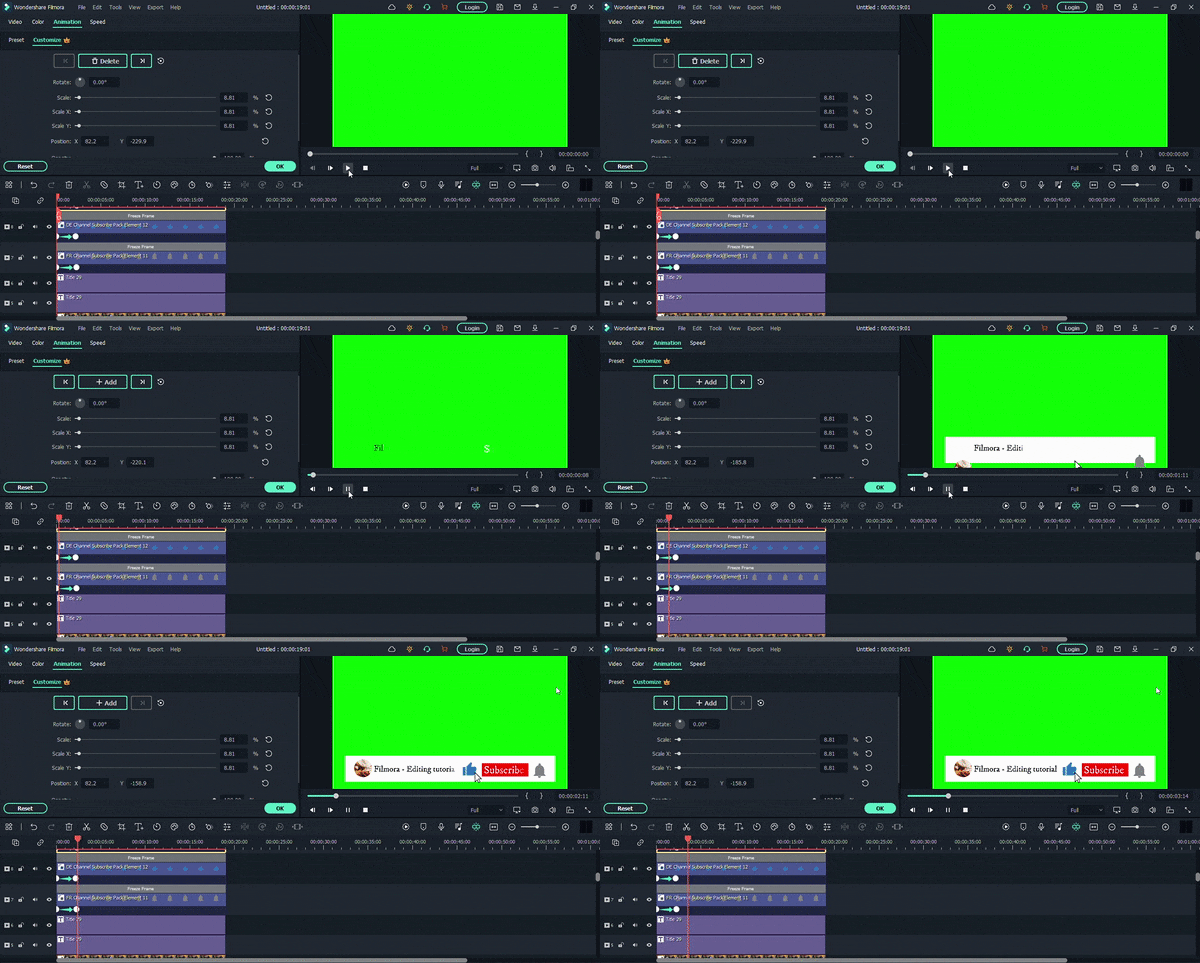
- As you can see, the text appears before the color layers. Let’s correct it. Double-click the text layer. Select the” Type Writer’ form and hit the “Advanced option.
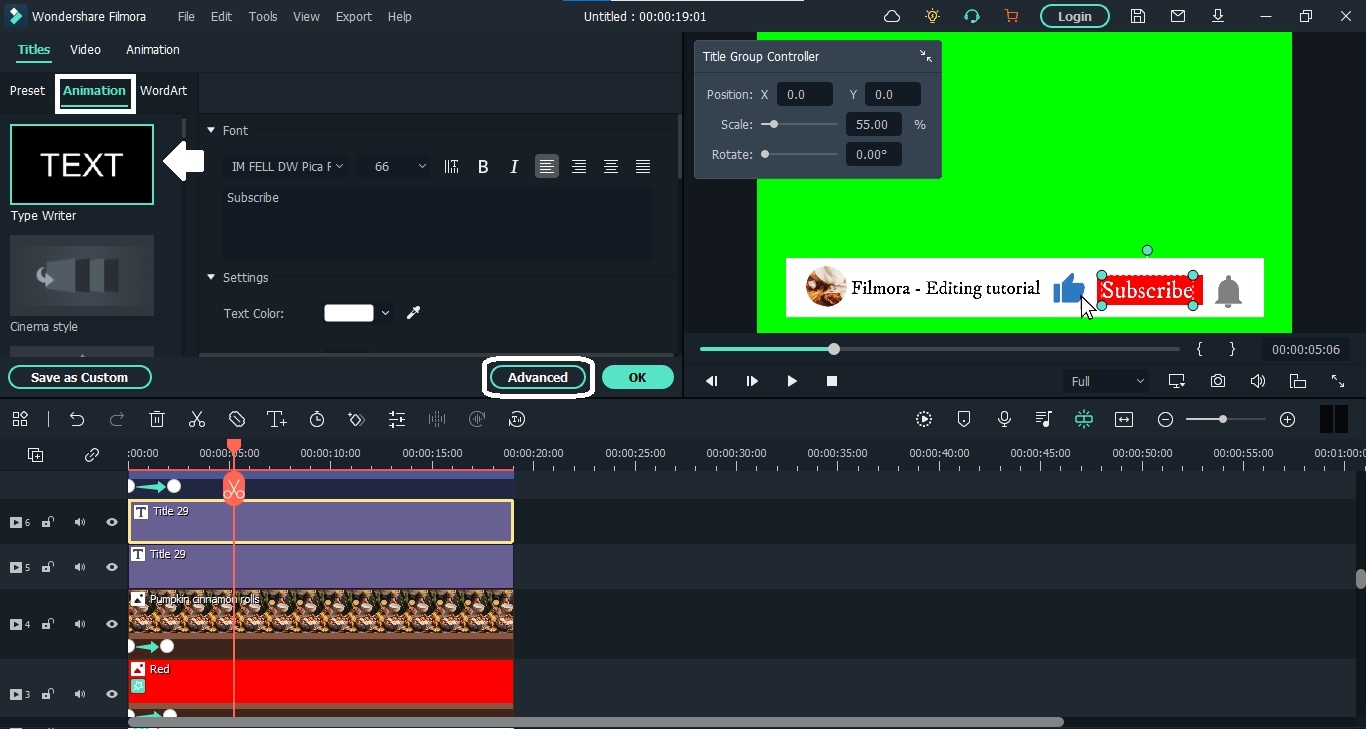
- Here, you can adjust the text with the color layers.
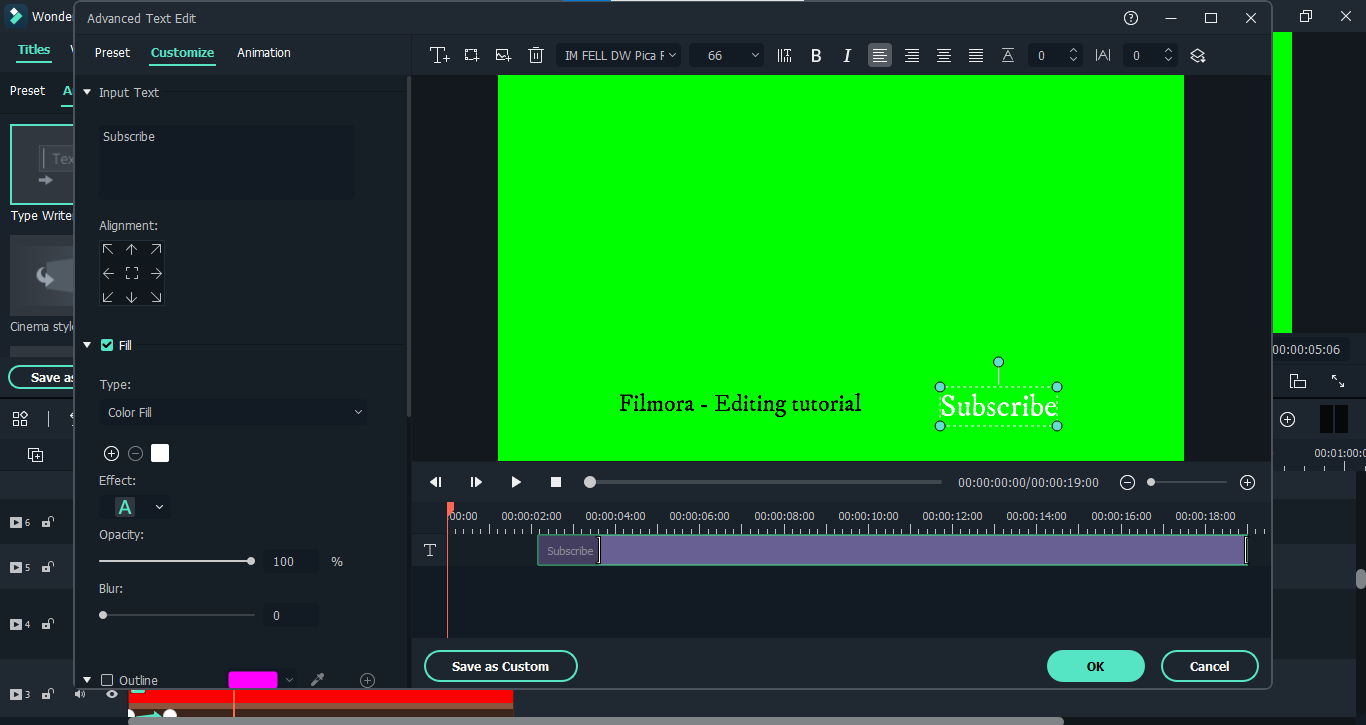
- After adjusting both the channel name and subscribe button texts, your animation will appear like this.
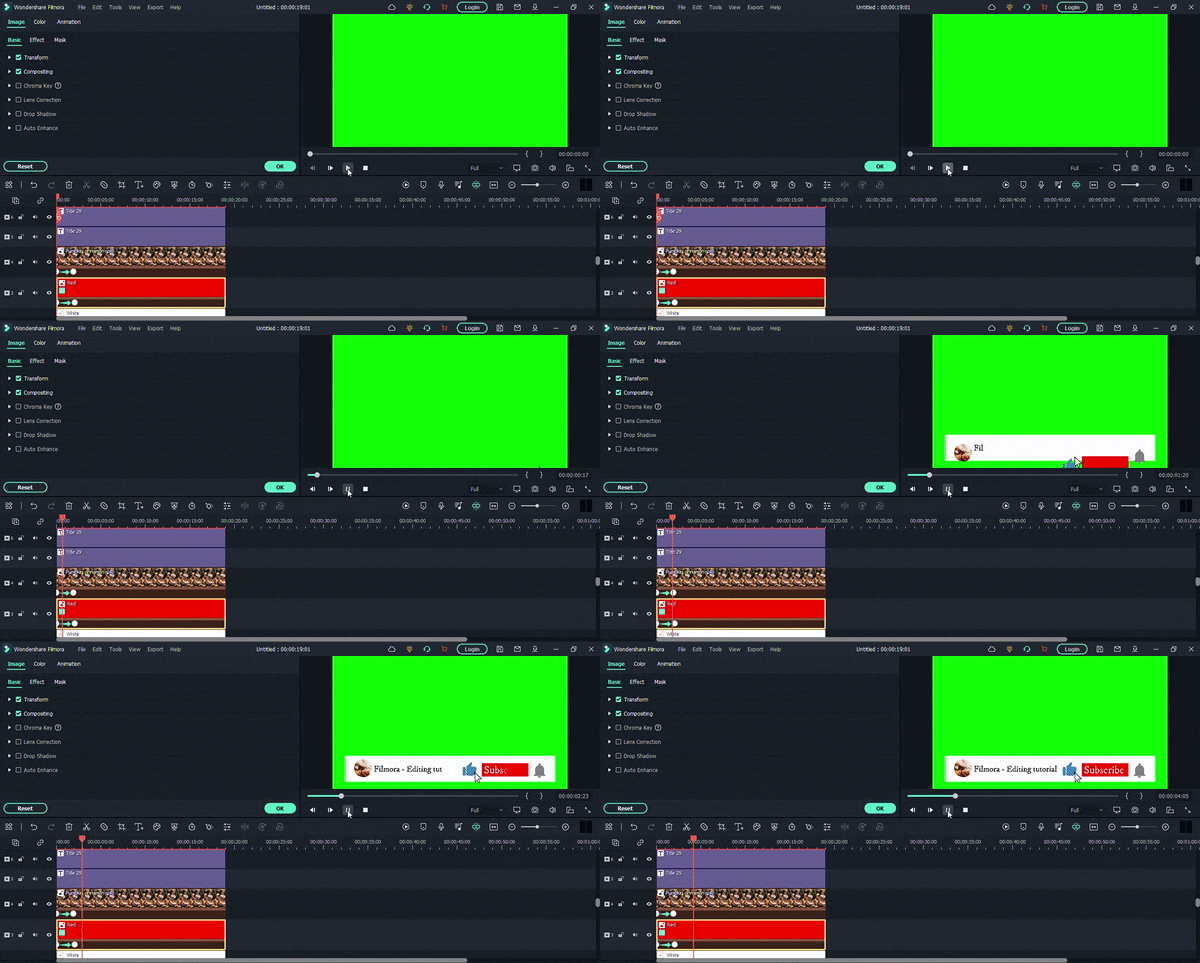
If you’ve managed so far, then that’s great. We have done most of the work. Now we need to animate the graphics of the mouse cursor so that it clicks on the bell icon, thumb icon, and our subscribe button. The process is somewhat similar because we will need to add different keyframes. But still, let’s see it in detail.
Step4 Animate the mouse cursor
- Go to the “Mouse Cursor” icon layer and double-click on it. First, place the icon on the “Thumbs Up” so that when it animates in, it goes directly to the said icon. Then you have to add another keyframe after some time. And when you add a third one, place the “Mouse Cursor” icon on the subscribe button text.
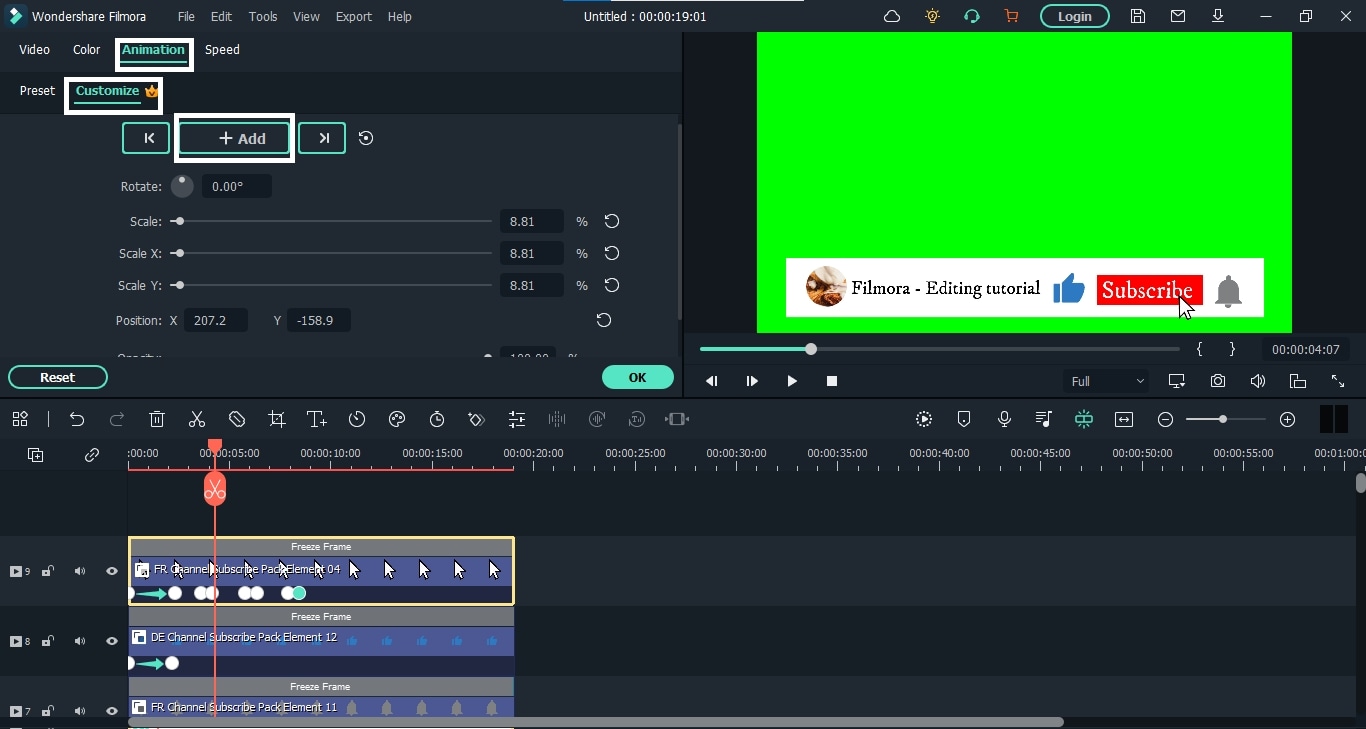
- Then add a similar pair of keyframes with some space from the last one and place the “Mouse Cursor” icon on the “Bell” icon.
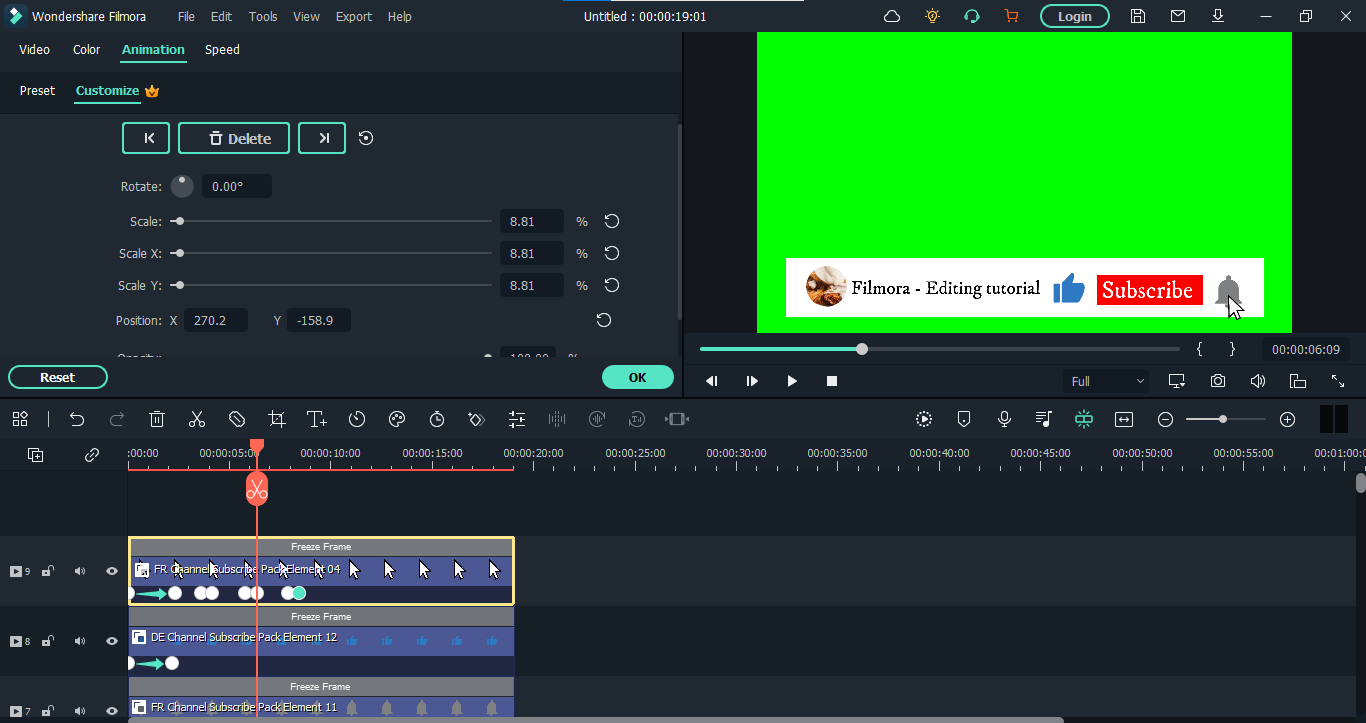
- The last keyframe we have to add will place this “Mouse Cursor” icon out of our view. After that, you need to adjust these keyframes to set the speed of the moving “Mouse Cursor’ icon according to your taste.
The final product up till now will be like this.
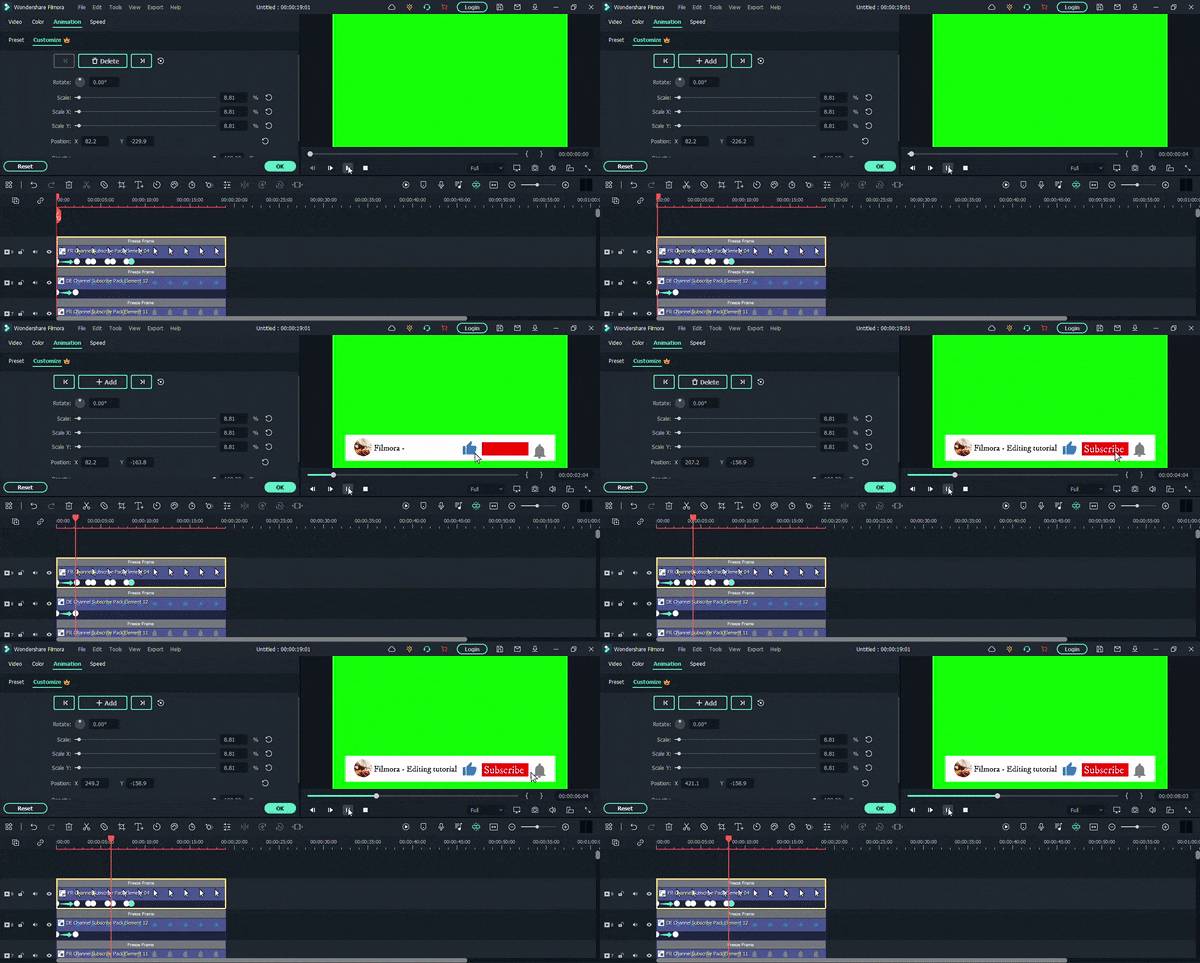
We are nearing our end, guys. Now we just need to make the graphics animate out of our view, and our work will be done. So let’s dive right into it.
Step5 Animate the graphics out
The process of animating out your graphics is like how we animated in our video. We just need to reverse those steps. So here’s how it’s done.
- Go to the white color layer and double-click on it to open its properties.
- Now, from the “Animation” option, add a new keyframe a little before the end of the video.
- After that, you have to add another keyframe at the end of your video. But in this keyframe, place the white color layer out of your view. Like this,
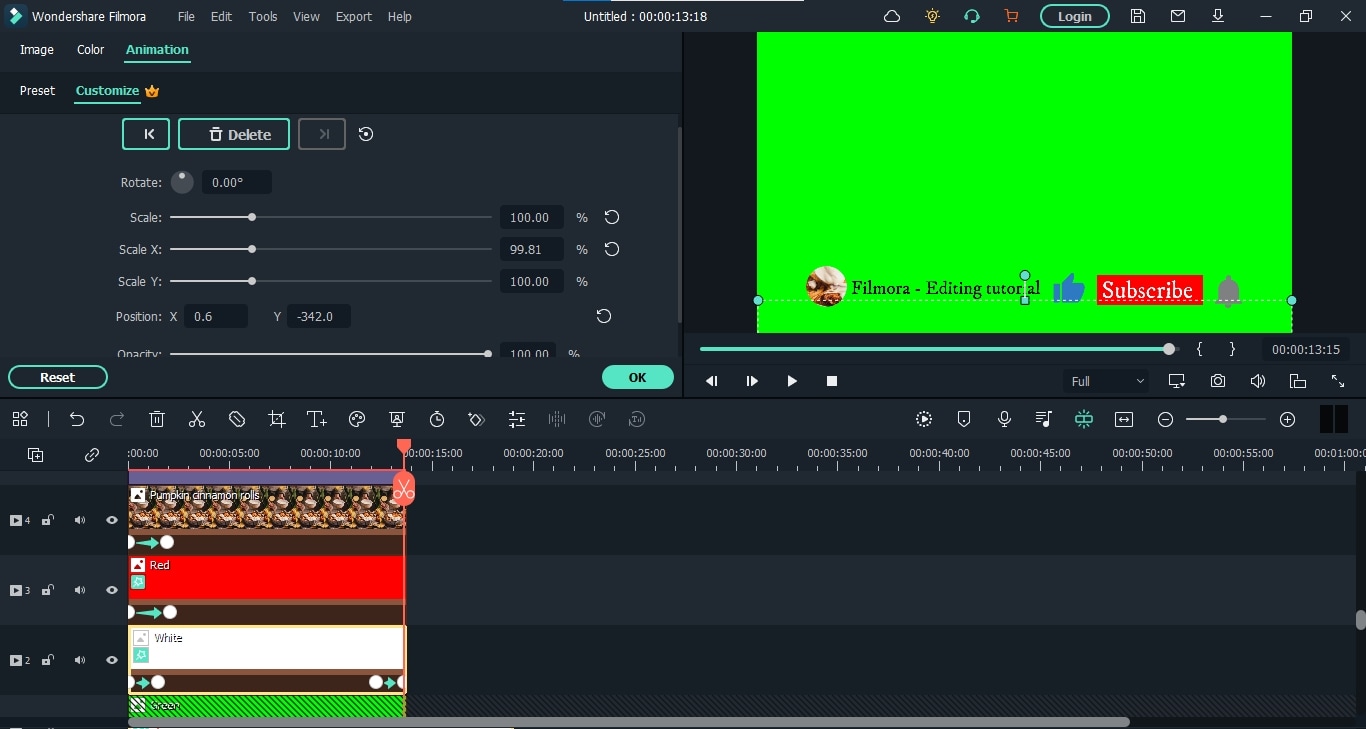
- Repeat the same steps for the red color layer, channel image layer, and icons layer.
- After it’s done, the whole graphics will look like this.
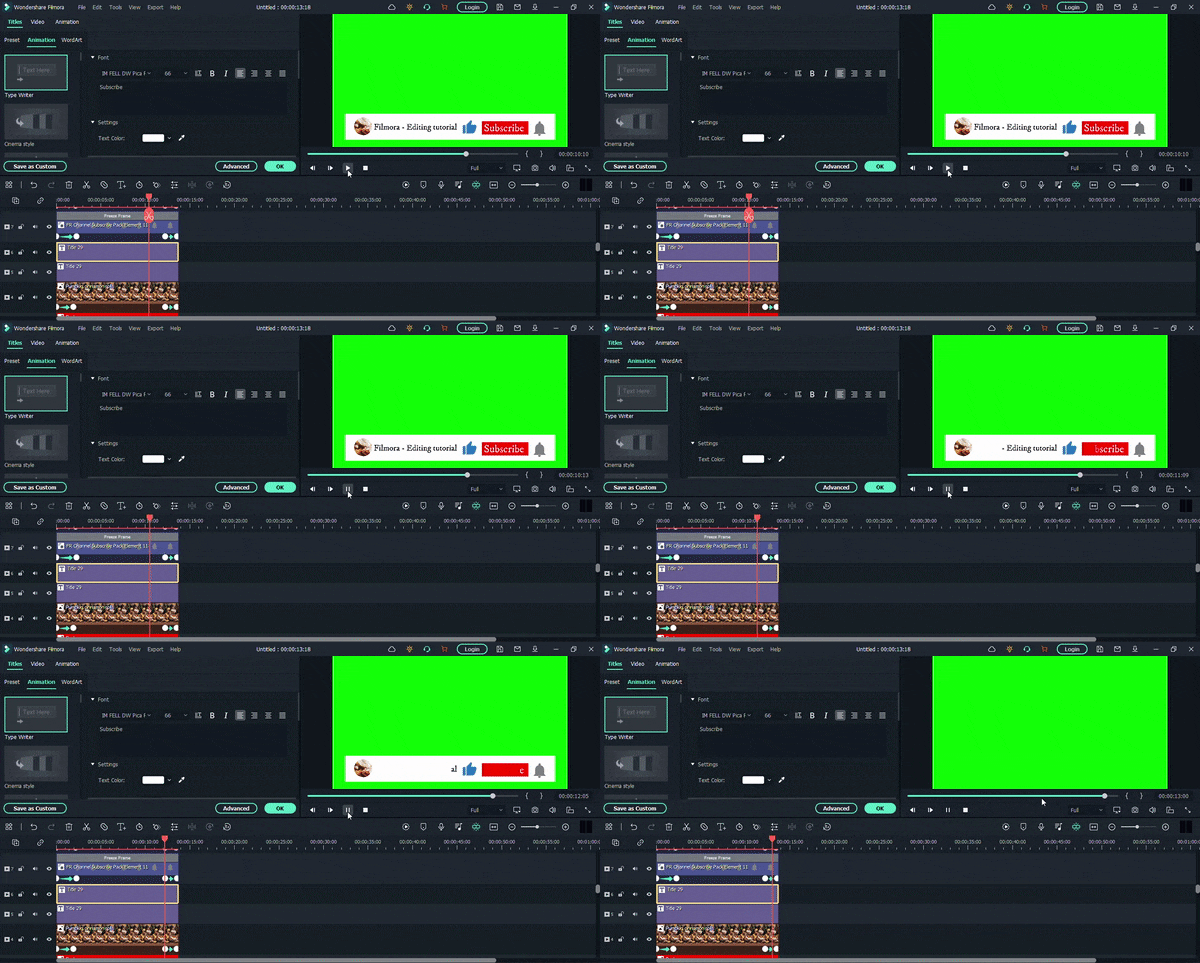
- The only thing that remains is to fix the text layers. For this, double-click on the channel text layer and go to the “Advanced” settings, just like before.
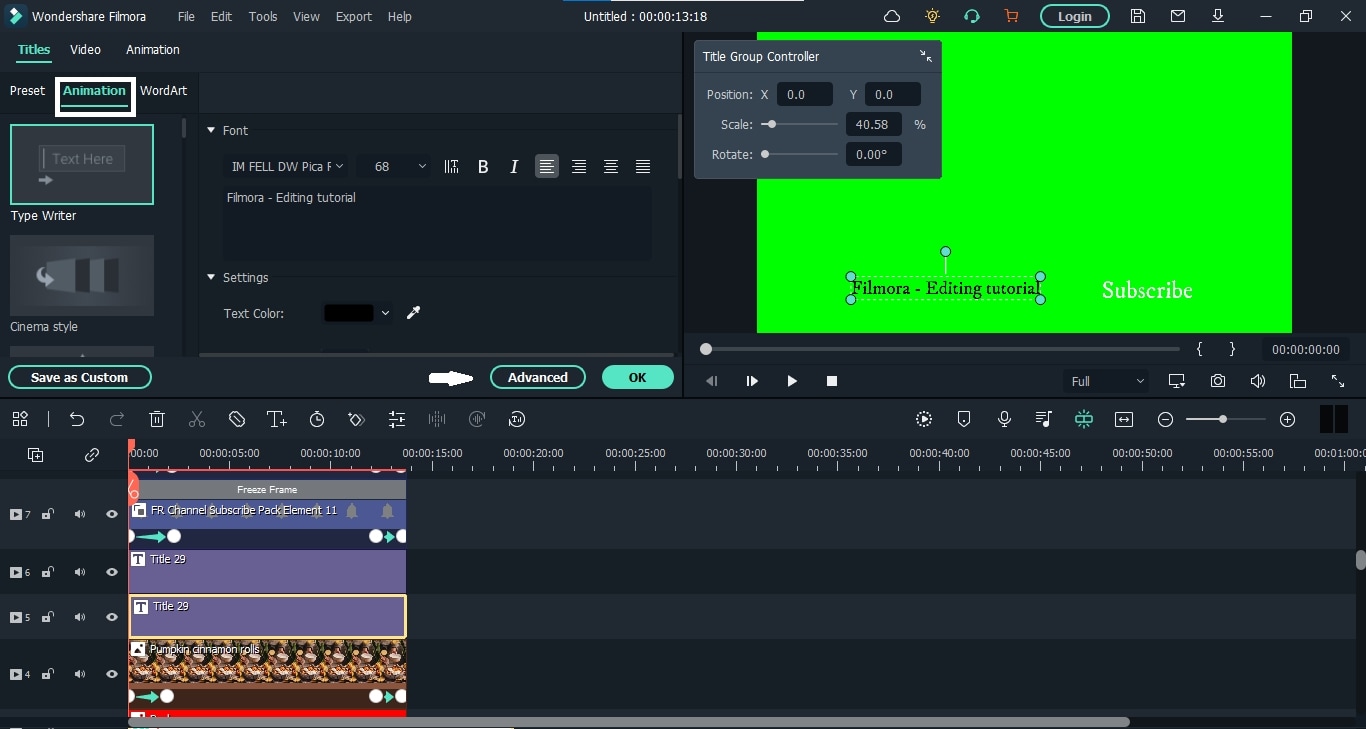
- From here, fix the text speed and end with your other graphic elements. After it’s done, we will do the same for the “Subscribe” button text.
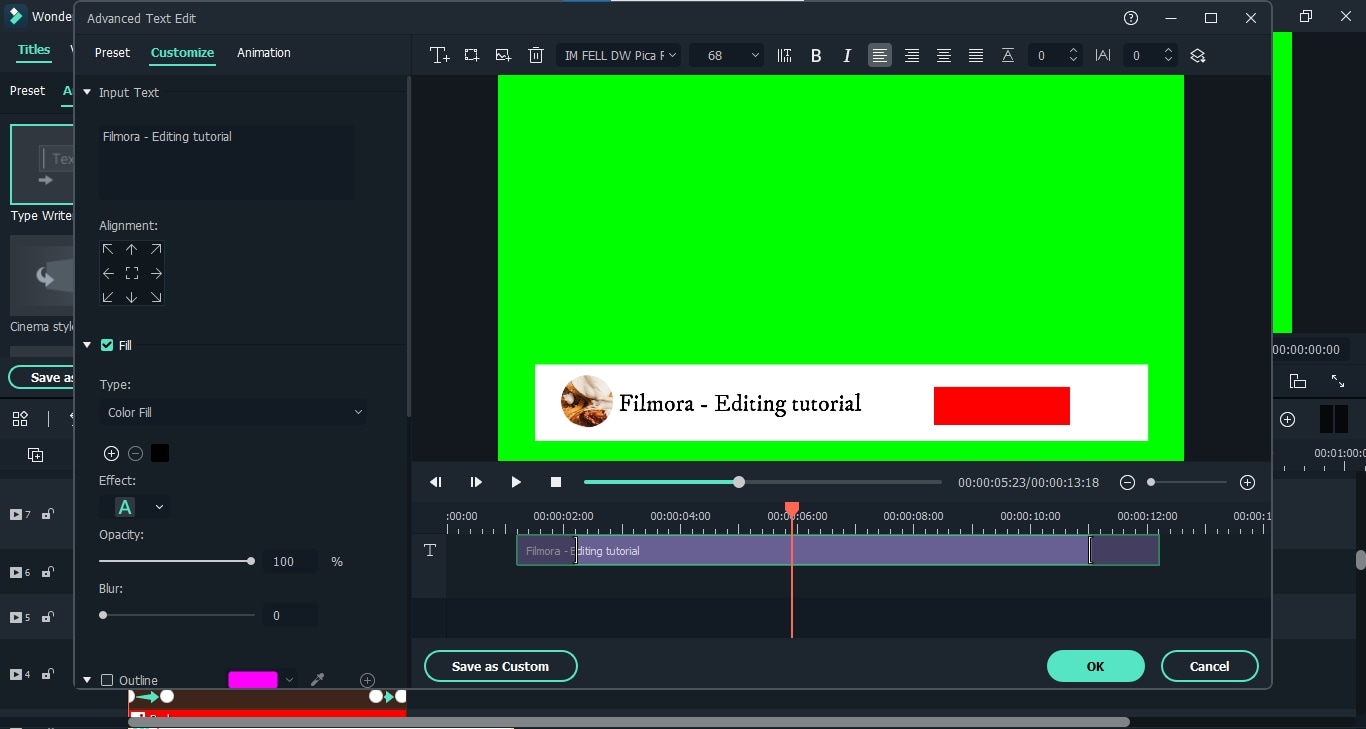
Finally, our graphic is completed. “Export” it from the software to your computer.
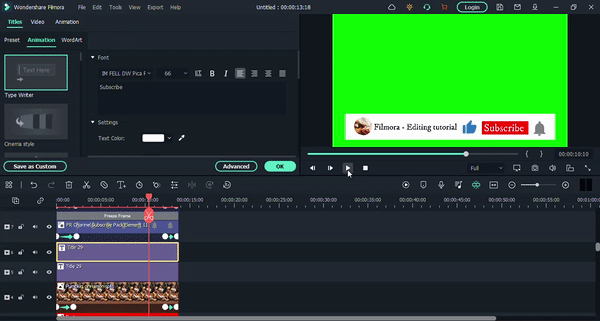
Whenever you want to use this graphic on your video, you have to import it first and enable the “Green Screen” option. It will remove the green background color. Then you can upload your video and place this graphic on it to add to the video. And that’s all.
Conclusion
Creating the Subscribe channel graphics is like picking stars from the sky for any video creator, especially if you are a beginner. However, now you don’t need to go for the professionals anymore. Wondershare Filmora has got you covered. So follow this detailed guide and create excellent subscribe channel graphics for your videos.
Free Download For macOS 10.14 or later
Step1 Download and install Wondershare Filmora
First, you need to download and install the video editor, Filmora. If you’ve already done that, then launch the software right away. But if you haven’t, then download it below. Once the download finishes, install the software on your computer.
When you launch the Filmora, click on “New Project.”

Step2 Make the structure of your graphics
For creating anything, we first need a flawless structure. Here, we can make the structure of Subscribe channel graphics using different colors, icons, texts, and channel photos. We’ll start by adding color layers.
1. Add color layers
- Go to the “Media” on the top left corner of the interface and Click on “Sample Color.” Here find the Green color and add it in the panel below as the first video layer by the drag-n-drop function.

- We will key this layer at the end, so make sure not to use any other green graphics for your animation.
- Let’s lock this layer because we will no longer use it. For this, click on the “Lock” icon on the layer’s left side.
- Add white and red colors and stack them on top of the green color layer.

After adding all three color layers, it’s time to crop these layers to make the structure of our graphic.
Crop the Color Layers
- Go to the “Effects” tab from the top bar and search for the “Crop” effect. Then drag the effect and add it to the white and red layers on the panel.

- First, click on the “Eye” icon beside the red color layer to hide it. Then double-click the white layer to see its properties. When the properties appear, select “Effects” from there.

- You can also enable the safe zones from the display settings on the right side of the panel. After that, crop the white layer first, then show the red layer and crop it too. It will look like this.

That’s it, folks. Our color backgrounds are here. Now we have to add our channel photo to this. So let’s move on to see how to do it.
2. Add a channel photo
- To add the channel photo, you can upload the image. Here we are going to use some images from the stock media. No matter the image, drop it down on the panel above the red color layer.

- Now double-click on the image layer, and from the properties, go to the “Mask” option and select the circle. You can also select any other shape you like.

- After that, scroll down and make the circle even by matching all numbers. Then scale it down and place it on the left corner of the white layer.

It’s done. Let’s add our channel text now.
3. Add texts
- For adding text, go to the “Titles” from the top bar and add the title you like to the panel.

- Now double-click this layer and add the text you want. You can also change the color of the text, scale it down and place it where ever you want.

- Now, let’s add another title for the subscribe button. You have to place it on the red layer.

We can’t finish our structure without icons, can we? So let’s move on to them.
4. Add icons
- Hit the “Element” from the top bar and search for the “Bell” icon. You will find the short animations of the bell. Add the suitable one to the panel.

- Now find a suitable place in the animation, stop it at that point, right-click on the element layer and add a freeze frame.

- You can also extend the freeze frame and remove the other parts. Then reduce its size and place it beside the “Subscribe” text.

- Similarly, add “Thumbs Up” and “Mouse Cursor” icons on the panel.

Finally, our structure is finished. Now let’s start animating.
Step3 Animate the graphics
First, we’ll make it so that all these graphics come in from below the view.
- Go to the white layer first and double-click on it. Then hit the “Animation” option and scroll down. Here add a new keyframe by clicking “Add.” Now move the playhead to the beginning and place the white color layer out of the frame.

- Now, do the same for channel photos and icons. The whole animation will look like this.

- As you can see, the text appears before the color layers. Let’s correct it. Double-click the text layer. Select the” Type Writer’ form and hit the “Advanced option.

- Here, you can adjust the text with the color layers.

- After adjusting both the channel name and subscribe button texts, your animation will appear like this.

If you’ve managed so far, then that’s great. We have done most of the work. Now we need to animate the graphics of the mouse cursor so that it clicks on the bell icon, thumb icon, and our subscribe button. The process is somewhat similar because we will need to add different keyframes. But still, let’s see it in detail.
Step4 Animate the mouse cursor
- Go to the “Mouse Cursor” icon layer and double-click on it. First, place the icon on the “Thumbs Up” so that when it animates in, it goes directly to the said icon. Then you have to add another keyframe after some time. And when you add a third one, place the “Mouse Cursor” icon on the subscribe button text.

- Then add a similar pair of keyframes with some space from the last one and place the “Mouse Cursor” icon on the “Bell” icon.

- The last keyframe we have to add will place this “Mouse Cursor” icon out of our view. After that, you need to adjust these keyframes to set the speed of the moving “Mouse Cursor’ icon according to your taste.
The final product up till now will be like this.

We are nearing our end, guys. Now we just need to make the graphics animate out of our view, and our work will be done. So let’s dive right into it.
Step5 Animate the graphics out
The process of animating out your graphics is like how we animated in our video. We just need to reverse those steps. So here’s how it’s done.
- Go to the white color layer and double-click on it to open its properties.
- Now, from the “Animation” option, add a new keyframe a little before the end of the video.
- After that, you have to add another keyframe at the end of your video. But in this keyframe, place the white color layer out of your view. Like this,

- Repeat the same steps for the red color layer, channel image layer, and icons layer.
- After it’s done, the whole graphics will look like this.

- The only thing that remains is to fix the text layers. For this, double-click on the channel text layer and go to the “Advanced” settings, just like before.

- From here, fix the text speed and end with your other graphic elements. After it’s done, we will do the same for the “Subscribe” button text.

Finally, our graphic is completed. “Export” it from the software to your computer.

Whenever you want to use this graphic on your video, you have to import it first and enable the “Green Screen” option. It will remove the green background color. Then you can upload your video and place this graphic on it to add to the video. And that’s all.
Conclusion
Creating the Subscribe channel graphics is like picking stars from the sky for any video creator, especially if you are a beginner. However, now you don’t need to go for the professionals anymore. Wondershare Filmora has got you covered. So follow this detailed guide and create excellent subscribe channel graphics for your videos.
How to Get the Most Out of KineMaster Video Templates
Creating videos has always been challenging, especially with the advent of mobile video editing apps like KineMaster. This app is for professionals and amateur content creators who want to take their videos to the next level. With KineMaster, you can easily edit, enhance and share your videos in no time. One of the best features that KineMaster offers is the ability to use video templates.
This article will guide you through using and downloading KineMaster templates. We will also share some alternative templates that you can use to elevate your video creation. Whether you’re a beginner or an advanced user, this guide will give you all the information you need to create stunning videos with KineMaster. So, let’s get started!

Overview of KineMaster & Its Video Templates
KineMaster is a powerful video editing app that allows users to create professional-looking videos on their mobile devices. It is available on both Android and iOS platforms.
With a wide range of features like multi-layer video, chroma key, and blending modes, KineMaster empowers users to edit their videos with precision and creativity. It is also one of the first mobile video editing apps that supports multiple video layers and audio keyframes.
KineMaster also provides a variety of video templates for different purposes, such as intro, outro, social media posts, and more. These templates are pre-designed and include different elements such as animation, text, and effects.
KineMaster templates provide an easy way for users to create videos with professional looks and styles. Templates are also customizable, so you can add photos, videos, and text to match your brand or style. This feature of KineMaster saves time for users to create the video from scratch and make the editing process much more seamless.
How To Use & Download KineMaster Video Templates?
KineMaster video templates are a great way to quickly create professional-looking videos without starting from scratch. With a wide range of templates to choose from, you can easily find one that suits your needs.
Whether you’re a beginner or an advanced user, these steps will provide you with all the information you need to get the most out of KineMaster’s video templates.
Step 1. Launch the KineMaster app and go to “Video Templates.“

Step 2. Search for a template category you want to use.
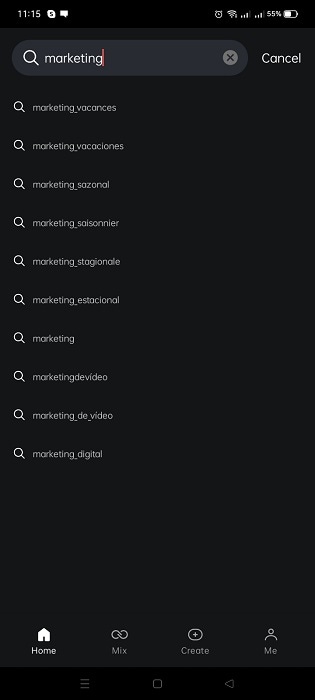
Step 3. Choose your template design.
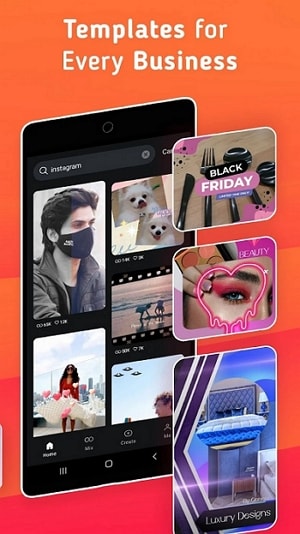
Step 4. Tap the “Mix“ button to download the template.

Step 5. Edit the template to your preference. You can replace the clips with your video.
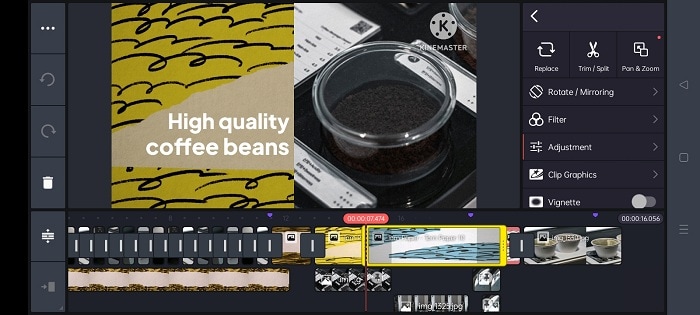
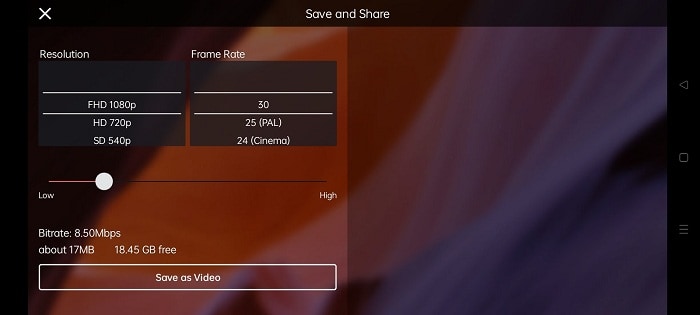
Step 6. Change the resolution of your video and tap the “Save as Video“ button to save your work.
Filmora for Mobile - KineMaster’s Alternative
Filmora for mobile is an alternative video editing app that provides features similar to KineMaster. It is a user-friendly app designed for amateur and professional content creators. The app is available on both Android and iOS platforms. Some of its key features include:
- A wide range of video effects, including filters, overlays, and elements.
- A library of music and sound effects to enhance your videos
- A variety of text and title templates for adding captions and subtitles.
- Multi-layer video editing allows you to add text, stickers, and more to your videos.
- A dedicated social media export feature that allows you to quickly share your videos on different platforms.
- A wide range of resolution and aspect ratio options.
- In-app purchase options for extra features and assets
Video Templates of Filmora - Alternative to KineMaster Template
Just like KineMaster, Filmora also offers a wide range of video templates to help users create professional-looking videos quickly. These templates include different elements such as animations, text, and effects. These templates are pre-designed and customizable, allowing users to add photos, videos, and text to match their brand or style.
Filmora also provides the feature of customizing these templates according to the user’s preference, making them flexible and versatile. The templates are regularly updated with new options and designs to match the latest trends and styles.
How To Use Video Templates of Filmora for Mobile in Video Editing?
This section will show you how to use Filmora’s video templates to enhance your video editing skills. With step-by-step instructions and visual aids, this guide will make it easy for you to use Filmora’s video templates to take your videos to the next level.
Step 1. Install and launch the Filmora app on your device.
Step 2. Tap the “Template“ button on the lower right part of the interface.

Step 3. Choose the template you want to use.
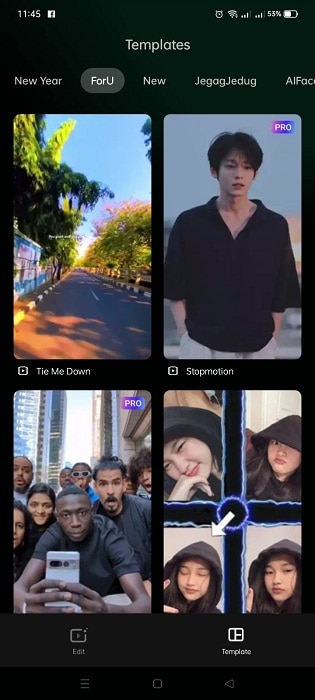
Step 4. Tap the “Make Video“ button to download the template.
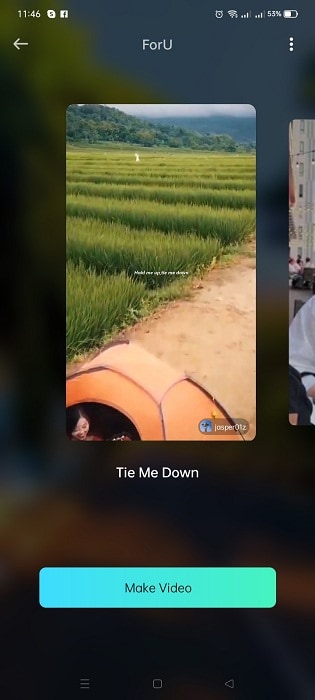
Step 5. Add the required number of clips to edit the template, then tap “Next.”
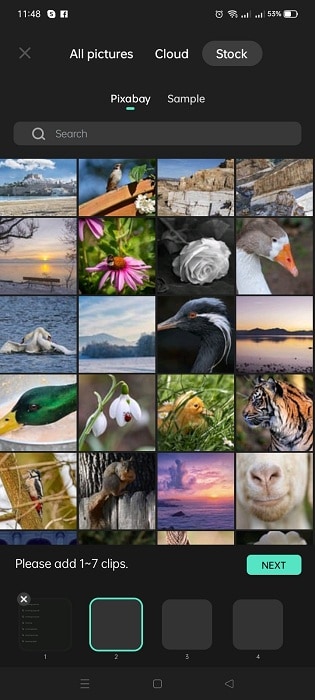
Step 6. You can preview the video and edit it if necessary.
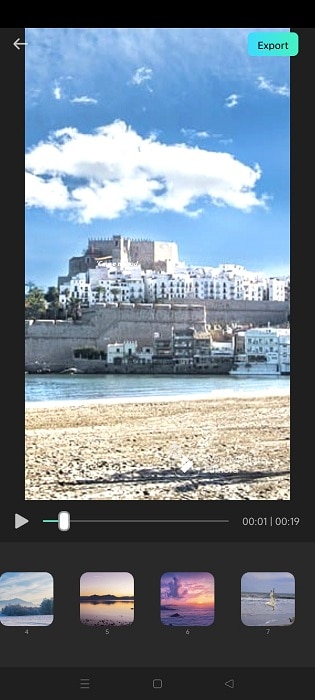
Step 7. Tap the “Export“ button to save your video.

KineMaster vs. Filmora Comparison
KineMaster and Filmora are powerful video editing apps that offer a wide range of features and tools for creating professional-looking videos. In the table below, we will compare the two apps side-by-side, highlighting the similarities and differences between the two. This will help you decide which app best fits your video editing needs.
| KineMaster | Wondershare Filmora | |
|---|---|---|
| Operating System | Android and iOS | Android and iOS |
| App Store Rating | 4.7 out of 5 | 4.7 out of 5 |
| Google Play Store Rating | 4.1 out of 5 | 4.7 out of 5 |
| Pricing | Free and offers In-App PurchasesPremium Subscriptions - $79.99 | Free and offers In-App Purchases |
| Number of Templates | 800+ Templates | 1000+ Templates |
KineMaster is a powerful video editing app available on Android and iOS platforms. It has a rating of 4.7 out of 5 on the App Store and 4.1 out of 5 on the Google Play Store. The app is free to download and use but offers in-app purchases for additional features and assets. Users can also opt for a premium subscription, priced at $79.99 per year.
One of the key features of KineMaster is its templates. These templates are suitable for various purposes, like intros, outros, social media posts, etc. It offers more than 1000 templates, giving the user more options.
KineMaster is an ideal app for amateur and professional content creators who want to take their videos to the next level. This app is great for YouTubers, Social media influencers, and small businesses looking to create engaging video content.
Filmora is another alternative video editing app available on Android and iOS platforms. It has a 4.7 out of 5 on both the App Store and the Google Play Store. Like KineMaster, Filmora is free to download and use, but it also offers in-app purchases for additional features and assets.
Filmora’s key feature is also its templates. It offers a wide range of pre-designed video templates, including animations, text, and effects. Users can customize these templates by adding photos, videos, and text to match their brand or style. It also offers more than 1000 templates, making it a great choice for users looking for various options.
Filmora is an ideal app for both amateur and professional content creators. Its user-friendly interface makes it perfect for beginners new to video editing, while its powerful features make it suitable for advanced users.
People Also Ask
Whether you’re a beginner or an advanced user, this section will provide the answers you need to make an informed decision.
Q1. Does KineMaster Have Watermarks?
KineMaster does have a watermark feature for the free version of the app. When you edit a video using the app’s free version, it will add a KineMaster watermark to the bottom-right corner of your video. However, you can remove this watermark by purchasing the full version of the app or by subscribing to the KineMaster Premium.
Q2. Is KineMaster Copyright Free?
KineMaster is not a copyright-free app, but it allows you to use copyright-free music and other media within the app. KineMaster has a library of royalty-free music and sound effects that you can use in your videos without fearing copyright infringement. However, you are responsible for ensuring that all media you use within the app is not protected by copyright.
Q3. Can KineMaster Videos Be Monetized on YouTube?
Yes, KineMaster videos can be monetized on YouTube. As long as your videos adhere to YouTube’s community guidelines and terms of service, you can monetize them on the platform.
Conclusion
KineMaster and Filmora are both powerful and versatile video editing apps that are great options for anyone looking to create professional-looking videos quickly and easily. Both apps offer a wide range of features, including templates, and are available on Android and iOS platforms.
Ultimately, the best app for you will depend on your specific needs and preferences. Consider factors such as pricing, features, and the number of templates when making your decision. Both apps are great choices, but Filmora may be more suitable for beginners.
Find Out the Best Animated Text Video Tools and Learn How to Animate Text in a Video in Simple Steps. Discover the Best Fonts to Animate Text Along with the Text Animation Templates
If you need to add text to video, you should animate the text part so that it looks attractive and enhance the video content. When you want to animate the texts and titles in your video, you should have the best animated text video tools where there is a wide range of text effects and animations templates and presets.
We have listed the best platforms for animating texts and titles in your video. You can check out their pros and cons and select the perfect one to get started. We have illustrated the simple steps for stunning text animation using Wondershare Filmora.
Part 1. Best Animated Text Video Tools
Here is the list of the best tools that you can use to animate the text in your video. Starting from desktop applications to online platforms, we have reviewed them for your easy selection.
1. Premiere Pro
Best for: Professional video editors
Price: $20.99 per month(subscription)
Compatible OS: Windows and macOS
Adobe Premiere Pro is one of the most preferred video editors in the professional video editing world. Premiere Pro is designed for experienced video editors and amateur video editors can find its user interface difficult to get used to without thorough tutorials. In fact, it is a great platform to work as a team for editing a large video project.

There are advanced video editing options available that you generally do not get in a regular video editor. Starting from video effects, color correction to audio editing and text effects, all the different features are available. As a matter of fact, you can edit VR as well as multi-cam videos as well. The software also supports importing and exporting different types of video file formats.
Pros
- Huge library of video and text effects and presets.
- Multi-cam editing and VR support.
- Dedicated options for audio editing and mixing.
- Stunning stabilization and color grading options.
- Supports a wide range of video file formats.
- Easy workflow for a team of video editors.
Cons
- Required high-end systems for smooth operation.
- Learning curve is steep for amateurs and beginners.
2. Filmora
Best for: beginners as well as professionals who are looking for a wide range of text effects.
Price: $49.99 annually
Compatible OS: Windows and macOS
Wondershare Filmora is the best animated text maker. In comparison to popular video editors, Filmora has the widest range of text effects and animations that you can apply to the text in your video instantly. Most importantly, you can customize and personalize the effects and animations as per your requirements.

The user interface is super intuitive and hence, both beginners as well as professionals prefer it. There are tons of stock photos, videos, and backgrounds that you can use in your video without any copyright claim. This is why Filmora is one of the most preferred video editors among video creators for social media and video streaming platforms.
Pros
- Vast stock media library of photos, videos, and GIFs.
- Various graphical elements, transitions, and audio.
- Motion tracking, audio ducking, and color matching.
- Wide collection of text effects and animation.
- User-friendly interface and faster rendering.
- Supports different types of video file formats.
- Highly affordable pricing and responsive support team.
Cons
- There is scope for improvement in advanced video editing features.
3. iMovie
Best for: beginners who use Apple computers and mobile devices.
Price: Free
Compatible OS: macOS and iOS

iMovie by Apple comes pre-installed on MacBook and Mac. It is the most preferred video editor for beginners who do not want to invest in purchasing a premium video editor. iMovie is a standard video editor where you can get all the basic tools for effects and animations. There are themes and templates available with easy customization options. Most importantly, iMovie has cross-device support as iMovie is available for all Apple devices.
Pros
- Cinematic effects, beautiful styles, and chrome key.
- Decent range of text effect, video effects, and enhancements.
- User-friendly interface for easy operation.
- Easy sharing on cloud, video streaming, and social media platforms.
- Work on any Apple device starting from MacBook to iPad.
Cons
- The output file size is huge.
- Importing MP4 file format is complicated.
- You can work with two video tracks only.
4. Veed.io
Best for: those who prefer online text animation maker.
Price: $12 per month
Compatible OS: Windows, Linux, macOS, Android, and iOS.

Veed.io is a popular online video editor and it is perfect for you if you do not want to install a dedicated video editor on your computer. In fact, it is suitable for low-end computers without low storage space. You can add text effects and animations on the go from your web browser. The platform also supports collaborative video project editing. There are loads of text effects and animation templates available to pick from.
Pros
- Powerful video editor and comparable to premium ones.
- Wide range of video effects, text animation templates available.
- The user interface is intuitive and suitable for everyone.
- Option to add subtitle and supports various video file formats.
- The support team is highly responsive.
Cons
- Users have complained about bugs and hangs.
- Advanced text animation editing options not available.
- Does not have a dedicated app for mobile users.
5. Kapwing
Best for: social media video creators who need videos in different aspect ratios.
Price: $16 per month
Compatible OS: Windows, Linux, and macOS.

Kapwing is a great online editor where you can get to animate the texts and titles in your videos pretty easily. Starting from editing your photos to videos and even creating GIFs, the platform serves all the needs of the users completely. It is particularly popular among social media video creators as there are several aspect ratios and templates available for creating shorts, stories, and regular videos. There is a dedicated app available for mobile users.
Pros
- Different types of text and video templates available.
- Wide range of elements, transitions, and stock media files.
- Quick transformation into different aspect ratio.
- Multi-lingual subtitle support and direct recording option.
- User-friendly and intuitive interface and support for plugins.
Cons
- It gets slower on a low-end computer.
- Does not support a wide range of file formats.
- The support team is not that responsive.
6. Flixier
Best for: those looking for faster and cheaper online text animation maker
Price: $8 per month
Compatible OS: Windows, Linux, macOS and mobile OS.

Flixier is a powerful video editor that you can access from any popular web browser from any device. It is one of the fastest text animation makers and the pricing is highly affordable. The platform is quite popular among social media video creators. There are dedicated formats available for Facebook, Instagram, and YouTube. The user interface feels like a premium video editor with timeline and you can even record video through Flixier.
Pros
- Different text motion presets for animations and effects.
- Allows working with multiple tracks.
- Stock media files such as photos, videos, and audio files.
- Simple but powerful user interface for smooth operation.
- Speeds up collaborative work and cloud integration.
Cons
- Lacks certain advanced editing features.
- Limited file format support and compatibility.
Part 2. Creative Fonts Resource for The Animated Text
Fonts play an important role in text animations. If the typography of the text is not up to the mark, the animation won’t come out as intended. Therefore, you should have trendy and dynamic fonts in your possession to type in your texts and titles.
Trendy Fonts to Use
You have to follow the trend in the animation so that your text animation gets instant traction and stays relevant. You will need to have trendy fonts so that your creative text animations look eye-catching and engaging. Here is the list of the best trendy fonts to use in the animated text.
- Redwing font
If you want to display titles in uppercase as well as in large-sized letters, Redwing should match your requirements perfectly. The font can be considered an upgrade over the popular Impact font that most people use for showing one-word texts and titles in bold style and large sizes.

- Takota font
If you are looking for something cool and funky, Takota font should be at the top of your list. You will find people using similar fonts for showing cool text animations over beautiful landscapes in the background. Every character in this font has its individuality and uniqueness in design.

- Basement grotesque font
This font is inspired by 19th-century typeface where boldness gets the upper hand. It is one of the best display typefaces to showcase titles in brutal fashion. The font strikes a mark in the mind of the viewers instantly. You might see this font in newspapers especially in the titles and headlines.

- Meraki
If you are looking for a compact and modern font to animate the text, Meraki is perfect. You can fit more words in a sentence within a video frame. You must have seen this font in games, t-shirts, logos, and much more. You can consider an upgrade to Sans Serif font.

- Ashfiana
Ashfiana is another upgrade to the regular Sans Serif font but this one has high contrast and it looks more elegant. It is quite slim and you can use the font for titles and text blocks and you can use it more elegantly in oblique style.

- Clap hand
If you are looking for a fun and cute typeface, clap hand font can be great. It is particularly popular among video creators who make videos for kids. You must have seen similar font among brands selling kids’ products. The font is impactful for titles, banners, logos, and short paragraphs.

- Made mellow
You can consider this a serious typeface of Clap Hand font. You get different variations in weights from light to black and it is particularly popular for showing full screen texts and titles. You can apply several stunning text effects on it so that the effects become prominently visible and the animation comes out superb.

- Wonder type
This font has unique design for each character and it gives out cuteness as well as positivity. The font is bold and it has a rustic look. There are several numeral text styles and there are different textures for uppercase and lowercase. The font is modern as well as elegant for all types of text effects and animations.

Dynamic Fonts to Choose
A dynamic font is highly useful in text animation as the characters are not static and they have their own individuality. The characters could have their own texture even though the overall theme of the font stays the same. Besides, the characters have their own animations and effects. Here are some of the popular dynamic fonts to choose from.
- Wicked Mouse Font
If you want to have a cartoon-based text effect and animation, Wicked mouse font is the best option. The font style is large and bold and the characters come in uppercase. When you type in lowercase and uppercase characters, you can notice certain variations and there is 3D text version available.

- Animated Alphabet
It is needless to say that the animated alphabet font is the go-to font when there are texts in a video that needs to be animated. There are so many different variations of animated alphabet fonts that you will find on popular font resource websites and you should download as per your preference.

- Halloween Titles
When you add mysterious or suspenseful typography to your texts and titles, it gets more traction than usual. In this pack, you will get different types of dynamic fonts and text animations that are simple yet impactful. You can use them to create unique and engaging text animations for your video.

- Instagram Title Pack
If you are making videos for Instagram or social media platforms, this is a pack that you should definitely have. In this pack, you will get text fonts for stories and posts, animated titles, dynamic texts for transitions and swipe up activities. For each category, there are several variations to post creative text animations.

- Chalkboard Animated Handwriting
The chalkboard animated handwriting pack has the classic text animation with customization options. There are different variations available along with rubbing the displayed text off with duster animation. It is great for titles as well as showing lengthy text and you can change the texture, border, color, and much more.

- Glitch Titles
The glitch text animation is one of the trending text effects in the modern videos. The glitch animation is often accompanied by heavy bass sound effect for opening and closing titles. The glitch titles preset comes with several variations so that your videos do not look the same to the viewers and get appreciation of the text animations.

- Glow Text Animations
The glow text animations font is suitable for titles, transitions, as well as low thirds. The font has 3D effect along with the glow effect and both of them make the text instantly engaging. There are different variations available such as cool glow, fiery glow, sober glow, and icy glow effect.

- Neon Short Circuit Titles
For text animations, dynamic fonts based on neon effects are always in high demand. Neon short circuit titles combine the neon as well as the short circuit animation together. That is why it is more refreshing and eye-catching than regular neon fonts and you must use it for text animations especially when you have a darker background.

Part 3. How to Animate Text in A Video
Out of the top video tools to animate text in a video, we have picked Wondershare Filmora as the best animated text maker. Filmora Video Editor has all the different categories of text animations to cater to all the different video niches. Therefore, you can have appropriate and creative text animations based on your video content to make it eye-catching and engaging. Here are the detailed steps to animate the text in video.
Free Download For Win 7 or later(64-bit)
Free Download For macOS 10.14 or later
- How to add text in Filmora?
First of all, you need to add text to your video project to get started. Launch Filmora and import any video that you want to place in the background. You can also go to Stock Media and select any background photo or video as per your preference. Click on Quick Text option from the toolbar above the timeline.
This will add a text layer on the timeline with a default text. Double-click on the text layer and edit the default text. The text layer should be over the background layer and you can reposition the text layer depending on where you want the text to appear on the video. You can adjust the position of the text on the video from Viewer.

- How to edit font in Filmora?
Now that you have placed and positioned the text in your video properly, it is time to edit the text style. Double-click on the text layer and go to Title>Preset> Font section. Select the font, size, and alignment. If there are multiple texts in the template, select them one by one from Viewer and edit them. Go to Settings section and change text color and spacing as appropriate. There are also several text style templates available to choose from if you want to.

- How to use animation in text in Filmora?
Double-click on the text layer again and this time, you need to go to Animation tab. You will see all the popular text animation templates on the left panel. Place your mouse pointer over them to get a preview. Select any one of these animations by double-clicking on the animation and click on Ok button. Play the video to watch the applied animation.

- How to use text preset in Filmora?
If you want to make the text animation eye-catching and attention-grabbing, you need to select a text animation preset in Filmora. Go to Titles and check out the left panel where you will find all the different categories of text effects and animations. Go to the category that matches your video content and select any template and drop it on the timeline. Double-click on the text layer to edit the default text and text style as per your preference.

Part 4. How to Make Creative Text Animation?
Depending on the video content, you have to select the text effect and create text animation accordingly. We have already stated that Filmora has different categories of text animation templates to satisfy all your video requirements perfectly. You can choose appropriate text animation templates that go well with your video category and use them to come up with creative text animations.
- Social media
If you are making videos for social media platforms such as Facebook or for video streaming platforms like YouTube, you should select text animations from Social Media category in Filmora. There are over 200+ text animation templates available that have all the common text animations you usually see as well as creative text animations that will make your video stand out.

All you need to do is import your video and place it in the background. Go to Titles and select Social Media category and drop any desired text animation on the timeline. Thereafter, edit and customize the text layer and style along with the animation as per your preference.
- Education
If your video belongs to education nice such as you are explaining a concept or demonstrating a tutorial, you need to use text animations that are graceful for your video content. Filmora has a dedicated section for text animations related to education. Go to Titles> Tutorials and you will see around 400 text effects and animations that you can use in your educational video effectively.

- Business
If you are creating videos for brands and businesses, there are certain creative text animations you have to use in order to get traction from the target audiences. Filmora comes with over 150 text effects and animations specifically for business videos so that the branding gets strong and leaves a good impression in the mind of the viewers. Go to Titles> Business and choose the desired text animations and customize them to fit into your brand image.

- Travel
If you are into making traveling vlogs or informational travel videos, Filmora has a specific set of text effects and creative animations. You get to choose from over 250 templates to represent any text and title you want to display in your video. The beautiful and eye-catching animated text will definitely get your message across to the viewers pleasantly. Go to Titles> Travel section and check out all the text animations to choose from.

- Gaming
There are so many gamers who put up their gameplay videos on social media and video streaming platforms. While editing the video, they need to put up animated text so that the video content looks interesting and engaging. If you have a gaming video, Filmora has around 500 text effects and animations to use in your video. Go to Titles> Gaming and select from any creative text animations as per your preference.

2. Filmora
Best for: beginners as well as professionals who are looking for a wide range of text effects.
Price: $49.99 annually
Compatible OS: Windows and macOS
Wondershare Filmora is the best animated text maker. In comparison to popular video editors, Filmora has the widest range of text effects and animations that you can apply to the text in your video instantly. Most importantly, you can customize and personalize the effects and animations as per your requirements.

The user interface is super intuitive and hence, both beginners as well as professionals prefer it. There are tons of stock photos, videos, and backgrounds that you can use in your video without any copyright claim. This is why Filmora is one of the most preferred video editors among video creators for social media and video streaming platforms.
Pros
- Vast stock media library of photos, videos, and GIFs.
- Various graphical elements, transitions, and audio.
- Motion tracking, audio ducking, and color matching.
- Wide collection of text effects and animation.
- User-friendly interface and faster rendering.
- Supports different types of video file formats.
- Highly affordable pricing and responsive support team.
Cons
- There is scope for improvement in advanced video editing features.
3. iMovie
Best for: beginners who use Apple computers and mobile devices.
Price: Free
Compatible OS: macOS and iOS

iMovie by Apple comes pre-installed on MacBook and Mac. It is the most preferred video editor for beginners who do not want to invest in purchasing a premium video editor. iMovie is a standard video editor where you can get all the basic tools for effects and animations. There are themes and templates available with easy customization options. Most importantly, iMovie has cross-device support as iMovie is available for all Apple devices.
Pros
- Cinematic effects, beautiful styles, and chrome key.
- Decent range of text effect, video effects, and enhancements.
- User-friendly interface for easy operation.
- Easy sharing on cloud, video streaming, and social media platforms.
- Work on any Apple device starting from MacBook to iPad.
Cons
- The output file size is huge.
- Importing MP4 file format is complicated.
- You can work with two video tracks only.
4. Veed.io
Best for: those who prefer online text animation maker.
Price: $12 per month
Compatible OS: Windows, Linux, macOS, Android, and iOS.

Veed.io is a popular online video editor and it is perfect for you if you do not want to install a dedicated video editor on your computer. In fact, it is suitable for low-end computers without low storage space. You can add text effects and animations on the go from your web browser. The platform also supports collaborative video project editing. There are loads of text effects and animation templates available to pick from.
Pros
- Powerful video editor and comparable to premium ones.
- Wide range of video effects, text animation templates available.
- The user interface is intuitive and suitable for everyone.
- Option to add subtitle and supports various video file formats.
- The support team is highly responsive.
Cons
- Users have complained about bugs and hangs.
- Advanced text animation editing options not available.
- Does not have a dedicated app for mobile users.
5. Kapwing
Best for: social media video creators who need videos in different aspect ratios.
Price: $16 per month
Compatible OS: Windows, Linux, and macOS.

Kapwing is a great online editor where you can get to animate the texts and titles in your videos pretty easily. Starting from editing your photos to videos and even creating GIFs, the platform serves all the needs of the users completely. It is particularly popular among social media video creators as there are several aspect ratios and templates available for creating shorts, stories, and regular videos. There is a dedicated app available for mobile users.
Pros
- Different types of text and video templates available.
- Wide range of elements, transitions, and stock media files.
- Quick transformation into different aspect ratio.
- Multi-lingual subtitle support and direct recording option.
- User-friendly and intuitive interface and support for plugins.
Cons
- It gets slower on a low-end computer.
- Does not support a wide range of file formats.
- The support team is not that responsive.
6. Flixier
Best for: those looking for faster and cheaper online text animation maker
Price: $8 per month
Compatible OS: Windows, Linux, macOS and mobile OS.

Flixier is a powerful video editor that you can access from any popular web browser from any device. It is one of the fastest text animation makers and the pricing is highly affordable. The platform is quite popular among social media video creators. There are dedicated formats available for Facebook, Instagram, and YouTube. The user interface feels like a premium video editor with timeline and you can even record video through Flixier.
Pros
- Different text motion presets for animations and effects.
- Allows working with multiple tracks.
- Stock media files such as photos, videos, and audio files.
- Simple but powerful user interface for smooth operation.
- Speeds up collaborative work and cloud integration.
Cons
- Lacks certain advanced editing features.
- Limited file format support and compatibility.
Part 2. Creative Fonts Resource for The Animated Text
Fonts play an important role in text animations. If the typography of the text is not up to the mark, the animation won’t come out as intended. Therefore, you should have trendy and dynamic fonts in your possession to type in your texts and titles.
Trendy Fonts to Use
You have to follow the trend in the animation so that your text animation gets instant traction and stays relevant. You will need to have trendy fonts so that your creative text animations look eye-catching and engaging. Here is the list of the best trendy fonts to use in the animated text.
- Redwing font
If you want to display titles in uppercase as well as in large-sized letters, Redwing should match your requirements perfectly. The font can be considered an upgrade over the popular Impact font that most people use for showing one-word texts and titles in bold style and large sizes.

- Takota font
If you are looking for something cool and funky, Takota font should be at the top of your list. You will find people using similar fonts for showing cool text animations over beautiful landscapes in the background. Every character in this font has its individuality and uniqueness in design.

- Basement grotesque font
This font is inspired by 19th-century typeface where boldness gets the upper hand. It is one of the best display typefaces to showcase titles in brutal fashion. The font strikes a mark in the mind of the viewers instantly. You might see this font in newspapers especially in the titles and headlines.

- Meraki
If you are looking for a compact and modern font to animate the text, Meraki is perfect. You can fit more words in a sentence within a video frame. You must have seen this font in games, t-shirts, logos, and much more. You can consider an upgrade to Sans Serif font.

- Ashfiana
Ashfiana is another upgrade to the regular Sans Serif font but this one has high contrast and it looks more elegant. It is quite slim and you can use the font for titles and text blocks and you can use it more elegantly in oblique style.

- Clap hand
If you are looking for a fun and cute typeface, clap hand font can be great. It is particularly popular among video creators who make videos for kids. You must have seen similar font among brands selling kids’ products. The font is impactful for titles, banners, logos, and short paragraphs.

- Made mellow
You can consider this a serious typeface of Clap Hand font. You get different variations in weights from light to black and it is particularly popular for showing full screen texts and titles. You can apply several stunning text effects on it so that the effects become prominently visible and the animation comes out superb.

- Wonder type
This font has unique design for each character and it gives out cuteness as well as positivity. The font is bold and it has a rustic look. There are several numeral text styles and there are different textures for uppercase and lowercase. The font is modern as well as elegant for all types of text effects and animations.

Dynamic Fonts to Choose
A dynamic font is highly useful in text animation as the characters are not static and they have their own individuality. The characters could have their own texture even though the overall theme of the font stays the same. Besides, the characters have their own animations and effects. Here are some of the popular dynamic fonts to choose from.
- Wicked Mouse Font
If you want to have a cartoon-based text effect and animation, Wicked mouse font is the best option. The font style is large and bold and the characters come in uppercase. When you type in lowercase and uppercase characters, you can notice certain variations and there is 3D text version available.

- Animated Alphabet
It is needless to say that the animated alphabet font is the go-to font when there are texts in a video that needs to be animated. There are so many different variations of animated alphabet fonts that you will find on popular font resource websites and you should download as per your preference.

- Halloween Titles
When you add mysterious or suspenseful typography to your texts and titles, it gets more traction than usual. In this pack, you will get different types of dynamic fonts and text animations that are simple yet impactful. You can use them to create unique and engaging text animations for your video.

- Instagram Title Pack
If you are making videos for Instagram or social media platforms, this is a pack that you should definitely have. In this pack, you will get text fonts for stories and posts, animated titles, dynamic texts for transitions and swipe up activities. For each category, there are several variations to post creative text animations.

- Chalkboard Animated Handwriting
The chalkboard animated handwriting pack has the classic text animation with customization options. There are different variations available along with rubbing the displayed text off with duster animation. It is great for titles as well as showing lengthy text and you can change the texture, border, color, and much more.

- Glitch Titles
The glitch text animation is one of the trending text effects in the modern videos. The glitch animation is often accompanied by heavy bass sound effect for opening and closing titles. The glitch titles preset comes with several variations so that your videos do not look the same to the viewers and get appreciation of the text animations.

- Glow Text Animations
The glow text animations font is suitable for titles, transitions, as well as low thirds. The font has 3D effect along with the glow effect and both of them make the text instantly engaging. There are different variations available such as cool glow, fiery glow, sober glow, and icy glow effect.

- Neon Short Circuit Titles
For text animations, dynamic fonts based on neon effects are always in high demand. Neon short circuit titles combine the neon as well as the short circuit animation together. That is why it is more refreshing and eye-catching than regular neon fonts and you must use it for text animations especially when you have a darker background.

Part 3. How to Animate Text in A Video
Out of the top video tools to animate text in a video, we have picked Wondershare Filmora as the best animated text maker. Filmora Video Editor has all the different categories of text animations to cater to all the different video niches. Therefore, you can have appropriate and creative text animations based on your video content to make it eye-catching and engaging. Here are the detailed steps to animate the text in video.
Free Download For Win 7 or later(64-bit)
Free Download For macOS 10.14 or later
- How to add text in Filmora?
First of all, you need to add text to your video project to get started. Launch Filmora and import any video that you want to place in the background. You can also go to Stock Media and select any background photo or video as per your preference. Click on Quick Text option from the toolbar above the timeline.
This will add a text layer on the timeline with a default text. Double-click on the text layer and edit the default text. The text layer should be over the background layer and you can reposition the text layer depending on where you want the text to appear on the video. You can adjust the position of the text on the video from Viewer.

- How to edit font in Filmora?
Now that you have placed and positioned the text in your video properly, it is time to edit the text style. Double-click on the text layer and go to Title>Preset> Font section. Select the font, size, and alignment. If there are multiple texts in the template, select them one by one from Viewer and edit them. Go to Settings section and change text color and spacing as appropriate. There are also several text style templates available to choose from if you want to.

- How to use animation in text in Filmora?
Double-click on the text layer again and this time, you need to go to Animation tab. You will see all the popular text animation templates on the left panel. Place your mouse pointer over them to get a preview. Select any one of these animations by double-clicking on the animation and click on Ok button. Play the video to watch the applied animation.

- How to use text preset in Filmora?
If you want to make the text animation eye-catching and attention-grabbing, you need to select a text animation preset in Filmora. Go to Titles and check out the left panel where you will find all the different categories of text effects and animations. Go to the category that matches your video content and select any template and drop it on the timeline. Double-click on the text layer to edit the default text and text style as per your preference.

Part 4. How to Make Creative Text Animation?
Depending on the video content, you have to select the text effect and create text animation accordingly. We have already stated that Filmora has different categories of text animation templates to satisfy all your video requirements perfectly. You can choose appropriate text animation templates that go well with your video category and use them to come up with creative text animations.
- Social media
If you are making videos for social media platforms such as Facebook or for video streaming platforms like YouTube, you should select text animations from Social Media category in Filmora. There are over 200+ text animation templates available that have all the common text animations you usually see as well as creative text animations that will make your video stand out.

All you need to do is import your video and place it in the background. Go to Titles and select Social Media category and drop any desired text animation on the timeline. Thereafter, edit and customize the text layer and style along with the animation as per your preference.
- Education
If your video belongs to education nice such as you are explaining a concept or demonstrating a tutorial, you need to use text animations that are graceful for your video content. Filmora has a dedicated section for text animations related to education. Go to Titles> Tutorials and you will see around 400 text effects and animations that you can use in your educational video effectively.

- Business
If you are creating videos for brands and businesses, there are certain creative text animations you have to use in order to get traction from the target audiences. Filmora comes with over 150 text effects and animations specifically for business videos so that the branding gets strong and leaves a good impression in the mind of the viewers. Go to Titles> Business and choose the desired text animations and customize them to fit into your brand image.

- Travel
If you are into making traveling vlogs or informational travel videos, Filmora has a specific set of text effects and creative animations. You get to choose from over 250 templates to represent any text and title you want to display in your video. The beautiful and eye-catching animated text will definitely get your message across to the viewers pleasantly. Go to Titles> Travel section and check out all the text animations to choose from.

- Gaming
There are so many gamers who put up their gameplay videos on social media and video streaming platforms. While editing the video, they need to put up animated text so that the video content looks interesting and engaging. If you have a gaming video, Filmora has around 500 text effects and animations to use in your video. Go to Titles> Gaming and select from any creative text animations as per your preference.

2. Filmora
Best for: beginners as well as professionals who are looking for a wide range of text effects.
Price: $49.99 annually
Compatible OS: Windows and macOS
Wondershare Filmora is the best animated text maker. In comparison to popular video editors, Filmora has the widest range of text effects and animations that you can apply to the text in your video instantly. Most importantly, you can customize and personalize the effects and animations as per your requirements.

The user interface is super intuitive and hence, both beginners as well as professionals prefer it. There are tons of stock photos, videos, and backgrounds that you can use in your video without any copyright claim. This is why Filmora is one of the most preferred video editors among video creators for social media and video streaming platforms.
Pros
- Vast stock media library of photos, videos, and GIFs.
- Various graphical elements, transitions, and audio.
- Motion tracking, audio ducking, and color matching.
- Wide collection of text effects and animation.
- User-friendly interface and faster rendering.
- Supports different types of video file formats.
- Highly affordable pricing and responsive support team.
Cons
- There is scope for improvement in advanced video editing features.
3. iMovie
Best for: beginners who use Apple computers and mobile devices.
Price: Free
Compatible OS: macOS and iOS

iMovie by Apple comes pre-installed on MacBook and Mac. It is the most preferred video editor for beginners who do not want to invest in purchasing a premium video editor. iMovie is a standard video editor where you can get all the basic tools for effects and animations. There are themes and templates available with easy customization options. Most importantly, iMovie has cross-device support as iMovie is available for all Apple devices.
Pros
- Cinematic effects, beautiful styles, and chrome key.
- Decent range of text effect, video effects, and enhancements.
- User-friendly interface for easy operation.
- Easy sharing on cloud, video streaming, and social media platforms.
- Work on any Apple device starting from MacBook to iPad.
Cons
- The output file size is huge.
- Importing MP4 file format is complicated.
- You can work with two video tracks only.
4. Veed.io
Best for: those who prefer online text animation maker.
Price: $12 per month
Compatible OS: Windows, Linux, macOS, Android, and iOS.

Veed.io is a popular online video editor and it is perfect for you if you do not want to install a dedicated video editor on your computer. In fact, it is suitable for low-end computers without low storage space. You can add text effects and animations on the go from your web browser. The platform also supports collaborative video project editing. There are loads of text effects and animation templates available to pick from.
Pros
- Powerful video editor and comparable to premium ones.
- Wide range of video effects, text animation templates available.
- The user interface is intuitive and suitable for everyone.
- Option to add subtitle and supports various video file formats.
- The support team is highly responsive.
Cons
- Users have complained about bugs and hangs.
- Advanced text animation editing options not available.
- Does not have a dedicated app for mobile users.
5. Kapwing
Best for: social media video creators who need videos in different aspect ratios.
Price: $16 per month
Compatible OS: Windows, Linux, and macOS.

Kapwing is a great online editor where you can get to animate the texts and titles in your videos pretty easily. Starting from editing your photos to videos and even creating GIFs, the platform serves all the needs of the users completely. It is particularly popular among social media video creators as there are several aspect ratios and templates available for creating shorts, stories, and regular videos. There is a dedicated app available for mobile users.
Pros
- Different types of text and video templates available.
- Wide range of elements, transitions, and stock media files.
- Quick transformation into different aspect ratio.
- Multi-lingual subtitle support and direct recording option.
- User-friendly and intuitive interface and support for plugins.
Cons
- It gets slower on a low-end computer.
- Does not support a wide range of file formats.
- The support team is not that responsive.
6. Flixier
Best for: those looking for faster and cheaper online text animation maker
Price: $8 per month
Compatible OS: Windows, Linux, macOS and mobile OS.

Flixier is a powerful video editor that you can access from any popular web browser from any device. It is one of the fastest text animation makers and the pricing is highly affordable. The platform is quite popular among social media video creators. There are dedicated formats available for Facebook, Instagram, and YouTube. The user interface feels like a premium video editor with timeline and you can even record video through Flixier.
Pros
- Different text motion presets for animations and effects.
- Allows working with multiple tracks.
- Stock media files such as photos, videos, and audio files.
- Simple but powerful user interface for smooth operation.
- Speeds up collaborative work and cloud integration.
Cons
- Lacks certain advanced editing features.
- Limited file format support and compatibility.
Part 2. Creative Fonts Resource for The Animated Text
Fonts play an important role in text animations. If the typography of the text is not up to the mark, the animation won’t come out as intended. Therefore, you should have trendy and dynamic fonts in your possession to type in your texts and titles.
Trendy Fonts to Use
You have to follow the trend in the animation so that your text animation gets instant traction and stays relevant. You will need to have trendy fonts so that your creative text animations look eye-catching and engaging. Here is the list of the best trendy fonts to use in the animated text.
- Redwing font
If you want to display titles in uppercase as well as in large-sized letters, Redwing should match your requirements perfectly. The font can be considered an upgrade over the popular Impact font that most people use for showing one-word texts and titles in bold style and large sizes.

- Takota font
If you are looking for something cool and funky, Takota font should be at the top of your list. You will find people using similar fonts for showing cool text animations over beautiful landscapes in the background. Every character in this font has its individuality and uniqueness in design.

- Basement grotesque font
This font is inspired by 19th-century typeface where boldness gets the upper hand. It is one of the best display typefaces to showcase titles in brutal fashion. The font strikes a mark in the mind of the viewers instantly. You might see this font in newspapers especially in the titles and headlines.

- Meraki
If you are looking for a compact and modern font to animate the text, Meraki is perfect. You can fit more words in a sentence within a video frame. You must have seen this font in games, t-shirts, logos, and much more. You can consider an upgrade to Sans Serif font.

- Ashfiana
Ashfiana is another upgrade to the regular Sans Serif font but this one has high contrast and it looks more elegant. It is quite slim and you can use the font for titles and text blocks and you can use it more elegantly in oblique style.

- Clap hand
If you are looking for a fun and cute typeface, clap hand font can be great. It is particularly popular among video creators who make videos for kids. You must have seen similar font among brands selling kids’ products. The font is impactful for titles, banners, logos, and short paragraphs.

- Made mellow
You can consider this a serious typeface of Clap Hand font. You get different variations in weights from light to black and it is particularly popular for showing full screen texts and titles. You can apply several stunning text effects on it so that the effects become prominently visible and the animation comes out superb.

- Wonder type
This font has unique design for each character and it gives out cuteness as well as positivity. The font is bold and it has a rustic look. There are several numeral text styles and there are different textures for uppercase and lowercase. The font is modern as well as elegant for all types of text effects and animations.

Dynamic Fonts to Choose
A dynamic font is highly useful in text animation as the characters are not static and they have their own individuality. The characters could have their own texture even though the overall theme of the font stays the same. Besides, the characters have their own animations and effects. Here are some of the popular dynamic fonts to choose from.
- Wicked Mouse Font
If you want to have a cartoon-based text effect and animation, Wicked mouse font is the best option. The font style is large and bold and the characters come in uppercase. When you type in lowercase and uppercase characters, you can notice certain variations and there is 3D text version available.

- Animated Alphabet
It is needless to say that the animated alphabet font is the go-to font when there are texts in a video that needs to be animated. There are so many different variations of animated alphabet fonts that you will find on popular font resource websites and you should download as per your preference.

- Halloween Titles
When you add mysterious or suspenseful typography to your texts and titles, it gets more traction than usual. In this pack, you will get different types of dynamic fonts and text animations that are simple yet impactful. You can use them to create unique and engaging text animations for your video.

- Instagram Title Pack
If you are making videos for Instagram or social media platforms, this is a pack that you should definitely have. In this pack, you will get text fonts for stories and posts, animated titles, dynamic texts for transitions and swipe up activities. For each category, there are several variations to post creative text animations.

- Chalkboard Animated Handwriting
The chalkboard animated handwriting pack has the classic text animation with customization options. There are different variations available along with rubbing the displayed text off with duster animation. It is great for titles as well as showing lengthy text and you can change the texture, border, color, and much more.

- Glitch Titles
The glitch text animation is one of the trending text effects in the modern videos. The glitch animation is often accompanied by heavy bass sound effect for opening and closing titles. The glitch titles preset comes with several variations so that your videos do not look the same to the viewers and get appreciation of the text animations.

- Glow Text Animations
The glow text animations font is suitable for titles, transitions, as well as low thirds. The font has 3D effect along with the glow effect and both of them make the text instantly engaging. There are different variations available such as cool glow, fiery glow, sober glow, and icy glow effect.

- Neon Short Circuit Titles
For text animations, dynamic fonts based on neon effects are always in high demand. Neon short circuit titles combine the neon as well as the short circuit animation together. That is why it is more refreshing and eye-catching than regular neon fonts and you must use it for text animations especially when you have a darker background.

Part 3. How to Animate Text in A Video
Out of the top video tools to animate text in a video, we have picked Wondershare Filmora as the best animated text maker. Filmora Video Editor has all the different categories of text animations to cater to all the different video niches. Therefore, you can have appropriate and creative text animations based on your video content to make it eye-catching and engaging. Here are the detailed steps to animate the text in video.
Free Download For Win 7 or later(64-bit)
Free Download For macOS 10.14 or later
- How to add text in Filmora?
First of all, you need to add text to your video project to get started. Launch Filmora and import any video that you want to place in the background. You can also go to Stock Media and select any background photo or video as per your preference. Click on Quick Text option from the toolbar above the timeline.
This will add a text layer on the timeline with a default text. Double-click on the text layer and edit the default text. The text layer should be over the background layer and you can reposition the text layer depending on where you want the text to appear on the video. You can adjust the position of the text on the video from Viewer.

- How to edit font in Filmora?
Now that you have placed and positioned the text in your video properly, it is time to edit the text style. Double-click on the text layer and go to Title>Preset> Font section. Select the font, size, and alignment. If there are multiple texts in the template, select them one by one from Viewer and edit them. Go to Settings section and change text color and spacing as appropriate. There are also several text style templates available to choose from if you want to.

- How to use animation in text in Filmora?
Double-click on the text layer again and this time, you need to go to Animation tab. You will see all the popular text animation templates on the left panel. Place your mouse pointer over them to get a preview. Select any one of these animations by double-clicking on the animation and click on Ok button. Play the video to watch the applied animation.

- How to use text preset in Filmora?
If you want to make the text animation eye-catching and attention-grabbing, you need to select a text animation preset in Filmora. Go to Titles and check out the left panel where you will find all the different categories of text effects and animations. Go to the category that matches your video content and select any template and drop it on the timeline. Double-click on the text layer to edit the default text and text style as per your preference.

Part 4. How to Make Creative Text Animation?
Depending on the video content, you have to select the text effect and create text animation accordingly. We have already stated that Filmora has different categories of text animation templates to satisfy all your video requirements perfectly. You can choose appropriate text animation templates that go well with your video category and use them to come up with creative text animations.
- Social media
If you are making videos for social media platforms such as Facebook or for video streaming platforms like YouTube, you should select text animations from Social Media category in Filmora. There are over 200+ text animation templates available that have all the common text animations you usually see as well as creative text animations that will make your video stand out.

All you need to do is import your video and place it in the background. Go to Titles and select Social Media category and drop any desired text animation on the timeline. Thereafter, edit and customize the text layer and style along with the animation as per your preference.
- Education
If your video belongs to education nice such as you are explaining a concept or demonstrating a tutorial, you need to use text animations that are graceful for your video content. Filmora has a dedicated section for text animations related to education. Go to Titles> Tutorials and you will see around 400 text effects and animations that you can use in your educational video effectively.

- Business
If you are creating videos for brands and businesses, there are certain creative text animations you have to use in order to get traction from the target audiences. Filmora comes with over 150 text effects and animations specifically for business videos so that the branding gets strong and leaves a good impression in the mind of the viewers. Go to Titles> Business and choose the desired text animations and customize them to fit into your brand image.

- Travel
If you are into making traveling vlogs or informational travel videos, Filmora has a specific set of text effects and creative animations. You get to choose from over 250 templates to represent any text and title you want to display in your video. The beautiful and eye-catching animated text will definitely get your message across to the viewers pleasantly. Go to Titles> Travel section and check out all the text animations to choose from.

- Gaming
There are so many gamers who put up their gameplay videos on social media and video streaming platforms. While editing the video, they need to put up animated text so that the video content looks interesting and engaging. If you have a gaming video, Filmora has around 500 text effects and animations to use in your video. Go to Titles> Gaming and select from any creative text animations as per your preference.

2. Filmora
Best for: beginners as well as professionals who are looking for a wide range of text effects.
Price: $49.99 annually
Compatible OS: Windows and macOS
Wondershare Filmora is the best animated text maker. In comparison to popular video editors, Filmora has the widest range of text effects and animations that you can apply to the text in your video instantly. Most importantly, you can customize and personalize the effects and animations as per your requirements.

The user interface is super intuitive and hence, both beginners as well as professionals prefer it. There are tons of stock photos, videos, and backgrounds that you can use in your video without any copyright claim. This is why Filmora is one of the most preferred video editors among video creators for social media and video streaming platforms.
Pros
- Vast stock media library of photos, videos, and GIFs.
- Various graphical elements, transitions, and audio.
- Motion tracking, audio ducking, and color matching.
- Wide collection of text effects and animation.
- User-friendly interface and faster rendering.
- Supports different types of video file formats.
- Highly affordable pricing and responsive support team.
Cons
- There is scope for improvement in advanced video editing features.
3. iMovie
Best for: beginners who use Apple computers and mobile devices.
Price: Free
Compatible OS: macOS and iOS

iMovie by Apple comes pre-installed on MacBook and Mac. It is the most preferred video editor for beginners who do not want to invest in purchasing a premium video editor. iMovie is a standard video editor where you can get all the basic tools for effects and animations. There are themes and templates available with easy customization options. Most importantly, iMovie has cross-device support as iMovie is available for all Apple devices.
Pros
- Cinematic effects, beautiful styles, and chrome key.
- Decent range of text effect, video effects, and enhancements.
- User-friendly interface for easy operation.
- Easy sharing on cloud, video streaming, and social media platforms.
- Work on any Apple device starting from MacBook to iPad.
Cons
- The output file size is huge.
- Importing MP4 file format is complicated.
- You can work with two video tracks only.
4. Veed.io
Best for: those who prefer online text animation maker.
Price: $12 per month
Compatible OS: Windows, Linux, macOS, Android, and iOS.

Veed.io is a popular online video editor and it is perfect for you if you do not want to install a dedicated video editor on your computer. In fact, it is suitable for low-end computers without low storage space. You can add text effects and animations on the go from your web browser. The platform also supports collaborative video project editing. There are loads of text effects and animation templates available to pick from.
Pros
- Powerful video editor and comparable to premium ones.
- Wide range of video effects, text animation templates available.
- The user interface is intuitive and suitable for everyone.
- Option to add subtitle and supports various video file formats.
- The support team is highly responsive.
Cons
- Users have complained about bugs and hangs.
- Advanced text animation editing options not available.
- Does not have a dedicated app for mobile users.
5. Kapwing
Best for: social media video creators who need videos in different aspect ratios.
Price: $16 per month
Compatible OS: Windows, Linux, and macOS.

Kapwing is a great online editor where you can get to animate the texts and titles in your videos pretty easily. Starting from editing your photos to videos and even creating GIFs, the platform serves all the needs of the users completely. It is particularly popular among social media video creators as there are several aspect ratios and templates available for creating shorts, stories, and regular videos. There is a dedicated app available for mobile users.
Pros
- Different types of text and video templates available.
- Wide range of elements, transitions, and stock media files.
- Quick transformation into different aspect ratio.
- Multi-lingual subtitle support and direct recording option.
- User-friendly and intuitive interface and support for plugins.
Cons
- It gets slower on a low-end computer.
- Does not support a wide range of file formats.
- The support team is not that responsive.
6. Flixier
Best for: those looking for faster and cheaper online text animation maker
Price: $8 per month
Compatible OS: Windows, Linux, macOS and mobile OS.

Flixier is a powerful video editor that you can access from any popular web browser from any device. It is one of the fastest text animation makers and the pricing is highly affordable. The platform is quite popular among social media video creators. There are dedicated formats available for Facebook, Instagram, and YouTube. The user interface feels like a premium video editor with timeline and you can even record video through Flixier.
Pros
- Different text motion presets for animations and effects.
- Allows working with multiple tracks.
- Stock media files such as photos, videos, and audio files.
- Simple but powerful user interface for smooth operation.
- Speeds up collaborative work and cloud integration.
Cons
- Lacks certain advanced editing features.
- Limited file format support and compatibility.
Part 2. Creative Fonts Resource for The Animated Text
Fonts play an important role in text animations. If the typography of the text is not up to the mark, the animation won’t come out as intended. Therefore, you should have trendy and dynamic fonts in your possession to type in your texts and titles.
Trendy Fonts to Use
You have to follow the trend in the animation so that your text animation gets instant traction and stays relevant. You will need to have trendy fonts so that your creative text animations look eye-catching and engaging. Here is the list of the best trendy fonts to use in the animated text.
- Redwing font
If you want to display titles in uppercase as well as in large-sized letters, Redwing should match your requirements perfectly. The font can be considered an upgrade over the popular Impact font that most people use for showing one-word texts and titles in bold style and large sizes.

- Takota font
If you are looking for something cool and funky, Takota font should be at the top of your list. You will find people using similar fonts for showing cool text animations over beautiful landscapes in the background. Every character in this font has its individuality and uniqueness in design.

- Basement grotesque font
This font is inspired by 19th-century typeface where boldness gets the upper hand. It is one of the best display typefaces to showcase titles in brutal fashion. The font strikes a mark in the mind of the viewers instantly. You might see this font in newspapers especially in the titles and headlines.

- Meraki
If you are looking for a compact and modern font to animate the text, Meraki is perfect. You can fit more words in a sentence within a video frame. You must have seen this font in games, t-shirts, logos, and much more. You can consider an upgrade to Sans Serif font.

- Ashfiana
Ashfiana is another upgrade to the regular Sans Serif font but this one has high contrast and it looks more elegant. It is quite slim and you can use the font for titles and text blocks and you can use it more elegantly in oblique style.

- Clap hand
If you are looking for a fun and cute typeface, clap hand font can be great. It is particularly popular among video creators who make videos for kids. You must have seen similar font among brands selling kids’ products. The font is impactful for titles, banners, logos, and short paragraphs.

- Made mellow
You can consider this a serious typeface of Clap Hand font. You get different variations in weights from light to black and it is particularly popular for showing full screen texts and titles. You can apply several stunning text effects on it so that the effects become prominently visible and the animation comes out superb.

- Wonder type
This font has unique design for each character and it gives out cuteness as well as positivity. The font is bold and it has a rustic look. There are several numeral text styles and there are different textures for uppercase and lowercase. The font is modern as well as elegant for all types of text effects and animations.

Dynamic Fonts to Choose
A dynamic font is highly useful in text animation as the characters are not static and they have their own individuality. The characters could have their own texture even though the overall theme of the font stays the same. Besides, the characters have their own animations and effects. Here are some of the popular dynamic fonts to choose from.
- Wicked Mouse Font
If you want to have a cartoon-based text effect and animation, Wicked mouse font is the best option. The font style is large and bold and the characters come in uppercase. When you type in lowercase and uppercase characters, you can notice certain variations and there is 3D text version available.

- Animated Alphabet
It is needless to say that the animated alphabet font is the go-to font when there are texts in a video that needs to be animated. There are so many different variations of animated alphabet fonts that you will find on popular font resource websites and you should download as per your preference.

- Halloween Titles
When you add mysterious or suspenseful typography to your texts and titles, it gets more traction than usual. In this pack, you will get different types of dynamic fonts and text animations that are simple yet impactful. You can use them to create unique and engaging text animations for your video.

- Instagram Title Pack
If you are making videos for Instagram or social media platforms, this is a pack that you should definitely have. In this pack, you will get text fonts for stories and posts, animated titles, dynamic texts for transitions and swipe up activities. For each category, there are several variations to post creative text animations.

- Chalkboard Animated Handwriting
The chalkboard animated handwriting pack has the classic text animation with customization options. There are different variations available along with rubbing the displayed text off with duster animation. It is great for titles as well as showing lengthy text and you can change the texture, border, color, and much more.

- Glitch Titles
The glitch text animation is one of the trending text effects in the modern videos. The glitch animation is often accompanied by heavy bass sound effect for opening and closing titles. The glitch titles preset comes with several variations so that your videos do not look the same to the viewers and get appreciation of the text animations.

- Glow Text Animations
The glow text animations font is suitable for titles, transitions, as well as low thirds. The font has 3D effect along with the glow effect and both of them make the text instantly engaging. There are different variations available such as cool glow, fiery glow, sober glow, and icy glow effect.

- Neon Short Circuit Titles
For text animations, dynamic fonts based on neon effects are always in high demand. Neon short circuit titles combine the neon as well as the short circuit animation together. That is why it is more refreshing and eye-catching than regular neon fonts and you must use it for text animations especially when you have a darker background.

Part 3. How to Animate Text in A Video
Out of the top video tools to animate text in a video, we have picked Wondershare Filmora as the best animated text maker. Filmora Video Editor has all the different categories of text animations to cater to all the different video niches. Therefore, you can have appropriate and creative text animations based on your video content to make it eye-catching and engaging. Here are the detailed steps to animate the text in video.
Free Download For Win 7 or later(64-bit)
Free Download For macOS 10.14 or later
- How to add text in Filmora?
First of all, you need to add text to your video project to get started. Launch Filmora and import any video that you want to place in the background. You can also go to Stock Media and select any background photo or video as per your preference. Click on Quick Text option from the toolbar above the timeline.
This will add a text layer on the timeline with a default text. Double-click on the text layer and edit the default text. The text layer should be over the background layer and you can reposition the text layer depending on where you want the text to appear on the video. You can adjust the position of the text on the video from Viewer.

- How to edit font in Filmora?
Now that you have placed and positioned the text in your video properly, it is time to edit the text style. Double-click on the text layer and go to Title>Preset> Font section. Select the font, size, and alignment. If there are multiple texts in the template, select them one by one from Viewer and edit them. Go to Settings section and change text color and spacing as appropriate. There are also several text style templates available to choose from if you want to.

- How to use animation in text in Filmora?
Double-click on the text layer again and this time, you need to go to Animation tab. You will see all the popular text animation templates on the left panel. Place your mouse pointer over them to get a preview. Select any one of these animations by double-clicking on the animation and click on Ok button. Play the video to watch the applied animation.

- How to use text preset in Filmora?
If you want to make the text animation eye-catching and attention-grabbing, you need to select a text animation preset in Filmora. Go to Titles and check out the left panel where you will find all the different categories of text effects and animations. Go to the category that matches your video content and select any template and drop it on the timeline. Double-click on the text layer to edit the default text and text style as per your preference.

Part 4. How to Make Creative Text Animation?
Depending on the video content, you have to select the text effect and create text animation accordingly. We have already stated that Filmora has different categories of text animation templates to satisfy all your video requirements perfectly. You can choose appropriate text animation templates that go well with your video category and use them to come up with creative text animations.
- Social media
If you are making videos for social media platforms such as Facebook or for video streaming platforms like YouTube, you should select text animations from Social Media category in Filmora. There are over 200+ text animation templates available that have all the common text animations you usually see as well as creative text animations that will make your video stand out.

All you need to do is import your video and place it in the background. Go to Titles and select Social Media category and drop any desired text animation on the timeline. Thereafter, edit and customize the text layer and style along with the animation as per your preference.
- Education
If your video belongs to education nice such as you are explaining a concept or demonstrating a tutorial, you need to use text animations that are graceful for your video content. Filmora has a dedicated section for text animations related to education. Go to Titles> Tutorials and you will see around 400 text effects and animations that you can use in your educational video effectively.

- Business
If you are creating videos for brands and businesses, there are certain creative text animations you have to use in order to get traction from the target audiences. Filmora comes with over 150 text effects and animations specifically for business videos so that the branding gets strong and leaves a good impression in the mind of the viewers. Go to Titles> Business and choose the desired text animations and customize them to fit into your brand image.

- Travel
If you are into making traveling vlogs or informational travel videos, Filmora has a specific set of text effects and creative animations. You get to choose from over 250 templates to represent any text and title you want to display in your video. The beautiful and eye-catching animated text will definitely get your message across to the viewers pleasantly. Go to Titles> Travel section and check out all the text animations to choose from.

- Gaming
There are so many gamers who put up their gameplay videos on social media and video streaming platforms. While editing the video, they need to put up animated text so that the video content looks interesting and engaging. If you have a gaming video, Filmora has around 500 text effects and animations to use in your video. Go to Titles> Gaming and select from any creative text animations as per your preference.

Best Online GIF to Image (PNG/JPG) Converter
Great Video Converter - Wondershare Filmora
Provide abundant video effects - A creative video editor
Powerful color correction and grading
Detailed tutorials provided by the official channel
There are times you may need to convert GIFs into PNG or PNG and avoid losing image quality. Yet still, it can be tricky to carry this out without losing quality. This is the reason you need a powerful third-party image converter. So today, I will give you a list of the best GIF to image converters online. Let’s dive right in!
In addition, before jumping right into the conversion processes, it is paramount to know that many of these tools are free-to-all and offer exciting customization options. However, some might have specific requirements or conversion size limits. That aside, let’s now discuss how we can convert GIF into PNG online:
In this article
Part 1: Best Online GIF to PNG/JPG Converters
Part 2: How to Convert GIF to PNG?
Part 3: How to Convert GIF to JPG?
Part 1: Best Online GIF to PNG/JPG Converters
FileZigZag
This method can transfer GIF to JPG or PNG online, i.e., it does not require users to download any third-party software. In addition, it supports a wide range of formats, including PNG, WMA, SWF, image, documents, ZIP, MOV, etc.
This is a straightforward process: upload your image and choose the required format. Then input your email address, and the converter will send you a mail within minutes with the conversion.
Features
- Images, documents, audio and video files, ebooks, archival files, and webpages can all be converted with FileZigZag.
- Users will upload or drag a file to the platform.
- It supports a wide range of conversion formats.
- Convert files in minutes
Pros
It is convenient and free to use
The process is effortless, and the conversion speed is moderate
it provides users with sharing option
convert images in a real-time
Cons
You need to wait for a confirmation email, making it a little slow compared to other converters.
CoolUtils Online Image Converter
This is an online converter that gets rid of the need to download any software. In addition, you can get the conversion without wasting any time, and there is no need to wait for an email link.
Features
- To convert your files from GIF to JPG, PNG to JPG, and JPG to PNG, JPEG, or TIFF.
- Drag and drop your source file.
- Convert file online in a matter of seconds.
Pros
It allows users to rotate and resize the image before conversion.
It is compatible with nearly all operating system
It supports many file formats like JPEG, GIF, BMP, etc.
Cons
As of now, nothing in particular
ZAMZAR
This is a comprehensive GIF to PNG and JPG online converter that helps users convert GIF files to any photo format, including PNG and JPG format, for free.
Features
- Allows the addition of GIF files from your computer directly without downloading any programs to your PC.
- It requires only a few steps in converting GIF to JPG format
- It supports several video and photo formats in converting different formats easily
Pros
It is 100% simple to use
Support various input and output formats
No software installation is required
The software is free for conversions up to 100MB
Cons
Most users say the conversion process is a little too slow
The restriction of free conversion up to 100 MB makes it difficult in converting huge files
Ezgif
This is a free GIF to JPG converter that allows you to turn your GIF into an image with a single click leaving no watermark on the picture. In addition, the process is relatively easy to use as you need to upload a GIF file up to 35MB, then click the “Convert “ button, and your image will be ready.
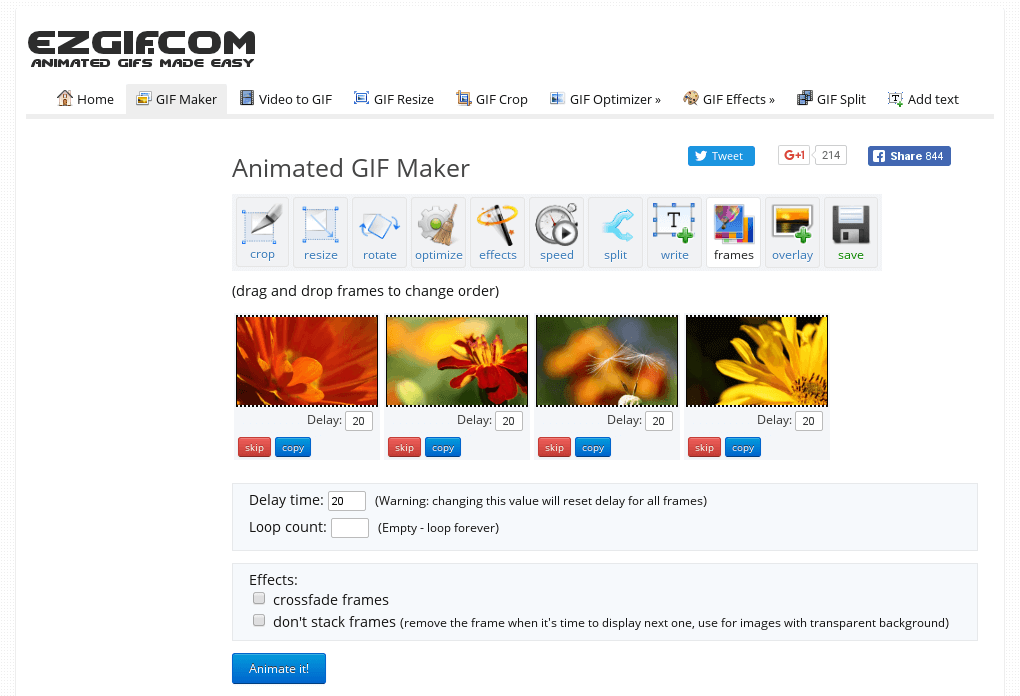
Features:
- It performs most picture editing tasks, such as scaling, optimization, and cropping.
- Making, optimizing, trimming, and resizing animated GIFs with gifsicle and lossygif.
- For video conversions and editing, use FFmpeg.
Pros
Fast and free
No watermark
No Ads
No software downloads
Cons
It is sometimes slow
This online editing tool is a complete package that enables you to choose more than 80 different operations, which include the following:
Features:
- It allows Metadata Editing, i.e., editing the data before saving and converting it.
- Transform your pictures as well as resize, rotate, etc.
- Colors can adjust according to users’ preference
- Includes the addition of different filters, including emboss, sharpen, blur, etc.
- Users can do special effects like; vignetting, watermarking, etc.
Pros
Supports 500+ formats
Available on Mac, Windows, and Linux OS
Available in 20+ different languages
Advanced options available.
Cons
Some specific programs require constant updates.
Picresize
This is a free web-based GIF to JPG Converter that lets users add pictures for editing by uploading, linking, URL, etc. It is a customizable, lightweight tool for free editing images and photos online.
Features:
- Shrink and enlarge your photos
- It can crop your images for print or social media.
- Flip and rotate your pictures.
- Reduce the file size of your photos to the desired quality or disk size.
- Get web-ready image files by converting your photos or graphics into BMP, GIF. JPG or PNG format
Pros
It is an easy-to-use software
Support many formats
Compatible with a lot of Operating System
Allows changing the quality of the output file
Cons
There are limited settings compared to other editing software
This is a free Image Convert and Resize editor that is compact yet powerful for batch mode image processing. In addition, the program can easily convert separate images and file folders containing images into different renames, graphic formats, and reorders and changes their size following the set parameters. The supported image file formats for this software include; JPG, PNG, BMP, GIF, TGA, and PDF (export only).
Features:
- It is a compact program required for batch mode image processing.
- It allows the conversion of separate images and file folders to resize them accordingly
- The software is safe to run and use
- There is an option to install additional features according to your requirement
Pros
A secure option for beginners.
This small program is quite light on your system.
It is customizable.
Cons
Not all image format is supported compared to other converters
This software allows the conversion of all your digital pictures for sending email, on your website, posting on auction sites, etc. It provides a straight way to batch convert your digital images according to your need and add your watermark.
Features:
- Allows users to carry out batch conversion
- Enables users to import multiple photos from a folder
- Allows users to add their watermark
- Users can rotate, resize, and alter the images before and after conversion.
- Enables the creation of thumbnail pictures
- Users can upload their pictures to a dedicated server using the built-in FTP client.
Pros
The online help desk is highly responsive
Exceptional quality
Reasonable price
There are no prerequisites related to knowledge or experience.
Massive demands
Cons
Based on users’ preferences, nothing major.
Based on the above list, we have picked two excellent GIF to PNG and GIF to JPG converters that will serve you the best across the industry. Let us look at them one by one.
Part 2: How to Convert GIF to PNG?
Undeniably, Convertio is the clearest GIF to PNG online converter on this list. The numbered steps make it super-easy to use as users can convert GIF to PNG, TIFF, TGA, JPG, BMP, and many others.
Step 1: Access the Website and Add Files
Log in to Convertio and click the Add Files button to add your GIF file. You can besides directly drag and drop your GIF file to the timeline.
Step 2: Search and Choose the Format
Open the File drop-down list and select PNG open under the Image Formats.
Step 3: Convert and Download
Finally, click the Convert Now button to convert GIF to PNG.
Part 3: How to Convert GIF to JPG?
Ezgif is also a robust GIF converter that supports converting any image format to JPG without losing quality. It also supports the conversion of GIFs to other formats like PNG, WebP, or PDF formats.
Step 1: Import GIF
After logging in to the website and clicking the Choose file button to import your local GIF file, you can import multiple files having a total file size of less than 35MB.
Step 2: Start Editing GIF
Next is to click the Upload button to start editing your GIF file (cut, add text, resize, rotate) before converting it.
Step 3: Convert to APNG and Save
Finally, click the Convert to APNG! button to start converting, and your image is ready.
Conclusion
This article gave a detailed breakdown of GIF to PNG converter and explained how to convert GIF into JPG or PNG effectively.
Also, in the last two parts, you got details on how to use Convertio and Ezgif to convert GIF to PNG in a few simple steps.
There are times you may need to convert GIFs into PNG or PNG and avoid losing image quality. Yet still, it can be tricky to carry this out without losing quality. This is the reason you need a powerful third-party image converter. So today, I will give you a list of the best GIF to image converters online. Let’s dive right in!
In addition, before jumping right into the conversion processes, it is paramount to know that many of these tools are free-to-all and offer exciting customization options. However, some might have specific requirements or conversion size limits. That aside, let’s now discuss how we can convert GIF into PNG online:
In this article
Part 1: Best Online GIF to PNG/JPG Converters
Part 2: How to Convert GIF to PNG?
Part 3: How to Convert GIF to JPG?
Part 1: Best Online GIF to PNG/JPG Converters
FileZigZag
This method can transfer GIF to JPG or PNG online, i.e., it does not require users to download any third-party software. In addition, it supports a wide range of formats, including PNG, WMA, SWF, image, documents, ZIP, MOV, etc.
This is a straightforward process: upload your image and choose the required format. Then input your email address, and the converter will send you a mail within minutes with the conversion.
Features
- Images, documents, audio and video files, ebooks, archival files, and webpages can all be converted with FileZigZag.
- Users will upload or drag a file to the platform.
- It supports a wide range of conversion formats.
- Convert files in minutes
Pros
It is convenient and free to use
The process is effortless, and the conversion speed is moderate
it provides users with sharing option
convert images in a real-time
Cons
You need to wait for a confirmation email, making it a little slow compared to other converters.
CoolUtils Online Image Converter
This is an online converter that gets rid of the need to download any software. In addition, you can get the conversion without wasting any time, and there is no need to wait for an email link.
Features
- To convert your files from GIF to JPG, PNG to JPG, and JPG to PNG, JPEG, or TIFF.
- Drag and drop your source file.
- Convert file online in a matter of seconds.
Pros
It allows users to rotate and resize the image before conversion.
It is compatible with nearly all operating system
It supports many file formats like JPEG, GIF, BMP, etc.
Cons
As of now, nothing in particular
ZAMZAR
This is a comprehensive GIF to PNG and JPG online converter that helps users convert GIF files to any photo format, including PNG and JPG format, for free.
Features
- Allows the addition of GIF files from your computer directly without downloading any programs to your PC.
- It requires only a few steps in converting GIF to JPG format
- It supports several video and photo formats in converting different formats easily
Pros
It is 100% simple to use
Support various input and output formats
No software installation is required
The software is free for conversions up to 100MB
Cons
Most users say the conversion process is a little too slow
The restriction of free conversion up to 100 MB makes it difficult in converting huge files
Ezgif
This is a free GIF to JPG converter that allows you to turn your GIF into an image with a single click leaving no watermark on the picture. In addition, the process is relatively easy to use as you need to upload a GIF file up to 35MB, then click the “Convert “ button, and your image will be ready.

Features:
- It performs most picture editing tasks, such as scaling, optimization, and cropping.
- Making, optimizing, trimming, and resizing animated GIFs with gifsicle and lossygif.
- For video conversions and editing, use FFmpeg.
Pros
Fast and free
No watermark
No Ads
No software downloads
Cons
It is sometimes slow
This online editing tool is a complete package that enables you to choose more than 80 different operations, which include the following:
Features:
- It allows Metadata Editing, i.e., editing the data before saving and converting it.
- Transform your pictures as well as resize, rotate, etc.
- Colors can adjust according to users’ preference
- Includes the addition of different filters, including emboss, sharpen, blur, etc.
- Users can do special effects like; vignetting, watermarking, etc.
Pros
Supports 500+ formats
Available on Mac, Windows, and Linux OS
Available in 20+ different languages
Advanced options available.
Cons
Some specific programs require constant updates.
Picresize
This is a free web-based GIF to JPG Converter that lets users add pictures for editing by uploading, linking, URL, etc. It is a customizable, lightweight tool for free editing images and photos online.
Features:
- Shrink and enlarge your photos
- It can crop your images for print or social media.
- Flip and rotate your pictures.
- Reduce the file size of your photos to the desired quality or disk size.
- Get web-ready image files by converting your photos or graphics into BMP, GIF. JPG or PNG format
Pros
It is an easy-to-use software
Support many formats
Compatible with a lot of Operating System
Allows changing the quality of the output file
Cons
There are limited settings compared to other editing software
This is a free Image Convert and Resize editor that is compact yet powerful for batch mode image processing. In addition, the program can easily convert separate images and file folders containing images into different renames, graphic formats, and reorders and changes their size following the set parameters. The supported image file formats for this software include; JPG, PNG, BMP, GIF, TGA, and PDF (export only).
Features:
- It is a compact program required for batch mode image processing.
- It allows the conversion of separate images and file folders to resize them accordingly
- The software is safe to run and use
- There is an option to install additional features according to your requirement
Pros
A secure option for beginners.
This small program is quite light on your system.
It is customizable.
Cons
Not all image format is supported compared to other converters
This software allows the conversion of all your digital pictures for sending email, on your website, posting on auction sites, etc. It provides a straight way to batch convert your digital images according to your need and add your watermark.
Features:
- Allows users to carry out batch conversion
- Enables users to import multiple photos from a folder
- Allows users to add their watermark
- Users can rotate, resize, and alter the images before and after conversion.
- Enables the creation of thumbnail pictures
- Users can upload their pictures to a dedicated server using the built-in FTP client.
Pros
The online help desk is highly responsive
Exceptional quality
Reasonable price
There are no prerequisites related to knowledge or experience.
Massive demands
Cons
Based on users’ preferences, nothing major.
Based on the above list, we have picked two excellent GIF to PNG and GIF to JPG converters that will serve you the best across the industry. Let us look at them one by one.
Part 2: How to Convert GIF to PNG?
Undeniably, Convertio is the clearest GIF to PNG online converter on this list. The numbered steps make it super-easy to use as users can convert GIF to PNG, TIFF, TGA, JPG, BMP, and many others.
Step 1: Access the Website and Add Files
Log in to Convertio and click the Add Files button to add your GIF file. You can besides directly drag and drop your GIF file to the timeline.

Step 2: Search and Choose the Format
Open the File drop-down list and select PNG open under the Image Formats.

Step 3: Convert and Download
Finally, click the Convert Now button to convert GIF to PNG.
Part 3: How to Convert GIF to JPG?
Ezgif is also a robust GIF converter that supports converting any image format to JPG without losing quality. It also supports the conversion of GIFs to other formats like PNG, WebP, or PDF formats.
Step 1: Import GIF
After logging in to the website and clicking the Choose file button to import your local GIF file, you can import multiple files having a total file size of less than 35MB.

Step 2: Start Editing GIF
Next is to click the Upload button to start editing your GIF file (cut, add text, resize, rotate) before converting it.

Step 3: Convert to APNG and Save
Finally, click the Convert to APNG! button to start converting, and your image is ready.
Conclusion
This article gave a detailed breakdown of GIF to PNG converter and explained how to convert GIF into JPG or PNG effectively.
Also, in the last two parts, you got details on how to use Convertio and Ezgif to convert GIF to PNG in a few simple steps.
There are times you may need to convert GIFs into PNG or PNG and avoid losing image quality. Yet still, it can be tricky to carry this out without losing quality. This is the reason you need a powerful third-party image converter. So today, I will give you a list of the best GIF to image converters online. Let’s dive right in!
In addition, before jumping right into the conversion processes, it is paramount to know that many of these tools are free-to-all and offer exciting customization options. However, some might have specific requirements or conversion size limits. That aside, let’s now discuss how we can convert GIF into PNG online:
In this article
Part 1: Best Online GIF to PNG/JPG Converters
Part 2: How to Convert GIF to PNG?
Part 3: How to Convert GIF to JPG?
Part 1: Best Online GIF to PNG/JPG Converters
FileZigZag
This method can transfer GIF to JPG or PNG online, i.e., it does not require users to download any third-party software. In addition, it supports a wide range of formats, including PNG, WMA, SWF, image, documents, ZIP, MOV, etc.
This is a straightforward process: upload your image and choose the required format. Then input your email address, and the converter will send you a mail within minutes with the conversion.
Features
- Images, documents, audio and video files, ebooks, archival files, and webpages can all be converted with FileZigZag.
- Users will upload or drag a file to the platform.
- It supports a wide range of conversion formats.
- Convert files in minutes
Pros
It is convenient and free to use
The process is effortless, and the conversion speed is moderate
it provides users with sharing option
convert images in a real-time
Cons
You need to wait for a confirmation email, making it a little slow compared to other converters.
CoolUtils Online Image Converter
This is an online converter that gets rid of the need to download any software. In addition, you can get the conversion without wasting any time, and there is no need to wait for an email link.
Features
- To convert your files from GIF to JPG, PNG to JPG, and JPG to PNG, JPEG, or TIFF.
- Drag and drop your source file.
- Convert file online in a matter of seconds.
Pros
It allows users to rotate and resize the image before conversion.
It is compatible with nearly all operating system
It supports many file formats like JPEG, GIF, BMP, etc.
Cons
As of now, nothing in particular
ZAMZAR
This is a comprehensive GIF to PNG and JPG online converter that helps users convert GIF files to any photo format, including PNG and JPG format, for free.
Features
- Allows the addition of GIF files from your computer directly without downloading any programs to your PC.
- It requires only a few steps in converting GIF to JPG format
- It supports several video and photo formats in converting different formats easily
Pros
It is 100% simple to use
Support various input and output formats
No software installation is required
The software is free for conversions up to 100MB
Cons
Most users say the conversion process is a little too slow
The restriction of free conversion up to 100 MB makes it difficult in converting huge files
Ezgif
This is a free GIF to JPG converter that allows you to turn your GIF into an image with a single click leaving no watermark on the picture. In addition, the process is relatively easy to use as you need to upload a GIF file up to 35MB, then click the “Convert “ button, and your image will be ready.

Features:
- It performs most picture editing tasks, such as scaling, optimization, and cropping.
- Making, optimizing, trimming, and resizing animated GIFs with gifsicle and lossygif.
- For video conversions and editing, use FFmpeg.
Pros
Fast and free
No watermark
No Ads
No software downloads
Cons
It is sometimes slow
This online editing tool is a complete package that enables you to choose more than 80 different operations, which include the following:
Features:
- It allows Metadata Editing, i.e., editing the data before saving and converting it.
- Transform your pictures as well as resize, rotate, etc.
- Colors can adjust according to users’ preference
- Includes the addition of different filters, including emboss, sharpen, blur, etc.
- Users can do special effects like; vignetting, watermarking, etc.
Pros
Supports 500+ formats
Available on Mac, Windows, and Linux OS
Available in 20+ different languages
Advanced options available.
Cons
Some specific programs require constant updates.
Picresize
This is a free web-based GIF to JPG Converter that lets users add pictures for editing by uploading, linking, URL, etc. It is a customizable, lightweight tool for free editing images and photos online.
Features:
- Shrink and enlarge your photos
- It can crop your images for print or social media.
- Flip and rotate your pictures.
- Reduce the file size of your photos to the desired quality or disk size.
- Get web-ready image files by converting your photos or graphics into BMP, GIF. JPG or PNG format
Pros
It is an easy-to-use software
Support many formats
Compatible with a lot of Operating System
Allows changing the quality of the output file
Cons
There are limited settings compared to other editing software
This is a free Image Convert and Resize editor that is compact yet powerful for batch mode image processing. In addition, the program can easily convert separate images and file folders containing images into different renames, graphic formats, and reorders and changes their size following the set parameters. The supported image file formats for this software include; JPG, PNG, BMP, GIF, TGA, and PDF (export only).
Features:
- It is a compact program required for batch mode image processing.
- It allows the conversion of separate images and file folders to resize them accordingly
- The software is safe to run and use
- There is an option to install additional features according to your requirement
Pros
A secure option for beginners.
This small program is quite light on your system.
It is customizable.
Cons
Not all image format is supported compared to other converters
This software allows the conversion of all your digital pictures for sending email, on your website, posting on auction sites, etc. It provides a straight way to batch convert your digital images according to your need and add your watermark.
Features:
- Allows users to carry out batch conversion
- Enables users to import multiple photos from a folder
- Allows users to add their watermark
- Users can rotate, resize, and alter the images before and after conversion.
- Enables the creation of thumbnail pictures
- Users can upload their pictures to a dedicated server using the built-in FTP client.
Pros
The online help desk is highly responsive
Exceptional quality
Reasonable price
There are no prerequisites related to knowledge or experience.
Massive demands
Cons
Based on users’ preferences, nothing major.
Based on the above list, we have picked two excellent GIF to PNG and GIF to JPG converters that will serve you the best across the industry. Let us look at them one by one.
Part 2: How to Convert GIF to PNG?
Undeniably, Convertio is the clearest GIF to PNG online converter on this list. The numbered steps make it super-easy to use as users can convert GIF to PNG, TIFF, TGA, JPG, BMP, and many others.
Step 1: Access the Website and Add Files
Log in to Convertio and click the Add Files button to add your GIF file. You can besides directly drag and drop your GIF file to the timeline.

Step 2: Search and Choose the Format
Open the File drop-down list and select PNG open under the Image Formats.

Step 3: Convert and Download
Finally, click the Convert Now button to convert GIF to PNG.
Part 3: How to Convert GIF to JPG?
Ezgif is also a robust GIF converter that supports converting any image format to JPG without losing quality. It also supports the conversion of GIFs to other formats like PNG, WebP, or PDF formats.
Step 1: Import GIF
After logging in to the website and clicking the Choose file button to import your local GIF file, you can import multiple files having a total file size of less than 35MB.

Step 2: Start Editing GIF
Next is to click the Upload button to start editing your GIF file (cut, add text, resize, rotate) before converting it.

Step 3: Convert to APNG and Save
Finally, click the Convert to APNG! button to start converting, and your image is ready.
Conclusion
This article gave a detailed breakdown of GIF to PNG converter and explained how to convert GIF into JPG or PNG effectively.
Also, in the last two parts, you got details on how to use Convertio and Ezgif to convert GIF to PNG in a few simple steps.
There are times you may need to convert GIFs into PNG or PNG and avoid losing image quality. Yet still, it can be tricky to carry this out without losing quality. This is the reason you need a powerful third-party image converter. So today, I will give you a list of the best GIF to image converters online. Let’s dive right in!
In addition, before jumping right into the conversion processes, it is paramount to know that many of these tools are free-to-all and offer exciting customization options. However, some might have specific requirements or conversion size limits. That aside, let’s now discuss how we can convert GIF into PNG online:
In this article
Part 1: Best Online GIF to PNG/JPG Converters
Part 2: How to Convert GIF to PNG?
Part 3: How to Convert GIF to JPG?
Part 1: Best Online GIF to PNG/JPG Converters
FileZigZag
This method can transfer GIF to JPG or PNG online, i.e., it does not require users to download any third-party software. In addition, it supports a wide range of formats, including PNG, WMA, SWF, image, documents, ZIP, MOV, etc.
This is a straightforward process: upload your image and choose the required format. Then input your email address, and the converter will send you a mail within minutes with the conversion.
Features
- Images, documents, audio and video files, ebooks, archival files, and webpages can all be converted with FileZigZag.
- Users will upload or drag a file to the platform.
- It supports a wide range of conversion formats.
- Convert files in minutes
Pros
It is convenient and free to use
The process is effortless, and the conversion speed is moderate
it provides users with sharing option
convert images in a real-time
Cons
You need to wait for a confirmation email, making it a little slow compared to other converters.
CoolUtils Online Image Converter
This is an online converter that gets rid of the need to download any software. In addition, you can get the conversion without wasting any time, and there is no need to wait for an email link.
Features
- To convert your files from GIF to JPG, PNG to JPG, and JPG to PNG, JPEG, or TIFF.
- Drag and drop your source file.
- Convert file online in a matter of seconds.
Pros
It allows users to rotate and resize the image before conversion.
It is compatible with nearly all operating system
It supports many file formats like JPEG, GIF, BMP, etc.
Cons
As of now, nothing in particular
ZAMZAR
This is a comprehensive GIF to PNG and JPG online converter that helps users convert GIF files to any photo format, including PNG and JPG format, for free.
Features
- Allows the addition of GIF files from your computer directly without downloading any programs to your PC.
- It requires only a few steps in converting GIF to JPG format
- It supports several video and photo formats in converting different formats easily
Pros
It is 100% simple to use
Support various input and output formats
No software installation is required
The software is free for conversions up to 100MB
Cons
Most users say the conversion process is a little too slow
The restriction of free conversion up to 100 MB makes it difficult in converting huge files
Ezgif
This is a free GIF to JPG converter that allows you to turn your GIF into an image with a single click leaving no watermark on the picture. In addition, the process is relatively easy to use as you need to upload a GIF file up to 35MB, then click the “Convert “ button, and your image will be ready.

Features:
- It performs most picture editing tasks, such as scaling, optimization, and cropping.
- Making, optimizing, trimming, and resizing animated GIFs with gifsicle and lossygif.
- For video conversions and editing, use FFmpeg.
Pros
Fast and free
No watermark
No Ads
No software downloads
Cons
It is sometimes slow
This online editing tool is a complete package that enables you to choose more than 80 different operations, which include the following:
Features:
- It allows Metadata Editing, i.e., editing the data before saving and converting it.
- Transform your pictures as well as resize, rotate, etc.
- Colors can adjust according to users’ preference
- Includes the addition of different filters, including emboss, sharpen, blur, etc.
- Users can do special effects like; vignetting, watermarking, etc.
Pros
Supports 500+ formats
Available on Mac, Windows, and Linux OS
Available in 20+ different languages
Advanced options available.
Cons
Some specific programs require constant updates.
Picresize
This is a free web-based GIF to JPG Converter that lets users add pictures for editing by uploading, linking, URL, etc. It is a customizable, lightweight tool for free editing images and photos online.
Features:
- Shrink and enlarge your photos
- It can crop your images for print or social media.
- Flip and rotate your pictures.
- Reduce the file size of your photos to the desired quality or disk size.
- Get web-ready image files by converting your photos or graphics into BMP, GIF. JPG or PNG format
Pros
It is an easy-to-use software
Support many formats
Compatible with a lot of Operating System
Allows changing the quality of the output file
Cons
There are limited settings compared to other editing software
This is a free Image Convert and Resize editor that is compact yet powerful for batch mode image processing. In addition, the program can easily convert separate images and file folders containing images into different renames, graphic formats, and reorders and changes their size following the set parameters. The supported image file formats for this software include; JPG, PNG, BMP, GIF, TGA, and PDF (export only).
Features:
- It is a compact program required for batch mode image processing.
- It allows the conversion of separate images and file folders to resize them accordingly
- The software is safe to run and use
- There is an option to install additional features according to your requirement
Pros
A secure option for beginners.
This small program is quite light on your system.
It is customizable.
Cons
Not all image format is supported compared to other converters
This software allows the conversion of all your digital pictures for sending email, on your website, posting on auction sites, etc. It provides a straight way to batch convert your digital images according to your need and add your watermark.
Features:
- Allows users to carry out batch conversion
- Enables users to import multiple photos from a folder
- Allows users to add their watermark
- Users can rotate, resize, and alter the images before and after conversion.
- Enables the creation of thumbnail pictures
- Users can upload their pictures to a dedicated server using the built-in FTP client.
Pros
The online help desk is highly responsive
Exceptional quality
Reasonable price
There are no prerequisites related to knowledge or experience.
Massive demands
Cons
Based on users’ preferences, nothing major.
Based on the above list, we have picked two excellent GIF to PNG and GIF to JPG converters that will serve you the best across the industry. Let us look at them one by one.
Part 2: How to Convert GIF to PNG?
Undeniably, Convertio is the clearest GIF to PNG online converter on this list. The numbered steps make it super-easy to use as users can convert GIF to PNG, TIFF, TGA, JPG, BMP, and many others.
Step 1: Access the Website and Add Files
Log in to Convertio and click the Add Files button to add your GIF file. You can besides directly drag and drop your GIF file to the timeline.

Step 2: Search and Choose the Format
Open the File drop-down list and select PNG open under the Image Formats.

Step 3: Convert and Download
Finally, click the Convert Now button to convert GIF to PNG.
Part 3: How to Convert GIF to JPG?
Ezgif is also a robust GIF converter that supports converting any image format to JPG without losing quality. It also supports the conversion of GIFs to other formats like PNG, WebP, or PDF formats.
Step 1: Import GIF
After logging in to the website and clicking the Choose file button to import your local GIF file, you can import multiple files having a total file size of less than 35MB.

Step 2: Start Editing GIF
Next is to click the Upload button to start editing your GIF file (cut, add text, resize, rotate) before converting it.

Step 3: Convert to APNG and Save
Finally, click the Convert to APNG! button to start converting, and your image is ready.
Conclusion
This article gave a detailed breakdown of GIF to PNG converter and explained how to convert GIF into JPG or PNG effectively.
Also, in the last two parts, you got details on how to use Convertio and Ezgif to convert GIF to PNG in a few simple steps.
Also read:
- Updated In 2024, What Are the Top 15 Slideshow Presentation Examples Your Audience Will
- New In 2024, Do You Want to Explore some Available Opportunities to Create Slow Motion? Discover the Best Slow-Motion Video Editors for Desktop, Android, and iPhone Here
- How to Rotate Videos With Media Player Classic for 2024
- What Are the Best 10 GIF Creator?
- 2024 Approved Simple Tricks Make 3D GIF Production of Inspiration Pop up Constantly
- Updated Guide To Scaling and Setting Videos in Filmora | Tutorial
- Updated This Article Introduces How Sheila Become a Youtuber and How She Started Video Editing
- New 2024 Approved Learn How to Change Aspect Ratio in iMovie on Mac, iPad, and iPhone in This Guide. And You Can Also Use iMovie Alternatives Like Wondershare Filmora to Edit Your Videos
- Updated In 2024, Want to Capture Captivating, Detailed Videos? If Yes, Then You Need to Learn the Recording of Super Slow Motion Videos. In This Article, I Will Show You How to Record a Super Slow-Motion Video on Your Android and iPhone
- How to Make a Video Slideshow in iMovie for 2024
- Updated We All Know Very Well that a 1-Second-Video Has Several Images in a Single Row. Even with iMovie Time-Lapse, You Can Create This! So, without Any Further Ado, Lets Learn How to Make a Timelapse in iMovie for 2024
- 6 Instant Ways to Make Windows 10 Slideshow
- Discover the Top 5 Online Tools for Merging MP4 Files Easily and Quickly. Streamline Your Video Editing Process and Create Seamless Videos with These User-Friendly Tools for 2024
- New 2 Ways to Fade in Text in Premiere Pro
- Updated This Article Talks in Detail About How to Convert Time-Lapse to Normal Video Using Certain Methods on iPhone, Online Tools, and so On. It Further Discusses Converting Time-Lapse Video to Normal on the Computer. Check Out for 2024
- Updated 2024 Approved Looking for Free Tools to Create Radial Blur Images Online? Read Our Full Guide to Learn About the 6 Best Programs to Add This Effect to Your Pictures
- 2024 Approved How to Make Video Fade to Black in Movie Maker
- New Discover the Top 10 Video Editing Apps with Templates for Professional-Grade Results. Edit Like a Pro with These Tools for 2024
- In 2024, 5 Simple Tools to Merge Video and Audio Online
- Updated If You Want to Know More About the Basics of Final Cut Pro, It Would Be Helpful to Watch a Beginner Tutorial, with the Length of only 20 Minutes, an Introduction of the Whole Program
- Updated In 2024, This Easy Hack Using Wondershare Filmora New Masking Feature Will Be a Great Addition to Your Next Horror Video Content
- Best Green Screen Software for Beginner on Mac for 2024
- Updated 15 Best LUTS to Buy for 2024
- New In 2024, How to Rotate Video in iMovie with Alternative
- Updated How to Make a Video Loop in QuickTime
- New In 2024, 10 Best Free GIF Background Remover for PC and Online
- In 2024, Logo Intro Videos Are the Hottest Trend in Town and Are Gaining Popularity Quickly. Keep Reading This Article to Learn Their Importance and How to Design One
- 2024 Approved Do You Wish to Make Changes Across Your Video? Are You Looking to Record Your Desktop Screen on Mac? Worry Not, as This Article Provides Details About QuickTime Player that Caters to All User Requirements
- 8 Tips to Apply Cinematic Color Grading to Your Video
- 2024 Approved Do You Want to Replace the Sky in Your Media? Read the Article to Learn How to Change the Sky App on Your Mobile Phone
- Updated How to Add Effects in Premiere Pro for 2024
- New Things About Transparent PNG Remove and Convert for 2024
- 2024 Approved Are You Aware that AV1 Has the Potential to Change the Way We Watch Videos Online? Read on to Learn More About AV1 and How It Could Impact Your Life
- New 2024 Approved Edit FLV Video Files with FLV Editor Windows, Mac,Android, iPhone
- New 2024 Approved Back up and Organize Your Files to Protect Any Misfortune Befalling Them. The Article Will Guide You on How to Back up and Manage Your Footage
- New 2024 Approved Here Are the Steps to Crop a Video in Sony Vegas Pro Step 1 Click on Import and Import the Video to Be Edited. Click on It and Drag-Drop to Timeline
- New In 2024, How to Use Lumetri Color in Adobe After Effects
- 2024 Approved Filmora Is a Great Video Editor that Many Users Are Making Intro Video with It. This Article Will Guide You How to Create an Intro Video with Filmora
- Creating Testimonial Videos For Health And Wellness Business Industry for 2024
- Updated In 2024, Mask Tracking Is Believed to Be a Helpful Procedure for Marking Proper Areas in Videos. Learn How to Perform Premiere Pro Mask Tracking in This Guide
- In 2024, In This Guidepost, Youll Learn What an HDRI Photo Is and How to Use the Best Free HDRI Program to Edit Photos. Youll Also Know the Difference Between HDR and HDRI
- How To Pause Life360 Location Sharing For Vivo V29 | Dr.fone
- How to Factory Reset Oppo A78 in 5 Easy Ways | Dr.fone
- In 2024, How to Unlock Your iPhone XS Passcode 4 Easy Methods (With or Without iTunes)
- Recover your contacts after Oppo A78 has been deleted.
- In 2024, How Can I Create My Pokemon Overworld Maps On Apple iPhone 14 Pro? | Dr.fone
- Unlock locked iPhone 6 Plus without Passcode or Face ID
- Unlock Your Device iCloud DNS Bypass Explained and Tested, Plus Easy Alternatives On iPhone XS
- Apple ID is Greyed Out On iPhone XS How to Bypass?
- How to Mirror Your Xiaomi 14 Screen to PC with Chromecast | Dr.fone
- The Best Android SIM Unlock Code Generators Unlock Your Vivo X100 Phone Hassle-Free
- Title: Are You Looking to Make Subscribe Channel Graphics? Here Is a Complete Guide on How to Make One on Your Own
- Author: Morgan
- Created at : 2024-06-15 18:56:40
- Updated at : 2024-06-16 18:56:40
- Link: https://ai-video-editing.techidaily.com/are-you-looking-to-make-subscribe-channel-graphics-here-is-a-complete-guide-on-how-to-make-one-on-your-own/
- License: This work is licensed under CC BY-NC-SA 4.0.

