:max_bytes(150000):strip_icc():format(webp)/GettyImages-14050070541-0fc96b82fdc54287bf3bbce3ba323342.jpg)
As Video Editing Has Become a Pillar Stone in Post-Production Work, You Might Need to Upgrade Your Knowledge About It. In This Article, You Will Learn How to Rotate the Video

As Video Editing Has Become a Pillar Stone in Post-Production Work, You Might Need to Upgrade Your Knowledge About It. In This Article, You Will Learn How to Rotate the Video
The first video editing machine in 1924 (Moviola) left an indelible print on the minds of the media industry. It was a maiden attempt to make edits while simultaneously viewing the film. Over time, editing videos followed the trajectory of various transitions letting the imagination run wild. According to a survey, the video editing software market will grow to 932.7 million U.S. dollars by 2025.
As video editing has become a pillar stone in post-production work, you might need to upgrade your knowledge about it. In this article, you will learn how to rotate the video.
Whether your video has an issue in the aspect ratio or you want the desired output in the mirror or flipped version, you need not panic. By exploring different options of Davinci Resolve and Filmora, you can easily change the orientation of your video.
You’ll see a complete picture guide of the above-mentioned softwares.
Changing the orientation of video by Davinci Resolve
Davinci Resolve is a comprehensive video editing software. It performs functions from colour grading to auto-enhancement for the post-production work. Though, professionals usually use this and pitch it as comparatively complex. But even novices need not worry. It comes with features that can change the entire output of the video. One of such functions is the rotation of the videos. You can give a professional and top-notch touch to your post-production work by changing the orientation of the videos. That will bring a new dimension to your project. The flipped version of videos can make the output more prompt and subtle as they stitch different videos scenes together.
Here is the step by step guide for rotating the video
Step 1: Entering the Edit Mode
Set DaVinci Resolve to Edit mode and in the upper-right corner of your workspace, select the Inspector tab.
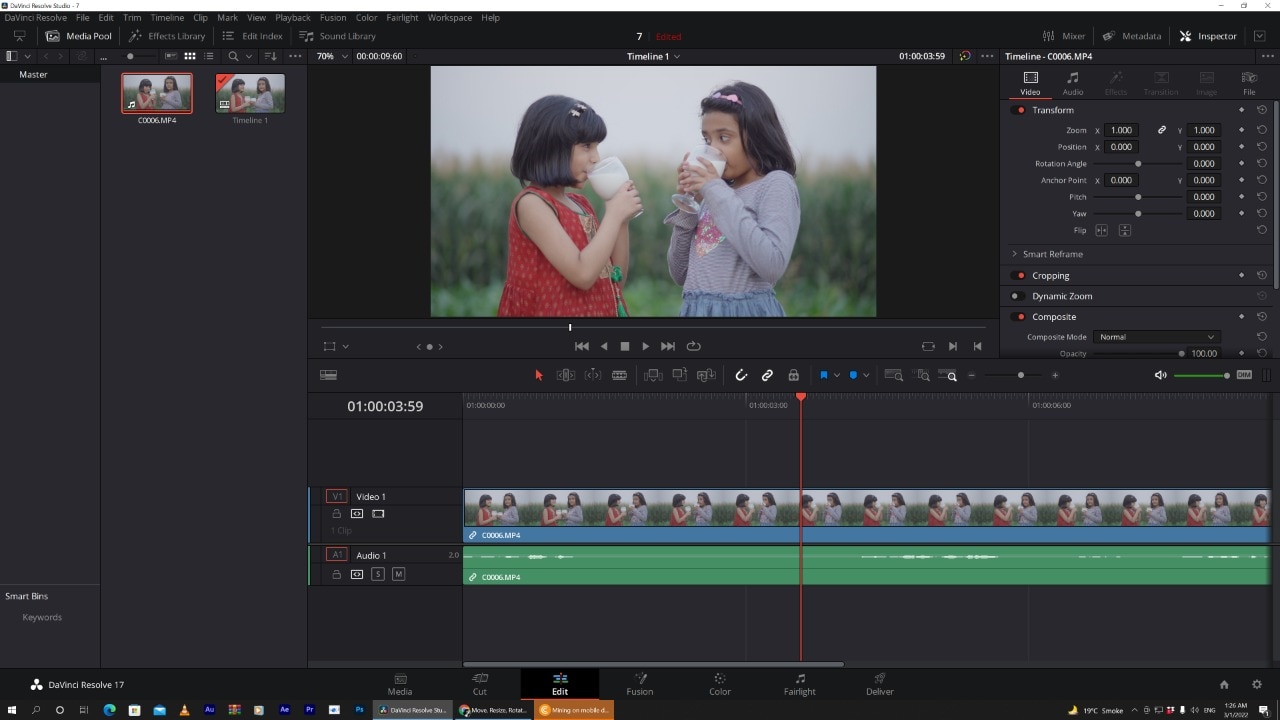
The drop-down menu with different options will appear. Search for the Transform section. There you have to select the **Rotation Angle.**You can also enter the value of rotation.After entering the value, you will notice that your vidoe is rotated.
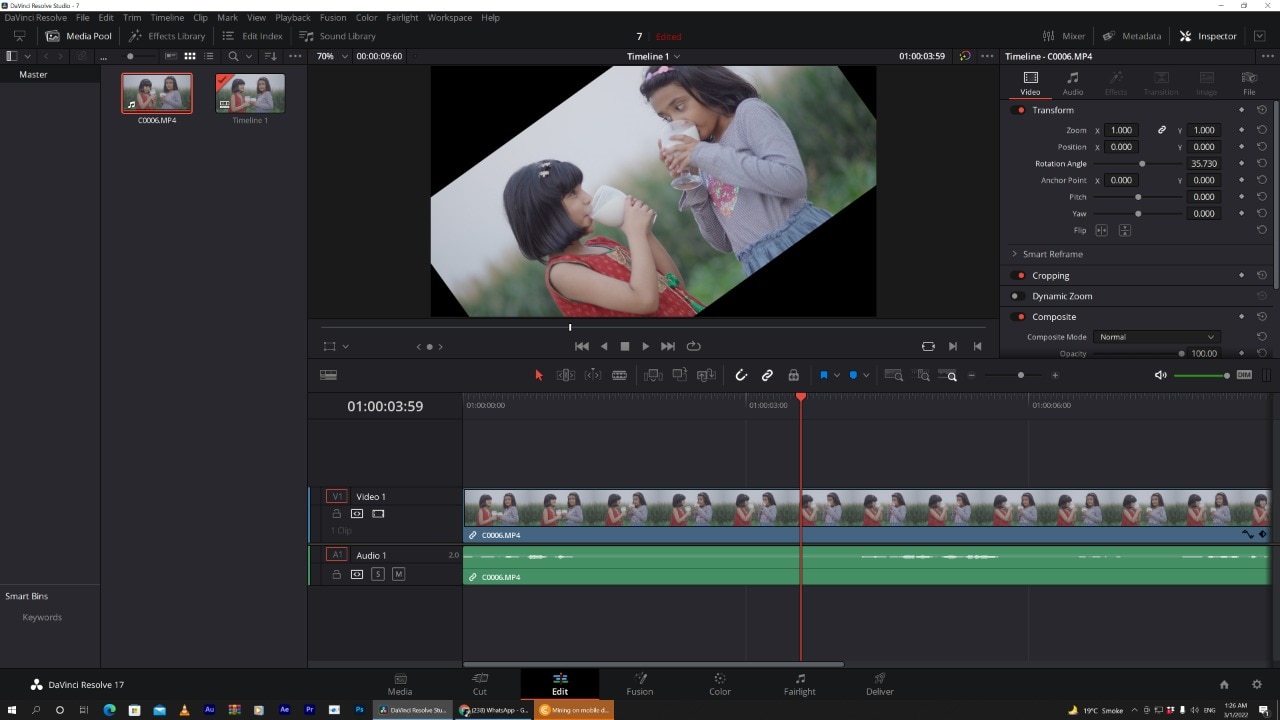
Tip: By pressing Ctrl + R, you can rotate the video 90 degrees clockwise.
Editing a portrait video in DaVinci Resolve
The Transform Panel has the XY Zoom fields. You can use this to scale your video to fit the vertical frame by increasing the size to ~1.750.
Voilà, you now have a vertical video you can edit and export.
Horizontal and Vertical Flip in DaVinci Resolve
You want to create a mirror effect for your video. Flipp it. You would love the results.
You can edit it by going to the same Inspector drop-down menu.
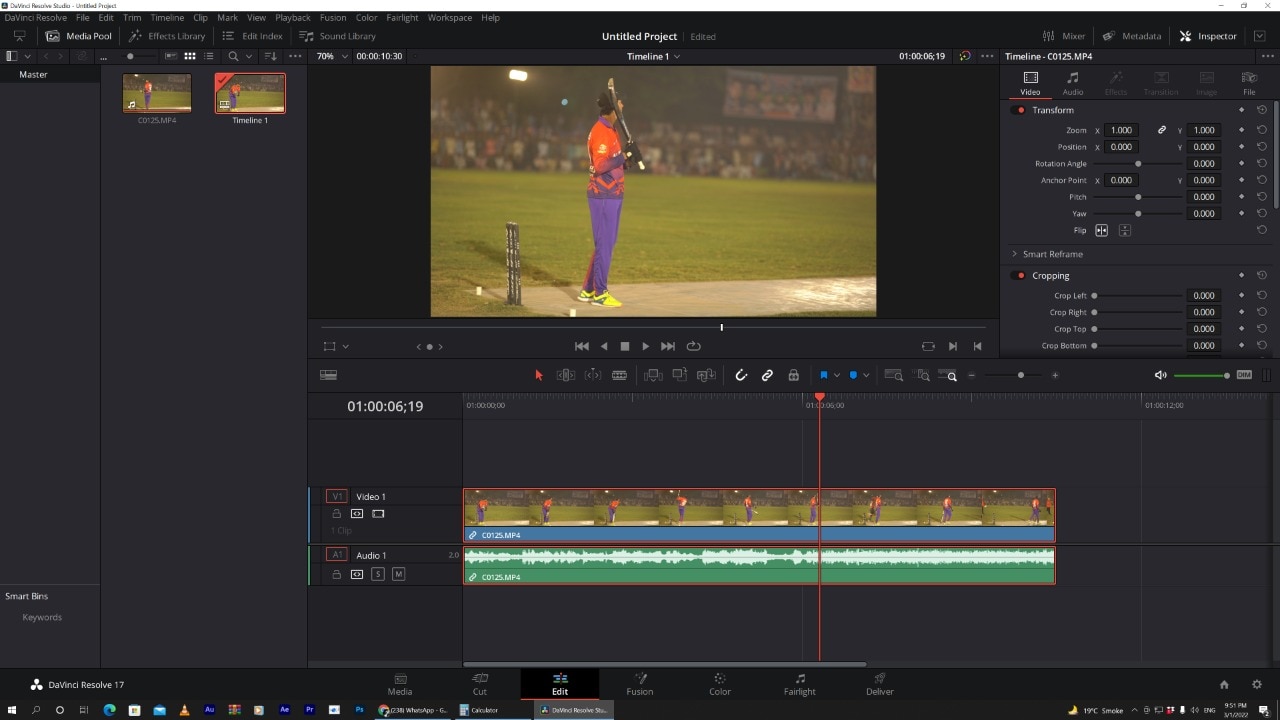
Select the kind of flip you want at the bottom of the Transform section. It can be horizontal or vertical.
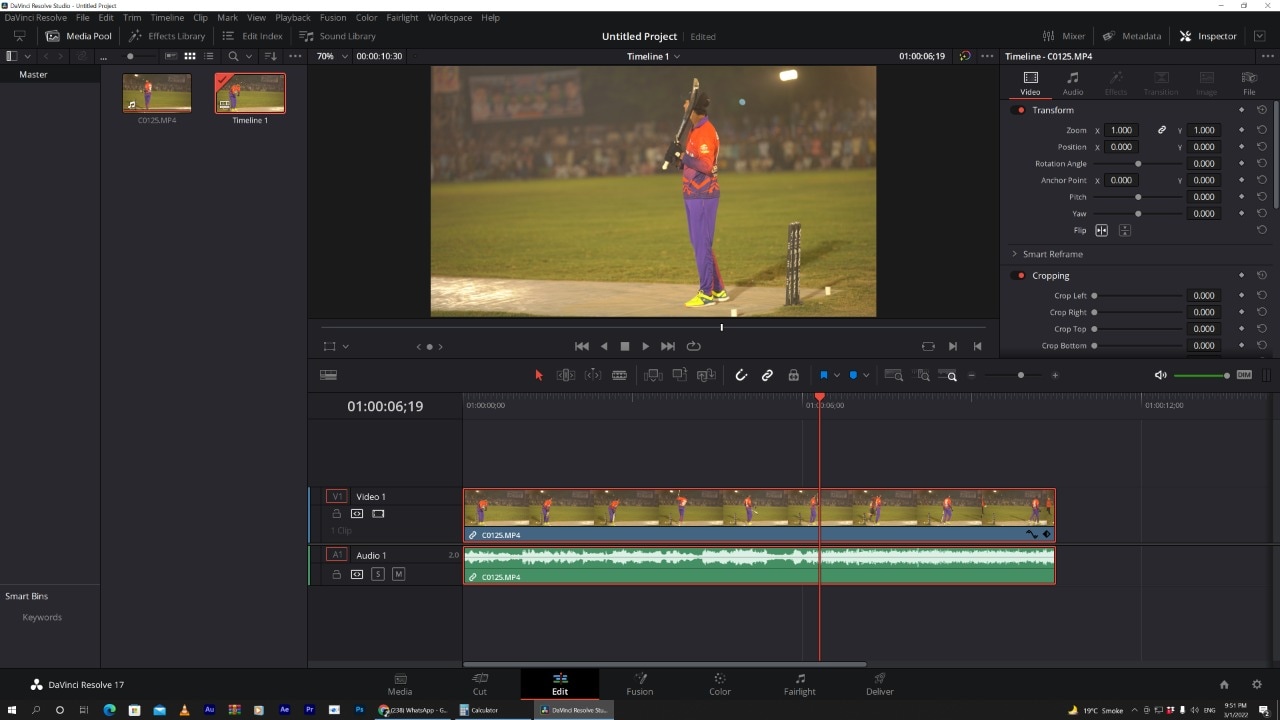
How to change the direction of animation in the DaVinci Resolve?
Keyframes are an essential part of video animations. Davinci Resolve facilitates you to play a little with its keyframes parameters.
The keyframe system is not that complex.
All you need to do is select a region on your Timeline. Choose the parameters that need animation by clicking the small diamond. You can see the small diamond next to each parameter’s value.
Apart from Davinci Resolve, there is also an alternate software which has this versatility.You can also use Filmora Wonder for rotation of your vidoes
Changing the direction of video using Filmora Wondershare
If you have mistakenly taken a video at the wrong angle and don’t want to lose it. Filmora Video Editor is there to keep you out of trouble. It comes with the option of changing the orientation of your videos in your desired way. You can even zoom in or crop the unwanted parts in the videos. Adding more to it, it offers you preset ratios (16:9, 9:16; 4:5, 1:1) to find the perfect aspect ratio for YuoTube, Instagram, etc.
For Win 7 or later (64-bit)
For macOS 10.14 or later
Here is the step-by-step guide to rotating the direction of the video by using it.
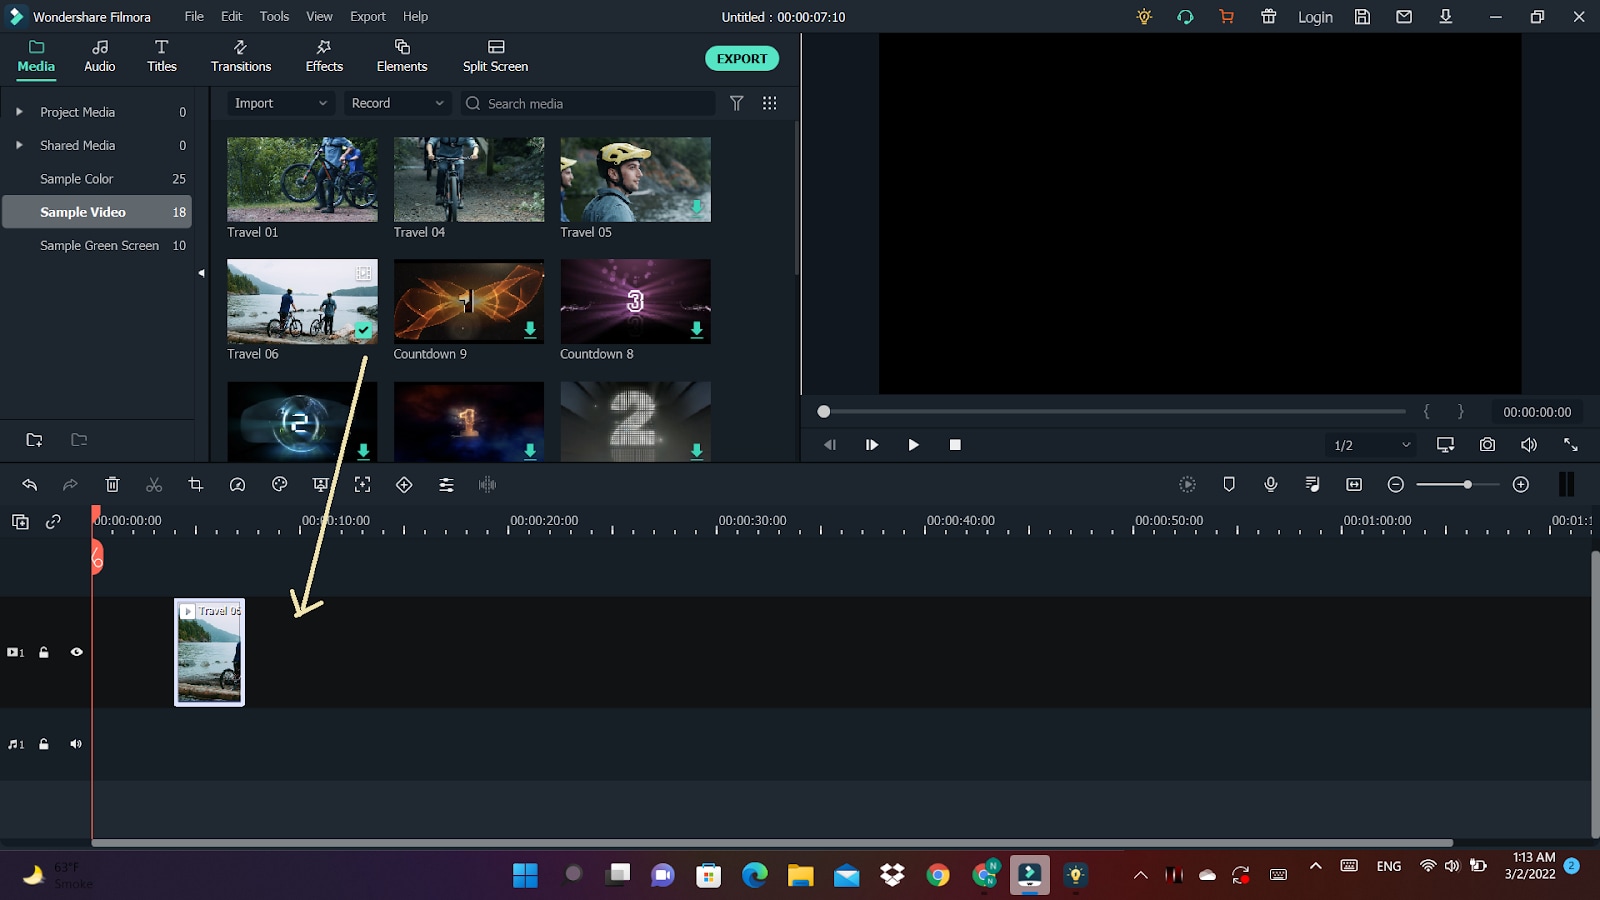
Step 1: Drag and Drop
It starts with importing the desired file you wish to edit. Afterwards, you have to drag-drop it to the timeline.
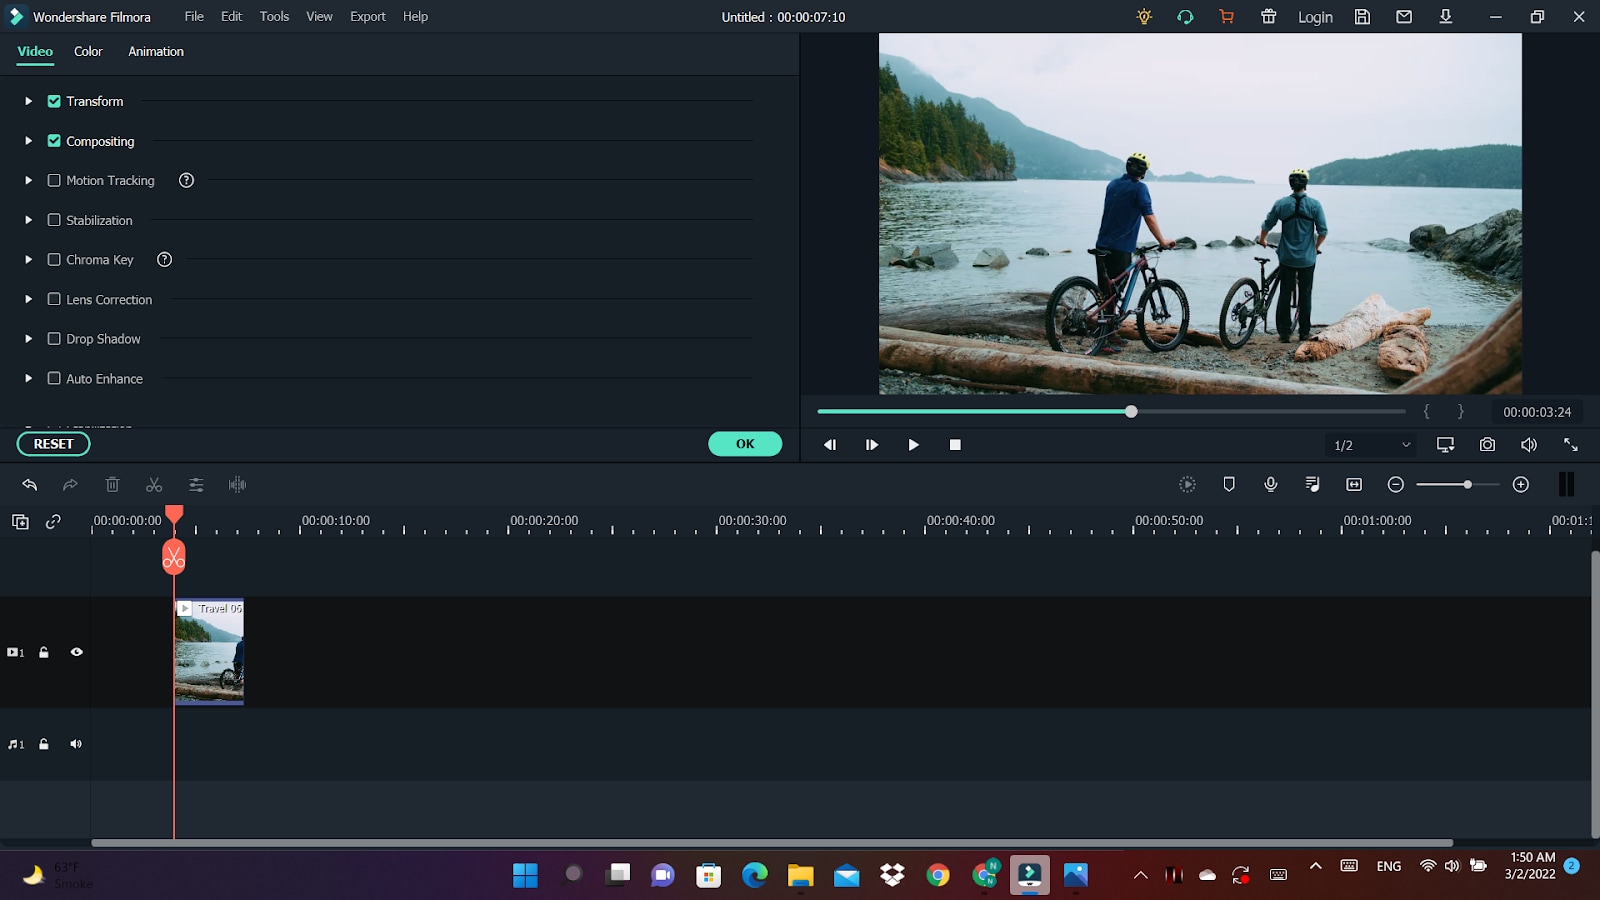
Step 2: Enter the video-editing Panel
To start editing, you need to double-click on the video clip in the timeline. You’ll see various tabs above the timeline header from transformation to auto-enhance.
Step 3: Explore your options
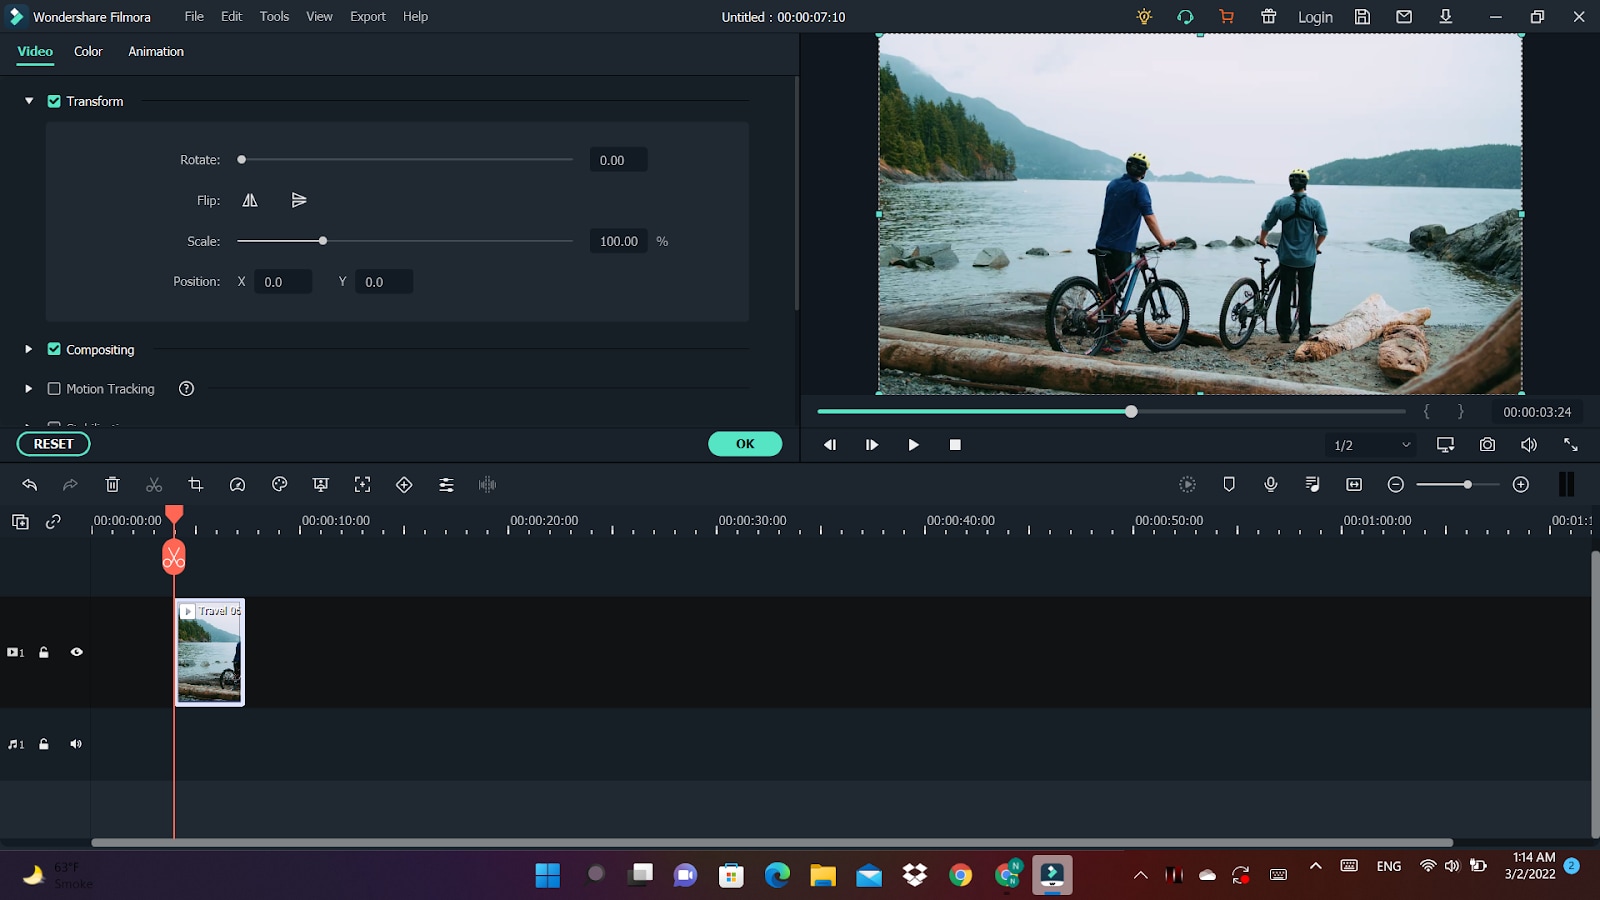
Click on the Transform menu. It will display various options from rotation to scaling. You’ll find the “Rotate” option.
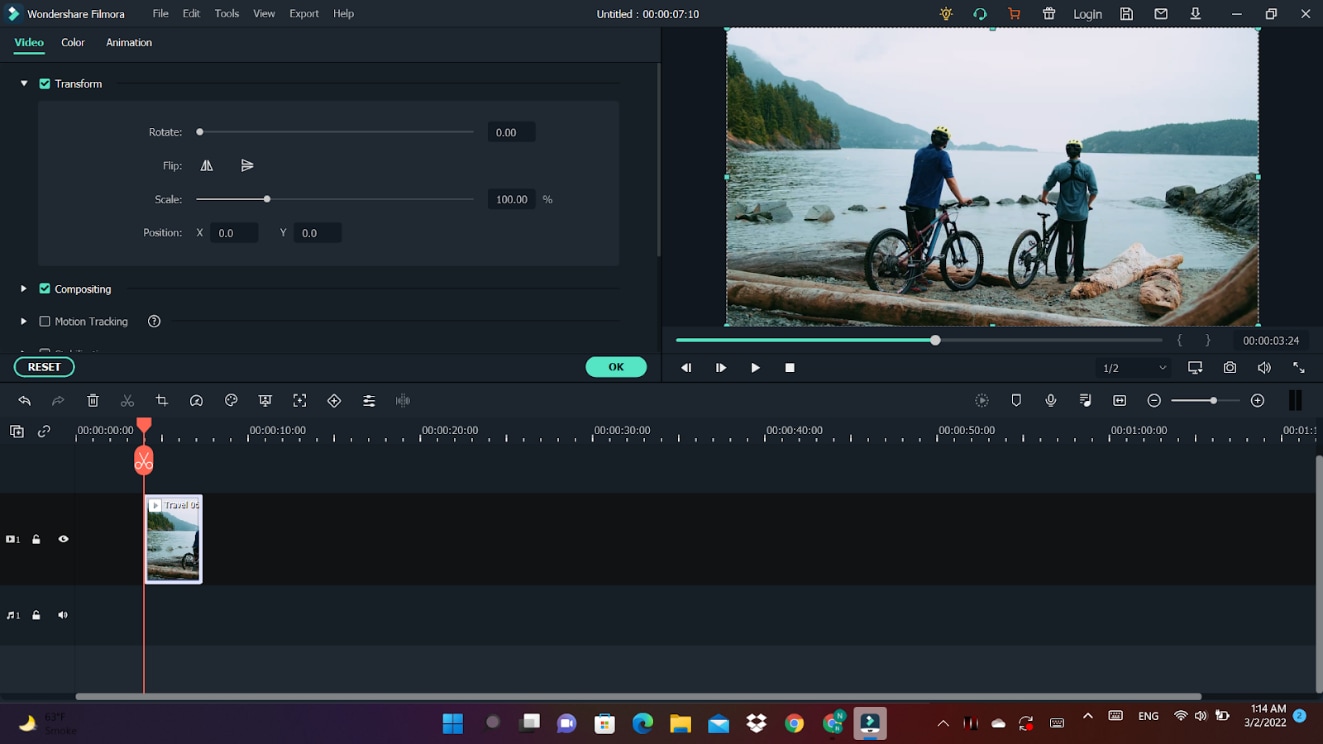
Either you can drag the slider or enter the specific value to adjust to the desired rotation.
For example, if you want to rotate this clip 170 degrees, enter the value in the box.
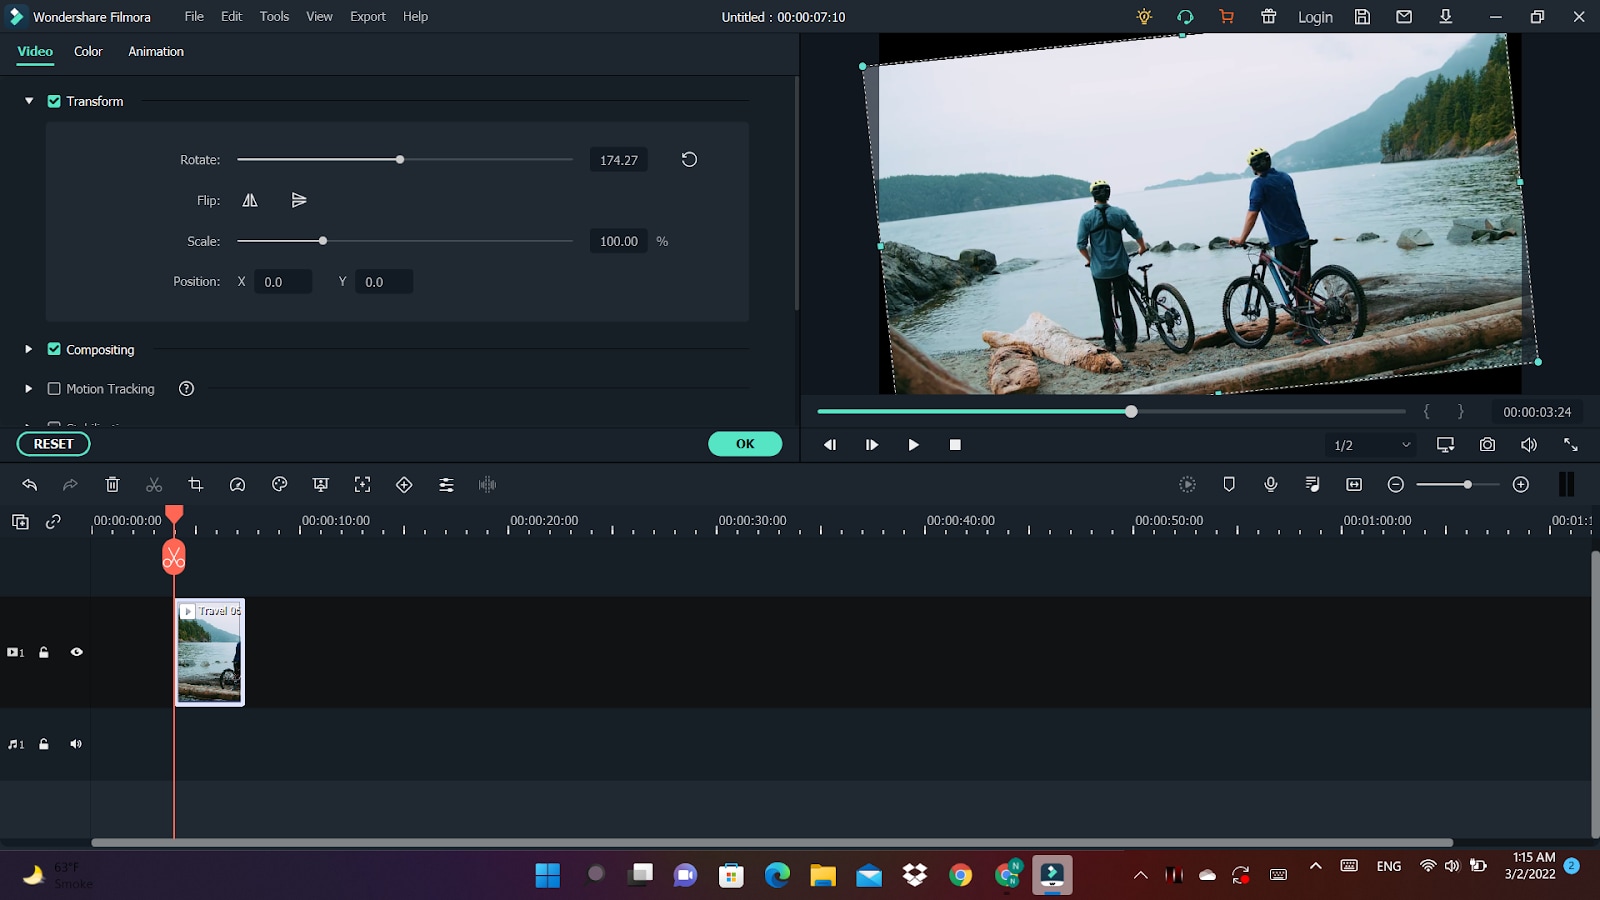
Moreover, you can adjust the scale. You have to drag the Scale slider to have a full-screen image. You can also edit the shape, size and position in the Viewer Panel.
Step 4:Ready to Export
Now, you have achieved the desired rotation for your video. You can export it and select the option that you want.
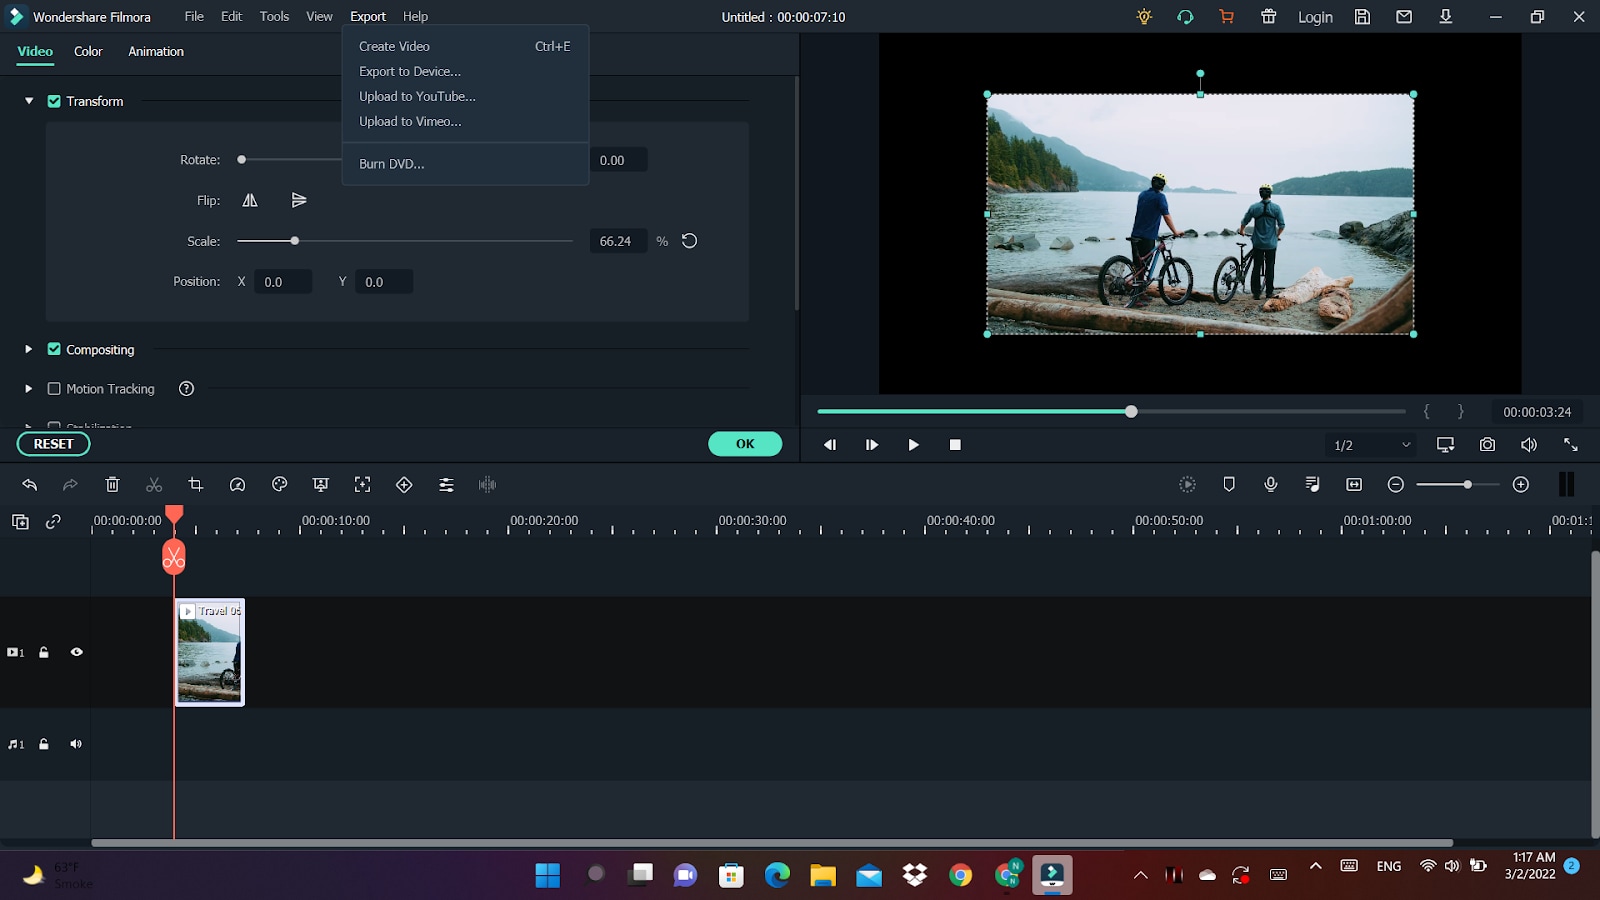
You can flip the direction of your video in a jiff by following these simple steps.
Conclusion
Stitching different scenes by video rotation has brought video editing to a new dimension altogether. Creating transitions in the videos has become easy more than ever. By adding effects in video editing, you can achieve your editing goals. Hence, you can have that “wow part of editing” without breaking a sweat. When the scenes with different directions are combined, they help in creating the subtle mood prompts for creating the desired flow. You can even adjust the angle of your video if you captured it at the wrong angle.
There are a variety of softwares in the digital world for this purpose. Davinci Resolve and Filmora Wondershare come with dynamic options for your post-production work. Owing to their versatility, these also have the feature of rotating your videos. Their user-friendly interface has made the entire experience of post-production work enjoyable.
The drop-down menu with different options will appear. Search for the Transform section. There you have to select the **Rotation Angle.**You can also enter the value of rotation.After entering the value, you will notice that your vidoe is rotated.

Tip: By pressing Ctrl + R, you can rotate the video 90 degrees clockwise.
Editing a portrait video in DaVinci Resolve
The Transform Panel has the XY Zoom fields. You can use this to scale your video to fit the vertical frame by increasing the size to ~1.750.
Voilà, you now have a vertical video you can edit and export.
Horizontal and Vertical Flip in DaVinci Resolve
You want to create a mirror effect for your video. Flipp it. You would love the results.
You can edit it by going to the same Inspector drop-down menu.

Select the kind of flip you want at the bottom of the Transform section. It can be horizontal or vertical.

How to change the direction of animation in the DaVinci Resolve?
Keyframes are an essential part of video animations. Davinci Resolve facilitates you to play a little with its keyframes parameters.
The keyframe system is not that complex.
All you need to do is select a region on your Timeline. Choose the parameters that need animation by clicking the small diamond. You can see the small diamond next to each parameter’s value.
Apart from Davinci Resolve, there is also an alternate software which has this versatility.You can also use Filmora Wonder for rotation of your vidoes
Changing the direction of video using Filmora Wondershare
If you have mistakenly taken a video at the wrong angle and don’t want to lose it. Filmora Video Editor is there to keep you out of trouble. It comes with the option of changing the orientation of your videos in your desired way. You can even zoom in or crop the unwanted parts in the videos. Adding more to it, it offers you preset ratios (16:9, 9:16; 4:5, 1:1) to find the perfect aspect ratio for YuoTube, Instagram, etc.
For Win 7 or later (64-bit)
For macOS 10.14 or later
Here is the step-by-step guide to rotating the direction of the video by using it.
Step 1: Drag and Drop
It starts with importing the desired file you wish to edit. Afterwards, you have to drag-drop it to the timeline.

Step 2: Enter the video-editing Panel
To start editing, you need to double-click on the video clip in the timeline. You’ll see various tabs above the timeline header from transformation to auto-enhance.

Step 3: Explore your options
Click on the Transform menu. It will display various options from rotation to scaling. You’ll find the “Rotate” option.

Either you can drag the slider or enter the specific value to adjust to the desired rotation.
For example, if you want to rotate this clip 170 degrees, enter the value in the box.

Moreover, you can adjust the scale. You have to drag the Scale slider to have a full-screen image. You can also edit the shape, size and position in the Viewer Panel.

Step 4:Ready to Export
Now, you have achieved the desired rotation for your video. You can export it and select the option that you want.

You can flip the direction of your video in a jiff by following these simple steps.
Conclusion
Stitching different scenes by video rotation has brought video editing to a new dimension altogether. Creating transitions in the videos has become easy more than ever. By adding effects in video editing, you can achieve your editing goals. Hence, you can have that “wow part of editing” without breaking a sweat. When the scenes with different directions are combined, they help in creating the subtle mood prompts for creating the desired flow. You can even adjust the angle of your video if you captured it at the wrong angle.
There are a variety of softwares in the digital world for this purpose. Davinci Resolve and Filmora Wondershare come with dynamic options for your post-production work. Owing to their versatility, these also have the feature of rotating your videos. Their user-friendly interface has made the entire experience of post-production work enjoyable.
The drop-down menu with different options will appear. Search for the Transform section. There you have to select the **Rotation Angle.**You can also enter the value of rotation.After entering the value, you will notice that your vidoe is rotated.

Tip: By pressing Ctrl + R, you can rotate the video 90 degrees clockwise.
Editing a portrait video in DaVinci Resolve
The Transform Panel has the XY Zoom fields. You can use this to scale your video to fit the vertical frame by increasing the size to ~1.750.
Voilà, you now have a vertical video you can edit and export.
Horizontal and Vertical Flip in DaVinci Resolve
You want to create a mirror effect for your video. Flipp it. You would love the results.
You can edit it by going to the same Inspector drop-down menu.

Select the kind of flip you want at the bottom of the Transform section. It can be horizontal or vertical.

How to change the direction of animation in the DaVinci Resolve?
Keyframes are an essential part of video animations. Davinci Resolve facilitates you to play a little with its keyframes parameters.
The keyframe system is not that complex.
All you need to do is select a region on your Timeline. Choose the parameters that need animation by clicking the small diamond. You can see the small diamond next to each parameter’s value.
Apart from Davinci Resolve, there is also an alternate software which has this versatility.You can also use Filmora Wonder for rotation of your vidoes
Changing the direction of video using Filmora Wondershare
If you have mistakenly taken a video at the wrong angle and don’t want to lose it. Filmora Video Editor is there to keep you out of trouble. It comes with the option of changing the orientation of your videos in your desired way. You can even zoom in or crop the unwanted parts in the videos. Adding more to it, it offers you preset ratios (16:9, 9:16; 4:5, 1:1) to find the perfect aspect ratio for YuoTube, Instagram, etc.
For Win 7 or later (64-bit)
For macOS 10.14 or later
Here is the step-by-step guide to rotating the direction of the video by using it.
Step 1: Drag and Drop
It starts with importing the desired file you wish to edit. Afterwards, you have to drag-drop it to the timeline.

Step 2: Enter the video-editing Panel
To start editing, you need to double-click on the video clip in the timeline. You’ll see various tabs above the timeline header from transformation to auto-enhance.

Step 3: Explore your options
Click on the Transform menu. It will display various options from rotation to scaling. You’ll find the “Rotate” option.

Either you can drag the slider or enter the specific value to adjust to the desired rotation.
For example, if you want to rotate this clip 170 degrees, enter the value in the box.

Moreover, you can adjust the scale. You have to drag the Scale slider to have a full-screen image. You can also edit the shape, size and position in the Viewer Panel.

Step 4:Ready to Export
Now, you have achieved the desired rotation for your video. You can export it and select the option that you want.

You can flip the direction of your video in a jiff by following these simple steps.
Conclusion
Stitching different scenes by video rotation has brought video editing to a new dimension altogether. Creating transitions in the videos has become easy more than ever. By adding effects in video editing, you can achieve your editing goals. Hence, you can have that “wow part of editing” without breaking a sweat. When the scenes with different directions are combined, they help in creating the subtle mood prompts for creating the desired flow. You can even adjust the angle of your video if you captured it at the wrong angle.
There are a variety of softwares in the digital world for this purpose. Davinci Resolve and Filmora Wondershare come with dynamic options for your post-production work. Owing to their versatility, these also have the feature of rotating your videos. Their user-friendly interface has made the entire experience of post-production work enjoyable.
The drop-down menu with different options will appear. Search for the Transform section. There you have to select the **Rotation Angle.**You can also enter the value of rotation.After entering the value, you will notice that your vidoe is rotated.

Tip: By pressing Ctrl + R, you can rotate the video 90 degrees clockwise.
Editing a portrait video in DaVinci Resolve
The Transform Panel has the XY Zoom fields. You can use this to scale your video to fit the vertical frame by increasing the size to ~1.750.
Voilà, you now have a vertical video you can edit and export.
Horizontal and Vertical Flip in DaVinci Resolve
You want to create a mirror effect for your video. Flipp it. You would love the results.
You can edit it by going to the same Inspector drop-down menu.

Select the kind of flip you want at the bottom of the Transform section. It can be horizontal or vertical.

How to change the direction of animation in the DaVinci Resolve?
Keyframes are an essential part of video animations. Davinci Resolve facilitates you to play a little with its keyframes parameters.
The keyframe system is not that complex.
All you need to do is select a region on your Timeline. Choose the parameters that need animation by clicking the small diamond. You can see the small diamond next to each parameter’s value.
Apart from Davinci Resolve, there is also an alternate software which has this versatility.You can also use Filmora Wonder for rotation of your vidoes
Changing the direction of video using Filmora Wondershare
If you have mistakenly taken a video at the wrong angle and don’t want to lose it. Filmora Video Editor is there to keep you out of trouble. It comes with the option of changing the orientation of your videos in your desired way. You can even zoom in or crop the unwanted parts in the videos. Adding more to it, it offers you preset ratios (16:9, 9:16; 4:5, 1:1) to find the perfect aspect ratio for YuoTube, Instagram, etc.
For Win 7 or later (64-bit)
For macOS 10.14 or later
Here is the step-by-step guide to rotating the direction of the video by using it.
Step 1: Drag and Drop
It starts with importing the desired file you wish to edit. Afterwards, you have to drag-drop it to the timeline.

Step 2: Enter the video-editing Panel
To start editing, you need to double-click on the video clip in the timeline. You’ll see various tabs above the timeline header from transformation to auto-enhance.

Step 3: Explore your options
Click on the Transform menu. It will display various options from rotation to scaling. You’ll find the “Rotate” option.

Either you can drag the slider or enter the specific value to adjust to the desired rotation.
For example, if you want to rotate this clip 170 degrees, enter the value in the box.

Moreover, you can adjust the scale. You have to drag the Scale slider to have a full-screen image. You can also edit the shape, size and position in the Viewer Panel.

Step 4:Ready to Export
Now, you have achieved the desired rotation for your video. You can export it and select the option that you want.

You can flip the direction of your video in a jiff by following these simple steps.
Conclusion
Stitching different scenes by video rotation has brought video editing to a new dimension altogether. Creating transitions in the videos has become easy more than ever. By adding effects in video editing, you can achieve your editing goals. Hence, you can have that “wow part of editing” without breaking a sweat. When the scenes with different directions are combined, they help in creating the subtle mood prompts for creating the desired flow. You can even adjust the angle of your video if you captured it at the wrong angle.
There are a variety of softwares in the digital world for this purpose. Davinci Resolve and Filmora Wondershare come with dynamic options for your post-production work. Owing to their versatility, these also have the feature of rotating your videos. Their user-friendly interface has made the entire experience of post-production work enjoyable.
Are You Looking for Top AI Video Recognition Software to Choose From? Please Stay on This Article as We Look at the Current Top AI-Based Video Tools
Deep Learning of AI Video Recognition
An easy yet powerful editor
Numerous effects to choose from
Detailed tutorials provided by the official channel
Artificial Intelligence (AI) software is used to mimic human behavior by learning various insights and data patterns. High features of AI software should include speech and voice recognition, machine learning, virtual assistants, etc. In addition, AI software combined with machine learning can provide various users with the required functionality to simplify the business process.

AI software can develop and build an intelligent application from the beginning with the help of deep learning capabilities and Machine learning. In addition, video recognition AI is the machine’s capacity to analyze, obtain, and process information that it receives from a visual source, specifically video. The video recognition systems help computers comprehend the information received in the large volumes of video feeds, frame by frame.
In this article
01 [What is AI Video Recognition and How Does Video Recognition Work?](#Part 1)
02 [Difference Between AI Video Recognition and Facial Recognition?](#Part 2)
03 [Understanding 6 Top Video Recognition Software](#Part 3)
Part 1 What is AI Video Recognition and How Does Video Recognition Work?
AI Video Recognition is the capability of machines to obtain, analyze, and process information received from videos. It allows us to quickly assess video data by detecting objects, behaviors, people, and vehicles of concern.
In today’s world, we all look at video as a piece of critical evidence used in different situations such as security investigations and law enforcement because it holds a lot of valuable data. In addition, video is seen as a very unclear format lacking context, scheme, and structure, making it hard to deal with. But with the use of AI in machines, you can effectively handle data with video recognition.
Also, video recognition is not the same as facial or image recognition, regardless of its name, even though they are interrelated. Video recognition is referred to as video content analysis or intelligent video analytics because it entails many tasks. Thus, AI is used in video recognition to rapidly reduce the time for research from weeks or months to seconds and process mass video data.
Video recognition employs AI to complete the tasks by applying enhanced deep learning (DL) and computer vision (CV) models to live video streams or recorded video footage. The following are the most common ways AI video recognition works:
● Classification of Image: It allows the selection of the right category for a video
● Localization: It helps to locate a target object in the video
● Detection of Object: Categorize and locate the object in the video
● Identification of Object: Instances of the object of interest
● Tracking of Object: It can track the object’s trajectory, which will change in the video.

Part 2 Difference Between AI Video Recognition and Facial Recognition?
Video recognition AI primarily focuses on comprehending the information or data received from many video feeds, frame by frame. It is the ability to use Artificial Intelligence to quickly process mass video data and reduce the required time for analysis.
Alternatively, facial recognition describes a biometric technology beyond recognizing when a human face is present (Facial detection). Facial recognition attempts to establish the owner of a particular face. AI Facial recognition works by quickly utilizing a computer application that captures an individual’s face’s digital image, sometimes taken from a video frame, and compares it to images stored in the database records.

Part 3 Understanding 6 Top Video Recognition Software
Video Recognition AI Software (VRS) is an AI-powered software that works with digital video surveillance systems to recognize and detect threats. In addition, these threats can be single objects like knives and guns or more complex disturbances and crowd movements. However, the software does not aim to replace the eye of security personnel but to focus their eyes.
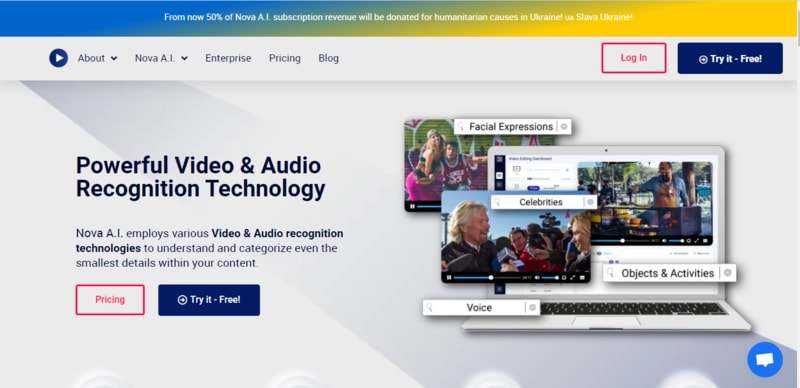
01Nova A.I.
This software employs various audio and video recognition technologies to categorize and understand even the most minor details within your content.
Features of Nova A.I
● Analyze: It extracts and discovers every vital moment with computer vision technologies.
● Index: Allows the storage of newly found metadata within your cloud account.
● Awareness: Discover where and when certain content concept appears in your video. It helps understand the in and out of the video.
● Leverage: Utilization of various recognition technologies to leverage all library content instantly
● Differentiate between human speech from the vast pool of sounds available in your video.
02Sensifai
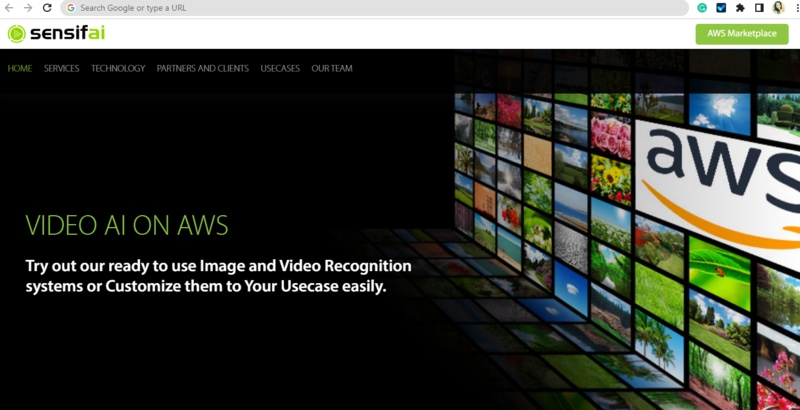
This software uses AI tools to recognize live images and videos. It also aims to identify logos, attributes, nudity, actions, scenes, objects, celebrities, and landmarks.
Features of Sensifai
● It finds and tags drinking, nudity, smoking, violence, and swearwords in videos and images.
● Sensifai recognizes and tags millions of actions, attributes, concepts, objects, and sports in your images and videos.
● It recognizes explosions, fire, unknown person on your property, and suspicious sounds, including window and cry breaking.
● It can also add sub-title automatically to your audio and video files and make them searchable.
● It can permanently monitor your loved ones when they are all alone and receive an alarm when you feel there is a threat.
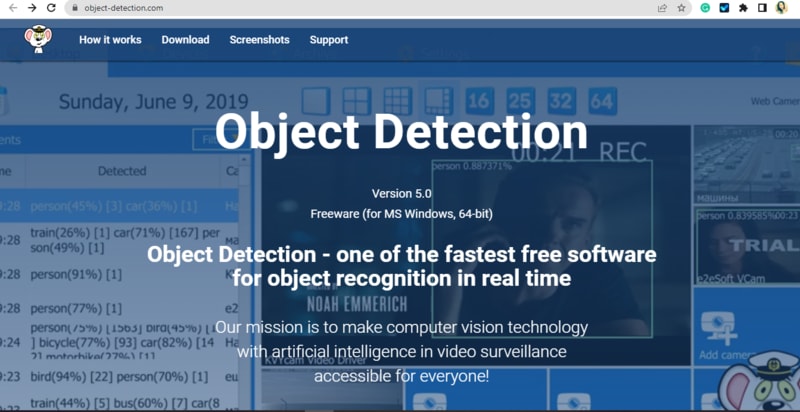
03Object Detection
This AI-powered software turns your computer into a powerful video-security system by allowing you to watch what is going on remotely in your business or home.
Features of Object Detection
● The intelligent subsystem can single-handedly detect IP cameras and connects them to the application.
● It enriches video surveillance with artificial intelligence to recognize objects in real-time.
● It has a web camera cloud that helps use video surveillance based on artificial intelligence.
● Perfect for video surveillance cloud
● The software will automatically upload the video to Telegram messenger or YouTube during specific events.
04Cloud Video Intelligence API
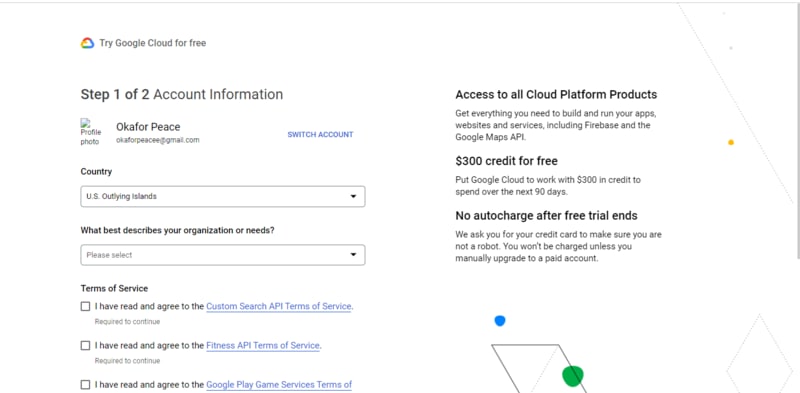
This powerful AI, video recognition software, powered by Google Cloud, enables powerful content discovery and engaging video experiences.
Features of Cloud Video Intelligence API
● Allows for precise video analysis that helps to recognize over 20,000 places, objects, places, and actions in a video
● It helps to extract rich metadata at the video frame level or shot
● Assists in the creation of custom personal entity labels with AutoML Video Intelligence
● Gain near real-time insights with object-based event triggers and streaming video annotation
● Helps in building engaging customer experiences with recommendations, highlight reels, etc.
05Valossa
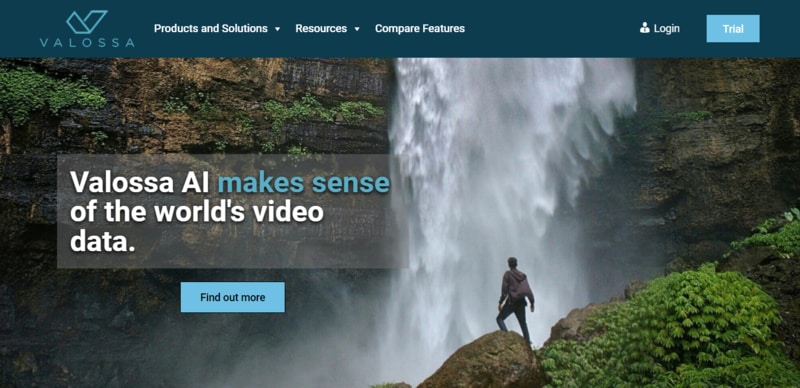
Valossa is an AI software that helps to reveal the real meaning of content inside audio and visual data. This cognitive AI helps video-based businesses to manage and grow their business safely.
Features of Valossa
● Perfect software for businesses working with video
● This video recognition software is available as an on-premise and SaaS service software solution.
● The AI technology combines recognition with high-level semantic inferencing and multimodal video analysis to make sense of video content data.
● It helps to profile videos for contextual advertising.
● Allows the application of AI automation for immersive video on demand (VOD) and over-the-top (OTT) user experiences.
06Thetake.ai
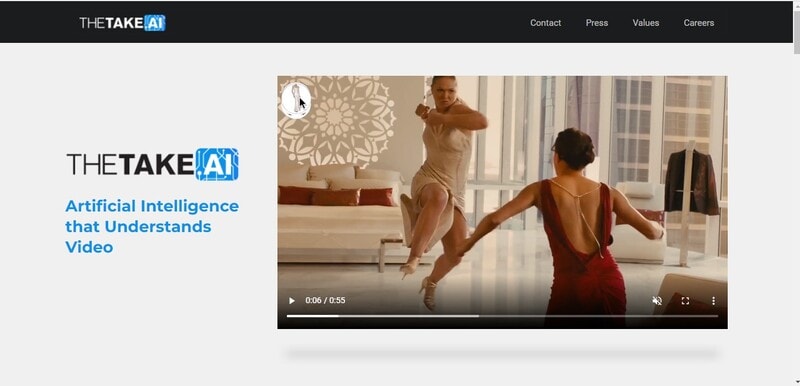
This software harnesses machine learning to identify people and products in a video automatically. It is an artificial intelligence tool that understands the video.
Features of Thetakeai
● Perfect for Content Creators and Hardware Manufacturers to Power Shoppable Content.
● Provides efficiency for viewers in identifying the products they discover in the content they love
● It helps in improving the viewer’s experience
● Transform ways in product discovery and content engagement
● More focused on problem-solving
07****Wondershare Filmora Video Editor **
Filmora’s new update brings a set of exclusive features with which you can create high-quality AI videos with a touch of a few fingers.
For Win 7 or later (64-bit)
For macOS 10.12 or later
For example, you can add effects to a particular object by pinpointing its movement with its motion tracking feature. Similarly, its new Speed Ramping feature assists you in adjusting the speed of the video and lets you create incredible movie-like effects. You can add music to your game video with its Auto Beat Sync feature, and the Instant Mode will help you complete your video recognition AI mode in minutes.
● Ending Thoughts →
● First, we learned what AI is and how AI recognition works.
● Then, we compared AI recognition with Facial recognition.
● The report also listed the top 6 AI recognition software you should know and
● Lastly, we recommended Filmora as the best software for editing videos recognition with AI software.
● So, try out an AI video recognition today and see the incredible magic.
Artificial Intelligence (AI) software is used to mimic human behavior by learning various insights and data patterns. High features of AI software should include speech and voice recognition, machine learning, virtual assistants, etc. In addition, AI software combined with machine learning can provide various users with the required functionality to simplify the business process.

AI software can develop and build an intelligent application from the beginning with the help of deep learning capabilities and Machine learning. In addition, video recognition AI is the machine’s capacity to analyze, obtain, and process information that it receives from a visual source, specifically video. The video recognition systems help computers comprehend the information received in the large volumes of video feeds, frame by frame.
In this article
01 [What is AI Video Recognition and How Does Video Recognition Work?](#Part 1)
02 [Difference Between AI Video Recognition and Facial Recognition?](#Part 2)
03 [Understanding 6 Top Video Recognition Software](#Part 3)
Part 1 What is AI Video Recognition and How Does Video Recognition Work?
AI Video Recognition is the capability of machines to obtain, analyze, and process information received from videos. It allows us to quickly assess video data by detecting objects, behaviors, people, and vehicles of concern.
In today’s world, we all look at video as a piece of critical evidence used in different situations such as security investigations and law enforcement because it holds a lot of valuable data. In addition, video is seen as a very unclear format lacking context, scheme, and structure, making it hard to deal with. But with the use of AI in machines, you can effectively handle data with video recognition.
Also, video recognition is not the same as facial or image recognition, regardless of its name, even though they are interrelated. Video recognition is referred to as video content analysis or intelligent video analytics because it entails many tasks. Thus, AI is used in video recognition to rapidly reduce the time for research from weeks or months to seconds and process mass video data.
Video recognition employs AI to complete the tasks by applying enhanced deep learning (DL) and computer vision (CV) models to live video streams or recorded video footage. The following are the most common ways AI video recognition works:
● Classification of Image: It allows the selection of the right category for a video
● Localization: It helps to locate a target object in the video
● Detection of Object: Categorize and locate the object in the video
● Identification of Object: Instances of the object of interest
● Tracking of Object: It can track the object’s trajectory, which will change in the video.

Part 2 Difference Between AI Video Recognition and Facial Recognition?
Video recognition AI primarily focuses on comprehending the information or data received from many video feeds, frame by frame. It is the ability to use Artificial Intelligence to quickly process mass video data and reduce the required time for analysis.
Alternatively, facial recognition describes a biometric technology beyond recognizing when a human face is present (Facial detection). Facial recognition attempts to establish the owner of a particular face. AI Facial recognition works by quickly utilizing a computer application that captures an individual’s face’s digital image, sometimes taken from a video frame, and compares it to images stored in the database records.

Part 3 Understanding 6 Top Video Recognition Software
Video Recognition AI Software (VRS) is an AI-powered software that works with digital video surveillance systems to recognize and detect threats. In addition, these threats can be single objects like knives and guns or more complex disturbances and crowd movements. However, the software does not aim to replace the eye of security personnel but to focus their eyes.
01Nova A.I.
This software employs various audio and video recognition technologies to categorize and understand even the most minor details within your content.
Features of Nova A.I
● Analyze: It extracts and discovers every vital moment with computer vision technologies.
● Index: Allows the storage of newly found metadata within your cloud account.
● Awareness: Discover where and when certain content concept appears in your video. It helps understand the in and out of the video.
● Leverage: Utilization of various recognition technologies to leverage all library content instantly
● Differentiate between human speech from the vast pool of sounds available in your video.

02Sensifai
This software uses AI tools to recognize live images and videos. It also aims to identify logos, attributes, nudity, actions, scenes, objects, celebrities, and landmarks.
Features of Sensifai
● It finds and tags drinking, nudity, smoking, violence, and swearwords in videos and images.
● Sensifai recognizes and tags millions of actions, attributes, concepts, objects, and sports in your images and videos.
● It recognizes explosions, fire, unknown person on your property, and suspicious sounds, including window and cry breaking.
● It can also add sub-title automatically to your audio and video files and make them searchable.
● It can permanently monitor your loved ones when they are all alone and receive an alarm when you feel there is a threat.

03Object Detection
This AI-powered software turns your computer into a powerful video-security system by allowing you to watch what is going on remotely in your business or home.
Features of Object Detection
● The intelligent subsystem can single-handedly detect IP cameras and connects them to the application.
● It enriches video surveillance with artificial intelligence to recognize objects in real-time.
● It has a web camera cloud that helps use video surveillance based on artificial intelligence.
● Perfect for video surveillance cloud
● The software will automatically upload the video to Telegram messenger or YouTube during specific events.

04Cloud Video Intelligence API
This powerful AI, video recognition software, powered by Google Cloud, enables powerful content discovery and engaging video experiences.
Features of Cloud Video Intelligence API
● Allows for precise video analysis that helps to recognize over 20,000 places, objects, places, and actions in a video
● It helps to extract rich metadata at the video frame level or shot
● Assists in the creation of custom personal entity labels with AutoML Video Intelligence
● Gain near real-time insights with object-based event triggers and streaming video annotation
● Helps in building engaging customer experiences with recommendations, highlight reels, etc.

05Valossa
Valossa is an AI software that helps to reveal the real meaning of content inside audio and visual data. This cognitive AI helps video-based businesses to manage and grow their business safely.
Features of Valossa
● Perfect software for businesses working with video
● This video recognition software is available as an on-premise and SaaS service software solution.
● The AI technology combines recognition with high-level semantic inferencing and multimodal video analysis to make sense of video content data.
● It helps to profile videos for contextual advertising.
● Allows the application of AI automation for immersive video on demand (VOD) and over-the-top (OTT) user experiences.

06Thetake.ai
This software harnesses machine learning to identify people and products in a video automatically. It is an artificial intelligence tool that understands the video.
Features of Thetakeai
● Perfect for Content Creators and Hardware Manufacturers to Power Shoppable Content.
● Provides efficiency for viewers in identifying the products they discover in the content they love
● It helps in improving the viewer’s experience
● Transform ways in product discovery and content engagement
● More focused on problem-solving

07****Wondershare Filmora Video Editor **
Filmora’s new update brings a set of exclusive features with which you can create high-quality AI videos with a touch of a few fingers.
For Win 7 or later (64-bit)
For macOS 10.12 or later
For example, you can add effects to a particular object by pinpointing its movement with its motion tracking feature. Similarly, its new Speed Ramping feature assists you in adjusting the speed of the video and lets you create incredible movie-like effects. You can add music to your game video with its Auto Beat Sync feature, and the Instant Mode will help you complete your video recognition AI mode in minutes.
● Ending Thoughts →
● First, we learned what AI is and how AI recognition works.
● Then, we compared AI recognition with Facial recognition.
● The report also listed the top 6 AI recognition software you should know and
● Lastly, we recommended Filmora as the best software for editing videos recognition with AI software.
● So, try out an AI video recognition today and see the incredible magic.
Artificial Intelligence (AI) software is used to mimic human behavior by learning various insights and data patterns. High features of AI software should include speech and voice recognition, machine learning, virtual assistants, etc. In addition, AI software combined with machine learning can provide various users with the required functionality to simplify the business process.

AI software can develop and build an intelligent application from the beginning with the help of deep learning capabilities and Machine learning. In addition, video recognition AI is the machine’s capacity to analyze, obtain, and process information that it receives from a visual source, specifically video. The video recognition systems help computers comprehend the information received in the large volumes of video feeds, frame by frame.
In this article
01 [What is AI Video Recognition and How Does Video Recognition Work?](#Part 1)
02 [Difference Between AI Video Recognition and Facial Recognition?](#Part 2)
03 [Understanding 6 Top Video Recognition Software](#Part 3)
Part 1 What is AI Video Recognition and How Does Video Recognition Work?
AI Video Recognition is the capability of machines to obtain, analyze, and process information received from videos. It allows us to quickly assess video data by detecting objects, behaviors, people, and vehicles of concern.
In today’s world, we all look at video as a piece of critical evidence used in different situations such as security investigations and law enforcement because it holds a lot of valuable data. In addition, video is seen as a very unclear format lacking context, scheme, and structure, making it hard to deal with. But with the use of AI in machines, you can effectively handle data with video recognition.
Also, video recognition is not the same as facial or image recognition, regardless of its name, even though they are interrelated. Video recognition is referred to as video content analysis or intelligent video analytics because it entails many tasks. Thus, AI is used in video recognition to rapidly reduce the time for research from weeks or months to seconds and process mass video data.
Video recognition employs AI to complete the tasks by applying enhanced deep learning (DL) and computer vision (CV) models to live video streams or recorded video footage. The following are the most common ways AI video recognition works:
● Classification of Image: It allows the selection of the right category for a video
● Localization: It helps to locate a target object in the video
● Detection of Object: Categorize and locate the object in the video
● Identification of Object: Instances of the object of interest
● Tracking of Object: It can track the object’s trajectory, which will change in the video.

Part 2 Difference Between AI Video Recognition and Facial Recognition?
Video recognition AI primarily focuses on comprehending the information or data received from many video feeds, frame by frame. It is the ability to use Artificial Intelligence to quickly process mass video data and reduce the required time for analysis.
Alternatively, facial recognition describes a biometric technology beyond recognizing when a human face is present (Facial detection). Facial recognition attempts to establish the owner of a particular face. AI Facial recognition works by quickly utilizing a computer application that captures an individual’s face’s digital image, sometimes taken from a video frame, and compares it to images stored in the database records.

Part 3 Understanding 6 Top Video Recognition Software
Video Recognition AI Software (VRS) is an AI-powered software that works with digital video surveillance systems to recognize and detect threats. In addition, these threats can be single objects like knives and guns or more complex disturbances and crowd movements. However, the software does not aim to replace the eye of security personnel but to focus their eyes.
01Nova A.I.
This software employs various audio and video recognition technologies to categorize and understand even the most minor details within your content.
Features of Nova A.I
● Analyze: It extracts and discovers every vital moment with computer vision technologies.
● Index: Allows the storage of newly found metadata within your cloud account.
● Awareness: Discover where and when certain content concept appears in your video. It helps understand the in and out of the video.
● Leverage: Utilization of various recognition technologies to leverage all library content instantly
● Differentiate between human speech from the vast pool of sounds available in your video.

02Sensifai
This software uses AI tools to recognize live images and videos. It also aims to identify logos, attributes, nudity, actions, scenes, objects, celebrities, and landmarks.
Features of Sensifai
● It finds and tags drinking, nudity, smoking, violence, and swearwords in videos and images.
● Sensifai recognizes and tags millions of actions, attributes, concepts, objects, and sports in your images and videos.
● It recognizes explosions, fire, unknown person on your property, and suspicious sounds, including window and cry breaking.
● It can also add sub-title automatically to your audio and video files and make them searchable.
● It can permanently monitor your loved ones when they are all alone and receive an alarm when you feel there is a threat.

03Object Detection
This AI-powered software turns your computer into a powerful video-security system by allowing you to watch what is going on remotely in your business or home.
Features of Object Detection
● The intelligent subsystem can single-handedly detect IP cameras and connects them to the application.
● It enriches video surveillance with artificial intelligence to recognize objects in real-time.
● It has a web camera cloud that helps use video surveillance based on artificial intelligence.
● Perfect for video surveillance cloud
● The software will automatically upload the video to Telegram messenger or YouTube during specific events.

04Cloud Video Intelligence API
This powerful AI, video recognition software, powered by Google Cloud, enables powerful content discovery and engaging video experiences.
Features of Cloud Video Intelligence API
● Allows for precise video analysis that helps to recognize over 20,000 places, objects, places, and actions in a video
● It helps to extract rich metadata at the video frame level or shot
● Assists in the creation of custom personal entity labels with AutoML Video Intelligence
● Gain near real-time insights with object-based event triggers and streaming video annotation
● Helps in building engaging customer experiences with recommendations, highlight reels, etc.

05Valossa
Valossa is an AI software that helps to reveal the real meaning of content inside audio and visual data. This cognitive AI helps video-based businesses to manage and grow their business safely.
Features of Valossa
● Perfect software for businesses working with video
● This video recognition software is available as an on-premise and SaaS service software solution.
● The AI technology combines recognition with high-level semantic inferencing and multimodal video analysis to make sense of video content data.
● It helps to profile videos for contextual advertising.
● Allows the application of AI automation for immersive video on demand (VOD) and over-the-top (OTT) user experiences.

06Thetake.ai
This software harnesses machine learning to identify people and products in a video automatically. It is an artificial intelligence tool that understands the video.
Features of Thetakeai
● Perfect for Content Creators and Hardware Manufacturers to Power Shoppable Content.
● Provides efficiency for viewers in identifying the products they discover in the content they love
● It helps in improving the viewer’s experience
● Transform ways in product discovery and content engagement
● More focused on problem-solving

07****Wondershare Filmora Video Editor **
Filmora’s new update brings a set of exclusive features with which you can create high-quality AI videos with a touch of a few fingers.
For Win 7 or later (64-bit)
For macOS 10.12 or later
For example, you can add effects to a particular object by pinpointing its movement with its motion tracking feature. Similarly, its new Speed Ramping feature assists you in adjusting the speed of the video and lets you create incredible movie-like effects. You can add music to your game video with its Auto Beat Sync feature, and the Instant Mode will help you complete your video recognition AI mode in minutes.
● Ending Thoughts →
● First, we learned what AI is and how AI recognition works.
● Then, we compared AI recognition with Facial recognition.
● The report also listed the top 6 AI recognition software you should know and
● Lastly, we recommended Filmora as the best software for editing videos recognition with AI software.
● So, try out an AI video recognition today and see the incredible magic.
Artificial Intelligence (AI) software is used to mimic human behavior by learning various insights and data patterns. High features of AI software should include speech and voice recognition, machine learning, virtual assistants, etc. In addition, AI software combined with machine learning can provide various users with the required functionality to simplify the business process.

AI software can develop and build an intelligent application from the beginning with the help of deep learning capabilities and Machine learning. In addition, video recognition AI is the machine’s capacity to analyze, obtain, and process information that it receives from a visual source, specifically video. The video recognition systems help computers comprehend the information received in the large volumes of video feeds, frame by frame.
In this article
01 [What is AI Video Recognition and How Does Video Recognition Work?](#Part 1)
02 [Difference Between AI Video Recognition and Facial Recognition?](#Part 2)
03 [Understanding 6 Top Video Recognition Software](#Part 3)
Part 1 What is AI Video Recognition and How Does Video Recognition Work?
AI Video Recognition is the capability of machines to obtain, analyze, and process information received from videos. It allows us to quickly assess video data by detecting objects, behaviors, people, and vehicles of concern.
In today’s world, we all look at video as a piece of critical evidence used in different situations such as security investigations and law enforcement because it holds a lot of valuable data. In addition, video is seen as a very unclear format lacking context, scheme, and structure, making it hard to deal with. But with the use of AI in machines, you can effectively handle data with video recognition.
Also, video recognition is not the same as facial or image recognition, regardless of its name, even though they are interrelated. Video recognition is referred to as video content analysis or intelligent video analytics because it entails many tasks. Thus, AI is used in video recognition to rapidly reduce the time for research from weeks or months to seconds and process mass video data.
Video recognition employs AI to complete the tasks by applying enhanced deep learning (DL) and computer vision (CV) models to live video streams or recorded video footage. The following are the most common ways AI video recognition works:
● Classification of Image: It allows the selection of the right category for a video
● Localization: It helps to locate a target object in the video
● Detection of Object: Categorize and locate the object in the video
● Identification of Object: Instances of the object of interest
● Tracking of Object: It can track the object’s trajectory, which will change in the video.

Part 2 Difference Between AI Video Recognition and Facial Recognition?
Video recognition AI primarily focuses on comprehending the information or data received from many video feeds, frame by frame. It is the ability to use Artificial Intelligence to quickly process mass video data and reduce the required time for analysis.
Alternatively, facial recognition describes a biometric technology beyond recognizing when a human face is present (Facial detection). Facial recognition attempts to establish the owner of a particular face. AI Facial recognition works by quickly utilizing a computer application that captures an individual’s face’s digital image, sometimes taken from a video frame, and compares it to images stored in the database records.

Part 3 Understanding 6 Top Video Recognition Software
Video Recognition AI Software (VRS) is an AI-powered software that works with digital video surveillance systems to recognize and detect threats. In addition, these threats can be single objects like knives and guns or more complex disturbances and crowd movements. However, the software does not aim to replace the eye of security personnel but to focus their eyes.
01Nova A.I.
This software employs various audio and video recognition technologies to categorize and understand even the most minor details within your content.
Features of Nova A.I
● Analyze: It extracts and discovers every vital moment with computer vision technologies.
● Index: Allows the storage of newly found metadata within your cloud account.
● Awareness: Discover where and when certain content concept appears in your video. It helps understand the in and out of the video.
● Leverage: Utilization of various recognition technologies to leverage all library content instantly
● Differentiate between human speech from the vast pool of sounds available in your video.

02Sensifai
This software uses AI tools to recognize live images and videos. It also aims to identify logos, attributes, nudity, actions, scenes, objects, celebrities, and landmarks.
Features of Sensifai
● It finds and tags drinking, nudity, smoking, violence, and swearwords in videos and images.
● Sensifai recognizes and tags millions of actions, attributes, concepts, objects, and sports in your images and videos.
● It recognizes explosions, fire, unknown person on your property, and suspicious sounds, including window and cry breaking.
● It can also add sub-title automatically to your audio and video files and make them searchable.
● It can permanently monitor your loved ones when they are all alone and receive an alarm when you feel there is a threat.

03Object Detection
This AI-powered software turns your computer into a powerful video-security system by allowing you to watch what is going on remotely in your business or home.
Features of Object Detection
● The intelligent subsystem can single-handedly detect IP cameras and connects them to the application.
● It enriches video surveillance with artificial intelligence to recognize objects in real-time.
● It has a web camera cloud that helps use video surveillance based on artificial intelligence.
● Perfect for video surveillance cloud
● The software will automatically upload the video to Telegram messenger or YouTube during specific events.

04Cloud Video Intelligence API
This powerful AI, video recognition software, powered by Google Cloud, enables powerful content discovery and engaging video experiences.
Features of Cloud Video Intelligence API
● Allows for precise video analysis that helps to recognize over 20,000 places, objects, places, and actions in a video
● It helps to extract rich metadata at the video frame level or shot
● Assists in the creation of custom personal entity labels with AutoML Video Intelligence
● Gain near real-time insights with object-based event triggers and streaming video annotation
● Helps in building engaging customer experiences with recommendations, highlight reels, etc.

05Valossa
Valossa is an AI software that helps to reveal the real meaning of content inside audio and visual data. This cognitive AI helps video-based businesses to manage and grow their business safely.
Features of Valossa
● Perfect software for businesses working with video
● This video recognition software is available as an on-premise and SaaS service software solution.
● The AI technology combines recognition with high-level semantic inferencing and multimodal video analysis to make sense of video content data.
● It helps to profile videos for contextual advertising.
● Allows the application of AI automation for immersive video on demand (VOD) and over-the-top (OTT) user experiences.

06Thetake.ai
This software harnesses machine learning to identify people and products in a video automatically. It is an artificial intelligence tool that understands the video.
Features of Thetakeai
● Perfect for Content Creators and Hardware Manufacturers to Power Shoppable Content.
● Provides efficiency for viewers in identifying the products they discover in the content they love
● It helps in improving the viewer’s experience
● Transform ways in product discovery and content engagement
● More focused on problem-solving

07****Wondershare Filmora Video Editor **
Filmora’s new update brings a set of exclusive features with which you can create high-quality AI videos with a touch of a few fingers.
For Win 7 or later (64-bit)
For macOS 10.12 or later
For example, you can add effects to a particular object by pinpointing its movement with its motion tracking feature. Similarly, its new Speed Ramping feature assists you in adjusting the speed of the video and lets you create incredible movie-like effects. You can add music to your game video with its Auto Beat Sync feature, and the Instant Mode will help you complete your video recognition AI mode in minutes.
● Ending Thoughts →
● First, we learned what AI is and how AI recognition works.
● Then, we compared AI recognition with Facial recognition.
● The report also listed the top 6 AI recognition software you should know and
● Lastly, we recommended Filmora as the best software for editing videos recognition with AI software.
● So, try out an AI video recognition today and see the incredible magic.
Want to Know the Full Process of Adding the Falling Text Effect as a Video Introduction? Detailed Guidelines on All the Steps Are Mentioned Here for Filmora Users
Indeed, there are different elements of a video that has the potential to make it stand out to viewers. The title you add to the video, content information in the slides, and other elements are some parts that capture one’s interest.
But seeing only the text in single lines or paragraphs can get repetitive and unappealing, especially with so many videos having the same style. In this context, the fun falling text effect is a unique and exciting approach to making your titles in videos engaging. It creates a fun look when the viewer clicks into the video and is met with this styling title effect.
On Wondershare Filmora , there is a feature available for users to apply this effect to videos in a more straightforward sequence of steps than other editors. Yet, knowing how it works is still valid, even for experienced editing professionals. In this post, we shall detail all of the steps that go into creating this effect in videos, with examples.
Launch Filmora on the Device
Before getting started with the editing steps, you need to download and install this third-party editing software into your device. Filmora works on both Mac and Windows-based computers. (Download here:
Free Download For Win 7 or later(64-bit)
Free Download For macOS 10.14 or later
After switching on your device and going to your preferred browser, search for Wonderhsare Filmora’s official website. Upon accessing it, you will see the “Download” button at the top of the screen. Click on it, and the respective Filmora installer will download into your device instantly, depending on your OS type.
Then, you have to double-click on the installer file you will find in the Downloads folder. This will open the software installation problem window. Click on the Install button and then tap the Agree option for the terms & conditions that appear next on the screen. After that, the software will begin installing automatically.
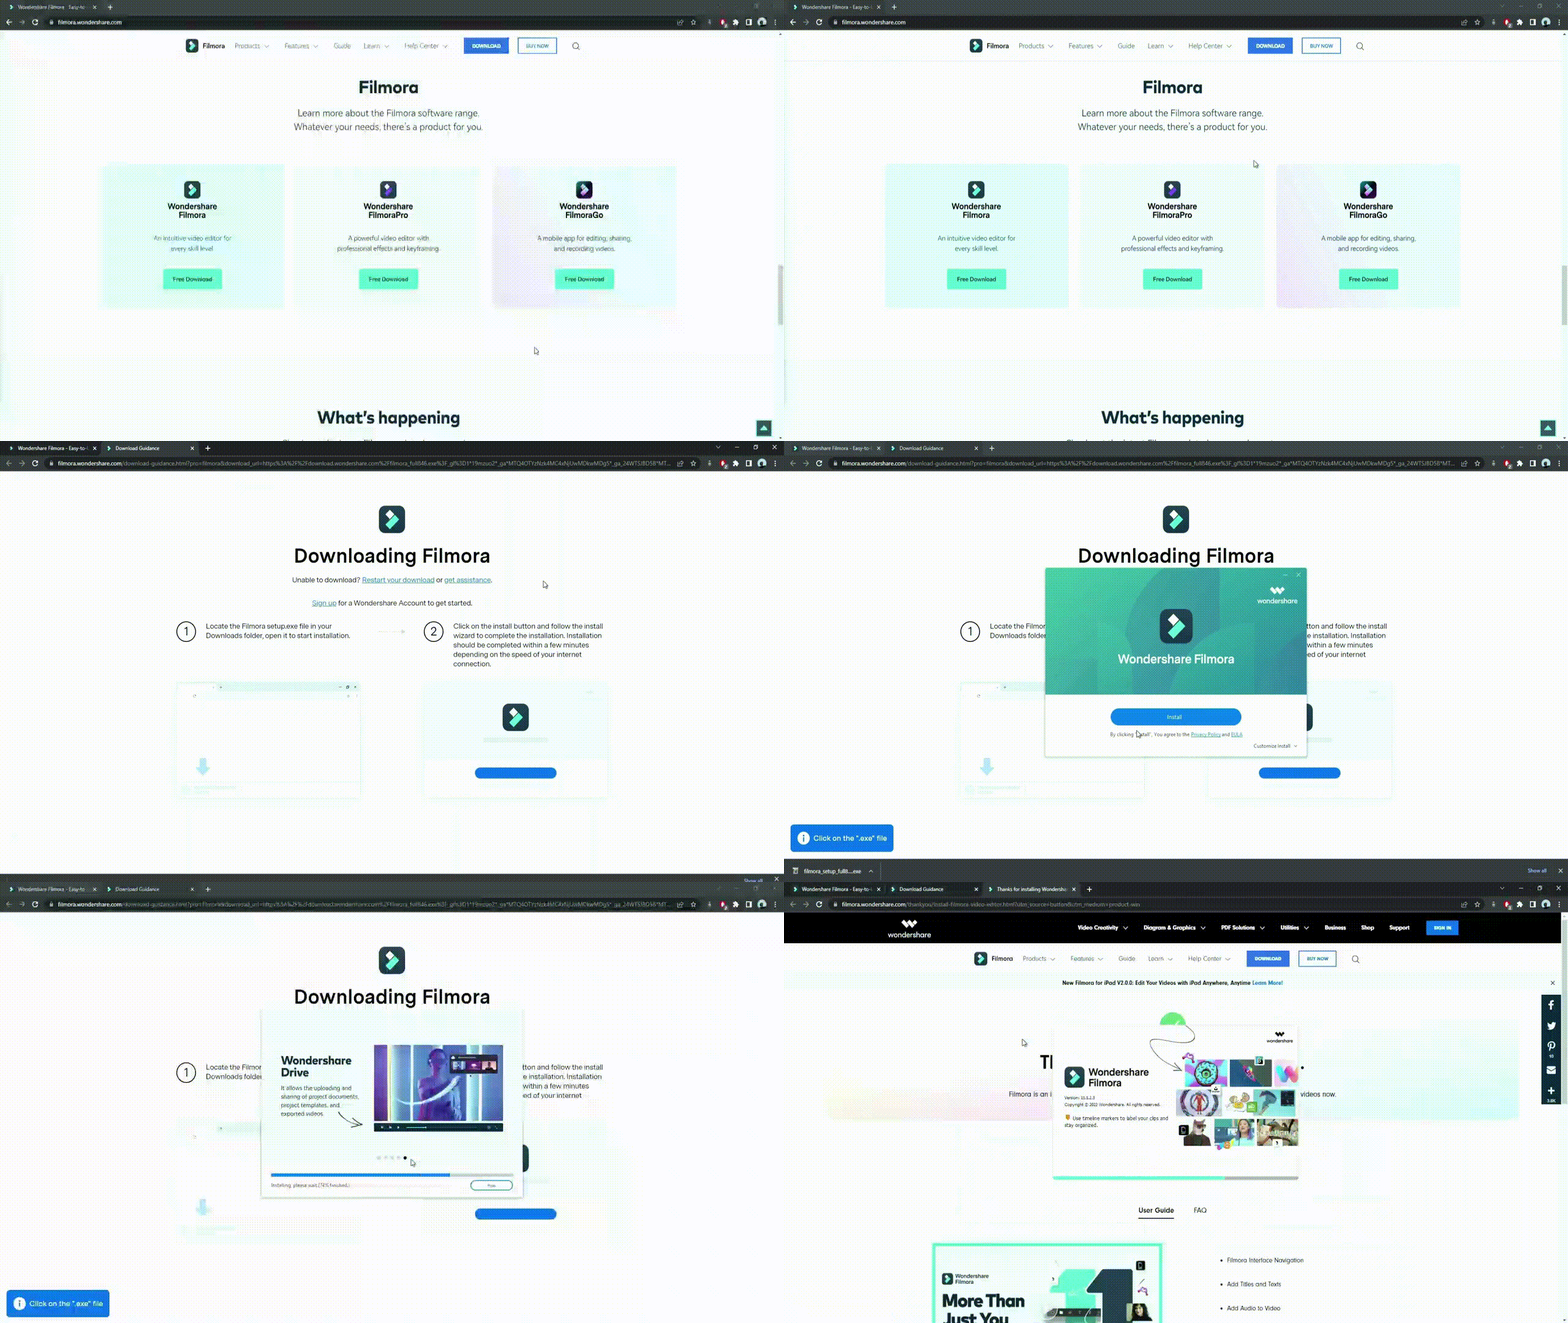
Finally, press the Start Now button on the installation complete prompt window. The software will then launch automatically.
Adjust the project settings
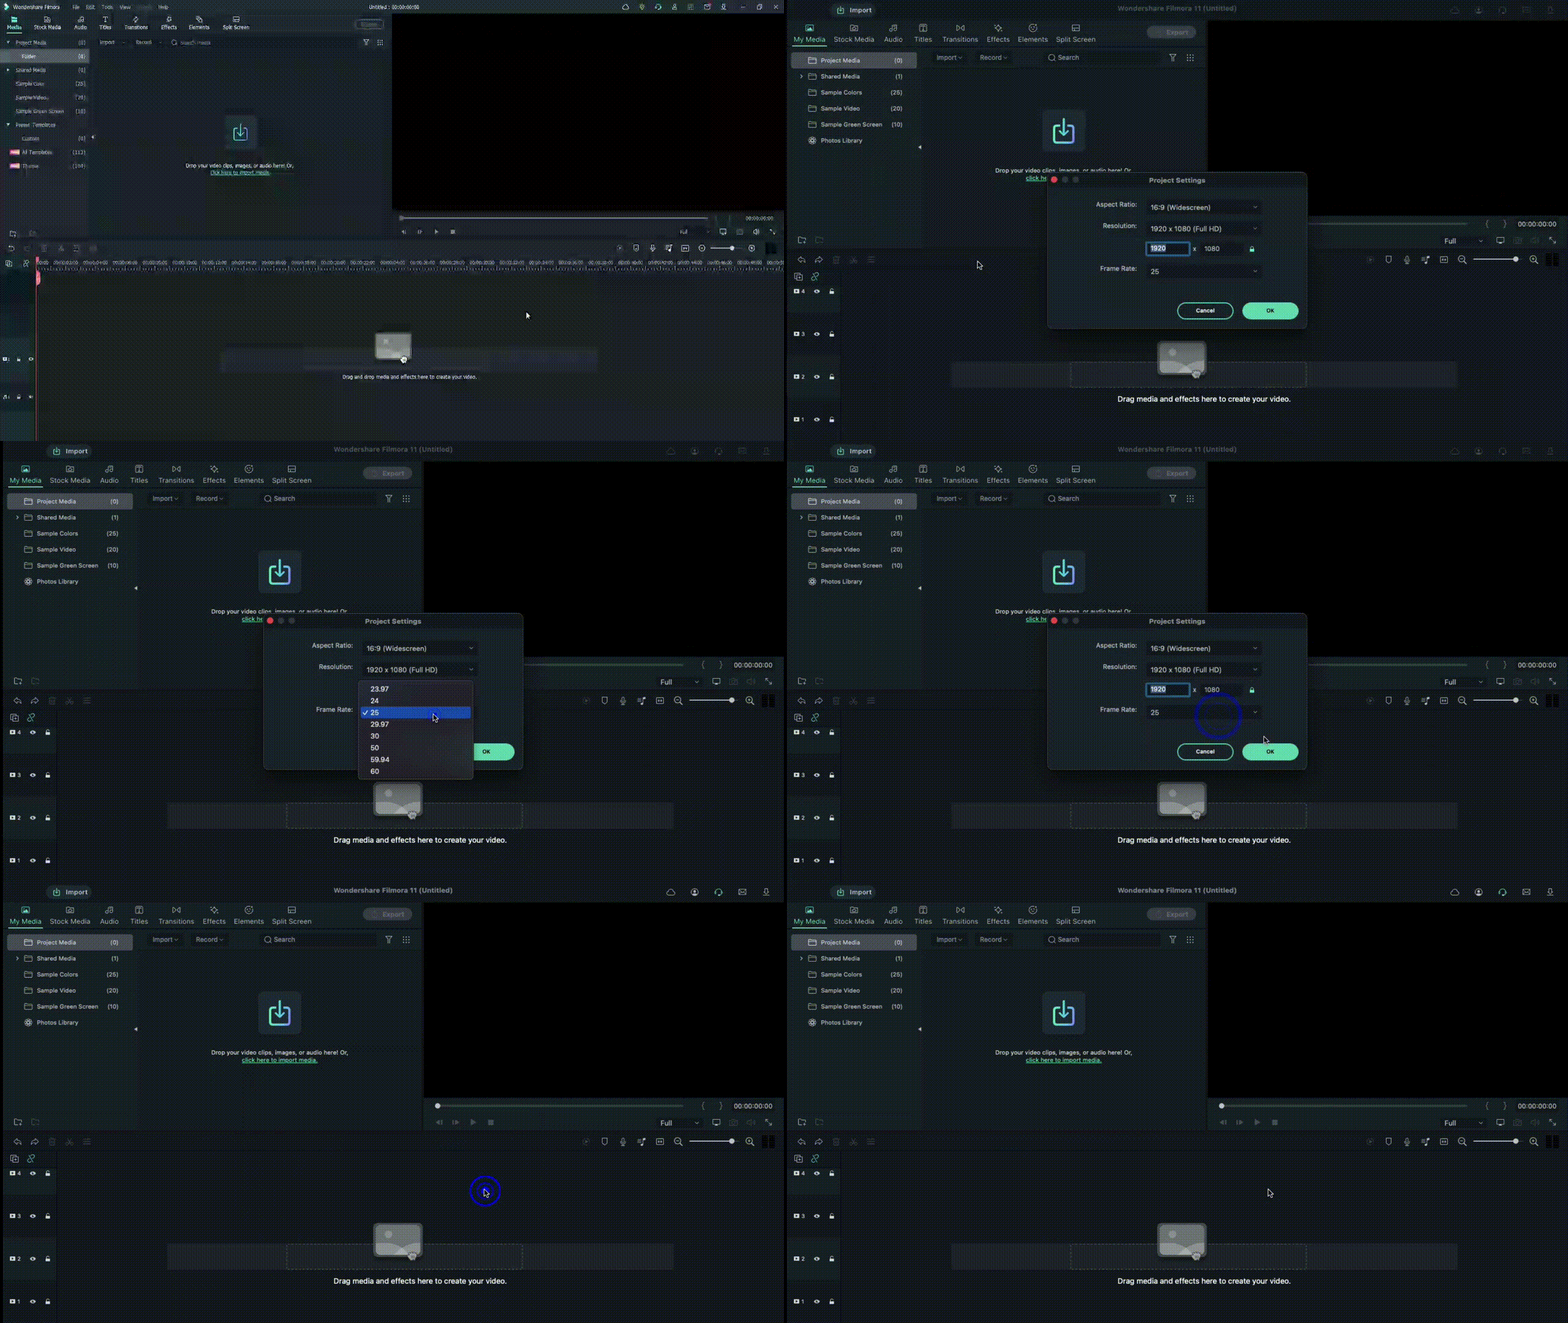
After the software launches on your device, you should tap on the Create New Project button. Before you add the video file you will edit from your device through; you should take time to change some aspects of the project settings.
For this, click on the File tab at the top-most toolbar in the editor window. You should click on the Project Settings option from the drop-down menu, which will open the dialog box. Under the resolution option, you will see the Frame Rate element. Click on the drop-down menu and adjust the video’s frame rate to 25 FPS. After you are done, tap the OK button.
Add the Title
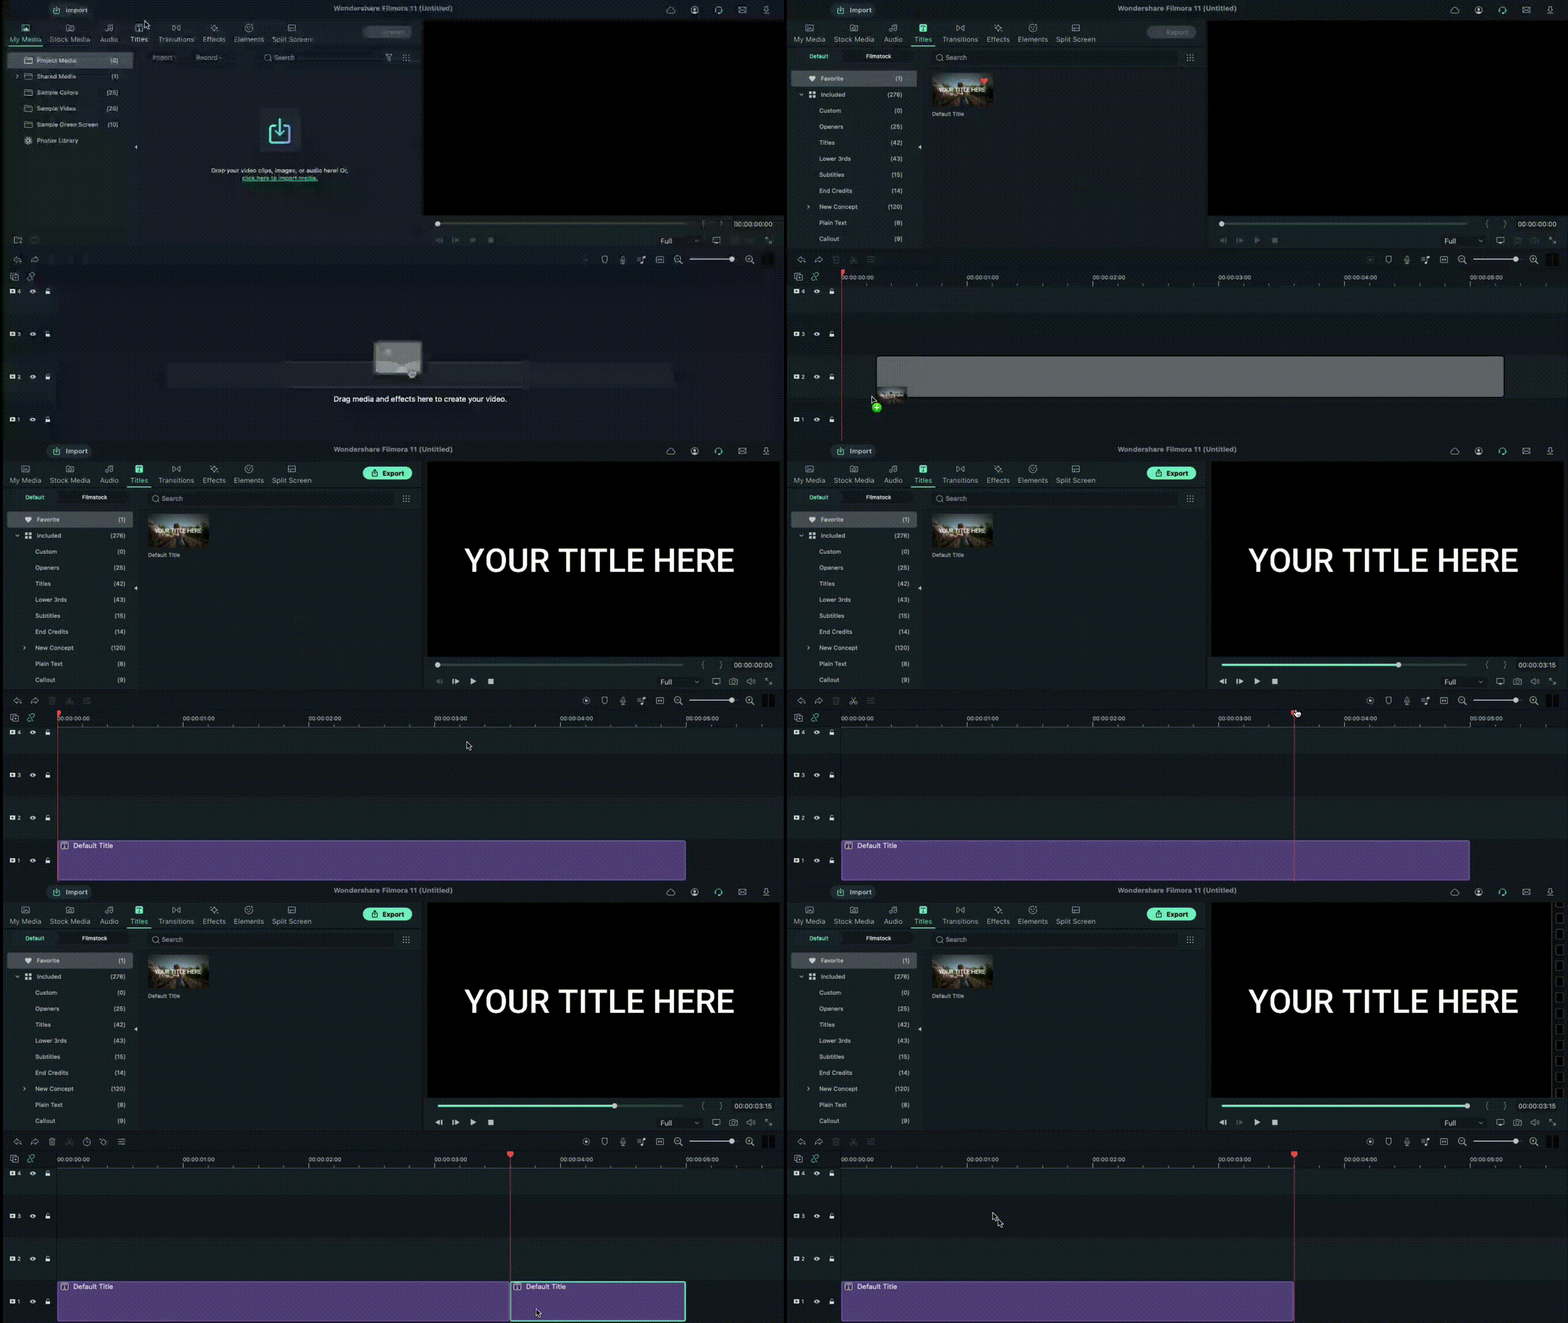
Following this, you must click on the Titles tab at the top toolbar on the editor. Different title templates, like Custom, Openers, End Credits, etc., will appear. Choose the default title of your liking and download it.
Next, hold the title that appears in the library window and then drag it to the first layer of the editing timeline. Clip the title short by moving the play head to the 3-second and 15 frames mark and shape the title to that length. Then, delete the rest of the part.
Edit the Title
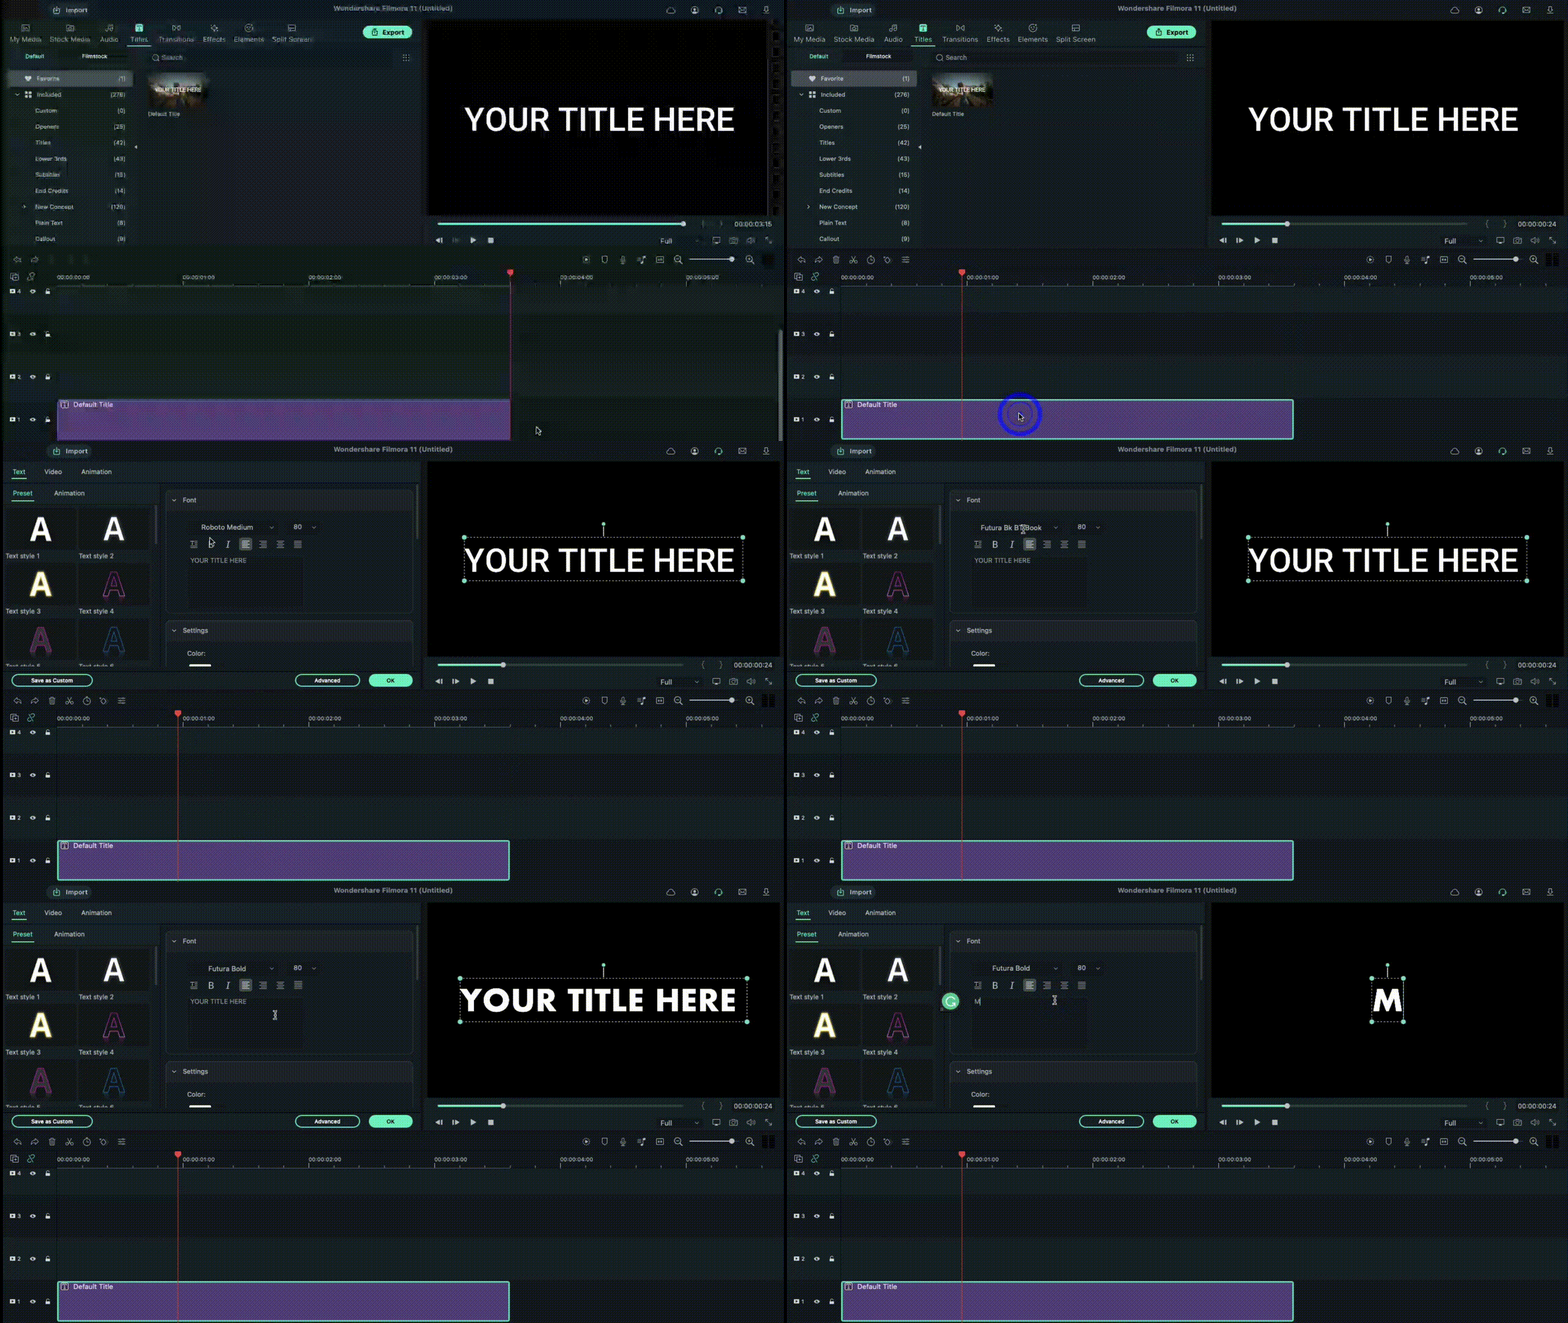
After this, you have to double-click on the top of the default title in your Track 1 timeline. A window will appear for editing the title. Click on the Text tab in this window and tap on the Font options. You should change the font of your title to Futura Bold or any other option that you would prefer.
Animate the characters
When this part is done, in the text field, add the first letter of the text you will add to your animated introduction. After inserting the first letter only, click on the Animation tab next. Following that, you have to move the playhead on your timeline to the very front. You will see the Position parameter in the Animation settings and change the number in the Y axis until it goes out of the top frame of the video.
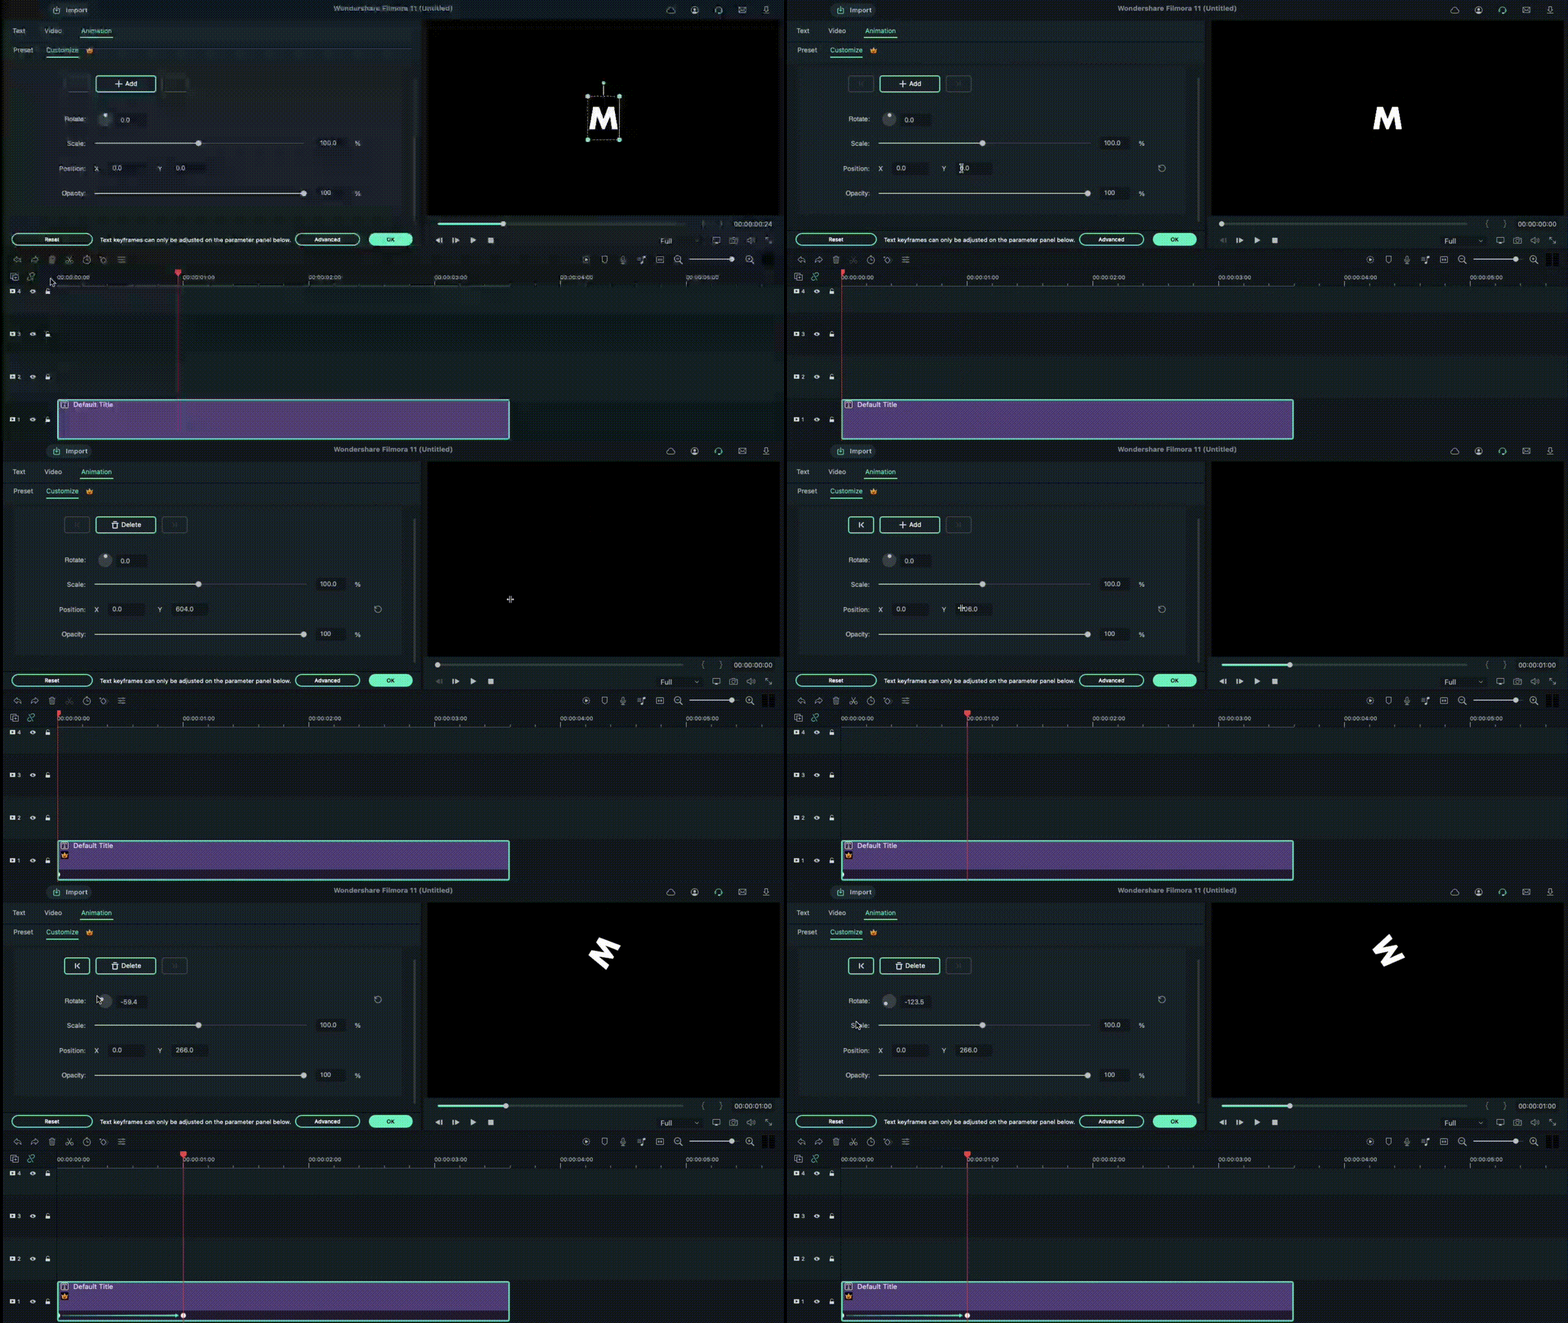
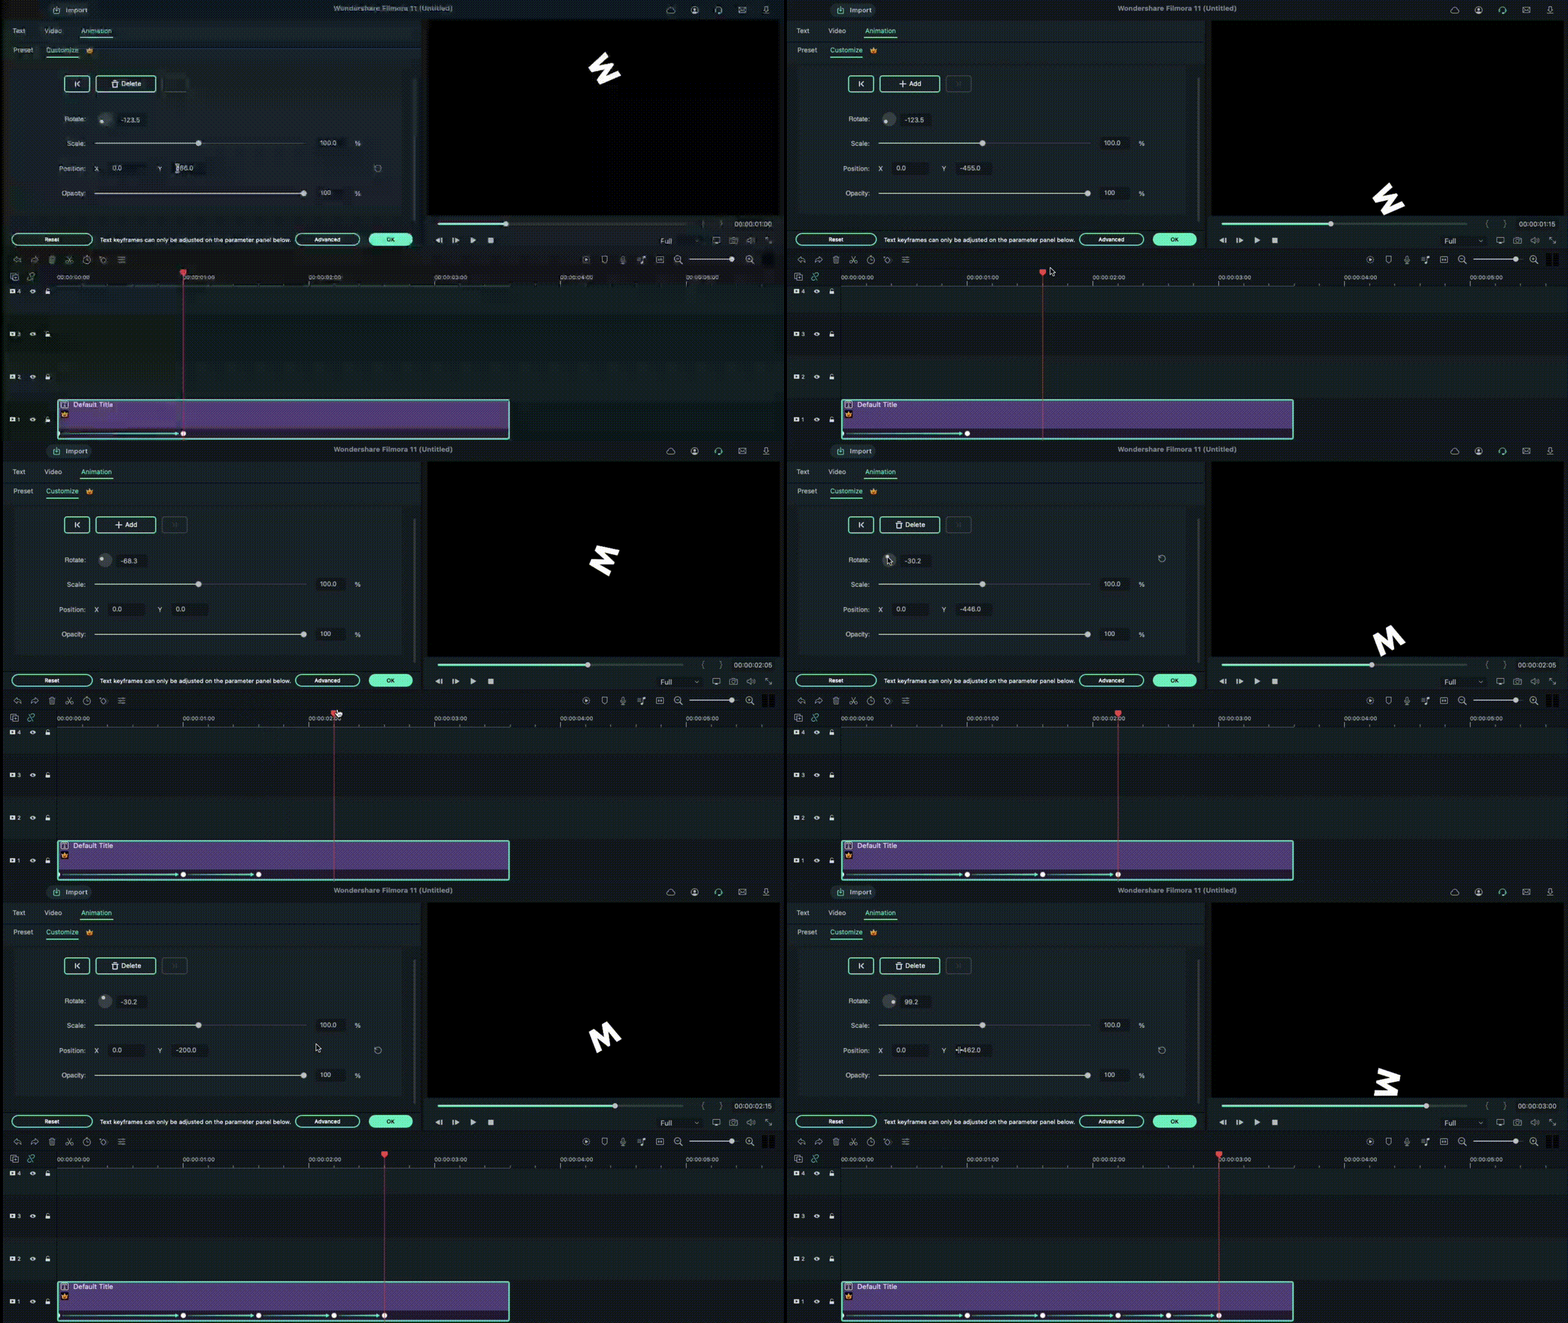
Next, you must move the play head to the 1-second position in the timeline. Here, you must change the number Y axis to a lower position and adjust the Rotate element as per your preference. After that, move the playhead again to 15 frames from the 1-second mark. It would be best if you changed the Y-axis position digit to 0 and adjusted the Rotation value slightly.
Following that, move the playhead again by 15 frames ahead. Rotate the letter again and change the Y-axis value until the letter rests at the bottom of the screen. Again, you have to move the play head on the timeline to 10 frames ahead and adjust the Y-axis and Rotation values to a higher point. Then, continue the step like this at ten frames forward, this time making the character move to the ground again. Press the OK button to complete.
Repeat for the next letters
After you are done with this editing process for the first letter, hold the default title in the library and drag and drop it into Track 2 on the timeline. Adjust the starting point for this layer to frame five from the beginning, and move the file to that starting point. In the end, cut the title length at the same position as layer one was, at 3.15 seconds.
Follow the process explained in the previous section for the first letter, i.e., moving the playhead at specific frames and changing the Y-axis and Rotation value multiple times.
After editing the second letter in the title, repeat the process of holding and dragging the default title to Track 3 in the timeline and adjusting starting position at the 10th frame. Again, follow the process of animating the letter like for Letter 1 and Letter 2. Continue doing this process for multiple more letters in your title text.
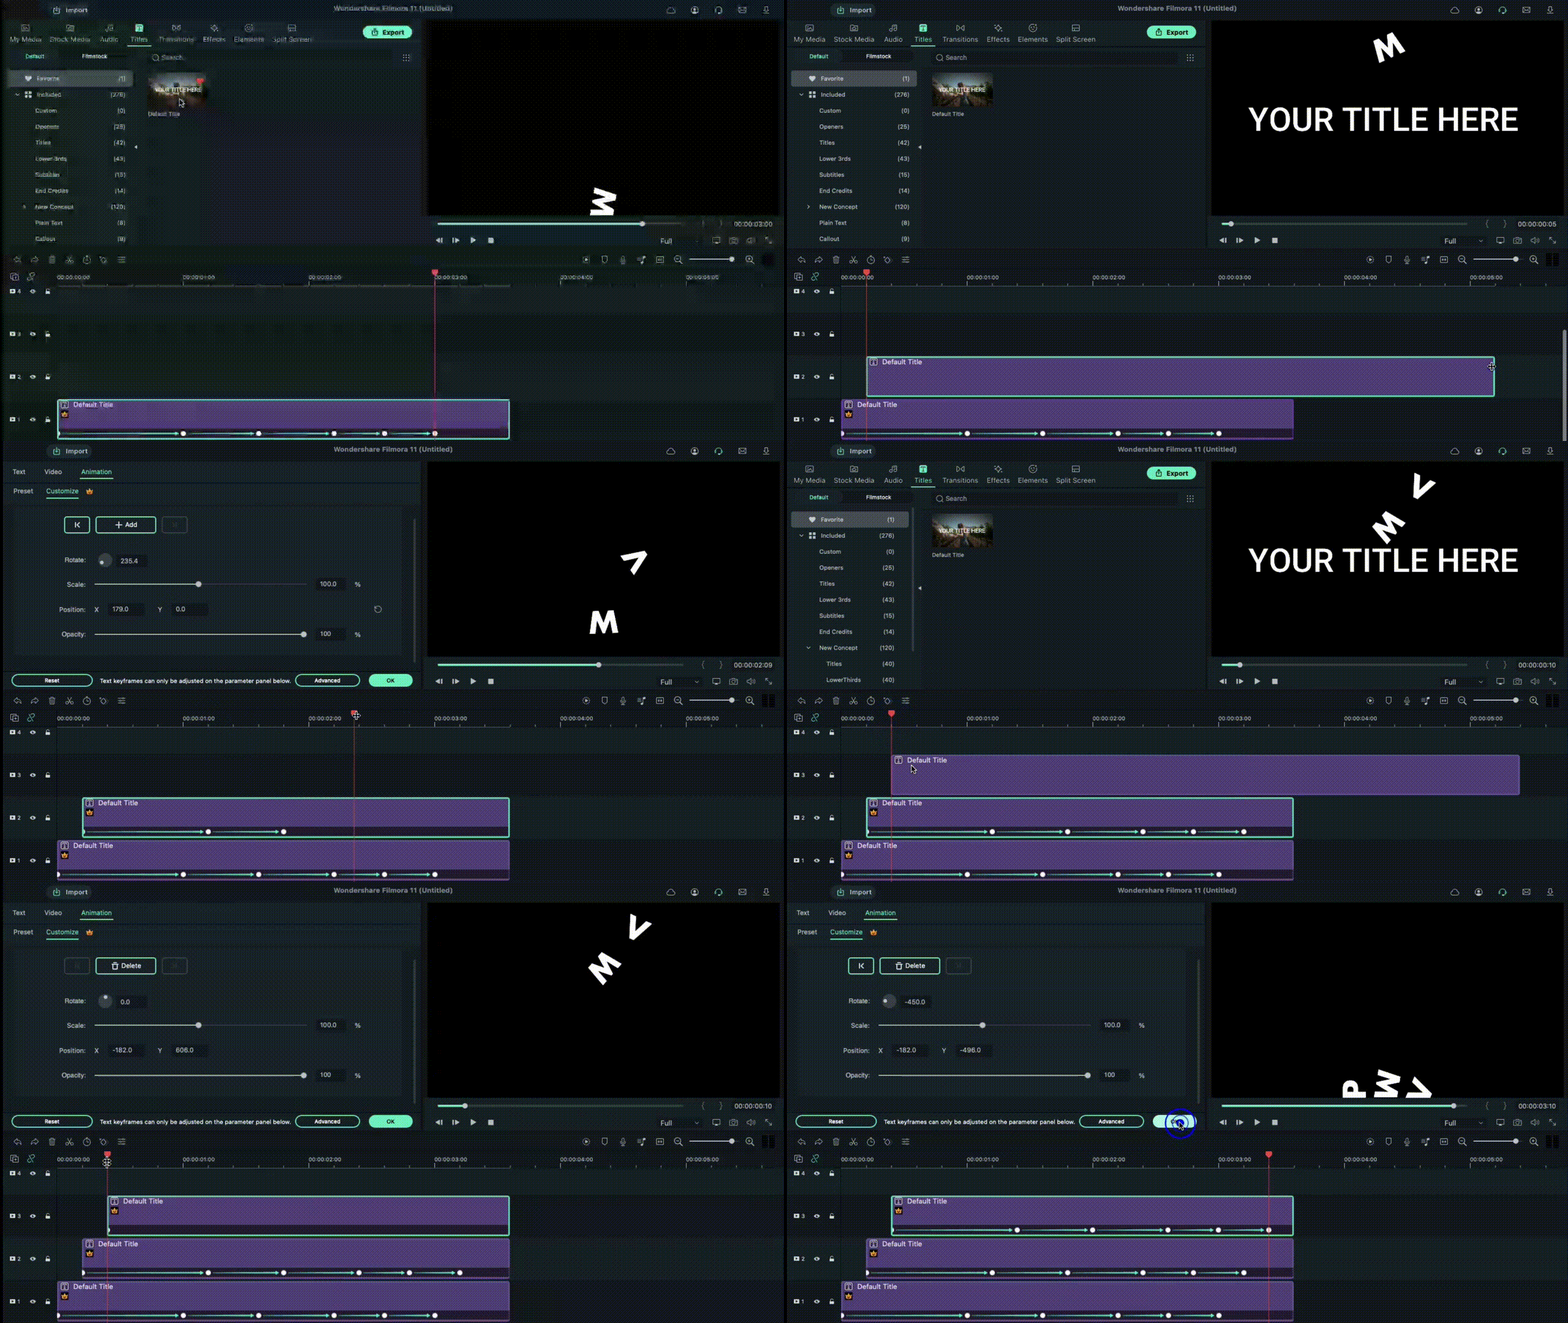
Tap on the Play button under the Preview screen to see how the letters have the falling text effect.
Add Screenshot
Next, you have to click on the hide button for Tracks 2 and up. Tap on the Snapshot icon in the editing timeline of the first letter. Then, when it appears in the library window, click on it and move it beside the Track 1 Title file that you were editing. Move the play head to the 1-second position of this file in the timeline.
Hide Track 1 again and click the Unhide button on Track 2. Repeat the snapshot function and add it to Layer 2. Adjust the end as per Track 1. After this, follow these steps for the subsequent letters as well.
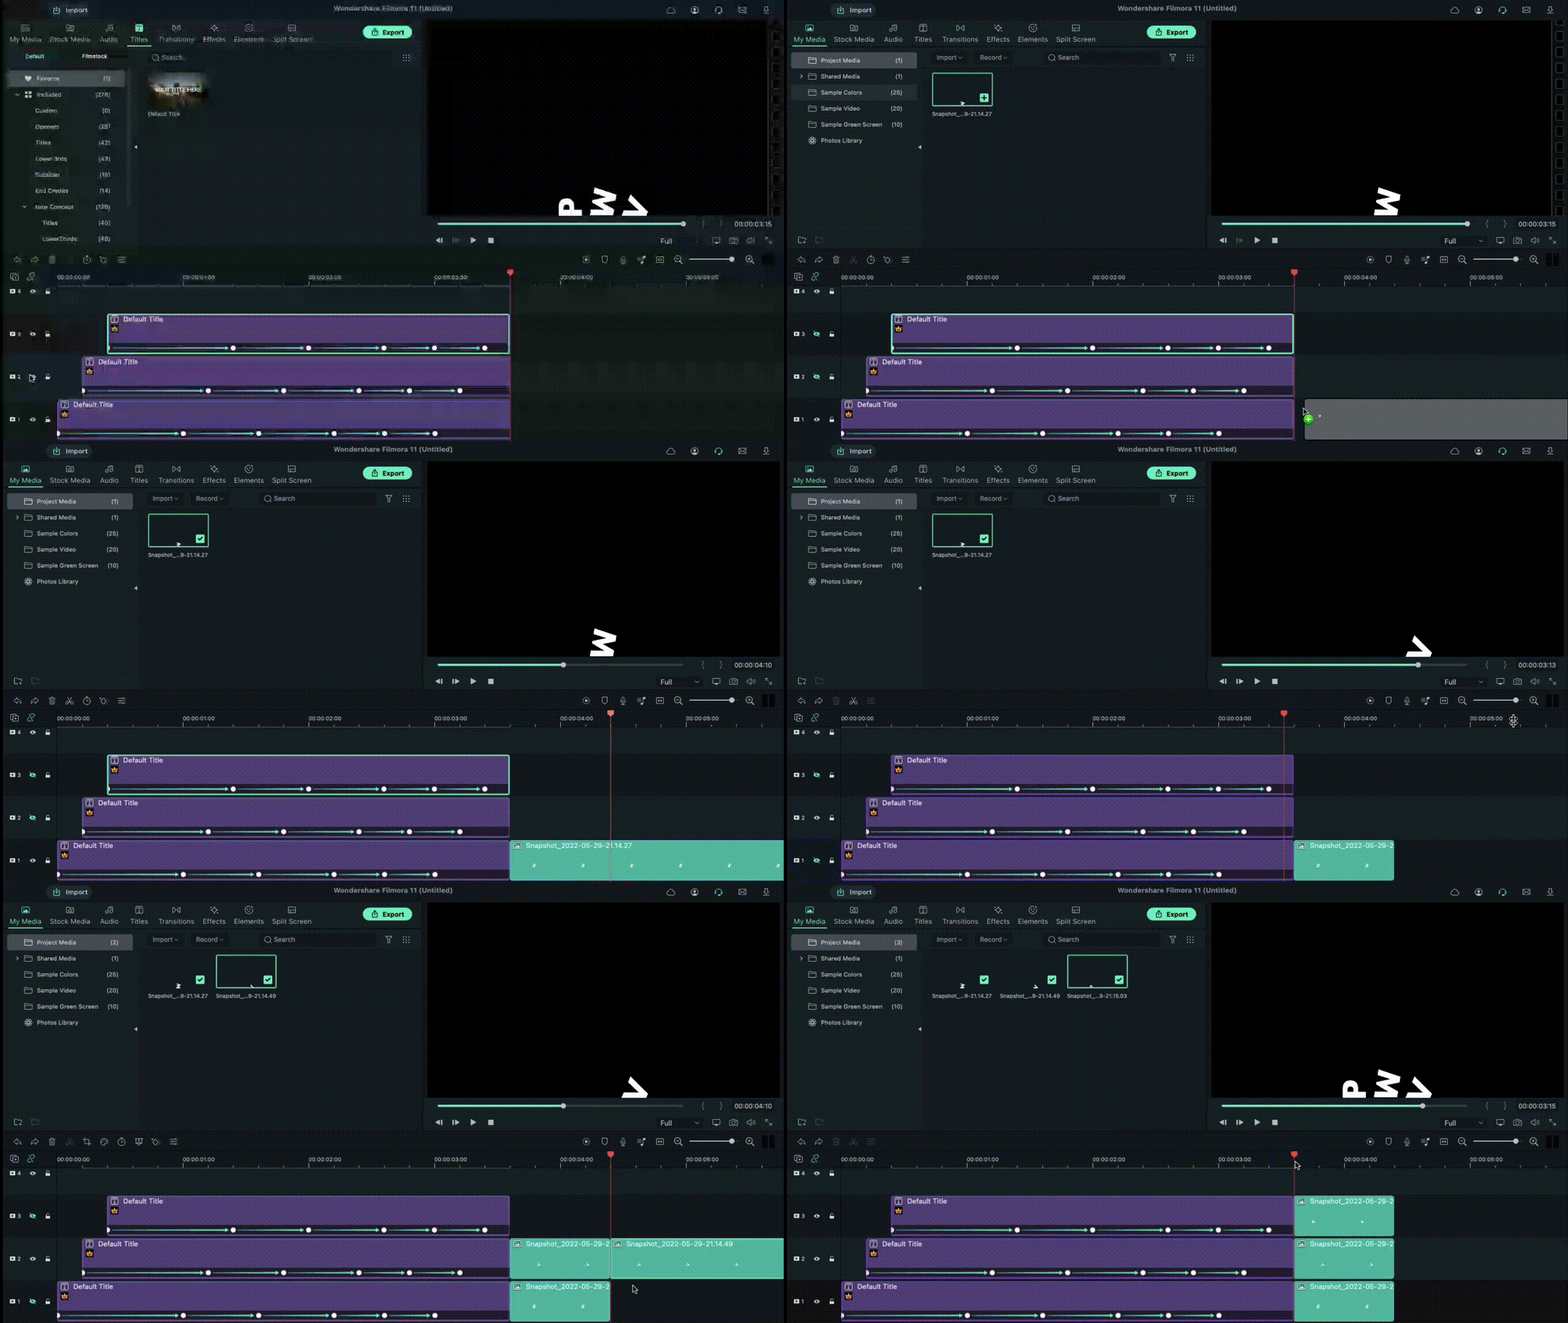
Adjust Keyframing
Follow the animation process for all of the title clips and screenshots you did before. Move the play head to the point where the Tracks end and the Screenshots on the timeline start. Choose the first letter and click on the Keyframe icon in the editing window under Animation. Then, make adjustments to the values of Position, Rotation, etc.
Continue this keyframing step for all of the letters in sequence. After you are done here, click on the Render Preview icon on the right-hand side of the toolbar above the editing timeline. See how the falling text effects line up.
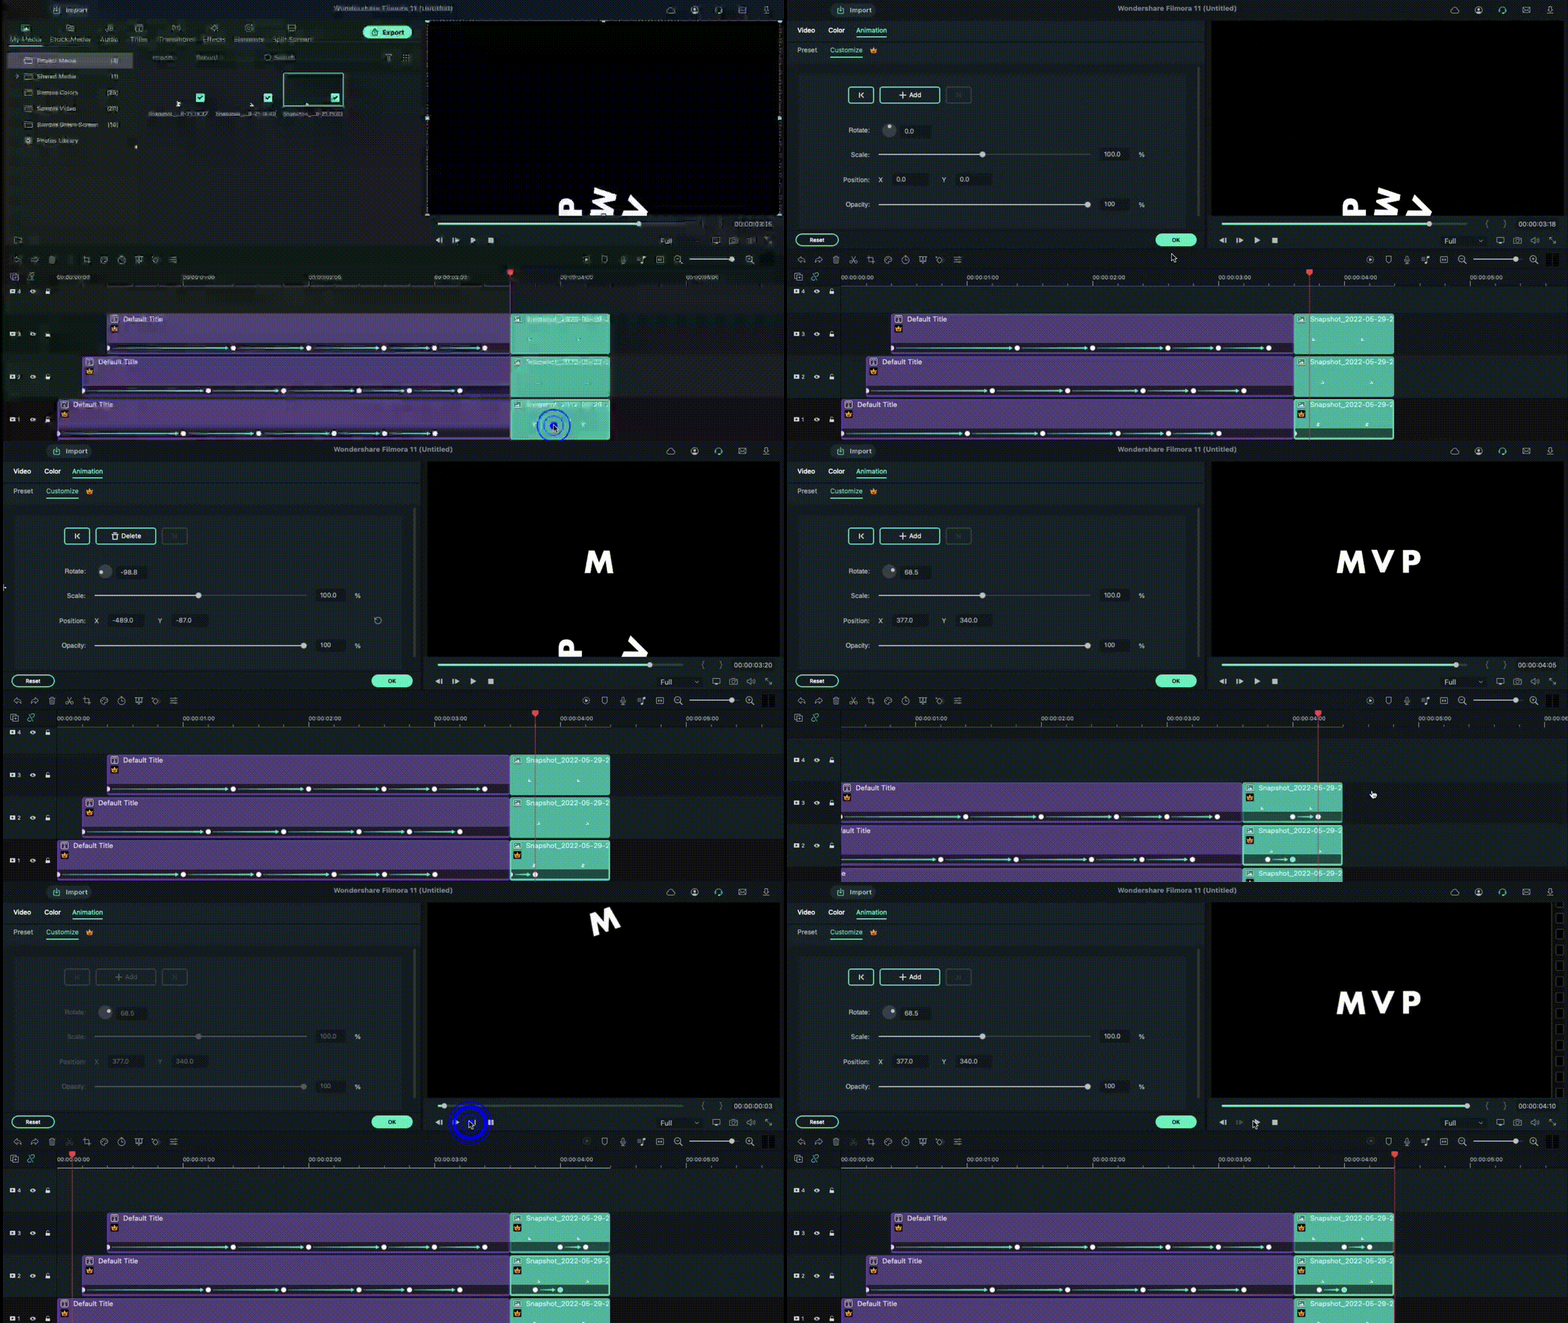
After that, you can export the final file to your device or do further editing work through the Export button.
Final Words
Indeed, adding the falling text effect should allow you to create a stunning, dynamic, and engaging video project. While the feature is available in many other editing software, you can expect a better user experience on Filmora, especially as a beginner-level user.
The UI on this software is simple to navigate, with all features easily accessible. Besides the falling text customization benefits, you will also use other effects, filters, and title presets in videos with some simple taps. So, install it soon and give it a try.
Free Download For macOS 10.14 or later
After switching on your device and going to your preferred browser, search for Wonderhsare Filmora’s official website. Upon accessing it, you will see the “Download” button at the top of the screen. Click on it, and the respective Filmora installer will download into your device instantly, depending on your OS type.
Then, you have to double-click on the installer file you will find in the Downloads folder. This will open the software installation problem window. Click on the Install button and then tap the Agree option for the terms & conditions that appear next on the screen. After that, the software will begin installing automatically.

Finally, press the Start Now button on the installation complete prompt window. The software will then launch automatically.
Adjust the project settings
After the software launches on your device, you should tap on the Create New Project button. Before you add the video file you will edit from your device through; you should take time to change some aspects of the project settings.
For this, click on the File tab at the top-most toolbar in the editor window. You should click on the Project Settings option from the drop-down menu, which will open the dialog box. Under the resolution option, you will see the Frame Rate element. Click on the drop-down menu and adjust the video’s frame rate to 25 FPS. After you are done, tap the OK button.

Add the Title
Following this, you must click on the Titles tab at the top toolbar on the editor. Different title templates, like Custom, Openers, End Credits, etc., will appear. Choose the default title of your liking and download it.
Next, hold the title that appears in the library window and then drag it to the first layer of the editing timeline. Clip the title short by moving the play head to the 3-second and 15 frames mark and shape the title to that length. Then, delete the rest of the part.

Edit the Title
After this, you have to double-click on the top of the default title in your Track 1 timeline. A window will appear for editing the title. Click on the Text tab in this window and tap on the Font options. You should change the font of your title to Futura Bold or any other option that you would prefer.

Animate the characters
When this part is done, in the text field, add the first letter of the text you will add to your animated introduction. After inserting the first letter only, click on the Animation tab next. Following that, you have to move the playhead on your timeline to the very front. You will see the Position parameter in the Animation settings and change the number in the Y axis until it goes out of the top frame of the video.

Next, you must move the play head to the 1-second position in the timeline. Here, you must change the number Y axis to a lower position and adjust the Rotate element as per your preference. After that, move the playhead again to 15 frames from the 1-second mark. It would be best if you changed the Y-axis position digit to 0 and adjusted the Rotation value slightly.
Following that, move the playhead again by 15 frames ahead. Rotate the letter again and change the Y-axis value until the letter rests at the bottom of the screen. Again, you have to move the play head on the timeline to 10 frames ahead and adjust the Y-axis and Rotation values to a higher point. Then, continue the step like this at ten frames forward, this time making the character move to the ground again. Press the OK button to complete.

Repeat for the next letters
After you are done with this editing process for the first letter, hold the default title in the library and drag and drop it into Track 2 on the timeline. Adjust the starting point for this layer to frame five from the beginning, and move the file to that starting point. In the end, cut the title length at the same position as layer one was, at 3.15 seconds.
Follow the process explained in the previous section for the first letter, i.e., moving the playhead at specific frames and changing the Y-axis and Rotation value multiple times.
After editing the second letter in the title, repeat the process of holding and dragging the default title to Track 3 in the timeline and adjusting starting position at the 10th frame. Again, follow the process of animating the letter like for Letter 1 and Letter 2. Continue doing this process for multiple more letters in your title text.

Tap on the Play button under the Preview screen to see how the letters have the falling text effect.
Add Screenshot
Next, you have to click on the hide button for Tracks 2 and up. Tap on the Snapshot icon in the editing timeline of the first letter. Then, when it appears in the library window, click on it and move it beside the Track 1 Title file that you were editing. Move the play head to the 1-second position of this file in the timeline.
Hide Track 1 again and click the Unhide button on Track 2. Repeat the snapshot function and add it to Layer 2. Adjust the end as per Track 1. After this, follow these steps for the subsequent letters as well.

Adjust Keyframing
Follow the animation process for all of the title clips and screenshots you did before. Move the play head to the point where the Tracks end and the Screenshots on the timeline start. Choose the first letter and click on the Keyframe icon in the editing window under Animation. Then, make adjustments to the values of Position, Rotation, etc.
Continue this keyframing step for all of the letters in sequence. After you are done here, click on the Render Preview icon on the right-hand side of the toolbar above the editing timeline. See how the falling text effects line up.

After that, you can export the final file to your device or do further editing work through the Export button.
Final Words
Indeed, adding the falling text effect should allow you to create a stunning, dynamic, and engaging video project. While the feature is available in many other editing software, you can expect a better user experience on Filmora, especially as a beginner-level user.
The UI on this software is simple to navigate, with all features easily accessible. Besides the falling text customization benefits, you will also use other effects, filters, and title presets in videos with some simple taps. So, install it soon and give it a try.
How to Convert SRT to DOCX
SRT to Word: How to Convert an SRT File to Docx file?
The SubRip Text (SRT) format is a popular subtitle format used in many videos. While SRT files are simple text files that can be edited with any text editor, they are not as convenient to work with as MS Word documents.
For one thing, it cannot be easy to format text in a way that is easy to read. In addition, SRT files do not support features such as spell checking and grammar checking.
As a result, converting SRT to Word can be a useful way to improve the quality of subtitles. In addition, it can also make it easier to translate subtitles into other languages.
Other than that, you might need to convert an SRT to a Word document when you need to edit the subtitles for a video you’re working on or you want to create a transcript of a recorded conversation.
You might think that converting a speech to text is difficult or impossible. But it’s not!
Here’s how you can easily convert SRT to DOCX files. Let’s begin.
- Convert SRT to Word file Manually
- How to Edit and merge your Subtitles with Wondershare Filmora
- Hot FAQs on Converting SRT to Word
What is an SRT file?
SRT files are used for subtitles. Subtitles are the audio track of a video or movie. Subtitles are displayed alongside a video or movie on your TV or computer screen. They allow the viewer to understand what is being said in the language they speak.
People have recently begun using online streaming services such as Netflix, Amazon Video, and Hulu to watch movies and television shows. While streaming services offer thousands of movies and shows, there are still many that only exist in a form that can be viewed in their entirety. This requires the user to download the entire file (usually in a format known as a .srt file).
Why do we need to convert SRT files into Word?
Subtitles are a great way to enjoy movies and TV shows in different languages. They provide text on the screen that tells you what the characters are saying, so you can follow along even if you don’t speak the language. However, SRT files can be difficult to work with because they are incompatible with all software programs**.** So, they need to be converted into Word. Some other reasons include:
- It allows your content to be viewed within a web browser or mobile device without downloading .srt file.
- If you need to embed the video into another site, you can do so easily with the.docx file.
- Learning a new language by downloading SRT subtitles from video.
Convert SRT to word file without downloading any software
With the advent of the SRT (SubRip) format, videos can now be enjoyed on both computers and mobile devices. This means that videos can be viewed anywhere and anytime. Converting videos to SRT is relatively easy, but some online converters offer more flexibility than others.
These converters can take an SRT file and convert it into a word document, which can then be edited or saved for future use. Not only do online SRT to word converters save time, but they can also ensure that your captions are accurate and properly formatted. Whether you’re captioning a home video or creating professional subtitles for a film, an online SRT to-word converter can be a valuable tool. Some of them include:
Aspose
Aspose is a simple online tool that can be used to convert SRT files to Docx format. The process is quick and easy, and the results are high quality. To use Aspose to convert your SRT file to a DOCX file, follow these steps:
1. Upload the SRT file inAspose
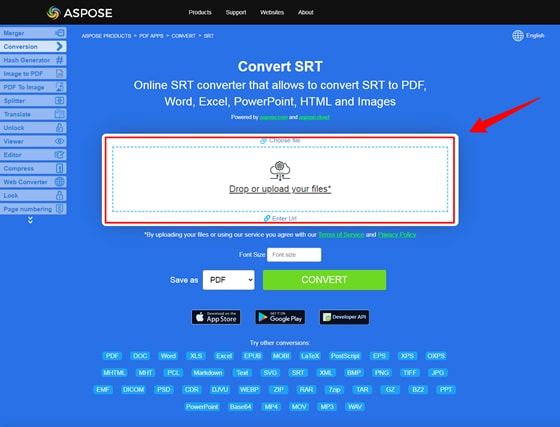
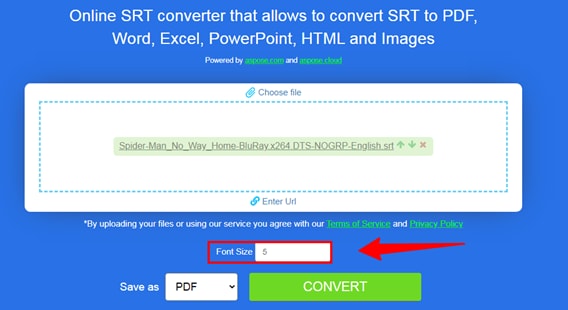
2. Change the font size as you will
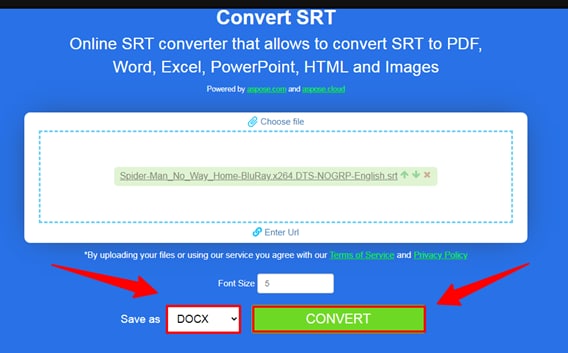
3. In the conversion window that appears, select “DOCX” as the output format and click “Convert”.
4. The conversion will begin immediately, and when it is finished, you will find the “DOWNLOAD” button to download the file. And below, you’ll find a “Send result to:” in which you can email the converted file.
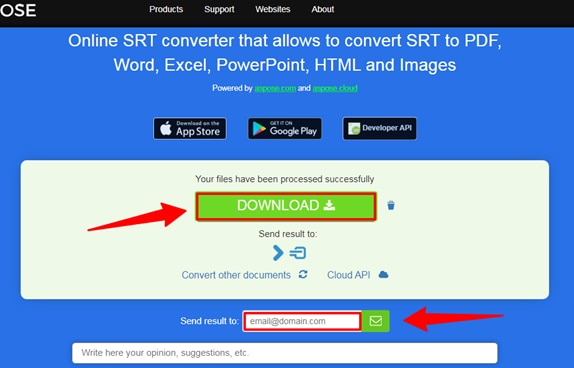
The app is a powerful document conversion tool that supports various formats, making it easy to convert your files for use in different applications. However, its performance is greatly reduced after multiple conversions on the file format.
Happyscribe
With Happyscribe, you can quickly and easily convert SRT files to Docx format. The process is simple with quick results that give high-quality output! Below are the steps to convert an SRT file to a DOCX file using the online tool, Happyscribe.
1. Go to happyscribe
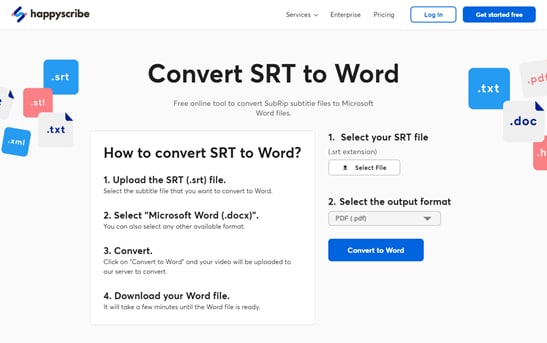
2. First, select your SRT file, second select the format to .docx, and click the convert button.

Using happyscribe converter can also help to reduce your overall costs. By automating the transcription process, you can avoid hiring expensive transcription services. As a result, you can save money while maintaining high quality and accuracy levels. The only drawback of this tool is that it does a poor job at matching times in long videos, resulting in a large amount of reformatting.
Ebby
At first glance, Ebby SRT to DOCX converter may not seem like much. However, this simple tool can be a lifesaver for anyone who needs to convert subtitles from one format to another. Using Ebby is quick and easy; select the file you want to convert, choose your desired output format, and click convert. That’s it! Your file will be converted and ready to download in just a few seconds. Here are the steps:
1. First go to Ebby.co
2. Browse and upload your “SRT file” and change the format to “Word (.docx)”.
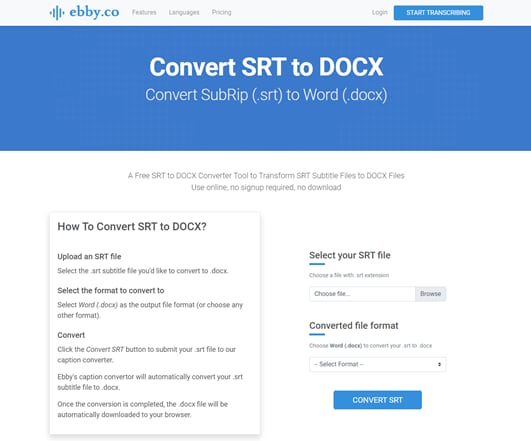
3. Then click “CONVERT SRT” after a few seconds, your .docx file will be downloaded to your browser.
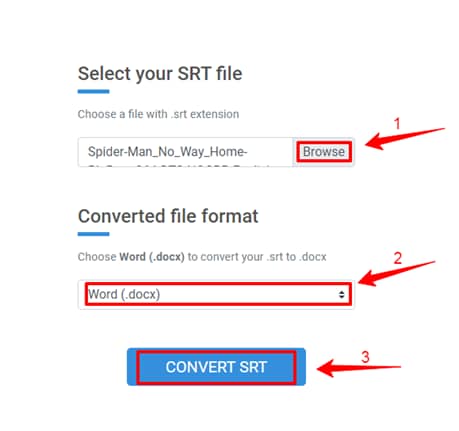
Ebby has 100+ languages and dialects, plus its fast transcription and accuracy make it stand out from its competitors. However, the web interface isn’t designed to handle large files. As it has no folder structure and only allows for up to 10 items per page (you can create more by dragging them), you will need another method if your project requires extensive organization or editing before uploading.
Convert .SRT to word file Offline
Converting an SRT file, or SubRip Subtitle file, into a Word document can be helpful if you want to be able to edit the subtitles or captioning for a video.
There are moves online that will do this conversion for you, but you may not want to trust your valuable data to someone else’s server.
Fortunately, some great subtitle editing programs will allow you to make this conversion offline.
These softwares are designed specifically for converting SRT files and usually provide a few different options for how the conversion is done.
They also offer a wide range of features for editing subtitles, and they can export the results as a Word document.
However, some of these programs can be difficult to use, so make sure you read the instructions carefully before trying to convert your file. The most popular softwares are:
Subtitle Edit
Subtitle Edit is a very helpful program for any fan of movies and TV shows who wants to see films and shows in their original language.
This free program can correct various subtitle syncing errors so that you can watch movies and TV shows with perfect subtitles.
Now you know what Subtitle Edit is, let’s discuss its features.
Features:
- It allows you to create or sync subtitle lines.
- You can convert your files in desired format as it supports 300+ formats such as SRT, SBV, advanced Sub station, etc.
- It has an amazing feature of auto translation via google translation.
- You can merge or split the subtitles.
- It enables you to convert your audio into speech with its speech recognition feature.
- You can also adjust your display time.
One of the best part of this software is that it provides a batch converter tool. This tool allows you to convert multiple SRT files to plain Text subtitles files at once. Let’s check out how it works.
Step-by-step guideline to convert SRT to TXT
Step1 Firstly, ensure that Subtitle edit is installed on your device. If not, then download it. After downloading, run this software.
Step2 From its tools menu, open the Batch converter tool.
Step3 Import a folder containing SRT files. You can also drag and drop SRT files to its interface, individually.
Step4 Now, select the output format as Plain Text or any other format and set the encoding option. You can also customize some output configurations including
- Remove formatting
- Add/remove tags
- Redo casing
- Fix some common errors
- Adjust speed, etc.
Step5 Then, provide the output location and hit the convert button to start the conversion process.
Now as we know the method of converting SRT files to Word, let’s discuss its advantages as well as disadvantages.
Pros
- It has friendly and intuitive interface.
- It supports 300+ formats.
- It includes google translate for fast translation.
- It provides open-office spelling correction.
- It has also an audio spectrum.
Cons
- It sometimes seems complex no customization functionality
Best for :
Windows devices
Jubler
Jubler is a powerful text editing tool. It allows you to make or edit existing subtitles and work with almost any video format.
The combination of Jubler and Mplayer allows users to see a preview of subtitles in a movie. In addition, Jubler also includes a tool known as ASpell, which corrects grammar and spelling (works with the English language).
After knowing what Jubler is, let’s move forward to know about its features.
Features:
- It supports multiple formats such as
- SubStation
- SubStation Alpha
- SubRip
- SubViewer
- MicroDVD
- Etc.
- It supports all encodings that are supported by Java platform.
- Jubler also supports translating mode.
- You can mark subtitles with different colors while editing or playing a video.
- It also checks spelling with the support for dictionary selection.
- It offers basic editing skills such as splitting, joining, time shifting, etc.
How to steps with images
Now you know how to convert SRT to Word format, let’s look at its pros and cons.
Pros
- It has a comprehensive interface to sync subtitles.
- You can transcribe your text and run your video at the same time.
- It includes a spell checker.
- It offers good customization possibilities.
- It works in Windows, Linux and Mac.
Cons
- To get a preview of your video, you’ll need to install MP player.
- It’s not really updated anymore.
Best for:
Quick subtitle editing
Subtitle Workshop
Subtitle workshop is a freeware subtitle editing tool that offers a complete, efficient and convenient way to edit subtitles.
It supports all major subtitle formats and provides powerful features such as spell checking, automatic translation, synchronization, timed text preview and more.
Subtitle workshop is constantly being updated with new features and improvements, making it the most complete and convenient subtitle editing tool available.
Features:
- It supports converting, creating, editing and saving over 60 subtitle formats.
- It offers customizable tools and functions for automatic timing and text manipulation.
- It has Multi-Level Undo-Redo system
- It supports the OCR (find-and-replace text) scripts.
- It has comprehensive system for automatically and manually detecting, marking, and fixing subtitle errors.
- It also offers a CPS (Characters per Second) system.
- It supports a variety of audio/video formats.
Now, we’re well aware of this software. Let’s discuss step-by-step guide to convert SRT to Word file with Subtitle Workshop.
Pros
- It’s straightforward to use that makes it ideal for beginners.
- It’s friendly user-interface is customizable and supports multiple language.
- It also supports style and color tags within the subtitle text.
- You can preview your subtitle in full screen mode.
Cons
- It can be difficult while importing transcripts and require a lot of manual lines.
- It shows limited checks on overlaps, reading speeds and duration limits.
Best for:
Small and short SRT files
Convert SRT to Word file Manually
You must first remove the time codes to convert an SRT file to a Word document. Open the SRT file in a text editor (such as Notepad++ or Sublime Text) and delete all the lines that begin with numbers. These lines will typically look something like “00:00:01,000 –> 00:00: 02,000.” Once you have removed the time codes, save the file and open it in Microsoft Word.
The text from the SRT file will now be visible in the Word document. You can then format the text as desired and save the document.
Keep in mind that this manual method will not retain any formatting from the original SRT file, so you may need to do some additional editing to get the final results you want.
How to Edit and merge your Subtitles with Wondershare Filmora
Wondershare Filmora is one of the most popular video editing software programs available today. One of the reasons for its popularity is that it offers a wide range of features, including the ability to convert SRT files to Word format.
This can be a valuable tool for those who need to edit subtitles or create closed captioning for their videos.
In addition, Wondershare Filmora also offers a wide range of other features that make it an essential tool for any video editor, such as the ability to add transitions, effects, and titles.
As a result, Wondershare Filmora is a valuable tool for anyone who needs to edit videos regularly. Here’s how to convert SRT to a Word file using Filmora:
Free Download For Win 7 or later(64-bit)
Free Download For macOS 10.14 or later
1. Download and install Filmora on your computer.
2. Launch Filmora, then click “Import”> “Import files.” To start the project, you need to right-click on the timeline and select Advanced Edit.
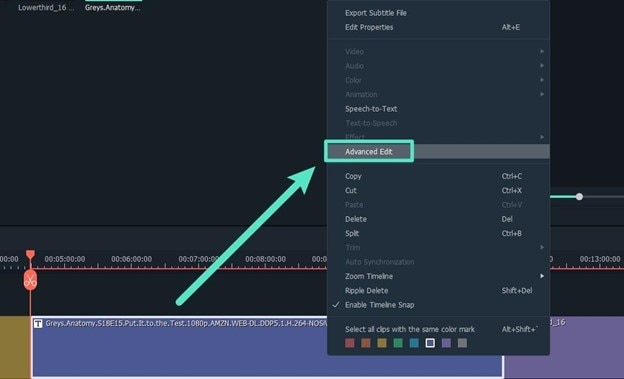
3. At advanced edit you can perform the following tasks:
- Edit Time code.
- Change subtitles.
- Add/remove/merge subtitle strips.
- Change subtitle styles (same as Filmora Advanced Edit Text)
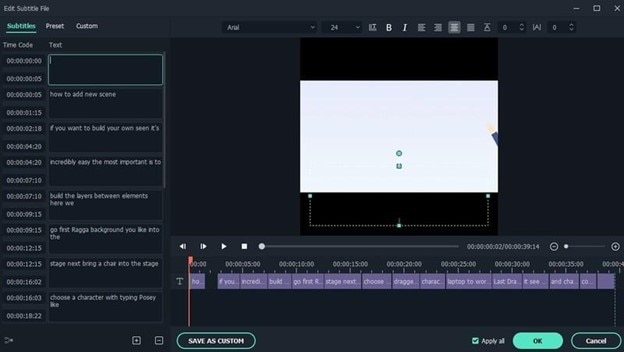
4. Finally, select the SRT file on the timeline, right-click and select “Export Subtitle File”.
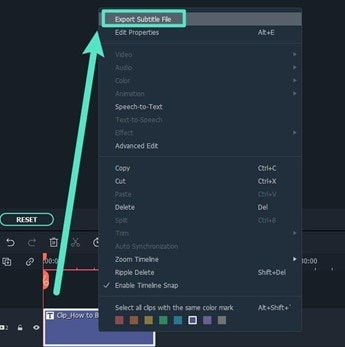
Hot FAQs on Converting SRT to Word
1. How do I edit an SRT file in Word?
First, open the SRT file in Word. You may see some strange characters or formatting issues, but don’t worry - these can be fixed later. Next, make your changes to the transcript. Be sure to double-check the timing information to make sure it is still accurate. Finally, save the file and close Word. You should now be able to use the updated SRT file in your video player of choice.
2. How do I open SRT files with text on Mac?
If you have downloaded a movie or TV show with an SRT file, you can open the file using the TextEdit application on your Mac. First, open TextEdit and then go to the File menu. Next, select Open and choose the SRT file you want to open. The text from the SRT file will now be displayed in the TextEdit window. You can then save the file if you wish.
Alternatively, you can use the Quick Look feature on your Mac if you want to view the text from the SRT file. To do this, select the SRT file in the Finder and press the spacebar. The text from the SRT file will then be displayed in a Quick Look window.
Final Words
That’s it! You now know how to convert an SRT file into a DOCX. It is easy to convert SRT files to DOCX format with the help of online tools and offline converters.
However, if you want more control over the editing process or an easy-to-use video editing software with all the bells and whistles, try Wondershare Filmora .
This software has all the features you need to edit your subtitles and merge them with your video content.
Plus, it’s affordable and comes with a free trial, so you can try it before you buy. Have fun creating beautiful videos with perfect subtitles!
- Subtitle Edit
- Jubler
- Subtitle Workshop
- Convert SRT to Word file Manually
- How to Edit and merge your Subtitles with Wondershare Filmora
- Hot FAQs on Converting SRT to Word
What is an SRT file?
SRT files are used for subtitles. Subtitles are the audio track of a video or movie. Subtitles are displayed alongside a video or movie on your TV or computer screen. They allow the viewer to understand what is being said in the language they speak.
People have recently begun using online streaming services such as Netflix, Amazon Video, and Hulu to watch movies and television shows. While streaming services offer thousands of movies and shows, there are still many that only exist in a form that can be viewed in their entirety. This requires the user to download the entire file (usually in a format known as a .srt file).
Why do we need to convert SRT files into Word?
Subtitles are a great way to enjoy movies and TV shows in different languages. They provide text on the screen that tells you what the characters are saying, so you can follow along even if you don’t speak the language. However, SRT files can be difficult to work with because they are incompatible with all software programs**.** So, they need to be converted into Word. Some other reasons include:
- It allows your content to be viewed within a web browser or mobile device without downloading .srt file.
- If you need to embed the video into another site, you can do so easily with the.docx file.
- Learning a new language by downloading SRT subtitles from video.
Convert SRT to word file without downloading any software
With the advent of the SRT (SubRip) format, videos can now be enjoyed on both computers and mobile devices. This means that videos can be viewed anywhere and anytime. Converting videos to SRT is relatively easy, but some online converters offer more flexibility than others.
These converters can take an SRT file and convert it into a word document, which can then be edited or saved for future use. Not only do online SRT to word converters save time, but they can also ensure that your captions are accurate and properly formatted. Whether you’re captioning a home video or creating professional subtitles for a film, an online SRT to-word converter can be a valuable tool. Some of them include:
Aspose
Aspose is a simple online tool that can be used to convert SRT files to Docx format. The process is quick and easy, and the results are high quality. To use Aspose to convert your SRT file to a DOCX file, follow these steps:
1. Upload the SRT file inAspose

2. Change the font size as you will

3. In the conversion window that appears, select “DOCX” as the output format and click “Convert”.

4. The conversion will begin immediately, and when it is finished, you will find the “DOWNLOAD” button to download the file. And below, you’ll find a “Send result to:” in which you can email the converted file.

The app is a powerful document conversion tool that supports various formats, making it easy to convert your files for use in different applications. However, its performance is greatly reduced after multiple conversions on the file format.
Happyscribe
With Happyscribe, you can quickly and easily convert SRT files to Docx format. The process is simple with quick results that give high-quality output! Below are the steps to convert an SRT file to a DOCX file using the online tool, Happyscribe.
1. Go to happyscribe

2. First, select your SRT file, second select the format to .docx, and click the convert button.

Using happyscribe converter can also help to reduce your overall costs. By automating the transcription process, you can avoid hiring expensive transcription services. As a result, you can save money while maintaining high quality and accuracy levels. The only drawback of this tool is that it does a poor job at matching times in long videos, resulting in a large amount of reformatting.
Ebby
At first glance, Ebby SRT to DOCX converter may not seem like much. However, this simple tool can be a lifesaver for anyone who needs to convert subtitles from one format to another. Using Ebby is quick and easy; select the file you want to convert, choose your desired output format, and click convert. That’s it! Your file will be converted and ready to download in just a few seconds. Here are the steps:
1. First go to Ebby.co
2. Browse and upload your “SRT file” and change the format to “Word (.docx)”.

3. Then click “CONVERT SRT” after a few seconds, your .docx file will be downloaded to your browser.

Ebby has 100+ languages and dialects, plus its fast transcription and accuracy make it stand out from its competitors. However, the web interface isn’t designed to handle large files. As it has no folder structure and only allows for up to 10 items per page (you can create more by dragging them), you will need another method if your project requires extensive organization or editing before uploading.
Convert .SRT to word file Offline
Converting an SRT file, or SubRip Subtitle file, into a Word document can be helpful if you want to be able to edit the subtitles or captioning for a video.
There are moves online that will do this conversion for you, but you may not want to trust your valuable data to someone else’s server.
Fortunately, some great subtitle editing programs will allow you to make this conversion offline.
These softwares are designed specifically for converting SRT files and usually provide a few different options for how the conversion is done.
They also offer a wide range of features for editing subtitles, and they can export the results as a Word document.
However, some of these programs can be difficult to use, so make sure you read the instructions carefully before trying to convert your file. The most popular softwares are:
Subtitle Edit
Subtitle Edit is a very helpful program for any fan of movies and TV shows who wants to see films and shows in their original language.
This free program can correct various subtitle syncing errors so that you can watch movies and TV shows with perfect subtitles.
Now you know what Subtitle Edit is, let’s discuss its features.
Features:
- It allows you to create or sync subtitle lines.
- You can convert your files in desired format as it supports 300+ formats such as SRT, SBV, advanced Sub station, etc.
- It has an amazing feature of auto translation via google translation.
- You can merge or split the subtitles.
- It enables you to convert your audio into speech with its speech recognition feature.
- You can also adjust your display time.
One of the best part of this software is that it provides a batch converter tool. This tool allows you to convert multiple SRT files to plain Text subtitles files at once. Let’s check out how it works.
Step-by-step guideline to convert SRT to TXT
Step1 Firstly, ensure that Subtitle edit is installed on your device. If not, then download it. After downloading, run this software.
Step2 From its tools menu, open the Batch converter tool.
Step3 Import a folder containing SRT files. You can also drag and drop SRT files to its interface, individually.
Step4 Now, select the output format as Plain Text or any other format and set the encoding option. You can also customize some output configurations including
- Remove formatting
- Add/remove tags
- Redo casing
- Fix some common errors
- Adjust speed, etc.
Step5 Then, provide the output location and hit the convert button to start the conversion process.
Now as we know the method of converting SRT files to Word, let’s discuss its advantages as well as disadvantages.
Pros
- It has friendly and intuitive interface.
- It supports 300+ formats.
- It includes google translate for fast translation.
- It provides open-office spelling correction.
- It has also an audio spectrum.
Cons
- It sometimes seems complex no customization functionality
Best for :
Windows devices
Jubler
Jubler is a powerful text editing tool. It allows you to make or edit existing subtitles and work with almost any video format.
The combination of Jubler and Mplayer allows users to see a preview of subtitles in a movie. In addition, Jubler also includes a tool known as ASpell, which corrects grammar and spelling (works with the English language).
After knowing what Jubler is, let’s move forward to know about its features.
Features:
- It supports multiple formats such as
- SubStation
- SubStation Alpha
- SubRip
- SubViewer
- MicroDVD
- Etc.
- It supports all encodings that are supported by Java platform.
- Jubler also supports translating mode.
- You can mark subtitles with different colors while editing or playing a video.
- It also checks spelling with the support for dictionary selection.
- It offers basic editing skills such as splitting, joining, time shifting, etc.
How to steps with images
Now you know how to convert SRT to Word format, let’s look at its pros and cons.
Pros
- It has a comprehensive interface to sync subtitles.
- You can transcribe your text and run your video at the same time.
- It includes a spell checker.
- It offers good customization possibilities.
- It works in Windows, Linux and Mac.
Cons
- To get a preview of your video, you’ll need to install MP player.
- It’s not really updated anymore.
Best for:
Quick subtitle editing
Subtitle Workshop
Subtitle workshop is a freeware subtitle editing tool that offers a complete, efficient and convenient way to edit subtitles.
It supports all major subtitle formats and provides powerful features such as spell checking, automatic translation, synchronization, timed text preview and more.
Subtitle workshop is constantly being updated with new features and improvements, making it the most complete and convenient subtitle editing tool available.
Features:
- It supports converting, creating, editing and saving over 60 subtitle formats.
- It offers customizable tools and functions for automatic timing and text manipulation.
- It has Multi-Level Undo-Redo system
- It supports the OCR (find-and-replace text) scripts.
- It has comprehensive system for automatically and manually detecting, marking, and fixing subtitle errors.
- It also offers a CPS (Characters per Second) system.
- It supports a variety of audio/video formats.
Now, we’re well aware of this software. Let’s discuss step-by-step guide to convert SRT to Word file with Subtitle Workshop.
Pros
- It’s straightforward to use that makes it ideal for beginners.
- It’s friendly user-interface is customizable and supports multiple language.
- It also supports style and color tags within the subtitle text.
- You can preview your subtitle in full screen mode.
Cons
- It can be difficult while importing transcripts and require a lot of manual lines.
- It shows limited checks on overlaps, reading speeds and duration limits.
Best for:
Small and short SRT files
Convert SRT to Word file Manually
You must first remove the time codes to convert an SRT file to a Word document. Open the SRT file in a text editor (such as Notepad++ or Sublime Text) and delete all the lines that begin with numbers. These lines will typically look something like “00:00:01,000 –> 00:00: 02,000.” Once you have removed the time codes, save the file and open it in Microsoft Word.
The text from the SRT file will now be visible in the Word document. You can then format the text as desired and save the document.
Keep in mind that this manual method will not retain any formatting from the original SRT file, so you may need to do some additional editing to get the final results you want.
How to Edit and merge your Subtitles with Wondershare Filmora
Wondershare Filmora is one of the most popular video editing software programs available today. One of the reasons for its popularity is that it offers a wide range of features, including the ability to convert SRT files to Word format.
This can be a valuable tool for those who need to edit subtitles or create closed captioning for their videos.
In addition, Wondershare Filmora also offers a wide range of other features that make it an essential tool for any video editor, such as the ability to add transitions, effects, and titles.
As a result, Wondershare Filmora is a valuable tool for anyone who needs to edit videos regularly. Here’s how to convert SRT to a Word file using Filmora:
Free Download For Win 7 or later(64-bit)
Free Download For macOS 10.14 or later
1. Download and install Filmora on your computer.
2. Launch Filmora, then click “Import”> “Import files.” To start the project, you need to right-click on the timeline and select Advanced Edit.

3. At advanced edit you can perform the following tasks:
- Edit Time code.
- Change subtitles.
- Add/remove/merge subtitle strips.
- Change subtitle styles (same as Filmora Advanced Edit Text)

4. Finally, select the SRT file on the timeline, right-click and select “Export Subtitle File”.

Hot FAQs on Converting SRT to Word
1. How do I edit an SRT file in Word?
First, open the SRT file in Word. You may see some strange characters or formatting issues, but don’t worry - these can be fixed later. Next, make your changes to the transcript. Be sure to double-check the timing information to make sure it is still accurate. Finally, save the file and close Word. You should now be able to use the updated SRT file in your video player of choice.
2. How do I open SRT files with text on Mac?
If you have downloaded a movie or TV show with an SRT file, you can open the file using the TextEdit application on your Mac. First, open TextEdit and then go to the File menu. Next, select Open and choose the SRT file you want to open. The text from the SRT file will now be displayed in the TextEdit window. You can then save the file if you wish.
Alternatively, you can use the Quick Look feature on your Mac if you want to view the text from the SRT file. To do this, select the SRT file in the Finder and press the spacebar. The text from the SRT file will then be displayed in a Quick Look window.
Final Words
That’s it! You now know how to convert an SRT file into a DOCX. It is easy to convert SRT files to DOCX format with the help of online tools and offline converters.
However, if you want more control over the editing process or an easy-to-use video editing software with all the bells and whistles, try Wondershare Filmora .
This software has all the features you need to edit your subtitles and merge them with your video content.
Plus, it’s affordable and comes with a free trial, so you can try it before you buy. Have fun creating beautiful videos with perfect subtitles!
Also read:
- Updated Mastering Video Speed Control Slow Down, Speed Up, and Edit with Ease for 2024
- New 2024 Approved Powerpoint Supported Video Format and User Tips
- New Easy Guide to Overlay Videos in Premiere Pro
- In 2024, Top 5 Best Video Denoisers
- Easy Steps to Export Video in Filmora
- Updated How to Concatenate Videos Using FFmpeg for 2024
- New A Complete Guide to the Best Brand Story Videos |2023|
- How to Use Rules of Thirds for 2024
- New In 2024, Quickly Turn Any Video Into a Paper Rip Effect
- In 2024, Free Green Screen Mobile Frame Downloads
- Updated How to Create an URL for Your Video, In 2024
- The Best Cinematic LUTs in The Market for 2024
- How to Make Custom Lower Thirds with Filmora for 2024
- In 2024, Add some Sci-Fi Touch to Your Next Video Content Using Wondershare Filmora Editing Tools to Create an Alternate Reality Effect
- New 2024 Approved 2 Solutions to Cut Video in VLC on Windows
- New This Article Will Show You the Steps to Make Coin Magic in Videos with Filmora
- Updated 2024 Approved How I Got Free After Effects Templates Slideshow with Simple Trick
- New 2024 Approved How to Create a Clideo Slideshow
- In 2024, Explore the Potential of Slow-Motion Video for Different Industries. Read This Guide and Choose the Best Slow-Motion Camera App to Create Stunning Videos
- Updated In 2024, Splitting Audio From a Video in Sony Vegas Step by Step
- Ways to Find Free Online Slideshow Maker with No Watermark
- New How to Loop QuickTime Video
- Updated You Can Match Paint Colors From Pictures for Your Wall, as Well as for Your Videos. And to Know How to Do Both, We Have Laid Down the Following Discussion for 2024
- How to Perfect Quick and Efficient Video Editing | Keyboard Shortcuts in Filmora for 2024
- Updated In 2024, Google Meet Green Screen Is the Latest Addition to the Virtual Meeting App. It Is a Crucial Feature as It Allows Users to Maintain a Semblance of Privacy Through Virtual Backgrounds
- Updated 2024 Approved 10 Best Old Film Overlays to Make Your Videos Look Vintage
- New Mastering the Art of Video Framing for 2024
- New 2024 Approved 3 Effective Methods to Correct Color Distortion in Videos
- New In 2024, Detailed Tutorial to Merge Videos in VLC Media Player
- How to turn off the screen lock on my Nord CE 3 5G
- What Is AI Voice Over?
- Complete Guide to Hard Reset Your Tecno Spark 20 Pro | Dr.fone
- In 2024, Ultimate guide to get the meltan box pokemon go For Samsung Galaxy A14 5G | Dr.fone
- In 2024, Can Life360 Track You When Your Samsung Galaxy M34 5G is off? | Dr.fone
- In 2024, Does Life360 Notify When You Log Out On OnePlus 11 5G? | Dr.fone
- New Generate Video with Talking Photo Feature for 2024
- How to Change Google Play Location On Motorola Moto G Stylus (2023) | Dr.fone
- In 2024, 5 Techniques to Transfer Data from Infinix Zero 5G 2023 Turbo to iPhone 15/14/13/12 | Dr.fone
- In 2024, 5 Ways To Teach You To Transfer Files from Realme C67 4G to Other Android Devices Easily | Dr.fone
- This is how you can recover deleted pictures from Tecno Pova 5.
- 4 solution to get rid of pokemon fail to detect location On Vivo V27 Pro | Dr.fone
- Fix File Not Loaded Completely Error in Excel 2013 | Stellar
- How to Change Credit Card on Your iPhone 15 Plus Apple ID and Apple Pay
- Everything You Need To Know About Unlocked Apple iPhone 8 | Dr.fone
- In 2024, Is pgsharp legal when you are playing pokemon On Asus ROG Phone 7 Ultimate? | Dr.fone
- How to retrieve erased messages from Tecno Spark 20 Pro
- How to Downgrade Apple iPhone 11 without Data Loss? | Dr.fone
- Updated 2024 Approved What Is AI Voice Text to Speech? | Wondershare Virbo Glossary
- In 2024, 4 Most-Known Ways to Find Someone on Tinder For Motorola Razr 40 Ultra by Name | Dr.fone
- Reasons for Oppo F25 Pro 5G Stuck on Startup Screen and Ways To Fix Them | Dr.fone
- In 2024, How to Bypass Activation Lock from iPhone 13 or iPad?
- Title: As Video Editing Has Become a Pillar Stone in Post-Production Work, You Might Need to Upgrade Your Knowledge About It. In This Article, You Will Learn How to Rotate the Video
- Author: Morgan
- Created at : 2024-05-19 05:11:41
- Updated at : 2024-05-20 05:11:41
- Link: https://ai-video-editing.techidaily.com/as-video-editing-has-become-a-pillar-stone-in-post-production-work-you-might-need-to-upgrade-your-knowledge-about-it-in-this-article-you-will-learn-how-to-r/
- License: This work is licensed under CC BY-NC-SA 4.0.

