:max_bytes(150000):strip_icc():format(webp)/GettyImages-1139785112-76d1d0f975934233883a19f33b8cd813.jpg)
AVI Video Format How to Open, Play, Edit AVI File, In 2024

AVI Video Format: How to Open, Play, Edit AVI File?
Do you want to know about a file format that has high quality? We are talking about the AVI file format. The format is developed by Microsoft, but it also works well with non-Microsoft operating systems.
Do you know something interesting about the AVI video format? The format does not have any hardware or software requirements to run the file. If you want to know more about the AVI file, get ready because we are about to begin.
In this article
02 How Can You Open and Play AVI Video Format?
03 How to Edit AVI Video Files More Creatively?
Part 1. What Is AVI Video Format?
AVI file format has the abbreviation ‘Audio Video Interleave.’ AVI is a multimedia file container that was developed by Microsoft back in 1992. AVI file format is commonly used as a video file container, and it can store both audio and video. The format is a less compressed file and takes more space than other files like MPEG or MOV.

AVI video format allows synchronous audio-with-video playback even without any codec. The video format can also contain lossless files that are greater in size and keep the same quality. It is used to keep video files that are to be edited.
Part 2. How Can You Open and Play AVI Video Format?
Do you know anything about the software that supports AVI video format? If you don’t, this section is a great opportunity for you to learn. We are going to discuss a few software that can open and play AVI file format.
VLC Media Player
The VLC media player is a cross-platform media player. It is developed by the VideoLAN project to run on all platforms. Being free and open-source software, anyone can use the tool for their convenience. Do VLC Media Player work on mobile? Yes! VLC Media Player operates on Android and iOS devices as well.
The VLC Media Player has many encoding and decoding libraries. These libraries reduce the usage of proprietary plugins. It is the first to support playback of encrypted DVDs on Linux. VLC can stream media over computer networks, and multimedia files can also be transcoded. VLC Media Player allows playing many video and audio compression formats.

Elmedia Player
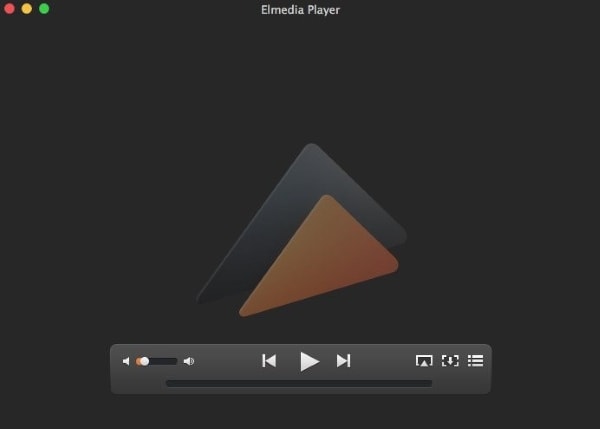
Elmedia Player is a media player specifically for macOS users that can handle any conceivable media file format. It offers advanced streaming and playback services. No extra codec is needed to stream files on Chromecast or AirPlay. It can also do streaming on DLNA devices and Roku while providing an exquisite audio and video experience.
The media player supports formats like AVI file format along with MOV, MP4, FLAC, and MP3. It delivers an HD experience without putting strain on the system that the consumer is using. You can control the playback. Elmedia player even allows you to watch the video frame-by-frame.
5KPlayer
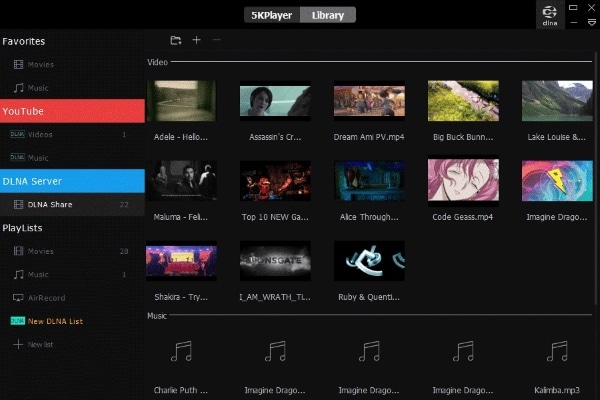
Digiarty Software has created this different media player, which is one of a kind that supports AirPlay. 5KPlayer is a video player along with being a music player. It is an online downloader and media streamer. It wirelessly plays both audio and video on AirPlay and DLNA without quality loss.
5KPlayer can bridge billions of DLNA compliant devices so that the interoperation is made easy. It quickly plays 4K and 1080p videos. It allows the user to download videos from YouTube and Vimeo along with 300 plus different sites. You can also play MP3, and FLAC music perfectly with 5KPlayer.
GOM Media Player
GOM Media Player was firstly made by GOM & Company for Windows users. It is considered the most used media player in South Korea. GOM Media Player can find codecs from codec finding services if they are missing. It can also be used on macOS along with Android mobiles and iOS devices.
GOM Media Player has both free and paid versions. The paid version allows the users to do video playback without advertisements. If the subtitles of a video are not available, you can find the subtitle archive that the GOM Player supports. It can also play 360-degree videos without any issue.

Part 3. How to Edit AVI Video Files More Creatively?
If your video is creatively edited, it will spontaneously attract more viewers. Do you want to attract more and more viewers? Allow us to help you. Wondershare Filmora is wonderful editing software that will help you create mind-blowing AVI file format videos.
The video editor offers more features than anyone can even imagine. Name a single platform that can trim videos, split videos, and join videos? Like this, Filmora has many more features; let’s share them.
Key Features of Wondershare Filmora
- Silence Detection: Are you recording a video, but it has way too many silent instances? What could be done in this situation? Use the Silence Detection feature of Filmora. It will automatically detect the pauses from the video and will remove the parts from the video.
- Split Screen: Your video looks very cool if it has a split-screen effect. Wondershare Filmora offers you a Split Screen feature so that you can create and edit attractive videos. The feature lets you add multiple clips, images, or footage to a single screen and make a collage by comparing different angled shots.
- Auto Reframe: This AI-powered feature is excellent for saving time and creating quality content. With the Auto Reframe feature, Filmora spontaneously detects the focal point of the video and makes sure that it stays in the frame. At the same time, crop the extra part from the video.
- AI Portrait: If you are not satisfied with the background of your video, try the AI Portrait feature of Wondershare Filmora. This lets you add glitch effects, noise, borders, and a lot more things. The coolest thing is it removes the background without chroma key and green screen. This feature is the newest addition to Filmora.
For Win 7 or later (64-bit)
For macOS 10.12 or later
Step by Step Guideline to Use Filmora Video Editor
If you are impressed by Wondershare Filmora and want to edit your video available in AVI file format, the coming guideline is for you. Learn from us how to use Filmora.
Step 1: Import AVI Video
For creating interesting videos on Filmora, start by importing your AVI video format to the video editor. First, launch it and from the main screen, select the ‘File’ tab. A list of options will appear on the screen; hover on the ‘Import Media’ option to select ‘Import Media Files’ from the sub-menu.

Step 2: Move the File to Timeline
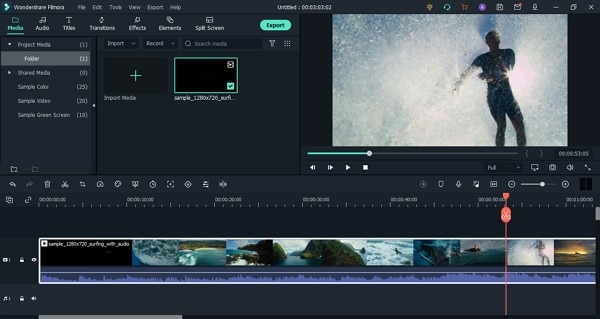
After you have located and imported the AVI video file to Filmora, you should drag and drop the file on the ‘Timeline’ so that you can start the editing process.
Step 3: Use Audio Effects
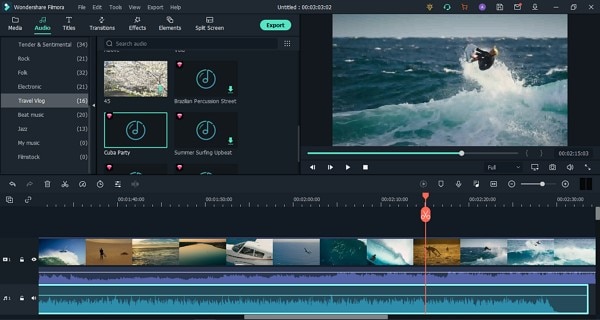
If you want to hide the voices in your AVI video, start by detaching the audio. Then, you can add cool sound effects from Filmora. Head to the ‘Audio’ tab and look for an excellent sound suitable sound effect for your video.
Step 4: Add Catch Transitions
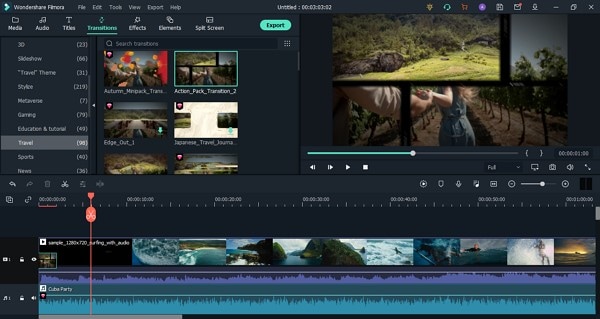
If your video has different clips in it, make sure the slips have smooth transitions. This could be done by taking help from the ‘Transitions’ tab. It has different effects like Glitch, School Pack, Educational board, and whatnot.
Step 5: Export Customized Video
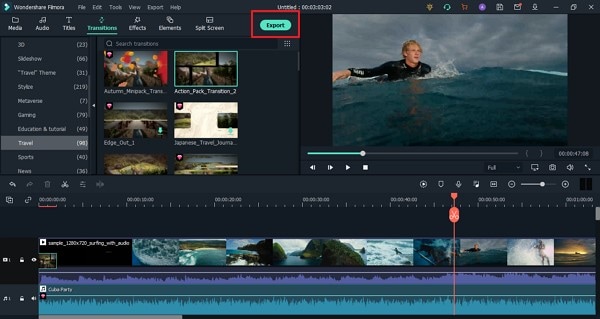
After you have created an exciting and attractive video, hit the ‘Export’ button. Filmora offers you to select your preferred output file format and export the video to your device.
Conclusion
You must have heard about AVI file format before, but you will have detailed knowledge about it after reading this article. We talked about the format and also ways to use it. In addition to that, we discussed Filmora Video Editor. Let’s talk a little more about it.
The software is amazing to use with great features. Users can easily understand Filmora from its simple yet intuitive interface. It offers Basic as well as Advanced Features to create eye-catching videos. Moreover, with Filmora, get your hands on crazy sound effects, transitions, elements, video effects, and much more than that.
For Win 7 or later (64-bit)
For macOS 10.12 or later
02 How Can You Open and Play AVI Video Format?
03 How to Edit AVI Video Files More Creatively?
Part 1. What Is AVI Video Format?
AVI file format has the abbreviation ‘Audio Video Interleave.’ AVI is a multimedia file container that was developed by Microsoft back in 1992. AVI file format is commonly used as a video file container, and it can store both audio and video. The format is a less compressed file and takes more space than other files like MPEG or MOV.

AVI video format allows synchronous audio-with-video playback even without any codec. The video format can also contain lossless files that are greater in size and keep the same quality. It is used to keep video files that are to be edited.
Part 2. How Can You Open and Play AVI Video Format?
Do you know anything about the software that supports AVI video format? If you don’t, this section is a great opportunity for you to learn. We are going to discuss a few software that can open and play AVI file format.
VLC Media Player
The VLC media player is a cross-platform media player. It is developed by the VideoLAN project to run on all platforms. Being free and open-source software, anyone can use the tool for their convenience. Do VLC Media Player work on mobile? Yes! VLC Media Player operates on Android and iOS devices as well.
The VLC Media Player has many encoding and decoding libraries. These libraries reduce the usage of proprietary plugins. It is the first to support playback of encrypted DVDs on Linux. VLC can stream media over computer networks, and multimedia files can also be transcoded. VLC Media Player allows playing many video and audio compression formats.

Elmedia Player
Elmedia Player is a media player specifically for macOS users that can handle any conceivable media file format. It offers advanced streaming and playback services. No extra codec is needed to stream files on Chromecast or AirPlay. It can also do streaming on DLNA devices and Roku while providing an exquisite audio and video experience.
The media player supports formats like AVI file format along with MOV, MP4, FLAC, and MP3. It delivers an HD experience without putting strain on the system that the consumer is using. You can control the playback. Elmedia player even allows you to watch the video frame-by-frame.

5KPlayer
Digiarty Software has created this different media player, which is one of a kind that supports AirPlay. 5KPlayer is a video player along with being a music player. It is an online downloader and media streamer. It wirelessly plays both audio and video on AirPlay and DLNA without quality loss.
5KPlayer can bridge billions of DLNA compliant devices so that the interoperation is made easy. It quickly plays 4K and 1080p videos. It allows the user to download videos from YouTube and Vimeo along with 300 plus different sites. You can also play MP3, and FLAC music perfectly with 5KPlayer.

GOM Media Player
GOM Media Player was firstly made by GOM & Company for Windows users. It is considered the most used media player in South Korea. GOM Media Player can find codecs from codec finding services if they are missing. It can also be used on macOS along with Android mobiles and iOS devices.
GOM Media Player has both free and paid versions. The paid version allows the users to do video playback without advertisements. If the subtitles of a video are not available, you can find the subtitle archive that the GOM Player supports. It can also play 360-degree videos without any issue.

Part 3. How to Edit AVI Video Files More Creatively?
If your video is creatively edited, it will spontaneously attract more viewers. Do you want to attract more and more viewers? Allow us to help you. Wondershare Filmora is wonderful editing software that will help you create mind-blowing AVI file format videos.
The video editor offers more features than anyone can even imagine. Name a single platform that can trim videos, split videos, and join videos? Like this, Filmora has many more features; let’s share them.
Key Features of Wondershare Filmora
- Silence Detection: Are you recording a video, but it has way too many silent instances? What could be done in this situation? Use the Silence Detection feature of Filmora. It will automatically detect the pauses from the video and will remove the parts from the video.
- Split Screen: Your video looks very cool if it has a split-screen effect. Wondershare Filmora offers you a Split Screen feature so that you can create and edit attractive videos. The feature lets you add multiple clips, images, or footage to a single screen and make a collage by comparing different angled shots.
- Auto Reframe: This AI-powered feature is excellent for saving time and creating quality content. With the Auto Reframe feature, Filmora spontaneously detects the focal point of the video and makes sure that it stays in the frame. At the same time, crop the extra part from the video.
- AI Portrait: If you are not satisfied with the background of your video, try the AI Portrait feature of Wondershare Filmora. This lets you add glitch effects, noise, borders, and a lot more things. The coolest thing is it removes the background without chroma key and green screen. This feature is the newest addition to Filmora.
For Win 7 or later (64-bit)
For macOS 10.12 or later
Step by Step Guideline to Use Filmora Video Editor
If you are impressed by Wondershare Filmora and want to edit your video available in AVI file format, the coming guideline is for you. Learn from us how to use Filmora.
Step 1: Import AVI Video
For creating interesting videos on Filmora, start by importing your AVI video format to the video editor. First, launch it and from the main screen, select the ‘File’ tab. A list of options will appear on the screen; hover on the ‘Import Media’ option to select ‘Import Media Files’ from the sub-menu.

Step 2: Move the File to Timeline
After you have located and imported the AVI video file to Filmora, you should drag and drop the file on the ‘Timeline’ so that you can start the editing process.

Step 3: Use Audio Effects
If you want to hide the voices in your AVI video, start by detaching the audio. Then, you can add cool sound effects from Filmora. Head to the ‘Audio’ tab and look for an excellent sound suitable sound effect for your video.

Step 4: Add Catch Transitions
If your video has different clips in it, make sure the slips have smooth transitions. This could be done by taking help from the ‘Transitions’ tab. It has different effects like Glitch, School Pack, Educational board, and whatnot.

Step 5: Export Customized Video
After you have created an exciting and attractive video, hit the ‘Export’ button. Filmora offers you to select your preferred output file format and export the video to your device.

Conclusion
You must have heard about AVI file format before, but you will have detailed knowledge about it after reading this article. We talked about the format and also ways to use it. In addition to that, we discussed Filmora Video Editor. Let’s talk a little more about it.
The software is amazing to use with great features. Users can easily understand Filmora from its simple yet intuitive interface. It offers Basic as well as Advanced Features to create eye-catching videos. Moreover, with Filmora, get your hands on crazy sound effects, transitions, elements, video effects, and much more than that.
For Win 7 or later (64-bit)
For macOS 10.12 or later
02 How Can You Open and Play AVI Video Format?
03 How to Edit AVI Video Files More Creatively?
Part 1. What Is AVI Video Format?
AVI file format has the abbreviation ‘Audio Video Interleave.’ AVI is a multimedia file container that was developed by Microsoft back in 1992. AVI file format is commonly used as a video file container, and it can store both audio and video. The format is a less compressed file and takes more space than other files like MPEG or MOV.

AVI video format allows synchronous audio-with-video playback even without any codec. The video format can also contain lossless files that are greater in size and keep the same quality. It is used to keep video files that are to be edited.
Part 2. How Can You Open and Play AVI Video Format?
Do you know anything about the software that supports AVI video format? If you don’t, this section is a great opportunity for you to learn. We are going to discuss a few software that can open and play AVI file format.
VLC Media Player
The VLC media player is a cross-platform media player. It is developed by the VideoLAN project to run on all platforms. Being free and open-source software, anyone can use the tool for their convenience. Do VLC Media Player work on mobile? Yes! VLC Media Player operates on Android and iOS devices as well.
The VLC Media Player has many encoding and decoding libraries. These libraries reduce the usage of proprietary plugins. It is the first to support playback of encrypted DVDs on Linux. VLC can stream media over computer networks, and multimedia files can also be transcoded. VLC Media Player allows playing many video and audio compression formats.

Elmedia Player
Elmedia Player is a media player specifically for macOS users that can handle any conceivable media file format. It offers advanced streaming and playback services. No extra codec is needed to stream files on Chromecast or AirPlay. It can also do streaming on DLNA devices and Roku while providing an exquisite audio and video experience.
The media player supports formats like AVI file format along with MOV, MP4, FLAC, and MP3. It delivers an HD experience without putting strain on the system that the consumer is using. You can control the playback. Elmedia player even allows you to watch the video frame-by-frame.

5KPlayer
Digiarty Software has created this different media player, which is one of a kind that supports AirPlay. 5KPlayer is a video player along with being a music player. It is an online downloader and media streamer. It wirelessly plays both audio and video on AirPlay and DLNA without quality loss.
5KPlayer can bridge billions of DLNA compliant devices so that the interoperation is made easy. It quickly plays 4K and 1080p videos. It allows the user to download videos from YouTube and Vimeo along with 300 plus different sites. You can also play MP3, and FLAC music perfectly with 5KPlayer.

GOM Media Player
GOM Media Player was firstly made by GOM & Company for Windows users. It is considered the most used media player in South Korea. GOM Media Player can find codecs from codec finding services if they are missing. It can also be used on macOS along with Android mobiles and iOS devices.
GOM Media Player has both free and paid versions. The paid version allows the users to do video playback without advertisements. If the subtitles of a video are not available, you can find the subtitle archive that the GOM Player supports. It can also play 360-degree videos without any issue.

Part 3. How to Edit AVI Video Files More Creatively?
If your video is creatively edited, it will spontaneously attract more viewers. Do you want to attract more and more viewers? Allow us to help you. Wondershare Filmora is wonderful editing software that will help you create mind-blowing AVI file format videos.
The video editor offers more features than anyone can even imagine. Name a single platform that can trim videos, split videos, and join videos? Like this, Filmora has many more features; let’s share them.
Key Features of Wondershare Filmora
- Silence Detection: Are you recording a video, but it has way too many silent instances? What could be done in this situation? Use the Silence Detection feature of Filmora. It will automatically detect the pauses from the video and will remove the parts from the video.
- Split Screen: Your video looks very cool if it has a split-screen effect. Wondershare Filmora offers you a Split Screen feature so that you can create and edit attractive videos. The feature lets you add multiple clips, images, or footage to a single screen and make a collage by comparing different angled shots.
- Auto Reframe: This AI-powered feature is excellent for saving time and creating quality content. With the Auto Reframe feature, Filmora spontaneously detects the focal point of the video and makes sure that it stays in the frame. At the same time, crop the extra part from the video.
- AI Portrait: If you are not satisfied with the background of your video, try the AI Portrait feature of Wondershare Filmora. This lets you add glitch effects, noise, borders, and a lot more things. The coolest thing is it removes the background without chroma key and green screen. This feature is the newest addition to Filmora.
For Win 7 or later (64-bit)
For macOS 10.12 or later
Step by Step Guideline to Use Filmora Video Editor
If you are impressed by Wondershare Filmora and want to edit your video available in AVI file format, the coming guideline is for you. Learn from us how to use Filmora.
Step 1: Import AVI Video
For creating interesting videos on Filmora, start by importing your AVI video format to the video editor. First, launch it and from the main screen, select the ‘File’ tab. A list of options will appear on the screen; hover on the ‘Import Media’ option to select ‘Import Media Files’ from the sub-menu.

Step 2: Move the File to Timeline
After you have located and imported the AVI video file to Filmora, you should drag and drop the file on the ‘Timeline’ so that you can start the editing process.

Step 3: Use Audio Effects
If you want to hide the voices in your AVI video, start by detaching the audio. Then, you can add cool sound effects from Filmora. Head to the ‘Audio’ tab and look for an excellent sound suitable sound effect for your video.

Step 4: Add Catch Transitions
If your video has different clips in it, make sure the slips have smooth transitions. This could be done by taking help from the ‘Transitions’ tab. It has different effects like Glitch, School Pack, Educational board, and whatnot.

Step 5: Export Customized Video
After you have created an exciting and attractive video, hit the ‘Export’ button. Filmora offers you to select your preferred output file format and export the video to your device.

Conclusion
You must have heard about AVI file format before, but you will have detailed knowledge about it after reading this article. We talked about the format and also ways to use it. In addition to that, we discussed Filmora Video Editor. Let’s talk a little more about it.
The software is amazing to use with great features. Users can easily understand Filmora from its simple yet intuitive interface. It offers Basic as well as Advanced Features to create eye-catching videos. Moreover, with Filmora, get your hands on crazy sound effects, transitions, elements, video effects, and much more than that.
For Win 7 or later (64-bit)
For macOS 10.12 or later
02 How Can You Open and Play AVI Video Format?
03 How to Edit AVI Video Files More Creatively?
Part 1. What Is AVI Video Format?
AVI file format has the abbreviation ‘Audio Video Interleave.’ AVI is a multimedia file container that was developed by Microsoft back in 1992. AVI file format is commonly used as a video file container, and it can store both audio and video. The format is a less compressed file and takes more space than other files like MPEG or MOV.

AVI video format allows synchronous audio-with-video playback even without any codec. The video format can also contain lossless files that are greater in size and keep the same quality. It is used to keep video files that are to be edited.
Part 2. How Can You Open and Play AVI Video Format?
Do you know anything about the software that supports AVI video format? If you don’t, this section is a great opportunity for you to learn. We are going to discuss a few software that can open and play AVI file format.
VLC Media Player
The VLC media player is a cross-platform media player. It is developed by the VideoLAN project to run on all platforms. Being free and open-source software, anyone can use the tool for their convenience. Do VLC Media Player work on mobile? Yes! VLC Media Player operates on Android and iOS devices as well.
The VLC Media Player has many encoding and decoding libraries. These libraries reduce the usage of proprietary plugins. It is the first to support playback of encrypted DVDs on Linux. VLC can stream media over computer networks, and multimedia files can also be transcoded. VLC Media Player allows playing many video and audio compression formats.

Elmedia Player
Elmedia Player is a media player specifically for macOS users that can handle any conceivable media file format. It offers advanced streaming and playback services. No extra codec is needed to stream files on Chromecast or AirPlay. It can also do streaming on DLNA devices and Roku while providing an exquisite audio and video experience.
The media player supports formats like AVI file format along with MOV, MP4, FLAC, and MP3. It delivers an HD experience without putting strain on the system that the consumer is using. You can control the playback. Elmedia player even allows you to watch the video frame-by-frame.

5KPlayer
Digiarty Software has created this different media player, which is one of a kind that supports AirPlay. 5KPlayer is a video player along with being a music player. It is an online downloader and media streamer. It wirelessly plays both audio and video on AirPlay and DLNA without quality loss.
5KPlayer can bridge billions of DLNA compliant devices so that the interoperation is made easy. It quickly plays 4K and 1080p videos. It allows the user to download videos from YouTube and Vimeo along with 300 plus different sites. You can also play MP3, and FLAC music perfectly with 5KPlayer.

GOM Media Player
GOM Media Player was firstly made by GOM & Company for Windows users. It is considered the most used media player in South Korea. GOM Media Player can find codecs from codec finding services if they are missing. It can also be used on macOS along with Android mobiles and iOS devices.
GOM Media Player has both free and paid versions. The paid version allows the users to do video playback without advertisements. If the subtitles of a video are not available, you can find the subtitle archive that the GOM Player supports. It can also play 360-degree videos without any issue.

Part 3. How to Edit AVI Video Files More Creatively?
If your video is creatively edited, it will spontaneously attract more viewers. Do you want to attract more and more viewers? Allow us to help you. Wondershare Filmora is wonderful editing software that will help you create mind-blowing AVI file format videos.
The video editor offers more features than anyone can even imagine. Name a single platform that can trim videos, split videos, and join videos? Like this, Filmora has many more features; let’s share them.
Key Features of Wondershare Filmora
- Silence Detection: Are you recording a video, but it has way too many silent instances? What could be done in this situation? Use the Silence Detection feature of Filmora. It will automatically detect the pauses from the video and will remove the parts from the video.
- Split Screen: Your video looks very cool if it has a split-screen effect. Wondershare Filmora offers you a Split Screen feature so that you can create and edit attractive videos. The feature lets you add multiple clips, images, or footage to a single screen and make a collage by comparing different angled shots.
- Auto Reframe: This AI-powered feature is excellent for saving time and creating quality content. With the Auto Reframe feature, Filmora spontaneously detects the focal point of the video and makes sure that it stays in the frame. At the same time, crop the extra part from the video.
- AI Portrait: If you are not satisfied with the background of your video, try the AI Portrait feature of Wondershare Filmora. This lets you add glitch effects, noise, borders, and a lot more things. The coolest thing is it removes the background without chroma key and green screen. This feature is the newest addition to Filmora.
For Win 7 or later (64-bit)
For macOS 10.12 or later
Step by Step Guideline to Use Filmora Video Editor
If you are impressed by Wondershare Filmora and want to edit your video available in AVI file format, the coming guideline is for you. Learn from us how to use Filmora.
Step 1: Import AVI Video
For creating interesting videos on Filmora, start by importing your AVI video format to the video editor. First, launch it and from the main screen, select the ‘File’ tab. A list of options will appear on the screen; hover on the ‘Import Media’ option to select ‘Import Media Files’ from the sub-menu.

Step 2: Move the File to Timeline
After you have located and imported the AVI video file to Filmora, you should drag and drop the file on the ‘Timeline’ so that you can start the editing process.

Step 3: Use Audio Effects
If you want to hide the voices in your AVI video, start by detaching the audio. Then, you can add cool sound effects from Filmora. Head to the ‘Audio’ tab and look for an excellent sound suitable sound effect for your video.

Step 4: Add Catch Transitions
If your video has different clips in it, make sure the slips have smooth transitions. This could be done by taking help from the ‘Transitions’ tab. It has different effects like Glitch, School Pack, Educational board, and whatnot.

Step 5: Export Customized Video
After you have created an exciting and attractive video, hit the ‘Export’ button. Filmora offers you to select your preferred output file format and export the video to your device.

Conclusion
You must have heard about AVI file format before, but you will have detailed knowledge about it after reading this article. We talked about the format and also ways to use it. In addition to that, we discussed Filmora Video Editor. Let’s talk a little more about it.
The software is amazing to use with great features. Users can easily understand Filmora from its simple yet intuitive interface. It offers Basic as well as Advanced Features to create eye-catching videos. Moreover, with Filmora, get your hands on crazy sound effects, transitions, elements, video effects, and much more than that.
For Win 7 or later (64-bit)
For macOS 10.12 or later
Denoise a Video in Adobe Premiere Pro – Audio and Video Noise Removal
What’s the key to our success? And what’s the process that it takes us? How can we attract audiences and guarantee the viewers’ transition to loyalty? – these are the questions that people in the professions connected to the technology should ask. There is no recipe, but at least, we know what NOT to do – DO NOT create bad content! You will never have a desired amount of listeners for your podcasts if the voice of the actor or noise of the whole track is annoying, you will struggle to have success on Youtube if your shots are unpleasant to watch, and the list goes on – there are just too many things you should not do!
But sometimes bad quality just happens. It happens when you know you have a problem and it happens when you think everything is going well in producing. You might come back from the production and find out that every shot you took had bad lightning, or there was an almost naked guy running on the background, or there is a noise on the background that just makes the whole experience of watching and listening not worthwhile! This might be something that sinks your heart…
But the mistakes we make don’t ensure that there has been a verdict cast for our failure. Nowadays, the will is everything – if you are really willing to make something work, you will just have to find the right tools, and learn a little about them, and, Voila! – Maybe you can turn bad into something good? Unacceptable into something acceptable? Annoying into interesting, and unpleasant into enjoyable?
This is called EDITING. And Editing covers different, almost endless days – too many computer programs, too many tools, too many opportunities to modify almost anything you want to make look and sound better - All of this feels like magic!
Among many instruments and techniques, there is one thing called denoising, with two different meaning. You might find noise in two areas – video and audio. Audio denoising means to remove or reduce the background noise, such as air conditioner hum, someone screaming from far away, birds chirping, the waves, etc. the noise in photo and video terms means that the scene we are looking at is grainy and makes watching the scene a little more difficult, with a less clear picture. And whenever these kind of things appear, mostly out of the blue, – because no one wants to take a bad video or record a bad voice-over, - our magical tools and abilities come to play…
One of those is called Adobe Premiere Pro, using for video editing, viewed as the most sophisticated video editor software. So, in this article, we will learn how to handle bot noise-s – in video as well as audio terms, and how to create a better viewer/listener experience in this very program. Lastly, we’ll touch upon an alternative for background noise removal, so, there’s nothing left but tuning in!
Video denoising in Adobe Premiere Pro
Reducing the noise in the video in this software can be achieved through using effect which is called Median. Before discovering it, without any doubt, we need to add our footage into the Timeline in Premiere Pro. Then, we can proceed to finding the Effects Panel, where our wanted Median can be found – just drag and drop the effect to your clip.

In order to make sure that the Median touches the grainiest parts of the whole clip, we need to use something called masks. In the Effects Control panel, we can select the mask shape for our clip –either choose rectangle, circle, or pen tool. Pen tool is something with which we move the Mask around the screen and resize it to include the desired area and cover it.

Changing Feather setting to 100 will make sure that the effect loses a visible edge and there is some smoothness added to those edges.

There might be the need to repeat this process and create several masks, if that means to have covered all of the grainy area of the scene.
Lastly, tom reduce the noise, adjusting the effect settings is needed.

Technically, what the Median effect does is just blurring the graininess, not exactly “taking it away”. And if we play with the Radius settings there, we can find our desired look!
How to remove background noise in Adobe Premiere Pro
Removing background noise in Adobe Premiere Pro can be a pretty simple process and lead to much better results. First of all, of course, import the desired material into your software so you can see the video and audio in the sequence visually. After having the project set up, you will need to find the Efffects Panel, which might be hidden a little, but it must be on the left and bottom of the program layout; or, you can find it on the top, in the navbar.
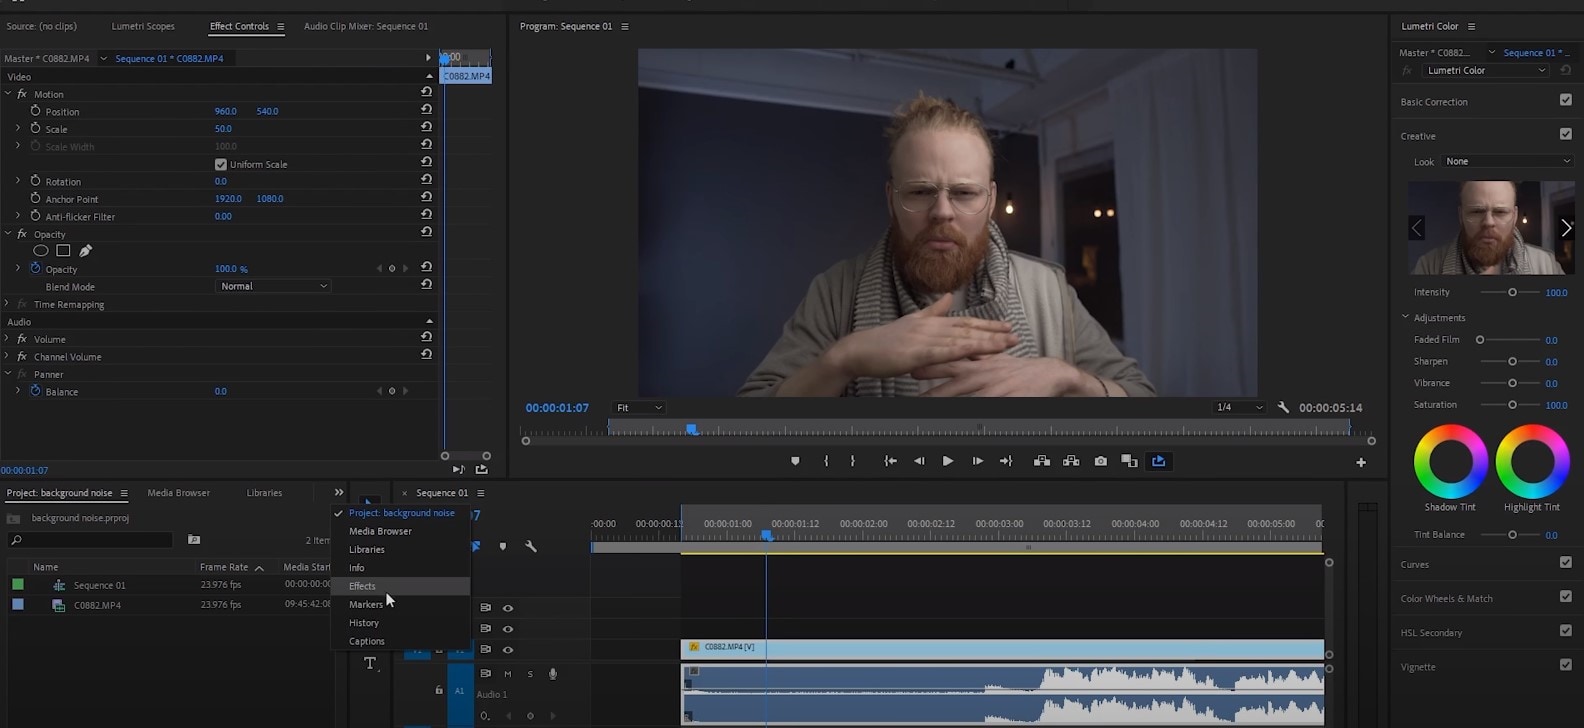
After having located the Effects panel, go for the search bar and type: denoise, and you’ll see that DeNoise effect is under Audio Effects.
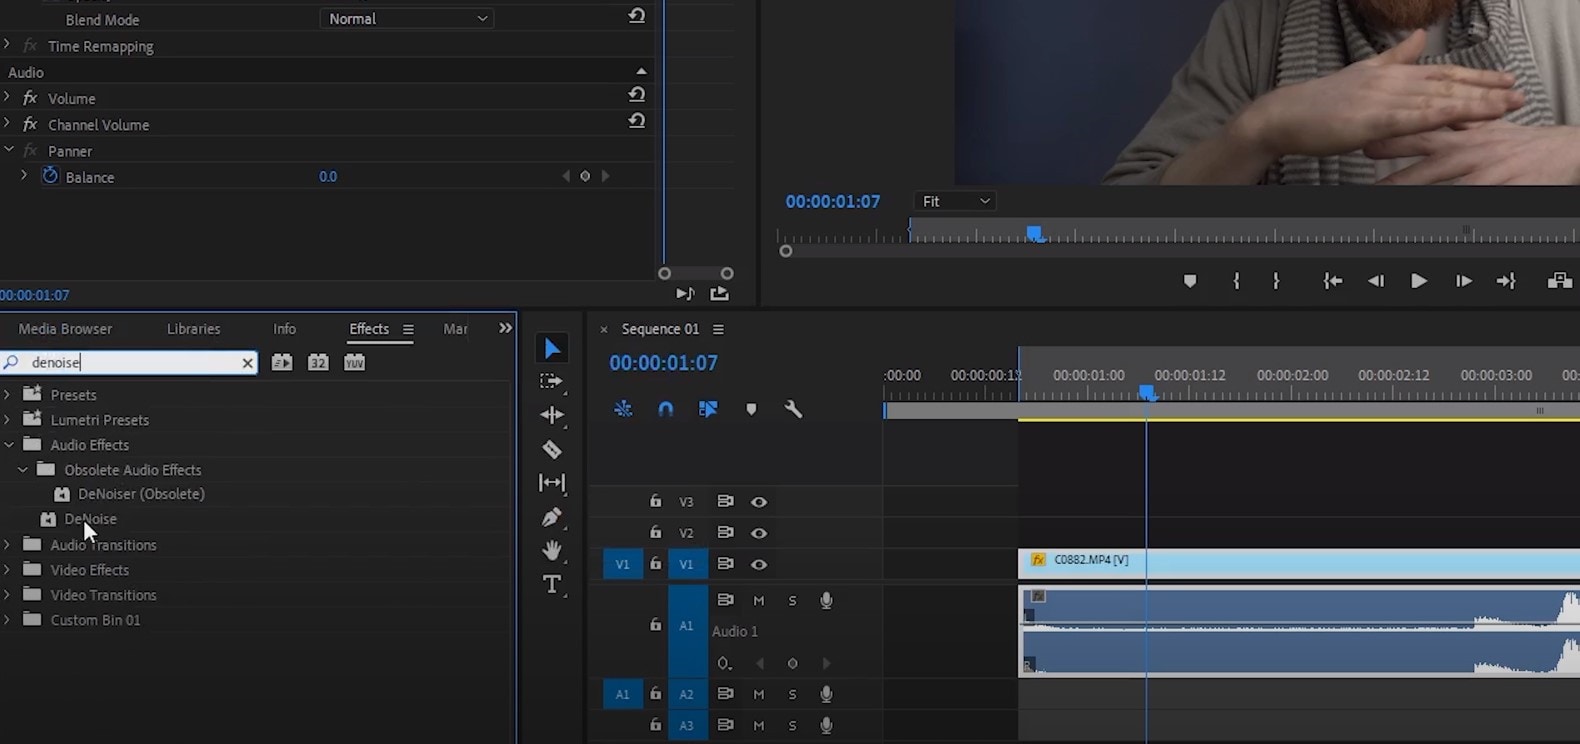
You hold onto the effect, drag and drop it on the audio track in the timeline itself! Then, you just click on the audio in the sequence and on the top right Effect Controls will appear, which we need to concentrate on. You will scroll down a little there and below Audio notice: fx DeNoise, where you hit on the Edit button. This will open the Clip Fx Editor for the Audio denoising.
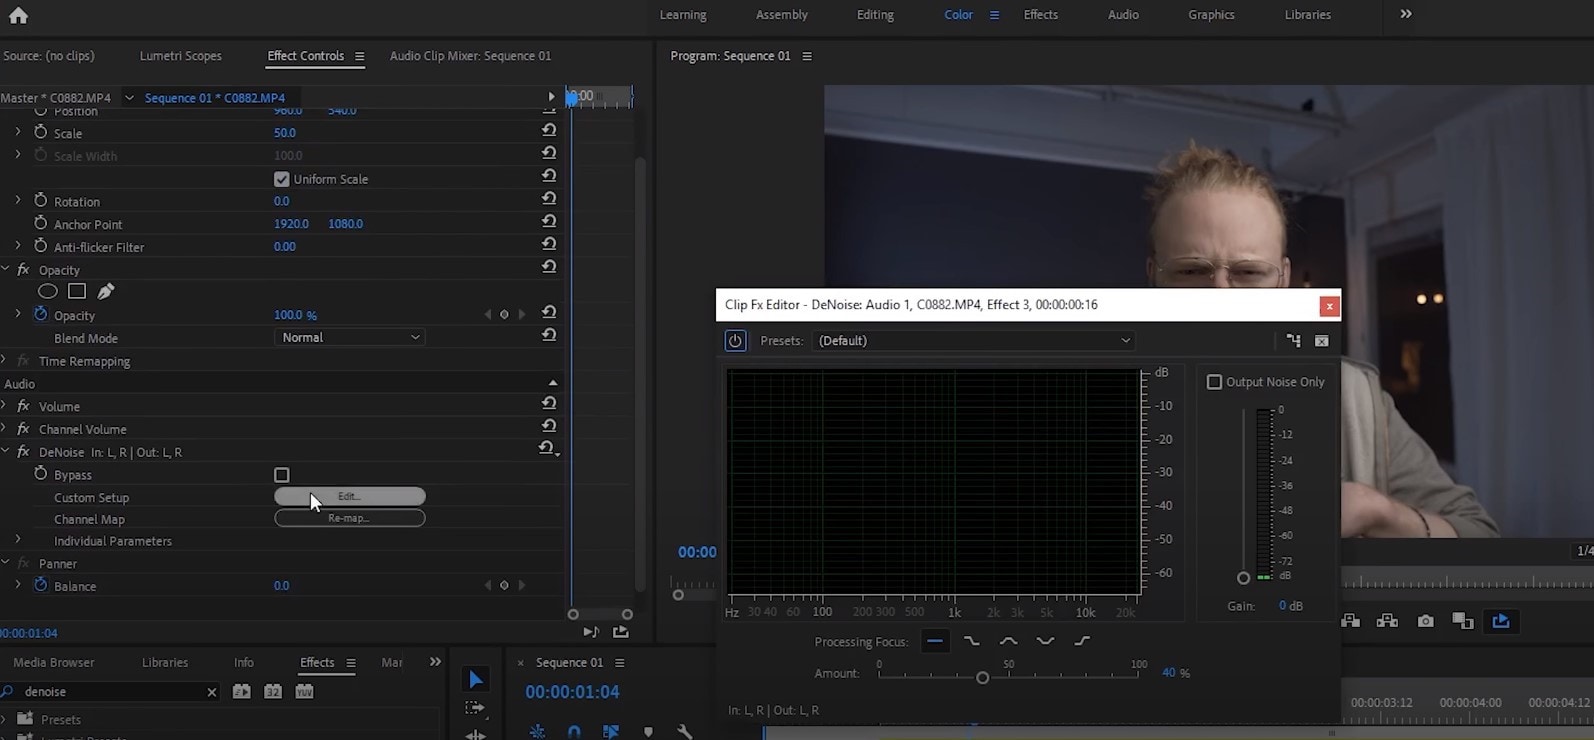
Basically, it only has one, Amount scale, and if you drag the slider of it to the right at 100%, it will remove the whole noise, but setting it on 0% will not remove any noise at all. So, you need to choose your preferred percentage! Just listen what is acceptable for you, but the general suggestion here would be that you can choose as high percent as you want, but if the effect starts taking out the voice and actually wanted parts, then you will have to stop and keep it that way. So, that’s actually it!
Bonus tip: how to remove audio noise in video with Wondershare Filmora
What we have promised in the beginning in the video, we like to offer now – the alternative to reduce or remove audio noise in the video is called Wondershare Filmora, which functions in a very simple way. So, we can start using these guides:
Drag and drop your video into the timeline. Right-clicking on the video and hitting Detach Audio will enable us to separate audio and video from one another, getting us a chance to work on them individually.

Double-click on the audio track shows the editing panel, where we see Remove background noise – choosing this option removes the noise!

Though, there is another way to do this too. If you don’t want to detach the audio, then first, double-click on the video clip in the timeline and when the editing panel opens, switch to Audio. If you check the box next to Remove background noise, you will see that there are three levels – weak, mid, and strong, which determine the strength of how toe noise is going to be reduced. Choosing one of them is up to you!
In case you find that the voice sounds a little robotics, you’ll need to make it sound more natural, of course. For it, you will need to click Customize, which will take you into the Customize Equalizer department.

The low tunes are on the left, while the highs are on the right. Background noises are often the low ones, so we better lower them even more, but we would raise the middle ones to achieve a natural sound.

And, that’s it – you are done with audio background noise removal!
So, in this article, we learned how to remove the video noise and grain and audio background noise using the software Adobe Premire Pro, while we also discussed how to do the latter using Wondershare Filmora – hope you can start using your new knowledge and tools very soon and create the content you never thought you could have created!
In order to make sure that the Median touches the grainiest parts of the whole clip, we need to use something called masks. In the Effects Control panel, we can select the mask shape for our clip –either choose rectangle, circle, or pen tool. Pen tool is something with which we move the Mask around the screen and resize it to include the desired area and cover it.

Changing Feather setting to 100 will make sure that the effect loses a visible edge and there is some smoothness added to those edges.

There might be the need to repeat this process and create several masks, if that means to have covered all of the grainy area of the scene.
Lastly, tom reduce the noise, adjusting the effect settings is needed.

Technically, what the Median effect does is just blurring the graininess, not exactly “taking it away”. And if we play with the Radius settings there, we can find our desired look!
How to remove background noise in Adobe Premiere Pro
Removing background noise in Adobe Premiere Pro can be a pretty simple process and lead to much better results. First of all, of course, import the desired material into your software so you can see the video and audio in the sequence visually. After having the project set up, you will need to find the Efffects Panel, which might be hidden a little, but it must be on the left and bottom of the program layout; or, you can find it on the top, in the navbar.

After having located the Effects panel, go for the search bar and type: denoise, and you’ll see that DeNoise effect is under Audio Effects.

You hold onto the effect, drag and drop it on the audio track in the timeline itself! Then, you just click on the audio in the sequence and on the top right Effect Controls will appear, which we need to concentrate on. You will scroll down a little there and below Audio notice: fx DeNoise, where you hit on the Edit button. This will open the Clip Fx Editor for the Audio denoising.

Basically, it only has one, Amount scale, and if you drag the slider of it to the right at 100%, it will remove the whole noise, but setting it on 0% will not remove any noise at all. So, you need to choose your preferred percentage! Just listen what is acceptable for you, but the general suggestion here would be that you can choose as high percent as you want, but if the effect starts taking out the voice and actually wanted parts, then you will have to stop and keep it that way. So, that’s actually it!
Bonus tip: how to remove audio noise in video with Wondershare Filmora
What we have promised in the beginning in the video, we like to offer now – the alternative to reduce or remove audio noise in the video is called Wondershare Filmora, which functions in a very simple way. So, we can start using these guides:
Drag and drop your video into the timeline. Right-clicking on the video and hitting Detach Audio will enable us to separate audio and video from one another, getting us a chance to work on them individually.

Double-click on the audio track shows the editing panel, where we see Remove background noise – choosing this option removes the noise!

Though, there is another way to do this too. If you don’t want to detach the audio, then first, double-click on the video clip in the timeline and when the editing panel opens, switch to Audio. If you check the box next to Remove background noise, you will see that there are three levels – weak, mid, and strong, which determine the strength of how toe noise is going to be reduced. Choosing one of them is up to you!
In case you find that the voice sounds a little robotics, you’ll need to make it sound more natural, of course. For it, you will need to click Customize, which will take you into the Customize Equalizer department.

The low tunes are on the left, while the highs are on the right. Background noises are often the low ones, so we better lower them even more, but we would raise the middle ones to achieve a natural sound.

And, that’s it – you are done with audio background noise removal!
So, in this article, we learned how to remove the video noise and grain and audio background noise using the software Adobe Premire Pro, while we also discussed how to do the latter using Wondershare Filmora – hope you can start using your new knowledge and tools very soon and create the content you never thought you could have created!
In order to make sure that the Median touches the grainiest parts of the whole clip, we need to use something called masks. In the Effects Control panel, we can select the mask shape for our clip –either choose rectangle, circle, or pen tool. Pen tool is something with which we move the Mask around the screen and resize it to include the desired area and cover it.

Changing Feather setting to 100 will make sure that the effect loses a visible edge and there is some smoothness added to those edges.

There might be the need to repeat this process and create several masks, if that means to have covered all of the grainy area of the scene.
Lastly, tom reduce the noise, adjusting the effect settings is needed.

Technically, what the Median effect does is just blurring the graininess, not exactly “taking it away”. And if we play with the Radius settings there, we can find our desired look!
How to remove background noise in Adobe Premiere Pro
Removing background noise in Adobe Premiere Pro can be a pretty simple process and lead to much better results. First of all, of course, import the desired material into your software so you can see the video and audio in the sequence visually. After having the project set up, you will need to find the Efffects Panel, which might be hidden a little, but it must be on the left and bottom of the program layout; or, you can find it on the top, in the navbar.

After having located the Effects panel, go for the search bar and type: denoise, and you’ll see that DeNoise effect is under Audio Effects.

You hold onto the effect, drag and drop it on the audio track in the timeline itself! Then, you just click on the audio in the sequence and on the top right Effect Controls will appear, which we need to concentrate on. You will scroll down a little there and below Audio notice: fx DeNoise, where you hit on the Edit button. This will open the Clip Fx Editor for the Audio denoising.

Basically, it only has one, Amount scale, and if you drag the slider of it to the right at 100%, it will remove the whole noise, but setting it on 0% will not remove any noise at all. So, you need to choose your preferred percentage! Just listen what is acceptable for you, but the general suggestion here would be that you can choose as high percent as you want, but if the effect starts taking out the voice and actually wanted parts, then you will have to stop and keep it that way. So, that’s actually it!
Bonus tip: how to remove audio noise in video with Wondershare Filmora
What we have promised in the beginning in the video, we like to offer now – the alternative to reduce or remove audio noise in the video is called Wondershare Filmora, which functions in a very simple way. So, we can start using these guides:
Drag and drop your video into the timeline. Right-clicking on the video and hitting Detach Audio will enable us to separate audio and video from one another, getting us a chance to work on them individually.

Double-click on the audio track shows the editing panel, where we see Remove background noise – choosing this option removes the noise!

Though, there is another way to do this too. If you don’t want to detach the audio, then first, double-click on the video clip in the timeline and when the editing panel opens, switch to Audio. If you check the box next to Remove background noise, you will see that there are three levels – weak, mid, and strong, which determine the strength of how toe noise is going to be reduced. Choosing one of them is up to you!
In case you find that the voice sounds a little robotics, you’ll need to make it sound more natural, of course. For it, you will need to click Customize, which will take you into the Customize Equalizer department.

The low tunes are on the left, while the highs are on the right. Background noises are often the low ones, so we better lower them even more, but we would raise the middle ones to achieve a natural sound.

And, that’s it – you are done with audio background noise removal!
So, in this article, we learned how to remove the video noise and grain and audio background noise using the software Adobe Premire Pro, while we also discussed how to do the latter using Wondershare Filmora – hope you can start using your new knowledge and tools very soon and create the content you never thought you could have created!
In order to make sure that the Median touches the grainiest parts of the whole clip, we need to use something called masks. In the Effects Control panel, we can select the mask shape for our clip –either choose rectangle, circle, or pen tool. Pen tool is something with which we move the Mask around the screen and resize it to include the desired area and cover it.

Changing Feather setting to 100 will make sure that the effect loses a visible edge and there is some smoothness added to those edges.

There might be the need to repeat this process and create several masks, if that means to have covered all of the grainy area of the scene.
Lastly, tom reduce the noise, adjusting the effect settings is needed.

Technically, what the Median effect does is just blurring the graininess, not exactly “taking it away”. And if we play with the Radius settings there, we can find our desired look!
How to remove background noise in Adobe Premiere Pro
Removing background noise in Adobe Premiere Pro can be a pretty simple process and lead to much better results. First of all, of course, import the desired material into your software so you can see the video and audio in the sequence visually. After having the project set up, you will need to find the Efffects Panel, which might be hidden a little, but it must be on the left and bottom of the program layout; or, you can find it on the top, in the navbar.

After having located the Effects panel, go for the search bar and type: denoise, and you’ll see that DeNoise effect is under Audio Effects.

You hold onto the effect, drag and drop it on the audio track in the timeline itself! Then, you just click on the audio in the sequence and on the top right Effect Controls will appear, which we need to concentrate on. You will scroll down a little there and below Audio notice: fx DeNoise, where you hit on the Edit button. This will open the Clip Fx Editor for the Audio denoising.

Basically, it only has one, Amount scale, and if you drag the slider of it to the right at 100%, it will remove the whole noise, but setting it on 0% will not remove any noise at all. So, you need to choose your preferred percentage! Just listen what is acceptable for you, but the general suggestion here would be that you can choose as high percent as you want, but if the effect starts taking out the voice and actually wanted parts, then you will have to stop and keep it that way. So, that’s actually it!
Bonus tip: how to remove audio noise in video with Wondershare Filmora
What we have promised in the beginning in the video, we like to offer now – the alternative to reduce or remove audio noise in the video is called Wondershare Filmora, which functions in a very simple way. So, we can start using these guides:
Drag and drop your video into the timeline. Right-clicking on the video and hitting Detach Audio will enable us to separate audio and video from one another, getting us a chance to work on them individually.

Double-click on the audio track shows the editing panel, where we see Remove background noise – choosing this option removes the noise!

Though, there is another way to do this too. If you don’t want to detach the audio, then first, double-click on the video clip in the timeline and when the editing panel opens, switch to Audio. If you check the box next to Remove background noise, you will see that there are three levels – weak, mid, and strong, which determine the strength of how toe noise is going to be reduced. Choosing one of them is up to you!
In case you find that the voice sounds a little robotics, you’ll need to make it sound more natural, of course. For it, you will need to click Customize, which will take you into the Customize Equalizer department.

The low tunes are on the left, while the highs are on the right. Background noises are often the low ones, so we better lower them even more, but we would raise the middle ones to achieve a natural sound.

And, that’s it – you are done with audio background noise removal!
So, in this article, we learned how to remove the video noise and grain and audio background noise using the software Adobe Premire Pro, while we also discussed how to do the latter using Wondershare Filmora – hope you can start using your new knowledge and tools very soon and create the content you never thought you could have created!
Efficient Ways to Change Slow Motion Video to Normal on iPhone
Slow-motion videos bring your videos to life by highlighting the emotions and details of a story. However, transforming a slow motion into a normal video has its benefits. For instance, you can make boomerangs or GIFs with normal videos. In addition, you can introduce limitless transitions and animations to them. Thus, are you also finding how to change slow-motion video to a normal iPhone?
This article is the perfect stop for you as it covers all your slow-motion queries from here. It will focus on how to unslow-mo a video on an iPhone and related tools. We will discuss the iPhone’s pre-built feature and some tools to achieve this. There will be a bonus tip on how to change slow-mo video to normal on iPhone.
Slow Motion Video Maker Slow your video’s speed with better control of your keyframes to create unique cinematic effects!
Make A Slow Motion Video Make A Slow Motion Video More Features

Part 1: Direct Method: Changing Slow Motion Video to Normal on iPhone
You might not be aware of this feature if you are a previous user or have just started using an iPhone. This is Apple’s built-in feature, found in iPhones and iPads. In this section, we have tailored a step-by-step guide to doing this. Here is a brief overview of how to convert a slow-motion video to a normal iPhone:
Step 1
Move to its bottom after opening the “Photos” application on your iPhone. From there, select the “Albums” option and scroll down to the “Slo-mo” option in “Media Types.”

Step 2
In the slow-mo section, find a video you want to reverse and select it to open. Navigate towards the top right corner of this video and click the “Edit” option.

Step 3
An editing panel will appear at the bottom of this video. If you’d notice, a vertical lined bar is under the video timeline. This indicates slow-mo duration, which you can change by repositioning sliders. Afterward, click the “Done” button at the right bottom of this screen to finalize.

Part 2: Top Applications That Can Be Used to Change Slow Motion Video to Normal
The iPhone’s built-in feature is equally effective for reversing a slow-mo back to normal. However, sometimes, one requires a tool for detailed editing. In such cases, we recommend you use a third party to help you achieve the desired results. We have assembled some tools on how to take slow-mo off a video on iPhone below:
- SpeedPro Slow Speed Video Edit
- Slow-Fast Motion Video Editor
- Slow Motion Video Fx Editor
- Reverse Cam – Slow Motion Video
- Slow Motion Video Editor
1. SpeedPro Slow Speed Video Edit
This is a versatile application designed explicitly to resolve the slow speed queries on iPhone. Users can effortlessly manipulate the speed of video during editing. The best part about this editor is that you can select a specific video section. It is up to you to reverse a complete slow-mo video or a part of it.

Key Features
- Facilitates both professionals and amateurs with its reachable user interface.
- After editing a video as super slow or super-fast, you can incorporate music.
- The application offers direct sharing options to vast applications like Instagram or YouTube.
2. Slow-Fast Motion Video Editor
If how to convert slow motion video to normal on an iPhone was a bet, this application would be worth your money. Many content creators have used it, and everyone has positively reviewed it. You can transform a slow-mo into a normal video using its speed option. The highest speed option is 2x, and the slowest speed option is 1/4th. There is no limitation on the video’s length or resolution for conversion.

Key Features
- You can apply different time transitions (fast or slow) to distinct video segments.
- The application doesn’t export with a Watermark addition to maintain professionalism.
- Upon converting a video or reversing it, you can adjust the audio pitch to align with it.
3. SloMo Slow Motion Video Editor
With technological advancements, the editing industry has taken up a notch. This application uses modern algorithms to create or reverse a slow with customizations. To reverse a slow-mo, you just need to upload it and increase the video’s speed. It offers three sorts of speed editing, including slow-mo, time-lapse, and stop-motion. The video speed is adjustable up to 240fps and 12x with quick processing.

Key Features
- With its independent frame manipulation, you can edit specific parts of a video.
- You can incorporate music behind your tracks out of 170+ pre-built music tracks.
- This iPhone editor retains the natural resolution of video to maintain its quality.
4. Reverse Cam – Slow Motion Video
Surfing through the internet to find how to unslow-mo a video on an iPhone? This application assists you in controlling or reversing video speed. You just need to import a previously created slow-mo into the application. In addition to reversing a video, you can also reverse audio tracks with it. There are multiple speed options like 0.25, 0.5x, and more.

Key Features
- After modifying the video speed, you can apply multiple effects to it.
- The application is compatible with iOS 9.0 or newer versions.
- It has a built-in library that users can use to save the edited videos and share them directly.
5. Slow Motion’ Video Editor
Solve all your queries related to how to change slo-mo video to normal on iPhone here. Designed to give your videos a perfect slow-motion or high-speed effect. To convert a slow-mo video into a normal one, it offers speed increase options. You can have complete control over your videos with this application.

Key Features
- It has an accessible and intuitive editing interface for user comprehension.
- It allows you to manipulate the speed of your video from 60 to 240 frames.
- It has multiple subscription options, weekly, monthly, or yearly, that you can avail accordingly.
Bonus Part: Speed Up Your iPhone Video on Desktop Using Wondershare Filmora
All these methods of transforming a slow-mo to normal are accurate and efficient. However, when it comes to perfection, one software stands tall than the others.Wondershare Filmora is a premium video editing software for precise editing. There are two methods of manipulating a slow-motion video to normal in it.
The speed ramping involves slow-mo reverse action from specific video frames. On the other hand, uniform speed modifies the complete video speed. You can add specific values for manipulating the frame rate or change the sliders. In addition, you can also add multiple effects to your video afterward. Moreover, you can also export the video in high resolution and desired format.
Free Download For Win 7 or later(64-bit)
Free Download For macOS 10.14 or later
Step-by-Step Guide to Shift Your Slow-Motion Video to Normal with Filmora
This segment involves a step-by-step guide to reverse a slow-mo. Let’s see how to change slo-mo video to normal on iPhone with Filmora below:
Step 1Import Media Files from iPhone
First, connect your iPhone to the source device you are using Filmora on. Once you have connected the devices, navigate towards the “Import” button. Expand this option, and from the dropdown menu, select “Import from a Camera or Phone.” Select the name of your iPhone in the “Import from” section and click “OK.” Once imported, place the clip in the timeline.

Step 2Access Uniform Speed Option
Then, select the clip in the timeline and navigate towards the settings panel. Afterward, go to the “Speed” tab under “Uniform Speed” set values. Drag the Speed slider towards the right to increase the video speed.

Step 3Export the Edited Video
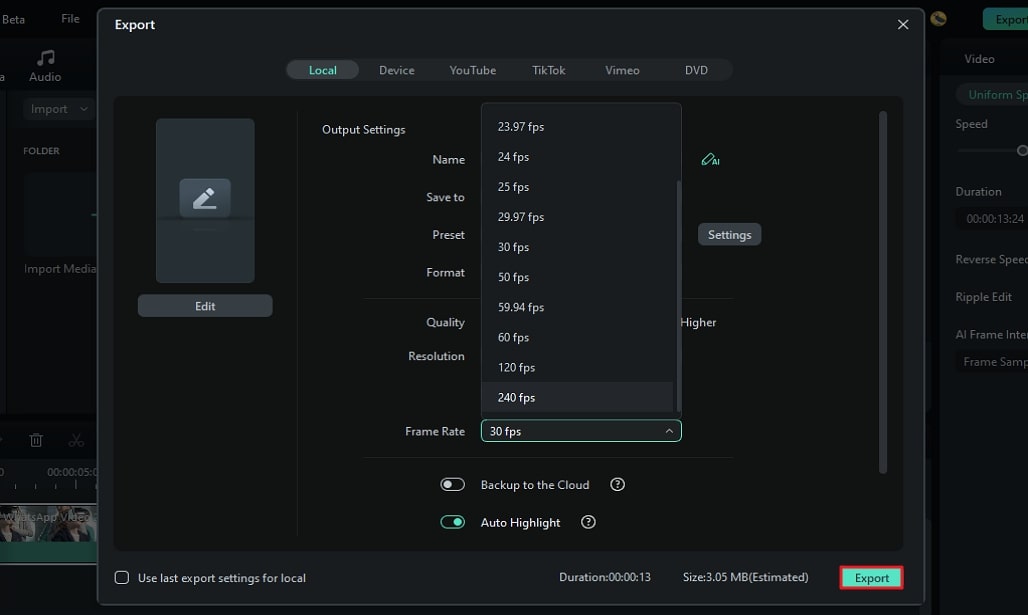
Hit the “Play” button from the preview window to preview your video. Afterward, navigate towards the “Export” button at the top right corner. You can also set the framerate in the Export window according to preference. Further, hit the “Export” button in the Export window to save the file on the device.
Top Features to Note About Wondershare Filmora
There is more to Filmora than how to unslow-mo a video on an iPhone. The tool shows support with multiple devices like Windows, iOS, Linux, and more. Following are some of the top-notch AI features of Filmora:
1. AI Text-to-Video
Use this tool to craft creative and graphic-based videos along with voice integration. With its generative AI, it allows you to tailor videos in different contexts. It uses text-based instructions to analyze demands and follow them.
2. AI Text-Based Editing
Cutting and Trimming videos in a timeline might be difficult for some people. It requires proper skills; however, there is an alternate option. The text-based editing AI uses voice recognition to convert speech to text. Once the video has been converted, you can eliminate the parts you want.
3. AI Music Generator
If you want to generate music based on your video’s mood or context, use this AI. It asks for a few directions like theme, mood, and language to curate music. The song is efficient in what it is designed for and generates results in seconds.
4. AI Vocal Remover
Background noises always decline the quality of an audio track or overall video. With Filmora, you can separate vocals from background noise and delete the track. Both tracks are shown in the timeline and are easy to remove. Afterward, you can apply effects or introduce music before export.
Conclusion
After reaching a conclusion, one should have fully understood the merits of how to change slow-motion video to a normal iPhone. It provided insights into several useful applications for achieving this effect. Wondershare Filmora emerged as a worthy AI-driven desktop application tailored for crafting such videos. It is recommended to help you with your creative endeavors in this domain.
Make A Slow Motion Video Make A Slow Motion Video More Features

Part 1: Direct Method: Changing Slow Motion Video to Normal on iPhone
You might not be aware of this feature if you are a previous user or have just started using an iPhone. This is Apple’s built-in feature, found in iPhones and iPads. In this section, we have tailored a step-by-step guide to doing this. Here is a brief overview of how to convert a slow-motion video to a normal iPhone:
Step 1
Move to its bottom after opening the “Photos” application on your iPhone. From there, select the “Albums” option and scroll down to the “Slo-mo” option in “Media Types.”

Step 2
In the slow-mo section, find a video you want to reverse and select it to open. Navigate towards the top right corner of this video and click the “Edit” option.

Step 3
An editing panel will appear at the bottom of this video. If you’d notice, a vertical lined bar is under the video timeline. This indicates slow-mo duration, which you can change by repositioning sliders. Afterward, click the “Done” button at the right bottom of this screen to finalize.

Part 2: Top Applications That Can Be Used to Change Slow Motion Video to Normal
The iPhone’s built-in feature is equally effective for reversing a slow-mo back to normal. However, sometimes, one requires a tool for detailed editing. In such cases, we recommend you use a third party to help you achieve the desired results. We have assembled some tools on how to take slow-mo off a video on iPhone below:
- SpeedPro Slow Speed Video Edit
- Slow-Fast Motion Video Editor
- Slow Motion Video Fx Editor
- Reverse Cam – Slow Motion Video
- Slow Motion Video Editor
1. SpeedPro Slow Speed Video Edit
This is a versatile application designed explicitly to resolve the slow speed queries on iPhone. Users can effortlessly manipulate the speed of video during editing. The best part about this editor is that you can select a specific video section. It is up to you to reverse a complete slow-mo video or a part of it.

Key Features
- Facilitates both professionals and amateurs with its reachable user interface.
- After editing a video as super slow or super-fast, you can incorporate music.
- The application offers direct sharing options to vast applications like Instagram or YouTube.
2. Slow-Fast Motion Video Editor
If how to convert slow motion video to normal on an iPhone was a bet, this application would be worth your money. Many content creators have used it, and everyone has positively reviewed it. You can transform a slow-mo into a normal video using its speed option. The highest speed option is 2x, and the slowest speed option is 1/4th. There is no limitation on the video’s length or resolution for conversion.

Key Features
- You can apply different time transitions (fast or slow) to distinct video segments.
- The application doesn’t export with a Watermark addition to maintain professionalism.
- Upon converting a video or reversing it, you can adjust the audio pitch to align with it.
3. SloMo Slow Motion Video Editor
With technological advancements, the editing industry has taken up a notch. This application uses modern algorithms to create or reverse a slow with customizations. To reverse a slow-mo, you just need to upload it and increase the video’s speed. It offers three sorts of speed editing, including slow-mo, time-lapse, and stop-motion. The video speed is adjustable up to 240fps and 12x with quick processing.

Key Features
- With its independent frame manipulation, you can edit specific parts of a video.
- You can incorporate music behind your tracks out of 170+ pre-built music tracks.
- This iPhone editor retains the natural resolution of video to maintain its quality.
4. Reverse Cam – Slow Motion Video
Surfing through the internet to find how to unslow-mo a video on an iPhone? This application assists you in controlling or reversing video speed. You just need to import a previously created slow-mo into the application. In addition to reversing a video, you can also reverse audio tracks with it. There are multiple speed options like 0.25, 0.5x, and more.

Key Features
- After modifying the video speed, you can apply multiple effects to it.
- The application is compatible with iOS 9.0 or newer versions.
- It has a built-in library that users can use to save the edited videos and share them directly.
5. Slow Motion’ Video Editor
Solve all your queries related to how to change slo-mo video to normal on iPhone here. Designed to give your videos a perfect slow-motion or high-speed effect. To convert a slow-mo video into a normal one, it offers speed increase options. You can have complete control over your videos with this application.

Key Features
- It has an accessible and intuitive editing interface for user comprehension.
- It allows you to manipulate the speed of your video from 60 to 240 frames.
- It has multiple subscription options, weekly, monthly, or yearly, that you can avail accordingly.
Bonus Part: Speed Up Your iPhone Video on Desktop Using Wondershare Filmora
All these methods of transforming a slow-mo to normal are accurate and efficient. However, when it comes to perfection, one software stands tall than the others.Wondershare Filmora is a premium video editing software for precise editing. There are two methods of manipulating a slow-motion video to normal in it.
The speed ramping involves slow-mo reverse action from specific video frames. On the other hand, uniform speed modifies the complete video speed. You can add specific values for manipulating the frame rate or change the sliders. In addition, you can also add multiple effects to your video afterward. Moreover, you can also export the video in high resolution and desired format.
Free Download For Win 7 or later(64-bit)
Free Download For macOS 10.14 or later
Step-by-Step Guide to Shift Your Slow-Motion Video to Normal with Filmora
This segment involves a step-by-step guide to reverse a slow-mo. Let’s see how to change slo-mo video to normal on iPhone with Filmora below:
Step 1Import Media Files from iPhone
First, connect your iPhone to the source device you are using Filmora on. Once you have connected the devices, navigate towards the “Import” button. Expand this option, and from the dropdown menu, select “Import from a Camera or Phone.” Select the name of your iPhone in the “Import from” section and click “OK.” Once imported, place the clip in the timeline.

Step 2Access Uniform Speed Option
Then, select the clip in the timeline and navigate towards the settings panel. Afterward, go to the “Speed” tab under “Uniform Speed” set values. Drag the Speed slider towards the right to increase the video speed.

Step 3Export the Edited Video
Hit the “Play” button from the preview window to preview your video. Afterward, navigate towards the “Export” button at the top right corner. You can also set the framerate in the Export window according to preference. Further, hit the “Export” button in the Export window to save the file on the device.

Top Features to Note About Wondershare Filmora
There is more to Filmora than how to unslow-mo a video on an iPhone. The tool shows support with multiple devices like Windows, iOS, Linux, and more. Following are some of the top-notch AI features of Filmora:
1. AI Text-to-Video
Use this tool to craft creative and graphic-based videos along with voice integration. With its generative AI, it allows you to tailor videos in different contexts. It uses text-based instructions to analyze demands and follow them.
2. AI Text-Based Editing
Cutting and Trimming videos in a timeline might be difficult for some people. It requires proper skills; however, there is an alternate option. The text-based editing AI uses voice recognition to convert speech to text. Once the video has been converted, you can eliminate the parts you want.
3. AI Music Generator
If you want to generate music based on your video’s mood or context, use this AI. It asks for a few directions like theme, mood, and language to curate music. The song is efficient in what it is designed for and generates results in seconds.
4. AI Vocal Remover
Background noises always decline the quality of an audio track or overall video. With Filmora, you can separate vocals from background noise and delete the track. Both tracks are shown in the timeline and are easy to remove. Afterward, you can apply effects or introduce music before export.
Conclusion
After reaching a conclusion, one should have fully understood the merits of how to change slow-motion video to a normal iPhone. It provided insights into several useful applications for achieving this effect. Wondershare Filmora emerged as a worthy AI-driven desktop application tailored for crafting such videos. It is recommended to help you with your creative endeavors in this domain.
Learning How to Slow Down a Video on iPhone Properly
Slow-motion videos are widely used for various purposes in videography or filmmaking. They not only underline the significance of a shot but also elevate creativity. The frame rate is remarkably higher in slow-motion videos than in normal videos. There are two methods included in the process of how to slow down a video on an iPhone.
The first method involves increasing the frame rate; meanwhile, the other is playback speed adjustment. This article will enfold apps to teach how to slow a video down on iPhone. All these applications will be available in the iPhone’s official App Store. However, check the compatibility of these apps with the iOS version you’re using. Ultimately, we’ll share a desktop alternative on how to slow down a video iPhone.
Slow Motion Video Maker Slow your video’s speed with better control of your keyframes to create unique cinematic effects!
Make A Slow Motion Video Make A Slow Motion Video More Features

Part 1: Pre-Recorded A Video? Adjust Slow Motion Parameters Right Away
One of the major reasons Gen Z and Gen Alpha opt for iPhones is their high-quality camera. It is ideal for capturing and editing videos in high resolution is ideal. In 2013, iPhones were integrated with the Slow-mo feature for creative purposes. Where first users needed third-party applications, they could use the built-in feature. Here is how do you slow down a video on iPhone officially:
Step 1
Locate the “Photos” application on your iPhone and launch it by simply clicking. Upon accessing the app, go to the bottom and click on “Albums.” Afterward, click the “Slo-mo” option from the expanding menu. Formerly, select a video from your device media library import.

Step 2
Once the video has been selected, navigate to the top right corner and select “Edit.”

Step 3
When the editing panel appears, navigate towards the bottom of the timeline bar. Drag the slider’s position to adjust the speed to create a slow motion. As the slow-motion effect has been created, click the “Done” button. Commencing this action will finalize your slow-motion video.

Part 2: Some Top-Notch Solutions to Slow Down Any Video on iPhone
The iPhone does offer a built-in feature to help you curate a perfect slow-mo. Nonetheless, a third-party application can offer additional and upgraded features. They offer specialized effects and filters, multiplatform support, and more. This section discusses 4 applications and how to make video slow motion iPhone using them. Find the brief introduction, capabilities, and guides of these apps below:
- SpeedPro Slow Speed Video Edit
- Slow Fast Slow – Control the Speed of Your Videos
- Slo Mo – Speed Up Video Editor
- Video Speed Editor Slow & Fast
1. SpeedPro Slow Speed Video Edit
This is an exclusive application to answer your question about how to put a video in slow motion on an iPhone. This application offers a -2x to -6x playback speed option for a slow-mo. Its intuitive feature enables speed alteration from a specific video section. This option is ideal for creatively editing your Instagram reels. Along with slowing down the speed, you can also enhance it for fast motion generation.

Key Features
- The application offers a timeline editing interface that enhances precision and accuracy.
- It possesses the ability to incorporate music in your videos using its Music feature.
- The application collaborates with social platforms like Instagram and Facebook for
Steps to Add Slow Motion in Video Using SpeedPro Slow Speed Video Edit
When you embark on a new experience, using something for the first time can be tricky. The unfamiliarity makes it harder, and one doubts its abilities. Hence, consider us your partner in guiding you on how to edit slow motion on your iPhone. We have curated a step-by-step guide to help you in creating a slow-mo:
Step 1: After downloading and accessing the application’s main menu, click the “Speed Pro” option. Then, select a video clip from your device that you desire to apply this effect to.

Step 2: Once the video clip has been selected, click the “Done” button to import.

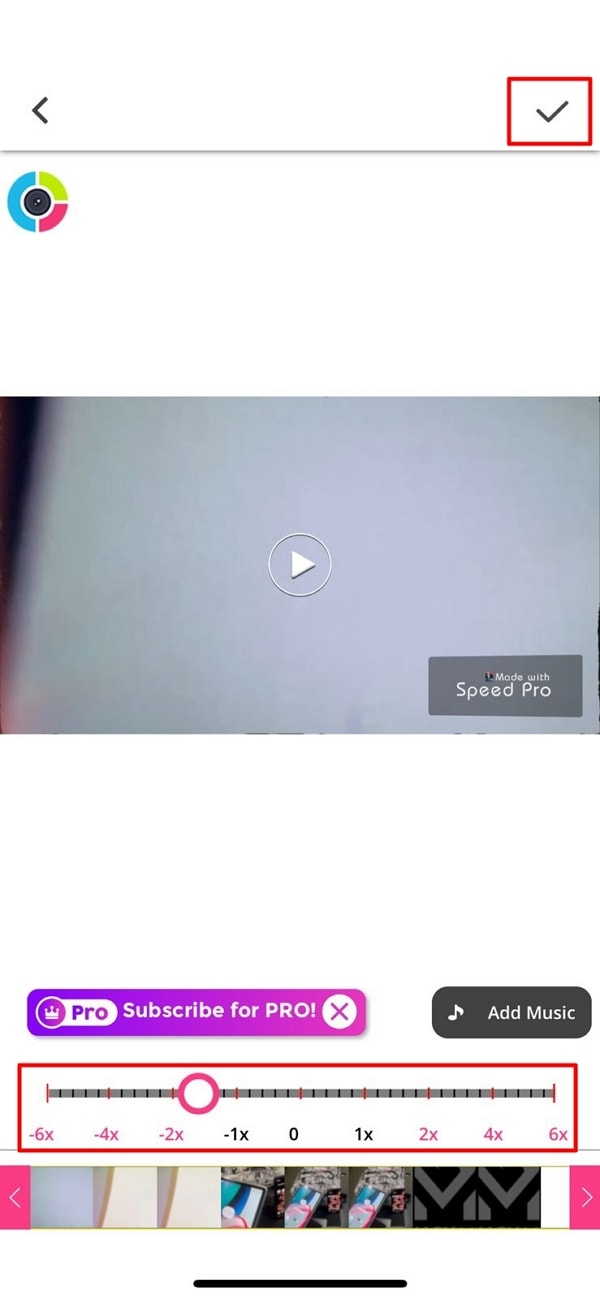
Step 3: Afterward, you’ll be redirected to its editing interface for speed change. Navigate toward the speed slider at the bottom of the video display. Drag the slider towards the left to select a suitable playback speed option. You can also apply the slow-mo to a specific area by dragging the timeline slider.
2. Slow Fast Slow - Control the Speed of Your Videos
Use this application to record a slow-motion video or add the effect in post-production editing. This application offers a high frame rate of 240 fps for a high-grade slow-mo effect. This means you can now slow a video up to 1/16th of its original speed. It wins at creating slow motion with the iPhone’s built-in speed manipulation feature.

Key Features
- Provides audio pitch maintenance feature during speed alteration.
- Gives the option to adjust the screen ratio before editing, like square or more.
- The application is compatible with all your iOS 10.0 devices and higher versions.
Steps to Add Slow Motion in Video Using Slow Fast Slow
The encounter with an advanced tool or application is often stressful as you are unfamiliar with it. You do not want to mess up the video, so you must master an app. Following is how to slow down a video on an iPhone using the Slow Fast Slow app:
Step 1: After launching the application, give it access to your files for editing. Then, click on the “Other Videos” option to select a video from a device for slow-mo.

Step 2: Once the video has been imported, you will reach the editing interface. You’ll notice a slider with different points. These points indicate the time frames of your video. The slider is positioned downward to add a slow-mo effect at specific durations.
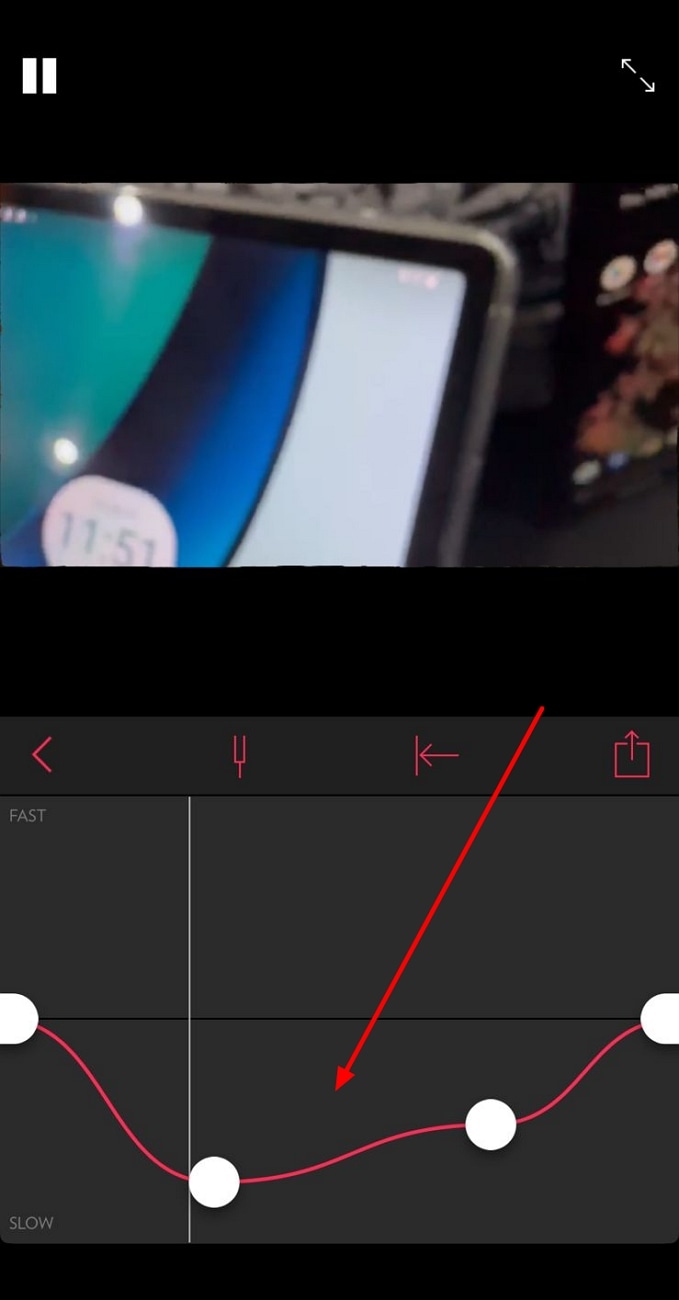
Step 3: Once you are done with the editing, click the play button to preview. Next, navigate towards the right-side bottom of the preview screen and hit “Export.” Select any particular resolution to save the slowed-down video on your device.
3. Slo Mo – Speed Up Video Editor
Are you looking for a versatile application about how to make a normal video slow-motion iPhone 13? Fashioned to modify a video’s speed, this app can help you. It allows users to adjust the video speed up to 12x for slow and fast motion. In addition, you can alter the video frame rate up to 240 fps at precise frames.

Key Feature
- With an additional freeze frame feature, infuse an innovative touch to videos.
- Experience a more productive workflow with its quick processing feature.
- Keeping up an accessible to all approach, the user interface is straightforward and minimal.
Steps to Add Slow Motion in Video Using Slo Mo – Speed Up Video Editor
Those initial stages of operating a new app and getting your hands on its UI are difficult. However, this article prioritizes your ease more than anything. Find our guide on how to make a video in slow motion on iPhone here:
Step 1: Upon launching the application, it will ask you for storage access. After that, you’ll have to import a video to add slow motion. Just select any normal video on your device and click on the “Next” option.

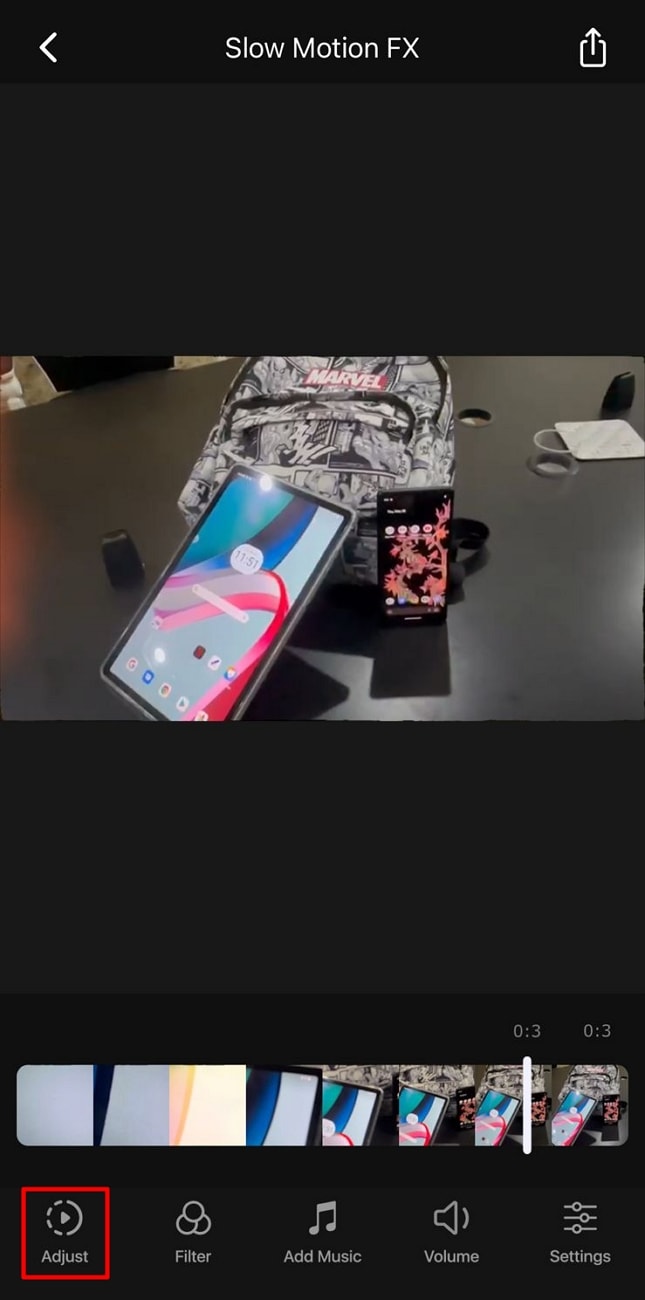
Step 2: Navigate toward the bar at the bottom of the timeline panel and select “Adjust.”
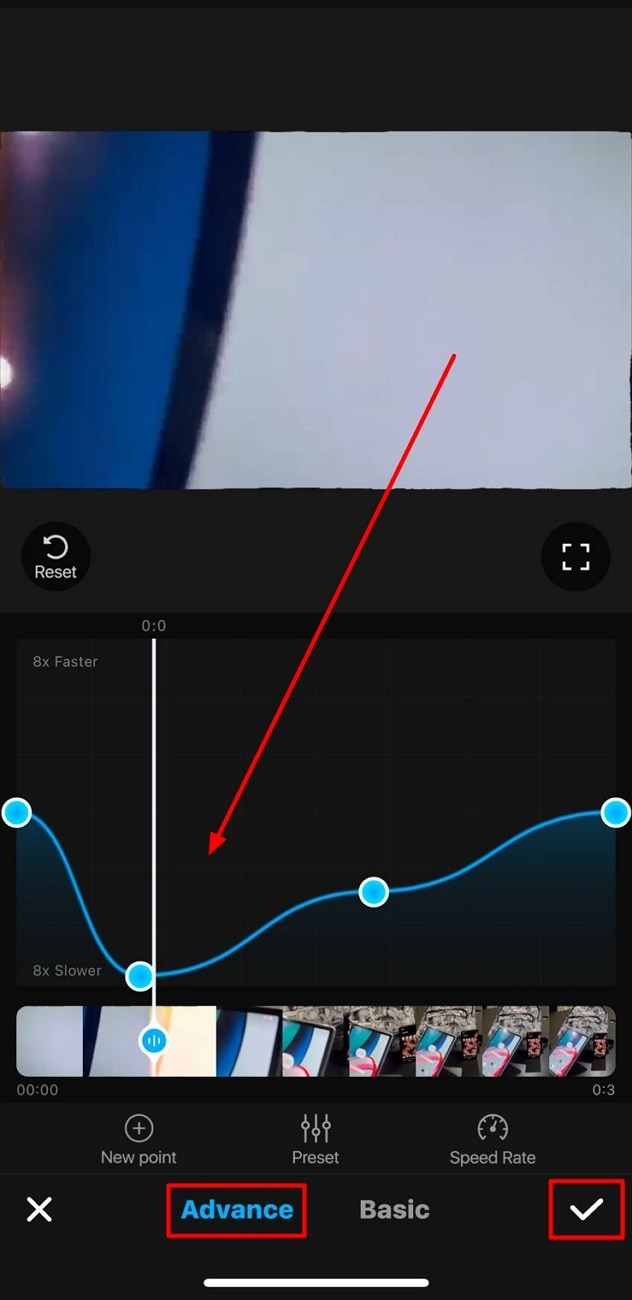
Step 3: This will feature the speed control options on your screen; go to “Advance.” Further, change the speed change slider towards the left to manipulate it. Afterward, preview the video and click on the “tick” icon.
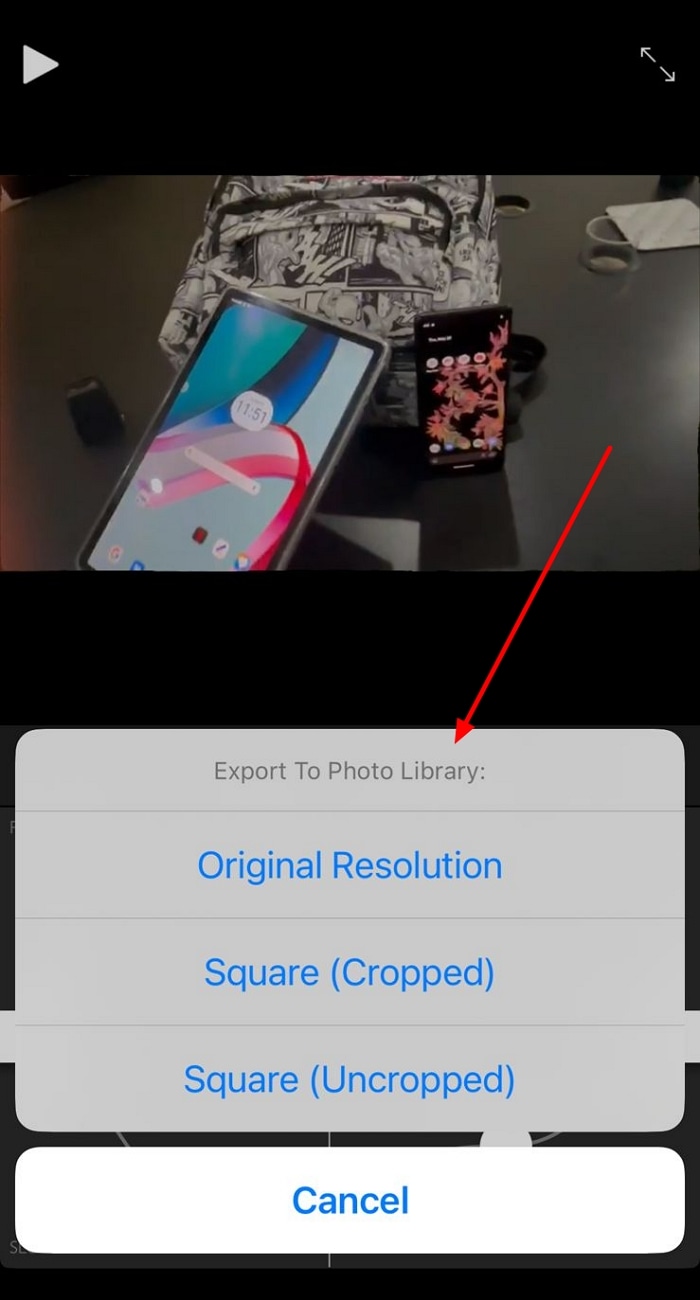
Step 4: Further, select the “Export” icon appearing in the expanded menu.

4. Video Speed Editor Slow & Fast
How do you slow down a video on an iPhone after recording in a minimalistic way? This iPhone application is designed for such contexts to create slow-motion videos. Users can slow down a clip’s playback speed up to 8x at specific durations. Simply trim the video parts to apply the speed setting at specific sections and merge them later.

Key Features
- After slow motion, you have the option to keep the original sound or insert music offered by it.
- The timeline editing method helps you to trim the video at the right time.
- The application is compatible with iOS 12.0, iPadOS 12.0, macOS 11.0, and newer versions.
Steps to Add Slow Motion in Video Using Video Speed Editor Slow & Fast
This application has an innovative user interface with a simple operational menu. To add a slow-motion effect to a video, buy its Pro subscription first. To assist you further, here is how to slow down an iPhone video in it:
Step 1: Create a new project after launching the application and giving access to storage. Do this by clicking on the screen saying, “Tap to create a new project.”
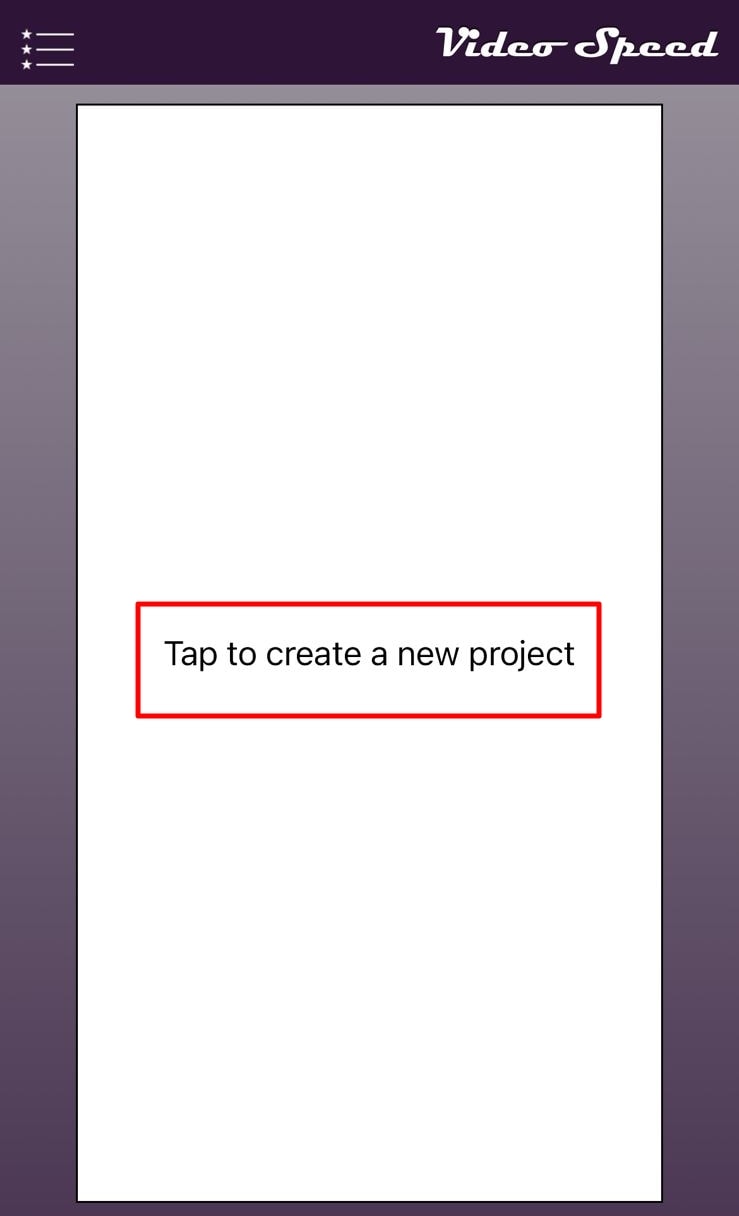
Step 2: From the Videos section of your media, select a video and hit “Choose.”

Step 3: In the editing interface, simply select a speed option from -2x to -8x for slowing. Once the video is slowed down according to your preferences, export it.
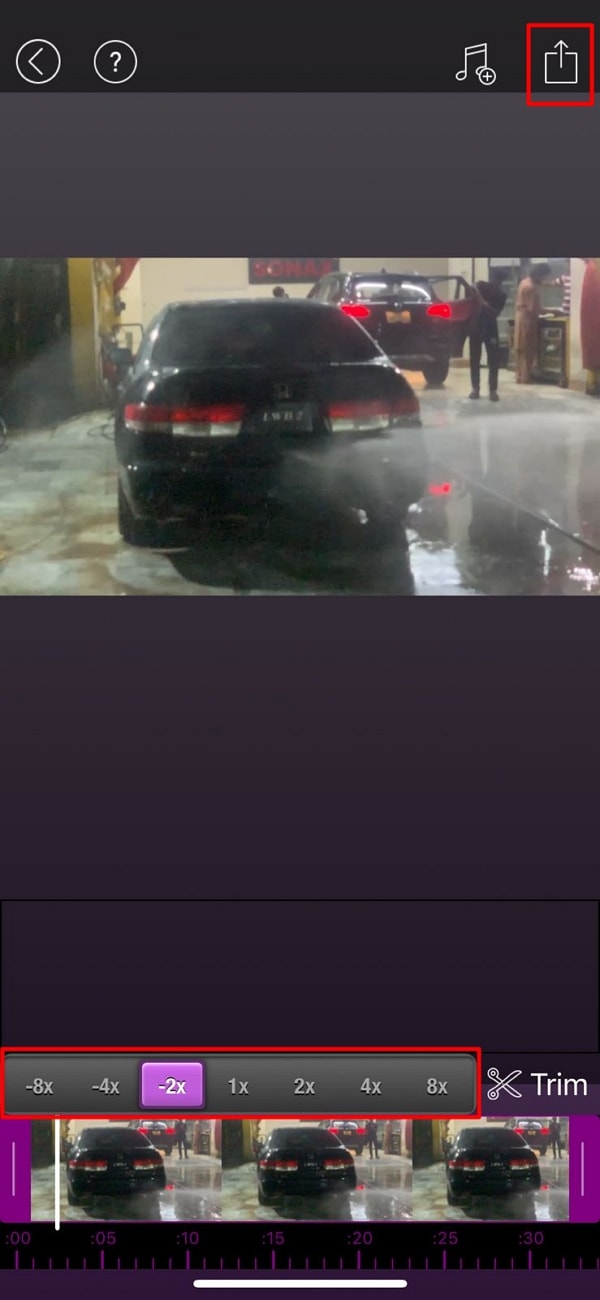
Part 3: Failed to Slow Down Video Properly? Try Wondershare Filmora as a Remedy
Have you tried all the given solutions on how to slow-mo a video on an iPhone and are still clueless? Not getting the desired results can be frustrating, but we have brought the best answer. Wondershare Filmora helps you achieve slow motion on a computer or laptop. The software is compatible with all Windows and macOS devices. You can just connect your iPhone with the source using a cable and import media.
Being a versatile software, Filmora introduces you to two advanced methods. Uniform speed emerges as a simple method of creating a slow-motion effect. On the other hand, Speed Ramping allows you to edit speed for professional purposes. Amongst speed alteration, users can also use the frame interpolation technique. It increases video frames to ensure a smooth playback during slow-mo.
Step-by-Step Guide to Creating Slow-Motion in Filmora
If you are using Filmora for the first time, the user interface might initially seem confusing. However, in comparison to other post-production software, it possesses a minimal interface. In this section, learn about how to slo-mo a video iPhone using Filmora:
Free Download For Win 7 or later(64-bit)
Free Download For macOS 10.14 or later
Step 1Connect iPhone and Import Clip
Once you have created a new project on Filmora, import media. First, to import media from your iPhone, connect it to your computer or related device. Then, go to “Import” > “Import from a Camera or Phone” option. Further, select the device name and import data.

Step 2Access Speed Ramping Option
Use your cursor to bring the edited media to the timeline and select it. From the appearing settings panel, access the “Speed” > “Speed Ramping” tabs. Here, either choose any of the predesigned templates or customize one.

Step 3Enable Optical Flow for Additional Touch
If the slow motion seems rough or abrupt, Filmora has a solution to that as well. Go to the “AI Frame Interpolation” section and expand it. From the expanding menu, click the “Optical Flow” option for a high-quality slow-mo.

Step 4Rendering for Final Preview
To observe the overall results, navigate towards the top toolbar. Select the “File” tab and “Render Preview” from the dropdown menu. After reviewing the final video, use your cursor to click the “Export” button.
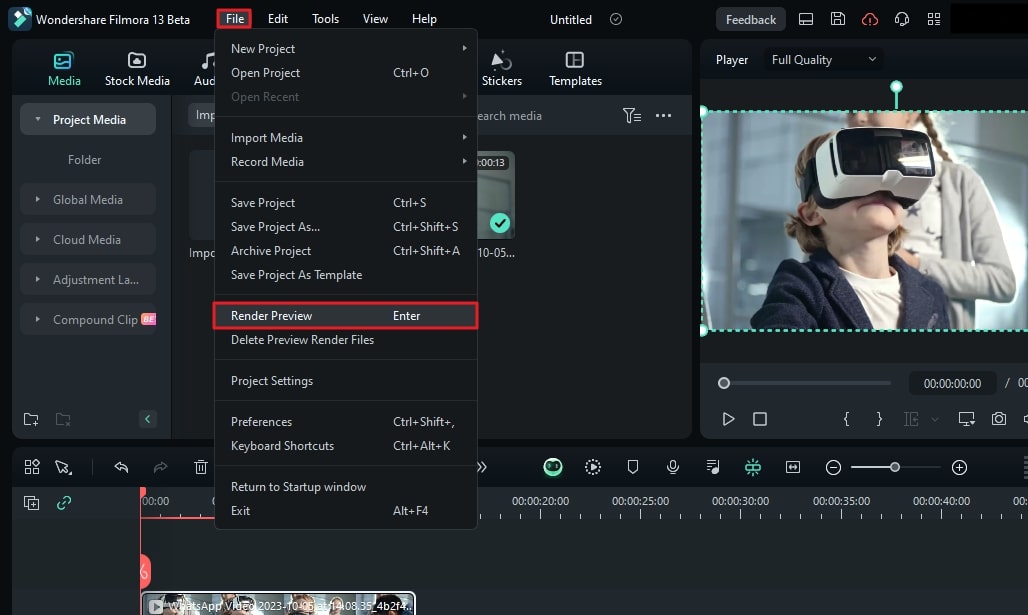
Key Features of Wondershare Filmora
Wondershare Filmora provides a wide range of features for a full-fledged editing experience. Some of these features are for video, some are for audio, and others are for visuals. Here is a list of some of Filmora’s key features that you must give a try to:
1. Instant Mode
Once you have recorded a video, the post-production process cannot be neglected. However, when you start editing a video, the process might be confusing at first. With Filmora’s Instant Mode, use AI’s assistance to edit any video without effort. There are 115 built-in templates to integrate according to context and highlights it.
2. Green Screen
Integrate attractive backgrounds in your videos, like mountains, beaches, or more. With Filmora’s Green Screen feature, remove the video backgrounds with accuracy. After removing the background, you can insert multiple backgrounds, like solid colors. If there are backgrounds that you have previously saved, import them to the timeline. They will automatically show in the video, and you can customize them further.
3. Color Correction
Filmora offers an extensive range of color correction elements to enhance visibility. There are 40+ free presets in Filmora that you can download and apply within the app. In addition, you can do custom color settings and save them as custom presets. You can also use the 3D LUT feature to set preferences for specific factors.
4. Text-to-Speech
Another important feature that helps with interactive video creation is text-to-speech. It allows users to transform text into speech with voice selection options. The software has been trained on NLP and integrates realistic voices in videos. Being closer to the human voice helps with better audience interaction and understanding.
Conclusion
The main theme of this article was how to slow down a video on iPhone and the tools to do it. We mentioned 4 applications that are compatible with higher versions of the iPhone. In addition, the article provided detailed guides on all these applications.
Among them, Wondershare Filmora has been integrated with an advanced slow-mo feature. It allows a seamless and professional user interface to import, edit, and customize. The AI Optical Flow in it adds a remarkable fine touch to your slow-mo video.
Make A Slow Motion Video Make A Slow Motion Video More Features

Part 1: Pre-Recorded A Video? Adjust Slow Motion Parameters Right Away
One of the major reasons Gen Z and Gen Alpha opt for iPhones is their high-quality camera. It is ideal for capturing and editing videos in high resolution is ideal. In 2013, iPhones were integrated with the Slow-mo feature for creative purposes. Where first users needed third-party applications, they could use the built-in feature. Here is how do you slow down a video on iPhone officially:
Step 1
Locate the “Photos” application on your iPhone and launch it by simply clicking. Upon accessing the app, go to the bottom and click on “Albums.” Afterward, click the “Slo-mo” option from the expanding menu. Formerly, select a video from your device media library import.

Step 2
Once the video has been selected, navigate to the top right corner and select “Edit.”

Step 3
When the editing panel appears, navigate towards the bottom of the timeline bar. Drag the slider’s position to adjust the speed to create a slow motion. As the slow-motion effect has been created, click the “Done” button. Commencing this action will finalize your slow-motion video.

Part 2: Some Top-Notch Solutions to Slow Down Any Video on iPhone
The iPhone does offer a built-in feature to help you curate a perfect slow-mo. Nonetheless, a third-party application can offer additional and upgraded features. They offer specialized effects and filters, multiplatform support, and more. This section discusses 4 applications and how to make video slow motion iPhone using them. Find the brief introduction, capabilities, and guides of these apps below:
- SpeedPro Slow Speed Video Edit
- Slow Fast Slow – Control the Speed of Your Videos
- Slo Mo – Speed Up Video Editor
- Video Speed Editor Slow & Fast
1. SpeedPro Slow Speed Video Edit
This is an exclusive application to answer your question about how to put a video in slow motion on an iPhone. This application offers a -2x to -6x playback speed option for a slow-mo. Its intuitive feature enables speed alteration from a specific video section. This option is ideal for creatively editing your Instagram reels. Along with slowing down the speed, you can also enhance it for fast motion generation.

Key Features
- The application offers a timeline editing interface that enhances precision and accuracy.
- It possesses the ability to incorporate music in your videos using its Music feature.
- The application collaborates with social platforms like Instagram and Facebook for
Steps to Add Slow Motion in Video Using SpeedPro Slow Speed Video Edit
When you embark on a new experience, using something for the first time can be tricky. The unfamiliarity makes it harder, and one doubts its abilities. Hence, consider us your partner in guiding you on how to edit slow motion on your iPhone. We have curated a step-by-step guide to help you in creating a slow-mo:
Step 1: After downloading and accessing the application’s main menu, click the “Speed Pro” option. Then, select a video clip from your device that you desire to apply this effect to.

Step 2: Once the video clip has been selected, click the “Done” button to import.

Step 3: Afterward, you’ll be redirected to its editing interface for speed change. Navigate toward the speed slider at the bottom of the video display. Drag the slider towards the left to select a suitable playback speed option. You can also apply the slow-mo to a specific area by dragging the timeline slider.

2. Slow Fast Slow - Control the Speed of Your Videos
Use this application to record a slow-motion video or add the effect in post-production editing. This application offers a high frame rate of 240 fps for a high-grade slow-mo effect. This means you can now slow a video up to 1/16th of its original speed. It wins at creating slow motion with the iPhone’s built-in speed manipulation feature.

Key Features
- Provides audio pitch maintenance feature during speed alteration.
- Gives the option to adjust the screen ratio before editing, like square or more.
- The application is compatible with all your iOS 10.0 devices and higher versions.
Steps to Add Slow Motion in Video Using Slow Fast Slow
The encounter with an advanced tool or application is often stressful as you are unfamiliar with it. You do not want to mess up the video, so you must master an app. Following is how to slow down a video on an iPhone using the Slow Fast Slow app:
Step 1: After launching the application, give it access to your files for editing. Then, click on the “Other Videos” option to select a video from a device for slow-mo.

Step 2: Once the video has been imported, you will reach the editing interface. You’ll notice a slider with different points. These points indicate the time frames of your video. The slider is positioned downward to add a slow-mo effect at specific durations.

Step 3: Once you are done with the editing, click the play button to preview. Next, navigate towards the right-side bottom of the preview screen and hit “Export.” Select any particular resolution to save the slowed-down video on your device.

3. Slo Mo – Speed Up Video Editor
Are you looking for a versatile application about how to make a normal video slow-motion iPhone 13? Fashioned to modify a video’s speed, this app can help you. It allows users to adjust the video speed up to 12x for slow and fast motion. In addition, you can alter the video frame rate up to 240 fps at precise frames.

Key Feature
- With an additional freeze frame feature, infuse an innovative touch to videos.
- Experience a more productive workflow with its quick processing feature.
- Keeping up an accessible to all approach, the user interface is straightforward and minimal.
Steps to Add Slow Motion in Video Using Slo Mo – Speed Up Video Editor
Those initial stages of operating a new app and getting your hands on its UI are difficult. However, this article prioritizes your ease more than anything. Find our guide on how to make a video in slow motion on iPhone here:
Step 1: Upon launching the application, it will ask you for storage access. After that, you’ll have to import a video to add slow motion. Just select any normal video on your device and click on the “Next” option.

Step 2: Navigate toward the bar at the bottom of the timeline panel and select “Adjust.”

Step 3: This will feature the speed control options on your screen; go to “Advance.” Further, change the speed change slider towards the left to manipulate it. Afterward, preview the video and click on the “tick” icon.

Step 4: Further, select the “Export” icon appearing in the expanded menu.

4. Video Speed Editor Slow & Fast
How do you slow down a video on an iPhone after recording in a minimalistic way? This iPhone application is designed for such contexts to create slow-motion videos. Users can slow down a clip’s playback speed up to 8x at specific durations. Simply trim the video parts to apply the speed setting at specific sections and merge them later.

Key Features
- After slow motion, you have the option to keep the original sound or insert music offered by it.
- The timeline editing method helps you to trim the video at the right time.
- The application is compatible with iOS 12.0, iPadOS 12.0, macOS 11.0, and newer versions.
Steps to Add Slow Motion in Video Using Video Speed Editor Slow & Fast
This application has an innovative user interface with a simple operational menu. To add a slow-motion effect to a video, buy its Pro subscription first. To assist you further, here is how to slow down an iPhone video in it:
Step 1: Create a new project after launching the application and giving access to storage. Do this by clicking on the screen saying, “Tap to create a new project.”

Step 2: From the Videos section of your media, select a video and hit “Choose.”

Step 3: In the editing interface, simply select a speed option from -2x to -8x for slowing. Once the video is slowed down according to your preferences, export it.

Part 3: Failed to Slow Down Video Properly? Try Wondershare Filmora as a Remedy
Have you tried all the given solutions on how to slow-mo a video on an iPhone and are still clueless? Not getting the desired results can be frustrating, but we have brought the best answer. Wondershare Filmora helps you achieve slow motion on a computer or laptop. The software is compatible with all Windows and macOS devices. You can just connect your iPhone with the source using a cable and import media.
Being a versatile software, Filmora introduces you to two advanced methods. Uniform speed emerges as a simple method of creating a slow-motion effect. On the other hand, Speed Ramping allows you to edit speed for professional purposes. Amongst speed alteration, users can also use the frame interpolation technique. It increases video frames to ensure a smooth playback during slow-mo.
Step-by-Step Guide to Creating Slow-Motion in Filmora
If you are using Filmora for the first time, the user interface might initially seem confusing. However, in comparison to other post-production software, it possesses a minimal interface. In this section, learn about how to slo-mo a video iPhone using Filmora:
Free Download For Win 7 or later(64-bit)
Free Download For macOS 10.14 or later
Step 1Connect iPhone and Import Clip
Once you have created a new project on Filmora, import media. First, to import media from your iPhone, connect it to your computer or related device. Then, go to “Import” > “Import from a Camera or Phone” option. Further, select the device name and import data.

Step 2Access Speed Ramping Option
Use your cursor to bring the edited media to the timeline and select it. From the appearing settings panel, access the “Speed” > “Speed Ramping” tabs. Here, either choose any of the predesigned templates or customize one.

Step 3Enable Optical Flow for Additional Touch
If the slow motion seems rough or abrupt, Filmora has a solution to that as well. Go to the “AI Frame Interpolation” section and expand it. From the expanding menu, click the “Optical Flow” option for a high-quality slow-mo.

Step 4Rendering for Final Preview
To observe the overall results, navigate towards the top toolbar. Select the “File” tab and “Render Preview” from the dropdown menu. After reviewing the final video, use your cursor to click the “Export” button.

Key Features of Wondershare Filmora
Wondershare Filmora provides a wide range of features for a full-fledged editing experience. Some of these features are for video, some are for audio, and others are for visuals. Here is a list of some of Filmora’s key features that you must give a try to:
1. Instant Mode
Once you have recorded a video, the post-production process cannot be neglected. However, when you start editing a video, the process might be confusing at first. With Filmora’s Instant Mode, use AI’s assistance to edit any video without effort. There are 115 built-in templates to integrate according to context and highlights it.
2. Green Screen
Integrate attractive backgrounds in your videos, like mountains, beaches, or more. With Filmora’s Green Screen feature, remove the video backgrounds with accuracy. After removing the background, you can insert multiple backgrounds, like solid colors. If there are backgrounds that you have previously saved, import them to the timeline. They will automatically show in the video, and you can customize them further.
3. Color Correction
Filmora offers an extensive range of color correction elements to enhance visibility. There are 40+ free presets in Filmora that you can download and apply within the app. In addition, you can do custom color settings and save them as custom presets. You can also use the 3D LUT feature to set preferences for specific factors.
4. Text-to-Speech
Another important feature that helps with interactive video creation is text-to-speech. It allows users to transform text into speech with voice selection options. The software has been trained on NLP and integrates realistic voices in videos. Being closer to the human voice helps with better audience interaction and understanding.
Conclusion
The main theme of this article was how to slow down a video on iPhone and the tools to do it. We mentioned 4 applications that are compatible with higher versions of the iPhone. In addition, the article provided detailed guides on all these applications.
Among them, Wondershare Filmora has been integrated with an advanced slow-mo feature. It allows a seamless and professional user interface to import, edit, and customize. The AI Optical Flow in it adds a remarkable fine touch to your slow-mo video.
Also read:
- New Are You Excited to Learn About a Video Maker with a Song? Do You Want to Create a Video Embedded with Audio Tracks to Entertain the Viewers? Then, This Guide Assists You to Build Interesting Videos Along with Songs Precisely
- You Can Create Interaction Videos with Friends and Family by Sitting Far Away, Which Seems Innovative. In This Article, Youll Get a Guide to Edit a Split-Screen Video on Filmora
- Updated 2024 Approved Deleting White Background in Photoshop Is Hard? No
- New Best 5 Apps To Add Song To Video for 2024
- In 2024, An Ultimate Guide on the Significance of Music in Videos and How to Choose the Right Music for Your Videos with Wondershare Filmora
- Updated Find The Best Free Canon LUTs
- Updated 2024 Approved Best Animated Video Makers
- In 2024, | How to Livestream Zoom on Facebook?
- 3 In-Camera Transitions Tricks To Make Videos Like a Pro for 2024
- Troubleshoot Snapchat Camera Zoomed in Issue 4 Tips
- Updated In 2024, Everything That You Need to Know About Video Montages- Ideas, Techniqu
- In 2024, How to Do Masking in After Effects Alternative Provided
- Updated Best 4 Love Video Maker with Music
- New 2024 Approved This Article Introduce You the Best Video Trimmers to Use on Different Devices, Check Them Out and Choose Your Favoriate One
- Let Us Help You with Something that You Might Not Know. Have You Ever Worked with MOV File Format Before? Or Do You Know What that Is? Lets Talk About It
- 2024 Approved The Top 10 AI Video Analytics Companies at a Glance
- Updated Looking Forward to Try Hands at Using the Icecream Slideshow Maker Program to Create High End Slideshow Presentations? Stay Here for a Complete Insight Into the Process
- Fast and Easy Method to Match Color in Photoshop for 2024
- In 2024, If You Are Wondering How to Play a Slideshow in PowerPoint Automatically, This Article Is for You. Here We Will Be Looking at How to Add a Slideshow in PowerPoint and Other Relevant Headings that Would Help You Quickly Work on a PowerPoint
- New Vegas Pro - How to Download, Install and Use It, In 2024
- Updated 2024 Approved 15 Camera Shake Preset for Adobe Premiere Pro
- Updated In 2024, Explore Our Comprehensive Guide to the 10 Best Cameras . Unlock the World of Advanced Technology Perfect for Capturing Slow-Motion Footage in Various Scenarios
- Read This Guide to Find a Reliable Alternative to Fake GPS On Realme Narzo 60x 5G | Dr.fone
- Simple ways to get lost music back from Samsung Galaxy S23 Tactical Edition
- How to Fix It Infinix Zero 5G 2023 Turbo Wont Turn On | Dr.fone
- Complete guide for recovering video files on Vivo X100 Pro
- All About Kapwing Video Translation for 2024
- In 2024, How to Bypass Google FRP Lock from HTC Devices
- In 2024, How to Mirror PC Screen to Vivo Y100i Power 5G Phones? | Dr.fone
- Recover iPhone 13 mini Data From iTunes Backup | Dr.fone
- In 2024, CatchEmAll Celebrate National Pokémon Day with Virtual Location On Apple iPhone 8 | Dr.fone
- Turn Off Screen Lock - Xiaomi 14 Pro
- In 2024, Best Ways to Bypass iCloud Activation Lock on iPhone 13 Pro Max/iPad/iPod
- Solved Photos Disappeared from iPhone 12 Pro Suddenly | Stellar
- How to Transfer Data from Honor Magic 6 to Samsung Phone | Dr.fone
- How to Change Location On Facebook Dating for your Realme 11 Pro | Dr.fone
- Overview of the Best Xiaomi 14 Ultra Screen Mirroring App | Dr.fone
- A Detailed VPNa Fake GPS Location Free Review On Samsung Galaxy Z Flip 5 | Dr.fone
- Title: AVI Video Format How to Open, Play, Edit AVI File, In 2024
- Author: Morgan
- Created at : 2024-05-19 05:12:11
- Updated at : 2024-05-20 05:12:11
- Link: https://ai-video-editing.techidaily.com/avi-video-format-how-to-open-play-edit-avi-file-in-2024/
- License: This work is licensed under CC BY-NC-SA 4.0.

