Backup and Organize Your Tons of Footage in Minutes

Backup and Organize Your Tons of Footage in Minutes
Backing up your data is deemed significantly necessary among video editing communities. Files get corrupted easily. Having a backup drive can save your day and countless hours. You can back up your data any way you deem fit. However, it will do you right if you follow the advice of professionals.
The article is written explicitly after due consideration and suggestions from the professional video editor. You can follow the steps in it to make backup files. Let us start with very straightforward steps to help you understand the professional way of backing up and organizing your footage.
Part 1. Back Up Your Files
Backing up your files gives you peace of mind. If one file is lost, the whole project becomes vulnerable to failure. Therefore, every effort must be made to ensure the protection of files. The best way to protect the files from any misfortune is to back them up.
Remember, there is no specific way to back up your files. Depending on the project’s requirements, you can do that differently. The following steps will light up how you can back up your files.
Step1Back up your files in two different places
It is crucial to do that. If one backup drive corrupts, you have the second option. It gives you an opportunity to back up files.
- You can make two different external backup hard drives.
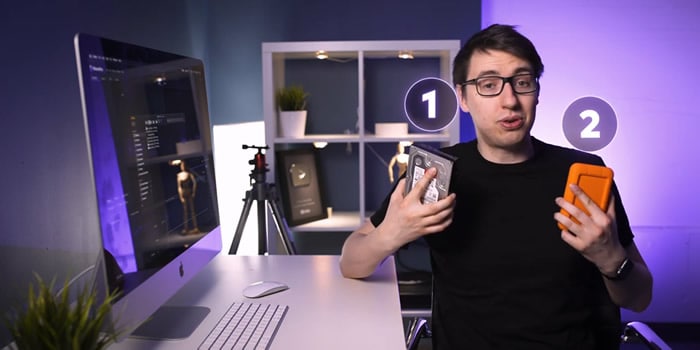
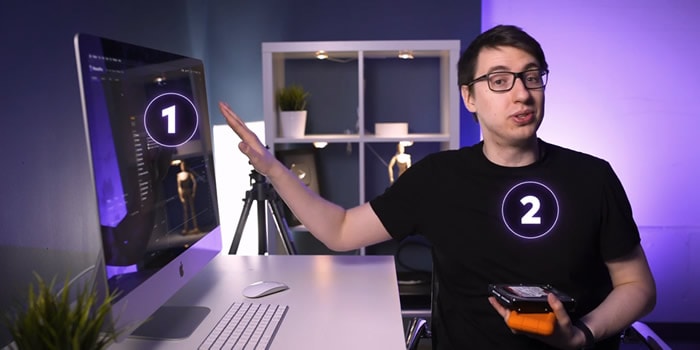
- You can also use your internal and external devices as two backup options.
Step2Make specific folders for each purpose of the video
The next step is how you back up your files properly and safely. Make separate folders for the different formats you are importing in your drive. Always use the primary source to make a copy of your files.
Follow the steps below to understand how to back up your files in two drives.
- Create a folder in your drive.
- Name it. You can name it according to the given format. The choice is yours.
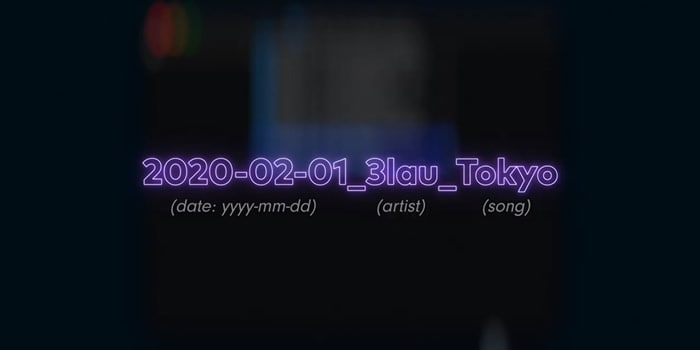
- Your backup folder is created.
- Make new folders based on the files that are imported into the file. We are making two folders for the project, 01 Footage, and 02 Audio.
- 01 Footage is for the original footage.
- 02 Audio is for audio files provided by the music artist.
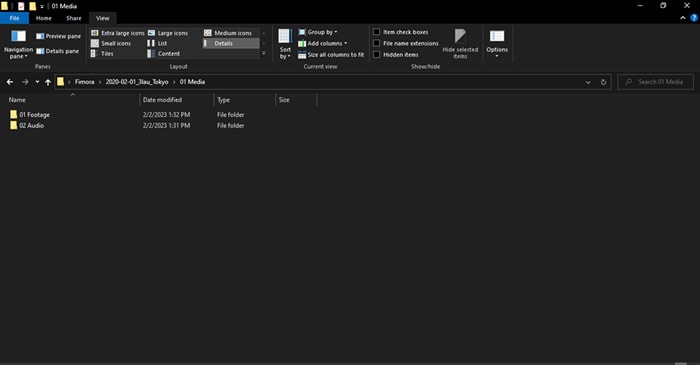
Step3Repeat the same process in your second backup drive
- Make the same folders and sub-folders in your secondary backup drive.
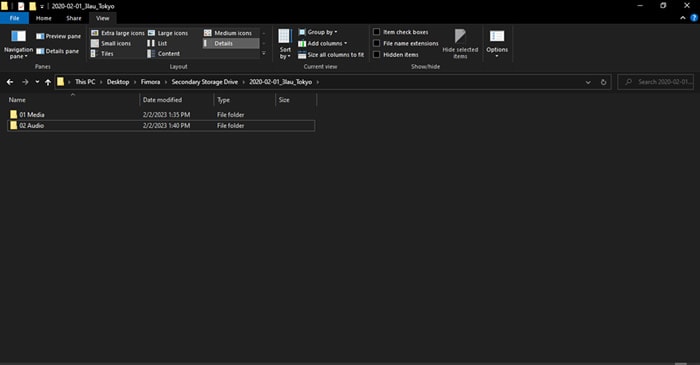
Step4Transfer files to your primary and secondary folders
- Transfer files to folders and sub-folders in your first backup drive.
- Transfer files to folders and sub-folders in your secondary backup drive.
![]()
Note: Most people make the mistake of making a backup drive and then using the same drive to make the second backup. The approach needs to be corrected.
We are done with backing up our files. It is time to organize the files in your drive.
Part 2. Organize Your Files in Filmora
Organizing your files is vital for any operation in video and editing. It makes everything streamlined. The risk of losing your data become negligible. Let us enlighten you on how you can organize your files.
Free Download For Win 7 or later(64-bit)
Free Download For macOS 10.14 or later
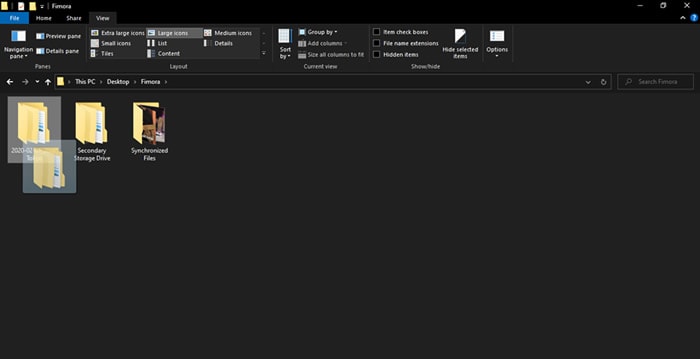
Step1Create new folders to lay the foundation for your video editing project
You can imitate the format we have chosen. However, you can choose any way you deem fit.
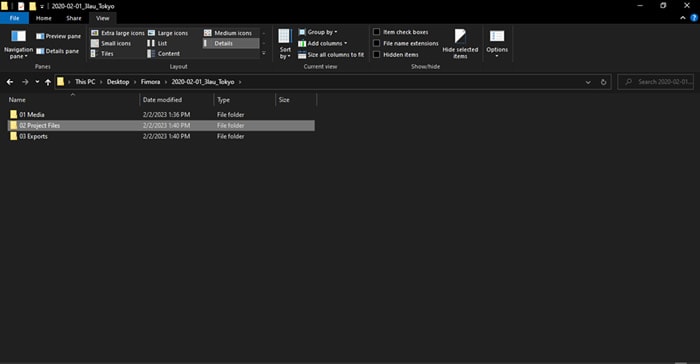
- Create 02 Project Files and 03 Exports.
- 02 Project contains the files that we will edit in Filmora .
- 03 Exports will have files that will be exported out of Filmora.
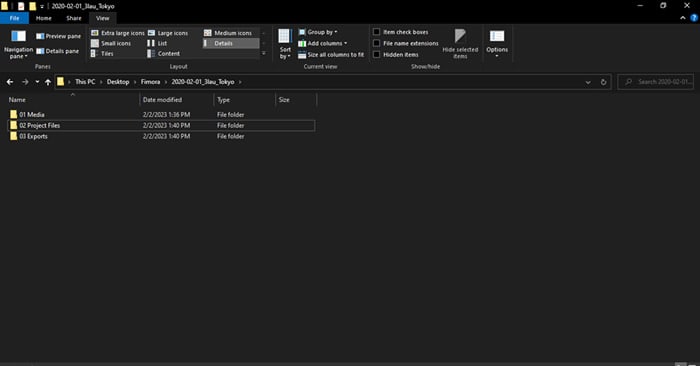
- In the 01 Media folder, create a new folder, 03 Graphics. It will contain graphics the artist will provide, such as a logo. You can also add your graphics to the folder if you want.
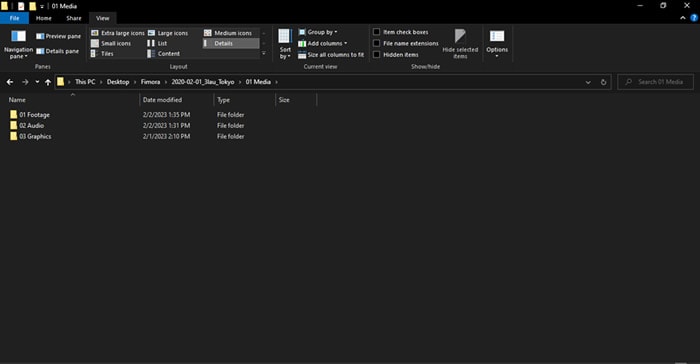
The format will help you if you move files from one device to the next case. In that case, you will only have to move one folder with the artist’s name.
Step2Create a new project
In this step, we will organize our files in Filmora. It will help us to keep discipline and order in file organization. It makes work easy and fun.
- Create a new project when you open Filmora on your PC or Mac.
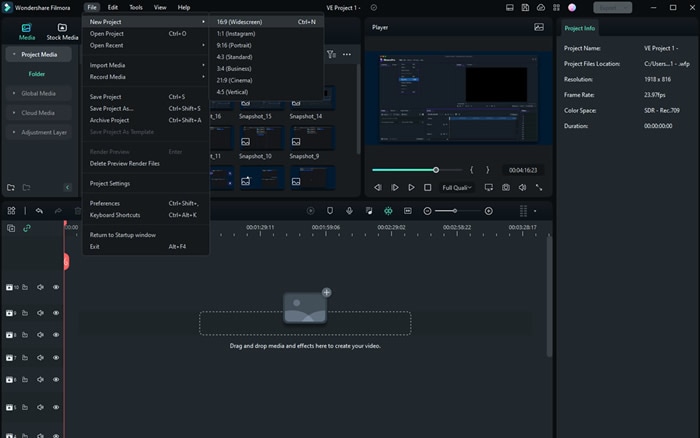
- Save the project in any name you want. We have saved the project in the format explained above.
- Save the file in 02 Project Files.
Step3Edit your workspace if you want
Users can edit the workspace in Filmora. You can customize it to your liking. Also, it is entirely optional.
- Go to layout mode. Change the layout if you want.
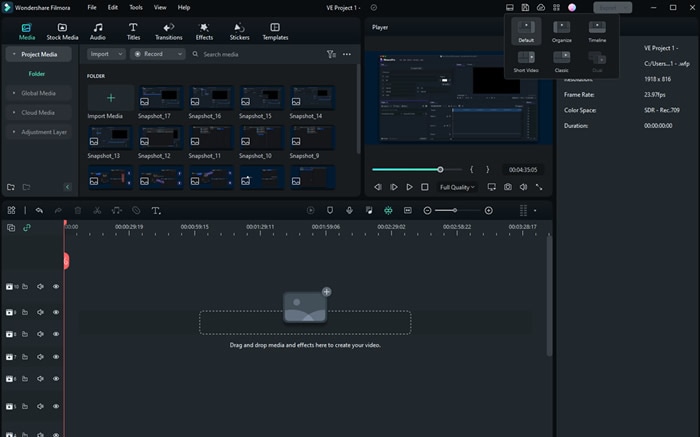
- You can manually change the panels by simply dragging them across the screen.
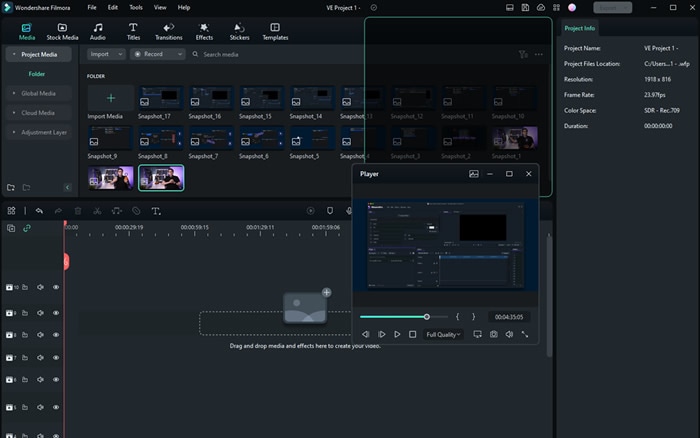
The workspace settings will be saved automatically. The next time you start Filmora, you will not need to readjust the panels.
- Save the file
Step4Recreate the file structure in your 02 project files
Now, you create folders in your project. For that, you can follow our structure, or you can follow your instincts.
- Create the folders in Filmora, as you have created them in your drive. The folders will be created in your 02 Project Files.
These new folders are the exact copies of your media files that you have got from the producer and music artist.
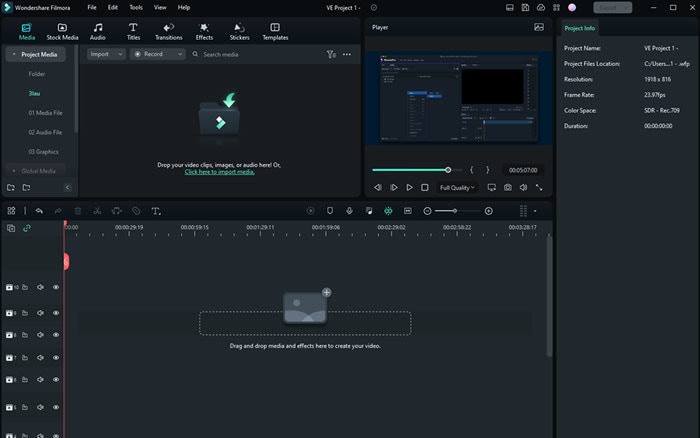
- Import the files into respective folders. Footage should include all the original videos given to your producers.
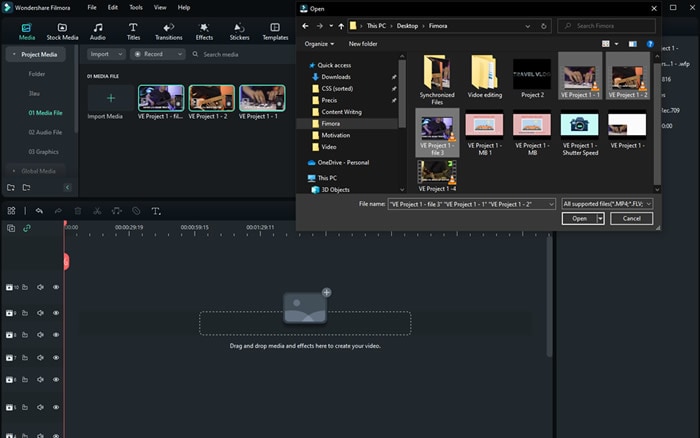
Step5Save the project
You can save the file using the button on Filmora, as shown below.
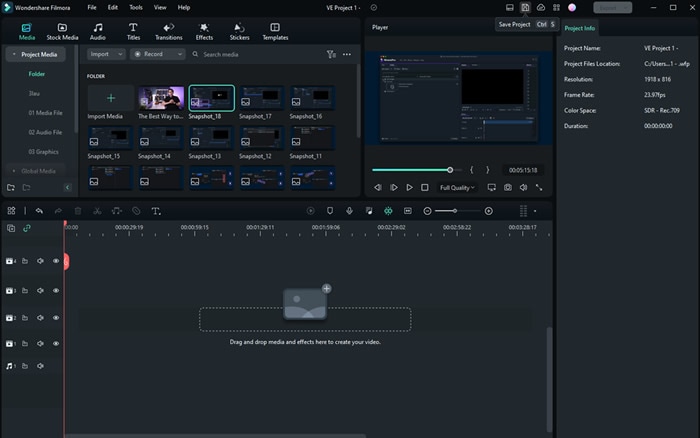
- You can save the files using short keys.

Conclusion
Making a backup file for your project is crucial. For a video editor, it is quite painful to learn that the final product has a missing file. Therefore, one must ensure that all the files are backed up before beginning the editing phase.
Apart from that, one must also keep updating the files in Filmora . You performed some editing. Make sure to save the file then and there. Any minor mistake can cause great worry for the professional editor. Thus, it is better to take proactive actions.
Free Download For Win 7 or later(64-bit)
Free Download For macOS 10.14 or later
We are done with backing up our files. It is time to organize the files in your drive.
Part 2. Organize Your Files in Filmora
Organizing your files is vital for any operation in video and editing. It makes everything streamlined. The risk of losing your data become negligible. Let us enlighten you on how you can organize your files.
Free Download For Win 7 or later(64-bit)
Free Download For macOS 10.14 or later
Step1Create new folders to lay the foundation for your video editing project
You can imitate the format we have chosen. However, you can choose any way you deem fit.
- Create 02 Project Files and 03 Exports.
- 02 Project contains the files that we will edit in Filmora .
- 03 Exports will have files that will be exported out of Filmora.

- In the 01 Media folder, create a new folder, 03 Graphics. It will contain graphics the artist will provide, such as a logo. You can also add your graphics to the folder if you want.

The format will help you if you move files from one device to the next case. In that case, you will only have to move one folder with the artist’s name.

Step2Create a new project
In this step, we will organize our files in Filmora. It will help us to keep discipline and order in file organization. It makes work easy and fun.
- Create a new project when you open Filmora on your PC or Mac.

- Save the project in any name you want. We have saved the project in the format explained above.
- Save the file in 02 Project Files.

Step3Edit your workspace if you want
Users can edit the workspace in Filmora. You can customize it to your liking. Also, it is entirely optional.
- Go to layout mode. Change the layout if you want.

- You can manually change the panels by simply dragging them across the screen.

The workspace settings will be saved automatically. The next time you start Filmora, you will not need to readjust the panels.
- Save the file
Step4Recreate the file structure in your 02 project files
Now, you create folders in your project. For that, you can follow our structure, or you can follow your instincts.
- Create the folders in Filmora, as you have created them in your drive. The folders will be created in your 02 Project Files.
These new folders are the exact copies of your media files that you have got from the producer and music artist.

- Import the files into respective folders. Footage should include all the original videos given to your producers.

Step5Save the project
You can save the file using the button on Filmora, as shown below.

- You can save the files using short keys.

Conclusion
Making a backup file for your project is crucial. For a video editor, it is quite painful to learn that the final product has a missing file. Therefore, one must ensure that all the files are backed up before beginning the editing phase.
Apart from that, one must also keep updating the files in Filmora . You performed some editing. Make sure to save the file then and there. Any minor mistake can cause great worry for the professional editor. Thus, it is better to take proactive actions.
Free Download For Win 7 or later(64-bit)
Free Download For macOS 10.14 or later
15 Best LUTS to Buy
The LUTs application improves the quality factors of the media files. It works on the color gradients and performs corrections with the existing images to bring out the best in the captures. Some details become visible only after making innovative corrections using the best LUTs program.
Using this tool, you can create filters and apply them to the photos in no time. Choose reliable applications to obtain the desired outcomes. Select the programs that carry in-built elements and a user-friendly interface for optimal tool usage. In this article, you will explore the top 15 best LUTs you can buy in 2024 to increase the overall view of the photos and videos.

Here, quickly surf the wide range of the LUTs app and its related details. Connect with the right ones that match your needs.
1. Urban Dark LUTs
The Urban dark LUTs are exclusively designed to display the city environment. You can use these LUTs to enhance your shot with urban effects. The relevant color gradients are applied to this file.
Price: $37.

Urban Dark LUTs
2. Osiris Cinematic LUT
The Osiris Cinematic LUT hails from a reputed developer Vision Color. This pack contains 3 different LUT effects with processed films to provide cinematic looks to the media content. Many filmmakers use this LUT effect frequently to reveal the realistic shots in their movies.
Price: $57

Osiris Cinematic LUT
3. Black Magic LUT
The Black magic LUT corrects the color shifts and brings out the natural flavors in the shots. This LUT effect includes the skin tone and displays the realistic colors on the captured content.
Price: $22.

Black Magic LUT
4. Filmic Tone LUT
In this LUT, you can rectify the color gradients and match the skin tone perfectly. It contains dark vibes and it is enough if you import this LUT to the editing interface without any complex installation process. The Filmic Tone LUT seems to be compatible with different video editing platforms.
Price: $28.

Filmic Tone LUT
5. Moody Bundles
Here, you can find seven types of LUT effects available in this pack. It displays the atmospheric vibes and specializes in the moods related to the landscapes, weather, fashion, and sports. Choose the LUTs as per the genre of the video clippings.
Price: $91

Moody Bundles
6. Filippo Cinotti
The film lovers use these LUT effects to adjust the shadows and highlights on the captured content. There are options to customize this LUT using the in-built color panel available with the video editing environment like Adobe Premiere, Photoshop and many more adds to the list.
Price: $29

Filippo Cinotti
7. Winter Lifestyle LUT pack
This LUTs pack is specially built to apply winter effects to the media content. It helps to include the snow, and white environment in the background to add flavor to the capture. There are more than 30 winter lifestyle LUTs effects available to include in the videos and photos effortlessly.
Price: $55

Winter Lifestyle LUT pack
8. Autumn LUTs pack
There are 20 autumn LUTs packs available in this product to edit the videos and photos with unique effects. Instead of applying similar filters to the media content, try this autumn collection LUTs to view different looks of your photos and videos.
Price: $35

Autumn LUTs pack
9. Sports LUTs
It is a pack of 20 unique sports LUTs exclusively available to insert into your videos and images. Customize the LUTs by adjusting the brightness, contrast, color grading and intensity values to add value to the captured content.
Price: $36

Sports LUTs
10. Christmas LUTs
Use these LUTs during the festival season and create an impact on the viewers. You can impress the audience by playing the videos edited using the Christmas LUTs at the time of family and friend get together. Here the effects are highly professional and no compromises with the quality factors.
Price: $36

Christmas LUTs
11. Beach LUTs
When you shoot the memorable moments on the beach, edit the content using 20 different types of beach LUTs. They are highly professional and work on the blue color with intense gradients to provide natural looks overall.
Price: $36

Beach LUTs
12. Black and White LUTs
To add the black and white color gradients to the imported videos or photos, this LUT gives you great effects. Brush the media file with black and white shades to obtain a new look at the existing content.
Price: $17

Black and White LUTs
13. Creamy LUTs
In these LUTs, you can add the skin tone effects realistically on the characters in the video content. The skin color is quickly matched by adjusting the color gradients. The creamy nature of the skin tone is retained using these LUTs.
Price: $36

Creamy LUTs
14. Retro LUTs
The retro effects are assured when you apply these LUTs in your video. Convert your latest images and videos into a retro mood by using the Retro LUTs while editing the media content on any platform. There are 20 different retro LUTs to add flavors to the videos.
Price: $36

Retro LUTs
15. Epic LUTs
When you narrate a story with the photos and videos, then insert the epic LUTs in the content to convey the tracks as a history. Resemble any epic events in your shots and use these LUTs to maintain the realistic looks overall.
Price: $36

Epic LUTs
Bonus! Use your LUTs in Filmora
Now, it is high time to study the usage of LUTs effects in Filmora and build a media file outstanding. The Filmora is a video editor tool that edits the video content beyond imagination. It allows you to perform limitless edits in your content hassle-free. You can easily upload the content from any storage space and quickly add desired effects to the videos. Apart from effects, you can insert transitions, animations, and icons to create an impact on the audience who watches the final edited video content. The Filmora video editor satisfies both the professionals and newbies giving satisfactory results.
Follow the below steps to insert the LUT effects on the imported video or photos using the Filmora editor application.
Step 1Install the LUTs app
Go to the official webpage of Filmora and download the tool according to the system OS. Install it and launch the application. Then, upload the desired video or photo that requires further edits.
Step 2Choose Effects
Now, tap the Effects option in the menu and select the LUTs option in the left panel of the screen. Next, select your favorite LUT effect displayed on the right side of the screen. Here, you can find a wide range of LUTs to include in the loaded videos or photos.

Choose Effects
Step 3Apply Now
Finally, hit the Apply button to insert the chosen LUT effect into the imported video or photo. There are options to expand the Effects library by loading LUTs from external sources. Click the Custom LUT tab and tap the drop-down menu nearby the 3D LUT label. Then, choose the Load New LUTs option to include extra LUTs in the list. You can include them in further video edits on the Filmora interface.

Load New LUTs
You can also customize the available LUT effects in the Filmora library according to the video or photo content. Use the Filmora video editor program optimally to bring the best in the content and entertain the audience for better reach. Every edit reveals the expected displays of the media content. Choose the editing features in the Filmora Video Editor app precisely for satisfactory results.
Wondershare Filmora11 Express Better
Achieve More
Grow Together
Free Download Free Download Learn More

Summarize:
Thus, you are the last lines in the discussion of the best LUTs you can purchase in 2024. Quickly rush up to the stores before the above discussed LUTs becomes out of stock. You can wait for a few days if your favorite LUTs go unavailable. Choose the LUTs professionally and use the Filmora Video Editor to insert the LUTs optimally in the video content. Connect with this article to gather exciting facts about LUTs.
Free Download Free Download Learn More

Summarize:
Thus, you are the last lines in the discussion of the best LUTs you can purchase in 2024. Quickly rush up to the stores before the above discussed LUTs becomes out of stock. You can wait for a few days if your favorite LUTs go unavailable. Choose the LUTs professionally and use the Filmora Video Editor to insert the LUTs optimally in the video content. Connect with this article to gather exciting facts about LUTs.
This Article Will Address Your Questions About the Easiest Way to Turn a Blog Into a Podcast. Let’s Begin with the Reasons Why You Should Do a Podcast
Being a content creator, either writing or generating videos, requires podcast text-to-speech knowledge. The impact of content depends on how many people see it. It means finding new ways to get it into real and virtual places where customers and users might be.
Depending on the context, podcasting can be a perfect alternative for sharing content.
This article will address your questions about the easiest way to turn a blog into a podcast. Let’s begin with the reasons why you should do a podcast.
Part 1. Why You Should Podcast
Podcasts are one of the simplest and most cost-effective ways. It helps to advertise yourself and your products to a highly targeted audience. Podcasts are also excellent for engaging with potential clients interested in your content. In your field, you can achieve fame and expertise.

Repurposing of Content
Podcasters can maximize their potential for successful episodes and repurposing their podcast into multiple content pieces.
This podcasting strategy can help you reach more people by putting your podcasts on more channels and engaging more people who might be interested.
More Fulfilling than Articles
Unlike music, news, TV, and social media, podcast listeners don’t have to watch the screen like they do with YouTube videos or TV shows. This means they can listen while walking or driving home from work.
Podcasts are the best way to get people to pay attention and make fundamental societal changes. They can keep people interested for a long time, so you can go into detail and get personal without turning off your audience.
Minimal Start-Up Costs
To start a podcast, you can spend a little money. Even some of the most famous podcasts use a microphone, a computer, and software for recording. But it’s common to spend more money on advertising and better hosting.
Starting a podcast doesn’t cost much, as you can get everything you need for about $145.
Expansion of Search Potential
In the past few years, many big brands and small to medium-sized businesses have started using podcasts as a marketing strategy. This is because podcasts are becoming more and more popular and can help raise your company’s profile.
Podcasting is another way to disseminate your study to a broader audience, whether that audience consists of policymakers or interested citizens.
Potential to Monetize
Using an affiliate program podcast, you can earn money. Businesses can increase their income by offering paid advertising sponsorships to monetize podcasts. Suppose you accept an affiliate offer to sell ads. In that case, you become the company’s voice and put recorded ads in your podcast episodes.
The most common way to make money from a podcast is through sponsorship. It’s also the easiest way to make money because you don’t have to make or sell anything. You just have to make a deal with a sponsor.
Part 2. Why Are Writers Hesitant to Start a Podcast?
Even after knowing all these benefits, writers are still hesitant to start a podcast. One of the main reasons a writer may be reluctant to launch a podcast is the cost of the necessary equipment. You will need at least $80 to $500 for this unpromissing business.
However, let me tell you a secret that many podcastors didn’t buy any audio equipment for the launch of their podcast channel on Spotify.
Moreover, many writers don’t want to show their voice through recordings. This is because they couldn’t just make a recording and hand it off to a sound specialist. Besides, finding their voice through the stories they write is the routine.
But we all need to get the truth that many podcastors don’t record a single word of the podcast with their own voice. Due to a solution: text-to-speech, technology like this has been around for a while and continues to improve.
The two important issues have been solved, so what are you waiting for? Platform building has always relied heavily on content marketing. With blog posts and social media, additional support was provided, and now podcasts are becoming more commonplace.
Part 3. How to Turn a Text Into a Podcast?
Text To Speech
To turn your text into audible content, Text-to-speech (TTS) is an assistive technology. With a single click, TTS reads your written text aloud. Many people also use it for writing and editing to maintain audience concentration.
Text-to-speech technology is compatible with all digital devices, including computers, tablets, and smartphones. Increasing numbers of websites and products now have developed this function. For example, you can find it within the trusted video editing software like Filmora. With Filmora’s Text to Speech (TTS) feature , you may add extra aspects to your video by turning your text files into voiceovers.
Why we regard text to speech as a good
For writers, imagination is the only tool to construct their stories. To bring our stories to life, all we need is a laptop. The same holds for text-to-speech technologies, which can significantly assist writing and editing by allowing the author to hear their words without using their voice.
- Text-to-speech applications can assist you in repurposing your material.
Your written work can be converted into spoken language or a podcast. A podcast can be converted into a YouTube video with a few alterations. All of these factors can help you reach new audiences.
Repurposing material permits your audience to consume it in a variety of ways. The audience can read, listen to, or view your content.
- Text-to-speech systems enable authors to create information that is accessible.
As per World Health Organization, there are almost 285 million visually impaired persons and 39 million blind people. We writers can create a more inclusive world by constantly keeping accessibility in mind.
The limitations of text to speech
Text-to-speech software is becoming increasingly lifelike thanks to technological advancements. However, it cannot still express genuine human emotions. However, this should allow you to utilize these tools. The positives significantly exceed the disadvantages, and technology is continually improving.
Easiest Fix: Turn Texts Into Podcasts With TTS in Filmora
So how can you use text-to-speech? Andhow you can turn your texts into audio podcasts in a daily routine? Filmora , a all-in-one video editor, gets you the solution.
Free Download For Win 7 or later(64-bit)
Free Download For macOS 10.14 or later
Step1 Download and install Filmora on your PC or Mac.
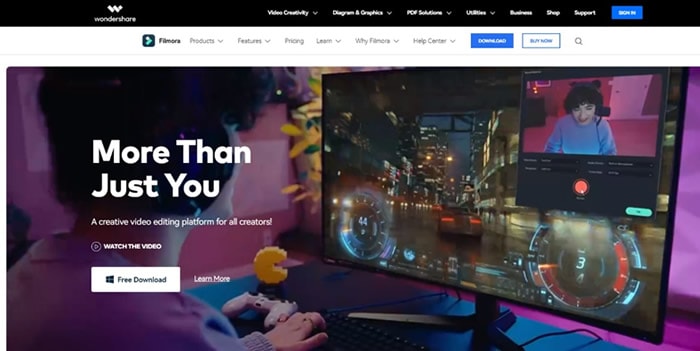
Step2 Open Filmora and select the video on which you wish to add audio.

Step3 After adding your selected video, select the option “Titles” to add text to your video.

Step4 Select your favorite position for text in the video, like “lower third,” which is used the most in video titles.
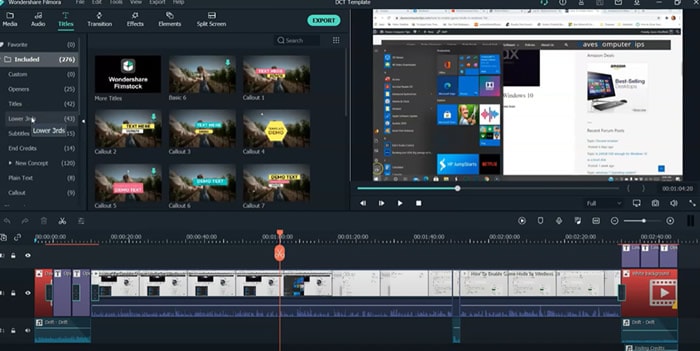
Step5 Add text to the timeline and click “Ok.” You can move the red timeline marker if you want your text in a certain spot.

Click the “+” button marked in the picture below to add text.

You can also edit the text by changing its style, color, and font or by animating it.

Step6 Press the “Text-to-Speech” button in the lower right side and choose your preferred voice. For example, Lilly’s voice resembles Siri.

You can also choose another language other than English.

Click “Ok” once you’ve selected everything according to your requirements.
Step7 Once the transcription is completed, go ahead and test the video and audio to see if it’s synching.

And that’s done. This is how easy it is to turn your texts into speech using Filmora.
Part 4. Hot FAQs on Podcast Text to Speech
How do I convert podcasts to text?
With the help of the smartphone app Google Recorder you can easily convert podcasts to texts for free.
- Open the app on your phone, start recording to it, and start recording your podcast simultaneously.
- The words will be automatically recorded and entered into the application as you talk into your phone’s microphone.
- After you click stop on the app, you can store and share the files once you finish your recording.
You have an option of sharing the text, the audio, or both. Alternatively, you can save them to your Google Drive if you don’t want to share them.
How to turn my podcast into a sound?
To convert your video podcasts into audio through Filmora. Follow these steps:
- Drag the imported video from the media library into the video timeline.
- To extract the audio from the video, right-click the video clip and select “Audio Detach.”
- After a while, audio and video will be seen on separate tracks.
Can I save the sound after converting text to speech?
Once the text has been converted to speech, you can save the sound. Select your preferred format after clicking the “export” option in Filmora.
Conclusion
Many of us wish to launch a podcast and blog. A productive podcast’s essence is turning writing into audio using various podcasting techniques. AI-powered text-to-speech softwares can quickly convert articles into podcasts. Or, you can invite significant people to your podcast to personalize it. Podcasting can give outdated content a new life.
Free Download For macOS 10.14 or later
Step1 Download and install Filmora on your PC or Mac.

Step2 Open Filmora and select the video on which you wish to add audio.

Step3 After adding your selected video, select the option “Titles” to add text to your video.

Step4 Select your favorite position for text in the video, like “lower third,” which is used the most in video titles.

Step5 Add text to the timeline and click “Ok.” You can move the red timeline marker if you want your text in a certain spot.

Click the “+” button marked in the picture below to add text.

You can also edit the text by changing its style, color, and font or by animating it.

Step6 Press the “Text-to-Speech” button in the lower right side and choose your preferred voice. For example, Lilly’s voice resembles Siri.

You can also choose another language other than English.

Click “Ok” once you’ve selected everything according to your requirements.
Step7 Once the transcription is completed, go ahead and test the video and audio to see if it’s synching.

And that’s done. This is how easy it is to turn your texts into speech using Filmora.
Part 4. Hot FAQs on Podcast Text to Speech
How do I convert podcasts to text?
With the help of the smartphone app Google Recorder you can easily convert podcasts to texts for free.
- Open the app on your phone, start recording to it, and start recording your podcast simultaneously.
- The words will be automatically recorded and entered into the application as you talk into your phone’s microphone.
- After you click stop on the app, you can store and share the files once you finish your recording.
You have an option of sharing the text, the audio, or both. Alternatively, you can save them to your Google Drive if you don’t want to share them.
How to turn my podcast into a sound?
To convert your video podcasts into audio through Filmora. Follow these steps:
- Drag the imported video from the media library into the video timeline.
- To extract the audio from the video, right-click the video clip and select “Audio Detach.”
- After a while, audio and video will be seen on separate tracks.
Can I save the sound after converting text to speech?
Once the text has been converted to speech, you can save the sound. Select your preferred format after clicking the “export” option in Filmora.
Conclusion
Many of us wish to launch a podcast and blog. A productive podcast’s essence is turning writing into audio using various podcasting techniques. AI-powered text-to-speech softwares can quickly convert articles into podcasts. Or, you can invite significant people to your podcast to personalize it. Podcasting can give outdated content a new life.
How to Turn On/Off Motion Blur in Dying Light 2?
Are you playing Dying Light 2 on PlayStation or PC and not satisfied with the graphics? No need to worry, as this article will introduce an efficient way through which you can improve your gaming graphics tremendously. By adding a motion blur effect in your gameplay while playing PlayStation, such as Dying Light 2, you can enhance the visual appeal of the game significantly.
By reading this article, you can come to know how to use Dying Light 2 motion blur proficiently. Thus, continue reading this guide to find out simple solutions to apply the motion blur effect.
Part 1: What is Dying Light 2?
Dying Light 2 , recently released on February 2022, revolves around survival in a zombie-apocalyptic world. It involves a protagonist known as Aiden Caldwell, who comprises different capabilities and skills. Being a player, you can perform various actions such as running, climbing, sliding, etc. This particular game is melee-based, as a majority of the players will be using melee weapons.
Moreover, players can also use other weapons, such as spears, shotguns, or crossbows. As the development occurs while playing the game, you will see that more zombies will be added to give you a thrilling experience. This game is set in the city of Villedor, having beautiful infrastructure. While accomplishing the goals, players can freely roam around the city.
While exploring the city, you would also encounter different inhibitors through which you can enhance the health and power of Aiden. You can easily find this adventurous and thrilling game on various platforms, such as PlayStation 4, PlayStation 5, Xbox One, Xbox Series X/S, Windows, and Nintendo Switch.

Part 2: How to Turn On/Off Motion Blur in Dying Light 2?
Dying Light 2 provides the players complete freedom to change the game settings. On this gaming platform, you can easily modify and adjust the settings according to your need to enhance the graphics while playing the game.
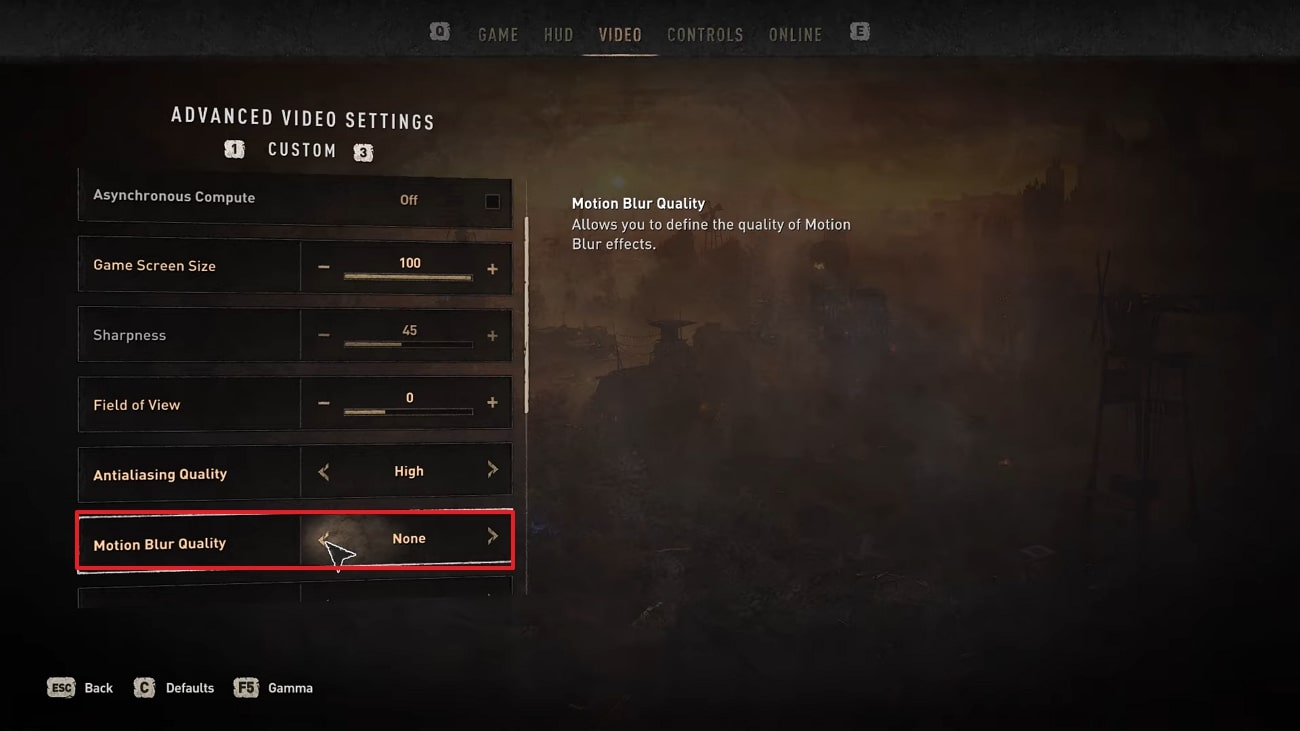
Moreover, unlike other games, you can easily adjust the motion blur quality on Dying Light 2, preferably. To turn off motion blur in Dying Light 2, you can check the following simple instructions:
Step1 Open and load your Dying Light 2 game on your PC. Head to its Menu and select “Options.” Afterward, click on the “Video” option from the top toolbar.
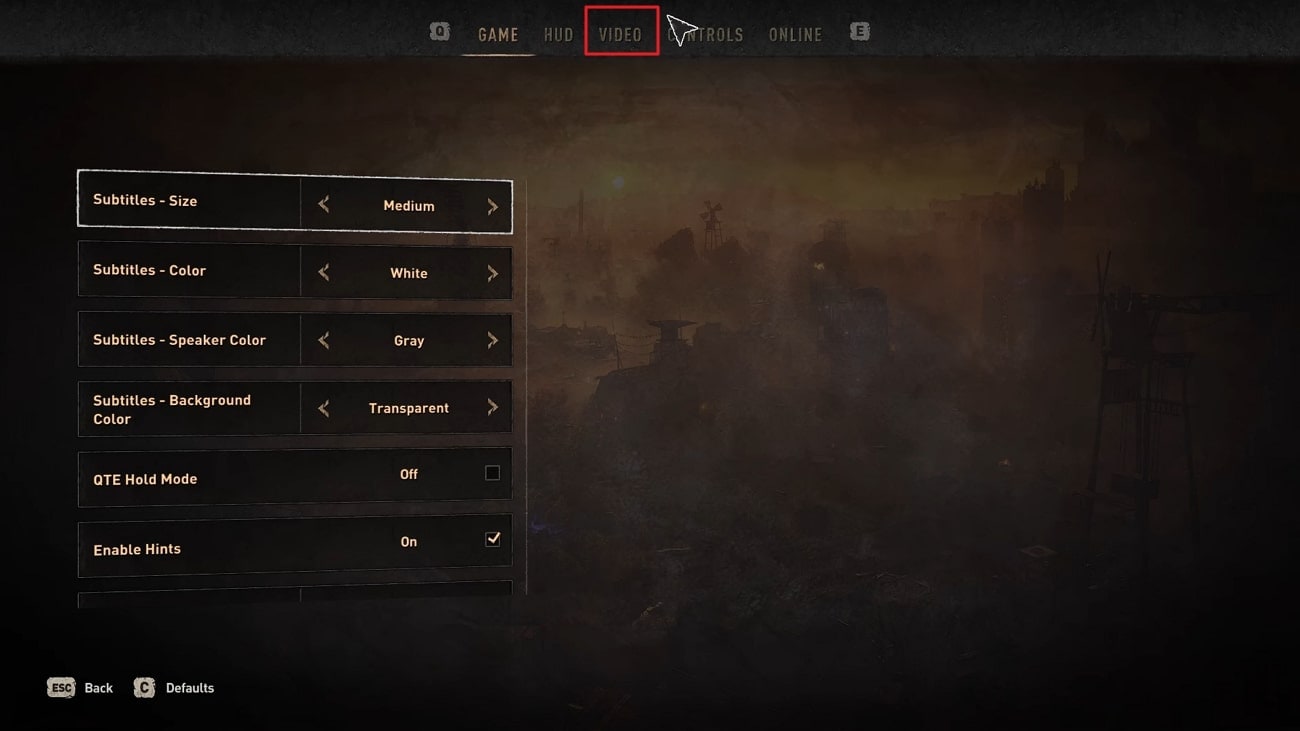
Step2 Now click on “Advanced Video Settings” from the bottom to proceed further. Afterward, scroll down and locate the option called “Motion Blur Quality.” Using this option, you can easily select the mode of motion blur quality, such as Medium, High, Low, or None.
Bonus Tips – How to Add Motion Blur to Your Dying Light Gaming Video
It may be possible that you only want to add the motion blur effect in the game’s highlight. So, if you don’t want to thoroughly add the motion blur effect in the whole gameplay, you can use professional software such as Wondershare Filmora . This platform is supported by all the major operating systems and functions effortlessly. It contains various editing features that can help you to produce a high-end quality video.
Free Download For Win 7 or later(64-bit)
Free Download For macOS 10.14 or later
Moreover, Filmora can also help you in modifying the speed of your video. Using this all-rounder tool, you can also add and synchronize the audio clips with your videos. Apart from editing your videos, you can use this platform to add a motion blur effect to your gaming videos. Hence, it’s a must-try tool to increase the visual appeal of your recorded gameplay.
Key Features of Filmora
- Using Filmora, you can add different transitions and effects to your video clips within a few clicks.
- This tool allows you to split the screen so you can tell the story through your video in a fun way.
- Using the Green Screen feature, you can craft special effects for your videos. Also you can also change and replace the backgrounds of your videos using this special feature.
- To precisely resize your videos without putting in any manual effort, you can use its AI Reframe feature.
How to Add Motion Blur to Dying Light 2 Using Filmora
Are you eager to know how to turn off motion blur Dying Light 2? In this section, we will guide you on how to use Filmora to create a motion blur effect on the desired place of your recorded gameplay. The entire process is simple and easy to follow, even for beginners. Hence, proceed to read this part to check the authentic steps of adding a motion blur effect:
Step1 Choose New Project
Download and initiate the Wondershare Filmora on your PC or Mac. Once done, click on the “New Project” button and then tap on the “Import” icon. By doing so, you can upload the recorded gameplay of Dying Light 2.

Step2 Select the Position to Apply the Effect
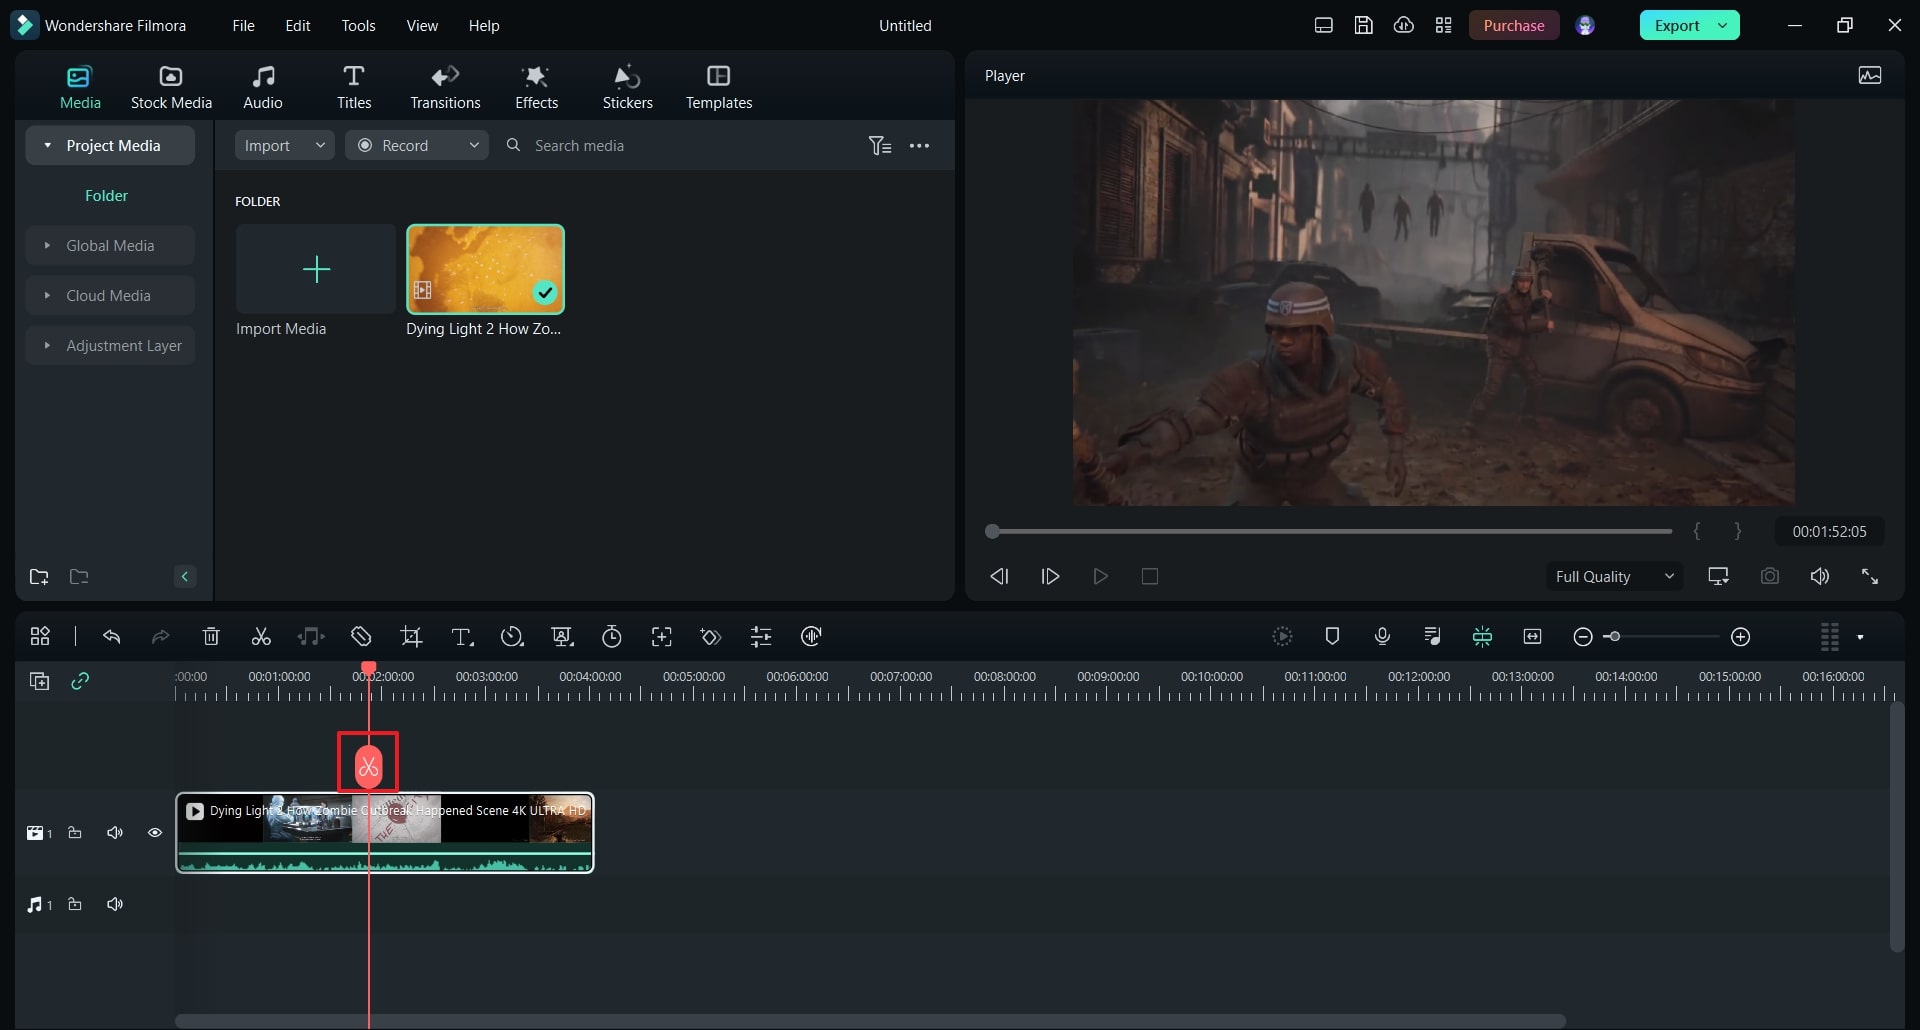
After uploading, make sure to drag and drop the video into the timeline. Now move the play head to the place where you wish to add a motion blur effect. Afterward, use the “Scissors” icon to split the video flawlessly.
Step3 Locate the Blur Effect
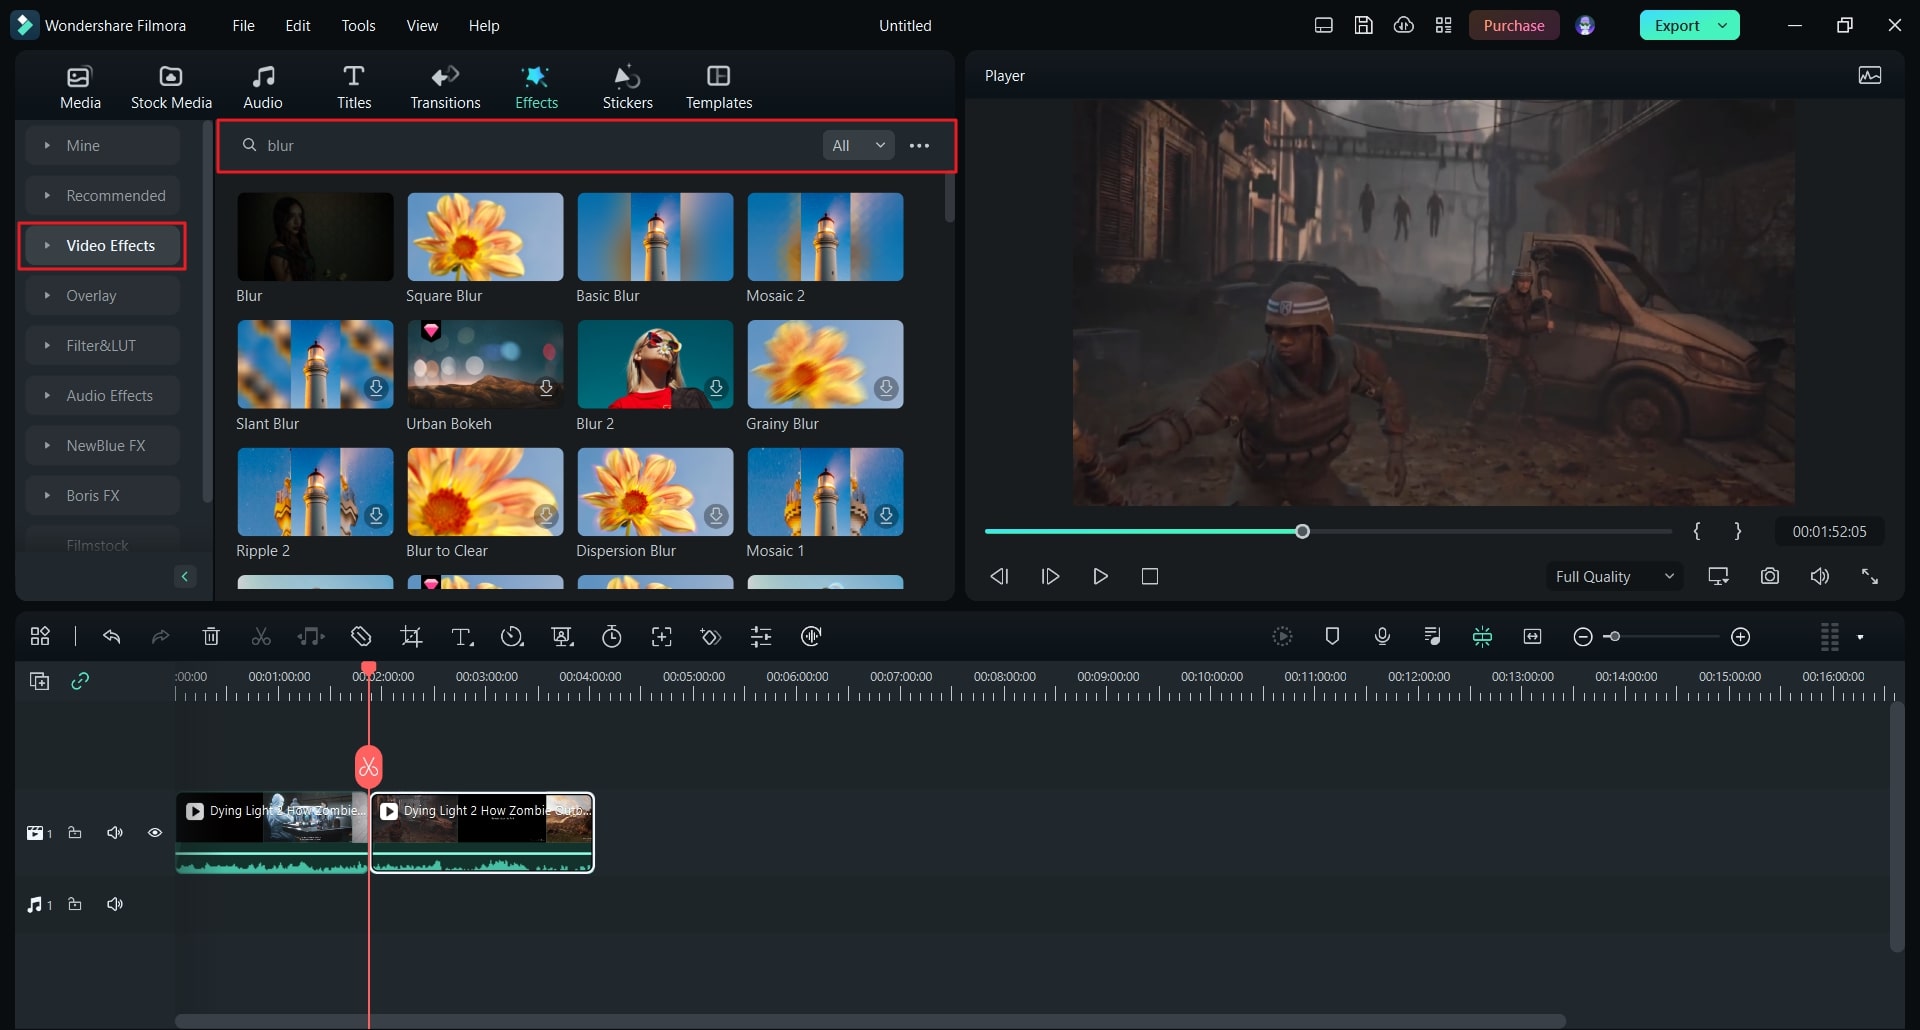
To proceed further, go to the “Effects” tab and select “Video Effects” from the left panel. Search for the blur effect and choose any blur effects from the results. Once you have selected the blur effect, drag and apply it to the timeline.
Step4 Add a Suitable Transition
If you want to make the video look clean and smooth, go to the “Transitions” tab. From there, search for “Dissolve” and select it from the results. Now apply it to the timeline where you have added the motion blur. Once done, click on the “Export” button and save the edited Dying Light 2 gameplay video.

Conclusion
Motion blur effect can undoubtedly change the appearance of your gaming graphics. If you are a game lover and want to add perfection to your gameplay, this article has answered all your questions. By exploring this guide, you have learned how to use Dying Light 2 motion blur. You can also use the recommended software known as Filmora to apply the motion blur effect to the highlights of your gameplay aesthetically.
Free Download For macOS 10.14 or later
Moreover, Filmora can also help you in modifying the speed of your video. Using this all-rounder tool, you can also add and synchronize the audio clips with your videos. Apart from editing your videos, you can use this platform to add a motion blur effect to your gaming videos. Hence, it’s a must-try tool to increase the visual appeal of your recorded gameplay.
Key Features of Filmora
- Using Filmora, you can add different transitions and effects to your video clips within a few clicks.
- This tool allows you to split the screen so you can tell the story through your video in a fun way.
- Using the Green Screen feature, you can craft special effects for your videos. Also you can also change and replace the backgrounds of your videos using this special feature.
- To precisely resize your videos without putting in any manual effort, you can use its AI Reframe feature.
How to Add Motion Blur to Dying Light 2 Using Filmora
Are you eager to know how to turn off motion blur Dying Light 2? In this section, we will guide you on how to use Filmora to create a motion blur effect on the desired place of your recorded gameplay. The entire process is simple and easy to follow, even for beginners. Hence, proceed to read this part to check the authentic steps of adding a motion blur effect:
Step1 Choose New Project
Download and initiate the Wondershare Filmora on your PC or Mac. Once done, click on the “New Project” button and then tap on the “Import” icon. By doing so, you can upload the recorded gameplay of Dying Light 2.

Step2 Select the Position to Apply the Effect
After uploading, make sure to drag and drop the video into the timeline. Now move the play head to the place where you wish to add a motion blur effect. Afterward, use the “Scissors” icon to split the video flawlessly.

Step3 Locate the Blur Effect
To proceed further, go to the “Effects” tab and select “Video Effects” from the left panel. Search for the blur effect and choose any blur effects from the results. Once you have selected the blur effect, drag and apply it to the timeline.

Step4 Add a Suitable Transition
If you want to make the video look clean and smooth, go to the “Transitions” tab. From there, search for “Dissolve” and select it from the results. Now apply it to the timeline where you have added the motion blur. Once done, click on the “Export” button and save the edited Dying Light 2 gameplay video.

Conclusion
Motion blur effect can undoubtedly change the appearance of your gaming graphics. If you are a game lover and want to add perfection to your gameplay, this article has answered all your questions. By exploring this guide, you have learned how to use Dying Light 2 motion blur. You can also use the recommended software known as Filmora to apply the motion blur effect to the highlights of your gameplay aesthetically.
Also read:
- [New] 2024 Approved Step-by-Step Easy Snapchat Videos with Multiple Snaps
- [New] In 2024, Revolutionize Your Videography Workflow Recording/Editing on Adobe Connect
- 2023'S Best Replacements for Samsung Gear 360
- Academic Excellence Through AI Technology
- Expert Analysis of the Genius WideCam F100: Dealing with Blurry Images & Reverberating Audio
- In 2024, Ideal Screencasting Software for Effective Teaching
- Learn Eight Simple Steps that Will Allow You to Create a Stunning Text Reveal Animation in Filmora. Simple yet Very Professional
- New 2024 Approved How to Achieve GoPro Slow Motion With Quality
- New In 2024, Want to Add a Motion Blur Effect to Your Photos? This Step-by-Step Tutorial Will Show You How to Use GIMP Software to Get the Effect You Want
- The New Wave of YouTube Branding Best Titles for Vloggers & Filmmakers (Keep It Under or at 156 Characters) for 2024
- Updated 2024 Approved Say Goodbye to Grainy Videos Top Resolution Enhancement Tools
- Updated Are You Looking to Create some Impressive Slow-Motion Video Content? Get This Done with some Impressive Android Slow Motion Video Apps for 2024
- Updated In 2024, Slow Motion Videos Are Taking over Social Media and Becoming a New Trend. Read This Article if You Want to Learn How to Slow Down Video in After Effects
- Updated In 2024, Step-by-Step Guide to Storyboard
- Updated Using VN Editor To Add Luts for Video Editing for 2024
- Title: Backup and Organize Your Tons of Footage in Minutes
- Author: Morgan
- Created at : 2024-10-02 23:51:11
- Updated at : 2024-10-05 20:01:07
- Link: https://ai-video-editing.techidaily.com/backup-and-organize-your-tons-of-footage-in-minutes/
- License: This work is licensed under CC BY-NC-SA 4.0.
