:max_bytes(150000):strip_icc():format(webp)/GettyImages-1139232374-700d343900854115ad26acf3f1dd80b3.jpg)
Bandicut Video Editor Review

Bandicut Video Editor Review
Bandicut Video Cutter is super-fast video editing software, known for its ability to cutting and join videos. It is an easy-to-use interface for small and professional users. While maintaining the video quality, Bundicut enables the user to trim parts of the video quickly. With this software, users can split videos into multiple video files or join multiple video files and as well extract audio from the video to MP3.
According to Bandicut reviews, Bandicut is one of the best video cutting and joining programs for Windows. Its free version features are limited to support AVI, MP4, and MOV but it is set to watermark the final results. If you download the Bandicut premium version you will get features that can join videos, do the fast cutting and offer high-speed encoding without watermarking the final results. It is also important to understand that Bandicut software is not just a video cutter. This tool entertains its users with a range of features that are easy to understand and use.
Key Features of Bandicut
Crop Video: Bandicut is a video clipping program that enables its users to crop-specific sections of the video. It specifies the beginning and the end of the video and with this, you can split a long recorded video into multiple frames.
Split Video: The split video function available in the Bandicut software can help users to split a large video into many video clips. This allows the video editor to collect and join those video clips that are theme-related.
Merge Video: Bandicut software has a merge video feature used to combine video clips of different formats and from different files to create a new file. This feature provides two merging modes; the high-speed merging mode and the conversion merging mode.
Special Section Removal: This software allows the user to delete specific sections of the video. It is easy to remove the unwanted section of the video like those advertisements inserted in the middle of the videos. The bad sections are removed with a click.
Extract MP3 audio Files: Bandicut has a “Rip MP3’ function to extract the audio of the video to an MP3 file. When you download a video and you are only interested in audio, you can extract it from the video using this function.
Convert Video Format: This feature allows the user to convert the videos that are not able to play automatically on their gadgets and those that are not editable in the video edit programs.
How to Use Bandicut
Bandicut is an easy-to-use video cutter for windows even for those who are not familiar with video editing tools. You can trim or cut your videos with Bandicut by just adjusting the start point and endpoint for the video with simple sliders. For those that want to use High-speed mode to edit their videos, they should download Bandicut software and make sure it is correctly installed then start to join the video clips.
Here are a few steps that you can take when editing multiple video clips with Bandicut Video Cutter;
Step 1: Download and Install Bandicut

You can start by downloading and installing the software on your computer. Then run the program and start video editing.
Step 2: Join your multiple videos into one with high-speed mode
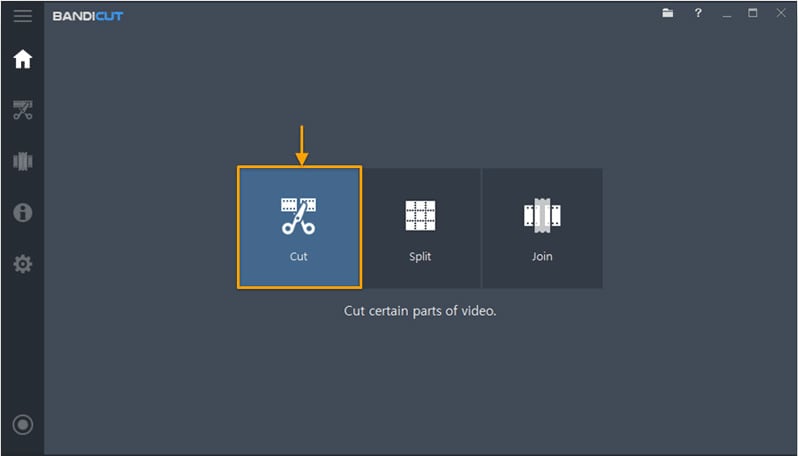
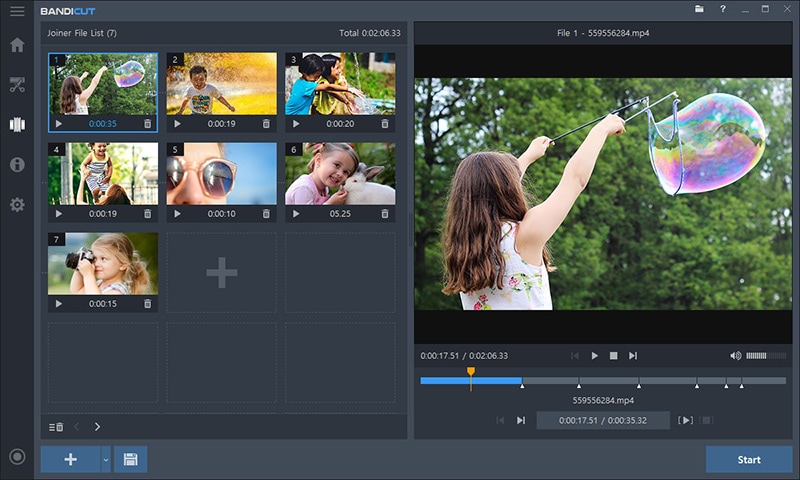
1.Now that you have successfully recorded and saved your multiple videos in your Bandicam recorder, click the ‘Join’ button and then select those multiple video files. This will transfer your videos from the Bandicam recorder to the Bandicut software for editing.
2.Press the Start button and then merge the videos with high-speed mode.
Step 3: Cut certain parts of a merged video in high-speed mode
1.Click the ‘Cut’ button, open the Merge Video file in ‘Step 2’
2.Then set the certain parts you want to use and click the add segment (+) button.
3.Click the ‘Merge Segments’ option and click the ‘Start’ button with high-speed mode.
If you follow the above steps carefully, you can successfully edit your multiple video clips with Bandicut Video Cutter software without losing the quality of your video.
Best Alternatives to Bandicut
There are several alternatives to Bandicut Video Cutter for Windows, MAC, Linux, and Web-based. Below are some of the best alternatives and their key features;
1. Filmora
Filmora is a powerful video editing tool for windows. This popular software is intended for those users who want to concentrate on editing and making high-quality videos. It is an affordable program built with cool features for both video and audio. It can provide you with a plethora of options when you are styling, adding effects, or customizing your videos. The ‘Tilt-shift’ feature is used to blur out selective video sections when one wants to emphasize a certain object in the video.

Additionally, the tools in this software make it possible for the users to put an overlay, create animations and specific elements as well as add audio and insert texts. It is an appropriate feature to use especially for those that want to make tributes, dedications, or put stories in the videos. To help you understand this software better here are some of its key features.
For Win 7 or later (64-bit)
For macOS 10.12 or later
Filmora Features
- Split Screen: Easily make video and photo collages with animation by applying split-screen template.
- Speed Ramping: Adjust your video’s speed with better control of your keyframes to create unique cinematic effects.
- Key Framing: Bring dynamism and energy to your videos with smooth animated effects.
- Motion Tracking: Track the movement of an object in the video, and pin graphics and media files.
- Instant Mode: Easily create a video within a few minutes. No editing skills are needed
- Green Screen: Reimagine your world by changing backgrounds and creating special effects.
- Speech to Text: Allows you to transcript voice to subtitles in one click. Save plenty of time on transcribing
2. Camtasia
Camtasia Studio is a user-friendly software and handy app that can make your experience gigantic and impressive. It is perfect for both amateur and professional video creators as it allows the user to generate quality videos for presentation. The Camtasia Studio possesses an easy-to-use setup that allows its users with limited experience to make polished videos and share them with the community.

Camtasia Studio software is built with cool and unique features for ideal video editing. This app can help you create tutorial videos, YouTube videos as well as other impressive videos for your presentations or marketing. With its abundance of powerful video editing tools, all level users can create professional videos without assistance from professionals. It is easy to use, quick, and professionally built with numerous features to generate the most effective-looking videos willing to be exported. There are several features of Camtasia but we will discuss a few of them below.
Features of Camtasia
- Record screen.
- Proxy video.
- Versatile transitions.
- Audio emphasis.
- Include royal free sounds.
- Apply Direct Video Effects.
- Insert Icons, shapes, texts, or clips.
- LUT (Look Up Table) and Media mats.
3. Lightworks
Lightworks is described as cloud-based video cutting and joining software used to edit both amateur and professional videos. This software is created with powerful tools and unique functionalities to enhance the creation of quality videos for social media uses, 4K film projects, YouTube, and other professional uses. This software can integrate with YouTube, Boris FX, Blackmagic Fusion, and Boris Grafitti. The video editors can apply the key-framing feature in this software to make smooth translations between clips.

This software is highly reputable in cinema history and is widely used as a video editor to make some of the finest movies in Hollywood. With Lightworks it is easy to edit clips using the drag-and-drop method. It’s color blending and grading, it is easy to enhance video images. Lightworks works with post-production image composition solutions for visual effects and the software plug-in to help users achieve visual effect solutions.
Features of Lightworks
- Drag and Drop interface.
- Video routing.
- Fusion composition.
- Content management.
- Color correction and blend modes.
- Chromakey application.
- Apply Color LUTs.
- Edit Multicam sources.
Related FAQs
Is Bandicut free to use?
Bandicut Video editor is not a free program and it requires the regular users to purchase a Bandicut license. Bandicut Video Cutter pricing begins at $29.95 for a one-time payment per user. The license does not expire or get revoked and can provide unlimited access to the user.
Is Bandicut a good video editor?
Bandicut is one of the best video editors available in the market today and can be used for small and professional purposes. Its results are incredible and can add audio, trim, and join video files without losing video quality.
Does Bandicut leave a watermark?
When using the free version of Bandicut you are likely to enjoy some great features but there will be a watermark on the final results. Professionals prefer using the premium version as it does not add watermarks to the final result.
Conclusion
Bandicut video editor and its alternative software is a video creation solution that everyone should embrace if they aim to archive quality. They are available in the online stores, and you can download Bandicut and install it without much effort. This article gives you knowledge on the above-discussed video creators to make your video creation journey a success. Clicking on individual software websites can add some more information on the above. Other sources of information are such as the Bandicut reviews.
For macOS 10.12 or later
Filmora Features
- Split Screen: Easily make video and photo collages with animation by applying split-screen template.
- Speed Ramping: Adjust your video’s speed with better control of your keyframes to create unique cinematic effects.
- Key Framing: Bring dynamism and energy to your videos with smooth animated effects.
- Motion Tracking: Track the movement of an object in the video, and pin graphics and media files.
- Instant Mode: Easily create a video within a few minutes. No editing skills are needed
- Green Screen: Reimagine your world by changing backgrounds and creating special effects.
- Speech to Text: Allows you to transcript voice to subtitles in one click. Save plenty of time on transcribing
2. Camtasia
Camtasia Studio is a user-friendly software and handy app that can make your experience gigantic and impressive. It is perfect for both amateur and professional video creators as it allows the user to generate quality videos for presentation. The Camtasia Studio possesses an easy-to-use setup that allows its users with limited experience to make polished videos and share them with the community.

Camtasia Studio software is built with cool and unique features for ideal video editing. This app can help you create tutorial videos, YouTube videos as well as other impressive videos for your presentations or marketing. With its abundance of powerful video editing tools, all level users can create professional videos without assistance from professionals. It is easy to use, quick, and professionally built with numerous features to generate the most effective-looking videos willing to be exported. There are several features of Camtasia but we will discuss a few of them below.
Features of Camtasia
- Record screen.
- Proxy video.
- Versatile transitions.
- Audio emphasis.
- Include royal free sounds.
- Apply Direct Video Effects.
- Insert Icons, shapes, texts, or clips.
- LUT (Look Up Table) and Media mats.
3. Lightworks
Lightworks is described as cloud-based video cutting and joining software used to edit both amateur and professional videos. This software is created with powerful tools and unique functionalities to enhance the creation of quality videos for social media uses, 4K film projects, YouTube, and other professional uses. This software can integrate with YouTube, Boris FX, Blackmagic Fusion, and Boris Grafitti. The video editors can apply the key-framing feature in this software to make smooth translations between clips.

This software is highly reputable in cinema history and is widely used as a video editor to make some of the finest movies in Hollywood. With Lightworks it is easy to edit clips using the drag-and-drop method. It’s color blending and grading, it is easy to enhance video images. Lightworks works with post-production image composition solutions for visual effects and the software plug-in to help users achieve visual effect solutions.
Features of Lightworks
- Drag and Drop interface.
- Video routing.
- Fusion composition.
- Content management.
- Color correction and blend modes.
- Chromakey application.
- Apply Color LUTs.
- Edit Multicam sources.
Related FAQs
Is Bandicut free to use?
Bandicut Video editor is not a free program and it requires the regular users to purchase a Bandicut license. Bandicut Video Cutter pricing begins at $29.95 for a one-time payment per user. The license does not expire or get revoked and can provide unlimited access to the user.
Is Bandicut a good video editor?
Bandicut is one of the best video editors available in the market today and can be used for small and professional purposes. Its results are incredible and can add audio, trim, and join video files without losing video quality.
Does Bandicut leave a watermark?
When using the free version of Bandicut you are likely to enjoy some great features but there will be a watermark on the final results. Professionals prefer using the premium version as it does not add watermarks to the final result.
Conclusion
Bandicut video editor and its alternative software is a video creation solution that everyone should embrace if they aim to archive quality. They are available in the online stores, and you can download Bandicut and install it without much effort. This article gives you knowledge on the above-discussed video creators to make your video creation journey a success. Clicking on individual software websites can add some more information on the above. Other sources of information are such as the Bandicut reviews.
For macOS 10.12 or later
Filmora Features
- Split Screen: Easily make video and photo collages with animation by applying split-screen template.
- Speed Ramping: Adjust your video’s speed with better control of your keyframes to create unique cinematic effects.
- Key Framing: Bring dynamism and energy to your videos with smooth animated effects.
- Motion Tracking: Track the movement of an object in the video, and pin graphics and media files.
- Instant Mode: Easily create a video within a few minutes. No editing skills are needed
- Green Screen: Reimagine your world by changing backgrounds and creating special effects.
- Speech to Text: Allows you to transcript voice to subtitles in one click. Save plenty of time on transcribing
2. Camtasia
Camtasia Studio is a user-friendly software and handy app that can make your experience gigantic and impressive. It is perfect for both amateur and professional video creators as it allows the user to generate quality videos for presentation. The Camtasia Studio possesses an easy-to-use setup that allows its users with limited experience to make polished videos and share them with the community.

Camtasia Studio software is built with cool and unique features for ideal video editing. This app can help you create tutorial videos, YouTube videos as well as other impressive videos for your presentations or marketing. With its abundance of powerful video editing tools, all level users can create professional videos without assistance from professionals. It is easy to use, quick, and professionally built with numerous features to generate the most effective-looking videos willing to be exported. There are several features of Camtasia but we will discuss a few of them below.
Features of Camtasia
- Record screen.
- Proxy video.
- Versatile transitions.
- Audio emphasis.
- Include royal free sounds.
- Apply Direct Video Effects.
- Insert Icons, shapes, texts, or clips.
- LUT (Look Up Table) and Media mats.
3. Lightworks
Lightworks is described as cloud-based video cutting and joining software used to edit both amateur and professional videos. This software is created with powerful tools and unique functionalities to enhance the creation of quality videos for social media uses, 4K film projects, YouTube, and other professional uses. This software can integrate with YouTube, Boris FX, Blackmagic Fusion, and Boris Grafitti. The video editors can apply the key-framing feature in this software to make smooth translations between clips.

This software is highly reputable in cinema history and is widely used as a video editor to make some of the finest movies in Hollywood. With Lightworks it is easy to edit clips using the drag-and-drop method. It’s color blending and grading, it is easy to enhance video images. Lightworks works with post-production image composition solutions for visual effects and the software plug-in to help users achieve visual effect solutions.
Features of Lightworks
- Drag and Drop interface.
- Video routing.
- Fusion composition.
- Content management.
- Color correction and blend modes.
- Chromakey application.
- Apply Color LUTs.
- Edit Multicam sources.
Related FAQs
Is Bandicut free to use?
Bandicut Video editor is not a free program and it requires the regular users to purchase a Bandicut license. Bandicut Video Cutter pricing begins at $29.95 for a one-time payment per user. The license does not expire or get revoked and can provide unlimited access to the user.
Is Bandicut a good video editor?
Bandicut is one of the best video editors available in the market today and can be used for small and professional purposes. Its results are incredible and can add audio, trim, and join video files without losing video quality.
Does Bandicut leave a watermark?
When using the free version of Bandicut you are likely to enjoy some great features but there will be a watermark on the final results. Professionals prefer using the premium version as it does not add watermarks to the final result.
Conclusion
Bandicut video editor and its alternative software is a video creation solution that everyone should embrace if they aim to archive quality. They are available in the online stores, and you can download Bandicut and install it without much effort. This article gives you knowledge on the above-discussed video creators to make your video creation journey a success. Clicking on individual software websites can add some more information on the above. Other sources of information are such as the Bandicut reviews.
For macOS 10.12 or later
Filmora Features
- Split Screen: Easily make video and photo collages with animation by applying split-screen template.
- Speed Ramping: Adjust your video’s speed with better control of your keyframes to create unique cinematic effects.
- Key Framing: Bring dynamism and energy to your videos with smooth animated effects.
- Motion Tracking: Track the movement of an object in the video, and pin graphics and media files.
- Instant Mode: Easily create a video within a few minutes. No editing skills are needed
- Green Screen: Reimagine your world by changing backgrounds and creating special effects.
- Speech to Text: Allows you to transcript voice to subtitles in one click. Save plenty of time on transcribing
2. Camtasia
Camtasia Studio is a user-friendly software and handy app that can make your experience gigantic and impressive. It is perfect for both amateur and professional video creators as it allows the user to generate quality videos for presentation. The Camtasia Studio possesses an easy-to-use setup that allows its users with limited experience to make polished videos and share them with the community.

Camtasia Studio software is built with cool and unique features for ideal video editing. This app can help you create tutorial videos, YouTube videos as well as other impressive videos for your presentations or marketing. With its abundance of powerful video editing tools, all level users can create professional videos without assistance from professionals. It is easy to use, quick, and professionally built with numerous features to generate the most effective-looking videos willing to be exported. There are several features of Camtasia but we will discuss a few of them below.
Features of Camtasia
- Record screen.
- Proxy video.
- Versatile transitions.
- Audio emphasis.
- Include royal free sounds.
- Apply Direct Video Effects.
- Insert Icons, shapes, texts, or clips.
- LUT (Look Up Table) and Media mats.
3. Lightworks
Lightworks is described as cloud-based video cutting and joining software used to edit both amateur and professional videos. This software is created with powerful tools and unique functionalities to enhance the creation of quality videos for social media uses, 4K film projects, YouTube, and other professional uses. This software can integrate with YouTube, Boris FX, Blackmagic Fusion, and Boris Grafitti. The video editors can apply the key-framing feature in this software to make smooth translations between clips.

This software is highly reputable in cinema history and is widely used as a video editor to make some of the finest movies in Hollywood. With Lightworks it is easy to edit clips using the drag-and-drop method. It’s color blending and grading, it is easy to enhance video images. Lightworks works with post-production image composition solutions for visual effects and the software plug-in to help users achieve visual effect solutions.
Features of Lightworks
- Drag and Drop interface.
- Video routing.
- Fusion composition.
- Content management.
- Color correction and blend modes.
- Chromakey application.
- Apply Color LUTs.
- Edit Multicam sources.
Related FAQs
Is Bandicut free to use?
Bandicut Video editor is not a free program and it requires the regular users to purchase a Bandicut license. Bandicut Video Cutter pricing begins at $29.95 for a one-time payment per user. The license does not expire or get revoked and can provide unlimited access to the user.
Is Bandicut a good video editor?
Bandicut is one of the best video editors available in the market today and can be used for small and professional purposes. Its results are incredible and can add audio, trim, and join video files without losing video quality.
Does Bandicut leave a watermark?
When using the free version of Bandicut you are likely to enjoy some great features but there will be a watermark on the final results. Professionals prefer using the premium version as it does not add watermarks to the final result.
Conclusion
Bandicut video editor and its alternative software is a video creation solution that everyone should embrace if they aim to archive quality. They are available in the online stores, and you can download Bandicut and install it without much effort. This article gives you knowledge on the above-discussed video creators to make your video creation journey a success. Clicking on individual software websites can add some more information on the above. Other sources of information are such as the Bandicut reviews.
How To Use Speed Ramping to Create an Intense Action Footage
Are you tired of using the same old way to edit your montages? Or do you want to learn to be more professional in your creativity? Don’t worry. We got you.
Here you will learn how to take your videos to the next level using speed ramping with a professional video editor- Wondershare Filmora. Moreover, you will get to know two ways to add the effect.
- Using speed ramping effect and glitch effects.
- Using the standard speed settings.
These effects can work well for any action sports or dance video. Let’s check out about speed ramping effect and ways to add it.
Part 1. What is speed ramping?
You’ve probably seen speed ramping used in suspenseful moments of a basketball video before, like a ball bouncing on the rim or a long buzzer-beating shot.

With speed ramping, we can slow down our most exciting moments to show our audience. And then speed it up again to keep pace with the music or action. So it will give you a smooth transition effect.
Part 2. How to enhance action videos with the speed ramping effect?
For example, we’ll create an intense basketball video with speed ramping and glitch effects in Filmora . Then, to show you how to show off your filming, editing, and basketball skills.
Free Download For Win 7 or later(64-bit)
Free Download For macOS 10.14 or later
Step1 Shot the footage
To edit a montage, you must first capture it correctly. For our example footage, we want to ensure we have set our camera to a higher frame rate for filming this type of video since we’re going to use slow motion.

How to capture the best footage?
You can shoot handheld with a camera or a mobile phone because it allows you to move around your talent and catch some movements and action while giving a shaky camera effect for added suspense. To make evenly balanced videos, you can use a gimbal stabilizer. Here are some tips to get better shots.
- Change camera angles. Try getting shots low to the ground as well as at higher angles. That will give you more options to cut between when you edit the video.
- Get various shots. You can get shots of dribbling, shooting, and just running with the ball to work with.
- Try shooting on a longer lens. It is because you may not be able to get close to the action.
- Record footage in slow mode on your camera or phone. It will allow you to capture more frames: the more frames, the smoother the slow-motion effect.
Best capturing will make your video more cinematic and visually pleasing after preparing the footage. Finally, we will dive into edit tutorials on speed ramping and glitch effects separately for better understanding.
Step2 Edit the speed of footage in Filmora
There are two ways to achieve the speed ramping effect. One is to use the speed ramping feature to adjust the video speed—the other way to achieve a similar effect is by using the standard speed settings.
Edit with speed ramping feature in Filmora
The speed ramping feature is included in Filmora standard license. So let’s start by opening Filmora.
1. Import media
First, import a video from your media library in the Wondershare Filmora. And drag the clip down on the timeline to start editing.

2. Apply the speed ramping feature
To apply the speed ramping feature, right-click on the clip on the timeline. And click speed in the menu and choose speed ramping to open the settings window.

You can choose different speed templates in the setting window. Or, on the left corner, click on the customize option to adjust the keyframes and create the speed you want for the video.

The lower keyframe is when the video is slowest, and the peak is when the video is fastest. The middle parts between the keyframes are when it speeds up or slows down to reach the specific speed you set on each keyframe.

Grab the keyframes and move them up to increase the speed or down to slow down the rate. You can also add more keyframes by moving the playhead to the spot where you want to change speed and clicking the plus button.
After adjusting our keyframes, we can play it back to see if we like the result.
Edit with standard speed settings in Filmora
Since speed ramping can only be used for paid users, we also provide you with an alternative way to give an exact transition effect, like speed ramping. Check out the following steps to add it.
1. You can drag the video from your library to the timeline. While in the timeline, double-click to open the speed menu. Then choose the starting speed you want your video to be with the speed slider.

2. Next, move your playhead to the point of the video you want to slow down the speed. Here we will cut and then double-click that clip to open the speed menu again. Change the pace with the speed slider again

Following the above steps, a speed ramping style effect can be created without using the premium feature. Stealthy, isn’t it?
Step3 Add some intensity to shots with the BCC glitch effect
We will use Boris FX BCC glitch to add some intensity to our video. It is a plug-in built-in Filmora and gives a feeling of chaos to match the action in the video. To apply the BCC glitch effect to the video.
- Click on the effects options in the top bar. For example, a window on the left side showing you the option Boris FX will have a sub-option BCC stylize. Click on it.
- Drag the effect above the place you want it in the timeline.
- Double-click the effect to open its settings.
- A drop-down menu at the top of the screen has tons of glitch presets to try out.
- We are going to scroll down and select shake with motion blur. This preset will use the exact look we want for our basketball video to make the speed ramping more intense.

- You can change the settings around after choosing a preset. For example, let’s turn up the glitch intensity to have our glitch a little more extreme. Moving further, we can change the glitch duration to our specific needs.
Now we can watch our video to see our glitch with the motion blur effect. Isn’t it crazy to make a cinematic video by yourself? The speed ramping feature and glitch effects can bring any sports video to the next level.
Free Download For macOS 10.14 or later
Step1 Shot the footage
To edit a montage, you must first capture it correctly. For our example footage, we want to ensure we have set our camera to a higher frame rate for filming this type of video since we’re going to use slow motion.

How to capture the best footage?
You can shoot handheld with a camera or a mobile phone because it allows you to move around your talent and catch some movements and action while giving a shaky camera effect for added suspense. To make evenly balanced videos, you can use a gimbal stabilizer. Here are some tips to get better shots.
- Change camera angles. Try getting shots low to the ground as well as at higher angles. That will give you more options to cut between when you edit the video.
- Get various shots. You can get shots of dribbling, shooting, and just running with the ball to work with.
- Try shooting on a longer lens. It is because you may not be able to get close to the action.
- Record footage in slow mode on your camera or phone. It will allow you to capture more frames: the more frames, the smoother the slow-motion effect.
Best capturing will make your video more cinematic and visually pleasing after preparing the footage. Finally, we will dive into edit tutorials on speed ramping and glitch effects separately for better understanding.
Step2 Edit the speed of footage in Filmora
There are two ways to achieve the speed ramping effect. One is to use the speed ramping feature to adjust the video speed—the other way to achieve a similar effect is by using the standard speed settings.
Edit with speed ramping feature in Filmora
The speed ramping feature is included in Filmora standard license. So let’s start by opening Filmora.
1. Import media
First, import a video from your media library in the Wondershare Filmora. And drag the clip down on the timeline to start editing.

2. Apply the speed ramping feature
To apply the speed ramping feature, right-click on the clip on the timeline. And click speed in the menu and choose speed ramping to open the settings window.

You can choose different speed templates in the setting window. Or, on the left corner, click on the customize option to adjust the keyframes and create the speed you want for the video.

The lower keyframe is when the video is slowest, and the peak is when the video is fastest. The middle parts between the keyframes are when it speeds up or slows down to reach the specific speed you set on each keyframe.

Grab the keyframes and move them up to increase the speed or down to slow down the rate. You can also add more keyframes by moving the playhead to the spot where you want to change speed and clicking the plus button.
After adjusting our keyframes, we can play it back to see if we like the result.
Edit with standard speed settings in Filmora
Since speed ramping can only be used for paid users, we also provide you with an alternative way to give an exact transition effect, like speed ramping. Check out the following steps to add it.
1. You can drag the video from your library to the timeline. While in the timeline, double-click to open the speed menu. Then choose the starting speed you want your video to be with the speed slider.

2. Next, move your playhead to the point of the video you want to slow down the speed. Here we will cut and then double-click that clip to open the speed menu again. Change the pace with the speed slider again

Following the above steps, a speed ramping style effect can be created without using the premium feature. Stealthy, isn’t it?
Step3 Add some intensity to shots with the BCC glitch effect
We will use Boris FX BCC glitch to add some intensity to our video. It is a plug-in built-in Filmora and gives a feeling of chaos to match the action in the video. To apply the BCC glitch effect to the video.
- Click on the effects options in the top bar. For example, a window on the left side showing you the option Boris FX will have a sub-option BCC stylize. Click on it.
- Drag the effect above the place you want it in the timeline.
- Double-click the effect to open its settings.
- A drop-down menu at the top of the screen has tons of glitch presets to try out.
- We are going to scroll down and select shake with motion blur. This preset will use the exact look we want for our basketball video to make the speed ramping more intense.

- You can change the settings around after choosing a preset. For example, let’s turn up the glitch intensity to have our glitch a little more extreme. Moving further, we can change the glitch duration to our specific needs.
Now we can watch our video to see our glitch with the motion blur effect. Isn’t it crazy to make a cinematic video by yourself? The speed ramping feature and glitch effects can bring any sports video to the next level.
The Definite Guide to Craig Bot Discord
The Definite Guide to Craig Bot Discord
An easy yet powerful editor
Numerous effects to choose from
Detailed tutorials provided by the official channel
Discord is a free text and audio communication tool for gamers and other communities. The voice channel in the Discord server allows users to speak with many people. On the other hand, Discord does not have a voice recording feature. Users can use third-party solutions to capture their discord audio when speaking via voice chat. When recording someone else’s discussion, be sure you have their permission. We’ll show you how to record discord audio with the Craig Discord bot and record discord audio using Craig in this article. Craig can record discord calls also. Let’s get started!
In this article
01 [What is Craig Bot Discord?](#Part 1)
02 [Is Craig Discord Bot Safe?](#Part 2)
03 [How Do I Enable Craig in Discord?](#Part 3)
04 [How to Record Discord Audio Using Craig](#Part 4)
05 [Craig Bot Discord Q&A](#Part 5)
Part 1 What is Craig Bot Discord?
Craig is a “Discord voice channel recording bot” with multi-track/multi-channel recording capabilities. In short, that means each speaker gets their audio file when Craig records your Discord voice channel.
Craig Recorder keeps track of all your recordings. You may use Craig Bot to record your calls in high-quality audio and video as a server owner.
Craig will record continuously for up to six hours. You can download a copy of the audio to examine the status of a recording until you download the file. The Craig website has a complete set of Craig bot commands, which you may immediately access by typing: Craig, help in a Discord channel.
Part 2 Is Craig Discord Bot Safe?
All Craig web services, like most websites, log all users’ IP addresses to identify and prevent criminal activity. Craig does not keep track of anyone who does not speak in a recorded channel, use any Craig bot commands, or participate in an EnnuiCastr recording.
Part 3 How Do I Enable Craig in Discord?
All Craig web services, like most websites, log all users’ IP addresses to identify and prevent criminal activity. Anyone who does not talk in a recorded channel, use any Discord Craig commands, or engage in a recording using the Craig web app is anonymous to Craig.
Part 4 How to Record Discord Audio Using Craig
Craig will not record without a visible label indicating that it is getting recorded. It records your conversation with others, but it also records each user as a unique audio track, making it much easier to edit or remove specific speakers if necessary.
Follow these simple steps to use a Discord recording bot.
Step 1: Invite Craig
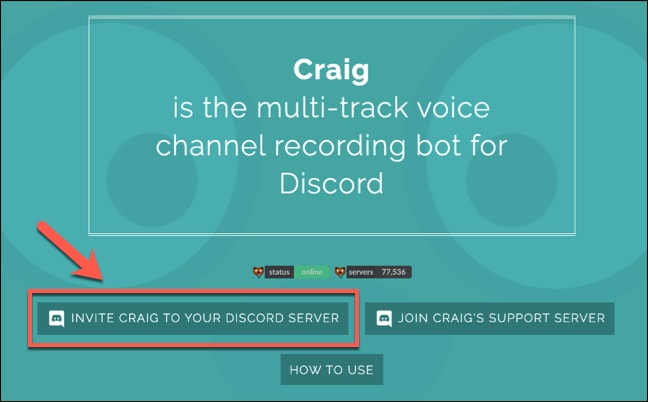
You must first invite Craig to your server to use him. Visit Craig’s website and click the “Invite Craig to Your Discord Server” option to get started.
Now, begin the joining procedure by pressing Invite Craig to your Discord Server. This action will take you to the authorization page for the Discord server. However, before using your server, you must first grant Craig permission to join it.
Step 2: Go to “Add Bot To”
Go to the “Add Bot To” section and select your server, then click “Authorize” to allow the bot to join. Select your Discord server, then click Authorize to enable the Craig bot to join.

Step 3: Join Craig
You should notice a join notification for “Craig” in your server if the process is successful. That’s it! You don’t have to do more; you may start recording your audio channels right away with Craig.
Enter an audio channel and type: Craig:; join to get started.

Step 4: Begin Your Recording
Craig will join the channel and start recording the audio instantly and the bot’s username will update to confirm this. Besides, you’ll also hear an voice from the bot saying, “now recording.”

Step 5: Exit to End Recording
Type: Craig, exit to end a Craig recording. It will force Craig to quit the current channel and stop recording. However, recordings in other channels will continue.

Step 6: Type “: Craig:, Stop”
If you wish to compel Craig to cease recording on all channels, type: Craig:, stop.
You can use this instead of the leave command to end a Craig recording if you’re only recording in one channel.

Step 7: Download or Delete Link
The Craig bot will send you a private message with links to download or delete your talks when you start recording.

Craig will record continuously for up to six hours. You can download a copy of the audio to examine the status of a recording until you download the file.
Part 5 Craig Bot Discord Q&A
Here are some frequently asked questions you need to go through to explore Craig discord bot:
Q: Is Craig bot capable of recording video?
A: Craig recorder keeps track of all your recordings. You may use Craig bot to record your calls in high-quality audio and video as a server owner.
Q: On Discord, how can I record my calls?
A: Select ‘Start Recording’ from the ‘Controls’ area. Discord now allows you to record calls.
Q: How do I make Craig active?
A: Enter an audio channel and type: Craig:, join to get started. Craig will join the channel and begin recording right away; update the bot’s username to reflect this. To confirm, you’ll hear an audio notice from the bot saying, “now recording.” Type: Craig:, exit to end a Craig recording.
Q: Is Craig safe?
A: Craig is in the 17th percentile for safety, which means that 83 percent of cities are safer while 17 percent are riskier. Only Craig’s appropriate borders are considered in this analysis. For a list of adjacent towns, see the table below. During a particular year, the crime rate in Craig is 48.61 per 1,000 residents.
Q: What is the best option to stop a Craig bot?
A: First, type in the audio channel and type: Craig:, join to begin. Craig will join the channel and start recording the bot immediately. You must see the updated bot’s username. After that, you’ll hear an audio note from the bot saying, “now recording.” Type: Craig:, leave to stop a Craig recording bot from all channels**.**

Wondershare Filmora Video Editor doesn’t feature multi-cam support or the latest VR technologies. However, its friendly UI and many effects can help you edit your Discord videos.
For Win 7 or later (64-bit)
For macOS 10.12 or later
PROS
● User-friendly interface
● Inexpensive
● There are numerous effects and overlays.
● Good text and title tools
● In the test, the rendering is quick.
● Regular updates with new effects for video-making and tweaking tools.
● Try it for free option before purchasing.
CONS
● The user interface is not touch-friendly.
● There is no DVD menu authoring or chapter authoring.
● Ending Thoughts →
● What Craig bot is, is it safe to use, and how you can activate it.
● Besides, you also went through the steps to use the Craig bot on Discord and some FAQs.
● Finally, we introduced Filmora, the best video editing software to get excellent results for the Discord platform.
● Thus, now with Discord Craig bot you can make recordings easily using the simple laud down steps. Ensure that you get familiar with the Craig bot commands for a seamless process. Also, get a fantastic video editor by Wondershare; this video editor helps you create amazing videos with effects giving your video that professional touch.
Discord is a free text and audio communication tool for gamers and other communities. The voice channel in the Discord server allows users to speak with many people. On the other hand, Discord does not have a voice recording feature. Users can use third-party solutions to capture their discord audio when speaking via voice chat. When recording someone else’s discussion, be sure you have their permission. We’ll show you how to record discord audio with the Craig Discord bot and record discord audio using Craig in this article. Craig can record discord calls also. Let’s get started!
In this article
01 [What is Craig Bot Discord?](#Part 1)
02 [Is Craig Discord Bot Safe?](#Part 2)
03 [How Do I Enable Craig in Discord?](#Part 3)
04 [How to Record Discord Audio Using Craig](#Part 4)
05 [Craig Bot Discord Q&A](#Part 5)
Part 1 What is Craig Bot Discord?
Craig is a “Discord voice channel recording bot” with multi-track/multi-channel recording capabilities. In short, that means each speaker gets their audio file when Craig records your Discord voice channel.
Craig Recorder keeps track of all your recordings. You may use Craig Bot to record your calls in high-quality audio and video as a server owner.
Craig will record continuously for up to six hours. You can download a copy of the audio to examine the status of a recording until you download the file. The Craig website has a complete set of Craig bot commands, which you may immediately access by typing: Craig, help in a Discord channel.
Part 2 Is Craig Discord Bot Safe?
All Craig web services, like most websites, log all users’ IP addresses to identify and prevent criminal activity. Craig does not keep track of anyone who does not speak in a recorded channel, use any Craig bot commands, or participate in an EnnuiCastr recording.
Part 3 How Do I Enable Craig in Discord?
All Craig web services, like most websites, log all users’ IP addresses to identify and prevent criminal activity. Anyone who does not talk in a recorded channel, use any Discord Craig commands, or engage in a recording using the Craig web app is anonymous to Craig.
Part 4 How to Record Discord Audio Using Craig
Craig will not record without a visible label indicating that it is getting recorded. It records your conversation with others, but it also records each user as a unique audio track, making it much easier to edit or remove specific speakers if necessary.
Follow these simple steps to use a Discord recording bot.
Step 1: Invite Craig
You must first invite Craig to your server to use him. Visit Craig’s website and click the “Invite Craig to Your Discord Server” option to get started.
Now, begin the joining procedure by pressing Invite Craig to your Discord Server. This action will take you to the authorization page for the Discord server. However, before using your server, you must first grant Craig permission to join it.

Step 2: Go to “Add Bot To”
Go to the “Add Bot To” section and select your server, then click “Authorize” to allow the bot to join. Select your Discord server, then click Authorize to enable the Craig bot to join.

Step 3: Join Craig
You should notice a join notification for “Craig” in your server if the process is successful. That’s it! You don’t have to do more; you may start recording your audio channels right away with Craig.
Enter an audio channel and type: Craig:; join to get started.

Step 4: Begin Your Recording
Craig will join the channel and start recording the audio instantly and the bot’s username will update to confirm this. Besides, you’ll also hear an voice from the bot saying, “now recording.”

Step 5: Exit to End Recording
Type: Craig, exit to end a Craig recording. It will force Craig to quit the current channel and stop recording. However, recordings in other channels will continue.

Step 6: Type “: Craig:, Stop”
If you wish to compel Craig to cease recording on all channels, type: Craig:, stop.
You can use this instead of the leave command to end a Craig recording if you’re only recording in one channel.

Step 7: Download or Delete Link
The Craig bot will send you a private message with links to download or delete your talks when you start recording.

Craig will record continuously for up to six hours. You can download a copy of the audio to examine the status of a recording until you download the file.
Part 5 Craig Bot Discord Q&A
Here are some frequently asked questions you need to go through to explore Craig discord bot:
Q: Is Craig bot capable of recording video?
A: Craig recorder keeps track of all your recordings. You may use Craig bot to record your calls in high-quality audio and video as a server owner.
Q: On Discord, how can I record my calls?
A: Select ‘Start Recording’ from the ‘Controls’ area. Discord now allows you to record calls.
Q: How do I make Craig active?
A: Enter an audio channel and type: Craig:, join to get started. Craig will join the channel and begin recording right away; update the bot’s username to reflect this. To confirm, you’ll hear an audio notice from the bot saying, “now recording.” Type: Craig:, exit to end a Craig recording.
Q: Is Craig safe?
A: Craig is in the 17th percentile for safety, which means that 83 percent of cities are safer while 17 percent are riskier. Only Craig’s appropriate borders are considered in this analysis. For a list of adjacent towns, see the table below. During a particular year, the crime rate in Craig is 48.61 per 1,000 residents.
Q: What is the best option to stop a Craig bot?
A: First, type in the audio channel and type: Craig:, join to begin. Craig will join the channel and start recording the bot immediately. You must see the updated bot’s username. After that, you’ll hear an audio note from the bot saying, “now recording.” Type: Craig:, leave to stop a Craig recording bot from all channels**.**

Wondershare Filmora Video Editor doesn’t feature multi-cam support or the latest VR technologies. However, its friendly UI and many effects can help you edit your Discord videos.
For Win 7 or later (64-bit)
For macOS 10.12 or later
PROS
● User-friendly interface
● Inexpensive
● There are numerous effects and overlays.
● Good text and title tools
● In the test, the rendering is quick.
● Regular updates with new effects for video-making and tweaking tools.
● Try it for free option before purchasing.
CONS
● The user interface is not touch-friendly.
● There is no DVD menu authoring or chapter authoring.
● Ending Thoughts →
● What Craig bot is, is it safe to use, and how you can activate it.
● Besides, you also went through the steps to use the Craig bot on Discord and some FAQs.
● Finally, we introduced Filmora, the best video editing software to get excellent results for the Discord platform.
● Thus, now with Discord Craig bot you can make recordings easily using the simple laud down steps. Ensure that you get familiar with the Craig bot commands for a seamless process. Also, get a fantastic video editor by Wondershare; this video editor helps you create amazing videos with effects giving your video that professional touch.
Discord is a free text and audio communication tool for gamers and other communities. The voice channel in the Discord server allows users to speak with many people. On the other hand, Discord does not have a voice recording feature. Users can use third-party solutions to capture their discord audio when speaking via voice chat. When recording someone else’s discussion, be sure you have their permission. We’ll show you how to record discord audio with the Craig Discord bot and record discord audio using Craig in this article. Craig can record discord calls also. Let’s get started!
In this article
01 [What is Craig Bot Discord?](#Part 1)
02 [Is Craig Discord Bot Safe?](#Part 2)
03 [How Do I Enable Craig in Discord?](#Part 3)
04 [How to Record Discord Audio Using Craig](#Part 4)
05 [Craig Bot Discord Q&A](#Part 5)
Part 1 What is Craig Bot Discord?
Craig is a “Discord voice channel recording bot” with multi-track/multi-channel recording capabilities. In short, that means each speaker gets their audio file when Craig records your Discord voice channel.
Craig Recorder keeps track of all your recordings. You may use Craig Bot to record your calls in high-quality audio and video as a server owner.
Craig will record continuously for up to six hours. You can download a copy of the audio to examine the status of a recording until you download the file. The Craig website has a complete set of Craig bot commands, which you may immediately access by typing: Craig, help in a Discord channel.
Part 2 Is Craig Discord Bot Safe?
All Craig web services, like most websites, log all users’ IP addresses to identify and prevent criminal activity. Craig does not keep track of anyone who does not speak in a recorded channel, use any Craig bot commands, or participate in an EnnuiCastr recording.
Part 3 How Do I Enable Craig in Discord?
All Craig web services, like most websites, log all users’ IP addresses to identify and prevent criminal activity. Anyone who does not talk in a recorded channel, use any Discord Craig commands, or engage in a recording using the Craig web app is anonymous to Craig.
Part 4 How to Record Discord Audio Using Craig
Craig will not record without a visible label indicating that it is getting recorded. It records your conversation with others, but it also records each user as a unique audio track, making it much easier to edit or remove specific speakers if necessary.
Follow these simple steps to use a Discord recording bot.
Step 1: Invite Craig
You must first invite Craig to your server to use him. Visit Craig’s website and click the “Invite Craig to Your Discord Server” option to get started.
Now, begin the joining procedure by pressing Invite Craig to your Discord Server. This action will take you to the authorization page for the Discord server. However, before using your server, you must first grant Craig permission to join it.

Step 2: Go to “Add Bot To”
Go to the “Add Bot To” section and select your server, then click “Authorize” to allow the bot to join. Select your Discord server, then click Authorize to enable the Craig bot to join.

Step 3: Join Craig
You should notice a join notification for “Craig” in your server if the process is successful. That’s it! You don’t have to do more; you may start recording your audio channels right away with Craig.
Enter an audio channel and type: Craig:; join to get started.

Step 4: Begin Your Recording
Craig will join the channel and start recording the audio instantly and the bot’s username will update to confirm this. Besides, you’ll also hear an voice from the bot saying, “now recording.”

Step 5: Exit to End Recording
Type: Craig, exit to end a Craig recording. It will force Craig to quit the current channel and stop recording. However, recordings in other channels will continue.

Step 6: Type “: Craig:, Stop”
If you wish to compel Craig to cease recording on all channels, type: Craig:, stop.
You can use this instead of the leave command to end a Craig recording if you’re only recording in one channel.

Step 7: Download or Delete Link
The Craig bot will send you a private message with links to download or delete your talks when you start recording.

Craig will record continuously for up to six hours. You can download a copy of the audio to examine the status of a recording until you download the file.
Part 5 Craig Bot Discord Q&A
Here are some frequently asked questions you need to go through to explore Craig discord bot:
Q: Is Craig bot capable of recording video?
A: Craig recorder keeps track of all your recordings. You may use Craig bot to record your calls in high-quality audio and video as a server owner.
Q: On Discord, how can I record my calls?
A: Select ‘Start Recording’ from the ‘Controls’ area. Discord now allows you to record calls.
Q: How do I make Craig active?
A: Enter an audio channel and type: Craig:, join to get started. Craig will join the channel and begin recording right away; update the bot’s username to reflect this. To confirm, you’ll hear an audio notice from the bot saying, “now recording.” Type: Craig:, exit to end a Craig recording.
Q: Is Craig safe?
A: Craig is in the 17th percentile for safety, which means that 83 percent of cities are safer while 17 percent are riskier. Only Craig’s appropriate borders are considered in this analysis. For a list of adjacent towns, see the table below. During a particular year, the crime rate in Craig is 48.61 per 1,000 residents.
Q: What is the best option to stop a Craig bot?
A: First, type in the audio channel and type: Craig:, join to begin. Craig will join the channel and start recording the bot immediately. You must see the updated bot’s username. After that, you’ll hear an audio note from the bot saying, “now recording.” Type: Craig:, leave to stop a Craig recording bot from all channels**.**

Wondershare Filmora Video Editor doesn’t feature multi-cam support or the latest VR technologies. However, its friendly UI and many effects can help you edit your Discord videos.
For Win 7 or later (64-bit)
For macOS 10.12 or later
PROS
● User-friendly interface
● Inexpensive
● There are numerous effects and overlays.
● Good text and title tools
● In the test, the rendering is quick.
● Regular updates with new effects for video-making and tweaking tools.
● Try it for free option before purchasing.
CONS
● The user interface is not touch-friendly.
● There is no DVD menu authoring or chapter authoring.
● Ending Thoughts →
● What Craig bot is, is it safe to use, and how you can activate it.
● Besides, you also went through the steps to use the Craig bot on Discord and some FAQs.
● Finally, we introduced Filmora, the best video editing software to get excellent results for the Discord platform.
● Thus, now with Discord Craig bot you can make recordings easily using the simple laud down steps. Ensure that you get familiar with the Craig bot commands for a seamless process. Also, get a fantastic video editor by Wondershare; this video editor helps you create amazing videos with effects giving your video that professional touch.
Discord is a free text and audio communication tool for gamers and other communities. The voice channel in the Discord server allows users to speak with many people. On the other hand, Discord does not have a voice recording feature. Users can use third-party solutions to capture their discord audio when speaking via voice chat. When recording someone else’s discussion, be sure you have their permission. We’ll show you how to record discord audio with the Craig Discord bot and record discord audio using Craig in this article. Craig can record discord calls also. Let’s get started!
In this article
01 [What is Craig Bot Discord?](#Part 1)
02 [Is Craig Discord Bot Safe?](#Part 2)
03 [How Do I Enable Craig in Discord?](#Part 3)
04 [How to Record Discord Audio Using Craig](#Part 4)
05 [Craig Bot Discord Q&A](#Part 5)
Part 1 What is Craig Bot Discord?
Craig is a “Discord voice channel recording bot” with multi-track/multi-channel recording capabilities. In short, that means each speaker gets their audio file when Craig records your Discord voice channel.
Craig Recorder keeps track of all your recordings. You may use Craig Bot to record your calls in high-quality audio and video as a server owner.
Craig will record continuously for up to six hours. You can download a copy of the audio to examine the status of a recording until you download the file. The Craig website has a complete set of Craig bot commands, which you may immediately access by typing: Craig, help in a Discord channel.
Part 2 Is Craig Discord Bot Safe?
All Craig web services, like most websites, log all users’ IP addresses to identify and prevent criminal activity. Craig does not keep track of anyone who does not speak in a recorded channel, use any Craig bot commands, or participate in an EnnuiCastr recording.
Part 3 How Do I Enable Craig in Discord?
All Craig web services, like most websites, log all users’ IP addresses to identify and prevent criminal activity. Anyone who does not talk in a recorded channel, use any Discord Craig commands, or engage in a recording using the Craig web app is anonymous to Craig.
Part 4 How to Record Discord Audio Using Craig
Craig will not record without a visible label indicating that it is getting recorded. It records your conversation with others, but it also records each user as a unique audio track, making it much easier to edit or remove specific speakers if necessary.
Follow these simple steps to use a Discord recording bot.
Step 1: Invite Craig
You must first invite Craig to your server to use him. Visit Craig’s website and click the “Invite Craig to Your Discord Server” option to get started.
Now, begin the joining procedure by pressing Invite Craig to your Discord Server. This action will take you to the authorization page for the Discord server. However, before using your server, you must first grant Craig permission to join it.

Step 2: Go to “Add Bot To”
Go to the “Add Bot To” section and select your server, then click “Authorize” to allow the bot to join. Select your Discord server, then click Authorize to enable the Craig bot to join.

Step 3: Join Craig
You should notice a join notification for “Craig” in your server if the process is successful. That’s it! You don’t have to do more; you may start recording your audio channels right away with Craig.
Enter an audio channel and type: Craig:; join to get started.

Step 4: Begin Your Recording
Craig will join the channel and start recording the audio instantly and the bot’s username will update to confirm this. Besides, you’ll also hear an voice from the bot saying, “now recording.”

Step 5: Exit to End Recording
Type: Craig, exit to end a Craig recording. It will force Craig to quit the current channel and stop recording. However, recordings in other channels will continue.

Step 6: Type “: Craig:, Stop”
If you wish to compel Craig to cease recording on all channels, type: Craig:, stop.
You can use this instead of the leave command to end a Craig recording if you’re only recording in one channel.

Step 7: Download or Delete Link
The Craig bot will send you a private message with links to download or delete your talks when you start recording.

Craig will record continuously for up to six hours. You can download a copy of the audio to examine the status of a recording until you download the file.
Part 5 Craig Bot Discord Q&A
Here are some frequently asked questions you need to go through to explore Craig discord bot:
Q: Is Craig bot capable of recording video?
A: Craig recorder keeps track of all your recordings. You may use Craig bot to record your calls in high-quality audio and video as a server owner.
Q: On Discord, how can I record my calls?
A: Select ‘Start Recording’ from the ‘Controls’ area. Discord now allows you to record calls.
Q: How do I make Craig active?
A: Enter an audio channel and type: Craig:, join to get started. Craig will join the channel and begin recording right away; update the bot’s username to reflect this. To confirm, you’ll hear an audio notice from the bot saying, “now recording.” Type: Craig:, exit to end a Craig recording.
Q: Is Craig safe?
A: Craig is in the 17th percentile for safety, which means that 83 percent of cities are safer while 17 percent are riskier. Only Craig’s appropriate borders are considered in this analysis. For a list of adjacent towns, see the table below. During a particular year, the crime rate in Craig is 48.61 per 1,000 residents.
Q: What is the best option to stop a Craig bot?
A: First, type in the audio channel and type: Craig:, join to begin. Craig will join the channel and start recording the bot immediately. You must see the updated bot’s username. After that, you’ll hear an audio note from the bot saying, “now recording.” Type: Craig:, leave to stop a Craig recording bot from all channels**.**

Wondershare Filmora Video Editor doesn’t feature multi-cam support or the latest VR technologies. However, its friendly UI and many effects can help you edit your Discord videos.
For Win 7 or later (64-bit)
For macOS 10.12 or later
PROS
● User-friendly interface
● Inexpensive
● There are numerous effects and overlays.
● Good text and title tools
● In the test, the rendering is quick.
● Regular updates with new effects for video-making and tweaking tools.
● Try it for free option before purchasing.
CONS
● The user interface is not touch-friendly.
● There is no DVD menu authoring or chapter authoring.
● Ending Thoughts →
● What Craig bot is, is it safe to use, and how you can activate it.
● Besides, you also went through the steps to use the Craig bot on Discord and some FAQs.
● Finally, we introduced Filmora, the best video editing software to get excellent results for the Discord platform.
● Thus, now with Discord Craig bot you can make recordings easily using the simple laud down steps. Ensure that you get familiar with the Craig bot commands for a seamless process. Also, get a fantastic video editor by Wondershare; this video editor helps you create amazing videos with effects giving your video that professional touch.
Complete Tutorial on After Effects Countdown Timer Adding
Countdown timers in a video add up to the excitement and the fun element, while in many others they become a necessity to show how fast the time is running out. After Effects is one of the most sorted out and widely used tools for adding a countdown timer.
There are different ways using which AE allows adding countdown timer and this article will help you learn in detail about all. So, whether you want to create a video showing launch of an important event or your wedding day, the below will be a good read.
- Method 1. Adding Countdown Timer in After Effects using Expression
- Method 2. Adding Countdown Timer in After Effects using the Timecode plugin
- Method 3. Creating a simple Countdown in After Effects
- Why Countdown timer is not working in After Effects
- The best After Effects alternative to make a countdown Timer
- The best 6 After Effects countdown timer templates
- Cinematic Countdown
- Neon Countdown
- Cyber Countdown
- Digital Countdown Pack
- Glitch Countdown Transition
- Flashing Light Countdown
Part 1: How to Make a Countdown timer in After Effects
Developed by Adobe, After Effects is one of the most widely used animation software that is used for creating and editing videos using a wide range of functions supported by the application. Among other functions, After Effects facilitates adding a countdown timer to your videos and this task can be done in multiple ways.
Listed below are these different methods.
Method 1. Adding Countdown Timer in After Effects using Expression
Step1 Launch the software and then choose to Create a new Text Layer.
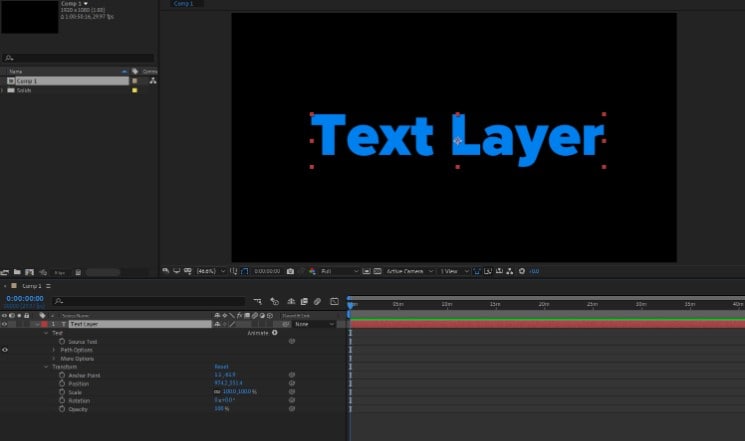
Step2 Open the text options and click on Alt + Click on your PC (For the Mac -Option + Click) on the stopwatch of the Source Text.
Step3 Next, you need to insert the expression - timeToCurrentFormat() inside the expression area.
Step4 Now, set the composition frame rate to 60fps which will make it look like an actual countdown timer.
Step5 Now count it down, pre-compose everything and then reverse the speed of the composition.
Composition speed can be reversed, right-click on the same, go to Time and then choose Time Reverse Layer.
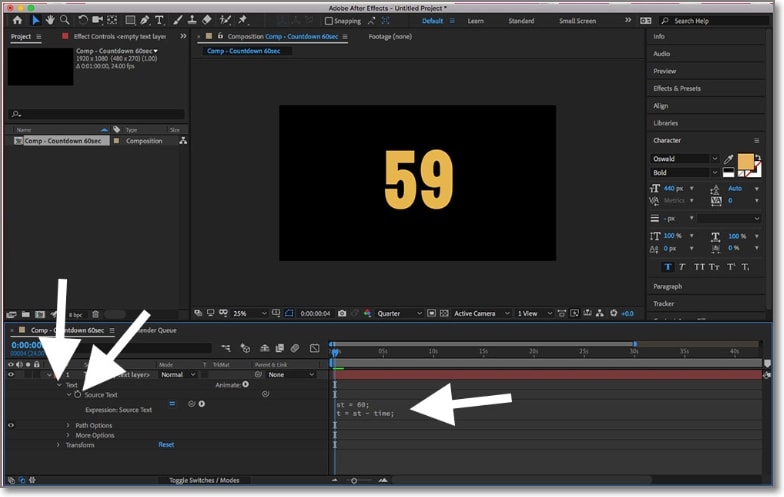
Above are the steps for timer expression after effects process.
Method 2. Adding Countdown Timer in After Effects using the Timecode plugin
In this method, you can use the Timecode plugin instead of using the “**timeToCurrentFormat()**” expression.
While using this after effects timer method, you would need to add a plugin to the New Solid that will create a timer layout automatically.
Next, follow the process as in the previous steps, and a countdown timer can be added.
Method 3. Creating a simple Countdown in After Effects
Step1 First of all, launch the software and then create a Text Layer.
Step2 Next, open the text options using Alt + Click for PC and Option + Click for Mac at the stopwatch of Source Text.
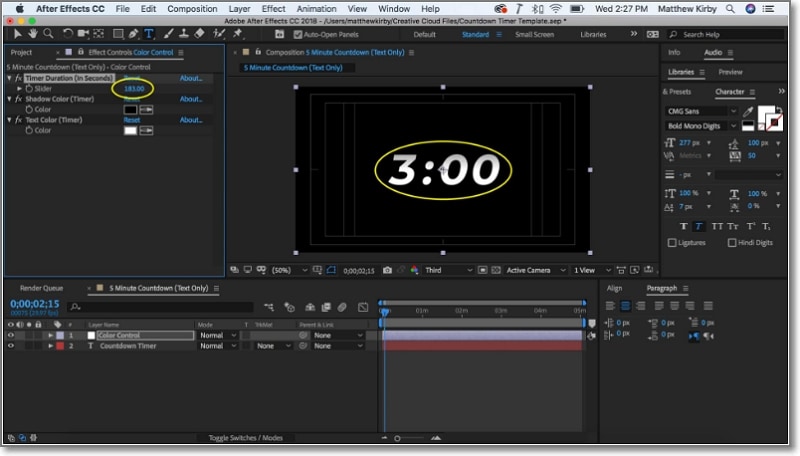
Step3 Next, at the expression area insert the expression- Math. Floor(-time) +10. Here in the place of 10, you can choose any number desired and this will be the starting countdown value.
Above we have learned 3 ways by which After Effects can be used for adding a countdown timer. Though these are workable methods, at times you may have issues with them and thus an alternate tool may be needed.
Part 2: Why Countdown timer is not working in After Effects
Though a lot of people use After Effects for creating countdown times, there are situations when the software will not serve your purpose. We have collected some of the common reasons that lead to the countdown timer not working in After Effects.
Software version out of date
If the software version of After Effects is out of date, then several features including Countdown Timer may be missing or have issues with the same.
Incorrect values or command
If the value for the countdown or the statement is incorrect while using After Effects, the countdown timer will not work properly.
The steep learning curve of the software
After Effects comes in with a wide range of features, but you need to have a thorough knowledge of the procedure to use the tool. Thus, the software has a steep learning curve which can be a problem for a lot of users and have issues while creating a countdown timer.
Part 3: The best After Effects alternative to make a countdown Timer
If you have also tried After Effects and it’s not working, no need to worry as there is an excellent tool that works as the best alternative to After Effects- Wondershare Filmora . Compatible with Windows and Mac, Wondershare Filmora is a video editing software that lets you create professional-looking videos with ease.
Using the advanced features of the tool along with video effects, transitions, and a stock library of media files, your desired video will be ready in no time. One of the latest features added to the software is a countdown timer that allows creating the countdown timer in a hassle-free and quick manner. Additionally, you can also add music/sound effects to the timer and even preview it before exporting it.
Steps to create countdown timer using Wondershare Filmora
Free Download For Win 7 or later(64-bit)
Free Download For macOS 10.14 or later
Step1 Launch the installed software and then add the desired video to which the timer has to be added by using the Import Media area. The added video now needs to be dragged and dropped to the timeline.
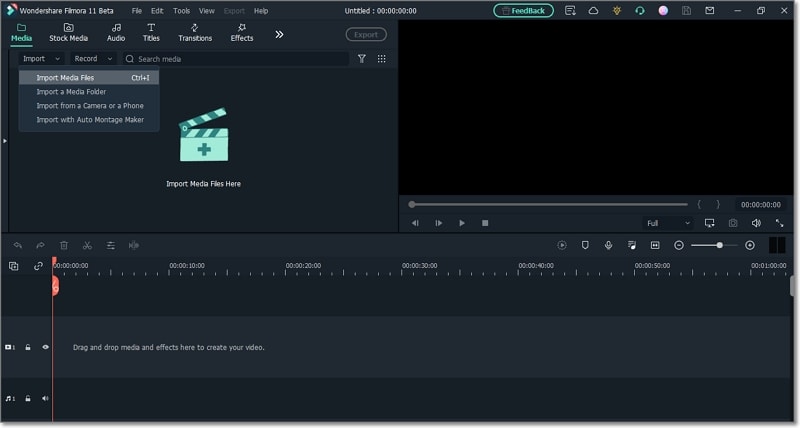
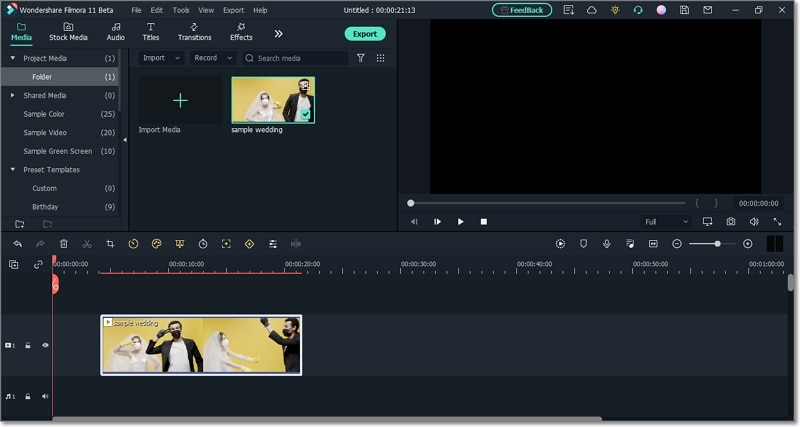
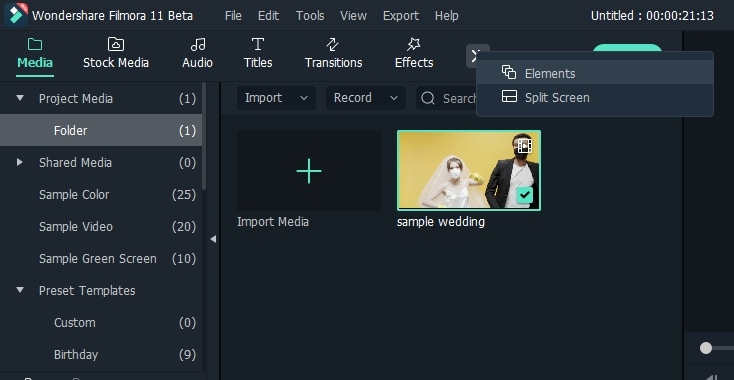
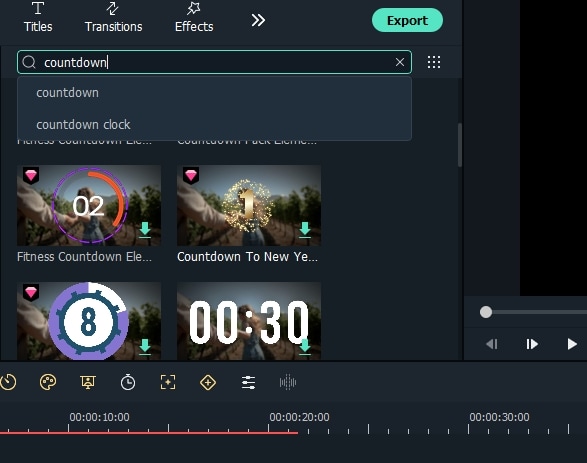
Step2 In this step, you need to select the type and design of the countdown. Tap on the double arrow button and then select the elements option. Multiple designs will be opened from which you can choose the one desired.
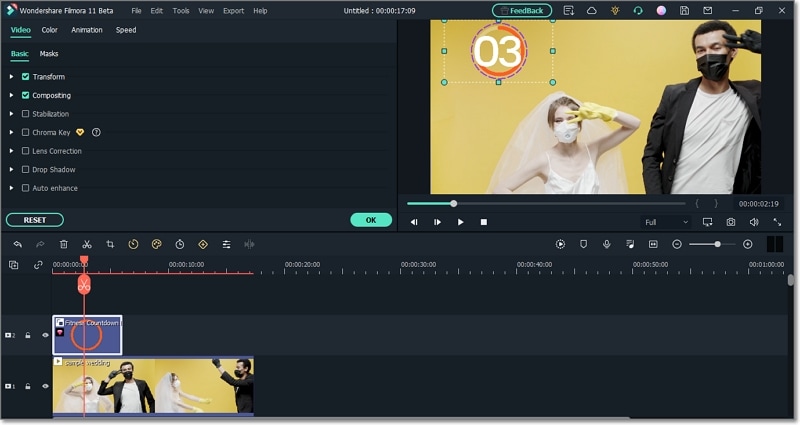
Step3 The selected design now needs to be resized and then relocated by double-clicking on it. On your video, place the countdown design at your choice of location.
Step4 Now comes the step to add numbers to the countdown. You need to select it from the Title tab and then move it to the timeline above the elements overlay.
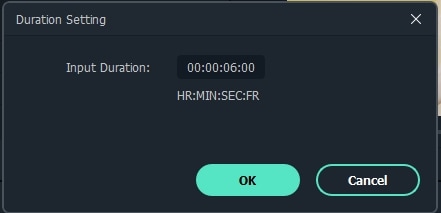
Step5 Next, adjust and change the number duration to 1 second. Select the text and then using copy-paste add as many numbers for the countdown needed. If you double-click the text, the number will change.
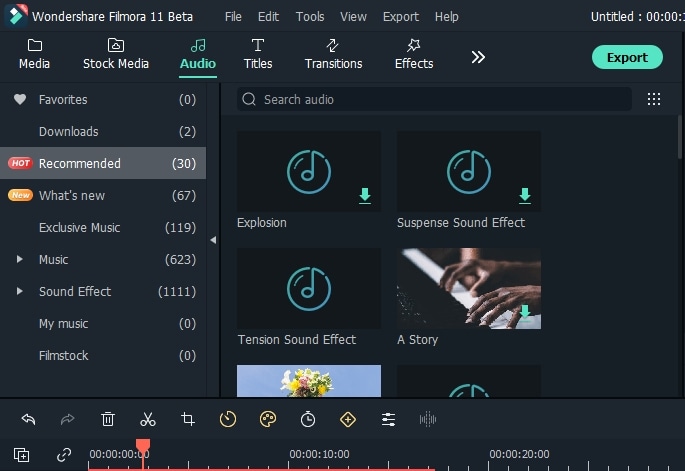
Step6 Using the Audio tab, add the desired music or sound effect to your countdown.
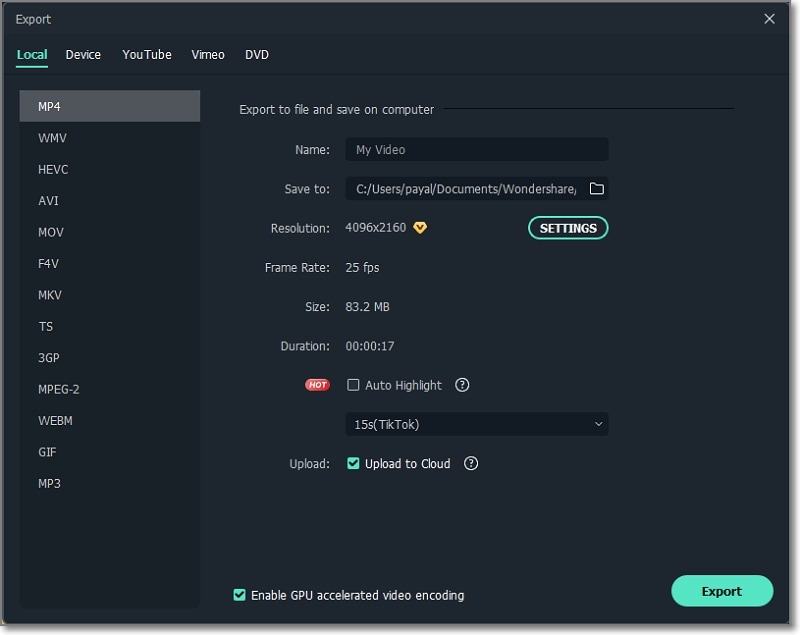
Step7 You can now check and preview the create file and then tap on the Export button to start the processing and add the countdown with the music of your video.
Part 4: The best 6 After Effects countdown timer templates
If you wish to make your countdown timers more stylish and interesting, there are several templates available. These templates are readymade designs where you just need to enter your details and your countdown timer will be ready.
Below we have shortlisted the best After Effects Countdown Timer Templates. Check them out and apply it directly to your videos in Wondershare Filmora.
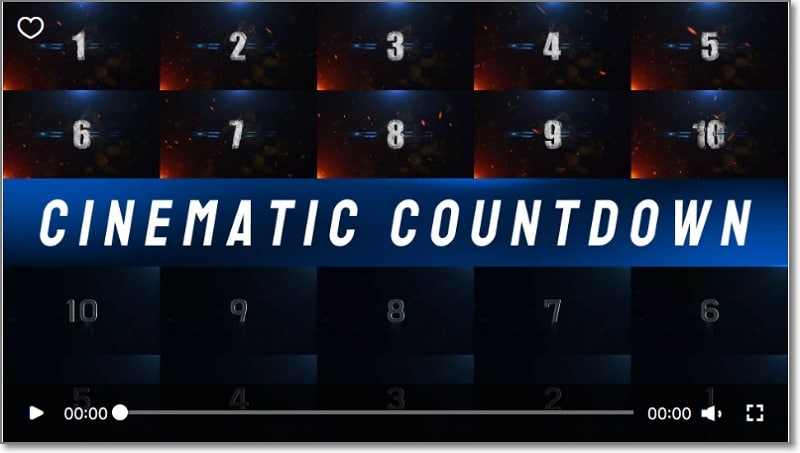
1. Cinematic Countdown
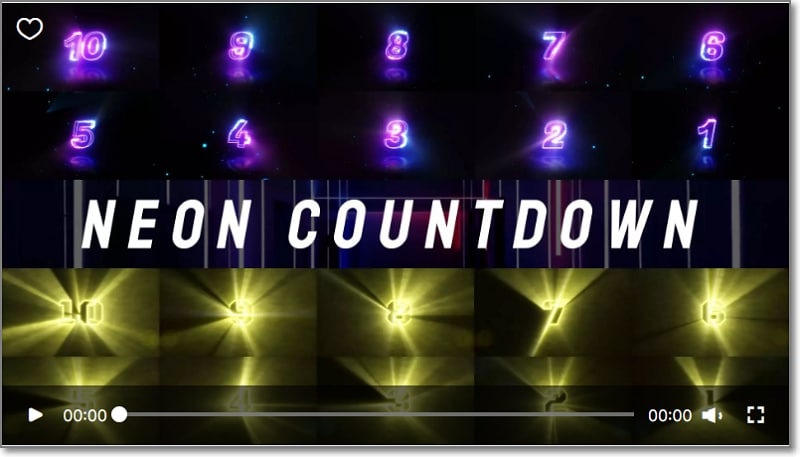
2. Neon Countdown
3. Cyber Countdown
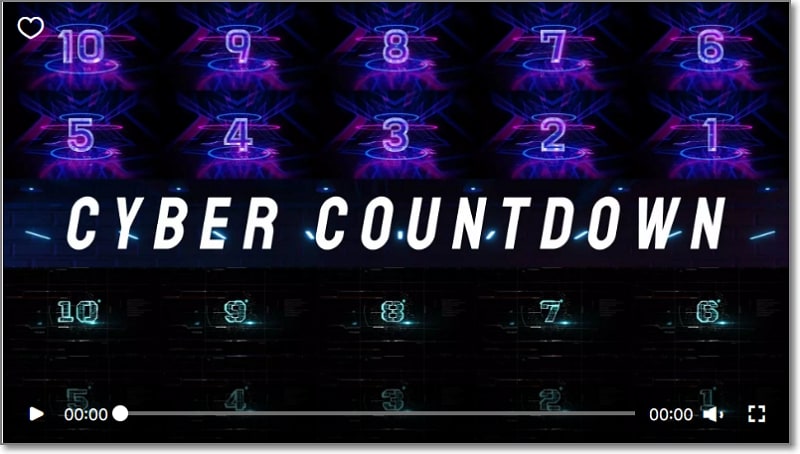
4. Digital Countdown Pack
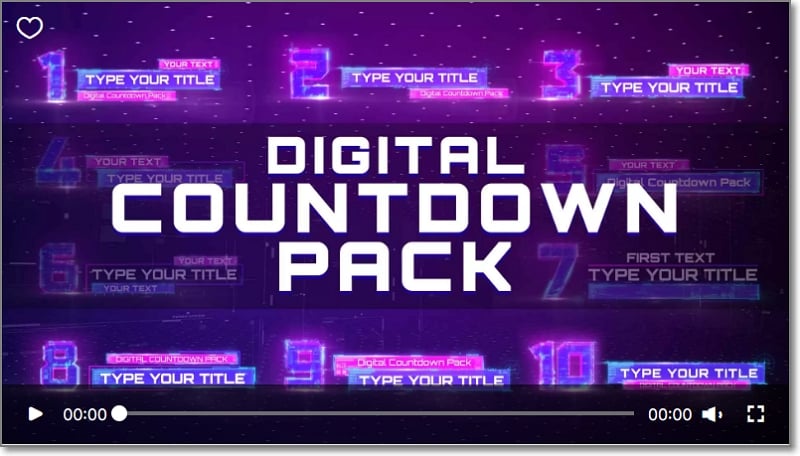
5. Glitch Countdown Transition
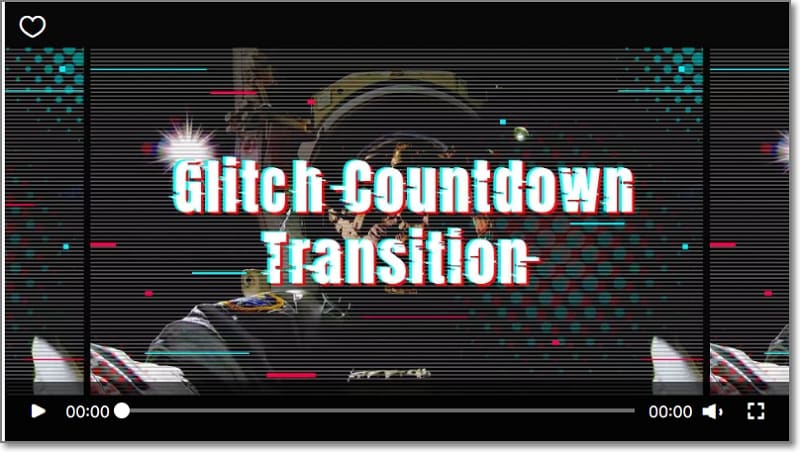
6. Flashing Light Countdown
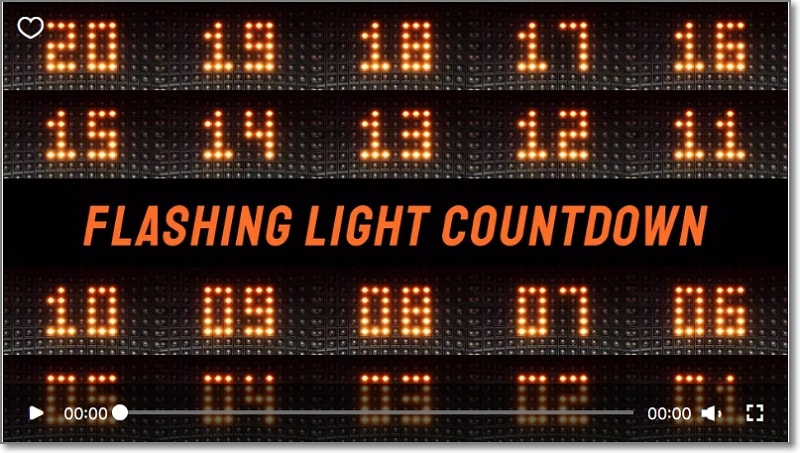
Final Words
So, all set!! You now know the best tools for creating the countdown timer and also have details about the best templates. Go and create some stylish, and eye-grabbing timers in no time. If you have installed Wondershare Filmora , there are several other options that can be used for editing your videos like a pro.
Free Download For Win 7 or later(64-bit)
Free Download For macOS 10.14 or later
- Cinematic Countdown
- Neon Countdown
- Cyber Countdown
- Digital Countdown Pack
- Glitch Countdown Transition
- Flashing Light Countdown
Part 1: How to Make a Countdown timer in After Effects
Developed by Adobe, After Effects is one of the most widely used animation software that is used for creating and editing videos using a wide range of functions supported by the application. Among other functions, After Effects facilitates adding a countdown timer to your videos and this task can be done in multiple ways.
Listed below are these different methods.
Method 1. Adding Countdown Timer in After Effects using Expression
Step1 Launch the software and then choose to Create a new Text Layer.

Step2 Open the text options and click on Alt + Click on your PC (For the Mac -Option + Click) on the stopwatch of the Source Text.
Step3 Next, you need to insert the expression - timeToCurrentFormat() inside the expression area.
Step4 Now, set the composition frame rate to 60fps which will make it look like an actual countdown timer.
Step5 Now count it down, pre-compose everything and then reverse the speed of the composition.
Composition speed can be reversed, right-click on the same, go to Time and then choose Time Reverse Layer.

Above are the steps for timer expression after effects process.
Method 2. Adding Countdown Timer in After Effects using the Timecode plugin
In this method, you can use the Timecode plugin instead of using the “**timeToCurrentFormat()**” expression.
While using this after effects timer method, you would need to add a plugin to the New Solid that will create a timer layout automatically.
Next, follow the process as in the previous steps, and a countdown timer can be added.
Method 3. Creating a simple Countdown in After Effects
Step1 First of all, launch the software and then create a Text Layer.
Step2 Next, open the text options using Alt + Click for PC and Option + Click for Mac at the stopwatch of Source Text.
Step3 Next, at the expression area insert the expression- Math. Floor(-time) +10. Here in the place of 10, you can choose any number desired and this will be the starting countdown value.
Above we have learned 3 ways by which After Effects can be used for adding a countdown timer. Though these are workable methods, at times you may have issues with them and thus an alternate tool may be needed.

Part 2: Why Countdown timer is not working in After Effects
Though a lot of people use After Effects for creating countdown times, there are situations when the software will not serve your purpose. We have collected some of the common reasons that lead to the countdown timer not working in After Effects.
Software version out of date
If the software version of After Effects is out of date, then several features including Countdown Timer may be missing or have issues with the same.
Incorrect values or command
If the value for the countdown or the statement is incorrect while using After Effects, the countdown timer will not work properly.
The steep learning curve of the software
After Effects comes in with a wide range of features, but you need to have a thorough knowledge of the procedure to use the tool. Thus, the software has a steep learning curve which can be a problem for a lot of users and have issues while creating a countdown timer.
Part 3: The best After Effects alternative to make a countdown Timer
If you have also tried After Effects and it’s not working, no need to worry as there is an excellent tool that works as the best alternative to After Effects- Wondershare Filmora . Compatible with Windows and Mac, Wondershare Filmora is a video editing software that lets you create professional-looking videos with ease.
Using the advanced features of the tool along with video effects, transitions, and a stock library of media files, your desired video will be ready in no time. One of the latest features added to the software is a countdown timer that allows creating the countdown timer in a hassle-free and quick manner. Additionally, you can also add music/sound effects to the timer and even preview it before exporting it.
Steps to create countdown timer using Wondershare Filmora
Free Download For Win 7 or later(64-bit)
Free Download For macOS 10.14 or later
Step1 Launch the installed software and then add the desired video to which the timer has to be added by using the Import Media area. The added video now needs to be dragged and dropped to the timeline.


Step2 In this step, you need to select the type and design of the countdown. Tap on the double arrow button and then select the elements option. Multiple designs will be opened from which you can choose the one desired.


Step3 The selected design now needs to be resized and then relocated by double-clicking on it. On your video, place the countdown design at your choice of location.

Step4 Now comes the step to add numbers to the countdown. You need to select it from the Title tab and then move it to the timeline above the elements overlay.
Step5 Next, adjust and change the number duration to 1 second. Select the text and then using copy-paste add as many numbers for the countdown needed. If you double-click the text, the number will change.

Step6 Using the Audio tab, add the desired music or sound effect to your countdown.

Step7 You can now check and preview the create file and then tap on the Export button to start the processing and add the countdown with the music of your video.

Part 4: The best 6 After Effects countdown timer templates
If you wish to make your countdown timers more stylish and interesting, there are several templates available. These templates are readymade designs where you just need to enter your details and your countdown timer will be ready.
Below we have shortlisted the best After Effects Countdown Timer Templates. Check them out and apply it directly to your videos in Wondershare Filmora.
1. Cinematic Countdown

2. Neon Countdown

3. Cyber Countdown

4. Digital Countdown Pack

5. Glitch Countdown Transition

6. Flashing Light Countdown

Final Words
So, all set!! You now know the best tools for creating the countdown timer and also have details about the best templates. Go and create some stylish, and eye-grabbing timers in no time. If you have installed Wondershare Filmora , there are several other options that can be used for editing your videos like a pro.
Free Download For Win 7 or later(64-bit)
Free Download For macOS 10.14 or later
Also read:
- In 2024, Guide To Cropping and Combining Content in Wondershare Filmora Latest
- Updated If You Dont Know How to Blur a Part of a Video, Youre in the Right Place. We Have Provided All the Details You Need to Help You Blur a Still or Moving Portion of Your Video
- In 2024, How To Make Ninja Jump Effect
- New 2024 Approved Create Your Slow Zoom TikTok in Minutes
- How to Zoom in Discord
- Updated 2024 Approved To Add SRT to MP4 Is Not as Hard as You Might Think. All You Just Need Is the Right Tool to Help You Get the Job Done. Read This Article and Learn the 8 Latest Methods to Merge SRT with MP4 Effortlessly
- Updated In 2024, Video Inspiration for Birthday Slideshow
- New Want to Immediately Know All About Discord GIF for 2024
- If You Want to Color Grading Your Video, Adobe Lightroom Will Be the Right Choice. This Article Will Teach You How to Use Lightroom to Apply Color Grading to Videos with Ease for 2024
- Updated How to Enable and Use OBS Zoom Camera for 2024
- In 2024, 3 Best Effects to Appear on Camera
- Free Ways to Download Mobile Phone Green Screen Videos and Pictures No Copyright for 2024
- New In 2024, Gimp Green Screen
- New 2024 Approved Do You Know How You Can Trim or Merge Using Wondershare Filmora? Trimming and Merging Using This Tool Is an Easy Task; Learn How
- Updated Do You Want to Professionally Blur the Background in Your Video? Read This Article to Find Out the Easiest Way to Blur the Background in Videos Using Adobe After Effects
- Updated How To Add Scrolling Text Effect for 2024
- New 2024 Approved Adding Slow Motion in DaVinci Resolve A Comprehensive Overview
- New How to Use Adjustment Layer in Final Cut Pro
- Looking for a Full Guide on Removing the Background From PNG Images? Do You Want to Transform JPG to PNG Transparent? If so, Take some Time to Read This Article
- New Do You Want to Create a Motion Blur Effect in Your Videos? Read This Well-Described Guide to Learn How to Add Motion Blur on CapCut on iPhone and Android Devices
- New Discover How to Download Mobile Phone Green Screen Videos and Pictures for Free. Elevate Your Content with HD Quality Green Screen Frames for 2024
- How to Make a GIF With Transparent Background for 2024
- Looking For a Cheap Camera to Make Slow Motion Video? Get It Now
- Updated 2024 Approved Little Known Ways of Adding Emojis to Photos on iPhone & Android
- Updated 2024 Approved 2 Effective Ways to Add Text Behind Objects
- New In 2024, This Article Will Help You Understand How to Create Video Contents that Convert Sales
- New Achieving GoPro Slow Motion with Quality An In-Depth Overview for 2024
- New 2024 Approved Have You Ever Heard of the Video Format for PowerPoint? Allow Us to Help You Learn More About PowerPoint. It Will Help You Make an Impression by Making Good Slides
- New How to Use Rule of Thirds in Video
- If You Are Looking for an Open-Source, Cross-Platform Video Editor, Shotcut Is a Great Choice, In 2024 But Is It Truly the Best Video Editor or Is There a Better Alternative Available?
- In 2024, What Is TS Format and How To Play TS Files? Basic Tips
- How to Use Speed Ramping to Create a Footage for 2024
- Updated 2024 Approved Are You Looking for the Best Way to Add Subtitles to Your Video? The Top SRT File Creators Can Help You Do That
- Are You Looking for the Best Way to Add Subtitles to Your Video? The Top SRT File Creators Can Help You Do That
- Spotify Keeps Crashing A Complete List of Fixes You Can Use on Vivo G2 | Dr.fone
- In 2024, How Can You Transfer Files From Tecno Pova 6 Pro 5G To iPhone 15/14/13? | Dr.fone
- Apple ID Unlock On iPhone 15 Pro? How to Fix it?
- Best Ways on How to Unlock/Bypass/Swipe/Remove Vivo Fingerprint Lock
- Wondering the Best Alternative to Hola On Tecno Pova 5 Pro? Here Is the Answer | Dr.fone
- In 2024, Forgot Locked Apple iPhone 8 Plus Password? Learn the Best Methods To Unlock
- In 2024, How Do You Get Sun Stone Evolutions in Pokémon For Apple iPhone 14? | Dr.fone
- In 2024, How to Remove a Previously Synced Google Account from Your Samsung Galaxy S23
- In 2024, Top 7 Phone Number Locators To Track Sony Xperia 10 V Location | Dr.fone
- Updated 2024 Approved Apps to Animate Still Pictures Which Could Make Your Pictures Become Internet Sensation
- How to restore wiped videos on Tecno Phantom V Fold
- How to Unlock Xiaomi Redmi A2+ Pattern Lock if Forgotten? 6 Ways
- In 2024, Resolve Your Apple iPhone 14 Keeps Asking for Outlook Password | Dr.fone
- How to Digitally Sign .xlsm online free - (Tutorial)
- In 2024, How Can I Catch the Regional Pokémon without Traveling On Oppo A59 5G | Dr.fone
- Complete Tutorial to Use GPS Joystick to Fake GPS Location On Nokia C02 | Dr.fone
- New What Is an AI Presentation Maker?
- Top 6 Apps/Services to Trace Any Apple iPhone 8 Location By Mobile Number | Dr.fone
- In 2024, Simple and Effective Ways to Change Your Country on YouTube App Of your Sony Xperia 1 V | Dr.fone
- In 2024, Remove the Lock Screen Fingerprint Of Your Nokia C02
- Complete guide for recovering video files on Poco F5 5G
- Overview of the Best Honor X9b Screen Mirroring App | Dr.fone
- In 2024, How to Lock Apps on Xiaomi 13 Ultra to Protect Your Individual Information
- How to Unlock Samsung Galaxy Z Fold 5 Phone without PIN
- How to Bypass iPhone X Passcode Easily Video Inside | Dr.fone
- In 2024, How to Lock Apps on Xiaomi Redmi 13C to Protect Your Individual Information
- Title: Bandicut Video Editor Review
- Author: Morgan
- Created at : 2024-05-19 05:11:37
- Updated at : 2024-05-20 05:11:37
- Link: https://ai-video-editing.techidaily.com/bandicut-video-editor-review/
- License: This work is licensed under CC BY-NC-SA 4.0.

