:max_bytes(150000):strip_icc():format(webp)/ArtificalIntelligenceChatbotConcept-c0e491e36fae46ef84b670334af5095f.jpg)
Best 16 Motion Blur Apps for Videos & Photos for 2024

Best 16 Motion Blur Apps for Videos & Photos
The blur observed in moving objects captured through the camera is called the motion blur effect. This, in particular, occurs due to the movement of the camera, subject, or both elements combined. People observe this effect in their real life through their eyes; thus, the motion blur effect is put into practice to give the clip or photo a touch of reality.
It is essentially used to display the message of speed or show the fast progression of time. Any object moving through a fast motion can be accompanied by the motion blur effect. There are many applications available to cater to this purpose. In this article, we will recommend some top-notch motion blur apps that will help you achieve this feat in no time.
- CapCut
- NSMB - Motion Blur Video
- BlurEffect - Blur Photo & Video
- Snapseed
- Picsart Photo Editor & Video
- Blur Video and Photo Editor
- Blur.r Photo, Pic.ture Motion
- Motion Blur Photo Effect
- Motion Blur Photo Editor
- Wondershare Filmora - The Best Motion Blur Effect App on Desktop
- Vegas Pro - Create Natural-Looking Motion Blurs With Ease
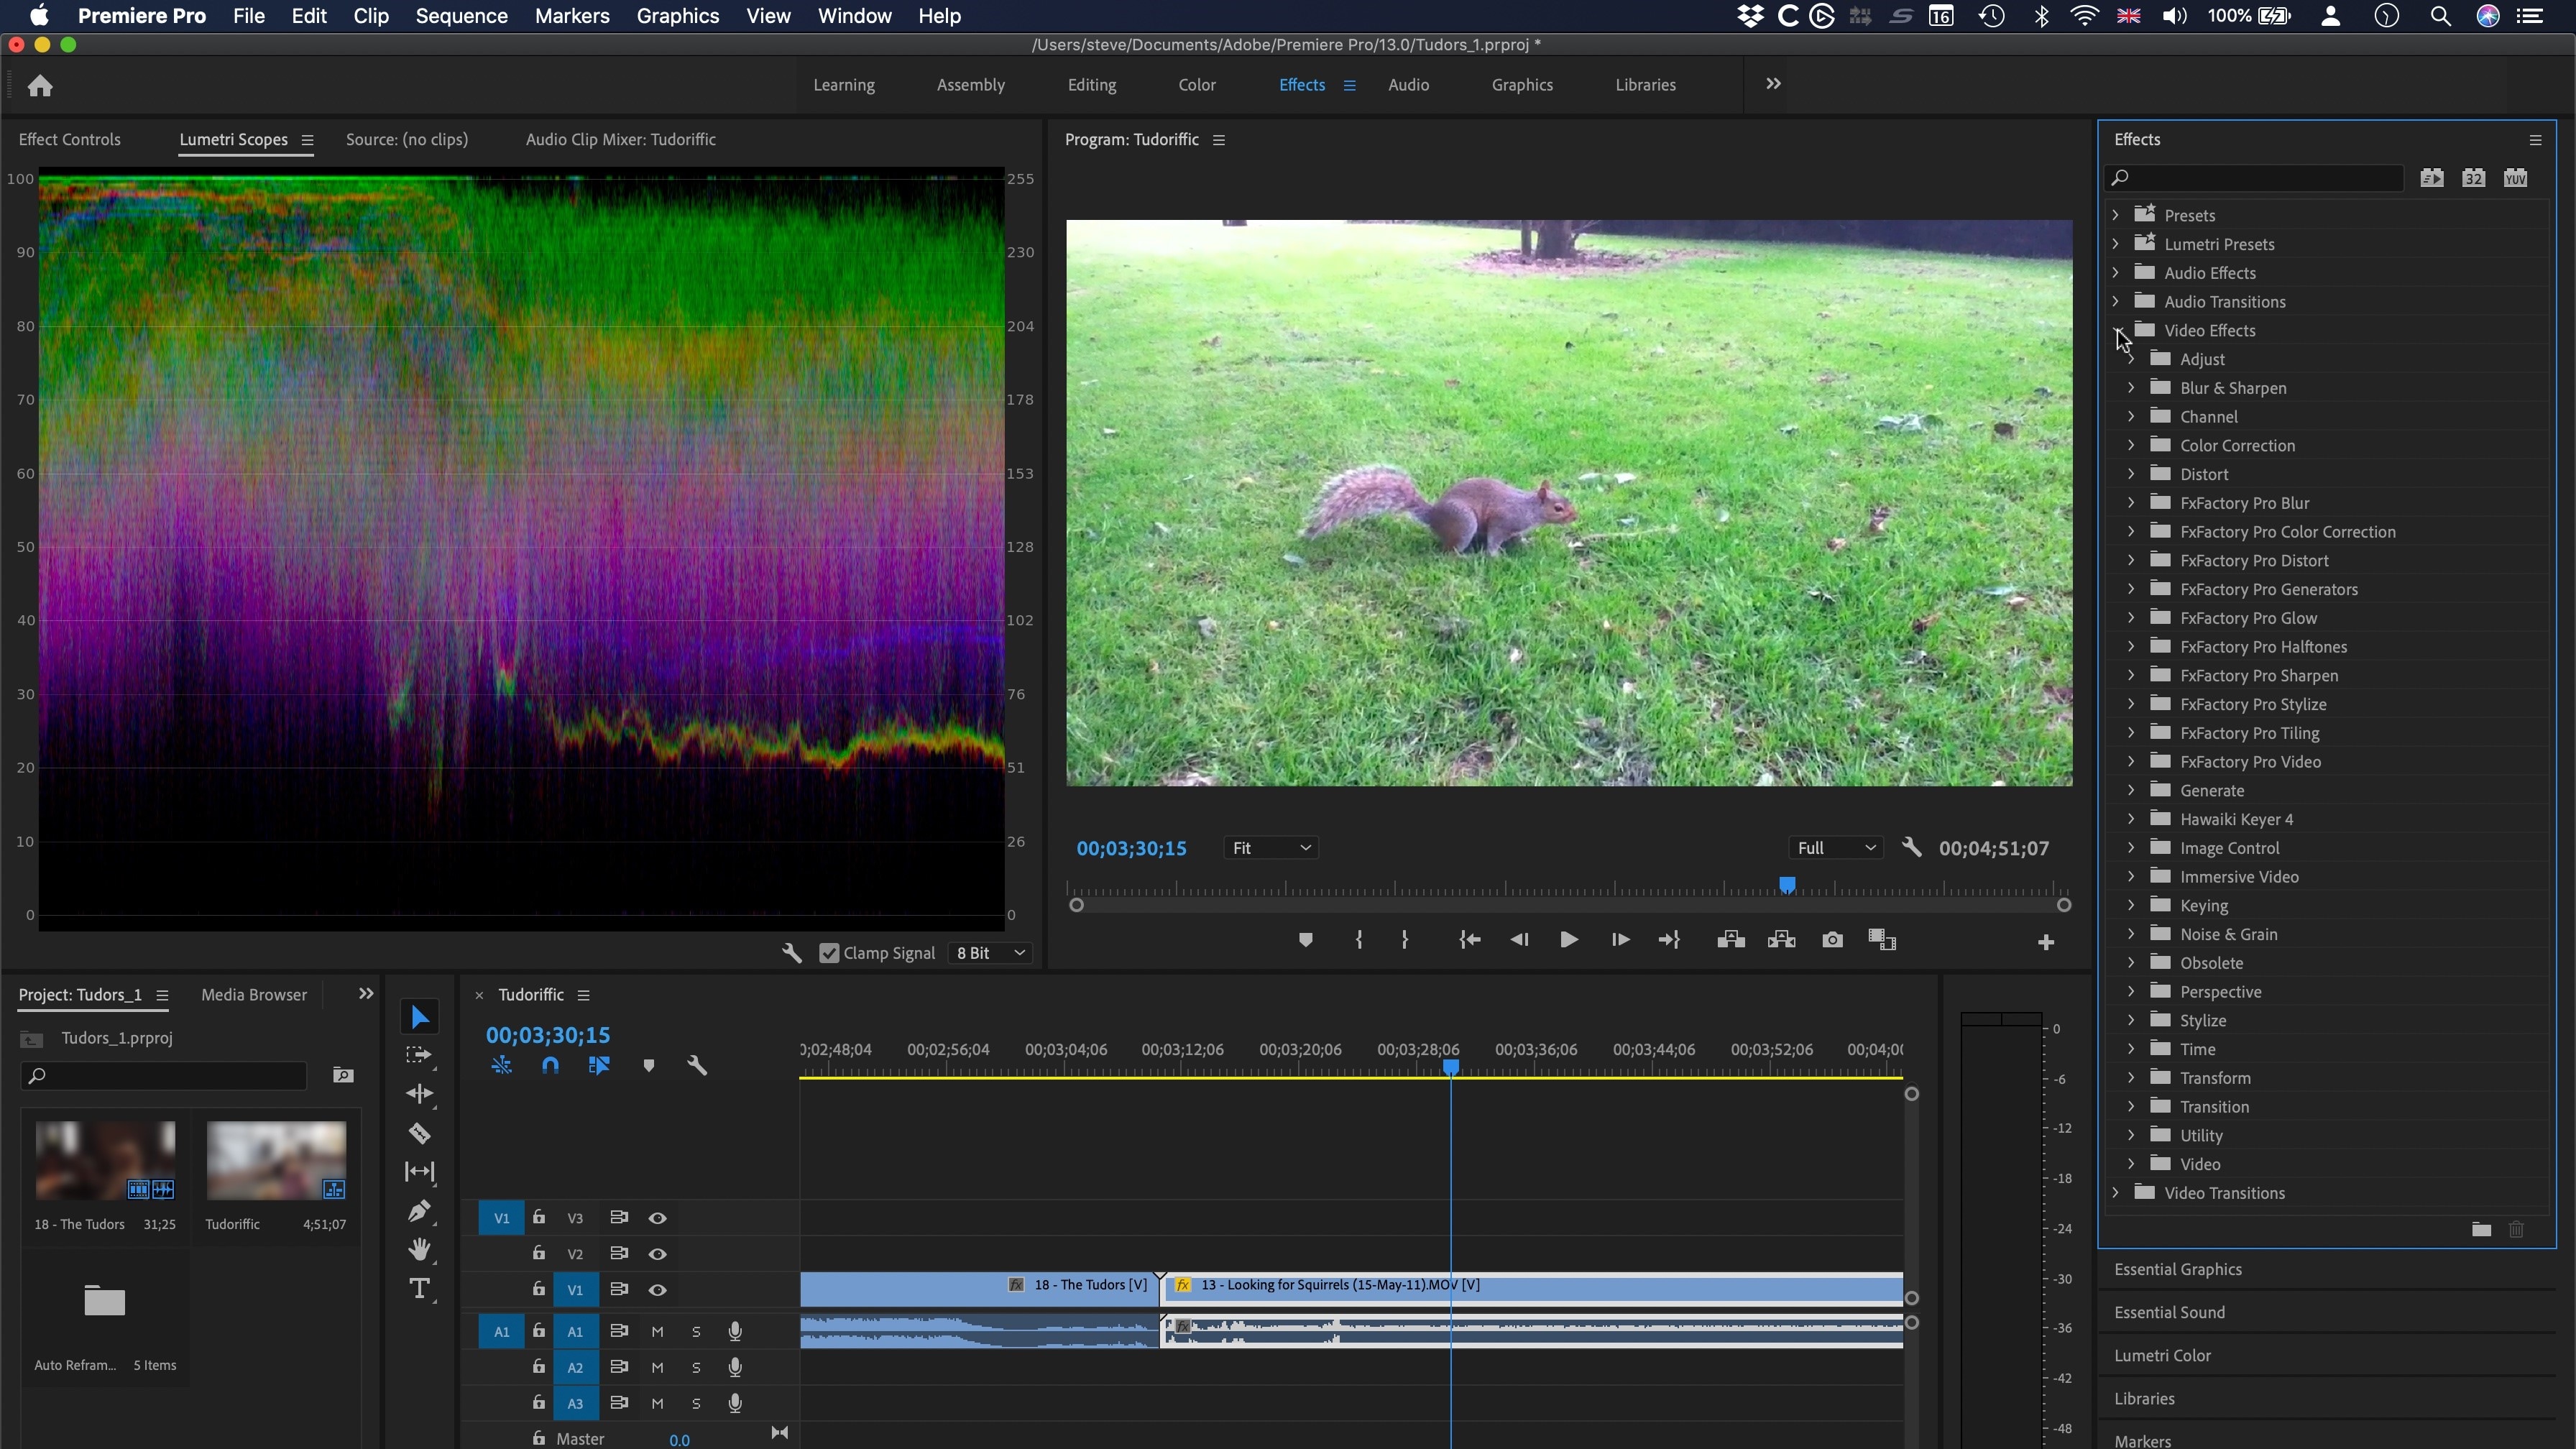
- Adobe Premiere Pro - Professionally Edit Motion Blur Videos
Best 4 Online Motion Blur Tools
Part 1: Best 9 Motion Blur Effect Apps for iPhone and Android
| Name | Price | Support System | Motion Blur for Photos | Motion Blur for Videos |
|---|---|---|---|---|
| CapCut | $0.99 - $74.99 Per Item | iPhone/Android | Yes | Yes |
| NSMB - Motion Blur Video | Not Provided | Android | No | Yes |
| BlurEffect - Blur Photo & Video | Full version: $39.99Premium - Monthly: $3.99Ad-Free & Watermark-Free: $14.99Up to 5 Minutes & Watermark-Free & Ad-Free: $19.99Premium - Annual: $19.99 | iPhone | Yes | Yes |
| Snapseed | Free | iPhone/Android | Yes | No |
| Picsart Photo Editor & Video | Ad Remover: $5.99Girl Minisketch: $1.99Food: $1.99Cartoon Animal Package: $2.99Grunge Stickers: $0.99Girly: $0.99Horoscope: $1.99Cute Thanksgiving: $2.99Happy Thanksgiving: $2.99Aliens: $0.99 | iPhone/Android | Yes | Yes |
| Blur Video and Photo Editor | $0.99 - $99.99 Per Item | Android | Yes | Yes |
| Blur.r Photo, Pic.ture Motion | Monthly Subscription: $ 11.98Weekly Subscription: $ 6.98One Week Subscription: $ 3.98Yearly Subscription: $ 94.98 | iPhone | Yes | No |
| Motion Blur Photo Effect | Premium Access: $7.99 - $29.99 | iPhone | Yes | No |
| Motion Blur Photo Editor | Not Provided | Android | Yes | No |
There are many motion blur effect applications available in the market, providing direct services for iPhone and Android users. However, finding the best app for this purpose is essential, which is why we came up with a list of the best motion blur apps that can be used on iPhone and Android.
1. CapCut
While it is known as an easy-to-use application, CapCut stands among the most premium mobile applications that help you create professional videos that can be posted on social media platforms. CapCut comes up with a dedicated motion blur effect that allows users to create stabilized videos with complete control over the speed of the video.
Following other adjustments in the video, CapCut is a complete tool designed to create advanced videos, including different effects such as motion blur.

Download: Google Play Store | App Store
Key Features
- You can quickly put transitions between the video and the clips to blend in perfectly.
- Video clips can be animated with the help of zoom-in and out effects, providing all major professional touchups a video can have.
- Execute a perfect motion blur video with the help of the multi-track timeline for arranging and previewing clips.
Pros
- It provides the option of including music clips and sound effects on the videos from the vast collection.
- It supports exporting videos in 4K and 60fps with Smart HDR technology.
Cons
- Won’t work perfectly if the RAM and hardware of the phone are limited.
2. NSMB - Motion Blur Video
The motion blur effect is a great feature that can enhance the quality of the video and make it look realistic if used properly. NSMB - Motion Blur Video is an Android motion blur application that features the option of creating such videos in a matter of seconds.
With no particular learning requirement, NSMB makes the process look easy. You have to set the intensity of video, and that’s all you need to do within this application.

Download: Google Play Store
Key Features
- While the platform is easy-to-use, the interface is quite simple to understand, with no confusing structures.
- The platform comes up with an intelligent motion blur that automatically executes the process.
- It works with Android devices from Android 5.0 and later, making it a compatible tool with all major Android devices.
Pros
- You can set the resolution of your exported video to 1080p, which is a Full HD result.
- Set an appropriate fps value for your exported video with the available options.
Cons
- Long rendering times, which are not optimized and take up time.
3. BlurEffect - Blur Photo & Video
BlurEfffect - Blur Photo & Video is another great iOS application that provides the option of adding motion blur effects. This tool is built to include the blur effect to perfection in general. With defining blur options, you can create motion blur effects easily on your added videos. The functions are diverse and quite effective if appropriately observed.

Download: App Store
Key Features
- As the name exclaim, it works perfectly for photos and videos, likewise.
- The paid version of the application can save videos up to 1080p in quality.
- It provides the feature of managing the strength of the “Auto Blurs” feature for controlling motion blur.
Pros
- Multiple effects are available on the platform, including normal blurs, pixelated and dotted blurs, etc.
- It also provides the option of trimming videos before adding the blur effect to them.
Cons
- The resolution of the video is lowered after blurring it out.
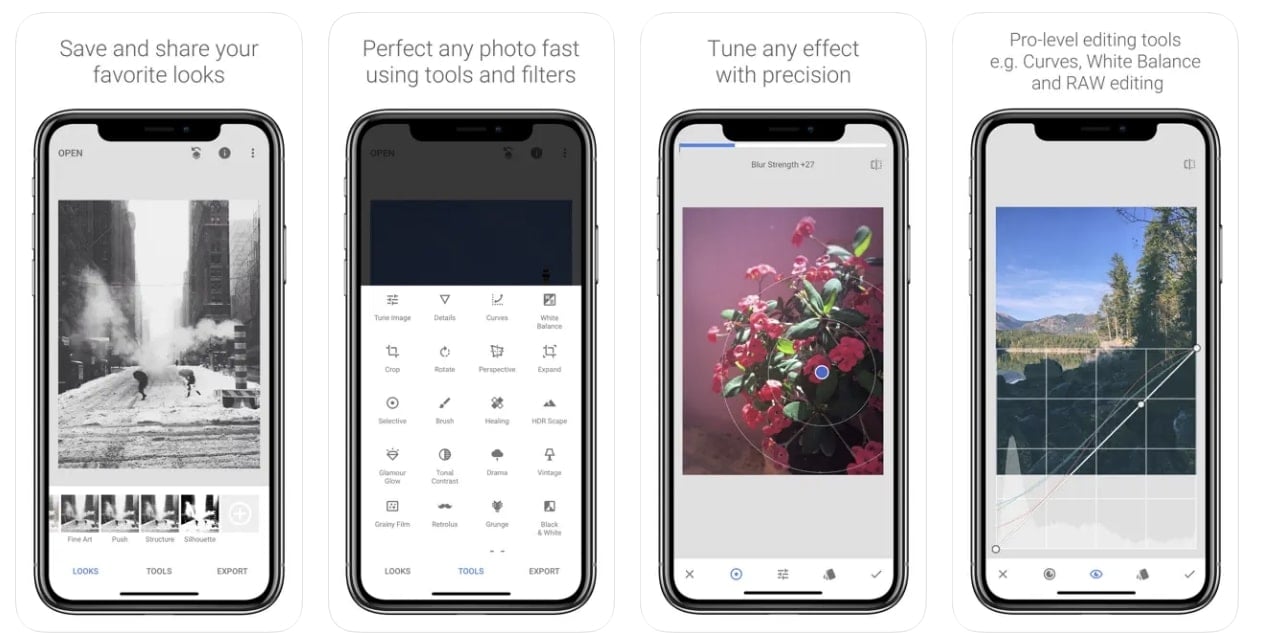
4. Snapseed
Google presented a great and quick photo editor for users confused about finding their perfect option. Snapseed was designed as a professional photo editor that allows users to add multiple touchups to the photo that is being edited.
While it backs itself up with Google Photos, this professional photo editor is enhanced and interconnected. Snapseed makes photo touchups simple; however, it does provide advanced functions that can help create motion blur pictures.
Download: Google Play Store | App Store
Key Features
- It combines with 29 different tools and filters, which also includes creating motion blur pictures.
- 38 predefined text styles are available in the editor for creating the text of different styles and forms.
- Create effects with multiple exposures brought with HDR Scape.
Pros
- Enhance a specific photo element with the help of the Face Enhance feature, which adds focus to the facial features.
- You can selectively retouch the photo and manage its exposure, saturation, and other elements.
Cons
- The application has no undo button, making it challenging to manage edits.
5. Picsart Photo Editor & Video
Picsart is a renowned photo and video editor available on App Store and Play Store. This exceptional editor covers a creative set of features combined with artificial intelligence to present some of the best options for retouching photos and videos. If you seek to create a motion blur effect with this application, it surely won’t disappoint, presenting a high-resolution result.

Download: Google Play Store | App Store
Key Features
- It helps users customize photos and videos with customizable brushes, layers, and drawing tools.
- Present a realistic display of motion blur with the help of the multiple effects and filters used for blending in perfectly.
- More than 60 million stickers are available in Picsart, which can be effectively used within any editing media.
Pros
- You can easily share the edited content with your friends through the platform.
- It provides multiple video effects and trendy filters to make video editing easier.
Cons
- There is a lot of lag in the application while editing the video.
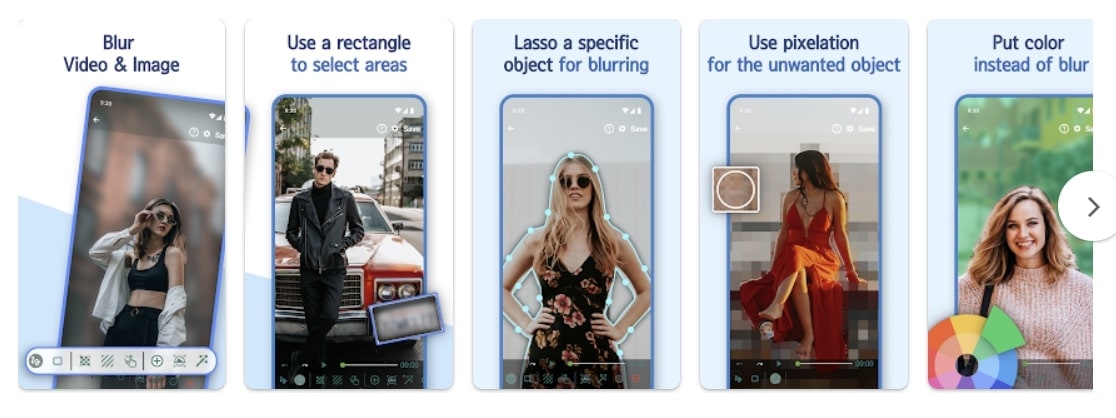
6. Blur Video and Photo Editor
This is one of the motion blur apps that provides a simple set of options for managing and enhancing the videos and photos on your Android device. Motion blur can be confusing if not managed properly; however, Blur Video and Photo Editor provides a simple platform to include the blurry effect and make the moving object look perfect in the preview.
Download: Google Play Store
Key Features
- You can blur out the background of the imported photo or video while adjusting the intensity with the help of an easy tool.
- It also allows you to pixelate the unwanted sections and portions of the media files.
- Define more than one area for blurring with the help of shapes.
Pros
- It features the intuitive option of blurring out an object that is moving in the video.
- You can track an object with a simple definition of the area within the platform.
Cons
- The user interface is not exceptional, with buttons that are not even usable.
7. Blur.r Photo, Pic.ture Motion
Not many tools provide a simple and customized set of options for including motion blur within photos and other media. Blur.r Photo, Pic.ture Motion has been tangibly designed to improvise a perfect motion-blurring photo platform. While it provides a quick set of tools to work with, the results are exquisite and better than most in the market.

Download: App Store
Key Features
- Set the intensity of the blurriness and size on the photo with custom tools.
- A complete set of sharing options is available on the platform, which is covered in a single click.
- For detailed blurring, you can consume the option of Zoom and Pan the photo.
Pros
- You can easily undo and redo actions on the edited photos to avoid repeating actions and wasting time.
- Use different filters within photos to edit them to perfection.
Cons
- It does not allow for adjustment of the intensity of the blur, as stated in the services.
8. Motion Blur Photo Effect
While finding the perfect motion blur effect app on iPhone for presenting realistic effects in photos, you might come across Motion Blur Photo Effect, a perfect motion blur photo application for iOS users. The tool is known for its fast processing and quick execution, with an easy-to-use interface for creating perfect blurred pictures.
You can find multiple features and effects in this application that relate to motion blur, providing a diverse range of options when seeking this effect.

Download: App Store
Key Features
- Protects the user’s privacy while maintaining its policy of avoiding illegal breaches.
- Emphasize the light spot in the background of a picture with the help of the Bokeh effect.
- Get a complete set of blur effects to include in the photo, which features advanced functionality.
Pros
- You can find different types of blur effects, such as Zoom Blur, Motion Blur, and Mosaic Effect, to enhance the motion blur.
- It is extremely simple and quick in procession.
Cons
- It does not provide motion blurring for videos, making it restricted.
9. Motion Blur Photo Editor
Adding realistic effects to images is important if your work involves professional requirements. Motion blur is an effect used in multiple places, which makes it a critical feat to achieve. While obtaining the effect, the simplicity of the procedure holds importance. This is why Motion Blur Photo Editor gives the perfect result with explicit functions and features to enhance the motion blur effect.

Download: Google Play Store
Key Features
- Make your images look realistic with the help of magic effects.
- Manage different elements, including the text and other features, such as the brightness of the tool.
- It allows you to share the rendered result on different social applications.
Pros
- Features support for Android devices with OS 4.2 or above.
- The process of including motion blur in photos is quite basic.
Cons
- An outdated application, which was last updated in 2019.
Part 2: 3 Motion Blur Apps for Mac and Windows
As you have consulted the motion blur apps for iPhone and Android, you might require something more professional. For this, you first have to shift onto a computer or Mac that provides you with a perfect platform for creating content. Let’s find out some top-notch motion blur effect apps that you can use on your Mac and Windows:
1. Wondershare Filmora - The Best Motion Blur Effect App on Desktop
Free Download For Win 7 or later(64-bit)
Free Download For macOS 10.14 or later
Not many tools provide a complete set of tools to manage the videos on your computer and create the best version out of them. Wondershare Filmora is a complete package for creating a motion blur effect on a video.
With a quick and effective toolkit available on the platform, Filmora turns out to simplify the process, thereby making the process look basic. Filmora unleashes the creativity of a beginner, helping them create a perfect video with its intuitive and impressive interface.
Supported System
- Windows, Mac, and iOS
Pricing
- Month Plan: $19.99
- Annual Plan: $49.99
- Perpetual Plan: $79.99
Key Features
- It provides support to a variety of file formats which allows you to recreate motion blur out of any video with ease.
- The variety of video transformation features offered in the tool is exquisite, where you can manage motion tracking, stabilization, and several other video parameters.
- Use effects and transitions to create the perfect motion blur video for yourselves.
Pros
- You can find the support of resolution up to 4K in the video editing platform.
- It also features the option of enhancing GPU acceleration for faster encoding.
Cons
- Puts a watermark on the export video for the free version.
Step-by-Step Guide on How to Create Motion Blur Effect on Filmora
We will now discuss how you can create a motion blur effect on Filmora, the best app for motion blur, using the right tools. First, look into the steps provided below for a better understanding:
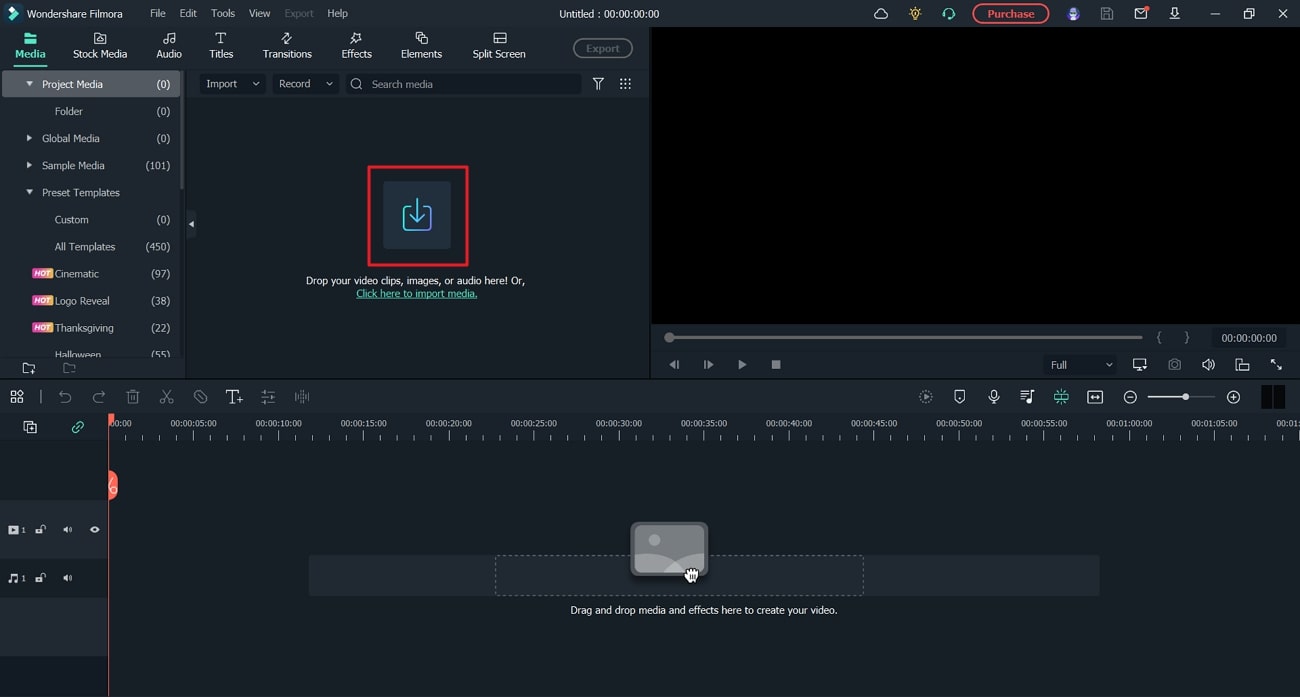
Step 1 Add Video File to Platform
Launch Wondershare Filmora on your computer and select “Create New Project” to open a new canvas. Click on the “Arrow” icon to import the video or photo.
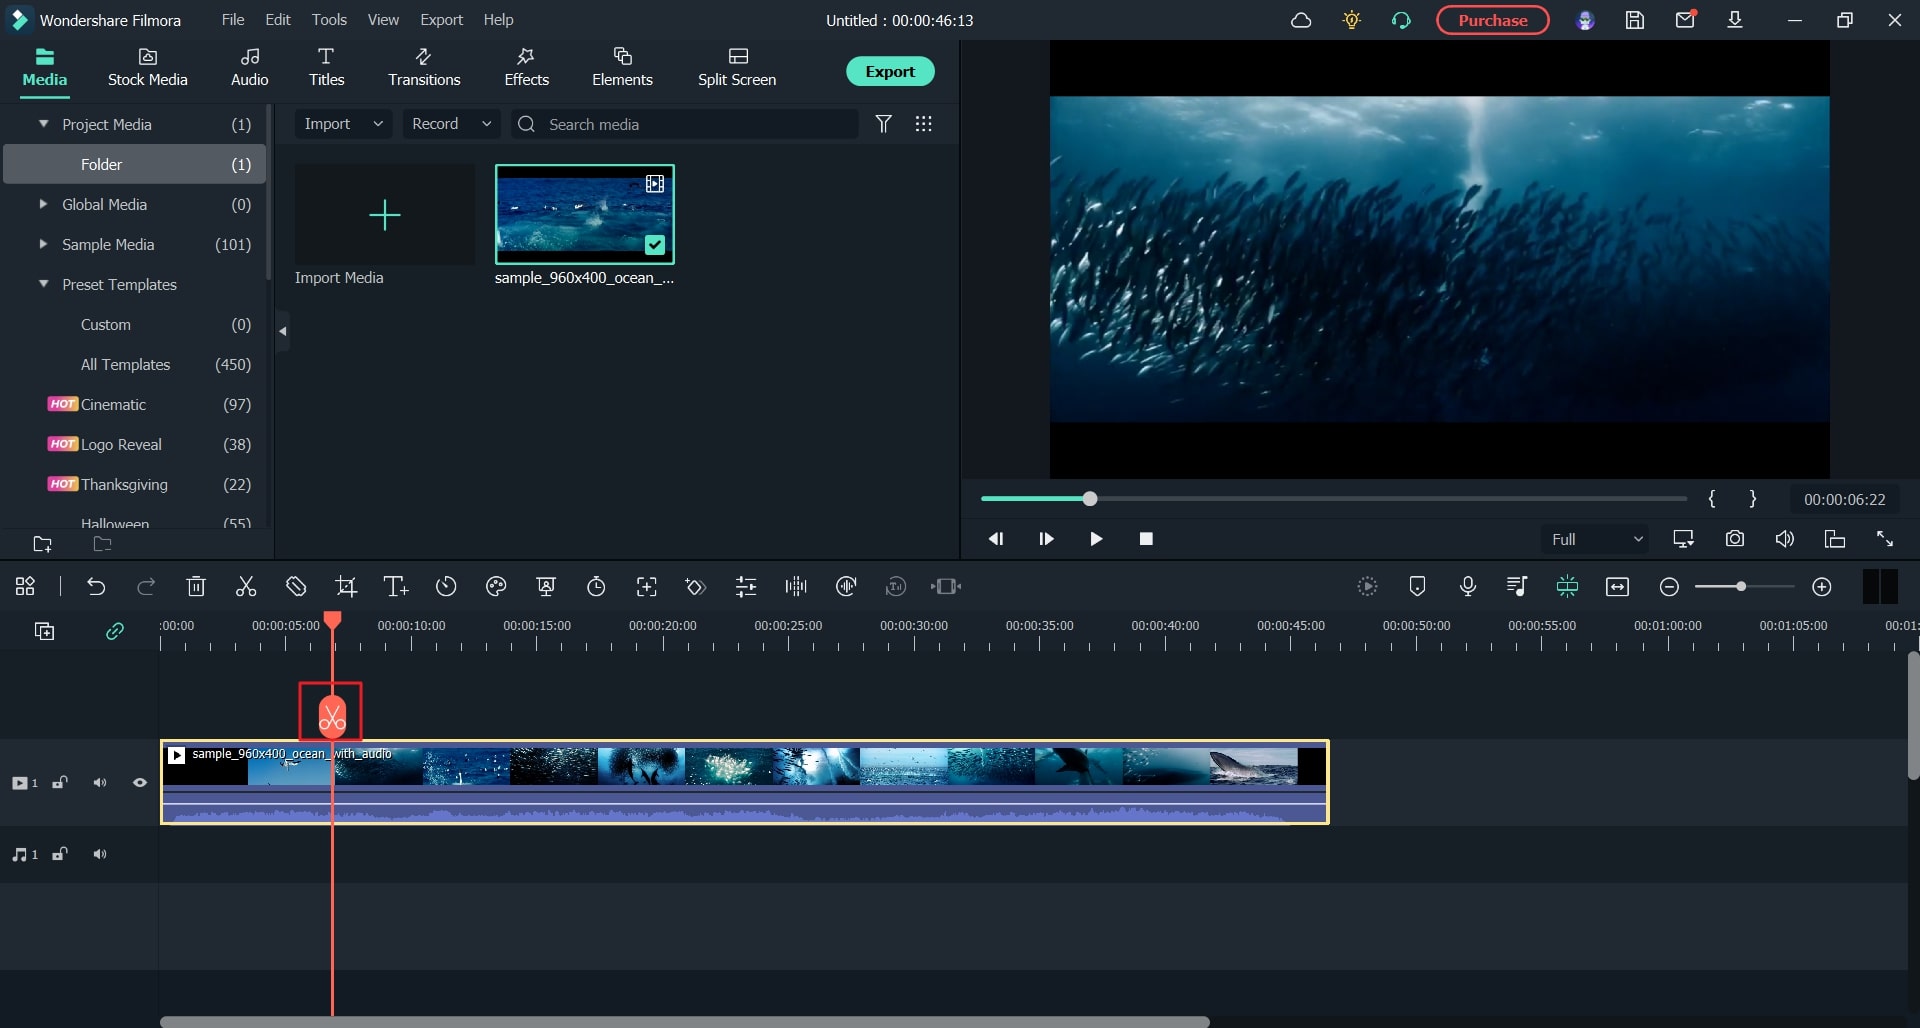
Step 2 Cut Down Sections of Clips
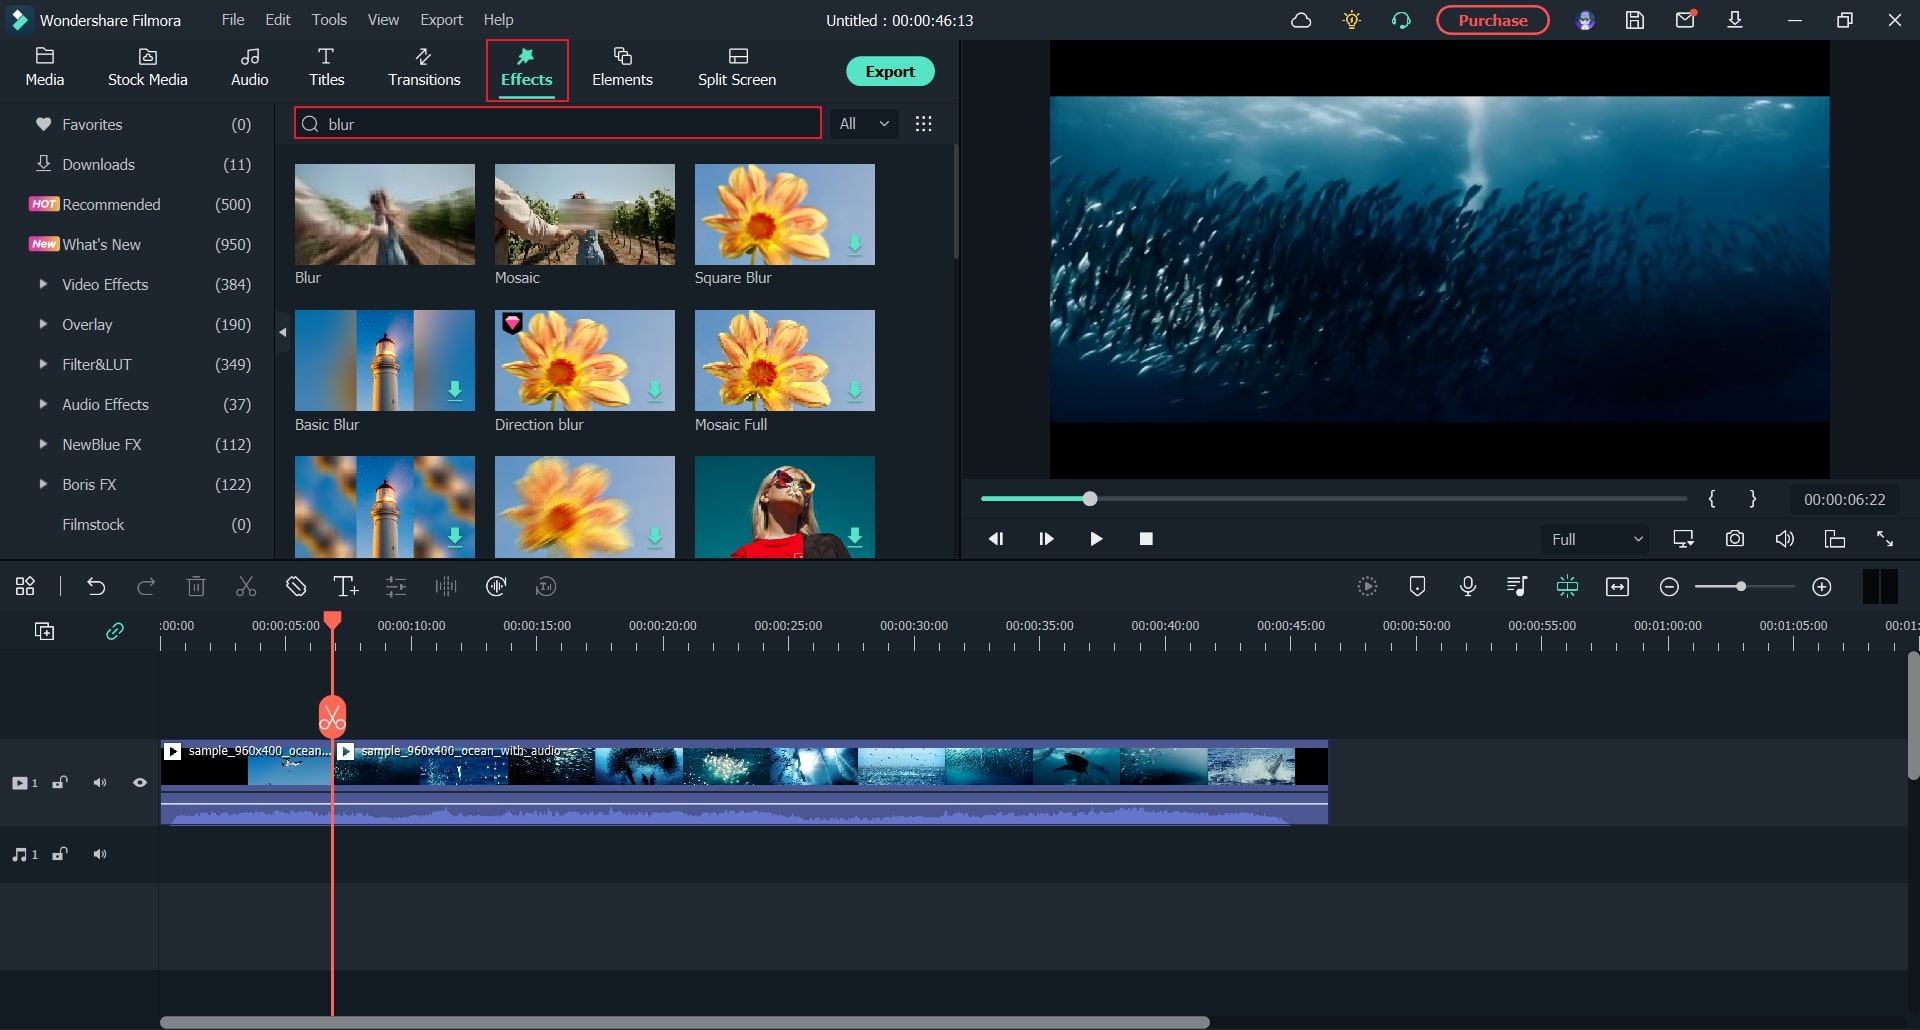
As you add the media into the timeline, lead to the point where you want to add the motion blur. Select the “Scissors” icon for splitting the clip and repeat this for every point where you want to add the effect.
Step 3 Include the Blur Effect
Access the “Effects” tab and look for the “Blur” effect. Add the blur effect by dragging it into the timeline on the split part of the video.
Step 4 Change Parameters to Smoothen Results
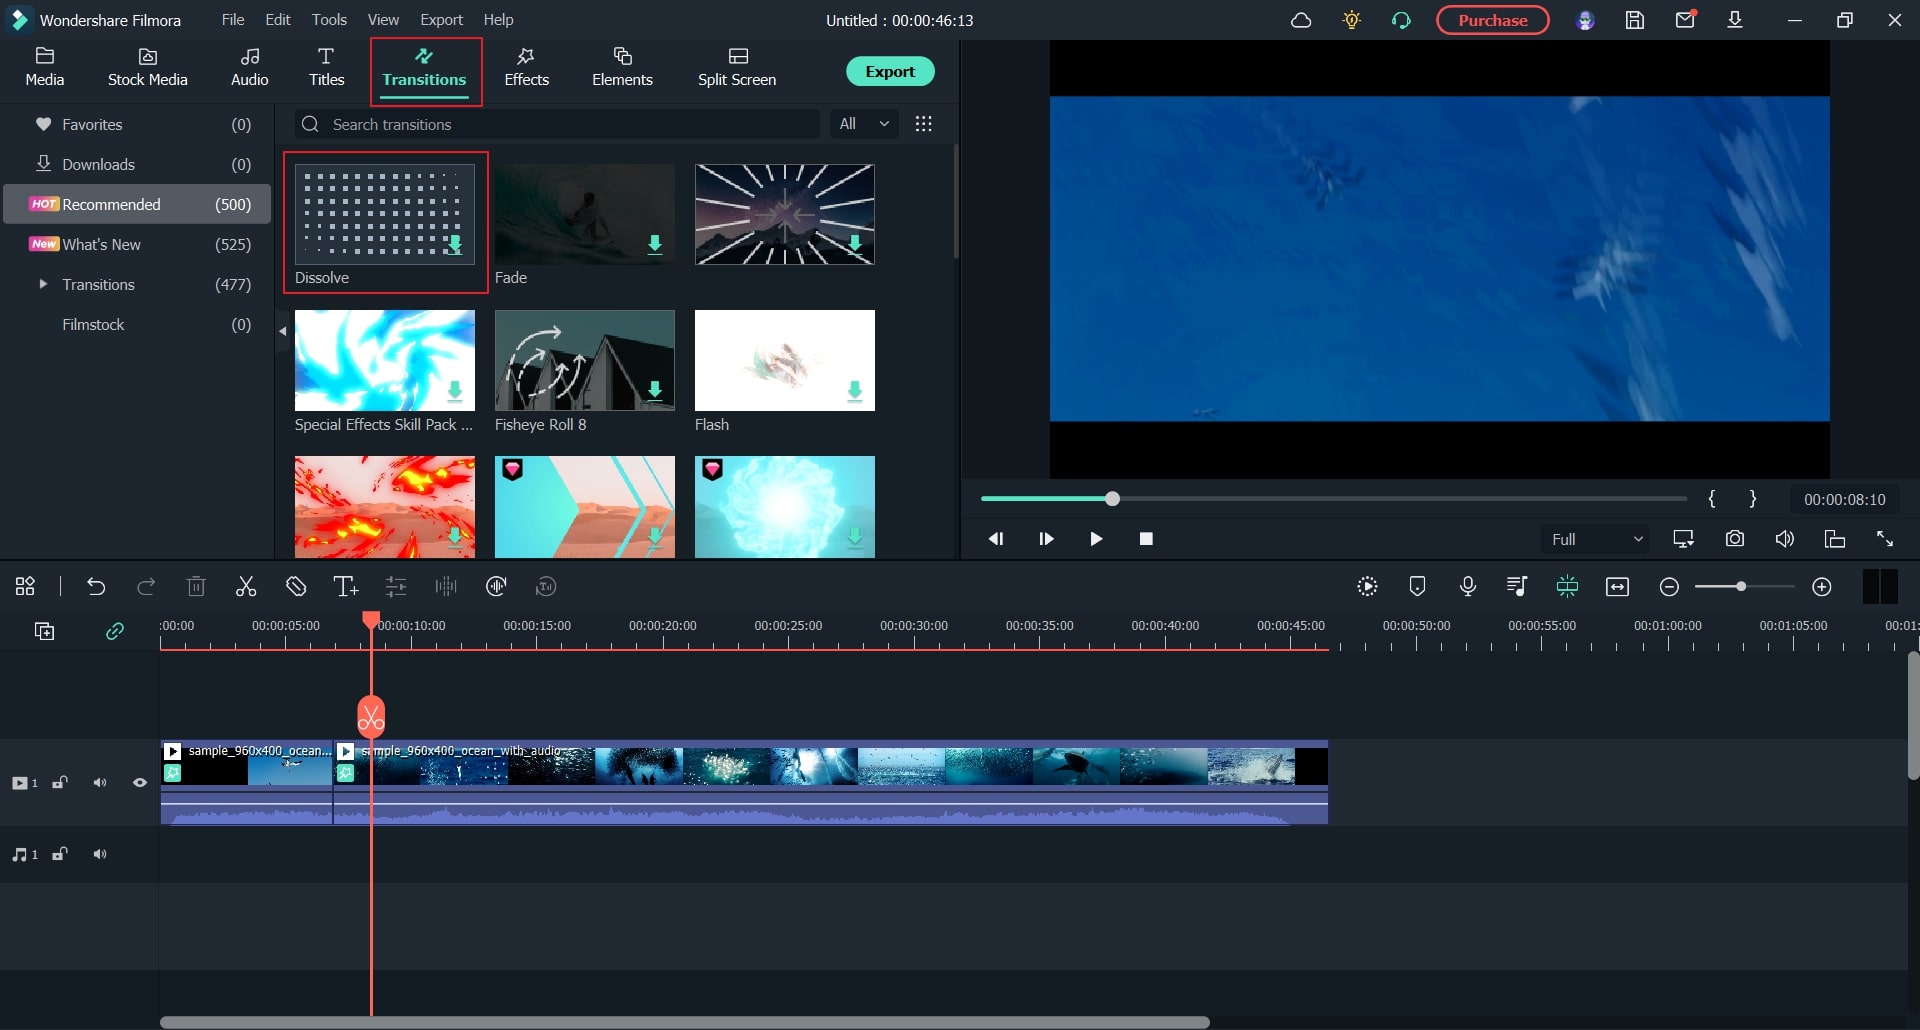
Adjust the parameters of the added effect to make it smooth. You can also access the “Dissolve” option in the Transitions. Add the motion blur effect and perform other vital changes in parameters that are required.
Step 5 Export Video File
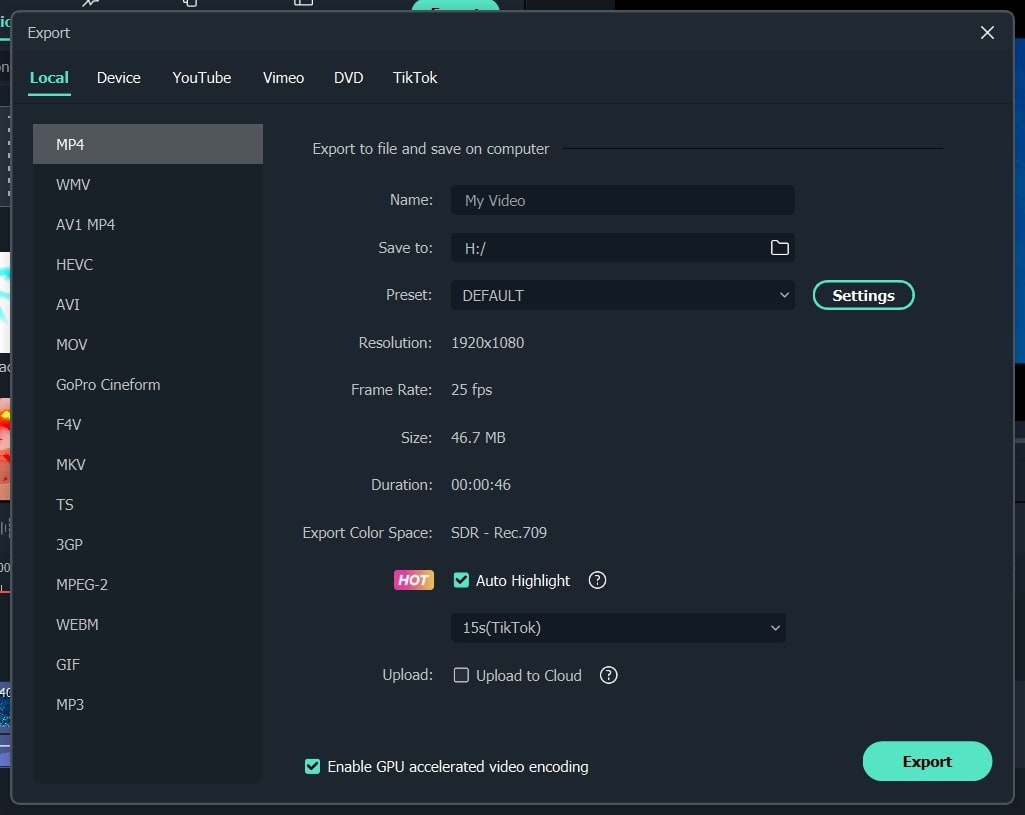
Afterward, select the “Export” button and define the desired resolution and frame rate to conclude. You can also share your video on your social media accounts.
2. Vegas Pro - Create Natural-Looking Motion Blurs With Ease
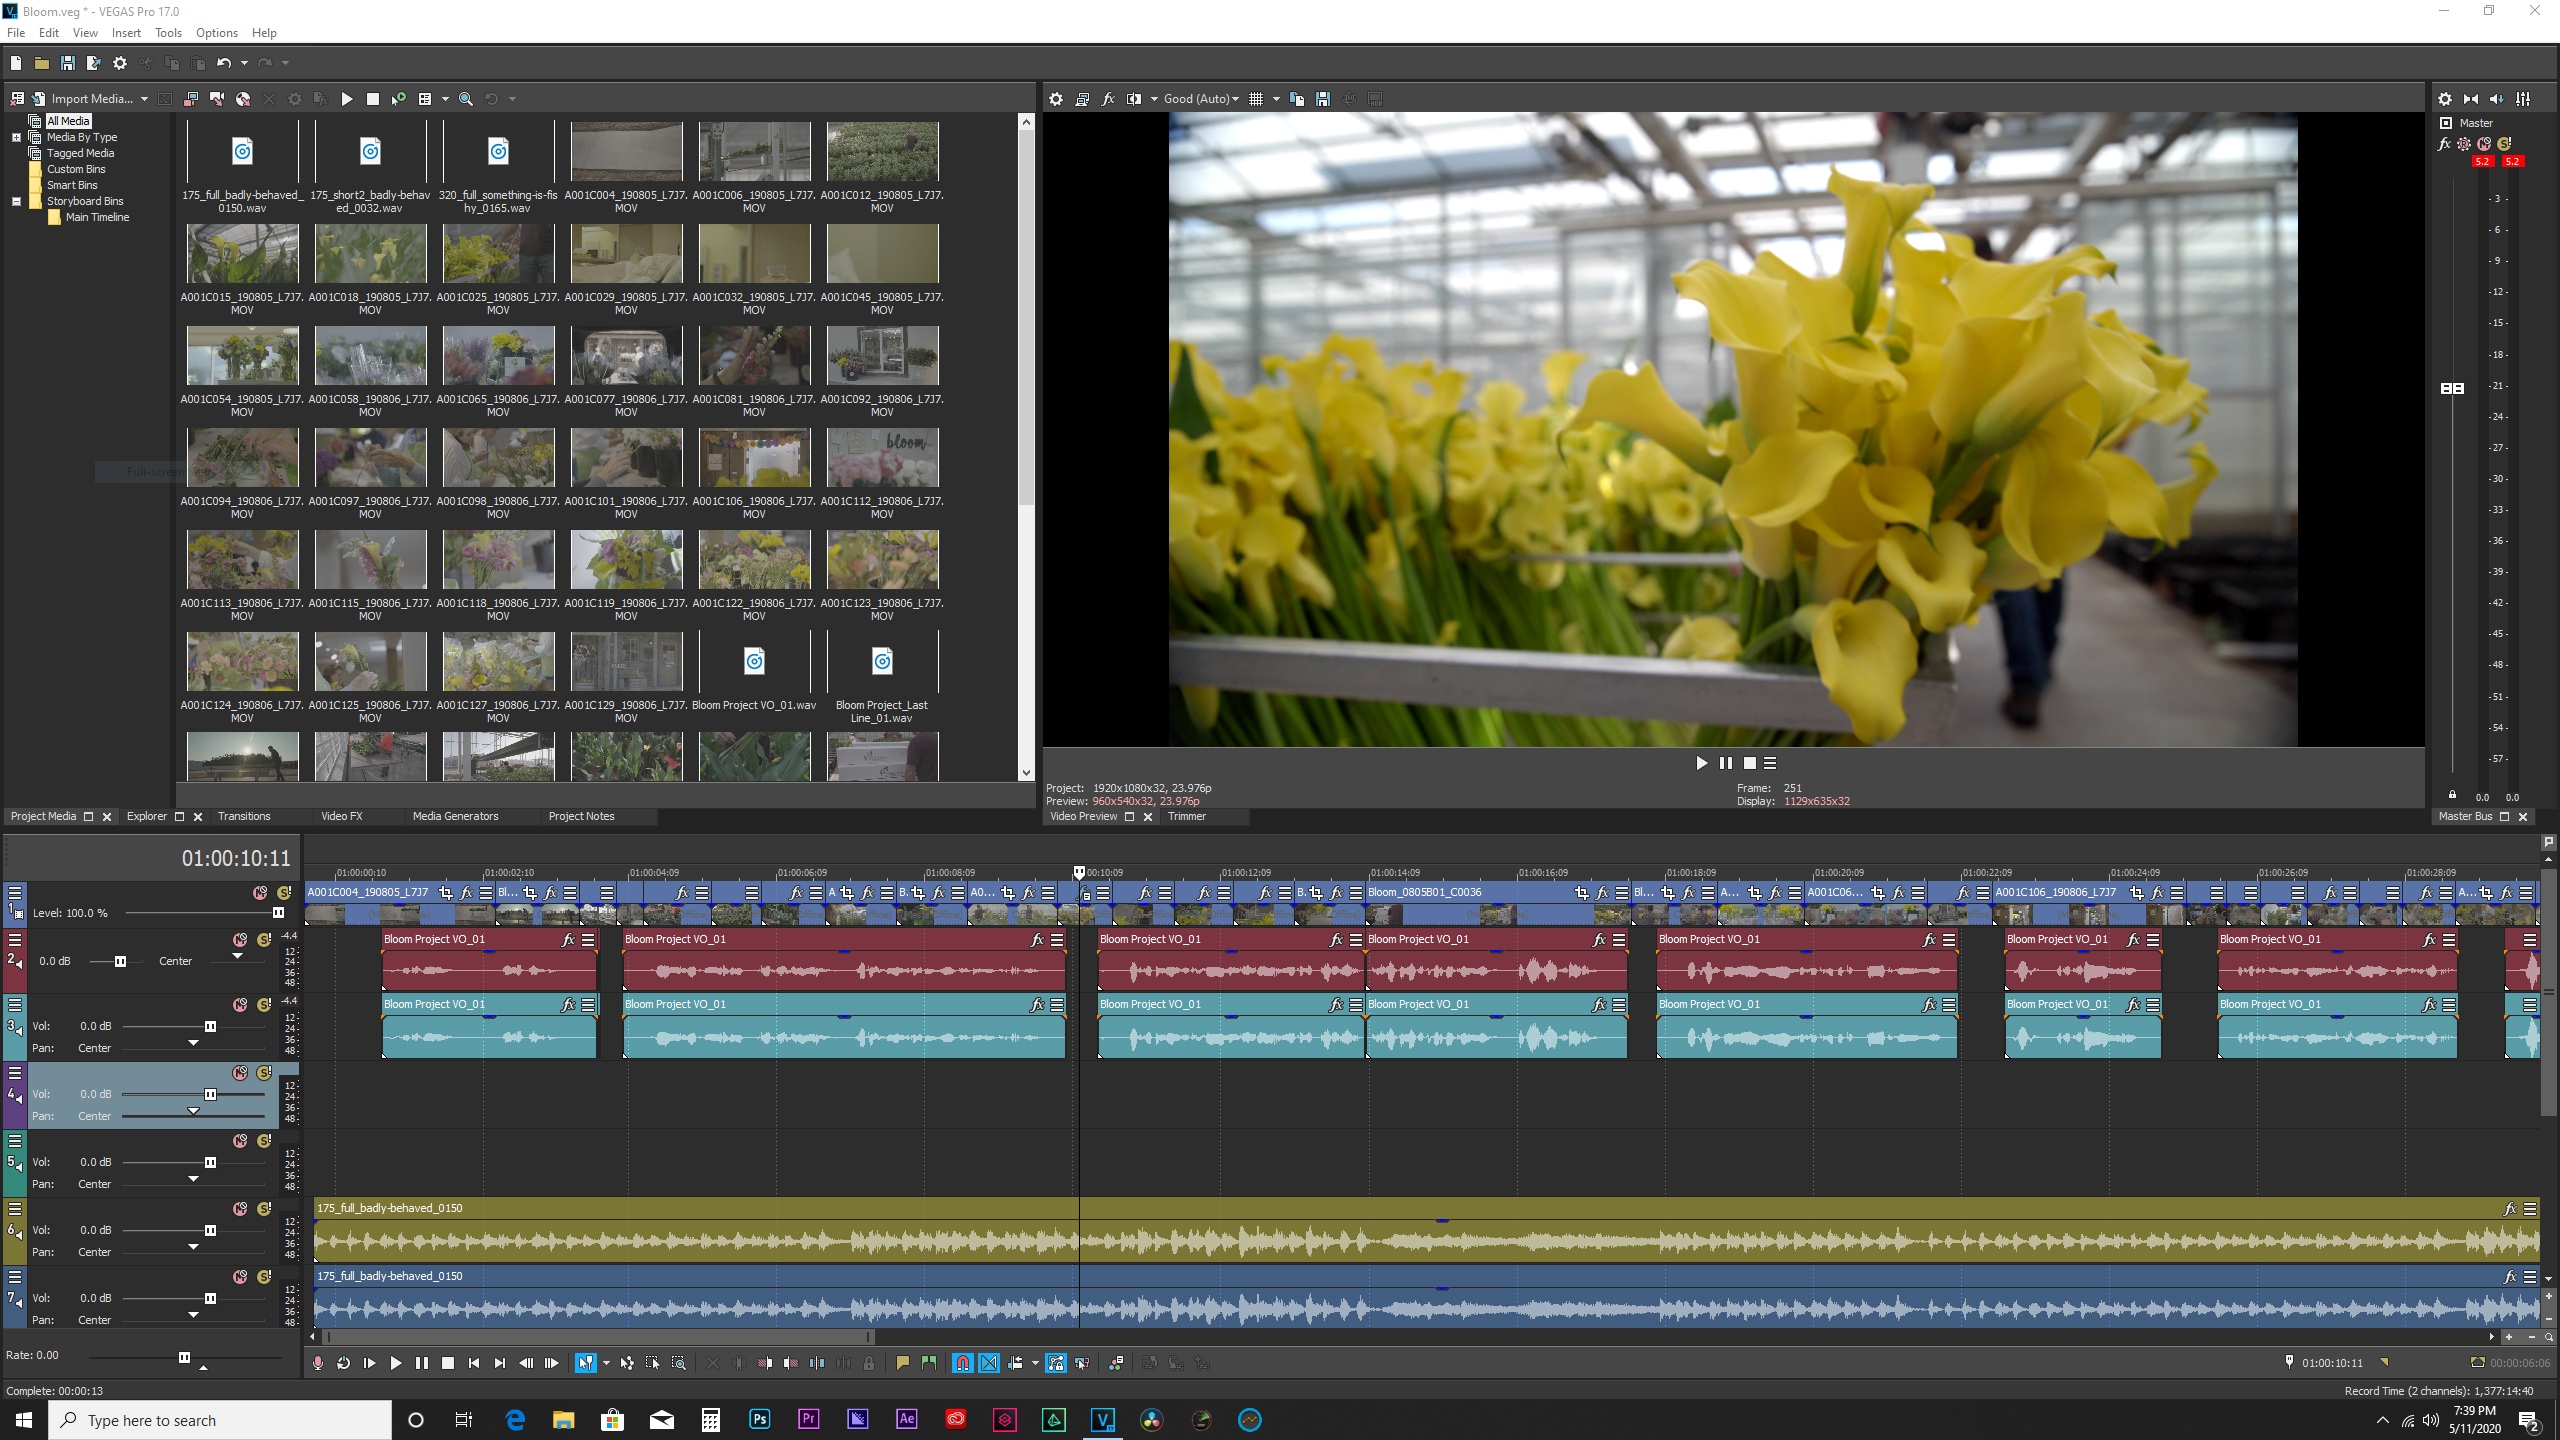
Vegas Pro is an impressive video editing platform that provides the option of creating motion blurs that look completely natural. It does not edit a specific element in the video but allows you to make changes in any other element that can be used to define motion. Motion blur can be added and edited to a fraction of a second with this platform.
3. Adobe Premiere Pro - Professionally Edit Motion Blur Videos
Adobe Premiere Pro is a great tool for improvising professional videos. With quick edits, you can come across every second of the video and present the perfect editing model with the help of the advanced toolkit. The major issue with such platforms is the high learning curve that prevents many users from considering this platform for tasks like executing motion blur in videos.
Part 3: Best 4 Online Motion Blur Tools
Many online platforms feature the option of introducing motion blur effects on videos. While we point out the best ones in the list, you should carefully assess them all to know more about them:
1. Lunapic
Lunapic is a great option for introducing motion blur into pictures. Being an online tool, it is pretty straightforward with its functionality, as you will only have to adjust some settings in the picture to edit it. Lunapic, being an online photo editor, provides different editing functions and tools in its interface. The result of motion blur turns out to be excellent in terms of it being an online tool.

Pros
- You can scale the image before putting a motion blur on the output.
- Add different shapes to highlight the image that is being edited.
Cons
- It provides an outdated interface when compared with other online photo editing tools.
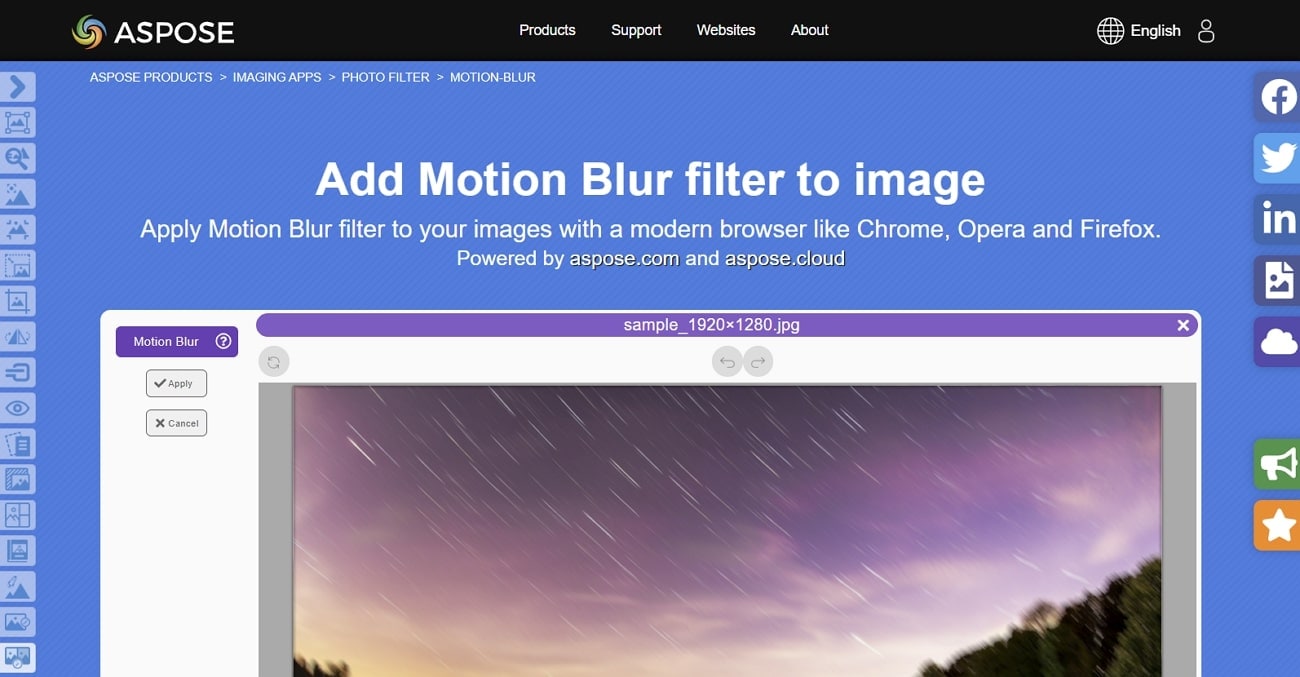
2. Aspose
This excellent photo editing platform provides you with a dedicated function of adding motion blur to an image as a filter. Aspose allows adding files from the computer and Dropbox while providing a straightforward process of putting motion blur into a photo. You have to adjust the filter parameters to create the perfect picture.
Pros
- You can also detect objects within the image with the help of the “Object detection” feature.
- Create Photo Book Maker along with including motion blurs on the image for managing a collection of pictures.
Cons
- It does not offer any adjustment sliders and options while performing motion blur.
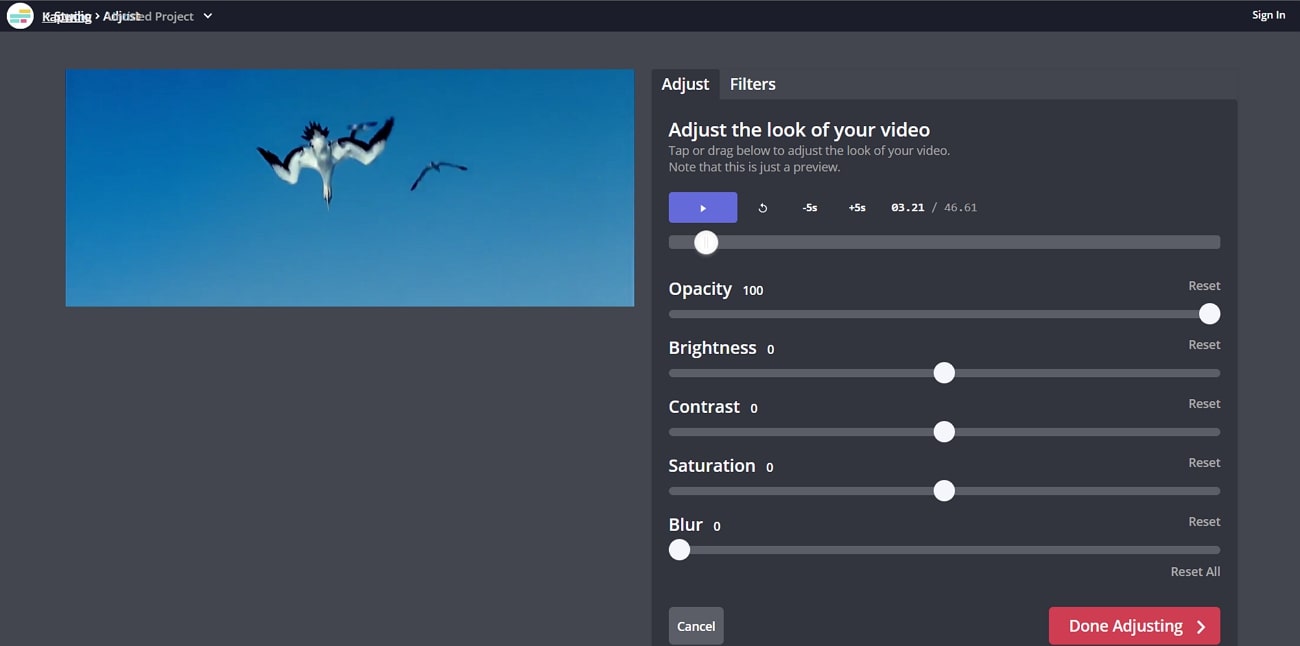
3. Kapwing
As an online tool, Kapwing provides many features that can be used to edit videos. Its ability to blur the videos is exceptional and tends to offer great results with the least of parameters. Users who are uncomfortable with editing videos on professional tools can consider this an alternative.
Pros
- No spam and ads are present in the tool while protecting the user’s information.
- The tool provides AI-Powered features, which can be easily used to manage videos.
Cons
- It does not maintain the quality of the videos after exporting the edits.
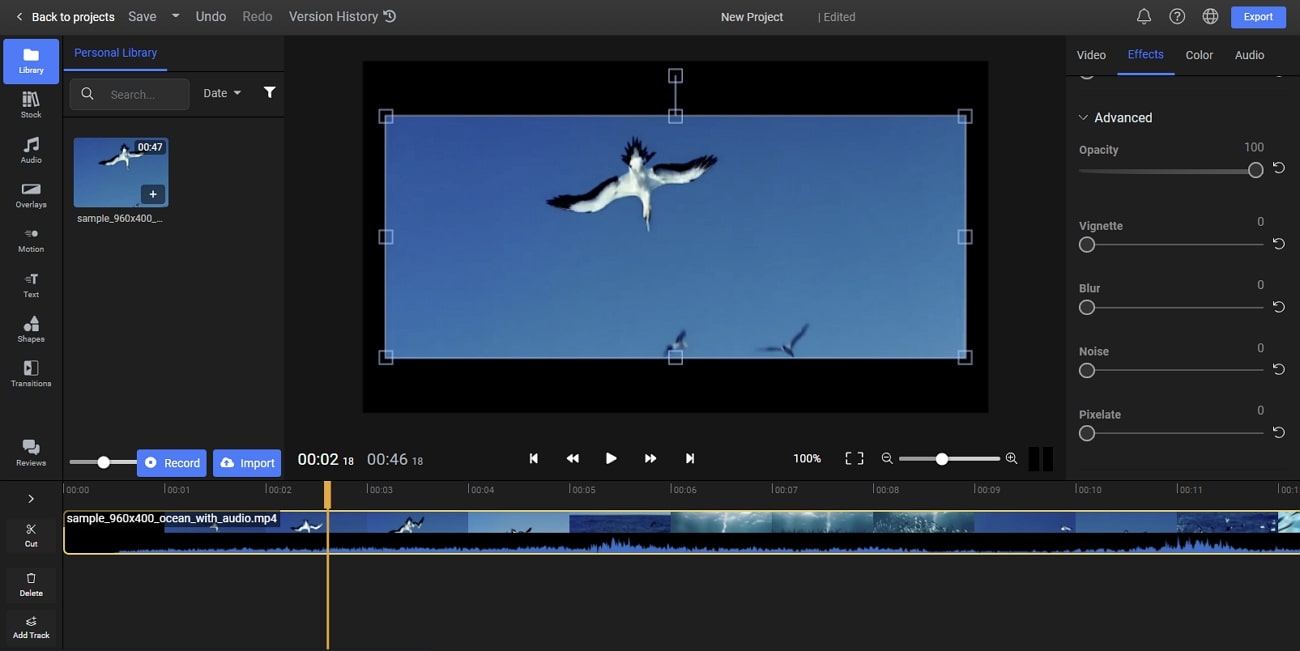
4. Flixier
For quick motion blurs, people can use Flixier to create motion blurs with its pixelating technology. Along with other features for managing videos and enhancing their outlook, Flixier can be used for editing videos quickly. You can easily attach the effect while setting up its time parameters and other functions.
Pros
- You can integrate the features used in Flixier for creating videos for your YouTube channel.
- Works on low-powered devices, including Chromebooks and old devices.
Cons
- There are not a lot of features available on the online platform, limiting its use.
Last Words
This article has provided an overview of the best motion blur apps you can find in the market to create a realistic effect on your photo or video. As the article covers all kinds of compatible devices, it turns out to be an informative article to go through. Ensure to fill in all the details and see which application serves the best purpose.
For iOS and Android devices, CapCut turns out to be a great option to work with. Filmora has shown promising results with its Mac and Windows version, and Kapwing presents an excellent interface to edit videos regardless of being an online editor. Wondershare Filmora provides the best features for creating motion blur pictures and videos if you tend to work on your desktop.
- Wondershare Filmora - The Best Motion Blur Effect App on Desktop
- Vegas Pro - Create Natural-Looking Motion Blurs With Ease
- Adobe Premiere Pro - Professionally Edit Motion Blur Videos
Best 4 Online Motion Blur Tools
Part 1: Best 9 Motion Blur Effect Apps for iPhone and Android
| Name | Price | Support System | Motion Blur for Photos | Motion Blur for Videos |
|---|---|---|---|---|
| CapCut | $0.99 - $74.99 Per Item | iPhone/Android | Yes | Yes |
| NSMB - Motion Blur Video | Not Provided | Android | No | Yes |
| BlurEffect - Blur Photo & Video | Full version: $39.99Premium - Monthly: $3.99Ad-Free & Watermark-Free: $14.99Up to 5 Minutes & Watermark-Free & Ad-Free: $19.99Premium - Annual: $19.99 | iPhone | Yes | Yes |
| Snapseed | Free | iPhone/Android | Yes | No |
| Picsart Photo Editor & Video | Ad Remover: $5.99Girl Minisketch: $1.99Food: $1.99Cartoon Animal Package: $2.99Grunge Stickers: $0.99Girly: $0.99Horoscope: $1.99Cute Thanksgiving: $2.99Happy Thanksgiving: $2.99Aliens: $0.99 | iPhone/Android | Yes | Yes |
| Blur Video and Photo Editor | $0.99 - $99.99 Per Item | Android | Yes | Yes |
| Blur.r Photo, Pic.ture Motion | Monthly Subscription: $ 11.98Weekly Subscription: $ 6.98One Week Subscription: $ 3.98Yearly Subscription: $ 94.98 | iPhone | Yes | No |
| Motion Blur Photo Effect | Premium Access: $7.99 - $29.99 | iPhone | Yes | No |
| Motion Blur Photo Editor | Not Provided | Android | Yes | No |
There are many motion blur effect applications available in the market, providing direct services for iPhone and Android users. However, finding the best app for this purpose is essential, which is why we came up with a list of the best motion blur apps that can be used on iPhone and Android.
1. CapCut
While it is known as an easy-to-use application, CapCut stands among the most premium mobile applications that help you create professional videos that can be posted on social media platforms. CapCut comes up with a dedicated motion blur effect that allows users to create stabilized videos with complete control over the speed of the video.
Following other adjustments in the video, CapCut is a complete tool designed to create advanced videos, including different effects such as motion blur.

Download: Google Play Store | App Store
Key Features
- You can quickly put transitions between the video and the clips to blend in perfectly.
- Video clips can be animated with the help of zoom-in and out effects, providing all major professional touchups a video can have.
- Execute a perfect motion blur video with the help of the multi-track timeline for arranging and previewing clips.
Pros
- It provides the option of including music clips and sound effects on the videos from the vast collection.
- It supports exporting videos in 4K and 60fps with Smart HDR technology.
Cons
- Won’t work perfectly if the RAM and hardware of the phone are limited.
2. NSMB - Motion Blur Video
The motion blur effect is a great feature that can enhance the quality of the video and make it look realistic if used properly. NSMB - Motion Blur Video is an Android motion blur application that features the option of creating such videos in a matter of seconds.
With no particular learning requirement, NSMB makes the process look easy. You have to set the intensity of video, and that’s all you need to do within this application.

Download: Google Play Store
Key Features
- While the platform is easy-to-use, the interface is quite simple to understand, with no confusing structures.
- The platform comes up with an intelligent motion blur that automatically executes the process.
- It works with Android devices from Android 5.0 and later, making it a compatible tool with all major Android devices.
Pros
- You can set the resolution of your exported video to 1080p, which is a Full HD result.
- Set an appropriate fps value for your exported video with the available options.
Cons
- Long rendering times, which are not optimized and take up time.
3. BlurEffect - Blur Photo & Video
BlurEfffect - Blur Photo & Video is another great iOS application that provides the option of adding motion blur effects. This tool is built to include the blur effect to perfection in general. With defining blur options, you can create motion blur effects easily on your added videos. The functions are diverse and quite effective if appropriately observed.

Download: App Store
Key Features
- As the name exclaim, it works perfectly for photos and videos, likewise.
- The paid version of the application can save videos up to 1080p in quality.
- It provides the feature of managing the strength of the “Auto Blurs” feature for controlling motion blur.
Pros
- Multiple effects are available on the platform, including normal blurs, pixelated and dotted blurs, etc.
- It also provides the option of trimming videos before adding the blur effect to them.
Cons
- The resolution of the video is lowered after blurring it out.
4. Snapseed
Google presented a great and quick photo editor for users confused about finding their perfect option. Snapseed was designed as a professional photo editor that allows users to add multiple touchups to the photo that is being edited.
While it backs itself up with Google Photos, this professional photo editor is enhanced and interconnected. Snapseed makes photo touchups simple; however, it does provide advanced functions that can help create motion blur pictures.

Download: Google Play Store | App Store
Key Features
- It combines with 29 different tools and filters, which also includes creating motion blur pictures.
- 38 predefined text styles are available in the editor for creating the text of different styles and forms.
- Create effects with multiple exposures brought with HDR Scape.
Pros
- Enhance a specific photo element with the help of the Face Enhance feature, which adds focus to the facial features.
- You can selectively retouch the photo and manage its exposure, saturation, and other elements.
Cons
- The application has no undo button, making it challenging to manage edits.
5. Picsart Photo Editor & Video
Picsart is a renowned photo and video editor available on App Store and Play Store. This exceptional editor covers a creative set of features combined with artificial intelligence to present some of the best options for retouching photos and videos. If you seek to create a motion blur effect with this application, it surely won’t disappoint, presenting a high-resolution result.

Download: Google Play Store | App Store
Key Features
- It helps users customize photos and videos with customizable brushes, layers, and drawing tools.
- Present a realistic display of motion blur with the help of the multiple effects and filters used for blending in perfectly.
- More than 60 million stickers are available in Picsart, which can be effectively used within any editing media.
Pros
- You can easily share the edited content with your friends through the platform.
- It provides multiple video effects and trendy filters to make video editing easier.
Cons
- There is a lot of lag in the application while editing the video.
6. Blur Video and Photo Editor
This is one of the motion blur apps that provides a simple set of options for managing and enhancing the videos and photos on your Android device. Motion blur can be confusing if not managed properly; however, Blur Video and Photo Editor provides a simple platform to include the blurry effect and make the moving object look perfect in the preview.

Download: Google Play Store
Key Features
- You can blur out the background of the imported photo or video while adjusting the intensity with the help of an easy tool.
- It also allows you to pixelate the unwanted sections and portions of the media files.
- Define more than one area for blurring with the help of shapes.
Pros
- It features the intuitive option of blurring out an object that is moving in the video.
- You can track an object with a simple definition of the area within the platform.
Cons
- The user interface is not exceptional, with buttons that are not even usable.
7. Blur.r Photo, Pic.ture Motion
Not many tools provide a simple and customized set of options for including motion blur within photos and other media. Blur.r Photo, Pic.ture Motion has been tangibly designed to improvise a perfect motion-blurring photo platform. While it provides a quick set of tools to work with, the results are exquisite and better than most in the market.

Download: App Store
Key Features
- Set the intensity of the blurriness and size on the photo with custom tools.
- A complete set of sharing options is available on the platform, which is covered in a single click.
- For detailed blurring, you can consume the option of Zoom and Pan the photo.
Pros
- You can easily undo and redo actions on the edited photos to avoid repeating actions and wasting time.
- Use different filters within photos to edit them to perfection.
Cons
- It does not allow for adjustment of the intensity of the blur, as stated in the services.
8. Motion Blur Photo Effect
While finding the perfect motion blur effect app on iPhone for presenting realistic effects in photos, you might come across Motion Blur Photo Effect, a perfect motion blur photo application for iOS users. The tool is known for its fast processing and quick execution, with an easy-to-use interface for creating perfect blurred pictures.
You can find multiple features and effects in this application that relate to motion blur, providing a diverse range of options when seeking this effect.

Download: App Store
Key Features
- Protects the user’s privacy while maintaining its policy of avoiding illegal breaches.
- Emphasize the light spot in the background of a picture with the help of the Bokeh effect.
- Get a complete set of blur effects to include in the photo, which features advanced functionality.
Pros
- You can find different types of blur effects, such as Zoom Blur, Motion Blur, and Mosaic Effect, to enhance the motion blur.
- It is extremely simple and quick in procession.
Cons
- It does not provide motion blurring for videos, making it restricted.
9. Motion Blur Photo Editor
Adding realistic effects to images is important if your work involves professional requirements. Motion blur is an effect used in multiple places, which makes it a critical feat to achieve. While obtaining the effect, the simplicity of the procedure holds importance. This is why Motion Blur Photo Editor gives the perfect result with explicit functions and features to enhance the motion blur effect.

Download: Google Play Store
Key Features
- Make your images look realistic with the help of magic effects.
- Manage different elements, including the text and other features, such as the brightness of the tool.
- It allows you to share the rendered result on different social applications.
Pros
- Features support for Android devices with OS 4.2 or above.
- The process of including motion blur in photos is quite basic.
Cons
- An outdated application, which was last updated in 2019.
Part 2: 3 Motion Blur Apps for Mac and Windows
As you have consulted the motion blur apps for iPhone and Android, you might require something more professional. For this, you first have to shift onto a computer or Mac that provides you with a perfect platform for creating content. Let’s find out some top-notch motion blur effect apps that you can use on your Mac and Windows:
1. Wondershare Filmora - The Best Motion Blur Effect App on Desktop
Free Download For Win 7 or later(64-bit)
Free Download For macOS 10.14 or later
Not many tools provide a complete set of tools to manage the videos on your computer and create the best version out of them. Wondershare Filmora is a complete package for creating a motion blur effect on a video.
With a quick and effective toolkit available on the platform, Filmora turns out to simplify the process, thereby making the process look basic. Filmora unleashes the creativity of a beginner, helping them create a perfect video with its intuitive and impressive interface.
Supported System
- Windows, Mac, and iOS
Pricing
- Month Plan: $19.99
- Annual Plan: $49.99
- Perpetual Plan: $79.99
Key Features
- It provides support to a variety of file formats which allows you to recreate motion blur out of any video with ease.
- The variety of video transformation features offered in the tool is exquisite, where you can manage motion tracking, stabilization, and several other video parameters.
- Use effects and transitions to create the perfect motion blur video for yourselves.
Pros
- You can find the support of resolution up to 4K in the video editing platform.
- It also features the option of enhancing GPU acceleration for faster encoding.
Cons
- Puts a watermark on the export video for the free version.
Step-by-Step Guide on How to Create Motion Blur Effect on Filmora
We will now discuss how you can create a motion blur effect on Filmora, the best app for motion blur, using the right tools. First, look into the steps provided below for a better understanding:
Step 1 Add Video File to Platform
Launch Wondershare Filmora on your computer and select “Create New Project” to open a new canvas. Click on the “Arrow” icon to import the video or photo.

Step 2 Cut Down Sections of Clips
As you add the media into the timeline, lead to the point where you want to add the motion blur. Select the “Scissors” icon for splitting the clip and repeat this for every point where you want to add the effect.

Step 3 Include the Blur Effect
Access the “Effects” tab and look for the “Blur” effect. Add the blur effect by dragging it into the timeline on the split part of the video.

Step 4 Change Parameters to Smoothen Results
Adjust the parameters of the added effect to make it smooth. You can also access the “Dissolve” option in the Transitions. Add the motion blur effect and perform other vital changes in parameters that are required.

Step 5 Export Video File
Afterward, select the “Export” button and define the desired resolution and frame rate to conclude. You can also share your video on your social media accounts.

2. Vegas Pro - Create Natural-Looking Motion Blurs With Ease
Vegas Pro is an impressive video editing platform that provides the option of creating motion blurs that look completely natural. It does not edit a specific element in the video but allows you to make changes in any other element that can be used to define motion. Motion blur can be added and edited to a fraction of a second with this platform.

3. Adobe Premiere Pro - Professionally Edit Motion Blur Videos
Adobe Premiere Pro is a great tool for improvising professional videos. With quick edits, you can come across every second of the video and present the perfect editing model with the help of the advanced toolkit. The major issue with such platforms is the high learning curve that prevents many users from considering this platform for tasks like executing motion blur in videos.

Part 3: Best 4 Online Motion Blur Tools
Many online platforms feature the option of introducing motion blur effects on videos. While we point out the best ones in the list, you should carefully assess them all to know more about them:
1. Lunapic
Lunapic is a great option for introducing motion blur into pictures. Being an online tool, it is pretty straightforward with its functionality, as you will only have to adjust some settings in the picture to edit it. Lunapic, being an online photo editor, provides different editing functions and tools in its interface. The result of motion blur turns out to be excellent in terms of it being an online tool.

Pros
- You can scale the image before putting a motion blur on the output.
- Add different shapes to highlight the image that is being edited.
Cons
- It provides an outdated interface when compared with other online photo editing tools.
2. Aspose
This excellent photo editing platform provides you with a dedicated function of adding motion blur to an image as a filter. Aspose allows adding files from the computer and Dropbox while providing a straightforward process of putting motion blur into a photo. You have to adjust the filter parameters to create the perfect picture.

Pros
- You can also detect objects within the image with the help of the “Object detection” feature.
- Create Photo Book Maker along with including motion blurs on the image for managing a collection of pictures.
Cons
- It does not offer any adjustment sliders and options while performing motion blur.
3. Kapwing
As an online tool, Kapwing provides many features that can be used to edit videos. Its ability to blur the videos is exceptional and tends to offer great results with the least of parameters. Users who are uncomfortable with editing videos on professional tools can consider this an alternative.

Pros
- No spam and ads are present in the tool while protecting the user’s information.
- The tool provides AI-Powered features, which can be easily used to manage videos.
Cons
- It does not maintain the quality of the videos after exporting the edits.
4. Flixier
For quick motion blurs, people can use Flixier to create motion blurs with its pixelating technology. Along with other features for managing videos and enhancing their outlook, Flixier can be used for editing videos quickly. You can easily attach the effect while setting up its time parameters and other functions.

Pros
- You can integrate the features used in Flixier for creating videos for your YouTube channel.
- Works on low-powered devices, including Chromebooks and old devices.
Cons
- There are not a lot of features available on the online platform, limiting its use.
Last Words
This article has provided an overview of the best motion blur apps you can find in the market to create a realistic effect on your photo or video. As the article covers all kinds of compatible devices, it turns out to be an informative article to go through. Ensure to fill in all the details and see which application serves the best purpose.
For iOS and Android devices, CapCut turns out to be a great option to work with. Filmora has shown promising results with its Mac and Windows version, and Kapwing presents an excellent interface to edit videos regardless of being an online editor. Wondershare Filmora provides the best features for creating motion blur pictures and videos if you tend to work on your desktop.
Want to Add Freeze Frame Effect to Your Video on Your Device? Here Are the Steps to Add Freeze Frame on PC, Mac, Smartphone as Well as Online From Any Device
Adding effects is an essential part of video editing to make a regular video look extraordinary. There are literally unlimited video effects available in popular video editors. You need to apply a video effect as per the trend and requirements of your video. Freeze frame effect has become extremely popular among video creators in today’s world of social media. Use freeze frame effect to freeze a specific scene in your video so that you can draw the attention of your viewers to that particular moment.
For example, in a match highlight video, you freeze the frame moment before a goal to show the positioning of the players or strikers. Owing to the popularity of freeze frame effect, you will find the video effect in almost all popular video editor apps for computers and smartphones. In fact, even popular online video editors have included the effect in their video effects. We will illustrate how to add freeze frame effect to your video on any device.
Part 1. How to Add Freeze Frame Video Effect on PC
If you are a computer user and you are looking for a video editor to add freeze frame effect to your video, we recommend Wondershare Filmora. Filmora is extremely popular among video creators for its wide range of video effects as well as its intuitive user interface. Adding freeze frame effect is super easy in Filmora and here are the steps to follow.
Step1Download and install Filmora for Windows PC. Launch Filmora and click on New Project button.
Step2Import your video clip under Project Media and then drop it into Timeline.
Step3Play the video and pause it where you want to freeze frame. Click on Snapshot icon to take photo of the frame. You will find the photo you have taken just now under Media library. In the meantime, you should split the video clip where you paused it to make space for the still image to get added and stay frozen.
Drag and drop the image on Timeline and stretch it to the duration up to which you want the frame to stay frozen. This image should be on top of the video clip in Timeline. You should place the image exactly where you paused the video.
Step4Double-click on the image in Timeline and adjust parameters as required. Play the video to notice the freeze frame effect. Click on Export button to save the video.
Part 2. How to Add Freeze Frame Video Effect on Mac
If you are a Mac user, the best video editor you can use to edit your video is Final Cut Pro. FCP is widely used by professional video creators and editors to edit their videos as per requirements. There are different categories of video effects available on FCP including freeze frame effect. Make sure your video is recorded with high frame rate and resolution for better outcomes. Here are the steps on how to add freeze frame in Final Cut Pro.
Step1Launch Final Cut Pro on your Mac. Go to File> Import> Files and select your video clip from the storage device. Drag it into the Timeline.

Step2Grab and move the Playhead to the point where you want to freeze the frame. Click on the video clip in the Timeline.
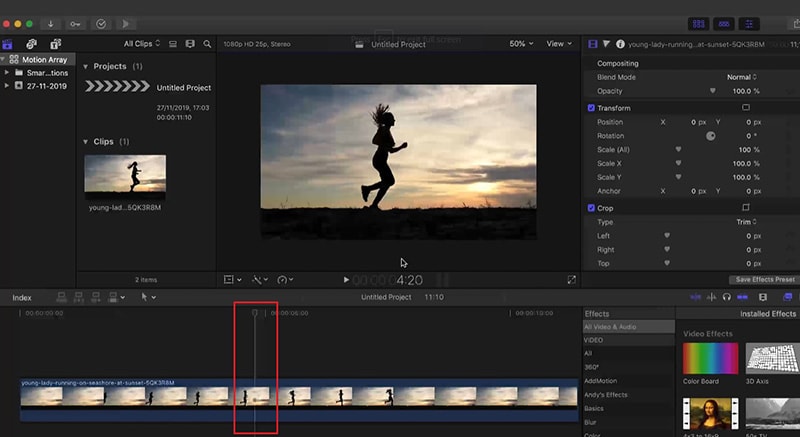
Step3Go to Edit menu and click on Add Freeze Frame. This will split your video clip and add frozen frame where you have placed the Playhead.
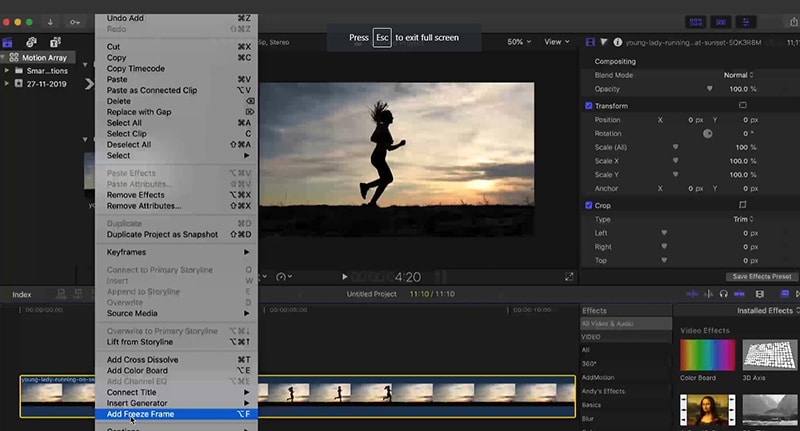
The default duration of the frozen freeze is four seconds. You can stretch it as per your requirements.
Just for information, both Windows and Mac users can also Premiere Pro add freeze frame effect if they already have Premiere Pro installed on their computers. The freeze frame feature in Premiere Pro is referred to as Add Frame Hold effect.
Part 3. How to Add Freeze Frame Video Effects Online
If you do not want to download and install a dedicated video editor on your computer, you can apply freeze frame effect to your video online as well. This will save your space as well as put less pressure on your CPU resource. We recommend Kapwing online video editor to use freeze frame effect on the go from any device directly from web browser. Here are the steps to add freeze frame effect to your video online.
Step1Open web browser on your device and visit “kapwing.com/tools/freeze-frame”. Click on Choose a video button.

Step2Drop your video file into Timeline and click on the video clip. Move the Playhead to the point where you want to add freeze frame effect.
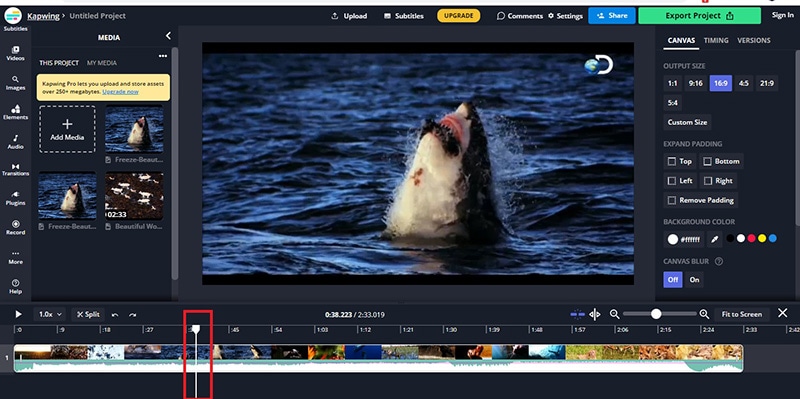
Step3Go to Timing tab located in the top-right corner. Click on Freeze Frame button to add still image of the scene in the video. You can click multiple times to add more still images of the same scene. The more still images, the greater its duration will be.
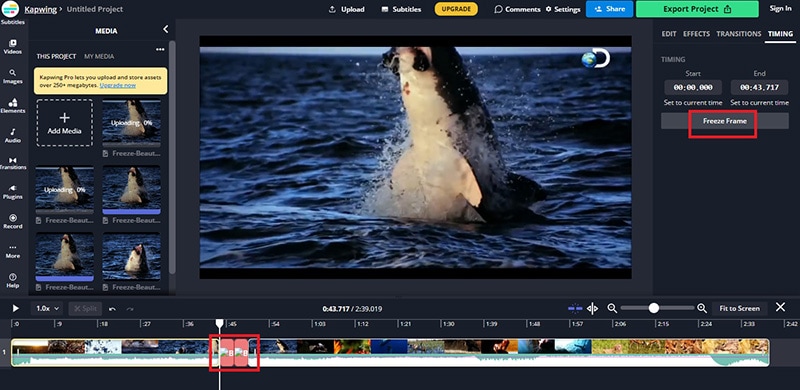
Step4Play the video and you can have multiple freeze frame effects in the video clip.
This is undoubtedly the easiest way to add freeze frame effects for beginners.
Part 4. How to Add Freeze Frame Video Effects on Mobile
If you are using an Android smartphone or iPhone, you can apply freeze frame effect directly on your mobile instantly. In today’s world, people capture videos through their smartphones thanks to high-quality phone camera. You can use CapCut video editor app on both Android and iOS devices to add freeze frame effects. Here are the steps you need to follow.
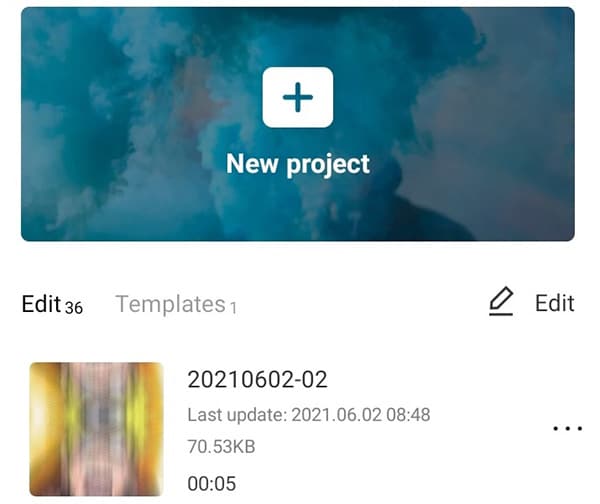
Step1Install CapCut app on your phone. Launch the app and tap on New Project.
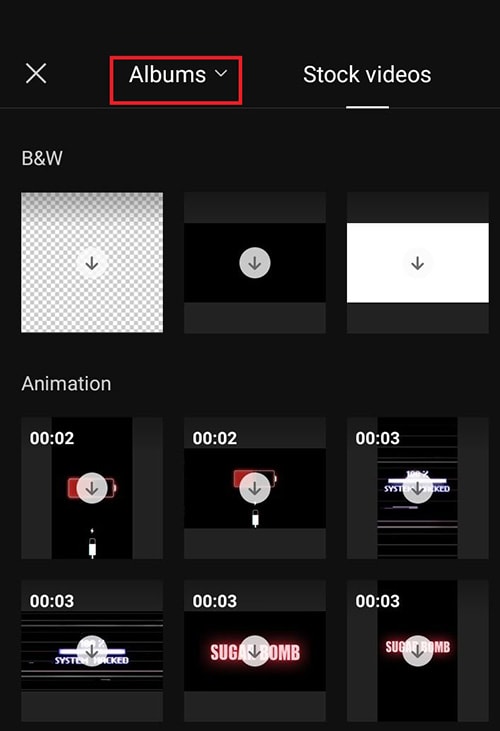
Step2Go to Albums and select the video to which you want to add the frame freeze effect.
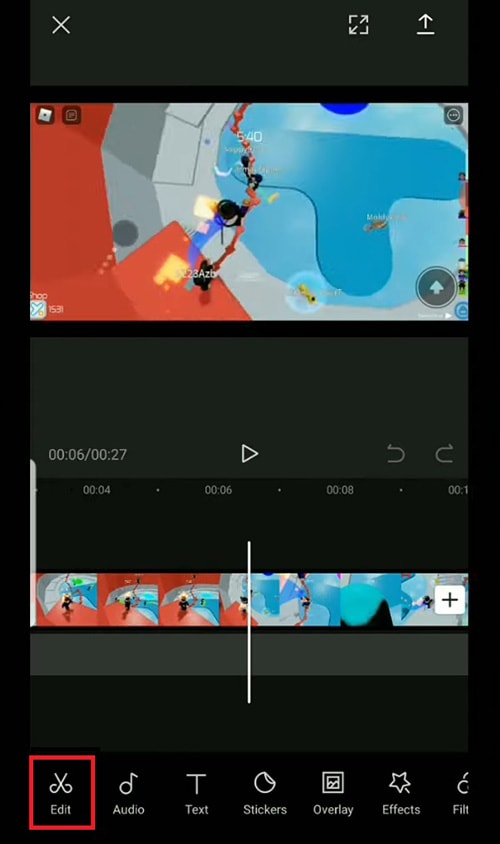
Step3Put the Playhead to the point where you want to add the effect. Tap on Edit option.
Step4Search for Freeze option located at the bottom and tap on it to insert still image of the scene in Timeline.
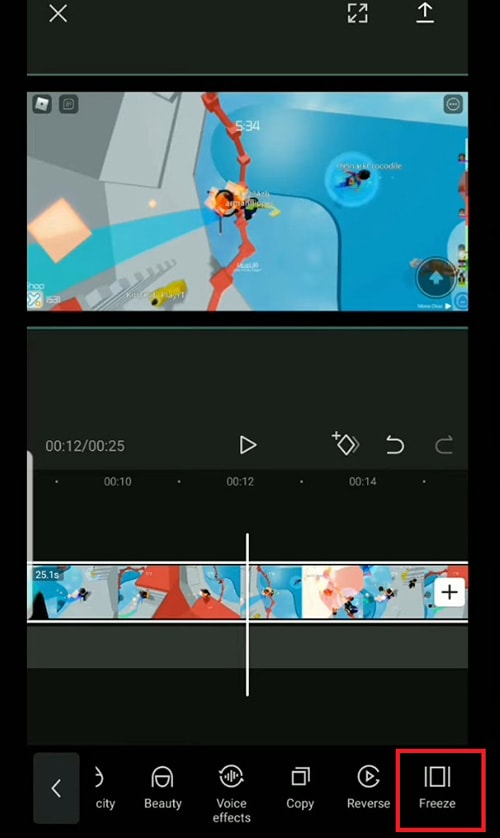
Step5You can drag the duration of the frame freeze effect as per your requirement.
The Bottom Line
Adding freeze frame to your videos before and during impactful moments can enhance your video content. We have illustrated how to add a freeze frame in Final Cut Pro for Mac users. You can also add it to your video online using Kapwing video editor. You can use CapCut app to use the effect in your video on your smartphone. We recommend Filmora to add the effect quickly and conveniently on your PC.
Free Download For Win 7 or later(64-bit)
Free Download For macOS 10.14 or later
Free Download For macOS 10.14 or later
5 Ways to Denoise a Video
In today’s world, the quality of digital product such as photos and videos increase day by day, prompting us to create our content crystal clear and keep it that way. Of course, different kinds of effects and filters are great, and something called “noise” is one of them, but sometimes it is actually unwanted and makes our footage less likable. What is noise, or denoising, anyway? Well, instead of clear video, it’s something quite different – the footage looks grainy, sometimes excessively, and makes our eyes hurt, or simply, more difficult to see what’s going on on the screen. And if you didn’t decide to use a noise effect, then from where does it appear?..
Noise means a mix of different variations of brightness or color information in the shot. It is likely to show up when there is a low light, and/or when the video is taken with small sensors such as smartphones and action cameras. It works as follows: if someone tries to compensate for low-light settings with gain and ISO, more noise is produced.
But, as our readers already know, almost nothing is ever impossible to solve. There is a way to get rid of this annoying grain, and it is called, as pretty obvious, denoising. Hence, denoising in image and video production is used as a technique to take footage from grainy to crystal-clear. And, as you may already agree, it improves a viewer’s quality of experience. And how does this happen? - There are varied techniques, and each of them uses different mathematical and statistical models.
What is considered a good noise reduction? The technique is successful when it suppresses noise effectively in uniform regions; preserves edges and other characteristics, such as fine details and textures; and provides a visually natural experience.
and here you will learn 5 ways, as in 5 software to denoise a video. We’ll touch upon the following ones: Final Cut Pro, Adobe After Effects, Adobe Premiere Pro, DaVinci Resolve and Movavi Video Editor. But, we are not limited to these ones, so maybe there is one more you could use? You’ll find out in the article!
- Final Cut Pro
Noise that appears as unwanted grain or artifacts in the video image can be removed in Final Cut Pro pretty easily, you just have to follow the little steps for it. Keep in mind that Final Cut Pro is not eligible for PC, this editor is only available for Mac (but Windows users, tune in for the editors functioning on PC’s!)
So, you have your grained footage, which you already chose to denoise, and for which you will need a video reduction effect.
First, you will need to open Final Cut Pro and import abovementioned video. Select this clip in the timeline,

and position the play head in a way that the clip appears in the viewer, that is, on the big screen - for you to see well.

Click the Effects button in the top-right corner of the timeline, or, to use the shortcut, press Command & 5.

In the Effects browser, select the Basics category in the list of Video effects on the left, then select the Noise Reduction effect. For 360° clips, select the 360° category, then select the 360° Noise Reduction effect.
And you will need to do one of the following:
Drag the effect to the timeline clip you want to apply it to, or double-click the effect thumbnail to apply the effect to the selected clip.
When the effect is applied, Final Cut Pro analyzes the clip for noise, so you might need to wait for a little while the process is complete and only then see the result.
Interesting tip you can remember is that if you are using several effects to your video clip, then adding Noise Reduction as the first effect would guarantee the best results for you. So, Mac users, you can start denoising your videos in Final Cut Pro now!
- Adobe After Effects
Adobe After Effects is a digital visual effects, motion graphics, and compositing application… Pretty intense, right? This very software has endless powers, and one of them is, you guessed correctly – denoising the video! So, how are we going to do that in this monster of the industry?
Sometimes what’s annoying about this kind of programs is that you need plugins, so let’s try to find a way to achieve our desired result without using anything external.
So, first of all (as in all cases!) import your video into After Effects. Then, you will need to find Effect in the menu, and find: Noise and Grain. There, you will choose Remove Grain and click on it.

On the left side of the program layout, the Effects Control will be opened. Now, you see viewing mode, where you need to change Preview to Final Output.

So, this will be the video with Preview checked:

Which will look like this when Final Output is checked:

Somewhat different and looking better, right?..
By the way, you can watch the whole process video here !
- Adobe Premiere Pro
Adobe Premiere Pro is one of the most and sophisticated video editor. So, of course, there is a way to reduce noise in this software as well, and this can be reached using effect called Median.
First of all, you add your footage to the Timeline in Premiere Pro and then go find the Effects Panel, where Median can be found. You need to drag and drop the Median effect to your video clip.

The next step is to make sure that adding the effect to the grainiest parts of the clip, which can be done using masks. So, in the Effects Control panel, you’ll need to select the mask shape for your clip – you can either choose rectangle, circle, or pen tool. With the latter you can move the Mask around the screen and resize it to cover the area.

And if you Change the Feather setting to 100, the effect will not have a very visible edge and some smoothness will cover for it.

You will need to repeat the process with more than one mask, if you would like to have covered all of the grainy area of your shot.
Lastly, you’ll need to adjust the effect settings to reduce the noise.

The Median effect doesn’t actually take away the graininess, it just blurs it. You’ll need to experiment with the Radius settings until you are happy with the result.
- DaVinci Resolve
When it comes to DaVinci Resolve, the process is somewhat different in the free version of it. So, first of all, off course, you add your footage into the timeline. Then,you are going to find the fusion tab underneath the timeline panel.

You will see MediaIn1 and MediaOut1, you click on MediaIn1, which will ensure the scene appears in the first viewer – and MediaOut1 by default is appearing in the second. So, now you stay on MediaIn1, hit shift+spacebar, and find the option which says: Remove Noise (RN) and then click Add, which adds the Remove Noise1 node. On the top right corner you will find Inspector, and if you click on it, you will see all the properties you can modify.
After going only into the second viewer, and in the top bar we can find channel icons. We open it and click on red, which makes the footage black and white for a while. Then, we go back to the Inspector, increase Softness Red and Detail Red.

This removes much grain from the red channel. Then we repeat the same for green, as well as for blue channel. Once you finish, you go to the same channel button in the bar and change it to “back to color”. So, the footage will have its colors back and you will see that it has become clearer, compared to the first viewer.

You can play around with the Chroma and Luma channels in the Inspector, if that is something you have ever had experience with!
- Movavi Video Editor
In Movavi Video Editor, it is pretty straightforward – unlike DaVinci Resolve, of course! So, getting to the point: the first thing you need to do is Entering the Edit Mode. In order to achieve it, you’ll need to click the Edit button next to the file you want to adjust or select Adjustments in the Tools tab.

After this, you will be able to select the Noise removal option, and then, move the Noise level slider to reflect the amount of noise you can see in the preview. The more noise you need to remove, the higher the Noise level, and vice versa.

When you’re finished removing the noise, click Apply, but in case you need to remove noise from several files, select Apply to all files, which ensures the same noise level will be applied on all your files there.
Lastly, of course, Wondershare Filmora X offers the same option as well. The steps are ase follows: You need to go to the Effects panel and type: “Smart Denoise”. Then, right-click on the video and choose Edit Properties.

This will make sure you go inside the Smart Denoise, where you can change opacity of the clip, threshold and radius.

You should reduce Opacity until you are satisfied with the result. Then, you can use the box next to Smart Denoise in order to see the scene before and after noise and grain removal.
So, that’s it! – We learned how to remove/reduce noise and grain from the videos, using several video editors. So you might as well start making your video clips look better right away!
Noise that appears as unwanted grain or artifacts in the video image can be removed in Final Cut Pro pretty easily, you just have to follow the little steps for it. Keep in mind that Final Cut Pro is not eligible for PC, this editor is only available for Mac (but Windows users, tune in for the editors functioning on PC’s!)
So, you have your grained footage, which you already chose to denoise, and for which you will need a video reduction effect.
First, you will need to open Final Cut Pro and import abovementioned video. Select this clip in the timeline,

and position the play head in a way that the clip appears in the viewer, that is, on the big screen - for you to see well.

Click the Effects button in the top-right corner of the timeline, or, to use the shortcut, press Command & 5.

In the Effects browser, select the Basics category in the list of Video effects on the left, then select the Noise Reduction effect. For 360° clips, select the 360° category, then select the 360° Noise Reduction effect.
And you will need to do one of the following:
Drag the effect to the timeline clip you want to apply it to, or double-click the effect thumbnail to apply the effect to the selected clip.
When the effect is applied, Final Cut Pro analyzes the clip for noise, so you might need to wait for a little while the process is complete and only then see the result.
Interesting tip you can remember is that if you are using several effects to your video clip, then adding Noise Reduction as the first effect would guarantee the best results for you. So, Mac users, you can start denoising your videos in Final Cut Pro now!
- Adobe After Effects
Adobe After Effects is a digital visual effects, motion graphics, and compositing application… Pretty intense, right? This very software has endless powers, and one of them is, you guessed correctly – denoising the video! So, how are we going to do that in this monster of the industry?
Sometimes what’s annoying about this kind of programs is that you need plugins, so let’s try to find a way to achieve our desired result without using anything external.
So, first of all (as in all cases!) import your video into After Effects. Then, you will need to find Effect in the menu, and find: Noise and Grain. There, you will choose Remove Grain and click on it.

On the left side of the program layout, the Effects Control will be opened. Now, you see viewing mode, where you need to change Preview to Final Output.

So, this will be the video with Preview checked:

Which will look like this when Final Output is checked:

Somewhat different and looking better, right?..
By the way, you can watch the whole process video here !
- Adobe Premiere Pro
Adobe Premiere Pro is one of the most and sophisticated video editor. So, of course, there is a way to reduce noise in this software as well, and this can be reached using effect called Median.
First of all, you add your footage to the Timeline in Premiere Pro and then go find the Effects Panel, where Median can be found. You need to drag and drop the Median effect to your video clip.

The next step is to make sure that adding the effect to the grainiest parts of the clip, which can be done using masks. So, in the Effects Control panel, you’ll need to select the mask shape for your clip – you can either choose rectangle, circle, or pen tool. With the latter you can move the Mask around the screen and resize it to cover the area.

And if you Change the Feather setting to 100, the effect will not have a very visible edge and some smoothness will cover for it.

You will need to repeat the process with more than one mask, if you would like to have covered all of the grainy area of your shot.
Lastly, you’ll need to adjust the effect settings to reduce the noise.

The Median effect doesn’t actually take away the graininess, it just blurs it. You’ll need to experiment with the Radius settings until you are happy with the result.
- DaVinci Resolve
When it comes to DaVinci Resolve, the process is somewhat different in the free version of it. So, first of all, off course, you add your footage into the timeline. Then,you are going to find the fusion tab underneath the timeline panel.

You will see MediaIn1 and MediaOut1, you click on MediaIn1, which will ensure the scene appears in the first viewer – and MediaOut1 by default is appearing in the second. So, now you stay on MediaIn1, hit shift+spacebar, and find the option which says: Remove Noise (RN) and then click Add, which adds the Remove Noise1 node. On the top right corner you will find Inspector, and if you click on it, you will see all the properties you can modify.
After going only into the second viewer, and in the top bar we can find channel icons. We open it and click on red, which makes the footage black and white for a while. Then, we go back to the Inspector, increase Softness Red and Detail Red.

This removes much grain from the red channel. Then we repeat the same for green, as well as for blue channel. Once you finish, you go to the same channel button in the bar and change it to “back to color”. So, the footage will have its colors back and you will see that it has become clearer, compared to the first viewer.

You can play around with the Chroma and Luma channels in the Inspector, if that is something you have ever had experience with!
- Movavi Video Editor
In Movavi Video Editor, it is pretty straightforward – unlike DaVinci Resolve, of course! So, getting to the point: the first thing you need to do is Entering the Edit Mode. In order to achieve it, you’ll need to click the Edit button next to the file you want to adjust or select Adjustments in the Tools tab.

After this, you will be able to select the Noise removal option, and then, move the Noise level slider to reflect the amount of noise you can see in the preview. The more noise you need to remove, the higher the Noise level, and vice versa.

When you’re finished removing the noise, click Apply, but in case you need to remove noise from several files, select Apply to all files, which ensures the same noise level will be applied on all your files there.
Lastly, of course, Wondershare Filmora X offers the same option as well. The steps are ase follows: You need to go to the Effects panel and type: “Smart Denoise”. Then, right-click on the video and choose Edit Properties.

This will make sure you go inside the Smart Denoise, where you can change opacity of the clip, threshold and radius.

You should reduce Opacity until you are satisfied with the result. Then, you can use the box next to Smart Denoise in order to see the scene before and after noise and grain removal.
So, that’s it! – We learned how to remove/reduce noise and grain from the videos, using several video editors. So you might as well start making your video clips look better right away!
Noise that appears as unwanted grain or artifacts in the video image can be removed in Final Cut Pro pretty easily, you just have to follow the little steps for it. Keep in mind that Final Cut Pro is not eligible for PC, this editor is only available for Mac (but Windows users, tune in for the editors functioning on PC’s!)
So, you have your grained footage, which you already chose to denoise, and for which you will need a video reduction effect.
First, you will need to open Final Cut Pro and import abovementioned video. Select this clip in the timeline,

and position the play head in a way that the clip appears in the viewer, that is, on the big screen - for you to see well.

Click the Effects button in the top-right corner of the timeline, or, to use the shortcut, press Command & 5.

In the Effects browser, select the Basics category in the list of Video effects on the left, then select the Noise Reduction effect. For 360° clips, select the 360° category, then select the 360° Noise Reduction effect.
And you will need to do one of the following:
Drag the effect to the timeline clip you want to apply it to, or double-click the effect thumbnail to apply the effect to the selected clip.
When the effect is applied, Final Cut Pro analyzes the clip for noise, so you might need to wait for a little while the process is complete and only then see the result.
Interesting tip you can remember is that if you are using several effects to your video clip, then adding Noise Reduction as the first effect would guarantee the best results for you. So, Mac users, you can start denoising your videos in Final Cut Pro now!
- Adobe After Effects
Adobe After Effects is a digital visual effects, motion graphics, and compositing application… Pretty intense, right? This very software has endless powers, and one of them is, you guessed correctly – denoising the video! So, how are we going to do that in this monster of the industry?
Sometimes what’s annoying about this kind of programs is that you need plugins, so let’s try to find a way to achieve our desired result without using anything external.
So, first of all (as in all cases!) import your video into After Effects. Then, you will need to find Effect in the menu, and find: Noise and Grain. There, you will choose Remove Grain and click on it.

On the left side of the program layout, the Effects Control will be opened. Now, you see viewing mode, where you need to change Preview to Final Output.

So, this will be the video with Preview checked:

Which will look like this when Final Output is checked:

Somewhat different and looking better, right?..
By the way, you can watch the whole process video here !
- Adobe Premiere Pro
Adobe Premiere Pro is one of the most and sophisticated video editor. So, of course, there is a way to reduce noise in this software as well, and this can be reached using effect called Median.
First of all, you add your footage to the Timeline in Premiere Pro and then go find the Effects Panel, where Median can be found. You need to drag and drop the Median effect to your video clip.

The next step is to make sure that adding the effect to the grainiest parts of the clip, which can be done using masks. So, in the Effects Control panel, you’ll need to select the mask shape for your clip – you can either choose rectangle, circle, or pen tool. With the latter you can move the Mask around the screen and resize it to cover the area.

And if you Change the Feather setting to 100, the effect will not have a very visible edge and some smoothness will cover for it.

You will need to repeat the process with more than one mask, if you would like to have covered all of the grainy area of your shot.
Lastly, you’ll need to adjust the effect settings to reduce the noise.

The Median effect doesn’t actually take away the graininess, it just blurs it. You’ll need to experiment with the Radius settings until you are happy with the result.
- DaVinci Resolve
When it comes to DaVinci Resolve, the process is somewhat different in the free version of it. So, first of all, off course, you add your footage into the timeline. Then,you are going to find the fusion tab underneath the timeline panel.

You will see MediaIn1 and MediaOut1, you click on MediaIn1, which will ensure the scene appears in the first viewer – and MediaOut1 by default is appearing in the second. So, now you stay on MediaIn1, hit shift+spacebar, and find the option which says: Remove Noise (RN) and then click Add, which adds the Remove Noise1 node. On the top right corner you will find Inspector, and if you click on it, you will see all the properties you can modify.
After going only into the second viewer, and in the top bar we can find channel icons. We open it and click on red, which makes the footage black and white for a while. Then, we go back to the Inspector, increase Softness Red and Detail Red.

This removes much grain from the red channel. Then we repeat the same for green, as well as for blue channel. Once you finish, you go to the same channel button in the bar and change it to “back to color”. So, the footage will have its colors back and you will see that it has become clearer, compared to the first viewer.

You can play around with the Chroma and Luma channels in the Inspector, if that is something you have ever had experience with!
- Movavi Video Editor
In Movavi Video Editor, it is pretty straightforward – unlike DaVinci Resolve, of course! So, getting to the point: the first thing you need to do is Entering the Edit Mode. In order to achieve it, you’ll need to click the Edit button next to the file you want to adjust or select Adjustments in the Tools tab.

After this, you will be able to select the Noise removal option, and then, move the Noise level slider to reflect the amount of noise you can see in the preview. The more noise you need to remove, the higher the Noise level, and vice versa.

When you’re finished removing the noise, click Apply, but in case you need to remove noise from several files, select Apply to all files, which ensures the same noise level will be applied on all your files there.
Lastly, of course, Wondershare Filmora X offers the same option as well. The steps are ase follows: You need to go to the Effects panel and type: “Smart Denoise”. Then, right-click on the video and choose Edit Properties.

This will make sure you go inside the Smart Denoise, where you can change opacity of the clip, threshold and radius.

You should reduce Opacity until you are satisfied with the result. Then, you can use the box next to Smart Denoise in order to see the scene before and after noise and grain removal.
So, that’s it! – We learned how to remove/reduce noise and grain from the videos, using several video editors. So you might as well start making your video clips look better right away!
Noise that appears as unwanted grain or artifacts in the video image can be removed in Final Cut Pro pretty easily, you just have to follow the little steps for it. Keep in mind that Final Cut Pro is not eligible for PC, this editor is only available for Mac (but Windows users, tune in for the editors functioning on PC’s!)
So, you have your grained footage, which you already chose to denoise, and for which you will need a video reduction effect.
First, you will need to open Final Cut Pro and import abovementioned video. Select this clip in the timeline,

and position the play head in a way that the clip appears in the viewer, that is, on the big screen - for you to see well.

Click the Effects button in the top-right corner of the timeline, or, to use the shortcut, press Command & 5.

In the Effects browser, select the Basics category in the list of Video effects on the left, then select the Noise Reduction effect. For 360° clips, select the 360° category, then select the 360° Noise Reduction effect.
And you will need to do one of the following:
Drag the effect to the timeline clip you want to apply it to, or double-click the effect thumbnail to apply the effect to the selected clip.
When the effect is applied, Final Cut Pro analyzes the clip for noise, so you might need to wait for a little while the process is complete and only then see the result.
Interesting tip you can remember is that if you are using several effects to your video clip, then adding Noise Reduction as the first effect would guarantee the best results for you. So, Mac users, you can start denoising your videos in Final Cut Pro now!
- Adobe After Effects
Adobe After Effects is a digital visual effects, motion graphics, and compositing application… Pretty intense, right? This very software has endless powers, and one of them is, you guessed correctly – denoising the video! So, how are we going to do that in this monster of the industry?
Sometimes what’s annoying about this kind of programs is that you need plugins, so let’s try to find a way to achieve our desired result without using anything external.
So, first of all (as in all cases!) import your video into After Effects. Then, you will need to find Effect in the menu, and find: Noise and Grain. There, you will choose Remove Grain and click on it.

On the left side of the program layout, the Effects Control will be opened. Now, you see viewing mode, where you need to change Preview to Final Output.

So, this will be the video with Preview checked:

Which will look like this when Final Output is checked:

Somewhat different and looking better, right?..
By the way, you can watch the whole process video here !
- Adobe Premiere Pro
Adobe Premiere Pro is one of the most and sophisticated video editor. So, of course, there is a way to reduce noise in this software as well, and this can be reached using effect called Median.
First of all, you add your footage to the Timeline in Premiere Pro and then go find the Effects Panel, where Median can be found. You need to drag and drop the Median effect to your video clip.

The next step is to make sure that adding the effect to the grainiest parts of the clip, which can be done using masks. So, in the Effects Control panel, you’ll need to select the mask shape for your clip – you can either choose rectangle, circle, or pen tool. With the latter you can move the Mask around the screen and resize it to cover the area.

And if you Change the Feather setting to 100, the effect will not have a very visible edge and some smoothness will cover for it.

You will need to repeat the process with more than one mask, if you would like to have covered all of the grainy area of your shot.
Lastly, you’ll need to adjust the effect settings to reduce the noise.

The Median effect doesn’t actually take away the graininess, it just blurs it. You’ll need to experiment with the Radius settings until you are happy with the result.
- DaVinci Resolve
When it comes to DaVinci Resolve, the process is somewhat different in the free version of it. So, first of all, off course, you add your footage into the timeline. Then,you are going to find the fusion tab underneath the timeline panel.

You will see MediaIn1 and MediaOut1, you click on MediaIn1, which will ensure the scene appears in the first viewer – and MediaOut1 by default is appearing in the second. So, now you stay on MediaIn1, hit shift+spacebar, and find the option which says: Remove Noise (RN) and then click Add, which adds the Remove Noise1 node. On the top right corner you will find Inspector, and if you click on it, you will see all the properties you can modify.
After going only into the second viewer, and in the top bar we can find channel icons. We open it and click on red, which makes the footage black and white for a while. Then, we go back to the Inspector, increase Softness Red and Detail Red.

This removes much grain from the red channel. Then we repeat the same for green, as well as for blue channel. Once you finish, you go to the same channel button in the bar and change it to “back to color”. So, the footage will have its colors back and you will see that it has become clearer, compared to the first viewer.

You can play around with the Chroma and Luma channels in the Inspector, if that is something you have ever had experience with!
- Movavi Video Editor
In Movavi Video Editor, it is pretty straightforward – unlike DaVinci Resolve, of course! So, getting to the point: the first thing you need to do is Entering the Edit Mode. In order to achieve it, you’ll need to click the Edit button next to the file you want to adjust or select Adjustments in the Tools tab.

After this, you will be able to select the Noise removal option, and then, move the Noise level slider to reflect the amount of noise you can see in the preview. The more noise you need to remove, the higher the Noise level, and vice versa.

When you’re finished removing the noise, click Apply, but in case you need to remove noise from several files, select Apply to all files, which ensures the same noise level will be applied on all your files there.
Lastly, of course, Wondershare Filmora X offers the same option as well. The steps are ase follows: You need to go to the Effects panel and type: “Smart Denoise”. Then, right-click on the video and choose Edit Properties.

This will make sure you go inside the Smart Denoise, where you can change opacity of the clip, threshold and radius.

You should reduce Opacity until you are satisfied with the result. Then, you can use the box next to Smart Denoise in order to see the scene before and after noise and grain removal.
So, that’s it! – We learned how to remove/reduce noise and grain from the videos, using several video editors. So you might as well start making your video clips look better right away!
How to Make a TikTok Loop Video
Nowadays, many people like to make a lot of videos with their phone and share it on social media. But if you are not familiar with this social media, then you should check out TikTok. You probably know that TikTok videos can be looped. If users were unable to replay videos, they would lose interest quickly. Therefore, more than 1 billion people now use the app daily.
TikTok is an app that allows you to create short videos and share them on social media. The app is available on many platforms, including Android, iOS, and Windows Phone. The videos can be up to 15 seconds long. It’s also possible to loop videos in TikTok. Are you dreaming to make loop TikTok videos? But makes you feel it is not as simple as it looks.
That’s where looping comes in. Looping allows you to sell your videos on TikTok directly from within the app. This means that instead of running ads for other companies all over your Instagram feed or website, you can run them from within TikTok itself and keep all of your followers happy!
Part 1: How to Make a TikTok Loop
One of the best features of TikTok is the loop feature. It allows you to add your favorite song and turn it into a video. But, that’s not all. It also allows you to make a video and loop it. If you are looking for an app that allows you to loop videos, then TikTok is a good app to use.
There are many ways to monetize your content. If you’re already making videos, you know how much time and energy it takes to produce them. And if you’re not already making videos, it’s going to take a lot of time and energy before you get started. But what if there was a way to make money while you were still learning?
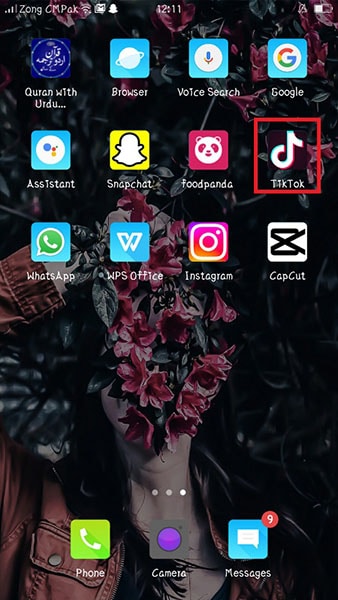
Step1 Download the TikTok app and create an account on it
Go to your play-store and type TikTok on its search bar. Install the app on your phone and create an account on it. You can sign up through your phone number, Gmail, or Facebook. After that, they will send you a code to verify your account.
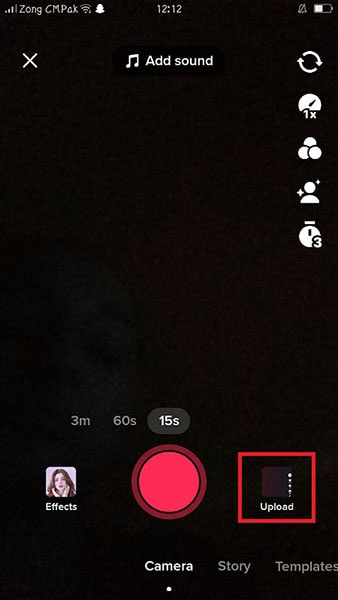
Step2 Make or select a video template
Click on the “+” symbol after that you can record your video or you can also select media from your gallery.

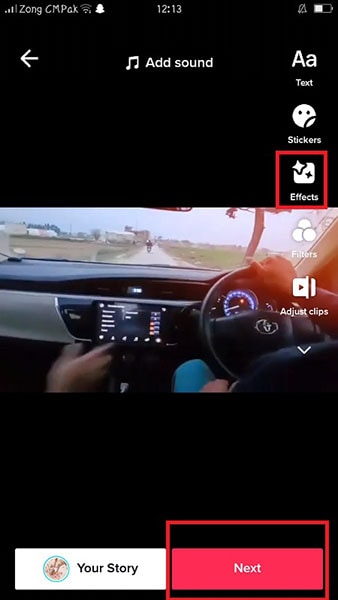
Step3 Select a template and add a transition
After selecting the video you can add a template to your video or can add transitions to your video. Your video must have an authentic starting and ending. You can add a transition in the middle of your video. Keep your looping video clips shorter because it looks more real.
Step4 Create a loop video and save it or publish it
If you want to merge the starting video with the ending video in one take. Now you can have to focus on the beginning video and split the starting and ending clips.
Benefits of loop TikTok videos
TikTok loop includes the use of videos with a similar rhythm to create a special atmosphere that attracts people to participate and share them. The videos are made by those people who know how to make the video attractive to the public. The most used technique of communication is through a video that is shared on social networks like Facebook and Instagram.
One reason why loop TikTok videos are so popular is that they’re really easy to use. You don’t need to be an expert in video editing to create them. All you need is a smartphone. Also, loop TikTok videos are a great way to share a moment with your friends and followers. Plus, they can be posted on the go and shared instantly.
Looping TikTok videos can have several positive impacts on your brand. Looping allows you to build a more consistent look for your content if you want to keep building brand equity. Second, it helps you maintain consistency in your storytelling across platforms. Third, it helps you avoid having to spend time creating new content because it gives viewers what they expect from you.
TikTok is one of the fastest-growing mobile apps in the world. It allows you to make short videos, which can be edited and shared with friends. As a plus, you can add cool music to your videos and customize them the way you want. You can also create short videos of yourself lip-syncing to the music. This article will guide you about the loop TikTok video.
Part 2: How to Edit Time-lapse Video on a Computer
Time-lapse video is a type of video that allows you to see a huge amount of change in a very short time. You can see it on all social media websites such as YouTube, Facebook, and Instagram. It can be used to make all kinds of videos, from simple scenes of nature to complex events. The first time-lapse video was made in France in 1872 by Léon Bouly.
There are a lot of steps to make a time-lapse video on a computer.
Step1 You need to download the free software that comes with the camera. You can find it on the manufacturer’s website or through a search engine.
Step2 You’ll want to plug in your phone’s charging cable and plug it in so that it can stay charged while filming.
Step3 You’ll need to find somewhere quiet where you can set up your camera and tripod. If possible, try to do this outside so that there’s no worry about getting dust or dirt on your lens.
Step4 Set up your phone so that it will record once every hour for an hour straight. This will give you enough time for each frame of video before switching over to the next one after an hour has passed.
Step5 Start recording!
Why we should make a time-lapse video on a computer?
Time lapses are also useful for showing how something changes over time. For example, if you want to show how an environment changes from day to night, or how a plant grows from seedlings into mature plants after being watered and nourished by sunlight, these videos would be perfect for demonstrating this change in real-time.
You can also create time-lapse videos that show the growth of plants or flowers over time. You could use this method to demonstrate how plants grow from seedlings into fully grown trees or bushes. You could even try creating a time-lapse video showing the growth of a weed from the seedling stage into full bloom with its seeds spread out across the ground below it!
You can make your videos more fun and engaging. By recording multiple angles at the same time, you can capture all the exciting moments, like when something unexpected happens. Or when something amazing turns out to be a total disaster in real life. You can easily share with friends and family members who might not be able to come to see you in person.
Why Filmora is the best option to make a time-lapse video?
Filmora is the best option to make time-lapse videos. The reason is simple: it has a lot of features that other editing programs don’t have, and it’s been designed by professional editors who know what they’re doing. In addition to offering full HD resolution, Filmora also allows you to easily customize the length of your time-lapse video.
In Filmora you can use your music while editing your video. This means you won’t need to worry about downloading any additional software or paying for expensive music licenses like you would with other editing programs out there. Filmora has an easy-to-use interface that makes it easy for beginners like yourself to get started right away without having any trouble understanding how everything works together.
Free Download For Win 7 or later(64-bit)
Free Download For macOS 10.14 or later
How to edit video in Filmora
A time-lapse video is a great way to show the passage of time in a short video. By speeding up the video, you can show a long event, such as a day of travel, in a short amount of time. You can use it for other purposes as well. But how do you edit time-lapse videos? That’s easy with Filmora just follow the below steps:
Step1 Select a video clip you want to add
Install Filmora from Google Chrome or any browser you want. After that click on create a new project and select media from your gallery. Select the video you want to make a time-lapse.

Step2 Put the video on the timeline
Place your video on a timeline or just simply drag and drop your video clip on the timeline. Place the video header on the front of your video.

Step3 Add effects and transitions
After putting the video on the timeline add some effects to your video. If you are combining two or more videos then must add a dissolve transition between the videos to show your video more seamlessly.

Step4 Edit the duration of the video then export it
After making all the editing videos, you can also select the duration according to your requirements. You can also edit the duration of your per video.

The Bottom Line
As a result, if you do make a TikTok Loop video, it’s important to get the “looping” right. If your end goal is more likes and followers, keep in mind that a short clip will get you there faster than trying to stretch out a single event over an entire song. It’s an easy, cost-free program to use, and it can provide tons of pleasure.
Covering everything from what a TikTok loop is to how to make one, we’ve compiled a guide for anyone looking for an informative and inspiring resource to take advantage of the app’s many features. If you want to edit your loop video, you must require the Filmora editing tool. Filmora is the best tool to customize your video. This software will give your video a professional look.
Free Download For macOS 10.14 or later
How to edit video in Filmora
A time-lapse video is a great way to show the passage of time in a short video. By speeding up the video, you can show a long event, such as a day of travel, in a short amount of time. You can use it for other purposes as well. But how do you edit time-lapse videos? That’s easy with Filmora just follow the below steps:
Step1 Select a video clip you want to add
Install Filmora from Google Chrome or any browser you want. After that click on create a new project and select media from your gallery. Select the video you want to make a time-lapse.

Step2 Put the video on the timeline
Place your video on a timeline or just simply drag and drop your video clip on the timeline. Place the video header on the front of your video.

Step3 Add effects and transitions
After putting the video on the timeline add some effects to your video. If you are combining two or more videos then must add a dissolve transition between the videos to show your video more seamlessly.

Step4 Edit the duration of the video then export it
After making all the editing videos, you can also select the duration according to your requirements. You can also edit the duration of your per video.

The Bottom Line
As a result, if you do make a TikTok Loop video, it’s important to get the “looping” right. If your end goal is more likes and followers, keep in mind that a short clip will get you there faster than trying to stretch out a single event over an entire song. It’s an easy, cost-free program to use, and it can provide tons of pleasure.
Covering everything from what a TikTok loop is to how to make one, we’ve compiled a guide for anyone looking for an informative and inspiring resource to take advantage of the app’s many features. If you want to edit your loop video, you must require the Filmora editing tool. Filmora is the best tool to customize your video. This software will give your video a professional look.
Also read:
- Basic Knowledge About WMV Format and Best WMV Video Editor for 2024
- 2024 Approved How to Trim Video in QuickTime Player on Your Mac
- Updated In 2024, Have You Ever Wanted to Speed up or Slow Down a Video? Maybe It Was Too Long, or You Wanted to Draw Out an Exciting Part of the Video without Having to Watch the Boring Parts
- New 2024 Approved Efficient Ways to Manage Your Timeline
- In 2024, Replacing Sky Background Using Adobe Photoshop A Comprehensive Guide
- New In 2024, Want to Speed up or Slow Down a Video to Make It Look Different? Here Are the Simple Steps to Change Video Speed in Lightworks Video Editor
- New Top 10 Free Spanish Text To Speech Converter Software Windows, Mac
- Backup and Organize Your Tons of Footage in Minutes
- 7 Tips to Create Teaching Videos
- Updated How to Use Speed Ramping to Create a Footage
- Updated How to Combine Videos Into One on Instagram
- Hyperlapse VS Timelapse Videos
- In 2024, Track Mattes The Ultimate Guide For After Effects
- Updated Your Recorded Video Footage Has some Visible Grains Making Your Video Noisy and Thus Hampering the Overall Viewing Experience. No Worries, as There AI Video Denoiser and Other Software Available to Correct the Issue for 2024
- 10 Best Text to Robot Voice Generators Windows, Mac, Android, iPhone & Online for 2024
- Updated Top 6 MP4 Mergers to Join Videos Easily for 2024
- Updated 2024 Approved Have You Recently Experienced Motion Blur in Games? Do You Wish to Learn More About It? This Article Provides an Overview and the Need for Motion Blur Gaming
- 2024 Approved Best Online GIF to Image (PNG/JPG) Converters
- Updated To Add SRT to MP4 Is Not as Hard as You Might Think. All You Just Need Is the Right Tool to Help You Get the Job Done. Read This Article and Learn the 8 Latest Methods to Merge SRT with MP4 Effortlessly
- New 2024 Approved Top Tips for Camtasia Freeze-Frame
- Updated Do You Want to Create Slow-Motion Videos? This Article Shows Methods to Create Slow-Mo Videos without Changing the Medias Quality
- New In 2024, Ultimate Guide on Making A Slideshow Video
- Are You in a Funny Chat with a Friend and Want to Send a GIF but Couldnt Find One? Here We Will Provide You with the Top Image for GIF Converters. So, Let Us See How to Turn Images Into GIFs Very Quickly for 2024
- 2024 Approved Motion Tracking Using The Best Video Editors
- Updated 2024 Approved If You Want to Color Grading Your Video, Final Cut Pro Can Be One of the Best Choices. However, Its Not Easy for Everyone to Use Color Grading Feature, and in This Guide Well Show You How to Do That
- Updated Finding The Best Ways To Replace Sky in Lightroom for 2024
- Updated How to Make Fortnite Thumbnail with Motion Blur?
- Updated In 2024, Deleting White Background in Photoshop Is Hard? No
- | Best 8 Online GIF to APNG Converters for 2024
- Updated In 2024, Top VHS Sound Effect That You Can Use in Video Making
- Updated Record Slow Motion Videos With Phantom Slow-Mo Camera for 2024
- Updated 30+ Amazing Templates for VN Video Editor for 2024
- Updated Slow Down or Speed Up Videos Easily on PC, Online, and Phone for 2024
- Discover How to Change Sky Background with The Best Applications? A Review
- Updated Perfecting the Art of Slowing Down Video on Instagram for 2024
- New In 2024, If You Are Trying to Create a Countdown Effect, but Youre Not Sure Where to Start, Then This Post Is Going to Show You some Ways to Create a Countdown Animation for Your Videos
- New Discover the Ultimate LUTs for Wondershare Filmora Uncover the Answer for 2024
- Updated In 2024, Heres All About GIF Keyboard Youll Ever Want to Know
- How to Add VHS Green Screen to Your Video for 2024
- New What You Should Know About Speech-to-Text Technology for 2024
- Updated In 2024, Making Slow Motion Videos in Premiere Pro A Review on The Best Methods
- New 2024 Approved Step By Step Guide on Using Media Player Classic To Rotate A Video
- 3 Ways of How to Get Someones Apple ID Off Apple iPhone 6 without Password
- How to Copy Contacts from Apple iPhone 6s Plus to SIM? | Dr.fone
- In 2024, Top 7 Skype Hacker to Hack Any Skype Account On your Realme Narzo 60 Pro 5G | Dr.fone
- In 2024, How to Unlock Your Apple iPhone 6 Plus Passcode 4 Easy Methods (With or Without iTunes)
- In 2024, How to Bypass Android Lock Screen Using Emergency Call On Nubia Z50 Ultra?
- 2 Ways to Transfer Text Messages from Samsung Galaxy S24 Ultra to iPhone 15/14/13/12/11/X/8/ | Dr.fone
- In 2024, How to Show Wi-Fi Password on Vivo V30 Lite 5G
- How To Track IMEI Number Of Samsung Galaxy S24 Through Google Earth?
- In 2024, Best Ways on How to Unlock/Bypass/Swipe/Remove Samsung Galaxy A05 Fingerprint Lock
- In 2024, Universal Unlock Pattern for Realme GT Neo 5
- In 2024, How to Watch Hulu Outside US On Oppo A1 5G | Dr.fone
- In 2024, How to Screen Mirroring Oppo A58 4G? | Dr.fone
- 7 Fixes for Unfortunately, Phone Has Stopped on Vivo V27e | Dr.fone
- Recover your messages after Xiaomi 13T Pro has been deleted
- How To Deal With the Vivo Y55s 5G (2023) Screen Black But Still Works? | Dr.fone
- How to Transfer Photos from Poco X6 to Laptop Without USB | Dr.fone
- Honor Magic5 Ultimate Screen Unresponsive? Heres How to Fix It | Dr.fone
- How Do I SIM Unlock My iPhone 14 Plus?
- In 2024, iSpoofer is not working On Honor 100 Pro? Fixed | Dr.fone
- In 2024, Unlock Xiaomi Redmi Note 13 5G Phone Password Without Factory Reset Full Guide Here
- In 2024, Where Is the Best Place to Catch Dratini On Apple iPhone 8 | Dr.fone
- 5 Easy Ways to Transfer Contacts from Apple iPhone XR to Android | Dr.fone
- Bypass iCloud Activation Lock with IMEI Code From your Apple iPhone 6 Plus
- In 2024, How to Cast Realme C51 to Computer for iPhone and Android? | Dr.fone
- In 2024, A Perfect Guide To Remove or Disable Google Smart Lock On Vivo S18
- Where Is the Best Place to Catch Dratini On Samsung Galaxy A14 4G | Dr.fone
- In 2024, Disabled Apple iPhone 14 Pro Max How to Unlock a Disabled Apple iPhone 14 Pro Max?
- Title: Best 16 Motion Blur Apps for Videos & Photos for 2024
- Author: Morgan
- Created at : 2024-05-19 05:11:56
- Updated at : 2024-05-20 05:11:56
- Link: https://ai-video-editing.techidaily.com/best-16-motion-blur-apps-for-videos-and-photos-for-2024/
- License: This work is licensed under CC BY-NC-SA 4.0.

