:max_bytes(150000):strip_icc():format(webp)/GettyImages-1135364530-dec5678c0c2c427ba18ae21452ff6326.jpg)
Best 8 Srt File Creators for 2024

Best 8 Srt File Creators
One of the ways that you can engage with all audiences even those who don’t speak your language is to add subtitles to your video. But it can be very frustrating when you don’t know how to do that. To successfully add subtitles to a video, you need a functioning STR file creator.
This is a program that will generate the SRT file that contains the subtitle and add it to your video. In this article, we will look at some of the best SRT file creators to choose from.
What is an SRT File?
An SRT file is a file that contains the content on a video in text format as well as the timing of the words and the order in which they show up on the video. It is one of the most popular captioning file formats in use today.
The SRT file only contains the subtitle information and must be used in combination with the video to be effective. When it is displayed correctly and loaded on a compatible video platform an SRT file can actually increase the effectiveness of the video’s content.
Best SRT File Creators
The following are just some of the best SRT file creators that you can use to generate an SRT file for your video;
YouTube Creator Studio
YouTube Creator Studio is a platform that YouTube content creators can use to upload their videos, manage their content, and even check the video stats. It is also a great solution for the creation and management of SRT files that add subtitles to the YouTube videos on the creator’s YouTube account.

It has numerous different solutions designed to help content creators get all the content they need and programs to teach them how to monetize the content on their channels.
Key Features
- It is the best way to manage content on YouTube
- It has numerous resources to create a successful channel
- You can use it to create and deploy SRT files
- It has numerous additional resources including programs and tips on growing an audience
Kapwing
Kapwing is a simple online tool that you can use to create an SRT file for your video. Because it is an online solution, you don’t need to install any programs on your computer to use it. It has a very pleasant user interface that makes the process of creating SRT very easy, even for a long video.

Key Features
- You can preview the subtitles in real-time
- The easy-to-use interface makes SRT file creation very easy.
- It also has an auto-generation feature that uses AI to create the SRT file and is very accurate.
Clideo SRT File Editor
Clideo is a very popular SRT editor that you can use to create and edit an SRT file for tur video. One of the greatest advantages of choosing Clideo over other solutions is that it supports a wide range of fonts, giving you the ability to customize the subtitle creation process to fit your unique video.

It also supports a wide range of video formats and can be used to add subtitles to various types of videos including movies, video clips, and more.
Key Features
- It has very many colors and fonts to choose from
- It works very well for most types of videos
- You can use it to create new subtitles or edit existing ones
- There are a lot of text effects to choose from
Filmora
Filmora is a program that allows you to add subtitles to a video in a few simple steps. But it is also a professional video editor that can be used to edit a video in numerous ways such as adding effects and even trimming away sections of the video.
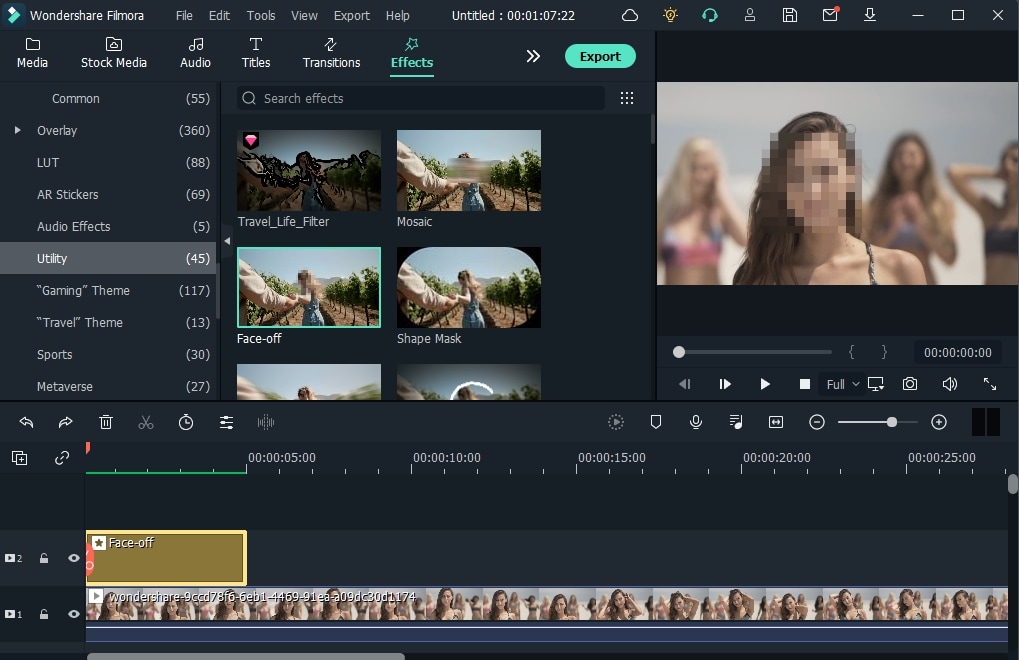
You can also use Filmora to change the location of the subtitles, add color to the text, and even chose a different font to use for the subtitles.
For Win 7 or later (64-bit)
For macOS 10.12 or later
Key Features
- It gives you a lot of fonts and colors to choose from
- You can create subtitles from scratch or edit existing subtitles
- You can use it to change the positioning of the text
- It is easily and accurately synchronizes the text and the video
AVIAddXSubs
AVIAddXSubs is a simple and effective solution for adding subtitles to any video. While it cannot be used to create subtitles, you can use it to accurately add a subtitle file to a movie or video. The user interface is not very friendly, but it is a simple way to edit SRT files.

Key Features
- You can edit up to 8 subtitles at the same time
- It easily configures different aspects of the SRT file including text color, position or even adding outlines to the text.
Subtitle Workshop
This tool can create subtitles from scratch and even convert other subtitles files to SRT format as well as edit the content of any subtitle file. It is a fast tool, able to process up to 60 subtitles at once and all subtitles it creates are very accurate.

Key Features
- It has a built-in video player to preview the subtitles as you create them
- You can create as well as edit existing SRT files
- It has numerous tools including spell check, time sync, undo and redo buttons and find and replace features.
Wave.video
This is an online SRT creator that will create and generate the subtitles file automatically. It can very easily transcribe even the largest of videos and sync the resultant subtitle to the video very accurately. It also allows you to customize the video in various ways. Other than SRT, you can also create subtitles in other formats including VTT and TXT.

Key Features
- Video transcription is done automatically
- It can translate the subtitles to more than 128 languages
- It easily synchronizes the video and the subtitles
- It has a simple user interface that makes subtitle generation very easy.
veed.io SRT Editor
This is another online tool that you can use to generate an SRT file for your video. It is easy to use, especially because you don’t have to install any programs on your computer to create subtitles. The user interface simplifies the process, but this tool also offers a lot of options such as adjusting the format and font of the text on the SRT file.

Key Features
- It supports a large number of audio and video formats
- The synchronization of the video and the subtitles is very accurate.
- The subtitles can be generated automatically.
Related FAQs
**How Do I create an SRT File?
The only way you can create an SRT file to add subtitles to your video is to use an SRT file generator. One of the tools we have describes above should be able to help you although you may want to ensure that the solution you choose will create the subtitles accurately. The automatic creators are probably a great option if the video is very long and you don’t want to spend a long time trying to get the subtitles just right.
**How Do I Make an SRT File for Free?
You can make an SRT file for free. In fact, some of the solutions that we have outlined above can allow you to create an SRT file for free. But we must warn you that while free solutions will work, they are often very difficult to use and you may find that you are spending a lot of time creating an SRT file for a single video.
**What Programs Can Create an SRT File?
Well, there are very many tools that you can use to create an SRT file and many of them work very well. Some of the best have been listed here in this article. But perhaps the most effective tool to create an SRT file for your video is a tool like Wondershare Filmora. This is because it is also a video editor and therefore has a higher chance of generating an accurate and more customized subtitle file.
SRT files can be a great way to share your content with a wider audience as they are designed to make video content available to people who speak a different language. Now you have a way to create the best SRT files for your video.
Kapwing
Kapwing is a simple online tool that you can use to create an SRT file for your video. Because it is an online solution, you don’t need to install any programs on your computer to use it. It has a very pleasant user interface that makes the process of creating SRT very easy, even for a long video.

Key Features
- You can preview the subtitles in real-time
- The easy-to-use interface makes SRT file creation very easy.
- It also has an auto-generation feature that uses AI to create the SRT file and is very accurate.
Clideo SRT File Editor
Clideo is a very popular SRT editor that you can use to create and edit an SRT file for tur video. One of the greatest advantages of choosing Clideo over other solutions is that it supports a wide range of fonts, giving you the ability to customize the subtitle creation process to fit your unique video.

It also supports a wide range of video formats and can be used to add subtitles to various types of videos including movies, video clips, and more.
Key Features
- It has very many colors and fonts to choose from
- It works very well for most types of videos
- You can use it to create new subtitles or edit existing ones
- There are a lot of text effects to choose from
Filmora
Filmora is a program that allows you to add subtitles to a video in a few simple steps. But it is also a professional video editor that can be used to edit a video in numerous ways such as adding effects and even trimming away sections of the video.

You can also use Filmora to change the location of the subtitles, add color to the text, and even chose a different font to use for the subtitles.
For Win 7 or later (64-bit)
For macOS 10.12 or later
Key Features
- It gives you a lot of fonts and colors to choose from
- You can create subtitles from scratch or edit existing subtitles
- You can use it to change the positioning of the text
- It is easily and accurately synchronizes the text and the video
AVIAddXSubs
AVIAddXSubs is a simple and effective solution for adding subtitles to any video. While it cannot be used to create subtitles, you can use it to accurately add a subtitle file to a movie or video. The user interface is not very friendly, but it is a simple way to edit SRT files.

Key Features
- You can edit up to 8 subtitles at the same time
- It easily configures different aspects of the SRT file including text color, position or even adding outlines to the text.
Subtitle Workshop
This tool can create subtitles from scratch and even convert other subtitles files to SRT format as well as edit the content of any subtitle file. It is a fast tool, able to process up to 60 subtitles at once and all subtitles it creates are very accurate.

Key Features
- It has a built-in video player to preview the subtitles as you create them
- You can create as well as edit existing SRT files
- It has numerous tools including spell check, time sync, undo and redo buttons and find and replace features.
Wave.video
This is an online SRT creator that will create and generate the subtitles file automatically. It can very easily transcribe even the largest of videos and sync the resultant subtitle to the video very accurately. It also allows you to customize the video in various ways. Other than SRT, you can also create subtitles in other formats including VTT and TXT.

Key Features
- Video transcription is done automatically
- It can translate the subtitles to more than 128 languages
- It easily synchronizes the video and the subtitles
- It has a simple user interface that makes subtitle generation very easy.
veed.io SRT Editor
This is another online tool that you can use to generate an SRT file for your video. It is easy to use, especially because you don’t have to install any programs on your computer to create subtitles. The user interface simplifies the process, but this tool also offers a lot of options such as adjusting the format and font of the text on the SRT file.

Key Features
- It supports a large number of audio and video formats
- The synchronization of the video and the subtitles is very accurate.
- The subtitles can be generated automatically.
Related FAQs
**How Do I create an SRT File?
The only way you can create an SRT file to add subtitles to your video is to use an SRT file generator. One of the tools we have describes above should be able to help you although you may want to ensure that the solution you choose will create the subtitles accurately. The automatic creators are probably a great option if the video is very long and you don’t want to spend a long time trying to get the subtitles just right.
**How Do I Make an SRT File for Free?
You can make an SRT file for free. In fact, some of the solutions that we have outlined above can allow you to create an SRT file for free. But we must warn you that while free solutions will work, they are often very difficult to use and you may find that you are spending a lot of time creating an SRT file for a single video.
**What Programs Can Create an SRT File?
Well, there are very many tools that you can use to create an SRT file and many of them work very well. Some of the best have been listed here in this article. But perhaps the most effective tool to create an SRT file for your video is a tool like Wondershare Filmora. This is because it is also a video editor and therefore has a higher chance of generating an accurate and more customized subtitle file.
SRT files can be a great way to share your content with a wider audience as they are designed to make video content available to people who speak a different language. Now you have a way to create the best SRT files for your video.
Kapwing
Kapwing is a simple online tool that you can use to create an SRT file for your video. Because it is an online solution, you don’t need to install any programs on your computer to use it. It has a very pleasant user interface that makes the process of creating SRT very easy, even for a long video.

Key Features
- You can preview the subtitles in real-time
- The easy-to-use interface makes SRT file creation very easy.
- It also has an auto-generation feature that uses AI to create the SRT file and is very accurate.
Clideo SRT File Editor
Clideo is a very popular SRT editor that you can use to create and edit an SRT file for tur video. One of the greatest advantages of choosing Clideo over other solutions is that it supports a wide range of fonts, giving you the ability to customize the subtitle creation process to fit your unique video.

It also supports a wide range of video formats and can be used to add subtitles to various types of videos including movies, video clips, and more.
Key Features
- It has very many colors and fonts to choose from
- It works very well for most types of videos
- You can use it to create new subtitles or edit existing ones
- There are a lot of text effects to choose from
Filmora
Filmora is a program that allows you to add subtitles to a video in a few simple steps. But it is also a professional video editor that can be used to edit a video in numerous ways such as adding effects and even trimming away sections of the video.

You can also use Filmora to change the location of the subtitles, add color to the text, and even chose a different font to use for the subtitles.
For Win 7 or later (64-bit)
For macOS 10.12 or later
Key Features
- It gives you a lot of fonts and colors to choose from
- You can create subtitles from scratch or edit existing subtitles
- You can use it to change the positioning of the text
- It is easily and accurately synchronizes the text and the video
AVIAddXSubs
AVIAddXSubs is a simple and effective solution for adding subtitles to any video. While it cannot be used to create subtitles, you can use it to accurately add a subtitle file to a movie or video. The user interface is not very friendly, but it is a simple way to edit SRT files.

Key Features
- You can edit up to 8 subtitles at the same time
- It easily configures different aspects of the SRT file including text color, position or even adding outlines to the text.
Subtitle Workshop
This tool can create subtitles from scratch and even convert other subtitles files to SRT format as well as edit the content of any subtitle file. It is a fast tool, able to process up to 60 subtitles at once and all subtitles it creates are very accurate.

Key Features
- It has a built-in video player to preview the subtitles as you create them
- You can create as well as edit existing SRT files
- It has numerous tools including spell check, time sync, undo and redo buttons and find and replace features.
Wave.video
This is an online SRT creator that will create and generate the subtitles file automatically. It can very easily transcribe even the largest of videos and sync the resultant subtitle to the video very accurately. It also allows you to customize the video in various ways. Other than SRT, you can also create subtitles in other formats including VTT and TXT.

Key Features
- Video transcription is done automatically
- It can translate the subtitles to more than 128 languages
- It easily synchronizes the video and the subtitles
- It has a simple user interface that makes subtitle generation very easy.
veed.io SRT Editor
This is another online tool that you can use to generate an SRT file for your video. It is easy to use, especially because you don’t have to install any programs on your computer to create subtitles. The user interface simplifies the process, but this tool also offers a lot of options such as adjusting the format and font of the text on the SRT file.

Key Features
- It supports a large number of audio and video formats
- The synchronization of the video and the subtitles is very accurate.
- The subtitles can be generated automatically.
Related FAQs
**How Do I create an SRT File?
The only way you can create an SRT file to add subtitles to your video is to use an SRT file generator. One of the tools we have describes above should be able to help you although you may want to ensure that the solution you choose will create the subtitles accurately. The automatic creators are probably a great option if the video is very long and you don’t want to spend a long time trying to get the subtitles just right.
**How Do I Make an SRT File for Free?
You can make an SRT file for free. In fact, some of the solutions that we have outlined above can allow you to create an SRT file for free. But we must warn you that while free solutions will work, they are often very difficult to use and you may find that you are spending a lot of time creating an SRT file for a single video.
**What Programs Can Create an SRT File?
Well, there are very many tools that you can use to create an SRT file and many of them work very well. Some of the best have been listed here in this article. But perhaps the most effective tool to create an SRT file for your video is a tool like Wondershare Filmora. This is because it is also a video editor and therefore has a higher chance of generating an accurate and more customized subtitle file.
SRT files can be a great way to share your content with a wider audience as they are designed to make video content available to people who speak a different language. Now you have a way to create the best SRT files for your video.
Kapwing
Kapwing is a simple online tool that you can use to create an SRT file for your video. Because it is an online solution, you don’t need to install any programs on your computer to use it. It has a very pleasant user interface that makes the process of creating SRT very easy, even for a long video.

Key Features
- You can preview the subtitles in real-time
- The easy-to-use interface makes SRT file creation very easy.
- It also has an auto-generation feature that uses AI to create the SRT file and is very accurate.
Clideo SRT File Editor
Clideo is a very popular SRT editor that you can use to create and edit an SRT file for tur video. One of the greatest advantages of choosing Clideo over other solutions is that it supports a wide range of fonts, giving you the ability to customize the subtitle creation process to fit your unique video.

It also supports a wide range of video formats and can be used to add subtitles to various types of videos including movies, video clips, and more.
Key Features
- It has very many colors and fonts to choose from
- It works very well for most types of videos
- You can use it to create new subtitles or edit existing ones
- There are a lot of text effects to choose from
Filmora
Filmora is a program that allows you to add subtitles to a video in a few simple steps. But it is also a professional video editor that can be used to edit a video in numerous ways such as adding effects and even trimming away sections of the video.

You can also use Filmora to change the location of the subtitles, add color to the text, and even chose a different font to use for the subtitles.
For Win 7 or later (64-bit)
For macOS 10.12 or later
Key Features
- It gives you a lot of fonts and colors to choose from
- You can create subtitles from scratch or edit existing subtitles
- You can use it to change the positioning of the text
- It is easily and accurately synchronizes the text and the video
AVIAddXSubs
AVIAddXSubs is a simple and effective solution for adding subtitles to any video. While it cannot be used to create subtitles, you can use it to accurately add a subtitle file to a movie or video. The user interface is not very friendly, but it is a simple way to edit SRT files.

Key Features
- You can edit up to 8 subtitles at the same time
- It easily configures different aspects of the SRT file including text color, position or even adding outlines to the text.
Subtitle Workshop
This tool can create subtitles from scratch and even convert other subtitles files to SRT format as well as edit the content of any subtitle file. It is a fast tool, able to process up to 60 subtitles at once and all subtitles it creates are very accurate.

Key Features
- It has a built-in video player to preview the subtitles as you create them
- You can create as well as edit existing SRT files
- It has numerous tools including spell check, time sync, undo and redo buttons and find and replace features.
Wave.video
This is an online SRT creator that will create and generate the subtitles file automatically. It can very easily transcribe even the largest of videos and sync the resultant subtitle to the video very accurately. It also allows you to customize the video in various ways. Other than SRT, you can also create subtitles in other formats including VTT and TXT.

Key Features
- Video transcription is done automatically
- It can translate the subtitles to more than 128 languages
- It easily synchronizes the video and the subtitles
- It has a simple user interface that makes subtitle generation very easy.
veed.io SRT Editor
This is another online tool that you can use to generate an SRT file for your video. It is easy to use, especially because you don’t have to install any programs on your computer to create subtitles. The user interface simplifies the process, but this tool also offers a lot of options such as adjusting the format and font of the text on the SRT file.

Key Features
- It supports a large number of audio and video formats
- The synchronization of the video and the subtitles is very accurate.
- The subtitles can be generated automatically.
Related FAQs
**How Do I create an SRT File?
The only way you can create an SRT file to add subtitles to your video is to use an SRT file generator. One of the tools we have describes above should be able to help you although you may want to ensure that the solution you choose will create the subtitles accurately. The automatic creators are probably a great option if the video is very long and you don’t want to spend a long time trying to get the subtitles just right.
**How Do I Make an SRT File for Free?
You can make an SRT file for free. In fact, some of the solutions that we have outlined above can allow you to create an SRT file for free. But we must warn you that while free solutions will work, they are often very difficult to use and you may find that you are spending a lot of time creating an SRT file for a single video.
**What Programs Can Create an SRT File?
Well, there are very many tools that you can use to create an SRT file and many of them work very well. Some of the best have been listed here in this article. But perhaps the most effective tool to create an SRT file for your video is a tool like Wondershare Filmora. This is because it is also a video editor and therefore has a higher chance of generating an accurate and more customized subtitle file.
SRT files can be a great way to share your content with a wider audience as they are designed to make video content available to people who speak a different language. Now you have a way to create the best SRT files for your video.
Learning How to Create LUTs with LUTs Generator
Lookup Tables can make your videos and pictures look more attractive. LUTs are like filters that give your media files different styles and emotions. There are many presets available on the internet that you can download to use for your media content. Moreover, LUTs help you to quickly change the look and mood of your photos and videos.
You can find LUTs for free or buy them online; some editing software already has LUTs included. Nevertheless, you can create your own LUTs using different online and offline tools. If you can’t find any online LUT generator, search for LUT generator free download. You’ll get many options allowing you to generate LUTs offline.
- Part 2: How to Create LUTs Using LUT Generator Free Download?
- Part 3: How to Create Online LUTs Using Online LUT Creator?
- Bonus Part: Wondershare Filmora – The Perfect Tool to Use Your LUTs
Part 1: An Overview of LUT Generator - The Best Platform for Creating LUTs
LUT Generator is an excellent tool for creating color-grading picture and video presets. This powerful LUT generator-free tool is available on both Windows and Mac. Moreover, you can create LUTs from any photo and video editing application, including Lightroom and Camera Raw. Not only can you create your LUTs, but you can also download presets that are already available.
Furthermore, it offers over 290 cinematic styles LUTs and 50+ LUTs that are optimized for drones and GoPro videos. If you want a surreal look, you can also use 70+ Psychedelia LUTs. This tool allows you to apply third-party effects easily on your photos and videos. Moreover, you can even match the tone of clips from different cameras to give a uniform look.
Part 2: How to Create LUTs Using LUT Generator Free Download?
If you don’t want to apply online LUTs that are available, you can create your own. To do so, you have to download the LUT Generator tool and follow these simple steps to create LUTs.
Step1
To create a LUT of your liking, search for the LUT Generator free download on your browser and download the tool.
Step2
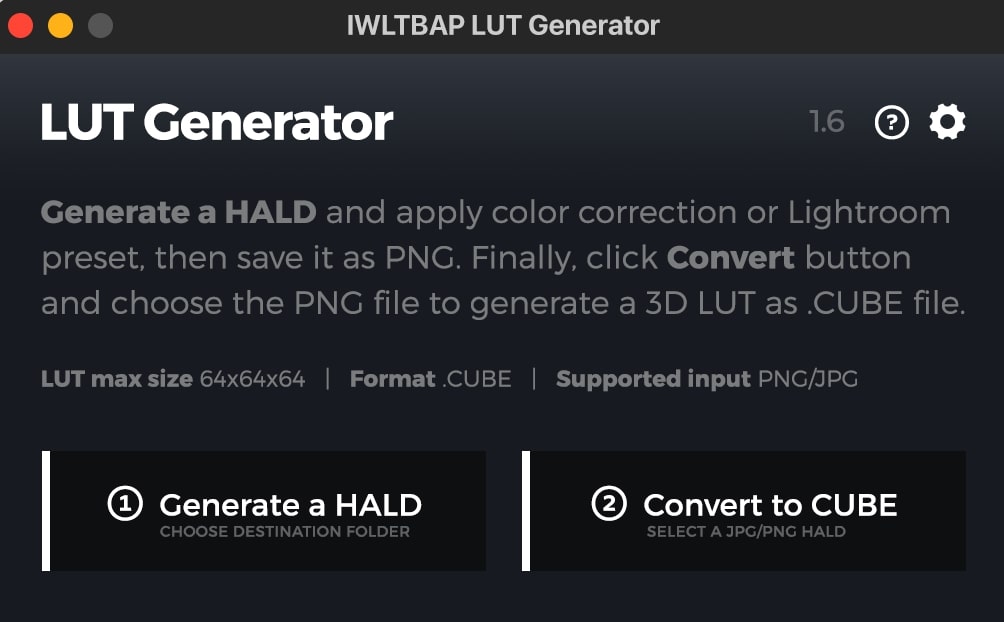
As you launch it, continue to select the “Generate a HALD” option. This option will let you generate a PNG HALD that you can use for color grading using editing software.
Step3
Open the generated PNG HALD into your preferred photo editing application. Apply the desired color correction on the PNG HALD. Save the modified PNG HALD without compression as PNG or at 100% quality in JPG format.
Step4
Click the “Convert to CUBE” button in the LUT Generator and select the modified PNG HALD you saved in the previous step.
Step5
In Preferences, choose the desired size of the 3D LUT as .CUBE format. You can choose between 25x25x25 or 64x64x64. After selecting your desired size, your customized LUT will be created in .CUBE format.
Part 3: How to Create Online LUTs Using Online LUT Creator?
There are two methods to create a LUT online and offline. Previously you’ve learned to generate LUTs using offline tools. However, you can also create LUTs online without installing any tool. This portion will teach you how to create online LUTs in this step-by-step guide.
Step1
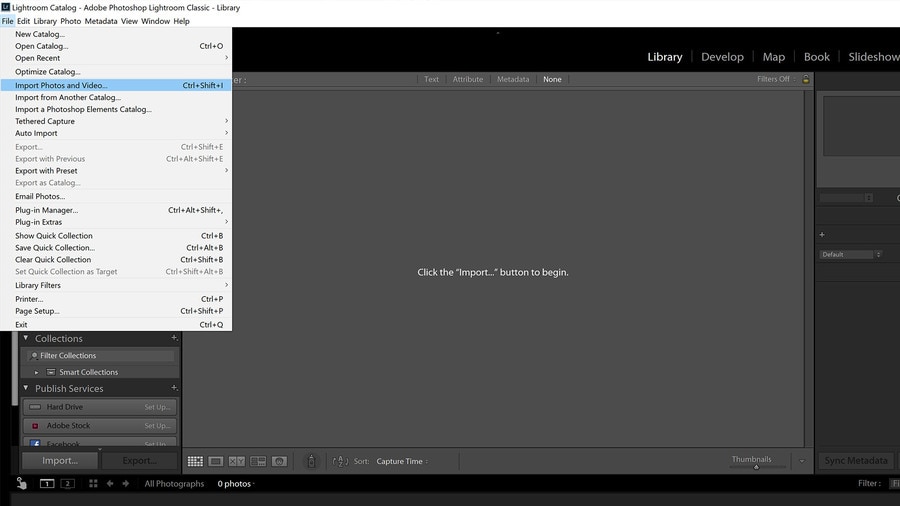
Import your photo into Lightroom by dragging and dropping it. You can also import the file by clicking the “File” button and selecting “Import Photos and Video.” For best results, ensure that the photo you will edit is still.
Step2
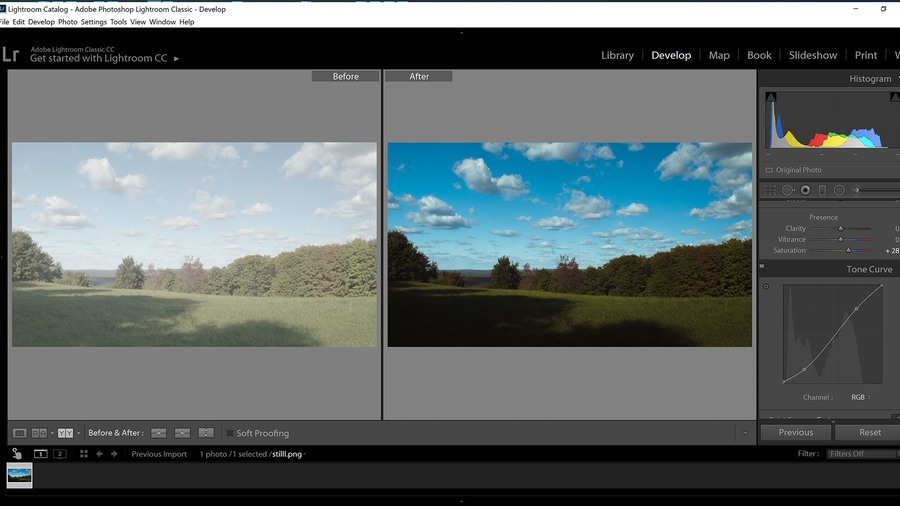
Edit your photo inside the “Develop” module in Lightroom with your desired preference and style. Only apply changes affecting the colors, not adjustments like noise reduction, vignette, or grain.
Step3
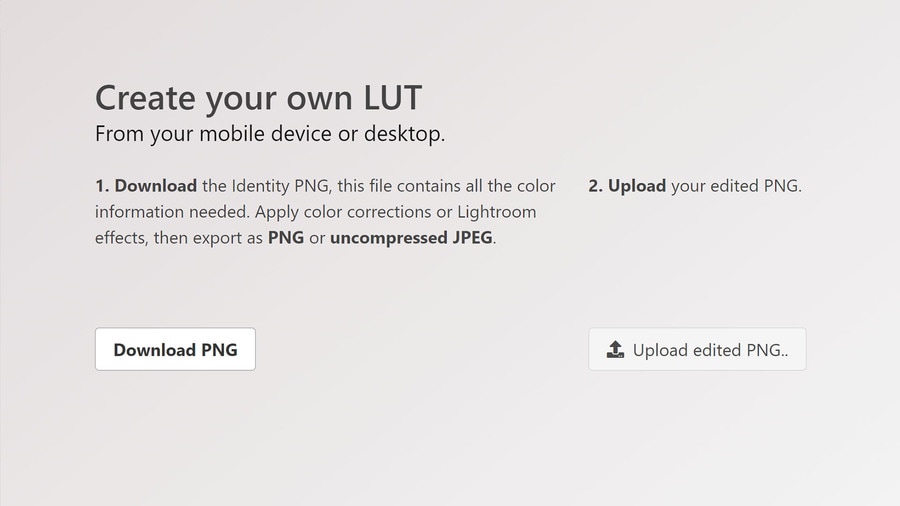
Download the original PNG from <www.onlinelutcreator.com/lutcreator> . Import it into Lightroom as you did in the first step.
Step4
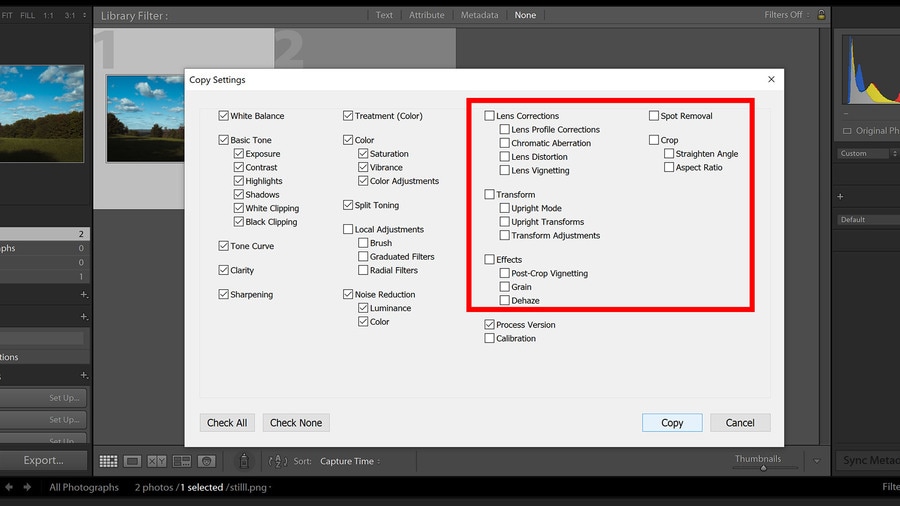
Right-click on your edited photo in the Develop module. Click “Develop Settings,” and select “Copy Settings.” After that, a new window will pop up; make sure you have the same things checked as in the screenshot.
Step5
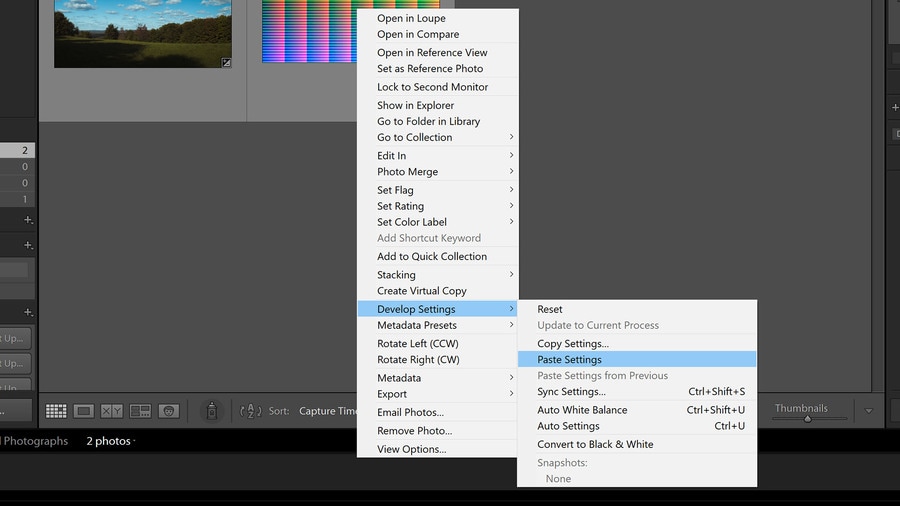
Right-click the original downloaded PNG file in the Develop module. Go to “Develop Settings,” and choose “Paste Settings.” This will paste the settings from your edited photo onto the original PNG.
Step6
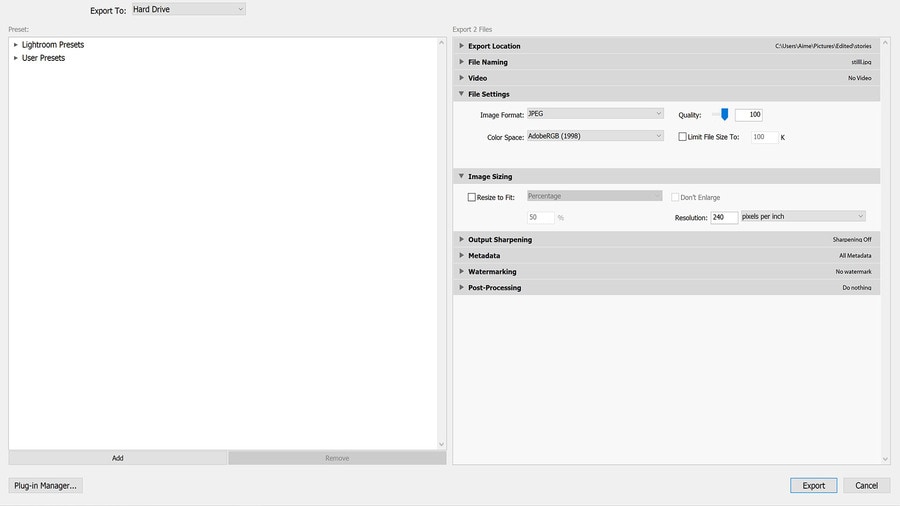
Now export the edited PNG by right-clicking on the PNG and selecting “Export.” In the Export popup menu, ensure you have the same settings as in the screenshot.
Step7
Go back to <www.onlinelutcreator.com/lutcreator> and upload the edited PNG. Generate your LUT and download it. You can now use this LUT to adjust the same color to other videos or photos.
Bonus Part: Wondershare Filmora – The Perfect Tool to Use Your LUTs
Wondershare Filmora is a powerful video editing tool that allows you to use your customized LUTs using this tool. With this tool, you can apply your custom LUTs. Moreover, you can choose from over 200+ pre-made LUTs in its library. Additionally, you can fine-tune your videos with various adjustment and correction options.
Furthermore, you can make changes frame-by-frame to your video footage. This tool also allows you to remove background noises with its AI feature. Moreover, this tool can automatically remove all your long pauses and awkward silence moments from your videos. However, to create a professional video with more options and control, it is a great tool to use.

Key Features To Keep Note of For Wondershare Filmora
- With Filmora, you can select any object or person and change its background. The AI Smart Cutout feature allows you to choose a person to change their background.
- Another fantastic feature is that it gives you access to 10 billion free media files. Moreover, you can select over 200 presets from its in-built for your videos.
- Wondershare Filmora has another unique feature, especially for vloggers and podcasters. With the Auto Ducking feature, music will fade when someone is speaking.
Empower your videos with a new mood using different LUTs. Filmora now offers 100+ top-quality 3D LUTs cover a broad range of scenarios. Transform your videos with Filmora’s powerful 3D LUTs.
Apply LUT on Videos Apply LUT on Videos Learn More

Conclusion
In conclusion, LUTs are essential in modern video and photo editing. They allow editors to apply different color adjustments to color-correct their digital media. There are many pre-made LUTs available online, covering various styles and moods. However, you can create your LUTs with LUT generator-free tools online and offline. You can apply these LUTs using tools like Wondershare Filmora.
- Part 3: How to Create Online LUTs Using Online LUT Creator?
- Bonus Part: Wondershare Filmora – The Perfect Tool to Use Your LUTs
Part 1: An Overview of LUT Generator - The Best Platform for Creating LUTs
LUT Generator is an excellent tool for creating color-grading picture and video presets. This powerful LUT generator-free tool is available on both Windows and Mac. Moreover, you can create LUTs from any photo and video editing application, including Lightroom and Camera Raw. Not only can you create your LUTs, but you can also download presets that are already available.
Furthermore, it offers over 290 cinematic styles LUTs and 50+ LUTs that are optimized for drones and GoPro videos. If you want a surreal look, you can also use 70+ Psychedelia LUTs. This tool allows you to apply third-party effects easily on your photos and videos. Moreover, you can even match the tone of clips from different cameras to give a uniform look.
Part 2: How to Create LUTs Using LUT Generator Free Download?
If you don’t want to apply online LUTs that are available, you can create your own. To do so, you have to download the LUT Generator tool and follow these simple steps to create LUTs.
Step1
To create a LUT of your liking, search for the LUT Generator free download on your browser and download the tool.
Step2
As you launch it, continue to select the “Generate a HALD” option. This option will let you generate a PNG HALD that you can use for color grading using editing software.
Step3
Open the generated PNG HALD into your preferred photo editing application. Apply the desired color correction on the PNG HALD. Save the modified PNG HALD without compression as PNG or at 100% quality in JPG format.
Step4
Click the “Convert to CUBE” button in the LUT Generator and select the modified PNG HALD you saved in the previous step.
Step5
In Preferences, choose the desired size of the 3D LUT as .CUBE format. You can choose between 25x25x25 or 64x64x64. After selecting your desired size, your customized LUT will be created in .CUBE format.

Part 3: How to Create Online LUTs Using Online LUT Creator?
There are two methods to create a LUT online and offline. Previously you’ve learned to generate LUTs using offline tools. However, you can also create LUTs online without installing any tool. This portion will teach you how to create online LUTs in this step-by-step guide.
Step1
Import your photo into Lightroom by dragging and dropping it. You can also import the file by clicking the “File” button and selecting “Import Photos and Video.” For best results, ensure that the photo you will edit is still.

Step2
Edit your photo inside the “Develop” module in Lightroom with your desired preference and style. Only apply changes affecting the colors, not adjustments like noise reduction, vignette, or grain.

Step3
Download the original PNG from <www.onlinelutcreator.com/lutcreator> . Import it into Lightroom as you did in the first step.

Step4
Right-click on your edited photo in the Develop module. Click “Develop Settings,” and select “Copy Settings.” After that, a new window will pop up; make sure you have the same things checked as in the screenshot.

Step5
Right-click the original downloaded PNG file in the Develop module. Go to “Develop Settings,” and choose “Paste Settings.” This will paste the settings from your edited photo onto the original PNG.

Step6
Now export the edited PNG by right-clicking on the PNG and selecting “Export.” In the Export popup menu, ensure you have the same settings as in the screenshot.

Step7
Go back to <www.onlinelutcreator.com/lutcreator> and upload the edited PNG. Generate your LUT and download it. You can now use this LUT to adjust the same color to other videos or photos.

Bonus Part: Wondershare Filmora – The Perfect Tool to Use Your LUTs
Wondershare Filmora is a powerful video editing tool that allows you to use your customized LUTs using this tool. With this tool, you can apply your custom LUTs. Moreover, you can choose from over 200+ pre-made LUTs in its library. Additionally, you can fine-tune your videos with various adjustment and correction options.
Furthermore, you can make changes frame-by-frame to your video footage. This tool also allows you to remove background noises with its AI feature. Moreover, this tool can automatically remove all your long pauses and awkward silence moments from your videos. However, to create a professional video with more options and control, it is a great tool to use.

Key Features To Keep Note of For Wondershare Filmora
- With Filmora, you can select any object or person and change its background. The AI Smart Cutout feature allows you to choose a person to change their background.
- Another fantastic feature is that it gives you access to 10 billion free media files. Moreover, you can select over 200 presets from its in-built for your videos.
- Wondershare Filmora has another unique feature, especially for vloggers and podcasters. With the Auto Ducking feature, music will fade when someone is speaking.
Empower your videos with a new mood using different LUTs. Filmora now offers 100+ top-quality 3D LUTs cover a broad range of scenarios. Transform your videos with Filmora’s powerful 3D LUTs.
Apply LUT on Videos Apply LUT on Videos Learn More

Conclusion
In conclusion, LUTs are essential in modern video and photo editing. They allow editors to apply different color adjustments to color-correct their digital media. There are many pre-made LUTs available online, covering various styles and moods. However, you can create your LUTs with LUT generator-free tools online and offline. You can apply these LUTs using tools like Wondershare Filmora.
How to Create After Effects Gifs
How to Create After Effects Gifs
An easy yet powerful editor
Numerous effects to choose from
Detailed tutorials provided by the official channel
GIFs have been around for quite some time but as the flow of content continues to plummet on popular social media platforms like Facebook or Instagram, the demand for GIFs would continue to increase.
Unfortunately, you won’t be able to make a gif in after effects directly, unless with the help of a plug-in like GIFGun.
Before moving forward, keep in mind that using Adobe Media Encoder is an easier method for compressing your exports rather than any third-party compressor.
In this article, you will find easy to follow methods using which you can create after effects GIFs within a matter of minutes.
In this article
01 [General Knowledge on GIF Animation](#Part 1)
02 [What Is the Difference Between After Effects Gifs’ Making and Photoshop Gifs’ Making?](#Part 2)
03 [How to Create After Effects Gifs](#Part 3)
Part 1 General Knowledge on GIF Animation
01What is a GIF?
The acronym GIF stands for Graphics Interchange Format and the file is created in bitmap image format. This was developed back in 1987 by a working in CompuServe.
This format was incredibly successful on the WEB due to benefits like smaller file sizes, broader support, and its easy compatibility with Operating Systems.
However, GIFs are much more suitable as simple graphics and logos rather than Live Action Videos with its palette limitation of 256 per image.
Creating a GIF is like looping an animation or animated elements. You can use these animated GIFs in banners to engage your audience or even create fun sharable content for your Facebook pages.
You can start by creating basic easy animations in Photoshop and then elevate them by using After Effects.
02Why create a GIF?
Here are a handful of things you can keep your eye on if you are just starting on making GIFs;
● Simple Product Demonstrations. With simple 3 to 4 step GIFs, you can briefly introduce steps on how to use a product.
● You can provide instructions in a short span of time.
● UX designers use GIFs to show the functioning of certain digital experiences.
● You can introduce GIFs on your page to keep followers engaged.
● You can display some amazing things on your website.
Part 2 Difference between making GIFs in After Effects and Photoshop
Creating GIFs in After Effects and Photoshop are both one in the same thing but the results may vary depending on which choice of tools and features suits you better.
Now, for those who are learning Photoshop and After Effects for the first time, to understand the difference in results between both these software lets familiarize you with their features in brief.
01What’s Similar?
Since both are designed by Adobe, there are bound to be similarities in the tools and interface they use. Both these software enables you to use layers of editing from the layer panel where you separate the blending or transform multiple layers. You can apply masks to these layers in different ways on both software.
02Groups (PS) and Nested (AE) Composition
In Photoshop, you can group layers together and apply styles, blends, and transformations together. However, in After Effects, this is called Nesting.
Both are in a way similar to each other but Nesting Comps give users more functionality as it interprets probable compositions during the nesting process.
Smart objects used in PS are also comparable to Nested Comps as you can apply filters over one while applying effects to the other.
03Vector and Shapes
You can use the Pen tool or Shape tool in both PS and AE that creates shape layers without losing any integrity. Both the applications support Bezier which lets you control curves between anchor points in PS and vertices in AE.
04Destructive Effects
After Effects does not provide you with destructive effects while in Photoshop you can apply non-destructive filters. You can also combine several layers to apply changes or distort your images but these permanent changes cannot be made in After Effects.
You will also notice that although there are several similarities, there are tools and features which are not shared between both applications. The types of tool categories would also vary. Like with After Effects, you can create paragraph and character styles that you can apply to texts.
Part 3 How to Create After Effects Gifs
After Effects harbors greater video editing capabilities rather than the basic animating options you can try on Photoshop. In creating a GIF, you would want to leverage the combination of tools offered on both After Effects and Photoshop.
Let’s first get into how you can create an animated video on After Effects and then convert it into an animated GIF in Photoshop.
01Animating in After Effects
Step 1: Open After Effects, go to ‘Composition’ and create ‘New Composition’. You will need to fill out the dimensions and specs for your project on the window that pops up. For example, 300x250 px at 30 fps and 6 sec duration.

Step 2: You can import assets by dragging and dropping, or by going to the ‘Project Panel’ in the After Effects Workspace as shown in the image.

Step 3: Now, you can begin animating your Assets. Drag them and add them to the ‘Composition’ panel or ‘Timeline’ panel. Placing them in either one will make them appear on both. Adjust the layers according to the topmost layer on the panel.

Dial down the scale of every animation to 0% so that can be animated in a growing sequence. Select the layer you wish to adjust and click on ‘Transform’. Click on ‘Scale’ to give that layer an active marker on the timeline. Set the scale to 0%.

You can now begin animating the first item by moving the current time indicator to 06f (the 6th frame on the 30fps timeline). Scale the item back to 100% and the marker will reappear.

Repeat this for the other items. Keep in mind that each item has a 06f space between them for later adjustability.

Your equation is now complete and all that is left to do is animate your CTA button. Adjust the position of the top layer on your CTA and set the current time indicator to start time on the button animation. Click on ‘position’ to set up a marker on your Timeline. Forward the 04f then nudge the button and reverse back to the original position so that it looks like a button clicking animation.

Your animation is now complete. Now go to ‘Composition’ and shorten the time in the ‘Duration’ panel.
Step 4: Go to Composition. Click on Pre-Render and a new selection will pop up. Now click on ‘Render’. Your output will be a .mov file.

If you find exporting gifs from After Effects too complicated, you can also upload and loop videos using Wondershare Filmora Video Editor which has plenty of other amazing video editing features you can drag and drop to create.

Wondershare Filmora - Best Video Editor for Mac/Windows
5,481,435 people have downloaded it.
Build unique custom animations without breaking a sweat.
Focus on creating epic stories and leave the details to Filmora’s auto features.
Start a creative adventure with drag & drop effects and endless possibilities.
Filmora simplifies advanced features to save you time and effort.
Filmora cuts out repetition so you can move on to your next creative breakthrough.
02Converting Animation to GIF in Photoshop
Step 1: Create a new file in Photoshop with the same specs as you did in After Effects. Now go to ‘File’ > ‘Import’ > ‘Frames to Layers’ and import the saved .mov file.

Step 2: If you don’t automatically see the timeline, go to Windows > Timeline.

Step 3: Decide on how many loops you want in your animation. Once you are done with your GIF, go to ‘File’ > Export. Apply the Legacy Save for Web and choose the format for your GIF.

Step 4: In Export options, you can gain access to several presets to apply to your animated GIFs. The more color displayed in your GIF, the larger its size. You can use Dethering to smoothen gradients and shades. Looping is also turned off on Photoshop but you can apply looping from the ‘Options’ shown at the bottom of the menu.
Part 1 Ending Thoughts
● GIFs are a popular type of media that is quite trendy and easy to make using Adobe after effects gifs or Photoshop. They are called Graphics Interchange Format and are best used as simple graphic images.
● You require a combination of both Photoshop and After Effects, though both share similar interfaces, tools, and effects. You can group or nest compositions, apply filters or effects, and adjust vectors and shapes.
● After Effects is better than Photoshop in terms of creating videos, so you can first create a project in AE and then import the project onto PS after exporting after effects to gif. You can also use Filmora for the first step of this process.
GIFs have been around for quite some time but as the flow of content continues to plummet on popular social media platforms like Facebook or Instagram, the demand for GIFs would continue to increase.
Unfortunately, you won’t be able to make a gif in after effects directly, unless with the help of a plug-in like GIFGun.
Before moving forward, keep in mind that using Adobe Media Encoder is an easier method for compressing your exports rather than any third-party compressor.
In this article, you will find easy to follow methods using which you can create after effects GIFs within a matter of minutes.
In this article
01 [General Knowledge on GIF Animation](#Part 1)
02 [What Is the Difference Between After Effects Gifs’ Making and Photoshop Gifs’ Making?](#Part 2)
03 [How to Create After Effects Gifs](#Part 3)
Part 1 General Knowledge on GIF Animation
01What is a GIF?
The acronym GIF stands for Graphics Interchange Format and the file is created in bitmap image format. This was developed back in 1987 by a working in CompuServe.
This format was incredibly successful on the WEB due to benefits like smaller file sizes, broader support, and its easy compatibility with Operating Systems.
However, GIFs are much more suitable as simple graphics and logos rather than Live Action Videos with its palette limitation of 256 per image.
Creating a GIF is like looping an animation or animated elements. You can use these animated GIFs in banners to engage your audience or even create fun sharable content for your Facebook pages.
You can start by creating basic easy animations in Photoshop and then elevate them by using After Effects.
02Why create a GIF?
Here are a handful of things you can keep your eye on if you are just starting on making GIFs;
● Simple Product Demonstrations. With simple 3 to 4 step GIFs, you can briefly introduce steps on how to use a product.
● You can provide instructions in a short span of time.
● UX designers use GIFs to show the functioning of certain digital experiences.
● You can introduce GIFs on your page to keep followers engaged.
● You can display some amazing things on your website.
Part 2 Difference between making GIFs in After Effects and Photoshop
Creating GIFs in After Effects and Photoshop are both one in the same thing but the results may vary depending on which choice of tools and features suits you better.
Now, for those who are learning Photoshop and After Effects for the first time, to understand the difference in results between both these software lets familiarize you with their features in brief.
01What’s Similar?
Since both are designed by Adobe, there are bound to be similarities in the tools and interface they use. Both these software enables you to use layers of editing from the layer panel where you separate the blending or transform multiple layers. You can apply masks to these layers in different ways on both software.
02Groups (PS) and Nested (AE) Composition
In Photoshop, you can group layers together and apply styles, blends, and transformations together. However, in After Effects, this is called Nesting.
Both are in a way similar to each other but Nesting Comps give users more functionality as it interprets probable compositions during the nesting process.
Smart objects used in PS are also comparable to Nested Comps as you can apply filters over one while applying effects to the other.
03Vector and Shapes
You can use the Pen tool or Shape tool in both PS and AE that creates shape layers without losing any integrity. Both the applications support Bezier which lets you control curves between anchor points in PS and vertices in AE.
04Destructive Effects
After Effects does not provide you with destructive effects while in Photoshop you can apply non-destructive filters. You can also combine several layers to apply changes or distort your images but these permanent changes cannot be made in After Effects.
You will also notice that although there are several similarities, there are tools and features which are not shared between both applications. The types of tool categories would also vary. Like with After Effects, you can create paragraph and character styles that you can apply to texts.
Part 3 How to Create After Effects Gifs
After Effects harbors greater video editing capabilities rather than the basic animating options you can try on Photoshop. In creating a GIF, you would want to leverage the combination of tools offered on both After Effects and Photoshop.
Let’s first get into how you can create an animated video on After Effects and then convert it into an animated GIF in Photoshop.
01Animating in After Effects
Step 1: Open After Effects, go to ‘Composition’ and create ‘New Composition’. You will need to fill out the dimensions and specs for your project on the window that pops up. For example, 300x250 px at 30 fps and 6 sec duration.

Step 2: You can import assets by dragging and dropping, or by going to the ‘Project Panel’ in the After Effects Workspace as shown in the image.

Step 3: Now, you can begin animating your Assets. Drag them and add them to the ‘Composition’ panel or ‘Timeline’ panel. Placing them in either one will make them appear on both. Adjust the layers according to the topmost layer on the panel.

Dial down the scale of every animation to 0% so that can be animated in a growing sequence. Select the layer you wish to adjust and click on ‘Transform’. Click on ‘Scale’ to give that layer an active marker on the timeline. Set the scale to 0%.

You can now begin animating the first item by moving the current time indicator to 06f (the 6th frame on the 30fps timeline). Scale the item back to 100% and the marker will reappear.

Repeat this for the other items. Keep in mind that each item has a 06f space between them for later adjustability.

Your equation is now complete and all that is left to do is animate your CTA button. Adjust the position of the top layer on your CTA and set the current time indicator to start time on the button animation. Click on ‘position’ to set up a marker on your Timeline. Forward the 04f then nudge the button and reverse back to the original position so that it looks like a button clicking animation.

Your animation is now complete. Now go to ‘Composition’ and shorten the time in the ‘Duration’ panel.
Step 4: Go to Composition. Click on Pre-Render and a new selection will pop up. Now click on ‘Render’. Your output will be a .mov file.

If you find exporting gifs from After Effects too complicated, you can also upload and loop videos using Wondershare Filmora Video Editor which has plenty of other amazing video editing features you can drag and drop to create.

Wondershare Filmora - Best Video Editor for Mac/Windows
5,481,435 people have downloaded it.
Build unique custom animations without breaking a sweat.
Focus on creating epic stories and leave the details to Filmora’s auto features.
Start a creative adventure with drag & drop effects and endless possibilities.
Filmora simplifies advanced features to save you time and effort.
Filmora cuts out repetition so you can move on to your next creative breakthrough.
02Converting Animation to GIF in Photoshop
Step 1: Create a new file in Photoshop with the same specs as you did in After Effects. Now go to ‘File’ > ‘Import’ > ‘Frames to Layers’ and import the saved .mov file.

Step 2: If you don’t automatically see the timeline, go to Windows > Timeline.

Step 3: Decide on how many loops you want in your animation. Once you are done with your GIF, go to ‘File’ > Export. Apply the Legacy Save for Web and choose the format for your GIF.

Step 4: In Export options, you can gain access to several presets to apply to your animated GIFs. The more color displayed in your GIF, the larger its size. You can use Dethering to smoothen gradients and shades. Looping is also turned off on Photoshop but you can apply looping from the ‘Options’ shown at the bottom of the menu.
Part 1 Ending Thoughts
● GIFs are a popular type of media that is quite trendy and easy to make using Adobe after effects gifs or Photoshop. They are called Graphics Interchange Format and are best used as simple graphic images.
● You require a combination of both Photoshop and After Effects, though both share similar interfaces, tools, and effects. You can group or nest compositions, apply filters or effects, and adjust vectors and shapes.
● After Effects is better than Photoshop in terms of creating videos, so you can first create a project in AE and then import the project onto PS after exporting after effects to gif. You can also use Filmora for the first step of this process.
GIFs have been around for quite some time but as the flow of content continues to plummet on popular social media platforms like Facebook or Instagram, the demand for GIFs would continue to increase.
Unfortunately, you won’t be able to make a gif in after effects directly, unless with the help of a plug-in like GIFGun.
Before moving forward, keep in mind that using Adobe Media Encoder is an easier method for compressing your exports rather than any third-party compressor.
In this article, you will find easy to follow methods using which you can create after effects GIFs within a matter of minutes.
In this article
01 [General Knowledge on GIF Animation](#Part 1)
02 [What Is the Difference Between After Effects Gifs’ Making and Photoshop Gifs’ Making?](#Part 2)
03 [How to Create After Effects Gifs](#Part 3)
Part 1 General Knowledge on GIF Animation
01What is a GIF?
The acronym GIF stands for Graphics Interchange Format and the file is created in bitmap image format. This was developed back in 1987 by a working in CompuServe.
This format was incredibly successful on the WEB due to benefits like smaller file sizes, broader support, and its easy compatibility with Operating Systems.
However, GIFs are much more suitable as simple graphics and logos rather than Live Action Videos with its palette limitation of 256 per image.
Creating a GIF is like looping an animation or animated elements. You can use these animated GIFs in banners to engage your audience or even create fun sharable content for your Facebook pages.
You can start by creating basic easy animations in Photoshop and then elevate them by using After Effects.
02Why create a GIF?
Here are a handful of things you can keep your eye on if you are just starting on making GIFs;
● Simple Product Demonstrations. With simple 3 to 4 step GIFs, you can briefly introduce steps on how to use a product.
● You can provide instructions in a short span of time.
● UX designers use GIFs to show the functioning of certain digital experiences.
● You can introduce GIFs on your page to keep followers engaged.
● You can display some amazing things on your website.
Part 2 Difference between making GIFs in After Effects and Photoshop
Creating GIFs in After Effects and Photoshop are both one in the same thing but the results may vary depending on which choice of tools and features suits you better.
Now, for those who are learning Photoshop and After Effects for the first time, to understand the difference in results between both these software lets familiarize you with their features in brief.
01What’s Similar?
Since both are designed by Adobe, there are bound to be similarities in the tools and interface they use. Both these software enables you to use layers of editing from the layer panel where you separate the blending or transform multiple layers. You can apply masks to these layers in different ways on both software.
02Groups (PS) and Nested (AE) Composition
In Photoshop, you can group layers together and apply styles, blends, and transformations together. However, in After Effects, this is called Nesting.
Both are in a way similar to each other but Nesting Comps give users more functionality as it interprets probable compositions during the nesting process.
Smart objects used in PS are also comparable to Nested Comps as you can apply filters over one while applying effects to the other.
03Vector and Shapes
You can use the Pen tool or Shape tool in both PS and AE that creates shape layers without losing any integrity. Both the applications support Bezier which lets you control curves between anchor points in PS and vertices in AE.
04Destructive Effects
After Effects does not provide you with destructive effects while in Photoshop you can apply non-destructive filters. You can also combine several layers to apply changes or distort your images but these permanent changes cannot be made in After Effects.
You will also notice that although there are several similarities, there are tools and features which are not shared between both applications. The types of tool categories would also vary. Like with After Effects, you can create paragraph and character styles that you can apply to texts.
Part 3 How to Create After Effects Gifs
After Effects harbors greater video editing capabilities rather than the basic animating options you can try on Photoshop. In creating a GIF, you would want to leverage the combination of tools offered on both After Effects and Photoshop.
Let’s first get into how you can create an animated video on After Effects and then convert it into an animated GIF in Photoshop.
01Animating in After Effects
Step 1: Open After Effects, go to ‘Composition’ and create ‘New Composition’. You will need to fill out the dimensions and specs for your project on the window that pops up. For example, 300x250 px at 30 fps and 6 sec duration.

Step 2: You can import assets by dragging and dropping, or by going to the ‘Project Panel’ in the After Effects Workspace as shown in the image.

Step 3: Now, you can begin animating your Assets. Drag them and add them to the ‘Composition’ panel or ‘Timeline’ panel. Placing them in either one will make them appear on both. Adjust the layers according to the topmost layer on the panel.

Dial down the scale of every animation to 0% so that can be animated in a growing sequence. Select the layer you wish to adjust and click on ‘Transform’. Click on ‘Scale’ to give that layer an active marker on the timeline. Set the scale to 0%.

You can now begin animating the first item by moving the current time indicator to 06f (the 6th frame on the 30fps timeline). Scale the item back to 100% and the marker will reappear.

Repeat this for the other items. Keep in mind that each item has a 06f space between them for later adjustability.

Your equation is now complete and all that is left to do is animate your CTA button. Adjust the position of the top layer on your CTA and set the current time indicator to start time on the button animation. Click on ‘position’ to set up a marker on your Timeline. Forward the 04f then nudge the button and reverse back to the original position so that it looks like a button clicking animation.

Your animation is now complete. Now go to ‘Composition’ and shorten the time in the ‘Duration’ panel.
Step 4: Go to Composition. Click on Pre-Render and a new selection will pop up. Now click on ‘Render’. Your output will be a .mov file.

If you find exporting gifs from After Effects too complicated, you can also upload and loop videos using Wondershare Filmora Video Editor which has plenty of other amazing video editing features you can drag and drop to create.

Wondershare Filmora - Best Video Editor for Mac/Windows
5,481,435 people have downloaded it.
Build unique custom animations without breaking a sweat.
Focus on creating epic stories and leave the details to Filmora’s auto features.
Start a creative adventure with drag & drop effects and endless possibilities.
Filmora simplifies advanced features to save you time and effort.
Filmora cuts out repetition so you can move on to your next creative breakthrough.
02Converting Animation to GIF in Photoshop
Step 1: Create a new file in Photoshop with the same specs as you did in After Effects. Now go to ‘File’ > ‘Import’ > ‘Frames to Layers’ and import the saved .mov file.

Step 2: If you don’t automatically see the timeline, go to Windows > Timeline.

Step 3: Decide on how many loops you want in your animation. Once you are done with your GIF, go to ‘File’ > Export. Apply the Legacy Save for Web and choose the format for your GIF.

Step 4: In Export options, you can gain access to several presets to apply to your animated GIFs. The more color displayed in your GIF, the larger its size. You can use Dethering to smoothen gradients and shades. Looping is also turned off on Photoshop but you can apply looping from the ‘Options’ shown at the bottom of the menu.
Part 1 Ending Thoughts
● GIFs are a popular type of media that is quite trendy and easy to make using Adobe after effects gifs or Photoshop. They are called Graphics Interchange Format and are best used as simple graphic images.
● You require a combination of both Photoshop and After Effects, though both share similar interfaces, tools, and effects. You can group or nest compositions, apply filters or effects, and adjust vectors and shapes.
● After Effects is better than Photoshop in terms of creating videos, so you can first create a project in AE and then import the project onto PS after exporting after effects to gif. You can also use Filmora for the first step of this process.
GIFs have been around for quite some time but as the flow of content continues to plummet on popular social media platforms like Facebook or Instagram, the demand for GIFs would continue to increase.
Unfortunately, you won’t be able to make a gif in after effects directly, unless with the help of a plug-in like GIFGun.
Before moving forward, keep in mind that using Adobe Media Encoder is an easier method for compressing your exports rather than any third-party compressor.
In this article, you will find easy to follow methods using which you can create after effects GIFs within a matter of minutes.
In this article
01 [General Knowledge on GIF Animation](#Part 1)
02 [What Is the Difference Between After Effects Gifs’ Making and Photoshop Gifs’ Making?](#Part 2)
03 [How to Create After Effects Gifs](#Part 3)
Part 1 General Knowledge on GIF Animation
01What is a GIF?
The acronym GIF stands for Graphics Interchange Format and the file is created in bitmap image format. This was developed back in 1987 by a working in CompuServe.
This format was incredibly successful on the WEB due to benefits like smaller file sizes, broader support, and its easy compatibility with Operating Systems.
However, GIFs are much more suitable as simple graphics and logos rather than Live Action Videos with its palette limitation of 256 per image.
Creating a GIF is like looping an animation or animated elements. You can use these animated GIFs in banners to engage your audience or even create fun sharable content for your Facebook pages.
You can start by creating basic easy animations in Photoshop and then elevate them by using After Effects.
02Why create a GIF?
Here are a handful of things you can keep your eye on if you are just starting on making GIFs;
● Simple Product Demonstrations. With simple 3 to 4 step GIFs, you can briefly introduce steps on how to use a product.
● You can provide instructions in a short span of time.
● UX designers use GIFs to show the functioning of certain digital experiences.
● You can introduce GIFs on your page to keep followers engaged.
● You can display some amazing things on your website.
Part 2 Difference between making GIFs in After Effects and Photoshop
Creating GIFs in After Effects and Photoshop are both one in the same thing but the results may vary depending on which choice of tools and features suits you better.
Now, for those who are learning Photoshop and After Effects for the first time, to understand the difference in results between both these software lets familiarize you with their features in brief.
01What’s Similar?
Since both are designed by Adobe, there are bound to be similarities in the tools and interface they use. Both these software enables you to use layers of editing from the layer panel where you separate the blending or transform multiple layers. You can apply masks to these layers in different ways on both software.
02Groups (PS) and Nested (AE) Composition
In Photoshop, you can group layers together and apply styles, blends, and transformations together. However, in After Effects, this is called Nesting.
Both are in a way similar to each other but Nesting Comps give users more functionality as it interprets probable compositions during the nesting process.
Smart objects used in PS are also comparable to Nested Comps as you can apply filters over one while applying effects to the other.
03Vector and Shapes
You can use the Pen tool or Shape tool in both PS and AE that creates shape layers without losing any integrity. Both the applications support Bezier which lets you control curves between anchor points in PS and vertices in AE.
04Destructive Effects
After Effects does not provide you with destructive effects while in Photoshop you can apply non-destructive filters. You can also combine several layers to apply changes or distort your images but these permanent changes cannot be made in After Effects.
You will also notice that although there are several similarities, there are tools and features which are not shared between both applications. The types of tool categories would also vary. Like with After Effects, you can create paragraph and character styles that you can apply to texts.
Part 3 How to Create After Effects Gifs
After Effects harbors greater video editing capabilities rather than the basic animating options you can try on Photoshop. In creating a GIF, you would want to leverage the combination of tools offered on both After Effects and Photoshop.
Let’s first get into how you can create an animated video on After Effects and then convert it into an animated GIF in Photoshop.
01Animating in After Effects
Step 1: Open After Effects, go to ‘Composition’ and create ‘New Composition’. You will need to fill out the dimensions and specs for your project on the window that pops up. For example, 300x250 px at 30 fps and 6 sec duration.

Step 2: You can import assets by dragging and dropping, or by going to the ‘Project Panel’ in the After Effects Workspace as shown in the image.

Step 3: Now, you can begin animating your Assets. Drag them and add them to the ‘Composition’ panel or ‘Timeline’ panel. Placing them in either one will make them appear on both. Adjust the layers according to the topmost layer on the panel.

Dial down the scale of every animation to 0% so that can be animated in a growing sequence. Select the layer you wish to adjust and click on ‘Transform’. Click on ‘Scale’ to give that layer an active marker on the timeline. Set the scale to 0%.

You can now begin animating the first item by moving the current time indicator to 06f (the 6th frame on the 30fps timeline). Scale the item back to 100% and the marker will reappear.

Repeat this for the other items. Keep in mind that each item has a 06f space between them for later adjustability.

Your equation is now complete and all that is left to do is animate your CTA button. Adjust the position of the top layer on your CTA and set the current time indicator to start time on the button animation. Click on ‘position’ to set up a marker on your Timeline. Forward the 04f then nudge the button and reverse back to the original position so that it looks like a button clicking animation.

Your animation is now complete. Now go to ‘Composition’ and shorten the time in the ‘Duration’ panel.
Step 4: Go to Composition. Click on Pre-Render and a new selection will pop up. Now click on ‘Render’. Your output will be a .mov file.

If you find exporting gifs from After Effects too complicated, you can also upload and loop videos using Wondershare Filmora Video Editor which has plenty of other amazing video editing features you can drag and drop to create.

Wondershare Filmora - Best Video Editor for Mac/Windows
5,481,435 people have downloaded it.
Build unique custom animations without breaking a sweat.
Focus on creating epic stories and leave the details to Filmora’s auto features.
Start a creative adventure with drag & drop effects and endless possibilities.
Filmora simplifies advanced features to save you time and effort.
Filmora cuts out repetition so you can move on to your next creative breakthrough.
02Converting Animation to GIF in Photoshop
Step 1: Create a new file in Photoshop with the same specs as you did in After Effects. Now go to ‘File’ > ‘Import’ > ‘Frames to Layers’ and import the saved .mov file.

Step 2: If you don’t automatically see the timeline, go to Windows > Timeline.

Step 3: Decide on how many loops you want in your animation. Once you are done with your GIF, go to ‘File’ > Export. Apply the Legacy Save for Web and choose the format for your GIF.

Step 4: In Export options, you can gain access to several presets to apply to your animated GIFs. The more color displayed in your GIF, the larger its size. You can use Dethering to smoothen gradients and shades. Looping is also turned off on Photoshop but you can apply looping from the ‘Options’ shown at the bottom of the menu.
Part 1 Ending Thoughts
● GIFs are a popular type of media that is quite trendy and easy to make using Adobe after effects gifs or Photoshop. They are called Graphics Interchange Format and are best used as simple graphic images.
● You require a combination of both Photoshop and After Effects, though both share similar interfaces, tools, and effects. You can group or nest compositions, apply filters or effects, and adjust vectors and shapes.
● After Effects is better than Photoshop in terms of creating videos, so you can first create a project in AE and then import the project onto PS after exporting after effects to gif. You can also use Filmora for the first step of this process.
Do You Want a LUT that You Can Use for Your High-Definition Content? You Can Use Rec 709 LUT Premiere Pro for Your HD Digital Media to Give the Perfect Result
Different styles of LUTs exist because each style serves a specific purpose in color correction and grading. LUTs are designed to replicate various cinematic styles and to change lighting conditions. By using different styles of LUTs, you can effortlessly achieve the desired color grading for your media. There are many types of LUTs to download, each with unique color composition.
However, Rec 709 LUT is a type of LUT commonly used in video editing software like Premiere Pro. Additionally, this LUT ensures that your video appears accurate and consistent on various HD screens. Moreover, it helps maintain the right balance of colors, contrast, and brightness. Furthermore, Rec 709 LUT Premiere Pro is suitable for broadcast, web streaming, or other HD content platforms.
Part 1: What are the Benefits of Using Premiere Pro Rec 709 LUTs in Video Editing?
Do you know the advantages of using Rec 709 Premiere Pro LUTs? Using Rec 709 LUTs in video editing with software like Adobe Premiere Pro can offer several benefits:
Color Accuracy
Rec 709 is the color space standard used for broadcast and video production. Furthermore, applying Rec 709 LUTs ensures accurate color representation of your media. Additionally, it maintains consistency and accuracy across different devices and platforms. It helps to achieve a standardized color look that conforms to industry standards.
Efficient Color Correction
Rec 709 LUTs streamline your color correction process. They provide a starting point for adjusting your videos’ color balance, contrast, and saturation. Moreover, if you apply this LUT at the start of your project, you can bring your video within the acceptable color range. Eventually, it will save you time and effort in the editing process.
Previewing Final Look
When you apply these LUTs, you can preview how your footage will look after color grading. Similarly, it helps you visualize your content to make changes for further adjustments. In addition, it also allows you to assess the tone and mood of the video in real-time.
Consistency and Compatibility
Such LUTs promote consistency across different cameras, lighting conditions, and sources. When working with multiple sources, you can apply this LUT for a consistent look. Furthermore, these LUTs also ensure compatibility with various display devices and platforms. It makes this tool compatible with different platforms and software.
Creative Control
Furthermore, these LUTs also serve as a starting point for further creative grading. You can layer additional adjustments on top of the LUT. In this way, you can achieve a specific artistic style to create a unique look for your project. Additionally, Rec 709 LUT creates a foundation for you to color-grade your content creatively.
Speeding Up Workflow
By using Rec 709 LUTs as a starting point, you can speed up your editing workflow. Using these LUTs, you don’t need to adjust each clip individually manually. In addition, you can apply a LUT to multiple clips simultaneously to color-correct your media files. Moreover, it saves you time when working on larger video projects.
Empower your videos with a new mood using different LUTs. Filmora now offers 100+ top-quality 3D LUTs cover a broad range of scenarios. Transform your videos with Filmora’s powerful 3D LUTs.
Apply LUT on Videos Apply LUT on Videos Learn More

Part 2: How to Use LUTs in Premiere Pro: A Guide
You can apply your Rec 709 LUT for Premiere Pro without needing any prior experience. All you have to do is to follow these simple steps to apply your favorite LUT.
Step 1: To apply a LUT using Adobe Premiere Pro, import your video by clicking the “File” button and selecting the “Import” option. You can also click on “Import media to start” in the Project Tab. Once your file is imported, drag the clip onto the timeline and move into the “Color” workspace.

Step 2: In continuation, click the “Adjustment Layer” button in the Project tab. Select your adjustment layer and drop it on top of your video clip in the timeline. Click on the layer and go to the “Video Effects” in the Effects option in the Project window. Then, navigate to “Color Correction” and select “Lumetri Color.”

Step 3: In the new window that appears, find the “Input LUT” option under the Basic Correction tab. Browse the LUT you want to apply to your video. Additionally, you can explore more creative LUTs by going to the “Creative” tab in the Lumetri Color window. In the “Look” section, browse for different creative LUTs for your video. You can adjust the intensity of the selected LUT using the slider.

Part 3: The Top Notch Premiere Pro LUTs Rec 709
There are many Premiere Pro Rec 709 LUTs available that you can download and purchase. In the list below are some of the best Rec 709 LUTs you can use.
1. LOOK Creative LUT Pack
The LOOK Creative LUT Pack is a collection of 10 creative LUTs. It includes a range of LUTs, including some popular ones like teal and orange and old noir. These LUTs provide a quick and easy way to add a specific color tone or mood to your footage. In addition to the basic LUTs, it also offers unique and creative options. For example, you’ll find LUTs like Subtle Sci-Fi, Grunge Green, and others.

2. Cinematic LUTs V2
Cinematic LUTs V2 is a pack of modern cinematic-style LUTs. This incredible LUTs pack is designed to give your videos a cinematic touch. With this pack, you get access to 10 different cinematic LUTs to color grade your videos. Furthermore, you can use these LUTs for your LOG footage as well. Additionally, with these LUTs, you can add richness and depth to your videos.
3. NATURAL Rec709
The NATURAL Rec709 LUT pack offers 17 different styles of LUTs. It includes ones inspired by Tobacco, Crunchy Gold, and Black & White filters. These LUTs can enhance the colors and tones in your videos, providing a natural look. Furthermore, you can customize the intensity of the LUTs. Moreover, each LUT in this pack offers a unique color scheme for your videos.
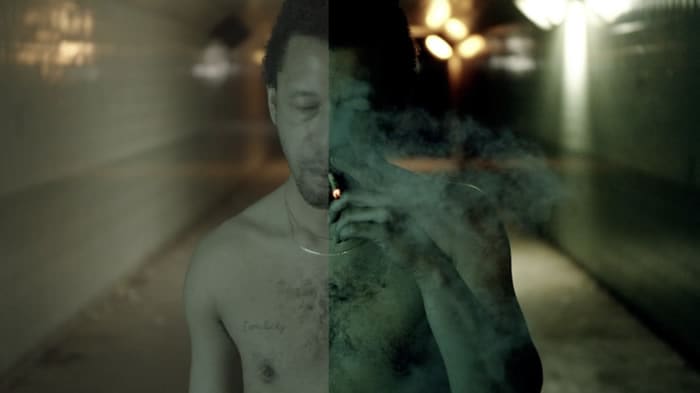
4. 35 Free LUTs for Color Grading Videos
It is an amazing LUT pack that offers you a variety of 35 different styles of LUTs. With these LUTs, you can achieve a vintage look or a cinematic vibe for your videos. These LUTs can work perfectly with Rec 709 footage with accurate and vibrant colors. Furthermore, this pack is compatible with different software, including Premiere Pro.

5. S-Log 3 to Rec.709 LUT
The S-Log3 to Rec.709 LUT pack is designed to enhance your footage by adding vibrance. Applying this LUT boosts saturation, giving your video a more natural and realistic look. Additionally, you can bring out the full potential of your videos captured in S-Log3 gamma. Moreover, this LUT amplifies the colors and is compatible with the Rec.709 color space.

6. DJI OSMO POCKET Creative LUTs Pack
The DJI Osmo Pocket Creative LUTs Pack offers a collection of various creative LUTs. You can choose from different styles and color overlays for your media files. Moreover, you can use this LUT pack for both pictures and videos. In addition to this, it is also compatible with popular editing software. Furthermore, this tool pack supports both .3dl and .cube formats.
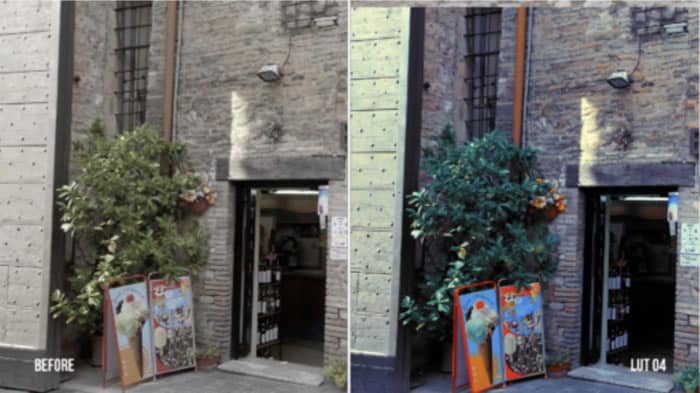
7. Blockbuster HLG And Standard LUTs
Another amazing pack of LUTs that you can use is Blockbuster HLG and Standard LUTs. This pack includes 21 Rec 709 LUTs with unique color toning and style. Furthermore, applying these LUTs will make your color grading more professional. Additionally, you can get rich and deep tones for your digital medial files. Similarly, you can change the feel of your content in a more professional style.
Conclusion
In conclusion, LUTs are perfect tools to enhance your media by altering its colors and tones. Different styles of LUTs cater to various creative needs. Furthermore, LUTs allow you to achieve specific looks and moods for your digital content. Moreover, the Rec 709 LUT Premiere Pro ensures your video appears accurate and consistent on HD displays. Additionally, you can achieve professional-grade results as well.
To add more LUTs on video, you can try Wondershare Filmora !
Add LUTs on Video For Win 7 or later(64-bit)
Add LUTs on Video For macOS 10.14 or later
Apply LUT on Videos Apply LUT on Videos Learn More

Part 2: How to Use LUTs in Premiere Pro: A Guide
You can apply your Rec 709 LUT for Premiere Pro without needing any prior experience. All you have to do is to follow these simple steps to apply your favorite LUT.
Step 1: To apply a LUT using Adobe Premiere Pro, import your video by clicking the “File” button and selecting the “Import” option. You can also click on “Import media to start” in the Project Tab. Once your file is imported, drag the clip onto the timeline and move into the “Color” workspace.

Step 2: In continuation, click the “Adjustment Layer” button in the Project tab. Select your adjustment layer and drop it on top of your video clip in the timeline. Click on the layer and go to the “Video Effects” in the Effects option in the Project window. Then, navigate to “Color Correction” and select “Lumetri Color.”

Step 3: In the new window that appears, find the “Input LUT” option under the Basic Correction tab. Browse the LUT you want to apply to your video. Additionally, you can explore more creative LUTs by going to the “Creative” tab in the Lumetri Color window. In the “Look” section, browse for different creative LUTs for your video. You can adjust the intensity of the selected LUT using the slider.

Part 3: The Top Notch Premiere Pro LUTs Rec 709
There are many Premiere Pro Rec 709 LUTs available that you can download and purchase. In the list below are some of the best Rec 709 LUTs you can use.
1. LOOK Creative LUT Pack
The LOOK Creative LUT Pack is a collection of 10 creative LUTs. It includes a range of LUTs, including some popular ones like teal and orange and old noir. These LUTs provide a quick and easy way to add a specific color tone or mood to your footage. In addition to the basic LUTs, it also offers unique and creative options. For example, you’ll find LUTs like Subtle Sci-Fi, Grunge Green, and others.

2. Cinematic LUTs V2
Cinematic LUTs V2 is a pack of modern cinematic-style LUTs. This incredible LUTs pack is designed to give your videos a cinematic touch. With this pack, you get access to 10 different cinematic LUTs to color grade your videos. Furthermore, you can use these LUTs for your LOG footage as well. Additionally, with these LUTs, you can add richness and depth to your videos.

3. NATURAL Rec709
The NATURAL Rec709 LUT pack offers 17 different styles of LUTs. It includes ones inspired by Tobacco, Crunchy Gold, and Black & White filters. These LUTs can enhance the colors and tones in your videos, providing a natural look. Furthermore, you can customize the intensity of the LUTs. Moreover, each LUT in this pack offers a unique color scheme for your videos.

4. 35 Free LUTs for Color Grading Videos
It is an amazing LUT pack that offers you a variety of 35 different styles of LUTs. With these LUTs, you can achieve a vintage look or a cinematic vibe for your videos. These LUTs can work perfectly with Rec 709 footage with accurate and vibrant colors. Furthermore, this pack is compatible with different software, including Premiere Pro.

5. S-Log 3 to Rec.709 LUT
The S-Log3 to Rec.709 LUT pack is designed to enhance your footage by adding vibrance. Applying this LUT boosts saturation, giving your video a more natural and realistic look. Additionally, you can bring out the full potential of your videos captured in S-Log3 gamma. Moreover, this LUT amplifies the colors and is compatible with the Rec.709 color space.

6. DJI OSMO POCKET Creative LUTs Pack
The DJI Osmo Pocket Creative LUTs Pack offers a collection of various creative LUTs. You can choose from different styles and color overlays for your media files. Moreover, you can use this LUT pack for both pictures and videos. In addition to this, it is also compatible with popular editing software. Furthermore, this tool pack supports both .3dl and .cube formats.

7. Blockbuster HLG And Standard LUTs
Another amazing pack of LUTs that you can use is Blockbuster HLG and Standard LUTs. This pack includes 21 Rec 709 LUTs with unique color toning and style. Furthermore, applying these LUTs will make your color grading more professional. Additionally, you can get rich and deep tones for your digital medial files. Similarly, you can change the feel of your content in a more professional style.

Conclusion
In conclusion, LUTs are perfect tools to enhance your media by altering its colors and tones. Different styles of LUTs cater to various creative needs. Furthermore, LUTs allow you to achieve specific looks and moods for your digital content. Moreover, the Rec 709 LUT Premiere Pro ensures your video appears accurate and consistent on HD displays. Additionally, you can achieve professional-grade results as well.
To add more LUTs on video, you can try Wondershare Filmora !
Add LUTs on Video For Win 7 or later(64-bit)
Add LUTs on Video For macOS 10.14 or later
Also read:
- Updated Blender - A Video Editor for Every Professional
- 2024 Approved 3 Ways to Make Time-Lapse Video on MacBook
- New How to Remove or Mute Audio in Video with Android Phones?
- In 2024, Hitfilm Express Video Editor Review
- Updated How to Create Vintage Film Effect 1950S
- New In 2024, How to Use Lumetri Color in Adobe After Effects
- New How to Add Text to Video
- New How to Speed Up Video with Canva Online Tool?
- Updated Are You Tired of Spending Too Much Time on Video Editing? Learn the Most Effective Ways to Manage Your Timeline and Streamline Your Video Editing Process
- Zoom In and Out on Discord (Desktop + App + Browser Solutions)
- New 2024 Approved OBS Green Screen Guide
- 2024 Approved How to Got Free After Effects Templates Slideshow with Simple Trick
- New How D AI Video Games Act More Human Than Human?
- Updated 2024 Approved Do You Want to Edit a TikTok After Posting? This Article Will Provide Multiple Methods Through Which You Can Do It in No Time
- Updated 2024 Approved You Can Learn How to Color Grade Your Picture in Lightroom Effectively. By Understanding the Process of Color Grading in Lightroom, You Can Create Unique Works, and Improve Your Abilities
- Boost Your Spirit Creating Motivational Status Videos for 2024
- Updated In 2024, How to Make Vintage Film Effect 1980S
- Some Effective Slow Motion Video Editors You Can Try for 2024
- In 2024, Detailed Guide to the Best Convertors for Turning GIF Into PDF Files. Know Their Features, Pros, Cons, and More
- How to Unlock T-Mobile Apple iPhone 8 online without SIM Card?
- In 2024, What is the best Pokemon for pokemon pvp ranking On Samsung Galaxy A14 5G? | Dr.fone
- How to Fake GPS on Android without Mock Location For your Motorola Moto G34 5G | Dr.fone
- In 2024, A Perfect Guide To Remove or Disable Google Smart Lock On Realme 12 Pro 5G
- How to Unlock Samsung Galaxy A23 5G Bootloader Easily
- Effective Ways To Fix Checkra1n Error 31 On Apple iPhone 7 Plus
- Life360 Circle Everything You Need to Know On Nubia Red Magic 9 Pro | Dr.fone
- How to Fake GPS on Android without Mock Location For your Vivo Y77t | Dr.fone
- How to Transfer Photos From Infinix Note 30 Pro to Samsung Galaxy S21 Ultra | Dr.fone
- Top 15 Apps To Hack WiFi Password On Poco
- In 2024, 3 Effective Methods to Fake GPS location on Android For your Nubia Red Magic 9 Pro | Dr.fone
- Bypass iCloud Activation Lock with IMEI Code From iPhone X
- Why is iPogo not working On Tecno Pop 7 Pro? Fixed | Dr.fone
- Updated 2024 Approved What Is an AI Video Editor?
- How to Mirror Apple iPhone 11 Pro to PC via USB? | Dr.fone
- Title: Best 8 Srt File Creators for 2024
- Author: Morgan
- Created at : 2024-05-19 05:12:11
- Updated at : 2024-05-20 05:12:11
- Link: https://ai-video-editing.techidaily.com/best-8-srt-file-creators-for-2024/
- License: This work is licensed under CC BY-NC-SA 4.0.


