:max_bytes(150000):strip_icc():format(webp)/GettyImages-1302402871-ea3debd2e3c64ec5a78a99e580b6a8d1.jpg)
Check Out All Details About Kinemaster Here and Understand How to Add Effects in Kinemaster. You Can Use the Chroma Key for the Green Screen as Well

Check Out All Details About Kinemaster Here and Understand How to Add Effects in Kinemaster. You Can Use the Chroma Key for the Green Screen as Well
These days the usage of video editors and related software is getting increased quickly. Kinemaster appears as one of the popular and highly used video editors. It can be used for several purposes, such as – adding effects to videos, trimming, etc. Many individuals are considering its option for making different types of edits to the videos and achieving desired objectives with ease. Some people love to consider Kinemaster but they don’t know how to add effects in kinemaster. These types of individuals are regularly looking for the perfect guides and sources that can help them in getting some guidance and make things easier.
If you are also looking for such guidance and instructions, you should be focused on the upcoming details. In the upcoming paragraphs, we will discuss some crucial aspects of the Kinemaster and its procedure to add effects in a video.
In this article
01 [Effects In KineMaster You Should Know](#Part 1)
02 [How To Add Effects On Kinemaster?](#Part 2)
03 [FAQs Of KineMaster Effects](#Part 3)
Part 1 Effects In KineMaster You Should Know
KineMaster is serving video editing services in two different ways; free and paid. You can find out multiple differences in both versions. There are some advanced features that can be unlocked by using a paid version only. By using the free version, you can get your basic done without any kind of issue. If you choose the option of the free version of Kinemaster, you will be limited to two effects only, such as –
● Mosaic
● Gaussian Blur
In case you are interested in applying some blur effects to the video clips or layers, you can pick the option of the Gaussian Blur effect. If you are interested in applying blur effects with some pixelated appearance, you should consider the Mosaic effect. Many people are looking for more than these two effects, you need to consider the paid versions.
When it comes to getting paid version of Kinemaster, you can get its subscriptions by choosing a monthly or annual subscription. Once you get paid version of Kinemaster, you can get several effects unlocked. Here, we are listing some major ones.
● Mirror
● Ripple
● Cartoon
● Interference
● Mirror warp
● Pop out
● Anaglyph slide
● Split spectrum
● Auto HDR
● Poster perfect
● Rolling ball
● Rayburst
● Bulge / Pinch
● Bulge / Pinch
● Wave warp
● Radial blur
● Kaleidoscope
● Digital crash
● Prismatic
● Focus blur 2.0
● Sketch 2.0
● Swirl 2.0
● Neon outline
● Thermogram
● Square halftone
All with these, there are several other effects available on the Kinemaster that can make your video impressive. With a paid version, you can easily explore and present your creativity. Along with it, everyone also does not know how to add effects on kinemaster in a few minutes only. If you also want to figure it out, you should keep reading the article. In upcoming paragraphs, we are discussing a step-by-step procedure.
Part 2 How To Add Effects On Kinemaster?
Step-By-Step Procedure
Step1 Access KineMaster
Firstly, you should be focused on accessing KineMaster. Here, you can start importing videos or images with ease. You can also use your images as clips for an impressive outcome.
Step2 Import Images

For importing images, you should follow a small procedure. Here, firstly, you should click on MEDIA BUTTON to YOUR FOLDER to GO FOR IMAGES. Now, you should be focused on choosing images by marking them with check symbols. Afterward you can finalize the action and import all images.
Step3 Access Effects Menu

Now, it’s time to focus on adding effects to clips for an impressive video. For such a thing, you should proceed by focusing on the LAYER button on the interface. By clicking the LAYER button, you can access a specific menu with multiple options. One of these options is the EFFECT button. When you click on this particular button, it will take you to the effect menus. In case you have the paid version you can go with the GET MORE option in the EFFECT menu. It will be useful in getting more effective options. You can also download the effects to keep using them regularly.
Step4 Apply Effects

As per your application capability and subscriptions, you can see the availability of effects. You should choose the desired effect by clicking on it. Here, the most interesting thing is that when you apply any effect, it will not overlap the existing layer or anything like that but it will create a new layer. With it, you can use animations for both in and out purposes.
By following this small procedure, you can easily make things easier and add effects in a video by using KineMaster. In case you have any doubt regarding the procedure, you can be focused on guides and tutorials.
Part 3 FAQs Of KineMaster Effects
Are Effects In KineMaster Free?
KineMaster is providing video editing services in paid and free versions. While accessing services in both versions, you can see a big difference. In the paid version of KineMaster, you will get several effects that can make your video clip amazing. If we talk about the free version, you will get only 2 effects. These effects are – Mosaic and Gaussian Blur. In case you want more than these effects, you need to get paid subscription to KineMaster.
KineMaster Effects Alternative On PC
Some individuals are not satisfied with the services of KineMaster because of several reasons, such as – paid service options. If you are one of these individuals, you can consider the option of Filmora. It is a free video editor that will allow you to edit and modify a video in several possible ways. Filmora also has a big library that allows getting multiple effects and built-in video editing elements.
Is It Worth Paying For Extra Effects In KineMaster?
As we discussed earlier, with KineMaster you will get only two effects for free. For more, you need to spend money. In case you want several effects without spending any money, you can go with Filmora. It has a big built-in library to facilitate the users.
Can I Add Effects If I’m Working With Chroma Key?
Yes, the KineMaster users can easily apply Chrom Key while using video effects. It’s all about layering. By focusing on how to add chroma key in kinemaster guide, you can understand how it can be possible for creating an impressive video.
Final Words
By paying attention to all these things, you can understand everything about the KineMaster and its usability. You can also check out an alternative that can help you avoid the option of spending some money. It depends on you that what your requirements are and how want to get them fulfilled.
02 [How To Add Effects On Kinemaster?](#Part 2)
03 [FAQs Of KineMaster Effects](#Part 3)
Part 1 Effects In KineMaster You Should Know
KineMaster is serving video editing services in two different ways; free and paid. You can find out multiple differences in both versions. There are some advanced features that can be unlocked by using a paid version only. By using the free version, you can get your basic done without any kind of issue. If you choose the option of the free version of Kinemaster, you will be limited to two effects only, such as –
● Mosaic
● Gaussian Blur
In case you are interested in applying some blur effects to the video clips or layers, you can pick the option of the Gaussian Blur effect. If you are interested in applying blur effects with some pixelated appearance, you should consider the Mosaic effect. Many people are looking for more than these two effects, you need to consider the paid versions.
When it comes to getting paid version of Kinemaster, you can get its subscriptions by choosing a monthly or annual subscription. Once you get paid version of Kinemaster, you can get several effects unlocked. Here, we are listing some major ones.
● Mirror
● Ripple
● Cartoon
● Interference
● Mirror warp
● Pop out
● Anaglyph slide
● Split spectrum
● Auto HDR
● Poster perfect
● Rolling ball
● Rayburst
● Bulge / Pinch
● Bulge / Pinch
● Wave warp
● Radial blur
● Kaleidoscope
● Digital crash
● Prismatic
● Focus blur 2.0
● Sketch 2.0
● Swirl 2.0
● Neon outline
● Thermogram
● Square halftone
All with these, there are several other effects available on the Kinemaster that can make your video impressive. With a paid version, you can easily explore and present your creativity. Along with it, everyone also does not know how to add effects on kinemaster in a few minutes only. If you also want to figure it out, you should keep reading the article. In upcoming paragraphs, we are discussing a step-by-step procedure.
Part 2 How To Add Effects On Kinemaster?
Step-By-Step Procedure
Step1 Access KineMaster
Firstly, you should be focused on accessing KineMaster. Here, you can start importing videos or images with ease. You can also use your images as clips for an impressive outcome.
Step2 Import Images

For importing images, you should follow a small procedure. Here, firstly, you should click on MEDIA BUTTON to YOUR FOLDER to GO FOR IMAGES. Now, you should be focused on choosing images by marking them with check symbols. Afterward you can finalize the action and import all images.
Step3 Access Effects Menu

Now, it’s time to focus on adding effects to clips for an impressive video. For such a thing, you should proceed by focusing on the LAYER button on the interface. By clicking the LAYER button, you can access a specific menu with multiple options. One of these options is the EFFECT button. When you click on this particular button, it will take you to the effect menus. In case you have the paid version you can go with the GET MORE option in the EFFECT menu. It will be useful in getting more effective options. You can also download the effects to keep using them regularly.
Step4 Apply Effects

As per your application capability and subscriptions, you can see the availability of effects. You should choose the desired effect by clicking on it. Here, the most interesting thing is that when you apply any effect, it will not overlap the existing layer or anything like that but it will create a new layer. With it, you can use animations for both in and out purposes.
By following this small procedure, you can easily make things easier and add effects in a video by using KineMaster. In case you have any doubt regarding the procedure, you can be focused on guides and tutorials.
Part 3 FAQs Of KineMaster Effects
Are Effects In KineMaster Free?
KineMaster is providing video editing services in paid and free versions. While accessing services in both versions, you can see a big difference. In the paid version of KineMaster, you will get several effects that can make your video clip amazing. If we talk about the free version, you will get only 2 effects. These effects are – Mosaic and Gaussian Blur. In case you want more than these effects, you need to get paid subscription to KineMaster.
KineMaster Effects Alternative On PC
Some individuals are not satisfied with the services of KineMaster because of several reasons, such as – paid service options. If you are one of these individuals, you can consider the option of Filmora. It is a free video editor that will allow you to edit and modify a video in several possible ways. Filmora also has a big library that allows getting multiple effects and built-in video editing elements.
Is It Worth Paying For Extra Effects In KineMaster?
As we discussed earlier, with KineMaster you will get only two effects for free. For more, you need to spend money. In case you want several effects without spending any money, you can go with Filmora. It has a big built-in library to facilitate the users.
Can I Add Effects If I’m Working With Chroma Key?
Yes, the KineMaster users can easily apply Chrom Key while using video effects. It’s all about layering. By focusing on how to add chroma key in kinemaster guide, you can understand how it can be possible for creating an impressive video.
Final Words
By paying attention to all these things, you can understand everything about the KineMaster and its usability. You can also check out an alternative that can help you avoid the option of spending some money. It depends on you that what your requirements are and how want to get them fulfilled.
02 [How To Add Effects On Kinemaster?](#Part 2)
03 [FAQs Of KineMaster Effects](#Part 3)
Part 1 Effects In KineMaster You Should Know
KineMaster is serving video editing services in two different ways; free and paid. You can find out multiple differences in both versions. There are some advanced features that can be unlocked by using a paid version only. By using the free version, you can get your basic done without any kind of issue. If you choose the option of the free version of Kinemaster, you will be limited to two effects only, such as –
● Mosaic
● Gaussian Blur
In case you are interested in applying some blur effects to the video clips or layers, you can pick the option of the Gaussian Blur effect. If you are interested in applying blur effects with some pixelated appearance, you should consider the Mosaic effect. Many people are looking for more than these two effects, you need to consider the paid versions.
When it comes to getting paid version of Kinemaster, you can get its subscriptions by choosing a monthly or annual subscription. Once you get paid version of Kinemaster, you can get several effects unlocked. Here, we are listing some major ones.
● Mirror
● Ripple
● Cartoon
● Interference
● Mirror warp
● Pop out
● Anaglyph slide
● Split spectrum
● Auto HDR
● Poster perfect
● Rolling ball
● Rayburst
● Bulge / Pinch
● Bulge / Pinch
● Wave warp
● Radial blur
● Kaleidoscope
● Digital crash
● Prismatic
● Focus blur 2.0
● Sketch 2.0
● Swirl 2.0
● Neon outline
● Thermogram
● Square halftone
All with these, there are several other effects available on the Kinemaster that can make your video impressive. With a paid version, you can easily explore and present your creativity. Along with it, everyone also does not know how to add effects on kinemaster in a few minutes only. If you also want to figure it out, you should keep reading the article. In upcoming paragraphs, we are discussing a step-by-step procedure.
Part 2 How To Add Effects On Kinemaster?
Step-By-Step Procedure
Step1 Access KineMaster
Firstly, you should be focused on accessing KineMaster. Here, you can start importing videos or images with ease. You can also use your images as clips for an impressive outcome.
Step2 Import Images

For importing images, you should follow a small procedure. Here, firstly, you should click on MEDIA BUTTON to YOUR FOLDER to GO FOR IMAGES. Now, you should be focused on choosing images by marking them with check symbols. Afterward you can finalize the action and import all images.
Step3 Access Effects Menu

Now, it’s time to focus on adding effects to clips for an impressive video. For such a thing, you should proceed by focusing on the LAYER button on the interface. By clicking the LAYER button, you can access a specific menu with multiple options. One of these options is the EFFECT button. When you click on this particular button, it will take you to the effect menus. In case you have the paid version you can go with the GET MORE option in the EFFECT menu. It will be useful in getting more effective options. You can also download the effects to keep using them regularly.
Step4 Apply Effects

As per your application capability and subscriptions, you can see the availability of effects. You should choose the desired effect by clicking on it. Here, the most interesting thing is that when you apply any effect, it will not overlap the existing layer or anything like that but it will create a new layer. With it, you can use animations for both in and out purposes.
By following this small procedure, you can easily make things easier and add effects in a video by using KineMaster. In case you have any doubt regarding the procedure, you can be focused on guides and tutorials.
Part 3 FAQs Of KineMaster Effects
Are Effects In KineMaster Free?
KineMaster is providing video editing services in paid and free versions. While accessing services in both versions, you can see a big difference. In the paid version of KineMaster, you will get several effects that can make your video clip amazing. If we talk about the free version, you will get only 2 effects. These effects are – Mosaic and Gaussian Blur. In case you want more than these effects, you need to get paid subscription to KineMaster.
KineMaster Effects Alternative On PC
Some individuals are not satisfied with the services of KineMaster because of several reasons, such as – paid service options. If you are one of these individuals, you can consider the option of Filmora. It is a free video editor that will allow you to edit and modify a video in several possible ways. Filmora also has a big library that allows getting multiple effects and built-in video editing elements.
Is It Worth Paying For Extra Effects In KineMaster?
As we discussed earlier, with KineMaster you will get only two effects for free. For more, you need to spend money. In case you want several effects without spending any money, you can go with Filmora. It has a big built-in library to facilitate the users.
Can I Add Effects If I’m Working With Chroma Key?
Yes, the KineMaster users can easily apply Chrom Key while using video effects. It’s all about layering. By focusing on how to add chroma key in kinemaster guide, you can understand how it can be possible for creating an impressive video.
Final Words
By paying attention to all these things, you can understand everything about the KineMaster and its usability. You can also check out an alternative that can help you avoid the option of spending some money. It depends on you that what your requirements are and how want to get them fulfilled.
02 [How To Add Effects On Kinemaster?](#Part 2)
03 [FAQs Of KineMaster Effects](#Part 3)
Part 1 Effects In KineMaster You Should Know
KineMaster is serving video editing services in two different ways; free and paid. You can find out multiple differences in both versions. There are some advanced features that can be unlocked by using a paid version only. By using the free version, you can get your basic done without any kind of issue. If you choose the option of the free version of Kinemaster, you will be limited to two effects only, such as –
● Mosaic
● Gaussian Blur
In case you are interested in applying some blur effects to the video clips or layers, you can pick the option of the Gaussian Blur effect. If you are interested in applying blur effects with some pixelated appearance, you should consider the Mosaic effect. Many people are looking for more than these two effects, you need to consider the paid versions.
When it comes to getting paid version of Kinemaster, you can get its subscriptions by choosing a monthly or annual subscription. Once you get paid version of Kinemaster, you can get several effects unlocked. Here, we are listing some major ones.
● Mirror
● Ripple
● Cartoon
● Interference
● Mirror warp
● Pop out
● Anaglyph slide
● Split spectrum
● Auto HDR
● Poster perfect
● Rolling ball
● Rayburst
● Bulge / Pinch
● Bulge / Pinch
● Wave warp
● Radial blur
● Kaleidoscope
● Digital crash
● Prismatic
● Focus blur 2.0
● Sketch 2.0
● Swirl 2.0
● Neon outline
● Thermogram
● Square halftone
All with these, there are several other effects available on the Kinemaster that can make your video impressive. With a paid version, you can easily explore and present your creativity. Along with it, everyone also does not know how to add effects on kinemaster in a few minutes only. If you also want to figure it out, you should keep reading the article. In upcoming paragraphs, we are discussing a step-by-step procedure.
Part 2 How To Add Effects On Kinemaster?
Step-By-Step Procedure
Step1 Access KineMaster
Firstly, you should be focused on accessing KineMaster. Here, you can start importing videos or images with ease. You can also use your images as clips for an impressive outcome.
Step2 Import Images

For importing images, you should follow a small procedure. Here, firstly, you should click on MEDIA BUTTON to YOUR FOLDER to GO FOR IMAGES. Now, you should be focused on choosing images by marking them with check symbols. Afterward you can finalize the action and import all images.
Step3 Access Effects Menu

Now, it’s time to focus on adding effects to clips for an impressive video. For such a thing, you should proceed by focusing on the LAYER button on the interface. By clicking the LAYER button, you can access a specific menu with multiple options. One of these options is the EFFECT button. When you click on this particular button, it will take you to the effect menus. In case you have the paid version you can go with the GET MORE option in the EFFECT menu. It will be useful in getting more effective options. You can also download the effects to keep using them regularly.
Step4 Apply Effects

As per your application capability and subscriptions, you can see the availability of effects. You should choose the desired effect by clicking on it. Here, the most interesting thing is that when you apply any effect, it will not overlap the existing layer or anything like that but it will create a new layer. With it, you can use animations for both in and out purposes.
By following this small procedure, you can easily make things easier and add effects in a video by using KineMaster. In case you have any doubt regarding the procedure, you can be focused on guides and tutorials.
Part 3 FAQs Of KineMaster Effects
Are Effects In KineMaster Free?
KineMaster is providing video editing services in paid and free versions. While accessing services in both versions, you can see a big difference. In the paid version of KineMaster, you will get several effects that can make your video clip amazing. If we talk about the free version, you will get only 2 effects. These effects are – Mosaic and Gaussian Blur. In case you want more than these effects, you need to get paid subscription to KineMaster.
KineMaster Effects Alternative On PC
Some individuals are not satisfied with the services of KineMaster because of several reasons, such as – paid service options. If you are one of these individuals, you can consider the option of Filmora. It is a free video editor that will allow you to edit and modify a video in several possible ways. Filmora also has a big library that allows getting multiple effects and built-in video editing elements.
Is It Worth Paying For Extra Effects In KineMaster?
As we discussed earlier, with KineMaster you will get only two effects for free. For more, you need to spend money. In case you want several effects without spending any money, you can go with Filmora. It has a big built-in library to facilitate the users.
Can I Add Effects If I’m Working With Chroma Key?
Yes, the KineMaster users can easily apply Chrom Key while using video effects. It’s all about layering. By focusing on how to add chroma key in kinemaster guide, you can understand how it can be possible for creating an impressive video.
Final Words
By paying attention to all these things, you can understand everything about the KineMaster and its usability. You can also check out an alternative that can help you avoid the option of spending some money. It depends on you that what your requirements are and how want to get them fulfilled.
Create a Stunning Light Sweep Effect in Filmora. Use Simple and Easy Steps to Export a High-Quality Video that Will Impress Even Pro Video Editors
Preparation
What you need to prepare:
- A computer (Windows or macOS)
- Your video materials.
- Filmora video editor
Step 1
If you haven’t already, go ahead and download the Filmora video editor . Install it and run the application on your computer.
Step 2
Create a New Project by clicking on the big blue button. Immediately after, go to File → Project Settings. Here, make sure the project is in full resolution and 60 fps.

Step 3
Select the Titles tab and drag the Default Title to the Timeline.

Step 4
Double-click on the Default Title inside the Timeline and go to Advanced. Here, you can change the text, pick a new font, change its size, and so on. Make sure you change the Color Type to Gradient Fill. Choose a color of your own liking. When you’re done customizing it, click on OK.

Step 5
Right-click on the Default Title clip and select Copy. Then, right-click anywhere on the Timeline and select Paste. After this, drag the copy of that clip on the Track above it.

Step 6
Double-click on the copied Title, go to Advanced, and change the Color Type to Color Fill. Click OK.

Step 7
Next, take a snapshot of the new title. Then, delete the copied Title clip from your Timeline. After this, drag the snapshot into the Timeline.

Step 8
Double-click on the Snapshot clip and go to the Mask tab. From here, select the Rectangle mask. Then, rotate it as you see in the image below. Don’t click on OK yet.

Step 9
Now, look at the settings panel on the left and scroll down. First, change its Rotation to 40. Then, drag the Blur bar to 15. Finally, move the Rectangle mask to the left side like in the image below. Don’t click OK yet.

Step 10
Now, move the Playhead to the starting position on the Timeline. Then, click on the “**+Add**” button to add a keyframe. Next, move the Playhead a few seconds forward and move the Rectangle mask all the way to the right side of the text. Click OK.

Step 11
You are finally done. You can review, Render, and Export the video now to use it as you wish. Congratulations on creating a light sweep effect in Filmora.
Summary
What you’ve learned:
- How to create a modern light sweep effect in the Filmora video editor
- How to use Masks in Filmora
- Edit titles like a pro
What you need to prepare:
- A computer (Windows or macOS)
- Your video materials.
- Filmora video editor
Step 1
If you haven’t already, go ahead and download the Filmora video editor . Install it and run the application on your computer.
Step 2
Create a New Project by clicking on the big blue button. Immediately after, go to File → Project Settings. Here, make sure the project is in full resolution and 60 fps.

Step 3
Select the Titles tab and drag the Default Title to the Timeline.

Step 4
Double-click on the Default Title inside the Timeline and go to Advanced. Here, you can change the text, pick a new font, change its size, and so on. Make sure you change the Color Type to Gradient Fill. Choose a color of your own liking. When you’re done customizing it, click on OK.

Step 5
Right-click on the Default Title clip and select Copy. Then, right-click anywhere on the Timeline and select Paste. After this, drag the copy of that clip on the Track above it.

Step 6
Double-click on the copied Title, go to Advanced, and change the Color Type to Color Fill. Click OK.

Step 7
Next, take a snapshot of the new title. Then, delete the copied Title clip from your Timeline. After this, drag the snapshot into the Timeline.

Step 8
Double-click on the Snapshot clip and go to the Mask tab. From here, select the Rectangle mask. Then, rotate it as you see in the image below. Don’t click on OK yet.

Step 9
Now, look at the settings panel on the left and scroll down. First, change its Rotation to 40. Then, drag the Blur bar to 15. Finally, move the Rectangle mask to the left side like in the image below. Don’t click OK yet.

Step 10
Now, move the Playhead to the starting position on the Timeline. Then, click on the “**+Add**” button to add a keyframe. Next, move the Playhead a few seconds forward and move the Rectangle mask all the way to the right side of the text. Click OK.

Step 11
You are finally done. You can review, Render, and Export the video now to use it as you wish. Congratulations on creating a light sweep effect in Filmora.
Summary
What you’ve learned:
- How to create a modern light sweep effect in the Filmora video editor
- How to use Masks in Filmora
- Edit titles like a pro
What you need to prepare:
- A computer (Windows or macOS)
- Your video materials.
- Filmora video editor
Step 1
If you haven’t already, go ahead and download the Filmora video editor . Install it and run the application on your computer.
Step 2
Create a New Project by clicking on the big blue button. Immediately after, go to File → Project Settings. Here, make sure the project is in full resolution and 60 fps.

Step 3
Select the Titles tab and drag the Default Title to the Timeline.

Step 4
Double-click on the Default Title inside the Timeline and go to Advanced. Here, you can change the text, pick a new font, change its size, and so on. Make sure you change the Color Type to Gradient Fill. Choose a color of your own liking. When you’re done customizing it, click on OK.

Step 5
Right-click on the Default Title clip and select Copy. Then, right-click anywhere on the Timeline and select Paste. After this, drag the copy of that clip on the Track above it.

Step 6
Double-click on the copied Title, go to Advanced, and change the Color Type to Color Fill. Click OK.

Step 7
Next, take a snapshot of the new title. Then, delete the copied Title clip from your Timeline. After this, drag the snapshot into the Timeline.

Step 8
Double-click on the Snapshot clip and go to the Mask tab. From here, select the Rectangle mask. Then, rotate it as you see in the image below. Don’t click on OK yet.

Step 9
Now, look at the settings panel on the left and scroll down. First, change its Rotation to 40. Then, drag the Blur bar to 15. Finally, move the Rectangle mask to the left side like in the image below. Don’t click OK yet.

Step 10
Now, move the Playhead to the starting position on the Timeline. Then, click on the “**+Add**” button to add a keyframe. Next, move the Playhead a few seconds forward and move the Rectangle mask all the way to the right side of the text. Click OK.

Step 11
You are finally done. You can review, Render, and Export the video now to use it as you wish. Congratulations on creating a light sweep effect in Filmora.
Summary
What you’ve learned:
- How to create a modern light sweep effect in the Filmora video editor
- How to use Masks in Filmora
- Edit titles like a pro
What you need to prepare:
- A computer (Windows or macOS)
- Your video materials.
- Filmora video editor
Step 1
If you haven’t already, go ahead and download the Filmora video editor . Install it and run the application on your computer.
Step 2
Create a New Project by clicking on the big blue button. Immediately after, go to File → Project Settings. Here, make sure the project is in full resolution and 60 fps.

Step 3
Select the Titles tab and drag the Default Title to the Timeline.

Step 4
Double-click on the Default Title inside the Timeline and go to Advanced. Here, you can change the text, pick a new font, change its size, and so on. Make sure you change the Color Type to Gradient Fill. Choose a color of your own liking. When you’re done customizing it, click on OK.

Step 5
Right-click on the Default Title clip and select Copy. Then, right-click anywhere on the Timeline and select Paste. After this, drag the copy of that clip on the Track above it.

Step 6
Double-click on the copied Title, go to Advanced, and change the Color Type to Color Fill. Click OK.

Step 7
Next, take a snapshot of the new title. Then, delete the copied Title clip from your Timeline. After this, drag the snapshot into the Timeline.

Step 8
Double-click on the Snapshot clip and go to the Mask tab. From here, select the Rectangle mask. Then, rotate it as you see in the image below. Don’t click on OK yet.

Step 9
Now, look at the settings panel on the left and scroll down. First, change its Rotation to 40. Then, drag the Blur bar to 15. Finally, move the Rectangle mask to the left side like in the image below. Don’t click OK yet.

Step 10
Now, move the Playhead to the starting position on the Timeline. Then, click on the “**+Add**” button to add a keyframe. Next, move the Playhead a few seconds forward and move the Rectangle mask all the way to the right side of the text. Click OK.

Step 11
You are finally done. You can review, Render, and Export the video now to use it as you wish. Congratulations on creating a light sweep effect in Filmora.
Summary
What you’ve learned:
- How to create a modern light sweep effect in the Filmora video editor
- How to use Masks in Filmora
- Edit titles like a pro
How to Create a Glitch Text Effect?
Have you noticed the glitching effect that appears when you play a video or in games, creating a sporadic shaky effect on video edges? While this usually signifies a systematic software issue in these cases, the effect itself can work to create a dynamic visual style for different objects when done intentionally.
In fact, many video editors today use the glitch effect on elements in their videos, like the introductory title in movies or trailers. It creates a futuristic look to the text, which highly appeals to viewers who engage more in the video itself.
Suppose you are looking to add a similar effect to the title of your video project or other text-based content that you will add to your video, use a good tool for that. Wondershare Filmora , in particular, makes adding this effect very simple. Let’s learn how.
1. Launch the Filmora software
Free Download For Win 7 or later(64-bit)
Free Download For macOS 10.14 or later
The first step in preparing a customized glitch text effect is getting your software ready.
Visit the official website of Wondershare Filmora and tap on the Download button at the top to get the free software. The features necessary to create this effect are available under the free version, so you can avoid the plan upgradation process at this point.
After clicking the free download icon, the software’s installer version will save into your device automatically. Double-click on and agree with the related Terms and Conditions prompt. Then, tap on the Install button, and the software will take a few seconds to complete the installation process fully.
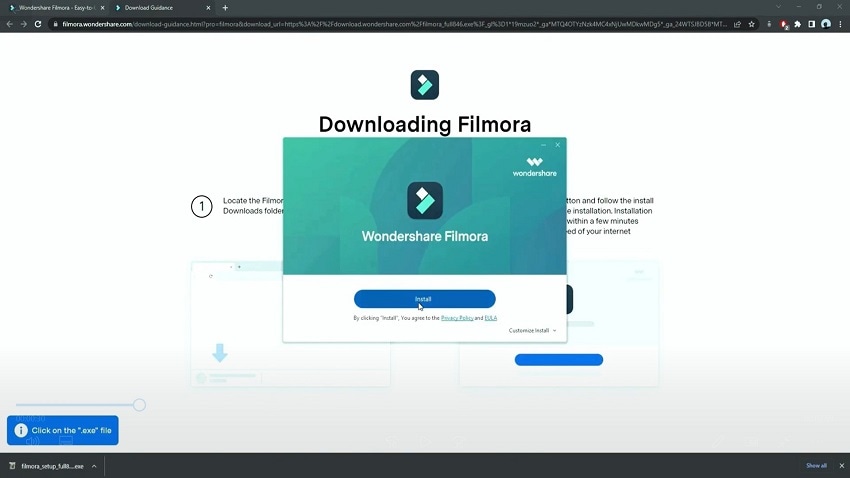
After that, click on the Start Now button to launch the software on your Mac or Windows computer that you are using. Filmora will open on its homepage.
2. Add the default title to timeline
Next, click the Create New Project button on the main page to access the editor section. Then, you have to click on the Titles tab and choose the Default Title option from the menu.
Drag it down from the media library section to the timeline and drop it in the Track 2 row. After that, move the play head with your cursor to the 1-second and the 10th frame on the timeline. Then, hold and move this clip until the end part of the clip is at this mark.

3. Adjust the font of the title
Next, double-click on this clip on the editor timeline to open the text editing window. Here, under the Preset section, change the title font to what to want to first word of your title to be.
Change the font style to a bigger bold option like Impact and increase the font size to 100. Then, scroll a little downward and tap on the Text Spacing option. Increase this value by 5 and press the OK button when you are done.

4. Add and copy all of the word clips
After adjusting the text font, tap on this clip on the timeline and copy it. Then, paste it just after the first clip ends, reducing its duration to around 1 second.
Then, double-click on the copied clip to open the text editing window. Click on the section where you can add the text and change it to the second word of your title. Again, copy this clip and paste it next to it, adjust it to be one second long, double-click on it to adjust the text to read the third word, and so on.

Continue until all of your intro’s words are added in these clip forms.
5. Create and add the snapshots
Following the previous step, click on the My Media section. Then, tap on the first clip in the collection and tap on the Snapshot icon at the end of the editing toolbar right above the timeline. Repeat this step for all the clips you have added until a snapshot of each of the words is stored in the media library.
Next, you have to grab hold of the first snapshot that you click and move it to the Track 1 of the timeline. Use the cursor to hold it and reduce the size of the clip to the same amount as the first clip on Track 1. To be sure, you can place the playhead at this point to see that the ending time for both clips is aligned.

6. Adjust the text effect for the first word
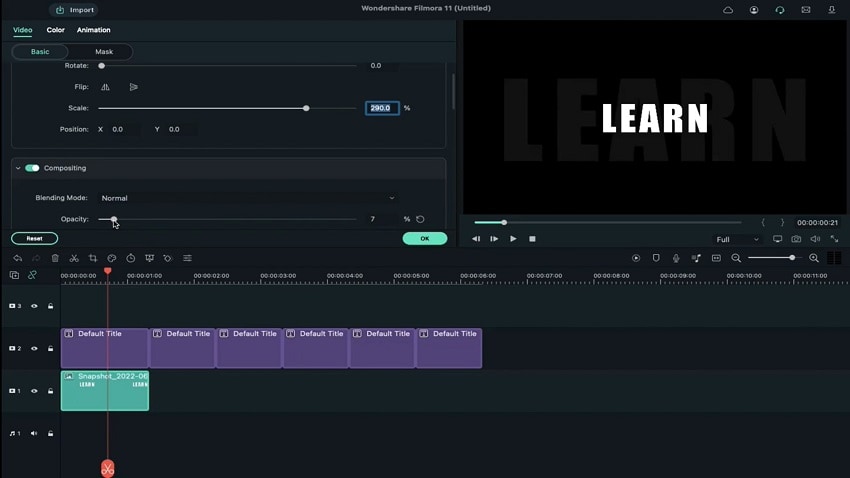
You have to click on the first-word snapshot in Track 1 of the Filmora editing timeline and double-click on it. Next, when the text editing window opens, you must change the Scale section to display the value of 290%. Following that, click on the slider in the Opacity parameter and decrease it to the 7% mark. Then, press the OK button.
On the timeline, right-click on this edited clip and choose the “Copy Effects” option from the drop-down menu.
7. Edit the snapshots for all words
After making changes to the first word, you must take hold of the second word’s snapshot from the media library. Drag and then drop it onto Track 1 of the editing timeline right next to the first clip. Then, hold the edge of this clip and reduce its size to fit the same duration as the second clip adjacent to it on Track 2.
Following that, you must choose this clip on Track 1 and right-click on top of it. Click on the “Paste Effects” option from the next drop-down menu, and the same adjustments will apply to this clip.

Repeat this step with all of the next snapshots of the following words.
8. Add the first effect layer
Next, you have to add stylish effects to your text. For that, you must tap on the Effects tab from the top toolbar of Filmora- a list of many effects collections will appear on the left panel.
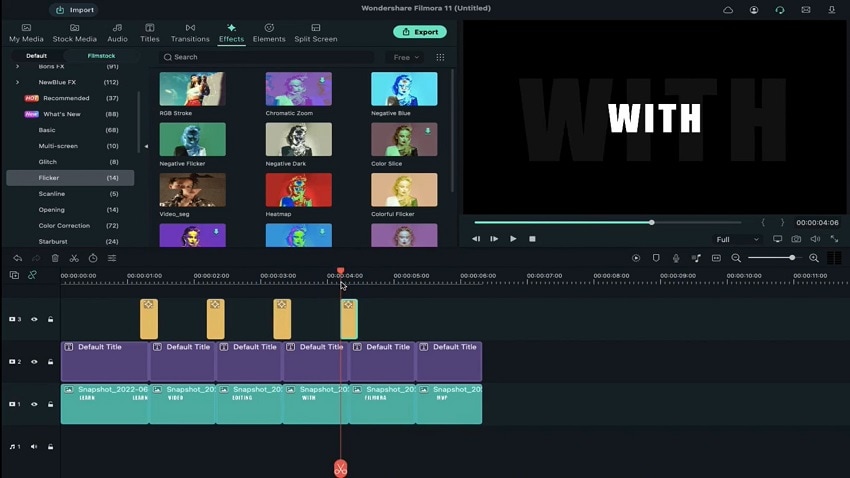
Scroll down until you reach the Filmstock option. You must click on it and find the Flicker option from the list. Under this collection, there are many options available. You must choose the Video_seg effect and drag it to the editing timeline above Track 2.

At this point, ensure the effect falls right above the first and second clip parts in the track below. Tap on the edges of this clip to reduce the size of the video effect, taking careful note to keep the clip 8 frames long overall.
Then, copy the cut-down effect from Track 3 and paste it at every intersectional point between the separated word-based clips in Track 2.
9. Zoom in to edit the first effect layer
Following this, you must zoom into the timeline for a better view and editing control for the next part.
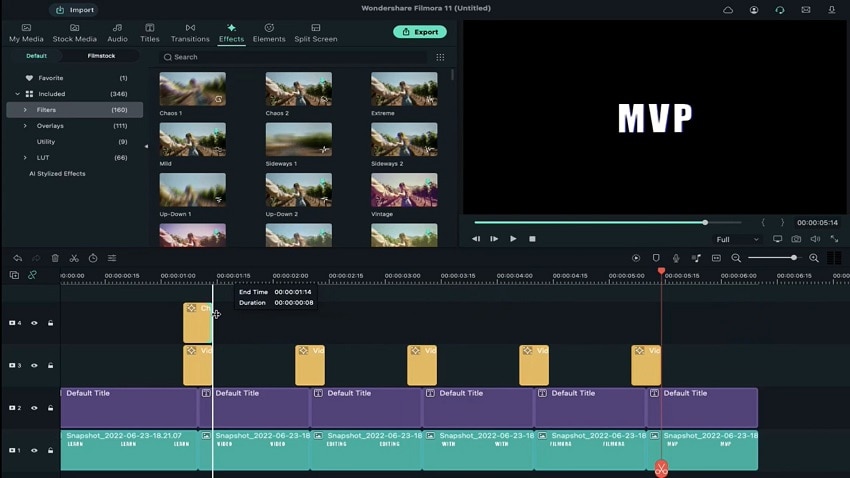
Go to the Effects tab at the top and choose the Filters collection next. Under it, choose the Chaos 1 effect option, drag it down to the timeline, and place it above the previous clip on Track 4. Adjust the starting edge of this clip to have the same starting point as the Video_seg effect on Track 3 with an overall 8-frame duration.
10. Edit the Effect
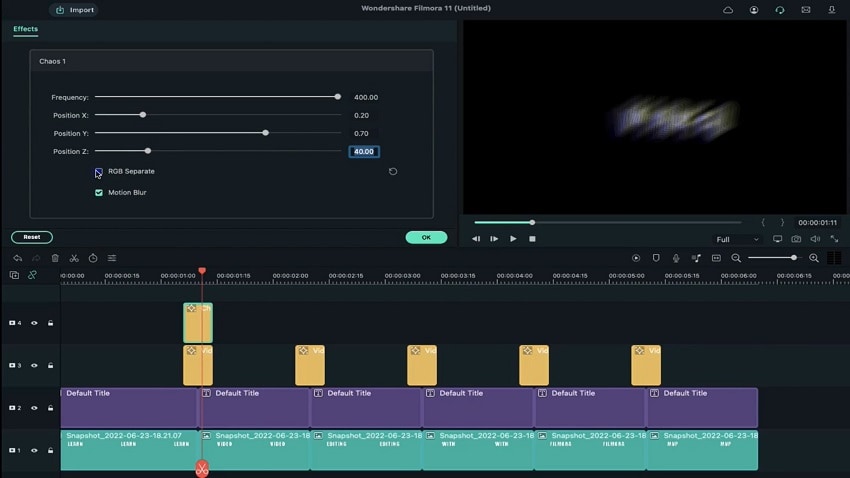
Next, you have to double-click on this clip to open the editing window for this effect. In this section, go to the Frequency parameter and increase the slider to 400. Following that, click on the Position X parameter and move the slider to the 0.20 point. Next, do the same for the Position Y parameter, but to the 0.70 point.
Change the Position Z parameter by typing the value 40 and disable the RGB Separate setting. Then, press the OK button and go to the timeline again.
11. Adjust the Glitch effects
Click on the effect clip on Track 4 and copy it. Please do the same as you did for the effect in Track 3 and paste it at the same locations between the clips in this track.
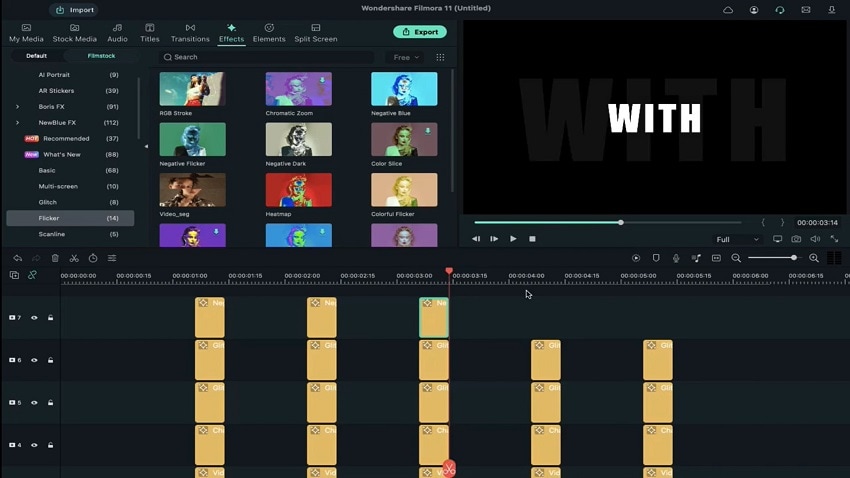
Afterward, go to the Effects tab again and choose the Filmstock tab. Among the collections here, you have to choose the Glitch option and select Glitch Stripe 1 from the collection. For an easier searching experience, you can directly type the effect in the search bar under the Effects tab.

Then, drag and drop it on Track 5 of the timeline right above the previous effect and reduce its duration to the same level as the first two effects. Copy it and then paste the clip again for each clip-to-clip intersection.
After this part, drag the Glitch Dispersion effect down to the timeline. Place it above the previous effect and adjust the clip’s size to the same length. Again, copy the effect and repeat the steps again. Next, repeat the same whole process with the Negative Flicker effect from the Flicker collection on Track 7.
12. See the preview and save the file
Finally, you are done adding all the effects, and you have to click on the Render Preview icon in the toolbar above the timeline. Then, press the Play button on the Preview window to see the full glitch text effect play out properly.

Conclusion
Now, you are done with creating a visually exciting and dynamic look for your introductory or ending title in the video using the glitch effect. For the best results, you should practice this process sometimes to get used to it and even make certain preferential changes to the font style. Ultimately, with the help of this software, you can expect a high-quality title look and use it for further video editing work.
Free Download For macOS 10.14 or later
The first step in preparing a customized glitch text effect is getting your software ready.
Visit the official website of Wondershare Filmora and tap on the Download button at the top to get the free software. The features necessary to create this effect are available under the free version, so you can avoid the plan upgradation process at this point.
After clicking the free download icon, the software’s installer version will save into your device automatically. Double-click on and agree with the related Terms and Conditions prompt. Then, tap on the Install button, and the software will take a few seconds to complete the installation process fully.

After that, click on the Start Now button to launch the software on your Mac or Windows computer that you are using. Filmora will open on its homepage.
2. Add the default title to timeline
Next, click the Create New Project button on the main page to access the editor section. Then, you have to click on the Titles tab and choose the Default Title option from the menu.
Drag it down from the media library section to the timeline and drop it in the Track 2 row. After that, move the play head with your cursor to the 1-second and the 10th frame on the timeline. Then, hold and move this clip until the end part of the clip is at this mark.

3. Adjust the font of the title
Next, double-click on this clip on the editor timeline to open the text editing window. Here, under the Preset section, change the title font to what to want to first word of your title to be.
Change the font style to a bigger bold option like Impact and increase the font size to 100. Then, scroll a little downward and tap on the Text Spacing option. Increase this value by 5 and press the OK button when you are done.

4. Add and copy all of the word clips
After adjusting the text font, tap on this clip on the timeline and copy it. Then, paste it just after the first clip ends, reducing its duration to around 1 second.
Then, double-click on the copied clip to open the text editing window. Click on the section where you can add the text and change it to the second word of your title. Again, copy this clip and paste it next to it, adjust it to be one second long, double-click on it to adjust the text to read the third word, and so on.

Continue until all of your intro’s words are added in these clip forms.
5. Create and add the snapshots
Following the previous step, click on the My Media section. Then, tap on the first clip in the collection and tap on the Snapshot icon at the end of the editing toolbar right above the timeline. Repeat this step for all the clips you have added until a snapshot of each of the words is stored in the media library.
Next, you have to grab hold of the first snapshot that you click and move it to the Track 1 of the timeline. Use the cursor to hold it and reduce the size of the clip to the same amount as the first clip on Track 1. To be sure, you can place the playhead at this point to see that the ending time for both clips is aligned.

6. Adjust the text effect for the first word
You have to click on the first-word snapshot in Track 1 of the Filmora editing timeline and double-click on it. Next, when the text editing window opens, you must change the Scale section to display the value of 290%. Following that, click on the slider in the Opacity parameter and decrease it to the 7% mark. Then, press the OK button.
On the timeline, right-click on this edited clip and choose the “Copy Effects” option from the drop-down menu.

7. Edit the snapshots for all words
After making changes to the first word, you must take hold of the second word’s snapshot from the media library. Drag and then drop it onto Track 1 of the editing timeline right next to the first clip. Then, hold the edge of this clip and reduce its size to fit the same duration as the second clip adjacent to it on Track 2.
Following that, you must choose this clip on Track 1 and right-click on top of it. Click on the “Paste Effects” option from the next drop-down menu, and the same adjustments will apply to this clip.

Repeat this step with all of the next snapshots of the following words.
8. Add the first effect layer
Next, you have to add stylish effects to your text. For that, you must tap on the Effects tab from the top toolbar of Filmora- a list of many effects collections will appear on the left panel.
Scroll down until you reach the Filmstock option. You must click on it and find the Flicker option from the list. Under this collection, there are many options available. You must choose the Video_seg effect and drag it to the editing timeline above Track 2.

At this point, ensure the effect falls right above the first and second clip parts in the track below. Tap on the edges of this clip to reduce the size of the video effect, taking careful note to keep the clip 8 frames long overall.
Then, copy the cut-down effect from Track 3 and paste it at every intersectional point between the separated word-based clips in Track 2.

9. Zoom in to edit the first effect layer
Following this, you must zoom into the timeline for a better view and editing control for the next part.
Go to the Effects tab at the top and choose the Filters collection next. Under it, choose the Chaos 1 effect option, drag it down to the timeline, and place it above the previous clip on Track 4. Adjust the starting edge of this clip to have the same starting point as the Video_seg effect on Track 3 with an overall 8-frame duration.

10. Edit the Effect
Next, you have to double-click on this clip to open the editing window for this effect. In this section, go to the Frequency parameter and increase the slider to 400. Following that, click on the Position X parameter and move the slider to the 0.20 point. Next, do the same for the Position Y parameter, but to the 0.70 point.
Change the Position Z parameter by typing the value 40 and disable the RGB Separate setting. Then, press the OK button and go to the timeline again.

11. Adjust the Glitch effects
Click on the effect clip on Track 4 and copy it. Please do the same as you did for the effect in Track 3 and paste it at the same locations between the clips in this track.
Afterward, go to the Effects tab again and choose the Filmstock tab. Among the collections here, you have to choose the Glitch option and select Glitch Stripe 1 from the collection. For an easier searching experience, you can directly type the effect in the search bar under the Effects tab.

Then, drag and drop it on Track 5 of the timeline right above the previous effect and reduce its duration to the same level as the first two effects. Copy it and then paste the clip again for each clip-to-clip intersection.
After this part, drag the Glitch Dispersion effect down to the timeline. Place it above the previous effect and adjust the clip’s size to the same length. Again, copy the effect and repeat the steps again. Next, repeat the same whole process with the Negative Flicker effect from the Flicker collection on Track 7.

12. See the preview and save the file
Finally, you are done adding all the effects, and you have to click on the Render Preview icon in the toolbar above the timeline. Then, press the Play button on the Preview window to see the full glitch text effect play out properly.

Conclusion
Now, you are done with creating a visually exciting and dynamic look for your introductory or ending title in the video using the glitch effect. For the best results, you should practice this process sometimes to get used to it and even make certain preferential changes to the font style. Ultimately, with the help of this software, you can expect a high-quality title look and use it for further video editing work.
If You Are a Free Video Editor Being a Windows User, VSDC Free Video Editor Is a Great Choice. But Is It the Best Video Editor You Should Use? Find Out From Our VSDC Free Video Editor Review
If you are a Window user and you are looking for a free video editor without a watermark, VSDC free video editor is definitely a great application. There are only a handful of free video editors available where the output video will not have a watermark, and there is no limitation on the video length. VSDC video editor belongs to the non-liner video editor group where you can combine video clips, photos, objects, and blend and overlap them as per your requirements.
For a beginner, VSDC free video editor is undoubtedly one of the best video editors. It supports different types of video and audio formats as well as codes. The system requirements are very basic, and hence, it is perfect for low-end computers? But can you rely on VSDC editor when you need slightly advanced video editing? Check out our VSDC editor review and find a better alternative.
Part 1. How to Download and Install VSDC?
VSDC editor download is only available for Windows users. It is tailor-made for those who have a low-end computer with older Windows version OS. The software is compatible with Windows 2000 to Windows 11. The minimum RAM requirement is 128MB and free disk space of 200 MB. Here are the steps to download and install VSDC editor.
Step 1: Open your web browser and visit ‘www.videosoftdev.com/free-video-editor/download” .
Step 2: Click on Download Video Editor button based on 32-bit or 64-bit version of your computer. If you have Windows XP, you have to download VDSC video editor version 6.4 instead of the latest version for compatibility.
Step 3: Give some time for the installer file to get downloaded. It is merely 100 MB and it should not take long. After downloading the installer, launch it and follow the on-screen instruction to complete the installation.
Step 4: After proper installation, launch VSDC video editor. You will get the options to create a new project and capture screen, start editing an existing video and export the finished project in a proper video format.
Part 2. Key Features of VSDC
There are two versions of VSDC video editor available – Free video editor and Pro video editor. The free version has limited features while Pro version has advanced features. Here are going to discuss the key features of VSDC Free Video Editor.
Low System Requirements – One of the reasons for the wide popularity of VSDC video editor is that it does not demand high system configurations like most other video editors. If you have a low-end computer with an outdated Windows operating system, you can use VSDC video editor without any issue.
Basic Editing – Among the basic editing tools, you can cut, trim, split and join video clips. There are options for rotating and resizing videos. You can also go for color correction and put overlays on videos as applicable. Besides, you can edit 36-degree videos with zoom and chart tools.
Effects – VSDC has a wide collection of video, audio and text effects. You can also add objects to your video and apply different ready-made filters. There are also transitions to apply in between video clips and slides. You can also use green screen effect to change your background. The special split-screen effect and picture-in-picture effects are quite eye-catching.
Capture Video – VSDC video editor is equally competent in capturing videos from your webcam as well as recording your screen video. In fact, there is a dedicated option available for creating slideshow videos from photos. You can even record your voiceover if you want to.
File Formats - VSDC supports all the popular file formats for importing and exporting video and audio files. There are different export profiles available so that you can save your edited video for different devices conveniently.
Apart from these, if you opt for the Pro version, you get motion tracking, video masking, video stabilization, and much more such advanced video editing tools.
Part 3. How to Edit Videos with VSDC
If you have the recorded video and you want to edit it with VSDC video editor, the steps are quite simple. You can even record your webcam and screen video with audio if you want to start from scratch. Coming to the editing part, you can split large video files, merge video clips, add transitions in between, add objects in the video as well as crop and rotate videos. There are different effects you can apply to uplift video content. Here are the steps to edit videos with VSDC editor.
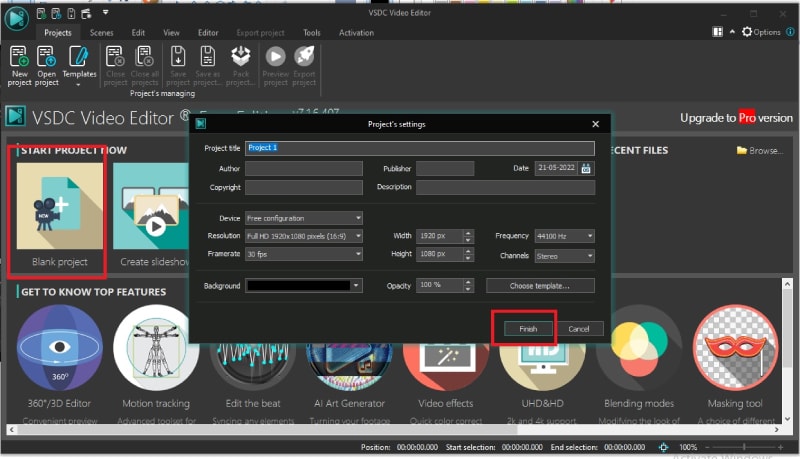
Step 1: Open VSDC Video Editor and click on Blank Project option. Name the project and change parameters, and click on Finish.
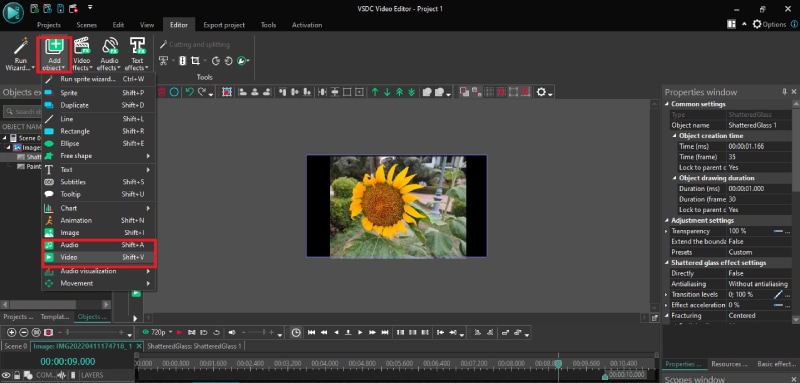
Step 2: Click on Add Object option at the top and select Video. Import the video clips saved on your hard drive. Similarly, you can go to Add Objects> Audio to import audio files.
Step 3: All the imported media files will appear on the timeline. If you have multiple video clips, you can shift the position of clips on the timeline so that one video clip ends and the other begins.
Step 4: If you want to add transitions in between the video clips, go to Video Effects> Transitions> select the effect you want to apply. Check the on-screen parameters such as duration and click on Ok button.
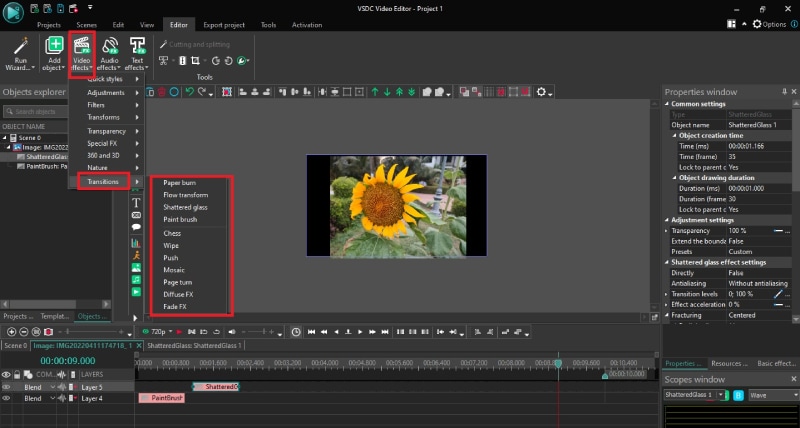
Step 5: If you want to add objects, go to Add Object and select shapes, texts, animations, charts, and much more. You can also add Audio Effects as well as Text Effects from the top bar.
Step 6: Once you are happy with the preview of the edited video, go to Export Project and check all the parameters. Click on Export Project option.
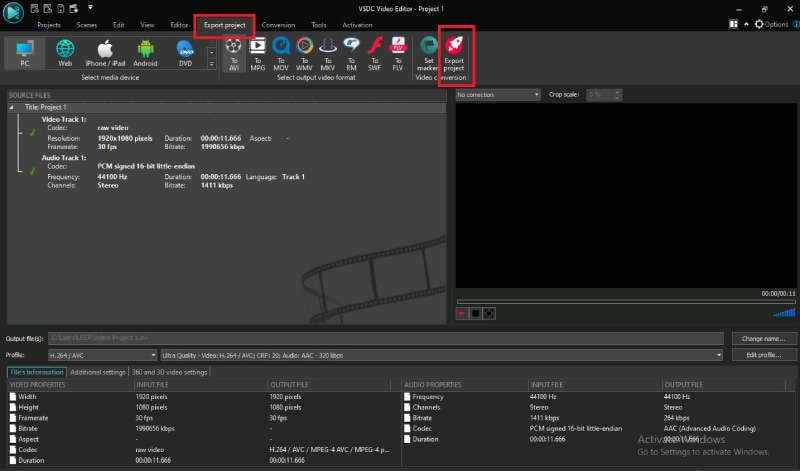
Part 4. Best VSDC Alternative Video Editor
Since VSDC video editor is available completely free, there is no hard in downloading the application and trying it out. But soon, you will understand that the video editor is limited as far as tools and features are concerned. If you want to get more than just basic tools, you will have to upgrade to its Pro version. However, there are better premium video editors available. We recommend Wondershare Filmora as a better alternative to VSDC video editor.
Filmora is extremely popular in the professional video editing world as it has an intuitive interface and does not demand high-end computers. There are tons of transitions, effects, filters, and objects available to add to your edit. You can perform all standard and advanced video editing to take your video to the next level. Here are all the steps to edit videos on Filmora.
For Win 7 or later (64-bit)
For macOS 10.12 or later
Step 1: Download and install Filmora and it is available for Windows and Mac. Launch Filmora and click on New Project. Import all your media files into Project Media folder by drag and drop action.

Step 2: Arrange the video clips and audio clips on the timeline by drag and drop action. You should be placing the video and audio files on different tracks. This is where you can do all the basic editing such as trimming, cutting, splitting, and merging.

Step 3: To add transitions in between the video clips, go to Transitions from the top bar and drag and drop any transition in between the clips. Check out Titles, Effects, and Elements from the top bar and insert them on the timeline as you think appropriate.

Step 4: Play the video to see if everything is perfect and click on Export button to save your video to your hard drive.

Part 5. FAQs about VSDC
1. Is VSDC video editor really free?
Yes, VSDC video editor is completely free to use. However, there is a pro version available where more features are present. But the free version does not put watermark on the output video and has all the standard tools for video editing without any limitation.
2. Is VSDC better than Adobe Premiere Pro?
No, VSDC is not better than Adobe Premiere Pro. VSDC is a free video tor while Adobe Premiere Pro is a premium one. Naturally, Adobe Premiere Pro has more features and functionalities. However, VSDC is better for beginners and those who have low-end computers if you compare it with Adobe Premiere Pro.
3. Is VSDC safe?
Yes VSDC video editor is safe and stable to use. However, there was an incident in 2019 where VSDC video editor’s official website was hacked, but the software itself is safe to use on Windows computers.
For macOS 10.12 or later
Step 1: Download and install Filmora and it is available for Windows and Mac. Launch Filmora and click on New Project. Import all your media files into Project Media folder by drag and drop action.

Step 2: Arrange the video clips and audio clips on the timeline by drag and drop action. You should be placing the video and audio files on different tracks. This is where you can do all the basic editing such as trimming, cutting, splitting, and merging.

Step 3: To add transitions in between the video clips, go to Transitions from the top bar and drag and drop any transition in between the clips. Check out Titles, Effects, and Elements from the top bar and insert them on the timeline as you think appropriate.

Step 4: Play the video to see if everything is perfect and click on Export button to save your video to your hard drive.

Part 5. FAQs about VSDC
1. Is VSDC video editor really free?
Yes, VSDC video editor is completely free to use. However, there is a pro version available where more features are present. But the free version does not put watermark on the output video and has all the standard tools for video editing without any limitation.
2. Is VSDC better than Adobe Premiere Pro?
No, VSDC is not better than Adobe Premiere Pro. VSDC is a free video tor while Adobe Premiere Pro is a premium one. Naturally, Adobe Premiere Pro has more features and functionalities. However, VSDC is better for beginners and those who have low-end computers if you compare it with Adobe Premiere Pro.
3. Is VSDC safe?
Yes VSDC video editor is safe and stable to use. However, there was an incident in 2019 where VSDC video editor’s official website was hacked, but the software itself is safe to use on Windows computers.
For macOS 10.12 or later
Step 1: Download and install Filmora and it is available for Windows and Mac. Launch Filmora and click on New Project. Import all your media files into Project Media folder by drag and drop action.

Step 2: Arrange the video clips and audio clips on the timeline by drag and drop action. You should be placing the video and audio files on different tracks. This is where you can do all the basic editing such as trimming, cutting, splitting, and merging.

Step 3: To add transitions in between the video clips, go to Transitions from the top bar and drag and drop any transition in between the clips. Check out Titles, Effects, and Elements from the top bar and insert them on the timeline as you think appropriate.

Step 4: Play the video to see if everything is perfect and click on Export button to save your video to your hard drive.

Part 5. FAQs about VSDC
1. Is VSDC video editor really free?
Yes, VSDC video editor is completely free to use. However, there is a pro version available where more features are present. But the free version does not put watermark on the output video and has all the standard tools for video editing without any limitation.
2. Is VSDC better than Adobe Premiere Pro?
No, VSDC is not better than Adobe Premiere Pro. VSDC is a free video tor while Adobe Premiere Pro is a premium one. Naturally, Adobe Premiere Pro has more features and functionalities. However, VSDC is better for beginners and those who have low-end computers if you compare it with Adobe Premiere Pro.
3. Is VSDC safe?
Yes VSDC video editor is safe and stable to use. However, there was an incident in 2019 where VSDC video editor’s official website was hacked, but the software itself is safe to use on Windows computers.
For macOS 10.12 or later
Step 1: Download and install Filmora and it is available for Windows and Mac. Launch Filmora and click on New Project. Import all your media files into Project Media folder by drag and drop action.

Step 2: Arrange the video clips and audio clips on the timeline by drag and drop action. You should be placing the video and audio files on different tracks. This is where you can do all the basic editing such as trimming, cutting, splitting, and merging.

Step 3: To add transitions in between the video clips, go to Transitions from the top bar and drag and drop any transition in between the clips. Check out Titles, Effects, and Elements from the top bar and insert them on the timeline as you think appropriate.

Step 4: Play the video to see if everything is perfect and click on Export button to save your video to your hard drive.

Part 5. FAQs about VSDC
1. Is VSDC video editor really free?
Yes, VSDC video editor is completely free to use. However, there is a pro version available where more features are present. But the free version does not put watermark on the output video and has all the standard tools for video editing without any limitation.
2. Is VSDC better than Adobe Premiere Pro?
No, VSDC is not better than Adobe Premiere Pro. VSDC is a free video tor while Adobe Premiere Pro is a premium one. Naturally, Adobe Premiere Pro has more features and functionalities. However, VSDC is better for beginners and those who have low-end computers if you compare it with Adobe Premiere Pro.
3. Is VSDC safe?
Yes VSDC video editor is safe and stable to use. However, there was an incident in 2019 where VSDC video editor’s official website was hacked, but the software itself is safe to use on Windows computers.
Also read:
- Do You Wish to Create the Best Video Collages ? No Problem, because Wondershare Filmora Will Help You Make the Best Video Collages
- New Are You Planning to Make a Product Review Video but Wondering How to Set up Your Background? If so, Then Youre in the Right Place. This Post Will Show You How to Adjust the Background to Black for Your Product Review Video for 2024
- New 2024 Approved How To Brighten Video In Premiere Pro | Step By Step Guide
- New In 2024, How to Create The Best Video Collages ?
- To Closely Observe the Content on Screen, We Often Zoom in to Catch the Details. This Article Will Provide You with a Brief Note on How to Zoom in on YouTube Videos Quickly on Your Devices
- Back up and Organize Your Files to Protect Any Misfortune Befalling Them. The Article Will Guide You on How to Back up and Manage Your Footage
- 2024 Approved General Knowledge About MP4 Format and Best MP4 Video Editor
- New In 2024, Learn How to Blur the Background in Adobe Premiere Pro with Our Quick and Simple Step-by-Step Instructions to Make Your Subject More Attention-Grabbing
- How to Get the Most Out of KineMaster Video Templates
- Updated 15 Best LUTS to Buy for 2024
- Updated In 2024, How To Mirror a Video Clip in Premiere Pro
- New In 2024, Basic Introduction for LumaFusion Color Grading
- 2024 Approved Top 10 Free Text to Speech Software Windows, Mac,Android, iPhone & O
- New In 2024, How to Control the Speed of Video
- In 2024, Secret Tips & Tricks to Use in Filmora
- New 2024 Approved How to Create Sports Intro and Outro for YouTube Video?
- Learn How to Create Your Own Unique Video in Cinematic Text Intro in Filmora. Its a Simple Process that Will Offer Professional-Level Intros of Your Own for 2024
- How to Create Freeze Frame Clone Effect for 2024
- Repeated Text Animation Tutorial for 2024
- 2024 Approved HOW to Add Fade to Black on Premiere Pro
- Updated 2024 Approved How to Become a Youtuber?
- Updated The Top Tools for Converting Slides to Digital - 2024 Review
- New How to Enable and Use OBS Zoom Camera
- Do You Know How to Zoom on Facebook Livestream Videos? Through This Article, You Will Find Multiple Ways and Detailed Steps to Zoom in on the Facebook Livestream Videos for 2024
- Updated 2024 Approved How to Loop QuickTime Video
- Updated Slideshow Makers Are On-Demand as They Come with Multiple Possibilities for Both Professional and Personal Uses. Gradually, the Best Software to Make Slideshows Is Always Welcomed to Save Time and Effort without Compromising the Quality
- 4 Methods for Rotating Your GoPro Videos Professionally
- New Camtasia Review – Is It The Best Video Editor for 2024
- Updated 2024 Approved What Is AI Composite Video App and AI Composite Video Tutorial
- Updated If You Want to Know What to Prepare and How to Make the Wedding Video Perfect for Videographers, Check Out This Menu Here for 2024
- Best 3 Motorola Razr 40 Emulator for Mac to Run Your Wanted Android Apps | Dr.fone
- 6 Ways to Change Spotify Location On Your Xiaomi Civi 3 Disney 100th Anniversary Edition | Dr.fone
- Updated 2024 Approved Uncensored Top 10 + Free Streaming Sites
- Android Screen Stuck General Poco C65 Partly Screen Unresponsive | Dr.fone
- In 2024, Top 5 Car Locator Apps for Realme C33 2023 | Dr.fone
- Easy Guide to Oppo A18 FRP Bypass With Best Methods
- In 2024, Is Fake GPS Location Spoofer a Good Choice On Nokia C110? | Dr.fone
- Vivo V29 Stuck on Screen – Finding Solutions For Stuck on Boot | Dr.fone
- In 2024, How To Unlock SIM Cards Of Xiaomi Redmi Note 12 Pro 4G Without PUK Codes
- How to Factory Reset Honor Magic 5 Lite If I Forgot Security Code or Password? | Dr.fone
- Easy steps to recover deleted music from Nubia Red Magic 9 Pro
- How to Transfer Photos From OnePlus 11R to Samsung Galaxy S21 Ultra | Dr.fone
- How to Fix It Oppo Reno 11 5G Wont Turn On | Dr.fone
- Fixing Foneazy MockGo Not Working On Realme GT 3 | Dr.fone
- How To Repair iPhone 6s iOS System Issues? | Dr.fone
- How to recover old messages from your Itel S23
- In 2024, Hassle-Free Ways to Remove FRP Lock on OnePlus 12 Phones with/without a PC
- In 2024, Ultimate Guide from Tecno Spark 10 Pro FRP Bypass
- In 2024, 2 Ways to Monitor HTC U23 Activity | Dr.fone
- Reasons why Pokémon GPS does not Work On Vivo Y200e 5G? | Dr.fone
- In 2024, 3 Ways to Erase iPhone SE When Its Locked Within Seconds
- In 2024, Top 10 Telegram Spy Tools On Oppo Find X6 for Parents | Dr.fone
- Useful ways that can help to effectively recover deleted files from Nokia C110
- In 2024, Change Location on Yik Yak For your Motorola Defy 2 to Enjoy More Fun | Dr.fone
- Does find my friends work on Oppo A1x 5G | Dr.fone
- In 2024, 4 Most-Known Ways to Find Someone on Tinder For Samsung Galaxy Z Fold 5 by Name | Dr.fone
- Title: Check Out All Details About Kinemaster Here and Understand How to Add Effects in Kinemaster. You Can Use the Chroma Key for the Green Screen as Well
- Author: Morgan
- Created at : 2024-05-19 05:11:41
- Updated at : 2024-05-20 05:11:41
- Link: https://ai-video-editing.techidaily.com/check-out-all-details-about-kinemaster-here-and-understand-how-to-add-effects-in-kinemaster-you-can-use-the-chroma-key-for-the-green-screen-as-well/
- License: This work is licensed under CC BY-NC-SA 4.0.

