:max_bytes(150000):strip_icc():format(webp)/cq5dam.web.1280.1280-3-5c2a5dc746e0fb0001d115f0.jpeg)
Complete Guide to Change Video Resolution in Filmora

Complete Guide to Change Video Resolution in Filmora
With the vast number of devices available in the market today, storing data and video files has become difficult. Frequently in cases where the devices share different forms of resolution, it makes sharing videos a hassle.
In those situations, changing the resolution of your video can be a great idea. It will also allow you to save storage. In this article, you’ll adjust the resolution in just a few clicks by Wondershare Filmora. But before we learn how to change a video’s resolution, let’s look into what a video resolution is!
Part 1. What Is a Video Resolution?
A video resolution, in short, is the quality of the video visible. A video is rendered at a specific rate whenever you watch a movie or go to a cinema. A screen is made up of tiny pixels and arranged in an order that determines the resolution of a screen.
Video resolution is rendered in a vertical and horizontal orientation. Therefore, whenever you play a video on YouTube, the resolution scale is available for you to choose from, i.e., 480p, 720p, 1080p, etc.
In most cases, a resolution is dictated by the full abbreviation. So, for example, a 720p video is 1280 x 720, and a 1080p video is a 1920 x 1080 resolution.

![]()
Note: The number written before is the number of horizontal pixels in a video. And the number written after is the vertical pixels in a video.
Before we adjust the resolution of a video, let’s look at a comparison between different types of video resolution.
Part 2. 7 Different Types of Video Resolution
It has been established that a video resolution is not a constant number and changes according to the screen. Scroll below to look at the different forms of video resolutions available!
360p
The full resolution is 480 x 360. This resolution is a minimal video resolution. On a big screen, 360p will look blurry. That is why a 360p resolution is the best for smaller devices such as Mobile phones.
480p
The full resolution is 853 x 480. Although an upgrade from the latter, this resolution is available on many devices. It’s mainly used in devices such as smaller TVs, laptops, and Desktop computers. It is also available for Burn-in DVDs.
720p
The full version of the resolution is 1280 x 720. This resolution is called HD, short for High Definition. 720p quality looks good almost on every device and is also reasonably available.
Most modern devices, such as Mobile phones, Touch Tablets, Laptops, and PCs, are calibrated in 720p Resolution.

1080p
The resolution in its complete form is 1920 x 1080. This resolution is also known as FHD, short for Full High Definition. 1080p resolution is the quality in which many high-quality devices are constructed. As a result, the screens of these devices have a clear and clean display.

![]()
Note: It is usually recommended to share videos on social media in 1080p resolution.
1440p
This resolution is also called QHD (Quad HD). The length and width of this resolution are 2560 x 1440. As the name suggests, its quality is quad (four times) than that of a standard 720p resolution.
The screens of devices constructed in this resolution usually have a high-end purpose. For example, this resolution is commonly used in Gaming monitors and High-end smartphones.

2160p
The screens constructed in this resolution are considered among the best available in the market. 2160p (3840 x 2160) is also known as UHD, which is short for Ultra High Definition. It is also known as 4K because it offers four times the power of 1080p or FHD (Full High Definition.)
These screens are usually available for high-end competitive gaming monitors or big screen LCD and LED Television. In addition, some of the flagship smartphones are also built with 4K resolution.

4320p
This resolution is also known as 8K. The length and width of the pixel arrangement are 7680 x 4320. The pixels are arranged in these screens to offer sixteen times the average power of a 1080p (FHD) monitor.
This resolution is only available on several devices, such as commercial TVs and monitors. However, this is the most significant resolution available in the modern market. Therefore, even if your monitor cannot support a larger resolution, you can test whether your PC can render an 8K resolution.

Part 3. Why Do You Need to Change a Video Resolution?
There are numerous cases where you will want to change the resolution of a video. Some of them are described below.
Decreasing a Video Resolution
Sometimes, you are trying to upload a video from a smartphone. Or, in general, you want to transfer videos to a smartphone. The resolution of your video can play a significant role in the transfer process.
If your video file has a higher resolution, it will take up more space on your phone. As well as, if your PC has a higher resolution, say a 4K resolution, and your phone is of 1080p resolution. You might not be able to play it.
To counter situations like these, you need to change the resolution of your video.
Increasing a Video Resolution
Similarly, there are instances where you would need to change the resolution of your video to increase it.
A good example would be to burn a low-quality DVD. To maintain good quality on a DVD, you need to increase its resolution before transfer.
Changing the exact resolution of a video is only possible in some cases because you cannot change the precise pixel of the video it is recorded in. But software like Wondershare Filmora allows you to change the resolution of your video easily.
Now let’s move to understanding the steps involved in changing the resolution of a video!
Part 4. Steps to Change Video Resolution in Filmora
To change the resolution of a video, you would need a basic video editor. This video editor needs to support the features that enable you to adjust a video resolution. In this case, Filmora is the best option.
Wondershare Filmora
Free Download For Win 7 or later(64-bit)
Free Download For macOS 10.14 or later
It has an attractive system UI that allows inexperienced users to learn how to use it quickly. It also has a diverse stock media collection. Not only that, but It gives you access to dependable features for changing the speed of a video.

Scroll below to learn how to download the latest version!
Step1 Download Filmora
Begin by installing the latest version of Wondershare Filmora if you don’t do already. Then, run the installer of this app on your PC or Mac.
Now that you have downloaded the app let’s change the resolution!
Step2 Import Video Clips
Your next step after launching Filmora is to import video clips you want to resize. To accomplish this, follow the steps outlined below:
- Locate and select the Import icon on the top left side of the Filmora Home Interface.
- It will take you to your computer’s library.
- Select the videos to be edited and then click OK.

If you need clarification about the resolution of the video that you imported, you can also check them before adding it to the timeline.
- Right-Click on the video in the import window.
- In the pop-up column, go to Properties.
It opens a window that will tell you the basic info about your video clips. Here you can also preview the resolution.

Now that we have our clips imported, it is time to add them to the timeline below!
Step3 Add The Video Clips to Timeline
To add Video clips to the timeline, go through the steps as guided:
- Hold Right click to drag and select the video clips in the import window.
- Release Right-click when in the timeline.

Doing so would have added the video clips to the timeline. Instead, it has created a workplace to edit our videos.
You can trim, add effects, and join multiple clips in this process. After finishing the editing process, it’s time to select an export format.
Step4 Export Your Video
You can export into video formats in two ways with Filmora. It can be either selecting a format for your video. Or you can also choose to export your video to a particular device.
Video Format Resolution
Wondershare Filmora is a fantastic software that allows you to access a variety of formats for your videos. These export formats include MP4, WMV, F4V, MOV, TS, 3GP, and more. To select a format for your video, follow the steps as guided:
- Click on Export.
- In the left column, click on the video format you need.
- Click Export on the bottom right corner of the window.

Exporting a video in a specific format not only allows you to change the format of a video but also allows you to change the resolution simultaneously.
Default Resolution Settings
Some formats have a built-in resolution. Whenever you choose a specific format for a video, the resolution of the video will be shifted to the resolution of that format, i.e., TS has a default 1080p resolution.
![]()
Note: Another thing to remember is that most video formats have defaulted to 1080p. But there are some formats whose resolutions vary according to their style. A good example is a 3GP format, which is set to 352 x 488 by default.
Customize the Resolution
But if you don’t find the resolution stable for your device, you can also change this default resolution in simple steps. In the export window, follow the steps mentioned ahead:
- In the preset tab, go to > settings.
- In the video tab, click on the resolution.
- In the drop-down menu, select the resolution that you desire.
You can also select a custom resolution by these steps:
- In the drop-down menu, click on Custom.
- Here, you can change the height and width according to your wish.

Exporting a Video to a Specific Device
Selecting a format for your video can help if you want to change the resolution. But in cases where you want to export a video to a particular mobile device. Such as an iPhone or an iPad, you can select the device export option.
In the device export option, you can select a custom device. Filmora allows you to choose from a wide variety of machines available when you choose a custom device; the resolution will be set to optimal for that particular device.
Select a Folder to Export Your Video
After you are done calibrating the resolution settings, you can move on to select the export location for your video. You can do so by the steps mentioned:
- In the main Export window, navigate to the Save
- Click on the Folder
- It will direct you to your PC library.
- Select the directory you want to export your video to.
- Click Select Folder.

Final Step
The last step to export your video is clicking on the Export icon in the bottom right corner of the window. It opens up a render window. Wait for a few minutes until the video finishes exporting.
When the export is finished, a window will pop up as a reminder. You can also find the target folder by clicking on Find Target.

Congratulations! You have successfully learned how to change the resolution of a video using Wondershare Filmora.
Conclusion
Rapid video technology advancement is leading to the development of higher-resolution devices. The greatest resolution in the modern day is the 8K; soon, everyone will be using 8K devices. So, it is beneficial to learn how to change a video’s resolution.
By following the steps mentioned in this article, you can now change the resolution of your video using Filmora.
Before we adjust the resolution of a video, let’s look at a comparison between different types of video resolution.
Part 2. 7 Different Types of Video Resolution
It has been established that a video resolution is not a constant number and changes according to the screen. Scroll below to look at the different forms of video resolutions available!
360p
The full resolution is 480 x 360. This resolution is a minimal video resolution. On a big screen, 360p will look blurry. That is why a 360p resolution is the best for smaller devices such as Mobile phones.
480p
The full resolution is 853 x 480. Although an upgrade from the latter, this resolution is available on many devices. It’s mainly used in devices such as smaller TVs, laptops, and Desktop computers. It is also available for Burn-in DVDs.
720p
The full version of the resolution is 1280 x 720. This resolution is called HD, short for High Definition. 720p quality looks good almost on every device and is also reasonably available.
Most modern devices, such as Mobile phones, Touch Tablets, Laptops, and PCs, are calibrated in 720p Resolution.

1080p
The resolution in its complete form is 1920 x 1080. This resolution is also known as FHD, short for Full High Definition. 1080p resolution is the quality in which many high-quality devices are constructed. As a result, the screens of these devices have a clear and clean display.

![]()
Note: It is usually recommended to share videos on social media in 1080p resolution.
1440p
This resolution is also called QHD (Quad HD). The length and width of this resolution are 2560 x 1440. As the name suggests, its quality is quad (four times) than that of a standard 720p resolution.
The screens of devices constructed in this resolution usually have a high-end purpose. For example, this resolution is commonly used in Gaming monitors and High-end smartphones.

2160p
The screens constructed in this resolution are considered among the best available in the market. 2160p (3840 x 2160) is also known as UHD, which is short for Ultra High Definition. It is also known as 4K because it offers four times the power of 1080p or FHD (Full High Definition.)
These screens are usually available for high-end competitive gaming monitors or big screen LCD and LED Television. In addition, some of the flagship smartphones are also built with 4K resolution.

4320p
This resolution is also known as 8K. The length and width of the pixel arrangement are 7680 x 4320. The pixels are arranged in these screens to offer sixteen times the average power of a 1080p (FHD) monitor.
This resolution is only available on several devices, such as commercial TVs and monitors. However, this is the most significant resolution available in the modern market. Therefore, even if your monitor cannot support a larger resolution, you can test whether your PC can render an 8K resolution.

Part 3. Why Do You Need to Change a Video Resolution?
There are numerous cases where you will want to change the resolution of a video. Some of them are described below.
Decreasing a Video Resolution
Sometimes, you are trying to upload a video from a smartphone. Or, in general, you want to transfer videos to a smartphone. The resolution of your video can play a significant role in the transfer process.
If your video file has a higher resolution, it will take up more space on your phone. As well as, if your PC has a higher resolution, say a 4K resolution, and your phone is of 1080p resolution. You might not be able to play it.
To counter situations like these, you need to change the resolution of your video.
Increasing a Video Resolution
Similarly, there are instances where you would need to change the resolution of your video to increase it.
A good example would be to burn a low-quality DVD. To maintain good quality on a DVD, you need to increase its resolution before transfer.
Changing the exact resolution of a video is only possible in some cases because you cannot change the precise pixel of the video it is recorded in. But software like Wondershare Filmora allows you to change the resolution of your video easily.
Now let’s move to understanding the steps involved in changing the resolution of a video!
Part 4. Steps to Change Video Resolution in Filmora
To change the resolution of a video, you would need a basic video editor. This video editor needs to support the features that enable you to adjust a video resolution. In this case, Filmora is the best option.
Wondershare Filmora
Free Download For Win 7 or later(64-bit)
Free Download For macOS 10.14 or later
It has an attractive system UI that allows inexperienced users to learn how to use it quickly. It also has a diverse stock media collection. Not only that, but It gives you access to dependable features for changing the speed of a video.

Scroll below to learn how to download the latest version!
Step1 Download Filmora
Begin by installing the latest version of Wondershare Filmora if you don’t do already. Then, run the installer of this app on your PC or Mac.
Now that you have downloaded the app let’s change the resolution!
Step2 Import Video Clips
Your next step after launching Filmora is to import video clips you want to resize. To accomplish this, follow the steps outlined below:
- Locate and select the Import icon on the top left side of the Filmora Home Interface.
- It will take you to your computer’s library.
- Select the videos to be edited and then click OK.

If you need clarification about the resolution of the video that you imported, you can also check them before adding it to the timeline.
- Right-Click on the video in the import window.
- In the pop-up column, go to Properties.
It opens a window that will tell you the basic info about your video clips. Here you can also preview the resolution.

Now that we have our clips imported, it is time to add them to the timeline below!
Step3 Add The Video Clips to Timeline
To add Video clips to the timeline, go through the steps as guided:
- Hold Right click to drag and select the video clips in the import window.
- Release Right-click when in the timeline.

Doing so would have added the video clips to the timeline. Instead, it has created a workplace to edit our videos.
You can trim, add effects, and join multiple clips in this process. After finishing the editing process, it’s time to select an export format.
Step4 Export Your Video
You can export into video formats in two ways with Filmora. It can be either selecting a format for your video. Or you can also choose to export your video to a particular device.
Video Format Resolution
Wondershare Filmora is a fantastic software that allows you to access a variety of formats for your videos. These export formats include MP4, WMV, F4V, MOV, TS, 3GP, and more. To select a format for your video, follow the steps as guided:
- Click on Export.
- In the left column, click on the video format you need.
- Click Export on the bottom right corner of the window.

Exporting a video in a specific format not only allows you to change the format of a video but also allows you to change the resolution simultaneously.
Default Resolution Settings
Some formats have a built-in resolution. Whenever you choose a specific format for a video, the resolution of the video will be shifted to the resolution of that format, i.e., TS has a default 1080p resolution.
![]()
Note: Another thing to remember is that most video formats have defaulted to 1080p. But there are some formats whose resolutions vary according to their style. A good example is a 3GP format, which is set to 352 x 488 by default.
Customize the Resolution
But if you don’t find the resolution stable for your device, you can also change this default resolution in simple steps. In the export window, follow the steps mentioned ahead:
- In the preset tab, go to > settings.
- In the video tab, click on the resolution.
- In the drop-down menu, select the resolution that you desire.
You can also select a custom resolution by these steps:
- In the drop-down menu, click on Custom.
- Here, you can change the height and width according to your wish.

Exporting a Video to a Specific Device
Selecting a format for your video can help if you want to change the resolution. But in cases where you want to export a video to a particular mobile device. Such as an iPhone or an iPad, you can select the device export option.
In the device export option, you can select a custom device. Filmora allows you to choose from a wide variety of machines available when you choose a custom device; the resolution will be set to optimal for that particular device.
Select a Folder to Export Your Video
After you are done calibrating the resolution settings, you can move on to select the export location for your video. You can do so by the steps mentioned:
- In the main Export window, navigate to the Save
- Click on the Folder
- It will direct you to your PC library.
- Select the directory you want to export your video to.
- Click Select Folder.

Final Step
The last step to export your video is clicking on the Export icon in the bottom right corner of the window. It opens up a render window. Wait for a few minutes until the video finishes exporting.
When the export is finished, a window will pop up as a reminder. You can also find the target folder by clicking on Find Target.

Congratulations! You have successfully learned how to change the resolution of a video using Wondershare Filmora.
Conclusion
Rapid video technology advancement is leading to the development of higher-resolution devices. The greatest resolution in the modern day is the 8K; soon, everyone will be using 8K devices. So, it is beneficial to learn how to change a video’s resolution.
By following the steps mentioned in this article, you can now change the resolution of your video using Filmora.
Learn How to Create Your Own Custom Animated Text Intro in the Filmora Video Editor. Follow a Few Simple Steps to Create Something that Looks Incredible
Preparation
What you need to prepare:
- A computer (Windows or macOS)
- Your video materials.
- Filmora video editor
Step 1
Download and Install the Filmora video editor . Then, click on New Project once the program starts.
Step 2
Go to Titles and drag the Default Title to the Timeline. Then, double-click on the Default Title clip to open its settings. Here, type in your text → change the text color to Black → click OK → take a snapshot.

Step 3
Double-click on the Default Title once more and simply change the text color to anything other than black this time. Then, click OK and take another snapshot. After this, delete the Default Title from the Timeline.
Step 4
Next, go to Sample Color and drag the White color to the Timeline. Increase the White Color clip’s duration to 10 seconds by dragging the tail of the clip to the right.

Step 5
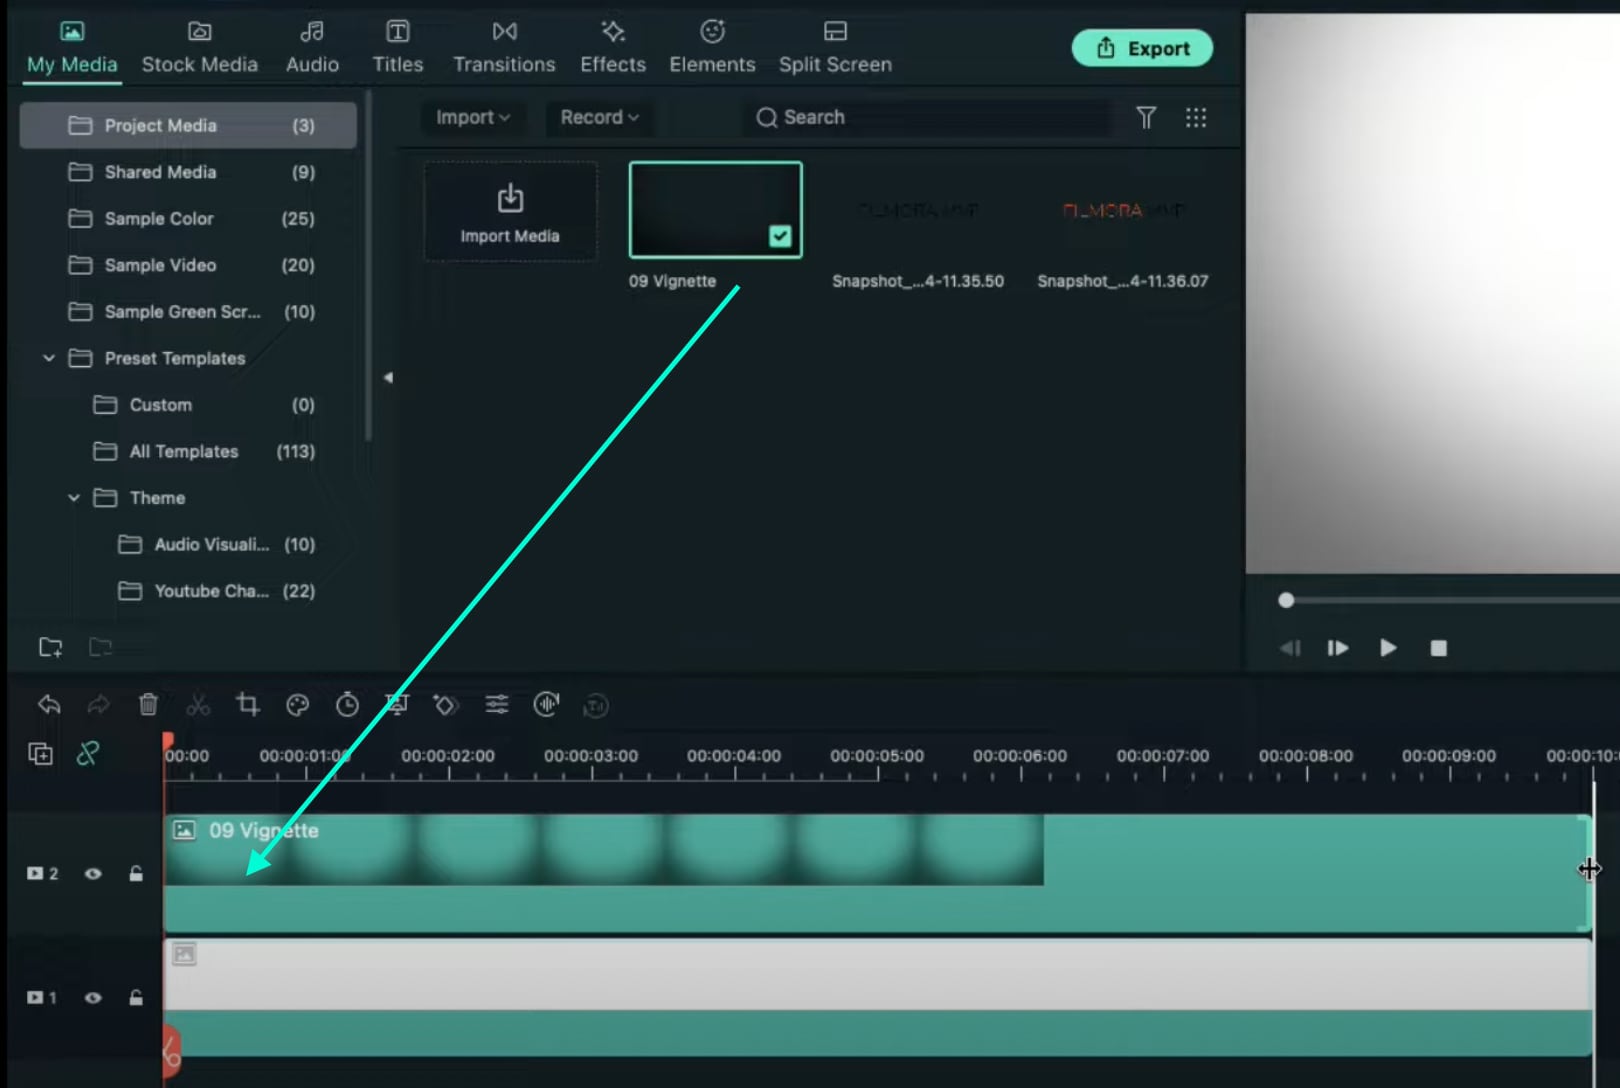
For the next step, you need to download a simple Vignette png image . Then, import the Vignette image into Filmora. Go to My Media and click on Import Media. Import it and drag the image to the Timeline. Then, move that clip to Track 3.
Step 6
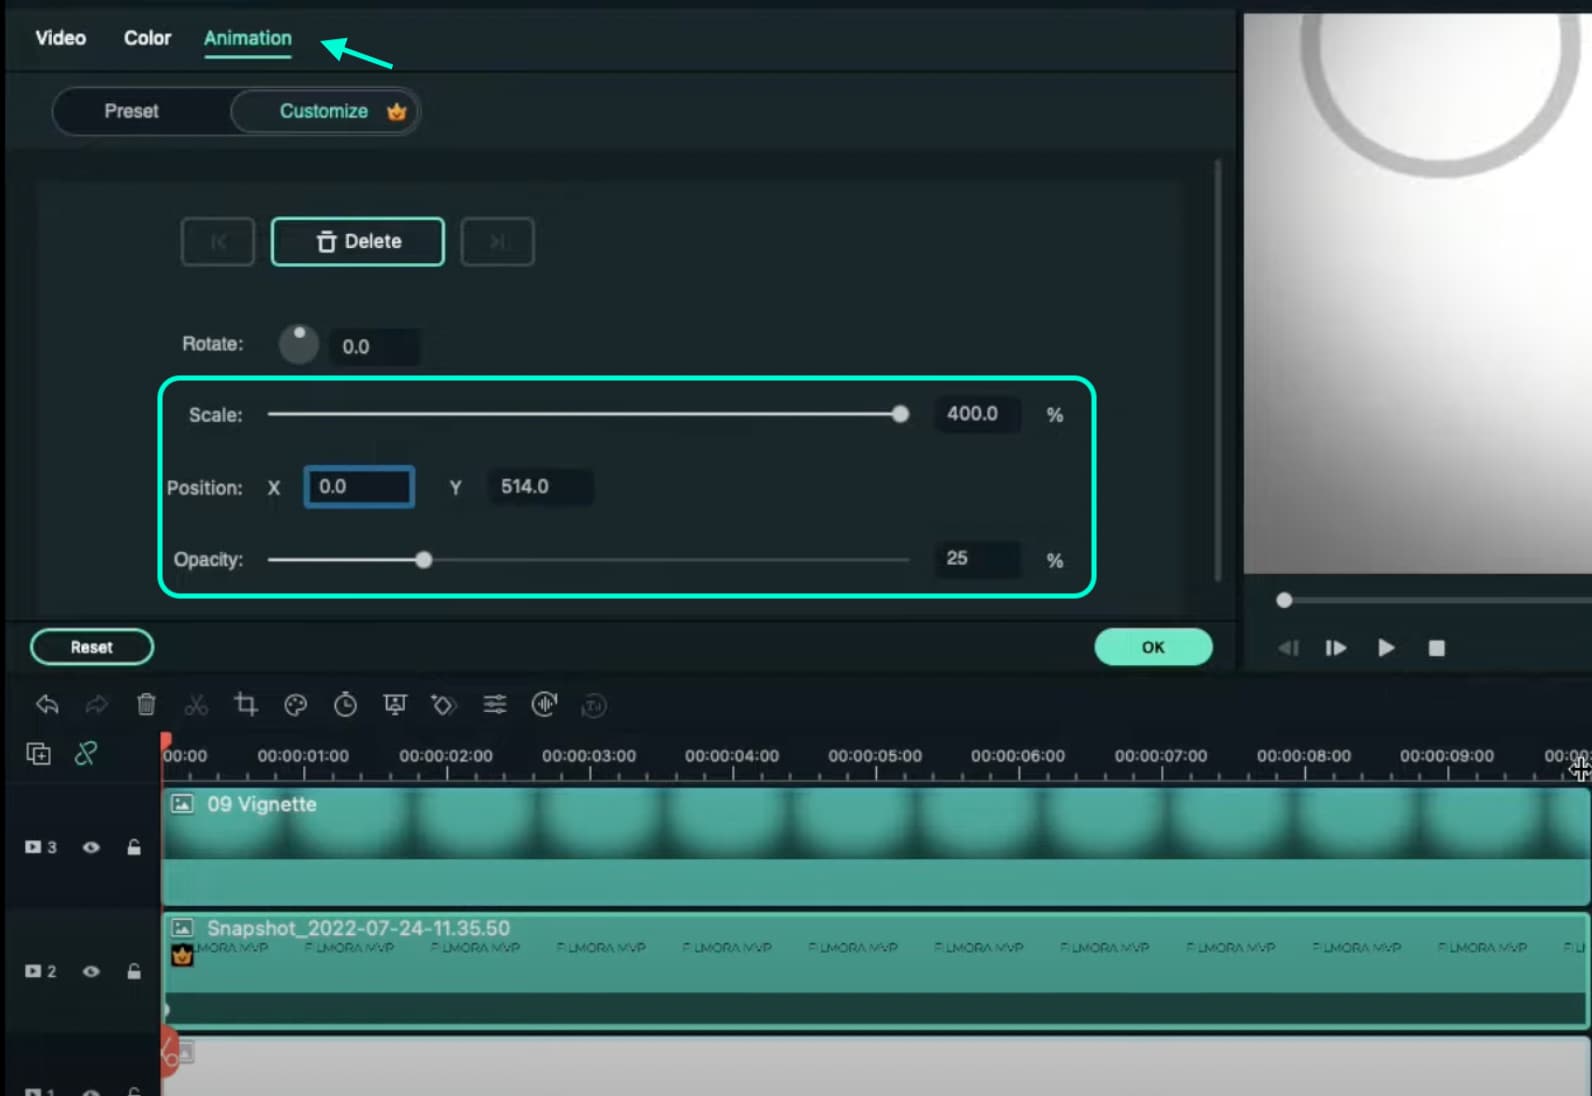
Drop the Black snapshot you took earlier to Track 2. Double-click on it, go to Animation, and apply these settings. After this, move the Playhead to the end of the clip and change the X-axis value to “-800”.
Step 7
Go to Effects and drag the Square Blur effect to Track 4 on the Timeline. Increase its duration to match the other clips. Then, click on the effect and change its Size bar value to 4. Click OK.

Step 8
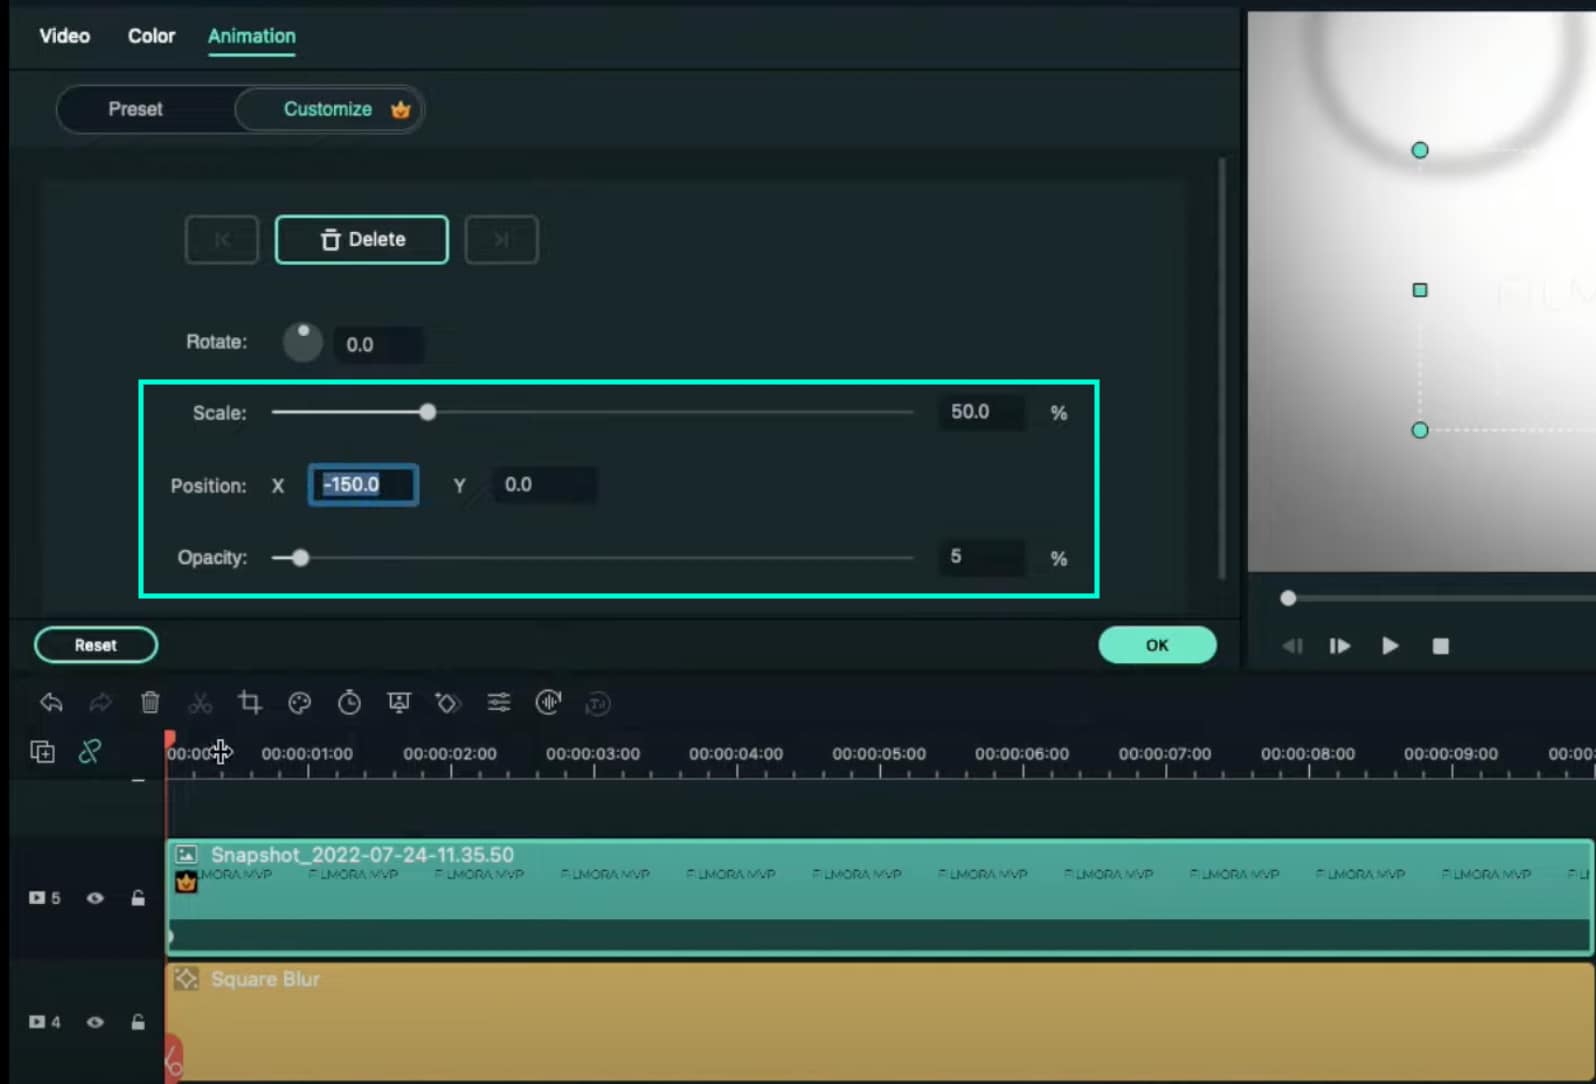
Place the Playhead at the beginning of the clip. Go to My Media and drag the Black snapshot to Track 5. Double-click on it → go to Animation and change the settings to look like this. Then, move the Playhead to 9 seconds. Here, change the X-axis to “150” and the Scale to 75%.
Step 9
Now, place the Playhead at the starting point and drag the colored snapshot in Track 6. Double-click on it and change the Scale to 50%. Then, move the Playhead to 9 seconds again and change the Scale to 75%. Click OK.
Step 10
Go to Sample Color and drag “Gradient 4” to Track 7 on the Timeline. Double-click on it → go to the Video tab → change the Blending Mode to Overlay → decrease the Opacity to 25%. Click OK.

Step 11
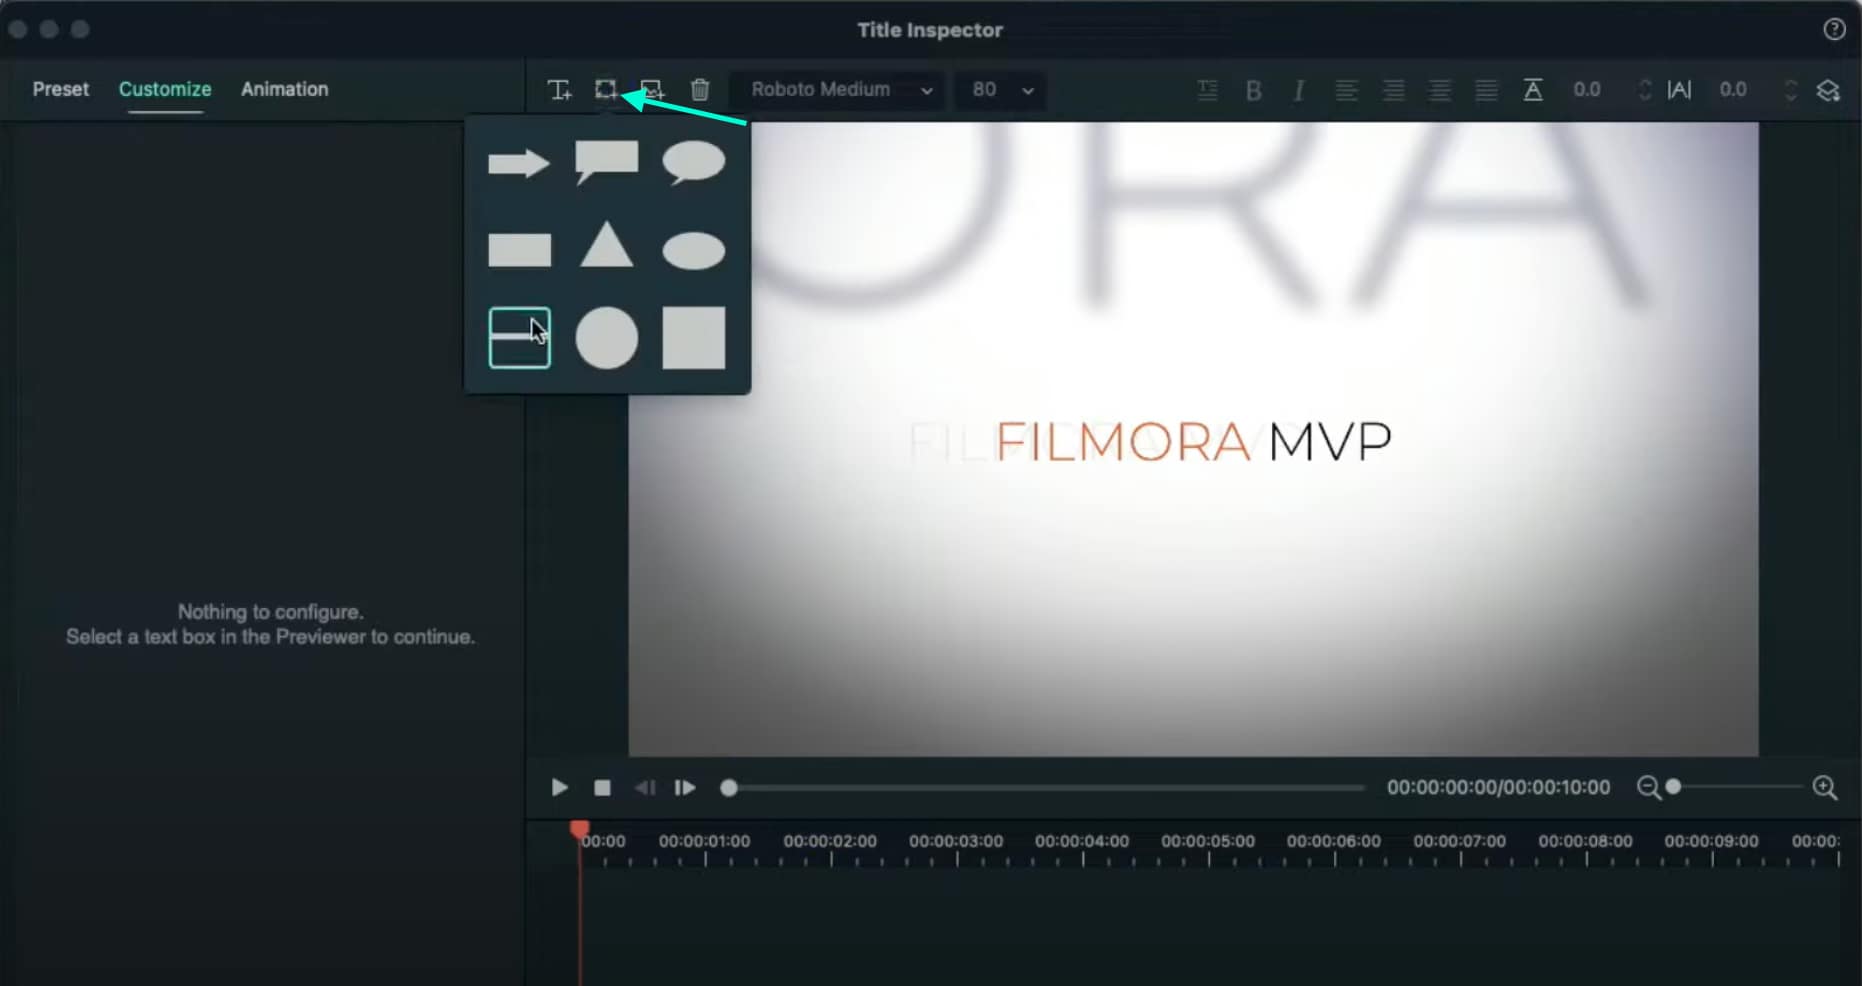
Drag a Default Title to Track 8 and double-click on it to open its Advanced settings. From here, delete the yellow text clip located under the video. Then, insert a Line shape.
Step 12
Increase the Line’s length to be almost as long as the screen. Then adjust its position until half of the Line is visible on the screen. Like this.
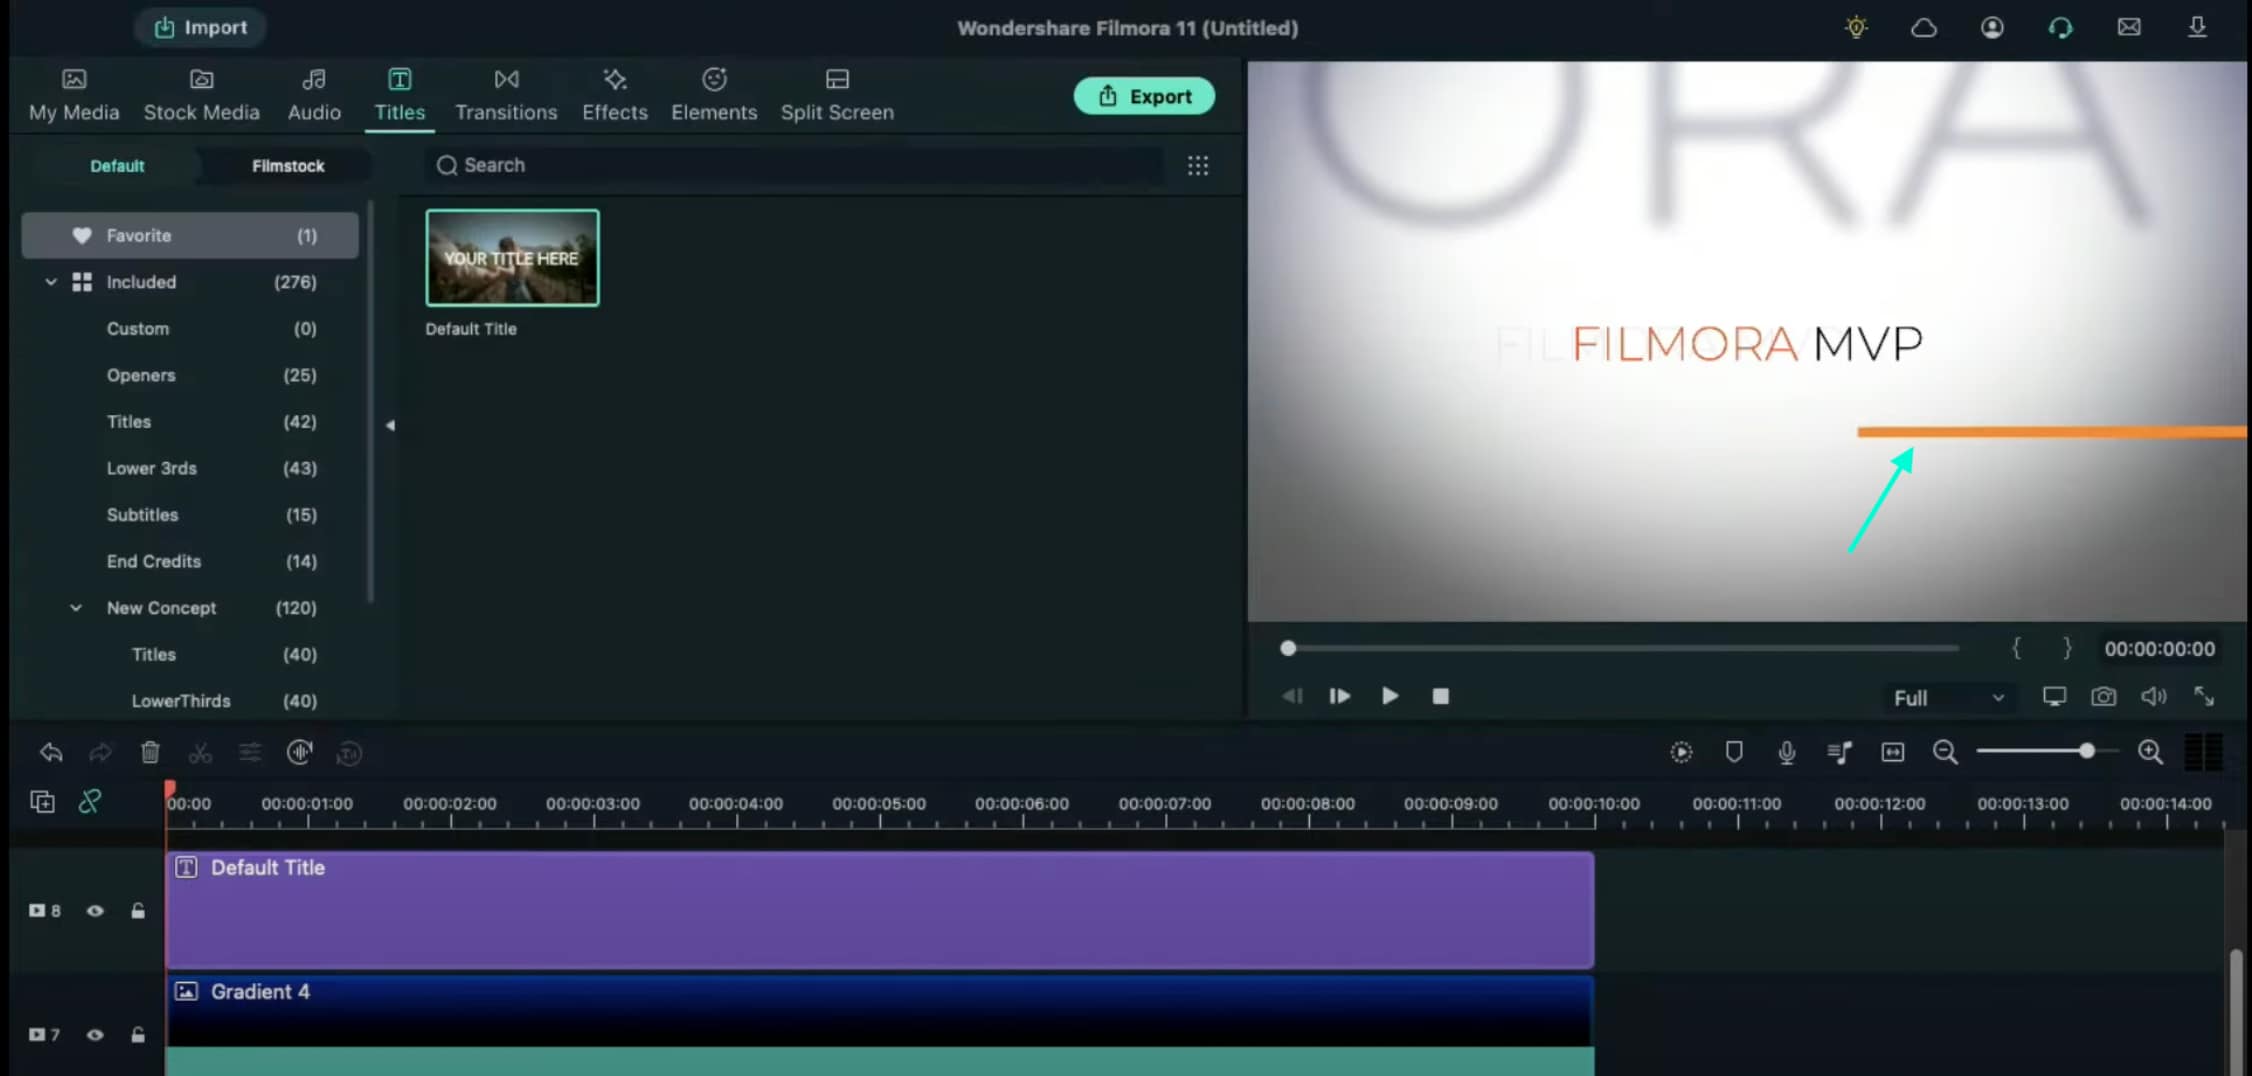
Step 13
Copy this Default Title and paste it into Track 9. Open its Advanced settings and change the Line color to something different than the previous one. Then, move it to the other side of the screen, slightly above the previous line. Click OK.
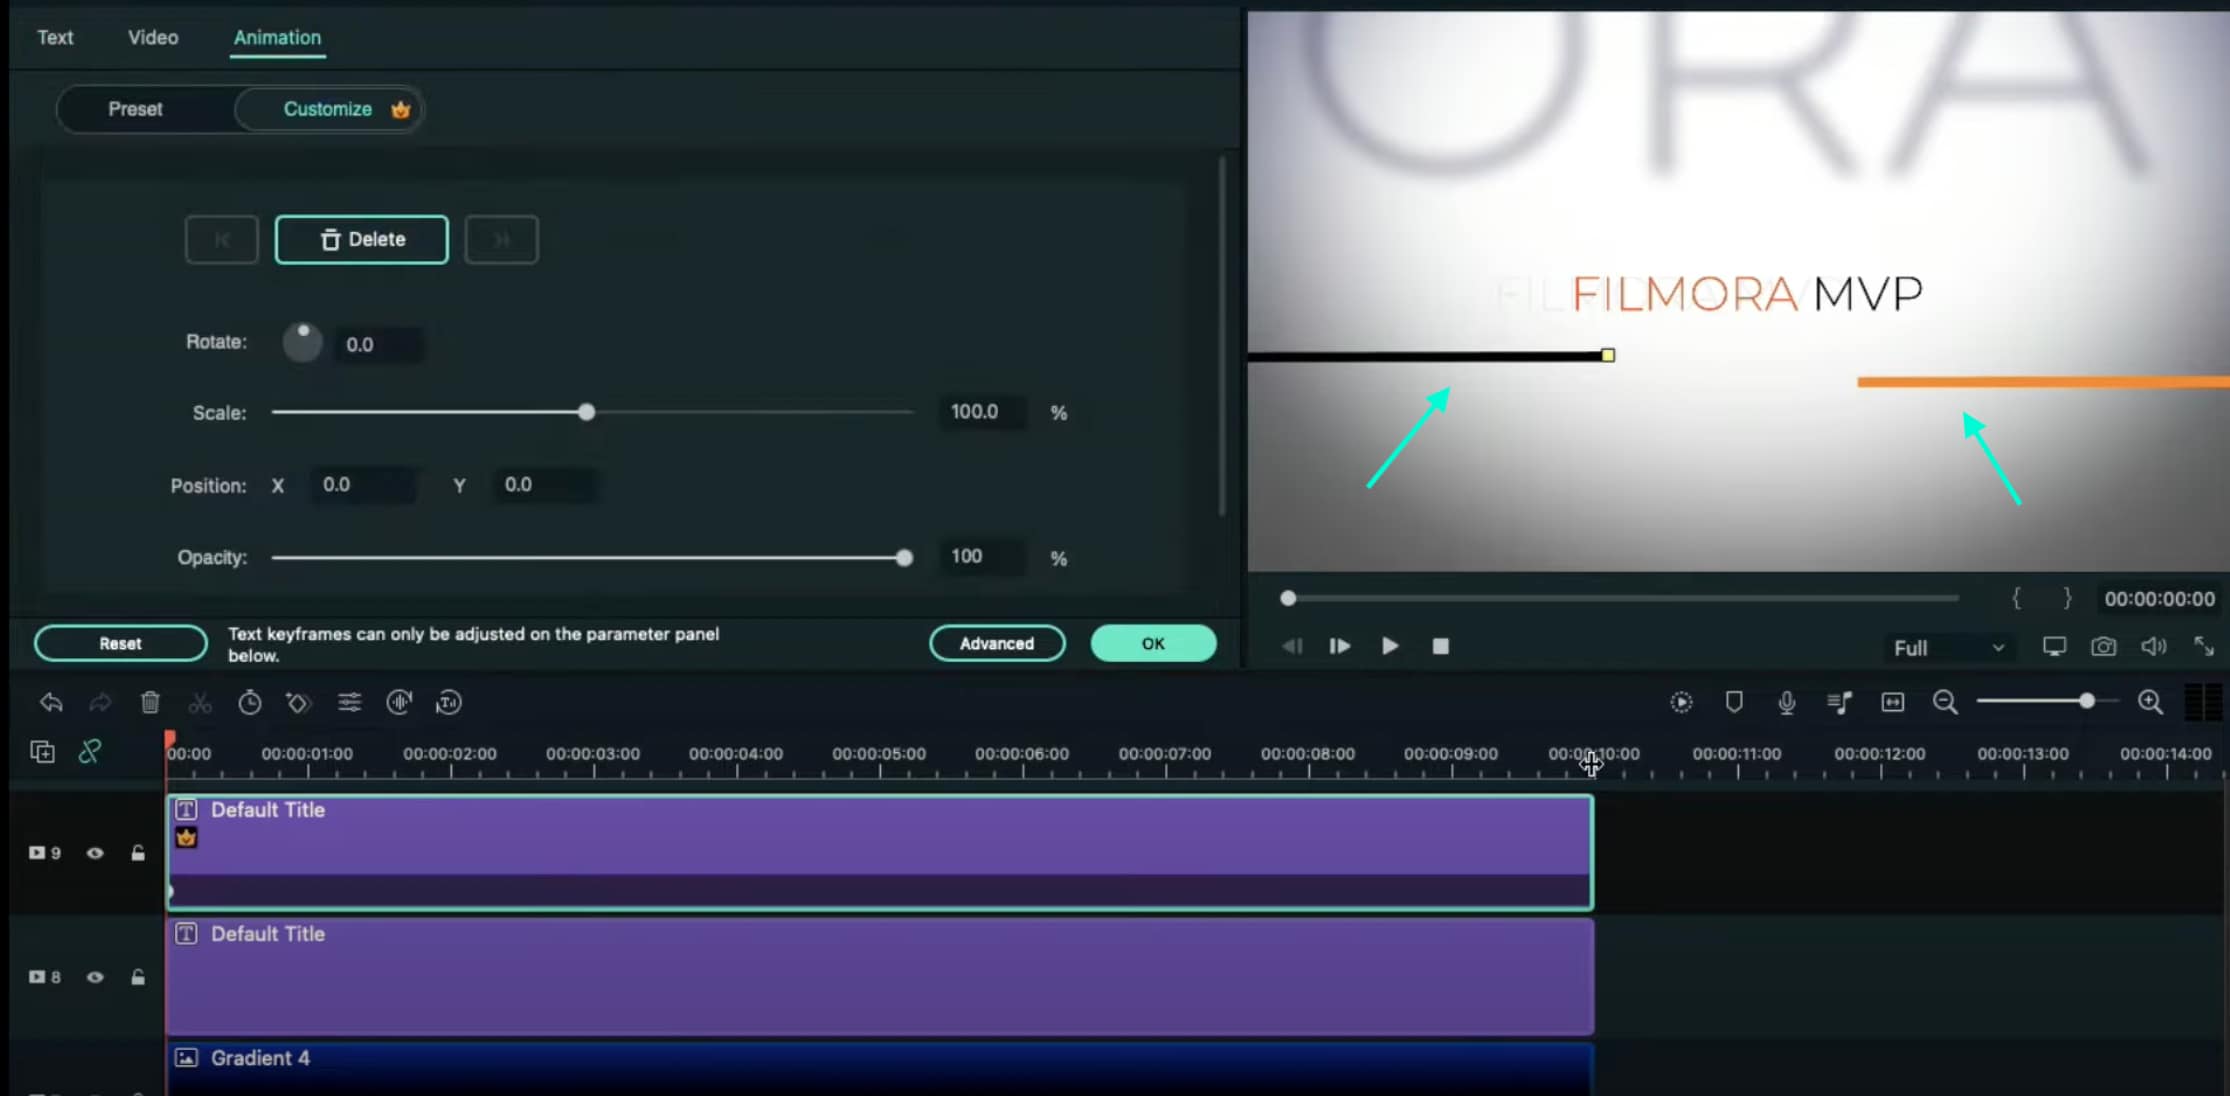
Step 14
Now, select the Default Title on Track 9, double-click it, and go to the Animation tab. Move the Playhead at the starting point of the Timeline and add a keyframe. Then, move the Playhead to the end of the clip. Drag the X-axis position to the right until the Line shape moves all the way to the right side of the screen.
Do the same for the Default Title on Track 8. But this time, drag the X-axis position toward the other side. When you’re done, press OK.
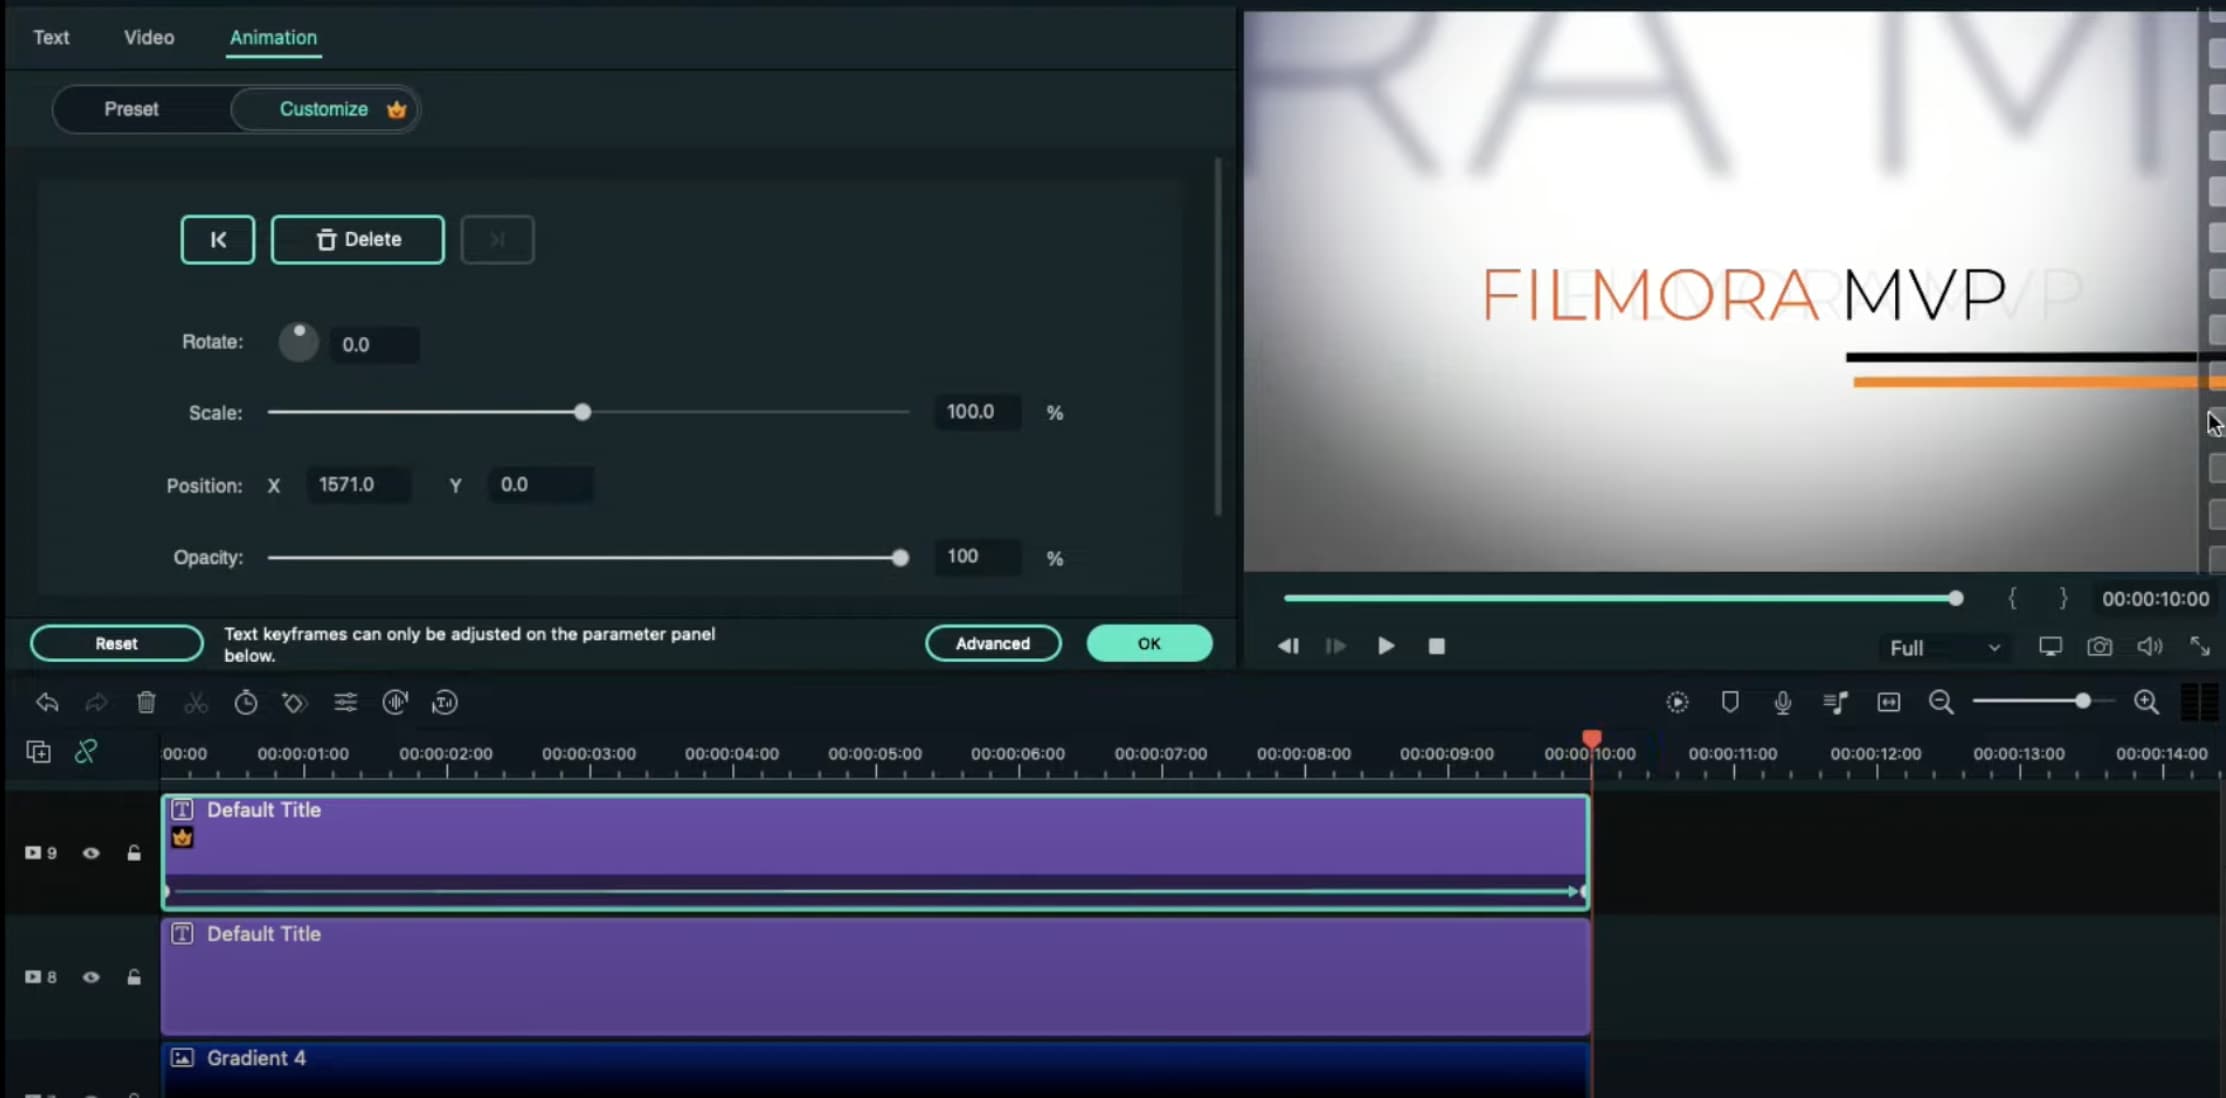
Step 15
Go to the Effects tab → drag the Luma Sharp effect to Track 10. Click it and change its Intensity to 10.
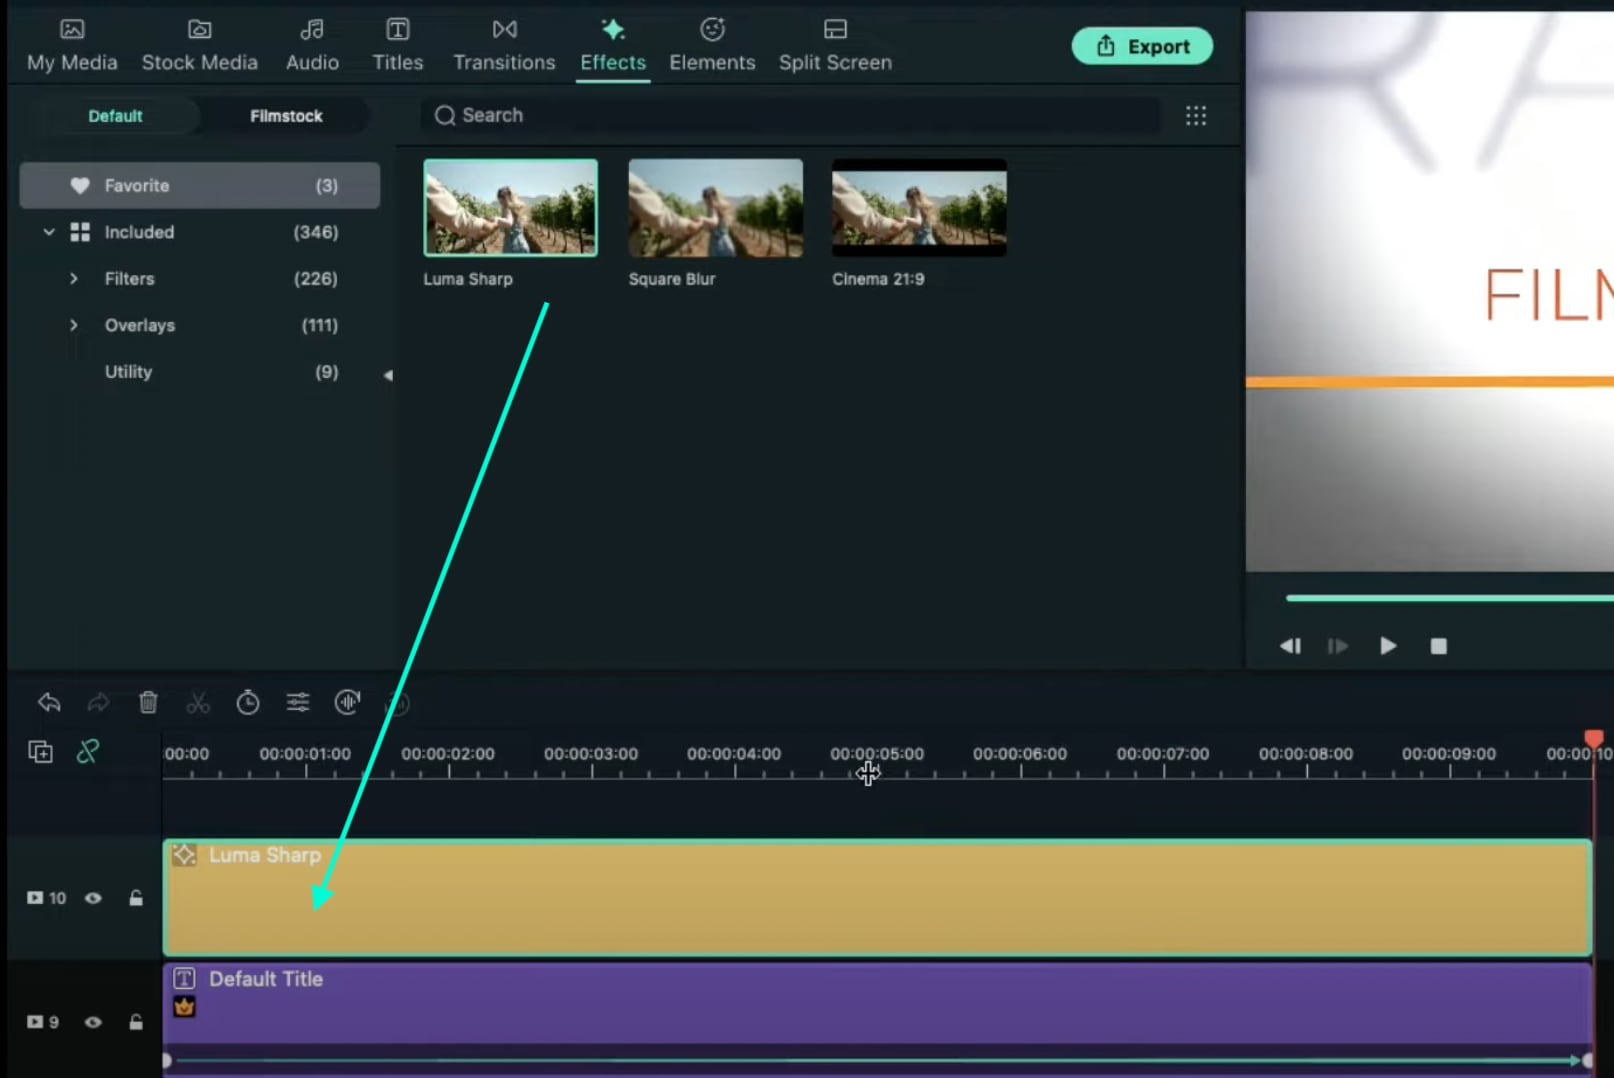
Step 16
You’re all done. Click on the Render button to render all the clips and finally preview your creation. Congratulations on creating a text animation intro in Filmora.

Summary
What you’ve learned:
- Create a unique text animation intro in Filmora
- Animate text and titles
- How to add and animate different shapes in Filmora
- Edit the advanced settings of elements in the Filmora video editor
What you need to prepare:
- A computer (Windows or macOS)
- Your video materials.
- Filmora video editor
Step 1
Download and Install the Filmora video editor . Then, click on New Project once the program starts.
Step 2
Go to Titles and drag the Default Title to the Timeline. Then, double-click on the Default Title clip to open its settings. Here, type in your text → change the text color to Black → click OK → take a snapshot.

Step 3
Double-click on the Default Title once more and simply change the text color to anything other than black this time. Then, click OK and take another snapshot. After this, delete the Default Title from the Timeline.
Step 4
Next, go to Sample Color and drag the White color to the Timeline. Increase the White Color clip’s duration to 10 seconds by dragging the tail of the clip to the right.

Step 5
For the next step, you need to download a simple Vignette png image . Then, import the Vignette image into Filmora. Go to My Media and click on Import Media. Import it and drag the image to the Timeline. Then, move that clip to Track 3.

Step 6
Drop the Black snapshot you took earlier to Track 2. Double-click on it, go to Animation, and apply these settings. After this, move the Playhead to the end of the clip and change the X-axis value to “-800”.

Step 7
Go to Effects and drag the Square Blur effect to Track 4 on the Timeline. Increase its duration to match the other clips. Then, click on the effect and change its Size bar value to 4. Click OK.

Step 8
Place the Playhead at the beginning of the clip. Go to My Media and drag the Black snapshot to Track 5. Double-click on it → go to Animation and change the settings to look like this. Then, move the Playhead to 9 seconds. Here, change the X-axis to “150” and the Scale to 75%.

Step 9
Now, place the Playhead at the starting point and drag the colored snapshot in Track 6. Double-click on it and change the Scale to 50%. Then, move the Playhead to 9 seconds again and change the Scale to 75%. Click OK.
Step 10
Go to Sample Color and drag “Gradient 4” to Track 7 on the Timeline. Double-click on it → go to the Video tab → change the Blending Mode to Overlay → decrease the Opacity to 25%. Click OK.

Step 11
Drag a Default Title to Track 8 and double-click on it to open its Advanced settings. From here, delete the yellow text clip located under the video. Then, insert a Line shape.

Step 12
Increase the Line’s length to be almost as long as the screen. Then adjust its position until half of the Line is visible on the screen. Like this.

Step 13
Copy this Default Title and paste it into Track 9. Open its Advanced settings and change the Line color to something different than the previous one. Then, move it to the other side of the screen, slightly above the previous line. Click OK.

Step 14
Now, select the Default Title on Track 9, double-click it, and go to the Animation tab. Move the Playhead at the starting point of the Timeline and add a keyframe. Then, move the Playhead to the end of the clip. Drag the X-axis position to the right until the Line shape moves all the way to the right side of the screen.
Do the same for the Default Title on Track 8. But this time, drag the X-axis position toward the other side. When you’re done, press OK.

Step 15
Go to the Effects tab → drag the Luma Sharp effect to Track 10. Click it and change its Intensity to 10.

Step 16
You’re all done. Click on the Render button to render all the clips and finally preview your creation. Congratulations on creating a text animation intro in Filmora.

Summary
What you’ve learned:
- Create a unique text animation intro in Filmora
- Animate text and titles
- How to add and animate different shapes in Filmora
- Edit the advanced settings of elements in the Filmora video editor
What you need to prepare:
- A computer (Windows or macOS)
- Your video materials.
- Filmora video editor
Step 1
Download and Install the Filmora video editor . Then, click on New Project once the program starts.
Step 2
Go to Titles and drag the Default Title to the Timeline. Then, double-click on the Default Title clip to open its settings. Here, type in your text → change the text color to Black → click OK → take a snapshot.

Step 3
Double-click on the Default Title once more and simply change the text color to anything other than black this time. Then, click OK and take another snapshot. After this, delete the Default Title from the Timeline.
Step 4
Next, go to Sample Color and drag the White color to the Timeline. Increase the White Color clip’s duration to 10 seconds by dragging the tail of the clip to the right.

Step 5
For the next step, you need to download a simple Vignette png image . Then, import the Vignette image into Filmora. Go to My Media and click on Import Media. Import it and drag the image to the Timeline. Then, move that clip to Track 3.

Step 6
Drop the Black snapshot you took earlier to Track 2. Double-click on it, go to Animation, and apply these settings. After this, move the Playhead to the end of the clip and change the X-axis value to “-800”.

Step 7
Go to Effects and drag the Square Blur effect to Track 4 on the Timeline. Increase its duration to match the other clips. Then, click on the effect and change its Size bar value to 4. Click OK.

Step 8
Place the Playhead at the beginning of the clip. Go to My Media and drag the Black snapshot to Track 5. Double-click on it → go to Animation and change the settings to look like this. Then, move the Playhead to 9 seconds. Here, change the X-axis to “150” and the Scale to 75%.

Step 9
Now, place the Playhead at the starting point and drag the colored snapshot in Track 6. Double-click on it and change the Scale to 50%. Then, move the Playhead to 9 seconds again and change the Scale to 75%. Click OK.
Step 10
Go to Sample Color and drag “Gradient 4” to Track 7 on the Timeline. Double-click on it → go to the Video tab → change the Blending Mode to Overlay → decrease the Opacity to 25%. Click OK.

Step 11
Drag a Default Title to Track 8 and double-click on it to open its Advanced settings. From here, delete the yellow text clip located under the video. Then, insert a Line shape.

Step 12
Increase the Line’s length to be almost as long as the screen. Then adjust its position until half of the Line is visible on the screen. Like this.

Step 13
Copy this Default Title and paste it into Track 9. Open its Advanced settings and change the Line color to something different than the previous one. Then, move it to the other side of the screen, slightly above the previous line. Click OK.

Step 14
Now, select the Default Title on Track 9, double-click it, and go to the Animation tab. Move the Playhead at the starting point of the Timeline and add a keyframe. Then, move the Playhead to the end of the clip. Drag the X-axis position to the right until the Line shape moves all the way to the right side of the screen.
Do the same for the Default Title on Track 8. But this time, drag the X-axis position toward the other side. When you’re done, press OK.

Step 15
Go to the Effects tab → drag the Luma Sharp effect to Track 10. Click it and change its Intensity to 10.

Step 16
You’re all done. Click on the Render button to render all the clips and finally preview your creation. Congratulations on creating a text animation intro in Filmora.

Summary
What you’ve learned:
- Create a unique text animation intro in Filmora
- Animate text and titles
- How to add and animate different shapes in Filmora
- Edit the advanced settings of elements in the Filmora video editor
What you need to prepare:
- A computer (Windows or macOS)
- Your video materials.
- Filmora video editor
Step 1
Download and Install the Filmora video editor . Then, click on New Project once the program starts.
Step 2
Go to Titles and drag the Default Title to the Timeline. Then, double-click on the Default Title clip to open its settings. Here, type in your text → change the text color to Black → click OK → take a snapshot.

Step 3
Double-click on the Default Title once more and simply change the text color to anything other than black this time. Then, click OK and take another snapshot. After this, delete the Default Title from the Timeline.
Step 4
Next, go to Sample Color and drag the White color to the Timeline. Increase the White Color clip’s duration to 10 seconds by dragging the tail of the clip to the right.

Step 5
For the next step, you need to download a simple Vignette png image . Then, import the Vignette image into Filmora. Go to My Media and click on Import Media. Import it and drag the image to the Timeline. Then, move that clip to Track 3.

Step 6
Drop the Black snapshot you took earlier to Track 2. Double-click on it, go to Animation, and apply these settings. After this, move the Playhead to the end of the clip and change the X-axis value to “-800”.

Step 7
Go to Effects and drag the Square Blur effect to Track 4 on the Timeline. Increase its duration to match the other clips. Then, click on the effect and change its Size bar value to 4. Click OK.

Step 8
Place the Playhead at the beginning of the clip. Go to My Media and drag the Black snapshot to Track 5. Double-click on it → go to Animation and change the settings to look like this. Then, move the Playhead to 9 seconds. Here, change the X-axis to “150” and the Scale to 75%.

Step 9
Now, place the Playhead at the starting point and drag the colored snapshot in Track 6. Double-click on it and change the Scale to 50%. Then, move the Playhead to 9 seconds again and change the Scale to 75%. Click OK.
Step 10
Go to Sample Color and drag “Gradient 4” to Track 7 on the Timeline. Double-click on it → go to the Video tab → change the Blending Mode to Overlay → decrease the Opacity to 25%. Click OK.

Step 11
Drag a Default Title to Track 8 and double-click on it to open its Advanced settings. From here, delete the yellow text clip located under the video. Then, insert a Line shape.

Step 12
Increase the Line’s length to be almost as long as the screen. Then adjust its position until half of the Line is visible on the screen. Like this.

Step 13
Copy this Default Title and paste it into Track 9. Open its Advanced settings and change the Line color to something different than the previous one. Then, move it to the other side of the screen, slightly above the previous line. Click OK.

Step 14
Now, select the Default Title on Track 9, double-click it, and go to the Animation tab. Move the Playhead at the starting point of the Timeline and add a keyframe. Then, move the Playhead to the end of the clip. Drag the X-axis position to the right until the Line shape moves all the way to the right side of the screen.
Do the same for the Default Title on Track 8. But this time, drag the X-axis position toward the other side. When you’re done, press OK.

Step 15
Go to the Effects tab → drag the Luma Sharp effect to Track 10. Click it and change its Intensity to 10.

Step 16
You’re all done. Click on the Render button to render all the clips and finally preview your creation. Congratulations on creating a text animation intro in Filmora.

Summary
What you’ve learned:
- Create a unique text animation intro in Filmora
- Animate text and titles
- How to add and animate different shapes in Filmora
- Edit the advanced settings of elements in the Filmora video editor
Secret Tips & Tricks to Use in Filmora
Wondershare Filmora is a great video editing software with millions of users worldwide. It has many features that it provides to its users. However, there are some other features hidden up its sleeve.
This article will share some “secrets” of Wondershare Filmora features you may not know that they exist in Filmora. Scroll below to see the features that level up your editing skills.
Part 1. Shared Media Folder
You might have had the hassle of importing the same videos for a considerable time in a different project. It can become a problem for you. It may be fine if you have organized your videos from the start.
Shared Media Folder in Filmora, now called the Global Media Folder, can store video and audio that you’ve imported for future projects. So you don’t have to keep re-importing your media for future videos.

Moreover, when you have imported files into the Shared Media Folder, you can create new Sub-Folders. You can name these folders according to the types of media you are going to use.
Suppose you are a content creator and want to spice up your content with memes. You can create a meme folder to import recent memes into your videos.
Once you have imported them into the Wondershare Filmora’s Shared Media Folder, you can access them anytime. Doing so will allow you to save time and build a base for your future projects.
Free Download For Win 7 or later(64-bit)
Free Download For macOS 10.14 or later
Part 2. Customize Proxy Files
Before understanding the custom proxy settings, let us know what proxy files are.
Proxy Files
Proxy files in Wondershare Filmora allow you to render and edit 4K and other higher-resolution videos easily, regardless of your computer’s processing power.
No one wants to compromise PC performance when editing videos. But if you are importing a video with a higher resolution than your PC, you can only play it sometimes. Other than that, your PC might get stuck and slow down.
If your PC has a built-in resolution of 1080p, but the video you are going to import is 2160p, you can encounter rendering and performance problems. But in the case of Wondershare Filmora Proxy files, you can smoothly edit your videos without any trouble.
How to Customize Proxy Files in Filmora
Although Wondershare Filmora automatically creates proxy files when it encounters resolutions more significant than the PC performance. But you can also set them to your preference.
And customize your proxy files takes some simple and easy steps. But first, follow the steps mentioned below.
Step1 Find the File option on the top left corner of the Wonderhsare Filmora home interface.
Step2 Click on Files and go to Preferences.
Step3 A window will pop up, and here you can see multiple options.
Step4 Go to the performance.
Step5 In the performance tab, scroll down till your see Proxy.
Step6 Here check the box that says, “Automatically create proxies when resolution higher than:”

Step7 Below you can see multiple options. In these options, select the resolution that you want.
Step8 You can also click on the box below to automatically delete the proxies when you close your project.
Now, whenever you encounter a resolution of a higher video than the one you selected, Wondershare Filmora will do its magic.
Part 3. Delete Project Render Cache
Another hack you can use to save space on your hard drive is Deleting the Render cache. But before we do that, let us understand what Render cache is!
What is Render Cache?
Rendering can be a giant leap to give you a smooth performance experience. However, when you import your videos into the timeline, you can always render to have an uninterrupted playback experience.
Doing so will allow you to work in your zone quickly and efficiently. You can do a manual rendering before you begin the editing process. Or you can also opt to choose automatic rendering. In the automatic rendering option, you can continue your editing process. In the meantime, your timeline will be rendered.
How to Delete Render Cache in Filmora
To save up storage space on your computer, you can delete your render cache by following the steps.
Step1 Click on files in the top left corner of the Wondershare Filmora home interface.
Step2 Go to Preferences.
Step3 A window will pop up and go to Performance.
Step4 In the performance tab, scroll down below to the Preview Render.
Step5 Check the box saying, “Automatically delete render files when a project is closed.”

Step6 Click on OK to save your changes.
Now, whenever you close your project, your render cache will be deleted and would have given you extra space on your computer.
Part 4. Remove Split Button on Playhead
In some instances, when you are moving the playhead on the timelines, it can distract you from doing your editing. Or even more, you can mistakenly click on the Split button to split the clips you don’t want them to.
Well, no worries at all! Wondershare Filmora takes care of that for you. You can hide or remove the Split button on the playhead. It only takes a few simple and easy steps. Follow the steps mentioned below to remove the Split button:
Step1 You will notice the File option on the top left corner of the Wonderhsare Filmora home interface.
Step2 Click on Files and go to Preferences.
Step3 A window will pop up, and here you can see multiple options.
Step4 Go to the editing
Step5 In the editing tab, scroll down till your see the Split button.

Step6 Check the box. Then, click OK to save your changes.
Doing so would have removed the Split button from your playhead. So now you can edit your videos without any distractions.
Part 5. Copy and Paste Effects
Copy and paste are one of the oldest tricks in editing procedures. Wondershare Filmora comes with a range of commands and features that allow you to save time and be reliable.
Suppose you want to add an effect to a video clip in the timeline. Then, after adding the effect to your video, make custom changes to make it look more closely to the style you want. You can now use the copy-and-paste function to add the same effect to another clip. That helps you save a lot of time from tedious and time-consuming work.
How to Copy and Paste Effects
While editing, you will need to ensure that your editing process is as clean as possible and that you have all the time on hand.
But there is a solution! You can easily copy and paste the effects you placed on one video clip to another. Just follow the steps mentioned, and you will be good to go:
Step1 Right-click on the video to you added the effects too.
Step2 A drop-down column will pop up.
Step3 In the options below, you will notice an option called “Copy Effects.”
Step4 Click on the “Copy Effects” option.
Step5 Now move the playhead to the video clip on which you want to paste the effects.
Step6 Right-click on the video that you want to place the effect on.
Step7 In the pop-up column, select the Paste Effect
Step8 It adjusts the video clip according to the changes of the prior one.
You can save editing time by simply copying and pasting video effects.

Part 6. Timeline Snap
You might have added multiple videos in the same timeline track. If you removed the video ahead of the video clip, you have to close the gap in between.
So, arranging and moving clips in the timeline are hectic and time-consuming. However, that is the case without timeline snapping.
How to Apply Timeline Snap in Filmora
Timeline snapping will allow you to arrange video clips side by side without any breaks and cut-offs. Also, it will enable you to place it precisely above other video and audio gaps in the timeline.
In most cases, Timeline snapping is enabled from the start. But if you are encountering some problems managing your videos. Or if you want to remove the Timeline snap feature. Follow the steps mentioned below:
Step1 Right-click on the Timeline.
Step2 A pop will open up, giving you multiple options.
Step3 Click on timeline Snapping to either enable it or disable it.

Now you can easily enable and disable timeline snapping according to your choice!
Part 7. Color Code Video Clips
When editing footage from multiple cameras, you might want to organize which media is from which source in the timeline. You can do this by color coding your clips.
Steps to Color Code Your Videos
Color coding allows you to edit all the clips marked with a particular color to be selected simultaneously without selecting them manually in the timeline.
To color code a video, follow the steps as mentioned:
Step1 Select the clips you want to color code, right-click, and choose from the available colors.
Step2 Once you’ve color coded your clips, you can right-click on the clip again and choose to select all clips from the color mark option.
Step3 And all the clips marked with that color will be selected.

Part 8. Group Clips Together
Now in an editing timeline, you might encounter a situation where you want to arrange a video clip with specific audio. Again, it allows you to stay organized and save up a lot of time.
Grouping clips together can also be helpful when you want to edit multiple clips in the timeline but want to maintain a particular order. The group will remain in its place and allow you to edit your other video clips quickly.
Stepwise Guide to Grouping the Clips in Filmora
You can group video and audio clips in straightforward steps. Just follow the actions ahead, and you will be good to go:
Step1 Hold Left-click and drag across the clips that you want to select.
Step2 When you are done, Right-click on the clip to open the options tab.
Step3 Scroll down, and you will see a “” option.
Step4 Select Group, and that’s done.

Your whole group will be selected whenever you select a video clip or an audio clip.
Part 9. Pan and Zoom Shortcut
Editing shortcuts are excellent. They allow you to save up a lot of time. Some people prefer to use a mouse only to edit their videos, but professionals always use a keyboard.
But there are some other shortcuts too! In these shortcuts, you would not necessarily need a keyboard; only a mouse will work and give a good outcome.
You might have seen those videos in which a specific screen ratio moves over a picture. Or, in some cases when you have to pan and zoom to create a flow effect.
Instead of manually adjusting the ratio of your videos and photos, Pan and Zoom shortcuts will allow you to use multiple features. These features allow you to select where your video or photo will start, zoom, and end.
These shortcuts are so easy to apply. Just go through the steps below, and you will accomplish the following:
Step1 Right-click on a photo or a video clip.
Step2 Go to the crop and zoom tab above the timeline.
Step3 In the window that opens up, you will see a pan and zoom option in the top left corner. Click on it.
Step4 And on the bottom right corner of the window, you can see the pan and zoom shortcuts available.
Step5 Please select any of them you want and then click on OK.

Part 10. New Feature Request
One of the significant features of Wondershare Filmora that sets it among the best is its capability to listen to the users. When you have been using Wondershare Filmora for a long time, there will come a time when you wish for a feature. You can also do so in a few simple steps. Just follow the steps mentioned:
Step1 Multiple options are available on the top left corner of the Wondershare Filmora home interface. Click on help.
Step2 A drop-down box will open up.
Step3 In the options offered to you, select suggest a feature.

Step4 It automatically directs you to your default browser, where you can see the multiple feature requests.
Step5 You can vote for a feature you want in the next update.
Step6 Or you can also create a request for another particular feature.

Summing Up
Wondershare Filmora is the best in the business regarding editing your videos. It has such creative and easy-to-use software that even a beginner efficiently edits videos.
There are a lot of features that Wondershare Filmora provides. But now, with these secret and hidden tips, you can edit your videos more creatively.
Free Download For macOS 10.14 or later
Part 2. Customize Proxy Files
Before understanding the custom proxy settings, let us know what proxy files are.
Proxy Files
Proxy files in Wondershare Filmora allow you to render and edit 4K and other higher-resolution videos easily, regardless of your computer’s processing power.
No one wants to compromise PC performance when editing videos. But if you are importing a video with a higher resolution than your PC, you can only play it sometimes. Other than that, your PC might get stuck and slow down.
If your PC has a built-in resolution of 1080p, but the video you are going to import is 2160p, you can encounter rendering and performance problems. But in the case of Wondershare Filmora Proxy files, you can smoothly edit your videos without any trouble.
How to Customize Proxy Files in Filmora
Although Wondershare Filmora automatically creates proxy files when it encounters resolutions more significant than the PC performance. But you can also set them to your preference.
And customize your proxy files takes some simple and easy steps. But first, follow the steps mentioned below.
Step1 Find the File option on the top left corner of the Wonderhsare Filmora home interface.
Step2 Click on Files and go to Preferences.
Step3 A window will pop up, and here you can see multiple options.
Step4 Go to the performance.
Step5 In the performance tab, scroll down till your see Proxy.
Step6 Here check the box that says, “Automatically create proxies when resolution higher than:”

Step7 Below you can see multiple options. In these options, select the resolution that you want.
Step8 You can also click on the box below to automatically delete the proxies when you close your project.
Now, whenever you encounter a resolution of a higher video than the one you selected, Wondershare Filmora will do its magic.
Part 3. Delete Project Render Cache
Another hack you can use to save space on your hard drive is Deleting the Render cache. But before we do that, let us understand what Render cache is!
What is Render Cache?
Rendering can be a giant leap to give you a smooth performance experience. However, when you import your videos into the timeline, you can always render to have an uninterrupted playback experience.
Doing so will allow you to work in your zone quickly and efficiently. You can do a manual rendering before you begin the editing process. Or you can also opt to choose automatic rendering. In the automatic rendering option, you can continue your editing process. In the meantime, your timeline will be rendered.
How to Delete Render Cache in Filmora
To save up storage space on your computer, you can delete your render cache by following the steps.
Step1 Click on files in the top left corner of the Wondershare Filmora home interface.
Step2 Go to Preferences.
Step3 A window will pop up and go to Performance.
Step4 In the performance tab, scroll down below to the Preview Render.
Step5 Check the box saying, “Automatically delete render files when a project is closed.”

Step6 Click on OK to save your changes.
Now, whenever you close your project, your render cache will be deleted and would have given you extra space on your computer.
Part 4. Remove Split Button on Playhead
In some instances, when you are moving the playhead on the timelines, it can distract you from doing your editing. Or even more, you can mistakenly click on the Split button to split the clips you don’t want them to.
Well, no worries at all! Wondershare Filmora takes care of that for you. You can hide or remove the Split button on the playhead. It only takes a few simple and easy steps. Follow the steps mentioned below to remove the Split button:
Step1 You will notice the File option on the top left corner of the Wonderhsare Filmora home interface.
Step2 Click on Files and go to Preferences.
Step3 A window will pop up, and here you can see multiple options.
Step4 Go to the editing
Step5 In the editing tab, scroll down till your see the Split button.

Step6 Check the box. Then, click OK to save your changes.
Doing so would have removed the Split button from your playhead. So now you can edit your videos without any distractions.
Part 5. Copy and Paste Effects
Copy and paste are one of the oldest tricks in editing procedures. Wondershare Filmora comes with a range of commands and features that allow you to save time and be reliable.
Suppose you want to add an effect to a video clip in the timeline. Then, after adding the effect to your video, make custom changes to make it look more closely to the style you want. You can now use the copy-and-paste function to add the same effect to another clip. That helps you save a lot of time from tedious and time-consuming work.
How to Copy and Paste Effects
While editing, you will need to ensure that your editing process is as clean as possible and that you have all the time on hand.
But there is a solution! You can easily copy and paste the effects you placed on one video clip to another. Just follow the steps mentioned, and you will be good to go:
Step1 Right-click on the video to you added the effects too.
Step2 A drop-down column will pop up.
Step3 In the options below, you will notice an option called “Copy Effects.”
Step4 Click on the “Copy Effects” option.
Step5 Now move the playhead to the video clip on which you want to paste the effects.
Step6 Right-click on the video that you want to place the effect on.
Step7 In the pop-up column, select the Paste Effect
Step8 It adjusts the video clip according to the changes of the prior one.
You can save editing time by simply copying and pasting video effects.

Part 6. Timeline Snap
You might have added multiple videos in the same timeline track. If you removed the video ahead of the video clip, you have to close the gap in between.
So, arranging and moving clips in the timeline are hectic and time-consuming. However, that is the case without timeline snapping.
How to Apply Timeline Snap in Filmora
Timeline snapping will allow you to arrange video clips side by side without any breaks and cut-offs. Also, it will enable you to place it precisely above other video and audio gaps in the timeline.
In most cases, Timeline snapping is enabled from the start. But if you are encountering some problems managing your videos. Or if you want to remove the Timeline snap feature. Follow the steps mentioned below:
Step1 Right-click on the Timeline.
Step2 A pop will open up, giving you multiple options.
Step3 Click on timeline Snapping to either enable it or disable it.

Now you can easily enable and disable timeline snapping according to your choice!
Part 7. Color Code Video Clips
When editing footage from multiple cameras, you might want to organize which media is from which source in the timeline. You can do this by color coding your clips.
Steps to Color Code Your Videos
Color coding allows you to edit all the clips marked with a particular color to be selected simultaneously without selecting them manually in the timeline.
To color code a video, follow the steps as mentioned:
Step1 Select the clips you want to color code, right-click, and choose from the available colors.
Step2 Once you’ve color coded your clips, you can right-click on the clip again and choose to select all clips from the color mark option.
Step3 And all the clips marked with that color will be selected.

Part 8. Group Clips Together
Now in an editing timeline, you might encounter a situation where you want to arrange a video clip with specific audio. Again, it allows you to stay organized and save up a lot of time.
Grouping clips together can also be helpful when you want to edit multiple clips in the timeline but want to maintain a particular order. The group will remain in its place and allow you to edit your other video clips quickly.
Stepwise Guide to Grouping the Clips in Filmora
You can group video and audio clips in straightforward steps. Just follow the actions ahead, and you will be good to go:
Step1 Hold Left-click and drag across the clips that you want to select.
Step2 When you are done, Right-click on the clip to open the options tab.
Step3 Scroll down, and you will see a “” option.
Step4 Select Group, and that’s done.

Your whole group will be selected whenever you select a video clip or an audio clip.
Part 9. Pan and Zoom Shortcut
Editing shortcuts are excellent. They allow you to save up a lot of time. Some people prefer to use a mouse only to edit their videos, but professionals always use a keyboard.
But there are some other shortcuts too! In these shortcuts, you would not necessarily need a keyboard; only a mouse will work and give a good outcome.
You might have seen those videos in which a specific screen ratio moves over a picture. Or, in some cases when you have to pan and zoom to create a flow effect.
Instead of manually adjusting the ratio of your videos and photos, Pan and Zoom shortcuts will allow you to use multiple features. These features allow you to select where your video or photo will start, zoom, and end.
These shortcuts are so easy to apply. Just go through the steps below, and you will accomplish the following:
Step1 Right-click on a photo or a video clip.
Step2 Go to the crop and zoom tab above the timeline.
Step3 In the window that opens up, you will see a pan and zoom option in the top left corner. Click on it.
Step4 And on the bottom right corner of the window, you can see the pan and zoom shortcuts available.
Step5 Please select any of them you want and then click on OK.

Part 10. New Feature Request
One of the significant features of Wondershare Filmora that sets it among the best is its capability to listen to the users. When you have been using Wondershare Filmora for a long time, there will come a time when you wish for a feature. You can also do so in a few simple steps. Just follow the steps mentioned:
Step1 Multiple options are available on the top left corner of the Wondershare Filmora home interface. Click on help.
Step2 A drop-down box will open up.
Step3 In the options offered to you, select suggest a feature.

Step4 It automatically directs you to your default browser, where you can see the multiple feature requests.
Step5 You can vote for a feature you want in the next update.
Step6 Or you can also create a request for another particular feature.

Summing Up
Wondershare Filmora is the best in the business regarding editing your videos. It has such creative and easy-to-use software that even a beginner efficiently edits videos.
There are a lot of features that Wondershare Filmora provides. But now, with these secret and hidden tips, you can edit your videos more creatively.
Detailed Review of Kodak LUTs
If you’re from the 20th century, you might have used Kodak cameras. Those cameras had a distinct look and feel, creating a nostalgic look. However, as technology has advanced, we now have access to more advanced cameras. Moreover, these new cameras can capture high-quality images with accurate details. However, you can still achieve that classic Kodak look with the help of LUTs.
To add up, these LUTs can mimic the characteristics of specific films or looks, including Kodak films. There are various LUTs available to download, offering different film looks and styles. In contrast, you can get the classic Kodak film look with your modern cameras. There are different options for Kodak 2383 LUTs free download on the internet. You can download these LUTs to apply on your digital media.
Part 1: An Overview of Some Famous Kodak LUTs and Powergrade Print Films
There are many different presets available that give you Kodak films-like color grading. Here are some of the Kodak film presets that you can use.
Kodak 2383
Kodak 2383 is a color film known for its unique qualities. When used, it enhances the richness of black shades, adding depth and intensity to your images. Additionally, it brings out neutral highlights, creating a distinctive Kodak film look. Moreover, this color film is suitable for both traditional camera films and digital prints. Additionally, you can expect your images to have a timeless quality and a distinct character.
Moreover, you can give your photos a dramatic touch with black shades and neutral highlights. These color films are a unique way to give your content a classic Kodak film look. You can experience the richness and clarity it brings to your images using this film. You can get the Kodak 2383 LUT download link online.
Kodak 2393
Kodak 2393 is a Powergrade film preset that you can use. This editable LUT can improve your media files by adding richer colors, especially in the shadows. When you apply this LUT, it brings out the natural beauty of your video with the right amount of saturation. Furthermore, you can make your videos a more natural and lifelike appearance with this Powergrade.
Moreover, it works particularly well in adding depth and richness to darker areas of your footage. Similarly, it ensures that every detail is visible in a natural way. Furthermore, this LUT can achieve a more natural and realistic look. Additionally, it is a great choice if you’re looking to add vibrance and naturalness to your media files.
Kodak 2302
Kodak 2302 is a high-resolution black-and-white color print film. Furthermore, this film is specifically designed for blue-sensitive printing. It allows for the precise reproduction of details and tones in black-and-white imagery. Moreover, this Kodak 2302 film offers exceptional image quality. Additionally, it uses electron beam recorders to create positive and negative titles.
In addition to this, it also creates RGB separations using beam recorders. Similarly, this technology creates accurate color reproduction and improves the final print’s quality. Kodak 2302 is coated with an ESTAR base to enhance its performance further. This special coating improves the film’s physical properties, making it more durable and resistant.
Empower your videos with a new mood using different LUTs. Filmora now offers 100+ top-quality 3D LUTs cover a broad range of scenarios. Transform your videos with Filmora’s powerful 3D LUTs.
Apply LUT on Videos Apply LUT on Videos Learn More

Part 2: The Best Kodak LUTs Free Available in the Market
You might find many Kodak 2393 LUT free download links, but some of them are not authentic. Here is a list of authentic Kodak-inspired LUTs that you can download and use.
1. Kinetic
Kinetic LUT is a great preset inspired by the iconic Kodak 2383 and 2393 films. With Kinetic, you can bring a vibrant and dynamic color palette to your digital media. This LUT enhances shades such as deep blues and rich reds, adding depth and intensity to your visuals. Moreover, it creates dynamic shadows to bring a sense of richness and dimension to your content. It is a pack of 5 Kodak-inspired LUTs.

2. Kodak Film 2383 - Vlog
The Kodak Film 2383 - Vlog LUT is a perfect choice for adding a Kodak-inspired look to your vlogs. This LUT brings an authentic touch to your content. Moreover, this LUT enhances the color grading of your content with yellowish and bluish tones. Furthermore, it aims to recreate the look and feel of shooting with Kodak film stock. Experiment, explore, and find the perfect balance that brings out the best in your vlogs.

3. Kodak 2383 Print Film LUT
The Kodak 2383 Print Film LUT allows you to create a modern cinematic look. You can use digital videos and transform them into old-style Kodak films look. Moreover, this LUT replicates the color grading of the Kodak 2383 print film. Additionally, it captures the essence of the original film stock, providing an authentic feel. It is a great LUT to make your video content look more natural.

4. Free LUTs Kodak Color
It is a collection of LUTs inspired by the iconic Kodak film look. LUTs Kodak Color is created to enhance your media with vibrant colors and a cinematic look. It is a Kodak LUT free pack that you can download from the internet. Moreover, it adds vibrancy to your media, making the colors pop and come to life. Additionally, these LUTs decrease the white balance, giving your media a warmer tone.

5. KODAK Film Emulation LUT
The KODAK Film Emulation LUT is a collection of 16 cinematic LUTs. These LUTs are inspired by the iconic Kodak 2383 film. Furthermore, these LUTs allow you to achieve the timeless and distinctive look of Kodak film. Moreover, to increase the authenticity of Kodak films, this LUT highlights rich red and blue tones. This LUT replicates Kodak film stock to improve the character of your digital media files.

6. Kodak Film LUTs and Presets
The Kodak Film LUTs and Presets pack features 17 LUTs inspired by the iconic Kodak film look. These LUTs are created to give your digital files a timeless aesthetic. Moreover, it fades certain colors and adds vibrant tones to your media files. Furthermore, replicating Kodak films adds richness and depth to your content with color grading. Additionally, it maintains a perfect balance between classic and modern looks.

7. CL-Kodak
CL-Kodak is a collection of 28 Kodak-style LUTs. Each LUT is designed to elevate your color grading game. Furthermore, you can color grade your media with the iconic reddish tones of Kodak films. Additionally, these LUTs add a grainy texture to your media. These LUTs support Kodak cameras up to 8K resolution. Using these LUTs, you can give your digital files the authentic nostalgic feel of Kodak films.

Part 3: Wondershare Filmora: Reviewing LUTs in Video Editor
There are many great video editing software that exist in the market. Wondershare Filmora , being among the best, offers features to enhance your videos, including color grading and adjustment capabilities. With Filmora, you can modify the colors and tones of your videos to get the desired look and feel. Furthermore, you can apply LUTs using Wondershare Filmora. You can import different LUTs in the tool and apply them directly to your files.
Add LUTs on Video For Win 7 or later(64-bit)
Add LUTs on Video For macOS 10.14 or later
In its newest update, Filmora has introduced over 200+ LUTs you can download and use. Filmora has expanded your creative color grading and adjustment options with this feature. These LUTs cover many styles, from bold and modern to retro and vintage looks. With such a vast selection, you can easily find the perfect LUT to match the mood and tone of your video project.

Key Features of Wondershare Filmora
- Filmora offers complete video editing features to help you edit your videos. You can trim and merge clips and apply transitions. Moreover, you can add text and titles, import music and sound effects, and much more.
- Furthermore, Wondershare Filmora provides advanced tools for precise control over your videos. You can adjust the brightness and contrast. Furthermore, you can control saturation and other parameters.
- You can create dynamic animations and apply effects at any frame with keyframing. Moreover, using this feature, you can add effects to specific sections of your video.
Conclusion
To conclude, using LUTs is a simple and effective way to transform your media files. Moreover, you can also add a nostalgic or cinematic feel to your videos. You can experiment with different film looks by exploring different LUTs. Furthermore, you can even get Kodak 2393 Powergrade free download options online. These Kodak-film-inspired LUTs can take you back to the 20th century.
Apply LUT on Videos Apply LUT on Videos Learn More

Part 2: The Best Kodak LUTs Free Available in the Market
You might find many Kodak 2393 LUT free download links, but some of them are not authentic. Here is a list of authentic Kodak-inspired LUTs that you can download and use.
1. Kinetic
Kinetic LUT is a great preset inspired by the iconic Kodak 2383 and 2393 films. With Kinetic, you can bring a vibrant and dynamic color palette to your digital media. This LUT enhances shades such as deep blues and rich reds, adding depth and intensity to your visuals. Moreover, it creates dynamic shadows to bring a sense of richness and dimension to your content. It is a pack of 5 Kodak-inspired LUTs.

2. Kodak Film 2383 - Vlog
The Kodak Film 2383 - Vlog LUT is a perfect choice for adding a Kodak-inspired look to your vlogs. This LUT brings an authentic touch to your content. Moreover, this LUT enhances the color grading of your content with yellowish and bluish tones. Furthermore, it aims to recreate the look and feel of shooting with Kodak film stock. Experiment, explore, and find the perfect balance that brings out the best in your vlogs.

3. Kodak 2383 Print Film LUT
The Kodak 2383 Print Film LUT allows you to create a modern cinematic look. You can use digital videos and transform them into old-style Kodak films look. Moreover, this LUT replicates the color grading of the Kodak 2383 print film. Additionally, it captures the essence of the original film stock, providing an authentic feel. It is a great LUT to make your video content look more natural.

4. Free LUTs Kodak Color
It is a collection of LUTs inspired by the iconic Kodak film look. LUTs Kodak Color is created to enhance your media with vibrant colors and a cinematic look. It is a Kodak LUT free pack that you can download from the internet. Moreover, it adds vibrancy to your media, making the colors pop and come to life. Additionally, these LUTs decrease the white balance, giving your media a warmer tone.

5. KODAK Film Emulation LUT
The KODAK Film Emulation LUT is a collection of 16 cinematic LUTs. These LUTs are inspired by the iconic Kodak 2383 film. Furthermore, these LUTs allow you to achieve the timeless and distinctive look of Kodak film. Moreover, to increase the authenticity of Kodak films, this LUT highlights rich red and blue tones. This LUT replicates Kodak film stock to improve the character of your digital media files.

6. Kodak Film LUTs and Presets
The Kodak Film LUTs and Presets pack features 17 LUTs inspired by the iconic Kodak film look. These LUTs are created to give your digital files a timeless aesthetic. Moreover, it fades certain colors and adds vibrant tones to your media files. Furthermore, replicating Kodak films adds richness and depth to your content with color grading. Additionally, it maintains a perfect balance between classic and modern looks.

7. CL-Kodak
CL-Kodak is a collection of 28 Kodak-style LUTs. Each LUT is designed to elevate your color grading game. Furthermore, you can color grade your media with the iconic reddish tones of Kodak films. Additionally, these LUTs add a grainy texture to your media. These LUTs support Kodak cameras up to 8K resolution. Using these LUTs, you can give your digital files the authentic nostalgic feel of Kodak films.

Part 3: Wondershare Filmora: Reviewing LUTs in Video Editor
There are many great video editing software that exist in the market. Wondershare Filmora , being among the best, offers features to enhance your videos, including color grading and adjustment capabilities. With Filmora, you can modify the colors and tones of your videos to get the desired look and feel. Furthermore, you can apply LUTs using Wondershare Filmora. You can import different LUTs in the tool and apply them directly to your files.
Add LUTs on Video For Win 7 or later(64-bit)
Add LUTs on Video For macOS 10.14 or later
In its newest update, Filmora has introduced over 200+ LUTs you can download and use. Filmora has expanded your creative color grading and adjustment options with this feature. These LUTs cover many styles, from bold and modern to retro and vintage looks. With such a vast selection, you can easily find the perfect LUT to match the mood and tone of your video project.

Key Features of Wondershare Filmora
- Filmora offers complete video editing features to help you edit your videos. You can trim and merge clips and apply transitions. Moreover, you can add text and titles, import music and sound effects, and much more.
- Furthermore, Wondershare Filmora provides advanced tools for precise control over your videos. You can adjust the brightness and contrast. Furthermore, you can control saturation and other parameters.
- You can create dynamic animations and apply effects at any frame with keyframing. Moreover, using this feature, you can add effects to specific sections of your video.
Conclusion
To conclude, using LUTs is a simple and effective way to transform your media files. Moreover, you can also add a nostalgic or cinematic feel to your videos. You can experiment with different film looks by exploring different LUTs. Furthermore, you can even get Kodak 2393 Powergrade free download options online. These Kodak-film-inspired LUTs can take you back to the 20th century.
Also read:
- New Do You Wish to Make Your Discord PFP an Attention-Seeker? If Yes, Try the Animated Discord PFP. Lets Go over Essential Facts on the Topic, Including How to Get an Animated Discord PFP for 2024
- In 2024, Top iOS Solutions Finding Premium Slow Motion Apps For Video Creation
- 2024 Approved 2 Methods to Crop Video in VLC
- Best Software or Website to Convert Video Format for 2024
- New 2024 Approved TEXT REVEAL Animation | Easy Masking Filmora
- OpenCV Object Tracking The Complete Guide for 2024
- New 2024 Approved ReVisionFX ReelSmart Motion Blur Plugin For Premiere Pro
- New Best Tips on How to Design Travel Slideshow for 2024
- Tips That Show Anybody How To Make Youtube Slideshow – Guaranteed for 2024
- Have You Ever Watched YouTube Live Streams? In Fact, You Can Also Start a Live Streaming on YouTube if You Want. Here Well Share some Tips to Live Stream on YouTube
- How to Create Emoji on Mac That Take Less Than 10 Mins
- In 2024, Ideas That Help You Out in Converting AVI to GIF
- 10 Recommended Websites to Discover Awesome Premiere Pro Video Templates
- How to Add Subtitles in QuickTime Player for 2024
- Updated 2024 Approved How to Create Motion Text Effects for Your Video?
- Updated How to Make Vintage Film Effect 1980S
- New 2024 Approved 12 Best GIF Editors to Use
- New Simple Step by Step Tutorial on Creating a Lightroom Collage for 2024
- How to Download and Use Windows Movie Maker 10
- 2024 Approved Do You Want to Explore some Available Opportunities to Create Slow Motion? Discover the Best Slow-Motion Video Editors for Desktop, Android, and iPhone Here
- YouTube Being One of the Most Used Video Platforms Uses Artificial Intelligence to Recommend Videos. Click Here to Know About YouTube AI in Detail
- Updated In 2024, 10 Best Free GIF Background Remover for PC and Online
- New In This Article Let Me Share with You How to Start a Vlog? Ideas and Any Tips for You to Start Your Own Vlogging Channel for 2024
- Learn Top Best Free LUTs For Premiere Pro for 2024
- 2024 Approved Review Video Is a Common Type Video and the First Impression Review Is Also Included. This Article Will Show You What Is First Impression Review Video and How to Create One by Yourself
- New Do You Want to Print Designs Onto Your Garments or Other Fashion Accessories? Find Out How to Create a Screen Print Effect in Photoshop to Give Your Text or Graphics a Vintage or Retro Look
- New 2024 Approved In This Article Let Me Share with You How to Start a Vlog? Ideas and Any Tips for You to Start Your Own Vlogging Channel
- Updated 2024 Approved How to Make a Video by Mouse with Filmora
- New Ultimate Guide To Make A Political Video
- Comprehensive Guide for Free Video Translator Downloading
- How to watch AVCHD MTS video on Motorola G54 5G?
- How to recover old messages from your 12 Pro+ 5G
- Top 9 Realme 12 Pro 5G Monitoring Apps for Parental Controls | Dr.fone
- Complete guide for recovering call logs on Tecno Camon 20
- How To Leave a Life360 Group On Motorola Edge 40 Neo Without Anyone Knowing? | Dr.fone
- In 2024, Detailed guide of ispoofer for pogo installation On Oppo Reno 11F 5G | Dr.fone
- Simple and Effective Ways to Change Your Country on YouTube App Of your Vivo Y36 | Dr.fone
- Restore Missing App Icon on Vivo V30 Step-by-Step Solutions | Dr.fone
- How To Fake GPS On Vivo V30 Pro For Mobile Legends? | Dr.fone
- How To Fix OEM Unlock Missing on Infinix Note 30 VIP Racing Edition?
- How to recover deleted photos from Android Gallery after format on Xiaomi Redmi K70
- How to Repair a Damaged video file of OnePlus Nord CE 3 5G using Video Repair Utility on Mac?
- 10 Best Fake GPS Location Spoofers for Samsung Galaxy F34 5G | Dr.fone
- Will iSpoofer update On Poco C65 | Dr.fone
- In 2024, How To Unlock Any Vivo Y28 5G Phone Password Using Emergency Call
- Complete Tutorial to Use VPNa to Fake GPS Location On Oppo Reno 8T | Dr.fone
- How to Unlock Apple iPhone 13 with/without SIM Card
- In 2024, Pokemon Go No GPS Signal? Heres Every Possible Solution On Sony Xperia 10 V | Dr.fone
- In 2024, Apple iPhone 14 Screen Mirroring You Must Know | Dr.fone
- In 2024, 6 Proven Ways to Unlock Xiaomi Redmi 12 5G Phone When You Forget the Password
- In 2024, How to use Snapchat Location Spoofer to Protect Your Privacy On Lava Storm 5G? | Dr.fone
- In 2024, How to Reset Gmail Password on Oppo A2 Devices
- How Motorola Moto G Stylus 5G (2023) Mirror Screen to PC? | Dr.fone
- In 2024, Best Ways on How to Unlock/Bypass/Swipe/Remove Oppo Find N3 Flip Fingerprint Lock
- Title: Complete Guide to Change Video Resolution in Filmora
- Author: Morgan
- Created at : 2024-05-19 05:11:34
- Updated at : 2024-05-20 05:11:34
- Link: https://ai-video-editing.techidaily.com/complete-guide-to-change-video-resolution-in-filmora/
- License: This work is licensed under CC BY-NC-SA 4.0.


