:max_bytes(150000):strip_icc():format(webp)/windows11contextmenu-f4d6ebb14db4444d851b4338aa553e21.png)
Create Realistic Fire Effects by Filmora

Create Realistic Fire Effects by Filmora
Do you know that many cinema films and big-budget companies use visual effects to create realistic fires? It saves them from potential danger in production and helps them manage the time required to create a project. In this article, you will get pro tips and easy ways to add Fire effects by Wondershare Filmora.
![]()
Note: let’s not count Michael Bay and Christopher Nolan productions because their movies have a higher budget, and creating fake fire is easy.
Part 1. What do you need to create fire effects?
Using simple tools such as Filmora and visual effects, you can create a realistic fire effect with an easy setup. For filming the effect, we will need
- A good camera
- A light source
- Video editing software - Wondershare Filmora
- Basic editing skills
However, the light source is key to the fire effects. It will be beneficial if you have a warmer color light or a light that can change its temperature. You can use tungsten light bulbs or small circular LEDs that are pretty famous with Vloggers and tick-tock users.
Part 2. How to make a realistic effect fire?
After getting prepared, it’s time to do the real things. Follow the steps below to create a realistic fire effect like a pro.
Step1 Record your footage
While recording the video, you can slightly shake your light source, which will give it the flickering effect of the flame. Here, you can do this in two ways.
Shaking the light manually
Just make sure when you are shaking the light, it is not shaken aggressively, or it will lose its realism to a real fire.

Shaking the light using a dimmer
You can also use some skills to create the flickering effect of the fire without literally shaking the LED light. Dimmers come to help. A dimmer is a device that enables you to change the temperature of the LED light. If you have a dimmer, your work will be more accessible.
A regulator on the dimmer will help you switch between low and high tones. It will flicker the light on the object like a flame and make it look like it was placed in front of a real fire.

Step2 Record the object
Our next step will be to record the object on which the effect is taking place. Ensure the camera is placed under a good light source so that the picture is not dim and the object is exposed. Make sure the camera is placed at the level of the eye so that it will help you record your video clearly and accurately.
Also, keep in mind to zoom out the camera lens, which will fix the frame of the video so that the object or the person is entirely on the screen. Another tip for creating a realistic fire effect would be the person acting as the object. The more natural the acting is, the more realistic would be the fire effect.
Step3 Edit the footage
We are being safe and saving time by not using actual fire. The goal of creating a fake fire would be the effect and reaction of the object or the actor.
1. Download a professional video editing software - Wondershare Filmora
Visit Wondershare Filmora official site if you haven’t already downloaded it.
![]()
Note: download the latest version of filmora. It will give you a pro version and help you to create more realistic fire effects.
2. Create a new project and import the recorded clips
Before adding the fire effects to your video, you must ensure that you are familiar with the editing software. Your first step would be to add your clips to the timeline. Drag the footage from the library and enter it into the timeline.

3. create the fire effect more realistic by adding smoke
The next step would be to add smoke to the fire. As it is only fair that the fire makes the smoke so. Adding the smoke will create the fire effect more realistic. Follow the below steps to get your cinematic video!
#Step1 Search for smoke effects
To add the smoke effect, click on the element’s icon on the bar above and search for smokescreen 2.
#Step2 Add a smoke effect
Once you have searched and found the smoke screen 2 effects, then import that effect onto your timeline so that you can begin editing.

Once you’ve added the fire effect, you will notice the change on the screen in the top right corner.
#Step3 Add duration
The next step would be to set the duration of the smokescreen effect so that it matches the length of the video. To do so,
- Click on the edge of the smoke screen effect.
- Drag it to the right if the effect appears smaller than the video clip.
- And drag it to the left if it is larger than the video clip.
- As soon as it matches the length of the video, leave the drag, and it will fit right into place.
#Step4 Make some changes to the smoke effect
Once you have matched the duration of the smoke screen effect to the video clip, our next step would be to make some changes. These changes will make the smokescreen appear more pleasing—double-click on the smokescreen effect, which will open the transform menu.
We would first focus on the transform panel. Here you would have many options, but our focus would be on rotation, scale, and position.
![]()
Note: make sure to rotate the smoke screen effect by simply sliding the slider or dragging the slider right or left to your desire.
- You would have created an angle of the smokescreen to make it more natural.
- Now, we would have to adjust the scale of the smokescreen effect.
- Drag the slider to the right to expand the smoke to spread on the screen. It will help the smoke screen do appear more natural.
- You can adjust how much the smoke screen is visible on the screen by decreasing the opacity.
Adjust the slider to the left so it blends in with the flickering of the light we created. Now playback the video from the big screen to get an idea of the effect you added. And here are our parameters for reference.

Cool, isn’t it? Now we have added smoke to our timeline. Combined with the flickering light effect, we are closer to our goal.
Step4 Add flames or sparks
To mimic a real fire, we also have one more element that is missing, And that will be the sparks and the flames. And if you want to bring the fire effect of your video to the pro level, we would have to use the film stock effects. Flames and sparks are also available in the Wondershare Filmora.
#Step1 Search for Fire Tab

- To do so, click on the bar above the element’s icon.
- Once you have opened the elements tab, look to your left window, where further options are available.
- From these options, click on the fire tab.
- A new window will pop up in the library panel.
#Step2 Add the flame to the timeline
Click on a large scale 14 and drag it into your timeline above the smoke effect and the clip. Doing so would have created two extra layers after the video tab.

#Step3 Adjust the flame effect
Now, we have to do steps similar to the ones above the first job. But first, you have to click on the edges of the effect. Then, match it to the length of your video.
Now, remember if the length of the effect is more than that of the video clip. You can adjust it by clicking on the edge and dragging it to the left. And if it appears to be smaller than the video clip, drag the edge to the right to match the length.
#Step4 Blend the video
When you look at the effect as you play the video from the start, you will notice that the effect is a little more intense than we want. To change it to your desires, you can follow the following steps.
- First of all, double-click and open the transform
- Experiment with the rotation and the scale and position; make your choice.
- Then move on to the compositing panel and focus on the blending mode.
- Here, you will notice a drop-down panel and select the screen option from all the other options.
- Doing so would help you blend the spark effect video much better.
If you focus on the spark effect that appears on the screen, you will notice that it seems to be much more intense than we require. If you want to blend it further, you can use the opacity adjuster and decrease the transparency. Then, adjust the slider till you feel it to be just right.
And the following are ideal parameters of our adjustment just for you to refer to.

Final results
Now can easily create a realistic-looking fire effect by Wondershare Filmora.

Best editing views
See how easy it was to create a fire effect without using real fire. A fire effect you can use:
- To make your car catch on fire.
- You are screaming at the top of your lungs in a yard where your garden is on fire.
- Act like your husband forgot to watch the stove on with the dish in the kitchen.
You can create all these scenarios by using camera tricks and lighting effects. And a few skills in video editing, easily! How cool is that?
If you are a beginner or a frequent user of Wondershare Filmora, following the steps explained above will help you quickly get the hang of how to add fire effects to your videos.
Also, if you have a YouTube channel or a content creator, adding these effects will add unique creativity to your videos and ultimately boost your approach.
Free Download For Win 7 or later(64-bit)
Free Download For macOS 10.14 or later
Part 1. What do you need to create fire effects?
Using simple tools such as Filmora and visual effects, you can create a realistic fire effect with an easy setup. For filming the effect, we will need
- A good camera
- A light source
- Video editing software - Wondershare Filmora
- Basic editing skills
However, the light source is key to the fire effects. It will be beneficial if you have a warmer color light or a light that can change its temperature. You can use tungsten light bulbs or small circular LEDs that are pretty famous with Vloggers and tick-tock users.
Part 2. How to make a realistic effect fire?
After getting prepared, it’s time to do the real things. Follow the steps below to create a realistic fire effect like a pro.
Step1 Record your footage
While recording the video, you can slightly shake your light source, which will give it the flickering effect of the flame. Here, you can do this in two ways.
Shaking the light manually
Just make sure when you are shaking the light, it is not shaken aggressively, or it will lose its realism to a real fire.

Shaking the light using a dimmer
You can also use some skills to create the flickering effect of the fire without literally shaking the LED light. Dimmers come to help. A dimmer is a device that enables you to change the temperature of the LED light. If you have a dimmer, your work will be more accessible.
A regulator on the dimmer will help you switch between low and high tones. It will flicker the light on the object like a flame and make it look like it was placed in front of a real fire.

Step2 Record the object
Our next step will be to record the object on which the effect is taking place. Ensure the camera is placed under a good light source so that the picture is not dim and the object is exposed. Make sure the camera is placed at the level of the eye so that it will help you record your video clearly and accurately.
Also, keep in mind to zoom out the camera lens, which will fix the frame of the video so that the object or the person is entirely on the screen. Another tip for creating a realistic fire effect would be the person acting as the object. The more natural the acting is, the more realistic would be the fire effect.
Step3 Edit the footage
We are being safe and saving time by not using actual fire. The goal of creating a fake fire would be the effect and reaction of the object or the actor.
1. Download a professional video editing software - Wondershare Filmora
Visit Wondershare Filmora official site if you haven’t already downloaded it.
![]()
Note: download the latest version of filmora. It will give you a pro version and help you to create more realistic fire effects.
2. Create a new project and import the recorded clips
Before adding the fire effects to your video, you must ensure that you are familiar with the editing software. Your first step would be to add your clips to the timeline. Drag the footage from the library and enter it into the timeline.

3. create the fire effect more realistic by adding smoke
The next step would be to add smoke to the fire. As it is only fair that the fire makes the smoke so. Adding the smoke will create the fire effect more realistic. Follow the below steps to get your cinematic video!
#Step1 Search for smoke effects
To add the smoke effect, click on the element’s icon on the bar above and search for smokescreen 2.
#Step2 Add a smoke effect
Once you have searched and found the smoke screen 2 effects, then import that effect onto your timeline so that you can begin editing.

Once you’ve added the fire effect, you will notice the change on the screen in the top right corner.
#Step3 Add duration
The next step would be to set the duration of the smokescreen effect so that it matches the length of the video. To do so,
- Click on the edge of the smoke screen effect.
- Drag it to the right if the effect appears smaller than the video clip.
- And drag it to the left if it is larger than the video clip.
- As soon as it matches the length of the video, leave the drag, and it will fit right into place.
#Step4 Make some changes to the smoke effect
Once you have matched the duration of the smoke screen effect to the video clip, our next step would be to make some changes. These changes will make the smokescreen appear more pleasing—double-click on the smokescreen effect, which will open the transform menu.
We would first focus on the transform panel. Here you would have many options, but our focus would be on rotation, scale, and position.
![]()
Note: make sure to rotate the smoke screen effect by simply sliding the slider or dragging the slider right or left to your desire.
- You would have created an angle of the smokescreen to make it more natural.
- Now, we would have to adjust the scale of the smokescreen effect.
- Drag the slider to the right to expand the smoke to spread on the screen. It will help the smoke screen do appear more natural.
- You can adjust how much the smoke screen is visible on the screen by decreasing the opacity.
Adjust the slider to the left so it blends in with the flickering of the light we created. Now playback the video from the big screen to get an idea of the effect you added. And here are our parameters for reference.

Cool, isn’t it? Now we have added smoke to our timeline. Combined with the flickering light effect, we are closer to our goal.
Step4 Add flames or sparks
To mimic a real fire, we also have one more element that is missing, And that will be the sparks and the flames. And if you want to bring the fire effect of your video to the pro level, we would have to use the film stock effects. Flames and sparks are also available in the Wondershare Filmora.
#Step1 Search for Fire Tab

- To do so, click on the bar above the element’s icon.
- Once you have opened the elements tab, look to your left window, where further options are available.
- From these options, click on the fire tab.
- A new window will pop up in the library panel.
#Step2 Add the flame to the timeline
Click on a large scale 14 and drag it into your timeline above the smoke effect and the clip. Doing so would have created two extra layers after the video tab.

#Step3 Adjust the flame effect
Now, we have to do steps similar to the ones above the first job. But first, you have to click on the edges of the effect. Then, match it to the length of your video.
Now, remember if the length of the effect is more than that of the video clip. You can adjust it by clicking on the edge and dragging it to the left. And if it appears to be smaller than the video clip, drag the edge to the right to match the length.
#Step4 Blend the video
When you look at the effect as you play the video from the start, you will notice that the effect is a little more intense than we want. To change it to your desires, you can follow the following steps.
- First of all, double-click and open the transform
- Experiment with the rotation and the scale and position; make your choice.
- Then move on to the compositing panel and focus on the blending mode.
- Here, you will notice a drop-down panel and select the screen option from all the other options.
- Doing so would help you blend the spark effect video much better.
If you focus on the spark effect that appears on the screen, you will notice that it seems to be much more intense than we require. If you want to blend it further, you can use the opacity adjuster and decrease the transparency. Then, adjust the slider till you feel it to be just right.
And the following are ideal parameters of our adjustment just for you to refer to.

Final results
Now can easily create a realistic-looking fire effect by Wondershare Filmora.

Best editing views
See how easy it was to create a fire effect without using real fire. A fire effect you can use:
- To make your car catch on fire.
- You are screaming at the top of your lungs in a yard where your garden is on fire.
- Act like your husband forgot to watch the stove on with the dish in the kitchen.
You can create all these scenarios by using camera tricks and lighting effects. And a few skills in video editing, easily! How cool is that?
If you are a beginner or a frequent user of Wondershare Filmora, following the steps explained above will help you quickly get the hang of how to add fire effects to your videos.
Also, if you have a YouTube channel or a content creator, adding these effects will add unique creativity to your videos and ultimately boost your approach.
Free Download For Win 7 or later(64-bit)
Free Download For macOS 10.14 or later
Secret Tips & Tricks to Use in Filmora
Wondershare Filmora is a great video editing software with millions of users worldwide. It has many features that it provides to its users. However, there are some other features hidden up its sleeve.
This article will share some “secrets” of Wondershare Filmora features you may not know that they exist in Filmora. Scroll below to see the features that level up your editing skills.
Part 1. Shared Media Folder
You might have had the hassle of importing the same videos for a considerable time in a different project. It can become a problem for you. It may be fine if you have organized your videos from the start.
Shared Media Folder in Filmora, now called the Global Media Folder, can store video and audio that you’ve imported for future projects. So you don’t have to keep re-importing your media for future videos.

Moreover, when you have imported files into the Shared Media Folder, you can create new Sub-Folders. You can name these folders according to the types of media you are going to use.
Suppose you are a content creator and want to spice up your content with memes. You can create a meme folder to import recent memes into your videos.
Once you have imported them into the Wondershare Filmora’s Shared Media Folder, you can access them anytime. Doing so will allow you to save time and build a base for your future projects.
Free Download For Win 7 or later(64-bit)
Free Download For macOS 10.14 or later
Part 2. Customize Proxy Files
Before understanding the custom proxy settings, let us know what proxy files are.
Proxy Files
Proxy files in Wondershare Filmora allow you to render and edit 4K and other higher-resolution videos easily, regardless of your computer’s processing power.
No one wants to compromise PC performance when editing videos. But if you are importing a video with a higher resolution than your PC, you can only play it sometimes. Other than that, your PC might get stuck and slow down.
If your PC has a built-in resolution of 1080p, but the video you are going to import is 2160p, you can encounter rendering and performance problems. But in the case of Wondershare Filmora Proxy files, you can smoothly edit your videos without any trouble.
How to Customize Proxy Files in Filmora
Although Wondershare Filmora automatically creates proxy files when it encounters resolutions more significant than the PC performance. But you can also set them to your preference.
And customize your proxy files takes some simple and easy steps. But first, follow the steps mentioned below.
Step1 Find the File option on the top left corner of the Wonderhsare Filmora home interface.
Step2 Click on Files and go to Preferences.
Step3 A window will pop up, and here you can see multiple options.
Step4 Go to the performance.
Step5 In the performance tab, scroll down till your see Proxy.
Step6 Here check the box that says, “Automatically create proxies when resolution higher than:”

Step7 Below you can see multiple options. In these options, select the resolution that you want.
Step8 You can also click on the box below to automatically delete the proxies when you close your project.
Now, whenever you encounter a resolution of a higher video than the one you selected, Wondershare Filmora will do its magic.
Part 3. Delete Project Render Cache
Another hack you can use to save space on your hard drive is Deleting the Render cache. But before we do that, let us understand what Render cache is!
What is Render Cache?
Rendering can be a giant leap to give you a smooth performance experience. However, when you import your videos into the timeline, you can always render to have an uninterrupted playback experience.
Doing so will allow you to work in your zone quickly and efficiently. You can do a manual rendering before you begin the editing process. Or you can also opt to choose automatic rendering. In the automatic rendering option, you can continue your editing process. In the meantime, your timeline will be rendered.
How to Delete Render Cache in Filmora
To save up storage space on your computer, you can delete your render cache by following the steps.
Step1 Click on files in the top left corner of the Wondershare Filmora home interface.
Step2 Go to Preferences.
Step3 A window will pop up and go to Performance.
Step4 In the performance tab, scroll down below to the Preview Render.
Step5 Check the box saying, “Automatically delete render files when a project is closed.”

Step6 Click on OK to save your changes.
Now, whenever you close your project, your render cache will be deleted and would have given you extra space on your computer.
Part 4. Remove Split Button on Playhead
In some instances, when you are moving the playhead on the timelines, it can distract you from doing your editing. Or even more, you can mistakenly click on the Split button to split the clips you don’t want them to.
Well, no worries at all! Wondershare Filmora takes care of that for you. You can hide or remove the Split button on the playhead. It only takes a few simple and easy steps. Follow the steps mentioned below to remove the Split button:
Step1 You will notice the File option on the top left corner of the Wonderhsare Filmora home interface.
Step2 Click on Files and go to Preferences.
Step3 A window will pop up, and here you can see multiple options.
Step4 Go to the editing
Step5 In the editing tab, scroll down till your see the Split button.

Step6 Check the box. Then, click OK to save your changes.
Doing so would have removed the Split button from your playhead. So now you can edit your videos without any distractions.
Part 5. Copy and Paste Effects
Copy and paste are one of the oldest tricks in editing procedures. Wondershare Filmora comes with a range of commands and features that allow you to save time and be reliable.
Suppose you want to add an effect to a video clip in the timeline. Then, after adding the effect to your video, make custom changes to make it look more closely to the style you want. You can now use the copy-and-paste function to add the same effect to another clip. That helps you save a lot of time from tedious and time-consuming work.
How to Copy and Paste Effects
While editing, you will need to ensure that your editing process is as clean as possible and that you have all the time on hand.
But there is a solution! You can easily copy and paste the effects you placed on one video clip to another. Just follow the steps mentioned, and you will be good to go:
Step1 Right-click on the video to you added the effects too.
Step2 A drop-down column will pop up.
Step3 In the options below, you will notice an option called “Copy Effects.”
Step4 Click on the “Copy Effects” option.
Step5 Now move the playhead to the video clip on which you want to paste the effects.
Step6 Right-click on the video that you want to place the effect on.
Step7 In the pop-up column, select the Paste Effect
Step8 It adjusts the video clip according to the changes of the prior one.
You can save editing time by simply copying and pasting video effects.

Part 6. Timeline Snap
You might have added multiple videos in the same timeline track. If you removed the video ahead of the video clip, you have to close the gap in between.
So, arranging and moving clips in the timeline are hectic and time-consuming. However, that is the case without timeline snapping.
How to Apply Timeline Snap in Filmora
Timeline snapping will allow you to arrange video clips side by side without any breaks and cut-offs. Also, it will enable you to place it precisely above other video and audio gaps in the timeline.
In most cases, Timeline snapping is enabled from the start. But if you are encountering some problems managing your videos. Or if you want to remove the Timeline snap feature. Follow the steps mentioned below:
Step1 Right-click on the Timeline.
Step2 A pop will open up, giving you multiple options.
Step3 Click on timeline Snapping to either enable it or disable it.

Now you can easily enable and disable timeline snapping according to your choice!
Part 7. Color Code Video Clips
When editing footage from multiple cameras, you might want to organize which media is from which source in the timeline. You can do this by color coding your clips.
Steps to Color Code Your Videos
Color coding allows you to edit all the clips marked with a particular color to be selected simultaneously without selecting them manually in the timeline.
To color code a video, follow the steps as mentioned:
Step1 Select the clips you want to color code, right-click, and choose from the available colors.
Step2 Once you’ve color coded your clips, you can right-click on the clip again and choose to select all clips from the color mark option.
Step3 And all the clips marked with that color will be selected.

Part 8. Group Clips Together
Now in an editing timeline, you might encounter a situation where you want to arrange a video clip with specific audio. Again, it allows you to stay organized and save up a lot of time.
Grouping clips together can also be helpful when you want to edit multiple clips in the timeline but want to maintain a particular order. The group will remain in its place and allow you to edit your other video clips quickly.
Stepwise Guide to Grouping the Clips in Filmora
You can group video and audio clips in straightforward steps. Just follow the actions ahead, and you will be good to go:
Step1 Hold Left-click and drag across the clips that you want to select.
Step2 When you are done, Right-click on the clip to open the options tab.
Step3 Scroll down, and you will see a “” option.
Step4 Select Group, and that’s done.

Your whole group will be selected whenever you select a video clip or an audio clip.
Part 9. Pan and Zoom Shortcut
Editing shortcuts are excellent. They allow you to save up a lot of time. Some people prefer to use a mouse only to edit their videos, but professionals always use a keyboard.
But there are some other shortcuts too! In these shortcuts, you would not necessarily need a keyboard; only a mouse will work and give a good outcome.
You might have seen those videos in which a specific screen ratio moves over a picture. Or, in some cases when you have to pan and zoom to create a flow effect.
Instead of manually adjusting the ratio of your videos and photos, Pan and Zoom shortcuts will allow you to use multiple features. These features allow you to select where your video or photo will start, zoom, and end.
These shortcuts are so easy to apply. Just go through the steps below, and you will accomplish the following:
Step1 Right-click on a photo or a video clip.
Step2 Go to the crop and zoom tab above the timeline.
Step3 In the window that opens up, you will see a pan and zoom option in the top left corner. Click on it.
Step4 And on the bottom right corner of the window, you can see the pan and zoom shortcuts available.
Step5 Please select any of them you want and then click on OK.

Part 10. New Feature Request
One of the significant features of Wondershare Filmora that sets it among the best is its capability to listen to the users. When you have been using Wondershare Filmora for a long time, there will come a time when you wish for a feature. You can also do so in a few simple steps. Just follow the steps mentioned:
Step1 Multiple options are available on the top left corner of the Wondershare Filmora home interface. Click on help.
Step2 A drop-down box will open up.
Step3 In the options offered to you, select suggest a feature.

Step4 It automatically directs you to your default browser, where you can see the multiple feature requests.
Step5 You can vote for a feature you want in the next update.
Step6 Or you can also create a request for another particular feature.

Summing Up
Wondershare Filmora is the best in the business regarding editing your videos. It has such creative and easy-to-use software that even a beginner efficiently edits videos.
There are a lot of features that Wondershare Filmora provides. But now, with these secret and hidden tips, you can edit your videos more creatively.
Free Download For macOS 10.14 or later
Part 2. Customize Proxy Files
Before understanding the custom proxy settings, let us know what proxy files are.
Proxy Files
Proxy files in Wondershare Filmora allow you to render and edit 4K and other higher-resolution videos easily, regardless of your computer’s processing power.
No one wants to compromise PC performance when editing videos. But if you are importing a video with a higher resolution than your PC, you can only play it sometimes. Other than that, your PC might get stuck and slow down.
If your PC has a built-in resolution of 1080p, but the video you are going to import is 2160p, you can encounter rendering and performance problems. But in the case of Wondershare Filmora Proxy files, you can smoothly edit your videos without any trouble.
How to Customize Proxy Files in Filmora
Although Wondershare Filmora automatically creates proxy files when it encounters resolutions more significant than the PC performance. But you can also set them to your preference.
And customize your proxy files takes some simple and easy steps. But first, follow the steps mentioned below.
Step1 Find the File option on the top left corner of the Wonderhsare Filmora home interface.
Step2 Click on Files and go to Preferences.
Step3 A window will pop up, and here you can see multiple options.
Step4 Go to the performance.
Step5 In the performance tab, scroll down till your see Proxy.
Step6 Here check the box that says, “Automatically create proxies when resolution higher than:”

Step7 Below you can see multiple options. In these options, select the resolution that you want.
Step8 You can also click on the box below to automatically delete the proxies when you close your project.
Now, whenever you encounter a resolution of a higher video than the one you selected, Wondershare Filmora will do its magic.
Part 3. Delete Project Render Cache
Another hack you can use to save space on your hard drive is Deleting the Render cache. But before we do that, let us understand what Render cache is!
What is Render Cache?
Rendering can be a giant leap to give you a smooth performance experience. However, when you import your videos into the timeline, you can always render to have an uninterrupted playback experience.
Doing so will allow you to work in your zone quickly and efficiently. You can do a manual rendering before you begin the editing process. Or you can also opt to choose automatic rendering. In the automatic rendering option, you can continue your editing process. In the meantime, your timeline will be rendered.
How to Delete Render Cache in Filmora
To save up storage space on your computer, you can delete your render cache by following the steps.
Step1 Click on files in the top left corner of the Wondershare Filmora home interface.
Step2 Go to Preferences.
Step3 A window will pop up and go to Performance.
Step4 In the performance tab, scroll down below to the Preview Render.
Step5 Check the box saying, “Automatically delete render files when a project is closed.”

Step6 Click on OK to save your changes.
Now, whenever you close your project, your render cache will be deleted and would have given you extra space on your computer.
Part 4. Remove Split Button on Playhead
In some instances, when you are moving the playhead on the timelines, it can distract you from doing your editing. Or even more, you can mistakenly click on the Split button to split the clips you don’t want them to.
Well, no worries at all! Wondershare Filmora takes care of that for you. You can hide or remove the Split button on the playhead. It only takes a few simple and easy steps. Follow the steps mentioned below to remove the Split button:
Step1 You will notice the File option on the top left corner of the Wonderhsare Filmora home interface.
Step2 Click on Files and go to Preferences.
Step3 A window will pop up, and here you can see multiple options.
Step4 Go to the editing
Step5 In the editing tab, scroll down till your see the Split button.

Step6 Check the box. Then, click OK to save your changes.
Doing so would have removed the Split button from your playhead. So now you can edit your videos without any distractions.
Part 5. Copy and Paste Effects
Copy and paste are one of the oldest tricks in editing procedures. Wondershare Filmora comes with a range of commands and features that allow you to save time and be reliable.
Suppose you want to add an effect to a video clip in the timeline. Then, after adding the effect to your video, make custom changes to make it look more closely to the style you want. You can now use the copy-and-paste function to add the same effect to another clip. That helps you save a lot of time from tedious and time-consuming work.
How to Copy and Paste Effects
While editing, you will need to ensure that your editing process is as clean as possible and that you have all the time on hand.
But there is a solution! You can easily copy and paste the effects you placed on one video clip to another. Just follow the steps mentioned, and you will be good to go:
Step1 Right-click on the video to you added the effects too.
Step2 A drop-down column will pop up.
Step3 In the options below, you will notice an option called “Copy Effects.”
Step4 Click on the “Copy Effects” option.
Step5 Now move the playhead to the video clip on which you want to paste the effects.
Step6 Right-click on the video that you want to place the effect on.
Step7 In the pop-up column, select the Paste Effect
Step8 It adjusts the video clip according to the changes of the prior one.
You can save editing time by simply copying and pasting video effects.

Part 6. Timeline Snap
You might have added multiple videos in the same timeline track. If you removed the video ahead of the video clip, you have to close the gap in between.
So, arranging and moving clips in the timeline are hectic and time-consuming. However, that is the case without timeline snapping.
How to Apply Timeline Snap in Filmora
Timeline snapping will allow you to arrange video clips side by side without any breaks and cut-offs. Also, it will enable you to place it precisely above other video and audio gaps in the timeline.
In most cases, Timeline snapping is enabled from the start. But if you are encountering some problems managing your videos. Or if you want to remove the Timeline snap feature. Follow the steps mentioned below:
Step1 Right-click on the Timeline.
Step2 A pop will open up, giving you multiple options.
Step3 Click on timeline Snapping to either enable it or disable it.

Now you can easily enable and disable timeline snapping according to your choice!
Part 7. Color Code Video Clips
When editing footage from multiple cameras, you might want to organize which media is from which source in the timeline. You can do this by color coding your clips.
Steps to Color Code Your Videos
Color coding allows you to edit all the clips marked with a particular color to be selected simultaneously without selecting them manually in the timeline.
To color code a video, follow the steps as mentioned:
Step1 Select the clips you want to color code, right-click, and choose from the available colors.
Step2 Once you’ve color coded your clips, you can right-click on the clip again and choose to select all clips from the color mark option.
Step3 And all the clips marked with that color will be selected.

Part 8. Group Clips Together
Now in an editing timeline, you might encounter a situation where you want to arrange a video clip with specific audio. Again, it allows you to stay organized and save up a lot of time.
Grouping clips together can also be helpful when you want to edit multiple clips in the timeline but want to maintain a particular order. The group will remain in its place and allow you to edit your other video clips quickly.
Stepwise Guide to Grouping the Clips in Filmora
You can group video and audio clips in straightforward steps. Just follow the actions ahead, and you will be good to go:
Step1 Hold Left-click and drag across the clips that you want to select.
Step2 When you are done, Right-click on the clip to open the options tab.
Step3 Scroll down, and you will see a “” option.
Step4 Select Group, and that’s done.

Your whole group will be selected whenever you select a video clip or an audio clip.
Part 9. Pan and Zoom Shortcut
Editing shortcuts are excellent. They allow you to save up a lot of time. Some people prefer to use a mouse only to edit their videos, but professionals always use a keyboard.
But there are some other shortcuts too! In these shortcuts, you would not necessarily need a keyboard; only a mouse will work and give a good outcome.
You might have seen those videos in which a specific screen ratio moves over a picture. Or, in some cases when you have to pan and zoom to create a flow effect.
Instead of manually adjusting the ratio of your videos and photos, Pan and Zoom shortcuts will allow you to use multiple features. These features allow you to select where your video or photo will start, zoom, and end.
These shortcuts are so easy to apply. Just go through the steps below, and you will accomplish the following:
Step1 Right-click on a photo or a video clip.
Step2 Go to the crop and zoom tab above the timeline.
Step3 In the window that opens up, you will see a pan and zoom option in the top left corner. Click on it.
Step4 And on the bottom right corner of the window, you can see the pan and zoom shortcuts available.
Step5 Please select any of them you want and then click on OK.

Part 10. New Feature Request
One of the significant features of Wondershare Filmora that sets it among the best is its capability to listen to the users. When you have been using Wondershare Filmora for a long time, there will come a time when you wish for a feature. You can also do so in a few simple steps. Just follow the steps mentioned:
Step1 Multiple options are available on the top left corner of the Wondershare Filmora home interface. Click on help.
Step2 A drop-down box will open up.
Step3 In the options offered to you, select suggest a feature.

Step4 It automatically directs you to your default browser, where you can see the multiple feature requests.
Step5 You can vote for a feature you want in the next update.
Step6 Or you can also create a request for another particular feature.

Summing Up
Wondershare Filmora is the best in the business regarding editing your videos. It has such creative and easy-to-use software that even a beginner efficiently edits videos.
There are a lot of features that Wondershare Filmora provides. But now, with these secret and hidden tips, you can edit your videos more creatively.
A Wedding Is One of the Exciting Parts that Will Happen in Your Life. It’s Not that Easy to Plan a Wedding, There’s a Lot to Be Consider Like Wedding Dress, Food, Venue, Videographer Etc
A wedding is one of the exciting parts that will happen in your life. It’s not that easy to plan a wedding, there’s a lot to be consider like wedding dress, food, venue, videographer etc. Everyone wants the best for their wedding and this includes videos that will record and capture important aspects of the event for years to come.
It’s probably hard to fast-forward your imagination ahead to see what you’ll be like in a decade, but if you and your spouse have your own children, as they grow it can be very special to be able to share your special memories with them, while you can certainly describe the flower archway where you exchange vows and tell them about the wedding care adorned with fresh flowers, your words can’t compare to the joy you’ll feel when you can show all of this first hand through your wedding video.
In this article will talk about how much does wedding videographer cost, how important to have your wedding day covered by the professional videographer and tips on how to save money in planning a wedding, because in your wedding day you want every moment that happens on that day will be captured.

How much a wedding videographer costs
Hiring a photographer for your wedding day is likely a given, but you might be wondering about the cost to hire a videographer and if it’s worth the extra expense.
Keep in mind that the average cost of a wedding videographer will largely depend on where you live, how many hours of coverage you want the videographer to capture, and how experienced the professional is. The longer they
’ve been in the business, the more likely the cost will increase.
It is recommended that you start with a standard package and customised it from there to make sure all your bases are covered. You can often get a better bargain this way.
Peak wedding season may also affect the cost some vendors, making coverage from June through December a bit pricier and harder to secure. The range can often run between $1000 and $1,500
Nationwide or as much as $12,500 for a luxury shoot that turns you into a celebrity wedding coverage.

What include in the packages
Videographers, like wedding photographers, will have a variety of wedding packages for you to choose from.
Here’s what you can expect to see in a basic package
- Three-to-five-minute highlight video
- A 20–30-minute full wedding video with wedding ceremony and speeches
- Two cinematographers
- An assistant to the videographer
There are also extra. Some videographer offers extras such as
- Drone footage– Drones are popular, especially at destination weddings. They have the ability to film hundreds of feet in the air which also makes your wedding video more unique. The extra equipment needed for this can cost you anywhere from $1,000 to $3,000
- Travel– Just because you’re getting married in a far-off place doesn’t mean you can’t have your dream videographer. Just be prepared to pay for their travel. You will likely pay for their accommodations, meals, and travel
- Extra edits– Videographers spend hours editing your final wedding video, so if you request any additional edits, it’s likely going to cost you
- Filming before and after the wedding– Whether your wedding is a weekend long affair or you host a brunch for your friends and family the day of the wedding, filming these moments is going to be additional cost. Discuss plans with your videographer as soon as possible so they can check their availability and they can give you a total for a wedding budget
- Tipping– tips are always welcomed even if they’re not expected. Your videographer puts in a lot of time and effort into capturing the beauty of the day, so any gesture of your appreciation will be welcomed.
And know what additional time can cost as much as $200-$500 per half hour, which pays for the videographer’s and assistant time, time spent editing additional footage, and video cards.
These included highlights and wedding videos will be professionally edited and they will also be set to music and delivered to you either via USB or through an online platform.
Typical videography prices also depend on the package you choose during the wedding planning process. Of course, you’re paying for a certain number of hours of coverage on your wedding day, but the post production editing process is even more time consuming and costly. While most videographers will produce an edited wedding movie, some may offer multiple clips at different lengths, like a wedding trailer for social media and a longer cinematic feature. Others might also be willing to give you the raw footage for your own personal use. Be sure to read your contract before making any final decisions so you know exactly what to get after the wedding day.
This one might sound strange. But the most experienced wedding videographer’s typically charge more than the going market rate. Price is a good way to tell who is the longest standing wedding videographer in an area. As the adage goes…you get what you pay for
Tips on saving money on wedding videographer
While you would need a professional videographer for your wedding and this does cost quite a penny, there are a few tips you could employ in saving on videography costs.
Time
As mentioned before, the more time the videographer spends at your event the more it would cost. Therefore, if you are looking to minimize the average cost of a wedding videographer, you could have him stay for only the most important aspects of the wedding. You could skip the pre-wedding prep part and also the last part of the reception. Because everyone now has mobile phone and can tag you what they captured on your social media. You can also use a hashtag where your friends can tag all of your wedding photo captured by them.
No extras
Such extras as cinematic effects, drone footage, personalised packaging and extra coppies of the finished product all add up in cost. Leaving extras out will go a long way uncutting costs.
No editing
Since post-production is the most time-consuming aspect, accepting the raw footage instead of an edited one would definitely cost less. You could choose to do the editing much later if desired.
You can also do your own editing, it’s also different from the feeling of editing your own wedding footage, because you can actually see the raw footage and personalised the editing.
For your editing software, you can never go wrong with Wondershare Filmora editing software. Offers easy to navigate features for beginners, expert editors and everyone in between. It includes professional tools that can turn your videos into professional level works of arts. Users new to the editing world will appreciate the programme intuitive interface and free video tutorials that walk you through its features step by step
Free Download For Win 7 or later(64-bit)
Free Download For macOS 10.14 or later
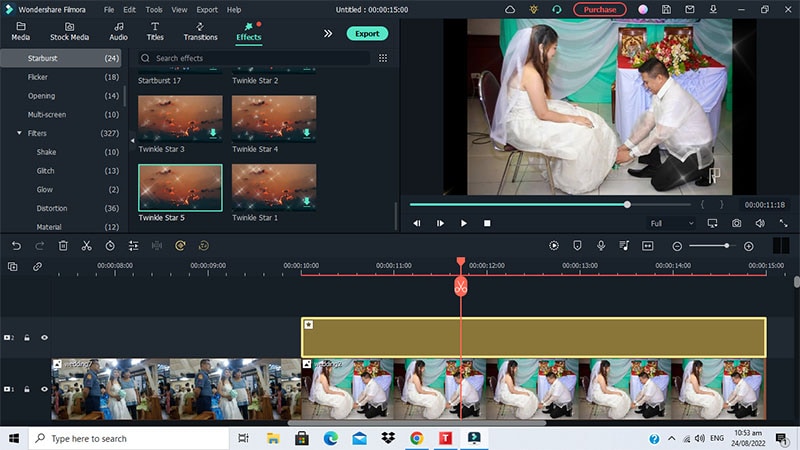
Filmora Wedding Video Editor Key Features:
- 300+effects
- Customised/animated text and titles
- Title tool
- Color grading
- Royalty-free music tracks
- Split screen
- Music library
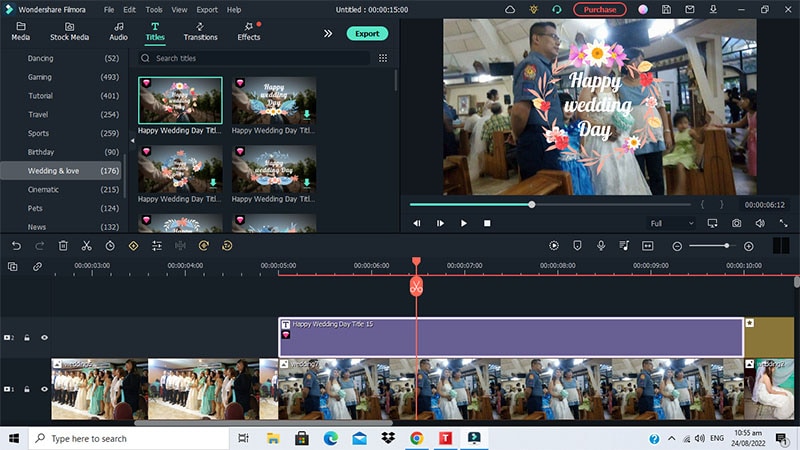
Why need to hire a videographer on wedding day
A wedding video is the best way to capture your celebration on the biggest day of your life. This is a chance for family and friends who were unable to attend to see you exchange vows, party with everyone else, dance, eat cake etc.
Wedding videos are an excellent way for your family and friends to relive the magic moment of your special day. Your guest can watch them repeatedly; you won’t believe how many times even your own wedding video has been viewed.
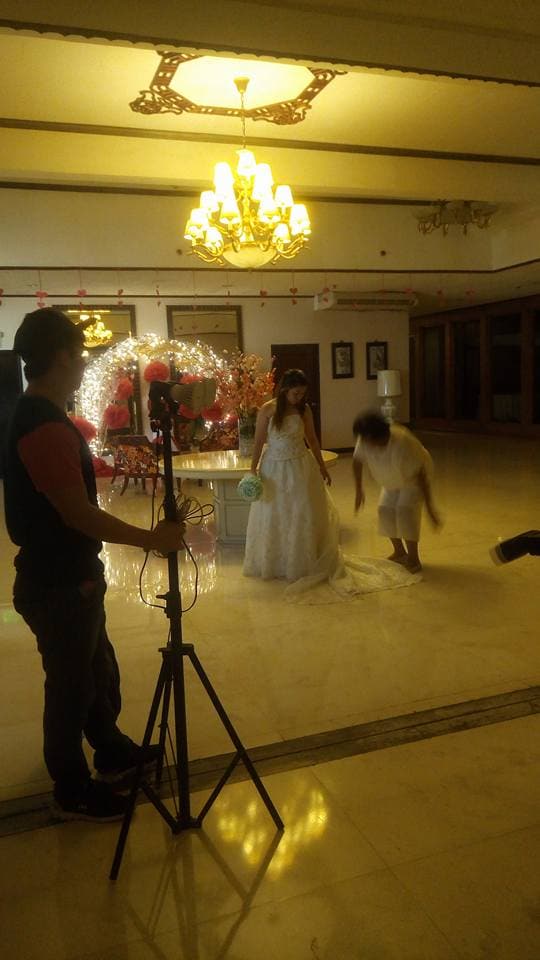
Having an videographer allows you to stress less about your wedding video. You will be in good hands when you hire and experienced wedding videographer. they will familiarize themselves with your wedding timeline and make sure that they are in sync with your photographer. They will know exactly where to be, at exactly the right time to get the perfect shot. Even an expensive camera can’t replace the gut instinct a long-time wedding.
Keep in mind that different wedding videographer’s will have different artistic styles, so you’ll also need to be sure the person you hire will be a good fit for your taste.
Conclusion
Your wedding video will capture the magical moments of your wedding day and help keep those memories for years to come. While we can’t place a price on quality, it is still helpful to know the average cost of a wedding videographer. If its fits in your wedding budget, a videographer is a great addition to your line up of vendors because after all, re-watching your nuptials will be priceless.
Capture the moments you can’t remember, your wedding day is a blur of excitement, love, and happiness. But what about all those special moments that happen when you’re not looking? What about the speeches, the first dance, or your dad’s toast? You might be able to recall some of these memories if they were captured on video but chances are you’ll never know for sure.
How much a wedding videographer costs
Hiring a photographer for your wedding day is likely a given, but you might be wondering about the cost to hire a videographer and if it’s worth the extra expense.
Keep in mind that the average cost of a wedding videographer will largely depend on where you live, how many hours of coverage you want the videographer to capture, and how experienced the professional is. The longer they
’ve been in the business, the more likely the cost will increase.
It is recommended that you start with a standard package and customised it from there to make sure all your bases are covered. You can often get a better bargain this way.
Peak wedding season may also affect the cost some vendors, making coverage from June through December a bit pricier and harder to secure. The range can often run between $1000 and $1,500
Nationwide or as much as $12,500 for a luxury shoot that turns you into a celebrity wedding coverage.

What include in the packages
Videographers, like wedding photographers, will have a variety of wedding packages for you to choose from.
Here’s what you can expect to see in a basic package
- Three-to-five-minute highlight video
- A 20–30-minute full wedding video with wedding ceremony and speeches
- Two cinematographers
- An assistant to the videographer
There are also extra. Some videographer offers extras such as
- Drone footage– Drones are popular, especially at destination weddings. They have the ability to film hundreds of feet in the air which also makes your wedding video more unique. The extra equipment needed for this can cost you anywhere from $1,000 to $3,000
- Travel– Just because you’re getting married in a far-off place doesn’t mean you can’t have your dream videographer. Just be prepared to pay for their travel. You will likely pay for their accommodations, meals, and travel
- Extra edits– Videographers spend hours editing your final wedding video, so if you request any additional edits, it’s likely going to cost you
- Filming before and after the wedding– Whether your wedding is a weekend long affair or you host a brunch for your friends and family the day of the wedding, filming these moments is going to be additional cost. Discuss plans with your videographer as soon as possible so they can check their availability and they can give you a total for a wedding budget
- Tipping– tips are always welcomed even if they’re not expected. Your videographer puts in a lot of time and effort into capturing the beauty of the day, so any gesture of your appreciation will be welcomed.
And know what additional time can cost as much as $200-$500 per half hour, which pays for the videographer’s and assistant time, time spent editing additional footage, and video cards.
These included highlights and wedding videos will be professionally edited and they will also be set to music and delivered to you either via USB or through an online platform.
Typical videography prices also depend on the package you choose during the wedding planning process. Of course, you’re paying for a certain number of hours of coverage on your wedding day, but the post production editing process is even more time consuming and costly. While most videographers will produce an edited wedding movie, some may offer multiple clips at different lengths, like a wedding trailer for social media and a longer cinematic feature. Others might also be willing to give you the raw footage for your own personal use. Be sure to read your contract before making any final decisions so you know exactly what to get after the wedding day.
This one might sound strange. But the most experienced wedding videographer’s typically charge more than the going market rate. Price is a good way to tell who is the longest standing wedding videographer in an area. As the adage goes…you get what you pay for
Tips on saving money on wedding videographer
While you would need a professional videographer for your wedding and this does cost quite a penny, there are a few tips you could employ in saving on videography costs.
Time
As mentioned before, the more time the videographer spends at your event the more it would cost. Therefore, if you are looking to minimize the average cost of a wedding videographer, you could have him stay for only the most important aspects of the wedding. You could skip the pre-wedding prep part and also the last part of the reception. Because everyone now has mobile phone and can tag you what they captured on your social media. You can also use a hashtag where your friends can tag all of your wedding photo captured by them.
No extras
Such extras as cinematic effects, drone footage, personalised packaging and extra coppies of the finished product all add up in cost. Leaving extras out will go a long way uncutting costs.
No editing
Since post-production is the most time-consuming aspect, accepting the raw footage instead of an edited one would definitely cost less. You could choose to do the editing much later if desired.
You can also do your own editing, it’s also different from the feeling of editing your own wedding footage, because you can actually see the raw footage and personalised the editing.
For your editing software, you can never go wrong with Wondershare Filmora editing software. Offers easy to navigate features for beginners, expert editors and everyone in between. It includes professional tools that can turn your videos into professional level works of arts. Users new to the editing world will appreciate the programme intuitive interface and free video tutorials that walk you through its features step by step
Free Download For Win 7 or later(64-bit)
Free Download For macOS 10.14 or later

Filmora Wedding Video Editor Key Features:
- 300+effects
- Customised/animated text and titles
- Title tool
- Color grading
- Royalty-free music tracks
- Split screen
- Music library

Why need to hire a videographer on wedding day
A wedding video is the best way to capture your celebration on the biggest day of your life. This is a chance for family and friends who were unable to attend to see you exchange vows, party with everyone else, dance, eat cake etc.
Wedding videos are an excellent way for your family and friends to relive the magic moment of your special day. Your guest can watch them repeatedly; you won’t believe how many times even your own wedding video has been viewed.
Having an videographer allows you to stress less about your wedding video. You will be in good hands when you hire and experienced wedding videographer. they will familiarize themselves with your wedding timeline and make sure that they are in sync with your photographer. They will know exactly where to be, at exactly the right time to get the perfect shot. Even an expensive camera can’t replace the gut instinct a long-time wedding.
Keep in mind that different wedding videographer’s will have different artistic styles, so you’ll also need to be sure the person you hire will be a good fit for your taste.

Conclusion
Your wedding video will capture the magical moments of your wedding day and help keep those memories for years to come. While we can’t place a price on quality, it is still helpful to know the average cost of a wedding videographer. If its fits in your wedding budget, a videographer is a great addition to your line up of vendors because after all, re-watching your nuptials will be priceless.
Capture the moments you can’t remember, your wedding day is a blur of excitement, love, and happiness. But what about all those special moments that happen when you’re not looking? What about the speeches, the first dance, or your dad’s toast? You might be able to recall some of these memories if they were captured on video but chances are you’ll never know for sure.
AVI Video Format: How to Open, Play, Edit AVI File?
Do you want to know about a file format that has high quality? We are talking about the AVI file format. The format is developed by Microsoft, but it also works well with non-Microsoft operating systems.
Do you know something interesting about the AVI video format? The format does not have any hardware or software requirements to run the file. If you want to know more about the AVI file, get ready because we are about to begin.
In this article
02 How Can You Open and Play AVI Video Format?
03 How to Edit AVI Video Files More Creatively?
Part 1. What Is AVI Video Format?
AVI file format has the abbreviation ‘Audio Video Interleave.’ AVI is a multimedia file container that was developed by Microsoft back in 1992. AVI file format is commonly used as a video file container, and it can store both audio and video. The format is a less compressed file and takes more space than other files like MPEG or MOV.
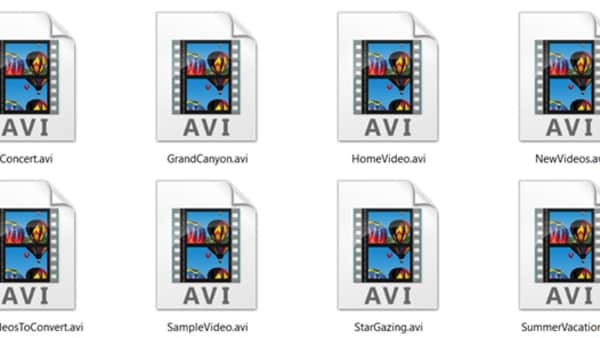
AVI video format allows synchronous audio-with-video playback even without any codec. The video format can also contain lossless files that are greater in size and keep the same quality. It is used to keep video files that are to be edited.
Part 2. How Can You Open and Play AVI Video Format?
Do you know anything about the software that supports AVI video format? If you don’t, this section is a great opportunity for you to learn. We are going to discuss a few software that can open and play AVI file format.
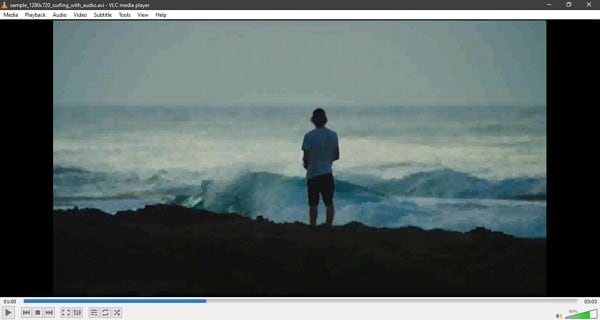
VLC Media Player
The VLC media player is a cross-platform media player. It is developed by the VideoLAN project to run on all platforms. Being free and open-source software, anyone can use the tool for their convenience. Do VLC Media Player work on mobile? Yes! VLC Media Player operates on Android and iOS devices as well.
The VLC Media Player has many encoding and decoding libraries. These libraries reduce the usage of proprietary plugins. It is the first to support playback of encrypted DVDs on Linux. VLC can stream media over computer networks, and multimedia files can also be transcoded. VLC Media Player allows playing many video and audio compression formats.
Elmedia Player
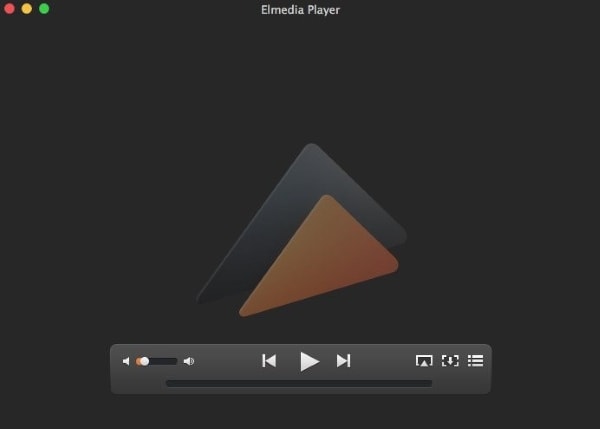
Elmedia Player is a media player specifically for macOS users that can handle any conceivable media file format. It offers advanced streaming and playback services. No extra codec is needed to stream files on Chromecast or AirPlay. It can also do streaming on DLNA devices and Roku while providing an exquisite audio and video experience.
The media player supports formats like AVI file format along with MOV, MP4, FLAC, and MP3. It delivers an HD experience without putting strain on the system that the consumer is using. You can control the playback. Elmedia player even allows you to watch the video frame-by-frame.
5KPlayer
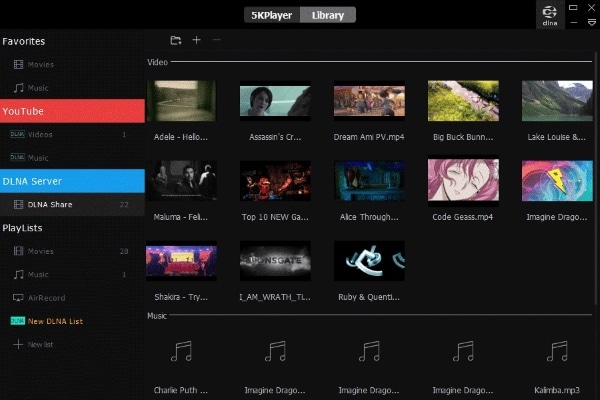
Digiarty Software has created this different media player, which is one of a kind that supports AirPlay. 5KPlayer is a video player along with being a music player. It is an online downloader and media streamer. It wirelessly plays both audio and video on AirPlay and DLNA without quality loss.
5KPlayer can bridge billions of DLNA compliant devices so that the interoperation is made easy. It quickly plays 4K and 1080p videos. It allows the user to download videos from YouTube and Vimeo along with 300 plus different sites. You can also play MP3, and FLAC music perfectly with 5KPlayer.
GOM Media Player
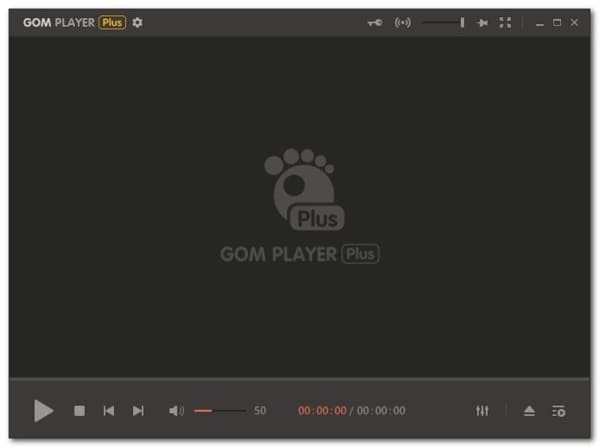
GOM Media Player was firstly made by GOM & Company for Windows users. It is considered the most used media player in South Korea. GOM Media Player can find codecs from codec finding services if they are missing. It can also be used on macOS along with Android mobiles and iOS devices.
GOM Media Player has both free and paid versions. The paid version allows the users to do video playback without advertisements. If the subtitles of a video are not available, you can find the subtitle archive that the GOM Player supports. It can also play 360-degree videos without any issue.
Part 3. How to Edit AVI Video Files More Creatively?
If your video is creatively edited, it will spontaneously attract more viewers. Do you want to attract more and more viewers? Allow us to help you. Wondershare Filmora is wonderful editing software that will help you create mind-blowing AVI file format videos.
The video editor offers more features than anyone can even imagine. Name a single platform that can trim videos, split videos, and join videos? Like this, Filmora has many more features; let’s share them.
Key Features of Wondershare Filmora
- Silence Detection: Are you recording a video, but it has way too many silent instances? What could be done in this situation? Use the Silence Detection feature of Filmora. It will automatically detect the pauses from the video and will remove the parts from the video.
- Split Screen: Your video looks very cool if it has a split-screen effect. Wondershare Filmora offers you a Split Screen feature so that you can create and edit attractive videos. The feature lets you add multiple clips, images, or footage to a single screen and make a collage by comparing different angled shots.
- Auto Reframe: This AI-powered feature is excellent for saving time and creating quality content. With the Auto Reframe feature, Filmora spontaneously detects the focal point of the video and makes sure that it stays in the frame. At the same time, crop the extra part from the video.
- AI Portrait: If you are not satisfied with the background of your video, try the AI Portrait feature of Wondershare Filmora. This lets you add glitch effects, noise, borders, and a lot more things. The coolest thing is it removes the background without chroma key and green screen. This feature is the newest addition to Filmora.
For Win 7 or later (64-bit)
For macOS 10.12 or later
Step by Step Guideline to Use Filmora Video Editor
If you are impressed by Wondershare Filmora and want to edit your video available in AVI file format, the coming guideline is for you. Learn from us how to use Filmora.
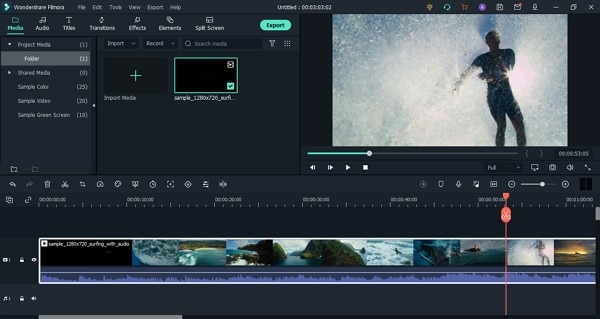
Step 1: Import AVI Video
For creating interesting videos on Filmora, start by importing your AVI video format to the video editor. First, launch it and from the main screen, select the ‘File’ tab. A list of options will appear on the screen; hover on the ‘Import Media’ option to select ‘Import Media Files’ from the sub-menu.

Step 2: Move the File to Timeline
After you have located and imported the AVI video file to Filmora, you should drag and drop the file on the ‘Timeline’ so that you can start the editing process.
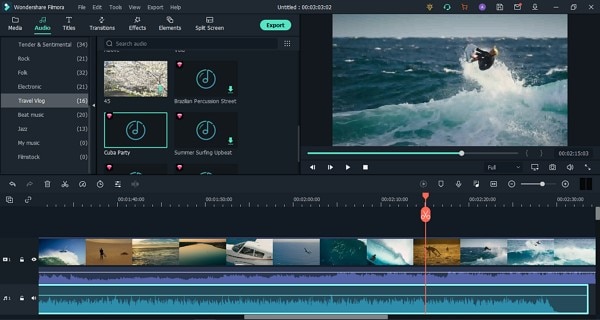
Step 3: Use Audio Effects
If you want to hide the voices in your AVI video, start by detaching the audio. Then, you can add cool sound effects from Filmora. Head to the ‘Audio’ tab and look for an excellent sound suitable sound effect for your video.
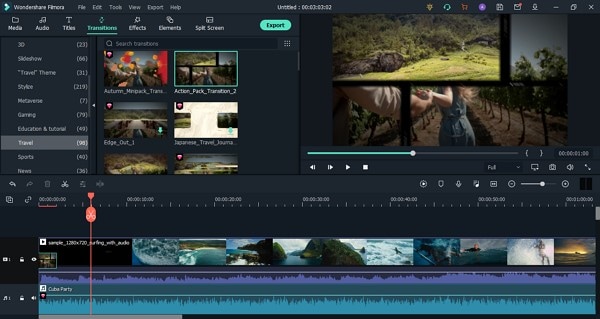
Step 4: Add Catch Transitions
If your video has different clips in it, make sure the slips have smooth transitions. This could be done by taking help from the ‘Transitions’ tab. It has different effects like Glitch, School Pack, Educational board, and whatnot.
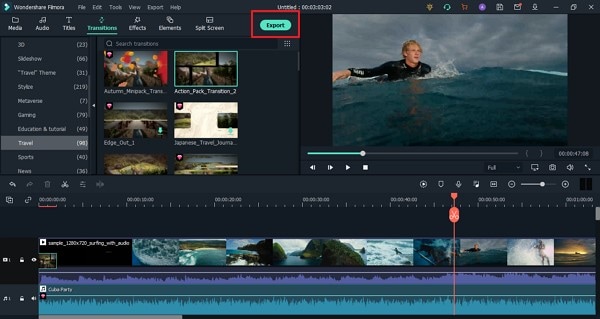
Step 5: Export Customized Video
After you have created an exciting and attractive video, hit the ‘Export’ button. Filmora offers you to select your preferred output file format and export the video to your device.
Conclusion
You must have heard about AVI file format before, but you will have detailed knowledge about it after reading this article. We talked about the format and also ways to use it. In addition to that, we discussed Filmora Video Editor. Let’s talk a little more about it.
The software is amazing to use with great features. Users can easily understand Filmora from its simple yet intuitive interface. It offers Basic as well as Advanced Features to create eye-catching videos. Moreover, with Filmora, get your hands on crazy sound effects, transitions, elements, video effects, and much more than that.
For Win 7 or later (64-bit)
For macOS 10.12 or later
02 How Can You Open and Play AVI Video Format?
03 How to Edit AVI Video Files More Creatively?
Part 1. What Is AVI Video Format?
AVI file format has the abbreviation ‘Audio Video Interleave.’ AVI is a multimedia file container that was developed by Microsoft back in 1992. AVI file format is commonly used as a video file container, and it can store both audio and video. The format is a less compressed file and takes more space than other files like MPEG or MOV.

AVI video format allows synchronous audio-with-video playback even without any codec. The video format can also contain lossless files that are greater in size and keep the same quality. It is used to keep video files that are to be edited.
Part 2. How Can You Open and Play AVI Video Format?
Do you know anything about the software that supports AVI video format? If you don’t, this section is a great opportunity for you to learn. We are going to discuss a few software that can open and play AVI file format.
VLC Media Player
The VLC media player is a cross-platform media player. It is developed by the VideoLAN project to run on all platforms. Being free and open-source software, anyone can use the tool for their convenience. Do VLC Media Player work on mobile? Yes! VLC Media Player operates on Android and iOS devices as well.
The VLC Media Player has many encoding and decoding libraries. These libraries reduce the usage of proprietary plugins. It is the first to support playback of encrypted DVDs on Linux. VLC can stream media over computer networks, and multimedia files can also be transcoded. VLC Media Player allows playing many video and audio compression formats.

Elmedia Player
Elmedia Player is a media player specifically for macOS users that can handle any conceivable media file format. It offers advanced streaming and playback services. No extra codec is needed to stream files on Chromecast or AirPlay. It can also do streaming on DLNA devices and Roku while providing an exquisite audio and video experience.
The media player supports formats like AVI file format along with MOV, MP4, FLAC, and MP3. It delivers an HD experience without putting strain on the system that the consumer is using. You can control the playback. Elmedia player even allows you to watch the video frame-by-frame.

5KPlayer
Digiarty Software has created this different media player, which is one of a kind that supports AirPlay. 5KPlayer is a video player along with being a music player. It is an online downloader and media streamer. It wirelessly plays both audio and video on AirPlay and DLNA without quality loss.
5KPlayer can bridge billions of DLNA compliant devices so that the interoperation is made easy. It quickly plays 4K and 1080p videos. It allows the user to download videos from YouTube and Vimeo along with 300 plus different sites. You can also play MP3, and FLAC music perfectly with 5KPlayer.

GOM Media Player
GOM Media Player was firstly made by GOM & Company for Windows users. It is considered the most used media player in South Korea. GOM Media Player can find codecs from codec finding services if they are missing. It can also be used on macOS along with Android mobiles and iOS devices.
GOM Media Player has both free and paid versions. The paid version allows the users to do video playback without advertisements. If the subtitles of a video are not available, you can find the subtitle archive that the GOM Player supports. It can also play 360-degree videos without any issue.

Part 3. How to Edit AVI Video Files More Creatively?
If your video is creatively edited, it will spontaneously attract more viewers. Do you want to attract more and more viewers? Allow us to help you. Wondershare Filmora is wonderful editing software that will help you create mind-blowing AVI file format videos.
The video editor offers more features than anyone can even imagine. Name a single platform that can trim videos, split videos, and join videos? Like this, Filmora has many more features; let’s share them.
Key Features of Wondershare Filmora
- Silence Detection: Are you recording a video, but it has way too many silent instances? What could be done in this situation? Use the Silence Detection feature of Filmora. It will automatically detect the pauses from the video and will remove the parts from the video.
- Split Screen: Your video looks very cool if it has a split-screen effect. Wondershare Filmora offers you a Split Screen feature so that you can create and edit attractive videos. The feature lets you add multiple clips, images, or footage to a single screen and make a collage by comparing different angled shots.
- Auto Reframe: This AI-powered feature is excellent for saving time and creating quality content. With the Auto Reframe feature, Filmora spontaneously detects the focal point of the video and makes sure that it stays in the frame. At the same time, crop the extra part from the video.
- AI Portrait: If you are not satisfied with the background of your video, try the AI Portrait feature of Wondershare Filmora. This lets you add glitch effects, noise, borders, and a lot more things. The coolest thing is it removes the background without chroma key and green screen. This feature is the newest addition to Filmora.
For Win 7 or later (64-bit)
For macOS 10.12 or later
Step by Step Guideline to Use Filmora Video Editor
If you are impressed by Wondershare Filmora and want to edit your video available in AVI file format, the coming guideline is for you. Learn from us how to use Filmora.
Step 1: Import AVI Video
For creating interesting videos on Filmora, start by importing your AVI video format to the video editor. First, launch it and from the main screen, select the ‘File’ tab. A list of options will appear on the screen; hover on the ‘Import Media’ option to select ‘Import Media Files’ from the sub-menu.

Step 2: Move the File to Timeline
After you have located and imported the AVI video file to Filmora, you should drag and drop the file on the ‘Timeline’ so that you can start the editing process.

Step 3: Use Audio Effects
If you want to hide the voices in your AVI video, start by detaching the audio. Then, you can add cool sound effects from Filmora. Head to the ‘Audio’ tab and look for an excellent sound suitable sound effect for your video.

Step 4: Add Catch Transitions
If your video has different clips in it, make sure the slips have smooth transitions. This could be done by taking help from the ‘Transitions’ tab. It has different effects like Glitch, School Pack, Educational board, and whatnot.

Step 5: Export Customized Video
After you have created an exciting and attractive video, hit the ‘Export’ button. Filmora offers you to select your preferred output file format and export the video to your device.

Conclusion
You must have heard about AVI file format before, but you will have detailed knowledge about it after reading this article. We talked about the format and also ways to use it. In addition to that, we discussed Filmora Video Editor. Let’s talk a little more about it.
The software is amazing to use with great features. Users can easily understand Filmora from its simple yet intuitive interface. It offers Basic as well as Advanced Features to create eye-catching videos. Moreover, with Filmora, get your hands on crazy sound effects, transitions, elements, video effects, and much more than that.
For Win 7 or later (64-bit)
For macOS 10.12 or later
02 How Can You Open and Play AVI Video Format?
03 How to Edit AVI Video Files More Creatively?
Part 1. What Is AVI Video Format?
AVI file format has the abbreviation ‘Audio Video Interleave.’ AVI is a multimedia file container that was developed by Microsoft back in 1992. AVI file format is commonly used as a video file container, and it can store both audio and video. The format is a less compressed file and takes more space than other files like MPEG or MOV.

AVI video format allows synchronous audio-with-video playback even without any codec. The video format can also contain lossless files that are greater in size and keep the same quality. It is used to keep video files that are to be edited.
Part 2. How Can You Open and Play AVI Video Format?
Do you know anything about the software that supports AVI video format? If you don’t, this section is a great opportunity for you to learn. We are going to discuss a few software that can open and play AVI file format.
VLC Media Player
The VLC media player is a cross-platform media player. It is developed by the VideoLAN project to run on all platforms. Being free and open-source software, anyone can use the tool for their convenience. Do VLC Media Player work on mobile? Yes! VLC Media Player operates on Android and iOS devices as well.
The VLC Media Player has many encoding and decoding libraries. These libraries reduce the usage of proprietary plugins. It is the first to support playback of encrypted DVDs on Linux. VLC can stream media over computer networks, and multimedia files can also be transcoded. VLC Media Player allows playing many video and audio compression formats.

Elmedia Player
Elmedia Player is a media player specifically for macOS users that can handle any conceivable media file format. It offers advanced streaming and playback services. No extra codec is needed to stream files on Chromecast or AirPlay. It can also do streaming on DLNA devices and Roku while providing an exquisite audio and video experience.
The media player supports formats like AVI file format along with MOV, MP4, FLAC, and MP3. It delivers an HD experience without putting strain on the system that the consumer is using. You can control the playback. Elmedia player even allows you to watch the video frame-by-frame.

5KPlayer
Digiarty Software has created this different media player, which is one of a kind that supports AirPlay. 5KPlayer is a video player along with being a music player. It is an online downloader and media streamer. It wirelessly plays both audio and video on AirPlay and DLNA without quality loss.
5KPlayer can bridge billions of DLNA compliant devices so that the interoperation is made easy. It quickly plays 4K and 1080p videos. It allows the user to download videos from YouTube and Vimeo along with 300 plus different sites. You can also play MP3, and FLAC music perfectly with 5KPlayer.

GOM Media Player
GOM Media Player was firstly made by GOM & Company for Windows users. It is considered the most used media player in South Korea. GOM Media Player can find codecs from codec finding services if they are missing. It can also be used on macOS along with Android mobiles and iOS devices.
GOM Media Player has both free and paid versions. The paid version allows the users to do video playback without advertisements. If the subtitles of a video are not available, you can find the subtitle archive that the GOM Player supports. It can also play 360-degree videos without any issue.

Part 3. How to Edit AVI Video Files More Creatively?
If your video is creatively edited, it will spontaneously attract more viewers. Do you want to attract more and more viewers? Allow us to help you. Wondershare Filmora is wonderful editing software that will help you create mind-blowing AVI file format videos.
The video editor offers more features than anyone can even imagine. Name a single platform that can trim videos, split videos, and join videos? Like this, Filmora has many more features; let’s share them.
Key Features of Wondershare Filmora
- Silence Detection: Are you recording a video, but it has way too many silent instances? What could be done in this situation? Use the Silence Detection feature of Filmora. It will automatically detect the pauses from the video and will remove the parts from the video.
- Split Screen: Your video looks very cool if it has a split-screen effect. Wondershare Filmora offers you a Split Screen feature so that you can create and edit attractive videos. The feature lets you add multiple clips, images, or footage to a single screen and make a collage by comparing different angled shots.
- Auto Reframe: This AI-powered feature is excellent for saving time and creating quality content. With the Auto Reframe feature, Filmora spontaneously detects the focal point of the video and makes sure that it stays in the frame. At the same time, crop the extra part from the video.
- AI Portrait: If you are not satisfied with the background of your video, try the AI Portrait feature of Wondershare Filmora. This lets you add glitch effects, noise, borders, and a lot more things. The coolest thing is it removes the background without chroma key and green screen. This feature is the newest addition to Filmora.
For Win 7 or later (64-bit)
For macOS 10.12 or later
Step by Step Guideline to Use Filmora Video Editor
If you are impressed by Wondershare Filmora and want to edit your video available in AVI file format, the coming guideline is for you. Learn from us how to use Filmora.
Step 1: Import AVI Video
For creating interesting videos on Filmora, start by importing your AVI video format to the video editor. First, launch it and from the main screen, select the ‘File’ tab. A list of options will appear on the screen; hover on the ‘Import Media’ option to select ‘Import Media Files’ from the sub-menu.

Step 2: Move the File to Timeline
After you have located and imported the AVI video file to Filmora, you should drag and drop the file on the ‘Timeline’ so that you can start the editing process.

Step 3: Use Audio Effects
If you want to hide the voices in your AVI video, start by detaching the audio. Then, you can add cool sound effects from Filmora. Head to the ‘Audio’ tab and look for an excellent sound suitable sound effect for your video.

Step 4: Add Catch Transitions
If your video has different clips in it, make sure the slips have smooth transitions. This could be done by taking help from the ‘Transitions’ tab. It has different effects like Glitch, School Pack, Educational board, and whatnot.

Step 5: Export Customized Video
After you have created an exciting and attractive video, hit the ‘Export’ button. Filmora offers you to select your preferred output file format and export the video to your device.

Conclusion
You must have heard about AVI file format before, but you will have detailed knowledge about it after reading this article. We talked about the format and also ways to use it. In addition to that, we discussed Filmora Video Editor. Let’s talk a little more about it.
The software is amazing to use with great features. Users can easily understand Filmora from its simple yet intuitive interface. It offers Basic as well as Advanced Features to create eye-catching videos. Moreover, with Filmora, get your hands on crazy sound effects, transitions, elements, video effects, and much more than that.
For Win 7 or later (64-bit)
For macOS 10.12 or later
02 How Can You Open and Play AVI Video Format?
03 How to Edit AVI Video Files More Creatively?
Part 1. What Is AVI Video Format?
AVI file format has the abbreviation ‘Audio Video Interleave.’ AVI is a multimedia file container that was developed by Microsoft back in 1992. AVI file format is commonly used as a video file container, and it can store both audio and video. The format is a less compressed file and takes more space than other files like MPEG or MOV.

AVI video format allows synchronous audio-with-video playback even without any codec. The video format can also contain lossless files that are greater in size and keep the same quality. It is used to keep video files that are to be edited.
Part 2. How Can You Open and Play AVI Video Format?
Do you know anything about the software that supports AVI video format? If you don’t, this section is a great opportunity for you to learn. We are going to discuss a few software that can open and play AVI file format.
VLC Media Player
The VLC media player is a cross-platform media player. It is developed by the VideoLAN project to run on all platforms. Being free and open-source software, anyone can use the tool for their convenience. Do VLC Media Player work on mobile? Yes! VLC Media Player operates on Android and iOS devices as well.
The VLC Media Player has many encoding and decoding libraries. These libraries reduce the usage of proprietary plugins. It is the first to support playback of encrypted DVDs on Linux. VLC can stream media over computer networks, and multimedia files can also be transcoded. VLC Media Player allows playing many video and audio compression formats.

Elmedia Player
Elmedia Player is a media player specifically for macOS users that can handle any conceivable media file format. It offers advanced streaming and playback services. No extra codec is needed to stream files on Chromecast or AirPlay. It can also do streaming on DLNA devices and Roku while providing an exquisite audio and video experience.
The media player supports formats like AVI file format along with MOV, MP4, FLAC, and MP3. It delivers an HD experience without putting strain on the system that the consumer is using. You can control the playback. Elmedia player even allows you to watch the video frame-by-frame.

5KPlayer
Digiarty Software has created this different media player, which is one of a kind that supports AirPlay. 5KPlayer is a video player along with being a music player. It is an online downloader and media streamer. It wirelessly plays both audio and video on AirPlay and DLNA without quality loss.
5KPlayer can bridge billions of DLNA compliant devices so that the interoperation is made easy. It quickly plays 4K and 1080p videos. It allows the user to download videos from YouTube and Vimeo along with 300 plus different sites. You can also play MP3, and FLAC music perfectly with 5KPlayer.

GOM Media Player
GOM Media Player was firstly made by GOM & Company for Windows users. It is considered the most used media player in South Korea. GOM Media Player can find codecs from codec finding services if they are missing. It can also be used on macOS along with Android mobiles and iOS devices.
GOM Media Player has both free and paid versions. The paid version allows the users to do video playback without advertisements. If the subtitles of a video are not available, you can find the subtitle archive that the GOM Player supports. It can also play 360-degree videos without any issue.

Part 3. How to Edit AVI Video Files More Creatively?
If your video is creatively edited, it will spontaneously attract more viewers. Do you want to attract more and more viewers? Allow us to help you. Wondershare Filmora is wonderful editing software that will help you create mind-blowing AVI file format videos.
The video editor offers more features than anyone can even imagine. Name a single platform that can trim videos, split videos, and join videos? Like this, Filmora has many more features; let’s share them.
Key Features of Wondershare Filmora
- Silence Detection: Are you recording a video, but it has way too many silent instances? What could be done in this situation? Use the Silence Detection feature of Filmora. It will automatically detect the pauses from the video and will remove the parts from the video.
- Split Screen: Your video looks very cool if it has a split-screen effect. Wondershare Filmora offers you a Split Screen feature so that you can create and edit attractive videos. The feature lets you add multiple clips, images, or footage to a single screen and make a collage by comparing different angled shots.
- Auto Reframe: This AI-powered feature is excellent for saving time and creating quality content. With the Auto Reframe feature, Filmora spontaneously detects the focal point of the video and makes sure that it stays in the frame. At the same time, crop the extra part from the video.
- AI Portrait: If you are not satisfied with the background of your video, try the AI Portrait feature of Wondershare Filmora. This lets you add glitch effects, noise, borders, and a lot more things. The coolest thing is it removes the background without chroma key and green screen. This feature is the newest addition to Filmora.
For Win 7 or later (64-bit)
For macOS 10.12 or later
Step by Step Guideline to Use Filmora Video Editor
If you are impressed by Wondershare Filmora and want to edit your video available in AVI file format, the coming guideline is for you. Learn from us how to use Filmora.
Step 1: Import AVI Video
For creating interesting videos on Filmora, start by importing your AVI video format to the video editor. First, launch it and from the main screen, select the ‘File’ tab. A list of options will appear on the screen; hover on the ‘Import Media’ option to select ‘Import Media Files’ from the sub-menu.

Step 2: Move the File to Timeline
After you have located and imported the AVI video file to Filmora, you should drag and drop the file on the ‘Timeline’ so that you can start the editing process.

Step 3: Use Audio Effects
If you want to hide the voices in your AVI video, start by detaching the audio. Then, you can add cool sound effects from Filmora. Head to the ‘Audio’ tab and look for an excellent sound suitable sound effect for your video.

Step 4: Add Catch Transitions
If your video has different clips in it, make sure the slips have smooth transitions. This could be done by taking help from the ‘Transitions’ tab. It has different effects like Glitch, School Pack, Educational board, and whatnot.

Step 5: Export Customized Video
After you have created an exciting and attractive video, hit the ‘Export’ button. Filmora offers you to select your preferred output file format and export the video to your device.

Conclusion
You must have heard about AVI file format before, but you will have detailed knowledge about it after reading this article. We talked about the format and also ways to use it. In addition to that, we discussed Filmora Video Editor. Let’s talk a little more about it.
The software is amazing to use with great features. Users can easily understand Filmora from its simple yet intuitive interface. It offers Basic as well as Advanced Features to create eye-catching videos. Moreover, with Filmora, get your hands on crazy sound effects, transitions, elements, video effects, and much more than that.
For Win 7 or later (64-bit)
For macOS 10.12 or later
Also read:
- Updated Overview of Best LUTs for Vlog for 2024
- Updated 4 Simple Methods for Making a High-Quality Recap Video for 2024
- Motion Tracking Using The Best Video Editors
- New Zoom In and Out on Discord (Desktop + App + Browser Solutions)
- Updated Adjust Background to Black for Your Product Review Video
- Updated In 2024, How to Add Filter to Video Online
- New Zoom In and Zoom Out on YouTube
- Updated 2024 Approved Detailed Guide to Merge Videos in VLC Media Player
- 2024 Approved So, without Further Dilly-Dallying, Lets Learn How to Create a Retro 1950-Style Video with This Simple Filmora Tutorial
- How to Enable and Use OBS Zoom Camera
- New 2024 Approved Are You Looking to Create some Impressive Slow-Motion Video Content? Get This Done with some Impressive Android Slow Motion Video Apps
- Updated 2024 Approved Several Tips Can Facilitate How You Edit Videos Faster and Easier. All You Need to Do Is to Read This Article to Find Out What They Are
- In 2024, How to Create a Glitch Text Effect?
- New In 2024, How to Use Rules of Thirds
- New Best 10 Fun Discord Bots You Need for 2024
- Updated In 2024, How to Remove Motion Blur In Photoshop
- New Sometimes, when It Comes to Editing a Video, We Dont Even Know Where to Start, because There Are Too Many Options –Online Platforms Which Instantly Help Us Edit Our Clips, without Lengthy Process of Downloading and Installing Computer Programs for 2024
- In 2024, A Working Guide For Pachirisu Pokemon Go Map On Nokia C12 Plus | Dr.fone
- In 2024, Best Free Apple iPhone 12 Pro Max IMEI Checker
- How Do You Get Sun Stone Evolutions in Pokémon For OnePlus Ace 2? | Dr.fone
- 4 solution to get rid of pokemon fail to detect location On Nokia G310 | Dr.fone
- A Complete Guide To OEM Unlocking on Xiaomi Civi 3 Disney 100th Anniversary Edition
- In 2024, 5 Ways to Transfer Music from Poco M6 5G to Other Android Devices Easily | Dr.fone
- How to Make the Most of Your Apple iPhone 13 Pro Max Lock Screen with Notifications?
- In 2024, Top 7 Skype Hacker to Hack Any Skype Account On your Oppo Find X6 | Dr.fone
- Full Guide to Bypass Infinix FRP
- Additional Tips About Sinnoh Stone For Oppo Find X6 | Dr.fone
- Pokemon Go Error 12 Failed to Detect Location On Tecno Camon 30 Pro 5G? | Dr.fone
- Most Asked Questions about Pokemon Go Battle League Rewards On Apple iPhone XS Max | Dr.fone
- Best Pokemons for PVP Matches in Pokemon Go For Samsung Galaxy M34 | Dr.fone
- Title: Create Realistic Fire Effects by Filmora
- Author: Morgan
- Created at : 2024-05-19 05:11:37
- Updated at : 2024-05-20 05:11:37
- Link: https://ai-video-editing.techidaily.com/create-realistic-fire-effects-by-filmora/
- License: This work is licensed under CC BY-NC-SA 4.0.

