Create the Stranger Things Upside Down Effect Video

Create the Stranger Things Upside Down Effect Video
With stranger things season 4 ending, it seems like great timing to make a stranger things style transition to the Upside Down. In the Netflix series Stranger Things, there is an opposite version of our world called the Upside Down. The Upside Down is dark, creepy, and possibly filled with aliens, monsters, creatures, and other things.
Now, you can also apply the Stranger Things Upside Down Effect to your video! This effect combines camera tricks and video editing within Filmora to transition from the normal world into the Upside Down.
How-to Guide
1) Preparation
To make this effect, you will need two footage shots: one with the camera moving down and one with the camera coming back up.
When shooting for the footage, follow the steps below:
First shot
- Find any item close enough to the ground that we can block our frame with.

- Once you have your talent lined up, rotate your camera while lowering it below the foreground item at a constant speed and leaving the camera there. The key is making sure when you go behind the object, the frame is nothing but black.

For the next scene, have your actor change positions, or you can change the set around to look like the Upside Down. For instance, adding fake plants and flickering lights.
Second shot
Start bringing your camera back up at the same speed and rotate it again in the direction it was moving.

2) Steps
After you have all the footage, you can start editing it on Filmora. If you haven’t installed it yet, you can download Filmora at their official website at https://filmora.wondershare.com .
Free Download For Win 7 or later(64-bit)
Free Download For macOS 10.14 or later
Now, launch Filmora on your PC and follow the steps below:
Step1 Take your first clip in the “normal” world and drag it down to a video track on the timeline. Trim the edge of the clip, so it ends on pure black and in a downward motion.

Step2 Drag the second clip (in the Upside Down) onto the video track on the timeline after the first clip. Trim this video, so it begins in pure black and an upward motion.

Cut the clips to get the timing right since it should be a very fast transition. You can cut in the black frames so they won’t be too apparent.
If you don’t have a perfectly smooth transition, you can add a dissolve by going to Transitions > Basic > Dissolve.

Color Grading and Effects
After the transition, you can make the clip look a lot more like the Upside Down from the show with a color grade and Filmora effects. Follow the steps below:
Step1 Double-click on your second clip, then go to Color > Advanced. For a quick edit, you can try one of the presets available, such as “cool film.” It will give you the colder blue tones that Stranger Things used for the Upside Down.

Step2 You can further edit the color grading in the white balance menu. Drag the slider to the left to get a blue, cold vibe for the Upside Down.
The “cool” or “warm” color grading technically talks about color temperature. A “warmer” look will be more orange, and a “colder” look will be bluer. You can also use the tint slider to fine-tune the look.

Step3 Next, move down to the color, lower the brightness and increase contrast. It makes the scene darker and more sinister than the normal world.

Step4 Finally, go down to the vignette and drag the amount slider a tiny bit to give a Vinnette around your clip.

3) Pro Tips
You can still make your clip look even more like Upside Down with some Filmora elements.
Go to Elements > Smoke > Smokescreen 2. Drag this element on top of your Upside Down clip and trim it, so it starts at the same time the clip leaves the black frame.

You can adjust the opacity by double-clicking the smoke effect to open the setting.
Finally, go to the Transition > Basic > Dissolve to the start of the smoke and adjust it when the smoke gradually appears.

Resources from Filmostock
You can also use filmstock effects to bring our video to the next level. Go to Elements > Fire > Large Scale 12 and drag it down on top of your clip and the smoke.

Double-click the clip and change the scale of the effect to your needs. Then, go to compositing to change the blending mode to the screen to help the effect blend in more.

Now, go to color and open the white balance menu. Drag the two sliders to change the color of the particles to match your clip.

Summary
That is all you need to make a Stranger Things Upside Down effects to your video. Let us know if there are any other effects from tv shows you want to learn how to make.
Free Download For macOS 10.14 or later
Now, launch Filmora on your PC and follow the steps below:
Step1 Take your first clip in the “normal” world and drag it down to a video track on the timeline. Trim the edge of the clip, so it ends on pure black and in a downward motion.

Step2 Drag the second clip (in the Upside Down) onto the video track on the timeline after the first clip. Trim this video, so it begins in pure black and an upward motion.

Cut the clips to get the timing right since it should be a very fast transition. You can cut in the black frames so they won’t be too apparent.
If you don’t have a perfectly smooth transition, you can add a dissolve by going to Transitions > Basic > Dissolve.

Color Grading and Effects
After the transition, you can make the clip look a lot more like the Upside Down from the show with a color grade and Filmora effects. Follow the steps below:
Step1 Double-click on your second clip, then go to Color > Advanced. For a quick edit, you can try one of the presets available, such as “cool film.” It will give you the colder blue tones that Stranger Things used for the Upside Down.

Step2 You can further edit the color grading in the white balance menu. Drag the slider to the left to get a blue, cold vibe for the Upside Down.
The “cool” or “warm” color grading technically talks about color temperature. A “warmer” look will be more orange, and a “colder” look will be bluer. You can also use the tint slider to fine-tune the look.

Step3 Next, move down to the color, lower the brightness and increase contrast. It makes the scene darker and more sinister than the normal world.

Step4 Finally, go down to the vignette and drag the amount slider a tiny bit to give a Vinnette around your clip.

3) Pro Tips
You can still make your clip look even more like Upside Down with some Filmora elements.
Go to Elements > Smoke > Smokescreen 2. Drag this element on top of your Upside Down clip and trim it, so it starts at the same time the clip leaves the black frame.

You can adjust the opacity by double-clicking the smoke effect to open the setting.
Finally, go to the Transition > Basic > Dissolve to the start of the smoke and adjust it when the smoke gradually appears.

Resources from Filmostock
You can also use filmstock effects to bring our video to the next level. Go to Elements > Fire > Large Scale 12 and drag it down on top of your clip and the smoke.

Double-click the clip and change the scale of the effect to your needs. Then, go to compositing to change the blending mode to the screen to help the effect blend in more.

Now, go to color and open the white balance menu. Drag the two sliders to change the color of the particles to match your clip.

Summary
That is all you need to make a Stranger Things Upside Down effects to your video. Let us know if there are any other effects from tv shows you want to learn how to make.
How to Add Font Effects to Videos
Adding titles and texts to a video clip during the post-production phase is a common thing. You may need to add texts in the intro and outro of the video as well as to highlight important parts in the middle of the video. Showing regular and static texts and titles is very unappealing, and that is why everyone includes font effects to animate the texts.
There are different types of font effects available to apply to the texts and titles in your video. There are premium video editors available with a wide range of effects such as After Effect font effects. If you are an occasional video creator, you can use online font effects while you edit your videos on the go. We will illustrate how to add font effects to videos on any device.
Part 1. Add Font Effects to Video on Windows PC
If you have the video where you want to edit and add font effect on your Windows PC, you will need a video editor where the font effects are available. If you are a regular video creator, you should opt for a premium video editor, and we recommend Wondershare Filmora. Filmora is a professional video editor with a super intuitive user interface. You can add texts and titles and add animation to the text conveniently without any prior knowledge or experience.
Filmora has a wide range of effects and animations that you can add to the text of the video. In fact, there are categorized so that you can choose from them as per your requirements. All you have to do is go for font effect download and apply them to any text on your video. Here are the steps to add font effects to video on your Windows computer.
Step1Download and install Wondershare Filmora for Windows PC. Launch the application to edit your video.
Step2To start a new project, click on New Project option on the welcome screen. Alternatively, you can go to File> New Project from the menu bar.

Step3Import your video file from your hard drive by going to File> Import Media> Import Media Files from the menu bar. Alternatively, you can drag and drop the video file into Project Media folder.

Step4Drag and drop the video file into the Timeline. You can add multiple video clips. Thereafter, you can arrange them in proper order on the Timeline.

Step5Go to Titles located at the top bar. From the left panel, select any category of text effect and drop into the Timeline on top of the video clip. You should place the text effect on the Timeline wherever you want it to appear in the video. You can also stretch the duration of the text effect as per your preference.

Step6Customize the text effect by double clicking on the text effect located on Timeline. Under Preset tab, you will find different font effects and styles. Change the text, font, size, color, and every other parameter as required. For more customization, you can click on Advanced button. Finally, click on OK button.

Step7Play the video and click on Export button. Select your desired file format and save the edited video on your hard drive.
Part 2. Add Video Font Effects on Mac
If you are using a Mac where you want to edit your video and add font effects, you do not have to install any external video editor. This is because Mac comes with a built-in video editor called iMovie by Apple where you can easily add font effects. There are different types of video font effects available on iMovie starting from animated titles to credits and callouts. You can get similar font for After Effect on iMovie. Here are the steps to add video font effects on Mac.
Step1Open iMovie on your Mac from Applications folder. Go to File> Import Media option to import your video under Project Media.

Step2Drag and drop the selected video into Timeline for your iMovie project. Click on Titles tab located at the top.

Step3Place the mouse point over the different text styles to check them. Drag and drop the desired text style into the Timeline and place it where you want the text to appear. You can stretch the duration of the text effect.

Step4From Viewer interface, double click on the text part of the video to customize the text. You will see options to change the font, font size, color and much more.

Step5Play the video and once you are satisfied, go to File> Share> File and save the edited video on your storage device.
Part 3. How to Add Font Effects Online
If you edit videos occasionally and you want to add font effects to your video without downloading any video editor, you can use an online video editor. There are several online video editors you will come across, but for adding free font effects, we recommend FlexClip video editor. It is a completely free online video editor where you can edit and export video without any watermark. There are several elegant font effects available, and you can make easy adjustments instantly. Here are the steps to add font effects to your video.
Step1Open your web browser and visit on “flexclip.com/tools/add-text-to-video”. Click on Browser Video button. Select the video from your storage device.

Step2Once the video is uploaded, you will see Text tab already selected. Go through the list of font effects available. Drag and drop the desired font effect into the video on the Viewer.

Step3Double-click on the font effect on the Viewer and customize all the parameters such as text, size, and style.

Step4Once you are satisfied, click on Export button in the top-right corner.

Conclusion
Adding font effects on video is a common practice especially when you have intro and outro in your video clip. Instead of the regular titles and texts, you should opt for creative font effects so that the text parts on your video look attractive. If it is a one-time thing, you can opt for an online video editor. If you use a Mac, you can use iMovie, and for Windows PC, we recommend Wondershare Filmora .
Free Download For Win 7 or later(64-bit)
Free Download For macOS 10.14 or later
Free Download For macOS 10.14 or later
How to Rotate Videos With Media Player Classic
The Internet and social media have become a staple in our daily lives. Internet users post thousands of videos every day that you can watch online or download and rewatch in your free time. Suppose you encounter a video that is upside down or shot at an angle that makes it difficult for you to enjoy it fully.
It would be nice to find a way to rotate the video to portrait mode so you can watch it without any distractions. Fortunately, this article will discuss using Media Player Classic to rotate any video. We also discuss an excellent alternative to the aforementioned media player.
What Is Media Player Classic?
In a nutshell, Media Player Classic is an open-source media player suitable for 32-bit and 64-bit Microsoft Windows. If you have used the original interface, you might notice that it resembles Windows Media Player 6.4. The only key difference is that the former is more feature-rich and provides more options. In addition, Media Player Classic is very compact and lightweight.
A programmer named “Gabest’’ created and designed this platform as a closed-source application. Things changed, and he later relicensed the media player as free under the terms of the GLP-2.0 license. He released the final version, MPC 6.4.9.0, on 20th March 2006.
Unfortunately, development stalled in 2006, much to the disappointment of many users who had grown to love it. Gabest made a public statement in 2007 saying that Media Player Classic was not dead, just that he couldn’t work on it anymore.
How To Rotate Video in Media Player Classic?
Media Player Classic allows you to rotate your video around three axes, X, Y, and Z. Once you are done, you can fix a video that was initially upside down or in landscape mode for a better viewing experience. Another perk of using Media Player Classic to rotate a video is that you can use shortcuts to make your work easier.
Before we teach you how to rotate video in windows Media Player Classic, there are a few things you should know. Unfortunately, this platform doesn’t allow you to rotate a video in its graphical user interface. You can’t also use it to edit a video. Suppose you want to add text or overwrite the original video clip. Media Player Classic can only allow you to playback a video or rotate it.
Here is a simple guide on how to rotate videos in Media Player Classic.
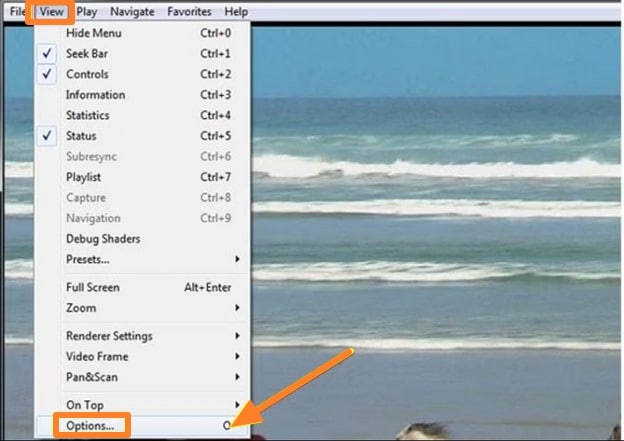
Step1 Launch Media Player Classic and click on the “View” tab. Select “Options” or click “O” to display the “Options” window.
Step2 Navigate to the left pane to the Player Group and click on “Keys.” If the Player Group is not expanded by the time, you launch the platform, double-click it and wait a few seconds. You can then navigate to the “PnS Rotate” command on the Keys list.
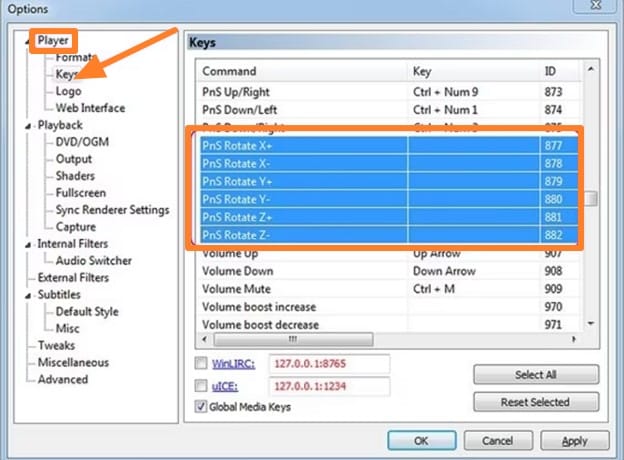
Step3 Go to the “PnS Rotate+” command and double-click the “Key” field. You can then click on any key to rotate your video around the x-axis. Once you are satisfied with the results, click “…” to apply the changes you have made.
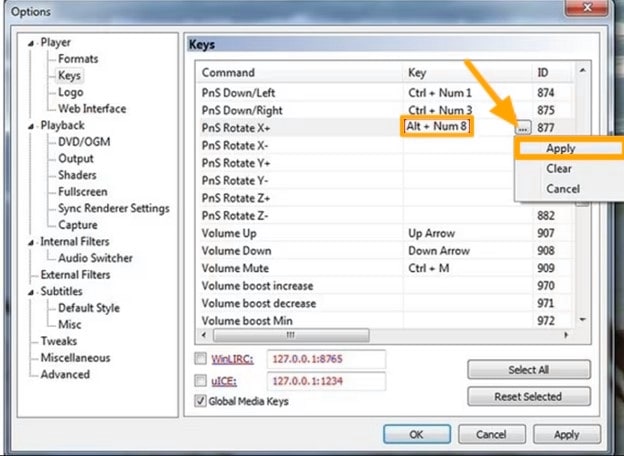
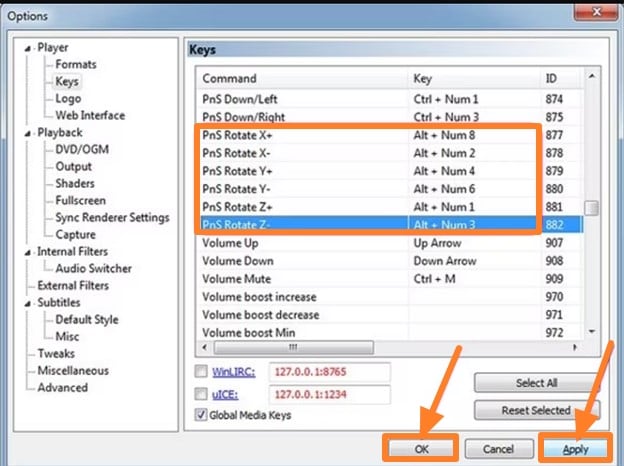
Step4 You can now assign shortcuts to “PnS Rotate” commands. For instance, you could assign PnS Rotate Y for rotation along the Y axis and PnS Z for rotation along the Z axis. After each axis has a shortcut, select “Apply” then “OK” to save your changes and close the Options window respectively.
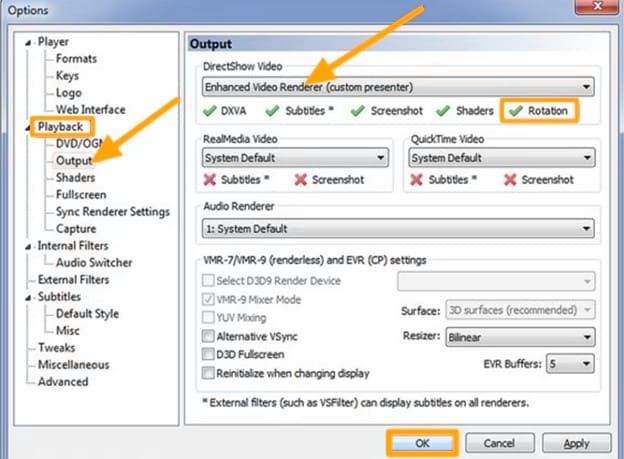
Step5 Select “Output” on the Options window and navigate to the DirectShow Video section to confirm whether the Media Classic Player supports rotation for the rendered video. Ascertain the Rotation feature has a green check mark, which indicates that the platform promotes rotation for the video. If the video has a red X, select “Apply” and click “OK.”
Step6 Use the shortcuts you assigned to the keys in Step 4 to rotate your video as you see fit. Since the rotation occurs gradually, you might need to press the keys numerous times or press and hold to see a visible change.
For instance, you can rotate your video from landscape to portrait by clicking “Alt-Num 1” and “Alt-Num 3,” respectively. To revert your video to its original state, press “Alt-Num 5.”
Need an alternative to Media Player Classic? Try Wondershare Filmora
Free Download For Win 7 or later(64-bit)
Free Download For macOS 10.14 or later
You might need a better alternative to Media Classic Player to help rotate your videos. As we mentioned, Media Classic Player doesn’t allow you to change the video. The scope of this platform only extends to playing and rotating videos along three axes. In our opinion, Wondershare Filmora is an excellent alternative.

This feature-rich platform is your one-stop solution for any creator who wants to make a mark with their videos. You can download it free on your desktop, laptop, or smartphone and use it anytime. The cloud storage allows you to snap a photo and upload it for editing at a later time.
In addition, the platform has a co-creation space where you can share your work with other users and compare notes. Here is a list of other nifty features we guarantee you will enjoy.
- Motion tracking
- Auto beat sync
- Split screen
- Title Editing
- Preset templates
- AI Portrait
- Mask and blend
- Text to speech
- Silence detection
- Audio visualizer
How To Rotate a Video 90 Degrees With Wondershare Filmora?
Now that you have seen how different this platform is from Media Classic Player, you might be curious about how effectively it rotates your videos. Perhaps our detailed guide will help you decide whether you want to give Wondershare Filmora a shot.
Stick around to learn how to rotate a video 90 degrees with Wondershare Filmora.
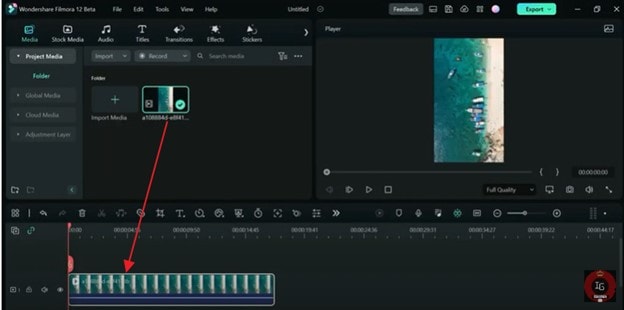
Step1 Import the video you want to rotate to Wondershare Filmora and drag and drop it to the timeline as shown below.
Step2 Click on the monitor icon and select “Change Project Aspect Ratio” in the drop-down menu.

Step3 In the “Project Settings” window, you can change your video’s Aspect Ratio, Resolution, Frame Rate, and Color space.
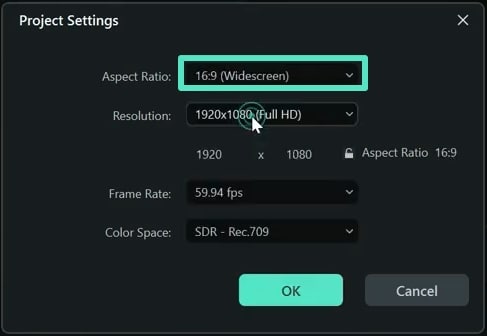
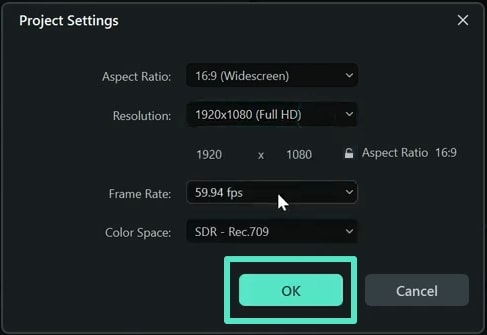
Step4 Once you are happy with your changes, click “OK” and close the window.
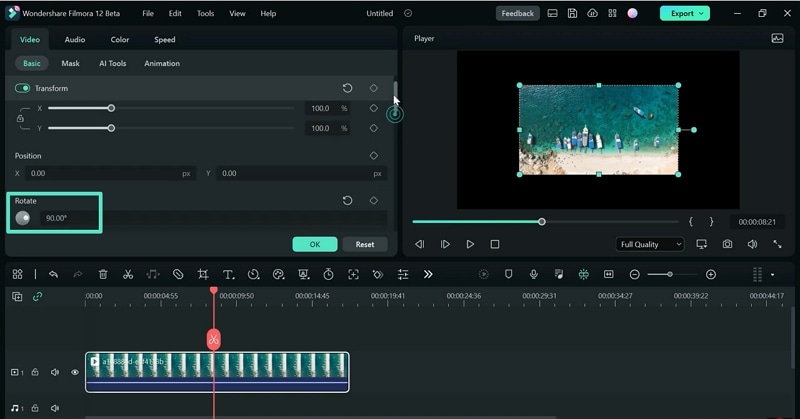
Step5 Double-click the video track and navigate to the Rotate option in the window. Hover your mouse over the dot in the Rotate tab until you get to 90 degrees. You could also adjust the rotation of the video by clicking on the pivot in the media player till the video is at 90 degrees.
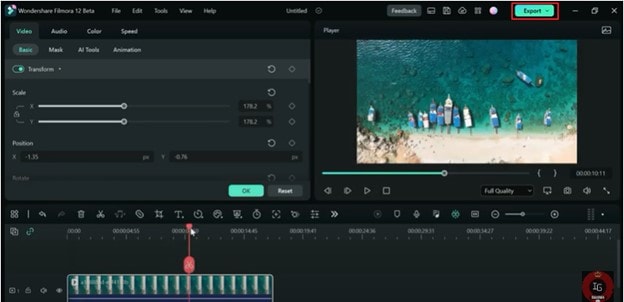
Step6 Click “Export” to save a copy of the rotated video to your device.
Which Is Better To Rotate a Video? Media Player Classic or Wondershare Filmora?
Having seen both sides of the coin, you might wonder which option is better to help you rotate a video. In this section of the article, we pit Wondershare Filmora against Media Player Classic to help you determine which option will work best for you.
Take a look at the table below.
| Media Player Classic | Wondershare Filmora | |
|---|---|---|
| Operating System | Microsoft Windows | Windows & Mac |
| Ratings from G2 | N/A | 4.4/5 stars |
| Pricing | Free | Annual Plan – US$49.99/yearCross Platform Plan - US$59.99/YearPerpetual Plan - US$79.99 |
| Features | ● Enhanced video rendering● Removal of tearing● Supports SVCD, VCD, and DVD playback● AVI subtitles● Customizable toolbar | ● AI Portrait● Mask and blend● Text to speech● Silence detection● Audio visualizer● Motion tracking● Auto beat sync● Split screen● Title Editing● Preset templates |
As you have seen, Media player Classic doesn’t have the Rotate feature per se. However, you can assign shortcuts to the keys to rotate a video along three axes as you see fit. You can also use a combination of keys like Alt and Num to change how your video sits so you can enjoy it as you like.
On the other hand, Wondershare Filmora has a more comprehensive Rotate feature that allows you to drag your pointer along a bar till the video sits at the correct number of degrees.
This platform also provides additional features, like allowing you to scale the video to fit the screen and adjusting project settings like the resolution and frame rate. If you don’t want to use the sliding bar, you can use your pointer to manually adjust the rotation by clicking on the pivot with your pointer.
In a nutshell, Windows Media Player is the ideal choice if you want to rotate your video and leave it at that. However, if you are looking for more advanced features, you are better off choosing Wondershare Filmora. The latter option also makes your videos look more polished like they were edited by a professional.
Conclusion
Videos might be trickier to edit than photos, especially when you want to rotate them. Fortunately, developers have been working tirelessly to ensure you have many tools at your disposal to edit your videos from any device at any time.
If you don’t fancy editing videos on your laptop, you could download the software to your smartphone and rotate videos on the move. Technology is truly a blessing that has come to make our work easier. Hopefully, after reading this article, you can effortlessly rotate any video you encounter.
Free Download For macOS 10.14 or later
You might need a better alternative to Media Classic Player to help rotate your videos. As we mentioned, Media Classic Player doesn’t allow you to change the video. The scope of this platform only extends to playing and rotating videos along three axes. In our opinion, Wondershare Filmora is an excellent alternative.

This feature-rich platform is your one-stop solution for any creator who wants to make a mark with their videos. You can download it free on your desktop, laptop, or smartphone and use it anytime. The cloud storage allows you to snap a photo and upload it for editing at a later time.
In addition, the platform has a co-creation space where you can share your work with other users and compare notes. Here is a list of other nifty features we guarantee you will enjoy.
- Motion tracking
- Auto beat sync
- Split screen
- Title Editing
- Preset templates
- AI Portrait
- Mask and blend
- Text to speech
- Silence detection
- Audio visualizer
How To Rotate a Video 90 Degrees With Wondershare Filmora?
Now that you have seen how different this platform is from Media Classic Player, you might be curious about how effectively it rotates your videos. Perhaps our detailed guide will help you decide whether you want to give Wondershare Filmora a shot.
Stick around to learn how to rotate a video 90 degrees with Wondershare Filmora.
Step1 Import the video you want to rotate to Wondershare Filmora and drag and drop it to the timeline as shown below.

Step2 Click on the monitor icon and select “Change Project Aspect Ratio” in the drop-down menu.

Step3 In the “Project Settings” window, you can change your video’s Aspect Ratio, Resolution, Frame Rate, and Color space.

Step4 Once you are happy with your changes, click “OK” and close the window.

Step5 Double-click the video track and navigate to the Rotate option in the window. Hover your mouse over the dot in the Rotate tab until you get to 90 degrees. You could also adjust the rotation of the video by clicking on the pivot in the media player till the video is at 90 degrees.

Step6 Click “Export” to save a copy of the rotated video to your device.

Which Is Better To Rotate a Video? Media Player Classic or Wondershare Filmora?
Having seen both sides of the coin, you might wonder which option is better to help you rotate a video. In this section of the article, we pit Wondershare Filmora against Media Player Classic to help you determine which option will work best for you.
Take a look at the table below.
| Media Player Classic | Wondershare Filmora | |
|---|---|---|
| Operating System | Microsoft Windows | Windows & Mac |
| Ratings from G2 | N/A | 4.4/5 stars |
| Pricing | Free | Annual Plan – US$49.99/yearCross Platform Plan - US$59.99/YearPerpetual Plan - US$79.99 |
| Features | ● Enhanced video rendering● Removal of tearing● Supports SVCD, VCD, and DVD playback● AVI subtitles● Customizable toolbar | ● AI Portrait● Mask and blend● Text to speech● Silence detection● Audio visualizer● Motion tracking● Auto beat sync● Split screen● Title Editing● Preset templates |
As you have seen, Media player Classic doesn’t have the Rotate feature per se. However, you can assign shortcuts to the keys to rotate a video along three axes as you see fit. You can also use a combination of keys like Alt and Num to change how your video sits so you can enjoy it as you like.
On the other hand, Wondershare Filmora has a more comprehensive Rotate feature that allows you to drag your pointer along a bar till the video sits at the correct number of degrees.
This platform also provides additional features, like allowing you to scale the video to fit the screen and adjusting project settings like the resolution and frame rate. If you don’t want to use the sliding bar, you can use your pointer to manually adjust the rotation by clicking on the pivot with your pointer.
In a nutshell, Windows Media Player is the ideal choice if you want to rotate your video and leave it at that. However, if you are looking for more advanced features, you are better off choosing Wondershare Filmora. The latter option also makes your videos look more polished like they were edited by a professional.
Conclusion
Videos might be trickier to edit than photos, especially when you want to rotate them. Fortunately, developers have been working tirelessly to ensure you have many tools at your disposal to edit your videos from any device at any time.
If you don’t fancy editing videos on your laptop, you could download the software to your smartphone and rotate videos on the move. Technology is truly a blessing that has come to make our work easier. Hopefully, after reading this article, you can effortlessly rotate any video you encounter.
How To Change Font In Premiere Pro
To know how to change font Premiere Pro, A video editing program called Adobe Premiere Pro enables you to change font Premiere Pro with high resolution and broadcast quality. Using this tool, you can simply add, modify, or import visuals and text for your films. Utilizing distinctive typefaces in your project gives the video a distinctive feel and helps you create a brand image. Regardless of the operating system you’re using, Premiere Pro makes it simple to edit videos. On this program, free downloadable fonts may also be added or imported.
People that need to create and edit video often utilize Premiere Pro. Knowing how to change font in Premiere Pro is a mandatory skill set. Premiere Pro comes with all you need to create basic text. You may also need After Effects if you want to create something a bit nicer. You may edit elements like text, color, size, and certain animations with Premiere Pro. Text is always added throughout the video editing process, and if you’re using Adobe Premiere Pro, this guide explains how to change font in Premiere Pro in detail.
Part 1. Steps to Change Font on Premiere Pro
Depending on the kind of projects you want to do in the future, learning how to edit text in Premiere Pro is a basic job and a critical talent to acquire. We’ll teach you how to add and modify the pre-installed typefaces in Adobe Premiere Pro so you may utilize them in your movie clip. The tools and functions in Adobe Premiere Pro allow video editors to add, alter, or change the typeface used in their films.
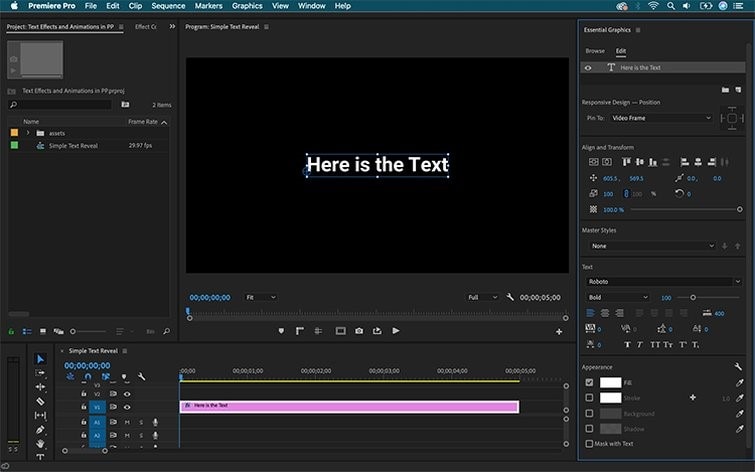
Step1Add Text Template
At the top of your project, and above the preview window, the Graphics panel will appear. When you choose it, the Essentials Graphics panel will appear on the Premiere Pro software’s right side. Select Browse. By dragging them into your sequence, you may utilize the graphic templates that are shown.
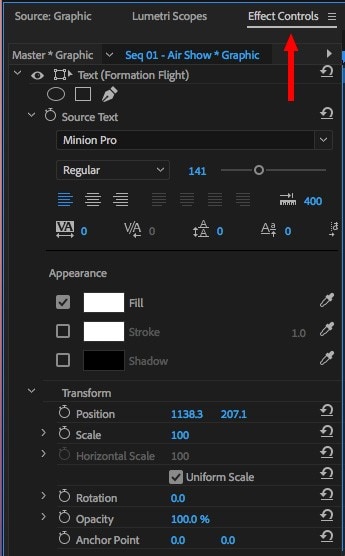
Step2Change Your Text
You may make simple text modifications, such as changing the font’s size, color, or style, by opening the Essential Graphics panel (Window > Essential Graphics).
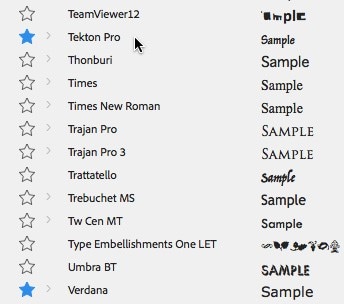
Step3Change the Font
To open the title in the Monitor panel and choose the text, double-click the title under the Export view timeline. Change the font of your text by choosing a style from the Font Style option under the text tab of the Adjust panel.
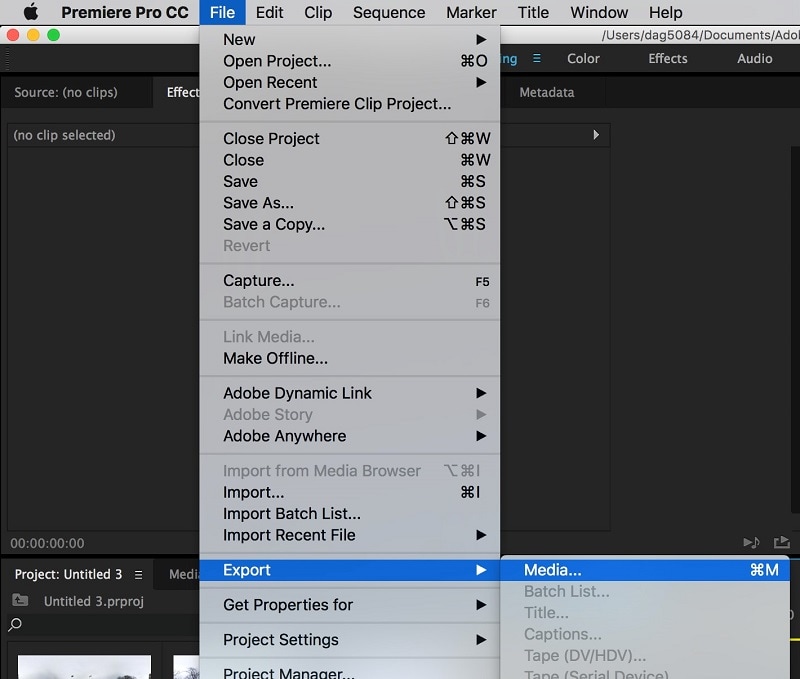
Step4Export the Content
Last but not least, choose File > Export > Media in Premiere Pro to export a video. On a PC or a Mac, you might alternatively hit the shortcut key CMD + M. Your window for export settings will open as a result. Prior to submitting the movie to Media Encoder for export, you may choose your preferred parameters (or presets) for it in this window.
Part 2. Premiere Pro Alternative to Change Font in Video
That’s simple to change typefaces in Adobe Premiere Pro, and it could be all you need to do to keep your audience interested in the footage. It may not be sufficient for your requirements in terms of video editing. Having a backup plan is always beneficial, regardless of the situation. In case anything goes wrong with your initial choice, you will have a backup alternative. You thus need an option like Filmora , which comes with a variety of typefaces pre-installed.
You can simply give your films an aesthetic with Filmora by adding text in a variety of fonts and colors. It’s simple to navigate this program. The installation procedure is also fairly rapid, which is a bonus. Downloads for all of the visuals, audio, and fonts are offered. You don’t have to download everything at once because of this. In conclusion, Filmora is a fantastic substitute to utilize if you are unable to use Adobe Premiere Pro. It contains a number of features that are quite helpful while editing videos. Videos with the highest quality and frame rates are supported.
Step1Install and Import Files
You’ll get the following screen once you launch Filmora on your PC. the Editing Mode option. to open a file, choose it from the menu. Select the picture or video on which you want to add a text by choosing the Import to Add Files option.

Step2Create a Text Layout
In the next step, refer to the Titles menu and from there, you can add a variety of layouts to add text into your video. For that, add the selected one inside the timeline and refer to the next step:

Step3Add and Change Text Font
On the timeline, drag the picture. Click the picture twice. Select all text by selecting it after selecting the text menu item. Choose text from the menu on the left after that, and then choose the font style you want to use for the picture. You may now alter the text’s font. The text may also be changed, and you can add animation and other styles.

Step4Export or Share Content
In the final step, you can save the photo or video now. You may choose your preferred extension by selecting the export option and saving the movie there. You can also share your content by selecting YouTube or Vimeo or any social platform available to share your edited content on the go. hhghh
Part 3. Related FAQs of Video Font Editing
1. How to change font color in Premiere Pro?
To do so, double-click the title in the timeline of the Expert view to bring up the Monitor panel. Select the text in the Monitor panel, then choose from the options below: Select a font color from the Font menu and paste it into the Text tab of the Adjust panel. Alternately, you may change the font color by pressing Alt + H, typing Font Color and then selecting a color.
2. How to fix the font in Premiere Pro?
You may even classify your excess typefaces if you have too many of them. You’ll be able to locate all of your typefaces in this method. You may use Adobe Premiere Pro’s Align and Transform feature to align the text with the screen. The text’s alignment, centering, nudge, and opacity are all editable. If you don’t want to, you are under no need to arrange your typefaces. It is, nevertheless, quite practical.
3. How to you add font in Premiere Mac?
Fonts from other sources may be downloaded and used with ease in Adobe Premiere Pro Mac. You may download other fonts if you don’t want to utilize Adobe Premiere Pro’s built-in fonts. Downloading your favorite typefaces is the first step. You may obtain fonts from a variety of websites.
Free Download For Win 7 or later(64-bit)
Free Download For macOS 10.14 or later
Also read:
- [New] 2024 Approved Enjoy Premium Video Artwork - Download at No Cost Today
- [New] Analyzing the Boons & Banes of VR Headsets
- [New] In 2024, Optimize Editing Efficiency Using XP's Capabilities
- 2024 Approved What Is Color Finale
- How to Rescue Lost Videos from OnePlus 12R
- In 2024, How to Be a YouTube Vlogger
- In 2024, How to Fix Pokemon Go Route Not Working On Lava Yuva 2 Pro? | Dr.fone
- In 2024, Monthly Earnings From YouTube as a Content Creator
- New How to Create a Bokeh Effect for 2024
- New In 2024, Boost the Pace of Your Instagram Reels Videos with These Simple Tricks
- Quick Fixes for Why Is My Motorola Moto G04 Black and White | Dr.fone
- Resolving Elephant's Foot Problem: A Step-by-Step Guide for 3D Printing
- Troubleshooting Alan Wake 2 Release Issues: Solutions & Tips
- Updated Best Ways to Add Meme Text to Videos for 2024
- Updated How to Create Freeze Frame Clone Effect for 2024
- Updated How To Use Motion Blur On Video Star for 2024
- Updated In 2024, Here Is a Step-by-Step Guide to Color Correct and Color Grade a Video Professionally with Wondershare Filmora. Lets Get Going
- Title: Create the Stranger Things Upside Down Effect Video
- Author: Morgan
- Created at : 2024-10-01 06:01:33
- Updated at : 2024-10-05 21:27:41
- Link: https://ai-video-editing.techidaily.com/create-the-stranger-things-upside-down-effect-video/
- License: This work is licensed under CC BY-NC-SA 4.0.
